
页眉和页脚是 Word 文档中常用的元素,用于在每一页的顶部或底部显示统一的信息,如文档标题、公司名称、页码等。在处理大量文档或需要批量添加页眉页脚时,手动操作效率较低。使用 Python 可以自动化完成这些任务,提高文档处理效率。
本文将介绍如何使用 Python 和 Free Spire.Doc 库在 Word 文档中添加和设置页眉页脚,包括添加文本、图片、页码,以及设置奇偶页不同的页眉页脚等常见操作。
环境准备
首先需要安装 Spire.Doc 库:
bash
pip install spire.doc.free安装完成后,即可在 Python 代码中导入并使用相关功能。
基本概念
在开始编写代码之前,需要了解几个基本概念:
- Section(节): Word 文档由一个或多个节组成,每个节可以有自己的页眉页脚设置
- Header(页眉): 位于页面顶部的区域
- Footer(页脚): 位于页面底部的区域
- Paragraph(段落): 页眉页脚中的内容通过段落来组织和显示
添加基本页眉页脚
下面的示例演示如何为 Word 文档添加包含文本和图片的页眉页脚:
python
from spire.doc import *
from spire.doc.common import *

# 创建文档对象并加载文件
document = Document()
document.LoadFromFile("Sample.docx")

# 获取第一个节
section = document.Sections[0]

# 获取页眉和页脚对象
header = section.HeadersFooters.Header
footer = section.HeadersFooters.Footer

# 在页眉中添加段落
headerParagraph = header.AddParagraph()

# 添加图片到页眉
headerPicture = headerParagraph.AppendPicture("Header.png")

# 设置图片大小和位置
headerPicture.Width = 40
headerPicture.Height = 40
headerPicture.TextWrappingStyle = TextWrappingStyle.InFrontOfText
headerPicture.HorizontalAlignment = ShapeHorizontalAlignment.Left
headerPicture.VerticalAlignment = ShapeVerticalAlignment.Outside

# 添加文本到页眉
text = headerParagraph.AppendText("公司内部文档")
text.CharacterFormat.FontName = "微软雅黑"
text.CharacterFormat.FontSize = 10
text.CharacterFormat.Italic = True

# 设置页眉段落右对齐
headerParagraph.Format.HorizontalAlignment = HorizontalAlignment.Right

# 添加下边框线
headerParagraph.Format.Borders.Bottom.BorderType = BorderStyle.Single
headerParagraph.Format.Borders.Bottom.Space = 0.05

# 在页脚中添加段落
footerParagraph = footer.AddParagraph()

# 添加页码字段
footerParagraph.AppendField("page number", FieldType.FieldPage)
footerParagraph.AppendText(" / ")
footerParagraph.AppendField("number of pages", FieldType.FieldNumPages)

# 设置页脚段落居中对齐
footerParagraph.Format.HorizontalAlignment = HorizontalAlignment.Center

# 保存文档
document.SaveToFile("HeaderAndFooter.docx", FileFormat.Docx)
document.Close()
以下是生成文档的页眉页脚:
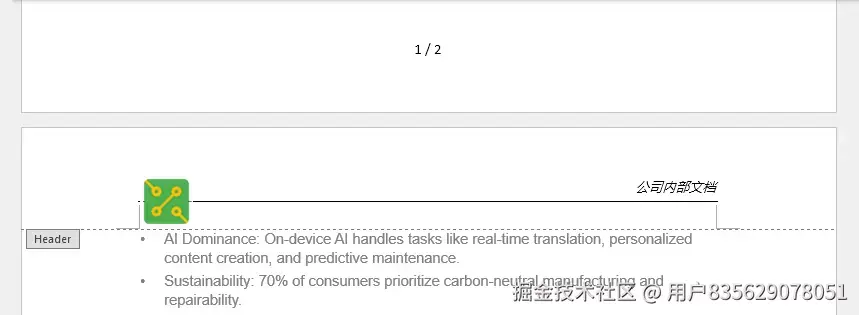
这段代码首先加载一个现有的 Word 文档,然后获取文档的第一个节。通过 HeadersFooters 属性访问页眉和页脚对象,使用 AddParagraph() 方法添加段落,再通过 AppendPicture() 和 AppendText() 方法添加图片和文本内容。
设置奇偶页不同的页眉页脚
在正式文档中,经常需要为奇数页和偶数页设置不同的页眉页脚,例如奇数页显示章节标题,偶数页显示文档名称。下面的代码演示如何实现这一功能:
python
from spire.doc import *
from spire.doc.common import *

# 加载文档
doc = Document()
doc.LoadFromFile("MultiplePages.docx")

# 获取第一个节
section = doc.Sections[0]

# 启用奇偶页不同的页眉页脚
section.PageSetup.DifferentOddAndEvenPagesHeaderFooter = True

# 添加奇数页页眉
oddHeaderPara = section.HeadersFooters.OddHeader.AddParagraph()
oddHeaderText = oddHeaderPara.AppendText("奇数页页眉 - 章节标题")
oddHeaderPara.Format.HorizontalAlignment = HorizontalAlignment.Center
oddHeaderText.CharacterFormat.FontName = "微软雅黑"
oddHeaderText.CharacterFormat.FontSize = 10

# 添加偶数页页眉
evenHeaderPara = section.HeadersFooters.EvenHeader.AddParagraph()
evenHeaderText = evenHeaderPara.AppendText("偶数页页眉 - 文档名称")
evenHeaderPara.Format.HorizontalAlignment = HorizontalAlignment.Center
evenHeaderText.CharacterFormat.FontName = "微软雅黑"
evenHeaderText.CharacterFormat.FontSize = 10

# 添加奇数页页脚
oddFooterPara = section.HeadersFooters.OddFooter.AddParagraph()
oddFooterText = oddFooterPara.AppendText("奇数页页脚")
oddFooterPara.Format.HorizontalAlignment = HorizontalAlignment.Center

# 添加偶数页页脚
evenFooterPara = section.HeadersFooters.EvenFooter.AddParagraph()
evenFooterText = evenFooterPara.AppendText("偶数页页脚")
evenFooterPara.Format.HorizontalAlignment = HorizontalAlignment.Center

# 保存文档
doc.SaveToFile("OddAndEvenHeaderFooter.docx", FileFormat.Docx)
doc.Close()
生成的文档页眉页脚如下:
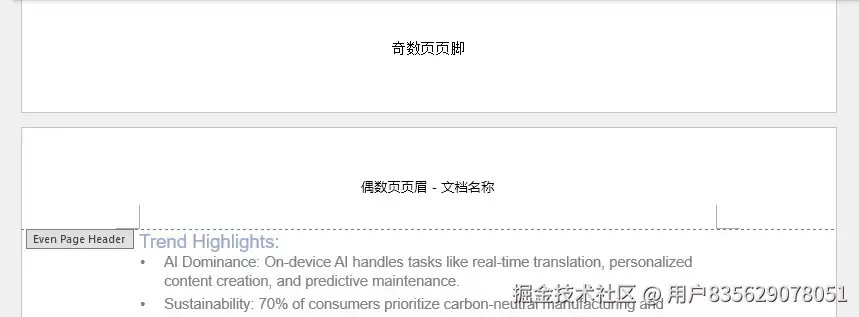
关键步骤是将 DifferentOddAndEvenPagesHeaderFooter 属性设置为 True,然后分别通过 OddHeader、EvenHeader、OddFooter、EvenFooter 属性访问和设置奇偶页的页眉页脚。
设置首页不同的页眉页脚
某些文档需要首页使用特殊的页眉页脚,或者首页不显示页眉页脚。可以通过以下方式实现:
python
from spire.doc import *
from spire.doc.common import *

# 加载文档
doc = Document()
doc.LoadFromFile("Sample.docx")

# 获取第一个节
section = doc.Sections[0]

# 启用首页不同的页眉页脚
section.PageSetup.DifferentFirstPageHeaderFooter = True

# 设置首页页眉(可以为空以实现首页不显示页眉)
firstHeaderPara = section.HeadersFooters.FirstPageHeader.AddParagraph()
firstHeaderText = firstHeaderPara.AppendText("首页专用页眉")
firstHeaderPara.Format.HorizontalAlignment = HorizontalAlignment.Center

# 设置常规页眉(用于除首页外的其他页面)
headerPara = section.HeadersFooters.Header.AddParagraph()
headerText = headerPara.AppendText("常规页眉")
headerPara.Format.HorizontalAlignment = HorizontalAlignment.Right

# 保存文档
doc.SaveToFile("FirstPageHeader.docx", FileFormat.Docx)
doc.Close()
生成的文档页眉页脚如下:

通过设置 DifferentFirstPageHeaderFooter 属性为 True,然后使用 FirstPageHeader 和 FirstPageFooter 属性设置首页的页眉页脚。
调整页眉页脚高度
页眉页脚的高度可以通过 HeaderDistance 和 FooterDistance 属性进行调整:
python
from spire.doc import *
from spire.doc.common import *

# 加载文档
doc = Document()
doc.LoadFromFile("Sample.docx")

# 获取第一个节
section = doc.Sections[0]

# 设置页眉距离页面顶部的距离(单位:磅)
section.PageSetup.HeaderDistance = 50

# 设置页脚距离页面底部的距离(单位:磅)
section.PageSetup.FooterDistance = 50

# 添加页眉内容
header = section.HeadersFooters.Header
headerPara = header.AddParagraph()
headerPara.AppendText("调整高度后的页眉")

# 保存文档
doc.SaveToFile("AdjustedHeight.docx", FileFormat.Docx)
doc.Close()
生成的文档如下:

实用技巧
添加页码格式
页码是页脚中最常见的元素,可以添加各种格式的页码:
python
footerParagraph = footer.AddParagraph()

# 添加"第 X 页"格式
footerParagraph.AppendText("第 ")
footerParagraph.AppendField("page number", FieldType.FieldPage)
footerParagraph.AppendText(" 页")

# 添加"第 X 页,共 Y 页"格式
footerParagraph.AppendText("第 ")
footerParagraph.AppendField("page number", FieldType.FieldPage)
footerParagraph.AppendText(" 页,共 ")
footerParagraph.AppendField("number of pages", FieldType.FieldNumPages)
footerParagraph.AppendText(" 页")
添加分隔线
为页眉或页脚添加分隔线可以增强视觉效果:
python
# 页眉底部添加分隔线
headerParagraph.Format.Borders.Bottom.BorderType = BorderStyle.Single
headerParagraph.Format.Borders.Bottom.Color = Color.get_Gray()
headerParagraph.Format.Borders.Bottom.LineWidth = 0.5

# 页脚顶部添加分隔线
footerParagraph.Format.Borders.Top.BorderType = BorderStyle.Single
footerParagraph.Format.Borders.Top.Color = Color.get_Gray()
footerParagraph.Format.Borders.Top.LineWidth = 0.5
设置图片大小和位置
当在页眉页脚中添加图片时,可以精确控制图片的位置:
python
picture = headerParagraph.AppendPicture("Logo.png")

# 设置图片大小
headerPicture.Width = 40
headerPicture.Height = 40

# 设置文字环绕方式
picture.TextWrappingStyle = TextWrappingStyle.Behind

# 设置水平位置
picture.HorizontalOrigin = HorizontalOrigin.Page
picture.HorizontalAlignment = ShapeHorizontalAlignment.Left

# 设置垂直位置
picture.VerticalOrigin = VerticalOrigin.Page
picture.VerticalAlignment = ShapeVerticalAlignment.Top
总结
本文介绍了使用 Python 在 Word 文档中添加和设置页眉页脚的多种方法,包括添加文本和图片、设置奇偶页不同的页眉页脚、首页特殊处理、调整高度等常见操作。通过这些技术,可以高效地批量处理文档,实现页眉页脚的自动化设置。
在实际应用中,可以根据具体需求组合使用这些方法,例如为正式报告创建包含公司 Logo、文档标题和页码的专业页眉页脚,或者为书籍排版设置奇偶页不同的页眉页脚样式。掌握这些技巧能够显著提升文档处理的效率和规范性。