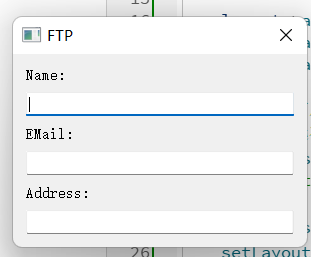
1.QFormLayout布局管理器
- 以表单的方式管理界面组件
- 表单布局中的标签和组件是相互对应的关系
表单布局支持嵌套,其他布局管理器可以 作为子布局被其管理
Widget::Widget(QWidget *parent) : QWidget(parent, Qt::WindowCloseButtonHint)
{

    QLineEdit* nameEdit = new QLineEdit();
    QLineEdit* mailEdit = new QLineEdit();
    QLineEdit* addrEdit = new QLineEdit();

    QFormLayout* layout = new QFormLayout();

    layout->addRow("Name:", nameEdit);
    layout->addRow("EMail:", mailEdit);
    layout->addRow("Address:", addrEdit);

    //把表单布局的 "换行策略" 设置为:所有行都必须换行
    //标签永远在上 / 左,输入框永远在下 / 右,绝对不会挤在同一行
    layout->setRowWrapPolicy(QFormLayout::WrapAllRows);
    layout->setLabelAlignment(Qt::AlignRight); //标签向右对齐

    layout->setSpacing(10); //间隔设置为10
    setLayout(layout);
    setWindowTitle("FTP");
}
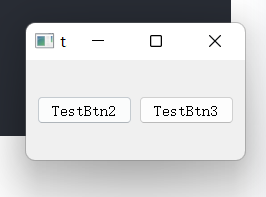
2.QStackedLayout栈式布局管理器
- 所有组件在垂直于屏幕的方向上被管理
- 每次只有一个组件会显示在屏幕上
- 只有最顶层的组件会被最终显示
特点:
-
组件大小一致且充满父组件的显示区
-
不能直接嵌套其他布局管理器
-
能够自由切换需要显示的组件
-
每次能且仅能显示一个组件
#include "Widget.h"
#include
Widget::Widget(QWidget parent) : QWidget(parent),
TestBtn1(this), TestBtn2(this), TestBtn3(this), TestBtn4(this)
{
initControl();
}
void Widget::initControl()
{
QStackedLayout sLayout = new QStackedLayout();
TestBtn1.setText("TestBtn1");
TestBtn2.setText("TestBtn2");
TestBtn3.setText("TestBtn3");
TestBtn4.setText("TestBtn4:TestBtn4");sLayout->addWidget(&TestBtn1); //下标为0 sLayout->addWidget(&TestBtn2); //1 sLayout->addWidget(&TestBtn3); //2 sLayout->addWidget(&TestBtn4); //3 sLayout->setCurrentIndex(1); //显示下标为1的组件 setLayout(sLayout);}
Widget::~Widget()
{}
如果想要实现嵌套:
void Widget::initControl()
{
    QStackedLayout* sLayout = new QStackedLayout();
    QHBoxLayout* hLayout = new QHBoxLayout();
    QWidget* widget = new QWidget(); //借助中间组件

    TestBtn1.setText("TestBtn1");
    TestBtn2.setText("TestBtn2");
    TestBtn3.setText("TestBtn3");
    TestBtn4.setText("TestBtn4:TestBtn4");

    TestBtn2.setParent(widget);
    TestBtn3.setParent(widget);

    hLayout->addWidget(&TestBtn2);
    hLayout->addWidget(&TestBtn3);

    widget->setLayout(hLayout);

    sLayout->addWidget(&TestBtn1); //下标为0
    sLayout->addWidget(widget); //1
    sLayout->addWidget(&TestBtn4); //2

    sLayout->setCurrentIndex(1); //显示下标为1的组件
    setLayout(sLayout);
}
3.计时器的概念
用于每隔一定的时间触发一个消息,计时器消息最终会被转化为函数调用
计时器(QTimer)的使用方法
-
编写计时器消息处理函数
-
在程序中创建计时器对象
-
连接计时器消息和消息处理函数
-
设置计时器时间间隔并启动计时
#include "Widget.h"
#include
#include
#includeWidget::Widget(QWidget parent) : QWidget(parent),
TestBtn1(this), TestBtn2(this), TestBtn3(this), TestBtn4(this)
{
initControl();
}
void Widget::initControl()
{
QStackedLayout sLayout = new QStackedLayout();
QHBoxLayout* hLayout = new QHBoxLayout();
QWidget* widget = new QWidget(); //借助中间组件QTimer* timer = new QTimer(this); TestBtn1.setText("TestBtn1"); TestBtn2.setText("TestBtn2"); TestBtn3.setText("TestBtn3"); TestBtn4.setText("TestBtn4:TestBtn4"); TestBtn2.setParent(widget); TestBtn3.setParent(widget); hLayout->addWidget(&TestBtn2); hLayout->addWidget(&TestBtn3); widget->setLayout(hLayout); sLayout->addWidget(&TestBtn1); //下标为0 sLayout->addWidget(widget); //1 sLayout->addWidget(&TestBtn4); //2 sLayout->setCurrentIndex(1); //显示下标为1的组件 setLayout(sLayout); //每隔 2 秒自动触发一次 timeTimeout() 函数。 connect(timer, SIGNAL(timeout()), this, SLOT(timeTimeout())); timer->start(2000);}
void Widget::timeTimeout()
{
QStackedLayout* sLayout = dynamic_cast<QStackedLayout*>(layout());if( sLayout != NULL) { int index = (sLayout->currentIndex() + 1) % sLayout->count(); sLayout->setCurrentIndex(index); }}
Widget::~Widget()
{}
示例:向导用户界面
- 在同一个界面上展现不同的向导页面
- 通过"上一步"和"下一步"按钮进行切换
- 不同页面上的元素组件和组件排布都不相同
- 页面中的组件通过布局管理器进行排布
Widget.h
#ifndef WIDGET_H
#define WIDGET_H

#include <QWidget>
#include <QPushButton>
#include <QLabel>
#include <QLineEdit>
#include <QStackedLayout>
class Widget : public QWidget
{
    Q_OBJECT
private:
    QPushButton preBtn;
    QPushButton nextBtn;

    QLabel fLbl1;
    QLabel fLbl2;
    QLabel fLbl3;
    QLabel fLbl4;

    QLineEdit sLineEdit;
    QPushButton tPushBtn1;
    QPushButton tPushBtn2;
    QStackedLayout sLayout;

    void initControl();

    QWidget* get1stPage();
    QWidget* get2stPage();
    QWidget* get3stPage();
private slots:
    void onPreBtnClicked();
    void onNextBtnClicked();
public:
    Widget(QWidget *parent = 0);
    ~Widget();
};

#endif // WIDGET_H
Widget.cpp
#include "Widget.h"
#include <QFormLayout>

Widget::Widget(QWidget *parent) : QWidget(parent)
{
    initControl();
}

void Widget::initControl()
{
    QVBoxLayout* vLayout = new QVBoxLayout();
    QHBoxLayout* hLayout = new QHBoxLayout();


    preBtn.setText("Pre Page");
    preBtn.setSizePolicy(QSizePolicy::Expanding, QSizePolicy::Fixed);
    preBtn.setMinimumSize(160, 30);

    nextBtn.setText("Next Page");

    //第一个参数:QSizePolicy::Expanding,水平方向(宽度):自动拉伸、占满可用空间
    //第二个参数:QSizePolicy::Fixed,垂直方向(高度):固定不变
    nextBtn.setSizePolicy(QSizePolicy::Expanding, QSizePolicy::Fixed);
    nextBtn.setMinimumSize(160, 30);

    connect(&preBtn, SIGNAL(clicked()), this, SLOT(onPreBtnClicked()));
    connect(&nextBtn, SIGNAL(clicked()), this, SLOT(onNextBtnClicked()));
    hLayout->addWidget(&preBtn);
    hLayout->addWidget(&nextBtn);

    sLayout.addWidget(get1stPage());
    sLayout.addWidget(get2stPage());
    sLayout.addWidget(get3stPage());

    vLayout->addLayout(&sLayout);
    vLayout->addLayout(hLayout);

    setLayout(vLayout);
}
QWidget* Widget::get1stPage()
{
    QWidget* ret = new QWidget();
    QGridLayout* layout = new QGridLayout(); //网格布局管理器

    fLbl1.setText("This");
    fLbl2.setText("is");
    fLbl3.setText("1st");
    fLbl4.setText("page");

    layout->addWidget(&fLbl1, 0, 0);
    layout->addWidget(&fLbl2, 0, 1);
    layout->addWidget(&fLbl3, 1, 0);
    layout->addWidget(&fLbl4, 1, 1);

    ret->setLayout(layout);
    return ret;
}
QWidget* Widget::get2stPage()
{
    QWidget* ret = new QWidget();

    QFormLayout* layout = new QFormLayout();
    sLineEdit.setText("This is 2rd page");
    layout->addRow("Hint:", &sLineEdit);

    ret->setLayout(layout);
    return ret;
}
QWidget* Widget::get3stPage()
{
    QWidget* ret = new QWidget();
    QVBoxLayout* layout = new QVBoxLayout();
    tPushBtn1.setText("This is");
    tPushBtn2.setText("3rd page");
    layout->addWidget(&tPushBtn1);
    layout->addWidget(&tPushBtn2);
    ret->setLayout(layout);
    return ret;
}
void Widget::onPreBtnClicked()
{
    int index = ((sLayout.currentIndex() - 1) + 3) % 3;
    sLayout.setCurrentIndex(index);
}
void Widget::onNextBtnClicked()
{
    int index = ((sLayout.currentIndex() + 1)) % 3;
    sLayout.setCurrentIndex(index);
}
Widget::~Widget()
{

}