Spring MVC全注解开发实现及其原理
一、概述
Spring MVC全注解开发主要是消除Spring MVC的配置文件和web.xml配置文件,实际上就是使用另外的入口,具体的我们可以看下面的教程。
二、实现及其原理
2.1组件扫描与配置非自定义Bean
java
package com.itheima.config;

import org.springframework.context.annotation.ComponentScan;
import org.springframework.context.annotation.Configuration;
import org.springframework.web.multipart.commons.CommonsMultipartResolver;

//定义为核心配置类
@Configuration
//组件扫描
@ComponentScan("com.itheima.controller")
public class SpringMVCConfig2 {
//    配置非自定义的bean
    public CommonsMultipartResolver multipartResolver(){
        CommonsMultipartResolver multipartResolver = new CommonsMultipartResolver();
        multipartResolver.setDefaultEncoding("UTF-8");
        multipartResolver.setMaxUploadSize(5000000);
        return multipartResolver;
    }
}
2.2使用核心配置类来取代SpringMVC的xml配置文件
在web.xml中我们在DispatcherServlet来加载SpringMVC的xml配置文件,那么我们就来看看它的源码:
下面是
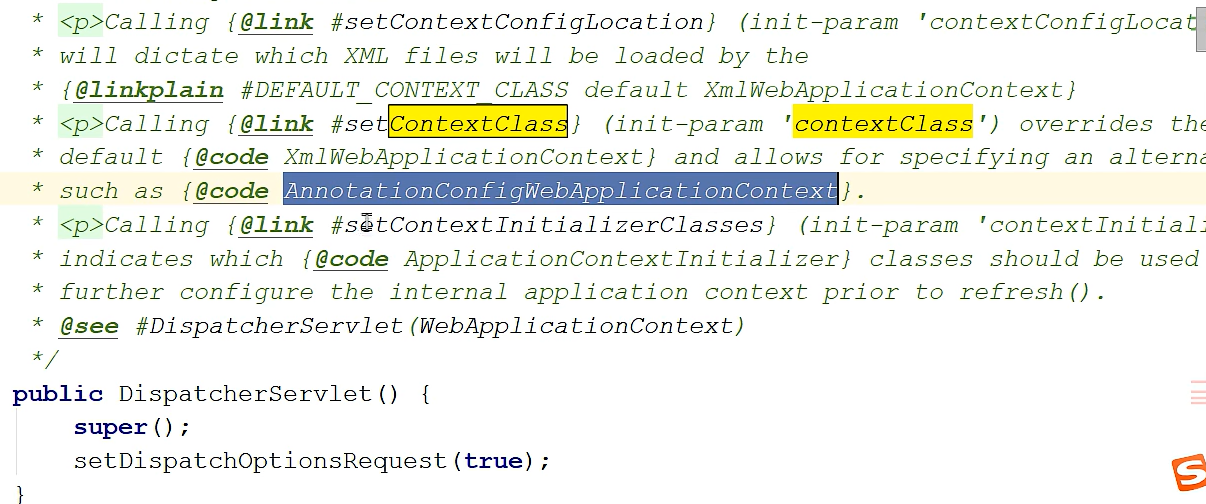
我们可以知道要想不使用xml的形式来加载,那么可以配置里面的contextClass属性,如:AnnotationConfigWebApplicationContext,来覆盖掉原来的xml配置方式,小伙伴们是不是有点似曾相识的感觉呢?哈哈,这实际上与我们之前使用核心配置类整合Spring和Web的思路是一致的,可以看这篇文章的第三大点:https://blog.csdn.net/2301_80749359/article/details/159435925?fromshare=blogdetail&sharetype=blogdetail&sharerId=159435925&sharerefer=PC&sharesource=2301_80749359&sharefrom=from_link;具体步骤就是配置一个类来实现
AnnotationConfigWebApplicationContext,再调用它的register方法完成核心配置类的注册。
java
package com.itheima.config;

import org.springframework.web.context.support.AnnotationConfigWebApplicationContext;

public class MyAnnotationConfigWebApplicationContext extends AnnotationConfigWebApplicationContext {
    public MyAnnotationConfigWebApplicationContext() {
        super.register(SpringMVCConfig2.class);
    }
}
最后在web.xml中将MyAnnotationConfigWebApplicationContext配置进去即可:
java
<servlet>
    <servlet-name>DispatcherServlet</servlet-name>
    <servlet-class>org.springframework.web.servlet.DispatcherServlet</servlet-class>
<!--    配置一下我们Spring配置文件的路径-->
<!--    <init-param>-->
<!--        <param-name>contextConfigLocation</param-name>-->
<!--        <param-value>classpath:spring-mvc2.xml</param-value>-->
<!--    </init-param>-->

<!--    下面是使用核心配置类取代SpringMVC.xml配置文件的形式-->
    <init-param>
        <param-name>contextClass</param-name>
        <param-value>com.itheima.config.MyAnnotationConfigWebApplicationContext</param-value>
    </init-param>
<!--    设置启动时加载-->
    <load-on-startup>2</load-on-startup>
</servlet>
2.3消除web.xml
2.3.1自己创建类实现ServletContainerInitializer接口
java
<?xml version="1.0" encoding="UTF-8"?>
<web-app xmlns="http://xmlns.jcp.org/xml/ns/javaee"
         xmlns:xsi="http://www.w3.org/2001/XMLSchema-instance"
         xsi:schemaLocation="http://xmlns.jcp.org/xml/ns/javaee http://xmlns.jcp.org/xml/ns/javaee/web-app_3_1.xsd"
         version="3.1">
<!--配置监听器-->
<!--    配置参数-->
<!--    <context-param>-->
<!--        <param-name>contextConfigLocation</param-name>-->
<!--        <param-value>classpath:applicationContext.xml</param-value>-->
<!--    </context-param>-->
<!--    <listener>-->
<!--        <listener-class>org.springframework.web.context.ContextLoaderListener</listener-class>-->
<!--    </listener>-->
<!--配置前端控制器-->
<servlet>
    <servlet-name>DispatcherServlet</servlet-name>
    <servlet-class>org.springframework.web.servlet.DispatcherServlet</servlet-class>
<!--    配置一下我们Spring配置文件的路径-->
<!--    <init-param>-->
<!--        <param-name>contextConfigLocation</param-name>-->
<!--        <param-value>classpath:spring-mvc2.xml</param-value>-->
<!--    </init-param>-->

<!--    下面是使用核心配置类取代SpringMVC.xml配置文件的形式-->
    <init-param>
        <param-name>contextClass</param-name>
        <param-value>com.itheima.config.MyAnnotationConfigWebApplicationContext</param-value>
    </init-param>
<!--    设置启动时加载-->
    <load-on-startup>2</load-on-startup>
</servlet>
<!--    配置前端控制器的映射-->
    <servlet-mapping>
        <servlet-name>DispatcherServlet</servlet-name>
        <url-pattern>/</url-pattern>
    </servlet-mapping>

<!--    再次激活DefaultServlet url-pattern配置得更精确一点-->
<!--    <servlet-mapping>-->
<!--        <servlet-name>default</servlet-name>-->
<!--        <url-pattern>*.html</url-pattern>-->
<!--    </servlet-mapping>-->
<!--    下面是指定图片的-->
<!--    <servlet-mapping>-->
<!--        <servlet-name>default</servlet-name>-->
<!--        <url-pattern>/img/*</url-pattern>-->
<!--    </servlet-mapping>-->
</web-app>
要消除web.xml实际上就是要解决SpringMVC的入口:DispatcherServlet前端控制器的问题,以及Spring的入口:ContextLoaderListener的问题。
Servlet3.0 环境中,web 容器提供了 javax.servlet.ServletContainerInitializer 接口,实现了该接口后,在对应的类加载路径的 META-INF/services 目录创建一个名为 javax.servlet.ServletContainerInitializer 的文件,文件内容指定具体的 ServletContainerInitializer 实现类,那么,当 web 容器启动时就会运行这个初始化器做一些组件内的初始化工作;
● 基于这个特性,Spring 就定义了一个 SpringServletContainerInitializer 实现了 ServletContainerInitializer 接口;
● 而 SpringServletContainerInitializer 会查找实现了 WebApplicationInitializer 的类,Spring 又提供了一个 WebApplicationInitializer 的基础实现类 AbstractAnnotationConfigDispatcherServletInitializer,当我们编写类继承 AbstractAnnotationConfigDispatcherServletInitializer 时,容器就会自动发现我们自己的类,在该类中我们就可以配置 Spring 和 SpringMVC 的入口了。
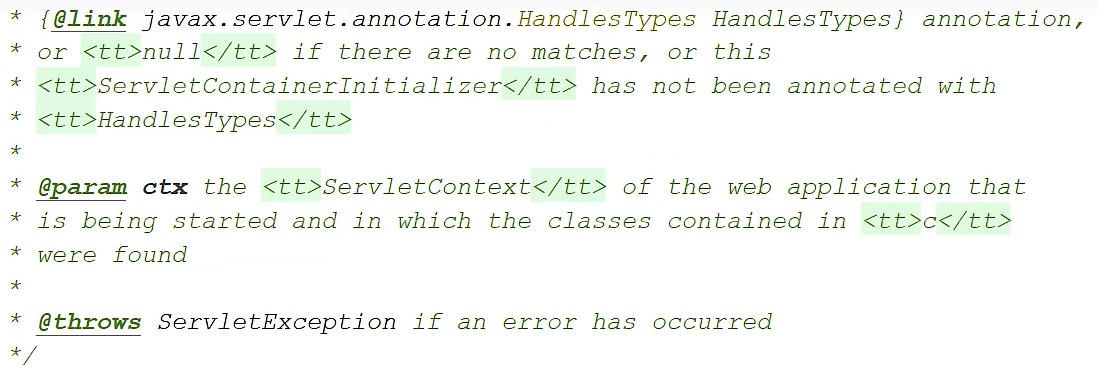
我们来看一下ServletContainerInitializer:
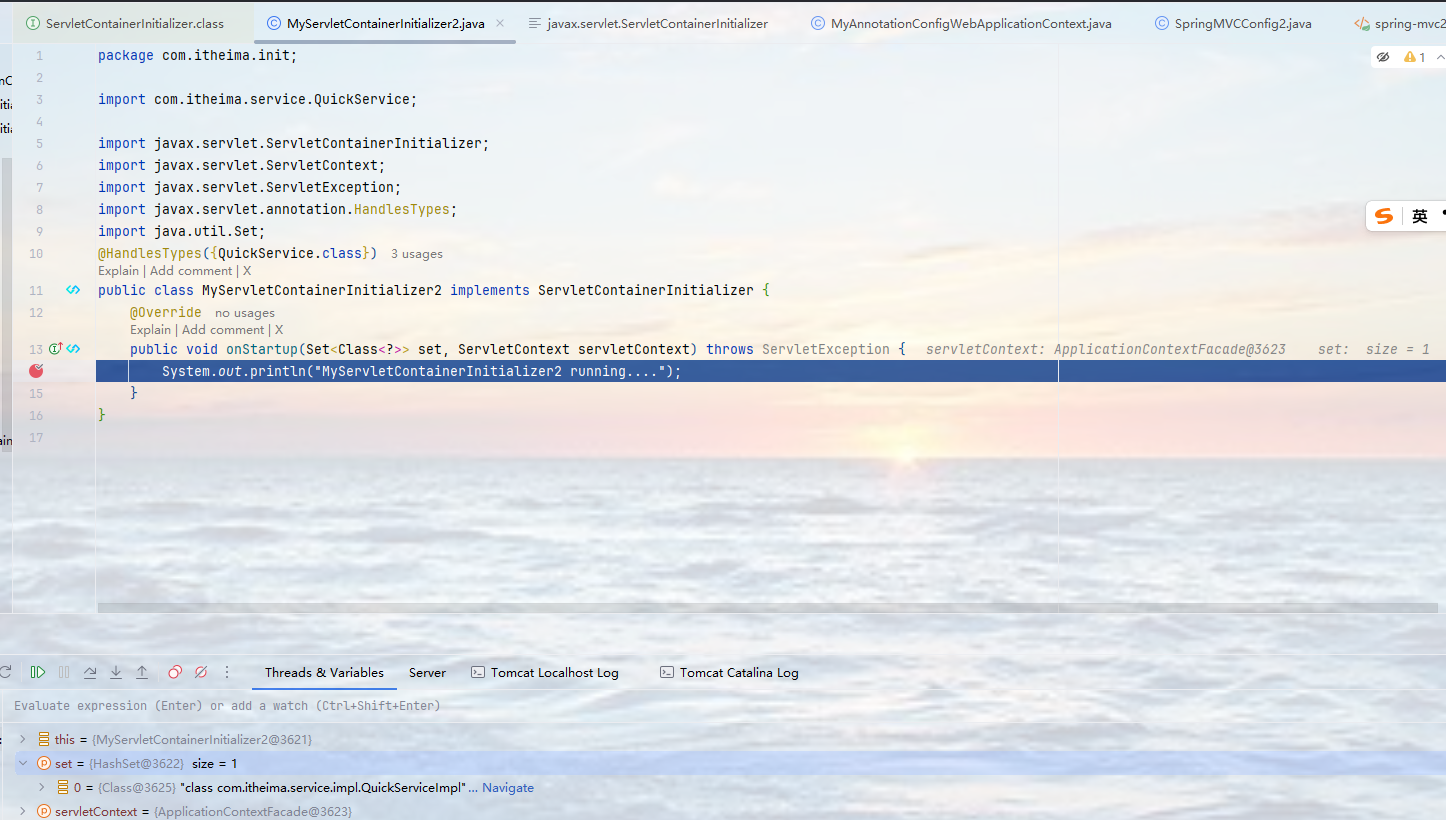
我们需要在META-INF目录下定义一个services子目录,同时在services下定义名为javax.servlet.ServletContainerInitializer的文件(即以ServletContainerInitializer的全限定名),里面写上我们实现ServletContainerInitializer接口类的全限定名:
java
com.itheima.init.MyServletContainerInitializer2
同时在实现类上写上@HandlesTypes注解指定要扫描的接口(实际上加载的是该接口的子接口或者实现类):
java
package com.itheima.init;

import com.itheima.service.QuickService;

import javax.servlet.ServletContainerInitializer;
import javax.servlet.ServletContext;
import javax.servlet.ServletException;
import javax.servlet.annotation.HandlesTypes;
import java.util.Set;
@HandlesTypes({QuickService.class})
public class MyServletContainerInitializer2 implements ServletContainerInitializer {
    @Override
    public void onStartup(Set<Class<?>> set, ServletContext servletContext) throws ServletException {
        System.out.println("MyServletContainerInitializer2 running....");
    }
}
2.3.1使用Spring的 SpringServletContainerInitializer(实现了ServletContainerInitializer接口)
先来看看SpringServletContainerInitializer,它实现了ServletContainerInitializer,属于package org.springframework.web包下的(Spring集成Web);
java
package org.springframework.web;

import java.lang.reflect.Modifier;
import java.util.ArrayList;
import java.util.Collections;
import java.util.List;
import java.util.Set;
import javax.servlet.ServletContainerInitializer;
import javax.servlet.ServletContext;
import javax.servlet.ServletException;
import javax.servlet.annotation.HandlesTypes;
import org.springframework.core.annotation.AnnotationAwareOrderComparator;
import org.springframework.lang.Nullable;
import org.springframework.util.ReflectionUtils;

@HandlesTypes({WebApplicationInitializer.class})
public class SpringServletContainerInitializer implements ServletContainerInitializer {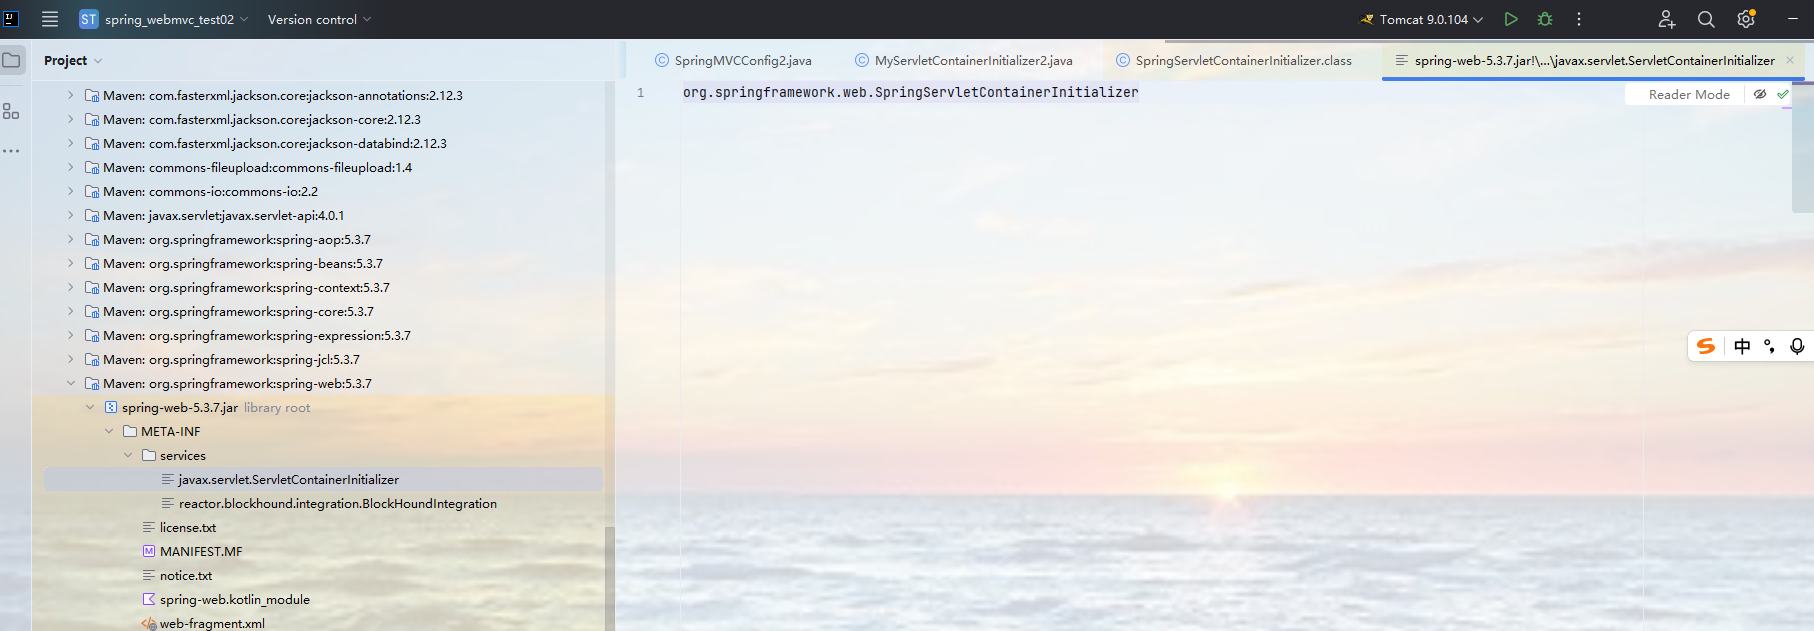
可以看到是和我们前面自己实现ServletContainerInitializer接口的原理是一致的。
同时**@HandlesTypes({WebApplicationInitializer.class})**可以看出会加载WebApplicationInitializer.class的子接口及其实现类,来看一下这个类:

一般在开发过程中我们是直接继承WebApplicationInitializer.class的最后一个实现类,即:AbstractAnnotationConfigDispatcherServletInitializer:
java
//
// Source code recreated from a .class file by IntelliJ IDEA
// (powered by FernFlower decompiler)
//
package org.springframework.web.servlet.support;
import org.springframework.lang.Nullable;
import org.springframework.util.ObjectUtils;
import org.springframework.web.context.WebApplicationContext;
import org.springframework.web.context.support.AnnotationConfigWebApplicationContext;
public abstract class AbstractAnnotationConfigDispatcherServletInitializer extends AbstractDispatcherServletInitializer {
public AbstractAnnotationConfigDispatcherServletInitializer() {
}
@Nullable
protected WebApplicationContext createRootApplicationContext() {
Class<?>[] configClasses = this.getRootConfigClasses();
if (!ObjectUtils.isEmpty(configClasses)) {
AnnotationConfigWebApplicationContext context = new AnnotationConfigWebApplicationContext();
context.register(configClasses);
return context;
} else {
return null;
}
}
protected WebApplicationContext createServletApplicationContext() {
AnnotationConfigWebApplicationContext context = new AnnotationConfigWebApplicationContext();
Class<?>[] configClasses = this.getServletConfigClasses();
if (!ObjectUtils.isEmpty(configClasses)) {
context.register(configClasses);
}
return context;
}
@Nullable
protected abstract Class<?>[] getRootConfigClasses();
@Nullable
protected abstract Class<?>[] getServletConfigClasses();
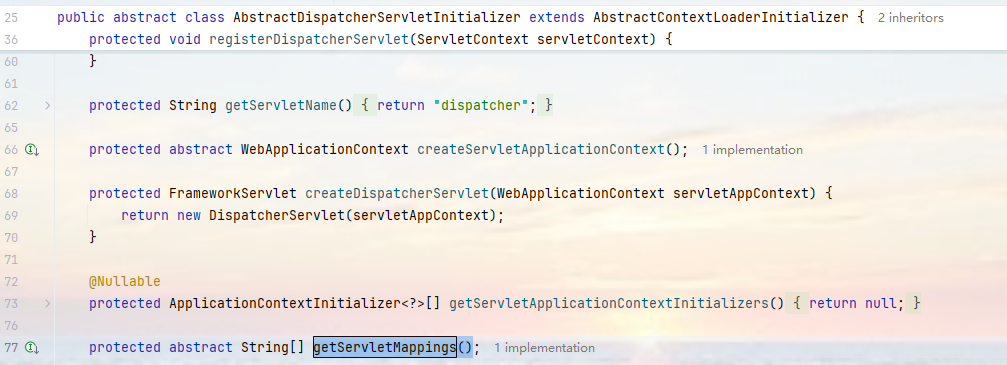
}getRootConfigClasses()是加载Spring的核心配置类,Root就是根的意思相当于是根容器,我们知道Spring与SpringMVC是父子容器的关系,先从父容器中找,找不到再去子容器找;getServletConfigClasses()是加载SpringMVC的核心配置类;那么还有前端控制器的映射路径还没有配置,怎么办呢?实际上它直接是调用了它父亲AbstractDispatcherServletInitializer的getServletMappings():
原理分析完了,我们来实现一下吧,实际上实现简单得多,直接继承AbstractAnnotationConfigDispatcherServletInitializer:
java
package com.itheima.init;

import com.itheima.config.SpringConfig;
import com.itheima.config.SpringMVCConfig2;
import org.springframework.web.servlet.support.AbstractAnnotationConfigDispatcherServletInitializer;

public class MyAbstractAnnotationConfigDispatcherServletInitializer2 extends AbstractAnnotationConfigDispatcherServletInitializer {
    @Override
//    这是配置Spring的核心配置类
    protected Class<?>[] getRootConfigClasses() {
        return new Class[]{SpringConfig.class};
    }
//这是配置SpeingMVC的核心配置类
 @Override
    protected Class<?>[] getServletConfigClasses() {
        return new Class[]{SpringMVCConfig2.class};
    }
//这是配置前端控制器的映射路径
    @Override
    protected String[] getServletMappings() {
        return new String[]{"/"};
    }
}
这样就可以使用Spring的SpringServletContainerInitializer来实现全注解开发了。