首先依赖方面要加入下面依赖
<?xml version="1.0" encoding="UTF-8"?>
<project xmlns="http://maven.apache.org/POM/4.0.0" xmlns:xsi="http://www.w3.org/2001/XMLSchema-instance"
         xsi:schemaLocation="http://maven.apache.org/POM/4.0.0 https://maven.apache.org/xsd/maven-4.0.0.xsd">
    <modelVersion>4.0.0</modelVersion>
    <parent>
        <groupId>org.springframework.boot</groupId>
        <artifactId>spring-boot-starter-parent</artifactId>
        <version>3.4.5</version>
        <relativePath/> <!-- lookup parent from repository -->
    </parent>
    <groupId>org.example</groupId>
    <artifactId>ai_demo</artifactId>
    <version>0.0.1-SNAPSHOT</version>
    <name>ai_demo</name>
    <description>ai_demo</description>
    <properties>
        <java.version>17</java.version>
    </properties>

    <dependencyManagement>
        <dependencies>
            <!-- 1. 先 Alibaba -->
            <dependency>
                <groupId>com.alibaba.cloud.ai</groupId>
                <artifactId>spring-ai-alibaba-bom</artifactId>
                <version>1.0.0.2</version>
                <type>pom</type>
                <scope>import</scope>
            </dependency>
            <!-- 2. 再 Spring AI -->
            <dependency>
                <groupId>org.springframework.ai</groupId>
                <artifactId>spring-ai-bom</artifactId>
                <version>1.0.0</version>
                <type>pom</type>
                <scope>import</scope>
            </dependency>
        </dependencies>
    </dependencyManagement>

    <dependencies>

        <dependency>
            <groupId>com.alibaba.cloud.ai</groupId>
            <artifactId>spring-ai-alibaba-starter-dashscope</artifactId>
        </dependency>
        <dependency>
            <groupId>org.springframework.boot</groupId>
            <artifactId>spring-boot-starter</artifactId>
        </dependency>

        <dependency>
            <groupId>org.springframework.boot</groupId>
            <artifactId>spring-boot-starter-web</artifactId>
        </dependency>

        <dependency>
            <groupId>org.springframework.boot</groupId>
            <artifactId>spring-boot-starter-test</artifactId>
            <scope>test</scope>
        </dependency>

        <dependency>
            <groupId>com.alibaba.cloud.ai</groupId>
            <artifactId>spring-ai-alibaba-starter-memory-redis</artifactId>
        </dependency>

        <dependency>
            <groupId>org.apache.commons</groupId>
            <artifactId>commons-pool2</artifactId>
            <version>2.12.0</version>
        </dependency>

        <dependency>
            <groupId>redis.clients</groupId>
            <artifactId>jedis</artifactId>
            <version>5.2.0</version>
        </dependency>

        <!-- Lombok 依赖 -->
        <dependency>
            <groupId>org.projectlombok</groupId>
            <artifactId>lombok</artifactId>
            <optional>true</optional>
        </dependency>

        <dependency>
            <groupId>org.springframework.ai</groupId>
            <artifactId>spring-ai-advisors-vector-store</artifactId>
        </dependency>

        <!-- 和风天气 API 返回 JSON,需要解析 -->
        <dependency>
            <groupId>com.fasterxml.jackson.core</groupId>
            <artifactId>jackson-databind</artifactId>
        </dependency>

<!--        <dependency>-->
<!--            <groupId>org.springframework.ai</groupId>-->
<!--            <artifactId>spring-ai-starter-model-ollama</artifactId>-->
<!--        </dependency>-->
    </dependencies>

    <build>
        <plugins>
            <plugin>
                <groupId>org.springframework.boot</groupId>
                <artifactId>spring-boot-maven-plugin</artifactId>
            </plugin>
        </plugins>
    </build>

</project>
我们创建好项目引入依赖之后,去和风API官网创建账号以及API凭证。然后再配置文件了配置我们的API凭证
weather.api.key=然后有两种实现,一种是实现Fuction接口,一直是靠@Tool注解。下面是第一种的实现方法。
首先是核心WeatherFunction
java
package org.example.ai_demo.function;

import com.fasterxml.jackson.databind.JsonNode;
import com.fasterxml.jackson.databind.ObjectMapper;
import org.springframework.beans.factory.annotation.Value;
import org.springframework.http.HttpEntity;
import org.springframework.http.HttpHeaders;
import org.springframework.http.HttpMethod;
import org.springframework.http.ResponseEntity;
import org.springframework.stereotype.Component;
import org.springframework.web.client.RestTemplate;

import java.io.*;
import java.nio.charset.StandardCharsets;
import java.util.zip.GZIPInputStream;
import java.util.function.Function;

@Component
public class WeatherFunction implements Function<WeatherRequest, WeatherResponse> {

    private final RestTemplate restTemplate = new RestTemplate();
    private final ObjectMapper objectMapper = new ObjectMapper();

    @Value("${weather.api.key:}")
    private String apiKey;

    @Override
    public WeatherResponse apply(WeatherRequest weatherRequest) {
        System.out.println("========== 查询天气,城市: " + weatherRequest.city() + " ==========");
        return fetchFromQWeather(weatherRequest.city());
    }

    /**
     * 核心方法:发送HTTP请求并自动解压Gzip响应
     */
    private String sendRequestWithGzip(String url) {
        try {
            // 1. 设置请求头,告诉服务器我们支持Gzip
            HttpHeaders headers = new HttpHeaders();
            headers.set("Accept-Encoding", "gzip, deflate");
            headers.set("User-Agent", "SpringBoot-WeatherApp");
            HttpEntity<String> entity = new HttpEntity<>(headers);

            // 2. 以字节数组接收响应
            ResponseEntity<byte[]> response = restTemplate.exchange(
                    url, HttpMethod.GET, entity, byte[].class);
            byte[] compressedData = response.getBody();

            // 3. 解压Gzip数据
            try (ByteArrayInputStream bais = new ByteArrayInputStream(compressedData);
                 GZIPInputStream gzipIS = new GZIPInputStream(bais);
                 InputStreamReader isr = new InputStreamReader(gzipIS, StandardCharsets.UTF_8);
                 BufferedReader br = new BufferedReader(isr)) {

                StringBuilder sb = new StringBuilder();
                String line;
                while ((line = br.readLine()) != null) {
                    sb.append(line);
                }
                return sb.toString();
            }
        } catch (Exception e) {
            System.out.println("请求失败: " + e.getMessage());
            e.printStackTrace();
            return null;
        }
    }

    public WeatherResponse fetchFromQWeather(String city) {
        try {
            // ========== 第一步:通过城市名获取 Location ID ==========
            String searchUrl = String.format(
                    "https://......../geo/v2/city/lookup?location=%s&key=%s",
                    city, apiKey);
            System.out.println("城市搜索URL: " + searchUrl);

            String searchResponse = sendRequestWithGzip(searchUrl);
            if (searchResponse == null) {
                return new WeatherResponse(city, "网络请求失败");
            }
            System.out.println("城市搜索响应: " + searchResponse);

            // 解析JSON获取Location ID
            JsonNode searchJson = objectMapper.readTree(searchResponse);
            String code = searchJson.get("code").asText();
            if (!"200".equals(code)) {
                return new WeatherResponse(city, "未找到该城市,错误码: " + code);
            }

            String locationId = searchJson.get("location").get(0).get("id").asText();
            System.out.println("找到Location ID: " + locationId);

            // ========== 第二步:用 Location ID 查询实时天气 ==========
            String weatherUrl = String.format(
                    "https://......./v7/weather/now?location=%s&key=%s",
                    locationId, apiKey);
            System.out.println("天气查询URL: " + weatherUrl);

            String weatherResponse = sendRequestWithGzip(weatherUrl);
            if (weatherResponse == null) {
                return new WeatherResponse(city, "天气查询网络请求失败");
            }
            System.out.println("天气查询响应: " + weatherResponse);

            // 解析天气JSON
            JsonNode weatherJson = objectMapper.readTree(weatherResponse);
            String weatherCode = weatherJson.get("code").asText();
            if ("200".equals(weatherCode)) {
                String weather = weatherJson.get("now").get("text").asText();
                String temp = weatherJson.get("now").get("temp").asText();
                return new WeatherResponse(city, weather + "," + temp + "℃");
            } else {
                return new WeatherResponse(city, "天气查询失败,错误码: " + weatherCode);
            }

        } catch (Exception e) {
            System.out.println("查询异常: " + e.getMessage());
            e.printStackTrace();
            return new WeatherResponse(city, "查询失败: " + e.getMessage());
        }
    }
}
1.其中发送HTTP请求并自动解压Gzip响应,这个是因为和风对返回数据进行了Gzip的压缩。如果我们不做处理的话 就会报错乱码。显示400状态码,告诉你你的参数有问题。
2.和风官网里面去看你专属的APIHOST,这个是你专属的,加入到这个URL里面。
下面是告诉模型你的
java
package org.example.ai_demo.function;

public record WeatherRequest(String city) {
}
java
package org.example.ai_demo.function;

public record WeatherResponse(String city,String weather) {
}
这是告诉大模型我需要的入参时什么以及返回结果是什么样子的。
java
package org.example.ai_demo.config;


import com.alibaba.cloud.ai.dashscope.chat.DashScopeChatModel;
import org.example.ai_demo.function.WeatherFunction;
import org.example.ai_demo.function.WeatherRequest;
import org.springframework.ai.chat.client.ChatClient;
import org.springframework.ai.tool.ToolCallback;
import org.springframework.ai.tool.function.FunctionToolCallback;
import org.springframework.context.annotation.Bean;
import org.springframework.context.annotation.Configuration;

import java.util.List;

@Configuration
public class AiConfig {

    @Bean
    public ToolCallback weatherToolCallback(WeatherFunction weatherFunction) {
        return FunctionToolCallback.builder("getWeather", weatherFunction)
                .description("获取指定城市的当前天气信息")
                .inputType(WeatherRequest.class)
                .build();
    }

    @Bean
    public ChatClient weatherChatClient(DashScopeChatModel chatModel,
                                        ToolCallback weatherToolCallback) {
        return ChatClient.builder(chatModel)
                .defaultToolCallbacks(weatherToolCallback)  // 关键:注册!
                .build();
    }
}
这个就是把这个天气工具注册成Bean,让框架和大模型能够识别调用。
java
package org.example.ai_demo.services;

import org.springframework.ai.chat.client.ChatClient;
import org.springframework.beans.factory.annotation.Autowired;
import org.springframework.stereotype.Service;

@Service
public class ChatService {
    @Autowired
    private ChatClient weatherChatClient;
    public String askWeather(String question) {
        return weatherChatClient.prompt()
                .user(question)
                .call().content();
    }
}
java
package org.example.ai_demo.controller;

import org.example.ai_demo.services.ChatService;
import org.springframework.beans.factory.annotation.Autowired;
import org.springframework.web.bind.annotation.GetMapping;
import org.springframework.web.bind.annotation.RequestMapping;
import org.springframework.web.bind.annotation.RequestParam;
import org.springframework.web.bind.annotation.RestController;

@RestController
public class FcWeatherController {
    @Autowired
    private ChatService chatService;
    @RequestMapping("/fc")
    public String fc(@RequestParam String q) {
        return chatService.askWeather(q);
    }
}
最后是Service以及Controller层的调用。
整体流程就是
- Spring 启动,扫描
@Configuration,创建两个 Bean:天气工具、绑定了工具的对话客户端。 - 业务代码注入
ChatClient,发起提问(例:杭州今天天气怎么样?)。 - 大模型读取工具的
description,判断需要调用getWeather工具。 - 大模型按照
WeatherRequest结构提取参数(city=杭州)。 - 框架自动执行
WeatherFunction业务逻辑查询天气,返回WeatherResponse。 - 大模型拿到结果,整理成自然语言回复用户。
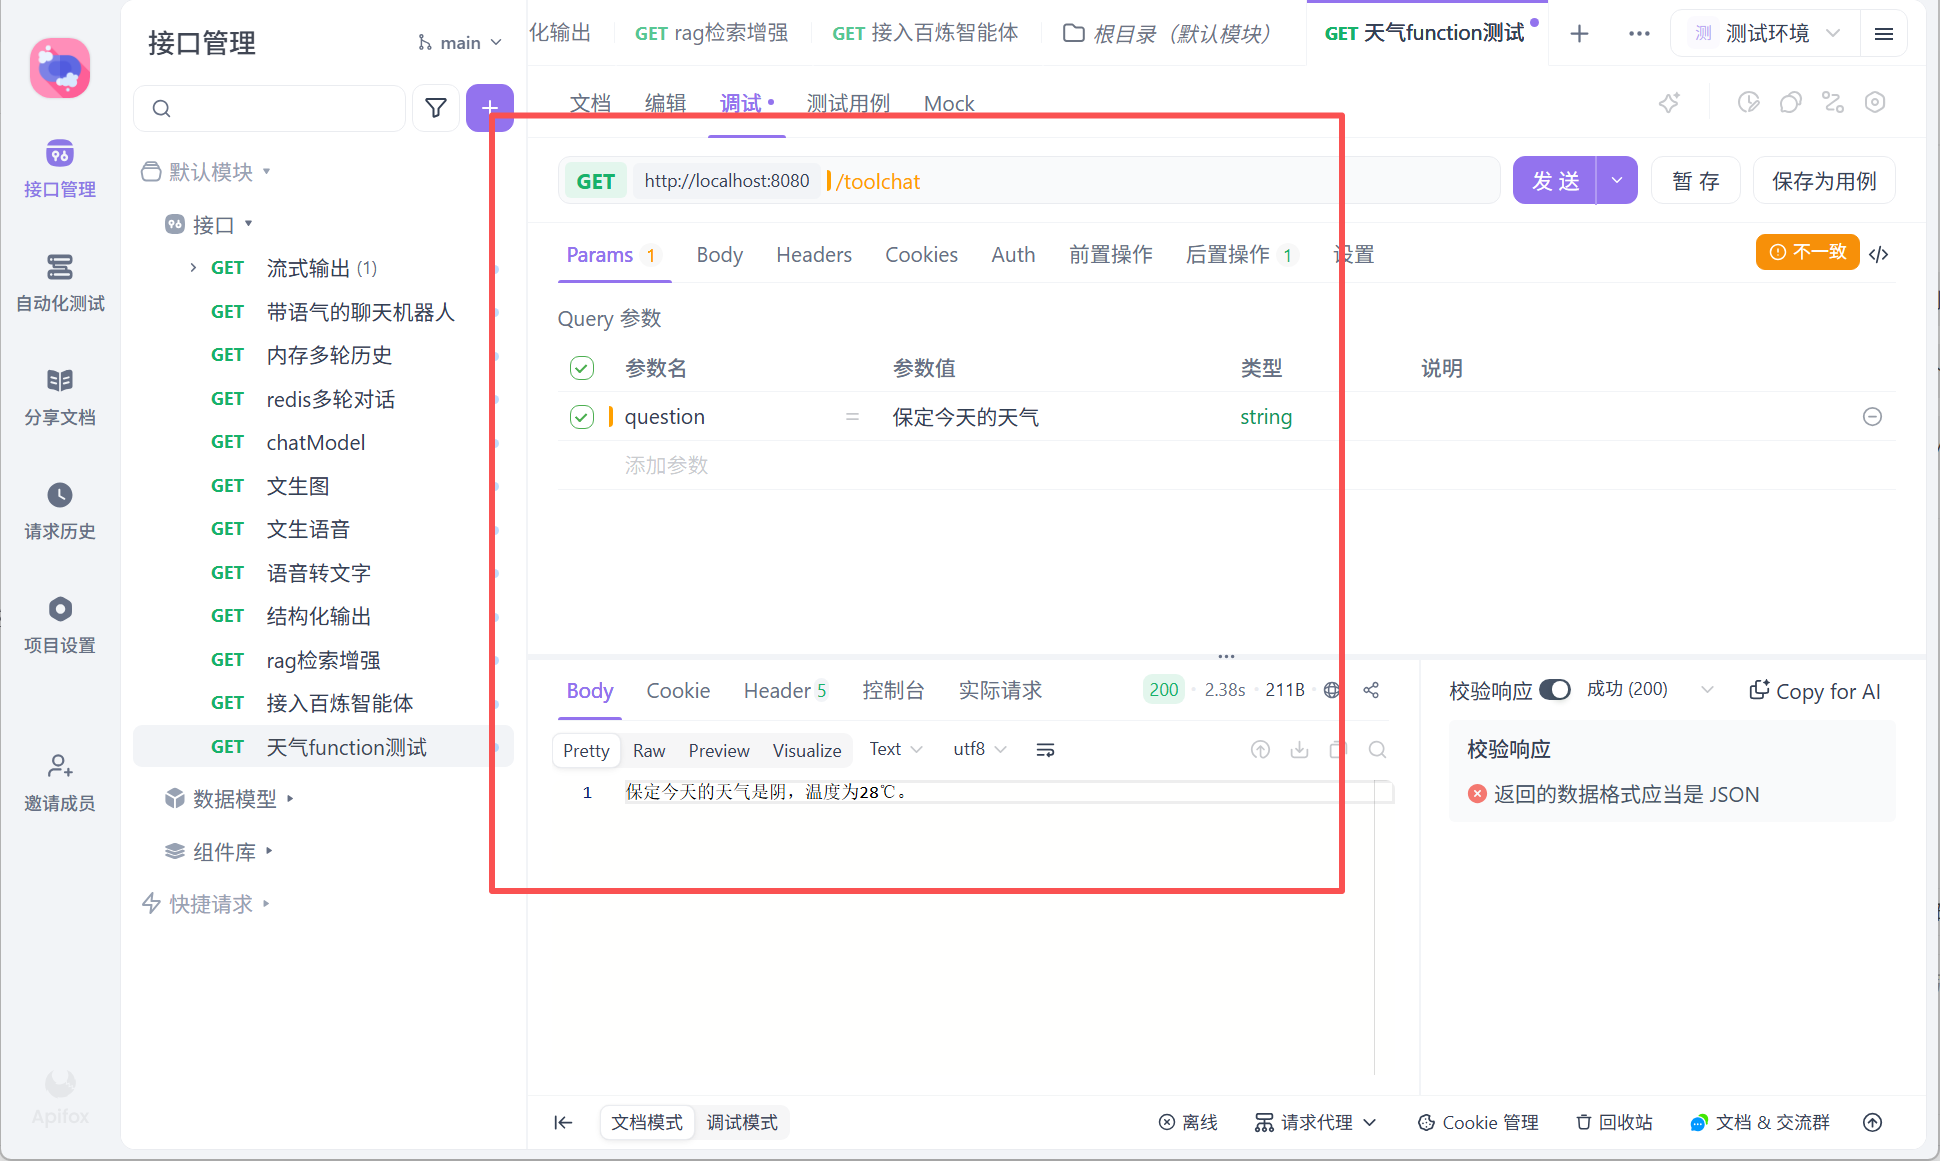
@Tool的用法
就是不用继承Fuction了
java
package org.example.ai_demo.tool;

import com.fasterxml.jackson.databind.JsonNode;
import com.fasterxml.jackson.databind.ObjectMapper;
import org.springframework.ai.tool.annotation.Tool;
import org.springframework.ai.tool.annotation.ToolParam;
import org.springframework.beans.factory.annotation.Value;
import org.springframework.http.HttpEntity;
import org.springframework.http.HttpHeaders;
import org.springframework.http.HttpMethod;
import org.springframework.http.ResponseEntity;
import org.springframework.stereotype.Component;
import org.springframework.web.client.RestTemplate;

import java.io.*;
import java.nio.charset.StandardCharsets;
import java.util.zip.GZIPInputStream;

@Component
public class WeatherTool {

    private final RestTemplate restTemplate = new RestTemplate();
    private final ObjectMapper objectMapper = new ObjectMapper();

    @Value("${weather.api.key:}")
    private String apiKey;

    /**
     * 核心方法:发送HTTP请求并自动解压Gzip响应
     */
    private String sendRequestWithGzip(String url) {
        try {
            HttpHeaders headers = new HttpHeaders();
            headers.set("Accept-Encoding", "gzip, deflate");
            headers.set("User-Agent", "SpringBoot-WeatherApp");
            HttpEntity<String> entity = new HttpEntity<>(headers);

            ResponseEntity<byte[]> response = restTemplate.exchange(
                    url, HttpMethod.GET, entity, byte[].class);
            byte[] compressedData = response.getBody();

            try (ByteArrayInputStream bais = new ByteArrayInputStream(compressedData);
                 GZIPInputStream gzipIS = new GZIPInputStream(bais);
                 InputStreamReader isr = new InputStreamReader(gzipIS, StandardCharsets.UTF_8);
                 BufferedReader br = new BufferedReader(isr)) {

                StringBuilder sb = new StringBuilder();
                String line;
                while ((line = br.readLine()) != null) {
                    sb.append(line);
                }
                return sb.toString();
            }
        } catch (Exception e) {
            System.out.println("请求失败: " + e.getMessage());
            e.printStackTrace();
            return null;
        }
    }

    /**
     * 获取 Location ID
     */
    private String getLocationId(String cityName) {
        try {
            String searchUrl = String.format(
                    "https://。。。。。。/geo/v2/city/lookup?location=%s&key=%s",
                    cityName, apiKey);
            System.out.println("城市搜索URL: " + searchUrl);

            String searchResponse = sendRequestWithGzip(searchUrl);
            if (searchResponse == null) {
                return null;
            }
            System.out.println("城市搜索响应: " + searchResponse);

            JsonNode searchJson = objectMapper.readTree(searchResponse);
            String code = searchJson.get("code").asText();
            if (!"200".equals(code)) {
                return null;
            }

            String locationId = searchJson.get("location").get(0).get("id").asText();
            System.out.println("找到Location ID: " + locationId);
            return locationId;
        } catch (Exception e) {
            System.out.println("获取Location ID异常: " + e.getMessage());
            return null;
        }
    }

    /**
     * 查询天气的核心方法
     */
    private String queryWeatherByLocationId(String locationId) {
        try {
            String weatherUrl = String.format(
                    "https://。。。。。/v7/weather/now?location=%s&key=%s",
                    locationId, apiKey);
            System.out.println("天气查询URL: " + weatherUrl);

            String weatherResponse = sendRequestWithGzip(weatherUrl);
            if (weatherResponse == null) {
                return null;
            }
            System.out.println("天气查询响应: " + weatherResponse);

            JsonNode weatherJson = objectMapper.readTree(weatherResponse);
            String weatherCode = weatherJson.get("code").asText();
            if ("200".equals(weatherCode)) {
                String weather = weatherJson.get("now").get("text").asText();
                String temp = weatherJson.get("now").get("temp").asText();
                return weather + "," + temp + "℃";
            } else {
                return null;
            }
        } catch (Exception e) {
            System.out.println("天气查询异常: " + e.getMessage());
            return null;
        }
    }

    /**
     * Tool 方法:获取指定城市的天气信息
     * AI 会自动识别这个 @Tool 注解的方法
     */
    @Tool(name = "getWeather", description = "获取指定城市的当前天气信息,返回天气状况和温度")
    public String getWeather(@ToolParam(description = "城市名称,例如:北京、上海、保定、广州") String city) {
        System.out.println("========== @Tool 被调用,城市: " + city + " ==========");

        try {
            // 第一步:获取 Location ID
            String locationId = getLocationId(city);
            if (locationId == null) {
                return "抱歉,未找到城市 '" + city + "' 的天气信息,请确认城市名称是否正确。";
            }

            // 第二步:查询天气
            String weatherInfo = queryWeatherByLocationId(locationId);
            if (weatherInfo == null) {
                return "抱歉,查询 " + city + " 的天气信息失败,请稍后重试。";
            }

            return city + "的天气:" + weatherInfo;

        } catch (Exception e) {
            System.out.println("查询异常: " + e.getMessage());
            e.printStackTrace();
            return "查询天气时发生错误:" + e.getMessage();
        }
    }
}
@Tool(name = "getWeather", description = "获取指定城市的当前天气信息,返回天气状况和温度")
使用Tool就不用再显示的写WeatherRequest和WeatherResponse了
对应的config也要改变
java
package org.example.ai_demo.config;

import com.alibaba.cloud.ai.dashscope.chat.DashScopeChatModel;
import org.example.ai_demo.tool.WeatherTool;
import org.springframework.ai.chat.client.ChatClient;
import org.springframework.context.annotation.Bean;
import org.springframework.context.annotation.Configuration;

@Configuration
public class AiToolConfig {

    @Bean
    public ChatClient weathertoolChatClient(DashScopeChatModel chatModel,
                                            WeatherTool weatherTool) {
        return ChatClient.builder(chatModel)
                .defaultTools(weatherTool)  // 直接传入 WeatherTool 对象,自动扫描 @Tool 注解
                .build();
    }
}