在现代游戏渲染中,体积光(Volumetric Lighting)和体积雾(Volumetric Fog)是营造氛围、提升沉浸感的关键技术。它们能够让光线可见化,让雾气充满体积感,使整个场景更加真实可信。
本文将深入探讨在 Unity URP(Universal Render Pipeline) 环境下,如何通过深度图重建世界空间位置,并基于此实现高质量的体积光与体积雾效果。
一、核心原理概述
1.1 体积渲染的基本思想
体积渲染的核心思想是:将三维空间中的介质(如雾气、烟尘、光线中的粒子)视为无数微小的体积元素,通过累积这些元素对光线的吸收和散射,最终得到视觉效果。
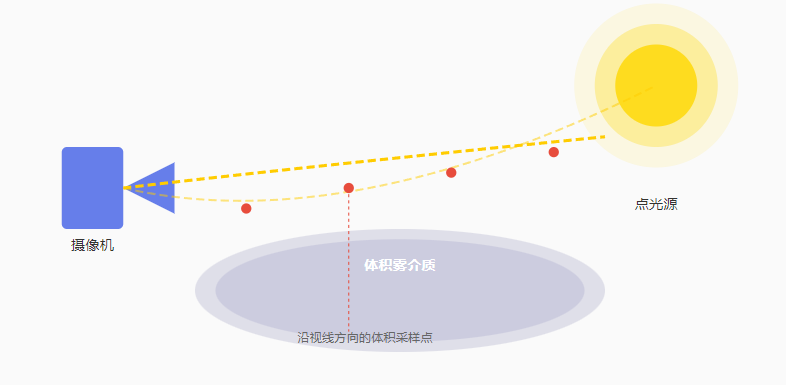
体积渲染关键步骤
- 从摄像机发射射线,穿过每个像素
- 沿射线方向进行等间距采样
- 在每个采样点重建世界空间位置
- 计算该点的介质密度和光照强度
- 沿路径累积光的散射和吸收
二、深度重建世界空间位置
2.1 为什么需要深度重建?
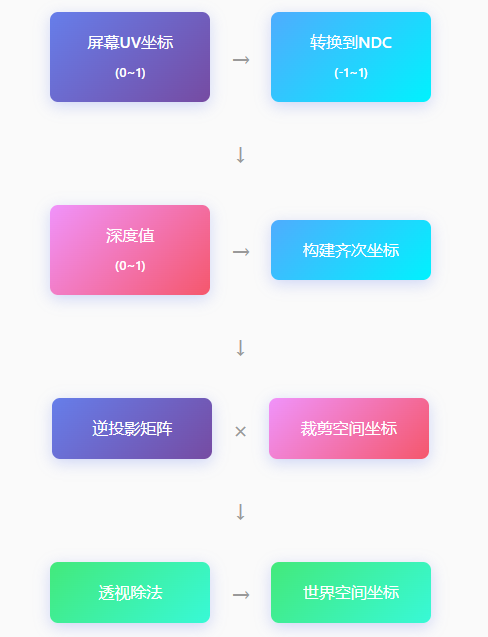
在 URP 中,深度图(Depth Texture)只存储了每个像素的深度值(0-1范围),我们无法直接获取该像素对应的三维空间位置。要实现体积渲染,必须将这个深度值转换为真正的世界空间坐标。

2.2 Shader 实现
以下是完整的深度重建 Shader 代码,逐行解析:
cs
// 获取深度纹理(URP 内置 _CameraDepthTexture)
sampler2D _CameraDepthTexture;
// 重建世界空间位置的核心函数
float3 ReconstructWorldPosition(float2 uv, float depth)
{
    // 构建该像素的裁剪空间坐标 (NDC)
    float4 clipPos = float4(uv * 2.0 - 1.0, depth * 2.0 - 1.0, 1.0);
    // 获取当前渲染相机的 VP 矩阵
    float4x4 invVP = unity_CameraInvProjection;
    float4 worldPos = mul(invVP, clipPos);

    // 透视除法,转换到世界空间
    worldPos.xyz /= worldPos.w;

    // 考虑相机世界位置偏移
    worldPos.xyz += _WorldSpaceCameraPos;

    return worldPos.xyz;
}
2.3 深度重建流程图
三、体积雾实现
3.1 体积雾的数学模型
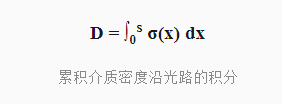
体积雾基于 Beer-Lambert 定律描述光线穿过介质时的衰减:
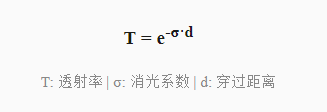
沿视线累积的光学深度公式:
3.2 体积雾 Shader
cs
// 体积雾属性
uniform float _FogDensity = 0.1;      // 雾的浓度
uniform float _FogHeight = 10.0;     // 雾的高度范围
uniform float3 _FogColor;              // 雾的颜色
// 计算某点的雾密度
float SampleFogDensity(float3 worldPos)
{
    // 基于高度的雾密度衰减
    float heightFactor = exp(-worldPos.y * 0.1);

    // 基础雾密度 × 高度衰减
    return _FogDensity * heightFactor;
}
// 体积雾累积函数
float4 VolumetricFog(float4 color, float2 uv, float depth)
{
    // 重建世界空间位置
    float3 worldPos = ReconstructWorldPosition(uv, depth);
    float3 cameraPos = _WorldSpaceCameraPos;

    // 视线方向
    float3 rayDir = normalize(worldPos - cameraPos);
    float rayLength = length(worldPos - cameraPos);

    // 采样步长和次数
    float stepSize = rayLength / 32.0;
    float accumulatedFog = 0.0;

    // 沿视线采样累积
    for (int i = 0; i < 32; i++)
    {
        float3 samplePos = cameraPos + rayDir * stepSize * i;
        float density = SampleFogDensity(samplePos);
        accumulatedFog += density * stepSize;
    }

    // Beer-Lambert 衰减
    float fogFactor = 1.0 - exp(-accumulatedFog);

    // 混合雾颜色
    return lerp(color, float4(_FogColor, 1.0), fogFactor);
}
3.3 体积雾效果示意

四、体积光实现
4.1 体积光的基本原理
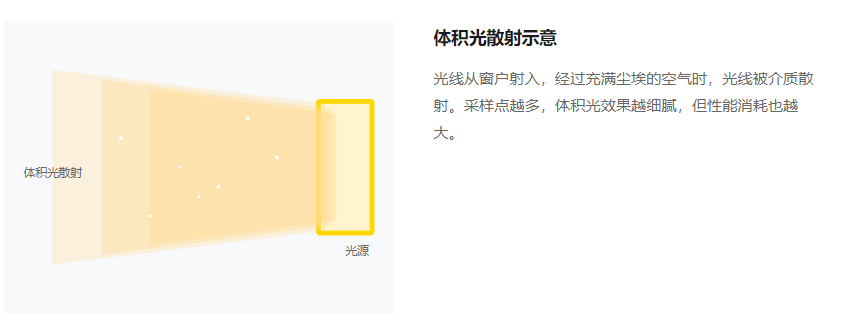
体积光(God Rays)模拟光线穿过介质(如雾气、尘埃)时的散射效果。当光线经过体积介质时,部分光线被散射到观察者眼中,形成可见的光柱效果。
4.2 体积光 Shader
cs
// 体积光属性
uniform float4 _LightPos;          // 光源世界位置
uniform float3 _LightColor;       // 光源颜色
uniform float _Scattering = 1.0;  // 散射系数
uniform float _Density = 1.0;      // 介质密度
// Ray Marching 体积光累积
float3 VolumetricLight(float2 uv, float depth)
{
    float3 worldPos = ReconstructWorldPosition(uv, depth);
    float3 cameraPos = _WorldSpaceCameraPos;

    // 计算到表面的距离
    float distToSurface = length(worldPos - cameraPos);
    float3 rayDir = normalize(worldPos - cameraPos);

    // 光线到采样点的方向
    float3 lightDir = normalize(_LightPos.xyz - cameraPos);

    // 采样参数
    int numSteps = 64;
    float stepSize = distToSurface / numSteps;
    float3 accumulatedLight = float3(0.0);

    for (int i = 0; i < numSteps; i++)
    {
        // 当前采样点
        float3 samplePos = cameraPos + rayDir * stepSize * i;

        // 计算到光源的距离
        float distToLight = length(_LightPos.xyz - samplePos);

        // Mie 散射相位函数
        float cosAngle = dot(-rayDir, lightDir);
        float phase = MieScattering(cosAngle);

        // 光源衰减 + 散射相位
        float attenuation = 1.0 / (1.0 + distToLight * distToLight);
        float3 lightContrib = _LightColor * attenuation * phase;

        // 累积光线贡献
        accumulatedLight += lightContrib * _Density * stepSize;
    }

    // 应用全局散射系数
    return accumulatedLight * _Scattering;
}
// Mie 散射相位函数(近似)
float MieScattering(float cosAngle)
{
    const float g = 0.8;  // 各向异性参数
    return (1.0 - g * g) /
           (4.0 * 3.14159 * pow(1.0 + g * g - 2.0 * g * cosAngle, 1.5));
}
五、性能优化策略
5.1 采样数量控制
体积渲染的主要性能瓶颈在于沿视线方向的采样次数。以下是不同采样级别的权衡:
| 采样级别 | 采样次数 | 视觉效果 | 性能消耗 |
|---|---|---|---|
| 低 | 16-24 次 | 噪点明显,颗粒感强 | ★★★★★ |
| 中 | 32-48 次 | 基本可用,需降噪 | ★★★☆☆ |
| 高 | 64-128 次 | 细腻平滑,效果优秀 | ★★☆☆☆ |
5.2 降噪技术
为了在有限的采样次数下获得平滑效果,通常需要配合降噪技术:
常用降噪方案
- 双边滤波(Bilateral Filter):保留边缘,平滑噪点
- 时间积累(Temporal Accumulation):利用历史帧信息
- 深度感知降噪:根据深度变化调整滤波强度
- 噪点抖动(Jitter):使用蓝噪声或哈希函数实现采样位置随机化
5.3 分辨率缩放
另一个常见优化是以较低分辨率渲染体积效果,然后上采样到全分辨率:
cs
// 以 1/2 或 1/4 分辨率渲染体积光
uniform float _ResolutionScale = 0.5;
void Main(float2 uv, out float4 color)
{
    // 缩放 UV 到低分辨率
    float2 lowResUV = uv * _ResolutionScale;
    float lowResDepth = tex2D(_CameraDepthTexture, lowResUV).r;

    // 在低分辨率下计算体积效果
    color = VolumetricLight(lowResUV, lowResDepth);

    // 后续通过上采样(双线性/双三次)恢复分辨率
    // 配合深度感知插值避免边缘模糊
}
六、在 URP 中集成
6.1 配置 Depth Texture
首先需要在 URP 渲染器配置中启用深度纹理:
URP Renderer AssetDepth Texture✓Opaque Texture✓HDR必须启用 Depth Texture 才能在自定义 Pass 中访问深度信息
6.2 创建体积雾 Pass
完整的 URP 自定义渲染 Pass 示例:
cs
六、在 URP 中集成
6.1 配置 Depth Texture
首先需要在 URP 渲染器配置中启用深度纹理:

URP Renderer Asset
Depth Texture
✓
Opaque Texture
✓
HDR
必须启用 Depth Texture 才能在自定义 Pass 中访问深度信息
6.2 创建体积雾 Pass
完整的 URP 自定义渲染 Pass 示例:

using UnityEngine;
using UnityEngine.Rendering;
using UnityEngine.Rendering.Universal;
public class VolumetricPass : ScriptableRenderPass
{
    private Material _volumetricMaterial;

    public VolumetricPass(Material mat)
    {
        _volumetricMaterial = mat;
        renderPassEvent = RenderPassEvent.AfterRenderingSkybox;
    }

    public override void Execute(
        ScriptableRenderContext context,
        ref RenderingData renderingData)
    {
        // 获取相机渲染数据
        Camera camera = renderingData.cameraData.camera;
        if (camera.cameraType != CameraType.Game) return;

        // 设置 Shader 属性
        _volumetricMaterial.SetMatrix("_InvVP",
            camera.projectionMatrix * camera.worldToCameraMatrix);

        // 启用深度纹理采样
        Shader.SetGlobalTexture("_CameraDepthTexture",
            renderingData.cameraData.depthTexture);

        // 提交渲染命令
        CommandBuffer cmd = CommandBuffer.Pool.Get();
        cmd.Blit(null, RenderTargetHandle.CameraTarget.Identifier(),
            _volumetricMaterial);
        context.ExecuteCommandBuffer(cmd);
        CommandBuffer.Pool.Release(cmd);
    }
}
总结
基于深度重建世界空间位置是实现高质量体积光与雾效的基础。通过理解 VP 矩阵的逆变换,我们可以将屏幕空间的深度值转换为真实的三维坐标,进而进行体积采样和光散射计算。
关键要点:采样数量与性能的权衡、使用降噪技术提升视觉质量、以及通过分辨率缩放等优化手段实现实时渲染。