本文围绕ICMP报文结构解析与UDP多发并发处理展开,系统介绍ICMP头部字段解码方法及其在主机探测中的应用,并结合代码实现对网络数据包的捕获与分析过程进行说明。
文章目录
前情提要
上一篇文章已经完整解码数据包的IP层,接下来还需要解码扫描器向非开放端口发UDP包时触发的ICMP响应:
不同的ICMP消息之间千差万别,但有三个字段是一定存在的:
- 类型(type)
- 代码(code)
- 校验和(checksum)
类型和代码两个字段告诉接收者,接下来要接收的ICMP信息是什么类型的,也就指明了如何正确地解码里面的数据;
为了实现扫描功能 ,需要检查类型为3、代码为3的ICMP消息:
- 类型为3表示目标不可达;
- 代码为3表示导致目标不可达的具体原因是端口不可达;
ICMP消息结构
具体结构如下:
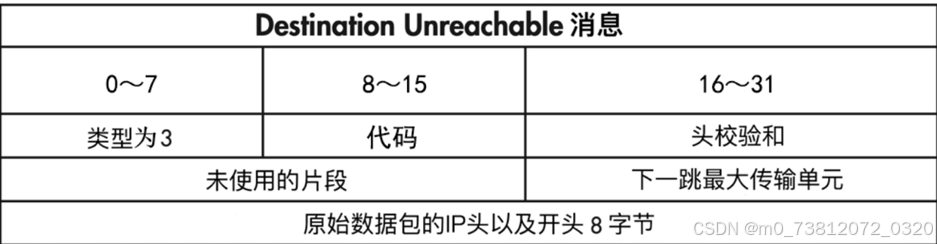
可以看到数据包开头:
bash
+----------------+----------------+----------------+----------------+
| 类型 (Type) | 代码 (Code) | 校验和 (Checksum) |
+----------------+----------------+----------------+----------------+
| 标识符 (Identifier) | 序列号 (Sequence Number) |
+---------------------------------------------------------------+

- 类型:1字节
- 代码:1字节
- 头校验和:2字节并且,为了确认这个ICMP消息真的是被扫描器触发的,我们还可以自定义8字节的特征数据放在UDP数据包的开头,然后与接收到的ICMP消息的最后8字节进行对比;
解码ICMP头
这里我们接着上一张的代码继续书写:Python编写基于UDP的主机发现工具(解码IP header)
具体代码如下:
python
import ipaddress
import struct
import sys
import socket
import os

class IP:
    def __init__(self,buff=None):
        # 使用 struct 模块解析前 20 个字节的 IP 头
        # '<' 代表小端序,'B'代表1字节无符号整数,'H'代表2字节,'4s'代表4字节字符串
	....


class ICMP:
    def __init__(self,buff):
        # 最后一个H,对应我们自定义的扫描特征
        header = struct.unpack('<BBHHH',buff)

        self.type = header[0]
        self.code = header[1]
        self.checknum = header[2]
        self.id = header[3]
        self.seq = header[4]


# 接下来的代码,就是之前的原始socket嗅探器的功能了
def sniff(host):
	....

    try:
        while True:
            # 读取一个数据包
            raw_buffer = sniffer.recvfrom(65535)[0]

            # 解析IP头
            ip_header = IP(raw_buffer[0:20])

            # ------------增加部分-------------
            if ip_header.protocol == 'icmp':
                print(f"Protocol:{ip_header.protocol} | {ip_header.src_address} --> {ip_header.dst_address}")
                print(f"Protocol Version:{ip_header.ver}")
                print(f"Header Len:{ip_header.h_len} TTL:{ip_header.ttl}")

            offset = ip_header.h_len * 4
            icmp_buf = raw_buffer[offset:offset+8]

            icmp_header = ICMP(icmp_buf)
            print(f"ICMP ------> Type:{icmp_header.type} Code:{icmp_header.code}")

	except KeyInterrupt as e:
		...

if __name__ == "__main__":
    # 这里必须填你运行代码的本机的真实局域网 IP
    host_ip = '192.168.1.12'
    sniff(host_ip)
代码解释
这里我给大家简单解释一下ICMP部分:
(1)首先就是创建一个ICMP的类,然后按照标准,将其划分为5个部分:
bash
+----------------+----------------+----------------+----------------+
| 类型 (Type) | 代码 (Code) | 校验和 (Checksum) |
+----------------+----------------+----------------+----------------+
| 标识符 (Identifier) | 序列号 (Sequence Number) |
+---------------------------------------------------------------+
(2)为什么协议类型是ICMP,还要调用前面的ip_header的参数呢:
python
if ip_header.protocol == 'icmp':
    print(f"Protocol:{ip_header.protocol} | {ip_header.src_address} --> {ip_header.dst_address}")
    print(f"Protocol Version:{ip_header.ver}")
    print(f"Header Len:{ip_header.h_len} TTL:{ip_header.ttl}")
虽然我们常说 ICMP 是网络层协议,但在实际的数据传输中,"ICMP 报文不能光着身子在网线上跑",它必须作为"数据负载(Payload)",被塞进一个 IPv4 数据包里,然后由 IP 协议负责把它送达目的地。
数据在内存中的真实排列顺序是这样的:
bash
[ 抓到的完整原始数据包 raw_buffer ]
|------------------ IP 层 ------------------|----------- ICMP 层 -----------|
+-------------------------------------------+-------------------------------+
| IPv4 头部 (包含 IHL 字段) | IP 可选参数 | ICMP 头部 (8字节) | ICMP 数据 |
+-------------------------------------------+-------------------------------+
\__________________ ______________________/ \_______________ _______________/
                   V                                        V
这就是代码为什么要算 offset 这就是上图里画的那个结构(3)为什么又要计算offset = ip_header.ihl * 4 偏移呢?
这行代码的核心目的,是为了精准定位 ICMP 报文在整个数据缓冲区(raw_buffer)中开始的精确字节位置。
bash
# 具体原因
- IPv4 头部长度是可变的(因为还包含又IP可选参数)
- 但是IPv4 头部的前20个字节是固定的,所以我们可以得到IPv4头部的长度参数h_len
- 头部长度h_len = 固定20字节 + IP可选参数
理解了这一点,我们再看图中的代码逻辑就很清晰了,这是一个典型的两段式解析策略:
python
ip_header = IP(raw_buffer[0:20])

offset = ip_header.h_len * 4
buf = raw_buffer[offset:offset+8]
ip_header = IP(raw_buffer[0:20]):由于 IP 头部的前 20 字节结构是绝对固定的(包含了版本、h_len、源/目的地址等基础信息),代码先强行读取前 20 字节,从而安全地提取出h_len的值。offset = ip_header.ihl * 4:根据刚解析出的h_len,算出真实的、可能包含 可选参数Options 的完整 IP 头部字节总长度(即偏移量)。icmp_buf = raw_buffer[offset:offset + 8]:使用算出的准确偏移量跳过整个 IP 头部,精准切片提取紧随其后的 8 个字节,这正好是标准 ICMP 头部(包含 Type, Code, Checksum 等)的长度,用于后续的 ICMP 解析。
效果展示
完整代码如下:
bash
import ipaddress
import struct
import sys
import socket
import os

class IP:
    def __init__(self,buff=None):
        # 使用 struct 模块解析前 20 个字节的 IP 头
        # '<' 代表小端序,'B'代表1字节无符号整数,'H'代表2字节,'4s'代表4字节字符串
        header = struct.unpack('<BBHHHBBH4s4s',buff[0:20])

        # 通过位运算提取版本号 (Version) 和头部长度 (IHL)
        self.ver = header[0] >> 4
        self.h_len = header[0] & 0xF

        self.server_type = header[1]
        self.len = header[2]
        self.id = header[3]
        self.offset = header[4]
        self.ttl = header[5]
        self.protocol_num = header[6]
        self.sum = header[7]
        self.src = header[8]
        self.dst = header[9]

        # 将二进制的源/目的 IP 转换为人类可读格式 (如 192.168.10.1)
        self.src_address = ipaddress.ip_address(self.src)
        self.dst_address = ipaddress.ip_address(self.dst)

        # # 协议号映射表
        self.protocol_map = {1:"ICMP",6:"TCP",17:"UDP"}

        try:
            self.protocol = self.protocol_map[self.protocol_num]
        except KeyError:
            self.protocol = str(self.protocol_num)


class ICMP:
    def __init__(self,buff):
        # 最后一个H,对应我们自定义的扫描特征
        header = struct.unpack('<BBHHH',buff)

        self.type = header[0]
        self.code = header[1]
        self.checknum = header[2]
        self.id = header[3]
        self.seq = header[4]


# 接下来的代码,就是之前的原始socket嗅探器的功能了
def sniff(host):
    if os.name == 'nt':
        socket_protocol = socket.IPPROTO_IP
    else:
        socket_protocol = socket.IPPROTO_ICMP

    # 创建socket对象,并绑定端口
    sniffer = socket.socket(socket.AF_INET,socket.SOCK_RAW,socket_protocol)
    sniffer.bind((host,0))

    # 抓包时,包含IP头;
    # socket.IP_HDRINCL=1 时,代表包含IP头
    sniffer.setsockopt(socket.IPPROTO_IP,socket.IP_HDRINCL,1)

    # 打开混杂模式,监听所有数据包(但是该程序只能读取一个)
    if os.name == 'nt':
        sniffer.ioctl(socket.SIO_RCVALL,socket.RCVALL_ON)

    # 读取收到的数据包
    print(f"[*] 正在 {host} 上嗅探流量.... ")

    try:
        while True:
            # 读取一个数据包
            raw_buffer = sniffer.recvfrom(65535)[0]

            # 解析IP头
            ip_header = IP(raw_buffer[0:20])

            # ------------addition-------------
            if ip_header.protocol == 'icmp':
                print(f"Protocol:{ip_header.protocol} | {ip_header.src_address} --> {ip_header.dst_address}")
                print(f"Protocol Version:{ip_header.ver}")
                print(f"Header Len:{ip_header.h_len} TTL:{ip_header.ttl}")

            offset = ip_header.h_len * 4
            buf = raw_buffer[offset:offset+8]

            icmp_header = ICMP(buf)
            print(f"ICMP ------> Type:{icmp_header.type} Code:{icmp_header.code}")


    except KeyboardInterrupt as e:
        print(f"[*] 用户中止嗅探....")

        # 关闭嗅探模式,如果Windows
        if os.name == 'nt':
            sniffer.ioctl(socket.SIO_RCVALL,socket.RCVALL_OFF)

        sys.exit()

if __name__ == "__main__":
    # 这里必须填你运行代码的本机的真实局域网 IP
    host_ip = '192.168.1.12'
    sniff(host_ip)
这里我们还是老样子,执行代码:

(之前的ICMP包,如下图)
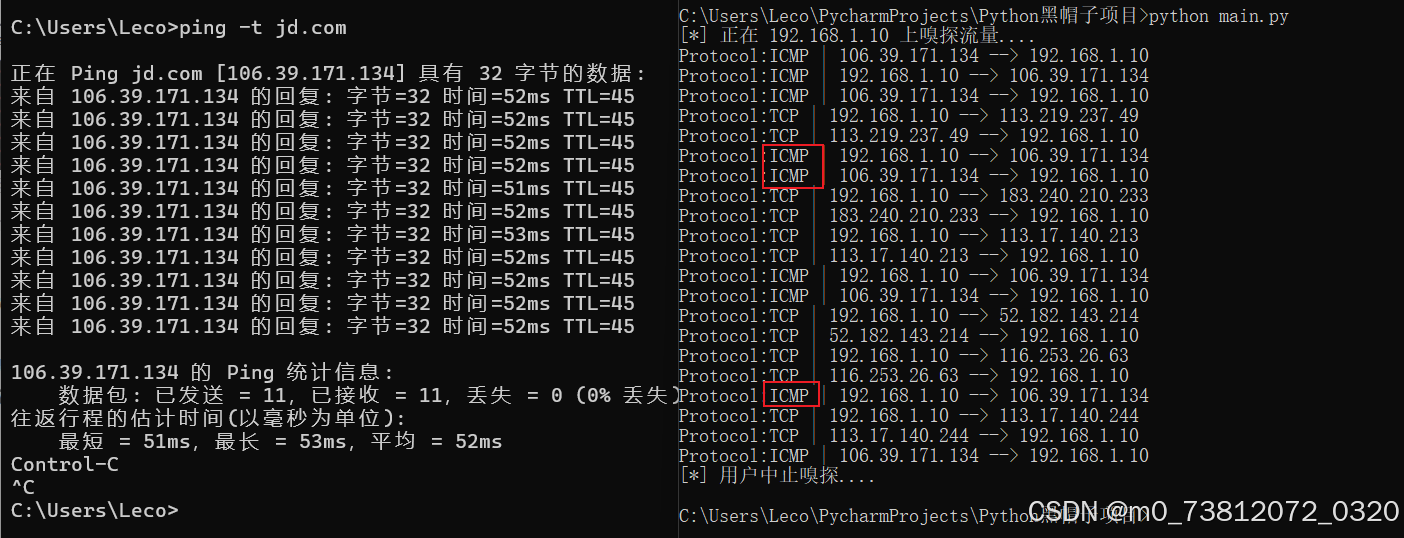
这里我们再做一次之前的ping测试,输出结果与之前的也是稍有不同;这表明ping(ICMP Echo)响应数据被正确地接收并解码了。
现在,我们准备实现整个扫描过程的最后一部分逻辑------群发UDP数据包,然后解析它们的结果。
--
多发并解析UDP
首先引入ipaddress库,这样就能对整个子网进行主机发现扫描:
bash
import ipaddress
import struct
import sys
import socket
import os

import threading
import time

target_host = '192.168.1.0/24'
message = 'Sec_tools by W1nner'

class IP():
	...

class ICMP():
	...

# ========将sniff移动到Scanner()里=============
class Scanner():
    def __init__(self,host):
        self.host = host

        # 正常的socket解析器流程
        if os.name == 'nt':
            socket_protocol = socket.IPPROTO_IP
        else:
            socket_protocol = socket.IPPROTO_ICMP

        self.socket = socket.socket(socket.AF_INET,socket.SOCK_RAW,socket_protocol)
        self.socket.bind((host,0))
        # 确定保留数据头
        self.socket.setsockopt(socket.IPPROTO_IP,socket.IP_HDRINCL,1)

        if os.name == 'nt':
            self.socket.ioctl(socket.SIO_RCVALL,socket.RCVALL_ON)


    # 接下来的代码,就是之前的原始socket嗅探器的功能了
    def sniff(self):
        hosts_up = set([f"{str(self.host)}"])

        try:

            while True:
                # 读取一个数据包
                raw_buffer = self.socket.recvfrom(65535)[0]

                # 解析IP头
                ip_header = IP(raw_buffer[0:20])

                # ------------第一部分添加的-------------
                if ip_header.protocol == 'ICMP':
                    print(f"Protocol:{ip_header.protocol} | {ip_header.src_address} --> {ip_header.dst_address}")
                    print(f"Protocol Version:{ip_header.ver}")
                    print(f"Header Len:{ip_header.h_len} TTL:{ip_header.ttl}")

                offset = ip_header.h_len * 4
                icmp_buf = raw_buffer[offset:offset + 8]

                icmp_header = ICMP(icmp_buf)
                # print(f"ICMP ------> Type:{icmp_header.type} Code:{icmp_header.code}")

                # ------------第二部分添加的-------------
                if icmp_header.code == 3 and icmp_header.type == 3:
                    if ipaddress.ip_address(ip_header.src_address) in ipaddress.IPv4Network(target_host):
                        # 确定未存活主机返回的信息,是否有我们的定制message
                        if raw_buffer[len(raw_buffer) - len(message):] == bytes(message,'utf-8'):
                            tgt = str(ip_header.src_address)

                            if tgt != self.host and tgt not in hosts_up:
                                hosts_up.add(str(ip_header.src_address))
                                print(f"Host Up:{tgt}")


        except KeyboardInterrupt as e:
            print(f"[*] 用户中止嗅探....")

            # 关闭嗅探模式,如果Windows
            if os.name == 'nt':
                self.socket.ioctl(socket.SIO_RCVALL, socket.RCVALL_OFF)

            sys.exit()


if __name__ == "__main__":
    # 这里必须填你运行代码的本机的真实局域网 IP
    host_ip = '192.168.1.12'
    s = Scanner(host_ip)
    time.sleep(5)
    t = threading.Thread(target=udp_sender)
    t.start()
    s.sniff()
代码解释
(1)开头的 def __init__ 内容就不解释了,最基础的socket解析器;
(2)接着上一部分,我们通过偏移offset,找到ICMP包的位置后:
- 首先判断其是否为
类型为3、代码为3的ICMP消息; - 然后通过
raw_buffer[len(raw_buffer) - len(message):]判断是否包含我们的信息:
方便大家理解这一句代码的作用,举例说明:
bash
抓到的这个 raw_buffer 在内存中的结构是这样的:
[当前收到的 IP 头] + [当前收到的 ICMP 头] + [你当初发出去的 IP 头] + [你当初发出去的 UDP 头] + [你的 UDP 负载 (W1nner)]


# 假设内容未 MESSAGE = "W1nner"(6个字符)
# raw_buffer 总长度74个字符
- 其中前 68 字节是各种网络头部。
- 最后 6 字节是回显的字符串 b"W1nner"

代入公式计算:
- len(raw_buffer) = 74
- len(MESSAGE) = 6
- 计算切片起点:74 - 6 = 68
- 执行切片:raw_buffer[68:]
结果: 代码完美截取了 raw_buffer 第 68 字节到最后的所有内容(即最后 6 字节),并将其与 b'W1nner' 进行 == 比对;
(3)tgt = str(ip_header.src_address):既然"暗号"匹配,说明发这个报错包的主机是存活的:
- 就从刚刚解析好的 IP 头部中,把它的源 IP 地址(src_address)提取出来,存入变量 tgt
(4)if tgt != self.host and tgt not in hosts_up:为了避免与本机内部路由发的某些ICMP包匹配;
- 同时,
hosts_up是一个集合(Set),只要这个 IP 已经记录过了,就忽略它,防止多次"刷屏";
完整代码
这里简单执行了一下:
- Kali:192.168.44.138
- Windows虚拟机:192.168.44.142
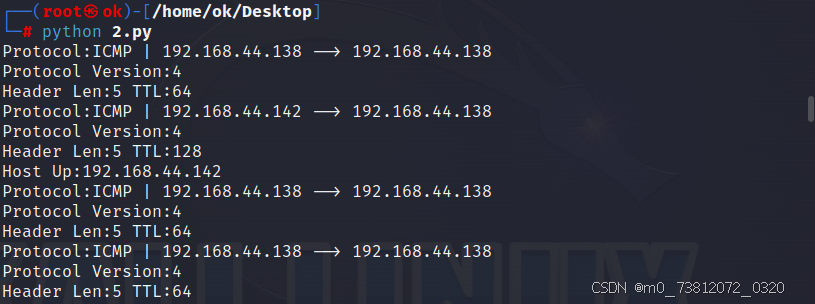
如果觉得结果太过复杂,可以注释掉一些print语句:

成功执行,完整代码如下:
bash
import ipaddress
import struct
import sys
import socket
import os
import threading
import time

target_host = '192.168.44.0/24'
message = 'Sec_tools by W1nner'


def udp_sender():
    with socket.socket(socket.AF_INET, socket.SOCK_DGRAM) as sender:
        for ip in ipaddress.ip_network(target_host).hosts():
            try:
                sender.sendto(message.encode(), (str(ip), 65421))
            except:
                pass


class Scanner:
    def __init__(self, host):
        self.host = host

        if os.name == 'nt':
            socket_protocol = socket.IPPROTO_IP
        else:
            socket_protocol = socket.IPPROTO_ICMP

        self.socket = socket.socket(socket.AF_INET, socket.SOCK_RAW, socket_protocol)
        self.socket.bind((host, 0))
        self.socket.setsockopt(socket.IPPROTO_IP, socket.IP_HDRINCL, 1)

        if os.name == 'nt':
            self.socket.ioctl(socket.SIO_RCVALL, socket.RCVALL_ON)

    def sniff(self):
        hosts_up = set()

        try:
            while True:
                raw_buffer = self.socket.recvfrom(65535)[0]

                ip_header = IP(raw_buffer[0:20])

                # 只处理 ICMP
                if ip_header.protocol != "ICMP":
                    continue

                offset = ip_header.h_len * 4
                icmp_buf = raw_buffer[offset:offset + 8]

                icmp_header = ICMP(icmp_buf)

                # ICMP Port Unreachable
                if icmp_header.type == 3 and icmp_header.code == 3:

                    src_ip = str(ip_header.src_address)

                    # 必须在目标网段
                    if ipaddress.ip_address(src_ip) not in ipaddress.IPv4Network(target_host):
                        continue

                    # 检查特征 payload
                    if raw_buffer[-len(message):] == message.encode():

                        if src_ip != self.host and src_ip not in hosts_up:
                            hosts_up.add(src_ip)
                            print(f"[+] Host Up: {src_ip}")

        except KeyboardInterrupt:
            print("\n[*] 扫描结束")

            if os.name == 'nt':
                self.socket.ioctl(socket.SIO_RCVALL, socket.RCVALL_OFF)

            sys.exit()


class IP:
    def __init__(self, buff):
        header = struct.unpack('!BBHHHBBH4s4s', buff)

        self.ver = header[0] >> 4
        self.h_len = header[0] & 0xF
        self.ttl = header[5]
        self.protocol_num = header[6]
        self.src = header[8]
        self.dst = header[9]

        self.src_address = ipaddress.ip_address(self.src)
        self.dst_address = ipaddress.ip_address(self.dst)

        protocol_map = {1: "ICMP", 6: "TCP", 17: "UDP"}
        self.protocol = protocol_map.get(self.protocol_num, str(self.protocol_num))


class ICMP:
    def __init__(self, buff):
        header = struct.unpack('!BBHHH', buff)

        self.type = header[0]
        self.code = header[1]


if __name__ == "__main__":
    host_ip = '192.168.44.138'  # 改成你的本机IP

    scanner = Scanner(host_ip)

    time.sleep(3)

    t = threading.Thread(target=udp_sender)
    t.start()

    scanner.sniff()
总结
像刚才这样简单的扫描任务,往往只需要几秒就能得到结果。通过比对家用路由器上的DHCP表,我们就能检查这份结果的准确性。
现在我们对网络上层协议和底层协议都有了基本的了解,下一章我们将会接着来了解一下名为
Scapy的Python框架。