大家好,我是鸿蒙Jack。本期我想结合自己的《时光旅记》APP,聊聊首页和发现页这套"悬浮导航 + 沉浸光感"Tab 是怎么落地的。
我当时想解决的,其实不是"底部放四个按钮"这么简单,而是两个更实际的问题。第一,Tab 不要把页面底部压得太死,内容应该继续往下长,页面看起来才轻。第二,视觉上可以有一点玻璃感和漂浮感,但不能为了一个效果把掉帧、发热和误触一起带进来。最后我没有继续用普通 Tabs + 固定底栏,而是把壳层换成了 HdsNavigation + HdsTabs,再把沉浸光感和悬浮主按钮拆成独立的一层。
先看一下《时光旅记》里已经跑起来的实际效果。
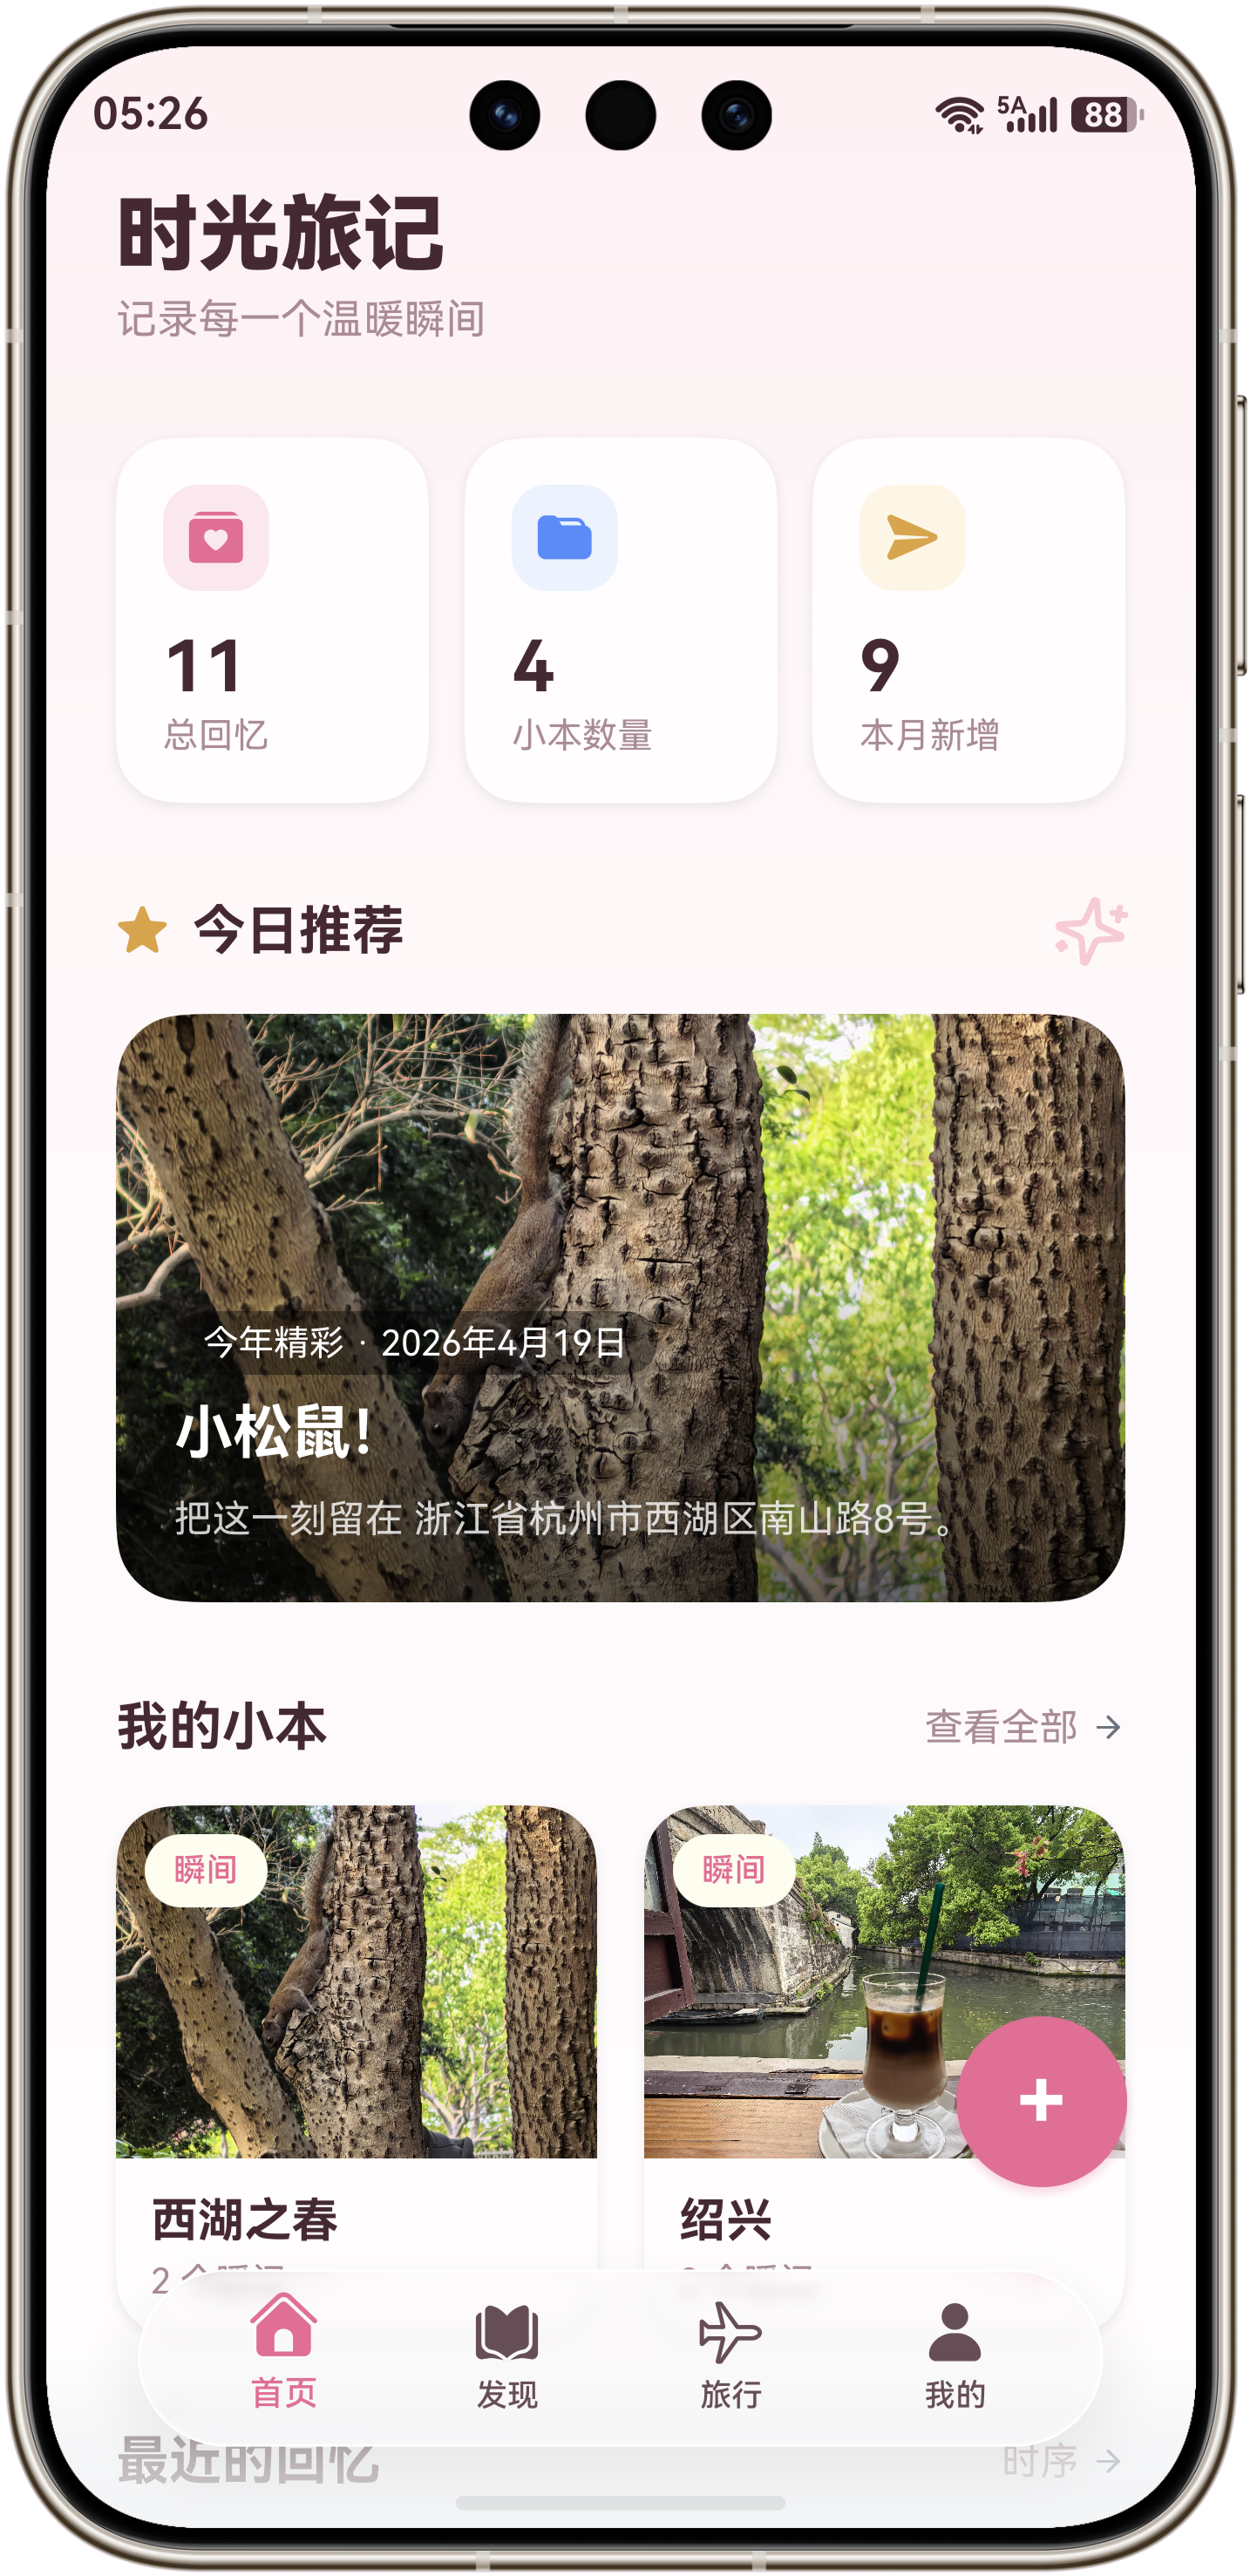
首页这里,底部导航不是贴在最底边,而是整体抬起来了一层。内容区继续往底部延展,主按钮再从内容层里跳出来,所以视觉重心会更稳。
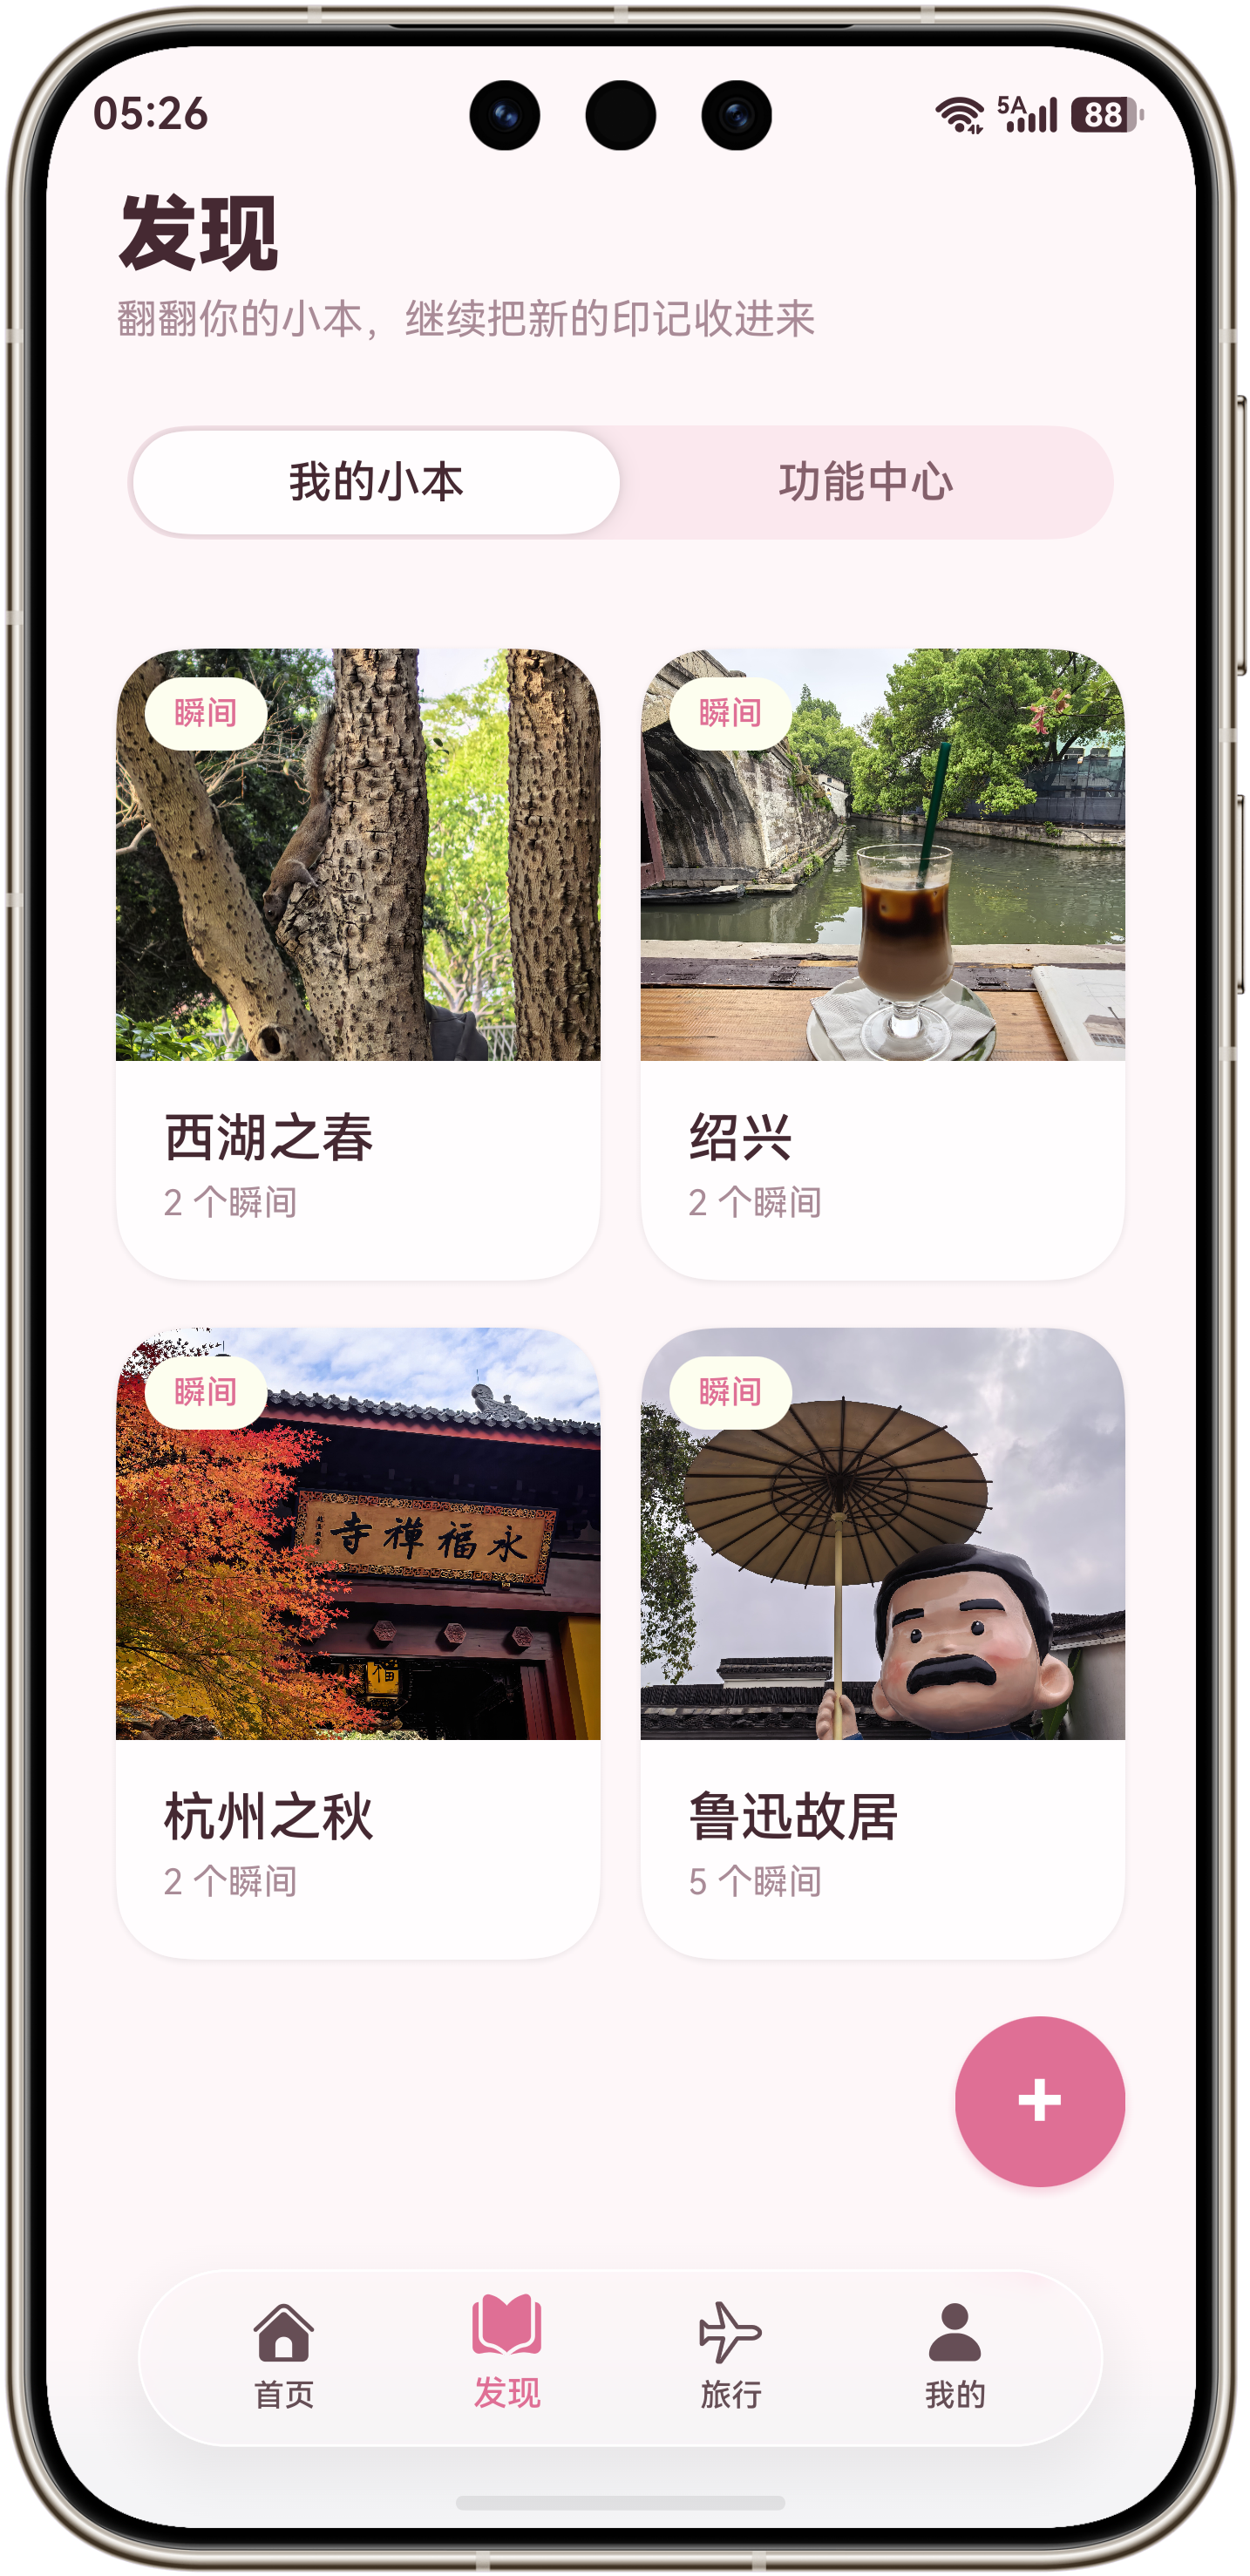
到了发现页,我保留了同一套悬浮壳层,只换内容。这样做的好处很直接,用户切页的时候不会觉得像换了一个页面系统,而是在同一块玻璃底座上切内容。
我怎么拆这套结构
我把它拆成了三层。
- 最外层是
HdsNavigation,它负责整页的壳、系统安全区和顶层材质能力。 - 中间层是
HdsTabs,它负责底部页签切换,以及真正的悬浮底栏。 - 最上层是我自己叠加的悬浮主按钮,它不塞进 TabBar 里,而是作为独立交互层覆盖在内容区之上。
这样拆完以后,职责会非常清楚。HdsTabs 只负责"导航",悬浮主按钮只负责"主动作",内容页只负责"滚动和展示",后续不管我是要换视觉、换按钮位置,还是接智能握持感知,都不会把几层代码缠成一团。
架构图
是
否
MainPage 壳层
HdsNavigation
HdsTabs
悬浮主按钮层
材质策略解析器
首页 TabContent
发现 TabContent
旅行或我的 TabContent
设备支持 IMMERSIVE?
materialLevel = ADAPTIVE
materialLevel = SMOOTH
这张图里最关键的是"材质策略解析器"这块。我的处理方式不是硬上一个固定等级的光感,而是先问系统支不支持 IMMERSIVE。支持,我就交给系统走 ADAPTIVE;不支持,我就主动退到 SMOOTH,把稳定性放在第一位。
对应到项目里,核心判断逻辑就是这一段:
arkts
private resolveImmersiveMaterialLevel(): void {
  let materialTypes: Array<hdsMaterial.MaterialType> = hdsMaterial.getSystemMaterialTypes();
  if (materialTypes.indexOf(hdsMaterial.MaterialType.IMMERSIVE) < 0) {
    this.immersiveMaterialLevel = hdsMaterial.MaterialLevel.SMOOTH;
    return;
  }
  this.immersiveMaterialLevel = hdsMaterial.MaterialLevel.ADAPTIVE;
}

private buildAdaptiveMaterialEffect(): SystemMaterialParams {
  return {
    materialType: hdsMaterial.MaterialType.ADAPTIVE,
    materialLevel: this.immersiveMaterialLevel
  };
}
页面是怎么跑起来的
真正让它有"悬浮感"的,不是单独某一个属性,而是一组组合拳。
首先是 HdsTabs 这一层,我会把 barPosition 放到底部,把 barOverlap 打开,让 TabBar 浮在内容上面,再用 barFloatingStyle 把边距、底距和沉浸光感一起配进去。到了这里,导航条才真正从"固定底栏"变成"悬浮底栏"。
arkts
HdsTabs({ controller: this.hdsTabsController, index: this.activeTab }) {
  // TabContent 省略
}
.vertical(false)
.barPosition(BarPosition.End)
.barMode(BarMode.Fixed)
.scrollable(false)
.animationDuration(240)
.barHeight(60)
.barOverlap(true)
.barFloatingStyle({
  barSideMargin: 18,
  barBottomMargin: 28,
  thermoCtrl: true,
  systemMaterialEffect: this.buildAdaptiveMaterialEffect()
})
然后是内容区。我没有让内容直接顶到最底,而是额外给了 bottom padding。因为底栏已经浮到内容之上了,如果内容区不让位,最后一屏就会被压住,视觉上看起来像"浮起来了",交互上却还是"挡住了"。
arkts
private getTabContentBottomPadding(): number {
  return 176;
}
最后才是那个粉色的悬浮主按钮。这个按钮我没有塞进 TabBar 里,因为一旦塞进去,它的布局、命中区和切换动画都会被页签体系反向约束住。我的做法是把它独立放在 Stack 顶层,然后通过 activeTab 和停靠位状态去驱动它的文案、位置和展开逻辑。项目实战版里,我还接了握姿感知能力,左右手握持时会自动切换停靠边;文章里这份完整代码为了方便复用,我保留成了一个可以手动切换左右停靠的版本。
时序图
悬浮主按钮层 HdsTabs HdsNavigation 材质策略 MainPage 用户 悬浮主按钮层 HdsTabs HdsNavigation 材质策略 MainPage 用户 打开页面 getSystemMaterialTypes() 返回材质能力 计算 materialLevel titleBar(style.systemMaterialEffect) barFloatingStyle(systemMaterialEffect) 根据 activeTab 渲染主按钮 点击某个页签 onChange(index) 更新 activeTab 更新按钮文案和位置 展示新的内容区
如果把这张时序图和上面的架构图放在一起看,整条链路其实非常顺。页面启动时先定材质,再建壳层,再渲染底栏,最后叠主按钮;用户切页时,只更新 activeTab,剩下的交给状态驱动去刷新。
完整代码
接下来分享一下我的完整代码,可以直接拿去改成你自己的页面。为了让文章里的代码能独立运行,我把业务数据换成了示例数据,把智能握持感知简化成了手动切换停靠位,但壳层写法、沉浸光感策略、悬浮底栏和主按钮叠层这几个关键点都保留了。
arkts
import { curves } from '@kit.ArkUI';
import { HdsNavigation, HdsNavigationTitleMode, HdsTabs, HdsTabsController, SystemMaterialParams, hdsMaterial } from '@kit.UIDesignKit';

enum DemoTab {
  HOME = 0,
  NOTEBOOK = 1,
  PROFILE = 2
}

interface DemoStatCard {
  value: string;
  label: string;
  icon: Resource;
  accentColor: string;
  surfaceColor: string;
}

interface DemoNotebookCard {
  title: string;
  subtitle: string;
  tag: string;
  coverColors: Array<[ResourceColor, number]>;
}

interface DemoMomentCard {
  title: string;
  dateLabel: string;
  preview: string;
  coverColors: Array<[ResourceColor, number]>;
}

const DEMO_STATS: Array<DemoStatCard> = [
  {
    value: '36',
    label: '总瞬间',
    icon: $r('sys.symbol.sparkles'),
    accentColor: '#F06795',
    surfaceColor: '#FFE8F1'
  },
  {
    value: '8',
    label: '旅行本',
    icon: $r('sys.symbol.book_pages_fill'),
    accentColor: '#5588F6',
    surfaceColor: '#EAF1FF'
  },
  {
    value: '12',
    label: '本月新增',
    icon: $r('sys.symbol.paperplane_fill'),
    accentColor: '#D39A2A',
    surfaceColor: '#FFF3DA'
  }
];

const DEMO_NOTEBOOKS: Array<DemoNotebookCard> = [
  {
    title: '西湖之春',
    subtitle: '把照片、文字和地点放进同一本小本',
    tag: '瞬间',
    coverColors: [['#FFD7E6', 0.0], ['#FFF7D8', 1.0]]
  },
  {
    title: '绍兴散记',
    subtitle: '喝完一杯黄酒奶茶之后,我把这段路重新记了一遍',
    tag: '旅行',
    coverColors: [['#D7E9FF', 0.0], ['#FFF2DD', 1.0]]
  },
  {
    title: '秋天到灵隐前',
    subtitle: '把天气、气味和树叶颜色都收进页面里',
    tag: '日常',
    coverColors: [['#FFE3CF', 0.0], ['#FFEFEA', 1.0]]
  }
];

const DEMO_MOMENTS: Array<DemoMomentCard> = [
  {
    title: '今天适合慢一点',
    dateLabel: '04 月 23 日',
    preview: '我会把刚拍到的画面、位置和一句话,先留在这里。',
    coverColors: [['#E9D7FF', 0.0], ['#FFF2D6', 1.0]]
  },
  {
    title: '把地图和回忆串起来',
    dateLabel: '04 月 19 日',
    preview: '旅行页和小本页共用一套壳层,所以切页不会有明显割裂感。',
    coverColors: [['#D7F0FF', 0.0], ['#EFFFE1', 1.0]]
  }
];

@Entry
@Component
export struct FloatingImmersiveTabDemoPage {
  private tabsController: HdsTabsController = new HdsTabsController();

  @State activeTab: number = DemoTab.HOME;
  @State floatingActionOnLeft: boolean = false;
  @State immersiveMaterialLevel: hdsMaterial.MaterialLevel = hdsMaterial.MaterialLevel.ADAPTIVE;

  aboutToAppear(): void {
    this.resolveImmersiveMaterialLevel();
  }

  private resolveImmersiveMaterialLevel(): void {
    let materialTypes: Array<hdsMaterial.MaterialType> = hdsMaterial.getSystemMaterialTypes();
    if (materialTypes.indexOf(hdsMaterial.MaterialType.IMMERSIVE) < 0) {
      this.immersiveMaterialLevel = hdsMaterial.MaterialLevel.SMOOTH;
      return;
    }
    this.immersiveMaterialLevel = hdsMaterial.MaterialLevel.ADAPTIVE;
  }

  private buildAdaptiveMaterialEffect(): SystemMaterialParams {
    return {
      materialType: hdsMaterial.MaterialType.ADAPTIVE,
      materialLevel: this.immersiveMaterialLevel
    };
  }

  private getTabContentBottomPadding(): number {
    return 178;
  }

  private getFloatingPrimaryLabel(): string {
    return this.activeTab === DemoTab.NOTEBOOK ? '创建小本' : '记录瞬间';
  }

  private getFloatingSecondaryLabel(): string {
    if (this.activeTab === DemoTab.NOTEBOOK) {
      return '把新的主题收进一本小本';
    }
    return '把刚刚发生的细节留在这一页';
  }

  build(): void {
    Stack({ alignContent: Alignment.Bottom }) {
      HdsNavigation() {
        HdsTabs({ controller: this.tabsController, index: this.activeTab }) {
          TabContent() {
            this.buildHomeTab()
          }
          .tabBar(this.customTabBar(DemoTab.HOME, $r('sys.symbol.house_fill'), '首页'))

          TabContent() {
            this.buildNotebookTab()
          }
          .tabBar(this.customTabBar(DemoTab.NOTEBOOK, $r('sys.symbol.book_pages_fill'), '发现'))

          TabContent() {
            this.buildProfileTab()
          }
          .tabBar(this.customTabBar(DemoTab.PROFILE, $r('sys.symbol.person_fill'), '我的'))
        }
        .vertical(false)
        .barPosition(BarPosition.End)
        .barMode(BarMode.Fixed)
        .scrollable(false)
        .animationDuration(240)
        .barHeight(60)
        .barOverlap(true)
        .barFloatingStyle({
          barSideMargin: 18,
          barBottomMargin: 28,
          thermoCtrl: true,
          systemMaterialEffect: this.buildAdaptiveMaterialEffect()
        })
        .onChange((index: number) => {
          this.activeTab = index;
        })
      }
      .mode(NavigationMode.Stack)
      .titleBar({
        content: {
          title: {
            mainTitle: '时光旅记'
          }
        },
        style: {
          thermoCtrl: true,
          systemMaterialEffect: this.buildAdaptiveMaterialEffect()
        },
        avoidLayoutSafeArea: true,
        enableComponentSafeArea: true
      })
      .titleMode(HdsNavigationTitleMode.MINI)
      .hideBackButton(true)
      .hideTitleBar(true)
      .ignoreLayoutSafeArea([LayoutSafeAreaType.SYSTEM], [LayoutSafeAreaEdge.BOTTOM])
      .width('100%')
      .height('100%')
      .backgroundColor('#FFF8FB')

      this.buildFloatingAction()
    }
    .width('100%')
    .height('100%')
    .backgroundColor('#FFF8FB')
  }

  @Builder
  private customTabBar(tabIndex: number, icon: Resource, text: string): void {
    Column() {
      SymbolGlyph(icon)
        .fontSize(24)
        .fontColor([this.activeTab === tabIndex ? '#F06795' : '#6F5963'])

      Text(text)
        .fontSize(11)
        .fontWeight(FontWeight.Medium)
        .fontColor(this.activeTab === tabIndex ? '#F06795' : '#6F5963')
        .margin({ top: 4 })
    }
    .width('100%')
    .height('100%')
    .justifyContent(FlexAlign.Center)
    .scale({ x: this.activeTab === tabIndex ? 1.06 : 0.96, y: this.activeTab === tabIndex ? 1.06 : 0.96 })
    .translate({ y: this.activeTab === tabIndex ? -2 : 0 })
    .opacity(this.activeTab === tabIndex ? 1 : 0.82)
    .animation({ duration: 320, curve: curves.springMotion() })
  }

  @Builder
  private buildHomeTab(): void {
    Scroll() {
      Column({ space: 24 }) {
        this.buildHeroSection()
        this.buildStatsSection()
        this.buildMomentSection()
      }
      .padding({ left: 24, right: 24, top: 48, bottom: this.getTabContentBottomPadding() })
      .width('100%')
      .alignItems(HorizontalAlign.Start)
    }
    .width('100%')
    .height('100%')
    .scrollBar(BarState.Off)
    .backgroundColor('#FFF8FB')
    .linearGradient({
      angle: 180,
      colors: [['#FFF5F9', 0.0], ['#FFF9FC', 0.38], ['#FFFDFE', 1.0]]
    })
  }

  @Builder
  private buildNotebookTab(): void {
    Scroll() {
      Column({ space: 20 }) {
        this.buildSectionTitle('翻翻你的小本,继续把新的印记收进来', '发现')
        this.buildNotebookSwitch()
        ForEach(DEMO_NOTEBOOKS, (item: DemoNotebookCard) => {
          this.buildNotebookCard(item)
        }, (item: DemoNotebookCard) => item.title)
      }
      .padding({ left: 24, right: 24, top: 48, bottom: this.getTabContentBottomPadding() })
      .width('100%')
      .alignItems(HorizontalAlign.Start)
    }
    .width('100%')
    .height('100%')
    .scrollBar(BarState.Off)
    .backgroundColor('#FFF8FB')
  }

  @Builder
  private buildProfileTab(): void {
    Scroll() {
      Column({ space: 20 }) {
        this.buildSectionTitle('我把交互层也做成了页面的一部分', '我的')
        this.buildProfileCard()
        this.buildMaterialCard()
        this.buildDockSwitcher()
      }
      .padding({ left: 24, right: 24, top: 48, bottom: this.getTabContentBottomPadding() })
      .width('100%')
      .alignItems(HorizontalAlign.Start)
    }
    .width('100%')
    .height('100%')
    .scrollBar(BarState.Off)
    .backgroundColor('#FFF8FB')
  }

  @Builder
  private buildHeroSection(): void {
    Column({ space: 12 }) {
      Text('时光旅记')
        .fontSize(30)
        .fontWeight(FontWeight.Bolder)
        .fontColor('#4D2E38')

      Text('我把底部导航抬起来,让内容继续向底部生长,页面第一眼会更轻。')
        .fontSize(15)
        .lineHeight(24)
        .fontColor('#A98293')

      Row({ space: 10 }) {
        this.buildHeroChip('悬浮导航')
        this.buildHeroChip('沉浸光感')
        this.buildHeroChip('主按钮叠层')
      }
    }
    .alignItems(HorizontalAlign.Start)
  }

  @Builder
  private buildHeroChip(text: string): void {
    Text(text)
      .fontSize(12)
      .fontColor('#A95276')
      .padding({ left: 12, right: 12, top: 7, bottom: 7 })
      .backgroundColor('#FFE7F0')
      .borderRadius(999)
  }

  @Builder
  private buildStatsSection(): void {
    Row({ space: 12 }) {
      ForEach(DEMO_STATS, (item: DemoStatCard) => {
        this.buildStatCard(item)
      }, (item: DemoStatCard) => item.label)
    }
    .width('100%')
  }

  @Builder
  private buildStatCard(item: DemoStatCard): void {
    Column({ space: 18 }) {
      Row() {
        SymbolGlyph(item.icon)
          .fontSize(22)
          .fontColor([item.accentColor])
      }
      .width(56)
      .height(56)
      .justifyContent(FlexAlign.Center)
      .borderRadius(20)
      .backgroundColor(item.surfaceColor)

      Column({ space: 6 }) {
        Text(item.value)
          .fontSize(32)
          .fontWeight(FontWeight.Bolder)
          .fontColor('#4D2E38')

        Text(item.label)
          .fontSize(13)
          .fontColor('#A98293')
      }
      .alignItems(HorizontalAlign.Start)
    }
    .layoutWeight(1)
    .height(176)
    .padding(18)
    .alignItems(HorizontalAlign.Start)
    .borderRadius(28)
    .backgroundColor('#FFFFFF')
    .shadow({
      radius: 18,
      color: 'rgba(126, 84, 105, 0.10)',
      offsetY: 8
    })
  }

  @Builder
  private buildMomentSection(): void {
    Column({ space: 14 }) {
      Row() {
        Text('最近的回忆')
          .fontSize(28)
          .fontWeight(FontWeight.Bolder)
          .fontColor('#4D2E38')
        Blank()
        Text('继续翻看')
          .fontSize(13)
          .fontColor('#B896A5')
      }
      .width('100%')

      ForEach(DEMO_MOMENTS, (item: DemoMomentCard) => {
        this.buildMomentCard(item)
      }, (item: DemoMomentCard) => item.title)
    }
    .width('100%')
  }

  @Builder
  private buildMomentCard(item: DemoMomentCard): void {
    Column({ space: 14 }) {
      Column()
        .width('100%')
        .height(180)
        .borderRadius(28)
        .linearGradient({
          angle: 135,
          colors: item.coverColors
        })

      Text(item.dateLabel)
        .fontSize(12)
        .fontColor('#B896A5')

      Text(item.title)
        .fontSize(24)
        .fontWeight(FontWeight.Bolder)
        .fontColor('#4D2E38')

      Text(item.preview)
        .fontSize(14)
        .lineHeight(22)
        .fontColor('#8C7080')
    }
    .width('100%')
    .padding(20)
    .borderRadius(30)
    .backgroundColor('#FFFFFF')
    .shadow({
      radius: 16,
      color: 'rgba(126, 84, 105, 0.08)',
      offsetY: 8
    })
  }

  @Builder
  private buildSectionTitle(subtitle: string, title: string): void {
    Column({ space: 10 }) {
      Text(title)
        .fontSize(30)
        .fontWeight(FontWeight.Bolder)
        .fontColor('#4D2E38')

      Text(subtitle)
        .fontSize(15)
        .lineHeight(24)
        .fontColor('#A98293')
    }
    .alignItems(HorizontalAlign.Start)
  }

  @Builder
  private buildNotebookSwitch(): void {
    Row() {
      Text('我的小本')
        .layoutWeight(1)
        .textAlign(TextAlign.Center)
        .fontSize(18)
        .fontWeight(FontWeight.Bold)
        .fontColor('#4D2E38')
        .padding({ top: 16, bottom: 16 })
        .backgroundColor('#FFFFFF')
        .borderRadius(999)

      Text('功能中心')
        .layoutWeight(1)
        .textAlign(TextAlign.Center)
        .fontSize(18)
        .fontWeight(FontWeight.Medium)
        .fontColor('#8A6677')
        .padding({ top: 16, bottom: 16 })
    }
    .width('100%')
    .padding(6)
    .borderRadius(999)
    .backgroundColor('#FCE2EA')
  }

  @Builder
  private buildNotebookCard(item: DemoNotebookCard): void {
    Column({ space: 16 }) {
      Stack({ alignContent: Alignment.TopStart }) {
        Column()
          .width('100%')
          .height(180)
          .borderRadius(28)
          .linearGradient({
            angle: 135,
            colors: item.coverColors
          })

        Text(item.tag)
          .fontSize(13)
          .fontWeight(FontWeight.Medium)
          .fontColor('#F06795')
          .padding({ left: 16, right: 16, top: 10, bottom: 10 })
          .backgroundColor('#FFFDE9')
          .borderRadius(999)
          .margin({ left: 16, top: 16 })
      }

      Text(item.title)
        .fontSize(24)
        .fontWeight(FontWeight.Bolder)
        .fontColor('#4D2E38')

      Text(item.subtitle)
        .fontSize(14)
        .lineHeight(22)
        .fontColor('#8C7080')
    }
    .width('100%')
    .padding(20)
    .borderRadius(30)
    .backgroundColor('#FFFFFF')
    .shadow({
      radius: 16,
      color: 'rgba(126, 84, 105, 0.08)',
      offsetY: 8
    })
  }

  @Builder
  private buildProfileCard(): void {
    Column({ space: 14 }) {
      Row({ space: 14 }) {
        Column()
          .width(68)
          .height(68)
          .borderRadius(34)
          .linearGradient({
            angle: 135,
            colors: [['#FFD5E7', 0.0], ['#E8E4FF', 1.0]]
          })

        Column({ space: 6 }) {
          Text('鸿蒙Jack')
            .fontSize(22)
            .fontWeight(FontWeight.Bolder)
            .fontColor('#4D2E38')

          Text('这个示例页保留了我在《时光旅记》里最关键的壳层写法。')
            .fontSize(14)
            .lineHeight(22)
            .fontColor('#8C7080')
        }
        .layoutWeight(1)
        .alignItems(HorizontalAlign.Start)
      }
    }
    .width('100%')
    .padding(20)
    .borderRadius(30)
    .backgroundColor('#FFFFFF')
    .shadow({
      radius: 16,
      color: 'rgba(126, 84, 105, 0.08)',
      offsetY: 8
    })
  }

  @Builder
  private buildMaterialCard(): void {
    Column({ space: 12 }) {
      Text('沉浸光感策略')
        .fontSize(20)
        .fontWeight(FontWeight.Bold)
        .fontColor('#4D2E38')

      Text('如果设备支持 IMMERSIVE,我就交给系统走 ADAPTIVE;不支持时自动降到 SMOOTH。')
        .fontSize(14)
        .lineHeight(22)
        .fontColor('#8C7080')

      Text(this.immersiveMaterialLevel === hdsMaterial.MaterialLevel.SMOOTH ? '当前效果:SMOOTH' : '当前效果:ADAPTIVE')
        .fontSize(13)
        .fontColor('#A95276')
        .padding({ left: 12, right: 12, top: 8, bottom: 8 })
        .backgroundColor('#FFE7F0')
        .borderRadius(999)
    }
    .width('100%')
    .padding(20)
    .alignItems(HorizontalAlign.Start)
    .borderRadius(30)
    .backgroundColor('#FFFFFF')
    .shadow({
      radius: 16,
      color: 'rgba(126, 84, 105, 0.08)',
      offsetY: 8
    })
  }

  @Builder
  private buildDockSwitcher(): void {
    Column({ space: 14 }) {
      Text('悬浮主按钮停靠位')
        .fontSize(20)
        .fontWeight(FontWeight.Bold)
        .fontColor('#4D2E38')

      Text('项目实战版会接入握姿感知,这里保留手动切换,便于文章里的完整代码独立运行。')
        .fontSize(14)
        .lineHeight(22)
        .fontColor('#8C7080')

      Button(this.floatingActionOnLeft ? '切到右下角' : '切到左下角')
        .type(ButtonType.Capsule)
        .fontSize(14)
        .fontWeight(FontWeight.Medium)
        .fontColor('#FFFFFF')
        .backgroundColor('#F06795')
        .padding({ left: 18, right: 18 })
        .height(44)
        .onClick(() => {
          this.floatingActionOnLeft = !this.floatingActionOnLeft;
        })
    }
    .width('100%')
    .padding(20)
    .alignItems(HorizontalAlign.Start)
    .borderRadius(30)
    .backgroundColor('#FFFFFF')
    .shadow({
      radius: 16,
      color: 'rgba(126, 84, 105, 0.08)',
      offsetY: 8
    })
  }

  @Builder
  private buildFloatingAction(): void {
    Row() {
      Column({ space: 10 }) {
        Column({ space: 4 }) {
          Text(this.getFloatingPrimaryLabel())
            .fontSize(13)
            .fontWeight(FontWeight.Bold)
            .fontColor('#4D2E38')

          Text(this.getFloatingSecondaryLabel())
            .fontSize(11)
            .lineHeight(18)
            .fontColor('#8C7080')
        }
        .width(152)
        .padding({ left: 14, right: 14, top: 12, bottom: 12 })
        .alignItems(HorizontalAlign.Start)
        .borderRadius(22)
        .backgroundColor('rgba(255,255,255,0.94)')
        .visibility(this.activeTab === DemoTab.PROFILE ? Visibility.None : Visibility.Visible)

        Button() {
          Text('+')
            .fontSize(28)
            .fontWeight(FontWeight.Bold)
            .fontColor('#FFFFFF')
        }
        .width(58)
        .height(58)
        .borderRadius(29)
        .backgroundColor('#F06795')
        .shadow({
          radius: 14,
          color: 'rgba(240,103,149,0.28)',
          offsetY: 8
        })
      }
      .alignItems(this.floatingActionOnLeft ? HorizontalAlign.Start : HorizontalAlign.End)
    }
    .width('100%')
    .padding({ left: 24, right: 24, bottom: 116 })
    .justifyContent(this.floatingActionOnLeft ? FlexAlign.Start : FlexAlign.End)
    .animation({
      duration: 420,
      curve: curves.springMotion(0.75, 0.86)
    })
  }
}
我在项目里特别注意的三个点
barOverlap(true)只是让它浮起来,不能解决内容被挡住的问题,所以内容区必须主动补bottom padding。systemMaterialEffect不要一上来就写死高等级光感,先查设备材质能力,再决定走ADAPTIVE还是SMOOTH,这一点比"更亮"更重要。- 悬浮主按钮不要塞进 TabBar 里。只要你后面还要做按钮展开、吸附左右侧、跟握姿联动,单独拉一层出来会轻松很多。
写到这里,这套"悬浮导航 + 沉浸光感"Tab 的关键思路其实就很清楚了。我的做法不是把视觉效果堆在一起,而是先把壳层、材质层和交互层拆开,再让它们通过状态重新组合。这样页面既能保持轻盈,也能保住后续扩展空间。
如果你也在做内容型应用,我会很建议你试一次这种写法。底部导航一旦从"固定条"变成"浮在内容上的一层",整个页面气质会马上不一样。