本文基于Spring AI官方1.1.4版本,完整实现MCP(模型上下文协议)服务端与客户端的搭建,全程注解式开发,开箱即用,代码完全开源可复用。
一、前言
1.1 什么是MCP?
MCP(Model Context Protocol,模型上下文协议)是由Anthropic推出的标准化协议,旨在解决大模型工具调用的碎片化问题,为大模型提供安全、统一、可扩展的外部能力接入通道。通过MCP,大模型可以无缝对接本地文件、数据库、第三方API、业务系统等各类工具,无需为不同工具编写定制化的函数调用代码。
Spring AI 从1.1.x版本开始原生深度支持MCP协议,提供了服务端自动注册、客户端自动发现、工具一键绑定的全链路能力,Java开发者只需通过几个注解,就能把普通业务方法封装成MCP标准工具,无需关注底层协议细节,完美契合Spring生态的开发习惯。
1.2 重要版本说明(必看)
本文采用SpringBoot 3.5.11版本,这是目前最新的稳定版本,与Spring AI 1.1.4完美兼容。
| 组件 | 版本 | 说明 |
|---|---|---|
| SpringBoot | 3.5.11 | 最新稳定版,内置Spring Framework 6.3.x |
| Spring AI | 1.1.4 | 本文核心版本,原生支持MCP全特性 |
| JDK | 17+ | Spring AI 1.x强制要求的最低Java版本 |
| Maven | 3.6+ | 依赖管理工具 |
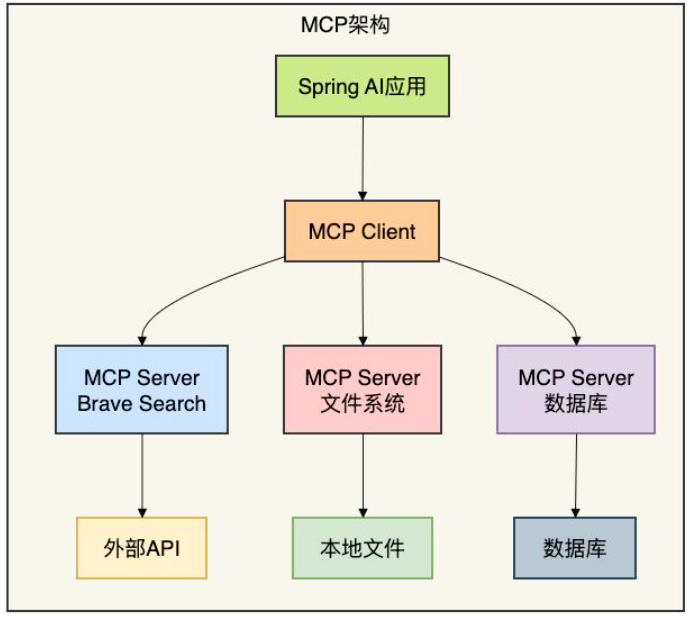
1.3 整体架构
本文实现的MCP架构分为两大核心模块,完全对应参考仓库的两个项目:
springboot-ai-mcp-server:MCP服务端,负责封装自定义业务工具,通过STDIO和SSE协议对外提供MCP标准服务springboot-ai-mcp-client:MCP客户端,对接大模型,自动发现并绑定MCP服务端的工具,实现大模型对话时的自动工具调用
二、MCP服务端搭建(springboot-ai-mcp-server)
MCP服务端的核心能力,是把普通的Java业务方法,通过Spring AI的注解封装成MCP标准工具,自动注册到MCP服务器,对外提供标准化的SSE接口,无需手动编写Controller层代码。
2.1 项目初始化与pom.xml配置
创建Maven项目,项目结构与参考仓库完全一致:
springboot-ai-mcp-server
├── src
│   ├── main
│   │   ├── java
│   │   └── resources
│   └── test
├── .gitignore
├── mvnw
├── mvnw.cmd
└── pom.xml
完整pom.xml配置如下,包含SpringBoot父依赖、Spring AI BOM、MCP服务端Starter、Web依赖:
xml
<?xml version="1.0" encoding="UTF-8"?>
<project xmlns="http://maven.apache.org/POM/4.0.0" xmlns:xsi="http://www.w3.org/2001/XMLSchema-instance"
         xsi:schemaLocation="http://maven.apache.org/POM/4.0.0 https://maven.apache.org/xsd/maven-4.0.0.xsd">
    <modelVersion>4.0.0</modelVersion>
    <parent>
        <groupId>org.springframework.boot</groupId>
        <artifactId>spring-boot-starter-parent</artifactId>
        <version>3.5.11</version>
        <relativePath/>
    </parent>

    <groupId>com.example</groupId>
    <artifactId>springboot-ai-mcp</artifactId>
    <version>0.0.1-SNAPSHOT</version>
    <name>springboot-ai-mcp</name>
    <description>Spring AI 1.1.4 MCP服务端示例</description>

    <properties>
        <java.version>17</java.version>
        <spring-ai.version>1.1.4</spring-ai.version>
    </properties>

    <dependencyManagement>
        <dependencies>
            <!-- Spring AI BOM 统一管理版本 -->
            <dependency>
                <groupId>org.springframework.ai</groupId>
                <artifactId>spring-ai-bom</artifactId>
                <version>${spring-ai.version}</version>
                <type>pom</type>
                <scope>import</scope>
            </dependency>
        </dependencies>
    </dependencyManagement>

    <dependencies>
        <!-- Spring AI MCP 服务端Starter 核心依赖 -->
        <dependency>
            <groupId>org.springframework.ai</groupId>
            <artifactId>spring-ai-starter-mcp-server-webmvc</artifactId>
        </dependency>

        <!-- Lombok 简化代码 -->
        <dependency>
            <groupId>org.projectlombok</groupId>
            <artifactId>lombok</artifactId>
            <optional>true</optional>
        </dependency>

        <!-- 测试依赖 -->
        <dependency>
            <groupId>org.springframework.boot</groupId>
            <artifactId>spring-boot-starter-test</artifactId>
            <scope>test</scope>
        </dependency>
    </dependencies>

    <build>
        <plugins>
            <plugin>
                <groupId>org.springframework.boot</groupId>
                <artifactId>spring-boot-maven-plugin</artifactId>
                <configuration>
                    <excludes>
                        <exclude>
                            <groupId>org.projectlombok</groupId>
                            <artifactId>lombok</artifactId>
                        </exclude>
                    </excludes>
                </configuration>
            </plugin>
        </plugins>
    </build>
</project>
2.2 配置文件application.yml
在src/main/resources下创建application.yml,配置MCP服务端核心参数,Spring AI会自动根据配置完成服务端初始化:
stdio方式:
yaml
server:
  port: 8088
spring:
  application:
    name: springboot-ai-mcp
  main:
    web-application-type: none      # 禁用 Web 环境
    banner-mode: off                # 禁用启动 Banner
  ai:
    mcp:
      server:
        enabled: true
        name: "天气预报 MCP 插件"
        version: "1.0.0"
        stdio: true                  # Stdio 传输模式(Trae IDE 集成用)


logging:
  pattern:
    console:
  level:
    root: OFF                       # 关闭所有控制台日志
    com.example: OFF
    org.springframework: OFF
  file:
    name: logs/weather-mcp-server.log
sse方式:
yaml
server:
  port: 8088
spring:
  application:
    name: springboot-ai-mcp
  main:
    web-application-type: servlet   # 启用 Web 环境
    banner-mode: console
  ai:
    mcp:
      server:
        enabled: true
        name: "天气预报 MCP 插件"
        version: "1.0.0"
        type: async
        sse-endpoint: /sse           # SSE 模式(开发调试用)
        sse-message-endpoint: /mcp/message


logging:
  pattern:
    console: "%d{HH:mm:ss.SSS} [%thread] %-5level %logger{36} - %msg%n"
  level:
    root: INFO
    com.example: DEBUG              # 开启详细日志
    org.springframework.ai.mcp: DEBUG
  file:
    name: logs/weather-mcp-server.log
2.3 自定义MCP工具开发(核心代码)
这是服务端的核心代码,只需通过@McpTool或@Tool,@McpToolParam或@ToolParam注解,就能把普通的Java方法封装成MCP标准工具,Spring AI会自动扫描并注册这些工具。
创建com.example.ai.tool.WeatherMcpTool类,实现两个演示工具:
java
package com.example.ai.tool;

import com.example.ai.model.WeatherResponse;
import com.example.ai.service.WeatherService;
import lombok.extern.slf4j.Slf4j;
import org.springframework.ai.tool.annotation.Tool;
import org.springframework.ai.tool.annotation.ToolParam;
import org.springframework.stereotype.Component;


@Component
@Slf4j
public class WeatherMcpTool {

    private final WeatherService weatherService;

    public WeatherMcpTool(WeatherService weatherService) {
        this.weatherService = weatherService;
    }

    /**
     * 获取实时天气
     */
    @Tool(
            name = "get_current_weather",
            description = """
                    获取指定城市的实时天气信息,包括:
                    - 当前温度、体感温度
                    - 湿度百分比
                    - 风速
                    - 天气描述(如晴、多云、雨等)

                    适用场景:当用户询问"现在某地天气怎么样"、"某地热不热"等问题时调用。
                    """
    )
    public String getCurrentWeather(
            @ToolParam(description = "城市名称,支持中文或英文,例如:Beijing、北京、London、New York")
            String city
    ) {
        log.info("[MCP Tool] 收到调用请求,参数city={}", city);
        WeatherResponse weather = weatherService.getWeather(city);
        log.info("[MCP Tool] 返回结果: {}", weather.toSummary());
        return weather.toSummary();
    }


}
调用聚合数据查询天气预报信息:
java
package com.example.ai.service;

import com.example.ai.model.WeatherResponse;
import com.fasterxml.jackson.databind.JsonNode;
import com.fasterxml.jackson.databind.ObjectMapper;
import org.springframework.stereotype.Service;
import org.springframework.web.client.RestClient;

import java.util.ArrayList;
import java.util.List;

@Service
public class WeatherService {

    private static final String BASE_URL = "http://apis.juhe.cn/simpleWeather/query?key=%s&city=%s";

    private final RestClient restClient;
    private final ObjectMapper objectMapper;

    private static final String API_KEY = "your-api-key";


    public WeatherService(RestClient.Builder restClientBuilder, ObjectMapper objectMapper) {
        this.restClient = restClientBuilder.build();
        this.objectMapper = objectMapper;
    }

    /**
     * 获取完整天气信息(实时 + 未来预报)
     */
    public WeatherResponse getWeather(String city) {
        try {

            String url = String.format(BASE_URL, API_KEY, city);

            String response = restClient.get()
                    .uri(url)
                    .retrieve()
                    .body(String.class);

            JsonNode root = objectMapper.readTree(response);

            // 检查错误码
            int errorCode = root.path("error_code").asInt();
            if (errorCode != 0) {
                String reason = root.path("reason").asText();
                throw new RuntimeException("聚合数据 API 调用失败: " + reason);
            }

            JsonNode result = root.path("result");

            // 解析实时天气
            JsonNode realtimeNode = result.path("realtime");
            WeatherResponse.RealtimeWeather realtime = new WeatherResponse.RealtimeWeather(
                    realtimeNode.path("temperature").asText(),
                    realtimeNode.path("humidity").asText(),
                    realtimeNode.path("info").asText(),
                    realtimeNode.path("wid").asText(),
                    realtimeNode.path("direct").asText(),
                    realtimeNode.path("power").asText(),
                    realtimeNode.path("aqi").asText()
            );

            // 解析未来天气预报
            List<WeatherResponse.FutureWeather> futureList = new ArrayList<>();
            JsonNode futureArray = result.path("future");
            if (futureArray.isArray()) {
                for (JsonNode futureNode : futureArray) {
                    WeatherResponse.FutureWeather future = new WeatherResponse.FutureWeather(
                            futureNode.path("date").asText(),
                            futureNode.path("temperature").asText(),
                            futureNode.path("weather").asText(),
                            futureNode.path("direct").asText()
                    );
                    futureList.add(future);
                }
            }

            return new WeatherResponse(
                    result.path("city").asText(),
                    realtime,
                    futureList
            );

        } catch (Exception e) {
            throw new RuntimeException("获取天气信息失败: " + e.getMessage(), e);
        }
    }
}
2.3 配置类编写
java
package com.example.ai.config;

import com.example.ai.tool.WeatherMcpTool;
import org.springframework.ai.tool.ToolCallbackProvider;
import org.springframework.ai.tool.method.MethodToolCallbackProvider;
import org.springframework.context.annotation.Bean;
import org.springframework.context.annotation.Configuration;

@Configuration
public class McpServerConfig {

    @Bean
    public ToolCallbackProvider weatherTools(WeatherMcpTool weatherMcpTool) {
        return MethodToolCallbackProvider.builder()
                .toolObjects(weatherMcpTool)
                .build();
    }
}
2.5 启动类编写
创建SpringBoot启动类com.example.mcp.SpringbootAiMcpApplication:
java
package com.example.mcp;

import org.springframework.boot.SpringApplication;
import org.springframework.boot.autoconfigure.SpringBootApplication;

@SpringBootApplication
public class SpringbootAiMcpApplication {
    public static void main(String[] args) {
        SpringApplication.run(SpringbootAiMcpApplication.class, args);
        System.out.println("==================== MCP服务端启动成功 ====================");
        System.out.println("SSE连接地址:http://localhost:8088/mcp/sse");
        System.out.println("===========================================================");
    }
}
2.5 服务端启动验证
启动项目,控制台无报错,且能看到启动成功的日志,说明MCP服务端搭建完成。此时访问http://localhost:8088/mcp/sse,会看到SSE长连接已建立,服务端正常运行。
三、MCP客户端搭建(springboot-ai-mcp-client)
MCP客户端负责对接MCP服务端,自动发现服务端的工具列表,并将工具绑定到Spring AI的ChatClient,实现大模型在对话过程中自动判断、调用MCP工具,完成端到端的智能交互。
3.1 项目初始化与pom.xml配置
创建Maven项目,项目结构与参考仓库完全一致:
springboot-ai-mcp-client
├── src
│   ├── main
│   │   ├── java
│   │   └── resources
│   └── test
├── .gitignore
├── mvnw
├── mvnw.cmd
└── pom.xml
完整pom.xml配置如下,包含SpringBoot父依赖、Spring AI BOM、MCP客户端Starter、大模型依赖、Web依赖:
xml
<?xml version="1.0" encoding="UTF-8"?>
<project xmlns="http://maven.apache.org/POM/4.0.0" xmlns:xsi="http://www.w3.org/2001/XMLSchema-instance"
         xsi:schemaLocation="http://maven.apache.org/POM/4.0.0 https://maven.apache.org/xsd/maven-4.0.0.xsd">
    <modelVersion>4.0.0</modelVersion>
    <parent>
        <groupId>org.springframework.boot</groupId>
        <artifactId>spring-boot-starter-parent</artifactId>
        <version>3.5.11</version>
        <relativePath/>
    </parent>

    <groupId>com.example</groupId>
    <artifactId>springboot-ai-mcp-client</artifactId>
    <version>0.0.1-SNAPSHOT</version>
    <name>springboot-ai-mcp-client</name>
    <description>Spring AI 1.1.4 MCP客户端示例</description>

    <properties>
        <java.version>17</java.version>
        <spring-ai.version>1.1.4</spring-ai.version>
    </properties>

    <dependencyManagement>
        <dependencies>
            <!-- Spring AI BOM 统一管理版本 -->
            <dependency>
                <groupId>org.springframework.ai</groupId>
                <artifactId>spring-ai-bom</artifactId>
                <version>${spring-ai.version}</version>
                <type>pom</type>
                <scope>import</scope>
            </dependency>
        </dependencies>
    </dependencyManagement>

    <dependencies>
        <!-- Spring Web MVC 提供HTTP接口 -->
        <dependency>
            <groupId>org.springframework.boot</groupId>
            <artifactId>spring-boot-starter-web</artifactId>
        </dependency>

        <!-- Spring AI MCP 客户端Starter 核心依赖 -->
        <dependency>
            <groupId>org.springframework.ai</groupId>
            <artifactId>spring-ai-starter-mcp-client</artifactId>
        </dependency>

        <!-- OpenAI兼容大模型Starter 可替换为通义千问、DeepSeek等国内模型 -->
        <dependency>
            <groupId>org.springframework.ai</groupId>
            <artifactId>spring-ai-starter-openai</artifactId>
        </dependency>

        <!-- Lombok 简化代码 -->
        <dependency>
            <groupId>org.projectlombok</groupId>
            <artifactId>lombok</artifactId>
            <optional>true</optional>
        </dependency>

        <!-- 测试依赖 -->
        <dependency>
            <groupId>org.springframework.boot</groupId>
            <artifactId>spring-boot-starter-test</artifactId>
            <scope>test</scope>
        </dependency>
    </dependencies>

    <build>
        <plugins>
            <plugin>
                <groupId>org.springframework.boot</groupId>
                <artifactId>spring-boot-maven-plugin</artifactId>
                <configuration>
                    <excludes>
                        <exclude>
                            <groupId>org.projectlombok</groupId>
                            <artifactId>lombok</artifactId>
                        </exclude>
                    </excludes>
                </configuration>
            </plugin>
        </plugins>
    </build>
</project>
3.2 配置文件application.yml
在src/main/resources下创建application.yml,配置大模型参数、MCP客户端连接参数,Spring AI会自动完成客户端初始化、服务端连接、工具自动发现:
yaml
server:
  port: 8080
spring:
  application:
    name: springboot-ai-mcp-client
  ai:
    openai:
      api-key: your-api-key
      base-url: https://api.siliconflow.cn
      chat:
        options:
          model: deepseek-ai/DeepSeek-R1-Distill-Qwen-7B
          temperature: 0.1
    mcp:
      client:
        toolcallback:
          enabled: true
        transports:
#          - type: sse
#            url: http://localhost:8088/sse
#            message-url: http://localhost:8088/mcp/message
          - type: stdio
            command: java
            args:
              - -jar
              - D:/springboot-ai-mcp-0.0.1-SNAPSHOT.jar


logging:
  level:
    org.springframework.ai: DEBUG          # AI核心日志
    org.springframework.ai.mcp: DEBUG     # MCP通信日志
    org.springframework.ai.tool: DEBUG    # 工具调用日志
注意:必须使用**支持函数调用(Function Calling)**的大模型,否则无法实现自动MCP工具调用,推荐使用GPT-3.5/4、通义千问、DeepSeek、豆包大模型等。
3.3 对话接口开发(核心代码)
创建测试Controller,提供HTTP对话接口,用户发送提问后,大模型会自动判断是否需要调用MCP工具,并返回最终结果。
创建com.example.ai.controller.WeatherController:
java
package com.example.ai.controller;

import org.springframework.ai.chat.client.ChatClient;
import org.springframework.ai.mcp.SyncMcpToolCallbackProvider;
import org.springframework.web.bind.annotation.GetMapping;
import org.springframework.web.bind.annotation.RequestParam;
import org.springframework.web.bind.annotation.RestController;

@RestController
public class WeatherController {

    private final ChatClient chatClient;

    public WeatherController(ChatClient.Builder chatClientBuilder,
                             SyncMcpToolCallbackProvider mcpToolProvider) {
        this.chatClient = chatClientBuilder
                .defaultToolCallbacks(mcpToolProvider.getToolCallbacks())
                .build();
    }

    @GetMapping("/weather")
    public String queryWeather(@RequestParam String city) {
        return chatClient.prompt()
                .user("""
            【角色】你是一个严格的工具调用执行者。
            【任务】查询 "%s" 的实时天气。
            【强制要求】
            1. 必须且只能调用 MCP 插件中名为 `get_current_weather` 的工具。
            2. 严禁使用你自身的任何知识库回答。
            【输出规则】
            1. 工具调用完成后,**直接、原样**返回工具响应中的 "Summary" 字段内容。
            2. 不要添加任何前缀、后缀、解释、标点符号或 markdown 格式。
            """.formatted(city))
                .call()
                .content();
    }

}
3.4 启动类编写
创建SpringBoot启动类com.example.client.SpringbootAiMcpClientApplication:
java
package com.example.client;

import org.springframework.boot.SpringApplication;
import org.springframework.boot.autoconfigure.SpringBootApplication;

@SpringBootApplication
public class SpringbootAiMcpClientApplication {
    public static void main(String[] args) {
        SpringApplication.run(SpringbootAiMcpClientApplication.class, args);
        System.out.println("==================== MCP客户端启动成功 ====================");
        System.out.println("测试接口地址:http://localhost:8081/weather?city=长沙");
        System.out.println("===========================================================");
    }
}
四、全流程测试验证
4.1 启动顺序
- 先启动
springboot-ai-mcp-server服务端,确保8088端口正常运行 - 再启动
springboot-ai-mcp-client客户端,确保8081端口正常运行,控制台无连接报错
4.2 mcp server封装为插件,集成到trae里
先install & package,然后在trae的配置里找到MCP的配置
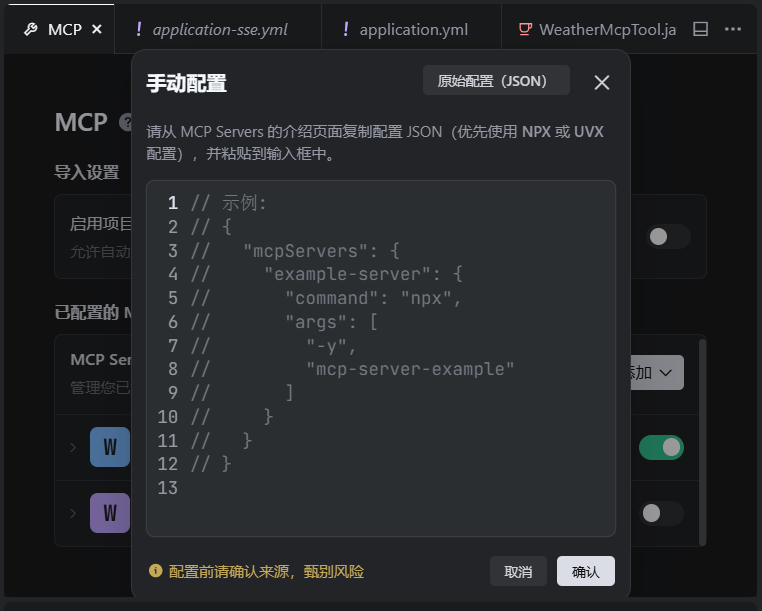
加上下面的配置
json
{
"mcpServers": {
"weather": {
"command": "java",
"args": [
"-Dfile.encoding=UTF-8",
"-Dsun.jnu.encoding=UTF-8",
"-jar",
"D:\\springboot-ai-mcp-server-0.0.1-SNAPSHOT.jar"
]
}
}
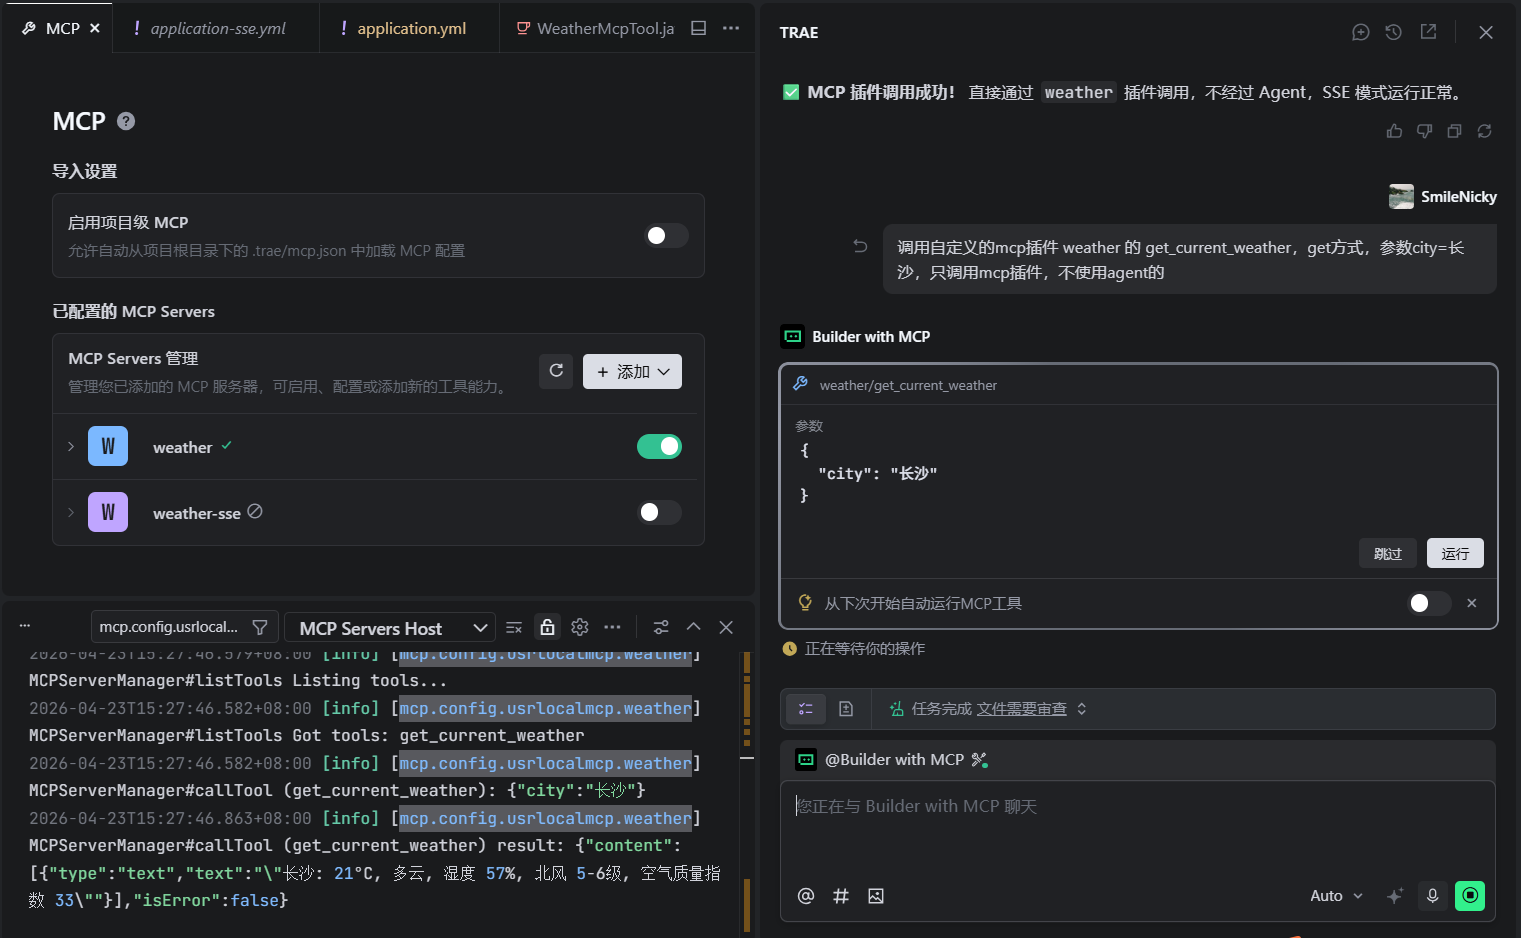
}加好之后,测试一下这个自定义MCP插件能否正常使用
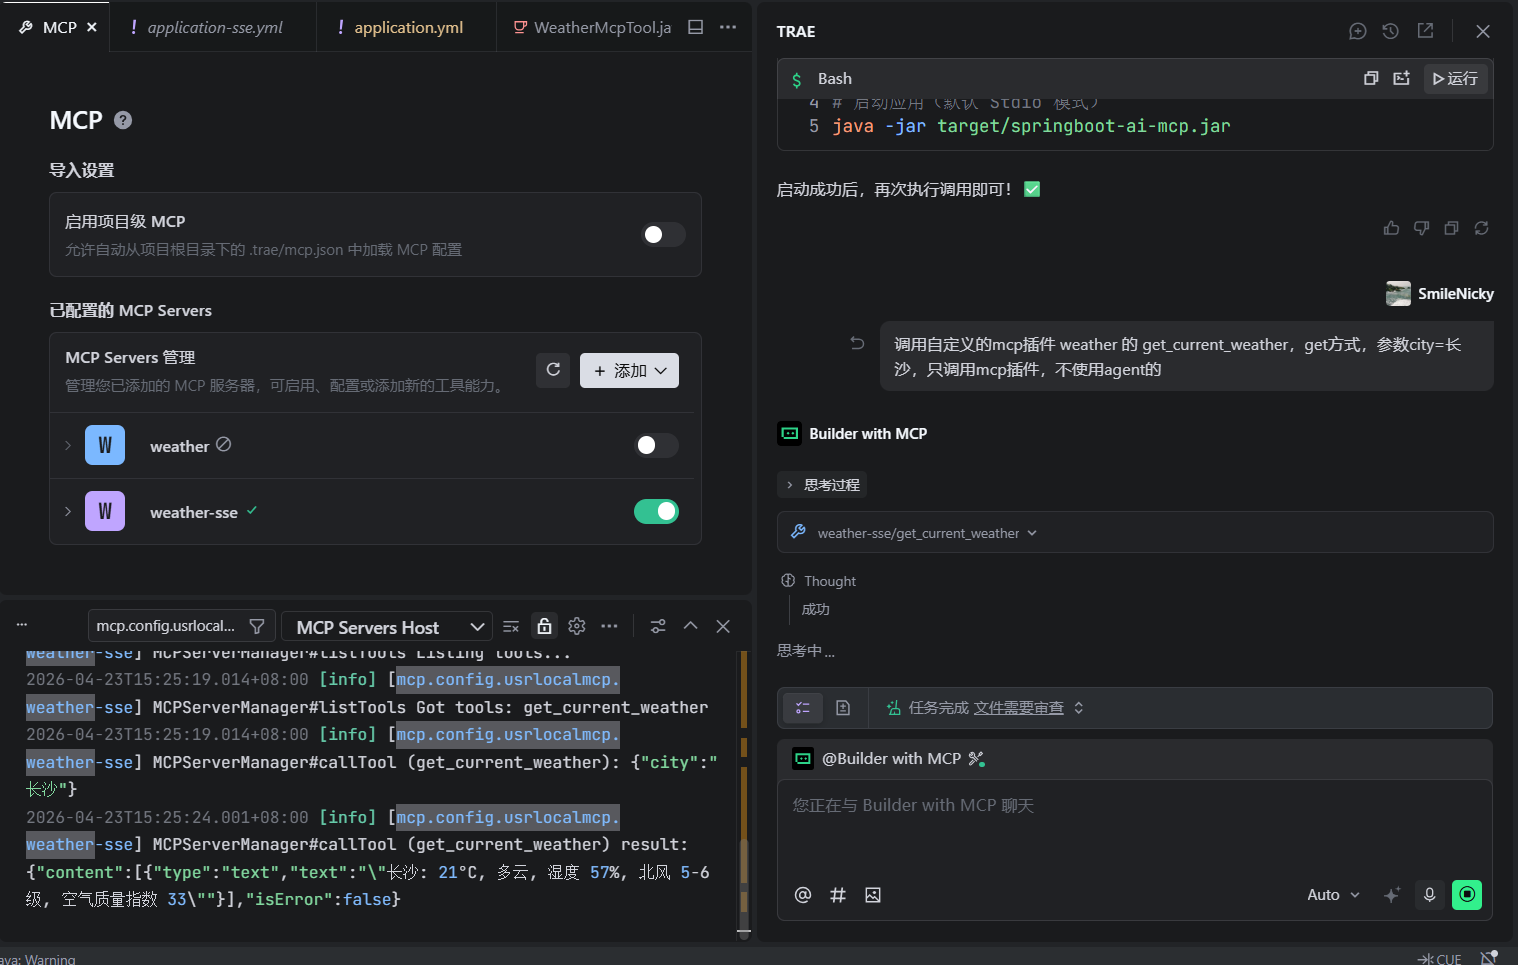
sse方式的配置:
json
{
  "mcpServers": {
    "weather-sse": {
      "url": "http://localhost:8088/sse"
    }
  }
}
测试一下sse方式配置的插件:
4.3 测试场景:天气查询(自动调用MCP工具)
访问接口:http://localhost:8081/weather?city=长沙
预期结果:
- 大模型自动识别需要调用
get_current_weather工具 - 自动通过MCP协议调用服务端的工具方法,获取长沙的天气数据
- 最终返回整合后的结果,例如:
长沙当前的天气为26℃,多云,南风3级,查询时间为2026-04-23T15:20:00。
五、避坑指南(生产级必看)
- 版本严格匹配:Spring AI版本与SpringBoot版本必须严格对应,1.1.4版本完美支持SpringBoot 3.5.x,否则会出现自动配置失效、依赖冲突等问题。
- 大模型必须支持函数调用:只有支持Function Calling的大模型才能实现自动MCP工具调用,基础对话模型无法使用该能力。
- 工具描述必须清晰 :
@McpTool和@McpToolParam的description必须写得清晰明确,大模型是通过描述来判断是否调用该工具、如何传递参数,描述模糊会导致工具调用失败。 - SSE连接超时配置 :生产环境需根据网络情况调整
connect-timeout和read-timeout,避免网络波动导致连接断开。 - 工具入参校验:MCP工具方法内必须做参数校验,避免大模型传递的异常参数导致服务端报错。
- 权限控制:生产环境的MCP服务端必须添加鉴权机制,避免未授权的客户端连接调用工具。
六、源码地址
本文完整代码已开源,对应参考仓库地址:
- MCP服务端:mcp-server
- MCP客户端:mcp-client
七、总结
通过SpringBoot 3.5.11 + Spring AI 1.1.4,我们仅用少量代码就实现了完整的MCP协议服务端与客户端,完全遵循Spring的注解式开发习惯,无需关注底层协议细节,就能让大模型快速对接业务系统的各类能力。
MCP协议正在成为大模型工具调用的行业标准,Spring AI的原生支持让Java开发者可以快速接入MCP生态,无论是对接内部业务系统,还是对接第三方MCP工具,都能实现开箱即用,大幅降低AI应用的开发成本。