文章使用Rockylinux10系统和sina新浪邮箱 演示,**需要新浪邮箱配置。**如果使用其他邮箱需要将邮箱后缀换成对应的使用邮箱。新浪邮箱官网链接
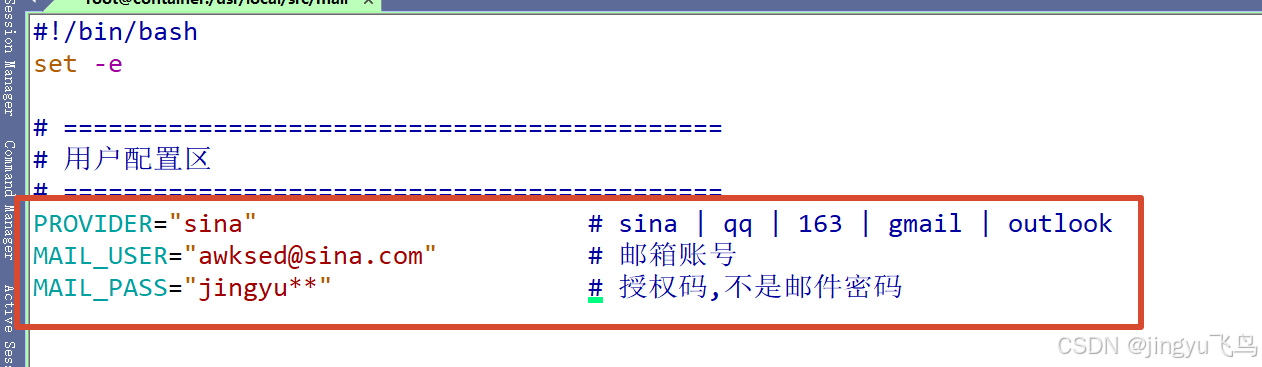
建议使用我的github仓库中的docker容器,修改enterpoint.sh脚本中三个值,docker compose up -d即可发送邮件。文档有新浪sina和QQ邮箱授权码获取方式。
bash
git pull git@github.com:jingyu1610/mail.git
bash
git pull https://github.com/jingyu1610/mail.git测试命令
bash
docker exec jingyu-mail-sender bash -c 'echo -e "Subject: Test\n\n$(date)" | sendmail -t 收件邮箱'jingyu-mail-sender是默认容器名称,如果修改了,记得修改测试命令中的容器名称。
服务器系统本地搭建
1、安装环境工具依赖包
bash
dnf -y install epel-release && \
dnf -y install postfix postfix-lmdb cyrus-sasl-plain cyrus-sasl cyrus-sasl-lib cyrus-sasl-plain postfix msmtp libntlm libidn libgsasl info sendmail tinycdb procmail openssl cyrus-sasl s-nail fetchmail dovecot
2、修改主配置文件:/etc/postfix/main.cf
bash
sed -i.backup \
    -e "0,/^#myhostname = .*/s/^#myhostname = .*/myhostname = $(hostname).localdomain/" \
    -e "0,/^#myorigin = .*/s/^#myorigin = .*/myorigin = sina.com/" \
    -e '/^inet_interfaces = /s/=.*/= localhost/' \
    -e '/^inet_protocols = /s/=.*/= ipv4/' \
    -e "0,/^#relayhost = .*/s/^#relayhost = .*/relayhost = [smtp.sina.com]:465/" \
    -e '/^smtp_use_tls = yes/b' \
    -e '/^smtp_use_tls = /s/.*/smtp_use_tls = yes/' \
    -e '/^#smtp_use_tls = /{s/^#//;s/=.*/= yes/;b}' \
    -e '$a smtp_use_tls = yes' \
    -e '/^smtp_tls_wrappermode = yes/b' \
    -e '/^smtp_tls_wrappermode = /s/.*/smtp_tls_wrappermode = yes/' \
    -e '/^#smtp_tls_wrappermode = /{s/^#//;s/=.*/= yes/;b}' \
    -e '$a smtp_tls_wrappermode = yes' \
    -e '/^smtp_tls_security_level = encrypt/b' \
    -e '/^smtp_tls_security_level = /s/.*/smtp_tls_security_level = encrypt/' \
    -e '/^#smtp_tls_security_level = /{s/^#//;s/=.*/= encrypt/;b}' \
    -e '$a smtp_tls_security_level = encrypt' \
    -e '/^smtp_tls_CAfile = \/etc\/pki\/tls\/certs\/ca-bundle.crt/b' \
    -e '/^smtp_tls_CAfile = /s/.*/smtp_tls_CAfile = \/etc\/pki\/tls\/certs\/ca-bundle.crt/' \
    -e '/^#smtp_tls_CAfile = /{s/^#//;s/=.*/= \/etc\/pki\/tls\/certs\/ca-bundle.crt/;b}' \
    -e '$a smtp_tls_CAfile = /etc/pki/tls/certs/ca-bundle.crt' \
    -e '/^smtp_tls_CApath = \/etc\/pki\/tls\/certs/b' \
    -e '/^smtp_tls_CApath = /s/.*/smtp_tls_CApath = \/etc\/pki\/tls\/certs/' \
    -e '/^#smtp_tls_CApath = /{s/^#//;s/=.*/= \/etc\/pki\/tls\/certs/;b}' \
    -e '$a smtp_tls_CApath = /etc/pki/tls/certs' \
    -e '/^smtp_sasl_auth_enable = yes/b' \
    -e '/^smtp_sasl_auth_enable = /s/.*/smtp_sasl_auth_enable = yes/' \
    -e '/^#smtp_sasl_auth_enable = /{s/^#//;s/=.*/= yes/;b}' \
    -e '$a smtp_sasl_auth_enable = yes' \
    -e '/^smtp_sasl_password_maps = lmdb:\/etc\/postfix\/sasl_passwd/b' \
    -e '/^smtp_sasl_password_maps = /s/.*/smtp_sasl_password_maps = lmdb:\/etc\/postfix\/sasl_passwd/' \
    -e '/^#smtp_sasl_password_maps = /{s/^#//;s/=.*/= lmdb:\/etc\/postfix\/sasl_passwd/;b}' \
    -e '$a smtp_sasl_password_maps = lmdb:/etc/postfix/sasl_passwd' \
    -e '/^smtp_sasl_security_options = noanonymous/b' \
    -e '/^smtp_sasl_security_options = /s/.*/smtp_sasl_security_options = noanonymous/' \
    -e '/^#smtp_sasl_security_options = /{s/^#//;s/=.*/= noanonymous/;b}' \
    -e '$a smtp_sasl_security_options = noanonymous' \
    -e '/^smtp_sasl_tls_security_options = noanonymous/b' \
    -e '/^smtp_sasl_tls_security_options = /s/.*/smtp_sasl_tls_security_options = noanonymous/' \
    -e '/^#smtp_sasl_tls_security_options = /{s/^#//;s/=.*/= noanonymous/;b}' \
    -e '$a smtp_sasl_tls_security_options = noanonymous' \
    -e '/^smtp_sasl_mechanism_filter = plain, login/b' \
    -e '/^smtp_sasl_mechanism_filter = /s/.*/smtp_sasl_mechanism_filter = plain, login/' \
    -e '/^#smtp_sasl_mechanism_filter = /{s/^#//;s/=.*/= plain, login/;b}' \
    -e '$a smtp_sasl_mechanism_filter = plain, login' \
    -e '/^smtp_sasl_type = cyrus/b' \
    -e '/^smtp_sasl_type = /s/.*/smtp_sasl_type = cyrus/' \
    -e '/^#smtp_sasl_type = /{s/^#//;s/=.*/= cyrus/;b}' \
    -e '$a smtp_sasl_type = cyrus' \
    -e '/^smtp_generic_maps = lmdb:\/etc\/postfix\/generic/b' \
    -e '/^smtp_generic_maps = /s/.*/smtp_generic_maps = lmdb:\/etc\/postfix\/generic/' \
    -e '/^#smtp_generic_maps = /{s/^#//;s/=.*/= lmdb:\/etc\/postfix\/generic/;b}' \
    -e '$a smtp_generic_maps = lmdb:/etc/postfix/generic' \
    -e '/^smtpd_relay_restrictions = /s/.*/smtpd_relay_restrictions = permit_mynetworks, permit_sasl_authenticated, reject_unauth_destination/' \
    -e '/^smtpd_recipient_restrictions = /s/.*/smtpd_recipient_restrictions = permit_mynetworks, permit_sasl_authenticated, reject_unauth_destination/' \
    -e '/^mydestination = /s/.*/mydestination = /' \
    -e '/^local_recipient_maps = /s/.*/local_recipient_maps = /' \
    -e '/^compatibility_level = /s/.*/compatibility_level = 3.6/' \
    /etc/postfix/main.cf
2.1/etc/postfix/main.cf主配置文件内容
sed命令修改的太多,主配置文件只需要有下面这些内容,需要将邮箱修改为自己使用的邮箱后缀。
bash
vim /etc/postfix/main.cf
bash
# 基本设置
myhostname = $(hostname).localdomain      # 主机名
#这里$(hostname)不能被转义,main.cf也不支持bash语言,需要自行修改为主机名
myorigin = sina.com                # 发件人域名
inet_interfaces = localhost        # 只监听本地,因为只发不收
inet_protocols = ipv4              # 使用 IPv4

# 中继设置(通过新浪发送)
relayhost = [smtp.sina.com]:465    # 新浪 SMTP 服务器

# SASL 认证
smtp_sasl_auth_enable = yes        # 启用认证
smtp_sasl_password_maps = lmdb:/etc/postfix/sasl_passwd  # 认证文件
smtp_sasl_security_options = noanonymous
smtp_sasl_tls_security_options = noanonymous
smtp_sasl_mechanism_filter = plain, login  # 认证机制
smtp_sasl_type = cyrus              # 使用 Cyrus SASL

# TLS/SSL 加密
smtp_use_tls = yes                 # 启用 TLS
smtp_tls_wrappermode = yes         # 465 端口专用
smtp_tls_security_level = encrypt  # 强制加密
smtp_tls_CAfile = /etc/pki/tls/certs/ca-bundle.crt  # CA 证书
smtp_tls_CApath = /etc/pki/tls/certs

# 发件人地址重写(关键配置)
smtp_generic_maps = lmdb:/etc/postfix/generic  # 重写规则

# 收件限制(必需)
smtpd_relay_restrictions = permit_mynetworks, permit_sasl_authenticated, reject_unauth_destination
smtpd_recipient_restrictions = permit_mynetworks, permit_sasl_authenticated, reject_unauth_destination

# 禁用本地收件
mydestination =
local_recipient_maps =

# 兼容性设置
compatibility_level = 3.6
3、sasl认证文件:/etc/postfix/sasl_passwd
3.1新浪邮箱授权码
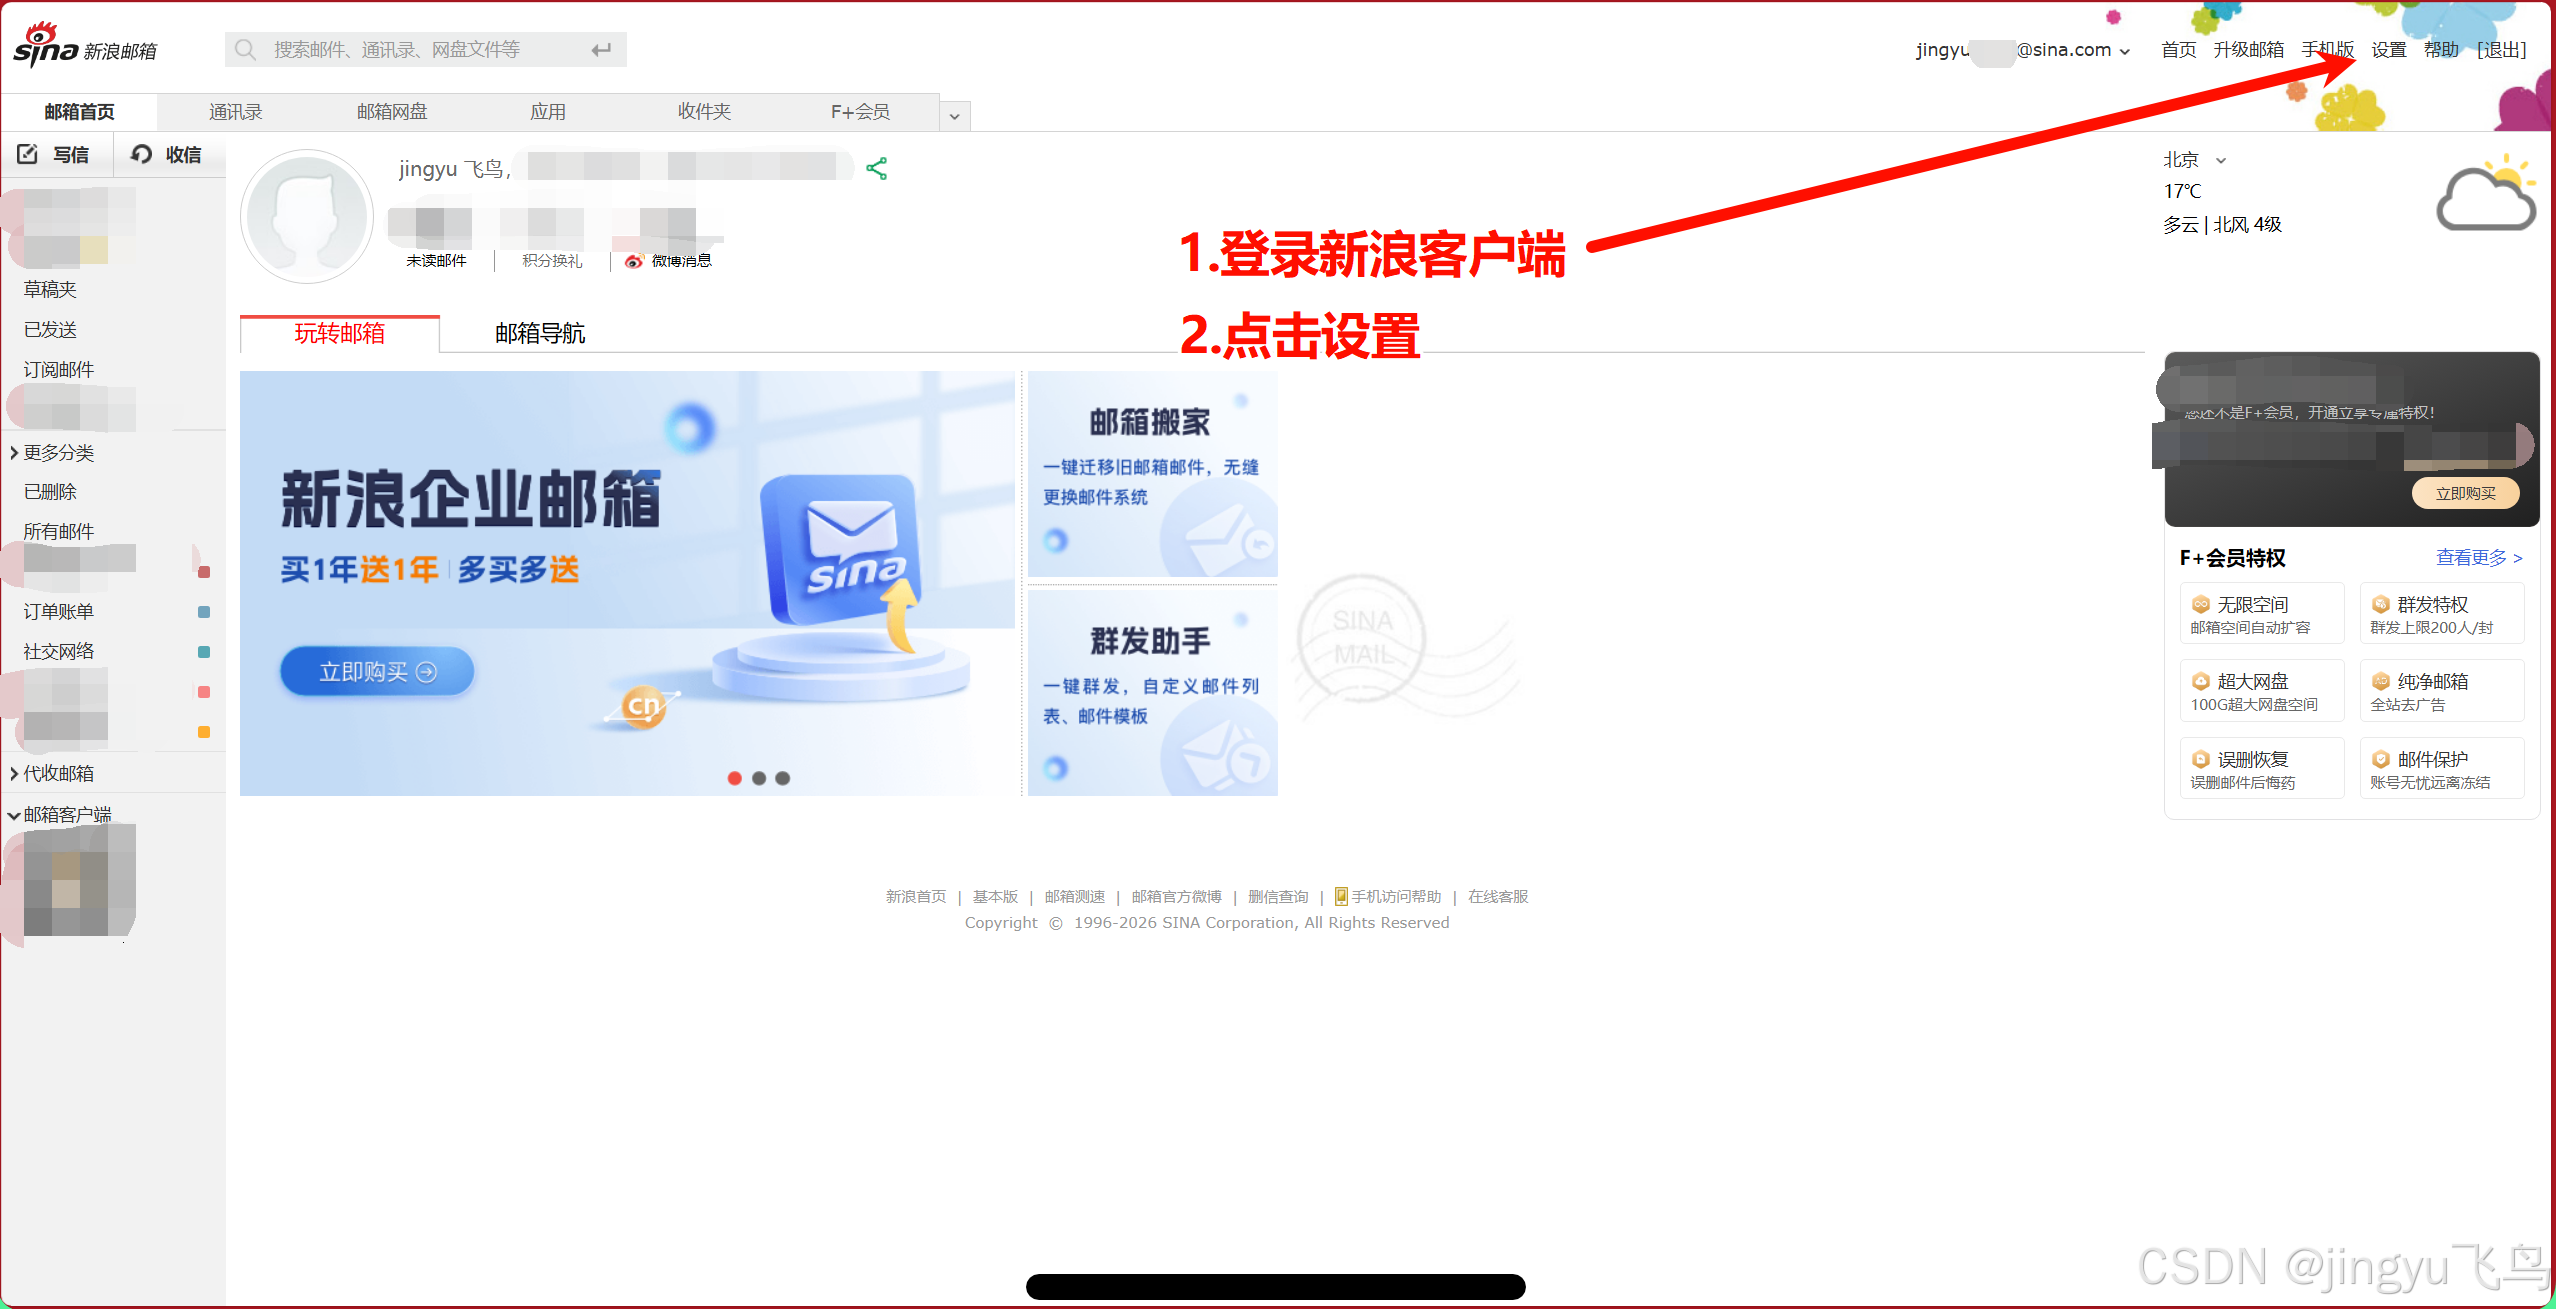
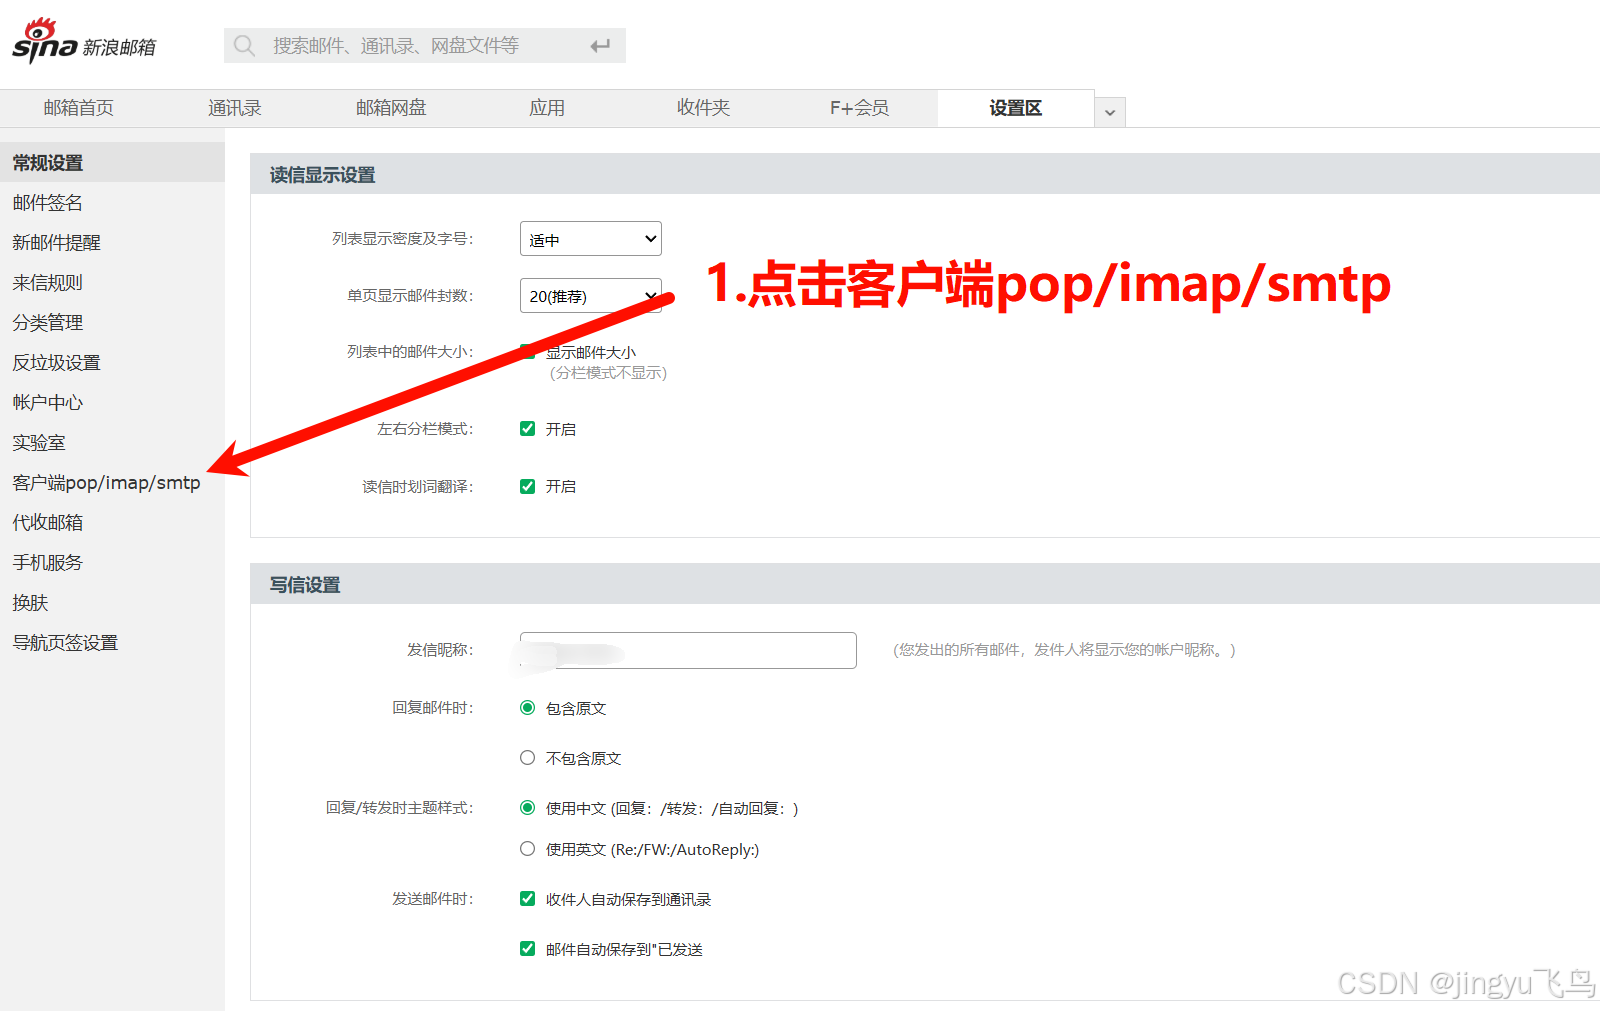
3.2设置新浪邮箱客户端pop/imap/smtp
3.3开启服务配置授权码
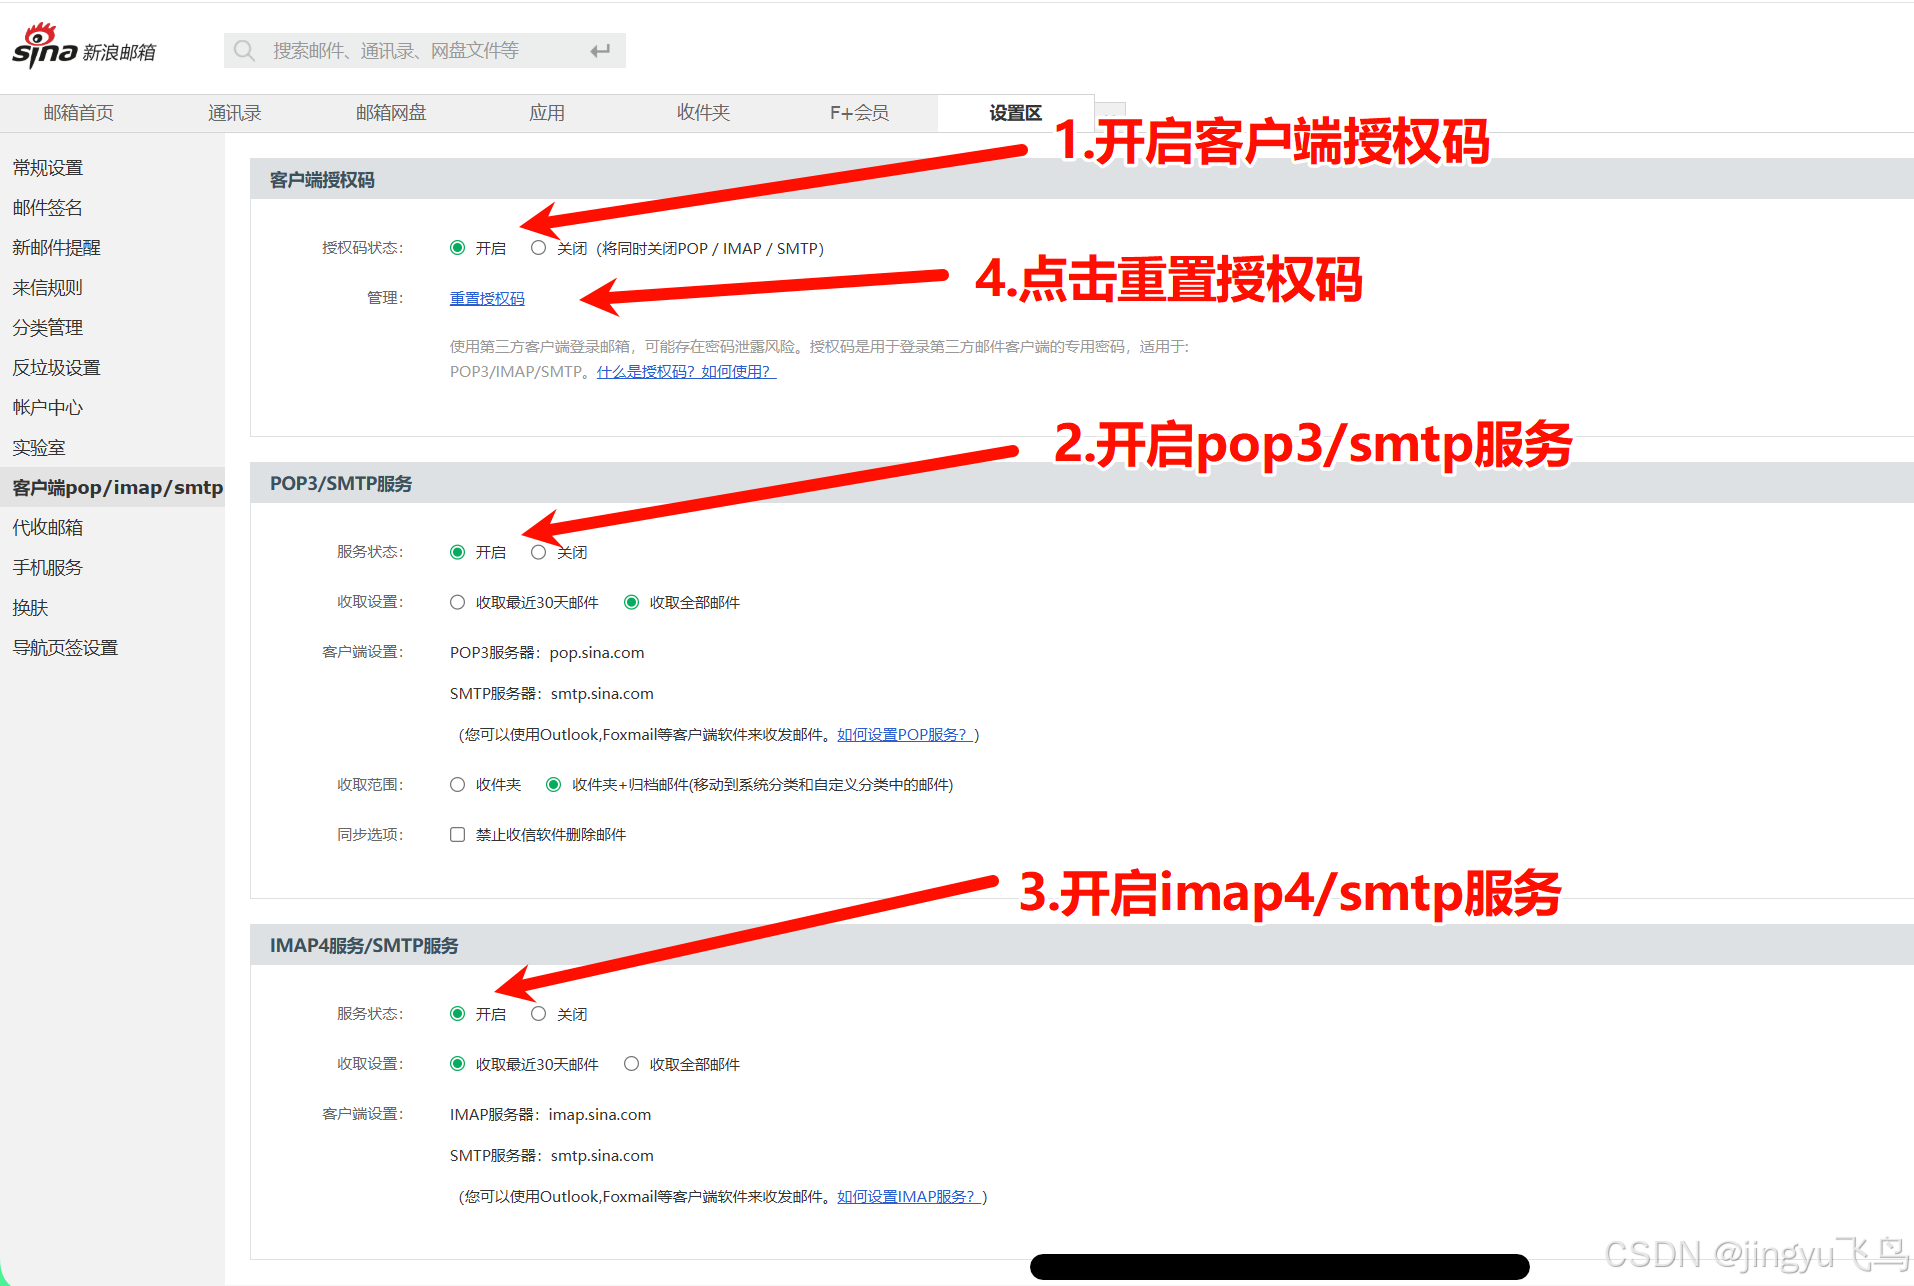
IMAP/POP3 服务器,用于接收邮件,服务器的需求一般只发送邮件,不需要接收。
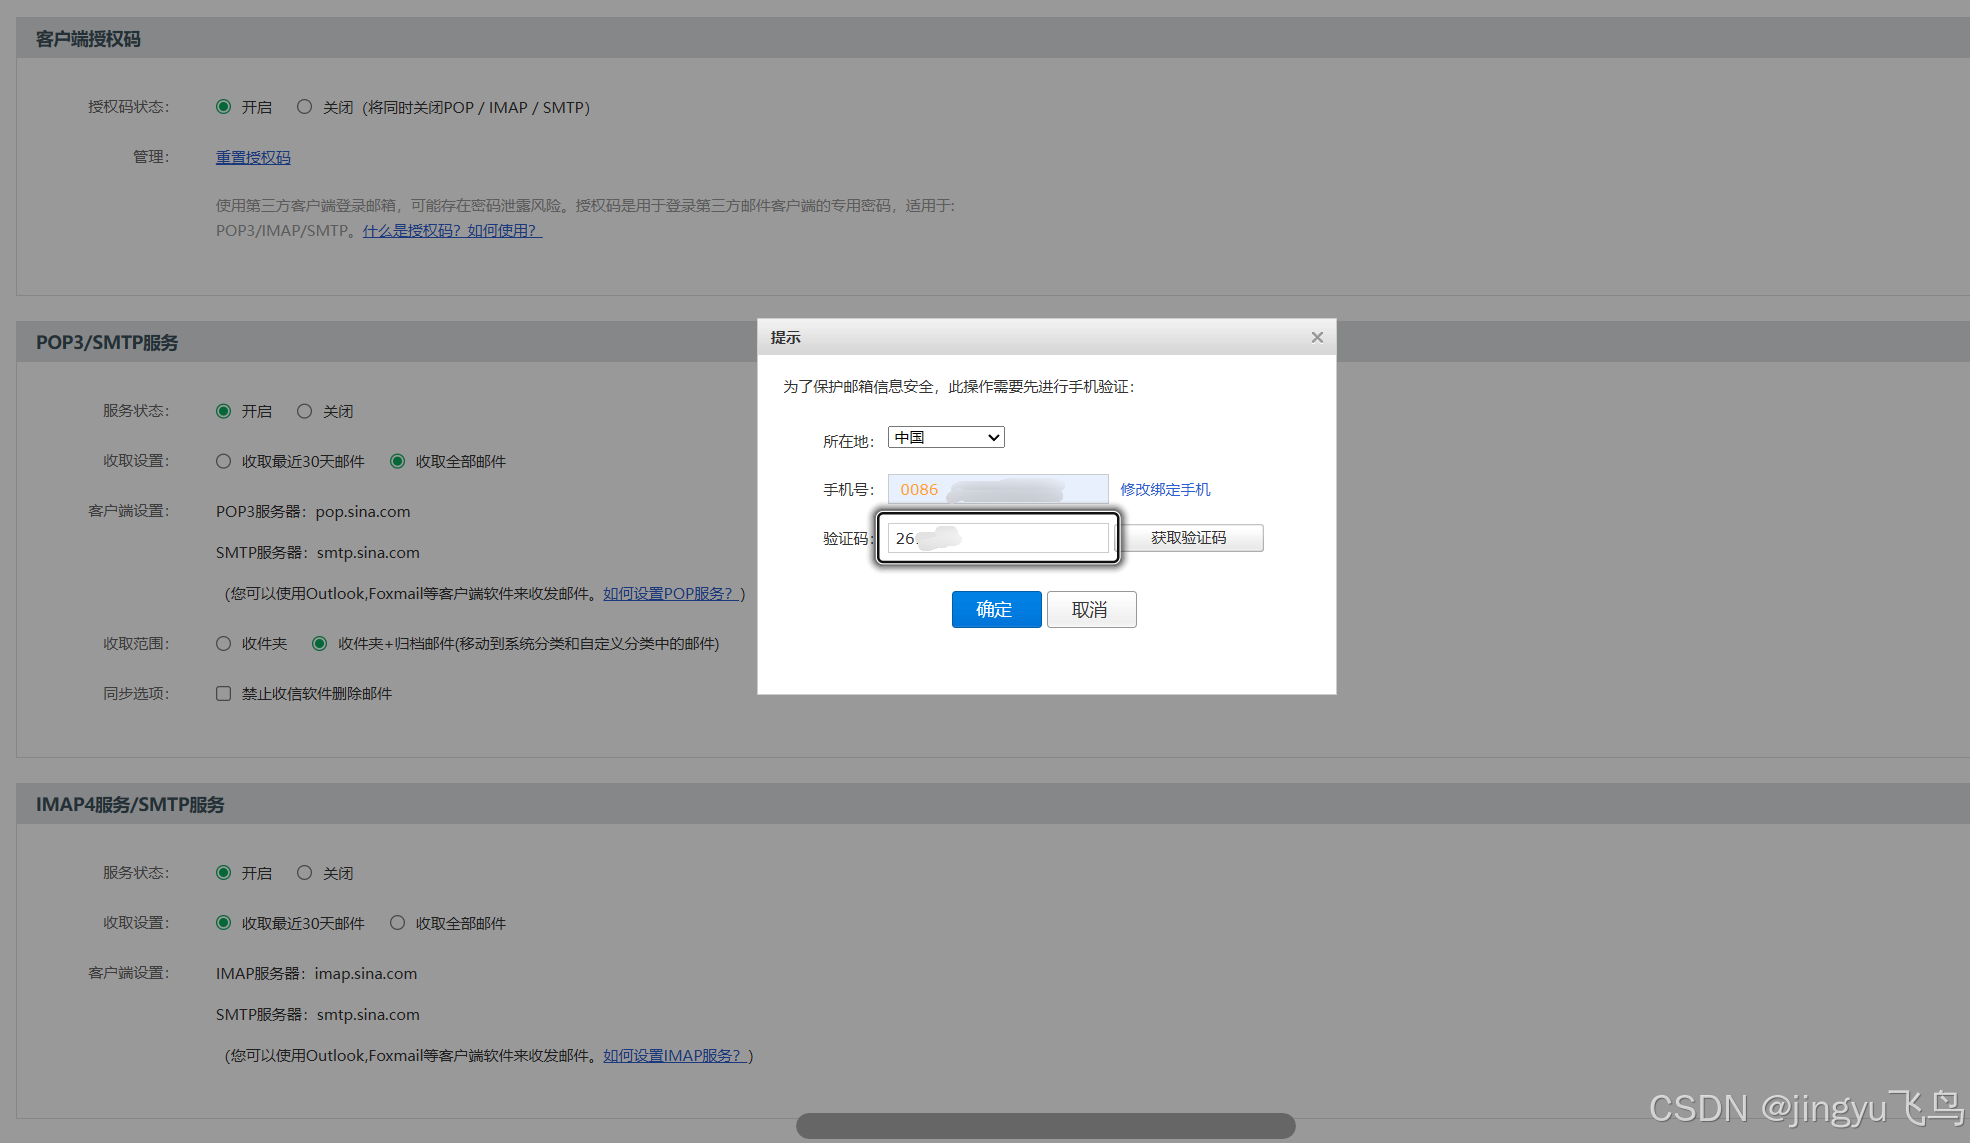
3.4验证授权码提示框
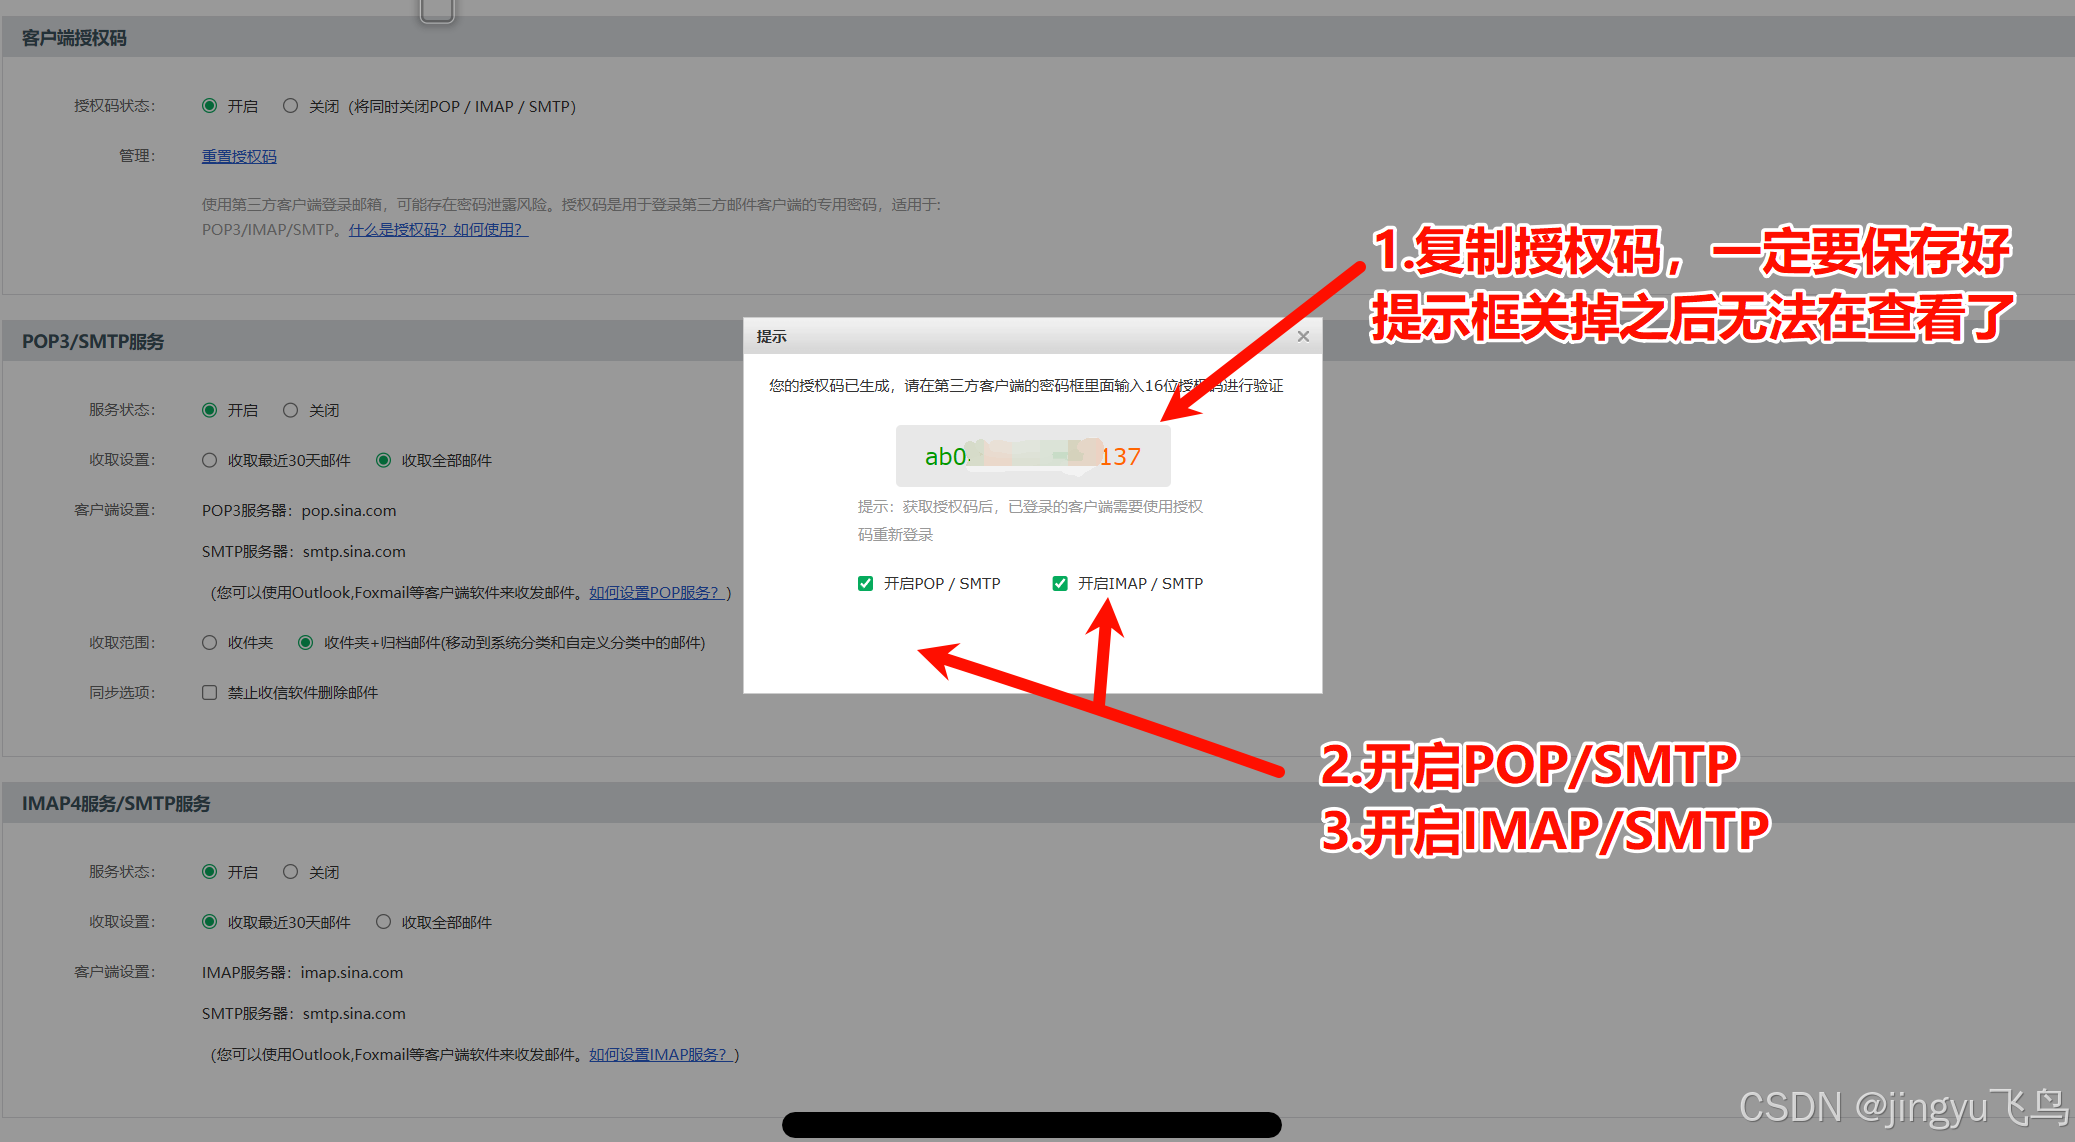
3.5复制授权码
3.6服务器配置/etc/postfix/sasl_passwd文件

格式示例:
bash
vim /etc/postfix/sasl_passwd
bash
[smtp.sina.com]:465 新浪邮箱:授权码
bash
[smtp.sina.com]:465 jing***@sina.com:9a*******953b格式: 服务器:端口 邮箱:授权码
权限: chmod 600
生成: postmap /etc/postfix/sasl_passwd → 生成 sasl_passwd.lmdb
bash
[smtp.sina.com]:4653.7生成 SASL 认证数据库
bash
postmap /etc/postfix/sasl_passwd3.8认证文件赋权
bash
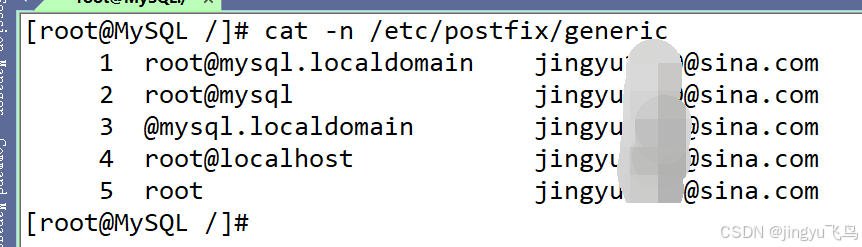
chmod 600 /etc/postfix/sasl_passwd /etc/postfix/sasl_passwd.lmdb4、发件人重写文件:/etc/postfix/generic
bash
vim /etc/postfix/generic添加内容格式
bash
root@$(hostname).localdomain    新浪邮箱@sina.com
root@$(hostname)                新浪邮箱@sina.com
@$(hostname).localdomain        新浪邮箱@sina.com
root                            新浪邮箱@sina.com
sed命令格式
注意将新浪邮箱换成你自己的新浪邮箱
bash
sed -i.backup "1i\\
root@$(hostname).localdomain    新浪邮箱@sina.com\\
root@$(hostname)                新浪邮箱@sina.com\\
@$(hostname).localdomain        新浪邮箱@sina.com\\
root@localhost                  新浪邮箱@sina.com\\
root                            新浪邮箱@sina.com\\
" /etc/postfix/generic
作用: 将本地发件人地址重写为新浪邮箱
生成: postmap lmdb:/etc/postfix/generic → 生成 generic.lmdb
示例图片
Postfix 内部会将域名转为小写进行匹配,如果generic 使用小写,但实际主机名是大写,可能导致匹配失败,所以建议用小写完成
4.1生成 generic 映射数据库
bash
postmap /etc/postfix/generic4.2设置权限
bash
chmod 600 /etc/postfix/sasl_passwd /etc/postfix/sasl_passwd.lmdb
chmod 600 /etc/postfix/generic /etc/postfix/generic.lmdb
5、配置aliases权限
bash
chmod 644 /etc/aliases
chmod 644 /etc/aliases.db 2>/dev/null
chmod 600 /etc/aliases.lmdb 2>/dev/null
5.1生成aliases数据库
bash
newaliases或使用 postalias
bash
postalias /etc/aliases警告例如:
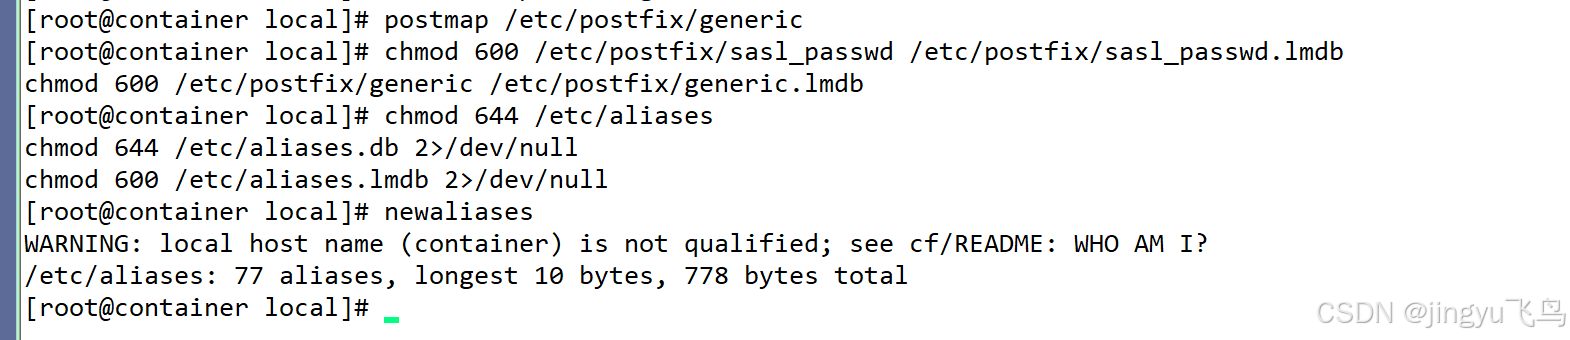
原因:主机名 container 不是完整的域名(缺少 .localdomain 或 .com 等后缀)
/etc/aliases: 77 aliases, longest 10 bytes, 778 bytes total
这个不是错误,只是显示邮件别名数据库已重建成功。
若是不放心可以,
bash
hostnamectl set-hostname 主机名.localdomain添加到 /etc/hosts
bash
echo -e "127.0.0.1 $(hostname).localdomain $(hostname)" >> /etc/hosts5.2 、设置自启动postfix服务
bash
systemctl enable --now postfix
bash
systemctl restart postfix5.3、# 停止 sendmail
bash
systemctl disable --now sendmail5.4设置 postfix 为默认 MTA
bash
alternatives --set mta /usr/sbin/sendmail.postfix验证

6、防火墙放行邮件端口
bash
firewall-cmd --add-port=25/tcp --add-port=465/tcp --add-port=587/tcp --permanent && \
firewall-cmd --reload
7、验证邮件配置
bash
postconf -n | grep -E "myorigin|myhostname|relayhost|smtp_generic"8 、发送邮件测试
bash
echo "按照成功服务器配置测试" | mail -s "测试邮件" 邮件地址9、查看日志
bash
tail -f /var/log/maillog核心流程
text
mail 命令
    ↓
Postfix 接收(发件人:root@perl.localdomain)
    ↓
smtp_generic_maps 重写发件人为 jingyu1610@sina.com
    ↓
SASL 认证(使用 sasl_passwd 中的授权码)
    ↓
TLS 加密连接到 smtp.sina.com:465
    ↓
新浪服务器验证通过
    ↓
邮件发送成功
10.常用命令
10.1查看所有配置
bash
postconf -n10.2查看单个配置
bash
postconf myorigin
bash
postconf myhostname
bash
postconf relayhost10.3修改配置
bash
postconf -e "myorigin = sina.com"
postconf -e "relayhost = [smtp.sina.com]:465"
10.4测试配置文件语言
bash
postfix check11数据库管理
11.1生成lmdb数据库
bash
postmap /etc/postfix/sasl_passwd
postmap /etc/postfix/generic
postmap /etc/postfix/canonical
11.2查案数据库内容
bash
postmap -s lmdb:/etc/postfix/sasl_passwd
postmap -q "root" lmdb:/etc/postfix/generic
12阵列管理
12.1查看邮件阵列
bash
mailq
postqueue -p
12.2查看队列统计
bash
mailq | wc -l12.3强制发送队列中的邮件
bash
postqueue -f12.4删除所有队列邮件
bash
postsuper -d ALL12.5删除特定队列邮件
bash
postsuper -d QUEUE_ID12.6重新处理队列
bash
postqueue -f# 简单发送
echo "邮件内容" | mail -s "主题" 收件人@domain.com
# 带发件人
echo "内容" | mail -s "主题" -r 发件人@domain.com 收件人@domain.com
# 发送文件内容
mail -s "主题" 收件人@domain.com < /path/to/file
# 多行内容
mail -s "主题" 收件人@domain.com << EOF
第一行
第二行
EOF测试工具
# 测试地址重写
sendmail -bv root@localhost

# 测试 SMTP 连接
telnet smtp.sina.com 465
openssl s_client -connect smtp.sina.com:465 -crlf -quiet

# 测试 DNS
nslookup smtp.sina.com
dig smtp.sina.com

# 查看进程
ps aux | grep postfix
QQ邮箱授权码
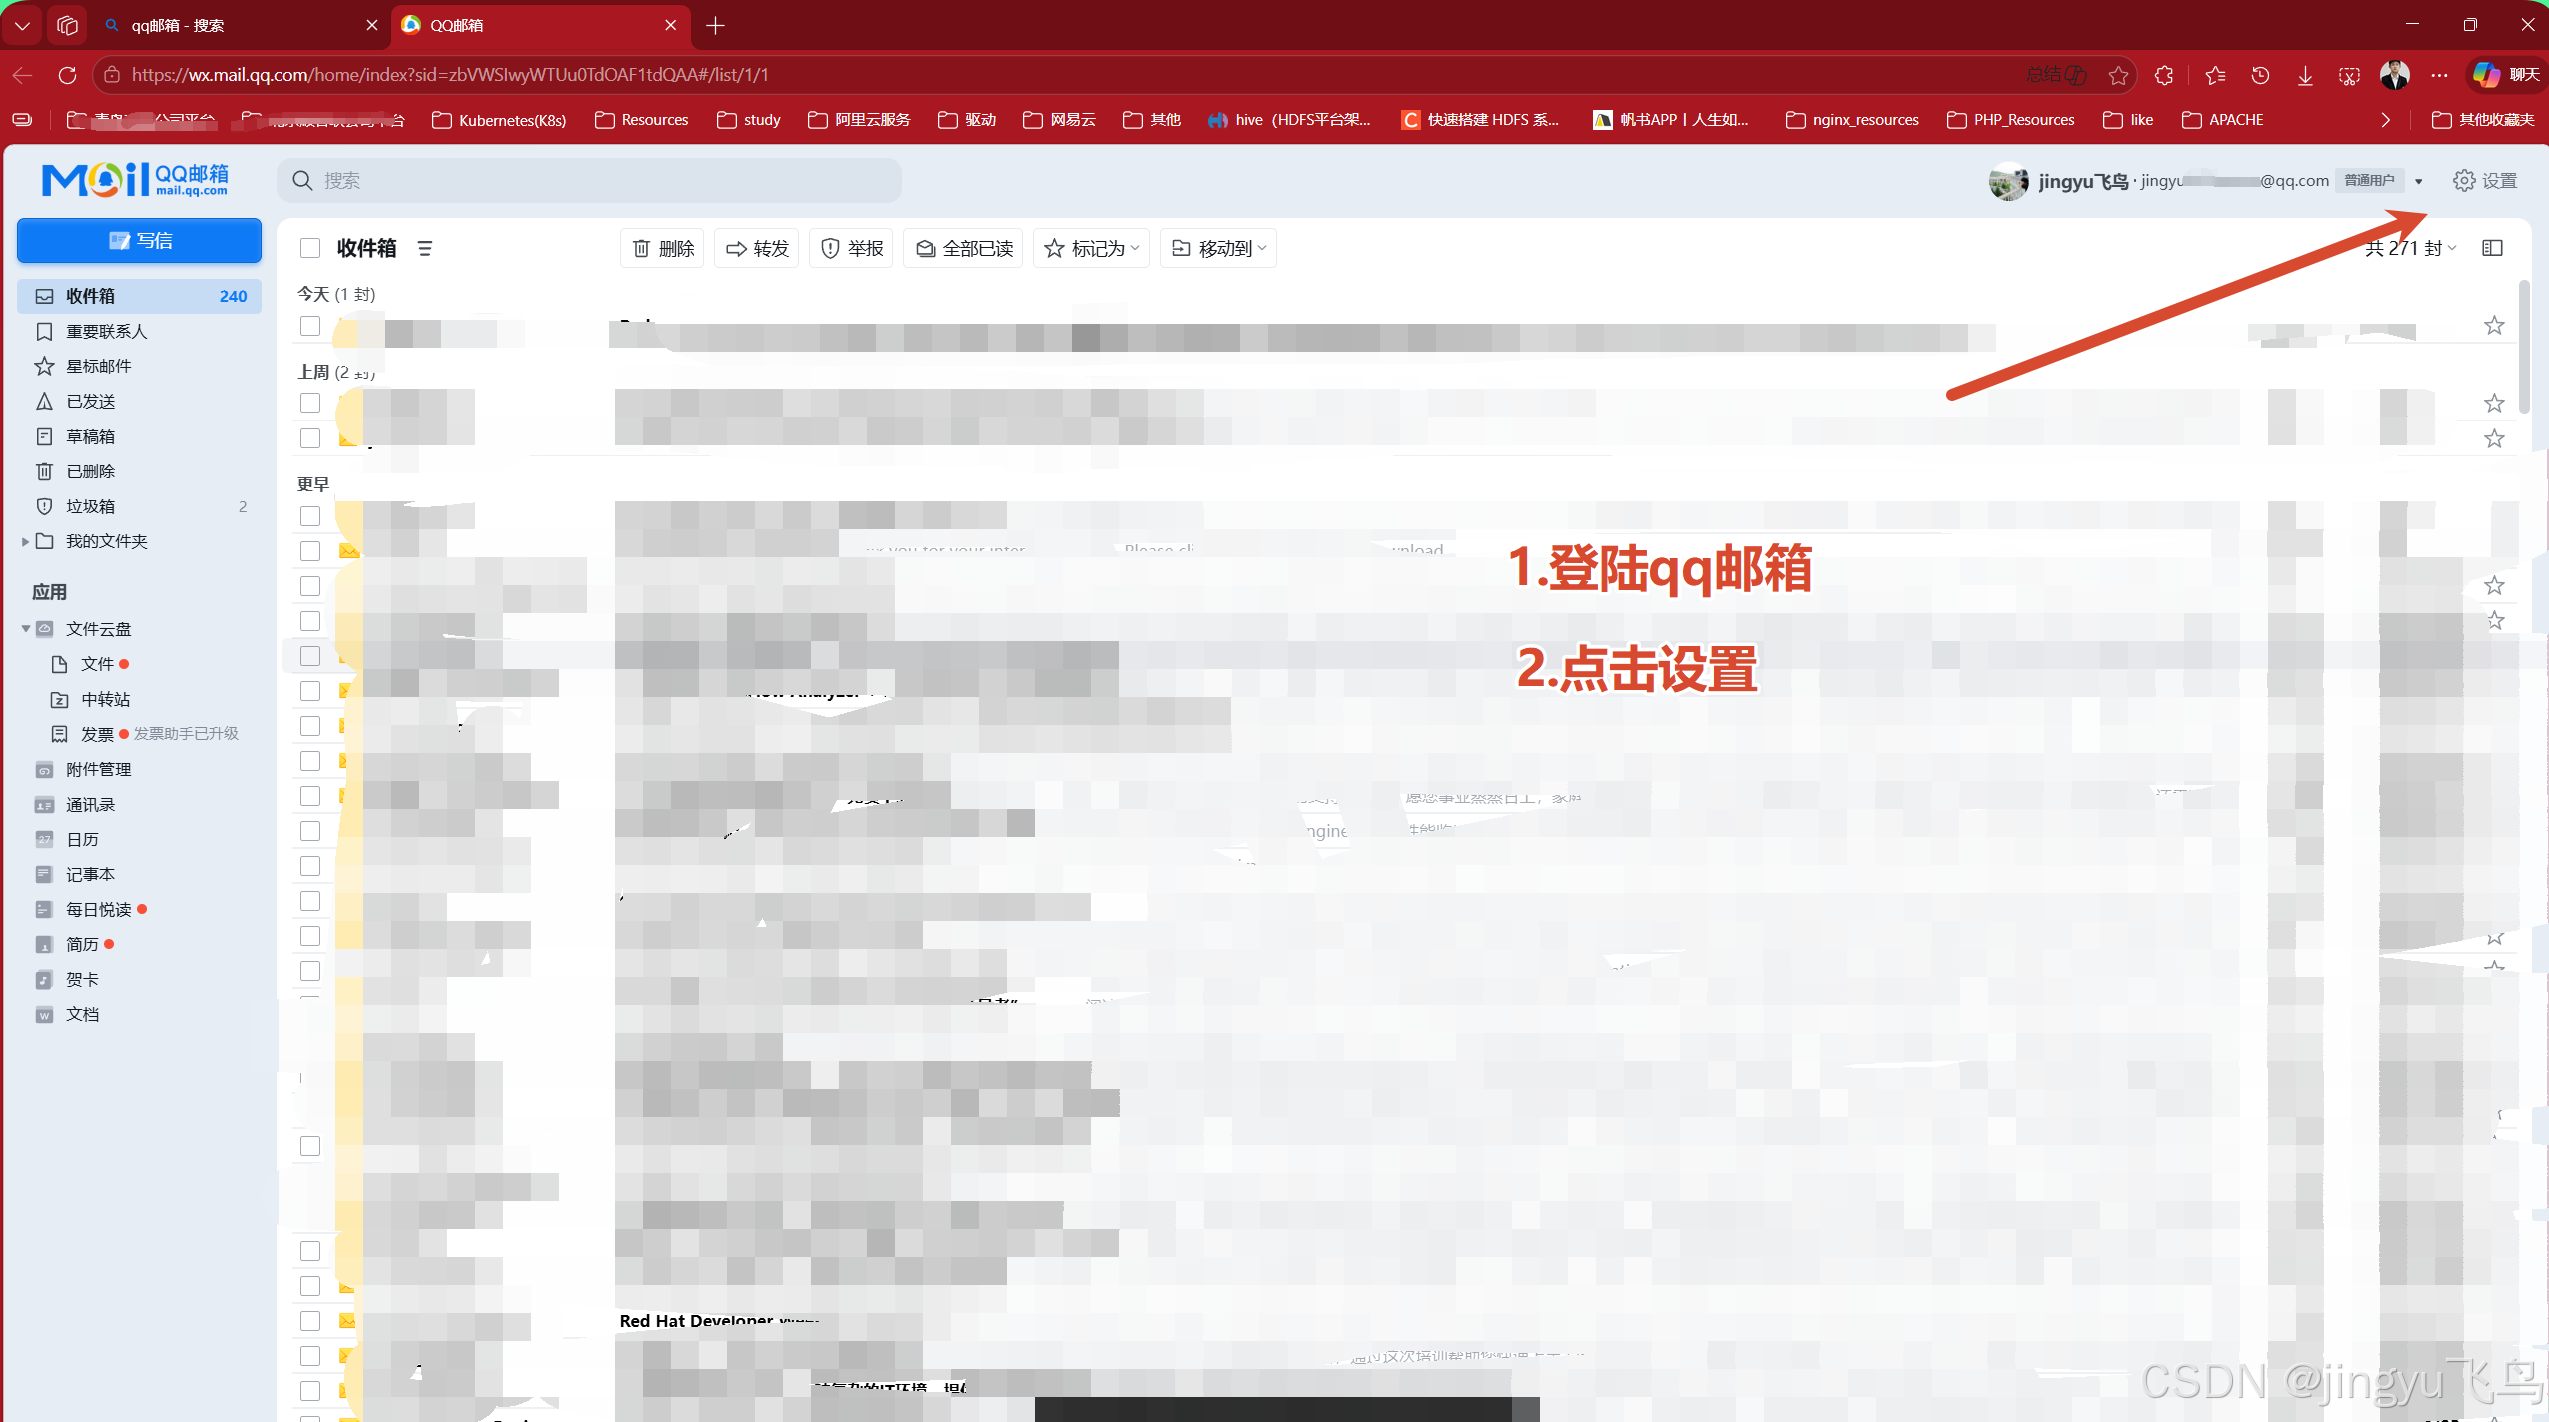
13.1qq设置
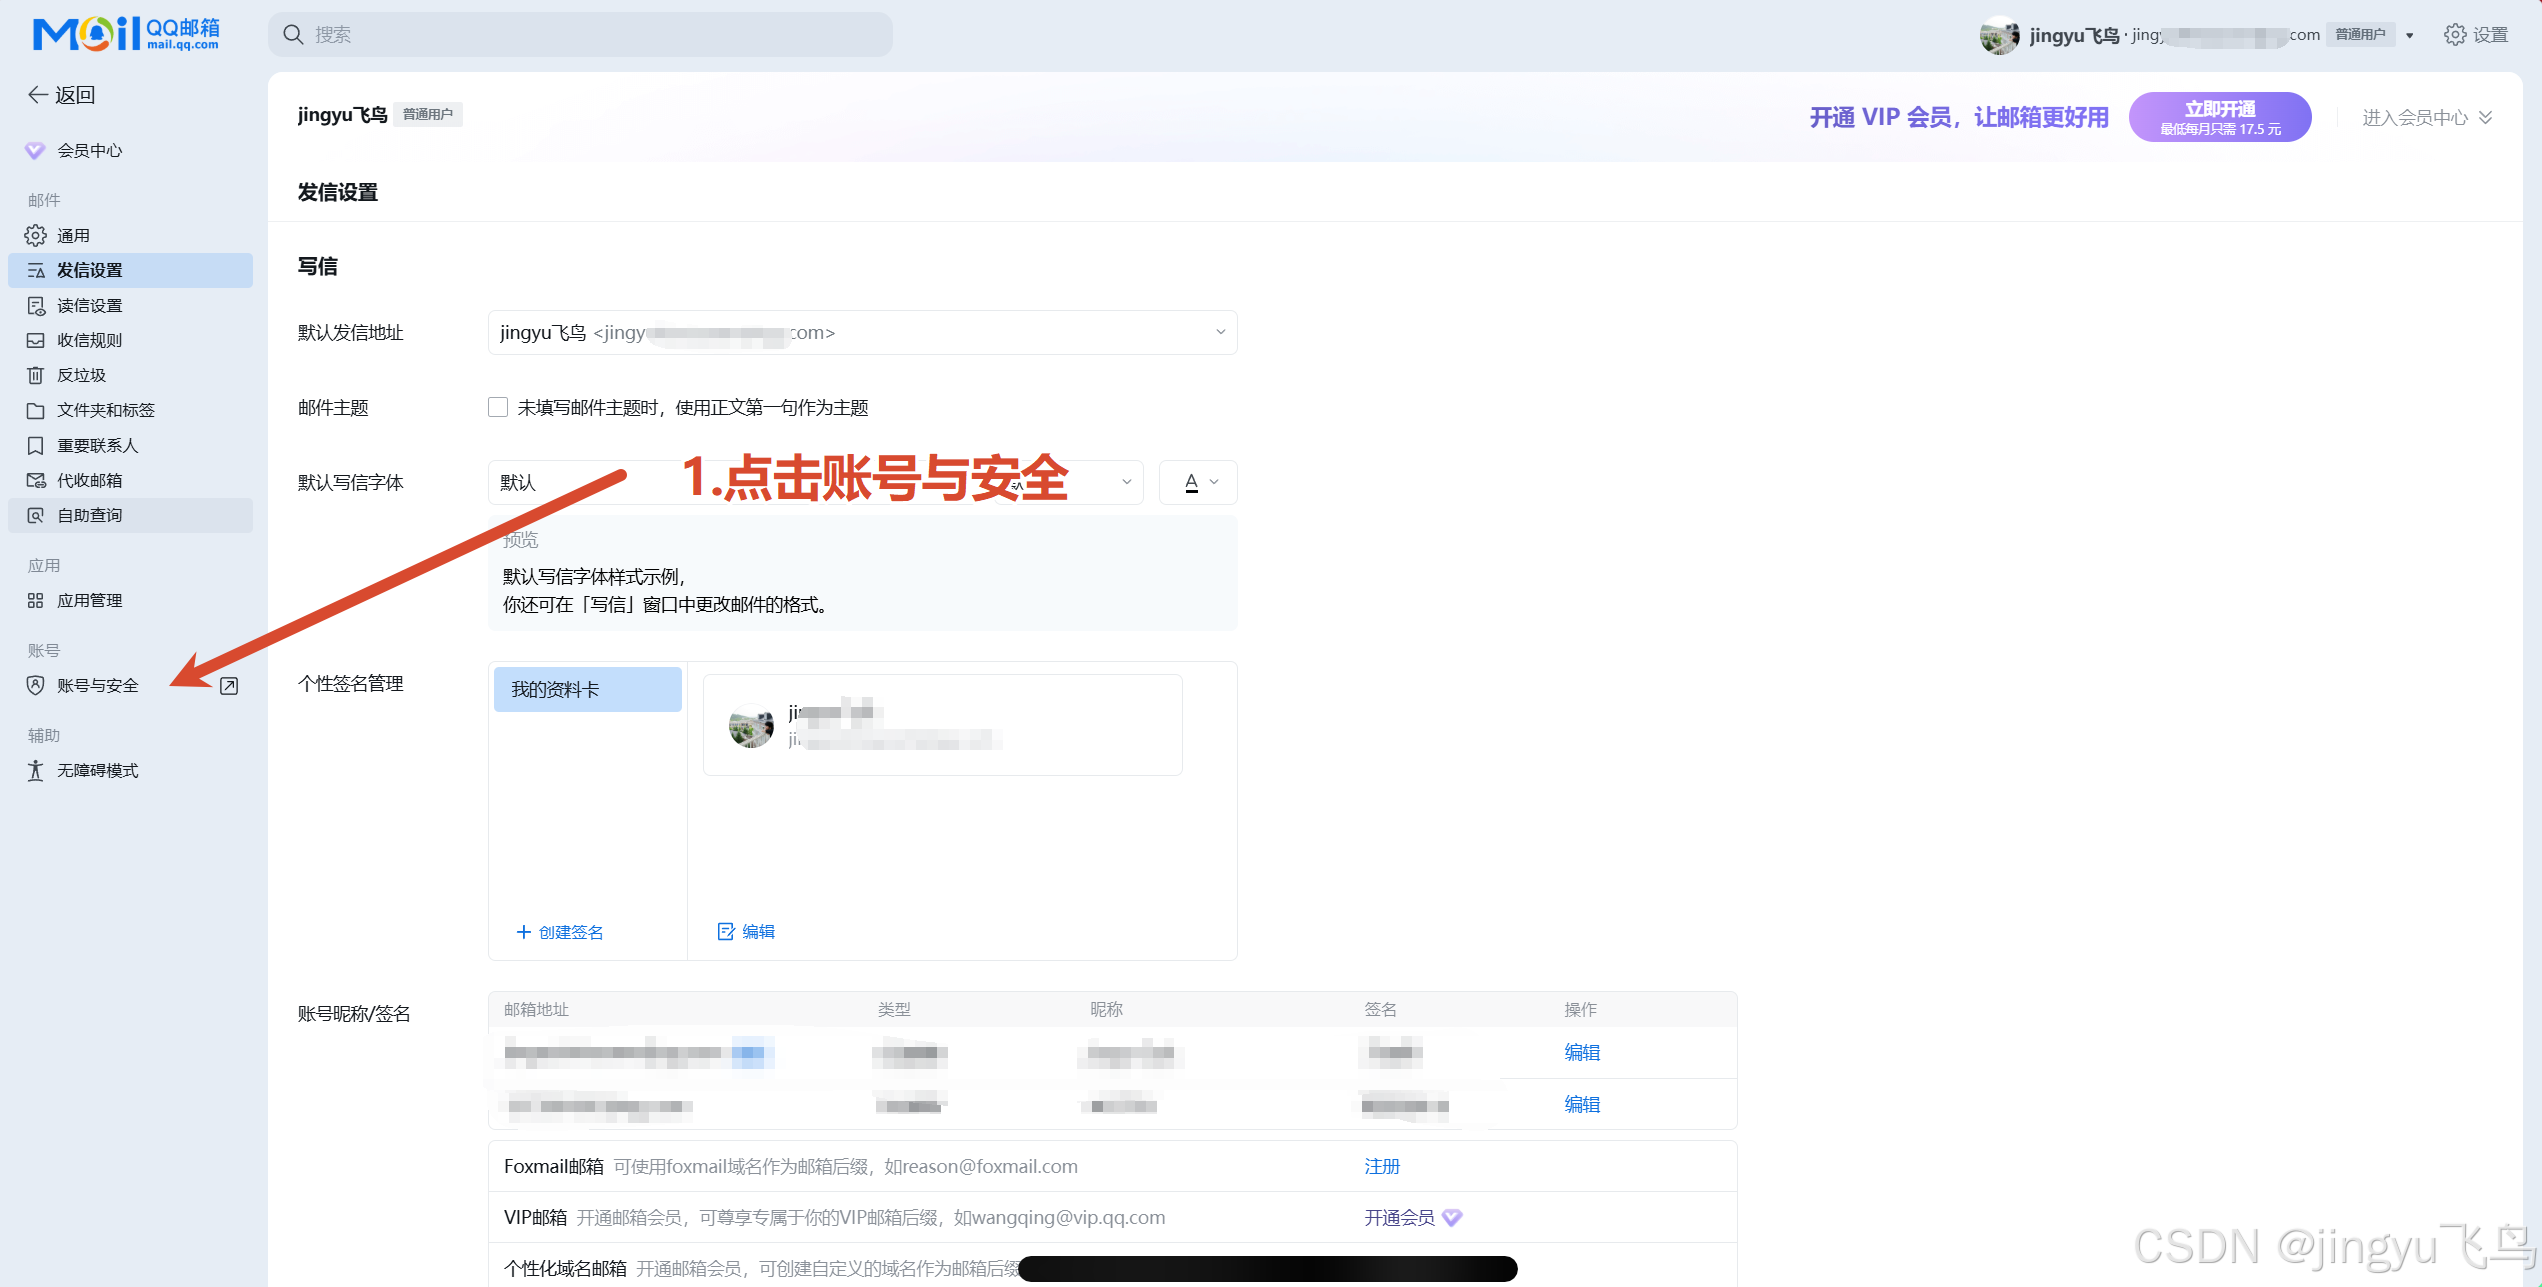
13.2账号与安全
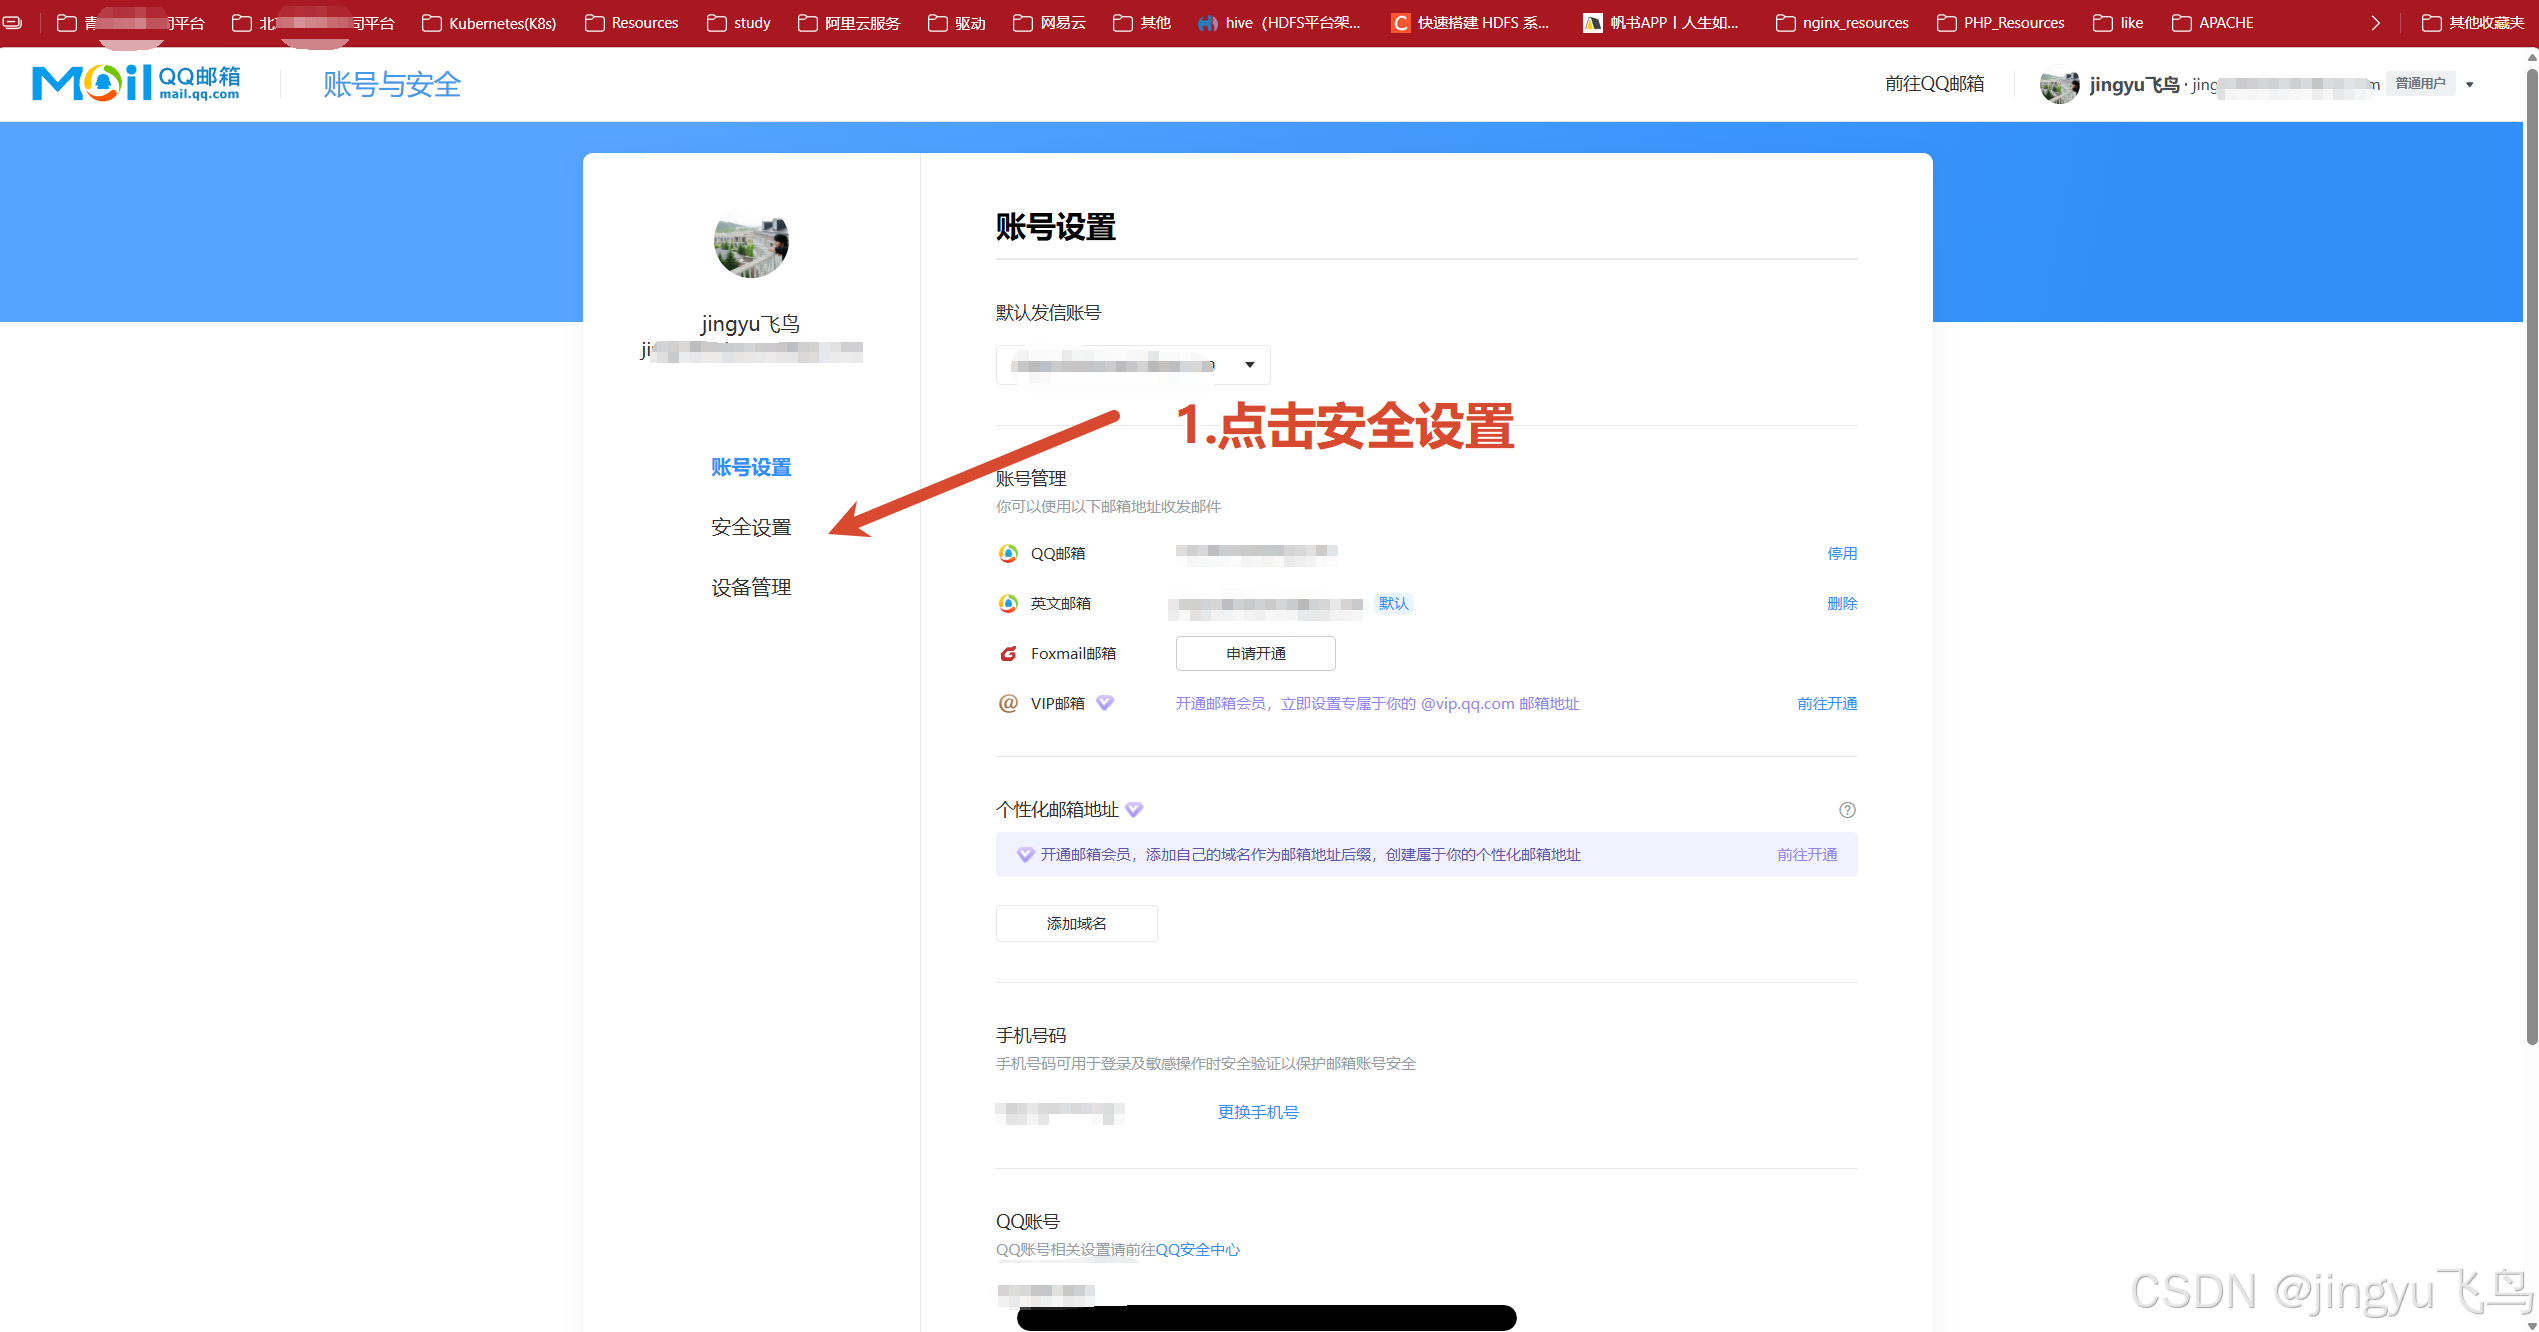
13.3安全设置
13.4生成授权码
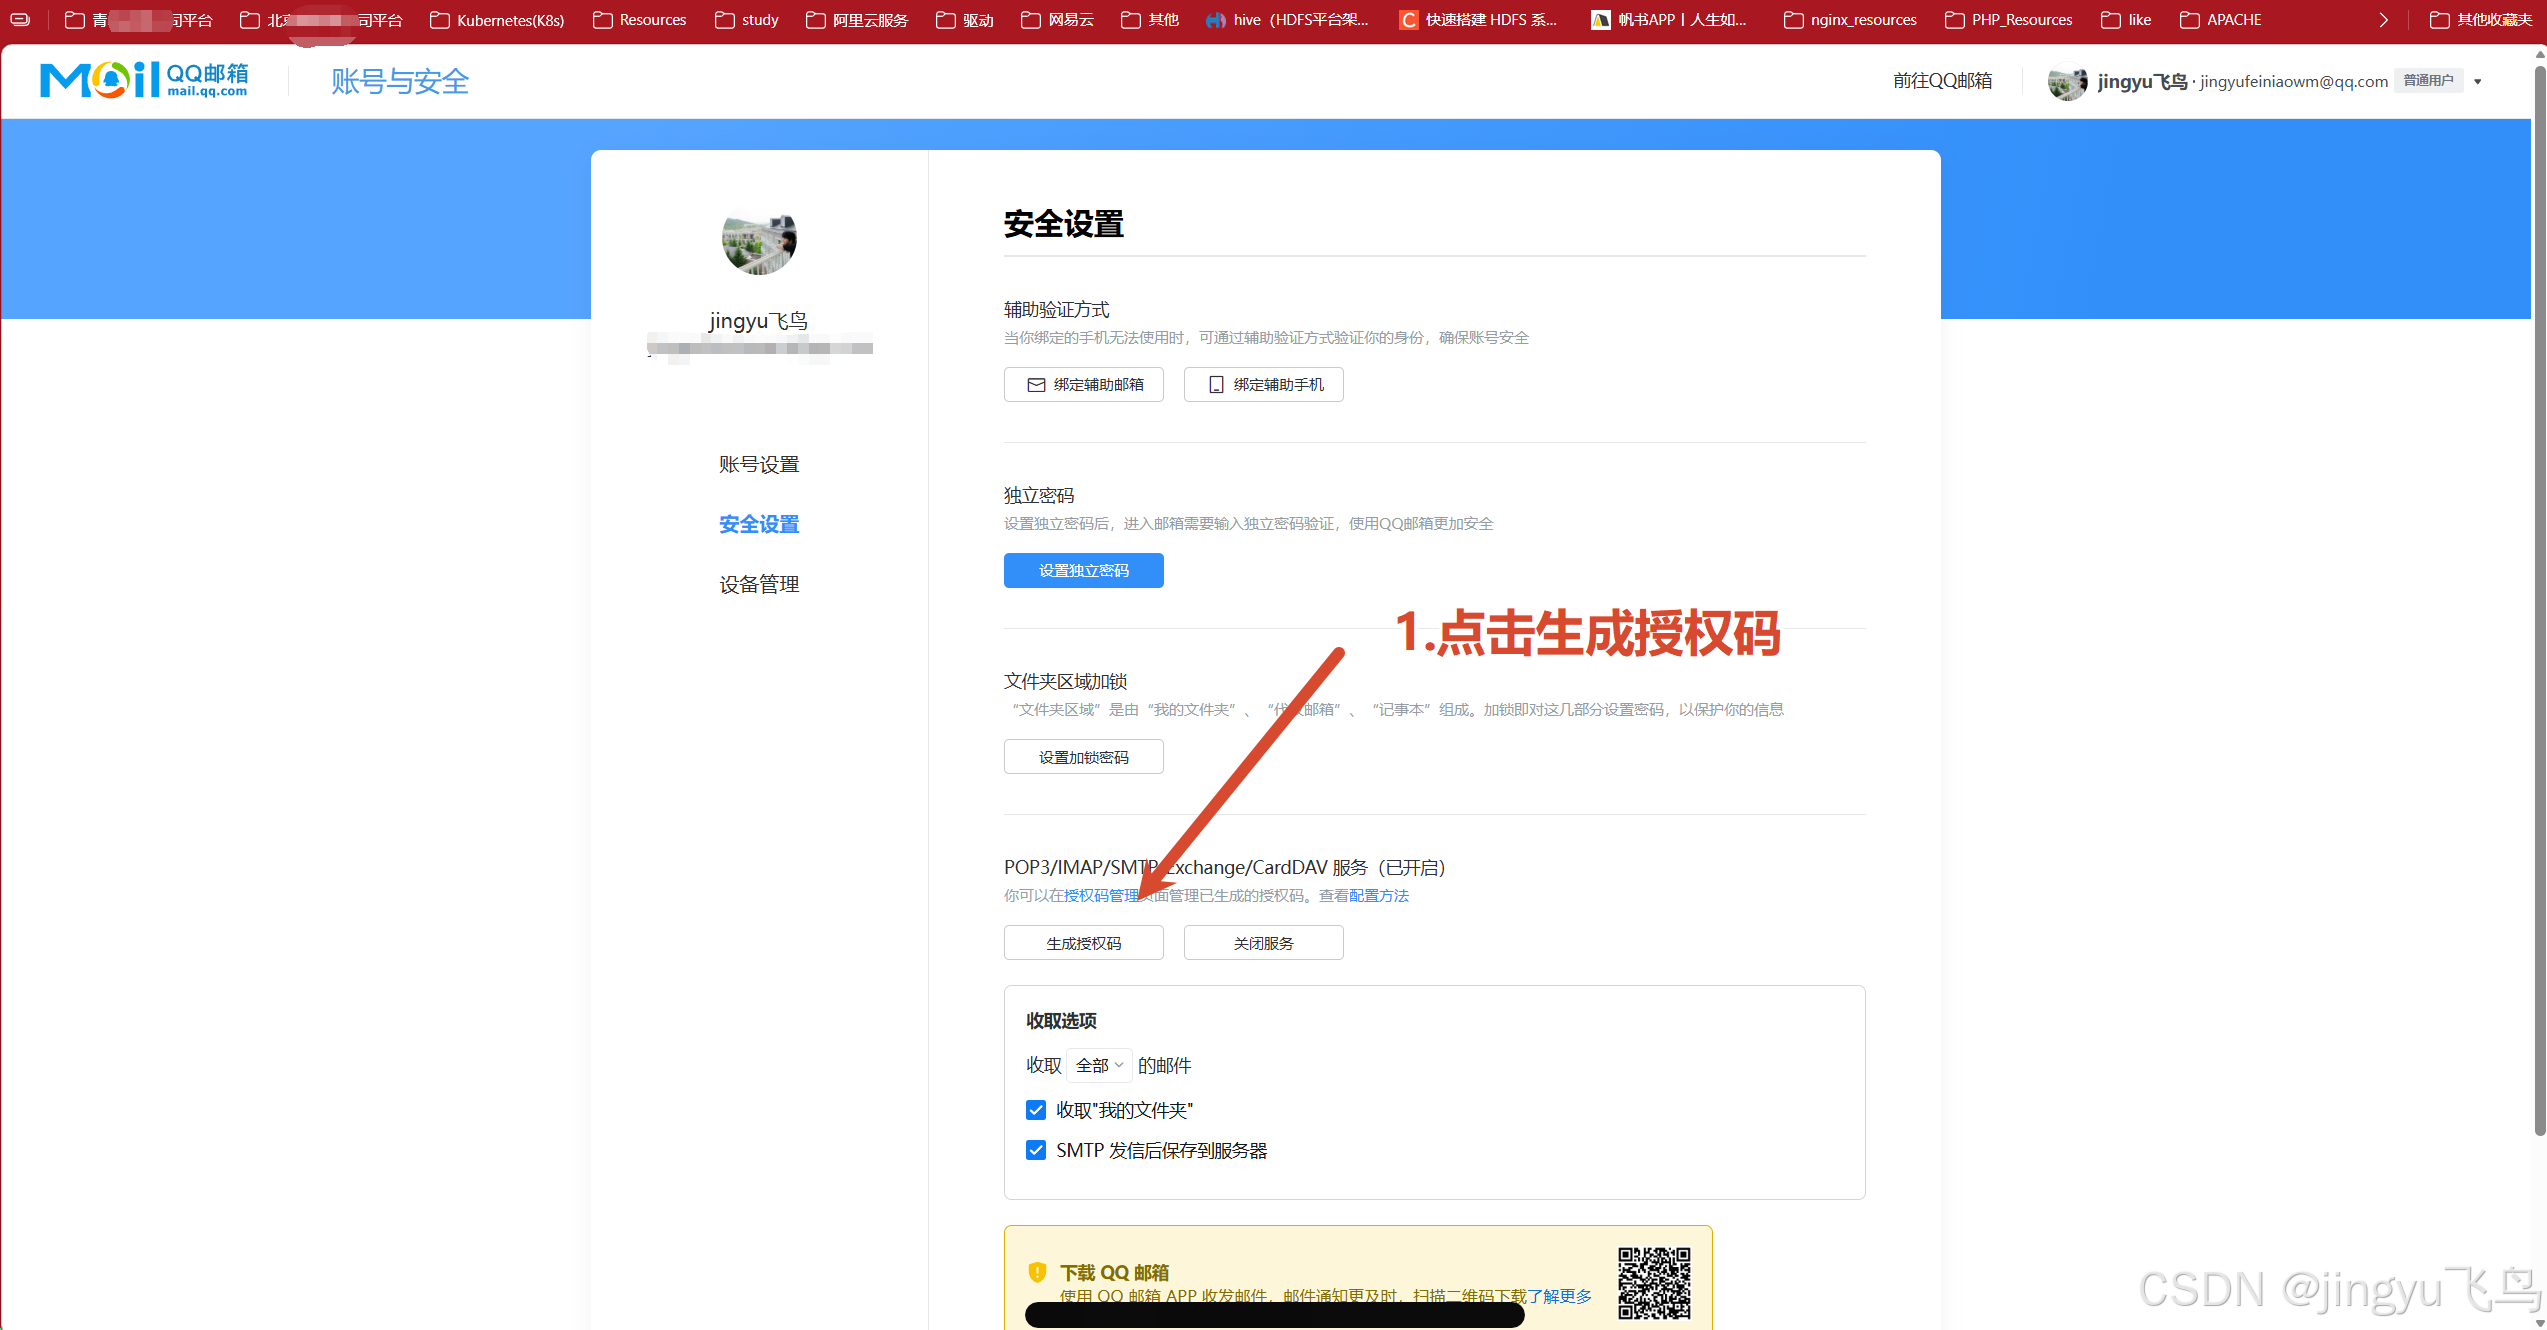
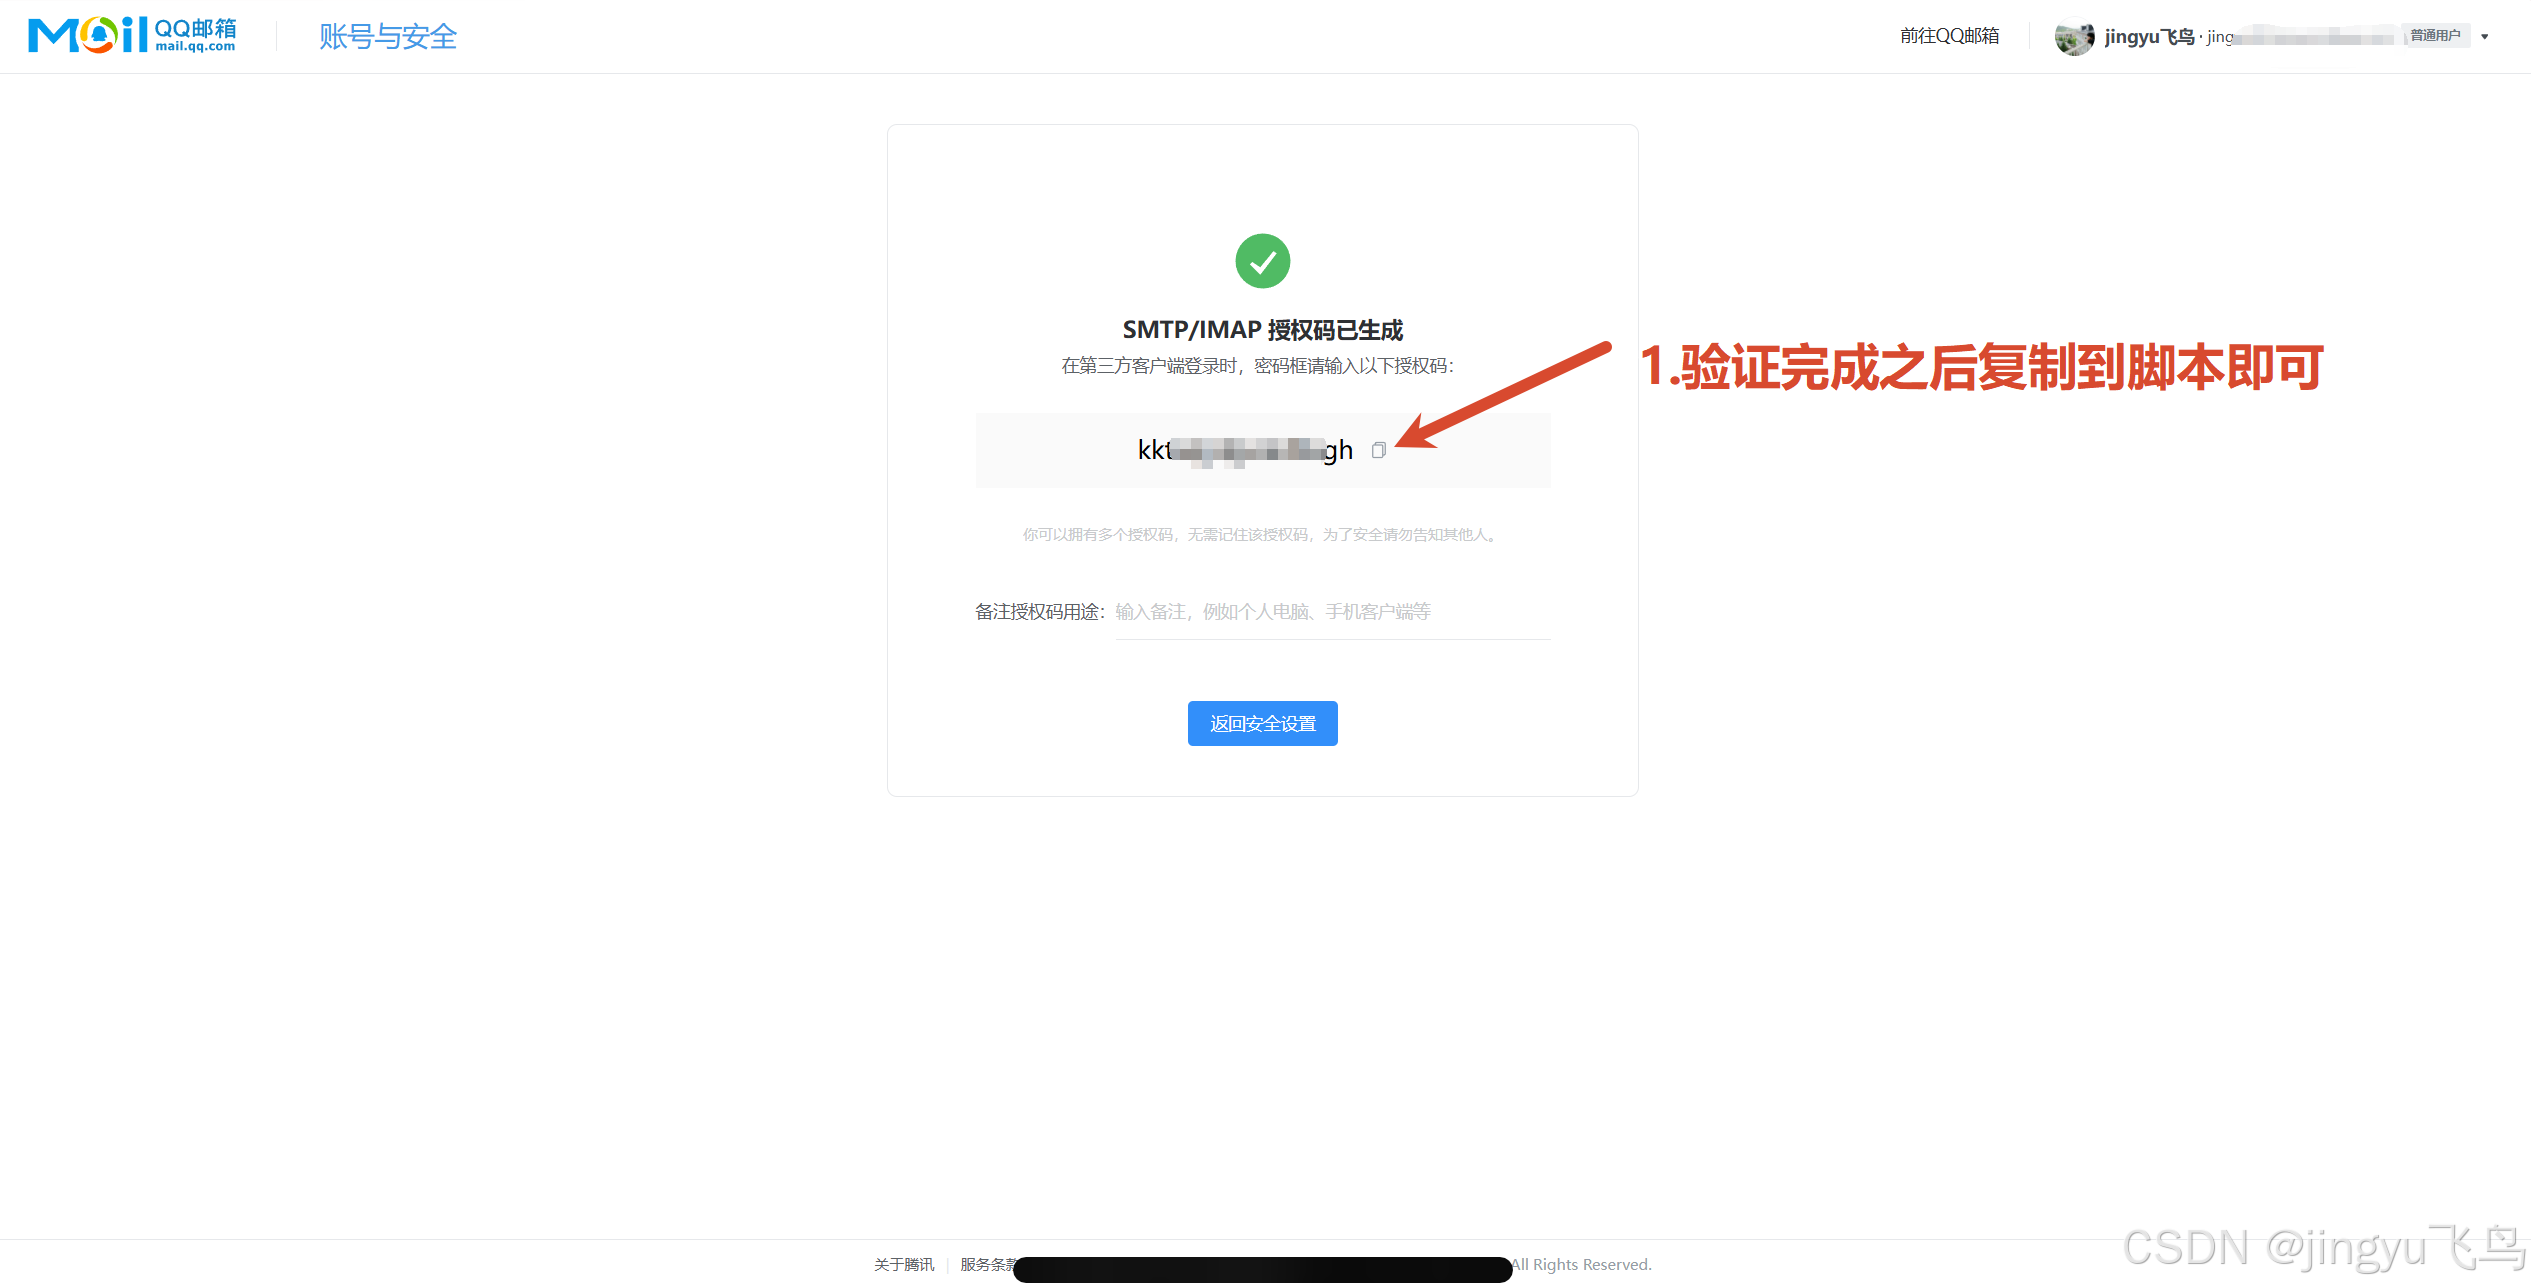
13.5验证

13.6复制授权码
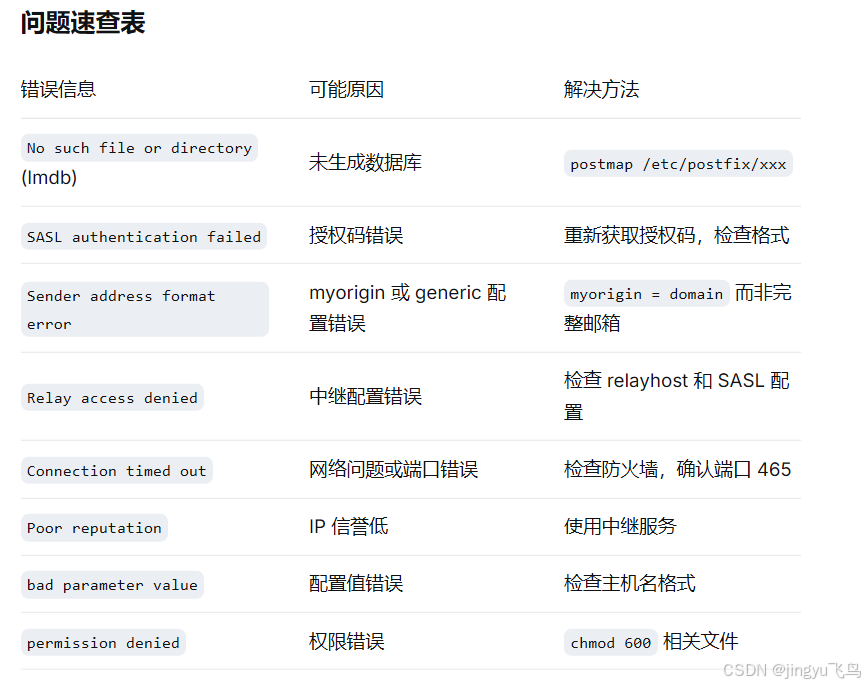
问题快速排查表