提示:本文原创作品,良心制作,干货为主,简洁清晰,一看就会
文章目录
- 前言
- 一、ConfigMap介绍
- 二、ConfigMap创建
-
- [2.1 通过命令创建](#2.1 通过命令创建)
- [2.2 通过yaml文件创建](#2.2 通过yaml文件创建)
- 三、ConfigMap使用
前言
在Kubernetes集群中,配置与应用解耦是云原生部署的关键实践。硬编码配置会导致镜像臃肿、环境适配困难,而ConfigMap正是解决这一问题的核心资源。它以键值对存储非敏感配置,支持环境变量、配置文件挂载等多种注入方式,实现配置集中管理与动态更新。本文将从原理、创建、使用到最佳实践,全面讲解ConfigMap的落地方法
一、ConfigMap介绍
ConfigMap 是 Kubernetes 中用于 存储非敏感配置信息 的核心资源,核心作用是 保存不需要加密的,应用所需的配置信息 ,让同一镜像可适配开发、测试、生产等不同环境,无需重新打包
它以 键值对 形式存放配置,可存储配置文件片段、环境变量、命令行参数等内容。创建后能通过环境变量注入、挂载为配置文件、命令行参数等方式供 Pod 使用,实现配置集中管理、灵活变更与统一分发,避免硬编码带来的维护难题,是云原生应用标准化配置的基础组件
二、ConfigMap创建
2.1 通过命令创建
yaml
## 1. 直接在命令行中指定configmap
root@k8s-master1:~# kubectl create configmap test-configmap1 --from-literal=user=amdin --from-literal=pass=1234

# kube-root-ca.crt存储了k8s集群的根CA证书公钥,用于集群内的身份认证、加密通信
# K8s会自动把这个ConfigMap挂载到每一个新建的Pod里,让容器内的应用可以信任集群的证书,实现安全访问API Server等组件
root@k8s-master1:~# kubectl get configmap
NAME               DATA   AGE
kube-root-ca.crt   1      15d  # k8s集群自动创建的系统内置ConfigMap
test-configmap1    2      7s
root@k8s-master1:~# kubectl get configmap test-configmap1 -o yaml
apiVersion: v1
data:
  pass: "1234"
  user: amdin
kind: ConfigMap
metadata:
  creationTimestamp: "2026-04-23T06:11:32Z"
  name: test-configmap1
  namespace: default
  resourceVersion: "611852"
  uid: 5f136be4-bbb7-4f4e-8f4e-86e3fc675eab
yaml
## 2. 将一个配置文件创建为configmap
root@k8s-master1:~# mkdir -p /k8s-test/configmap
root@k8s-master1:~# cd /k8s-test/configmap
root@k8s-master1:/k8s-test/configmap# vim app.properties
server.port=8080
database.url=jdbc:mysql://mysql:3306/test
redis.host=redis-service
log.level=info
root@k8s-master1:/k8s-test/configmap# kubectl create configmap test-configmap2 --from-file=app.properties
root@k8s-master1:/k8s-test/configmap# kubectl get configmap
NAME               DATA   AGE
kube-root-ca.crt   1      15d
test-configmap1    2      11m
test-configmap2    1      5s
root@k8s-master1:/k8s-test/configmap# kubectl get configmap test-configmap2 -o yaml  # 查看详细信息
apiVersion: v1
data:
  app.properties: |
    server.port=8080
    database.url=jdbc:mysql://mysql:3306/test
    redis.host=redis-service
    log.level=info
kind: ConfigMap
metadata:
  creationTimestamp: "2026-04-23T06:23:19Z"
  name: test-configmap2
  namespace: default
  resourceVersion: "613264"
  uid: f1d62b11-94e4-407e-aa18-4a50377cfe4f
root@k8s-master1:/k8s-test/configmap#
yaml
## 3. 将目录下的所有配置文件创建为configmap
root@k8s-master1:/k8s-test/configmap# mkdir config
root@k8s-master1:/k8s-test/configmap# echo 1111 > config/config1
root@k8s-master1:/k8s-test/configmap# echo 2222 > config/config2
root@k8s-master1:/k8s-test/configmap# kubectl create configmap test-configmap3 --from-file=config
configmap/test-configmap3 created
root@k8s-master1:/k8s-test/configmap# kubectl get configmap
NAME               DATA   AGE
kube-root-ca.crt   1      15d
test-configmap1    2      30m
test-configmap2    1      18m
test-configmap3    2      8s
root@k8s-master1:/k8s-test/configmap# kubectl get configmap test-configmap3 -o yaml
apiVersion: v1
data:
  config1: |
    1111
  config2: |
    2222
kind: ConfigMap
metadata:
  creationTimestamp: "2026-04-23T06:41:59Z"
  name: test-configmap3
  namespace: default
  resourceVersion: "615507"
  uid: 137fbc97-3458-4279-84f3-97178a655029
2.2 通过yaml文件创建
yaml
root@k8s-master1:/k8s-test/configmap# vim mysql-nginx.yaml
apiVersion: v1
kind: ConfigMap
metadata:
  name: mysql-nginx
  namespace: default
data:
  # MySQL 配置
  mysql.cnf: |
    [mysqld]
    datadir=/var/lib/mysql
    socket=/var/run/mysqld/mysqld.sock
    port=3306
    character-set-server=utf8mb4
    collation-server=utf8mb4_unicode_ci
    max_connections=200
    wait_timeout=600
    bind-address=0.0.0.0

  # Nginx 配置
  nginx.conf: |
    user nginx;
    worker_processes auto;
    error_log /var/log/nginx/error.log warn;
    pid /var/run/nginx.pid;

    events {
        worker_connections 1024;
    }

    http {
        include /etc/nginx/mime.types;
        default_type application/octet-stream;

        log_format main '$remote_addr - $remote_user [$time_local] "$request" '
                        '$status $body_bytes_sent "$http_referer" '
                        '"$http_user_agent" "$http_x_forwarded_for"';

        access_log /var/log/nginx/access.log main;

        sendfile on;
        keepalive_timeout 65;

        server {
            listen 80;
            server_name localhost;

            root /usr/share/nginx/html;
            index index.html index.htm;

            location / {
                try_files $uri $uri/ /index.html;
            }

            error_page 500 502 503 504 /50x.html;
            location = /50x.html {
                root /usr/share/nginx/html;
            }
        }
    }
root@k8s-master1:/k8s-test/configmap# kubectl apply -f mysql-nginx.yaml
configmap/mysql-nginx created
root@k8s-master1:/k8s-test/configmap# kubectl get configmap
NAME               DATA   AGE
kube-root-ca.crt   1      15d
mysql-nginx        2      5s
test-configmap1    2      35m
test-configmap2    1      23m
test-configmap3    2      5m17s
root@k8s-master1:/k8s-test/configmap#
root@k8s-master1:/k8s-test/configmap# kubectl get configmap mysql-nginx -o yaml
三、ConfigMap使用
3.1 环境变量引用
yaml
## 我这先删除一下没用的configmap
root@k8s-master1:/k8s-test/configmap# kubectl get configmap
NAME               DATA   AGE
kube-root-ca.crt   1      15d
mysql-nginx        2      30m
test-configmap1    2      65m
test-configmap2    1      54m
test-configmap3    2      35m
root@k8s-master1:/k8s-test/configmap# kubectl delete configmap test-configmap1 test-configmap2 test-configmap3
yaml
## 1. 创建一个configmap
root@k8s-master1:/k8s-test/configmap# vim configmap1.yaml
---
apiVersion: v1
kind: ConfigMap
metadata:
        name: test-config4
        namespace: default
data:
        name: jack
        sex: man
        age: ten
        my.cnf: |
                [mysqld]
                datadir=/var/lib/mysql
                socket=/var/run/mysqld/mysqld.sock
yaml
## 2. 创建pod,用环境变量引用configmap中的部分key
root@k8s-master1:/k8s-test/configmap# kubectl apply -f configmap1.yaml
root@k8s-master1:/k8s-test/configmap# kubectl get configmap
NAME               DATA   AGE
kube-root-ca.crt   1      15d
mysql-nginx        2      31m
test-config4       4      4s
root@k8s-master1:/k8s-test/configmap# vim pod.yaml
---
apiVersion: v1
kind: Pod
metadata:
        name: test-pod
spec:
        containers:
                - name: test-pod
                  image: nginx:1.24
                  env:  # 专门在容器里面设置变量的关键字
                          - name: TEST_NAME  # 容器里设置的新变量的名字
                            valueFrom:
                                    configMapKeyRef:
                                            name: test-config4  # 引用哪个configmap
                                            key: name  # 引用这个configmap中的哪个key
                          - name: TEST_AGE
                            valueFrom:
                                    configMapKeyRef:
                                            name: test-config4
                                            key: age
root@k8s-master1:/k8s-test/configmap# kubectl apply -f pod.yaml
root@k8s-master1:/k8s-test/configmap# kubectl get pod
NAME           READY   STATUS    RESTARTS      AGE
nginx-harbor   1/1     Running   1 (77m ago)   158m
test-pod       1/1     Running   0             4s
root@k8s-master1:/k8s-test/configmap# kubectl exec -it test-pod /bin/bash
kubectl exec [POD] [COMMAND] is DEPRECATED and will be removed in a future version. Use kubectl exec [POD] -- [COMMAND] instead.
root@test-pod:/# echo $TEST_NAME
jack
root@test-pod:/# echo $TEST_AGE
ten
root@test-pod:/# exit
exit
root@k8s-master1:/k8s-test/configmap#
yaml
## 3. 创建pod,用环境变量引用configmap中的所有key
root@k8s-master1:/k8s-test/configmap# vim pod2.yaml
---
apiVersion: v1
kind: Pod
metadata:
name: test-pod2
spec:
containers:
- name: test-pod2
image: nginx:1.24
envFrom:
- configMapRef:
name: test-config4
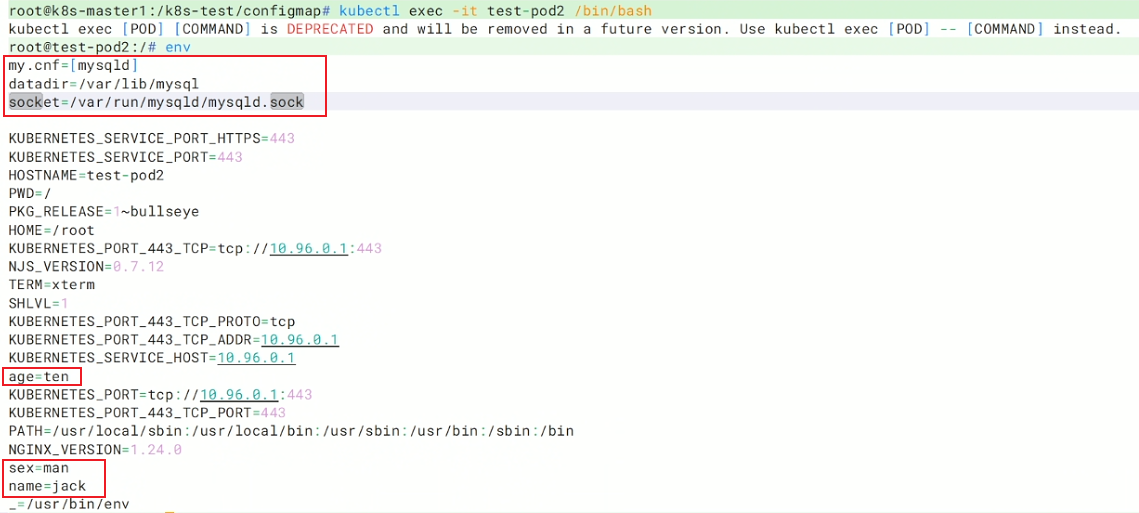
root@k8s-master1:/k8s-test/configmap# kubectl apply -f pod2.yaml
root@k8s-master1:/k8s-test/configmap# kubectl exec -it test-pod2 /bin/bash进入容器内部,发现所有的key已经自动变成环境变量
3.2 卷挂载
yaml
root@k8s-master1:/k8s-test/configmap# vim volupod.yaml
---
apiVersion: v1
kind: Pod
metadata:
        name: test-pod3
spec:
        containers:
                - name: test-pod3
                  image: nginx:1.24
                  volumeMounts:
                          - name: test-volume  # 挂载卷test-volume
                            mountPath: "/tmp/volume"  # 把它挂载到容器内的/tmp/volume目录下
        volumes:
                - name: test-volume  # 定义一个名为test-volume的卷
                  configMap:
                          name: test-config4  # test-volume卷的内容来自test-config4
root@k8s-master1:/k8s-test/configmap# kubectl apply -f volupod.yaml
root@k8s-master1:/k8s-test/configmap# kubectl exec -it test-pod3 /bin/bash # 进入容器
kubectl exec [POD] [COMMAND] is DEPRECATED and will be removed in a future version. Use kubectl exec [POD] -- [COMMAND] instead.
root@test-pod3:/# ls /tmp/volume/  # test-config4中的每个key都变成了文件,文件中存的是key对应的值
age  my.cnf  name  sex
root@test-pod3:/# cat /tmp/volume/my.cnf
[mysqld]
datadir=/var/lib/mysql
socket=/var/run/mysqld/mysqld.sock
root@test-pod3:/# cat /tmp/volume/name
jackroot@test-pod3:/# cat /tmp/volume/age
tenroot@test-pod3:/# cat /tmp/volume/sex
manroot@test-pod3:/# exit
exit
3.3 subPath参数
subPath:挂载文件用的,在 volumeMounts 下面,只挂载单个文件,不覆盖整个目录,不支持热更新用了 subPath → 不支持热更新
如果你要 覆盖配置文件(nginx.conf、my.cnf)→ 必须用 subPath,接受不能热更新,例如主配置文件
如果你要 挂载配置目录→ 不用 subPath,可以热更新,例如子配置文件
yaml
## 例:创建mysql和nginx pod,引用mysql-nginx configmap配置文件
root@k8s-master1:/k8s-test/configmap# kubectl get cm  # 查看当前的configmap
NAME               DATA   AGE
kube-root-ca.crt   1      15d
mysql-nginx        2      13m

## 1. 创建一个secret存放mysql的登录密码
root@k8s-master1:/k8s-test/configmap# echo -n "Abc@123" > password.txt
root@k8s-master1:/k8s-test/configmap# kubectl create secret generic mysql-pass --from-file=./password.txt
yaml
## 3. 创建mysql和nginx的pod
root@k8s-master1:/k8s-test/configmap# vim mysql-nginx-pod.yaml
---
apiVersion: v1
kind: Pod
metadata:
        name: mysql
spec:
        containers:
                - name: mysql
                  image: mysql:5.7
                  # 环境变量
                  env:
                          # 环境变量名:MYSQL_ROOT_PASSWORD(mysql的root密码)
                          - name: MYSQL_ROOT_PASSWORD
                            valueFrom:
                                    # 值从secret里提取
                                    secretKeyRef:
                                            # 来自哪个secret
                                            name: mysql-pass
                                            # 取该secret里的哪个键值
                                            key: password.txt
                  # 卷挂载:把外部卷挂到容器内部路径
                  volumeMounts:
                            # 使用一个名为mysql的卷
                          - name: mysql
                            # 容器内的挂载目标文件
                            mountPath: /etc/my.cnf
                            # 只挂载卷里的my.cnf这一个文件,不覆盖整个目录,如果不加subPath容器不能正常启动
                            subPath: my.cnf
        # 定义Pod级别的数据卷
        volumes:
                 # 定义一个卷的名字叫mysql
                - name: mysql
                  configMap:
                          # 使用名为mysql-nginx的configmap
                          name: mysql-nginx
                          items:
                                   # cm里的key是mysql.cnf
                                  - key: mysql.cnf
                                    # 映射到卷里的文件名叫my.cnf
                                    path: my.cnf
---
apiVersion: v1
kind: Pod
metadata:
        name: nginx

spec:
        containers:
                - name: nginx
                  image: nginx:1.24
                  volumeMounts:
                          - name: nginx
                            mountPath: /etc/nginx/nginx.conf
                            subPath: nginx.conf
        volumes:
                - name: nginx
                  configMap:
                          name: mysql-nginx
                          items:
                                  - key: nginx.conf
                                    path: nginx.conf
yaml
## 4. 运行pod
root@k8s-master1:/k8s-test/configmap# kubectl apply -f mysql-nginx-pod.yaml
root@k8s-master1:/k8s-test/configmap# kubectl get pod
NAME    READY   STATUS    RESTARTS   AGE
mysql   1/1     Running   0          59s
nginx   1/1     Running   0          10s
yaml
## 5. 进入nginx pod内部,看看nginx能否正常访问
root@k8s-master1:/k8s-test/configmap# kubectl exec -it nginx /bin/bash
kubectl exec [POD] [COMMAND] is DEPRECATED and will be removed in a future version. Use kubectl exec [POD] -- [COMMAND] instead.
root@nginx:/# curl localhost
<!DOCTYPE html>
<html>
<head>
<title>Welcome to nginx!</title>
<style>
html { color-scheme: light dark; }
body { width: 35em; margin: 0 auto;
font-family: Tahoma, Verdana, Arial, sans-serif; }
</style>
</head>
<body>
<h1>Welcome to nginx!</h1>
<p>If you see this page, the nginx web server is successfully installed and
working. Further configuration is required.</p>

<p>For online documentation and support please refer to
<a href="http://nginx.org/">nginx.org</a>.<br/>
Commercial support is available at
<a href="http://nginx.com/">nginx.com</a>.</p>

<p><em>Thank you for using nginx.</em></p>
</body>
</html>
root@nginx:/# exit
exit
yaml
## 6. 进入mysql pod中,看看能否登录mysql
root@k8s-master1:/k8s-test/configmap# kubectl exec -it mysql /bin/bash
kubectl exec [POD] [COMMAND] is DEPRECATED and will be removed in a future version. Use kubectl exec [POD] -- [COMMAND] instead.
bash-4.2# mysql -uroot -p'Abc@123'  # 登录成功
mysql: [Warning] Using a password on the command line interface can be insecure.
Welcome to the MySQL monitor.  Commands end with ; or \g.
Your MySQL connection id is 2
Server version: 5.7.44 MySQL Community Server (GPL)

Copyright (c) 2000, 2023, Oracle and/or its affiliates.

Oracle is a registered trademark of Oracle Corporation and/or its
affiliates. Other names may be trademarks of their respective
owners.

Type 'help;' or '\h' for help. Type '\c' to clear the current input statement.

mysql> exit
Bye
bash-4.2# exit
exit
3.4 configmap的热更新
不热更新案例
验证subPath支不支持热更新
yaml
## 例:
root@k8s-master1:/k8s-test/configmap# vim mysql-nginx.yaml
worker_processes 2;  # 更改这一行,之前是worker_processes auto;
root@k8s-master1:/k8s-test/configmap# kubectl apply -f mysql-nginx.yaml
root@k8s-master1:/k8s-test/configmap# kubectl get configmap mysql-nginx -o yaml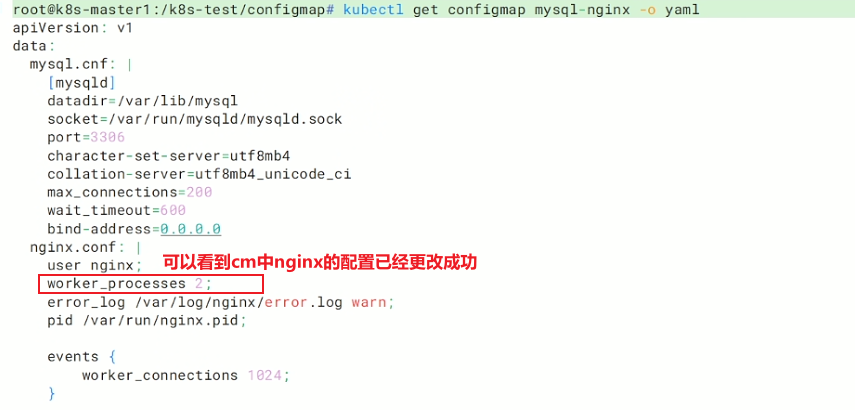

由此可知,subPath不支持热更新
热更新案例
想要支持热更新,需要用yaml文件方式创建configmap,并且不能使用subPath参数,并且需要卷挂载configmap才能实现热更新
yaml
# 例,热更新案例
## 1. 创建一个nginx的configmap,里面存放网页配置
root@k8s-master1:/k8s-test/configmap# vim nginx-configmap.yaml
apiVersion: v1
kind: ConfigMap
metadata:
  name: nginx
  namespace: default
data:
  # Nginx 页面
  index.html: |
          welcome nginx
          hello
root@k8s-master1:/k8s-test/configmap# kubectl apply -f nginx-configmap.yaml

## 2. 创建nginx pod,用卷挂载的方式引用nginx configmap
root@k8s-master1:/k8s-test/configmap# vim nginx-pod.yaml
---
apiVersion: v1
kind: Pod
metadata:
        name: nginx-pod
spec:
        hostNetwork: true
        containers:
                - name: nginx
                  image: nginx:1.24
                  ports:
                          - containerPort: 80
                  volumeMounts:
                          - mountPath: /usr/share/nginx/html
                            name: index
        volumes:
                - name: index
                  configMap:
                          name: nginx
                          items:
                                  - key: index.html
                                    path: index.html
root@k8s-master1:/k8s-test/configmap# kubectl apply -f nginx-pod.yaml
root@k8s-master1:/k8s-test/configmap# kubectl get pod
NAME        READY   STATUS    RESTARTS   AGE
nginx-pod   1/1     Running   0          7s

## 3. 访问页面,看是否挂载成功
root@k8s-master1:/k8s-test/configmap# curl 192.168.13.139:80
welcome nginx
hello
yaml
## 4. 更改nginx configmap,看看nginx pod的页面是否会改变
root@k8s-master1:/k8s-test/configmap# vim nginx-configmap.yaml
apiVersion: v1
kind: ConfigMap
metadata:
  name: nginx
  namespace: default
data:
  # Nginx 页面
  index.html: |
          welcome nginx  # 删除了最后一行
root@k8s-master1:/k8s-test/configmap# kubectl apply -f nginx-configmap.yaml

## 5. 重新访问页面,由于某种延迟过几秒后会刷新出新的页面
root@k8s-master1:/k8s-test/configmap# curl 192.168.13.139:80
welcome nginx
注:
文中若有疏漏,欢迎大家指正赐教。
本文为100%原创,转载请务必标注原创作者,尊重劳动成果。
求赞、求关注、求评论!你的支持是我更新的最大动力,评论区等你~