与常见的HSB色彩系统不同,HSL颜色系统有它独特的色彩设置规律,更适合UI工程的界面主题、模式切换、整体亮度调节、CSS 风格配色等应用。
- HSL颜色 hsl(h, s, l)的参数含义:
h: 色相,范围:0~360° ; 0°/360°:红,120°:绿,240°:蓝(和 HSB 一样)
s: 色彩浓郁度(算法和 HSB 不一样)
**l:**亮度,100%:纯白,0%:纯黑,50%:标准纯色
运行脚本,生成一个hsl色彩矩阵图(以绿色为例):
python
import sys
from PySide6.QtWidgets import QLabel, QApplication, QWidget, QHBoxLayout, QVBoxLayout

class LabelHsl(QLabel):
    def __init__(self,hsl, geo, parent=None):
        super().__init__(parent)
        self.setGeometry(*geo)
        self.setStyleSheet(f"background-color: hsl({hsl});color:red")

app = QApplication(sys.argv)

widget1 = QWidget()

v_layout = QVBoxLayout()
v_layout.setContentsMargins(0, 0, 0, 0)
v_layout.setSpacing(0)

h = 120
s = 100
width = 80
height = 80
for i in range(11):
    widget = QWidget()
    widget.setFixedSize(width * 10, height)
    h_layout = QHBoxLayout()
    h_layout.setContentsMargins(0, 0, 0, 0)
    h_layout.setSpacing(0)
    for j in range(11):
        l = f"{j * 10}%"
        geo = (j*width, i*height, width, height)
        hsl = f"{h}, {s}%, {l}"
        label = LabelHsl(hsl, geo)
        label.setText(f"{h},{s},{j*10}")
        h_layout.addWidget(label)
        j += width
    widget.setLayout(h_layout)
    v_layout.addWidget(widget)
    i += height
    s -= 10
widget1.setLayout(v_layout)
widget1.show()
app.exec()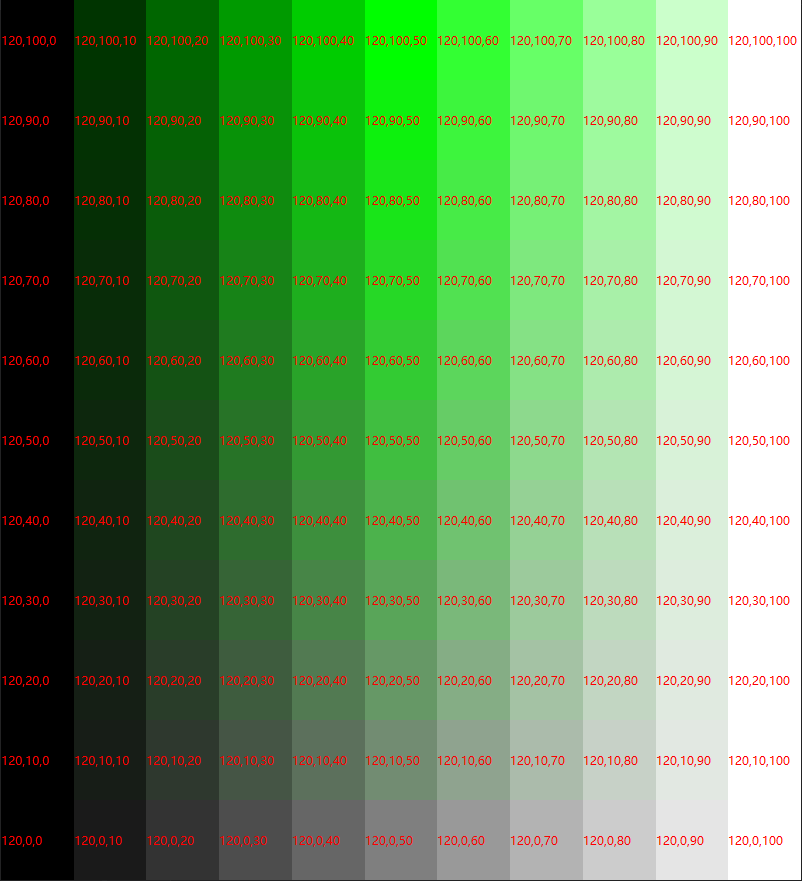
看得出,随着s的递增,色彩逐渐浓郁;随着l的递增,亮度逐渐提高;
据此,创建两个渐变色的小部件:
**1、**s = 100%(色彩浓度不变),l递增(亮度递增)
python
background-color: qlineargradient(x1: 0, y1: 0, x2: 1, y2:0,
stop: 0 hsl(120, 100%, 0%),
stop: 0.2 hsl(120, 100%, 20%),
stop: 0.4 hsl(120, 100%, 40%),
stop: 0.6 hsl(120, 100%, 60%),
stop: 0.8 hsl(120, 100%, 80%),
stop: 1 hsl(120, 100%, 100%));
**2、**l = 50%(亮度不变),s递增(色彩浓度递增)
python
background-color: qlineargradient(x1: 0, y1: 0, x2: 1, y2: 0,
stop: 0 hsl(120, 0%, 50%),
stop: 0.2 hsl(120, 20%, 50%),
stop: 0.4 hsl(120, 40%, 50%),
stop: 0.6 hsl(120, 60%, 50%),
stop: 0.8 hsl(120, 80%, 50%),
stop: 1 hsl(120,100%, 50%));
根据设计需求选择不同的常量和递变量即可。
- demo:一个绿色带灯按钮
先创建一个灭灯的绿色按钮:
python
QPushButton {background-color: qlineargradient(x1: 1, y1: 0, x2: 1, y2: 1,
	stop: 0 hsl(120,35%,90%),
	stop: 0.15 hsl(120,35%,60%),
	stop: 0.75 hsl(120,35%,50%),
	stop: 1.0 hsl(120,35%,35%));
	border-top: 2px solid #f0f0f0;
	border-left: 2px solid #f0f0f0;
	border-right: 2px solid #303030;
	border-bottom: 2px solid #303030;
border-radius: 5px;
	}
QPushButton:hover{background-color: qlineargradient(x1: 1, y1: 0, x2: 1, y2: 1,
	stop: 0 hsl(120,35%,85%),
	stop: 0.1 hsl(120,35%,65%),
	stop: 0.85 hsl(120,35%,55%),
	stop: 1.0 hsl(120,35%,50%));
	border-top: 1px solid #f0f0f0;
	border-left: 1px solid #f0f0f0;
	border-right: 1px solid #303030;
	border-bottom: 1px solid #303030;
	}
QPushButton:pressed{background-color: hsl(120,35%,70%);
	border-top: 1px solid #303030;
	border-left: 1px solid #303030;
	border-right: 1px solid #f0f0f0;
	border-bottom: 1px solid #f0f0f0;
}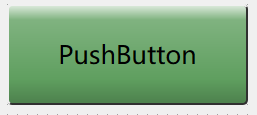
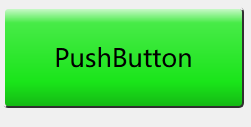
然后把按钮样式表中的所有的色彩浓度由25%批量替换为80%
python
QPushButton {background-color: qlineargradient(x1: 1, y1: 0, x2: 1, y2: 1,
	stop: 0 hsl(120,80%,90%),
	stop: 0.15 hsl(120,80%,60%),
	stop: 0.75 hsl(120,80%,50%),
	stop: 1.0 hsl(120,80%,40%));
	border-top: 2px solid #f0f0f0;
	border-left: 2px solid #f0f0f0;
	border-right: 2px solid #303030;
	border-bottom: 2px solid #303030;
border-radius: 5px;
	}
QPushButton:hover{background-color: qlineargradient(x1: 1, y1: 0, x2: 1, y2: 1,
	stop: 0 hsl(120,80%,85%),
	stop: 0.1 hsl(120,80%,65%),
	stop: 0.85 hsl(120,80%,55%),
	stop: 1.0 hsl(120,80%,50%));
	border-top: 1px solid #f0f0f0;
	border-left: 1px solid #f0f0f0;
	border-right: 1px solid #303030;
	border-bottom: 1px solid #303030;
	}
QPushButton:pressed{background-color: hsl(120,80%,70%);
	border-top: 1px solid #303030;
	border-left: 1px solid #303030;
	border-right: 1px solid #f0f0f0;
	border-bottom: 1px solid #f0f0f0;
}
就可以获得一个亮灯的绿按钮:
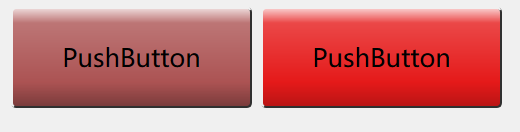
继续,把上面两个按钮样式表中的色相从120批量替换为0,其余的不变,就可以获得两个红色按钮:
python
QPushButton {background-color: qlineargradient(x1: 1, y1: 0, x2: 1, y2: 1,
	stop: 0 hsl(0,35%,90%),
	stop: 0.15 hsl(0,35%,60%),
	stop: 0.75 hsl(0,35%,50%),
	stop: 1.0 hsl(0,35%,35%));
	border-top: 2px solid #f0f0f0;
	border-left: 2px solid #f0f0f0;
	border-right: 2px solid #303030;
	border-bottom: 2px solid #303030;
border-radius: 5px;
	}
QPushButton:hover{background-color: qlineargradient(x1: 1, y1: 0, x2: 1, y2: 1,
	stop: 0 hsl(0,35%,85%),
	stop: 0.1 hsl(0,35%,65%),
	stop: 0.85 hsl(0,35%,55%),
	stop: 1.0 hsl(0,35%,50%));
	border-top: 1px solid #f0f0f0;
	border-left: 1px solid #f0f0f0;
	border-right: 1px solid #303030;
	border-bottom: 1px solid #303030;
	}
QPushButton:pressed{background-color: hsl(0,35%,70%);
	border-top: 1px solid #303030;
	border-left: 1px solid #303030;
	border-right: 1px solid #f0f0f0;
	border-bottom: 1px solid #f0f0f0;
}
python
QPushButton {background-color: qlineargradient(x1: 1, y1: 0, x2: 1, y2: 1,
	stop: 0 hsl(0,80%,90%),
	stop: 0.15 hsl(0,80%,60%),
	stop: 0.75 hsl(0,80%,50%),
	stop: 1.0 hsl(0,80%,40%));
	border-top: 2px solid #f0f0f0;
	border-left: 2px solid #f0f0f0;
	border-right: 2px solid #303030;
	border-bottom: 2px solid #303030;
border-radius: 5px;
	}
QPushButton:hover{background-color: qlineargradient(x1: 1, y1: 0, x2: 1, y2: 1,
	stop: 0 hsl(0,80%,85%),
	stop: 0.1 hsl(0,80%,65%),
	stop: 0.85 hsl(0,80%,55%),
	stop: 1.0 hsl(0,80%,50%));
	border-top: 1px solid #f0f0f0;
	border-left: 1px solid #f0f0f0;
	border-right: 1px solid #303030;
	border-bottom: 1px solid #303030;
	}
QPushButton:pressed{background-color: hsl(0,80%,70%);
	border-top: 1px solid #303030;
	border-left: 1px solid #303030;
	border-right: 1px solid #f0f0f0;
	border-bottom: 1px solid #f0f0f0;
}
利用HSL颜色系统,可以很方便地创建迭代方便、颜色体系变量化、高效组态UI工程。
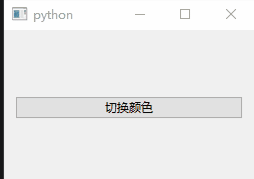
- 一个自定义颜色系统的demo:
python
import sys

from PySide6.QtWidgets import QApplication, QWidget, QPushButton, QVBoxLayout

h_dict = {
    "红色": "0",
    "棕色": "20",
    "橙色": "30",
    "黄色": "60",
    "黄绿": "90",
    "绿色": "120",
    "青绿": "150",
    "青色": "180",
    "靛蓝": "210",
    "蓝色": "240",
    "紫色": "270",
    "品红": "300",
    "紫红": "330",
}

colors = list(h_dict.keys())

i = 0
def toggle_color():
    global i
    if i>= len(colors):
        i = 0
    color_name = colors[i]
    h = h_dict[color_name]
    style_Sheet = f"""background-color:hsl({h},100%,50%)"""
    widget.setStyleSheet(style_Sheet)
    widget.style().unpolish(widget)
    widget.style().polish(widget)
    btn.setText(color_name)
    i += 1


app = QApplication(sys.argv)

widget = QWidget()

btn = QPushButton("切换颜色")
btn.clicked.connect(toggle_color)

layout = QVBoxLayout()
layout.addWidget(btn)
widget.setLayout(layout)

widget.show()
sys.exit(app.exec())