文章目录
- [1. 混合模式](#1. 混合模式)
-
- [1.1 并行收集数据](#1.1 并行收集数据)
- [1.2 分析收集到的数据](#1.2 分析收集到的数据)
- [1.3 路由选择报告格式](#1.3 路由选择报告格式)
- [1.4 工作流编排](#1.4 工作流编排)
- [1.5 调用工作流,执行完整任务](#1.5 调用工作流,执行完整任务)
- [1.6 执行流程](#1.6 执行流程)
- [2. SupervisorAgent 说明](#2. SupervisorAgent 说明)
-
- [2.1 功能概述](#2.1 功能概述)
- [2.2 移除说明](#2.2 移除说明)
- [3. 自定义模式](#3. 自定义模式)
-
- [3.1 FlowAgent 抽象类](#3.1 FlowAgent 抽象类)
- [2.1 条件执行 Agent](#2.1 条件执行 Agent)
-
- [2.1.1 ConditionalGraphBuildingStrategy](#2.1.1 ConditionalGraphBuildingStrategy)
- [2.1.2 实现 FlowAgent](#2.1.2 实现 FlowAgent)
- [2.1.3 创建各分支 Agent](#2.1.3 创建各分支 Agent)
- [2.1.4 使用默认 ConditionEvaluator](#2.1.4 使用默认 ConditionEvaluator)
- [2.1.5 自定义 ConditionEvaluator](#2.1.5 自定义 ConditionEvaluator)
- [2.3 自定义 FlowAgent 完整实现](#2.3 自定义 FlowAgent 完整实现)
-
- [2.3.1 定义 SupervisorStrategy](#2.3.1 定义 SupervisorStrategy)
- [2.3.2 注册 Strategy](#2.3.2 注册 Strategy)
- [2.3.3 定义 SupervisorAgent](#2.3.3 定义 SupervisorAgent)
- [2.3.4 使用案例](#2.3.4 使用案例)
1. 混合模式
实际业务中,我们可以组合条件路由、并行执行、顺序执行等模式,创建复杂的多 Agent 工作流。
案例说明 :实现「并行收集数据→分析数据→路由生成报告 」的完整业务流程,贴合实际业务场景(如 AI 技术趋势研究、多格式报告生成)。
1.1 并行收集数据
创建 2 个ReactAgent 分别负责互联网搜索、数据库查询,再通过 ParallelAgent 让两者并行执行,实现多数据源同步收集,提升数据获取效率。
创建「互联网搜索 Agent」,调用大模型,从互联网搜索用户指定主题(如 AI 技术趋势)的相关信息:
java
ReactAgent webResearchAgent = ReactAgent.builder()
  .name("web_research") // Agent唯一标识,用于后续管理和调试
  .model(chatModel) // 绑定大模型实例(需提前创建,如通义千问、GPT等),是Agent执行任务的核心依赖
  .description("从互联网搜索信息") // 描述Agent功能,用于路由判断(本案例中用于ParallelAgent识别子Agent作用)
  .instruction("请搜索并收集关于以下主题的信息:{input}") // Agent执行指令,{input}是占位符,会接收后续工作流的输入参数(如"研究AI技术趋势")
  .outputKey("web_data") // 定义该Agent输出结果的键名,后续其他Agent可通过{web_data}获取该Agent的执行结果
  .build(); // 构建Agent实例
创建「数据库查询 Agent」,调用大模型,从业务数据库中查询用户指定主题的相关数据(如历史 AI 技术趋势数据):
java
ReactAgent dbResearchAgent = ReactAgent.builder()
  .name("db_research") // Agent唯一标识,与webResearchAgent区分
  .model(chatModel) // 绑定同一个大模型实例(也可根据需求绑定不同模型)
  .description("从数据库查询信息") // 描述Agent功能,明确与互联网搜索的区别
  .instruction("请从数据库中查询并收集关于以下主题的信息:{input}") // 指令与webResearchAgent区分,聚焦数据库查询
  .outputKey("db_data") // 输出结果键名,与webResearchAgent的"web_data"区分,避免结果混淆
  .build();
创建「并行 Agent」,管理两个收集 Agent 并行执行:
java
ParallelAgent researchAgent = ParallelAgent.builder()
  .name("parallel_research") // 并行Agent唯一标识
  .description("并行收集多个数据源的信息") // 描述并行Agent的核心作用
  .subAgents(List.of(webResearchAgent, dbResearchAgent)) // 绑定需要并行执行的子Agent(互联网搜索+数据库查询)
  .mergeOutputKey("research_data") // 合并所有子Agent的输出结果,将"web_data"和"db_data"的内容合并为"research_data",方便后续Agent统一获取
  .build();
1.2 分析收集到的数据
创建「数据分析 Agent」,对合并后的 research_data 进行分析,生成专业见解,为后续报告生成提供核心内容:
java
ReactAgent analysisAgent = ReactAgent.builder()
  .name("analysis_agent") // Agent唯一标识,聚焦数据处理
  .model(chatModel) // 绑定大模型实例
  .description("分析研究数据") // 描述Agent功能,明确其核心是"分析"而非"收集"
  .instruction("请分析以下收集到的数据并提供专业见解:{research_data}") // 指令中通过{research_data}获取步骤2合并后的所有数据,要求大模型生成分析见解
  .outputKey("analysis_result") // 定义分析结果的键名,后续报告Agent可通过{analysis_result}获取分析内容
  .build();
1.3 路由选择报告格式
创建 2 个「报告生成 Agent」(PDF / HTML),再通过 LlmRoutingAgent(路由 Agent),根据用户需求动态选择生成对应格式的报告,实现 "一份数据,多格式输出"。
创建「PDF 报告生成 Agent」:
java
ReactAgent pdfReportAgent = ReactAgent.builder()
  .name("pdf_report") // Agent唯一标识,明确报告格式
  .model(chatModel) // 绑定大模型实例
  .description("生成PDF格式报告") // 核心描述,是LlmRoutingAgent路由判断的关键依据
  .instruction("""
              请根据研究结果和分析结果生成一份PDF格式的报告。
              研究结果:{research_data}
              分析结果:{analysis_result}
              """) // 指令明确要求生成PDF格式,同时通过{research_data}和{analysis_result}获取前两步的结果,确保报告内容完整
  .outputKey("pdf_report") // 定义PDF报告结果的键名
.build();创建「HTML 报告生成 Agent」:
java
ReactAgent htmlReportAgent = ReactAgent.builder()
  .name("html_report") // Agent唯一标识,与PDF报告Agent区分
  .model(chatModel) // 绑定大模型实例
  .description("生成HTML格式报告") // 核心描述,与PDF报告Agent的描述区分,供路由Agent判断
  .instruction("""
              请根据研究结果和分析结果生成一份HTML格式的报告。
              研究结果:{research_data}
              分析结果:{analysis_result}
              """) // 指令明确要求生成HTML格式,接收的数据与PDF报告Agent一致,保证报告内容统一
  .outputKey("html_report") // 定义HTML报告结果的键名
  .build();
创建「路由 Agent」,动态选择报告格式:
java
LlmRoutingAgent reportAgent = LlmRoutingAgent.builder()
  .name("report_router") // 路由Agent唯一标识
  .description("根据需求选择报告格式(PDF/HTML)") // 描述路由Agent的核心作用
  .model(chatModel) // 绑定大模型实例,由大模型判断用户需求,选择对应报告Agent
  .subAgents(List.of(pdfReportAgent, htmlReportAgent)) // 绑定需要路由的子Agent(PDF/HTML报告Agent)
  .build();
1.4 工作流编排
创建「顺序工作流 Agent」,将前面创建的所有 Agent 按业务逻辑串联,确保流程按 "数据收集→数据处理→报告生成" 的顺序执行:
java
SequentialAgent hybridWorkflow = SequentialAgent.builder()
  .name("research_workflow") // 工作流唯一标识,代表整个完整流程
  .description("完整的研究工作流:并行收集数据→分析数据→路由生成报告") // 描述工作流的整体逻辑
  .subAgents(List.of(researchAgent, analysisAgent, reportAgent)) // 按业务顺序绑定子Agent,执行顺序固定:
  // 1. researchAgent(并行收集数据)→ 2. analysisAgent(分析数据)→ 3. reportAgent(路由生成报告)
  .build();
1.5 调用工作流,执行完整任务
调用整个工作流,传入用户需求("研究 AI 技术趋势并生成 HTML 报告"),触发所有 Agent 按顺序执行:
java
<OverAllState> result = hybridWorkflow.invoke("研究AI技术趋势并生成HTML报告");
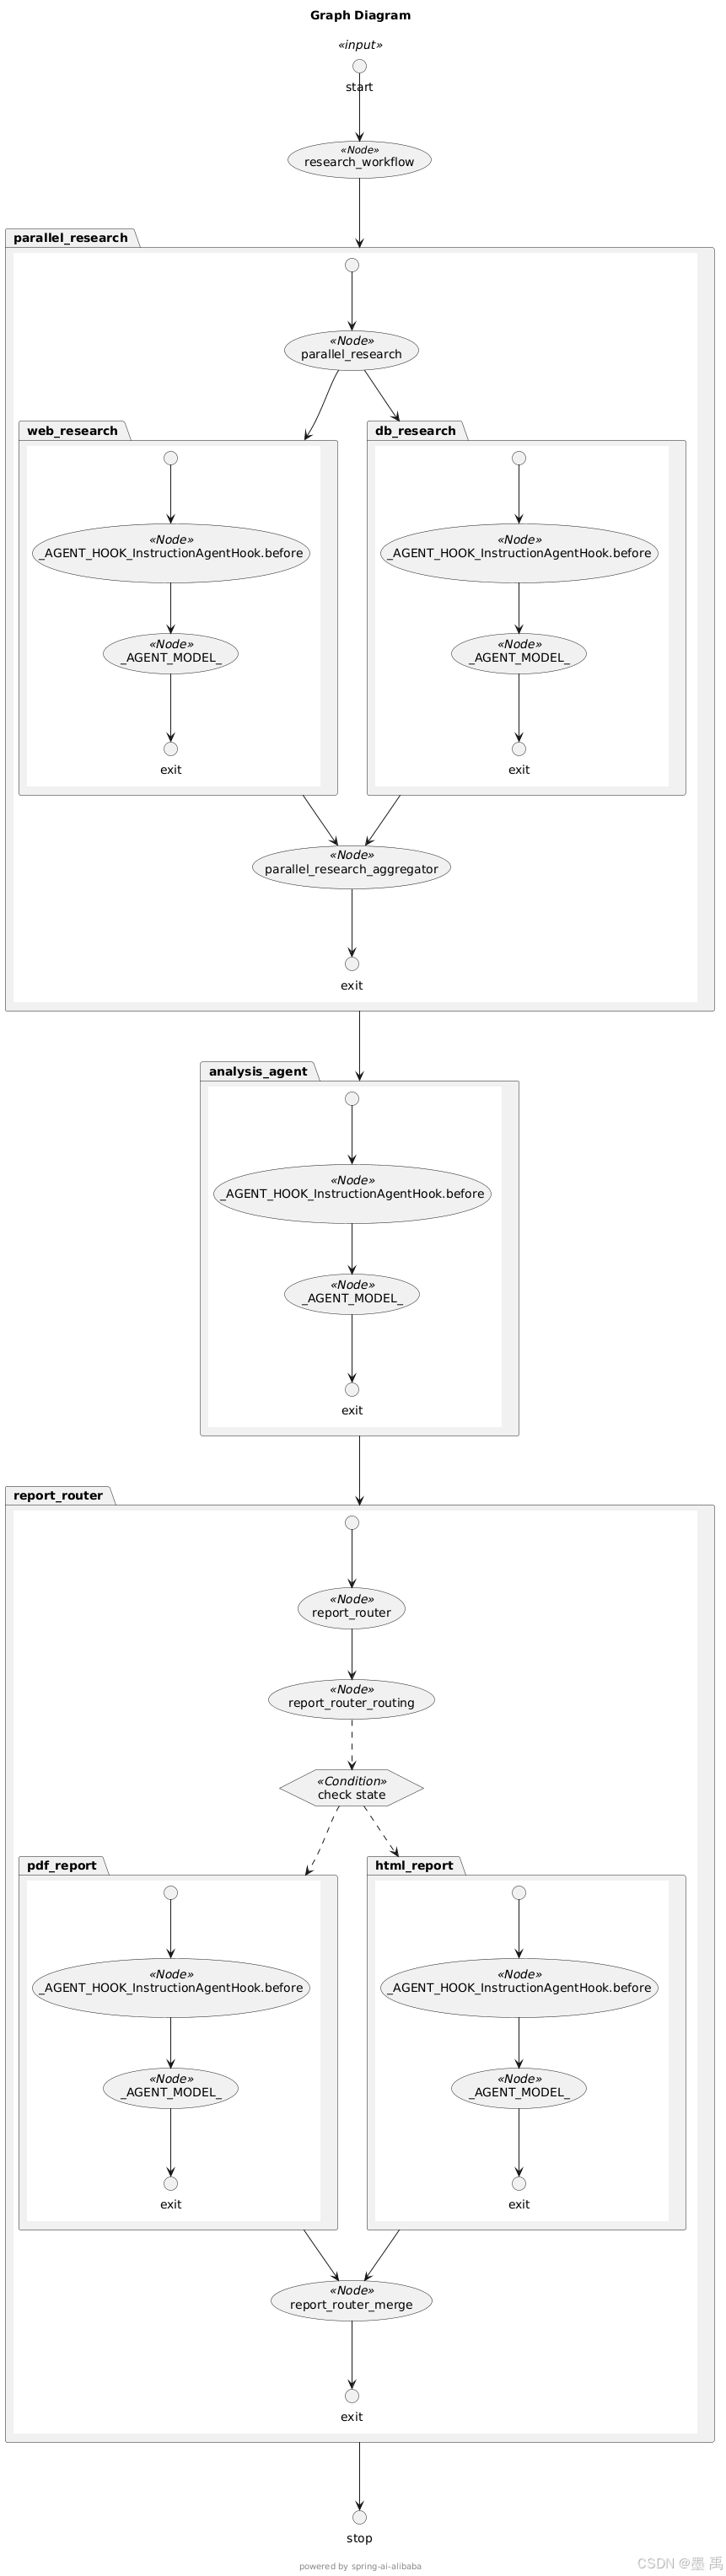
1.6 执行流程
执行流程拆解:
-
【并行数据收集阶段】
researchAgent并行执行两个子任务:webResearchAgent:从互联网搜索AI技术趋势相关信息dbResearchAgent:从数据库查询AI技术趋势相关数据- 执行完成后,框架自动将两份数据合并为
research_data
-
【数据分析阶段】 :
analysisAgent接收上一步的research_data并进行深度分析,生成AI技术趋势的专业见解,输出结果为analysis_result -
【智能路由报告生成阶段】
reportAgent执行智能路由决策:- 大模型自动解析用户需求(生成HTML报告)
- 根据需求路由至
htmlReportAgent htmlReportAgent结合research_data和analysis_result,生成标准HTML格式报告
-
【最终结果输出】 工作流执行结果封装在
result对象中,内部包含完整的HTML报告内容,可直接用于页面展示、文件保存、数据导出等后续业务操作。
2. SupervisorAgent 说明
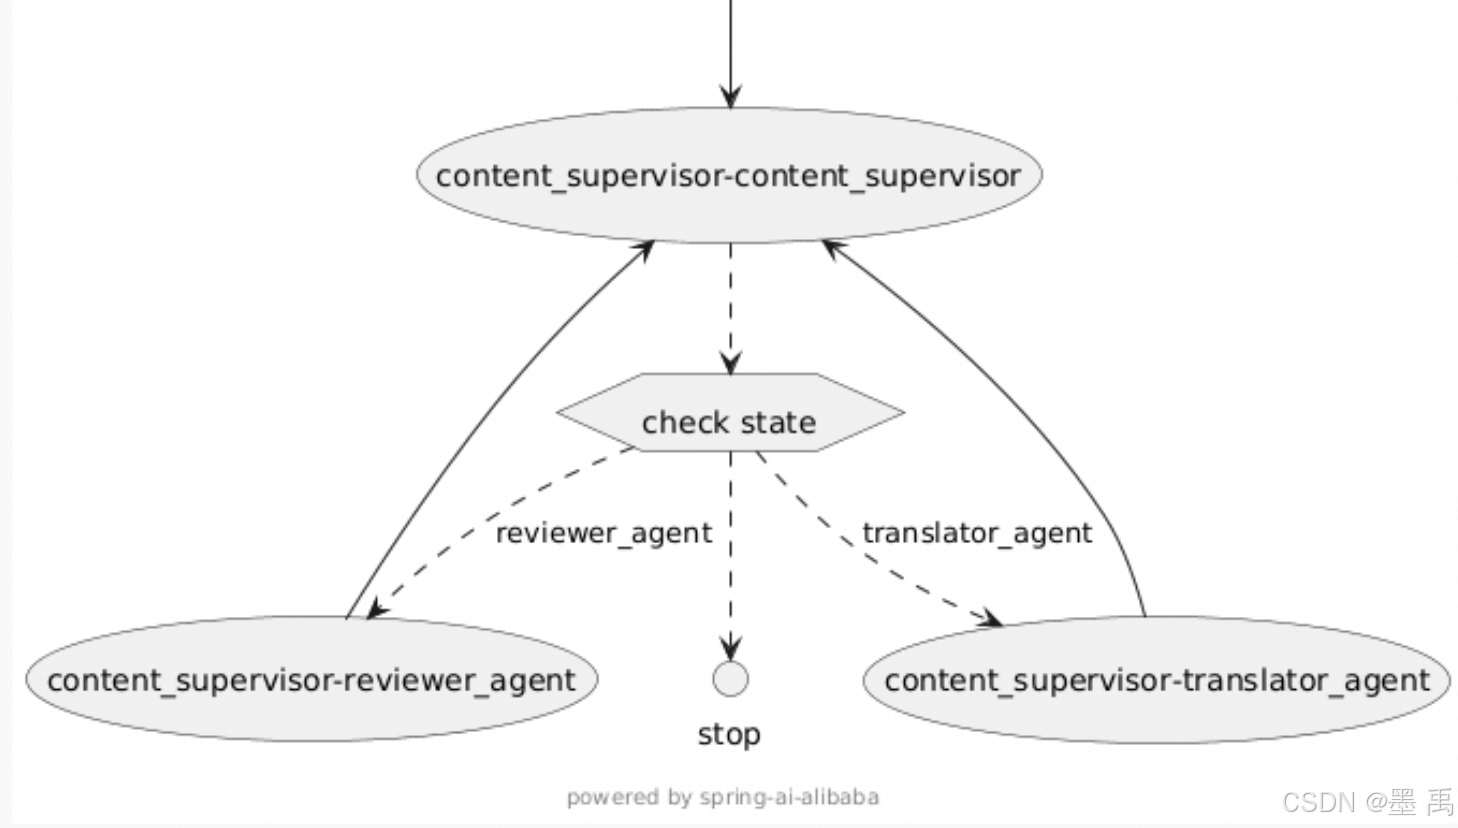
2.1 功能概述
在监督者模式中,使用大语言模型(LLM)作为监督者,动态决定将任务路由到哪个子Agent,并支持多步骤循环路由。与 LlmRoutingAgent 不同,SupervisorAgent 支持子Agent 执行完成后返回监督者,监督者可以根据执行结果继续路由到其他Agent 或完成任务。
监督者模式完整流程:
SupervisorAgent(监督者Agent)接收用户输入或前序Agent的输出,作为当前任务的初始状态。LLM(监督者核心)分析当前任务状态、需求目标,动态判断并选择最合适的子Agent执行当前步骤任务。- 被选中的子
Agent接收任务指令,执行具体的业务处理(如数据查询、逻辑计算、报告生成等)。 - 子
Agent执行完成后,将执行结果、任务进度等信息返回给SupervisorAgent。 SupervisorAgent结合LLM分析子Agent的返回结果,做出以下两种决策之一:- 继续路由:若任务未完成(如多步骤任务需分阶段处理),则再次通过
LLM选择下一个合适的子Agent,重复步骤2-4。 - 任务结束:若任务已完成,返回
FINISH标识,终止整个任务流程。
- 继续路由:若任务未完成(如多步骤任务需分阶段处理),则再次通过
核心区别(与 LlmRoutingAgent 对比):
核心差异在于「子Agent执行后的流转逻辑」:
LlmRoutingAgent:仅负责一次性路由 ,子Agent执行完成后直接输出结果,不返回路由节点,不支持多步骤循环。SupervisorAgent:子Agent执行完成后必须返回监督者,由监督者根据结果动态决策「继续路由」或「终止任务」,天然支持多步骤循环路由。
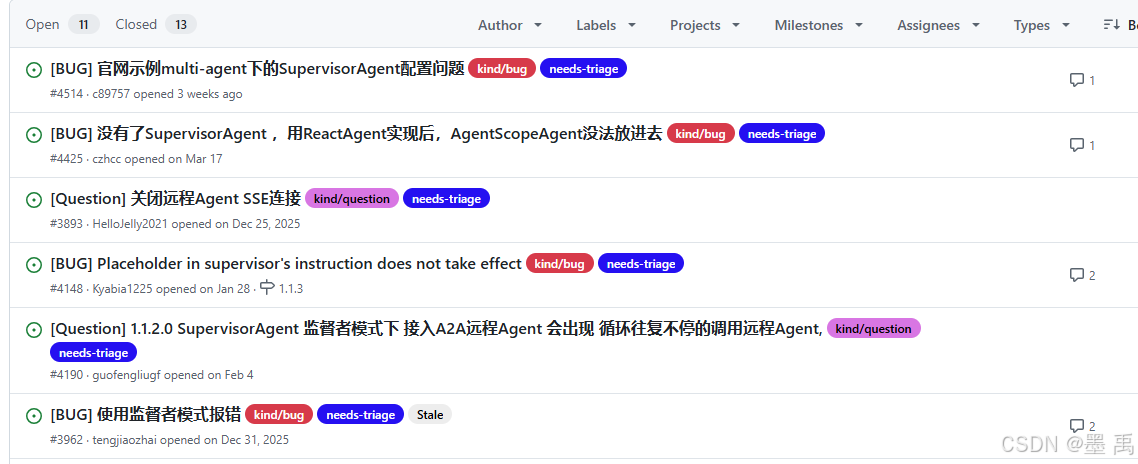
2.2 移除说明
在 1.1.2.2 版本中 SupervisorAgent 已被移除,但是在官网文档中还是给出了使用示例,也没相关删除声明。
查看 Github issues 猜测,应该是 BUG 很多又不好解决,所有谨慎使用:
3. 自定义模式
3.1 FlowAgent 抽象类
FlowAgent 作为所有流程型 Agent 的基类,提供了强大的扩展能力,允许我们根据业务需求定制任意复杂的多 Agent 协作模式。
核心能力说明:
- 子
Agent管理:通过subAgents列表统一管理所有参与协作的子Agent,便于流程调度。 - 抽象图构建:
buildSpecificGraph是自定义工作流的核心,子类通过该方法构建状态图,定义Agent执行逻辑。 - 工具方法支持:提供
subAgents()、compileConfig()方法,方便子类获取父类资源。
扩展 FlowAgent 关键要点:
- 必须实现
buildSpecificGraph方法 :这是核心方法,定义了Agent的工作流拓扑逻辑,所有自定义逻辑都需在该方法中通过FlowGraphBuilder构建。 - 使用
FlowGraphBuilder工具 :框架提供的FlowGraphBuilder封装了图构建的常用方法(如条件图、循环图),无需手动构建StateGraph,提升开发效率。 - 继承
FlowAgentBuilder:自定义Agent的Builder需继承FlowAgentBuilder,保持与框架一致的构建器模式,提升代码可读性和可维护性。 - 管理子
Agent:所有子Agent需统一放入subAgents列表,便于父类FlowAgent管理和调度,避免子Agent遗漏导致流程异常。 - 关注状态传递 :通过
StateGraph控制Agent之间的状态流转,确保子Agent之间的数据交互正常,这是多Agent协作的核心。
源码解析:
java
public abstract class FlowAgent extends Agent {

  protected List<Agent> subAgents;  // 子`Agent`列表,用于管理所有协作的子`Agent`
  protected CompileConfig compileConfig;  // 编译配置,控制图的编译行为

  // 核心抽象方法:子类必须实现,定义具体的工作流图构建逻辑
  protected abstract StateGraph buildSpecificGraph(
      FlowGraphBuilder.FlowGraphConfig config
  ) throws GraphStateException;

  // 提供给子类的工具方法,用于获取子`Agent`和编译配置
  public List<Agent> subAgents() { return this.subAgents; }
  public CompileConfig compileConfig() { return compileConfig; }
}
FlowAgentEnum 枚举类中定义了六种 FlowAgent :
java
public enum FlowAgentEnum {
CONDITIONAL("CONDITIONAL"),
SEQUENTIAL("SEQUENTIAL"),
ROUTING("ROUTING"),
PARALLEL("PARALLEL"),
LOOP("LOOP"),
SUPERVISOR("SUPERVISOR");
private final String type;
FlowAgentEnum(final String type) {
this.type = type;
}
public String getType() {
return type;
}
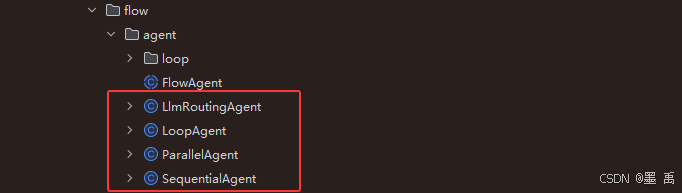
}Spring AI Alibaba 1.1.2.2 版本中只包含了四中 FlowAgent 实现类:
又定义了五种 FlowGraphBuildingStrategy 实现:
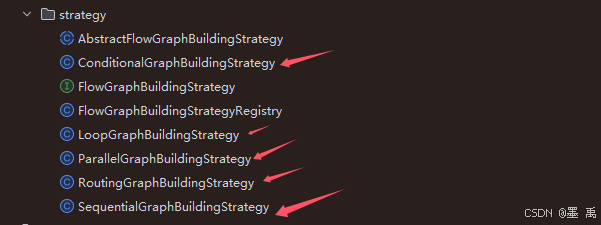
FlowGraphBuildingStrategyRegistry 支持五种策略:
java
	/**
	 * Registers the default built-in strategies. Each {@link #createStrategy(String)}
	 * call returns a new strategy instance for these types.
	 */
	private void registerDefaultStrategies() {
		registerStrategy(FlowAgentEnum.SEQUENTIAL.getType(), SequentialGraphBuildingStrategy::new);
		registerStrategy(FlowAgentEnum.ROUTING.getType(), RoutingGraphBuildingStrategy::new);
		registerStrategy(FlowAgentEnum.PARALLEL.getType(), ParallelGraphBuildingStrategy::new);
		registerStrategy(FlowAgentEnum.CONDITIONAL.getType(), ConditionalGraphBuildingStrategy::new);
		registerStrategy(FlowAgentEnum.LOOP.getType(), LoopGraphBuildingStrategy::new);
	}
2.1 条件执行 Agent
2.1.1 ConditionalGraphBuildingStrategy
框架已内置 ConditionalGraphBuildingStrategy,基于当前任务状态评估条件,动态选择对应的子 Agent 执行,实现一次性条件路由。
java
public class ConditionalGraphBuildingStrategy extends AbstractFlowGraphBuildingStrategy {

	/**
	 * 构建条件流的核心执行图
	 * 流程:起始节点 → 条件评估 → 路由子Agent → 分支收敛 → 钩子/结束节点
	 * @param config 流图配置对象,包含条件Agent映射、根Agent等核心配置
	 * @throws GraphStateException 图构建异常(节点/边创建失败)
	 */
	@Override
	protected void buildCoreGraph(FlowGraphBuilder.FlowGraphConfig config) throws GraphStateException {
		// 校验条件流专属配置合法性
		validateConditionalConfig(config);

		// 获取根Agent,作为条件流的入口主体
		Agent rootAgent = getRootAgent();

		// 添加根透明节点,作为条件流程的起始入口(无业务逻辑,仅做流程转发)
		String conditionalStartNode = rootAgent.name();
		this.graph.addNode(conditionalStartNode, node_async(new TransparentNode()));

		// 绑定前置模型钩子:若存在beforeModel钩子,连接到条件起始节点
		if (!this.beforeModelHooks.isEmpty()) {
			connectBeforeModelHookEdges(this.graph, conditionalStartNode, this.beforeModelHooks);
		}

		// 创建条件评估节点:用于解析任务状态,匹配路由条件
		String conditionNodeName = rootAgent.name() + "_condition";
		this.graph.addNode(conditionNodeName, node_async(new ConditionEvaluator()));
		// 建立根节点 → 条件评估节点的执行边
		this.graph.addEdge(rootAgent.name(), conditionNodeName);

		// 构建条件路由映射表:key=条件表达式,value=子Agent节点名称
		Map<String, String> conditionRoutingMap = new HashMap<>();

		// 遍历配置的所有条件Agent,注册子Agent节点并填充路由映射
		for (Map.Entry<String, Agent> entry : config.getConditionalAgents().entrySet()) {
			String condition = entry.getKey();
			Agent subAgent = entry.getValue();
			// 向图中添加子Agent节点
			FlowGraphBuildingStrategy.addSubAgentNode(subAgent, this.graph);
			// 绑定条件与子Agent的路由关系
			conditionRoutingMap.put(condition, subAgent.name());
		}

		// -------------------------- 核心设计:分支收敛 --------------------------
		// 所有条件分支必须统一收敛到一个节点,确保afterModel钩子仅执行一次
		// 不使用父类默认钩子连接,避免分支重复执行钩子
		String convergencePoint;
		if (!this.afterModelHooks.isEmpty()) {
			// 收敛点 = 第一个后置模型钩子
			convergencePoint = Hook.getFullHookName(this.afterModelHooks.get(0)) + ".afterModel";

			// 串联所有后置钩子(保证所有分支共用一套钩子链)
			String prevHook = convergencePoint;
			for (int i = 1; i < this.afterModelHooks.size(); i++) {
				String currentHook = Hook.getFullHookName(this.afterModelHooks.get(i)) + ".afterModel";
				this.graph.addEdge(prevHook, currentHook);
				prevHook = currentHook;
			}

			// 最后一个钩子连接到流程结束节点
			this.graph.addEdge(prevHook, this.exitNode);
		} else {
			// 无后置钩子时,收敛点直接为结束节点
			convergencePoint = this.exitNode;
		}

		// 将所有子Agent分支连接到统一收敛点
		for (Agent subAgent : config.getConditionalAgents().values()) {
			this.graph.addEdge(subAgent.name(), convergencePoint);
		}

		// 添加默认兜底路由:无匹配条件时,直接结束流程
		conditionRoutingMap.put("default", this.exitNode);

		// 绑定条件边:条件评估节点根据评估结果,路由到对应子Agent/结束节点
		this.graph.addConditionalEdges(conditionNodeName, new ConditionEvaluatorAction(), conditionRoutingMap);
	}

	/**
	 * 重写前置钩子连接方法(空实现)
	 * 原因:beforeModel钩子已在buildCoreGraph中完成绑定,适配条件路由逻辑
	 * @throws GraphStateException 图状态异常
	 */
	@Override
	protected void connectBeforeModelHooks() throws GraphStateException {
		// Empty override: beforeModel hooks are already connected in buildCoreGraph
		// to ensure proper integration with conditional routing logic
	}

	/**
	 * 重写后置钩子连接方法(空实现)
	 * 原因:条件路由需要统一收敛点,必须在核心图构建中处理钩子,避免重复执行
	 * @throws GraphStateException 图状态异常
	 */
	@Override
	protected void connectAfterModelHooks() throws GraphStateException {
		// Empty override: afterModel hooks must be handled in buildCoreGraph because:
		// 1. Conditional routing needs to know the convergence point when setting up routes
		// 2. All branches must converge to the same hook chain (not separate chains per branch)
		// 3. Hooks should execute only once, not once per branch
	}

	/**
	 * 获取当前策略类型
	 * @return 条件流策略标识(CONDITIONAL)
	 */
	@Override
	public String getStrategyType() {
		return FlowAgentEnum.CONDITIONAL.getType();
	}

	/**
	 * 校验流图配置(继承父类校验 + 条件流专属校验)
	 * @param config 流图配置对象
	 */
	@Override
	public void validateConfig(FlowGraphBuilder.FlowGraphConfig config) {
		// 执行父类基础配置校验
		super.validateConfig(config);
		// 执行条件流专属配置校验
		validateConditionalConfig(config);
	}

	/**
	 * 条件流专属配置校验
	 * 校验规则:
	 * 1. 必须配置至少一组 条件-子Agent 映射
	 * 2. 根Agent必须是FlowAgent类型
	 * 3. 条件键不能为空/空白字符串
	 * @param config 待校验的流图配置
	 * @throws IllegalArgumentException 配置不合法时抛出异常
	 */
	private void validateConditionalConfig(FlowGraphBuilder.FlowGraphConfig config) {
		// 校验条件Agent集合非空
		if (config.getConditionalAgents() == null || config.getConditionalAgents().isEmpty()) {
			throw new IllegalArgumentException("Conditional flow requires at least one conditional agent mapping");
		}

		// 校验根Agent类型必须为FlowAgent(支持状态/输入键读取)
		if (!(config.getRootAgent() instanceof FlowAgent)) {
			throw new IllegalArgumentException("Conditional flow requires root agent to be a FlowAgent");
		}

		// 校验所有条件键非空
		for (String condition : config.getConditionalAgents().keySet()) {
			if (condition == null || condition.trim().isEmpty()) {
				throw new IllegalArgumentException("Condition keys cannot be null or empty");
			}
		}
	}

}
2.1.2 实现 FlowAgent
自定义 ConditionalAgent 完整代码:
java
public class ConditionalAgent extends FlowAgent {

    private final Map<String, Agent> conditionalAgents;

    private final Function<OverAllState, String> conditionEvaluatorFn;

    protected ConditionalAgent(ConditionalAgentBuilder builder) {
        super(builder.name, builder.description, builder.compileConfig,
                // subAgents 留空,条件 Agent 通过 conditionalAgents 传递
                List.of(), builder.stateSerializer, builder.executor, builder.hooks);
        this.conditionalAgents = builder.conditionalAgents;
        this.conditionEvaluatorFn = builder.conditionEvaluatorFn;
    }

    public static ConditionalAgentBuilder builder() {
        return new ConditionalAgentBuilder();
    }

    @Override
    protected StateGraph buildSpecificGraph(FlowGraphConfig config) throws GraphStateException {
        // 核心:将 conditionalAgents 设置到 config(而非 subAgents)
        config.setConditionalAgents(this.conditionalAgents);

        // 如果有自定义条件评估器,注入到 config 的 customProperties
        if (this.conditionEvaluatorFn != null) {
            config.customProperty("conditionEvaluatorFn", this.conditionEvaluatorFn);
        }

        return FlowGraphBuilder.buildGraph(FlowAgentEnum.CONDITIONAL.getType(), config);
    }

    public Map<String, Agent> conditionalAgents() {
        return conditionalAgents;
    }

    // ========== Builder ==========

    public static class ConditionalAgentBuilder
            extends FlowAgentBuilder<ConditionalAgent, ConditionalAgentBuilder> {

        private final Map<String, Agent> conditionalAgents = new LinkedHashMap<>();
        private Function<OverAllState, String> conditionEvaluatorFn;

        /**
         * 添加一个条件分支:当条件评估返回 conditionName 时,路由到对应 Agent。
         *
         * @param conditionName 条件名称(必须与 ConditionEvaluator 返回值匹配)
         * @param agent         条件匹配时执行的子 Agent
         * @return this builder
         */
        public ConditionalAgentBuilder condition(String conditionName, Agent agent) {
            if (conditionName == null || conditionName.trim().isEmpty()) {
                throw new IllegalArgumentException("Condition name cannot be null or empty");
            }
            if (agent == null) {
                throw new IllegalArgumentException("Agent cannot be null for condition: " + conditionName);
            }
            if ("default".equals(conditionName)) {
                throw new IllegalArgumentException(
                        "'default' is a reserved condition name (no match → exit), "
                                + "please use a different name");
            }
            this.conditionalAgents.put(conditionName, agent);
            return self();
        }

        /**
         * 批量设置条件分支(覆盖之前通过 condition() 添加的所有条目)。
         *
         * @param agents 条件名 → Agent 的映射
         * @return this builder
         */
        public ConditionalAgentBuilder conditionalAgents(Map<String, Agent> agents) {
            if (agents == null) {
                throw new IllegalArgumentException("Conditional agents map cannot be null");
            }
            this.conditionalAgents.clear();
            this.conditionalAgents.putAll(agents);
            return self();
        }

        /**
         * 设置自定义条件评估函数。
         *
         * <p>函数接收当前 {@link OverAllState},返回条件名称字符串。
         * 返回值必须与某个 condition 名匹配,或返回 "default" 表示无匹配。
         *
         * <p>如果不设置,将使用默认的 {@link ConditionEvaluator}(基于关键词匹配)。
         *
         * @param evaluator 条件评估函数 (OverAllState → String)
         * @return this builder
         */
        public ConditionalAgentBuilder conditionEvaluator(Function<OverAllState, String> evaluator) {
            this.conditionEvaluatorFn = evaluator;
            return self();
        }

        @Override
        protected ConditionalAgentBuilder self() {
            return this;
        }

        @Override
        protected void validate() {
            // 不调用 super.validate(),因为它要求 subAgents 非空
            // ConditionalAgent 使用 conditionalAgents 而非 subAgents
            if (name == null || name.trim().isEmpty()) {
                throw new IllegalArgumentException("Name must be provided");
            }
            if (conditionalAgents.isEmpty()) {
                throw new IllegalArgumentException(
                        "At least one condition branch must be provided. "
                                + "Use .condition(name, agent) to add branches.");
            }

            // 校验条件名不含保留字或非法字符
            for (String conditionName : conditionalAgents.keySet()) {
                if (conditionName.contains(" ")) {
                    throw new IllegalArgumentException(
                            "Condition name cannot contain spaces: '" + conditionName + "'");
                }
            }
        }

        @Override
        public ConditionalAgent doBuild() {
            validate();
            return new ConditionalAgent(this);
        }
    }
}
2.1.3 创建各分支 Agent
创建各分支 Agent :
java
        ReactAgent refundAgent = ReactAgent.builder()
                .name("refund-handler")
                .description("处理退款相关请求")
                .model(dashscopeChatModel)
                .instruction("""
                        你是退款处理专员。根据用户提供的信息处理退款请求。
                        需要确认:订单号、退款原因、退款金额。
                        输出处理结果和退款进度。
                        """)
                .outputKey("refund_result")
                .build();

        ReactAgent techAgent = ReactAgent.builder()
                .name("tech-support")
                .description("处理技术问题")
                .model(dashscopeChatModel)
                .instruction("""
                        你是技术支持工程师。帮助用户解决产品使用中的技术问题。
                        提供分步骤的故障排除指南。
                        """)
                .outputKey("tech_result")
                .build();

        ReactAgent complaintAgent = ReactAgent.builder()
                .name("complaint-handler")
                .description("处理投诉")
                .model(dashscopeChatModel)
                .instruction("""
                        你是投诉处理专员。以同理心和专业的态度处理客户投诉。
                        记录投诉内容,提供解决方案和补偿建议。
                        """)
                .outputKey("complaint_result")
                .build();
2.1.4 使用默认 ConditionEvaluator
默认 ConditionEvaluator 执行节点:
java
public class ConditionEvaluator implements NodeAction {

	@Override
	public Map<String, Object> apply(OverAllState state) throws Exception {
		Map<String, Object> updatedState = new HashMap<>();

		// Default condition evaluation logic
		// This can be extended to support custom condition evaluation
		String conditionResult = evaluateCondition(state);
		updatedState.put(CONDITION_KEY, conditionResult);

		return updatedState;
	}
根据当前全局状态评估条件,返回匹配的条件结果处理逻辑:
- 从全局状态中获取用户输入文本,转为小写(忽略大小写匹配)
- 判断输入包含错误/异常关键词 → 路由到错误处理分支
- 判断输入包含数据/分析关键词 → 路由到数据处理分支
- 判断输入包含报告/总结关键词 → 路由到报告生成分支
- 无匹配关键词 → 返回默认分支
java
	/**
	 * 根据当前全局状态评估条件,返回匹配的条件结果(用于路由子Agent)
	 * 可重写此方法实现自定义的条件判断逻辑
	 * @param state 当前全局状态(包含用户输入、上下文等所有数据)
	 * @return 条件匹配结果字符串,对应流程图中的路由分支标识
	 */
	protected String evaluateCondition(OverAllState state) {
		// 从全局状态中获取用户输入文本,转为小写(忽略大小写匹配)
		String input = state.value("input", "").toString().toLowerCase();

		// 判断输入包含错误/异常关键词 → 路由到错误处理分支
		if (input.contains("error") || input.contains("exception")) {
			return "error_handling";
		}
		// 判断输入包含数据/分析关键词 → 路由到数据处理分支
		else if (input.contains("data") || input.contains("analyze")) {
			return "data_processing";
		}
		// 判断输入包含报告/总结关键词 → 路由到报告生成分支
		else if (input.contains("report") || input.contains("summary")) {
			return "report_generation";
		}
		// 无匹配关键词 → 返回默认分支
		else {
			return "default";
		}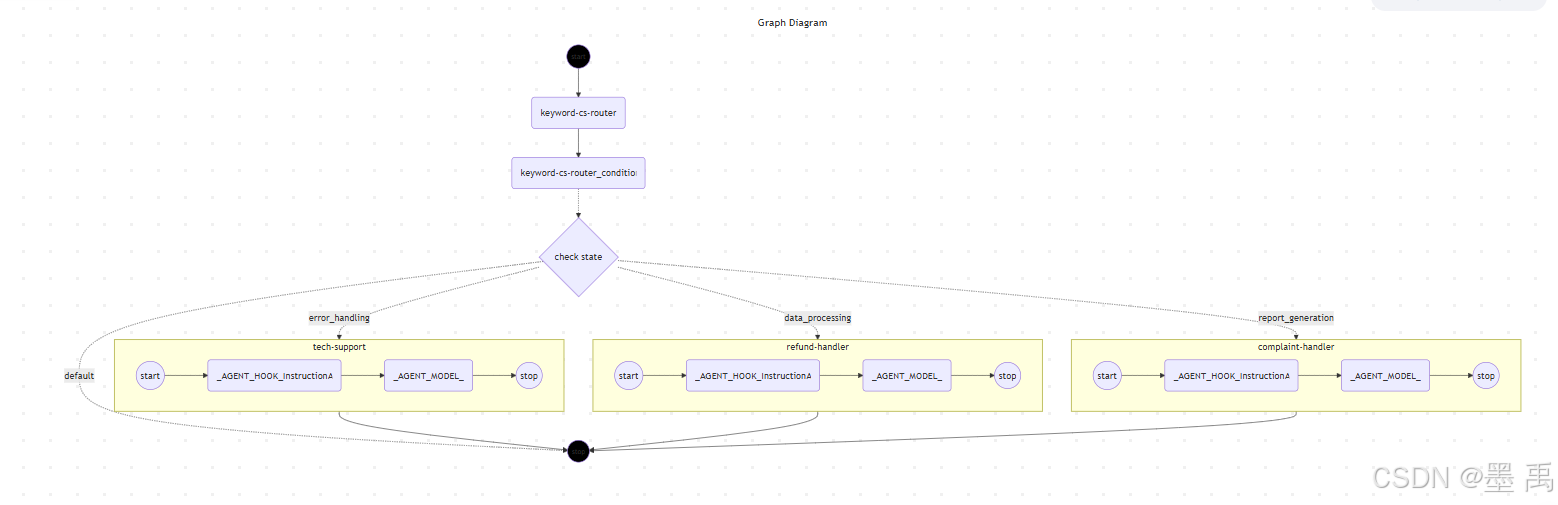
}使用默认关键词匹配(ConditionEvaluator 内置逻辑):
java
ConditionalAgent conditionalAgent = ConditionalAgent.builder()
.name("keyword-cs-router")
.description("基于关键词的客服路由")
.condition("error_handling", techAgent) // input 包含 "error"/"exception"
.condition("data_processing", refundAgent) // input 包含 "data"/"analyze"
.condition("report_generation", complaintAgent)// input 包含 "report"/"summary"
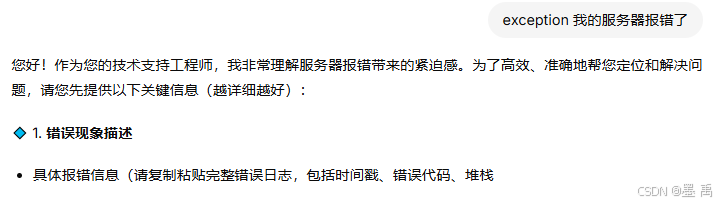
.build();测试时,需要在输入中包含对应的关键词:
2.1.5 自定义 ConditionEvaluator
自定义 ConditionEvaluator 通过字符串进行匹配,确实很 LOW 一般肯定需要自定义,比如通过前端用户自己选择传递标识符:
java
        // ========== 2. 构建 ConditionalAgent(带自定义条件评估) ==========
        ConditionalAgent conditionalAgent = ConditionalAgent.builder()
                .name("smart-cs-router")
                .description("智能客服意图路由")
                .conditionEvaluator(state -> {
                    String type = state.value("type", "").toString().toLowerCase();
                    return switch (type) {
                        case "refund" -> "refund";
                        case "tech" -> "tech";
                        case "complaint" -> "complaint";
                        default -> "general";
                    };
                })
                .condition("refund", refundAgent)
                .condition("tech", techAgent)
                .condition("complaint", complaintAgent)
                .condition("general", generalAgent)
                .build();
2.3 自定义 FlowAgent 完整实现
条件执行框架帮我们提供了相关实现,如何完全自定义实现一个多智能体呢?接下来我们自定义一个 监督者模式...
监督者模式(Supervisor Pattern)是 Agent 编排中的经典模式:一个 "监督者" Agent 先分析任务,决定哪些 Worker 应该执行,收集结果后再次评估,必要时进行下一轮分配。
java
START → beforeAgent → [SupervisorNode(LLM 决策)]
            │
            ├──→ worker1 ──┐
            ├──→ worker2 ──→ [SupervisorNode(评估)] ──(continue)──→ 回到分配
            └──→ worker3 ──┘        │
                                    └──(done)──→ afterAgent → END
提示:上个版本 Spring AI Alibaba 提供了 SupervisorAgent ,这个版本又删除了,说明该模式可能存在问题或者代码未完善,仅供学习参考,不保证当前代码可用。
2.3.1 定义 SupervisorStrategy
java
/**
 * Supervisor 模式图构建策略。
 *
 * 图结构:
 * START → root(TransparentNode) → [supervisorNode] ─(parallel conditional)→ worker1/worker2/...
 *   ←────── 所有 worker ──────→ [supervisorNode] ─(continue/done)──→ END
 *
 * 关键:supervisorNode 既是分配节点也是评估节点,通过条件边实现循环。
 */
public class SupervisorGraphBuildingStrategy extends AbstractFlowGraphBuildingStrategy {

    public static final String STRATEGY_TYPE = "SUPERVISOR";

    @Override
    public String getStrategyType() {
        return STRATEGY_TYPE;
    }

    @Override
    public void validateConfig(FlowGraphConfig config) {
        super.validateConfig(config);
        if (config.getSubAgents() == null || config.getSubAgents().size() < 2) {
            throw new IllegalArgumentException(
                "Supervisor flow requires at least 2 sub-agents (1 supervisor + workers)");
        }
        if (config.getChatModel() == null) {
            throw new IllegalArgumentException(
                "Supervisor flow requires a ChatModel for supervisor decision-making");
        }
    }

    @Override
    protected void buildCoreGraph(FlowGraphConfig config) throws GraphStateException {
        // 1. 添加根透明节点
        this.graph.addNode(getRootAgent().name(), node_async(new TransparentNode()));

        // 2. 第一个子 Agent 是 Supervisor(LLM 决策节点)
        Agent supervisorAgent = config.getSubAgents().get(0);
        FlowGraphBuildingStrategy.addSubAgentNode(supervisorAgent, this.graph);

        // 3. 剩余子 Agent 是 Worker
        for (int i = 1; i < config.getSubAgents().size(); i++) {
            Agent worker = config.getSubAgents().get(i);
            FlowGraphBuildingStrategy.addSubAgentNode(worker, this.graph);
        }

        // 4. 连接:root → supervisor
        this.graph.addEdge(getRootAgent().name(), supervisorAgent.name());

        // 5. Supervisor → Workers(并行条件边)
        //    supervisor 输出包含 next_agents 列表,路由到指定 worker
        String[] workerNames = config.getSubAgents().stream()
            .skip(1)
            .map(Agent::name)
            .toArray(String[]::new);

        this.graph.addParallelConditionalEdges(
            supervisorAgent.name(),
            state -> {
                // 从状态中读取 supervisor 的路由决策
                String nextAgents = (String) state.data().get("_supervisor_next_agents");
                if (nextAgents == null || nextAgents.equals("DONE")) {
                    return new String[]{ END };  // 任务完成,退出
                }
                // 解析要路由到的 worker 列表
                return nextAgents.split(",");
            },
            workerNames
        );

        // 6. 所有 Worker → 回到 Supervisor(形成循环)
        for (int i = 1; i < config.getSubAgents().size(); i++) {
            Agent worker = config.getSubAgents().get(i);
            this.graph.addEdge(worker.name(), supervisorAgent.name());
        }

        // 7. Supervisor 内部处理 hook 连接(覆盖模板方法的默认行为)
        if (!this.beforeModelHooks.isEmpty()) {
            connectBeforeModelHookEdges(this.graph, getRootAgent().name(), this.beforeModelHooks);
        }
        if (!this.afterModelHooks.isEmpty()) {
            // afterModel 连接到 supervisor 节点之后
            String lastAfterModel = connectAfterModelHookEdges(
                this.graph, supervisorAgent.name(), this.afterModelHooks);
            // 注意:这里不再连接到 exitNode,因为 supervisor 有条件边
        }
    }

    // Supervisor 策略自行处理 hook 连接,覆盖模板方法为空
    @Override
    protected void connectBeforeModelHooks() throws GraphStateException {
        // 已在 buildCoreGraph 中处理
    }

    @Override
    protected void connectAfterModelHooks() throws GraphStateException {
        // 已在 buildCoreGraph 中处理
    }
}
2.3.2 注册 Strategy
在 Agent 构建之前注册到全局 Registry:
java
// 注册自定义 Strategy(工厂模式,每次创建新实例)
FlowGraphBuildingStrategyRegistry.getInstance()
    .registerStrategy("SUPERVISOR", SupervisorGraphBuildingStrategy::new);

// 验证注册成功
assert FlowGraphBuildingStrategyRegistry.getInstance().hasStrategy("SUPERVISOR");注册方式对比:
| 方式 | API | 行为 |
|---|---|---|
| 实例注册 | registerStrategy(strategy) |
每次返回同一实例(单例) |
| 工厂注册 | registerStrategy(type, Supplier) |
每次返回新实例 |
2.3.3 定义 SupervisorAgent
继承 FlowAgent 的实现:
java
/**
 * Supervisor 模式 Agent。
 *
 * <p>第一个子 Agent 是 Supervisor(负责分配任务和评估结果),
 * 其余子 Agent 是 Worker(执行具体任务)。
 *
 * <p>执行流程:Supervisor 分析任务 → 分配给 Worker → 收集结果 → 评估 → 继续或结束
 *
 * <p>使用示例:
 * <pre>{@code
 * SupervisorAgent agent = SupervisorAgent.builder()
 *     .name("research-supervisor")
 *     .description("研究任务监督者")
 *     .model(chatModel)
 *     .maxIterations(5)
 *     .subAgents(List.of(supervisor, searcher, analyst, writer))
 *     .build();
 * }</pre>
 */
public class SupervisorAgent extends FlowAgent {

    private final ChatModel chatModel;
    private final int maxIterations;
    private final String systemPrompt;

    protected SupervisorAgent(SupervisorAgentBuilder builder) {
        super(builder.name, builder.description, builder.compileConfig,
              builder.subAgents, builder.stateSerializer, builder.executor, builder.hooks);
        this.chatModel = builder.chatModel;
        this.maxIterations = builder.maxIterations;
        this.systemPrompt = builder.systemPrompt;
    }

    public static SupervisorAgentBuilder builder() {
        return new SupervisorAgentBuilder();
    }

    @Override
    protected StateGraph buildSpecificGraph(FlowGraphConfig config) throws GraphStateException {
        // 将自定义参数注入 config
        config.setChatModel(this.chatModel);
        config.customProperty("maxIterations", this.maxIterations);
        config.customProperty("systemPrompt", this.systemPrompt);

        // 委托给注册的 SUPERVISOR 策略
        return FlowGraphBuilder.buildGraph("SUPERVISOR", config);
    }

    // ========== Builder ==========

    public static class SupervisorAgentBuilder
            extends FlowAgentBuilder<SupervisorAgent, SupervisorAgentBuilder> {

        private ChatModel chatModel;
        private int maxIterations = 10;
        private String systemPrompt;

        /** 设置用于 Supervisor 决策的 ChatModel(必填) */
        public SupervisorAgentBuilder model(ChatModel chatModel) {
            this.chatModel = chatModel;
            return self();
        }

        /** 设置最大迭代次数(默认 10) */
        public SupervisorAgentBuilder maxIterations(int maxIterations) {
            this.maxIterations = maxIterations;
            return self();
        }

        /** 设置 Supervisor 的系统提示词 */
        public SupervisorAgentBuilder systemPrompt(String systemPrompt) {
            this.systemPrompt = systemPrompt;
            return self();
        }

        @Override
        protected SupervisorAgentBuilder self() {
            return this;
        }

        @Override
        protected void validate() {
            super.validate();  // 校验 name 非空、subAgents 非空
            if (chatModel == null) {
                throw new IllegalArgumentException(
                    "ChatModel must be provided for SupervisorAgent");
            }
            if (subAgents != null && subAgents.size() < 2) {
                throw new IllegalArgumentException(
                    "SupervisorAgent requires at least 2 sub-agents "
                    + "(1 supervisor + at least 1 worker)");
            }
        }

        @Override
        public SupervisorAgent doBuild() {
            validate();
            return new SupervisorAgent(this);
        }
    }
}
2.3.4 使用案例
java
 // 0. 注册自定义策略(只需一次)
        FlowGraphBuildingStrategyRegistry.getInstance()
            .registerStrategy("SUPERVISOR", SupervisorGraphBuildingStrategy::new);

        // 1. 创建 ChatModel
        ChatModel chatModel = createChatModel();

        // 2. 创建 Supervisor Agent(第一个子 Agent)
        ReactAgent supervisor = ReactAgent.builder()
            .name("supervisor")
            .description("研究任务监督者,负责分配和评估")
            .model(chatModel)
            .instruction("""
                你是一个研究项目的监督者。你的职责是:
                1. 分析用户的研究需求
                2. 决定哪些 Worker 应该执行任务
                3. 评估 Worker 的结果是否满足要求
                4. 如果不满意,继续分配任务;如果满意,输出 DONE

                你必须在回复中包含以下标记:
                - 分配任务时:[NEXT_AGENTS:searcher,analyst](逗号分隔的 Worker 名称)
                - 任务完成时:[DONE]
                """)
            .outputKey("supervisor_result")
            .build();

        // 3. 创建 Worker Agents
        ReactAgent searcher = ReactAgent.builder()
            .name("searcher")
            .description("信息搜索员")
            .model(chatModel)
            .instruction("你是一个搜索专家,根据任务搜索相关信息并总结")
            .outputKey("search_result")
            .methodTools(new SearchTools())  // 假设有搜索工具
            .build();

        ReactAgent analyst = ReactAgent.builder()
            .name("analyst")
            .description("数据分析员")
            .model(chatModel)
            .instruction("你是一个分析专家,对数据进行深入分析并给出洞察")
            .outputKey("analysis_result")
            .build();

        ReactAgent writer = ReactAgent.builder()
            .name("writer")
            .description("报告撰写员")
            .model(chatModel)
            .instruction("你是一个技术写作专家,将分析结果整理成结构化报告")
            .outputKey("report")
            .build();

        // 4. 构建 SupervisorAgent
        SupervisorAgent researchTeam = SupervisorAgent.builder()
            .name("research-team")
            .description("研究团队:监督者 + 搜索 + 分析 + 写作")
            .model(chatModel)
            .maxIterations(5)
            .systemPrompt("你管理一个研究团队,成员包括 searcher、analyst、writer")
            .subAgents(List.of(supervisor, searcher, analyst, writer))
            .build();

        // 5. 执行
        var result = researchTeam.call(Map.of(
            "input", "研究 Spring AI 在企业级 Agent 开发中的最佳实践"
        ));

        System.out.println(result);