一、实验要求
-
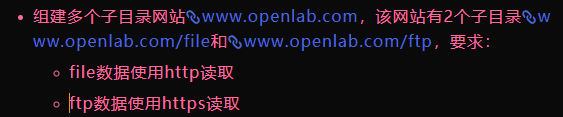
组建多个子目录网站<www.openlab.com>,该网站有2个子目录<www.openlab.com/file>和<www.openlab.com/ftp>,要求:
-
file数据使用http读取
-
ftp数据使用https读取
-
二、实验目的
- 掌握 Nginx 服务的安装、启动、配置与管理方法。
- 实现单域名多子目录网站部署:www.openlab.com 主域名下,/file 子目录通过 HTTP 协议访问,/ftp 子目录通过 HTTPS 协议访问。
- 掌握 Nginx 别名(alias)配置、SSL 证书制作与 HTTPS 配置、域名本地映射等核心技能。
- 理解 Linux 环境下防火墙、SELinux 对 Web 服务的影响及关闭方法。
三、实验步骤
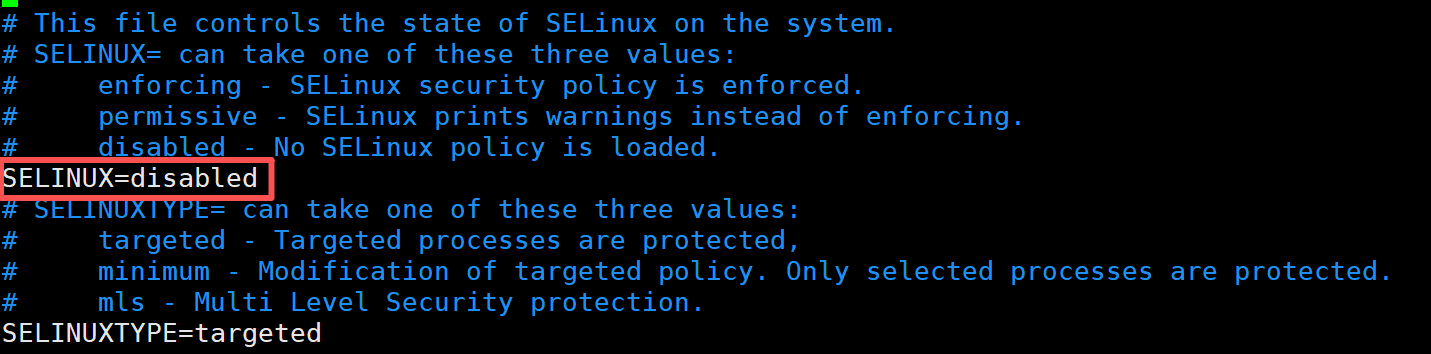
1、系统环境初始化与安全策略关闭
bash
[root@localhost ~]# hostnamectl set-hostname master    #修改主机名
[root@localhost ~]# bash

[root@master ~]# systemctl disable --now firewalld    #关闭防火墙
[root@master ~]# vim /etc/selinux/config     #关闭SeLinux

[root@master ~]# yum install nginx -y    #下载nginx
[root@master ~]# systemctl start nginx
[root@master ~]# systemctl enable --now nginx    #设置开机自启
Created symlink /etc/systemd/system/multi-user.target.wants/nginx.service → /usr/lib/systemd/system/nginx.service.
注:vim /etc/selinux/config 配置文件
2、创建网站根目录与测试页面
创建 /file 和 /ftp 子目录对应的本地存储目录,并写入测试网页文件。
bash
[root@master ~]# mkdir -p /www/file /www/ftp
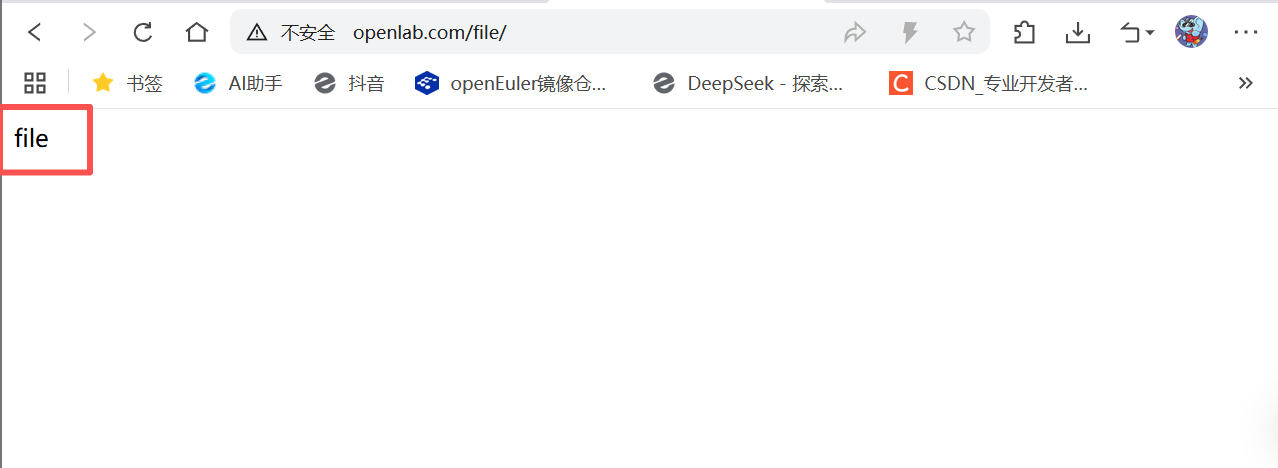
[root@master ~]# echo "file" > /www/file/index.html #写入网站数据
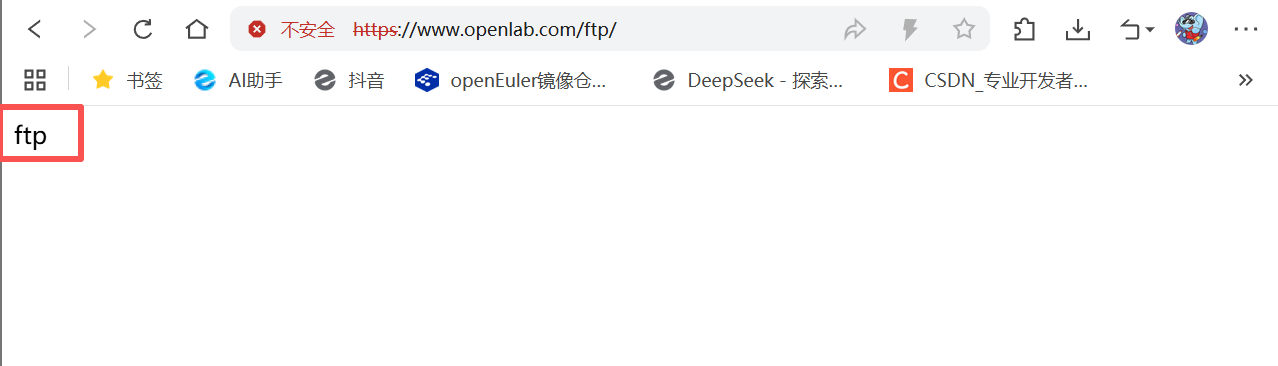
[root@master ~]# echo "ftp" > /www/ftp/index.html
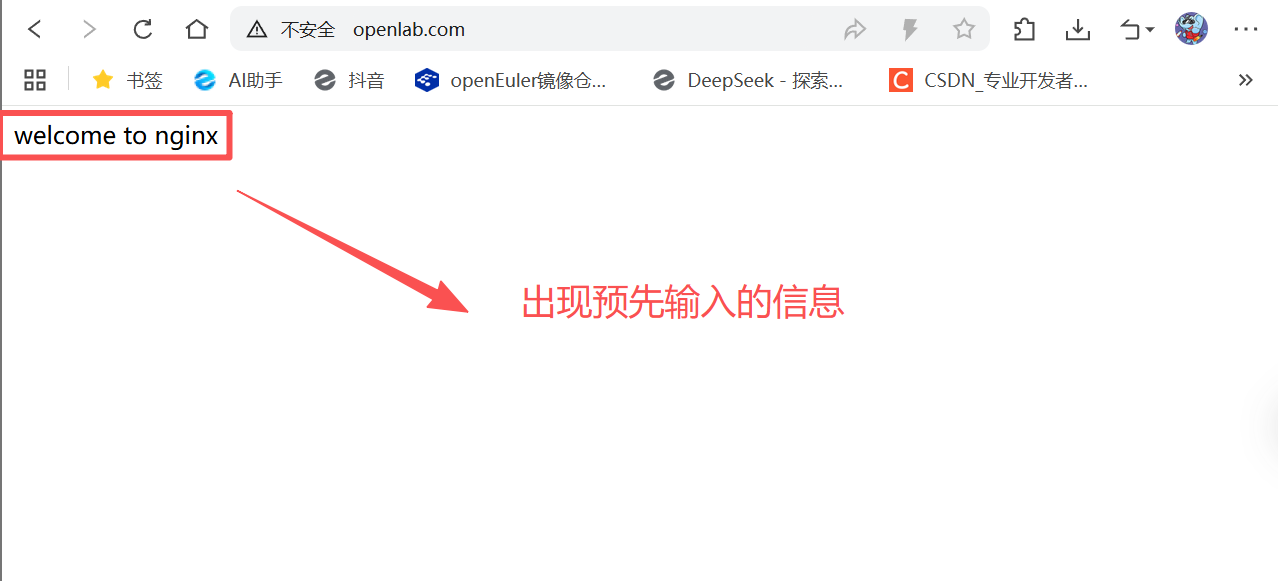
[root@master ~]# echo "welcome to nginx" > /www/index.html
[root@master ~]# tree /www
/www
├── file
│ └── index.html
├── ftp
│ └── index.html
└── index.html
2 directories, 3 files3、配置本地域名映射
修改 /etc/hosts 文件,将域名 www.openlab.com 解析到服务器 IP。
bash
[root@master ~]# vim /etc/hosts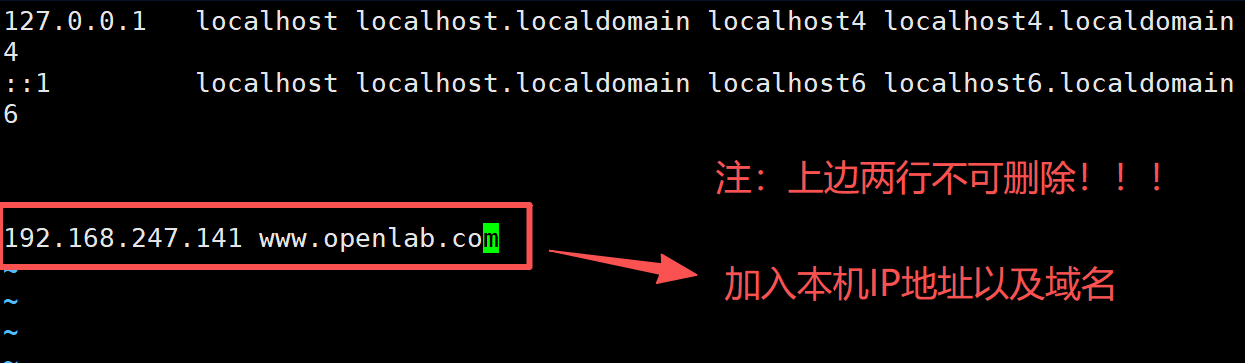
4、生成 SSL 证书(HTTPS 必需)
使用 openssl 生成加密私钥、自签名证书,并去除私钥密码(避免 Nginx 启动报错)。
bash
# 制作私钥
[root@master ~]# openssl  genrsa  -aes128  2048 > /etc/nginx/ftp.key
Generating RSA private key, 2048 bit long modulus (2 primes)
......................................................+++++
..........................................+++++
e is 65537 (0x010001)
Enter pass phrase:    #第一次密码输入
Verifying - Enter pass phrase:    #再次

# 制作证书
[root@master ~]# openssl  req  -utf8  -new  -key  /etc/nginx/ftp.key  -x509  -days  365  -out  /etc/nginx/ftp.crt
Enter pass phrase for /etc/nginx/ftp.key:    #输入加密私钥的密码
You are about to be asked to enter information that will be incorporated
into your certificate request.
What you are about to enter is what is called a Distinguished Name or a DN.
There are quite a few fields but you can leave some blank
For some fields there will be a default value,
If you enter '.', the field will be left blank.
-----
Country Name (2 letter code) [AU]:86                                    #国家代码
State or Province Name (full name) [Some-State]:shan'xi                 #省份
Locality Name (eg, city) []:xi'an                                       #城市
Organization Name (eg, company) [Internet Widgits Pty Ltd]:open         #公司
Organizational Unit Name (eg, section) []:test                          #部门
Common Name (e.g. server FQDN or YOUR name) []:master                   #主机名
Email Address []:3391747216@qq.com                                      #邮箱

# 在加载SSL支持的Nginx并使用上述私钥时除去必须的口令
[root@master ~]# cd /etc/nginx/
[root@master nginx]# cp /etc/nginx/ftp.key /etc/nginx/ftp.key.org
[root@master nginx]# openssl rsa -in /etc/nginx/ftp.key.org -out /etc/nginx/ftp.key
Enter pass phrase for /etc/nginx/ftp.key.org:    #输入加密私钥的密码
writing RSA key
5、修改 Nginx 主配置文件
bash
#最终vim /etc/nginx/nginx.conf文件配置

# For more information on configuration, see:
#   * Official English Documentation: http://nginx.org/en/docs/
#   * Official Russian Documentation: http://nginx.org/ru/docs/

user nginx;
worker_processes auto;
error_log /var/log/nginx/error.log;
pid /run/nginx.pid;

# Load dynamic modules. See /usr/share/doc/nginx/README.dynamic.
include /usr/share/nginx/modules/*.conf;

events {
    worker_connections 1024;
}

http {
    log_format  main  '$remote_addr - $remote_user [$time_local] "$request" '
                      '$status $body_bytes_sent "$http_referer" '
                      '"$http_user_agent" "$http_x_forwarded_for"';

    access_log  /var/log/nginx/access.log  main;

    sendfile            on;
    tcp_nopush          on;
    tcp_nodelay         on;
    keepalive_timeout   65;
    types_hash_max_size 4096;

    include             /etc/nginx/mime.types;
    default_type        application/octet-stream;

    # Load modular configuration files from the /etc/nginx/conf.d directory.
    # See http://nginx.org/en/docs/ngx_core_module.html#include
    # for more information.
    include /etc/nginx/conf.d/*.conf;

    server {
        listen       80;
        listen       [::]:80;
		server_name  www.openlab.com;
        root         /www;
        location     /file {
                                alias   /www/file/;
                                index   index.html index.htm;
        }
    }


    server {
        listen       443 ssl http2;
        server_name  www.openlab.com;
        location     /ftp {
                                alias   /www/ftp/;
                                index   index.html index.htm;
                }

        ssl_certificate "/etc/nginx/ftp.crt";
        ssl_certificate_key "/etc/nginx/ftp.key";
        }
# Settings for a TLS enabled server.
#
#    server {
#        listen       443 ssl http2;
#        listen       [::]:443 ssl http2;
#        server_name  _;
#        root         /usr/share/nginx/html;
#
#        ssl_certificate "/etc/pki/nginx/server.crt";
#        ssl_certificate_key "/etc/pki/nginx/private/server.key";
#        ssl_session_cache shared:SSL:1m;
#        ssl_session_timeout  10m;
#        ssl_ciphers PROFILE=SYSTEM;
#        ssl_prefer_server_ciphers on;
#
#        # Load configuration files for the default server block.
#        include /etc/nginx/default.d/*.conf;
#
#        error_page 404 /404.html;
#            location = /40x.html {
#        }
#
#        error_page 500 502 503 504 /50x.html;
#            location = /50x.html {
#        }
#    }

}
6、检查配置并重启 Nginx 服务
bash
# 检查Nginx配置语法(整改新增,提前排查错误)
[root@master nginx]# nginx -t
nginx: the configuration file /etc/nginx/nginx.conf syntax is ok
nginx: configuration file /etc/nginx/nginx.conf test is successful

# 重启Nginx使配置生效
[root@master nginx]# systemctl restart nginx
注:出现以下提示,说明配置文件没有问题
nginx: the configuration file /etc/nginx/nginx.conf syntax is ok
nginx: configuration file /etc/nginx/nginx.conf test is successful
四、实验结果
可自己先行使用命令进行验证:
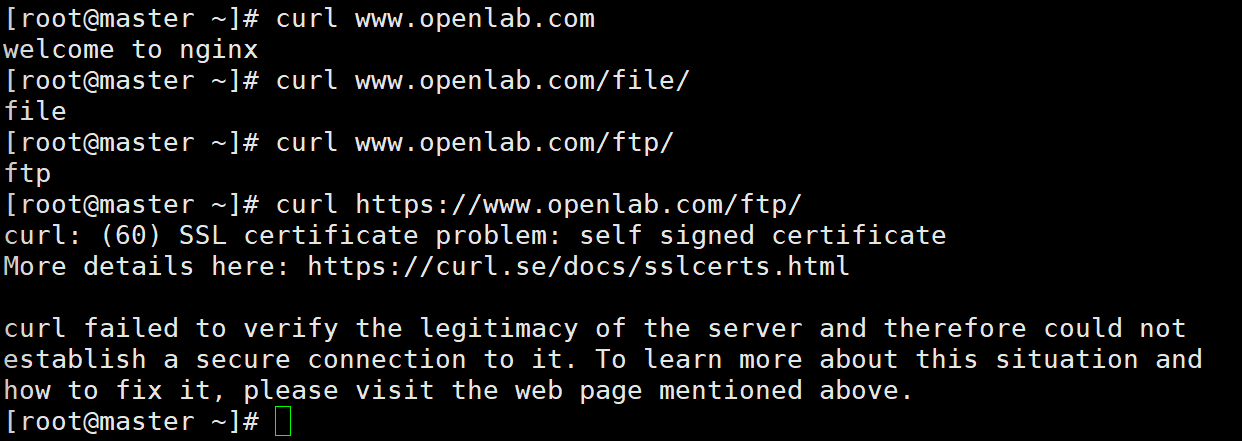
1、HTTP 访问 www.openlab.com
2、HTTP 访问 /file 子目录
3、HTTPS 访问 /ftp 子目录(点击高级->接受风险并继续)
注:如若不能访问,在真机上配置本地域名映射
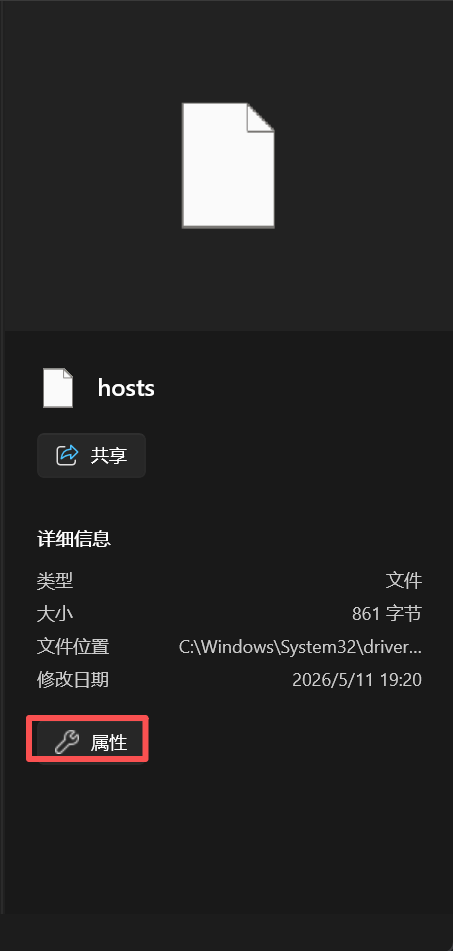
1、寻找具体文件位置
具体文件位置:"C:\Windows\System32\drivers\etc\hosts"

2、添加IP以及域名
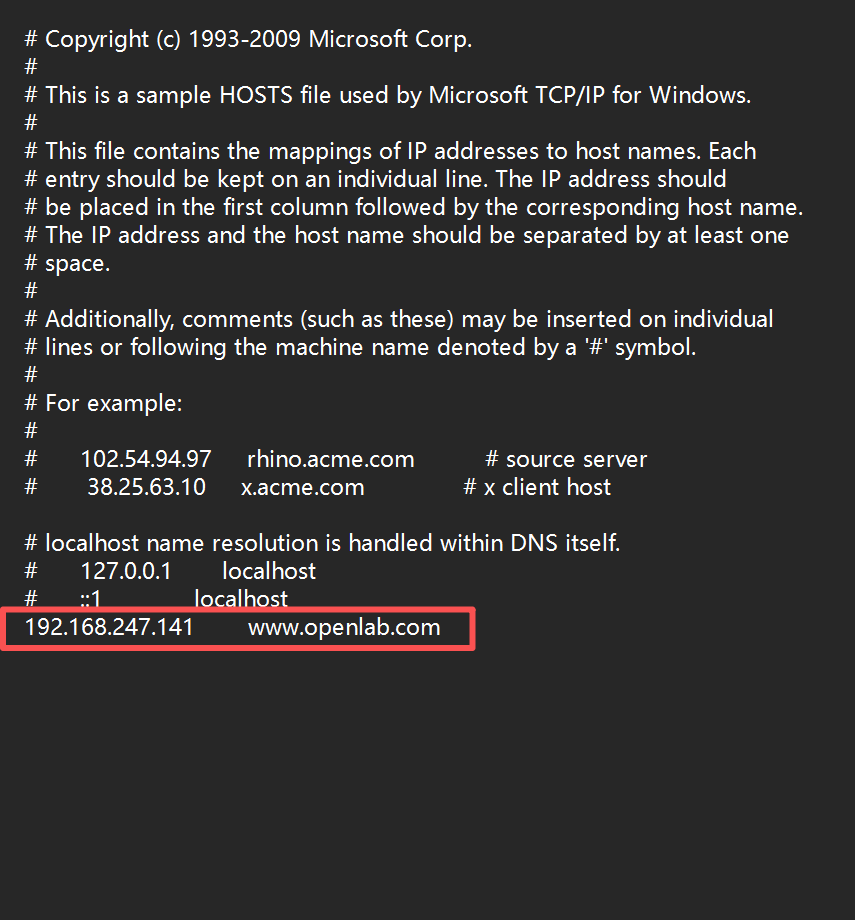
3、保存 hosts 文件
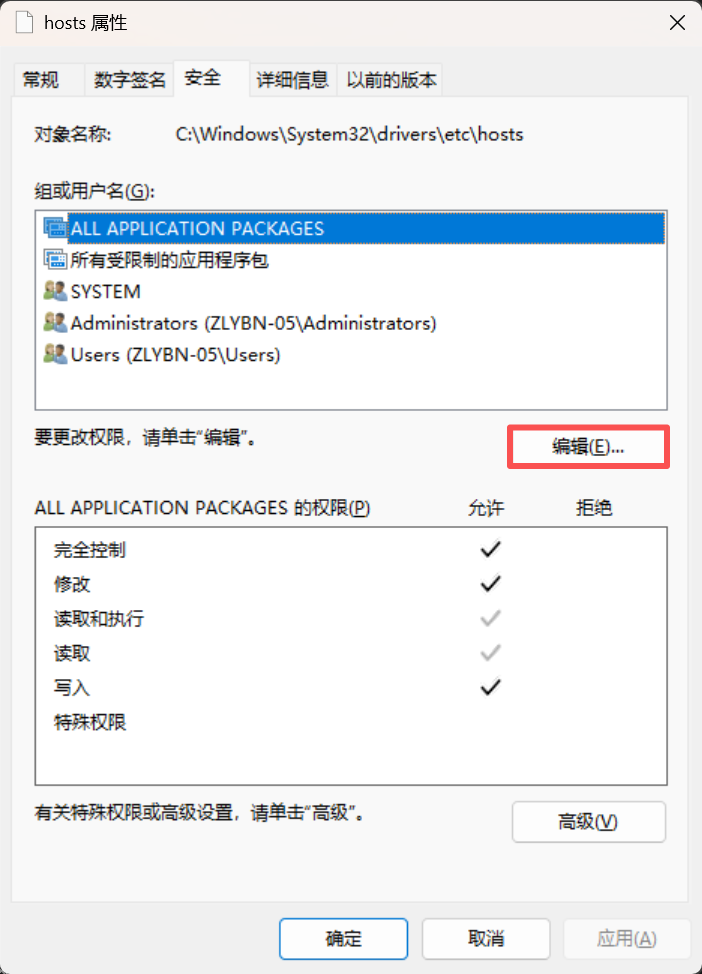
(1)更改权限
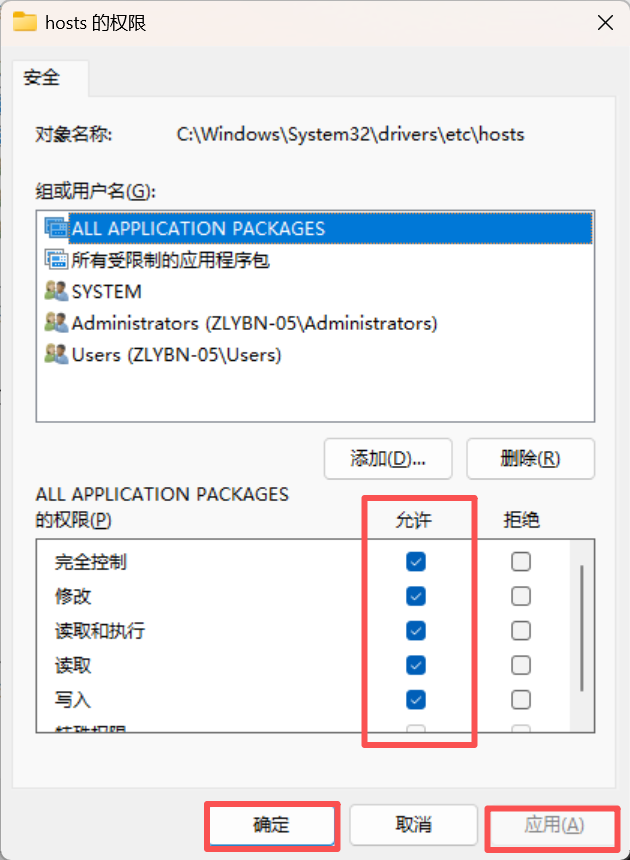
(2)保存至原地址
五、常见问题及解决方法
| 原实验问题 | 整改方案 |
|---|---|
| SELinux 仅临时关闭 | 新增永久关闭配置,避免重启失效 |
| 网页目录无权限 | 配置 nginx 用户权限,解决 403 报错 |
SSL 证书 Common Name 错误 |
修改为域名 www.openlab.com |
alias 路径缺少 / |
统一补全 /,修复 404 错误 |
| 无配置检查步骤 | 新增 nginx -t 语法检查,提前排错 |
| 无配置备份 | 新增配置文件备份,防止配置丢失 |
六、实验总结
- 本实验完成了单域名 + 双协议 + 双子目录的 Nginx 站点部署,实现了 HTTP/HTTPS 访问分离;
- 掌握了 location + alias 虚拟目录配置、SSL 自签名证书制作、本地域名映射等核心技能;
- 理解了 Linux 防火墙、SELinux、文件权限对 Web 服务的影响;
- 整改后的配置无语法错误、无权限问题、可直接运行,适用于学习与生产环境基础部署。