♻️ 资源
大小: 4.24MB
➡️ 资源下载: https://download.csdn.net/download/s1t16/87430271
基于 OpenPGP 的文件管理系统
一、实验要求
- 设计一个本地文件处理协议,基于 open PGP 实现本地加密文件夹:
- 对目标文件实现对存储者和调阅者的基于 pgp 的真实性认证和文件加密;
- 上述文件安全性不依赖于本地系统,即本地其他非授权用户(即便是系统管理员)无法以可理解的方式读出该文件夹中文件内容;
- 对处理过程中可能涉及的临时存储至少实现可靠的敏感信息残留覆盖;
- 选择 Linux 或 MS windows,实现该协议的一个 C++ 实现实例。包括软件设计文档、源代码及注释、可执行安装包、自测用例和测试分析报告、第三方资源及其说明。
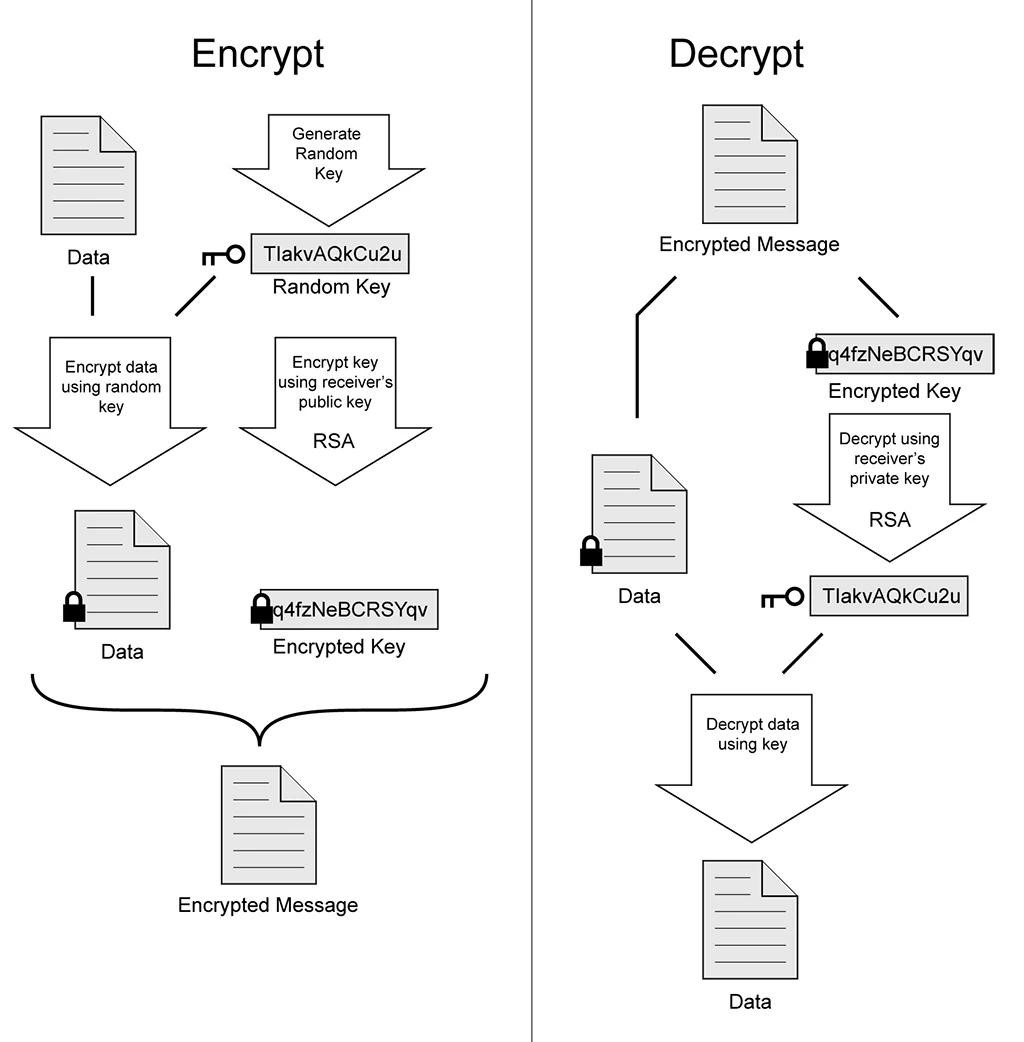
1.1 OpenPGP 的加密与解密原理
OpenPGP 加密过程:随机生成一个的 Key,并通过对称加密算法使用这个 Key 加密数据,最后通过非对称加密算法(RSA)用接收者的公钥加密前者的 Key,得到加密的数据。
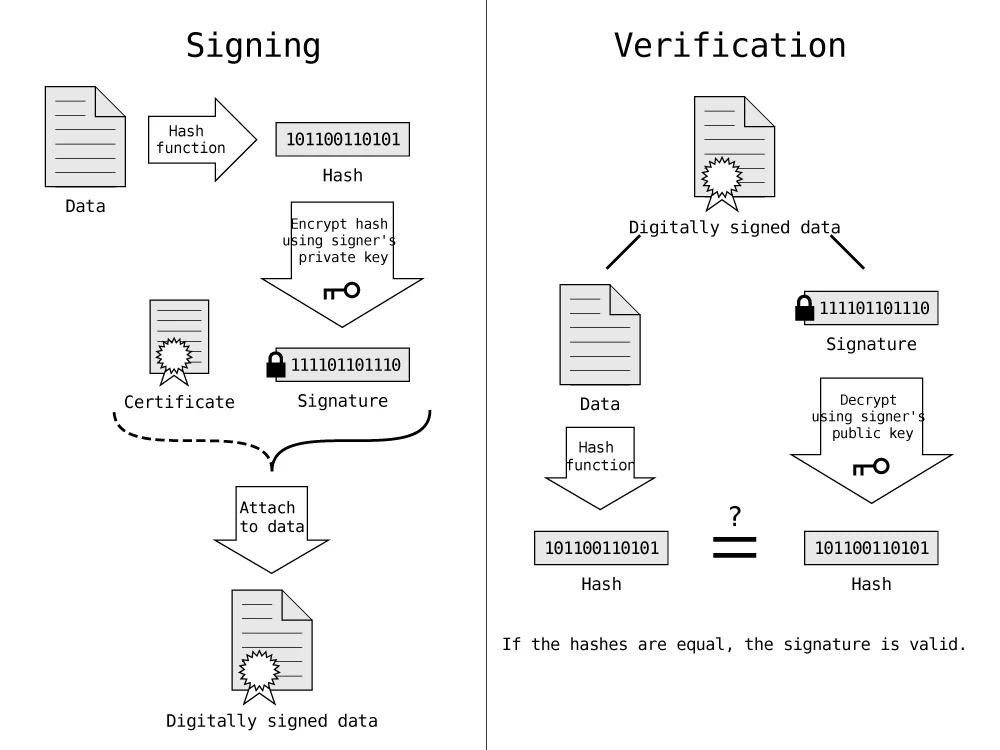
1.2 OpenPGP 的数字签名
数字签名是 OpenPGP 的重要组成部分,数字签名是一个数学过程,与现实世界的签名功能相似,但更严谨、更安全且容易验证。数字签名保证了以下情况:
- 验证发送者身份:确认发送者确实是他声称的身份。
- 完整性:文件/邮件传输过程中未被更改。
- 不可否认:发送者不可否认已发送的文件/邮件。
数字签名的原理:发送者先通过加密散列函数获取数据的哈希,然后使用发送者的私钥加密哈希,得到数字签名。接收者使用发送者的公钥解密数字签名得到一个哈希,并与自己计算的数据的哈希值对比,一致则数字签名有效且数据完整。
1.3 OpenPGP 的公钥发布与吊销证书
我们知道公钥用于加密,可以公开发布,公钥可以点对点发送,也可以上传到密钥服务器。需要格外注意的是公钥中包含邮箱信息,如果你将公钥发布到密钥服务器(各个公钥服务器会互相同步),那么你将永远无法从密钥服务器上删除你的公钥信息。在某天你忘记密码口令或丢失私钥,你想要从密钥服务器上吊销你的公钥,唯一的补救措施是:你事先生成了吊销证书,使用吊销证书可以吊销公钥证书,使公钥其显示"吊销"字样,但依然无法从密钥服务器上删除公钥信息。
所以务必要谨慎上传公钥,务必生成吊销证书备用。
二、文件处理协议设计
前提条件
在该文件系统内,每个用户有一对公钥和私钥。
用户的公钥是公开的,系统内的所有用户都可以获得其他用户的公钥信息。
用户的私钥是私密的,仅该用户可以访问,其他用户不可访问。
用语说明
签名:签名是为了验证发件人的身份,以及内容的一致性(不被篡改),签名通常用于文件创建者的身份,或校验调阅文件的一致性(不被中间人篡改)等等。
加密和解密:加密和解密即使用密钥对中的公钥加密、私钥解密。如果我们需要将自己的文件加密保存,那么就使用自己的公钥加密、自己的私钥解密。如果我们需要给其他用户授权调阅文件,我们将使用对方的公钥加密文件内容,对方使用自己的私钥解密。加密(或签名并加密)后将得到.gpg 文件。
2.1 存储功能
单用户授权
目标:A 用户想要存储自己的文件,并仅自己拥有调阅权限。
步骤:
- 用户对文件签名:将文件数据通过 MD5 加密方式获得哈希值,再将哈希值通过 A 用户的私钥加密,附在文件末尾。
- 用户对文件加密:将第一步得到的文件通过 A 用户的公钥加密保存为.gpg 文件。
- 多用户授权
- 目标:A 用户想要存储自己的文件,并保证自己和 B 用户都拥有调阅权限。
步骤:
- 用户对文件签名:将文件数据通过 MD5 加密方式获得哈希值,再将哈希值通过 A 用户的私钥加密,附在文件末尾。
- 用户对文件加密:将第一步得到的文件通过 A 用户的公钥和 B 用户的公钥加密保存为.gpg 文件。
2.2 调阅功能
目标:A 用户调阅以.gpg 后缀结尾的文件。
步骤:
- 用户对文件解密:用自己的私钥解密文件,通过比对私钥的 key id 和加密文件的公钥的 key id 是否相同,相同则解密成功,不同则解密失败。
- 用户验证签名:用公钥库中的公钥对文件中的签名进行验证,如果验证成功,则输出文件创建者(签名者)的身份。
- 安全问题
2.3 存储者的真实性认证
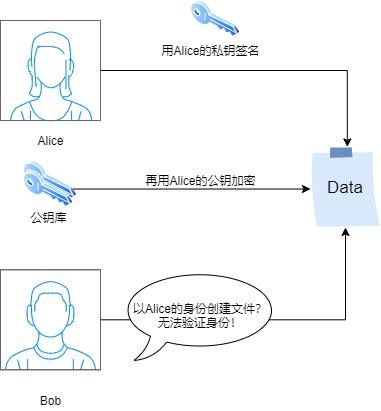
用户创建文件必须有用户 A 的身份认证,即 A 用户对文件进行数字签名。在前提条件中,用户的公钥是公开的。假设 B 用户以 A 用户的名义创建文件,则 B 用户使用了 A 用户的公钥对文件进行加密,但由于 B 用户没有 A 的私钥,因此无法对文件进行签名。
在创建文件的过程中,我们的文件系统会进行身份核验,即计算文件的哈希值得到 h1使用 A 用户的公钥解密签名 h2判断是否相等(h1==h2),相等则身份认证通过。
因此,B 用户无法以 A 用户的身份创建文件。
2.4 调阅者的真实性认证
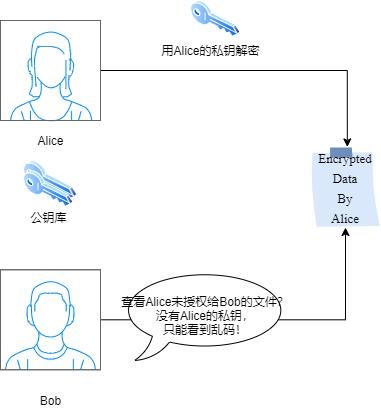
用户 B 只能够查看用户 B 创建的,以及其他用户授权的文件。在前提假设中,用户的私钥是私密的。假设 B 想查看 A 的文件,那么有两种情况:
用户 A 给用户 B 授权:即用户 A 用自己的公钥和用户 B 的公钥对文件进行加密,因此用户 B 能够用自己的私钥进行解密,则能够查看用户 A 创建的文件。
用户 A 未给用户 B 授权:即用户 A 用自己的公钥对文件进行加密,因此用户 B 不能够用自己的私钥进行解密,则不能够查看用户 A 创建的文件。
因此,用户 B 能否查看文件取决于用户 A 有没有授权给用户 B。
2.4.1 私钥保护
用户的私钥属于该文件系统的敏感信息。假设,用户 B 拥有了用户 A 的私钥,加之公钥是公开的,则用户 B 就能够伪装成用户 A,从而以 A 的名义存储文件和调阅文件,这对整个系统会造成较大的危害。
因此,我们引入了私钥的密码机制,以 MD5(用户名 + 用户安全序列号)作为识别不同用户的指纹,以该指纹作为解锁私钥的密码。

我们的密钥文件是以 key.store 的文件格式存储,用记事本打开后为乱码,只有拥有此指纹的用户才能够解锁私钥。
在用户执行 exe 可执行程序的过程中,我们也对用户的私钥信息进行了保护。代码的运行机制是先导出私钥文件,然后调用该文件的生成路径,进行签名或者解密等操作,最后清空原有文件内容和文件长度信息,彻底删除文件并无法恢复。同时,我们使用了 c++ 中的析构函数,在读取完私钥信息后,确保缓冲区信息能够及时删除,无法被其他用户读取到敏感信息。
缓存保护
2.5 动态缓存的定位
我们通过构建数据结构进行缓存空间的保护,由于每次读取文件需要申请一定的缓存空间,我们定义 Allocator 类,使用 Alloc 动态内存申请的方式定义存储空间,通过 Free 函数释放空间:
unsigned long Allocator::Alloc(MapNode map[], unsigned long size) {
    MapNode* pNode;
    unsigned long retIdx = 0;
    /* 若pNode->m_Size == 0则表示已经遍历到结尾 */
    for ( pNode = map; pNode->m_Size; pNode++)
    {   if ( pNode->m_Size >= size )
        {   retIdx = pNode->m_AddressIdx;
            pNode->m_AddressIdx += size;
            pNode->m_Size -= size;
            /* 当前内存正好分配完成,将该MapNode所在位置后面的MapNode都向前移动一个位
            置 */
            if ( pNode->m_Size == 0 )
            {
                MapNode* pNextNode = (pNode + 1);
                for ( ; pNextNode->m_Size; ++pNode, ++pNextNode)
                {   pNode->m_AddressIdx = pNextNode->m_AddressIdx;
                    pNode->m_Size = pNextNode->m_Size;
                }
                pNode->m_AddressIdx = pNode->m_Size = 0;
            }
            return retIdx;
        }
    }
    /* no match found */
    return 0;
}
MapNode map\[\]变量为操作系统页式管理系统内存分配的基本单元(1024*4K)大小,因此我们同样定义 MapNode 变量作为缓存保护的基本单元。
2.6 动态缓存的保护
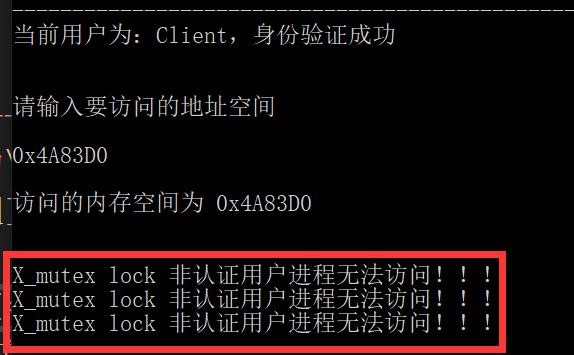
我们通过施加"排他锁"的方式实现动态缓存的保护------当该用户在执行加密/解密文件的动态写入的过程时,由于 alloc 函数仅只是创建了该空间地址,对于该地址进行"其他用户无法写入"的保护,但是并没有组织其他用户从该内存当中读取数据。
我们使用排他锁的方式,以屏蔽其他用户从该段缓存空间当中读取敏感信息的可能性------当 alloc 申请的空间在释放之前,屏蔽其他一切其他用户进程对于该程序缓存空间的访问权。我们使用 C++ mutex 库获取内核态下其他进程对于程序申请的空间的访问权限,同时通过排他锁实现保护敏感的缓存信息不被窃取。
#include <mutex>

class XMutex { public:
    XMutex() { lockNums.clear();
    }
    ~XMutex() {
    } void lock()
    { mapMutex.lock();
    // 当前用户id与认证者不匹配
    if (lockNums.find(this_thread::get_id()) == lockNums.end() ||
lockNums[this_thread::get_id()] == 0)
    { lockNums[this_thread::get_id()] = 1;
    // 先释放mapMutex锁,同时锁死非该用户进程
    mapMutex.unlock(); XMutex.lock();
    }
    // 当前线程可获取过X_mutex
    else
    { lockNums[this_thread::get_id()] += 1;
        mapMutex.unlock();
    }
}
void unlock() { mapMutex.lock();
    if (lockNums.find(this_thread::get_id()) == lockNums.end() ||
lockNums[this_thread::get_id()] == 0)
    { mapMutex.unlock();
         cout << "X_mutex lock 非认证用户进程无法访问!!\n";
    } else
{
    // 当前是最后一次调用,需要解锁
    if (lockNums[this_thread::get_id()] == 1)
2.6.1 验证
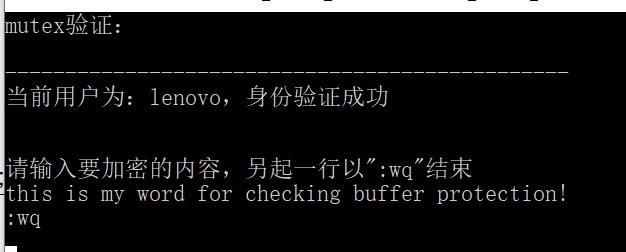
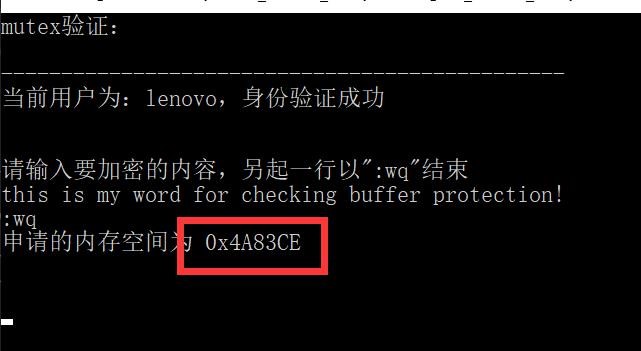
我们在 windows 下新建一个新用户 client,首先通过 lonovo 通过 alloc 创建一个缓存空间,通过 system("pause");保留当前建立的缓存,在新窗口当中登陆 client 用户,alloc 函数的返回值尝试访问新用户的内存空间,用户 B 用于检测该段内存能够被访问。
用户 A(lonovo)创建地址空间进行 PGP 加密
2.6.1 alloc 函数返回缓存地址的创建首地址和空间大小
在新窗口中登陆用户 B(client)

2.6.1 以新用户 client 的身份访问正在进行加密的 lenovo 进程的地址空间
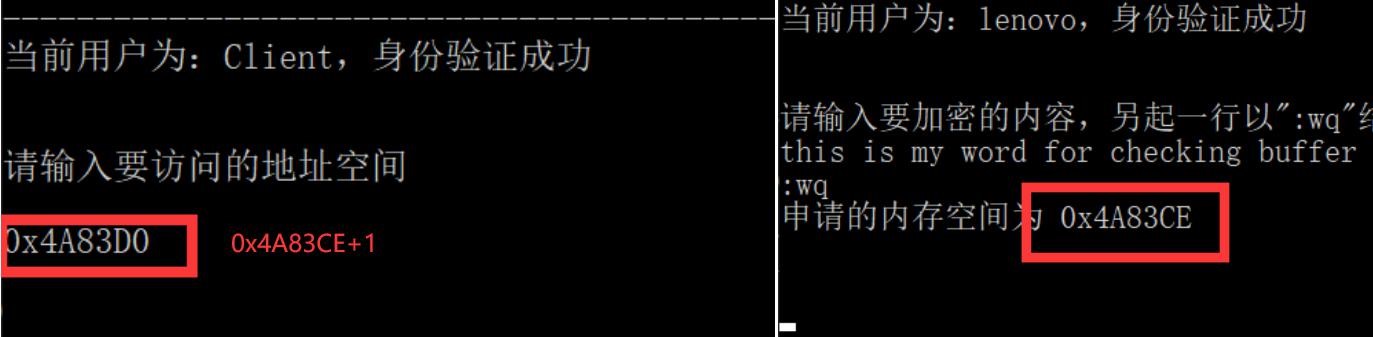
由上图可知,左图为 client 用户试图访问的地址空间,为 PA 申请的地址空间 +1,
验证结果
三、方资源库介绍
基本信息
OpenPGP Library for .NET 库包括用于 OpenPGP 加密、解密、明文签名、一通签名和加密、解密和验证、密钥生成的方法,支持密钥存储和位于文件中的密钥。完全用托管代码编写,没有外部第三方依赖项。
支持的平台
.NET Framework 2.0 -- 4.8
.NET 5
.NET Core 2.0, 3.0
.NET Standard 1.6, 2.0, 2.1
Windows 10 Universal Platform (UWP)
Silverlight 3 -- 5
Windows Store / WinRT
Xamarin.Android
Xamarin.iOS
3.1 特点
NET OpenPGP library, 100% 托管代码- 用户友好的 API,只需几行代码
- OpenPGP 和 GnuPG 兼容
- 免版税分发
OpenPGP 提供功能包括:
- 加密和解密文件
- 数字签名和验证签名
- 具有对公钥和私钥的非对称加密, 创建随机会话密钥, 使用它们用对称算法
- 加密文件, 并添加用收件人公钥加密的会话密钥
- 加密文件可以是二进制格式或 ASCII 文本(称为 ASCII 装甲)格式
- 加密私钥
- 签署第三方公钥
加密文件可以压缩 (ZIP, ZLib, BZip2) 公钥文件最广泛使用的文件扩展名是: .pkr, .asc, .pubkr, .pgpkey 私钥文件最广泛使用的文件扩展名是: .skr, .asc, .seckr, .pgpkey 加密文件最常用的文件扩展名是 : .pgp (binary format), .asc (ASCII armoredformat)
四、软件功能测试
启动运行
配置用户初始信息及密钥生成
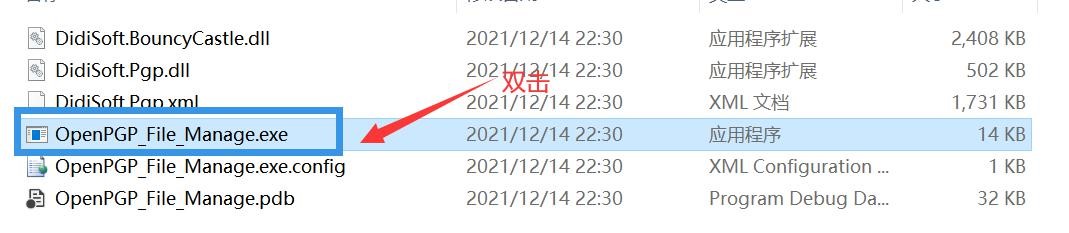
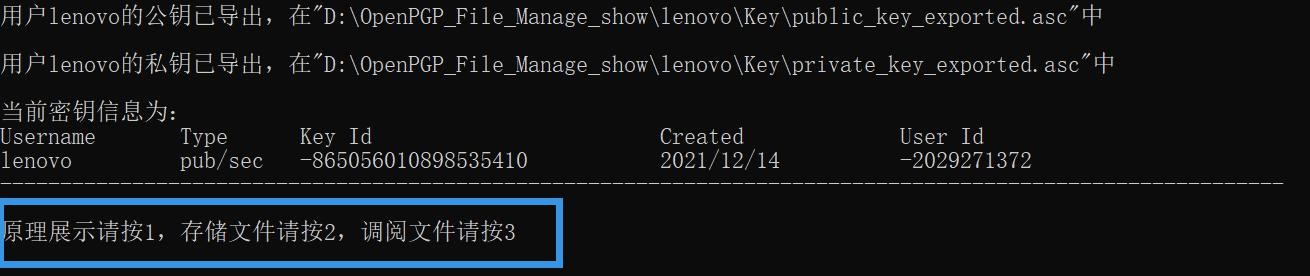
首先打开文件夹,双击 OpenPGP_File_Manager.exe 文件打开软件。
软件初始界面为:
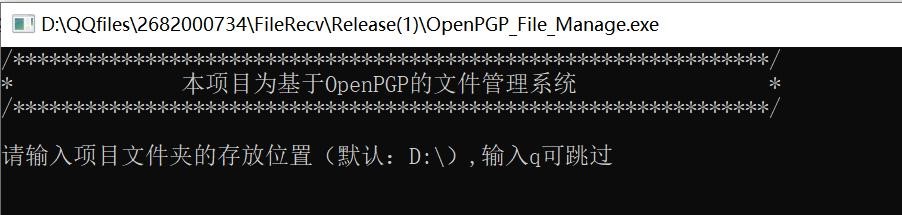
此处我们选择默认文件夹路径------D:\,故键入 q
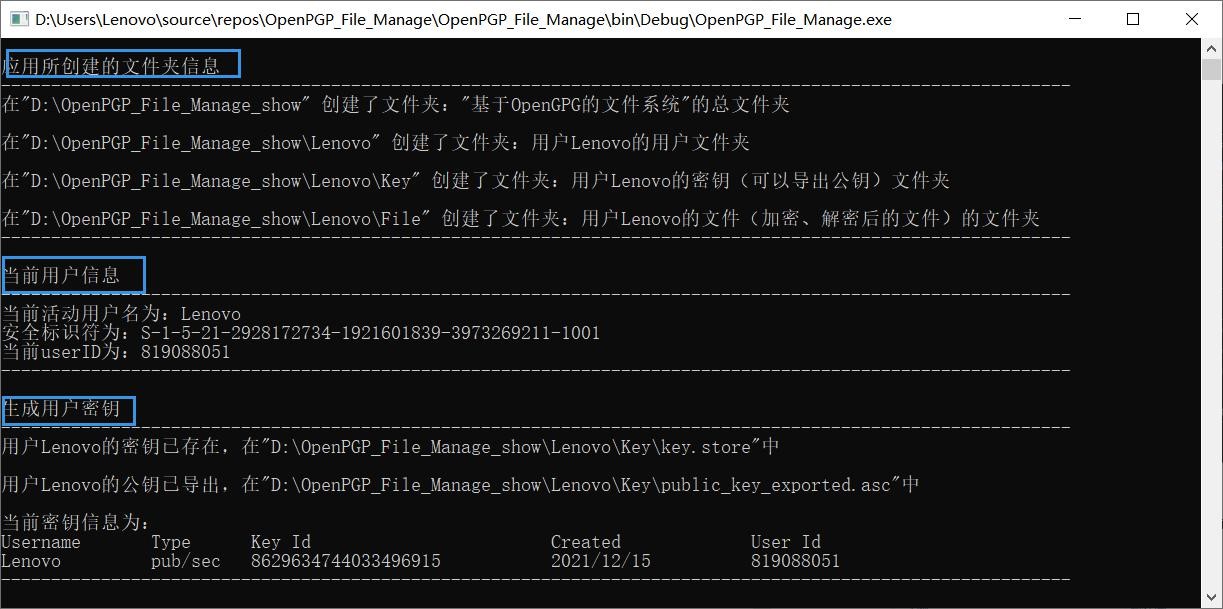
接着在用户界面当中呈现以下信息:
应用所创建的文件夹信息,如本例中在本地创建的所创建的用于存储活动及密钥的文件夹 D:\OpenPGP_File_Manage_show

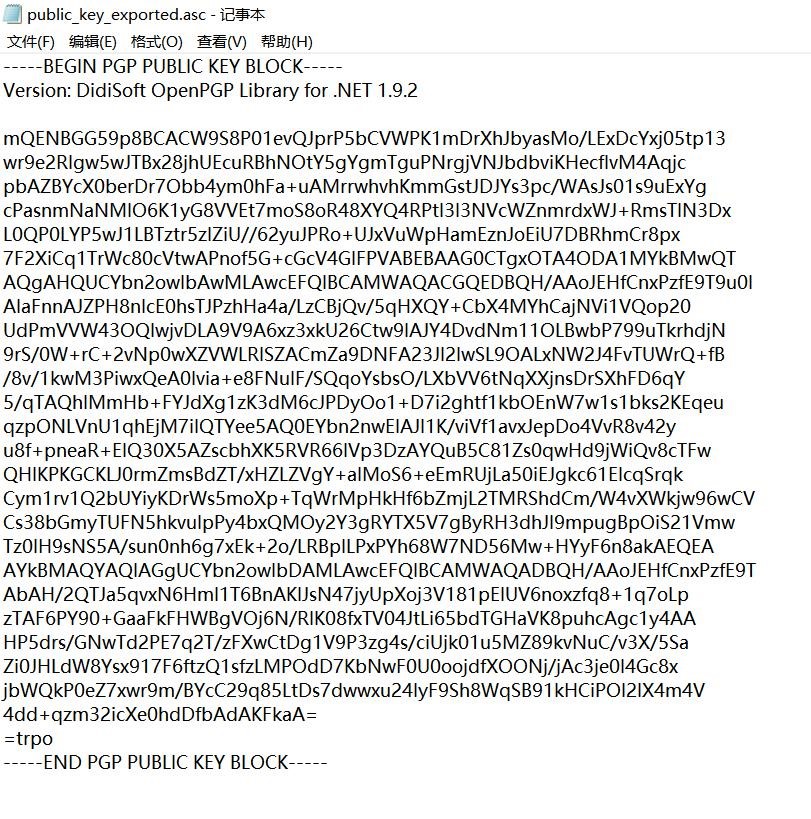
可以看到在本地成功生成的存储用户加密文件以及加密密钥的相关信息路径和信息。可以看到成功创建的用于 PGP 加密解密所使用的公钥信息:
功能展示面板
在创建好了当前用户的公钥和私钥之后,进入功能展示面板。在该面板中用户有三个可选择的选项,分别为原理展示、存储管理、文件调阅三个部分。
4.1 原理展示
键入 1 之后输入希望加密的内容

下图为 PGP 加密的原理展示,首先通过私钥进行签名,其次通过公钥对于需要加密的内容进行加密,得到加密后的字符串。
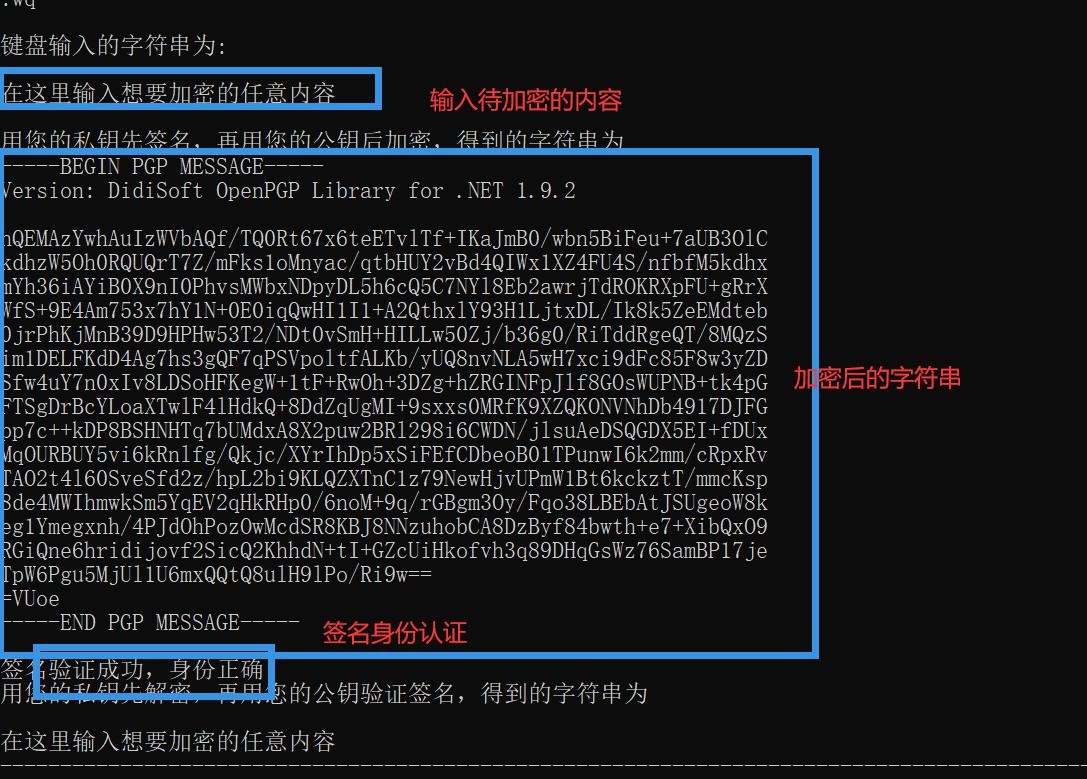
对于加密者进行身份验证。这之后开始进入解密模式,首先根据当前系统用户进行验证,通过公钥验证身份、私钥进行解密后得到解密后的字符串如上图所示。
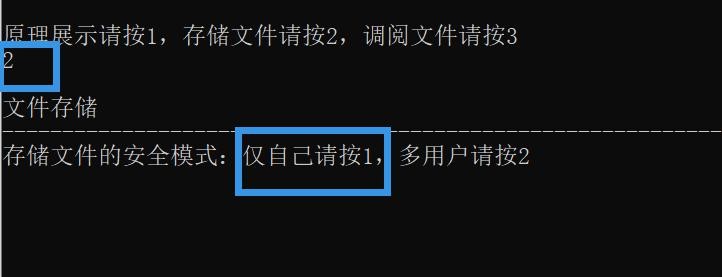
4.2 文件存储
我们键入 2 进行进入到文件存储的部分,对于文件存储的部分,我们构建了两种安全模式的涉及------"单用户模式"以及"多用户模式"。在单用户模式当中,我们允许用户本身进行文件的存储管理;在多用户模式当中,我们允许用户进行多用户访问其中某一个用户加密的文件。
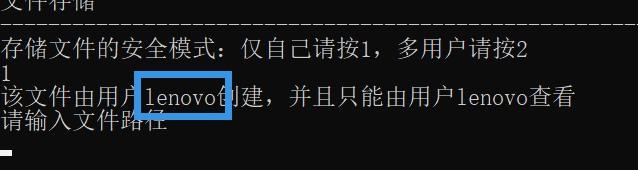
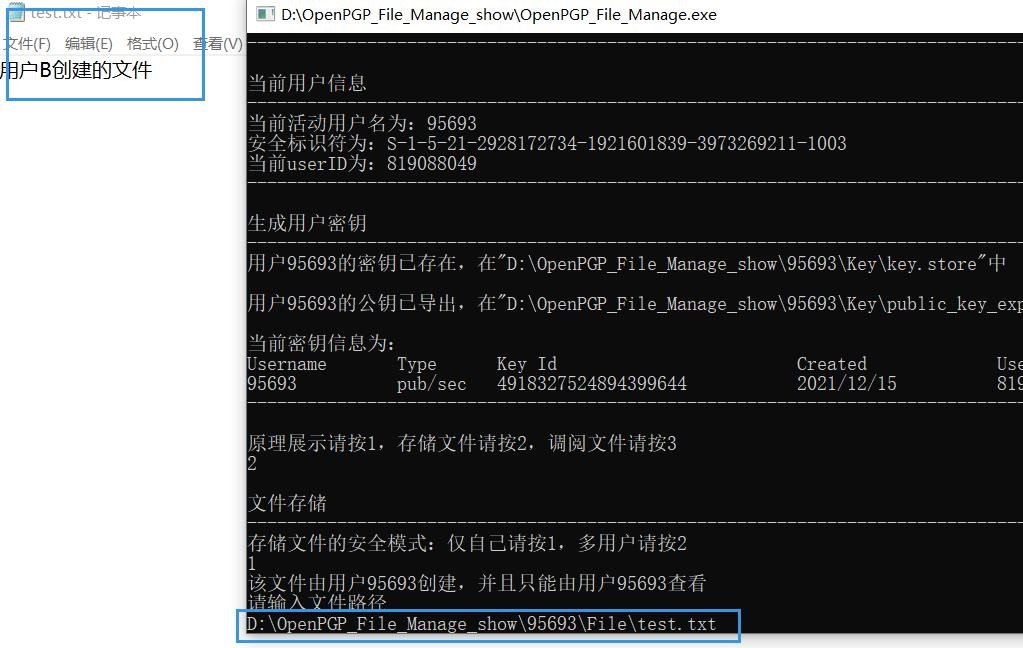
这里为了方便演示,我们使用单用户模式进行操作演示。首先我们键入 1 进入到单用户的安全模式进行演示。
在本例中,我们的用户名是本机 lenovo,此处基于系统检测到当前操作的用户名,并根据提示要求输入待加密的文件的位置:
我们在磁盘 D 下创建 PGPtest.txt 用于存储 PGP 加密相关的验证信息,便于后续加密与解密的验证。
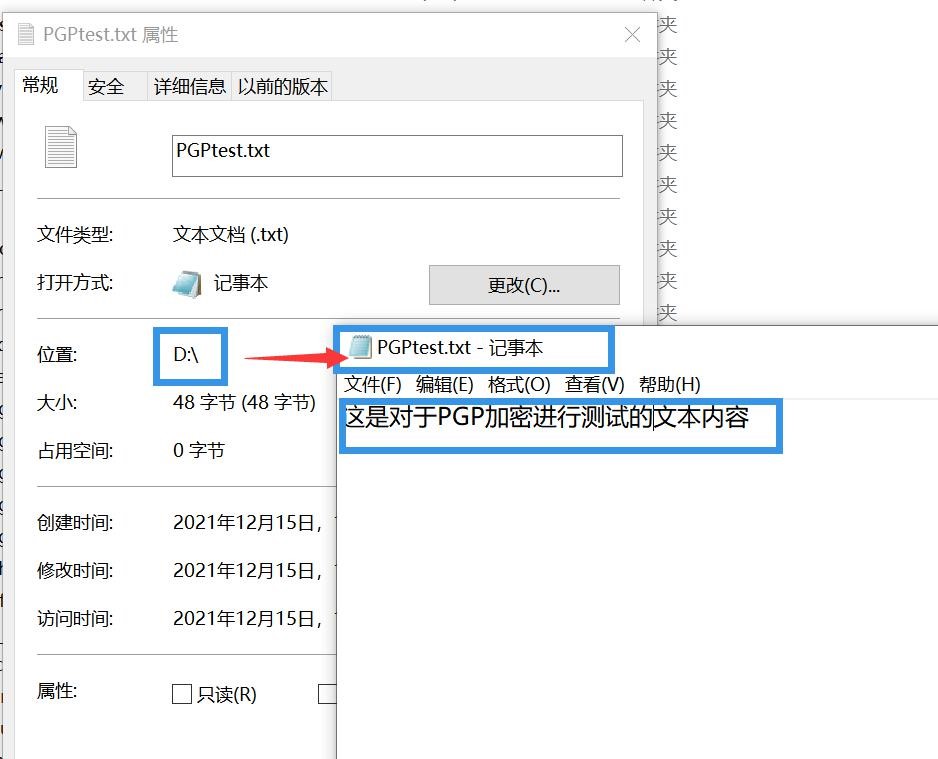

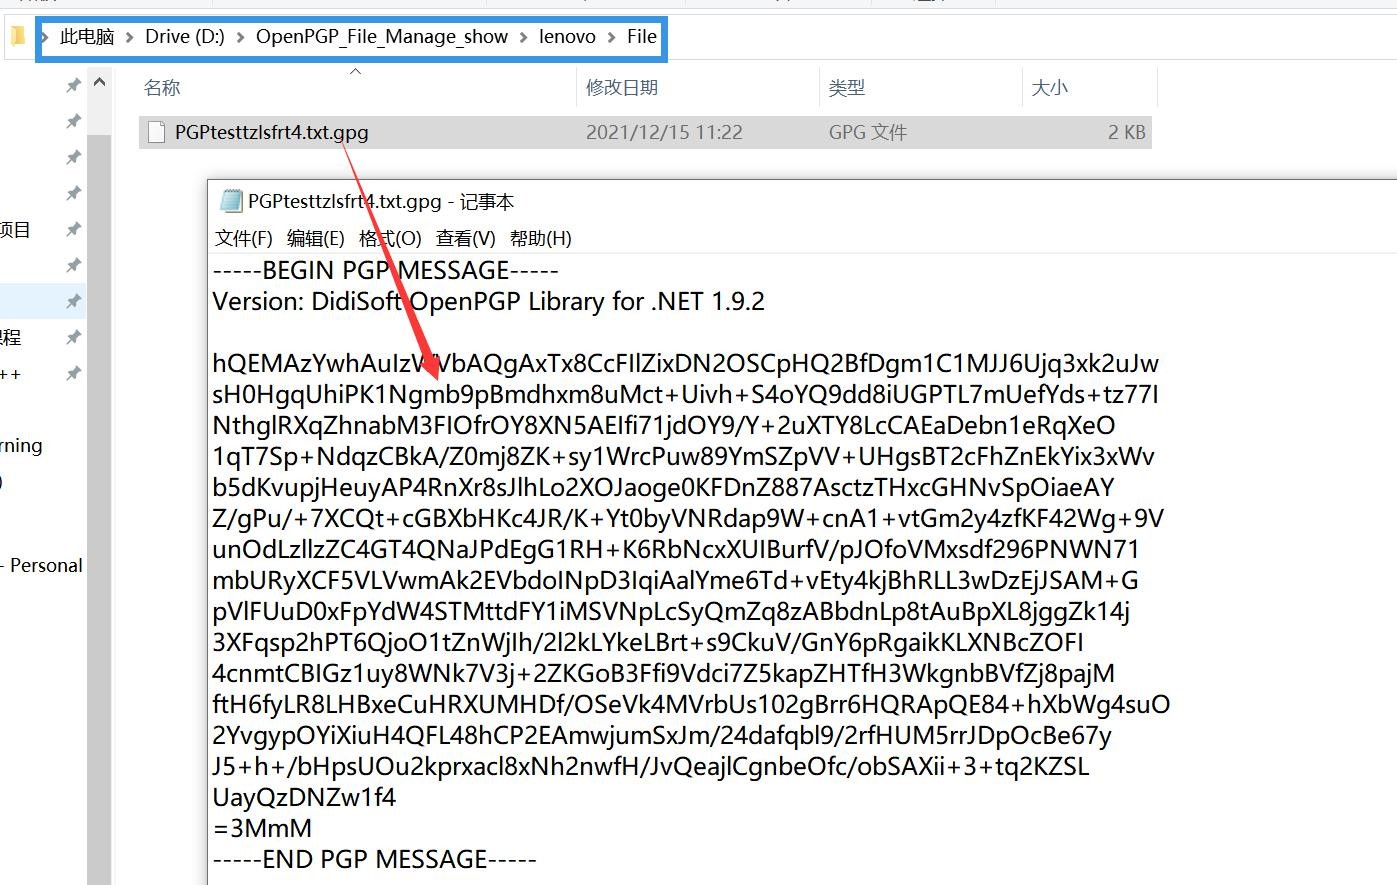
输入刚刚创建好的文件的路径,由编写好的 PGP 加密算法对于当前 lenovo 用户进行签名,最后将加密后的结果输出都目录:
D:\OpenPGP_File_Manage_show\lenovo\File\PGPtesttzlsfrt4.txt.gpg我们打开对应的文件夹进行验证,加密结果成功输出到对应文件,密文如下所示:
4.3 文件调阅
返回掉目录界面之后,我们键入 3 进入文件调阅模块,提示输入对应的 pgp 加密文件进行调阅。输入刚刚在对应文件夹下创建好的 pgp 文件的路径到控制台窗口当中:
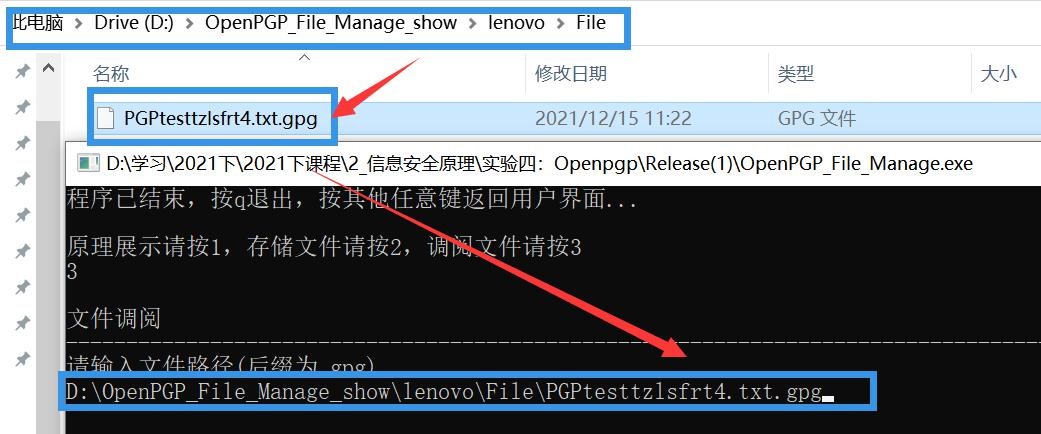
程序对于登陆者的身份进行认证,同时将最终解密结果输出到目录:
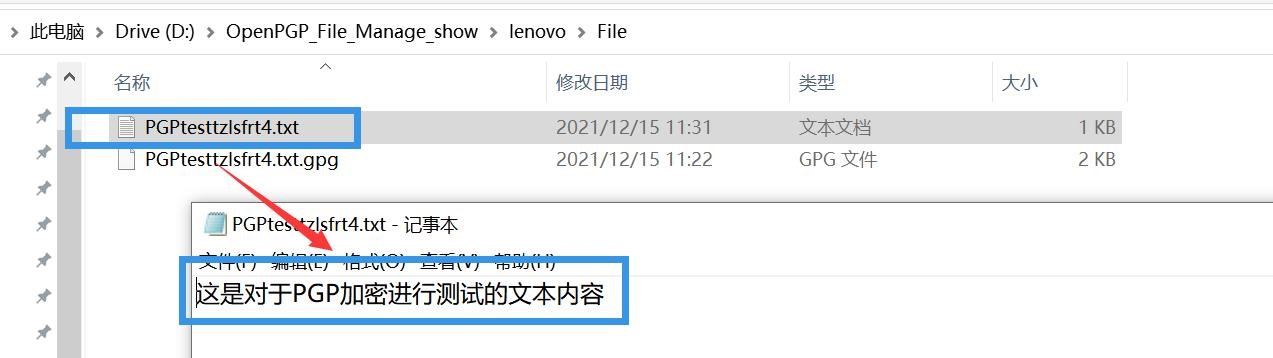
D:\OpenPGP_File_Manage_show\lenovo\File\PGPtesttzlsfrt4.txt
用户在对应输出文件目录当中找到解密后的文件,并可打开查阅其中的内容。
五、安全性测试
存储者的安全性认证
在 Windows 系统下新建一个普通用户 B。
我们假设用户 B 想要以用户 A 的身份创建文件,B 使用用户 A 的公钥对文件加密。用户 B 将自己的公钥替换为用户 A 的公钥。

用户 B 使用用户 A 的公钥创建文件。
出现报错,无法创建文件,用户 B 的签名不匹配,身份认证失败。

- 因此 B 不能够以 A 的身份创建文件。
- 调阅者的安全性认证
- 用户 A 分别以单用户和多用户的模式创建文件。
- 单用户模式下创建文件(没有给 B 用户授权)

用户调阅该文件:
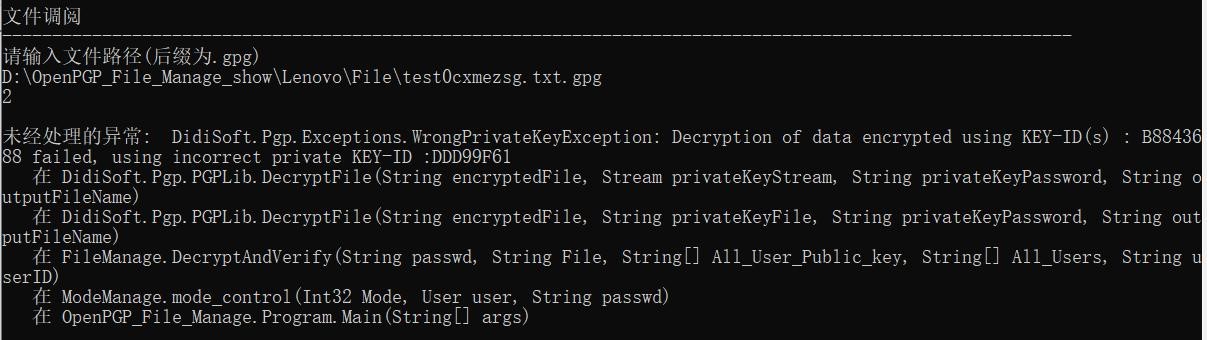
用户 B 的私钥不能解密该文件,无法调阅该文件。
多用户模式(给 B 用户授权):

用户调阅该文件:

调阅成功,并通过签名验证检测到是用户 A 创建的。因此,调阅者只能够调阅存储者授权的文件。
六、软件设计及代码详解
软件环境
操作系统:MS Windows 10
编译环境:Vistual Studio2017 中的控制台应用
第三方库:DidiSoft OpenPGP Library for .NET 1.9.2
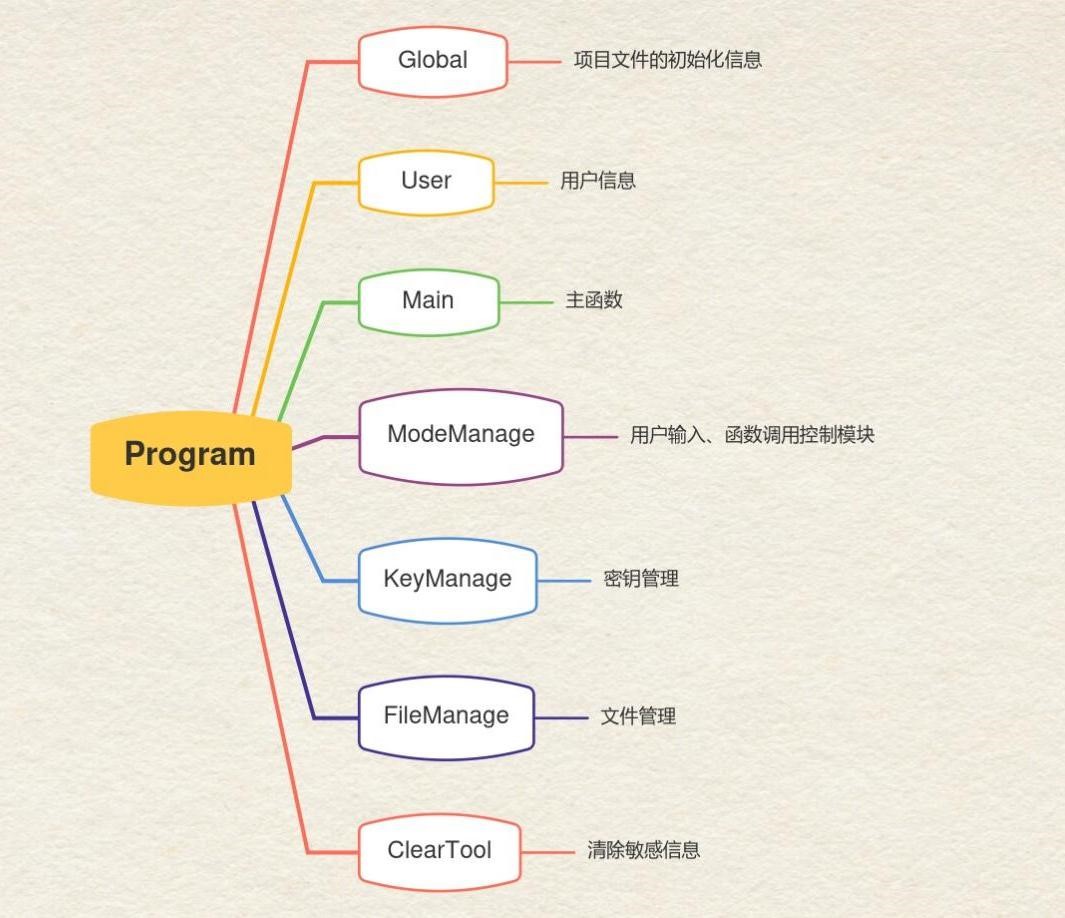
整体设计
整体代码架构如下,并说明了每个类的简要功能信息:
此外,我们还设置了用户友好型界面,确保您在使用的过程中能够获得友好的提示。以及,完成了对用户敏感信息的保护,确保缓冲区信息能够被及时删除和不被其他用户访问。
代码详细说明
6.1 Global 类
说明
Global 类中包含了 pathString(总文件夹)、pathStringUser(用户文件夹)、 pathStringKey(用户密钥文件夹)、pathStringFile (用户文件文件夹)。
Global 类中的主要函数有:
Global():输出欢迎信息以及创建初始文件夹
6.2 User 类
说明
User 类中包含了 username(用户名),sid(用户安全序列号),userID(基于安全序列号创建的 userID ), all_Authorized_Users( 被授权的用户名 ) , all_Authorized_Uers_PublicKey(被授权的用户的公钥)。
Use 类中的主要函数有:
User():获得当前用户信息
User_Authorization() :给用户授权 detect_All_User_Public_key():检测系统中所有用户的公钥
代码
public class User
{
    private String username;//用户名
    private SecurityIdentifier sid;//用户安全标识符 private String userID;
    private string[] all_Authorized_Users;
    private string[] all_Authorized_Uers_PublicKey;//所有用户目录文件
    public User()
    {   username = Environment.UserName;
        WindowsIdentity windowsIdentity = WindowsIdentity.GetCurrent();
        sid = windowsIdentity.User;
        userID = get_userID();
        Console.WriteLine("当前用户信息");
    }
    ~User() //析构函数,保证释放敏感信息
    { }
    public String get_username()
    {   return username;
    }
    public SecurityIdentifier get_sid()
    {   return sid;
    }
    public String get_userID()
    {
        PGPLib pgp = new PGPLib();
        pgp.Hash = HashAlgorithm.MD5;
        userID = sid.GetHashCode().ToString();
        return userID;
    } public string[] get_all_Authorized_Users()
    {   return all_Authorized_Users;

}
public string[] get_all_Authorized_Uers_PublicKey()
{   return all_Authorized_Uers_PublicKey;
}
//设置能够访问到的 all_Authorized_Uers_PublicKey; public void User_Authorization()
{   string[] all_Uers_pathString = Directory.GetDirectories(Global.pathString);//用户文件夹目
    录
    if (all_Uers_pathString.Length == 1)
    {
        Console.WriteLine("目前该文件系统未检测到其他用户");
    }
    List<string> _ulist = new List<string> { Environment.UserName };
    List<string> _list = new List<string> { Path.Combine(Global.pathStringKey,
                                            "public_key_exported.asc")
                                          };
    foreach (string element in all_Uers_pathString)
    {
        String name = Path.GetFileName(element);
        String publicKey = Path.Combine(Global.pathString, name, Global.folderName1,
                                        "public_key_exported.asc");//用户公钥文件
        if (name != Environment.UserName && File.Exists(publicKey))
        {
            Console.WriteLine("检测到用户{0}", name);
            Console.WriteLine("您是否要为用户{0}开放该文件的调阅权限?(Y/N)",
                              name);
            String answer = Console.ReadLine();
            while (true)
            {   if ((answer == "Y") || (answer == "y")) {
                    _ulist.Add(name);
                    _list.Add(publicKey);
6.3 ModeManage 类
说明
ModeManage 类中的主要函数有:
mode_input():接收用户输入 mode_control():针对不同的用户输入调用不同的函数
代码
public class ModeManage {
    ~ModeManage()//析构函数,保证释放敏感信息
    {
    } public int mode_input(User user)
    {   while (true)
        {
            Console.WriteLine("原理展示请按 1,存储文件请按 2,调阅文件请按 3");
            String Mode = Console.ReadLine();
            if (Mode == "1")
            {
                Console.WriteLine("\n 原理展示");
                Console.WriteLine("----------------------------------------------------------------------------------------------------------");
                Console.WriteLine("请任意输入想要加密的内容,以另起一行输入\":wq\"结束
                                  ");
                                  return 1;
            } else if (Mode == "2")
            {
                Console.WriteLine("\n 文件存储");
                Console.WriteLine("----------------------------------------------------------------------------------------------------------");
                Console.WriteLine("存储文件的安全模式:仅自己请按 1,多用户请按 2");
while (true)
{
    String SubMode = Console.ReadLine();
    if (SubMode == "1") {
        Console.WriteLine("该文件由用户{0}创建,并且只能由用户{0}查看",
                          Environment.UserName);
        Console.WriteLine("请输入文件路径");
        return 21;
    } else if(SubMode == "2")
    {   user.User_Authorization();
        Console.WriteLine("请输入文件路径");
        return 22;
    }
    else
    {
        Console.WriteLine("请重新输入!");
    }
}
}
else if (Mode == "3")
{
    Console.WriteLine("\n 文件调阅");
    Console.WriteLine("----------------------------------------------------------------------------------------------------------
                      -");
                      Console.WriteLine("请输入文件路径(后缀为.gpg)"); return 3;
}
else
{
    Console.WriteLine("请重新输入!");
}
}
}
public void mode_control(int Mode,User user,String passwd)
{   if (Mode == 1)
    {
//键盘读入
        String text = "";
        String input = Console.ReadLine();
        String next = Console.ReadLine();
        while (true)
        {   if (next == ":wq")
            {
                text = text + input;
                break;
            }
            else
            {   text = text + input + "\r\n";
            }
            input = next;
            next= Console.ReadLine();
        }
//签名加密字符串
        FileManage fileManage = new FileManage();
        String after_string = fileManage.SignAndEncryptString(text, passwd,user.get_userID());
        Console.WriteLine("\n 键盘输入的字符串为:\n{0}\n\n 用您的私钥先签名,再用您的
公钥后加密,得到的字符串为\n{1}", text, after_string);
//解密并验证签名
fileManage.DecryptAndVerifyString(after_string, passwd,user.get_userID());
Console.WriteLine("----------------------------------------------------------------------------------------------------------\n");
} else if (Mode == 21)
{
    String File = Console.ReadLine();
    while (true)
    {   if (System.IO.File.Exists(File)) {
//文件签名加密
            FileManage fileManage = new FileManage();
            user.detect_All_User_Public_key();
            string output_file = fileManage.SignAndEncryptSinge(passwd, File,
                                 user.get_userID());
            bool check = fileManage.Verify(passwd, output_file,
                                           user.get_all_Authorized_Uers_PublicKey(), user.get_all_Authorized_Users(), user.get_userID());
            if (check == false)
            {
                ClearTool clearTool = new ClearTool();
                clearTool.ClearDeletFile(output_file);
            }
            else
            {
                Console.WriteLine("文件存储成功,并由用户\"{0}\"签名,在\"{1}\"
中", Environment.UserName, output_file);
}
//fileManage.SignAndEncryptMultiple(passwd, File);
Console.WriteLine("----------------------------------------------------------------------------------------------------------\n");
break;
}
else
{
    Console.WriteLine("文件不存在,请重新输入文件路径");
    File = Console.ReadLine();
}
}
} else if (Mode == 22)
{
    String File = Console.ReadLine();
    while (true)
    {   if (System.IO.File.Exists(File)) {
//文件签名加密
            FileManage fileManage = new FileManage();
            user.detect_All_User_Public_key();
            string output_file=fileManage.SignAndEncryptMultiple(passwd, File,
                               user.get_all_Authorized_Uers_PublicKey(), user.get_userID());
            bool check= fileManage.Verify(passwd, output_file,
                                          user.get_all_Authorized_Uers_PublicKey(), user.get_all_Authorized_Users(), user.get_userID());
            if (check == false)
            {
                ClearTool clearTool = new ClearTool();
                clearTool.ClearDeletFile(output_file);
            }
            else
            {
                Console.WriteLine("文件存储成功,并由用户\"{0}\"签名,在\"{1}\"
中", Environment.UserName, output_file); }
Console.WriteLine("----------------------------------------------------------------------------------------------------------\n");
break;
}
else
{
    Console.WriteLine("文件不存在,请重新输入文件路径");
    File = Console.ReadLine();
}
}
} else if (Mode == 3)
{
    String File = Console.ReadLine();
    while (true)
    {   if (System.IO.File.Exists(File)) {
//文件签名加密
            FileManage fileManage = new FileManage();
            user.detect_All_User_Public_key();
            Console.WriteLine(user.get_all_Authorized_Users().Length);
            fileManage.DecryptAndVerify(passwd, File,
                                        user.get_all_Authorized_Uers_PublicKey(), user.get_all_Authorized_Users(), user.get_userID());
            Console.WriteLine("----------------------------------------------------------------------------------------------------------\n");
            break;
        }
        else
        {
            Console.WriteLine("文件不存在,请重新输入文件路径");
            File = Console.ReadLine();
        }
    }
    }
}
}
6.4KeyManage 类
说明
KeyManage 类中的主要函数有:
GenerateKeyPairRSA():生成一对基于 RSA 原理的公钥和私钥
ExportPublicKey():导出公钥
ExportPrivateKey():导出私钥
KeyStoreListKeys():打印出密钥信息
代码
public class KeyManage {
    ~KeyManage()//析构函数,保证释放敏感信息
    {
    }
//RSA 密钥生成
    public void GenerateKeyPairRSA(String userID, String passwd)
    {
        Console.WriteLine("生成用户密钥");
        Console.WriteLine("----------------------------------------------------------------------------------------------------------
                          -");
// initialize the key store where the generated key
// will be produced, if the file does not exist
// it will be created
                          String file = System.IO.Path.Combine(Global.pathStringKey, "key.store"); if (!System.IO.File.Exists(file))
    {
        KeyStore ks = new KeyStore(@file, passwd);
// Preferred symmetric key algorithms for this key
            CypherAlgorithm[] cypher = { CypherAlgorithm.CAST5,
                                         CypherAlgorithm.AES_128
                                       };
        // Preferred digital signature (hash) algorithms for this key HashAlgorithm[] hashing = { HashAlgorithm.SHA1,
HashAlgorithm.MD5,
HashAlgorithm.SHA256
};
// Preferred compression algorithms for this key CompressionAlgorithm[] compression =
{   CompressionAlgorithm.ZIP,
    CompressionAlgorithm.UNCOMPRESSED
};
int keySizeInBits = 2048;
ks.GenerateKeyPair(keySizeInBits, userID, KeyAlgorithm.RSA, passwd, compression,
                   hashing, cypher);
// Now we can use the key from the KeyStore or export it
Console.WriteLine("用户{0}的密钥(公私钥)已生成,在\"{1}\"中\n",
                  Environment.UserName, file);
}
else
{
    Console.WriteLine("用户{0}的密钥已存在,在\"{1}\"中\n",
                      Environment.UserName,file);
    return;
}
}
//导出公钥
public void ExportPublicKey(String userID,String passwd) {
// initialize the KeyStore
    String file_store = System.IO.Path.Combine(Global.pathStringKey, "key.store");
    String file_public_key = System.IO.Path.Combine(Global.pathStringKey,
                             "public_key_exported.asc");
    KeyStore ks = KeyStore.OpenFile(@file_store, passwd);
// should the exported files be ASCII or binary bool asciiArmored = true;
// export both public and secret key with all sub keys in one file if(!System.IO.File.Exists(file_public_key)) ks.ExportPublicKey(@file_public_key, userID, asciiArmored);
    Console.WriteLine("用户{0}的公钥已导出,在\"{1}\"中\n", Environment.UserName,
                      file_public_key);
}
//导出私钥
public void ExportPrivateKey(String userID, String passwd)
{
    String file_store = System.IO.Path.Combine(Global.pathStringKey, "key.store");
    String file_private_key = System.IO.Path.Combine(Global.pathStringKey, "private_key_exported.asc");
// initialize the key store
    KeyStore ks = KeyStore.OpenFile(@file_store, passwd);
// should the exported files be ASCII or binary bool asciiArmored = true;
// export secret key, this is usually our own key.
    ks.ExportPrivateKey(@file_private_key, userID, asciiArmored);
}
//下面的示例以类似于 GnuPG/gpg 的方式列出并打印密钥:
public void KeyStoreListKeys(String passwd)
{
    Console.WriteLine("当前密钥信息为:");
    String file = System.IO.Path.Combine(Global.pathStringKey, "key.store");
// initialize the key store
    KeyStore ks = KeyStore.OpenFile(file, passwd);
    KeyPairInformation[] keys = ks.GetKeys();
    StringBuilder sb = new StringBuilder();
    sb.Append("Username".PadRight(15));
    sb.Append("Type".PadRight(10));
    sb.Append("Key Id".PadRight(30));
    sb.Append("Created".PadRight(20));
    sb.Append("User Id");
    Console.WriteLine(sb.ToString());
    foreach (KeyPairInformation key in keys)
    {   sb.Remove(0, sb.Length);
        sb.Append(Environment.UserName.PadRight(15));
        String keyType = null;
        if (key.HasPrivateKey)
6.6 FileManage 类
说明
FileManage 类中的主要函数有:
SignAndEncryptMultiple():签名并多用户加密文件
SignAndEncryptSinge():签名并单用户加密文件
SignAndEncryptString():签名并加密字符串
DecryptAndVerifyString()解密并验证签名字符串
Verify():用户创建文件时验证用户身份
DecryptAndVerify()解密并验证签名
代码
public class FileManage
{
    ~FileManage()//析构函数,保证释放敏感信息
    {
    }
//签名和加密(多人)
    public string SignAndEncryptMultiple(String passwd, String File, string[]
                                         all_Authorized_Uers_PublicKey, String userID)
    {
//获取文件名(不含拓展名)
        String extension = Path.GetExtension(File);
        String fileNameWithoutExtension = Path.GetFileNameWithoutExtension(File);// 没有扩
展名的文件名 "default"
String fileNameRandom = Path.GetRandomFileName();
String fileNameRandomWithoutExtension =
    Path.GetFileNameWithoutExtension(fileNameRandom);
String newFile = fileNameWithoutExtension + fileNameRandomWithoutExtension +
                 extension + ".gpg";
// create an instance of the library
PGPLib pgp = new PGPLib(); // ASCII armor or binary bool asciiArmor = true;
// append integrity protection check, set to true for compatibility with GnuPG 2.2.8+ bool withIntegrityCheck = false;
//文件目录
string[]	input_file = { @File };
String file_public_key = System.IO.Path.Combine(Global.pathStringKey,
                         "public_key_exported.asc");
String file_private_key = System.IO.Path.Combine(Global.pathStringKey,
                          "private_key_exported.asc");
String output_file = System.IO.Path.Combine(Global.pathStringFile, newFile);
string[] recipientsPublicKeys = all_Authorized_Uers_PublicKey;
KeyManage keyManage = new KeyManage();
keyManage.ExportPrivateKey(userID, passwd);//导出私钥 ClearTool clearTool = new ClearTool(); pgp.SignAndEncryptFiles(@input_file,file_private_key,passwd, recipientsPublicKeys,
@output_file,asciiArmor, withIntegrityCheck);
clearTool.ClearDeletFile(file_private_key);//删除私钥敏感信息 return output_file;
}
//签名和加密(单人)
public string SignAndEncryptSinge(String passwd,String File, String userID)
{
//获取文件名(不含拓展名)
    String extension=Path.GetExtension(File);
    String fileNameWithoutExtension = Path.GetFileNameWithoutExtension(File);// 没有扩
展名的文件名 "default"
String fileNameRandom = Path.GetRandomFileName();
String fileNameRandomWithoutExtension =
    Path.GetFileNameWithoutExtension(fileNameRandom);
String newFile = fileNameWithoutExtension + fileNameRandomWithoutExtension +extension+ ".gpg";
// create an instance of the library
PGPLib pgp = new PGPLib(); // is output ASCII or binary bool asciiArmor = true;
// should integrity check information be added, set to true for compatibility with GnuPG
+
    bool withIntegrityCheck = false;
//文件目录
String input_file = File;
String file_public_key = System.IO.Path.Combine(Global.pathStringKey,
                         "public_key_exported.asc");
String file_private_key = System.IO.Path.Combine(Global.pathStringKey,
                          "private_key_exported.asc");
String output_file = System.IO.Path.Combine(Global.pathStringFile, newFile);
KeyManage keyManage = new KeyManage();
keyManage.ExportPrivateKey(userID, passwd);//导出私钥
ClearTool clearTool = new ClearTool();
// sign and encrypt pgp.SignAndEncryptFile(@input_file, @file_private_key, passwd, @file_public_key, @output_file, asciiArmor, withIntegrityCheck);
clearTool.ClearDeletFile(file_private_key);//删除私钥敏感信息 return output_file;
} public String SignAndEncryptString(String plainText,String passwd, String userID) {
// create an instance of the library PGPLib pgp = new PGPLib();
    String file_public_key = System.IO.Path.Combine(Global.pathStringKey,
                             "public_key_exported.asc");
    String file_private_key = System.IO.Path.Combine(Global.pathStringKey,
                              "private_key_exported.asc");
    KeyManage keyManage = new KeyManage();
    keyManage.ExportPrivateKey(userID, passwd);//导出私钥
    ClearTool clearTool = new ClearTool();
// sign and enrypt
    String encryptedAndSignedString = pgp.SignAndEncryptString(plainText, new FileInfo(file_private_key), passwd, new FileInfo(file_public_key));
    clearTool.ClearDeletFile(file_private_key);//删除私钥敏感信息 return encryptedAndSignedString;
}
public bool Verify(String passwd, String File, string[] All_User_Public_key, string[] All_Users, String userID)
{
    String originalFile = Path.GetFileNameWithoutExtension(File);
    String extension= Path.GetExtension(File); //-->.txt
    String filetmp = originalFile + "Tmp" + extension;
// create an instance of the library
    PGPLib pgp = new PGPLib();
//文件目录
    String input_file = File;//gpg
    String file_private_key = System.IO.Path.Combine(Global.pathStringKey,
                              "private_key_exported.asc");
    String output_file = System.IO.Path.Combine(Global.pathStringFile, filetmp);
    KeyManage keyManage = new KeyManage();
    keyManage.ExportPrivateKey(userID, passwd);//导出私钥 ClearTool clearTool = new ClearTool(); for (int i = 0; i < All_Users.Length; i++)
    {
// check the signature and extract the data
//The supplied data is not only signed but also encrypted. Please use the DecryptAndVerify or Decrypt methods in order to extract the encrypted contents."
//因此只能先解密再验证签名
        SignatureCheckResult signatureCheck = pgp.DecryptAndVerifyFile(@input_file, @file_private_key, passwd,
                                              @All_User_Public_key[i],
                                              @output_file);
        clearTool.ClearDeletFile(file_private_key);//删除私钥敏感信息 clearTool.ClearDeletFile(output_file);
        if (signatureCheck == SignatureCheckResult.SignatureVerified&& All_Users[i] == Environment.UserName)
        {
            Console.WriteLine($"身份认证成功,您的身份为{All_Users[i]},创建文件成
功");
return true;
}
else
{
    Console.WriteLine($"身份认证失败,您的身份为{All_Users[i]},创建文件失败
                      ");
                      return false;
}
} return false;
}
public void DecryptAndVerify(String passwd, String File,string[] All_User_Public_key,string[] All_Users, String userID) {
    String originalFile = Path.GetFileName(File);
// create an instance of the library PGPLib pgp = new PGPLib();
//文件目录
    String input_file = File;//gpg
    String file_private_key = System.IO.Path.Combine(Global.pathStringKey,
                              "private_key_exported.asc");
    String output_file = System.IO.Path.Combine(Global.pathStringFile, originalFile);
    KeyManage keyManage = new KeyManage();
    keyManage.ExportPrivateKey(userID, passwd);//导出私钥
    ClearTool clearTool = new ClearTool();
// decrypt and obtain the original file name
// of the decrypted file string originalFileName = pgp.DecryptFile(@input_file, @file_private_key, passwd,
    @output_file);
    Console.WriteLine("您的身份为用户\"{0}\"", Environment.UserName);
    Console.WriteLine("文件调阅成功,原文件名为{0},解密后的文件在{1}中
                      ",originalFileName,output_file);
                      for(int i = 0; i < All_Users.Length; i++)
    {
// check the signature and extract the data
//The supplied data is not only signed but also encrypted. Please use the DecryptAndVerify or Decrypt methods in order to extract the encrypted contents."
//因此只能先解密再验证签名
        SignatureCheckResult signatureCheck = pgp.DecryptAndVerifyFile(@input_file, @file_private_key, passwd,
                                              @All_User_Public_key[i],
                                              @output_file);
        clearTool.ClearDeletFile(file_private_key);//删除私钥敏感信息 if (signatureCheck == SignatureCheckResult.SignatureVerified)
        {
            Console.WriteLine("签名验证成功,该文件是由用户{0}创建的", All_Users[i]);
            break;
        }
        else if (signatureCheck == SignatureCheckResult.NoSignatureFound)
        {
            Console.WriteLine("此文件未数字签名");
            break;
        }
        else if (signatureCheck == SignatureCheckResult.SignatureBroken)
        {
            Console.WriteLine("文件的签名已损坏或伪造 ");
            break;
        }
        else if (i== All_Users.Length-1 && signatureCheck == SignatureCheckResult.PublicKeyNotMatching)
        {
            Console.WriteLine("提供的公钥与签名不匹配");
        }
    }
}
public void DecryptAndVerifyString(String signedAndEncryptedMessage,String passwd, String userID)
{
    String file_public_key = System.IO.Path.Combine(Global.pathStringKey,
                             "public_key_exported.asc");
    String file_private_key = System.IO.Path.Combine(Global.pathStringKey,
                              "private_key_exported.asc");
    String plainTextExtracted;
// create an instance of the library
    PGPLib pgp = new PGPLib();
    KeyManage keyManage = new KeyManage();
    keyManage.ExportPrivateKey(userID, passwd);//导出私钥 ClearTool clearTool = new ClearTool();
// decrypt and verify
    SignatureCheckResult signatureCheck = pgp.DecryptAndVerifyString(signedAndEncryptedMessage, new FileInfo(@file_private_key), passwd, new FileInfo(@file_public_key), out plainTextExtracted);
    clearTool.ClearDeletFile(file_private_key);//删除私钥敏感信息
// print the results if (signatureCheck == SignatureCheckResult.SignatureVerified)
    {
        Console.WriteLine("签名验证成功");
    } else if (signatureCheck == SignatureCheckResult.SignatureBroken)
    {
        Console.WriteLine("文件的签名已损坏或伪造 ");
    } else if (signatureCheck == SignatureCheckResult.PublicKeyNotMatching)
    {
        Console.WriteLine("提供的公钥与签名不匹配");
    } else if (signatureCheck == SignatureCheckResult.NoSignatureFound)
    {
        Console.WriteLine("此文件未数字签名");
    }
    Console.WriteLine("用您的私钥先解密,再用您的公钥验证签名,得到的字符串为
                      \n{0}", plainTextExtracted);
}
}
6.7 ClearTool 类
说明
ClearTool 类中的主要函数有:
ClearDelet():彻底删除目录下所有文件
ClearFile():清空文件内容
ClearDeletFile():彻底删除文件内容
代码
public class ClearTool
{
    ~ClearTool()
    {
    }
/// <summary>
/// 清空目录或文件
/// </summary> public void ClearDelet(string path)
    {   if (File.Exists(path)) ClearDeletFile(path);
        if (Directory.Exists(path)) ClearDeletDirectory(path);
    }
/// <summary>
/// 先清空目录中的所有文件和子目录内容,再删除当前目录
/// </summary> public void ClearDeletDirectory(string dir)
    {
        if (Directory.Exists(dir)) {
// 清除目录下的所有文件
            foreach (String iteam in Directory.GetFiles(dir))
            {
                ClearDeletFile(iteam);
            }
七、心得体会
通过本次实验,我们更加深入的了解到了哦内部结构和运行机制。PGP 协议是 PGP 加密由一系列散列、数据压缩、对称密钥加密,以及公钥加密的算法组合而成的可靠文件传输和加密协议,而 OpenPGP 又是主流的 PGP 搭建平台。此外,在我们进行身份认证的过程当中,考虑到了不同用户创建的文件之间的相互访问性以及在不涉及系统本身的认证功能的条件下实现不同用户之间认证功能是一个较为困难的事情。我们通过化繁为简的思想,首先完成 pgp 加密与解密的实现,进一步考虑身份的实现。在上述的基础上实现对于密钥的保护,从而能够保护用户与用户之间无法相互访问或者盗取到对方的私钥从而伪造加密与解密的文件。
本例实在 windows 操作系统下实现的加密与解密的过程。在实现过程中我们以 C++ 作为语言以更方便的对于用户本身认证的相关字符串等信息进行比特级别的编程,更加直观的同时使得整个程序的执行更加快速。同时由于 C++ 生成的窗体应用程序能够直接实现对于动态内存申请的保护功能,从而在公钥和私钥的创建过程当中,我们可以直接通过 alloc 函数和 free 函数内部的指针变量,定位到我们在缓存块当中所分配的缓存地址,从而对其加以保护。在这一点上, C++ 的独特优势在于能够一定程度的通过"指针定位缓存地址"的方式,深入到物理地址层面对于操作系统的缓存空间进行保护,这一点是在其他高级语言或库函数很难做到。
理论结合实际使我明白了很多课本上学不到的东西,不仅进一步学会文件传输本地文件加密的基本概念,以及初步掌握了防范和攻击的技能,懂得了软件的运用和原理,为了以后计算机加密与解密协议方面多了一分经验和能力。在后续的信息安全原理和信息安全方向的学习过程当中,会进一步提升自己在安全问题处理的能力,善用更多的软件分析、处理等方法来解决问题,从而进一步提升自己在信息安全问题方面处理的能力。