文章目录
- 1.二值化
-
- [1.1 固定阈值法](#1.1 固定阈值法)
- [1.2 双固定阈值法](#1.2 双固定阈值法)
- 2.灰度线性变换
-
- [2.1 窗口灰度变换](#2.1 窗口灰度变换)
- [2.2 图像分段线性变换](#2.2 图像分段线性变换)
- 3.灰度投影
-
- [3.1 水平投影](#3.1 水平投影)
- 3.2垂直投影
- 4.直方图
这篇博客主要介绍二值化,灰度变换,投影,直方图的计算方法.方法都是用python基于bitmap(8bit)来操作的,没使用三方图像处理库.
1.二值化
顾名思义,二值化就是对图像做一次非黑即白的变换,它将一张包含丰富灰度层次的图片,转换成只有纯黑(0)和纯白(255)两种颜色的图像.
1.1 固定阈值法
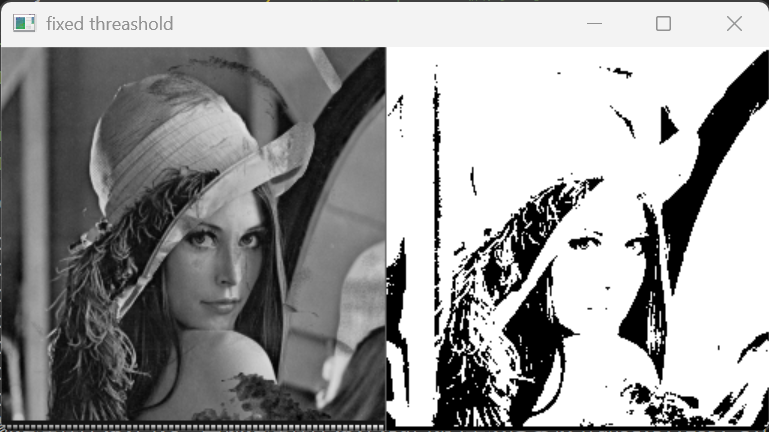
固定阈值法是灰度变换中最基础,最直接的手段.它的实现非常简单,大于这个阈值置白,小于这个阈值置黑. 它经常用在光照条件恒定,背景也固定的场景,且物体和背景的对比度高的情况.这样我们可以直接设置一个阈值,快速滤除背景信息. 如下是python代码片段.
python
    # 图像图像固定阈值
    def fixedThreshold(self, threshold):
        pixels = bytearray(self.width * self.height)
        for index in range(self.height *self.width):
            if self.pixels[index] >= threshold:
                pixels[index] = 255

        return pixels
效果展示,这里我设置的灰度级为50,可以看到一些暗的背景都被过滤掉了.
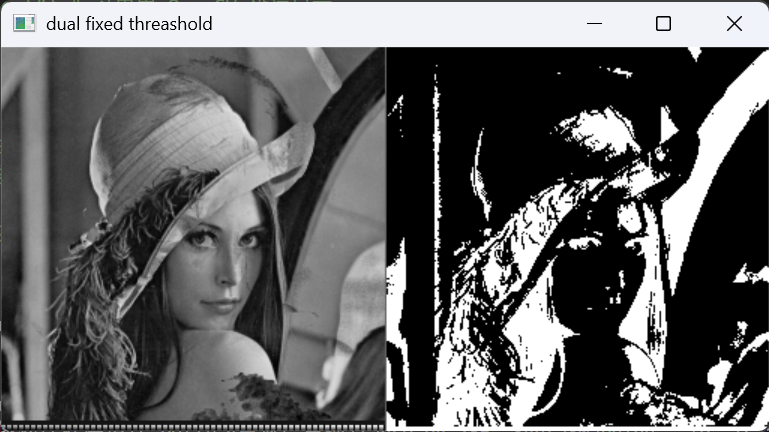
1.2 双固定阈值法
双固定阈值有2中实现方法,比如这里定义上下2个灰度级阈值L,U
- 0-255-0型: 即,当灰度级在L,U之间时,所有灰度级置白(255),其它为黑色(0)
- 255-0-255型: 即,当灰度级在L,U之间时,像素灰度置为黑色(0), 其它置为白色(255),正好和上面相反.
如下是按着0-255-0来实现的方法.
python
    # 图像图像双阈值
    # miniThreshold: 小阈值
    # maxThreshold: 大阈值
    def dualFixedThreshold(self, miniThreshold, maxThreshold):
        pixels = bytearray(self.width * self.height)
        for index in range(self.height *self.width):
            # 再阈值区间内置为255,即白色
            if self.pixels[index] >= miniThreshold and self.pixels[index] <=maxThreshold:
                pixels[index] = 255
            else:
                pixels[index] = 0

return pixels这里阈值设置为50,180时,0-255-0和255-0-255效果图如下
- 0-255-0型效果图:

- 255-0-255型效果图:
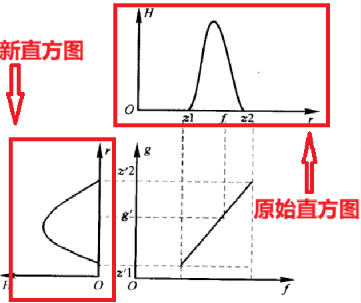
2.灰度线性变换
灰度变换一般用来扩大图像的动态范围,以让图像看起来更均衡一些.如下它的原理很简单.
- 当斜率超过1时,新图像的灰度将会映射到更宽的范围
- 当斜率低于1时,信徒想的灰度范围会被进一步压缩
- 当斜率不变,仅仅在Y轴方向上下移动,这会整体增加图像亮度
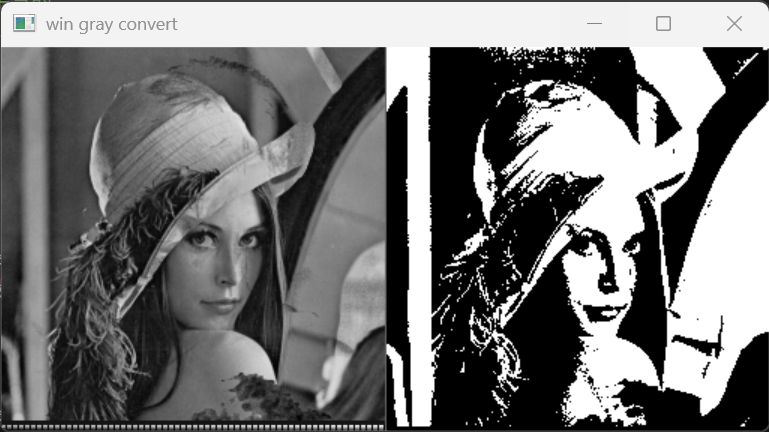
2.1 窗口灰度变换
当图像中大部分的像素的灰度级在L,U之间时,我们可以用此变换,将小于L的灰度级置0,大于U的灰度级置255.
尽管这样会损失一部分信息,但是在一些特殊情况可以大大减少图像运算量.
它的计算方法很简单,设置一个灰度窗口L,U
- 小于L置0
- 大于U的置255.
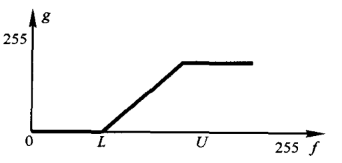
结合上面的判定规则,python代码如下
python
    # 图像窗口灰度变换
    # 当图像中的大部分灰度级在[L, U]之间时,我们可以进行运算,
    # 1.灰度级小于L的,都置为0,
    # 2.灰度级大于U的都置为255,
    # 3.灰度级大于L,小于U的,保持不变
    # note: 目前我们的位图深度为8,直接在像素操作即可
    def winGreyConvert(self, miniThreshold, maxThreshold):
        pixels = bytearray(self.width * self.height)
        for index in range(self.height *self.width):
            # 再阈值区间内置为255,即白色
            if self.pixels[index] < miniThreshold:
                pixels[index] = 0
            elif self.pixels[index] > maxThreshold:
                pixels[index] = 255

        return pixels
效果展示: 2,100
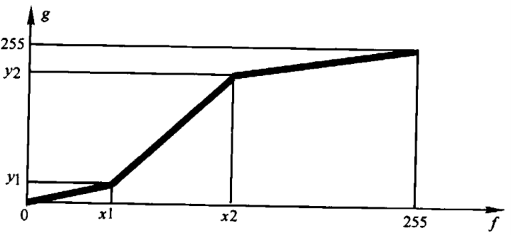
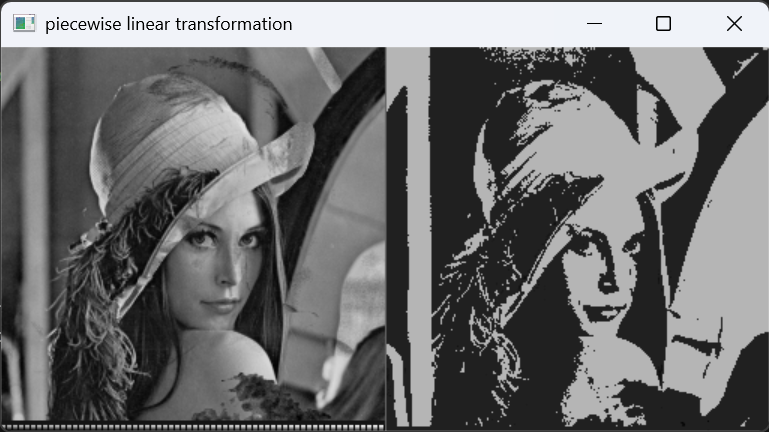
2.2 图像分段线性变换
理解成分段函数即可,
python
    # 图像分段线性变换
    # 参数:x1:折点1的原始灰度级, y1:折点1的变换后的灰度级
    # 参数:x2:折点2的原始灰度级, y2:折点1的变换后的灰度级
    # 其实这里就是分段处理图像的灰度级
    def pieceLinearTransform(self, x1, y1, x2, y2):
        pixels = bytearray(self.width * self.height)
        pMap = bytearray(256)

        # 第一阶段计算灰度级小于x1
        for i in range(x1):
            if x1 > 0:
                pMap[i] = round(y1/x1 * i)
            else:
                pMap[i] = 0

        # 第二阶段,计算灰度级在x1 和 x2
        for i in range(x1, x2):
            if x1 != x2:
                pMap[i] = round((y2-y1)/(x2-x1) + y1)
            else:
                pMap[i] = y1

        # 第三阶段,计算灰度级 大于X2
        for i in range(x2, 255):
            if x2 != 255:
                pMap[i] = round((255-y1)/(255-x1) + y2)
            else:
                pMap[i] = 255

        for index in range(self.height *self.width):
            # 将原本的数据映射到新的线性变换后的灰度级
            color = pMap[self.pixels[index]]
            pixels[index] = color

return pixels效果展示:10, 30, 100, 180
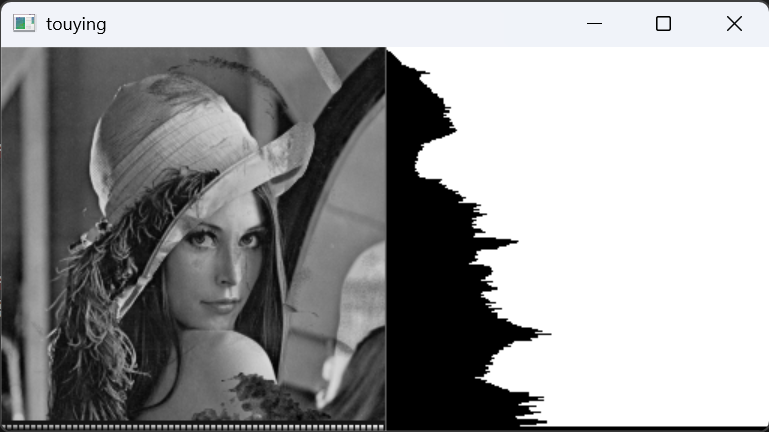
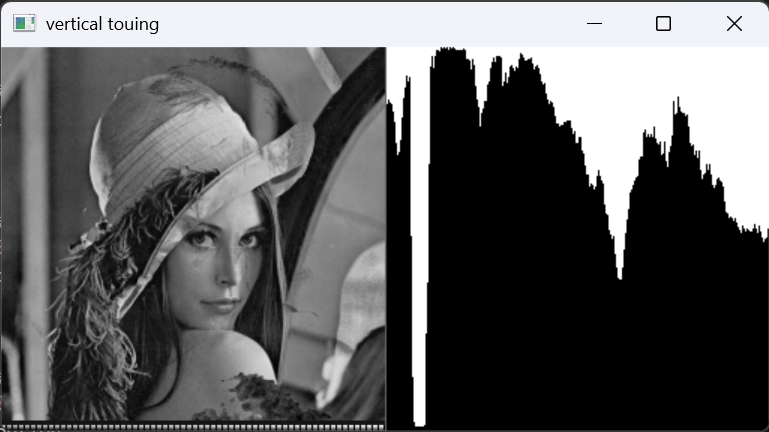
3.灰度投影
灰度投影一般用来判断特殊元素之间的间隔了,这有助于图像提取.比如在文字提取时,水平投影更找到行之间的间隔位置,垂直投影能找到字与字之间的间隔.
3.1 水平投影
python
    # 水平投影
    def horizontal_touying(self, threshold):
        pixels = bytearray(self.width * self.height)  #二值化图像
        pixels2 = [255]*self.width * self.height  #一张初始白图

        #1. 首先根据给定阈值,对图像做二值化
        for index in range(self.height *self.width):
            if self.pixels[index] > threshold:
                pixels[index] = 255
            else:
                pixels[index] = 0

        #2.其次依次扫描各行有多少为0的像素,然后根据为0像素的个数,将当前行的前几个像素置黑
        for raw in range(self.height):
            # 首先检查当前行有多少个黑色元素
            blackPixels = 0
            for index in range(self.width):
                if pixels[raw * self.width + index] == 0:
                    blackPixels = blackPixels +1
            # 然后pixels2当前行前几个像素置为黑色(blackPixels)
            for i in range(blackPixels):
                pixels2[raw * self.width + i] = 0

        return pixels2
效果图:
3.2垂直投影
python
# 垂直投影
    def vertical_touying(self, threshold):
        pixels = bytearray(self.width * self.height)  #二值化图像
        pixels2 = [255]*self.width * self.height  #一张初始白图

        #1. 首先根据给定阈值,对图像做二值化
        for index in range(self.height *self.width):
            if self.pixels[index] > threshold:
                pixels[index] = 255
            else:
                pixels[index] = 0

        #2.其次依次扫描各列0的像素,然后根据为0像素的个数,将当前行的前几个像素置黑
        for col in range(self.width):
            blackPixels = 0
            # 首先检查当前列有多少个黑色元素
            for raw in range(self.height):
                if pixels[raw * self.width + col] == 0:
                    blackPixels = blackPixels +1
            # 然后pixels2当前行前几个像素置为黑色(blackPixels)
            for i in range(blackPixels):
                #pixels2[(self.height-i-1)* self.width + col] = 0
                pixels2[i* self.width + col] = 0

        return pixels2
效果展示:
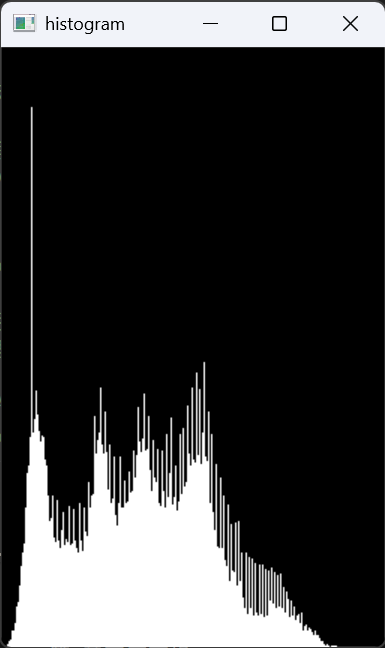
4.直方图
直方图能更清晰的看到,图像灰度级的分布,能只管看到图像亮暗的情况.
- 如果图像灰度比较窄,说明图像整体对比度不大,整体偏暗或偏亮,主题和背景不易区分
- 如果图像灰度范围比较广,说明图像对比度高,能较易区分前后景.
python
    # 计算直方图
    def calculate_histogram(self):
        pixelCount = self.width * self.height
        for i in range(pixelCount): #遍历所有像素点
            index = self.pixels[i]
            self.histogram[index] = self.histogram[index] + 1
    #画直方图
    def draw_histogram(self):
        #1 .创建一张画布
        chart_width, chart_heigt = 256, 400
        #2. 创建全黑的图像(都是0)
        char_img = np.zeros((chart_heigt, chart_width), dtype=np.uint8)

        #3. 找打灰度数最大的值
        max_count = max(self.histogram)
        if max_count == 0:
            max_count = 1

        print(f"灰度最大为{max_count}")

        #4.开始划线
        for x in range(255):
            count = self.histogram[x]
            if count > 0:
                bar_height = int((count/max_count) * (chart_heigt * 0.9))

                # 从底部向上画线
                # BMP/图像坐标通常是左上角为(0,0),所以我们要从 chart_height 往上减
                for j in range(bar_height):
                    char_img[chart_heigt - 1 - j, x] = 255

        cv2.imshow("histogram", char_img)