今天针对Spring框架的事务管理功能展开了学习,学习内容如下:
我们在使用jdbc技术来实现事务管理:设置自动提交为false,当没有异常,手动提交commit,如果有异常调用rollback
使用mybatis来实现事务管理:设置自动提交为false,sqlSession来调用commit,rollback;
使用spring框架,屏蔽掉不同数据库操作方式带来的差异,提供同一的事务管理机制
Spring框架内部采用事务管理器的接口PlatformTransactionManager,来完成commit和rollback针对不同的框架,来提供不同的实现类:
mybatis:DataSourceTransactionManager
hibernate:HibernateTransactionManager
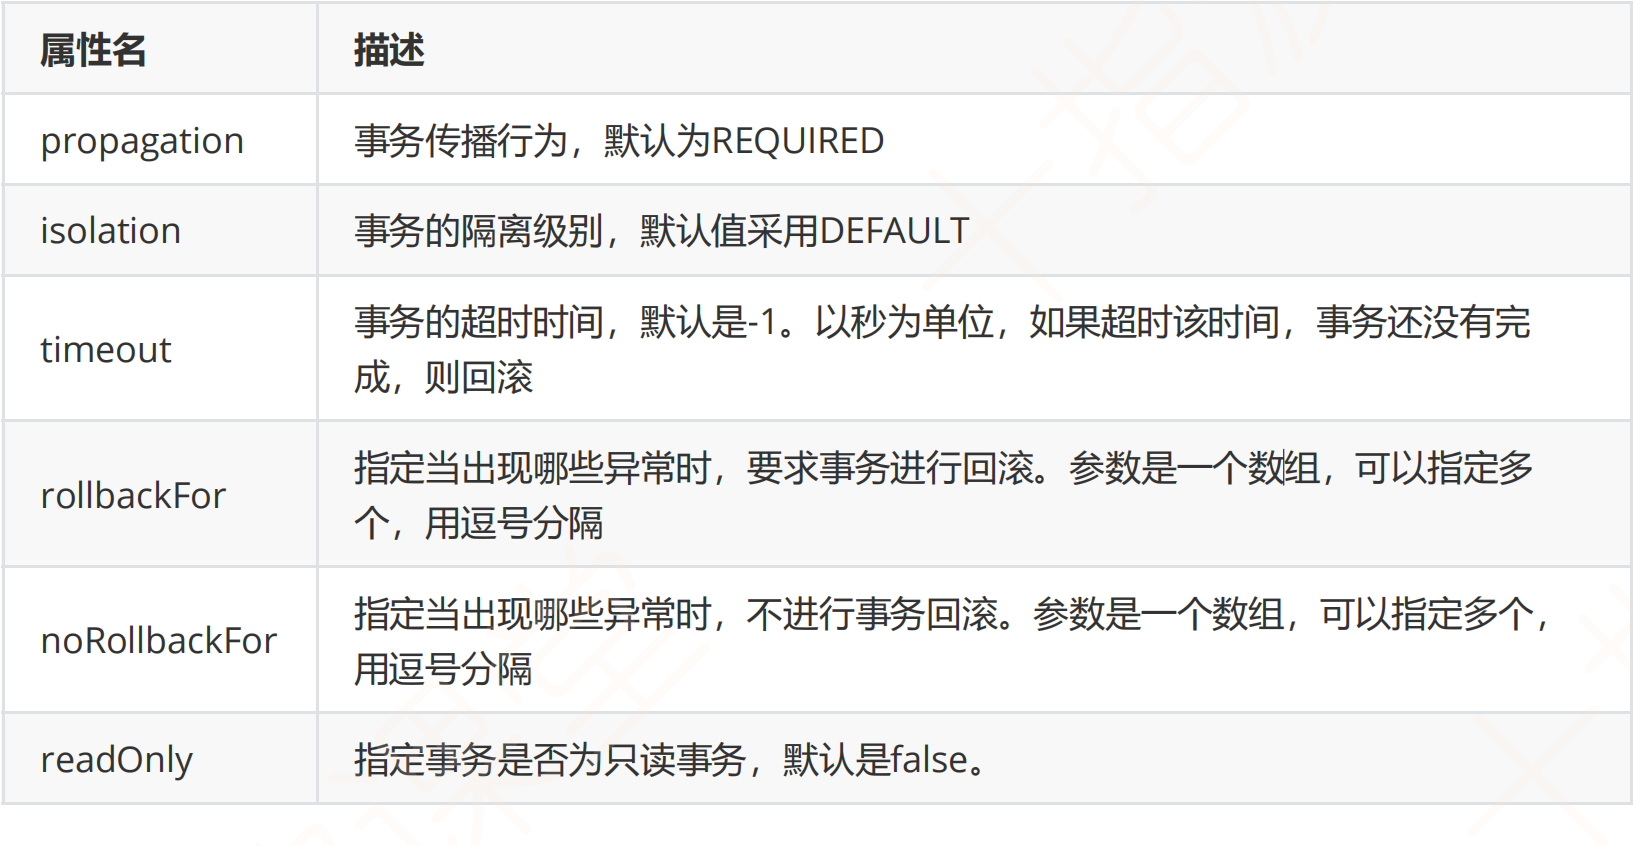
1.事务相关属性介绍
1.1事务隔离级别:
|---------------------------|-------------------------------------------------------------------------------------|
| 级别 | 描述 |
| ISOLATION_DEFAULT | 默认级别,mysql数据库默认隔离级别是ISOLATION_REPEATABLE_READ,Oracle数据库默认级别ISOLATION_READ_COMMITTED |
| ISOLATION_READ_UNCOMMITED | 读未提交,没有解决并发问题 |
| ISOLATION_READ_COMMITED | 读已提交,解决脏读 |
| ISOLATION_REPEATABLE_READ | 可重复读,解决脏读,不可重复读 |
| ISOLATION_SERIALIZABLE | 串行化,不会发生并发问题 |
1.2事务超时时间
表示当前事务的最长执行时间,如果在指定时间内结束,则事务正常提交。如果超过指定时间,则事务回滚。以秒为单位时,默认-1,不限时;
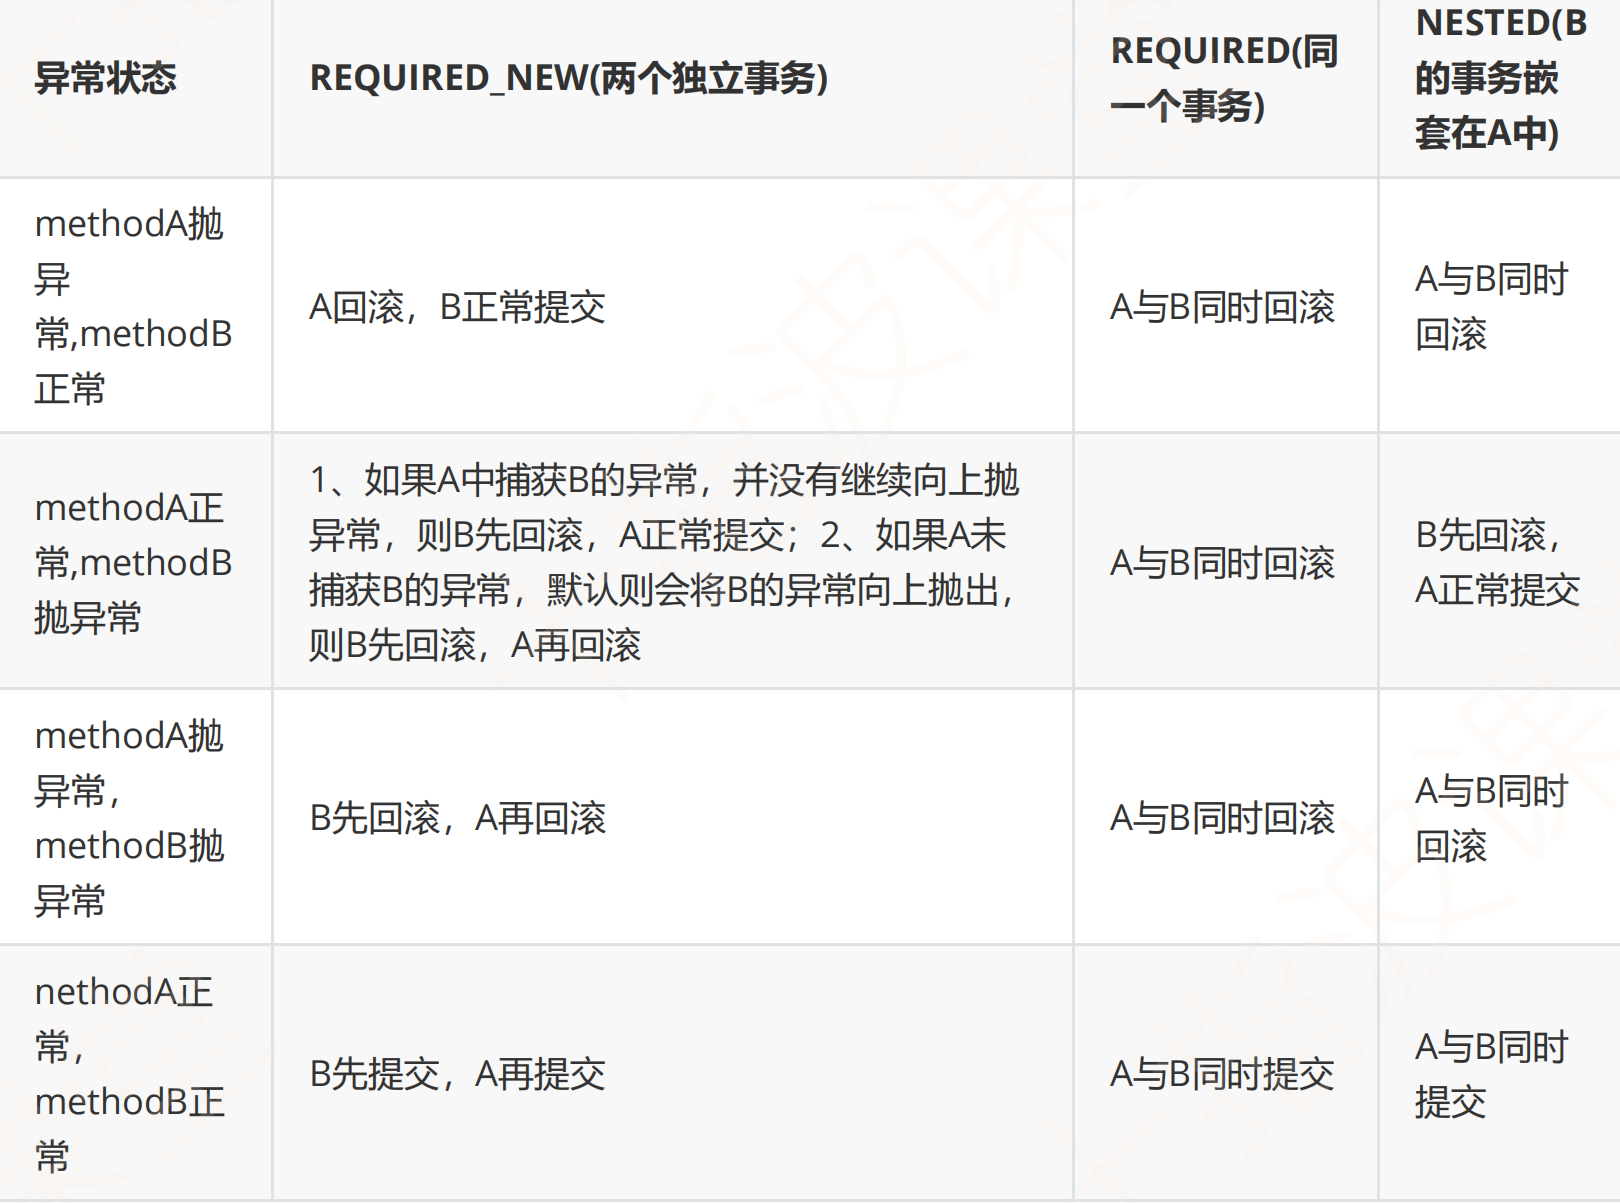
1.3事务传播行为
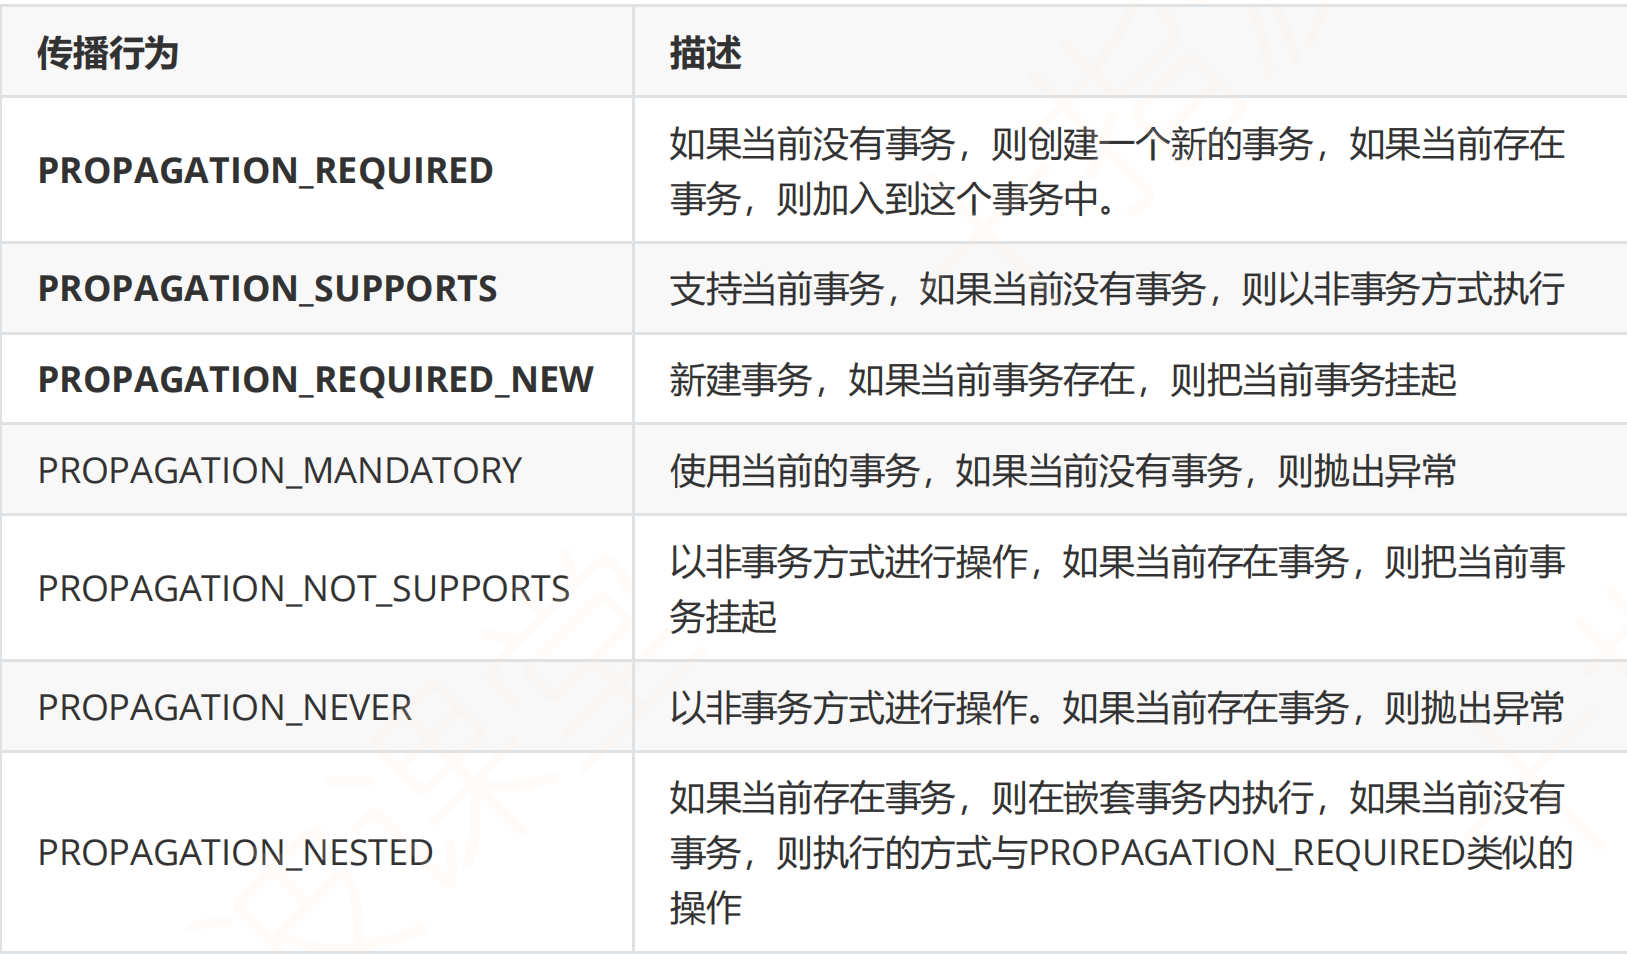
分析REQUIRED、REQUIRED_NEW、NESTED的差别
1.4Spring默认的事务提交和回滚的时机
如果业务方法可以正常执行结束,没有异常,事务执行提交
如果方法中出现运行时异常或者是Error,则回滚事务
如果方法中出现检查型异常,则提交事务
2.实战
我们模拟一个用户,银行帐户,执行一笔支付操作,将用户余额减少,并在交易记录中记录一条数据。
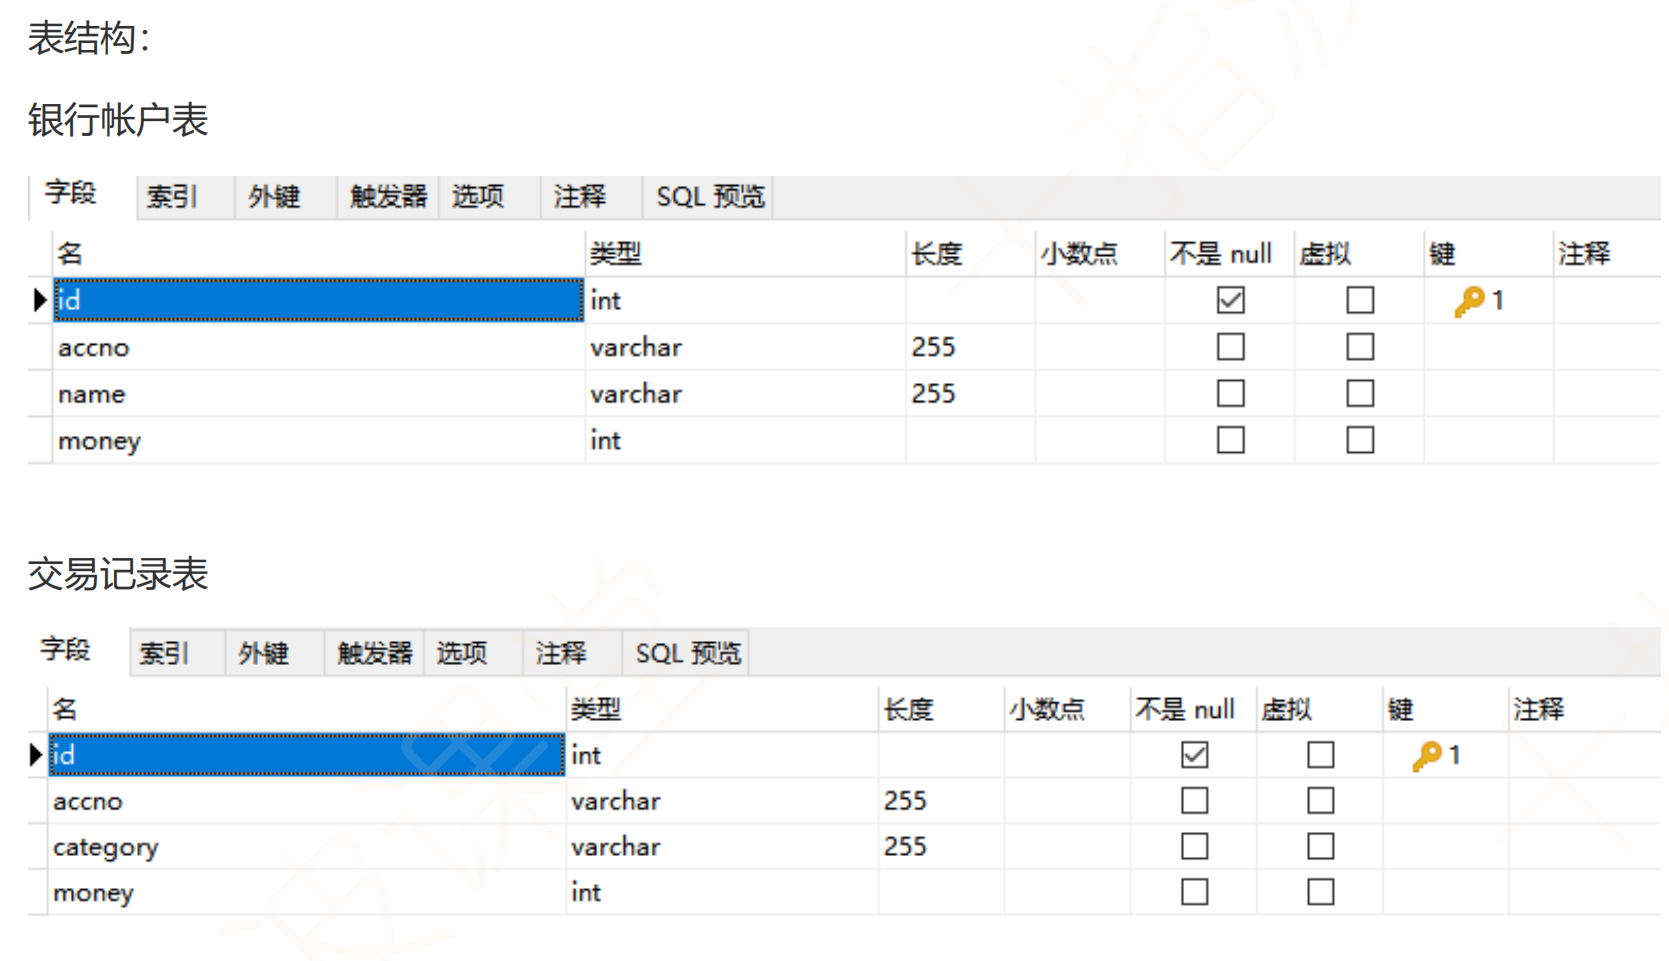
2.1创建实体类
java
package com.xzit.entity;
import lombok.Data;
import lombok.experimental .Accessors ;
@Data
@Accessors(chain = true)
public class Acc {
    private int id ;
    private String accno ;
    private String name ;
    private int money;
}
java
package com.xzit.entity;
import lombok.Data;
import lombok.experimental .Accessors ;
@Data
@Accessors(chain = true)
 public class Records {
    private int id ;
    private String accno ;
    private String category;
    private int money;
}
2.2Mapper的编写
java
package com.xzit.mapper ;
import com.xzit.entity .Acc ;
import org.apache.ibatis.annotations.Update ;
import org.springframework.stereotype.Repository;
@Repository
public interface AccMapper {
@Update("update acc set money=money-#{money} where accno=#{accno}")
 void update(Acc acc);
}
java
package com.xzit.mapper ;
import com.xzit.entity.Records ;
import org.apache.ibatis.annotations.Insert ;
import org.springframework.stereotype.Repository;
@Repository
public interface RecordsMapper {
@Insert("insert into records values(null ,#{accno},#{category},#
{money})")
void insert(Records records);
}
2.3Service的编写
javascript
package com .xzit .service ;
import java.io.FileNotFoundException ;
public interface AccService {
void doPay(int money) throws FileNotFoundException ;
}
java
package com.xzit.service ;
import com.xzit.entity.Acc ;
import com.xzit.entity.Records ;
import com.xzit.mapper.AccMapper ;
import com.xzit.mapper.RecordsMapper ;
import org.springframework.stereotype.Service ;
import org.springframework.transaction.annotation.Isolation ;
import org.springframework.transaction.annotation.Propagation ;
import org.springframework.transaction.annotation.Transactional ;
import javax.annotation.Resource ;
import java.io.FileNotFoundException ;
import java.util.concurrent.TimeUnit ;
@Service
public class AccServiceImpl implements AccService {
@Resource
private AccMapper accMapper ;
@Resource
    private RecordsMapper recordsMapper;

    @Transactional(
            propagation = Propagation.REQUIRED,
            isolation = Isolation.REPEATABLE_READ,
            timeout = 3
            /* rollbackFor = {
                     FileNotFoundException.class,
                     NullPointerException.class
             },
             noRollbackFor = {}*/
    )
    @Override
    public void doPay(int money) throws FileNotFoundException {
        //存一条交易记录
        Records records = new Records();
        records.setAccno("123456").setCategory("支出").setMoney(money);
        recordsMapper.insert(records);
        System.out.println("执行交易记录处理");
        //模拟超时处理
        try {
            TimeUnit.SECONDS.sleep(4);
        } catch (InterruptedException e) {
            e.printStackTrace();
        }
        //运行时异常
        /* try {
             int i = 10 / 0;//算术异常(运行时异常)
         }catch(ArithmeticException e){}*/
        //检查型异常
        /* if (money > 2000)
             throw new FileNotFoundException("文件找不到异常");*/
        //修改用户原帐户下的余额
        Acc acc = new Acc();
        acc.setAccno("123456");
        acc.setMoney(money);
        accMapper.update(acc);
        System.out.println("执行用户余额修改处理");

    }
}
可以看到我这里的doPay方法将两个DAO层的方法组装起来以实现功能,并且通过@Transactional对方法事务的超时时间、事务隔离级别、事务传播行为、以及回滚时机进行了配置;
2.4spring配置文件
XML
<?xml version="1.0" encoding="UTF-8"?>
<beans xmlns="http://www.springframework.org/schema/beans"
       xmlns:xsi="http://www.w3.org/2001/XMLSchema-instance"
       xmlns:context="http://www.springframework.org/schema/context"
       xmlns:tx="http://www.springframework.org/schema/tx"
       xsi:schemaLocation="
        http://www.springframework.org/schema/beans
        http://www.springframework.org/schema/beans/spring-beans.xsd
        http://www.springframework.org/schema/context
        http://www.springframework.org/schema/context/spring-context.xsd
        http://www.springframework.org/schema/tx
        http://www.springframework.org/schema/tx/spring-tx.xsd">

    <!-- 对应db.properties文件 -->
    <context:property-placeholder location="classpath:db.properties"/>

    <!-- 自动扫描 -->
    <context:component-scan base-package="com.xzit"/>

    <!-- 数据源 -->
    <bean id="dataSource" class="com.alibaba.druid.pool.DruidDataSource"
          init-method="init" destroy-method="close">
        <property name="url" value="${jdbc.url}"/>
        <property name="username" value="${jdbc.username}"/>
        <property name="password" value="${jdbc.password}"/>
    </bean>

    <!-- 配置SqlSessionFactory -->
    <bean id="sqlSessionFactory" class="org.mybatis.spring.SqlSessionFactoryBean">
        <property name="dataSource" ref="dataSource"/>
        <property name="configLocation" value="classpath:SqlMapConfig.xml"/>
    </bean>

    <!-- 对Mapper的扫描 -->
    <bean class="org.mybatis.spring.mapper.MapperScannerConfigurer">
        <property name="sqlSessionFactoryBeanName" value="sqlSessionFactory"/>
        <!-- 配置Mapper文件的基准包 -->
        <property name="basePackage" value="com.xzit.mapper"/>
    </bean>

    <!-- 配置事务管理器 -->
    <bean id="transactionManager" class="org.springframework.jdbc.datasource.DataSourceTransactionManager">
        <property name="dataSource" ref="dataSource"/>
    </bean>

    <tx:annotation-driven transaction-manager="transactionManager"/>

</beans>
我们在实际进行事务管理时需要配置事务管理器
2.5通过XML配置事务
对于pom.xml文件
需要加入pom.xml文件
XML
<dependency>
<groupId>org.springframework</groupId>
<artifactId>spring-aspects</artifactId>
<version>5.3.30</version>
</dependency>
在ApplicationContext.xml文件中进行编写
XML
<!-- 配置事务管理器 -->
<bean id="transactionManager" class="org.springframework.jdbc.datasource.DataSourceTransactionManager">
    <property name="dataSource" ref="dataSource"></property>
</bean>

<!--<tx:annotation-driven transaction-manager="transactionManager">
</tx:annotation-driven>-->

<tx:advice id="myTransaction" transaction-manager="transactionManager">
    <tx:attributes>
        <tx:method name="doPay" propagation="REQUIRED" timeout="3"/>
        <tx:method name="select*" propagation="SUPPORTS"/>
        <tx:method name="*" propagation="REQUIRED"/>
    </tx:attributes>
</tx:advice>

<aop:config>
    <aop:pointcut id="myPointcut" expression="execution(* *..service..*.*(..))"/>
    <aop:advisor advice-ref="myTransaction" pointcut-ref="myPointcut"></aop:advisor>
</aop:config>
我们先配置好TransactionManager再使用tx:advice进行作用方法的配置,最后再通过aop配置切点注入事务管理;
3.Transactional的属性