Kubernetes 实战入门:Namespace、Pod、Label、Deployment 与 Service 全解析
在 Kubernetes 的世界中,掌握核心资源的使用是迈向云原生应用管理的第一步。本文将通过实战演示,带你深入理解 Namespace、Pod、Label、Deployment 和 Service 这五大基础组件,并提供生产环境最佳实践。
为什么从这五大组件开始?
- ✅ Namespace:实现多租户隔离的基础
- ✅ Pod:Kubernetes 调度的最小单元
- ✅ Label:资源分组与选择的核心机制
- ✅ Deployment:无状态应用的标准部署方式
- ✅ Service:服务发现与负载均衡的关键
一、Namespace:资源隔离的基石
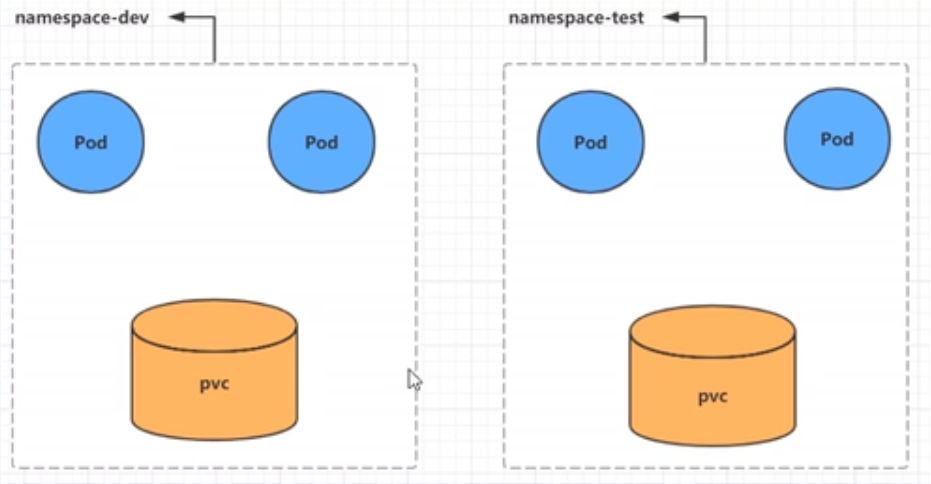
1.1 Namespace 的作用
- 多环境隔离:开发、测试、生产环境互不影响
- 多租户管理:不同团队/项目共享集群资源
- 资源配额控制:限制命名空间的资源使用量
1.2 默认 Namespace 详解
bash
[root@master ~]# kubectl get ns
NAME              STATUS   AGE
default           Active   32h # 未指定 namespace 的资源默认分配至此
kube-flannel      Active   31h # Flannel 网络插件相关资源
kube-node-lease   Active   32h # 节点心跳维护(v1.13+ 引入)
kube-public       Active   32h # 所有用户可读的公共资源
kube-system       Active   32h # Kubernetes 系统组件
1.3 Namespace 常用操作
查看 Namespace
bash
# 查看所有 namespace
kubectl get ns

# 查看指定 namespace
kubectl get ns kube-system

# 指定输出格式
kubectl get ns kube-system -o wide
kubectl get ns kube-system -o json
kubectl get ns kube-system -o yaml

# 查看详细信息
kubectl describe ns default
创建与删除 Namespace
bash
# 命令式创建
kubectl create ns test1

# 命令式删除
kubectl delete ns test1

# 配置文件方式
cat > ns.yaml <<EOF
apiVersion: v1
kind: Namespace
metadata:
  name: test1
EOF

kubectl create -f ns.yaml
kubectl delete -f ns.yaml
💡 最佳实践:
- 生产环境按业务线划分 namespace(如
order-service、user-service)- 使用 ResourceQuota 限制资源使用
- 通过 NetworkPolicy 实现网络隔离
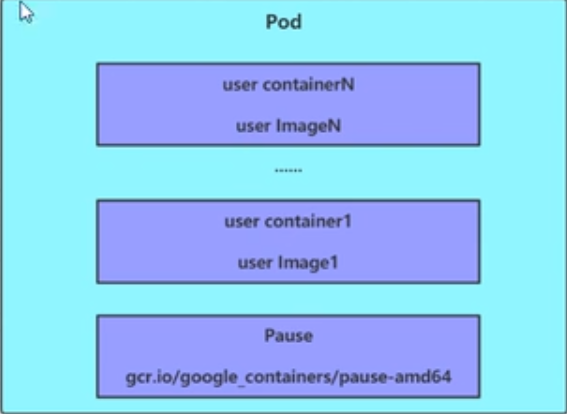
二、Pod:Kubernetes 的最小调度单元
Pod 是 Kubernetes 中最小的可部署单元,代表集群中运行的一个进程。一个 Pod 可以包含一个或多个容器,这些容器共享存储、网络和运行规范。
2.1 Pod 命令操作
创建 Pod
bash
# kubectl run 创建 Pod(实际通过 Deployment 控制器)
kubectl run pod1 --port=80 --image=nginx --namespace=test1
查看 Pod
bash
# 基本信息
kubectl get pods -n test1

# 详细信息(关键!用于排错)
kubectl describe po pod1 -n test1
访问 Pod
bash
# 获取 Pod IP
kubectl get po pod1 -n test1 -o wide

# 直接访问(仅集群内部)
curl 10.245.2.8:80
删除 Pod
bash
# 删除 Pod
kubectl delete po pod1 -n test1

# 注意:如果 Pod 由控制器管理,会自动重建
# 正确删除方式:删除控制器
kubectl delete deployment  -n
2.2 Pod 配置文件操作
yaml
# podcreate.yaml
apiVersion: v1
kind: Pod
metadata:
  name: nginx
  namespace: test1
spec:
  containers:
  - image: nginx
    name: nginx-container
    ports:
    - name: nginx-port
      containerPort: 80
      protocol: TCP
bash
# 创建 Pod
kubectl create -f podcreate.yaml

# 删除 Pod
kubectl delete -f podcreate.yaml
⚠️ 重要提醒 :
生产环境切勿直接使用裸 Pod!应使用 Deployment、StatefulSet 等控制器管理 Pod 生命周期。
三、Label:资源标识与选择的核心
Label 是附加到对象上的键值对标识,用于组织和选择对象的子集。Label Selector 则用于查询和筛选具有特定标签的对象。
3.1 Label 特性
- 灵活性:一个对象可有多个 Label,一个 Label 可附加到多个对象
- 动态性:可在对象创建后添加、修改或删除 Label
- 组合性:支持多条件组合查询
3.2 Label Selector 类型
| 类型 | 示例 | 说明 |
|---|---|---|
| 等式型 | name=slave |
选择 key="name" 且 value="slave" 的对象 |
env!=production |
选择 key="env" 且 value≠"production" 的对象 | |
| 集合型 | name in (master,slave) |
选择 key="name" 且 value 在集合中的对象 |
name not in (frontend) |
选择 key="name" 且 value 不在集合中的对象 |
3.3 Label 命令操作
bash
# 查看现有标签
kubectl get po nginx -n test1 --show-labels

# 添加标签
kubectl label po nginx -n test1 version=1.0
kubectl label po nginx -n test1 tier=back

# 更新标签
kubectl label po nginx -n test1 version=2.0 --overwrite

# 筛选标签
kubectl get po -n test1 --show-labels -l "version=2.0"
kubectl get po -n test1 -l "tier=back,version=2.0"

# 删除标签
kubectl label po nginx -n test1 tier-
3.4 Label 配置文件操作
yaml
# pod-with-labels.yaml
apiVersion: v1
kind: Pod
metadata:
  name: nginx1
  namespace: test1
  labels:
    version: "3.0"
    app: nginx
spec:
  containers:
  - image: nginx
    name: nginx-container
    ports:
    - containerPort: 80
bash
kubectl apply -f pod-with-labels.yaml
kubectl get po nginx1 -n test1 --show-labels
🔑 核心价值 :
Label 是 Kubernetes 实现 声明式 API 和 控制器模式 的基础,几乎所有高级功能都依赖于 Label。
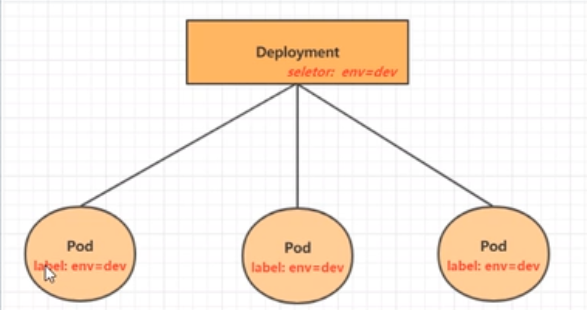
四、Deployment:无状态应用的标准部署
Deployment 为 Pod 和 ReplicaSet 提供声明式更新能力,确保应用始终运行指定数量的副本,并支持滚动更新、回滚等高级功能。
4.1 Deployment 命令操作
创建 Deployment
bash
# 创建 Deployment
kubectl create deployment nginx --image=nginx -n ns1

# 扩缩容
kubectl scale deployment nginx --replicas=3 -n ns1
查看 Deployment
bash
# 查看 Deployment 和关联的 Pod
kubectl get deploy,po -n ns1

# 查看详细信息
kubectl describe deploy nginx -n ns1
删除 Deployment
bash
kubectl delete deploy nginx -n ns14.2 Deployment 配置文件操作
yaml
# deploy.yaml
apiVersion: apps/v1
kind: Deployment
metadata:
  name: nginx
  namespace: ns1
  labels:
    app: nginx
spec:
  replicas: 3
  selector:
    matchLabels:
      app: nginx
  template:
    metadata:
      labels:
        app: nginx
    spec:
      containers:
      - name: nginx
        image: nginx:1.21
        ports:
        - containerPort: 80
        resources:
          requests:
            memory: "64Mi"
            cpu: "250m"
          limits:
            memory: "128Mi"
            cpu: "500m"
bash
# 创建 namespace
kubectl create ns ns1

# 应用配置
kubectl create -f deploy.yaml

# 查看结果
kubectl get deploy,po -n ns1
💡 最佳实践:
- 始终指定资源请求和限制(requests/limits)
- 使用语义化版本镜像(如
nginx:1.21而非latest)- 通过
kubectl rollout history管理版本
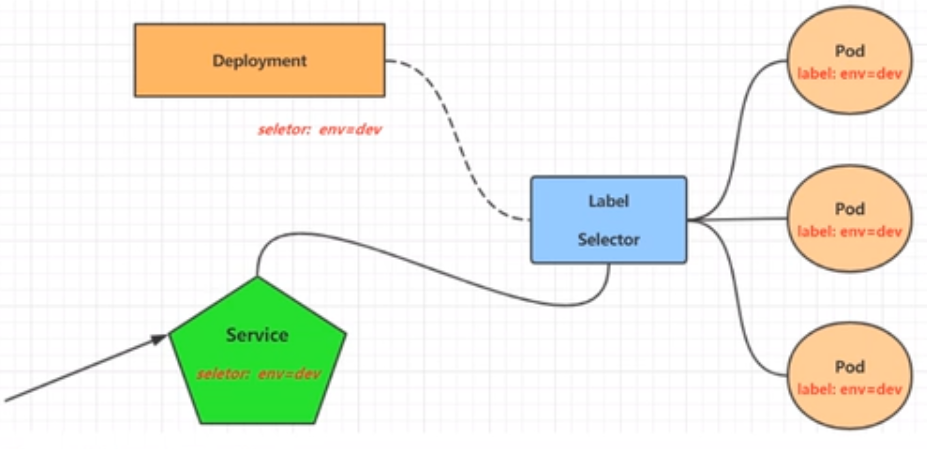
五、Service:服务发现与负载均衡
Pod IP 是临时的,会随着 Pod 重建而变化。Service 为一组 Pod 提供稳定的网络端点,实现服务发现和负载均衡。
5.1 Service 类型
| 类型 | 用途 | 访问范围 |
|---|---|---|
| ClusterIP | 集群内部访问 | 集群内 |
| NodePort | 通过节点端口暴露 | 集群外 |
| LoadBalancer | 云服务商负载均衡器 | 集群外 |
| ExternalName | DNS CNAME 记录 | 外部服务 |
5.2 Service 命令操作
ClusterIP Service(集群内部访问)
bash
# 暴露 Deployment 为 Service
kubectl expose deploy nginx --port=80 --target-port=80 --name=svc-nginx-0 --type=ClusterIP -n ns1

# 查看 Service
kubectl get svc -n ns1

# 测试访问
curl 10.96.160.119:80
NodePort Service(外部访问)
bash
# 创建 NodePort Service
kubectl expose deploy nginx --port=80 --target-port=80 --name=svc-nginx-1 --type=NodePort -n ns1

# 查看 Service(注意 PORT(S) 格式:80:32686/TCP)
kubectl get svc -n ns1

# 外部访问:http://<任意节点IP>:32686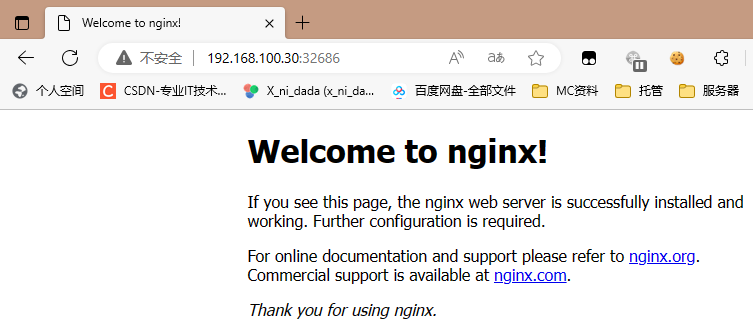
删除 Service
bash
kubectl delete svc svc-nginx-0 -n ns1
kubectl delete svc svc-nginx-1 -n ns1
5.3 Service 配置文件操作
yaml
# service.yaml
apiVersion: v1
kind: Service
metadata:
  name: svc-nginx
  namespace: ns1
spec:
  type: ClusterIP
  ports:
  - port: 80
    protocol: TCP
    targetPort: 80
  selector:
    app: nginx  # 必须匹配 Pod 的标签
bash
kubectl apply -f service.yaml🔑 关键点:
- selector 必须匹配 Pod 的标签,否则 Service 无法找到后端 Pod
- ClusterIP 在 Service 生命周期内保持不变
- NodePort 范围默认为 30000-32767,可通过
--service-node-port-range修改
六、完整实战:部署一个 Web 应用
6.1 创建应用栈
bash
# 1. 创建 namespace
kubectl create ns web-app

# 2. 部署应用
cat > web-deployment.yaml <<EOF
apiVersion: apps/v1
kind: Deployment
metadata:
  name: web-app
  namespace: web-app
spec:
  replicas: 2
  selector:
    matchLabels:
      app: web-app
  template:
    metadata:
      labels:
        app: web-app
    spec:
      containers:
      - name: nginx
        image: nginx:1.21
        ports:
        - containerPort: 80
EOF

kubectl apply -f web-deployment.yaml

# 3. 暴露服务
kubectl expose deploy web-app --port=80 --target-port=80 --type=NodePort -n web-app

# 4. 验证
kubectl get all -n web-app
6.2 验证访问
bash
# 获取 NodePort
NODE_PORT=$(kubectl get svc web-app -n web-app -o jsonpath='{.spec.ports[0].nodePort}')

# 从外部访问
curl http://<任意节点IP>:${NODE_PORT}
6.3 清理资源
bash
kubectl delete ns web-app七、生产环境最佳实践
7.1 资源管理规范
- 命名规范 :
<应用名>-<组件类型>(如order-service-deployment) - 标签规范 :统一使用
app、version、environment等标准标签 - 资源配置:始终设置 requests/limits,避免资源争抢
7.2 安全加固
- 最小权限:为每个应用创建专用 ServiceAccount
- 网络策略:默认拒绝所有流量,按需开放
- 镜像安全:使用私有仓库,扫描漏洞
7.3 监控告警
bash
# 资源使用监控
kubectl top pods -n web-app
kubectl top nodes

# 健康检查
kubectl get pods -n web-app --field-selector=status.phase!=Running
八、总结:Kubernetes 核心资源关系图
selector
labels
Namespace
Deployment
ReplicaSet
Pod
Container
Service
🚀 下一步行动:
- 将现有应用迁移到 Kubernetes
- 学习 Helm 管理复杂应用
- 配置 Ingress 实现 HTTP 路由
掌握这五大核心组件,你就具备了在 Kubernetes 上部署和管理应用的基础能力。现在,你的云原生之旅正式启航!