文章目录
- [react native(学习笔记第五课) 英语打卡微应用(4)- frontend的列表展示](#react native(学习笔记第五课) 英语打卡微应用(4)- frontend的列表展示)
-
- [1. 重新构造代码](#1. 重新构造代码)
-
- [1.1 `main`分支的`base`代码](#1.1
main分支的base代码) - [1.2 `article_list`分支的代码](#1.2
article_list分支的代码) -
- [1.2.1 `App.tsx`的修改](#1.2.1
App.tsx的修改) - [1.2.2 `AppNavigator`导航页](#1.2.2
AppNavigator导航页) - [1.2.3 `Home`默认初始页面](#1.2.3
Home默认初始页面) - [1.2.4 `ArticleListScreen`文章一览页面](#1.2.4
ArticleListScreen文章一览页面) - [1.2.5 `ArticleDetailScreen`文章详细页面](#1.2.5
ArticleDetailScreen文章详细页面)
- [1.2.1 `App.tsx`的修改](#1.2.1
- [1.1 `main`分支的`base`代码](#1.1
- [2. 启动问题解决](#2. 启动问题解决)
-
- [2.1 启动应用程序出现问题](#2.1 启动应用程序出现问题)
- [2.2 解决问题](#2.2 解决问题)
- 3.使用`dummy数据`
-
- [3.1 修改`OCRService`类进行数据`dummy`](#3.1 修改
OCRService类进行数据dummy) - [3.2 修改@router.post("/ocr/extract-text")](#3.2 修改@router.post("/ocr/extract-text"))
- [3.1 修改`OCRService`类进行数据`dummy`](#3.1 修改
- 4.最后的组合
react native(学习笔记第五课) 英语打卡微应用(4)- frontend的列表展示
- 重新构造代码
- 启动的问题解决(缺少依赖)
- 使用
dummy数据 - 最后的组合
1. 重新构造代码
最终的前段代码(注意,分支是article_list)
最终的后端代码
进行代码的比较。这里在原有的main分支基础上,做成了article_list分支,来开发列表显示的画面。即用户扫描了图片,调用AI进行了语音文件的转换之后,在自动转到一览(list)画面,进行全体的显示和试听。
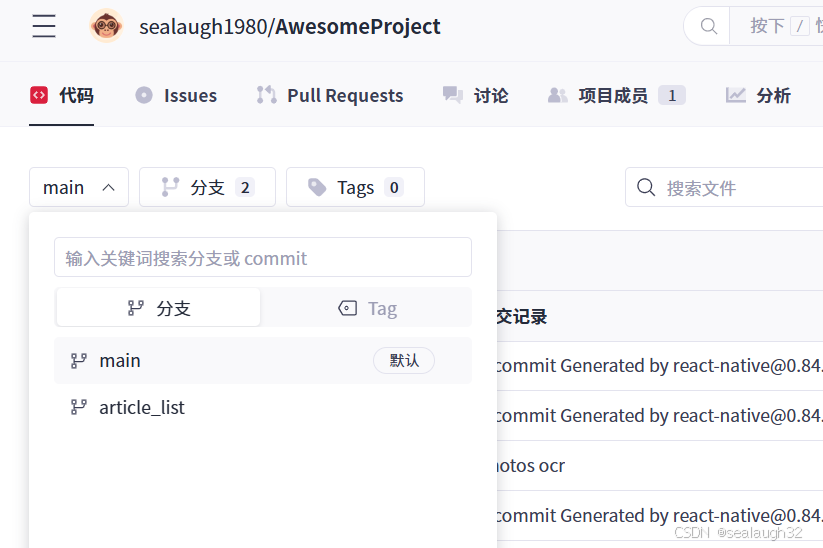
接下来比较main分支和article_list分支的代码差分。
1.1 main分支的base代码
这里整个界面就是一个App.tsx文件来进行描绘。没有其他tsx文件。
1.2 article_list分支的代码
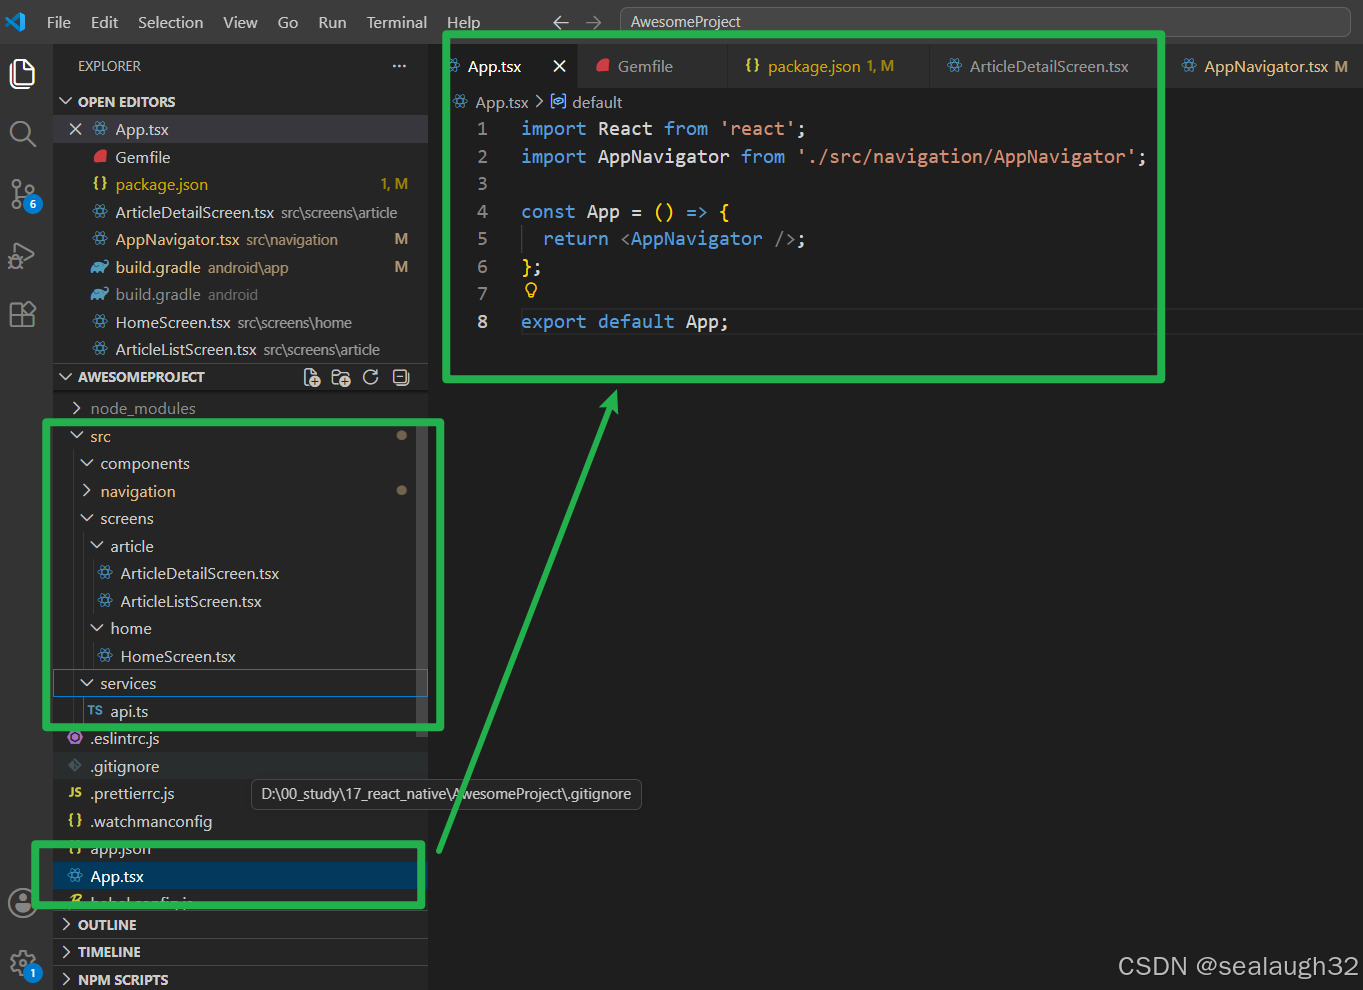
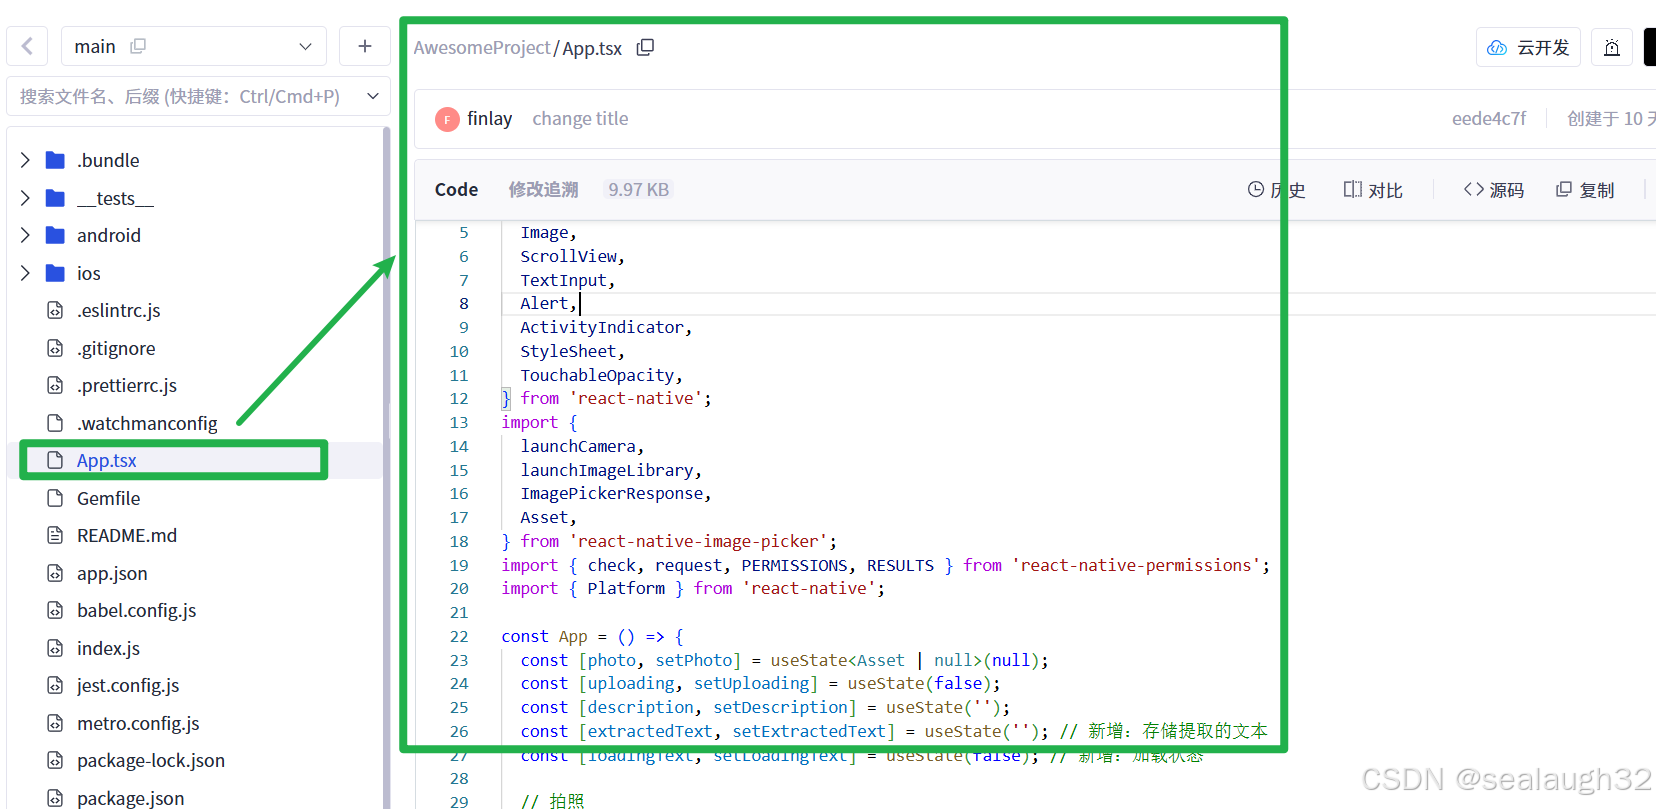
1.2.1 App.tsx的修改
App.tsx文件还是保持在原来的位置,为项目的根目录。但是,内容这里已经简单的成为了引用导航页面AppNavigator
typescript
import React from 'react';
import AppNavigator from './src/navigation/AppNavigator';

const App = () => {
  return <AppNavigator />;
};

export default App;这里看到,整个初始页面已经不放在这里了,取而代之的是一个AppNavigator页面。
1.2.2 AppNavigator导航页
这里定义了全局的一个导航页,作为整个手机应用的页面迁移控制类。
typescript
import React from 'react';
import { NavigationContainer } from '@react-navigation/native';
import { createStackNavigator } from '@react-navigation/stack';
import HomeScreen from '../screens/home/HomeScreen';
import ArticleListScreen from '../screens/article/ArticleListScreen';
import ArticleDetailScreen from '../screens/article/ArticleDetailScreen';

export type RootStackParamList = {
  Home: undefined;
  ArticleList: { articles: any[]; extractedText?: string };
  ArticleDetail: { article: any };
};

const Stack = createStackNavigator<RootStackParamList>();

const AppNavigator = () => {
  return (
    <NavigationContainer>
      <Stack.Navigator initialRouteName="Home">
        <Stack.Screen name="Home" component={HomeScreen} options={{ title: '拍照识别' }} />
        <Stack.Screen name="ArticleList" component={ArticleListScreen} options={{ title: '文章列表' }} />
        <Stack.Screen name="ArticleDetail" component={ArticleDetailScreen} options={{ title: '文章详情' }} />
      </Stack.Navigator>
    </NavigationContainer>
  );
};

export default AppNavigator;
在上面的代码中分别定义了:
Home页面ArticleList页面ArticleDetail页面
其中,initialRouteName="Home"设定了默认页面,是home页面。
1.2.3 Home默认初始页面
这里将扫描图片上传,之后调用AI进行语音转换的页面定义成默认表示的home页面。
typescript
import React, { useState } from 'react';
import {
  View,
  Text,
  Image,
  ScrollView,
  TextInput,
  Alert,
  ActivityIndicator,
  StyleSheet,
  TouchableOpacity,
} from 'react-native';
import {
  launchCamera,
  launchImageLibrary,
  ImagePickerResponse,
  Asset,
} from 'react-native-image-picker';
import { check, request, PERMISSIONS, RESULTS } from 'react-native-permissions';
import { Platform } from 'react-native';

interface HomeScreenProps {
  navigation: any; // 后续可替换为 NavigationProp
}

const HomeScreen: React.FC<HomeScreenProps> = ({ navigation }) => {
  const [photo, setPhoto] = useState<Asset | null>(null);
  const [uploading, setUploading] = useState(false);
  const [description, setDescription] = useState('');
  const [extractedText, setExtractedText] = useState('');
  const [loadingText, setLoadingText] = useState(false);

  const takePhoto = async () => {
    launchCamera(
      {
        mediaType: 'photo',
        quality: 0.8,
        saveToPhotos: true,
      },
      (response: ImagePickerResponse) => {
        if (response.didCancel) {
          console.log('用户取消了拍照');
        } else if (response.errorCode) {
          Alert.alert('错误', `拍照失败: ${response.errorMessage}`);
        } else if (response.assets && response.assets.length > 0) {
          setPhoto(response.assets[0]);
          setExtractedText('');
        }
      },
    );
  };

  const selectFromGallery = () => {
    launchImageLibrary(
      {
        mediaType: 'photo',
        quality: 0.8,
      },
      (response: ImagePickerResponse) => {
        if (response.didCancel) {
          console.log('用户取消了选择');
        } else if (response.errorCode) {
          Alert.alert('错误', `选择图片失败: ${response.errorMessage}`);
        } else if (response.assets && response.assets.length > 0) {
          setPhoto(response.assets[0]);
          setExtractedText('');
        }
      },
    );
  };

  const uploadToBackend = async () => {
    if (!photo) {
      Alert.alert('提示', '请先选择照片');
      return;
    }

    setUploading(true);
    setLoadingText(true);
    setExtractedText('');

    try {
      const formData = new FormData();
      formData.append('file', {
        uri: photo.uri,
        type: photo.type || 'image/jpeg',
        name: photo.fileName || 'photo.jpg',
      });

      if (description) {
        formData.append('description', description);
      }

      const response = await fetch('http://192.168.2.19:8000/api/v1/ocr/extract-text', {
        method: 'POST',
        body: formData,
      });

      const result = await response.json();

      if (response.ok) {
        if (result.extracted_text) {
          setExtractedText(result.extracted_text);
          Alert.alert('成功', '文字提取成功!');
          console.log("hello,world");
          // ✅ 成功后跳转到文章列表页,并传递数据
          navigation.navigate('ArticleList', {
            articles: result.articles || [], // 假设后端返回的是数组
            extractedText: result.extracted_text, // 也可以传原文
          });
        } else {
          Alert.alert('警告', '提取成功,但没有识别到文字');
          setExtractedText('没有识别到文字内容');
        }
      } else {
        Alert.alert('失败', `上传失败: ${result.message || '未知错误'}`);
        setExtractedText(`错误: ${result.message || '未知错误'}`);
      }
    } catch (error) {
      console.error('上传错误:', error);
      Alert.alert('错误', '网络错误,请稍后重试');
      setExtractedText('网络错误,请稍后重试');
    } finally {
      setUploading(false);
      setLoadingText(false);
    }
  };

  const clearPhoto = () => {
    setPhoto(null);
    setExtractedText('');
  };

  return (
    <ScrollView contentContainerStyle={styles.container}>
      <Text style={styles.title}>英语文章打卡小程序</Text>

      <View style={styles.section}>
        <Text style={styles.subtitle}>1. 选择或拍摄图片</Text>

        {photo ? (
          <View style={styles.previewContainer}>
            <Image
              source={{ uri: photo.uri }}
              style={styles.previewImage}
              resizeMode="contain"
            />
            <View style={styles.buttonRow}>
              <TouchableOpacity style={styles.clearButton} onPress={clearPhoto}>
                <Text style={styles.buttonText}>清除照片</Text>
              </TouchableOpacity>
            </View>
          </View>
        ) : (
          <View style={styles.placeholder}>
            <Text style={styles.placeholderText}>暂无照片</Text>
          </View>
        )}

        <View style={styles.buttonContainer}>
          <TouchableOpacity style={styles.actionButton} onPress={takePhoto}>
            <Text style={styles.buttonText}>📸 拍照</Text>
          </TouchableOpacity>

          <TouchableOpacity style={styles.actionButton} onPress={selectFromGallery}>
            <Text style={styles.buttonText}>🖼️ 从相册选择</Text>
          </TouchableOpacity>
        </View>

        <TouchableOpacity
          style={[styles.uploadButton, (uploading || !photo) && styles.uploadButtonDisabled]}
          onPress={uploadToBackend}
          disabled={uploading || !photo}>
          {uploading ? (
            <ActivityIndicator color="#fff" />
          ) : (
            <Text style={styles.uploadButtonText}>识别文字</Text>
          )}
        </TouchableOpacity>

        <View style={styles.textSection}>
          <Text style={styles.sectionTitle}>2. 识别结果</Text>

          {loadingText ? (
            <View style={styles.loadingContainer}>
              <ActivityIndicator size="large" color="#2196F3" />
              <Text style={styles.loadingText}>正在识别文字...</Text>
            </View>
          ) : extractedText ? (
            <View style={styles.textResultContainer}>
              <ScrollView style={styles.textScrollView}>
                <Text style={styles.extractedText}>{extractedText}</Text>
              </ScrollView>
              {extractedText && extractedText !== '网络错误,请稍后重试' && extractedText !== '没有识别到文字内容' && (
                <View style={styles.statsContainer}>
                  <Text style={styles.statsText}>
                    字符数: {extractedText.length} | 字数: {extractedText.trim().split(/\s+/).length}
                  </Text>
                </View>
              )}
            </View>
          ) : (
            <View style={styles.noResultContainer}>
              <Text style={styles.noResultText}>尚未识别文字,请先上传图片</Text>
            </View>
          )}
        </View>
      </View>
    </ScrollView>
  );
};

const styles = StyleSheet.create({
  container: {
    padding: 20,
    backgroundColor: '#f5f5f5',
  },
  title: {
    fontSize: 24,
    fontWeight: 'bold',
    marginBottom: 20,
    textAlign: 'center',
    color: '#333',
  },
  section: {
    marginBottom: 30,
    backgroundColor: '#fff',
    padding: 20,
    borderRadius: 12,
    shadowColor: '#000',
    shadowOffset: { width: 0, height: 2 },
    shadowOpacity: 0.1,
    shadowRadius: 6,
    elevation: 4,
  },
  subtitle: {
    fontSize: 18,
    fontWeight: '600',
    marginBottom: 15,
    color: '#333',
  },
  sectionTitle: {
    fontSize: 16,
    fontWeight: '600',
    marginBottom: 10,
    color: '#555',
    marginTop: 10,
  },
  previewContainer: {
    alignItems: 'center',
    marginBottom: 20,
  },
  previewImage: {
    width: '100%',
    height: 300,
    borderRadius: 10,
    marginBottom: 10,
    backgroundColor: '#f0f0f0',
  },
  placeholder: {
    width: '100%',
    height: 200,
    backgroundColor: '#f0f0f0',
    justifyContent: 'center',
    alignItems: 'center',
    borderRadius: 10,
    marginBottom: 20,
  },
  placeholderText: {
    color: '#888',
    fontSize: 16,
  },
  buttonContainer: {
    flexDirection: 'row',
    justifyContent: 'space-around',
    marginBottom: 20,
  },
  actionButton: {
    backgroundColor: '#4CAF50',
    paddingVertical: 12,
    paddingHorizontal: 20,
    borderRadius: 8,
    minWidth: 140,
    alignItems: 'center',
    elevation: 2,
  },
  clearButton: {
    backgroundColor: '#f44336',
    paddingVertical: 10,
    paddingHorizontal: 20,
    borderRadius: 8,
    elevation: 2,
  },
  buttonRow: {
    flexDirection: 'row',
    justifyContent: 'center',
    marginTop: 10,
  },
  buttonText: {
    color: '#fff',
    fontSize: 16,
    fontWeight: '600',
  },
  descriptionInput: {
    height: 80,
    borderColor: '#ddd',
    borderWidth: 1,
    borderRadius: 8,
    padding: 12,
    marginBottom: 20,
    textAlignVertical: 'top',
    fontSize: 16,
  },
  uploadButton: {
    backgroundColor: '#2196F3',
    paddingVertical: 15,
    borderRadius: 8,
    alignItems: 'center',
    marginTop: 10,
    marginBottom: 20,
    elevation: 2,
  },
  uploadButtonDisabled: {
    backgroundColor: '#ccc',
  },
  uploadButtonText: {
    color: '#fff',
    fontSize: 18,
    fontWeight: 'bold',
  },
  textSection: {
    marginTop: 20,
  },
  textResultContainer: {
    borderWidth: 1,
    borderColor: '#e0e0e0',
    borderRadius: 8,
    padding: 15,
    backgroundColor: '#f9f9f9',
    maxHeight: 300,
  },
  textScrollView: {
    maxHeight: 250,
  },
  extractedText: {
    fontSize: 16,
    lineHeight: 24,
    color: '#333',
  },
  loadingContainer: {
    alignItems: 'center',
    padding: 30,
  },
  loadingText: {
    marginTop: 10,
    color: '#666',
    fontSize: 16,
  },
  noResultContainer: {
    alignItems: 'center',
    padding: 30,
    backgroundColor: '#f9f9f9',
    borderRadius: 8,
  },
  noResultText: {
    color: '#888',
    fontSize: 16,
  },
  statsContainer: {
    marginTop: 10,
    paddingTop: 10,
    borderTopWidth: 1,
    borderTopColor: '#e0e0e0',
  },
  statsText: {
    color: '#666',
    fontSize: 14,
    textAlign: 'center',
  },
});

export default HomeScreen;
可以注意到,这里还是和以前的画面是一样的。
调用AI进行语音转换之后,将parameters设定给ArticleListScreen之后,进行页面跳转。

1.2.4 ArticleListScreen文章一览页面
typescript
import React from 'react';
import {
View,
Text,
FlatList,
TouchableOpacity,
StyleSheet,
SafeAreaView,
} from 'react-native';
interface Article {
id: number;
title: string;
content: string;
}
interface ArticleListScreenProps {
route: any;
navigation: any;
}
const ArticleListScreen: React.FC<ArticleListScreenProps> = ({ route, navigation }) => {
const { articles } = route.params || { articles: [] };
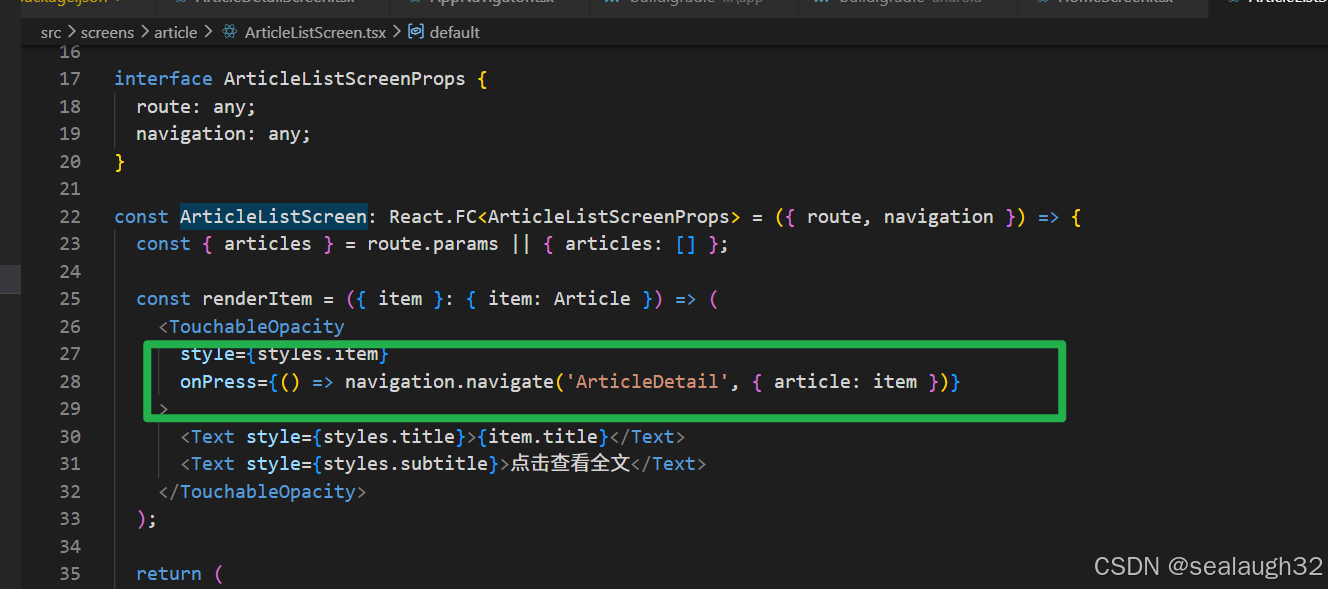
const renderItem = ({ item }: { item: Article }) => (
<TouchableOpacity
style={styles.item}
onPress={() => navigation.navigate('ArticleDetail', { article: item })}
>
<Text style={styles.title}>{item.title}</Text>
<Text style={styles.subtitle}>点击查看全文</Text>
</TouchableOpacity>
);
return (
<SafeAreaView style={styles.container}>
<Text style={styles.header}>📚 英文文章列表</Text>
{articles.length === 0 ? (
<Text style={styles.empty}>暂无文章</Text>
) : (
<FlatList
data={articles}
renderItem={renderItem}
keyExtractor={(item) => item.id.toString()}
contentContainerStyle={styles.list}
/>
)}
</SafeAreaView>
);
};
const styles = StyleSheet.create({
container: {
flex: 1,
backgroundColor: '#f5f5f5',
padding: 20,
},
header: {
fontSize: 24,
fontWeight: 'bold',
marginBottom: 20,
textAlign: 'center',
color: '#333',
},
list: {
paddingBottom: 20,
},
item: {
backgroundColor: '#fff',
padding: 15,
marginBottom: 10,
borderRadius: 8,
shadowColor: '#000',
shadowOffset: { width: 0, height: 1 },
shadowOpacity: 0.1,
shadowRadius: 3,
elevation: 2,
},
title: {
fontSize: 18,
fontWeight: '600',
color: '#333',
},
subtitle: {
fontSize: 14,
color: '#666',
marginTop: 5,
},
empty: {
textAlign: 'center',
color: '#888',
fontSize: 16,
marginTop: 50,
},
});
export default ArticleListScreen;这里很简单,从home页面收到ArticleList参数之后,进行页面的表示。
点击每个article的时候,进行跳转到ArticleDetailScreen页面。
1.2.5 ArticleDetailScreen文章详细页面
typescript
import React from 'react';
import {
  View,
  Text,
  StyleSheet,
  SafeAreaView,
  ScrollView,
} from 'react-native';

interface Article {
  id: number;
  title: string;
  content: string;
}

interface ArticleDetailScreenProps {
  route: any;
}

const ArticleDetailScreen: React.FC<ArticleDetailScreenProps> = ({ route }) => {
  const { article } = route.params || {};

  if (!article) {
    return (
      <SafeAreaView style={styles.container}>
        <Text style={styles.error}>文章不存在</Text>
      </SafeAreaView>
    );
  }

  return (
    <SafeAreaView style={styles.container}>
      <Text style={styles.title}>{article.title}</Text>
      <ScrollView style={styles.content}>
        <Text style={styles.body}>{article.content}</Text>
      </ScrollView>
    </SafeAreaView>
  );
};

const styles = StyleSheet.create({
  container: {
    flex: 1,
    backgroundColor: '#fff',
    padding: 20,
  },
  title: {
    fontSize: 24,
    fontWeight: 'bold',
    marginBottom: 20,
    color: '#333',
  },
  content: {
    flex: 1,
  },
  body: {
    fontSize: 16,
    lineHeight: 24,
    color: '#333',
  },
  error: {
    textAlign: 'center',
    color: '#888',
    fontSize: 16,
    marginTop: 50,
  },
});

export default ArticleDetailScreen;
2. 启动问题解决
2.1 启动应用程序出现问题
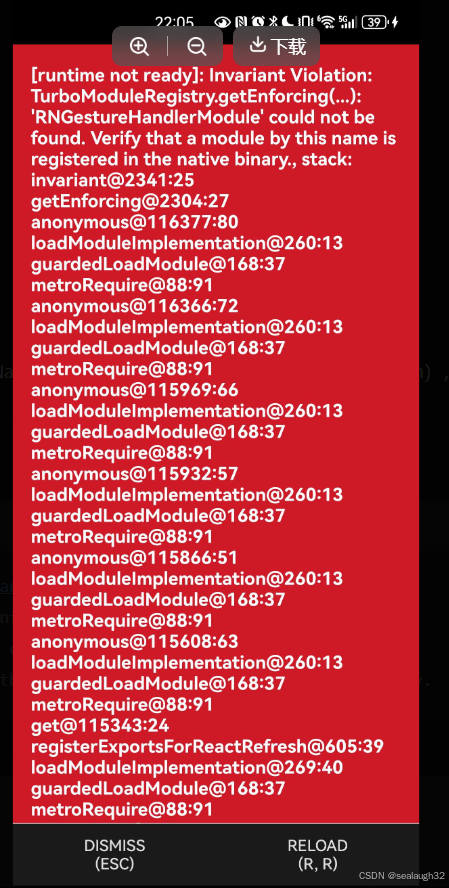
2.2 解决问题
同样,AI可以帮助完成任何问题的解决。采用下面的步骤解决问题:
npm install react-native-gesture-handler- 打开
android/app/src/main/java/com/awesomeproject/MainApplication.kt
import com.swmansion.gesturehandler.RNGestureHandlerPackage; // ← 确保这行存在
new RNGestureHandlerPackage() // ← 确保这行存在 android/app/build.gradle(或 build.gradle.kts)里有没有:
dependencies { implementation project(":react-native-gesture-handler") }
经过这几个地方的修改,重新sync gradle,即可重新yarn android进行启动。
3.使用dummy数据
3.1 修改OCRService类进行数据dummy
对于前段frontend想要进行快速开发,所以在后端进行dummy数据的创建。
使用AI,可以很快将想法付诸实施到代码中。
python
class OCRService:
    async def extract_text(self, base64_url) -> str:
        """
        从图片字节数据中提取文字
        """
        try:
            # 在线程池中运行CPU密集型的OCR任务
            # 这样可以避免阻塞FastAPI的异步事件循环
            loop = asyncio.get_event_loop()

            # 执行OCR
            analyzer = create_image_analyzer()
            result = analyzer(base64_url)
            # 将执行结果送给AI,转换成wav文件
            tts = GLMTTS()
            wav_path = tts.generate_speech(result)
            # return to frontend
            response_data = {
                "extracted_text": result,
                "articles": [
                    {
                     "id": 1,
                     "title": "示例文章 1",
                     "content": "这是第一段识别出的文字内容,用于测试 ArticleList 页面是否正常渲染。"
                    },
                    {
                     "id": 2,
                     "title": "示例文章 2",
                     "content": "这是第二段识别出的文字内容,同样用于前端展示和导航测试。"
                    }
                ],
                "audio_path": wav_path
            }
            return response_data

        except Exception as e:
            logger.error(f"文字提取失败: {str(e)}", exc_info=True)  # exc_info=True 会记录完整的堆栈跟踪
raise Exception(f"OCR处理失败: {str(e)}")为了快速进行前段frontend开发,这里在调用AI进行了wav_path的生成后,快速的进行了dummy的response_data,每条数据包括英文文章的id,title和content三个字段,用于前段表示。
3.2 修改@router.post("/ocr/extract-text")
修改了OCRService类之后,同样要修改router。
python
from fastapi import APIRouter, UploadFile, File, HTTPException
from app.services.ocr_service import OCRService
import os
import logging
import base64

router = APIRouter()
ocr_service = OCRService()

# 配置日志
logging.basicConfig(level=logging.INFO)
logger = logging.getLogger(__name__)  # 创建 logger 实例

@router.post("/ocr/extract-text")
async def extract_text_from_image(
    file: UploadFile = File(..., description="上传英文书的图片")
):
    """
    从上传的图片中提取文字
    """
    # 验证文件类型
    if not file.content_type.startswith('image/'):
        raise HTTPException(
            status_code=400,
            detail="文件类型必须是图片"
        )

    # 验证文件大小(例如限制10MB)
    file_size = 0
    content = await file.read()
    file_size = len(content)

    # 转换为 Base64 字符串
    base64_string = base64.b64encode(content).decode('utf-8')
    decoded_start = base64.b64decode(base64_string[:12])  # 解码前 12 个 Base64 字符
    print(f"文件头(十六进制): {decoded_start.hex()}")

    # 根据十六进制判断文件类型
    if decoded_start.startswith(b'\x89PNG\r\n\x1a\n'):
        data_url = f"data:image/png;base64,{base64_string}"
    elif decoded_start.startswith(b'\xff\xd8\xff'):
        data_url = f"data:image/jpeg;base64,{base64_string}"

    if file_size > 10 * 1024 * 1024:  # 10MB
        raise HTTPException(
            status_code=400,
            detail="文件大小不能超过10MB"
        )

    try:
        # 调用AI进行OCR解析
        result_json = await ocr_service.extract_text(data_url)
        return result_json

    except Exception as e:
        raise HTTPException(
            status_code=500,
            detail=f"文字提取失败: {str(e)}"
)就是直接将OCRService类返回的json数据返回给前端(frontend)。
4.最后的组合
最后,运行程序,会看到,程序按照预想动作,已经能够迁移到ArticleListScreen和ArticleDetailScreen。
接下来的学习中,会继续完善功能:
- 使用
AI对扫描的英语文章进行title的自动总结,传递到前端 - 不是使用
dummy数据,而是使用真实的数据进行传递英文文章列表list - 后端
backend不优先,所以暂时使用文件来管理英文文章列表list最终使用database管理 - 能够提供语音的播放功能