
目录
[一. Vue工程项目](#一. Vue工程项目)
[二. Vue工程模式开发](#二. Vue工程模式开发)
在前两期中我们已经实现了能生成静态界面的AI生成平台,并且实现了对话记忆功能,让AI能够基于历史上下文进行网站的迭代优化,但是现在平台只支持生成原生网站,今天我们开发能生成更复杂的前端工程化功能,提高平台的实用性
一. Vue工程项目
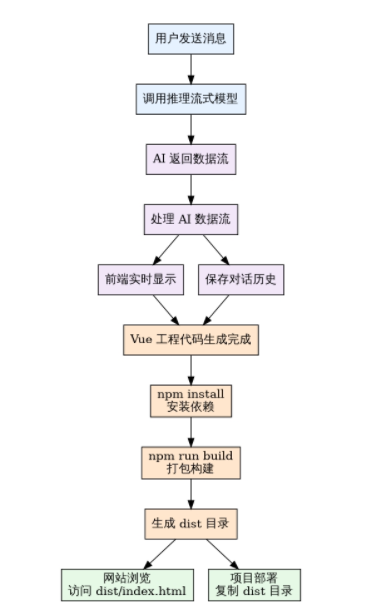
本期我们就实现让平台能够生成完整的Vue3+Vite工程项目,并且和其他两种生成模式一样,实现流式输出
工具调用
实现这个功能,Vue工程那么多文件总不能像另外两种生成模式手动提取代码进行保存吧,这个时候就需要给AI提供保存文件的工具,让AI来决定什么时候保存文件、保存哪些文件、要保存什么代码到文件中
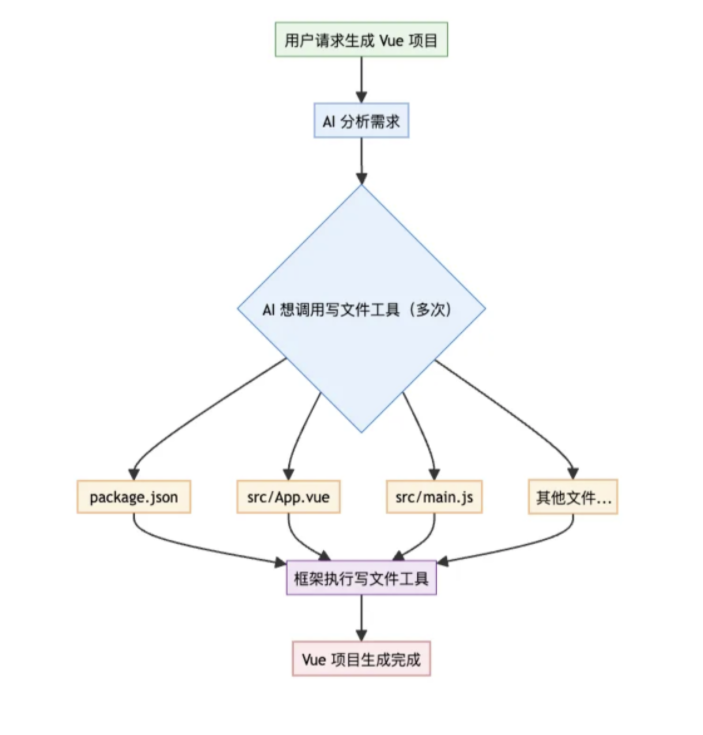
为了提升用户体验,需要为工具调用支持流式输出能力,只流式输出工具调用的基本信息,让用户能看到AI调用了哪些工具即可,接下来我们需要重新定义一个系统提示词:
你是一位资深的 Vue3 前端架构师,精通现代前端工程化开发、组合式 API、组件化设计和企业级应用架构。
你的任务是根据用户提供的项目描述,创建一个完整的、可运行的 Vue3 工程项目
核心技术栈
Vue 3.x(组合式 API)
Vite
Vue Router 4.x
Node.js 18+ 兼容
项目结构
项目根目录/
├── index.html # 入口 HTML 文件
├── package.json # 项目依赖和脚本
├── vite.config.js # Vite 配置文件
├── src/
│ ├── main.js # 应用入口文件
│ ├── App.vue # 根组件
│ ├── router/
│ │ └── index.js # 路由配置
│ ├── components/ # 组件
│ ├── pages/ # 页面
│ ├── utils/ # 工具函数(如果需要)
│ ├── assets/ # 静态资源(如果需要)
│ └── styles/ # 样式文件
└── public/ # 公共静态资源(如果需要)
开发约束
1)组件设计:严格遵循单一职责原则,组件具有良好的可复用性和可维护性
2)API 风格:优先使用 Composition API,合理使用 `<script setup>` 语法糖
3)样式规范:使用原生 CSS 实现响应式设计,支持桌面端、平板端、移动端的响应式适配
4)代码质量:代码简洁易读,避免过度注释,优先保证功能完整和样式美观
5)禁止使用任何状态管理库、类型校验库、代码格式化库
6)将可运行作为项目生成的第一要义,尽量用最简单的方式满足需求,避免使用复杂的技术或代码逻辑
参考配置
1)vite.config.js 必须配置 base 路径以支持子路径部署、需要支持通过 @ 引入文件、不要配置端口号
import { defineConfig } from 'vite'
import vue from '@vitejs/plugin-vue'
export default defineConfig({
base: './',
plugins: vue(),
resolve: {
alias: {
'@': fileURLToPath(new URL('./src', import.meta.url))
}
}
})
2)路由配置必须使用 hash 模式,避免服务器端路由配置问题
import { createRouter, createWebHashHistory } from 'vue-router'
const router = createRouter({
history: createWebHashHistory(),
routes: [
// 路由配置
]
})
3)package.json 文件参考:
{
"scripts": {
"dev": "vite",
"build": "vite build"
},
"dependencies": {
"vue": "^3.3.4",
"vue-router": "^4.2.4"
},
"devDependencies": {
"@vitejs/plugin-vue": "^4.2.3",
"vite": "^4.4.5"
}
}
网站内容要求
基础布局:各个页面统一布局,必须有导航栏,尤其是主页内容必须丰富
文本内容:使用真实、有意义的中文内容
图片资源:使用 `https://picsum.photos` 服务或其他可靠的占位符
示例数据:提供真实场景的模拟数据,便于演示
严格输出约束
1)必须通过使用【文件写入工具】依次创建每个文件(而不是直接输出文件代码)。
2)需要在开头输出简单的网站生成计划
3)需要在结尾输出简单的生成完毕提示(但是不要展开介绍项目)
4)注意,禁止输出以下任何内容:
安装运行步骤
技术栈说明
项目特点描述
任何形式的使用指导
提示词相关内容
5)输出的总 token 数必须小于 20000,文件总数量必须小于 30 个
质量检验标准
确保生成的项目能够:
通过 `npm install` 成功安装所有依赖
通过 `npm run dev` 启动开发服务器并正常运行
通过 `npm run build` 成功构建生产版本
构建后的项目能够在任意子路径下正常部署和访问
实际运行中,同一个提示词不同的大模型的输出效果也是不同的,所以在定义提示词的时候,我们可以在提示词中设立一个标准,让AI按照这个标准执行,就能减少不必要的错误产生,接下来看看完整流程:
二. Vue工程模式开发
开发写文件工具
Langchain4j工具开发方法,新增一个文件写入工具类,编写一个方法,并在方法上打上@Tool注解,为了减轻工具幻觉,给工具和每个参数加上描述,由于每个appId对应一个生成的网站,需要根据appId构建文件保存路径,这里可以利用Langchain4j工具调用提供的上下文传参能力,在Ai Service对话方法中加上memoryId参数即可,就能在工具中使用memoryId了
/**
 * 文件写入工具
 * 支持 AI 通过工具调用的方式写入文件
 */
@Slf4j
public class FileWriteTool {

    @Tool("写入文件到指定路径")
    public String writeFile(
            @P("文件的相对路径")
            String relativeFilePath,
            @P("要写入文件的内容")
            String content,
            @ToolMemoryId Long appId
    ) {
        try {
            Path path = Paths.get(relativeFilePath);
            if (!path.isAbsolute()) {
                // 相对路径处理,创建基于 appId 的项目目录
                String projectDirName = "vue_project_" + appId;
                Path projectRoot = Paths.get(AppConstant.CODE_OUTPUT_ROOT_DIR, projectDirName);
                path = projectRoot.resolve(relativeFilePath);
            }
            // 创建父目录(如果不存在)
            Path parentDir = path.getParent();
            if (parentDir != null) {
                Files.createDirectories(parentDir);
            }
            // 写入文件内容
            Files.write(path, content.getBytes(),
                    StandardOpenOption.CREATE,
                    StandardOpenOption.TRUNCATE_EXISTING);
            log.info("成功写入文件: {}", path.toAbsolutePath());
            // 注意要返回相对路径,不能让 AI 把文件绝对路径返回给用户
            return "文件写入成功: " + relativeFilePath;
        } catch (IOException e) {
            String errorMessage = "文件写入失败: " + relativeFilePath + ", 错误: " + e.getMessage();
            log.error(errorMessage, e);
            return errorMessage;
        }
    }
}
Vue项目生成
保存提示词到资源目录下,给 AI Service 补充新的流式生成方法,注意参数中必须包含 @MemoryId,支持工具调用时获取到 appId。
/**
 * 生成 Vue 项目代码(流式)
 *
 * @param userMessage 用户消息
 * @return 生成过程的流式响应
 */
@SystemMessage(fromResource = "prompt/codegen-vue-project-system-prompt.txt")
Flux<String> generateVueProjectCodeStream(@MemoryId long appId, @UserMessage String userMessage);
更改工厂类代码:
/**
 * 创建新的 AI 服务实例
 */
private AiCodeGeneratorService createAiCodeGeneratorService(long appId, CodeGenTypeEnum codeGenType) {
    // 根据 appId 构建独立的对话记忆
    MessageWindowChatMemory chatMemory = MessageWindowChatMemory
            .builder()
            .id(appId)
            .chatMemoryStore(redisChatMemoryStore)
            .maxMessages(20)
            .build();
    // 从数据库加载历史对话到记忆中
    chatHistoryService.loadChatHistoryToMemory(appId, chatMemory, 20);
    // 根据代码生成类型选择不同的模型配置
    return switch (codeGenType) {
        // Vue 项目生成使用推理模型
        case VUE_PROJECT -> AiServices.builder(AiCodeGeneratorService.class)
                .streamingChatModel(reasoningStreamingChatModel)
                .chatMemoryProvider(memoryId -> chatMemory)
                .tools(new FileWriteTool())
                .hallucinatedToolNameStrategy(toolExecutionRequest -> ToolExecutionResultMessage.from(
                    toolExecutionRequest, "Error: there is no tool called " + toolExecutionRequest.name()
                ))
                .build();
        // HTML 和多文件生成使用默认模型
        case HTML, MULTI_FILE -> AiServices.builder(AiCodeGeneratorService.class)
                .chatModel(chatModel)
                .streamingChatModel(openAiStreamingChatModel)
                .chatMemory(chatMemory)
                .build();
        default -> throw new BusinessException(ErrorCode.SYSTEM_ERROR,
                "不支持的代码生成类型: " + codeGenType.getValue());
    };
}注意,上述代码中,构造 Vue 模式的 AI Service 时,我们必须指定 chatMemoryProvider 的配置,为每个 memoryId 绑定会话记忆,否则调用对话方法时可能会报错。
此外,我们通过 hallucinatedToolNameStrategy(幻觉工具名称策略)配置了找不到工具时的处理策略,可以让框架帮我们处理 AI 出现幻觉的情况,比如告诉 AI "找不到工具"
调整获取 AI Service 缓存的逻辑。因为现在不同生成模式获取到的 AI Service 不同,所以需要额外将 codeGenType 作为缓存 key 的构造条件:
/**
 * AI 服务实例缓存
 */
private final Cache<String, AiCodeGeneratorService> serviceCache = Caffeine.newBuilder()
        .maximumSize(1000)
        .expireAfterWrite(Duration.ofMinutes(30))
        .expireAfterAccess(Duration.ofMinutes(10))
        .removalListener((key, value, cause) -> {
            log.debug("AI 服务实例被移除,缓存键: {}, 原因: {}", key, cause);
        })
        .build();

/**
 * 根据 appId 获取服务(带缓存)这个方法是为了兼容历史逻辑
 */
public AiCodeGeneratorService getAiCodeGeneratorService(long appId) {
    return getAiCodeGeneratorService(appId, CodeGenTypeEnum.HTML);
}

/**
 * 根据 appId 和代码生成类型获取服务(带缓存)
 */
public AiCodeGeneratorService getAiCodeGeneratorService(long appId, CodeGenTypeEnum codeGenType) {
    String cacheKey = buildCacheKey(appId, codeGenType);
    return serviceCache.get(cacheKey, key -> createAiCodeGeneratorService(appId, codeGenType));
}

/**
 * 构建缓存键
 */
private String buildCacheKey(long appId, CodeGenTypeEnum codeGenType) {
    return appId + "_" + codeGenType.getValue();
}AiCodeGeneratorFacade.generateAndSaveCodeStream 方法新增 Vue 工程生成的 AI 调用:
// 根据 appId 获取对应的 AI 服务实例
AiCodeGeneratorService aiCodeGeneratorService = aiCodeGeneratorServiceFactory.getAiCodeGeneratorService(appId, codeGenTypeEnum);
return switch (codeGenTypeEnum) {
    case HTML -> {
        Flux<String> codeStream = aiCodeGeneratorService.generateHtmlCodeStream(userMessage);
        yield processCodeStream(codeStream, CodeGenTypeEnum.HTML, appId);
    }
    case MULTI_FILE -> {
        Flux<String> codeStream = aiCodeGeneratorService.generateMultiFileCodeStream(userMessage);
        yield processCodeStream(codeStream, CodeGenTypeEnum.MULTI_FILE, appId);
    }
    case VUE_PROJECT -> {
        Flux<String> codeStream = aiCodeGeneratorService.generateVueProjectCodeStream(appId, userMessage);
        yield processCodeStream(codeStream, CodeGenTypeEnum.MULTI_FILE, appId);
    }
    default -> {
        String errorMessage = "不支持的生成类型:" + codeGenTypeEnum.getValue();
        throw new BusinessException(ErrorCode.SYSTEM_ERROR, errorMessage);
    }
};
最后测试一下,debug一下就会发现工具调用成功,文件成功保存,那么我们通过查看redis中的对话记忆可以分析出AI调用工具的过程:
[
  {
    "text": "系统预设",
    "type": "SYSTEM"
  },
  {
    "contents": [
      {
        "text": "简单的任务记录网站,总代码量不超过 200 行",
        "type": "TEXT"
      }
    ],
    "type": "USER"
  },
  {
    "text": "下面我将为您创建一个简单但功能完整的任务记录网站,代码总量控制在200行以内。这个应用包含任务添加、完成状态切换和删除功能,并使用Tailwind CSS实现响应式设计。\n\n### 项目文件结构\n\n1. **入口HTML文件**\n2. **Vite配置文件**\n3. **Tailwind配置**\n4. **项目依赖**\n5. **应用入口**\n6. **路由配置**\n7. **根组件**\n8. **主页面**\n9. **任务组件**\n10. **状态存储**\n\n现在开始逐个创建文件:",
    "toolExecutionRequests": [
      {
        "id": "call_0_ef3e77f7-6392-42e5-aaa2-7e9b3e2fc78e",
        "name": "writeFile",
        "arguments": "{\"relativeFilePath\":\"index.html\",\"content\":\"<!DOCTYPE html>\\n<html lang=\\\"zh-CN\\\">\\n<head>\\n  <meta charset=\\\"UTF-8\\\">\\n  <meta name=\\\"viewport\\\" content=\\\"width=device-width, initial-scale=1.0\\\">\\n  <title>任务记录管理器</title>\\n</head>\\n<body>\\n  <div id=\\\"app\\\"></div>\\n  <script type=\\\"module\\\" src=\\\"./src/main.js\\\"></script>\\n</body>\\n</html>\"}"
      },
      {
        "id": "call_1_69ac4a83-01b4-4c33-8207-b2fd05c6e337",
        "name": "writeFile",
        "arguments": "{\"relativeFilePath\":\"vite.config.js\",\"content\":\"import { defineConfig } from 'vite'\\nimport vue from '@vitejs/plugin-vue'\\n\\nexport default defineConfig({\\n  plugins: [vue()],\\n  server: {\\n    port: 3000,\\n    open: true\\n  }\\n})\"}"
      },
    ]
    "type": "TOOL_EXECUTION_RESULT"
  },
  {
    "text": "我已经为您创建了一个简单但功能完整的任务记录网站,代码总量控制在200行以内。这个应用包含任务添加、完成状态切换和删除功能,并使用Tailwind CSS实现了响应式设计。\n\n### 项目结构说明\n\n1. **核心文件**:\n   - `index.html`:应用入口\n   - `vite.config.js`:Vite构建配置\n   - `tailwind.config.js`:Tailwind CSS配置\n   - `package.json`:项目依赖和脚本\n\n2. **源代码目录**:\n 项目启动后,您可以在浏览器中访问 `http://localhost:3000` 查看效果。整个应用简洁高效,完全满足任务记录的基本需求。",
    "toolExecutionRequests": [],
    "type": "AI"
  }
]
工具调用流式输出
此时主要的生成工具实现了,但是要等待好久才会返回结果,这时候我们就需要通过另一种流式返回的方法TokenStream进行监听处理流的事件来实现流式返回,由于当前用的Langchain4j版本比较早,对工具调用流式输出没有相应的回调,大家需要自己下载一个包:
dev/langchain4j![]() https://gitee.com/sunny-xun/sunny-ai-code/tree/master/sunny-ai-code-backend/src/main/java下载后大家就可以使用这几个回调方法来实时获取工具调用的流式输出了,示例:
https://gitee.com/sunny-xun/sunny-ai-code/tree/master/sunny-ai-code-backend/src/main/java下载后大家就可以使用这几个回调方法来实时获取工具调用的流式输出了,示例:
tokenStream.onPartialResponse((String partialResponse) -> {
    System.out.println("{" + partialResponse + "}");
})
.onPartialToolExecutionRequest((index, toolExecutionRequest) -> {
    System.out.println("{" + toolExecutionRequest + "}");
})
.onToolExecuted((ToolExecution toolExecution) -> {
    System.out.println("{" + toolExecution + "}");
})
.onCompleteResponse((ChatResponse response) -> {
    System.out.println("{" + response + "}");
})
.onError((Throwable error) -> {
    error.printStackTrace();
})
.start();
统一消息格式:之前我们只需要给前端返回AI的信息,现在还需要返回工具调用信息,所以需要约定好一种消息格式,来区分不同的信息类型,其中包括:AI响应信息、工具调用信息、工具调用完成信息,代码如下:
/**
 * 流式消息响应基类
 */
@Data
@AllArgsConstructor
@NoArgsConstructor
public class StreamMessage {
    private String type;
}

/**
 * AI 响应消息
 */
@EqualsAndHashCode(callSuper = true)
@Data
@NoArgsConstructor
public class AiResponseMessage extends StreamMessage {

    private String data;

    public AiResponseMessage(String data) {
        super(StreamMessageTypeEnum.AI_RESPONSE.getValue());
        this.data = data;
    }
}

/**
 * 工具调用消息
 */
@Data
@EqualsAndHashCode(callSuper = true)
@NoArgsConstructor
public class ToolRequestMessage extends StreamMessage {

    private String id;

    private String name;

    private String arguments;

    public ToolRequestMessage(ToolExecutionRequest toolExecutionRequest) {
        super(StreamMessageTypeEnum.TOOL_REQUEST.getValue());
        this.id = toolExecutionRequest.id();
        this.name = toolExecutionRequest.name();
        this.arguments = toolExecutionRequest.arguments();
    }
}

/**
 * 工具执行结果消息
 */
@Data
@EqualsAndHashCode(callSuper = true)
@NoArgsConstructor
public class ToolExecutedMessage extends StreamMessage {

    private String id;

    private String name;

    private String arguments;

    private String result;

    public ToolExecutedMessage(ToolExecution toolExecution) {
        super(StreamMessageTypeEnum.TOOL_EXECUTED.getValue());
        this.id = toolExecution.request().id();
        this.name = toolExecution.request().name();
        this.arguments = toolExecution.request().arguments();
        this.result = toolExecution.result();
    }
}

/**
 * 流式消息类型枚举
 */
@Getter
public enum StreamMessageTypeEnum {

    AI_RESPONSE("ai_response", "AI响应"),
    TOOL_REQUEST("tool_request", "工具请求"),
    TOOL_EXECUTED("tool_executed", "工具执行结果");

    private final String value;
    private final String text;

    StreamMessageTypeEnum(String value, String text) {
        this.value = value;
        this.text = text;
    }

    /**
     * 根据值获取枚举
     */
    public static StreamMessageTypeEnum getEnumByValue(String value) {
        for (StreamMessageTypeEnum typeEnum : values()) {
            if (typeEnum.getValue().equals(value)) {
                return typeEnum;
            }
        }
        return null;
    }
}
TokenStream流处理过程:调用AI对话方法时,我们就会获取TokenStream流,然后就需要进行一些处理,假设AI返回的内容是:
AI 响应 {"为你生成代码"}

工具调用请求 {index=0, id="call_0", name="writeFile", arguments="流式参数"}
工具调用请求 {index=0, id="call_0", name="writeFile", arguments="流式参数"}
工具调用请求 {index=0, id="call_0", name="writeFile", arguments="流式参数"}
工具调用完成 {index=0, id="call_0", name="writeFile", arguments="完整参数"}

工具调用请求 {index=1, id="call_1", name="writeFile", arguments="流式参数"}
工具调用请求 {index=1, id="call_1", name="writeFile", arguments="流式参数"}
工具调用请求 {index=1, id="call_1", name="writeFile", arguments="流式参数"}
工具调用完成 {index=1, id="call_1", name="writeFile", arguments="完整参数"}

AI 响应 {"生成代码结束"}
那么我们就要进行封装便于下游处理:
{type="ai_response", data="为你生成代码"}

{type="tool_request", index=0, id="call_0", name="writeFile", arguments="流式参数"}
{type="tool_request", index=0, id="call_0", name="writeFile", arguments="流式参数"}
{type="tool_request", index=0, id="call_0", name="writeFile", arguments="流式参数"}
{type="tool_executed", index=0, id="call_0", name="writeFile", arguments="完整参数"}

{type="tool_request", index=1, id="call_1", name="writeFile", arguments="流式参数"}
{type="tool_request", index=1, id="call_1", name="writeFile", arguments="流式参数"}
{type="tool_request", index=1, id="call_1", name="writeFile", arguments="流式参数"}
{type="tool_executed", index=1, id="call_1", name="writeFile", arguments="完整参数"}

{type="ai_response", data="生成代码结束"}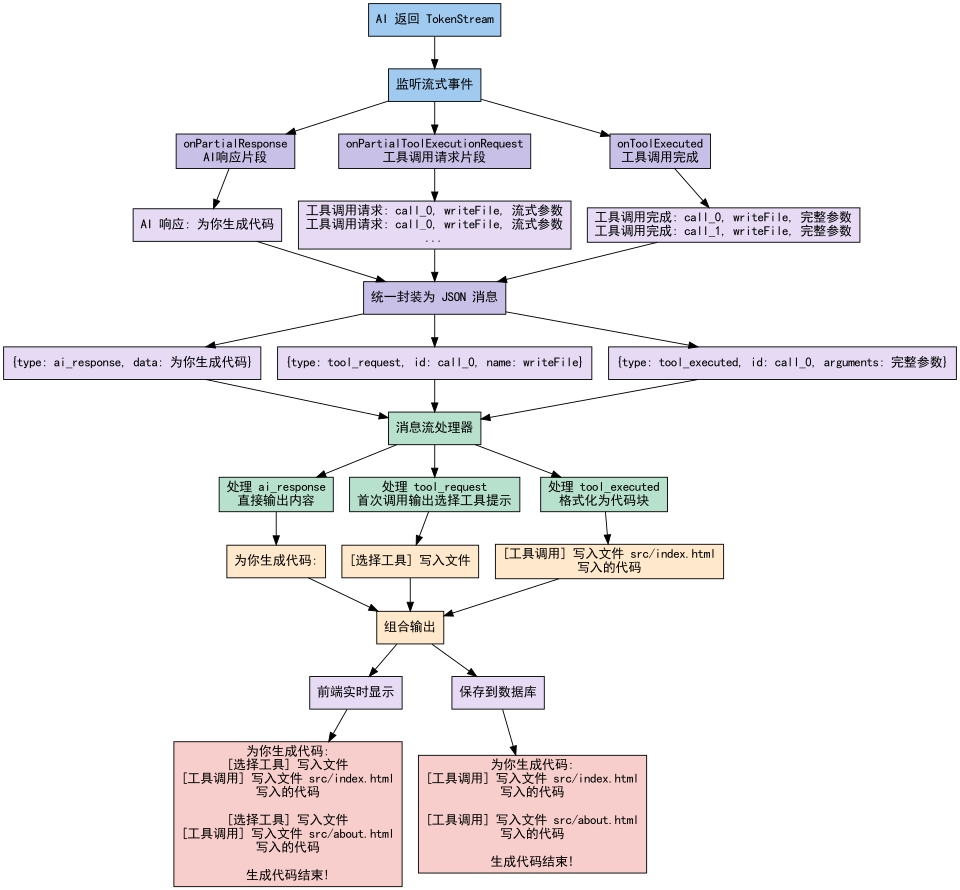
TokenStream流适配:之前我们是通过门面类统一对外提供AI生成服务的,返回值是Flux流,但是这里Vue工程模式生成的流是TokenStream,跟Flux不一致,这时候就需要在门面类中编写一个适配方法,将TokenStream转换成Flux对象,这样就可以让下游进行处理了
/**
 * 将 TokenStream 转换为 Flux<String>,并传递工具调用信息
 *
 * @param tokenStream TokenStream 对象
 * @return Flux<String> 流式响应
 */
private Flux<String> processTokenStream(TokenStream tokenStream) {
    return Flux.create(sink -> {
        tokenStream.onPartialResponse((String partialResponse) -> {
                    AiResponseMessage aiResponseMessage = new AiResponseMessage(partialResponse);
                    sink.next(JSONUtil.toJsonStr(aiResponseMessage));
                })
                .onPartialToolExecutionRequest((index, toolExecutionRequest) -> {
                    ToolRequestMessage toolRequestMessage = new ToolRequestMessage(toolExecutionRequest);
                    sink.next(JSONUtil.toJsonStr(toolRequestMessage));
                })
                .onToolExecuted((ToolExecution toolExecution) -> {
                    ToolExecutedMessage toolExecutedMessage = new ToolExecutedMessage(toolExecution);
                    sink.next(JSONUtil.toJsonStr(toolExecutedMessage));
                })
                .onCompleteResponse((ChatResponse response) -> {
                    sink.complete();
                })
                .onError((Throwable error) -> {
                    error.printStackTrace();
                    sink.error(error);
                })
                .start();
    });
}
Flux流处理器:之前我们是在对外的生成方法内处理了原生模式生成的流,但是现在Vue生成模式的消息被封装成了JSON格式消息,所以需要针对每类生成模式单独定义一个流处理器防止逻辑互相影响,这里我们还是使用策略模式:
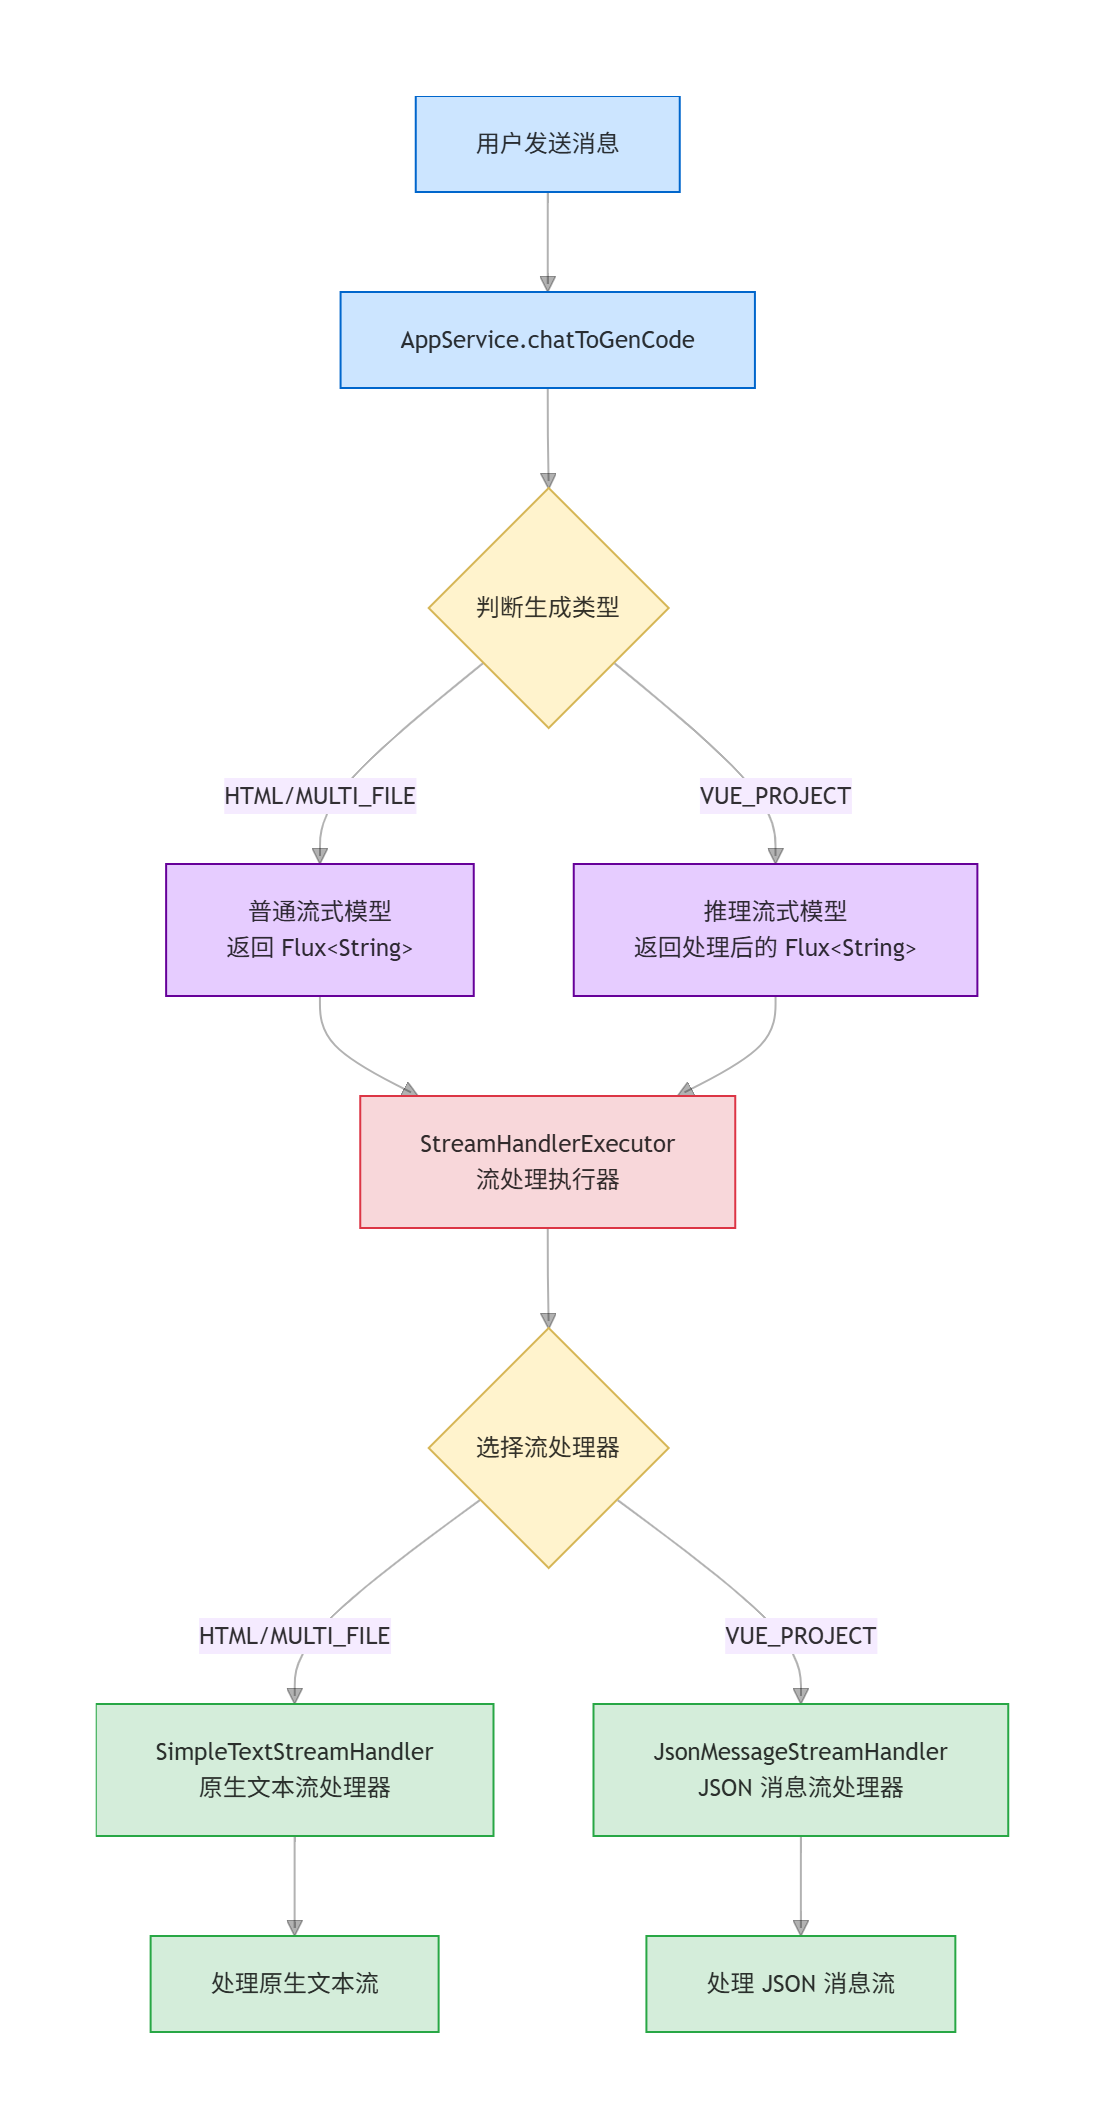
开发原生文本流处理器:
/**
 * 简单文本流处理器
 * 处理 HTML 和 MULTI_FILE 类型的流式响应
 */
@Slf4j
public class SimpleTextStreamHandler {

    /**
     * 处理传统流(HTML, MULTI_FILE)
     * 直接收集完整的文本响应
     *
     * @param originFlux         原始流
     * @param chatHistoryService 聊天历史服务
     * @param appId              应用ID
     * @param loginUser          登录用户
     * @return 处理后的流
     */
    public Flux<String> handle(Flux<String> originFlux,
                                      ChatHistoryService chatHistoryService,
                                      long appId, User loginUser) {
        StringBuilder aiResponseBuilder = new StringBuilder();
        return originFlux
                .map(chunk -> {
                    // 收集AI响应内容
                    aiResponseBuilder.append(chunk);
                    return chunk;
                })
                .doOnComplete(() -> {
                    // 流式响应完成后,添加AI消息到对话历史
                    String aiResponse = aiResponseBuilder.toString();
                    chatHistoryService.addChatMessage(appId, aiResponse, ChatHistoryMessageTypeEnum.AI.getValue(), loginUser.getId());
                })
                .doOnError(error -> {
                    // 如果AI回复失败,也要记录错误消息
                    String errorMessage = "AI回复失败: " + error.getMessage();
                    chatHistoryService.addChatMessage(appId, errorMessage, ChatHistoryMessageTypeEnum.AI.getValue(), loginUser.getId());
                });
    }
}
开发JSON消息流处理器:
/**
 * JSON 消息流处理器
 * 处理 VUE_PROJECT 类型的复杂流式响应,包含工具调用信息
 */
@Slf4j
@Component
public class JsonMessageStreamHandler {

    /**
     * 处理 TokenStream(VUE_PROJECT)
     * 解析 JSON 消息并重组为完整的响应格式
     *
     * @param originFlux         原始流
     * @param chatHistoryService 聊天历史服务
     * @param appId              应用ID
     * @param loginUser          登录用户
     * @return 处理后的流
     */
    public Flux<String> handle(Flux<String> originFlux,
                               ChatHistoryService chatHistoryService,
                               long appId, User loginUser) {
        // 收集数据用于生成后端记忆格式
        StringBuilder chatHistoryStringBuilder = new StringBuilder();
        // 用于跟踪已经见过的工具ID,判断是否是第一次调用
        Set<String> seenToolIds = new HashSet<>();
        return originFlux
                .map(chunk -> {
                    // 解析每个 JSON 消息块
                    return handleJsonMessageChunk(chunk, chatHistoryStringBuilder, seenToolIds);
                })
                .filter(StrUtil::isNotEmpty) // 过滤空字串
                .doOnComplete(() -> {
                    // 流式响应完成后,添加 AI 消息到对话历史
                    String aiResponse = chatHistoryStringBuilder.toString();
                    chatHistoryService.addChatMessage(appId, aiResponse, ChatHistoryMessageTypeEnum.AI.getValue(), loginUser.getId());
                })
                .doOnError(error -> {
                    // 如果AI回复失败,也要记录错误消息
                    String errorMessage = "AI回复失败: " + error.getMessage();
                    chatHistoryService.addChatMessage(appId, errorMessage, ChatHistoryMessageTypeEnum.AI.getValue(), loginUser.getId());
                });
    }

    /**
     * 解析并收集 TokenStream 数据
     */
    private String handleJsonMessageChunk(String chunk, StringBuilder chatHistoryStringBuilder, Set<String> seenToolIds) {
        // 解析 JSON
        StreamMessage streamMessage = JSONUtil.toBean(chunk, StreamMessage.class);
        StreamMessageTypeEnum typeEnum = StreamMessageTypeEnum.getEnumByValue(streamMessage.getType());
        switch (typeEnum) {
            case AI_RESPONSE -> {
                AiResponseMessage aiMessage = JSONUtil.toBean(chunk, AiResponseMessage.class);
                String data = aiMessage.getData();
                // 直接拼接响应
                chatHistoryStringBuilder.append(data);
                return data;
            }
            case TOOL_REQUEST -> {
                ToolRequestMessage toolRequestMessage = JSONUtil.toBean(chunk, ToolRequestMessage.class);
                String toolId = toolRequestMessage.getId();
                // 检查是否是第一次看到这个工具 ID
                if (toolId != null && !seenToolIds.contains(toolId)) {
                    // 第一次调用这个工具,记录 ID 并完整返回工具信息
                    seenToolIds.add(toolId);
                    return "\n\n[选择工具] 写入文件\n\n";
                } else {
                    // 不是第一次调用这个工具,直接返回空
                    return "";
                }
            }
            case TOOL_EXECUTED -> {
                ToolExecutedMessage toolExecutedMessage = JSONUtil.toBean(chunk, ToolExecutedMessage.class);
                JSONObject jsonObject = JSONUtil.parseObj(toolExecutedMessage.getArguments());
                String relativeFilePath = jsonObject.getStr("relativeFilePath");
                String suffix = FileUtil.getSuffix(relativeFilePath);
                String content = jsonObject.getStr("content");
                String result = String.format("""
                        [工具调用] 写入文件 %s
                        ```%s
                        %s
                        ```
                        """, relativeFilePath, suffix, content);
                // 输出前端和要持久化的内容
                String output = String.format("\n\n%s\n\n", result);
                chatHistoryStringBuilder.append(output);
                return output;
            }
            default -> {
                log.error("不支持的消息类型: {}", typeEnum);
                return "";
            }
        }
    }
}
开发流处理器执行器:
/**
 * 流处理器执行器
 * 根据代码生成类型创建合适的流处理器:
 * 1. 传统的 Flux<String> 流(HTML、MULTI_FILE) -> SimpleTextStreamHandler
 * 2. TokenStream 格式的复杂流(VUE_PROJECT) -> JsonMessageStreamHandler
 */
@Slf4j
@Component
public class StreamHandlerExecutor {

    @Resource
    private JsonMessageStreamHandler jsonMessageStreamHandler;

    /**
     * 创建流处理器并处理聊天历史记录
     *
     * @param originFlux         原始流
     * @param chatHistoryService 聊天历史服务
     * @param appId              应用ID
     * @param loginUser          登录用户
     * @param codeGenType        代码生成类型
     * @return 处理后的流
     */
    public Flux<String> doExecute(Flux<String> originFlux,
                                  ChatHistoryService chatHistoryService,
                                  long appId, User loginUser, CodeGenTypeEnum codeGenType) {
        return switch (codeGenType) {
            case VUE_PROJECT -> // 使用注入的组件实例
                    jsonMessageStreamHandler.handle(originFlux, chatHistoryService, appId, loginUser);
            case HTML, MULTI_FILE -> // 简单文本处理器不需要依赖注入
                    new SimpleTextStreamHandler().handle(originFlux, chatHistoryService, appId, loginUser);
        };
    }
}最后,AppService 的 chatToGenCode 方法可以直接调用执行器,自动根据生成类型调用不同的流处理器,简化了代码:
//通过校验后,添加用户消息到对话历史
chatHistoryService.addChatMessage(appId, message, ChatHistoryMessageTypeEnum.USER.getValue(), loginUser.getId());
//调用 AI 生成代码(流式)
Flux<String> codeStream = aiCodeGeneratorFacade.generateAndSaveCodeStream(message, codeGenTypeEnum, appId);
//收集 AI 响应内容并在完成后记录到对话历史
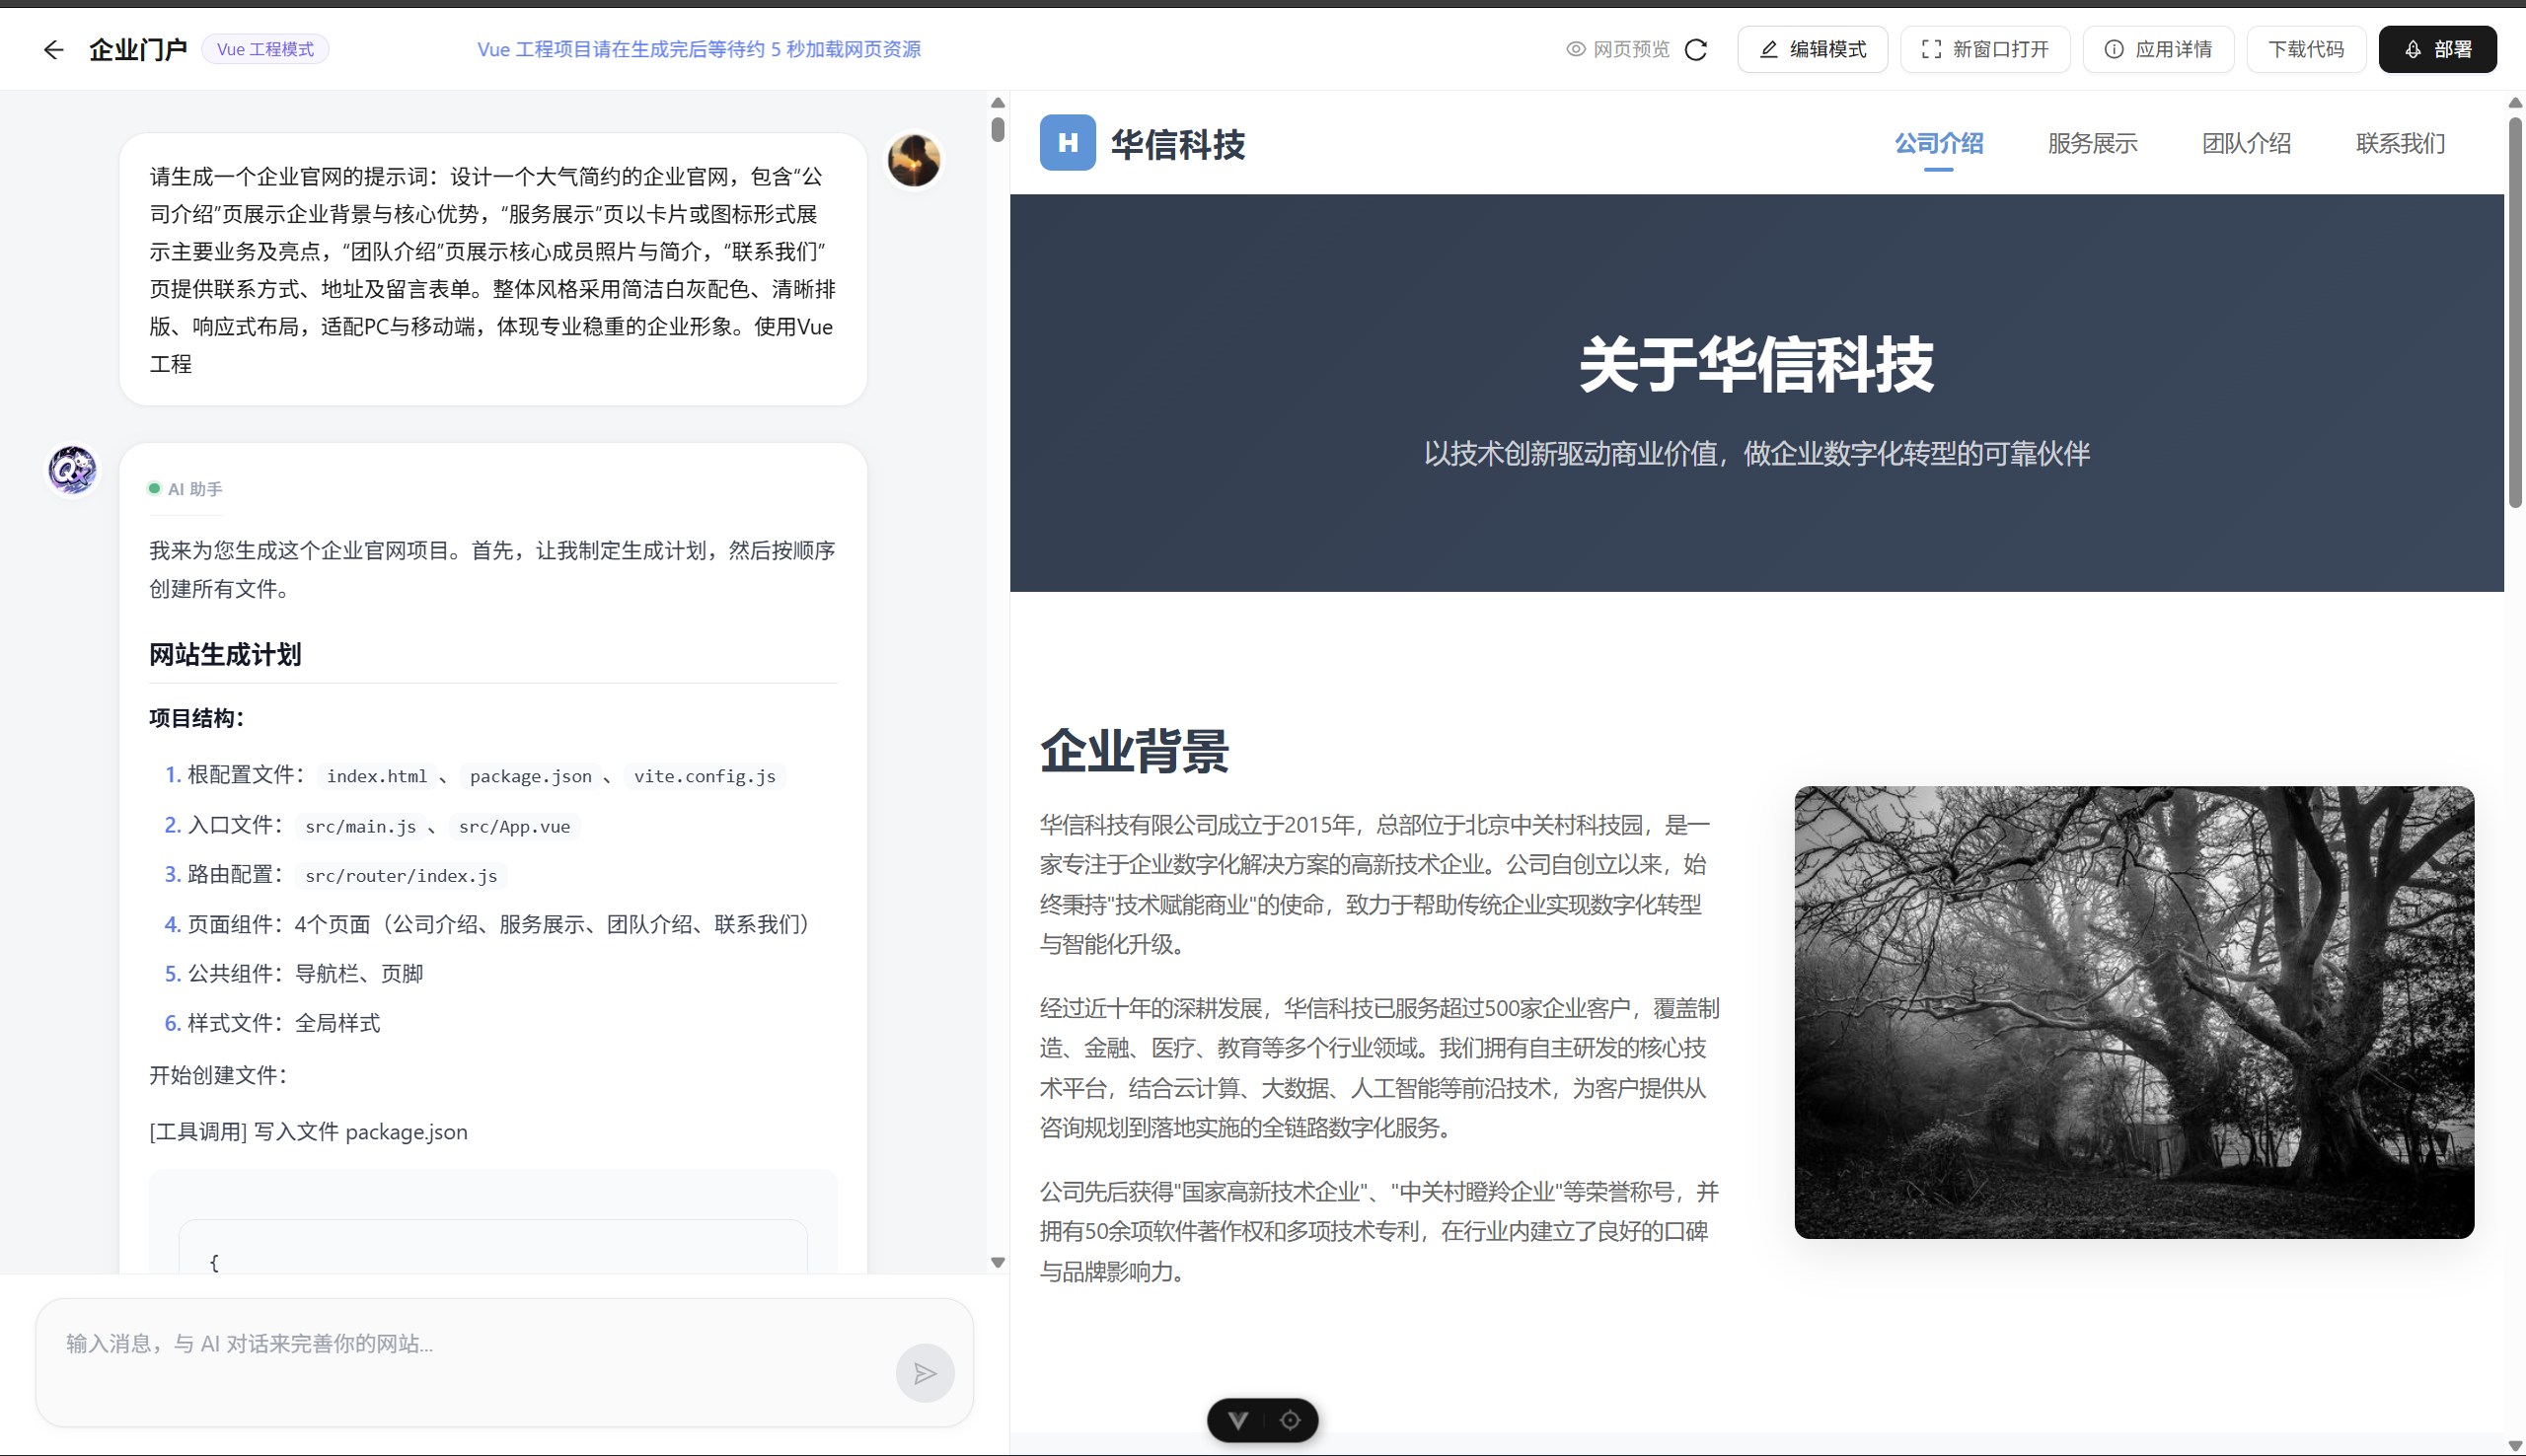
return streamHandlerExecutor.doExecute(codeStream, chatHistoryService, appId, loginUser, codeGenTypeEnum);然后通过前端和AI对话效果:
那么本期工作调用模块就已经实现啦,以后如果需要定义任何工具和流式返回工具调用信息,都可以按照上述步骤来操作~