目录
[1. BaseComponent](#1. BaseComponent)
[2. CustomComponent](#2. CustomComponent)
[3. Component](#3. Component)
[3.1. MessageTextInput](#3.1. MessageTextInput)
[3.2. MessageInput](#3.2. MessageInput)
[3.3. StrInput](#3.3. StrInput)
[3.4. MultilineInput](#3.4. MultilineInput)
[3.5. IntInput / FloatInput / BoolInput](#3.5. IntInput / FloatInput / BoolInput)
[3.6. DropdownInput](#3.6. DropdownInput)
[3.7. HandleInput](#3.7. HandleInput)
[3.8. DataInput / JSONInput](#3.8. DataInput / JSONInput)
[3.9. DataFrameInput / TableInput](#3.9. DataFrameInput / TableInput)
[3.10. SecretStrInput](#3.10. SecretStrInput)
[四、为什么方法名和 Output.method 必须对得上](#四、为什么方法名和 Output.method 必须对得上)
[1. 输入值直接用 self.](#1. 输入值直接用 self.)
[2. 输出一般靠返回值,不需要手动塞](#2. 输出一般靠返回值,不需要手动塞)
[3. self.status 是"当前组件状态展示"](#3. self.status 是“当前组件状态展示”)
[七、Component 给你的常用运行时能力](#七、Component 给你的常用运行时能力)
[1. graph](#1. graph)
[2. get_base_args()](#2. get_base_args())
[3. 上下文能力:ctx / add_to_ctx() / update_ctx()](#3. 上下文能力:ctx / add_to_ctx() / update_ctx())
[4. send_message()](#4. send_message())
[5. stop() / start()](#5. stop() / start())
八、动态表单怎么写:update_build_config()
[1. 纯文本处理组件](#1. 纯文本处理组件)
[1. 顶部导入](#1. 顶部导入)
[2. 组件类定义:继承 Component](#2. 组件类定义:继承 Component)
[3. 静态元信息:纯前端展示配置](#3. 静态元信息:纯前端展示配置)
[4. inputs:定义输入字段](#4. inputs:定义输入字段)
[5. outputs:定义输出端口,绑定执行方法](#5. outputs:定义输出端口,绑定执行方法)
[6. 业务执行方法:核心逻辑](#6. 业务执行方法:核心逻辑)
[2. 参数型组件](#2. 参数型组件)
[3. 结构化输入组件](#3. 结构化输入组件)
[4. 动态 UI 组件](#4. 动态 UI 组件)
前言
上一节主要说了bundles的安装使用方式,然后大概提供了两个示例,还有一些开发组件时基本的属性,比如有哪些属性类型,密码输入还是下拉框输入等等;输入时有哪些属性,比如display_name,name等等。那么本章主要以代码为主,解析langflow中组件的架构设计,以及具体的一些方法属性,编写规范,以及一些常用函数的作用,并且我会拿一个组件示例来讲解,看完本章后你会对bundles有一个全新的了解
在AI这么发展的时代,看很多博文都有一种AI味,我其实觉得AI创作有一点脱离博客本质,博客创作本身就是在写作中不断地反思与感悟,然后把它写出来,写的时候想着如何能把脑海中的知识叙述出来,这些我觉得都是很必要的。如果只是单纯的AI创作,可能一整篇看起来文章结构设计合理,每个知识点解释的清晰,这点毋庸置疑,但是可能有真有假,对自己来说也是单纯的过一遍,觉得AI这么写的没错挺详细,然后就搬上来了,在脑海中的印象远没有自己写出来深刻。也没有自己创作出来的文章的整体脉络以及所要讲述的知识点清晰,当然我肯定不否定使用AI,我平常工作很多时候也在用AI,包括文章创作,但只是对一些比较机械或者纯概念的问题,其他的我自己不理解或者有疑问的地方,结合搜索和AI整理成自己的话语后,再写出来,这样又是一遍新的感悟;当然也有可能一些人只是作为学习笔记来使用,这个怎么写看自己啦~
我不是呼吁大家不用AI,我是想大家使用AI的时候,不要忘了写博客的本质!因为有的人包括我有时搜索问题时,看到问题一样,但是点进去,一眼就看出是AI生成的空乏解释也没有切实的解决办法,当时那刻是真想骂人!!!
写组件时,建议大家脑子里按这条继承链理解:
- BaseComponent
- CustomComponent
- Component
- 你的具体组件类(继承自Component)
核心源码分别在:
- base_component.py (line 27)
- custom_component.py (line 43)
- component.py (line 112)
一、组件类体系分层
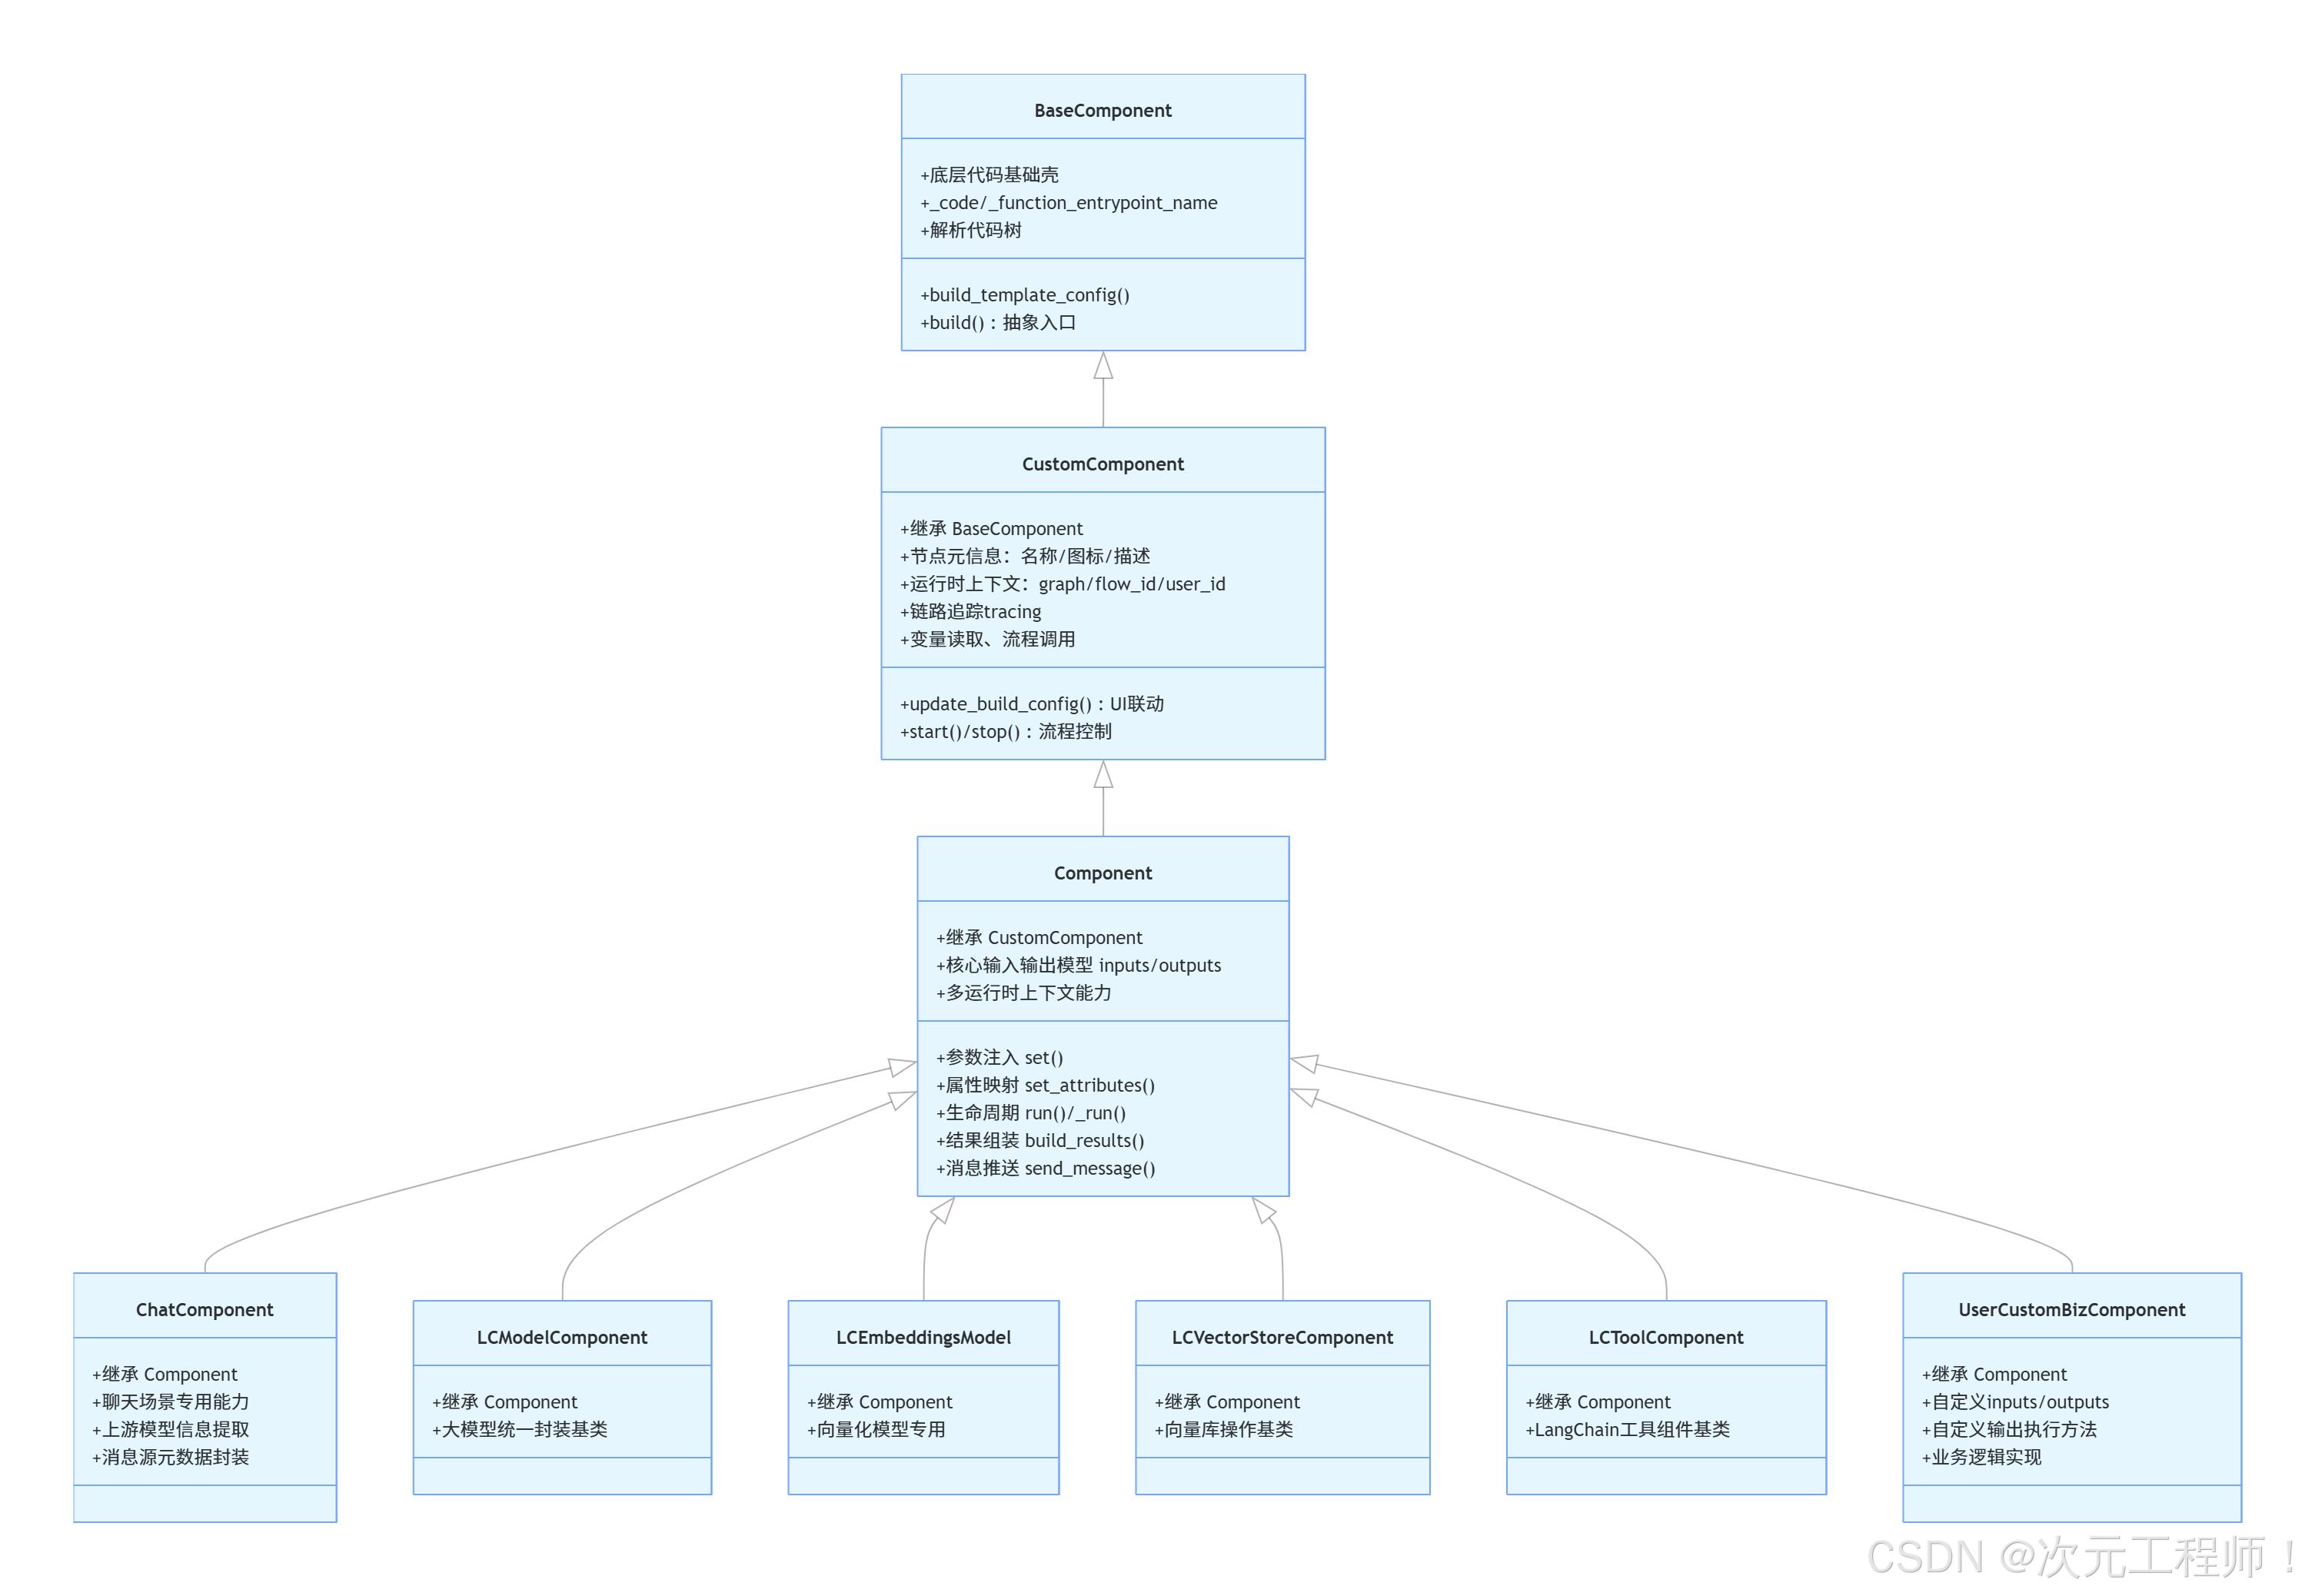
1. BaseComponent
**BaseComponent是最底层基础壳,**更像"组件元模型"。它不负责完整执行流程,而是负责让系统能理解"这段组件代码是什么、入口是什么、模板怎么生成"。
它主要负责几件事:
- 保存 _code、_function_entrypoint_name
- 构建 template config
- 解析组件代码树
- 提供最基础的 build() 抽象入口
你可以把它理解成"代码级组件定义能力",但还不是真正的"流程节点执行器"。
重点方法:
- build_template_config() 在 base_component.py
- build() 在 base_component.py
平时写普通业务组件时,你基本不会直接继承它。
以下是该基类的所有方法
| 名称 | 作用 | 常用度 |
|---|---|---|
| init(self, **data) | 初始化底层字段,包括 _code、_function_entrypoint_name、field_config、_user_id、_template_config 和缓存 cache。还会把传入的 data 挂到对象上。 | 低 |
| setattr(self, key, value) | 拦截属性赋值,重点保护 _user_id,避免被重复修改。 | 低 |
| code | 返回当前组件保存的源码字符串 self._code。如果组件是通过"代码字符串"构建出来的,这个属性就是核心原始材料。 | 低 |
| function_entrypoint_name | 返回函数式组件入口名,默认是 "build"。 | 低 |
| get_code_tree(self, code: str) | 把代码字符串交给 CodeParser 解析成代码树。后续很多"找类、找方法、找参数、找返回类型"的能力都依赖它。 | 低 |
| get_function(self) | 从 _code 中解析出可执行的入口函数;如果没有代码或没有入口名会抛异常。 | 低 |
| get_template_config(component) | 根据组件实例上的属性生成模板配置。它会遍历 ATTR_FUNC_MAPPING,把类属性转成前端节点模板能识别的结构。 | 低 |
| build_template_config(self) | 如果当前对象有 _code,就先把代码解析成类,再实例化组件,最后生成模板配置。常用于"代码 -> 前端节点模板"的流程。 | 中 |
| build(self, *args, **kwargs) | 抽象入口,占位方法。基类不实现,要求子类提供真正行为。 | 低 |
2. CustomComponent
CustomComponent补上运行时环境能力, 是从"代码元模型"过渡到"可运行节点"的桥梁。它开始引入 graph、flow、user、tracing、变量、子流程等能力。你可以把它理解成:组件的运行环境接口层。
这一层开始有"Langflow 节点"的味道了。它补充了:
- display_name / description / icon / name
- status
- field_config
- graph / user_id / flow_id
- tracing
- 变量读取
- flow 调用
- update_build_config()
- stop() / start() 控制分支
重点方法:
- update_build_config() 在 custom_component.py (line 256)
- **build()**抽象定义在 custom_component.py (line 604)
这层更像"自定义节点运行时基类"。
| 名称 | 类型 | 作用 | 常用度 |
|---|---|---|---|
| init(self, **data) | 方法 | 初始化运行时状态,如 status、field_config、_vertex、_results、_artifacts、日志、缓存等。 | 低 |
| set_attributes(self, parameters: dict) | 方法 | 参数注入入口,当前类里是空实现,主要留给更下层的 Component 真正处理。 | 低 |
| set_parameters(self, parameters: dict) | 方法 | 保存 _parameters 并调用 set_attributes(...),属于参数设置的统一入口之一。 | 低 |
| get_vertex(self) | 方法 | 返回当前组件绑定的图节点对象 vertex。 | 中 |
| get_results(self) | 方法 | 返回组件执行结果字典 _results。 | 低 |
| get_artifacts(self) | 方法 | 返回组件 artifacts 字典 _artifacts。 | 低 |
| set_results(self, results: dict) | 方法 | 手动设置 _results。 | 低 |
| set_artifacts(self, artifacts: dict) | 方法 | 手动设置 _artifacts。 | 低 |
| trace_name | 属性 | 返回 tracing 用的组件名,通常是 display_name (id) 这种形式。 | 低 |
| stop(self, output_name=None) | 方法 | 停止某个输出分支继续运行,常用于路由、条件分支、循环控制组件。 | 中 |
| start(self, output_name=None) | 方法 | 激活某个输出分支,与 stop() 相对。 | 中 |
| resolve_path(path: str) | 静态方法 | 把相对路径、~ 路径等规范化成绝对路径。 | 中 |
| get_full_path(self, path: str) | 方法 | 用 storage service 把内部文件路径解析成真实完整路径。 | 中 |
| graph | 属性 | 返回当前组件所属的 graph。很多运行期上下文都从这里来。 | 高 |
| user_id | 属性 | 返回用户 id,优先用 _user_id,否则从 graph 里取。 | 高 |
| flow_id | 属性 | 返回当前 flow id。 | 高 |
| flow_name | 属性 | 返回当前 flow 名称。 | 中 |
| tracing_service | 属性 | 惰性获取 tracing service。用于 tracing 和 LangChain callbacks。 | 中 |
| get_field_order(self) | 方法 | 返回字段顺序,优先看 field_order,否则按 field_config 顺序。 | 低 |
| get_function_entrypoint_return_type(self) | 方法 | 返回入口函数的返回类型信息。 | 低 |
| custom_repr(self) | 方法 | 生成组件结果的人类可读表示。artifact 展示、日志展示常会依赖它。 | 中 |
| build_config(self) | 方法 | 返回当前 field_config。这是偏旧风格的表单定义入口。 | 低 |
| update_build_config(self, build_config, field_value, field_name=None) | 方法 | 当前端某个字段变化时,动态更新组件配置。比如显示/隐藏字段、重建变量输入、更新 options。 | 高 |
| tree | 属性 | 返回当前 _code 解析后的代码树。 | 低 |
| to_data(self, data, keys=None, silent_errors=False) | 方法 | 把 Document、BaseModel、str、dict 等转成 listData。结构化输出组件里很实用。 | 高 |
| get_method_return_type(self, method_name: str) | 方法 | 读取组件某个方法的返回类型,并转换成 Langflow 识别的类型表示。 | 中 |
| create_references_from_data(self, data, include_data=False) | 方法 | 把 listData 转成 markdown 风格引用文本,适合 RAG、检索结果拼接。 | 中 |
| get_function_entrypoint_args | 属性 | 返回入口函数参数定义列表。 | 低 |
| get_method(self, method_name: str) | 方法 | 从代码树中找到指定方法定义信息。 | 低 |
| get_main_class_name | 属性 | 从 _code 中找主组件类名。 | 低 |
| template_config | 属性 | 懒加载模板配置,如果还没构建过就调用 build_template_config()。 | 中 |
| variables(self, name, field) | 方法 | 旧接口,同步获取变量。内部会转异步逻辑。 | 低 |
| get_variables(self, name, field) | 异步方法 | 旧异步接口,获取变量信息。 | 低 |
| get_variable(self, name, field, session) | 异步方法 | 获取某个变量值。先看 graph context 的 request_variables,再走数据库变量服务。 | 高 |
| list_key_names(self) | 异步方法 | 列出当前用户的变量名。 | 中 |
| index(self, value=0) | 方法 | 返回一个函数,用来取 iterable 指定下标的元素。 | 低 |
| get_function(self) | 方法 | 覆盖基类版本,直接从 _code 生成函数对象。 | 低 |
| load_flow(self, flow_id, tweaks=None) | 异步方法 | 加载另一个 flow。 | 中 |
| run_flow(self, inputs=None, flow_id=None, flow_name=None, output_type="chat", tweaks=None) | 异步方法 | 运行另一个 flow。做"子流程组件"时非常重要。 | 高 |
| list_flows(self) | 方法 | 同步列出当前用户所有 flow。 | 低 |
| alist_flows(self) | 异步方法 | 异步列出当前用户所有 flow。 | 中 |
| alist_flows_by_flow_folder(self) | 异步方法 | 列出和当前 flow 在同文件夹下的所有 flow。 | 中 |
| alist_flows_by_folder_id(self) | 异步方法 | 按 folder id 列出 flow。 | 中 |
| aget_flow_by_id_or_name(self) | 异步方法 | 按 id 或 name 获取 flow。 | 中 |
| build(self, *args, **kwargs) | 方法 | 仍是抽象占位,不提供实际业务实现。 | 低 |
| post_code_processing(self, new_frontend_node, current_frontend_node) | 方法 | 旧接口,本质是同步包装 update_frontend_node(...)。 | 低 |
| update_frontend_node(self, new_frontend_node, current_frontend_node) | 异步方法 | 代码校验完成后,更新前端节点结构。动态模板组件、变量组件很依赖它。 | 高 |
| get_langchain_callbacks(self) | 方法 | 从 tracing service 中取 LangChain callbacks。 | 中 |
3. Component
**Component才是我们日常写组件最应该关注的基类,**是真正写业务组件的核心基类。它负责把 inputs / outputs 声明变成一个真正能接线、能运行、能出结果、能发消息、能转工具的 Langflow 节点。
它在 CustomComponent 基础上加了最重要的三类能力:
- 输入输出建模:inputs、outputs
- 参数注入与属性访问:set()、set_attributes()
- 执行生命周期:run()、_run()、build_results()
你平时新建组件,基本都应该继承它。
关键方法:
- init() 在 component.py (line 118)
- set() 在 component.py (line 414)
- run() 在 component.py (line 438)
- map_outputs() 在 component.py (line 506)
- map_inputs() 在 component.py (line 539)
- _run() 在 component.py (line 904)
- set_attributes() 在 component.py (line 1070)
- build_results() 在 component.py (line 1128)
- send_message() 在 component.py (line 1627)
| 能力块 | 说明 |
|---|---|
| 输入输出建模 | 把 inputs = ...、outputs = ... 注册成运行期可用结构,并推断类型 |
| 参数注入 | 让你可以在方法里直接写 self.input_value、self.query、self.model_name |
| 运行生命周期 | 负责 set()、run()、build_results()、resolve_output() 这些执行流程 |
| 图和上下文 | 提供 ctx、add_to_ctx()、update_ctx()、edge / vertex / component 相关能力 |
| 消息与前端通信 | 提供 send_message()、send_error()、event manager 等 |
| 工具化与前端节点化 | 提供 to_toolkit()、to_frontend_node()、动态输出校验等能力 |
方法表
| 名称 | 类型 | 作用 | 常用度 |
|---|---|---|---|
| init(self, **kwargs) | 方法 | 初始化组件运行期所有核心结构:_inputs、_outputs_map、_results、_attributes、edge、components、event manager 等;还会映射 inputs/outputs、推断 output 类型。 | 高 |
| get_base_inputs(cls) | 类方法 | 返回类级别的基础 inputs。 | 低 |
| get_base_outputs(cls) | 类方法 | 返回类级别的基础 outputs。 | 低 |
| get_results(self) | 方法 | 返回结果字典。 | 低 |
| get_artifacts(self) | 方法 | 返回 artifacts 字典。 | 低 |
| get_event_manager(self) | 方法 | 返回事件管理器。 | 中 |
| get_undesrcore_inputs(self) | 方法 | 返回 _inputs 字典。 | 低 |
| get_id(self) | 方法 | 返回组件 id。 | 中 |
| set_id(self, id_) | 方法 | 设置组件 id。 | 低 |
| get_edges(self) | 方法 | 返回当前组件记录的边。 | 中 |
| get_components(self) | 方法 | 返回已连接的其他组件列表。 | 中 |
| get_outputs_map(self) | 方法 | 返回输出名到 Output 的映射。 | 中 |
| get_output_logs(self) | 方法 | 返回输出日志。 | 低 |
| get_incoming_edge_by_target_param(self, target_param) | 方法 | 根据输入参数名找到对应上游边的 source vertex id。 | 中 |
| enabled_tools | 属性 | 控制当前组件允许暴露哪些工具;默认 None 表示都允许。 | 中 |
| get_base_args(self) | 方法 | 返回基础上下文字典,通常包括 _user_id、_session_id、_tracing_service。组件内部实例化其他组件时很实用。 | 高 |
| ctx | 属性 | 返回 graph 的 context。 | 高 |
| add_to_ctx(self, key, value, overwrite=False) | 方法 | 向 graph context 写入一个键值。 | 高 |
| update_ctx(self, value_dict) | 方法 | 批量更新 graph context。 | 高 |
| set_event_manager(self, event_manager=None) | 方法 | 设置事件管理器。 | 中 |
| reset_all_output_values(self) | 方法 | 把所有 output.value 重置成 UNDEFINED。 | 低 |
| get_state_model_instance_getter(self) | 方法 | 返回一个生成组件状态模型实例的 getter。 | 低 |
| deepcopy(self, memo) | 方法 | 定义组件被深拷贝时的行为。 | 低 |
| set_class_code(self) | 方法 | 从当前类所在模块拿源码并保存到 _code。 | 中 |
| set(self, **kwargs) | 方法 | 给组件注入输入值、参数或连线,是运行前最常用的方法之一。 | 高 |
| list_inputs(self) | 方法 | 返回输入名列表。 | 中 |
| list_outputs(self) | 方法 | 返回输出名列表。 | 中 |
| run(self) | 异步方法 | 执行组件主流程。注意它最终返回的是 build_results() 的结果。 | 高 |
| set_vertex(self, vertex) | 方法 | 设置当前组件所属 vertex。 | 低 |
| get_input(self, name) | 方法 | 获取指定输入对象。 | 中 |
| get_output(self, name) | 方法 | 获取指定输出对象。 | 中 |
| set_on_output(self, name, **kwargs) | 方法 | 动态修改某个输出对象上的属性。 | 低 |
| set_output_value(self, name, value) | 方法 | 直接给指定输出写入 value。 | 低 |
| map_outputs(self) | 方法 | 把 outputs 列表映射为 _outputs_map,并支持从 vertex 覆盖。 | 低 |
| map_inputs(self, inputs) | 方法 | 把 inputs 列表映射成 _inputs,并准备 telemetry。 | 低 |
| get_telemetry_input_values(self) | 方法 | 返回缓存好的 telemetry 输入值。 | 低 |
| validate(self, params) | 方法 | 校验输入参数和输出配置是否合法。 | 中 |
| run_and_validate_update_outputs(self, frontend_node, field_name, field_value) | 异步方法 | 当前端字段变化时,更新并校验 outputs,同时处理 tool mode 相关输出变更。 | 高 |
| update_outputs(self, frontend_node, field_name, field_value) | 方法 | 动态输出联动入口。子类可覆写它,根据字段变化改变 outputs。 | 中 |
| get_output_by_method(self, method) | 方法 | 根据某个方法对象反查它对应哪个 output。 | 低 |
| call(self, **kwargs) | 方法 | 允许像函数一样直接调用组件,本质上是 set(...) + run()。 | 中 |
| getattr(self, name) | 方法 | 这是最关键的机制之一。它让 self.input_name 直接返回输入值,让 self.output_name 返回输出对象,也处理兼容 graph 的占位逻辑。 | 高 |
| set_input_value(self, name, value) | 方法 | 给单个 input 设置值。 | 中 |
| to_frontend_node(self) | 方法 | 把组件转换为前端节点结构,包括 template、outputs、code 字段等。 | 高 |
| set_attributes(self, params) | 方法 | 把输入值整理到 _attributes,并做保留字段冲突校验。运行时 self.xxx 能好用,很大程度靠它。 | 高 |
| get_trace_as_inputs(self) | 方法 | 收集需要作为 tracing 输入记录的字段。 | 低 |
| get_trace_as_metadata(self) | 方法 | 收集需要作为 tracing metadata 记录的字段。 | 低 |
| build_results(self) | 异步方法 | 组件正式执行的主流程之一。负责 tracing 包裹、异常处理、结果与 artifact 构建。 | 高 |
| resolve_output(self, output_name) | 异步方法 | 只计算并返回指定输出的值。比整体 run() 更聚焦。 | 高 |
| extract_data(self, result) | 方法 | 从输出结果中提取可序列化数据,供 artifact 构建使用。 | 中 |
| custom_repr(self) | 方法 | 生成更适合展示的结果表示,偏运行态展示。 | 中 |
| build_inputs(self) | 方法 | 构建输入配置。 | 低 |
| build(self, **kwargs) | 方法 | 这里的实现是调用 set_attributes(kwargs)。 | 低 |
| to_toolkit(self) | 异步方法 | 把组件转换成工具列表 listTool。做 agent/tool 生态时非常重要。 | 高 |
| check_for_tool_tag_change(self, old_tags, new_tags) | 方法 | 检查工具标签是否发生变化。 | 低 |
| get_project_name(self) | 方法 | 获取项目名。 | 低 |
| log(self, message, name=None) | 方法 | 写组件日志。调试、运行跟踪时很实用。 | 高 |
| is_connected_to_chat_output(self) | 方法 | 判断当前组件是否连到了 ChatOutput。 | 中 |
| is_connected_to_chat_input(self) | 方法 | 判断当前组件是否连到了 ChatInput。 | 中 |
| send_message(self, message, id_=None, skip_db_update=False) | 异步方法 | 发送消息到数据库、前端事件系统,支持 streaming、状态更新和消息持久化。聊天类组件的核心能力。 | 高 |
| send_error(self, exception, session_id, trace_name, source) | 异步方法 | 把异常包装成错误消息发给前端。 | 中 |
| get_input_display_name(self, input_name) | 方法 | 获取输入的人类可读显示名。 | 中 |
| get_output_display_name(self, output_name) | 方法 | 获取输出的人类可读显示名。 | 中 |
| build_input_error_message(self, input_name, message) | 方法 | 构造统一风格的输入错误信息。 | 高 |
| build_output_error_message(self, output_name, message) | 方法 | 构造统一风格的输出错误信息。 | 中 |
二、写组件时,类里通常要写什么
1.最小示例
最常见结构就是这 5 块:
- 类元信息(name,display_name等这些)
- inputs
- outputs
- 输出对应的方法
- 可选的动态 UI 配置方法
最小模板可以写成这样,这个组件作用是将输入得值转大写:
python
from langflow.custom import Component
from langflow.io import MessageTextInput, Output
from langflow.schema.message import Message

class MyComponent(Component):
    # 类元信息
    display_name = "My Component"
    description = "把输入文本处理后输出"
    icon = "braces"
    name = "MyComponent"

    # inputs
    inputs = [
        MessageTextInput(
            name="input_value",
            display_name="Input",
            required=True,
        ),
    ]

    #outputs
    outputs = [
        Output(
            name="result",
            display_name="Result",
            method="build_result",
        ),
    ]
    # outputs的处理方法
    def build_result(self) -> Message:
        text = self.input_value
        result = Message(text=text.upper())
        self.status = result
        return result
这个模板已经覆盖了最核心写法。
2.类元信息
1. display_name
给前端展示的组件名。
2. description
组件说明,会展示在节点信息或搜索列表里。
3. icon
前端图标名。仓库说明里也写了,通常是 Lucide 名称或者自定义图标名。
4. name
这个字段很重要,但没有类名那么重要。类似于该输入框的**id标识,**无论是组件的id还是各种Input 或者 Output
所以:
- class MyComponent(Component): 这个类名不要随便改
- name = "MyComponent" 也最好稳定
- display_name 可以相对灵活一些
3.inputs
inputs 是"前端表单 + 节点入参 + 运行时校验"的统一声明。
输入类型定义主要在:
- template/field/base.py (line 34)
- inputs.py
最底层公共字段是 Input,位置在 base.py (line 34)。
常用字段:
- name: 运行时字段名,代码里通过 self.xxx 访问
- display_name: 前端显示名
- required: 是否必填
- value: 默认值
- advanced: 是否放到高级参数
- info: tooltip 说明
- show: 是否显示
- dynamic: 是否动态字段
- real_time_refresh: 改值后是否触发刷新
- input_types: 允许连接的上游类型
- is_list: 是否列表输入
这个具体属性我上章也有写,可以具体去查看
最关键的一点:
name="input_value" 最终会变成 self.input_value 。
这是 Component.getattr 和 set_attributes() 共同完成的。
常用输入类型该怎么选
位置: inputs.py
3.1. MessageTextInput
位置: inputs.py (line 327)
最常用的文本输入之一。
特点:
- 既能接字符串
- 也能接 Message
- 接 Data 时会尝试取其 text_key
适合"我要一个文本字符串来处理"的场景。
3.2. MessageInput
位置: inputs.py (line 306)
它更偏"我要一个完整 Message 对象",而不是只要文本。
如果你需要保留消息对象上的:
- session_id
- sender
- properties
- files
这种,用它更合适。
3.3. StrInput
位置: inputs.py (line 247)
普通字符串输入,更偏参数配置,不一定是聊天消息语义。
3.4. MultilineInput
多行输入,适合长文本、prompt、模板。
3.5. IntInput / FloatInput / BoolInput
位置:
- IntInput (line 469)
- FloatInput (line 527)
- BoolInput (line 579)
用于数值和布尔配置。它们会做自动转换,比如字符串 "3" 转成 3。
3.6. DropdownInput
位置: inputs.py (line 660)
适合枚举选项。
常见写法:
python
DropdownInput(
    name="mode",
    display_name="Mode",
    options=["A", "B"],
    value="A",
    real_time_refresh=True,
)
3.7. HandleInput
位置: inputs.py (line 77)
这个非常关键。
它不是普通文本框,而是"连线型输入"。比如你要接上游节点输出的对象:
- Data
- Message
- DataFrame
- LanguageModel
- Embeddings
就用它或它的具体子类。
比如:
python
HandleInput(
    name="input_data",
    display_name="Input Data",
    input_types=["Data", "JSON"],
    required=True,
)
3.8. DataInput / JSONInput
位置: inputs.py (line 106)
这里 DataInput 实际上是 JSONInput 的别名。
适合接 Langflow 的 Data/JSON 风格对象。
3.9. DataFrameInput / TableInput
位置:
- DataFrameInput (line 123)
- TableInput (line 38)
区别可以这样记:
- DataFrameInput: 连线接"表格型对象"
- TableInput: 前端可编辑表格字段
3.10. SecretStrInput
位置: inputs.py (line 410)
用于 API key、密码等敏感信息。
六、 outputs 怎么理解
outputs 是组件的"可导出结果声明",定义在 base.py (line 181)。
核心字段:
- name: 输出字段名
- display_name: 前端展示名
- method: 这个输出对应调用哪个方法
- types: 返回类型列表,系统会尝试从方法注解里推断
- value: 运行后结果
- cache: 是否缓存
- group_outputs: 是否分组显示
最重要的是这句:
python
Output(name="result", display_name="Result", method="build_result")意思是:
- 这个组件有一个叫 result 的输出口
- 执行时会调用 self.build_result()
- 返回值就是这个输出口的值
三、组件真正是怎么跑起来的
这是最关键的运行链路。
1. 初始化阶段
Component.init() 会做:
- 检查 input/output 名字是否冲突
- 保存参数
- 调 set_attributes()
- 建 _inputs
- 建 _outputs_map
- map_inputs(self.inputs)
- map_outputs()
- 推断每个 output 的返回类型
2. set() 阶段
调用 component.set(xxx=yyy) 时,它会把输入值或连接关系灌进去。
位置: component.py (line 414)
通常测试里你会这样用:
python
component = MyComponent().set(input_value="hello")3. run() -> _run()
位置:
- run() (line 438)
- _run() (line 904)
_run() 会做两件大事:
- 先解析 callable/coroutine 类型输入
- 再执行 build_results()
4. set_attributes()
位置: component.py (line 1070)
它会把输入值同步到运行时属性里。
所以你在组件方法里直接写:
python
self.input_value
self.top_n
self.model_name
能拿到值,就是因为这里做了映射。
这是写组件时最常依赖的机制。
5. build_results()
位置: component.py (line 1128)
它负责:
- tracing 包裹
- 异常处理
- 调 _build_results()
_build_results() 会遍历 outputs,然后逐个执行对应 method。
也就是说:
- 你定义几个 Output
- 系统就按输出配置调用几个方法
- 方法返回值会收集到 results / artifacts
四、为什么方法名和 Output.method 必须对得上
因为输出不是随便跑某个函数,而是系统按 outputs 里写的 method 字符串找方法。
比如:
python
outputs = [
    Output(name="message", display_name="Message", method="message_response"),
]
那系统就会去找:
python
def message_response(self): ...如果方法不存在,或者名字写错,运行时会出问题。
另外,返回类型注解也会被拿来推断 output type,逻辑在 component.py (line 642) 附近的 _set_output_types() / _set_output_return_type()。
所以建议总是写返回注解,例如:
python
def build_result(self) -> Message:五、写组件时,输入值怎么拿,输出值怎么设
1. 输入值直接用 self.<input_name>
例如:
python
MessageTextInput(name="input_value", ...)
IntInput(name="top_n", ...)
方法里直接写:
python
text = self.input_value
n = self.top_n
2. 输出一般靠返回值,不需要手动塞
例如:
python
def build_result(self) -> Message:
return Message(text="ok")
系统会把这个返回值记到对应 output。
3. self.status 是"当前组件状态展示"
很多组件都会写:
python
self.status = result这不是必须,但非常推荐。这样前端/调试时更容易看到组件当前产物。
仓库里很多真实组件都这么写,比如 LCCompressorComponent。
六、同步方法还是异步方法
两种都能写。
同步:
python
def build_result(self) -> Message:
return Message(text="ok")
异步:
python
async def build_result(self) -> Message:
return Message(text="ok")
如果你的组件里有:
- 网络请求
- 异步数据库
- 异步模型调用
优先写 async def。
仓库里大量核心组件输出方法都是异步的,比如聊天输入输出、agent、model 类组件。
七、 Component 给你的常用运行时能力
1. graph
来自 CustomComponent.graph,位置: custom_component.py
可以拿到当前图上下文。
常见用途:
- self.graph.session_id
- self.graph.flow_id
- self.graph.context
2. get_base_args()
位置: component.py
适合你在组件内部再实例化别的组件时,把公共上下文带过去:
- _user_id
- _session_id
- _tracing_service
3. 上下文能力: ctx / add_to_ctx() / update_ctx()
位置:
- ctx/getter 附近 (line 295)
- add_to_ctx (line 306)
- update_ctx (line 325)
适合在多个节点之间传运行期共享信息。
4. send_message()
位置: component.py (line 1627)
如果你做的是 chat 类组件,或者想把消息发到前端/历史记录里,这个很重要。
它会处理:
- 消息持久化
- streaming
- 前端事件发送
- 错误清理
5. stop() / start()
位置:
- stop() (line 141)
- start() (line 156)
用于控制分支型 flow 的输出分支是否继续执行。
八、动态表单怎么写: update_build_config()
这是写**"联动 UI"**时最重要的方法。
位置: custom_component.py (line 256)
默认行为很简单:
- 把 field_value 写回 build_configfield_name"value"
你可以 override 它,做这些事:
- 根据某个字段值隐藏/显示其他字段
- 动态修改 options
- 动态新增字段
- 改 required
- 改默认值
典型写法:
python
def update_build_config(self, build_config, field_value, field_name=None):
    if field_name == "mode":
        build_config["pattern"]["show"] = self.mode == "Parser"
        build_config["pattern"]["required"] = self.mode == "Parser"
    return build_config
def update_build_config(self, build_config, field_value, field_name=None):
- 这是组件自带的钩子方法
- 只要前端修改任意一个输入框,系统就会自动调用它
- 你重写它,就能实现动态 UI
if field_name == "mode":
- 意思是:只有当用户修改了名为
mode的字段时,才执行下面逻辑- 比如你下拉框选了模式,才触发
build_config["pattern"]["show"] = self.mode == "Parser"
- build_config = 前端整个表单的配置表
build_config["pattern"]= 名为pattern的输入框配置show = True/False→ 控制这个输入框在前端显示还是隐藏这句话翻译成人话:
当 mode 选择 "Parser" 时,pattern 输入框才显示出来,否则隐藏
适用场景:
- 切换模式时显示不同参数
- 选模型供应商后加载不同模型列表
- 打开高级选项时显示额外输入框
九、写组件时的开发规范和经验
在我开发过程中,遇到的一些问题或者一些开发经验,写到下面可以参考:
1.开发规范
- 输入字段名尽量稳定、语义明确,比如 input_value、query、data、model
- 输出方法名用动词,比如 build_message、run_model、parse_data
- 总是写返回类型注解
- 尽量返回 Message / Data / DataFrame,少直接裸返回复杂原生对象
- 重要结果赋给 self.status
- 有 UI 联动需求再写 update_build_config()
- 不要改组件类名
- 如果一个组件已经有更合适的中间基类,不要直接从 Component 硬写全部逻辑
2.需要注意的问题
1. 输入名和输出名不能重名
Component.init() 一开始就会检查。
比如下面是错的:
python
#name 都为result
inputs = [MessageTextInput(name="result")]
outputs = [Output(name="result", method="build_result")]
2. Output.method 不是展示文案,是方法名
这个最容易写错。
错误例子:
python
Output(name="result", method="Result")除非你真有一个 def Result(self):,否则会炸。
顺便说一句,你仓库里 LCCompressorComponent 这里就有点可疑,method="Compressed Documents" 这种更像展示文案,不像 Python 方法名。按 Component 现在这套机制看,正常组件应该写真实方法名,例如 compress_documents。你以后自己写时不要照这个风格抄。
3. 返回类型要和语义匹配
常见返回对象:
- 文本聊天结果:Message
- 结构化对象:Data
- 表格:DataFrame
- 列表数据:listData
如果你只是返回裸 str,有时能跑,但在 Langflow 体系里通常不如 Message 稳定。
4. 组件里尽量不要自己绕开 input/output 体系
不建议乱在类里塞与输入同名的普通属性,因为 set_attributes() 会做保留字段冲突检查。
十、推荐几种模板写
1. 纯文本处理组件
python
from langflow.custom import Component
from langflow.io import MessageTextInput, Output
from langflow.schema.message import Message

class TextUpperComponent(Component):
    display_name = "Text Upper"
    description = "转成大写"
    icon = "type"
    name = "TextUpperComponent"

    inputs = [
        MessageTextInput(
            name="input_value",
            display_name="Input",
            required=True,
        ),
    ]

    outputs = [
        Output(
            name="message",
            display_name="Message",
            method="build_message",
        ),
    ]

    def build_message(self) -> Message:
        result = Message(text=self.input_value.upper())
        self.status = result
        return result
1. 顶部导入
python
from langflow.custom import Component from langflow.io
import MessageTextInput, Output from langflow.schema.message
import Message
写 Langflow 自定义组件,永远离不开这三类导入。
-
Component:所有自定义组件的父类,必须继承它,这是组件的根基。
-
输入/输出类:用来定义前端页面长什么样、节点有什么接口。
-
Message:Langflow 标准消息结构体,专门用来承载文本消息。
2. 组件类定义:继承 Component
python
class TextUpperComponent(Component):只要你写普通业务组件,无脑继承 Component。它是日常开发最常用、能力最全的基类,封装好了输入、输出、生命周期、参数映射。
这里一定要注意:类名绝对不能随便改。Langflow 保存的工作流 Flow 是靠类名识别组件的,改类名直接导致旧流程报错、兼容崩坏。
3. 静态元信息:纯前端展示配置
python
display_name = "Text Upper"
description = "转成大写"
icon = "type"
name = "TextUpperComponent"
这四行全部是给人看的静态信息
-
display_name:前端侧边栏展示名称,可以随便改。
-
description:组件描述,鼠标悬浮提示。
-
icon:前端图标,使用 Lucide 图标名。
-
name:组件唯一标识,建议和类名保持一致,不要随意改动。
这就是声明式开发,后端写几行字符串,前端自动渲染页面,不用写一行前端代码,非常舒服。
4. inputs:定义输入字段
python
inputs = [
    MessageTextInput(
        name="input_value",
        display_name="Input",
        required=True,
    ),
]
inputs 是当前组件的入参定义,同时兼顾前端表单、运行校验、连线能力。
这里使用 MessageTextInput,代表通用文本输入,既能手动输入字符串,也能接收上游节点传过来的 Message 消息。
最关键知识点:
name="input_value",运行时 Langflow 会自动把这个字段注入实例,代码里直接通过 self.input_value 取值。
这是 Langflow 最精髓的设计,不需要手动写构造函数、不用手动赋值,框架自动完成属性映射,写代码极度简洁。
5. outputs:定义输出端口,绑定执行方法
python
outputs = [
    Output(
        name="message",
        display_name="Message",
        method="build_message", ),
]输出不是单纯定义一个变量,每一个输出端口必须绑定一个方法。
本例含义:当前名为 message 的输出端口,运行时会自动调用 build_message 方法,把方法返回值作为输出结果。
容易踩坑的点:method 后面写的是字符串,必须和下方自定义方法名一模一样,写错直接运行报错。输出和方法强绑定,这是 Langflow 的硬性规则。
6. 业务执行方法:核心逻辑
python
def build_message(self) -> Message:
    result = Message(text=self.input_value.upper())
    self.status = result
    return result
这里是开发者真正写业务逻辑的地方,流程非常简单:
-
通过
self.input_value获取用户输入文本; -
调用 upper() 转为大写;
-
封装为 Langflow 标准 Message 对象;
-
self.status = result:把结果挂载到组件状态,前端调试面板可以直观看到运行结果; -
return 返回,自动流转给下游节点。
一定要养成习惯:优先返回框架标准对象(Message、Data、DataFrame),不要裸返回字符串、字典。标准对象才能适配 Langflow 的流式展示、日志、状态、链路追踪。
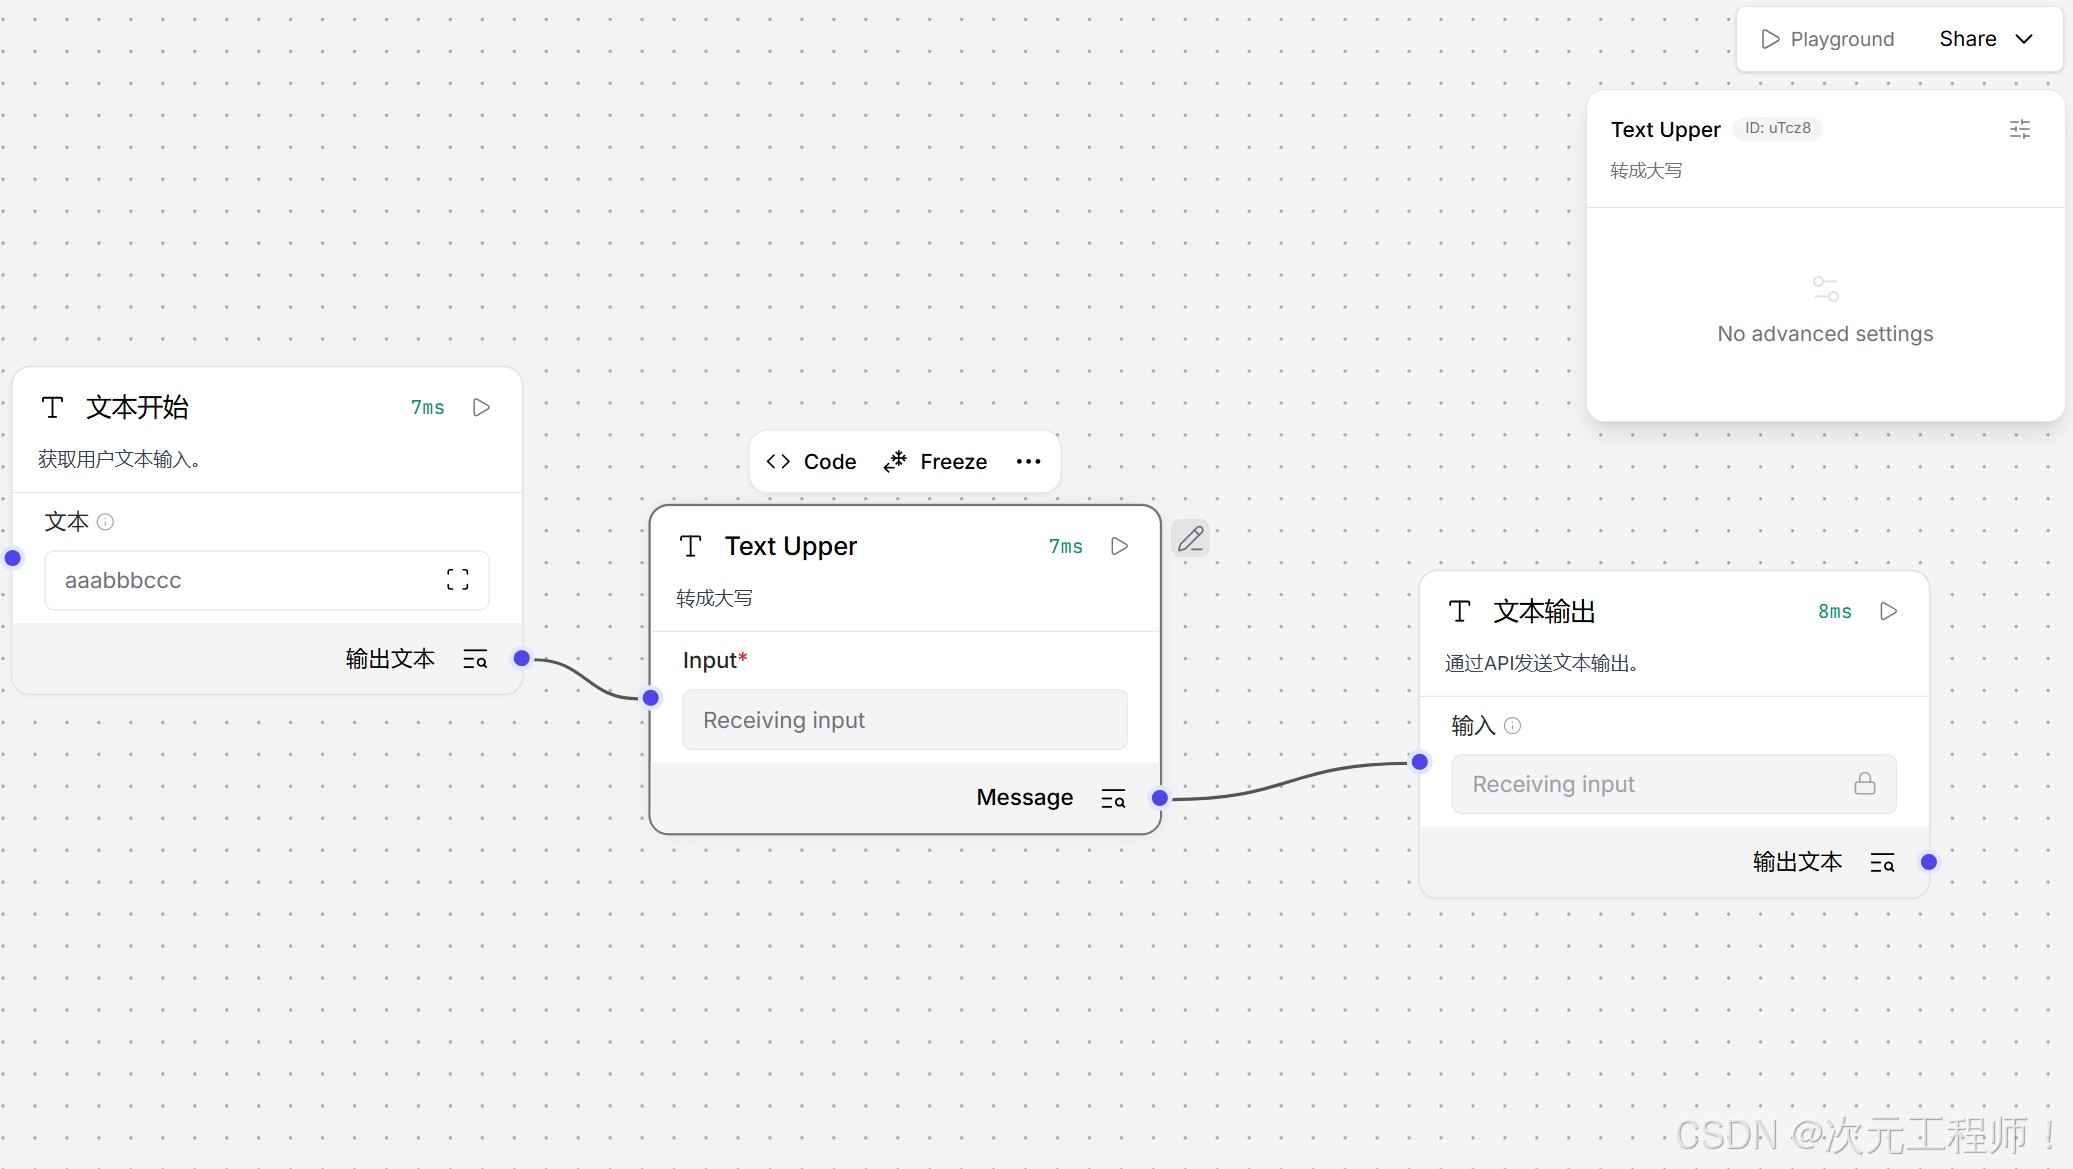
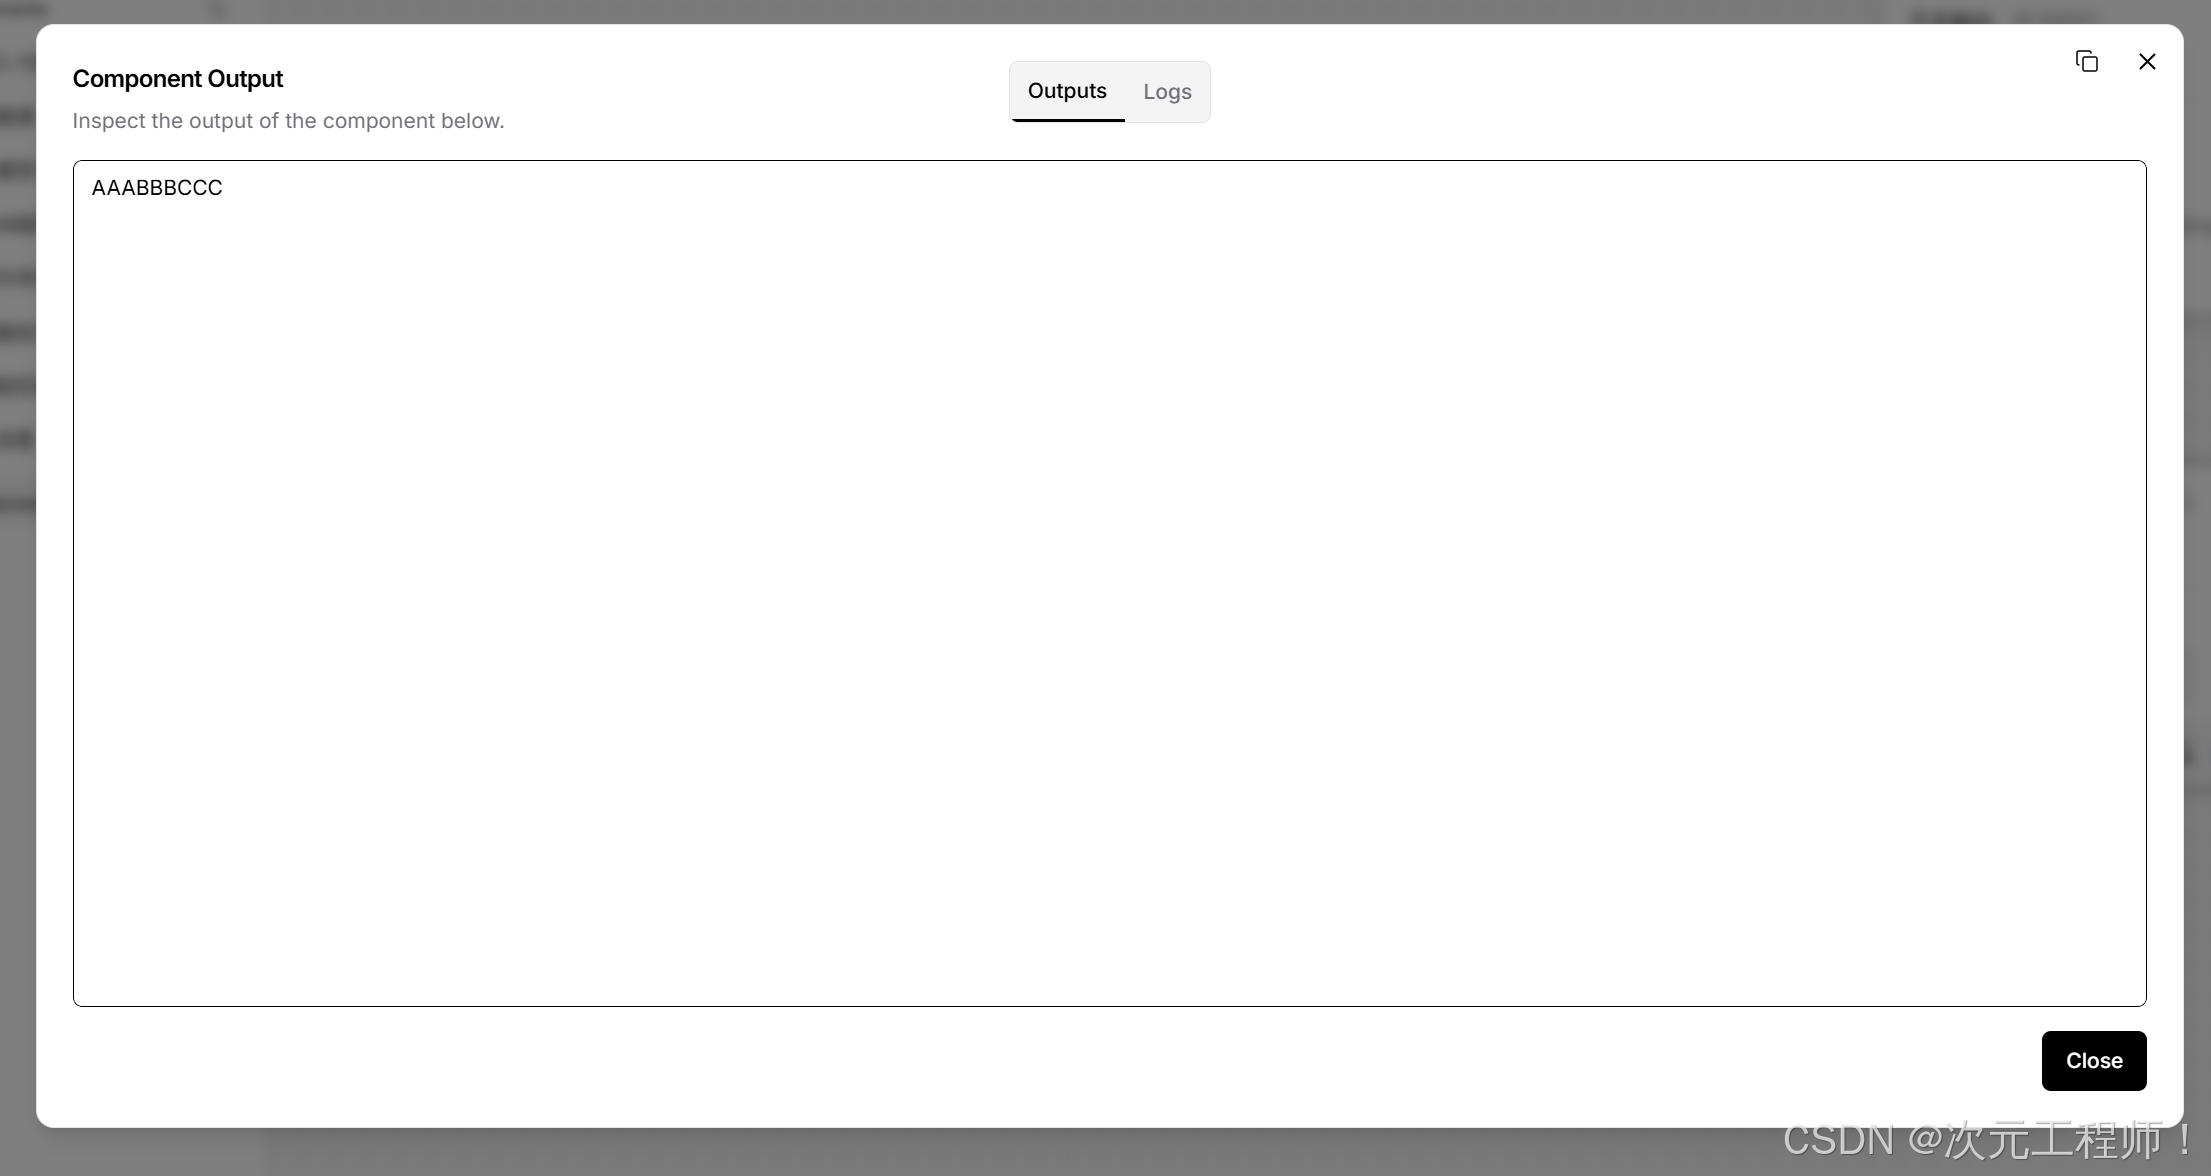
可以观察到输出,已经转为了大写
2. 参数型组件
python
from langflow.custom import Component
from langflow.io import IntInput, FloatInput, Output
from langflow.schema.data import Data

class MultiplyComponent(Component):
    display_name = "Multiply"
    description = "数值相乘"
    icon = "calculator"
    name = "MultiplyComponent"

    inputs = [
        IntInput(name="a", display_name="A", value=1),
        FloatInput(name="b", display_name="B", value=2.0),
    ]

    outputs = [
        Output(name="result", display_name="Result", method="build_result"),
    ]

    def build_result(self) -> Data:
        value = self.a * self.b
        result = Data(data={"result": value})
        self.status = result
        return result
3. 结构化输入组件
python
from langflow.custom import Component
from langflow.io import DataInput, Output
from langflow.schema.data import Data

class ExtractTextComponent(Component):
    display_name = "Extract Text"
    description = "从 Data 中抽 text"
    icon = "file-text"
    name = "ExtractTextComponent"

    inputs = [
        DataInput(name="input_data", display_name="Input Data", required=True),
    ]

    outputs = [
        Output(name="result", display_name="Result", method="build_result"),
    ]

    def build_result(self) -> Data:
        text = self.input_data.data.get("text", "")
        result = Data(data={"text": text})
        self.status = result
        return result
4. 动态 UI 组件
python
from langflow.custom import Component
from langflow.io import DropdownInput, MessageTextInput, Output
from langflow.schema.message import Message

class ModeComponent(Component):
    display_name = "Mode Component"
    description = "动态显示字段"
    icon = "sliders"
    name = "ModeComponent"

    inputs = [
        DropdownInput(
            name="mode",
            display_name="Mode",
            options=["simple", "advanced"],
            value="simple",
            real_time_refresh=True,
        ),
        MessageTextInput(
            name="extra_prompt",
            display_name="Extra Prompt",
            show=False,
        ),
    ]

    outputs = [
        Output(name="message", display_name="Message", method="build_message"),
    ]

    def update_build_config(self, build_config, field_value, field_name=None):
        if field_name == "mode":
            build_config["extra_prompt"]["show"] = field_value == "advanced"
        return build_config

    def build_message(self) -> Message:
        text = f"mode={self.mode}, extra={self.extra_prompt}"
        result = Message(text=text)
        self.status = result
        return result
十一、仓库里几个值得参考的现成基类
如果你不是写"普通组件",而是某一类特定组件,建议优先看这些中间基类:
- 聊天类基类:ChatComponent (line 15)
- LangChain tool 类基类:LCToolComponent (line 11)
- 模型类基类:LCModelComponent (line 26)
- 向量库类基类:LCVectorStoreComponent (line 41)
- Embedding 类基类:LCEmbeddingsModel (line 6)
也就是说:
- 普通节点:继承 Component
- 聊天输入输出:先看看 ChatComponent
- 模型封装:先看看 LCModelComponent
- 向量库:先看看 LCVectorStoreComponent
这样能少写很多重复逻辑。
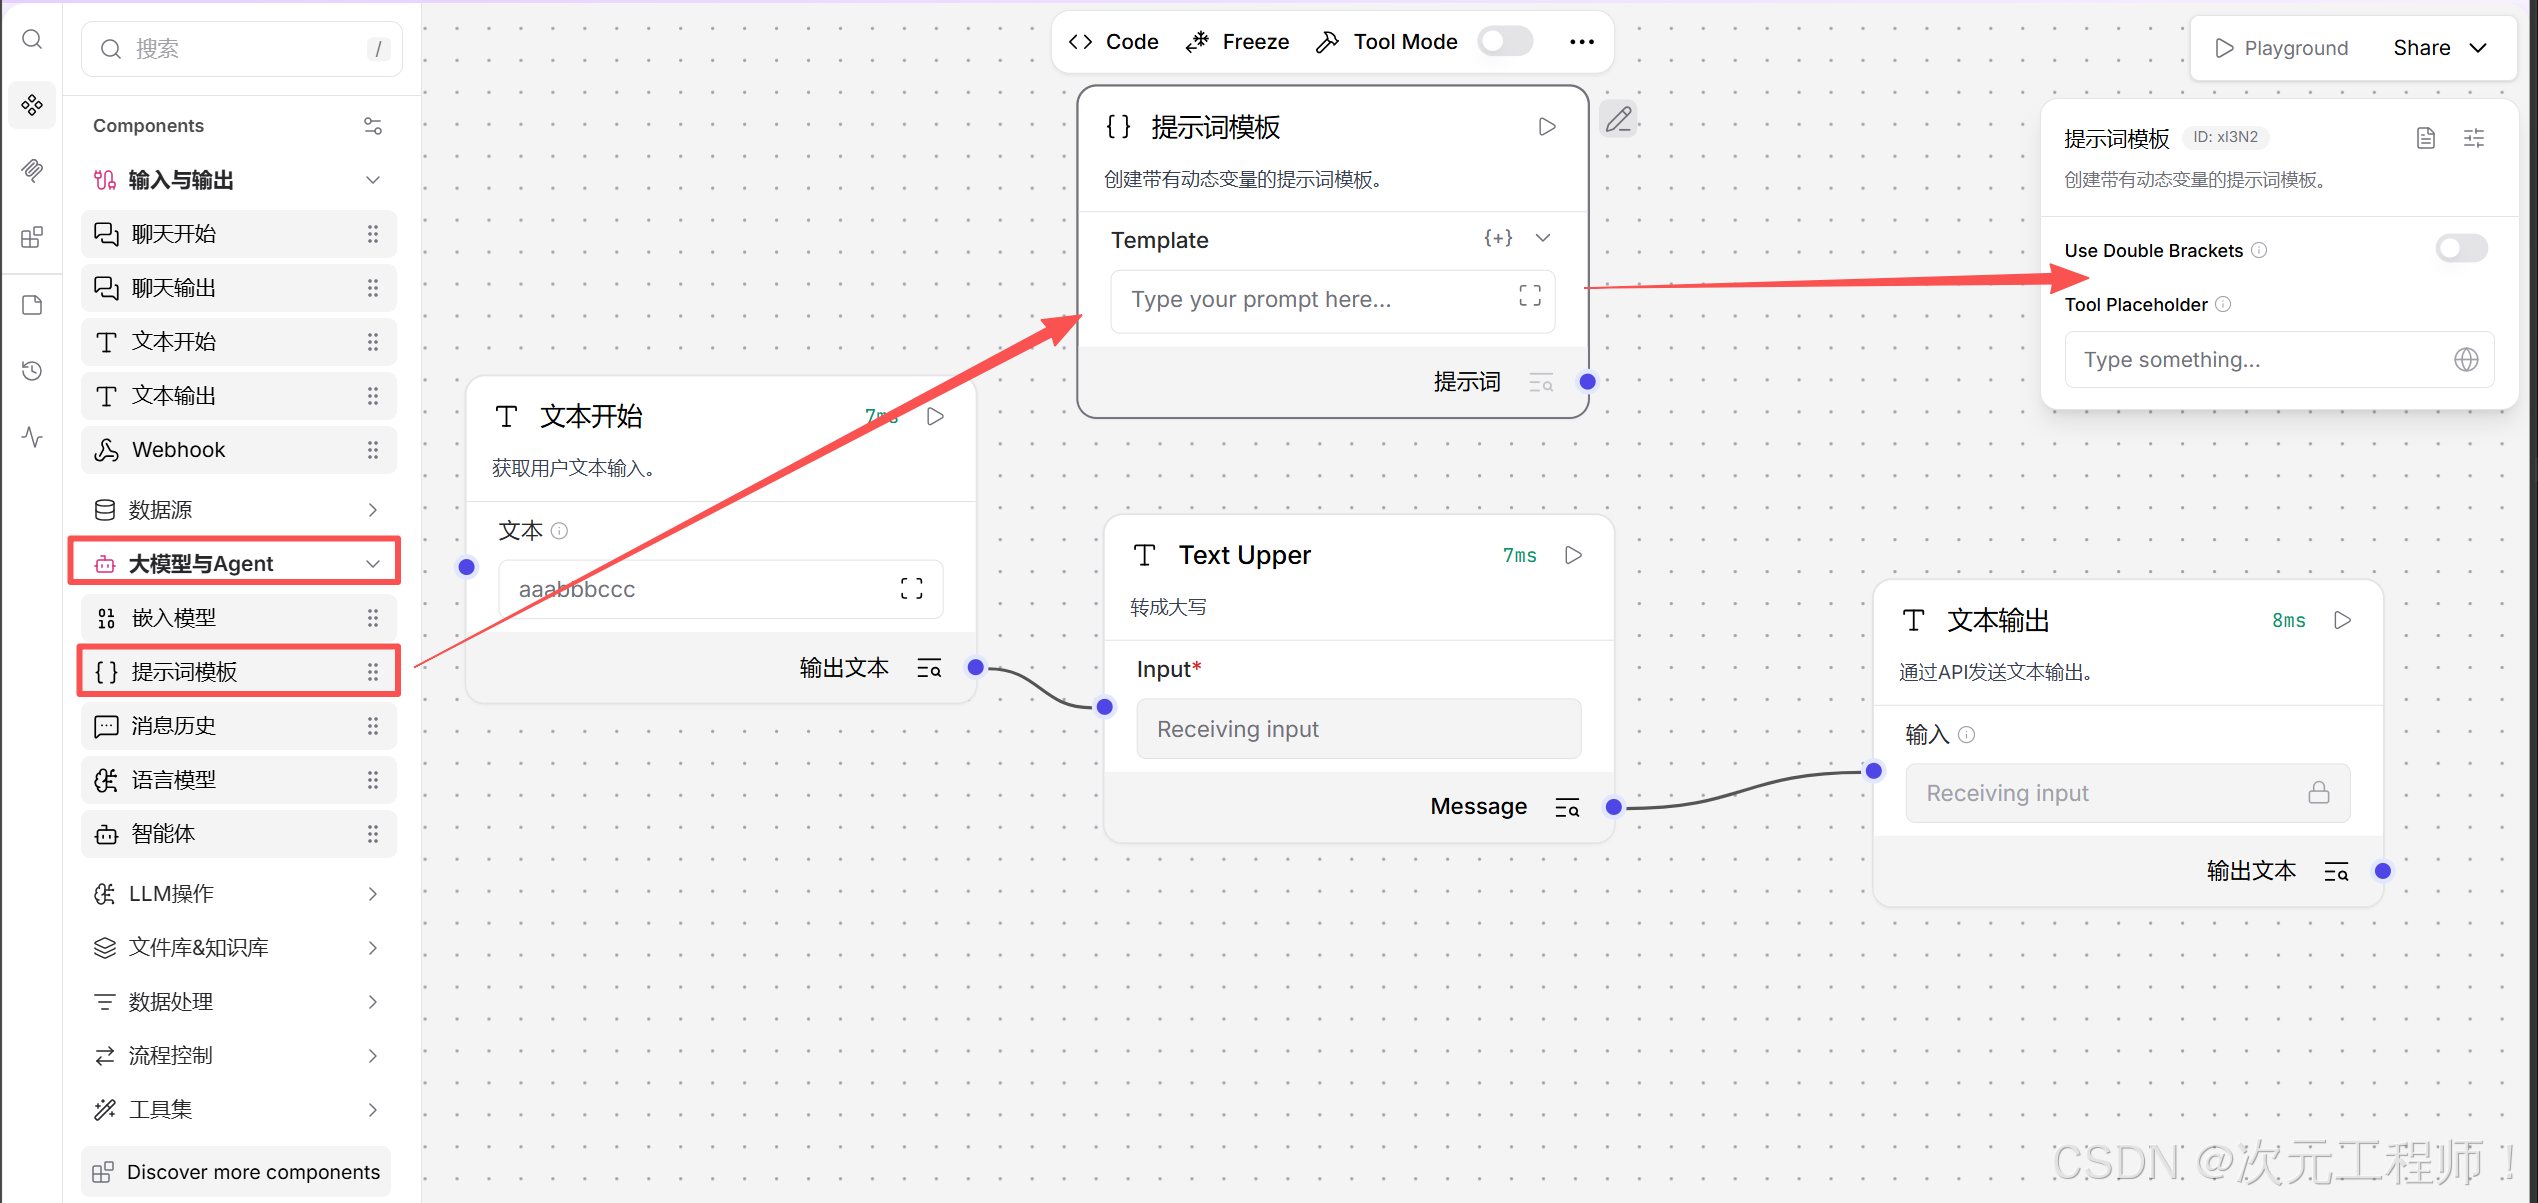
十二、解读一个真实例子
这个是langflow一个官方组件的例子,提示词模板
以下是该组件的源代码,你可以打开上方的<>Code来查看,或者直接从源代码里查看
python
from typing import Any
from lfx.base.prompts.api_utils import process_prompt_template
from lfx.custom.custom_component.component import Component
from lfx.inputs.input_mixin import FieldTypes
from lfx.inputs.inputs import DefaultPromptField
from lfx.io import BoolInput, MessageTextInput, Output, PromptInput
from lfx.log.logger import logger
from lfx.schema.dotdict import dotdict
from lfx.schema.message import Message
from lfx.template.utils import update_template_values
from lfx.utils.mustache_security import validate_mustache_template
class PromptComponent(Component):
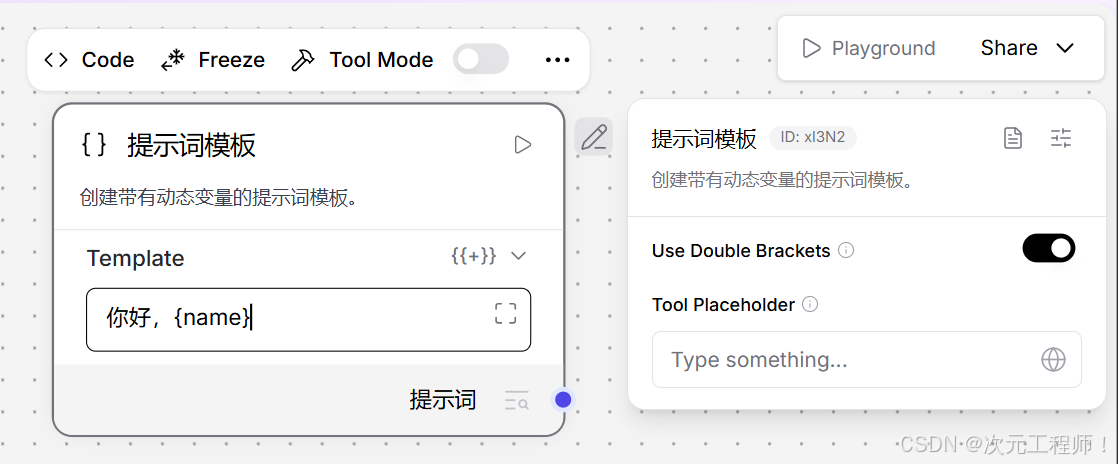
display_name: str = "提示词模板"
description: str = "创建带有动态变量的提示词模板。"
documentation: str = "https://docs.langflow.org/components-prompts"
icon = "prompts"
trace_type = "prompt"
name = "Prompt Template"
inputs = [
PromptInput(name="template", display_name="Template"),
BoolInput(
name="use_double_brackets",
display_name="Use Double Brackets",
value=False,
advanced=True,
info="使用 {{variable}} 语法代替 {variable}。",
real_time_refresh=True,
),
MessageTextInput(
name="tool_placeholder",
display_name="Tool Placeholder",
tool_mode=True,
advanced=True,
info="工具模式的占位符输入。",
),
]
outputs = [
Output(display_name="提示词", name="prompt", method="build_prompt"),
]
def update_build_config(self, build_config: dotdict, field_value: Any, field_name: str | None = None) -> dotdict:
"""Update the template field type based on the selected mode."""
if field_name == "use_double_brackets":
# Change the template field type based on mode
is_mustache = field_value is True
if is_mustache:
build_config["template"]["type"] = FieldTypes.MUSTACHE_PROMPT.value
else:
build_config["template"]["type"] = FieldTypes.PROMPT.value
# Re-process the template to update variables when mode changes
template_value = build_config.get("template", {}).get("value", "")
if template_value:
# Ensure custom_fields is properly initialized
if "custom_fields" not in build_config:
build_config["custom_fields"] = {}
# Clean up fields from the OLD mode before processing with NEW mode
# This ensures we don't keep fields with wrong syntax even if validation fails
old_custom_fields = build_config["custom_fields"].get("template", [])
for old_field in list(old_custom_fields):
# Remove the field from custom_fields and template
if old_field in old_custom_fields:
old_custom_fields.remove(old_field)
build_config.pop(old_field, None)
# Try to process template with new mode to add new variables
# If validation fails, at least we cleaned up old fields
try:
# Validate mustache templates for security
if is_mustache:
validate_mustache_template(template_value)
# Re-process template with new mode to add new variables
_ = process_prompt_template(
template=template_value,
name="template",
custom_fields=build_config["custom_fields"],
frontend_node_template=build_config,
is_mustache=is_mustache,
)
except ValueError as e:
# If validation fails, we still updated the mode and cleaned old fields
# User will see error when they try to save
logger.debug(f"Template validation failed during mode switch: {e}")
return build_config
async def build_prompt(self) -> Message:
use_double_brackets = self.use_double_brackets if hasattr(self, "use_double_brackets") else False
template_format = "mustache" if use_double_brackets else "f-string"
prompt = await Message.from_template_and_variables(template_format=template_format, **self._attributes)
self.status = prompt.text
return prompt
def _update_template(self, frontend_node: dict):
prompt_template = frontend_node["template"]["template"]["value"]
use_double_brackets = frontend_node["template"].get("use_double_brackets", {}).get("value", False)
is_mustache = use_double_brackets is True
try:
# Validate mustache templates for security
if is_mustache:
validate_mustache_template(prompt_template)
custom_fields = frontend_node["custom_fields"]
frontend_node_template = frontend_node["template"]
_ = process_prompt_template(
template=prompt_template,
name="template",
custom_fields=custom_fields,
frontend_node_template=frontend_node_template,
is_mustache=is_mustache,
)
except ValueError as e:
# If validation fails, don't add variables but allow component to be created
logger.debug(f"Template validation failed in _update_template: {e}")
return frontend_node
async def update_frontend_node(self, new_frontend_node: dict, current_frontend_node: dict):
"""This function is called after the code validation is done."""
frontend_node = await super().update_frontend_node(new_frontend_node, current_frontend_node)
template = frontend_node["template"]["template"]["value"]
use_double_brackets = frontend_node["template"].get("use_double_brackets", {}).get("value", False)
is_mustache = use_double_brackets is True
try:
# Validate mustache templates for security
if is_mustache:
validate_mustache_template(template)
# Kept it duplicated for backwards compatibility
_ = process_prompt_template(
template=template,
name="template",
custom_fields=frontend_node["custom_fields"],
frontend_node_template=frontend_node["template"],
is_mustache=is_mustache,
)
except ValueError as e:
# If validation fails, don't add variables but allow component to be updated
logger.debug(f"Template validation failed in update_frontend_node: {e}")
# Now that template is updated, we need to grab any values that were set in the current_frontend_node
# and update the frontend_node with those values
update_template_values(new_template=frontend_node, previous_template=current_frontend_node["template"])
return frontend_node
def _get_fallback_input(self, **kwargs):
return DefaultPromptField(**kwargs)拿这个 PromptComponent 讲最合适,因为它正好同时覆盖了两类流程:
- 编辑组件时,前端面板怎么动态变化
- 运行 flow 时,输入怎么变成真正的 Message 输出
我按这两个阶段拆开讲,并直接对应你贴的代码。
先看它的输入输出定义
文件是 prompt.py。
这个组件的输入在 prompt.py (line 23):
python
inputs = [
    PromptInput(name="template", display_name="Template"),
    BoolInput(name="use_double_brackets", ...),
    MessageTextInput(name="tool_placeholder", ...),
]
它有 3 个输入:
-
template
作用:提示词模板正文。
例子:你是一个助手,请总结:{topic} 或 你是一个助手,请总结:{{topic}}
-
use_double_brackets
作用:决定模板语法。
False 时走 f-string 风格,也就是 {topic}
True 时走 mustache 风格,也就是 {{topic}}
-
tool_placeholder
作用:工具模式下用的占位输入,普通跑 Prompt 时基本不是主角。
这个字段声明了 tool_mode=True,说明它主要给"组件转工具"场景用。
输出在 prompt.py (line 42):
python
outputs = [
    Output(display_name="提示词", name="prompt", method="build_prompt"),
]
意思是:
- 这个组件只有一个输出口,叫 prompt
- 当系统要取这个输出时,会调用 build_prompt()
所以这就是这个组件最核心的输入输出关系:
- 输入:模板 + 模板模式 + 动态变量
- 输出:渲染完成后的 Message
这个组件最特别的地方:动态变量不是写死在 inputs 里的
你会发现 inputs 里只有 template、use_double_brackets、tool_placeholder,但真正用 Prompt 时,我们还会传 topic、name、question 这种变量。
比如模板是:
你是一个助手,请回答关于 {topic} 的问题:{question}
那 topic 和 question 并不在最初的 inputs 列表里。
它们是后面从模板文本里"解析出来并动态加到组件输入面板里的"。
这正是这个组件的核心机制。
先讲编辑态:你在前端改组件时,会发生什么
这类函数不是 flow 真正执行时调用的,而是**"组件面板构建/更新时"**调用的。
这个组件编辑态主要有 4 个函数:
- update_build_config() 在 prompt.py (line 46)
- _update_template() 在 prompt.py (line 100)
- update_frontend_node() 在 prompt.py (line 124)
- _get_fallback_input() 在 prompt.py (line 152)
1. _update_template() 什么时候调用
它是在组件"被转换成前端节点结构"时调用的。
调用链在:
- Component.to_frontend_node() component.py (line 1000)
- 里面会执行 _update_template(frontend_node_dict) component.py (line 1011)
所以可以这样理解:
第一次把这个组件展示到前端面板时,_update_template() 会参与构建前端字段。
它做的事情是:
- 读取当前模板文本 frontend_node"template""template""value"
- 判断当前是不是 mustache 模式
- 调 process_prompt_template(...)
- 把模板里的变量解析出来,动态加进前端模板配置里
举例:
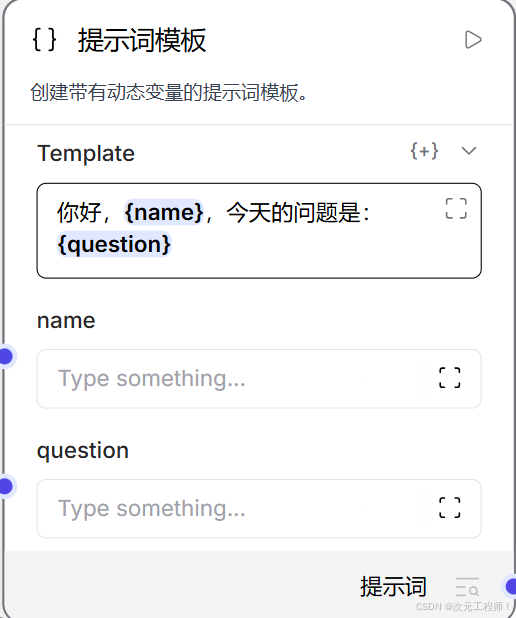
如果 template = "你好,{name},今天的问题是:{question}"
那 _update_template() 里调用的 process_prompt_template() 会把:
- name
- question
解析出来,并把这两个字段加入前端配置。
也就是说,前端最后不只看到最初的 3 个输入,还会多出:
- name
- question
这些动态变量输入框。
2. process_prompt_template() 到底干了什么
它在 api_utils.py (line 236)。
主要做 4 件事:
- 校验模板语法
- 找出模板里的变量名
- 把新变量加到前端模板中
- 把旧的、已经不在模板里的变量删掉
也就是说,Prompt 组件动态字段的本质就是它。
比如模板从:
你好,{name}
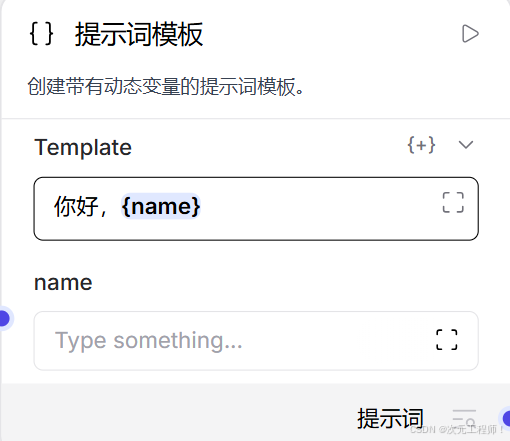
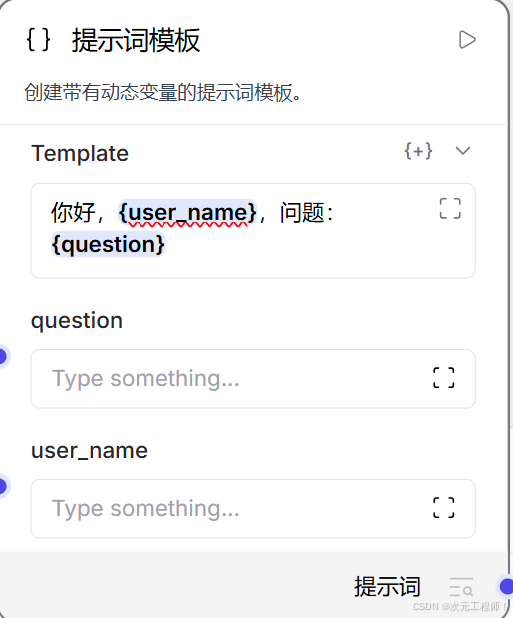
改成:
你好,{user_name},问题:{question}
那它会:
- 删除旧变量 name
- 新增变量 user_name
- 新增变量 question
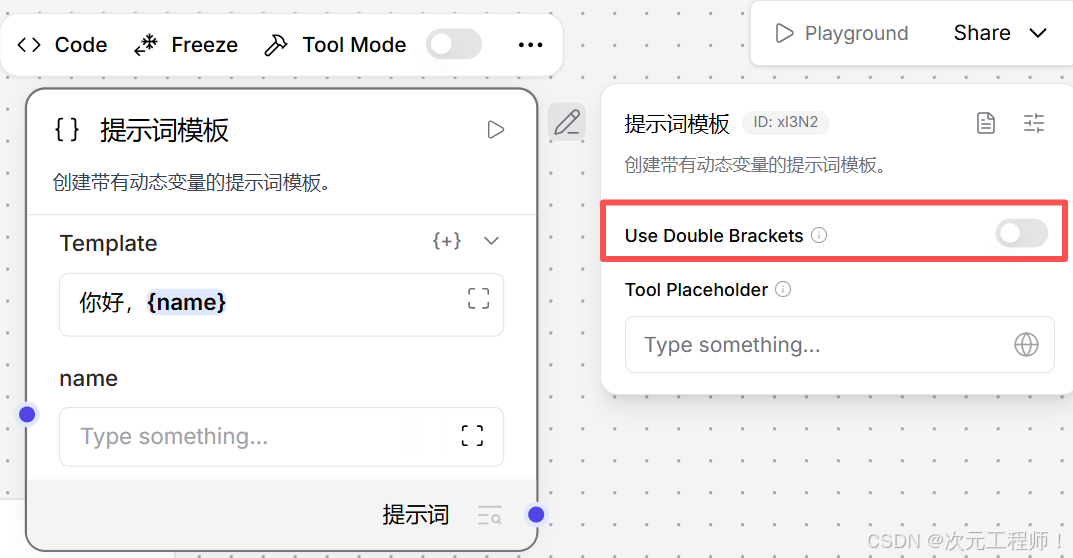
3. update_build_config() 什么时候调用
这个是"用户修改某个字段值时"的联动函数。
调用链在:
- 接口更新逻辑 endpoints.py#L1056-L1077 附近 (line 1056)
- 实际调度函数 custom/utils.py (line 742)
你可以把它理解为:
当用户在前端改了某个表单字段,后端会把当前 build_config 和改动字段传进来,让组件有机会动态修改表单结构。
在这个 Prompt 组件里,它只关心一个字段:
if field_name == "use_double_brackets":
也就是说:
只有你切换 "Use Double Brackets" 时,它才会做特殊处理。
它做的事有两层:
- 把 template 字段的类型切成 PROMPT 或 MUSTACHE_PROMPT
- 重新按新语法解析模板变量,并清理旧变量字段
具体逻辑在 prompt.py (line 46)。
举个例子。
初始模板:
你好,{name}
此时 use_double_brackets = False
前端有动态字段:
- name
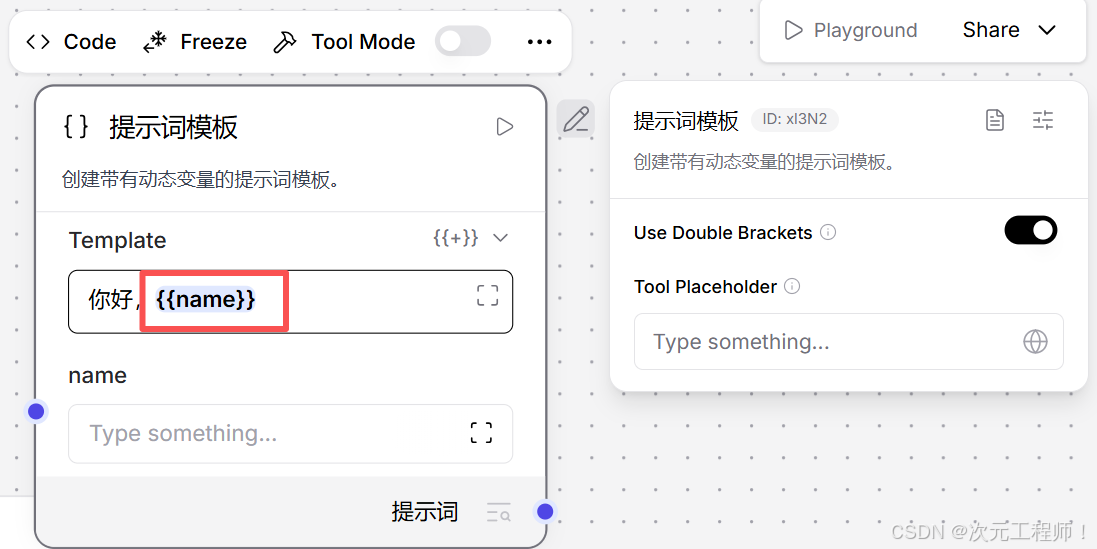
如果你切到 use_double_brackets = True,这个函数会:
- 把 template 的 field type 改成 mustache prompt
- 清掉旧的 name 动态字段
- 重新按 mustache 语法解析模板
如果此时模板还是:
你好,{name}
那它按 mustache 解析可能找不到合法变量,至少旧字段会先被清掉。
如果模板写成:
你好,{``{name}}
那它就会重新生成 name 这个动态字段。
所以这个函数的本质是:
切换模板语法模式时,重建模板变量输入栏。
4. update_frontend_node() 什么时候调用
这个更偏"组件节点整体更新"场景。
接口调用点在 endpoints.py (line 1016)。
它通常发生在:
- 自定义组件代码更新后
- 前端已有节点配置要和新模板重新对齐时
这个组件里的 update_frontend_node() 做了几件事:
- 先调用父类逻辑,把旧节点值同步到新节点结构
- 再重新解析模板变量
- 最后用 update_template_values(...) 把用户之前填过的变量值尽量保留下来
对应代码在 prompt.py (line 124)。
你可以把它理解成:
当组件节点整体刷新/重建时,用它来重新生成动态变量字段,同时尽量别把用户原来填的值丢掉。
举例:
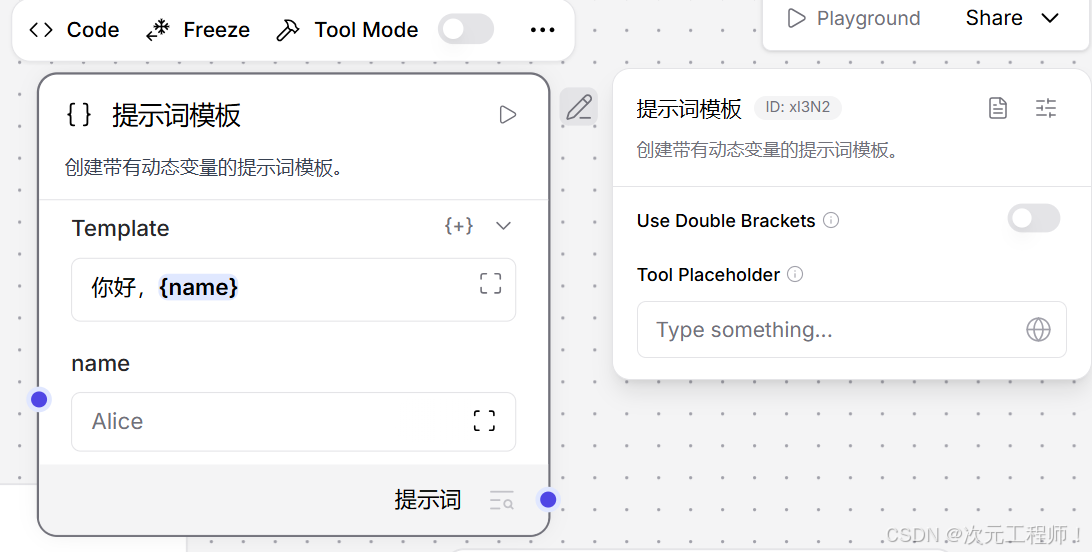
原来模板:
你好,{name}
用户已经填了:
- name = "Alice"
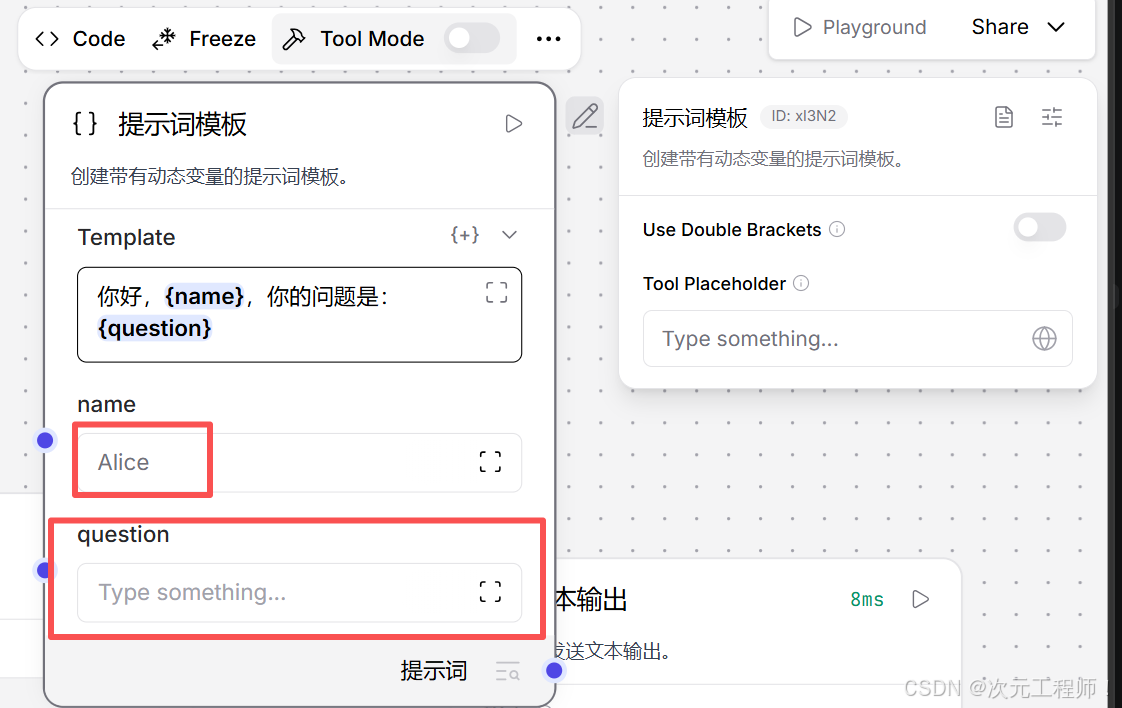
后来模板改成:
你好,{name},你的问题是:{question}
那 update_frontend_node() 会尽量保留:
- name = "Alice"
同时新增:
- question
这就是最后那句:
python
update_template_values(new_template=frontend_node, previous_template=current_frontend_node["template"])的作用。
5. _get_fallback_input() 什么时候调用
这个点很关键,和 Prompt 组件强相关。
调用位置在 component.py (line 857),是在 _get_or_create_input() 里。
意思是:
当系统运行时发现某个输入名字没有预先写在 inputs 里,就会调用 _get_fallback_input() 临时创建一个输入对象。
Prompt 组件为什么要重写它?
因为 Prompt 的动态变量,比如:
- name
- question
- topic
本来就不是类里写死的输入。
所以它重写成:
def _get_fallback_input(self, **kwargs): return DefaultPromptField(**kwargs)
而不是默认的普通 Input(**kwargs)。
这意味着:
Prompt 模板里动态出现的变量,会被当成"Prompt 风格输入字段"来创建。
这能保证这些动态字段在 UI 和运行时都更符合 Prompt 组件的预期。
再讲运行态:真正执行 flow 时,输入怎么变成输出
运行态主角其实只有一个函数:
- build_prompt() 在 prompt.py (line 93)
但要先知道它是怎么被调到的。
调用链是:
- Component.run() 文件:component.py (line 438)
- Component._run() 文件:component.py (line 904)
- build_results() 文件:component.py (line 1128)
- _build_results() 遍历 outputs
- 看到 Output(name="prompt", method="build_prompt")
- 调用 build_prompt()
所以:
build_prompt() 不是你手动调用的,是系统在执行这个组件的 prompt 输出时自动调用的。
build_prompt() 具体怎么处理输入
代码是:
python
async def build_prompt(self) -> Message:
    use_double_brackets = self.use_double_brackets if hasattr(self, "use_double_brackets") else False
    template_format = "mustache" if use_double_brackets else "f-string"
    prompt = await Message.from_template_and_variables(template_format=template_format, **self._attributes)
    self.status = prompt.text
    return prompt
重点看 self._attributes。
self._attributes 是运行时所有输入值的集合,由 Component.set_attributes() 维护,位置在 component.py (line 1070)。
对这个组件来说,它通常会包含:
- template
- use_double_brackets
- tool_placeholder
- 动态变量,比如 name、question、topic
所以如果你有:
template = "你好,{name},你的问题是:{question}"
name = "Alice"
question = "什么是 Langflow?"
use_double_brackets = False
那运行到:
python
Message.from_template_and_variables(template_format="f-string", **self._attributes)时,本质上就是把这些变量交给 Message 去渲染模板,最后生成:
你好,Alice,你的问题是:什么是 Langflow?
然后包装成一个 Message 返回。
输入输出用一个完整例子走一遍
假设你前端这样配置这个组件:
- template = "你是一个助手,请总结:{topic}"
- use_double_brackets = False
- 动态变量 topic = "Langflow 组件系统"
那整个过程是:
编辑阶段
- 组件初始化时,to_frontend_node() 调 _update_template()
- _update_template() 解析模板,发现变量 topic
- 前端面板自动多出一个输入框 topic
运行阶段
- 用户或上游节点把 topic 传入 "Langflow 组件系统"
- 组件执行 run()
- 系统根据 output 配置调用 build_prompt()
- build_prompt() 判断当前是 f-string
- Message.from_template_and_variables(...) 用 template 和 topic 渲染
- 得到输出 Message(text="你是一个助手,请总结:Langflow 组件系统")
所以这个组件的真实输入其实是:
- 显式输入:template、use_double_brackets、tool_placeholder
- 隐式动态输入:模板中解析出来的变量,比如 topic
输出则永远只有一个:
- prompt,类型是 Message
再举一个 mustache 模式的例子
如果配置是:
- template = "你是一个助手,请总结:{{topic}}"
- use_double_brackets = True
- topic = "Langflow 组件系统"
那么:
- update_build_config() 在你切换 use_double_brackets 时会把模板字段切到 mustache 模式
- _update_template() / update_frontend_node() 会按 mustache 规则解析变量
- build_prompt() 会设置 template_format = "mustache"
- 最后输出仍是:
你是一个助手,请总结:Langflow 组件系统
区别只在模板解析语法,不在输出类型。
每个函数一句话总结时机
对应这个组件,最实用的记忆法是:
-
update_build_config()
用户在前端改字段时触发,这里主要处理 use_double_brackets 切换后的模板类型和动态变量重建。
-
_update_template()
组件第一次转成前端节点结构时触发,用模板内容生成动态变量输入框。
-
update_frontend_node()
组件节点整体更新/重建时触发,重新解析模板变量,并尽量保留用户已填写的旧值。
-
_get_fallback_input()
运行期或构建期遇到"类里没预定义、但模板里动态出现的变量"时触发,用 DefaultPromptField 创建这类动态输入。
-
build_prompt()
真正执行 flow、需要产出 prompt 输出时触发,把模板和变量渲染成 Message。
你可以把这个组件理解成
它不是一个"普通固定输入组件",而是一个"会先根据模板文本长出额外输入框,再在运行时把这些输入渲染进模板里"的组件。
所以它的核心不是 build_prompt() 本身,而是这两段机制配合:
- 编辑态:process_prompt_template() 动态生成变量输入
- 运行态:Message.from_template_and_variables() 用这些变量渲染输出
通过本章的学习,你会对lanflow开发组件的流程更加清晰,内部是如何运转的更加清楚,写了这么多,希望对你有帮助,多的不说,少的不唠,本文结束
哦对了,本文是基于LangFlow1.8版本开发的,如果有任何不一样的地方,请检查版本是否一致!