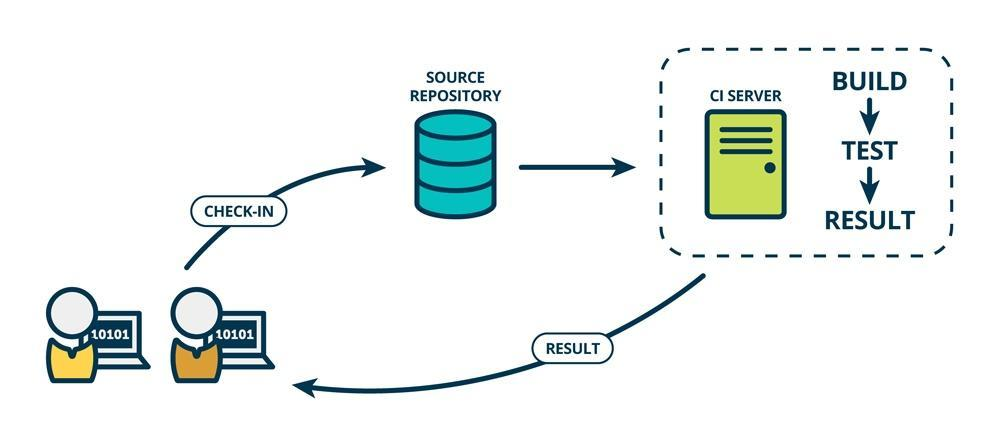
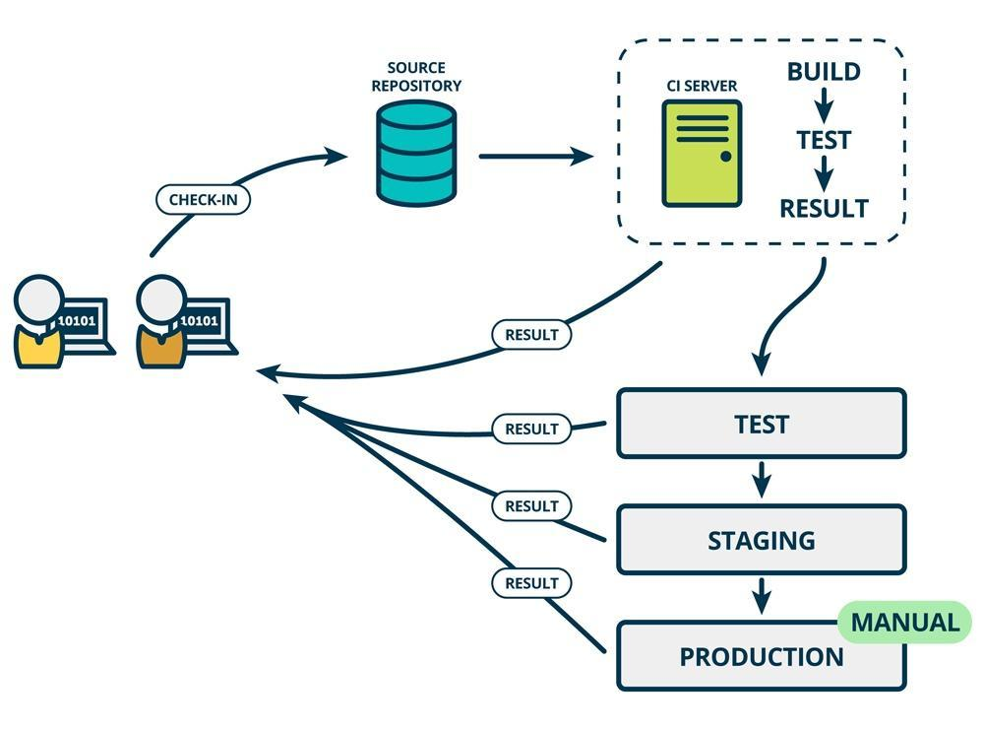
一CI/CD是什么
CI/CD 是指持续集成(Continuous Integration)和持续部署(Continuous Deployment)或持续交付
(Continuous Delivery)
1.1****持续集成(Continuous Integration)
持续集成是一种软件开发实践,团队成员频繁地将他们的工作集成到共享的代码仓库中。其主要特点包 括:
-
- 频繁提交代码:开发人员可以每天多次提交代码,确保代码库始终保持最新状态。
-
- 自动化构建:每次提交后,自动触发构建过程,包括编译、测试、静态分析等。
-
- 快速反馈:如果构建失败或测试不通过,能够快速地向开发人员提供反馈,以便及时修复问题。
1.2****持续部署(Continuous Deployment)
持续部署是在持续集成的基础上,将通过所有测试的代码自动部署到生产环境中。其特点如下:
-
- 自动化流程:从代码提交到生产环境的部署完全自动化,无需人工干预。
-
- 高频率部署:可以实现频繁的部署,使得新功能能够快速地提供给用户。
-
- 风险控制:需要有强大的测试和监控体系来确保部署的稳定性和可靠性。
1.3****持续交付(Continuous Delivery)
持续交付与持续部署类似,但不一定自动部署到生产环境,而是随时可以部署。其重点在于确保软件随 时处于可发布状态。
CI/CD 的好处包括:
-
- 提高开发效率:减少手动操作和等待时间,加快开发周期。
-
- 尽早发现问题:通过频繁的集成和测试,问题能够在早期被发现和解决。
-
- 降低风险:减少了大规模部署时可能出现的问题,提高了软件的质量和稳定性。
-
- 增强团队协作:促进团队成员之间的沟通和协作,提高团队的整体效率。
常见的 CI/CD 工具包括 Jenkins、GitLab CI/CD、Travis CI 等。这些工具可以帮助团队实现自动化的构 建、测试和部署流程。
二git工具使用

2.1 git****简介
Git 是一个分布式版本控制系统,被广泛用于软件开发中,以管理代码的版本和变更。
主要特点:
- 分布式
- 每个开发者都有完整的代码仓库副本,这使得开发者可以在离线状态下进行工作,并且在网络出现问题时也不会影响开发。
- 即使中央服务器出现故障,开发者仍然可以在本地进行开发和查看项目历史。
- 高效的分支管理
- Git 中的分支创建和切换非常快速和简单。开发人员可以轻松地创建新的分支来进行新功能的 开发或修复 bug,而不会影响主分支。
- 合并分支也相对容易,可以使用多种合并策略来满足不同的需求。
- 快速的版本回退
- 如果发现某个版本存在问题,可以快速回退到之前的版本。
- 可以查看每个版本的详细变更记录,方便了解代码的演进过程。
- 强大的提交管理
- 每个提交都有一个唯一的标识符,可以方便地引用和查看特定的提交。
- 提交可以包含详细的提交信息,描述本次提交的更改内容。
- 支持协作开发
- 开发者可以将自己的更改推送到远程仓库,供其他开发者拉取和合并。
- 可以处理多个开发者同时对同一文件进行修改的情况,通过合并冲突解决机制来确保代码的完整性。
Git必看秘籍:https://git-scm.com/book/zh/v2
2.2 git****工作流程
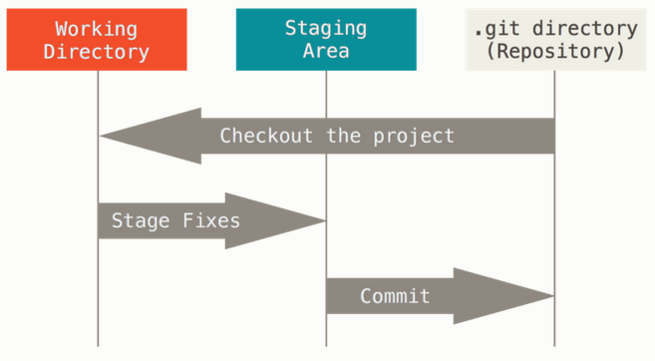
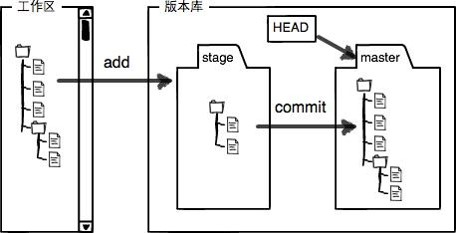
Git 有三种状态:已提交(committed)、已修改(modified) 和 已暂存(staged)。
- 已修改表示修改了文件,但还没保存到数据库中。已暂存表示对一个已修改文件的当前版本做了标记,使之包含在下次提交的快照中。
- 已提交表示数据已经安全地保存在本地数据库中。
这会让我们的 Git 项目拥有三个阶段:工作区、暂存区以及 Git 目录。
三 部署****git
3.1安装git
bash
#在rhel9的系统中默认自带git
[root@CICD-node1 ~]# dnf install git -y
#设定命令补全功能
[root@CICD-node1 timinglee]# echo "source /usr/share/bashcompletion/completions/git" >> ~/.bashrc
[root@CICD-node1 timinglee]# source ~/.bashrc
3.2****初始化
获取 Git 仓库通常有两种方式:
- 将尚未进行版本控制的本地目录转换为 Git 仓库。
- 从其它服务器克隆 一个已存在的 Git 仓库。比如: git clone
初始化版本库
bash
[root@CICD-node1 ~]# mkdir timinless
[root@CICD-node1 ~]# cd timinless/
[root@CICD-node1 timinless]# git init
提示: 使用 'master' 作为初始分支的名称。这个默认分支名称可能会更改。要在新仓库中
提示: 配置使用初始分支名,并消除这条警告,请执行:
提示:
提示: 	git config --global init.defaultBranch <名称>
提示:
提示: 除了 'master' 之外,通常选定的名字有 'main'、'trunk' 和 'development'。
提示: 可以通过以下命令重命名刚创建的分支:
提示:
提示: 	git branch -m <name>
已初始化空的 Git 仓库于 /root/timinless/.git/
[root@CICD-node1 timinless]# ls -a
.  ..  .git
[root@CICD-node1 timinless]# ls .git/
branches  config  description  HEAD  hooks  info  objects  refs
#设定用户信息
[root@CICD-node1 timinless]# git config --global user.name "timinglee"

[root@CICD-node1 timinless]# git config --global user.email "timinglee@timinglee.org"
#查看当前文件状态
[root@CICD-node1 timinless]# git status
位于分支 master

尚无提交

无文件要提交(创建/拷贝文件并使用 "git add" 建立跟踪)
[root@CICD-node1 timinless]# git status -s  #简化输出
温馨提示:git目录是git跟踪管理版本库的,没事别瞎溜达
四git的使用方法
4.1****常用方法
bash
[root@CICD-node1 timinless]# echo timinglee > README.MD
[root@CICD-node1 timinless]# git status
位于分支 master

尚无提交

未跟踪的文件:
  (使用 "git add <文件>..." 以包含要提交的内容)
	README.MD

提交为空,但是存在尚未跟踪的文件(使用 "git add" 建立跟踪)

[root@CICD-node1 timinless]# echo timnglee > README.md
[root@CICD-node1 timinless]# git status
位于分支 master
未跟踪的文件:
  (使用 "git add <文件>..." 以包含要提交的内容)
	README.md

提交为空,但是存在尚未跟踪的文件(使用 "git add" 建立跟踪)
[root@CICD-node1 timinless]# git status -s
?? README.md  #?? 新建文件未添加到版本库
[root@CICD-node1 timinless]# git add README.md
[root@CICD-node1 timinless]# git status -s
A  README.md  #A 已添加到暂存区

#提交暂存区的数据
[root@CICD-node1 timinless]# git commit -m "add README.md"
[master 3818265] add README.md
 1 file changed, 1 insertion(+)
 create mode 100644 README.md
[root@CICD-node1 timinless]# git status -s #无任何显示,标识已经提交到版本库

#再次修改
[root@CICD-node1 timinless]# vim README.md
timnglee
timnglee
[root@CICD-node1 timinless]# git status -s
 M README.md  #右M 表示文件在工作区被修改

#撤销修改
[root@CICD-node1 timinless]# git checkout -- README.md
从索引区更新了 1 个路径
[root@CICD-node1 timinless]# cat README.md
timnglee
#从新修改
[root@CICD-node1 timinless]# echo timinglee> README.md
[root@CICD-node1 timinless]# git add README.md
[root@CICD-node1 timinless]# git status -s
M  README.md  #左M表示文件已经在版本库中并被跟踪,


#从暂存区撤销
[root@CICD-node1 timinless]# git restore --staged README.md
[root@CICD-node1 timinless]# git status -s
 M README.md

#从新提交
[root@CICD-node1 timinless]# git add README.md
[root@CICD-node1 timinless]# git status -s
M  README.md
[root@CICD-node1 timinless]# git commit -m "update v1"
[master 6f01a55] update v1
 1 file changed, 1 insertion(+), 1 deletion(-)

#更新
[root@CICD-node1 timinless]# git status -s
[root@CICD-node1 timinless]#  echo timinglee >> README.md
[root@CICD-node1 timinless]# git add README.md
[root@CICD-node1 timinless]# echo timinglee >> README.md
[root@CICD-node1 timinless]# git status -s
MM README.md    #MM表示有一部分在暂存区,还有一部分没有提交

#如果现在提交只能提交在暂存区中的部分
[root@CICD-node1 timinless]# git commit -m "update v2"
[master 6344fa0] update v2
 1 file changed, 1 insertion(+)
[root@CICD-node1 timinless]# git status -s
 M README.md   #右M还在

#查看已暂存和未暂存的修改变化
[root@CICD-node1 timinless]# echo timinglee >> README.md
[root@CICD-node1 timinless]# git diff
diff --git a/README.md b/README.md
index 62be538..f08851c 100644
--- a/README.md
+++ b/README.md
@@ -1,2 +1,4 @@
 timinglee
 timinglee
+timinglee
+timinglee

#跳过使用暂存区,只能在提交过的在版本库中存在的文件使用如果文件状态是"??"不能用此方法
[root@CICD-node1 timinless]# git commit -a -m "update v3"
[master af80c87] update v3
 1 file changed, 2 insertions(+)

#撤销工作区中删除动作
[root@CICD-node1 timinless]# touch lee.txt
[root@CICD-node1 timinless]# git add lee.txt
[root@CICD-node1 timinless]# git commit  -m "add lee.txt"
[master 2833638] add lee.txt
 1 file changed, 0 insertions(+), 0 deletions(-)
 create mode 100644 lee.txt
[root@CICD-node1 timinless]# git status -s
[root@CICD-node1 timinless]# git checkout -- lee.txt
[root@CICD-node1 timinless]# ls
lee.txt  README.md
#从版本库中删除文件
[root@CICD-node1 timinless]# git rm lee.txt
rm 'lee.txt'
[root@CICD-node1 timinless]# git status -s
D  lee.txt
[root@CICD-node1 timinless]# git commit  -m "delete lee.txt"
[master 3add8f7] delete lee.txt
 1 file changed, 0 insertions(+), 0 deletions(-)
 delete mode 100644 lee.txt
[root@CICD-node1 timinless]# git status -s
#恢复从版本库中被删除的文件
[root@CICD-node1 timinglee]# git log #查看操作日志
commit 3add8f7102cb9413beafbc681a63b1a1985ec09d (HEAD -> master)
Author: timinglee <timinglee@timinglee.org>
Date:   Sat May 16 15:09:24 2026 +0800

    delete lee.txt

commit 28336386bbab70708f42cbdc2caffeb94da11688
Author: timinglee <timinglee@timinglee.org>
Date:   Sat May 16 15:07:49 2026 +0800

    add lee.txt

commit af80c8762c1299af7c218d85ff67ff85d0167ef8
Author: timinglee <timinglee@timinglee.org>
Date:   Sat May 16 15:07:14 2026 +0800

    update v3

commit 6344fa0e9ac254170ae104448beeb2a251076740
Author: timinglee <timinglee@timinglee.org>
Date:   Sat May 16 15:06:24 2026 +0800

    update v2

commit 6f01a55797cb044c525e7e1e232d7a88e82bad77
Author: timinglee <timinglee@timinglee.org>
Date:   Sat May 16 15:05:19 2026 +0800

    update v1

commit 988f4120af9c9d6f9bd22f3f619275cecc6e0521
Author: timinglee <timinglee@timinglee.org>
Date:   Sat May 16 15:03:29 2026 +0800

    add README.md

[root@CICD-node1 timinless]# git reflog  #查看提交动作
3add8f7 (HEAD -> master) HEAD@{0}: commit: delete lee.txt
2833638 HEAD@{1}: commit: add lee.txt
af80c87 HEAD@{2}: commit: update v3
6344fa0 HEAD@{3}: commit: update v2
6f01a55 HEAD@{4}: commit: update v1
988f412 HEAD@{5}: commit: add README.md

#版本回退到删除之前
[root@CICD-node1 timinless]# git reset --hard 2833638
HEAD 现在位于 2833638 add lee.txt
[root@CICD-node1 timinless]# ls
lee.txt  README.md
4.2 git****对于文件如何忽略
在做软件开发时对源码编译会产生一些临时文件,我们在提交时需要忽略这些临时文件
bash
[root@CICD-node1 timinless]# touch .file1
[root@CICD-node1 timinless]# mkdir dir1/
[root@CICD-node1 timinless]# touch dir1/.file2
[root@CICD-node1 timinless]# git status -s
?? .file1
?? dir1/
[root@CICD-node1 timinless]# echo .file1 > .gitignore
[root@CICD-node1 timinless]# git status -s
?? .gitignore
?? dir1/
[root@CICD-node1 timinless]#  echo ".*" > .gitignore
[root@CICD-node1 timinless]# git status -s五gitlab代码仓库
5.1 gitlab****简介
- GitLab 是一个用于仓库管理系统的开源项目,使用 Git 作为代码管理工具,并在此基础上搭建起来 的 web 服务。
- GitLab 具有很多功能,比如代码托管、持续集成和持续部署(CI/CD)、问题跟踪、合并请求管理等。它可以帮助开发团队更好地协作开发软件项目,提高开发效率和代码质量。
官网:https://about.gitlab.com/install/
中文站点: https://gitlab.cn/install/
官方包地址:https://packages.gitlab.com/gitlab/gitlab-ce
5.2 gitlab****的部署实施
5.2.1部署gitlab
部署gitlab需要内存大于4G
bash
#在安装包之前需配置好软件仓库来解决依赖性
[root@CICD-node1 ~]# dnf install -y curl policycoreutils-python-utils opensshserver perl
[root@CICD-node1 ~]# dnf install gitlab-ce-18.11.2-ce.0.el9.x86_64.rpm -y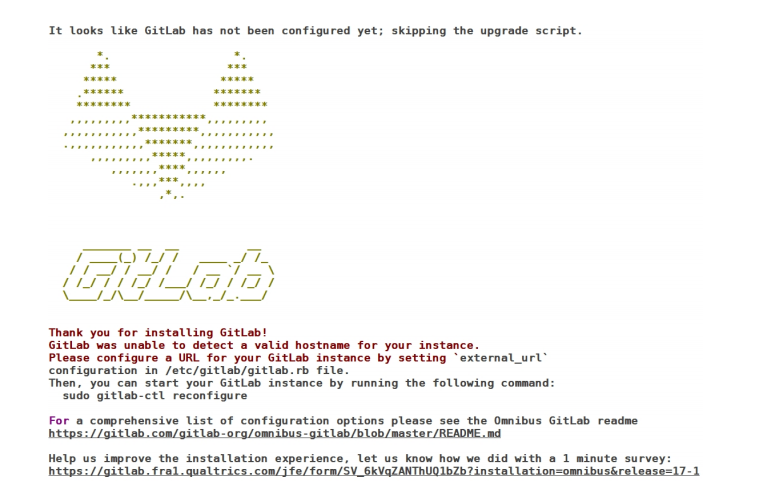
出现以上效果算成功
5.2.2配置gitlab
bash
[root@CICD-node1 ~]# cd /etc/gitlab/
[root@CICD-node1 gitlab]# ls
gitlab.rb
[root@CICD-node1 gitlab]# vim gitlab.rb
32 external_url 'http://172.25.254.10'  #主机的IP
#修改配置文件后需利用gitlab-crt来生效,
[root@CICD-node1 gitlab]# gitlab-ctl reconfigure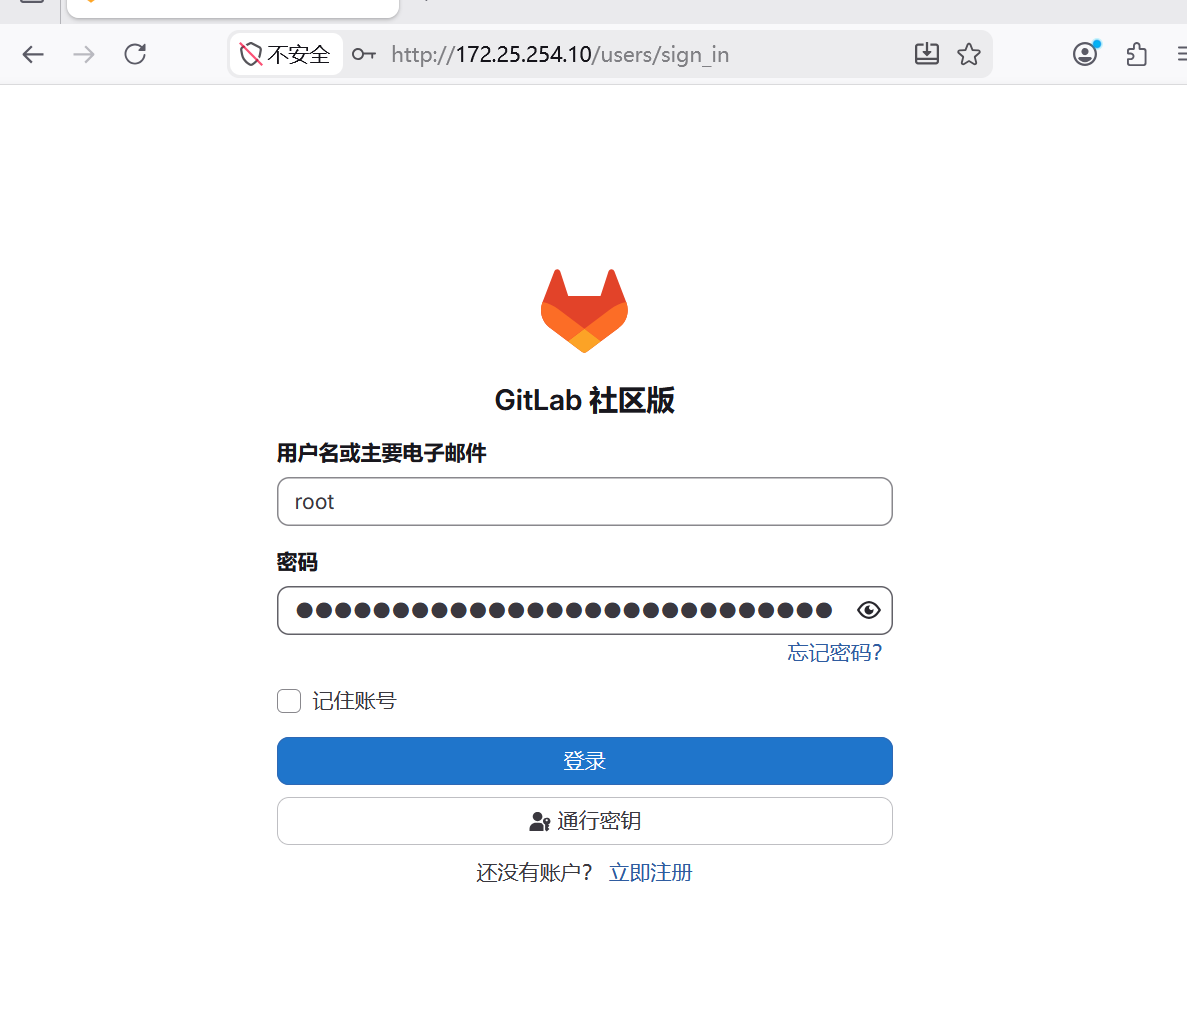
#执行命令成功后会把所有组件全部启动起来5.2.3登陆gitlab
用户名默认为 root 。如果在安装过程中指定了初始密码,则用初始密码登录,如果未指定密码,则系
统会随机生成一个密码并存储在 /etc/gitlab/initial_root_password 文件中, 查看随机密码并使
用 root 用户名登录。
Warning
注意:出于安全原因,24 小时后, /etc/gitlab/initial_root_password 会被第一次 gitlab
ctl reconfigure 自动删除,因此若使用随机密码登录,建议安装成功初始登录成功之后,立即修
改初始密码。
bash
[root@CICD-node1 gitlab]# cat /etc/gitlab/initial_root_password
# WARNING: This password is only valid if ALL of the following are true:
#          ? You set it manually via the GITLAB_ROOT_PASSWORD environment variable
#            OR the gitlab_rails['initial_root_password'] setting in /etc/gitlab/gitlab.rb
#          ? You set it BEFORE the initial database setup (typically during first installation)
#          ? You have NOT changed the password since then (via web UI or command line)
#
#          If this password doesn't work, reset the admin password using:
#          https://docs.gitlab.com/security/reset_user_password/#reset-the-root-password

Password: eidDRrUQTlhS+/szE4yTtdazLmJk7ZJb1GSUvEILPwc=

# NOTE: This file is automatically deleted after 24 hours on the next reconfigure run.
登录
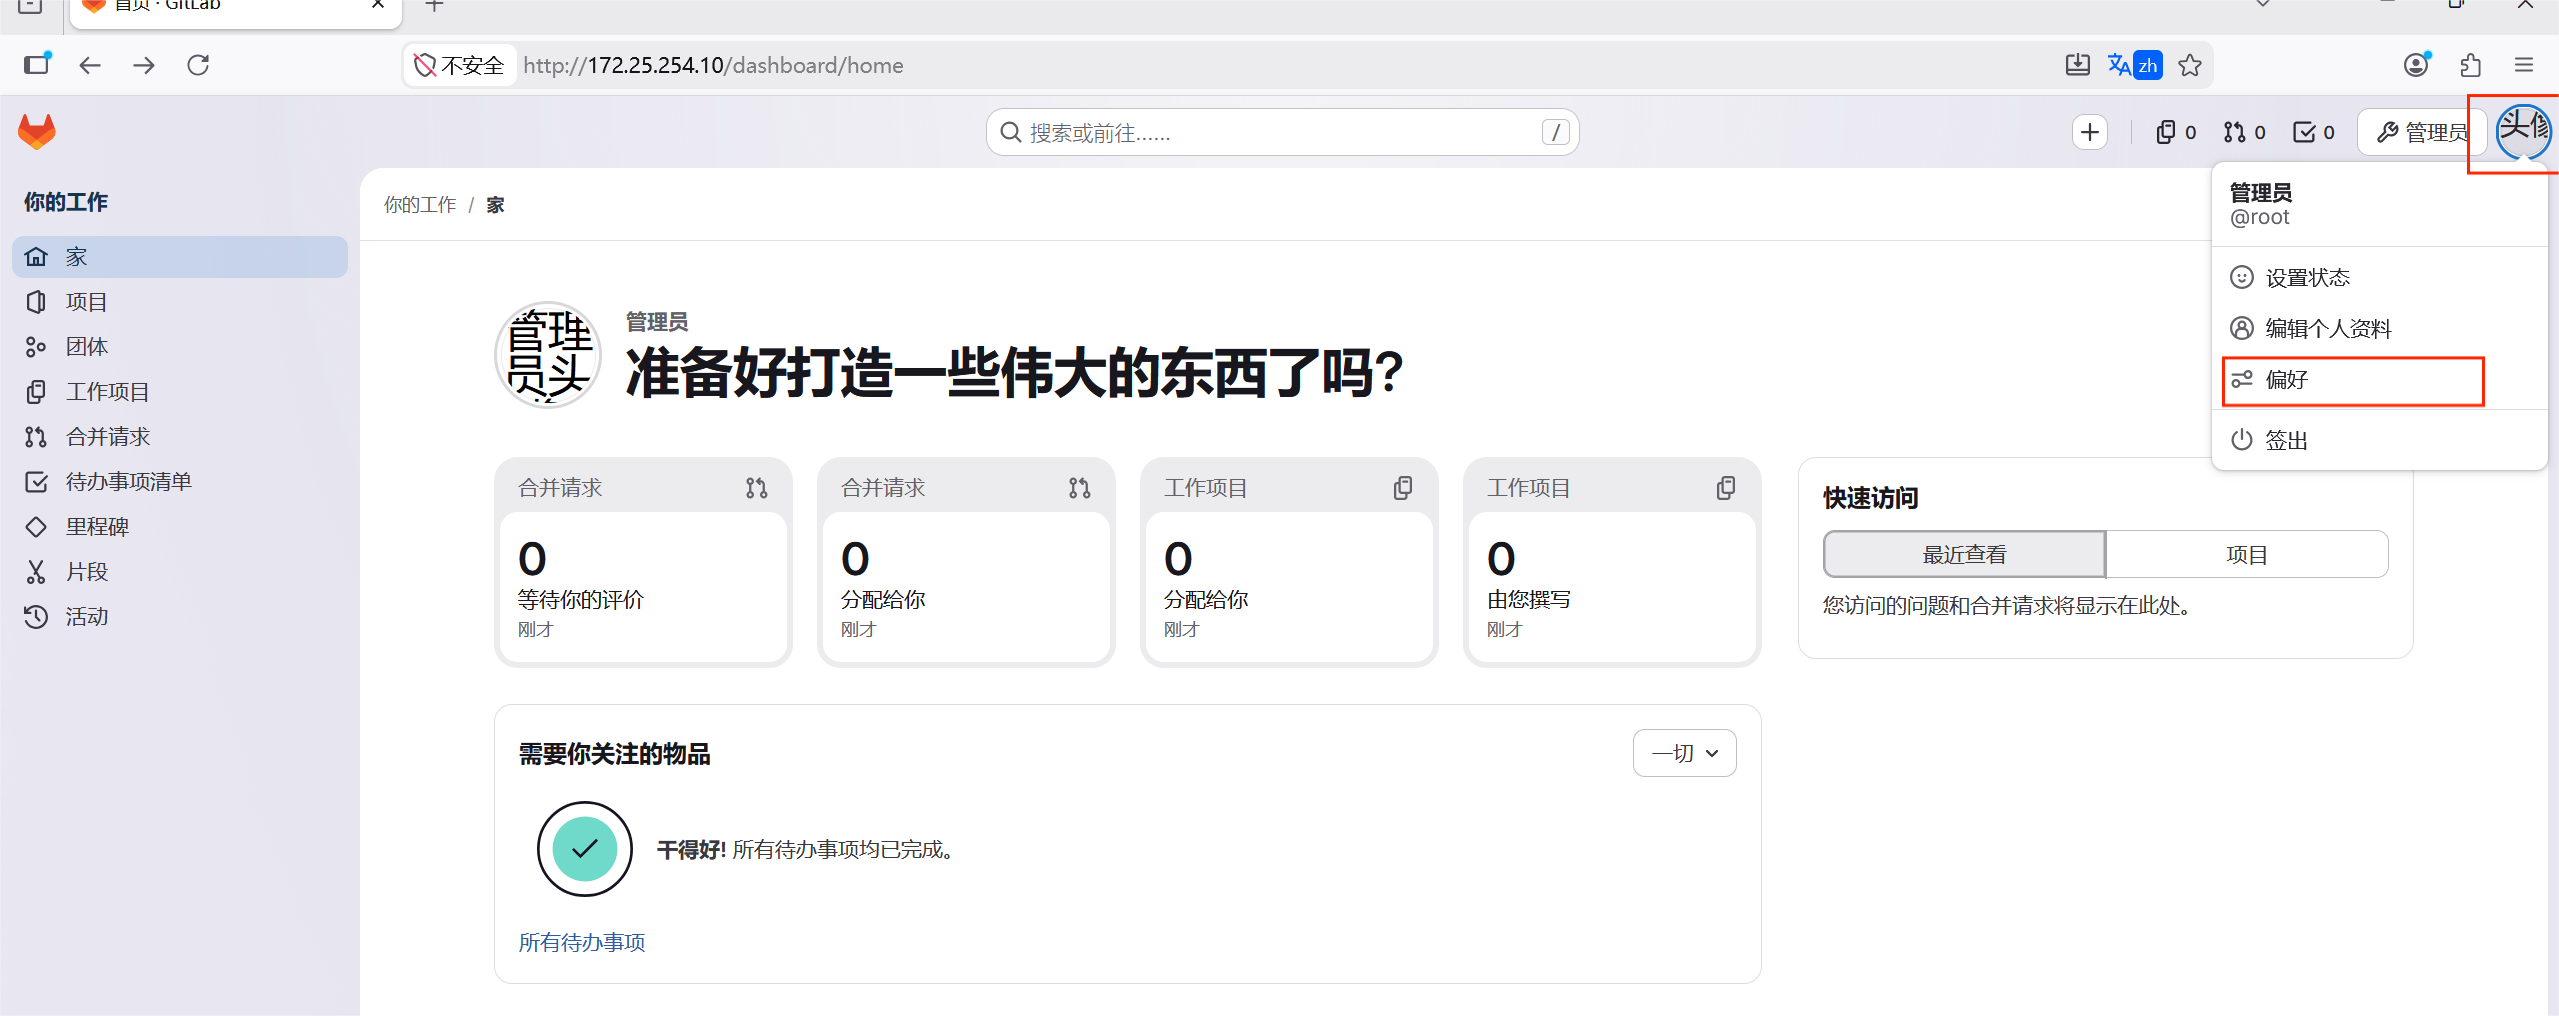
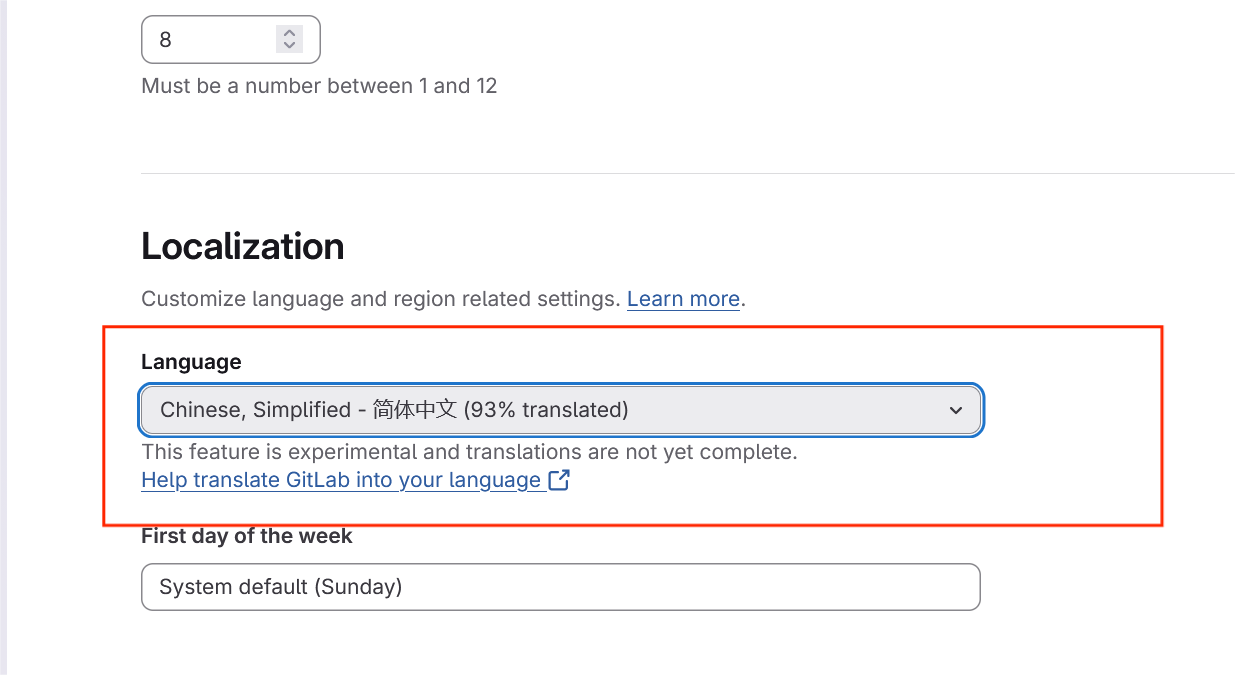
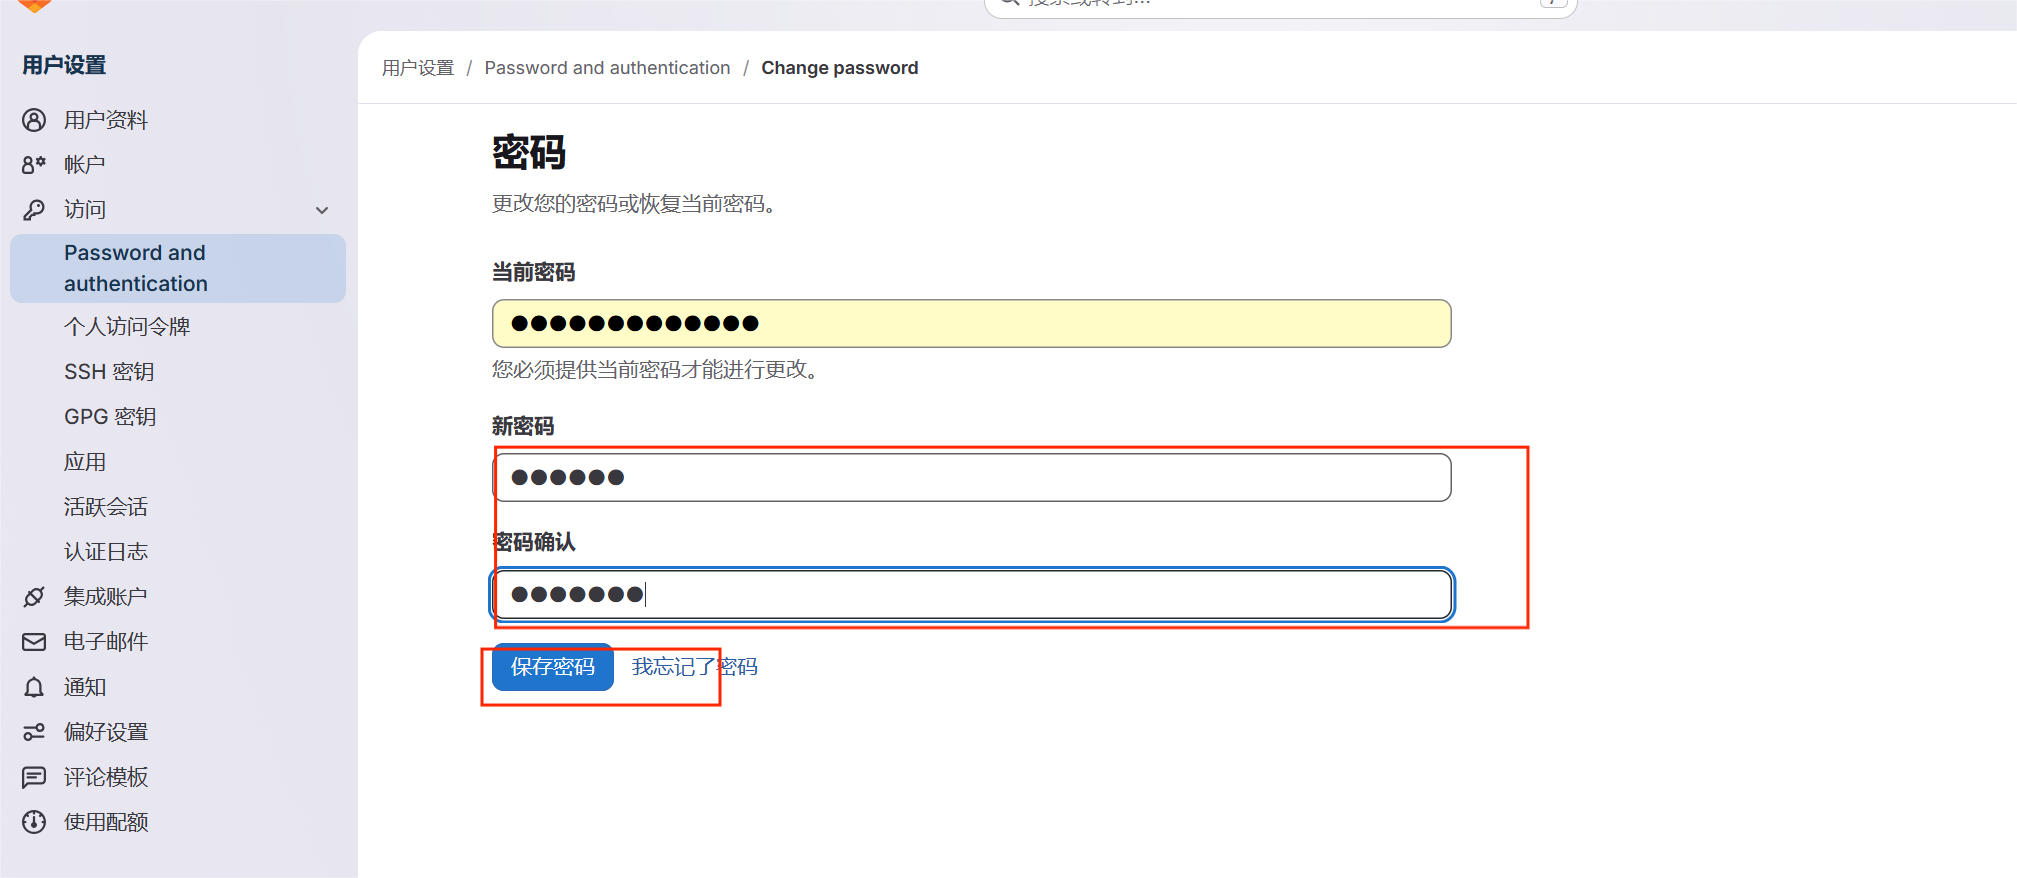
改语言
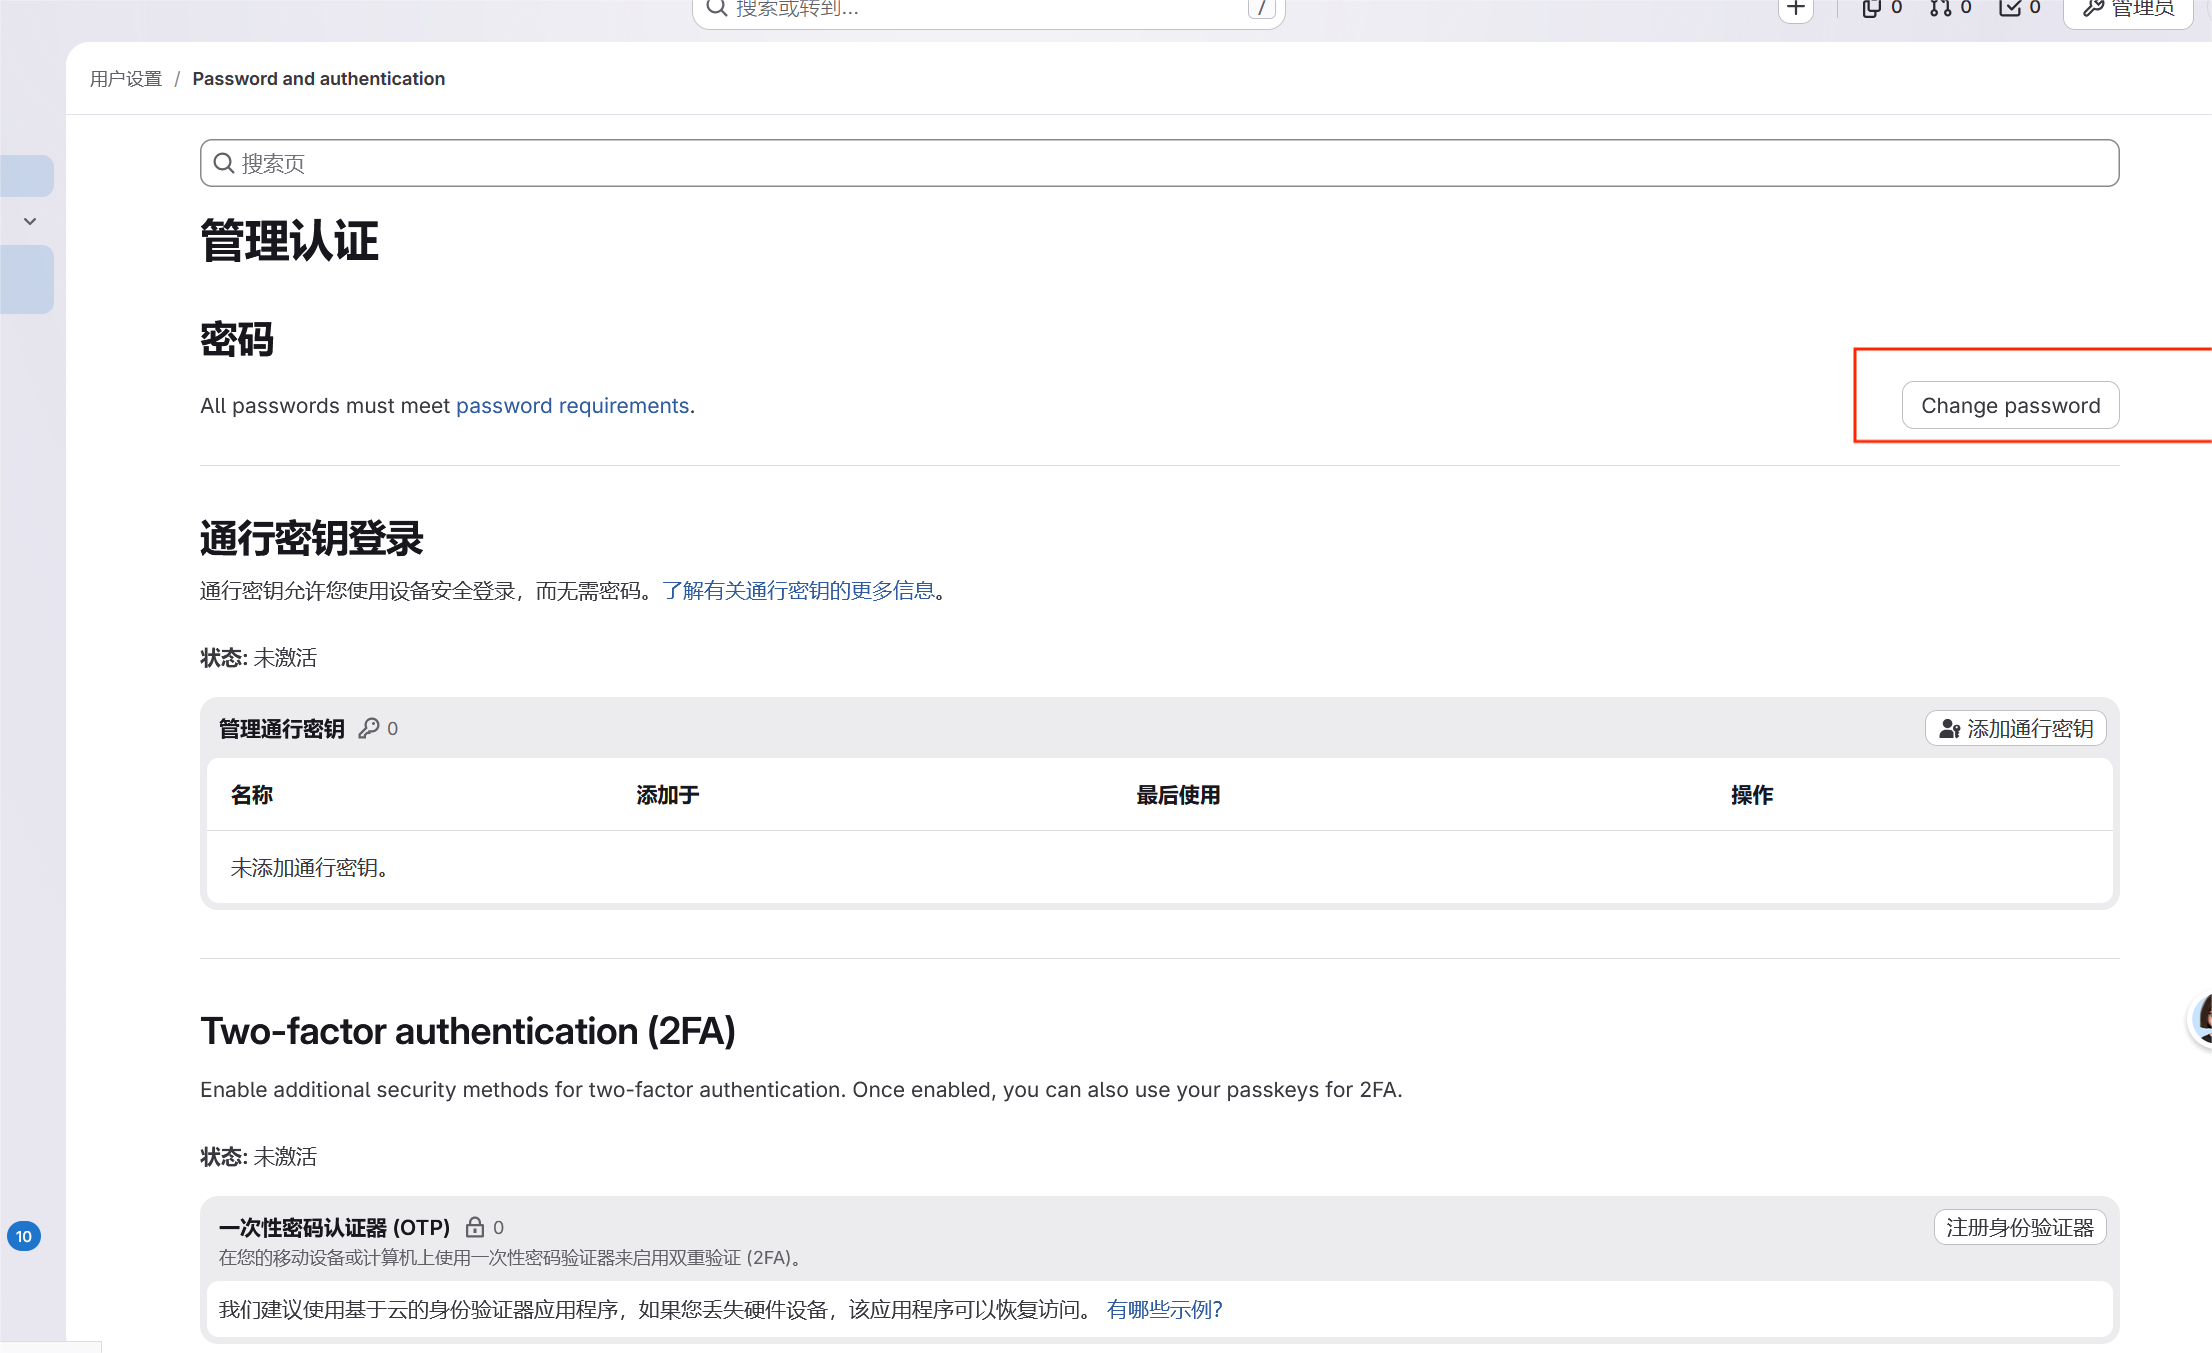
改密码
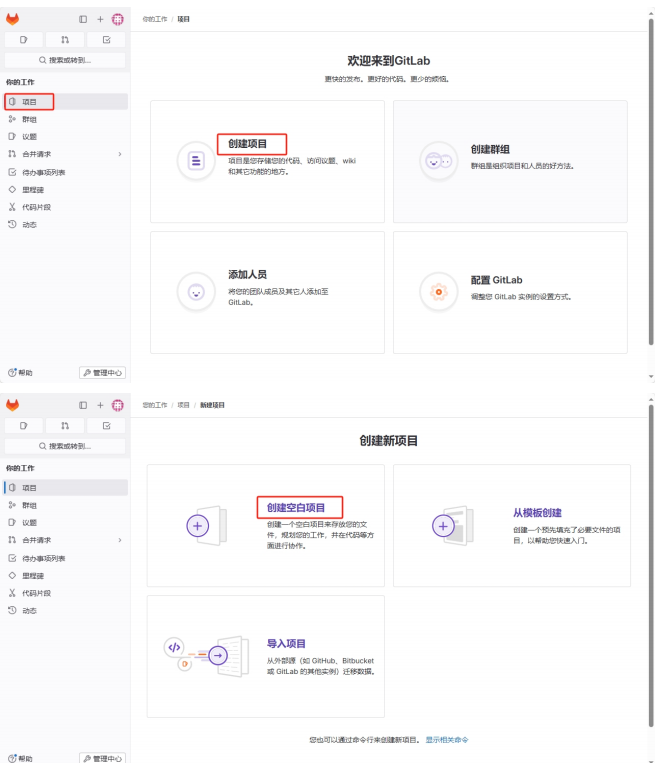
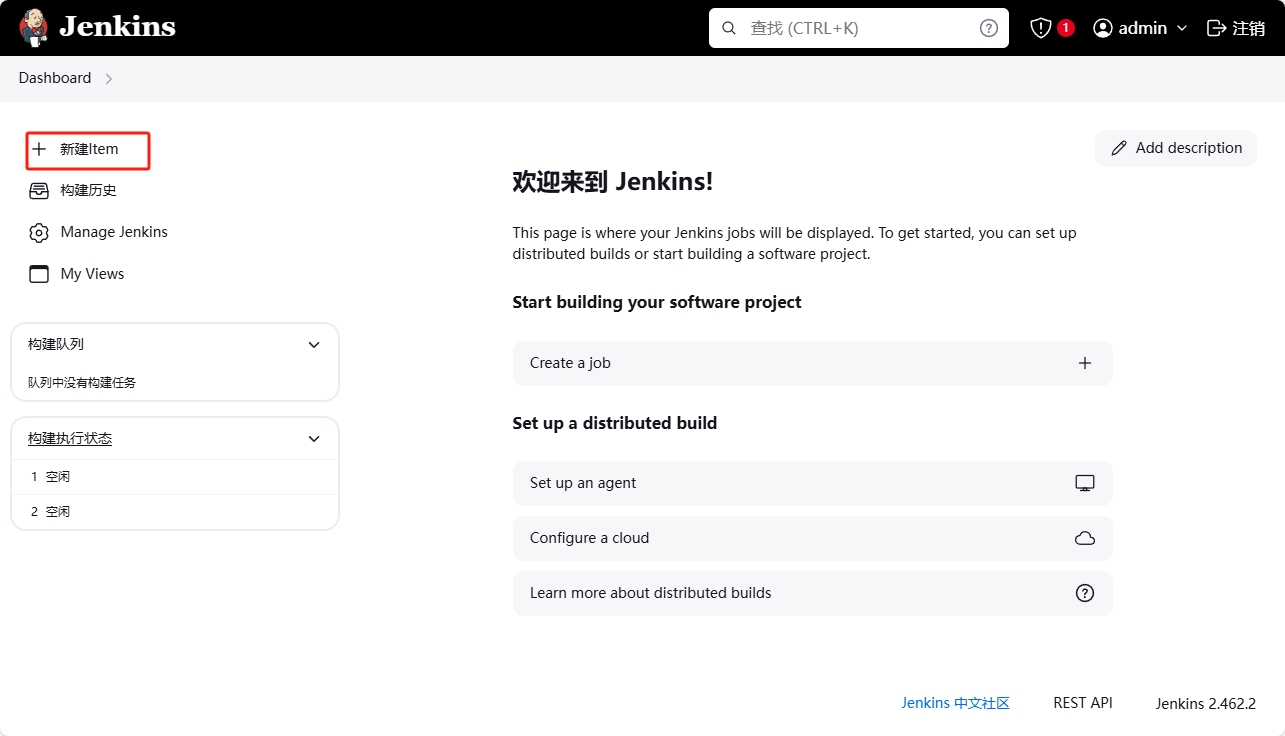
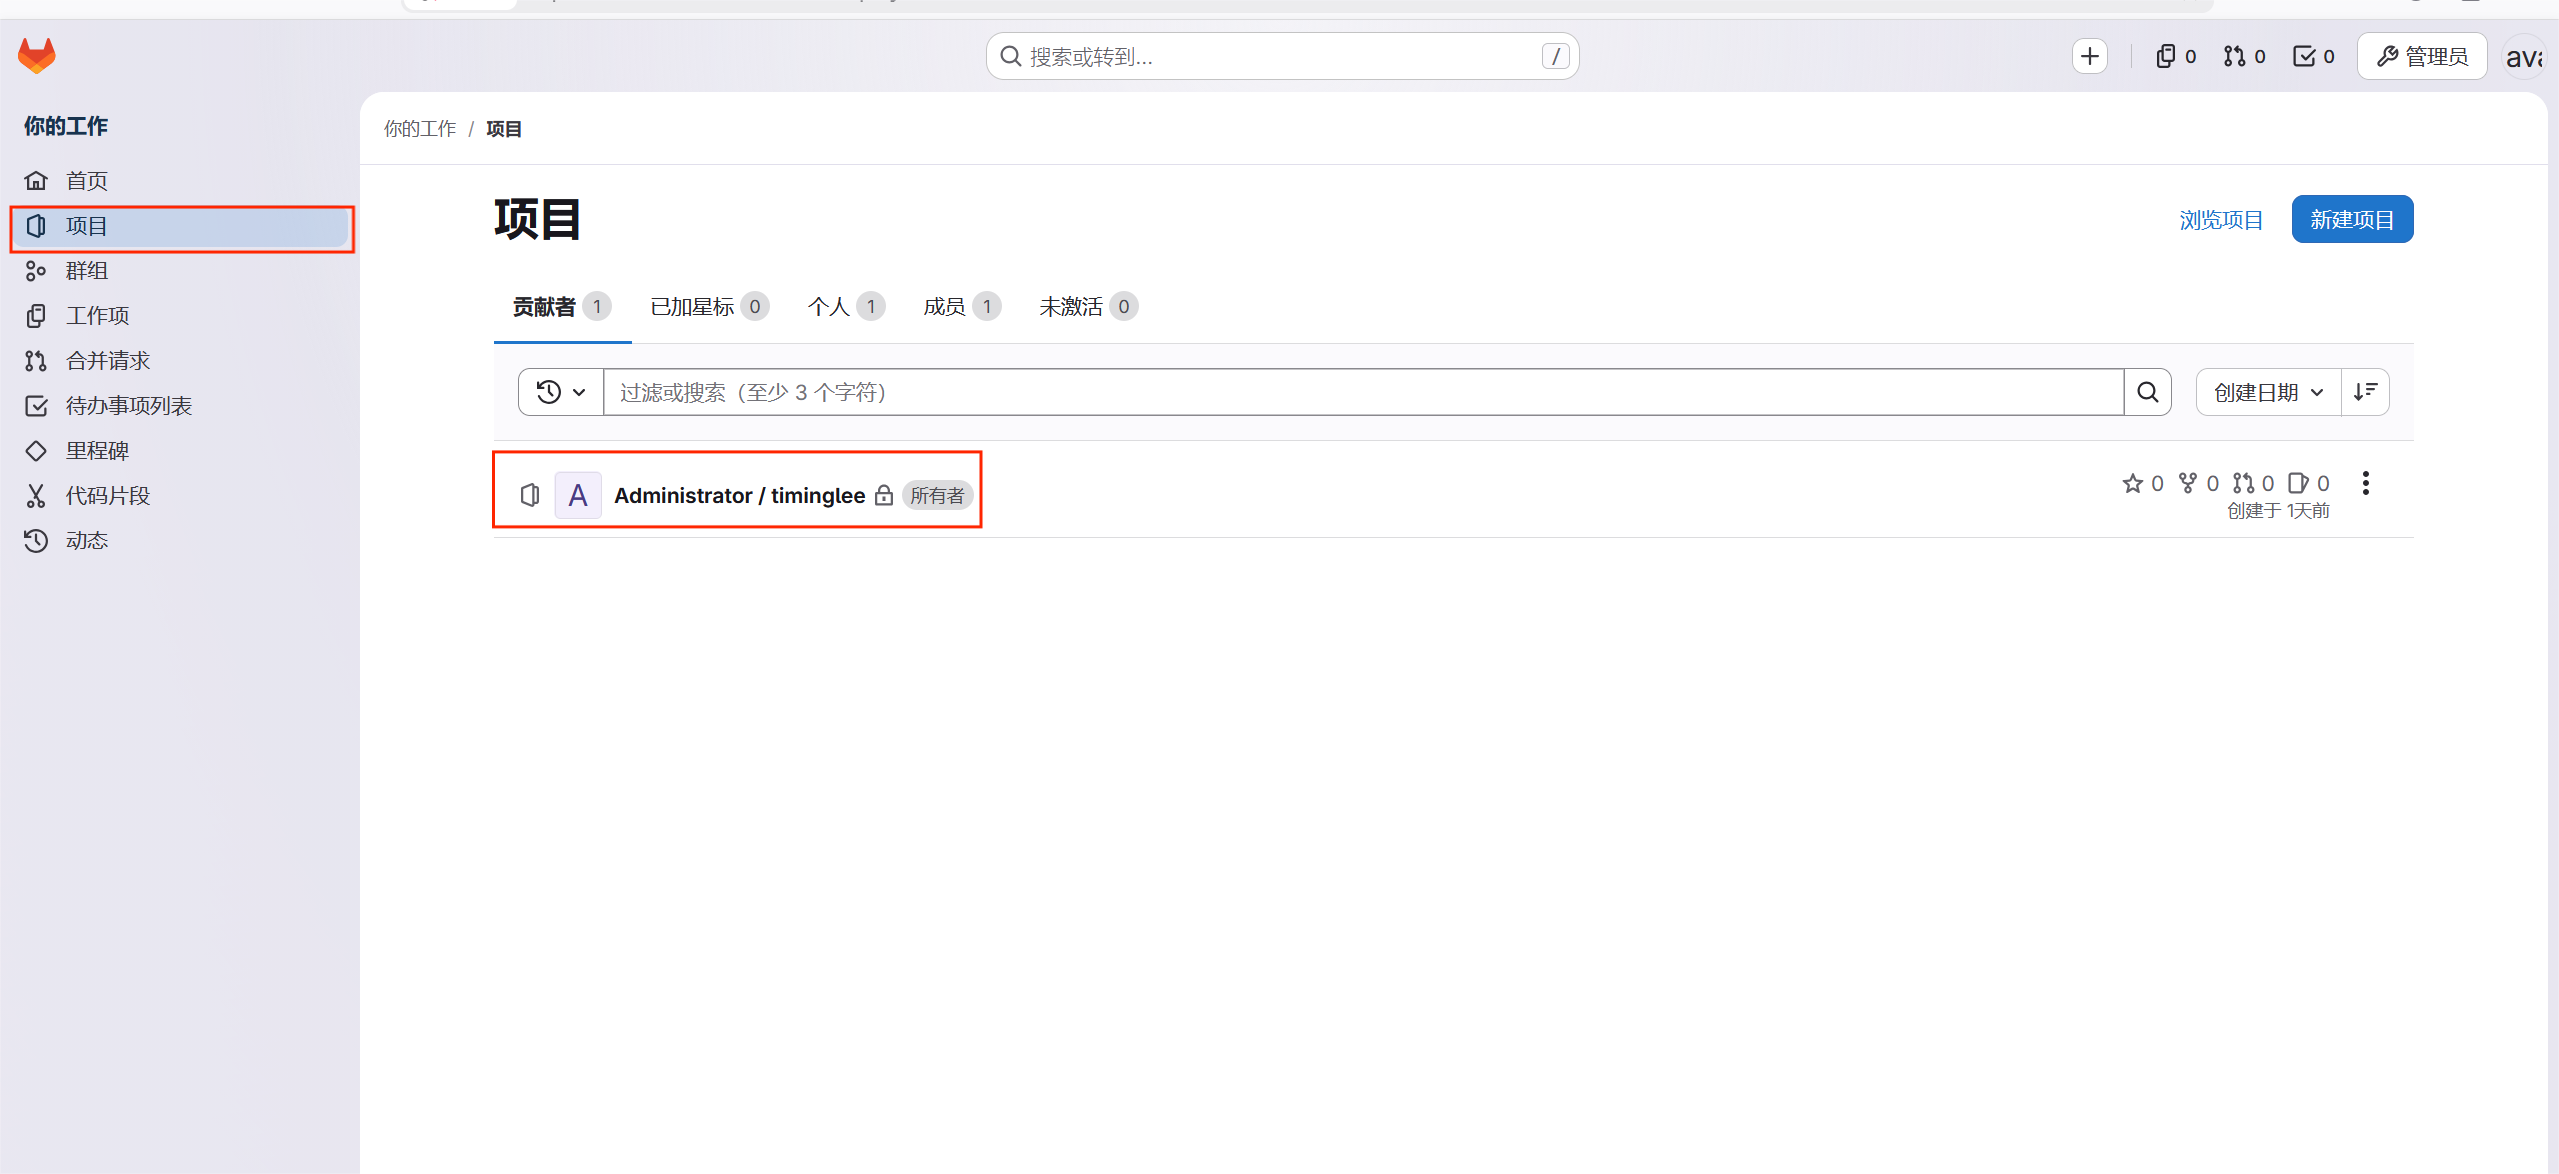
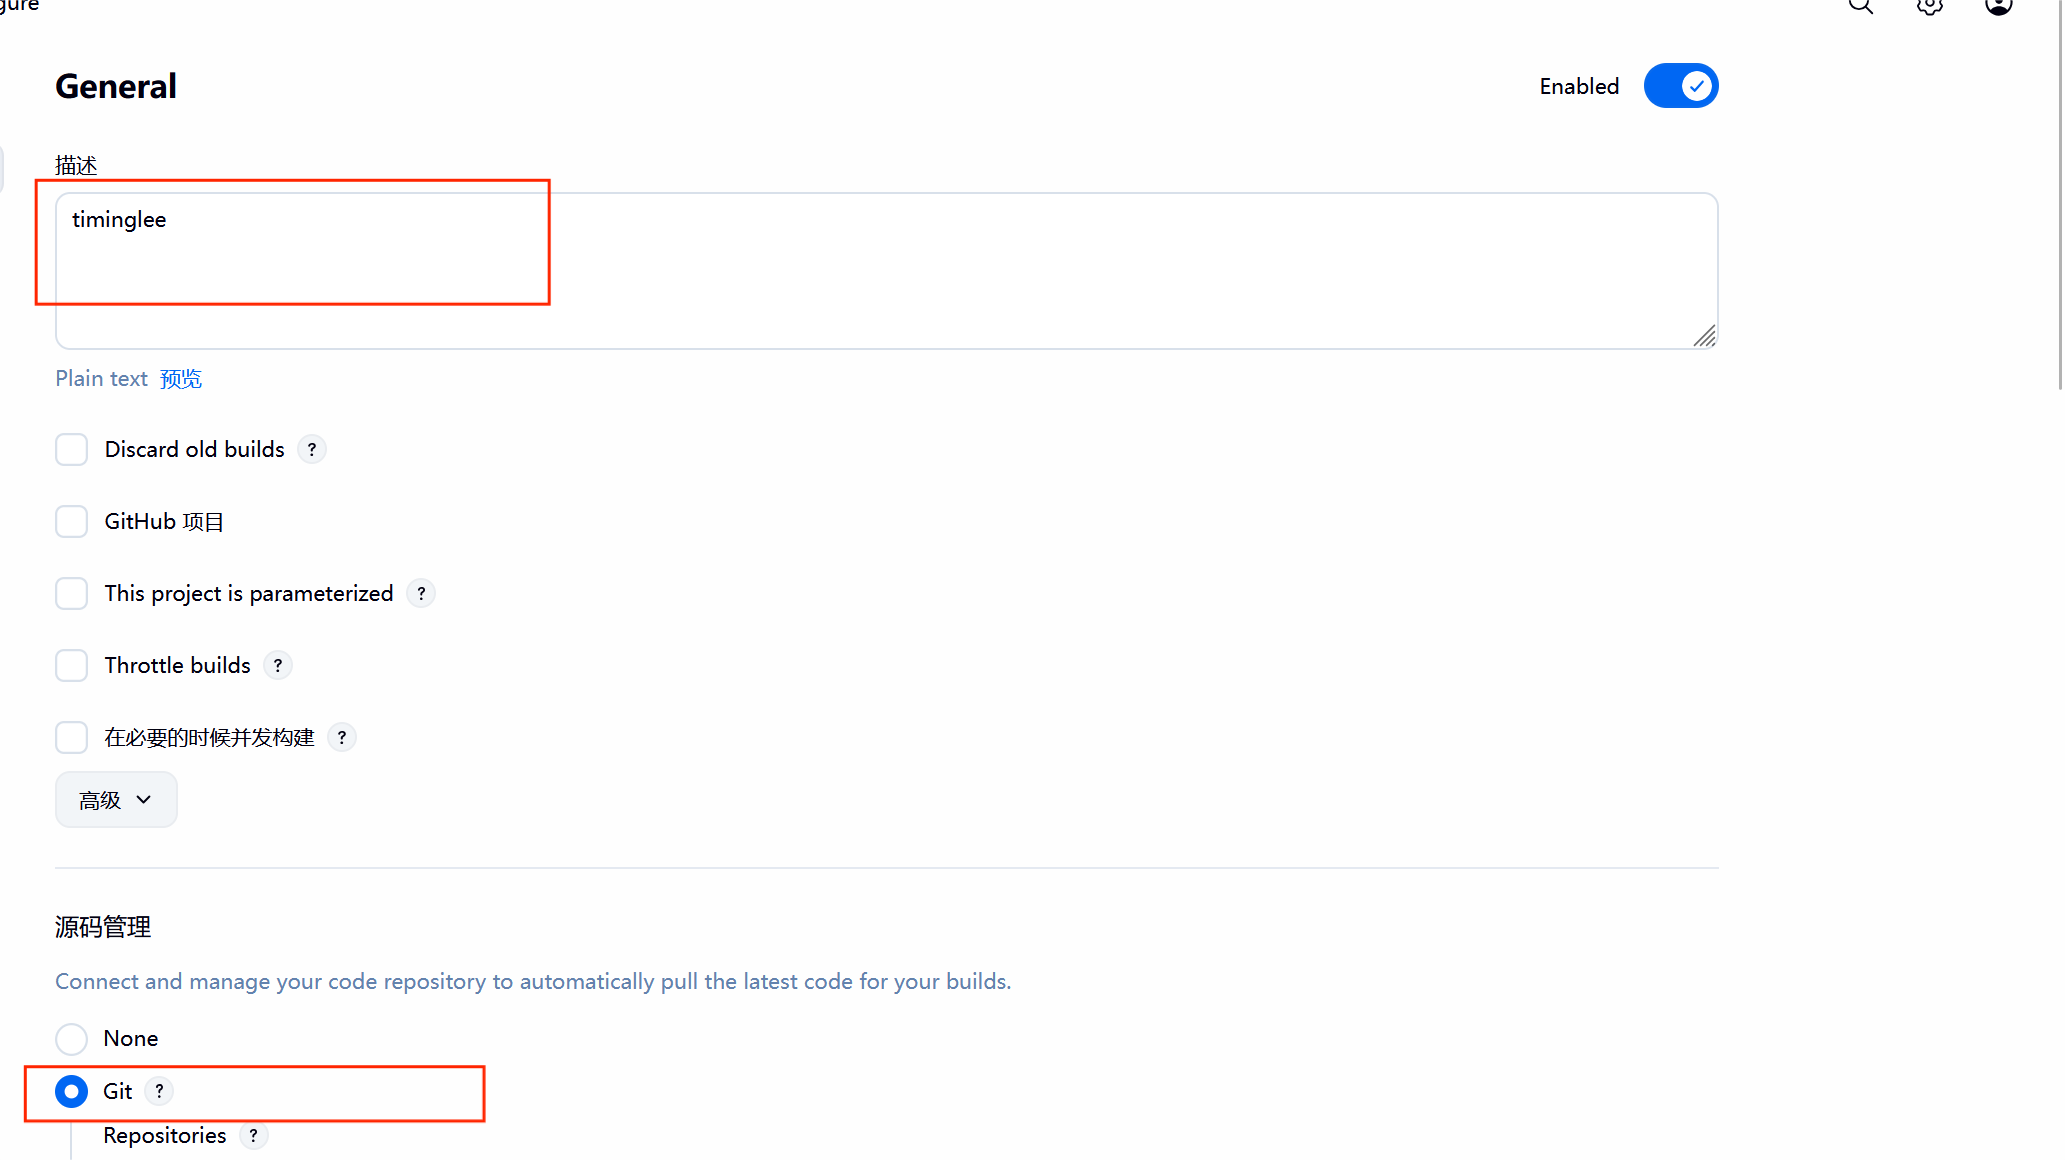
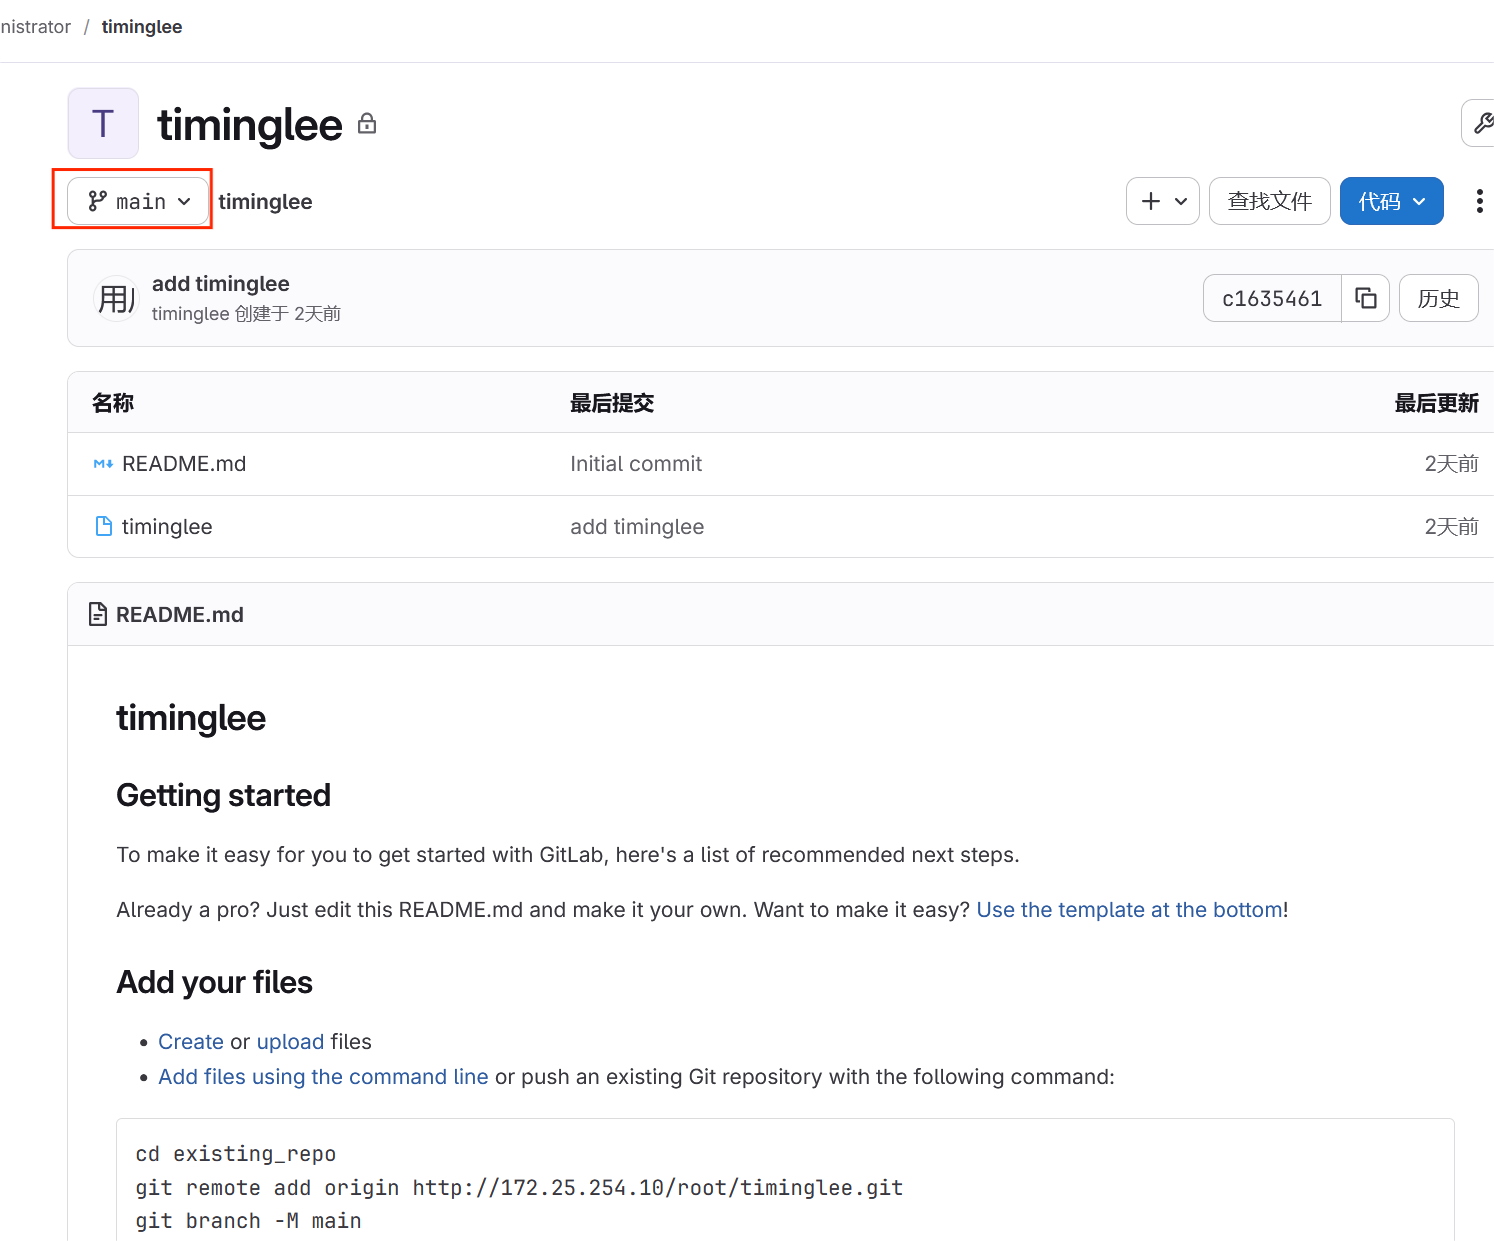
5.3在gitlab****中新建项目

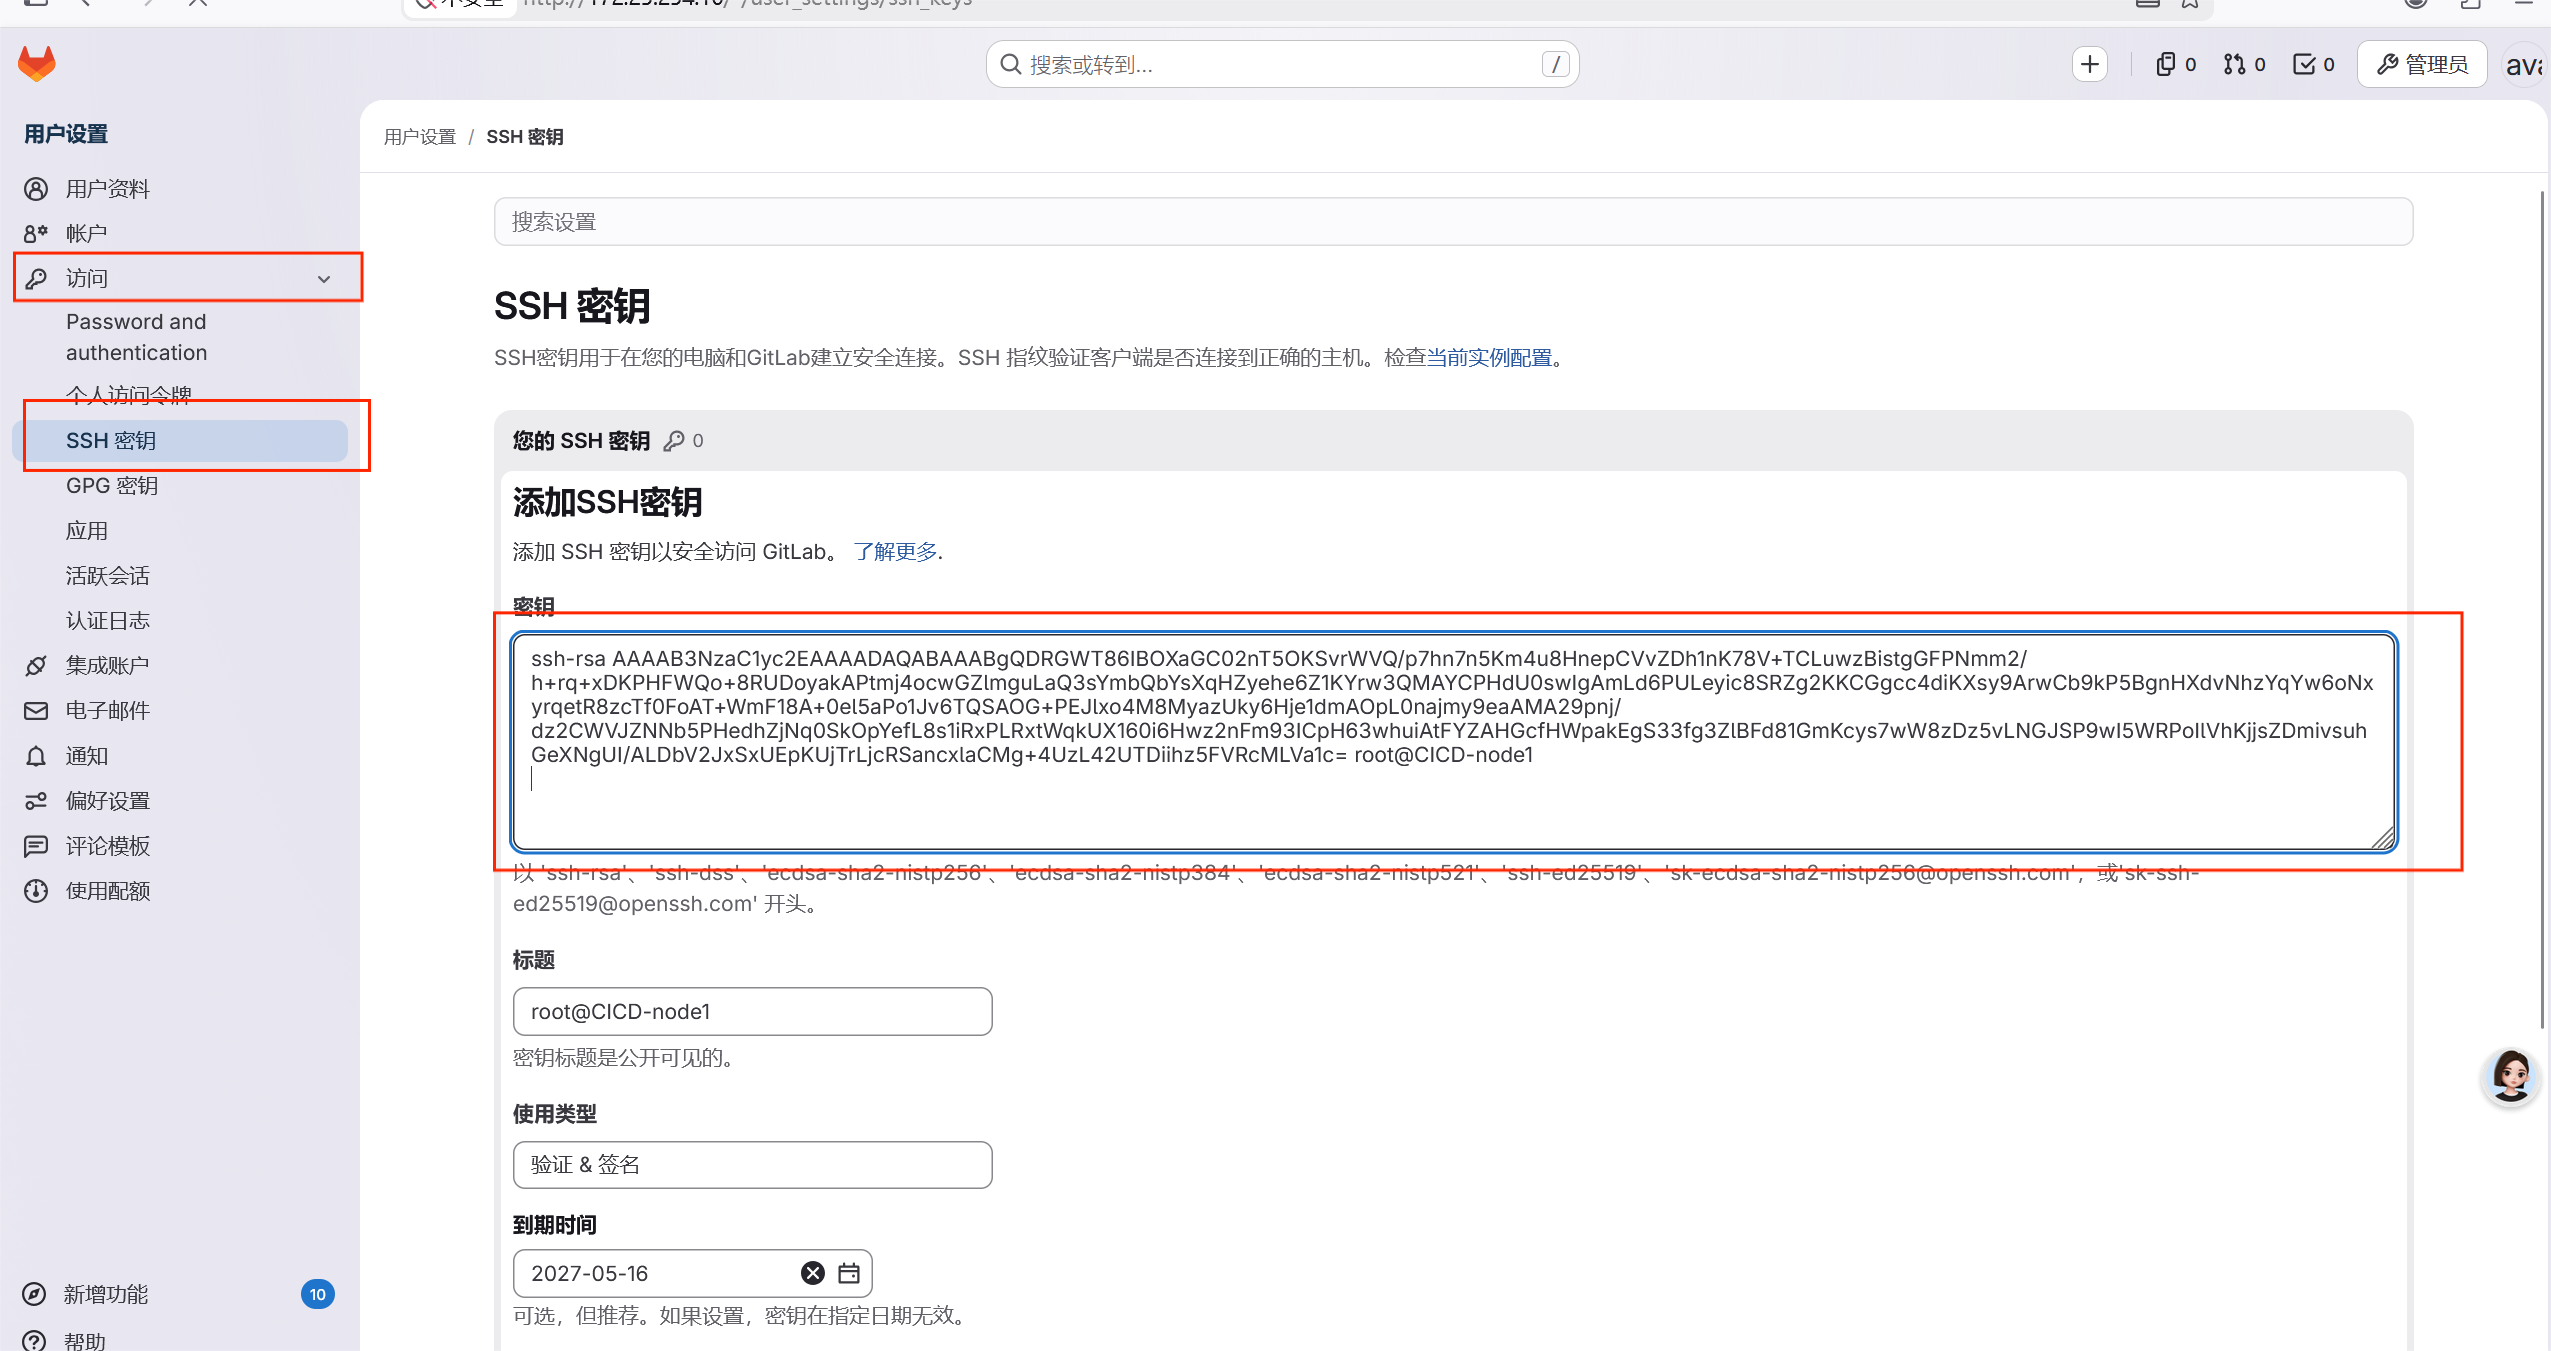
上传公钥到gitlab中
下载项目
bash
[root@CICD-node1 ~]# git clone git@172.25.254.10:root/timinglee.git
正克隆到 'timinglee'...
The authenticity of host '172.25.254.10 (172.25.254.10)' can't be established.
ED25519 key fingerprint is SHA256:z5npIsfz0hBt4Dxrf+zBQqefNk1o7kGD7vxt3KTFOv4.
This key is not known by any other names
Are you sure you want to continue connecting (yes/no/[fingerprint])? yes
Warning: Permanently added '172.25.254.10' (ED25519) to the list of known hosts.
remote: Enumerating objects: 3, done.
remote: Counting objects: 100% (3/3), done.
remote: Compressing objects: 100% (2/2), done.
remote: Total 3 (delta 0), reused 0 (delta 0), pack-reused 0 (from 0)
接收对象中: 100% (3/3), 完成.
[root@CICD-node1 ~]# ls -R
.:
anaconda-ks.cfg  gitlab  timinglee  timinless

./gitlab:
gitlab-ce-18.11.2-ce.0.el9.x86_64.rpm

./timinglee:
README.md

./timinless:
dir1  lee.txt  README.md

./timinless/dir1:
[root@CICD-node1 ~]# cd timinglee/
[root@CICD-node1 timinglee]# ls
README.md
[root@CICD-node1 timinglee]# git remote -v
origin	git@172.25.254.10:root/timinglee.git (fetch)
origin	git@172.25.254.10:root/timinglee.git (push)
[root@CICD-node1 timinglee]# echo timinglee > timinglee
[root@CICD-node1 timinglee]# git add timinglee
[root@CICD-node1 timinglee]# git commit -m "add timinglee"
[main c163546] add timinglee
 1 file changed, 1 insertion(+)
 create mode 100644 timinglee
[root@CICD-node1 timinglee]# git push -u origin main
枚举对象中: 4, 完成.
对象计数中: 100% (4/4), 完成.
使用 4 个线程进行压缩
压缩对象中: 100% (2/2), 完成.
写入对象中: 100% (3/3), 276 字节 | 276.00 KiB/s, 完成.
总共 3(差异 0),复用 0(差异 0),包复用 0(来自  0 个包)
To 172.25.254.10:root/timinglee.git
   f8f6263..c163546  main -> main
分支 'main' 设置为跟踪 'origin/main'。
六****jenkins
6.1 jenkins****简介

- Jenkins是开源CI&CD软件领导者, 提供超过1000个插件来支持构建、部署、自动化, 满足任何项 目的需要。
- Jenkins用Java语言编写,可在Tomcat等流行的servlet容器中运行,也可独立运行
CI(Continuous integration持续集成)持续集成强调开发人员提交了新代码之后,立刻进行构建(单 元)测试。
CD(Continuous Delivery持续交付) 是在持续集成的基础上,将集成后的代码部署到更贴近真实运行环境 (类生产环境)中
6.2部署jenkins
软件下载:https://www.jenkins.io/download/
jenkins需要部署在新的虚拟机中
Warning
jenkins需要部署在新的虚拟机中,建议最少4G内存,4核心cpu
bash
#安装依赖包
[root@jenkins ~]# dnf install fontconfig java-21-openjdk git -y
[root@jenkins ~]# ls
anaconda-ks.cfg jenkins-2.555.1-1.noarch.rpm
安装jenkins包
[root@jenkins ~]# dnf install jenkins-2.555.1-1.noarch.rpm
#启动jenkins
[root@jenkins ~]# systemctl enable --now jenkins.service
Created symlink /etc/systemd/system/multi-user.target.wants/jenkins.service → /usr/lib/systemd/system/jenkins.service.
#查看原始密码
[root@jenkins ~]# cat /var/lib/jenkins/secrets/initialAdminPassword
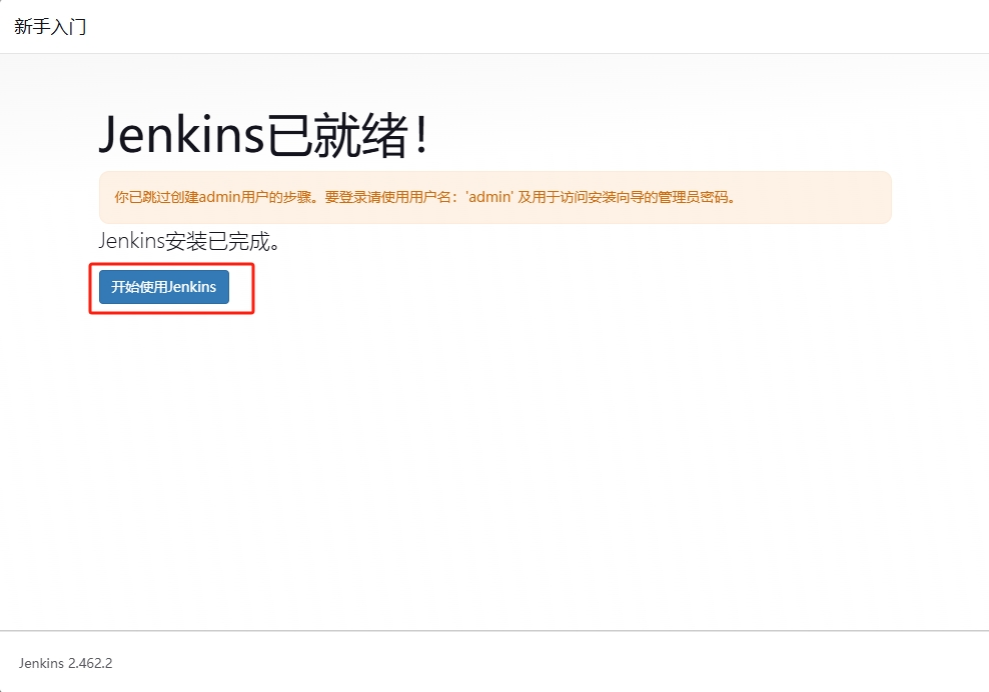
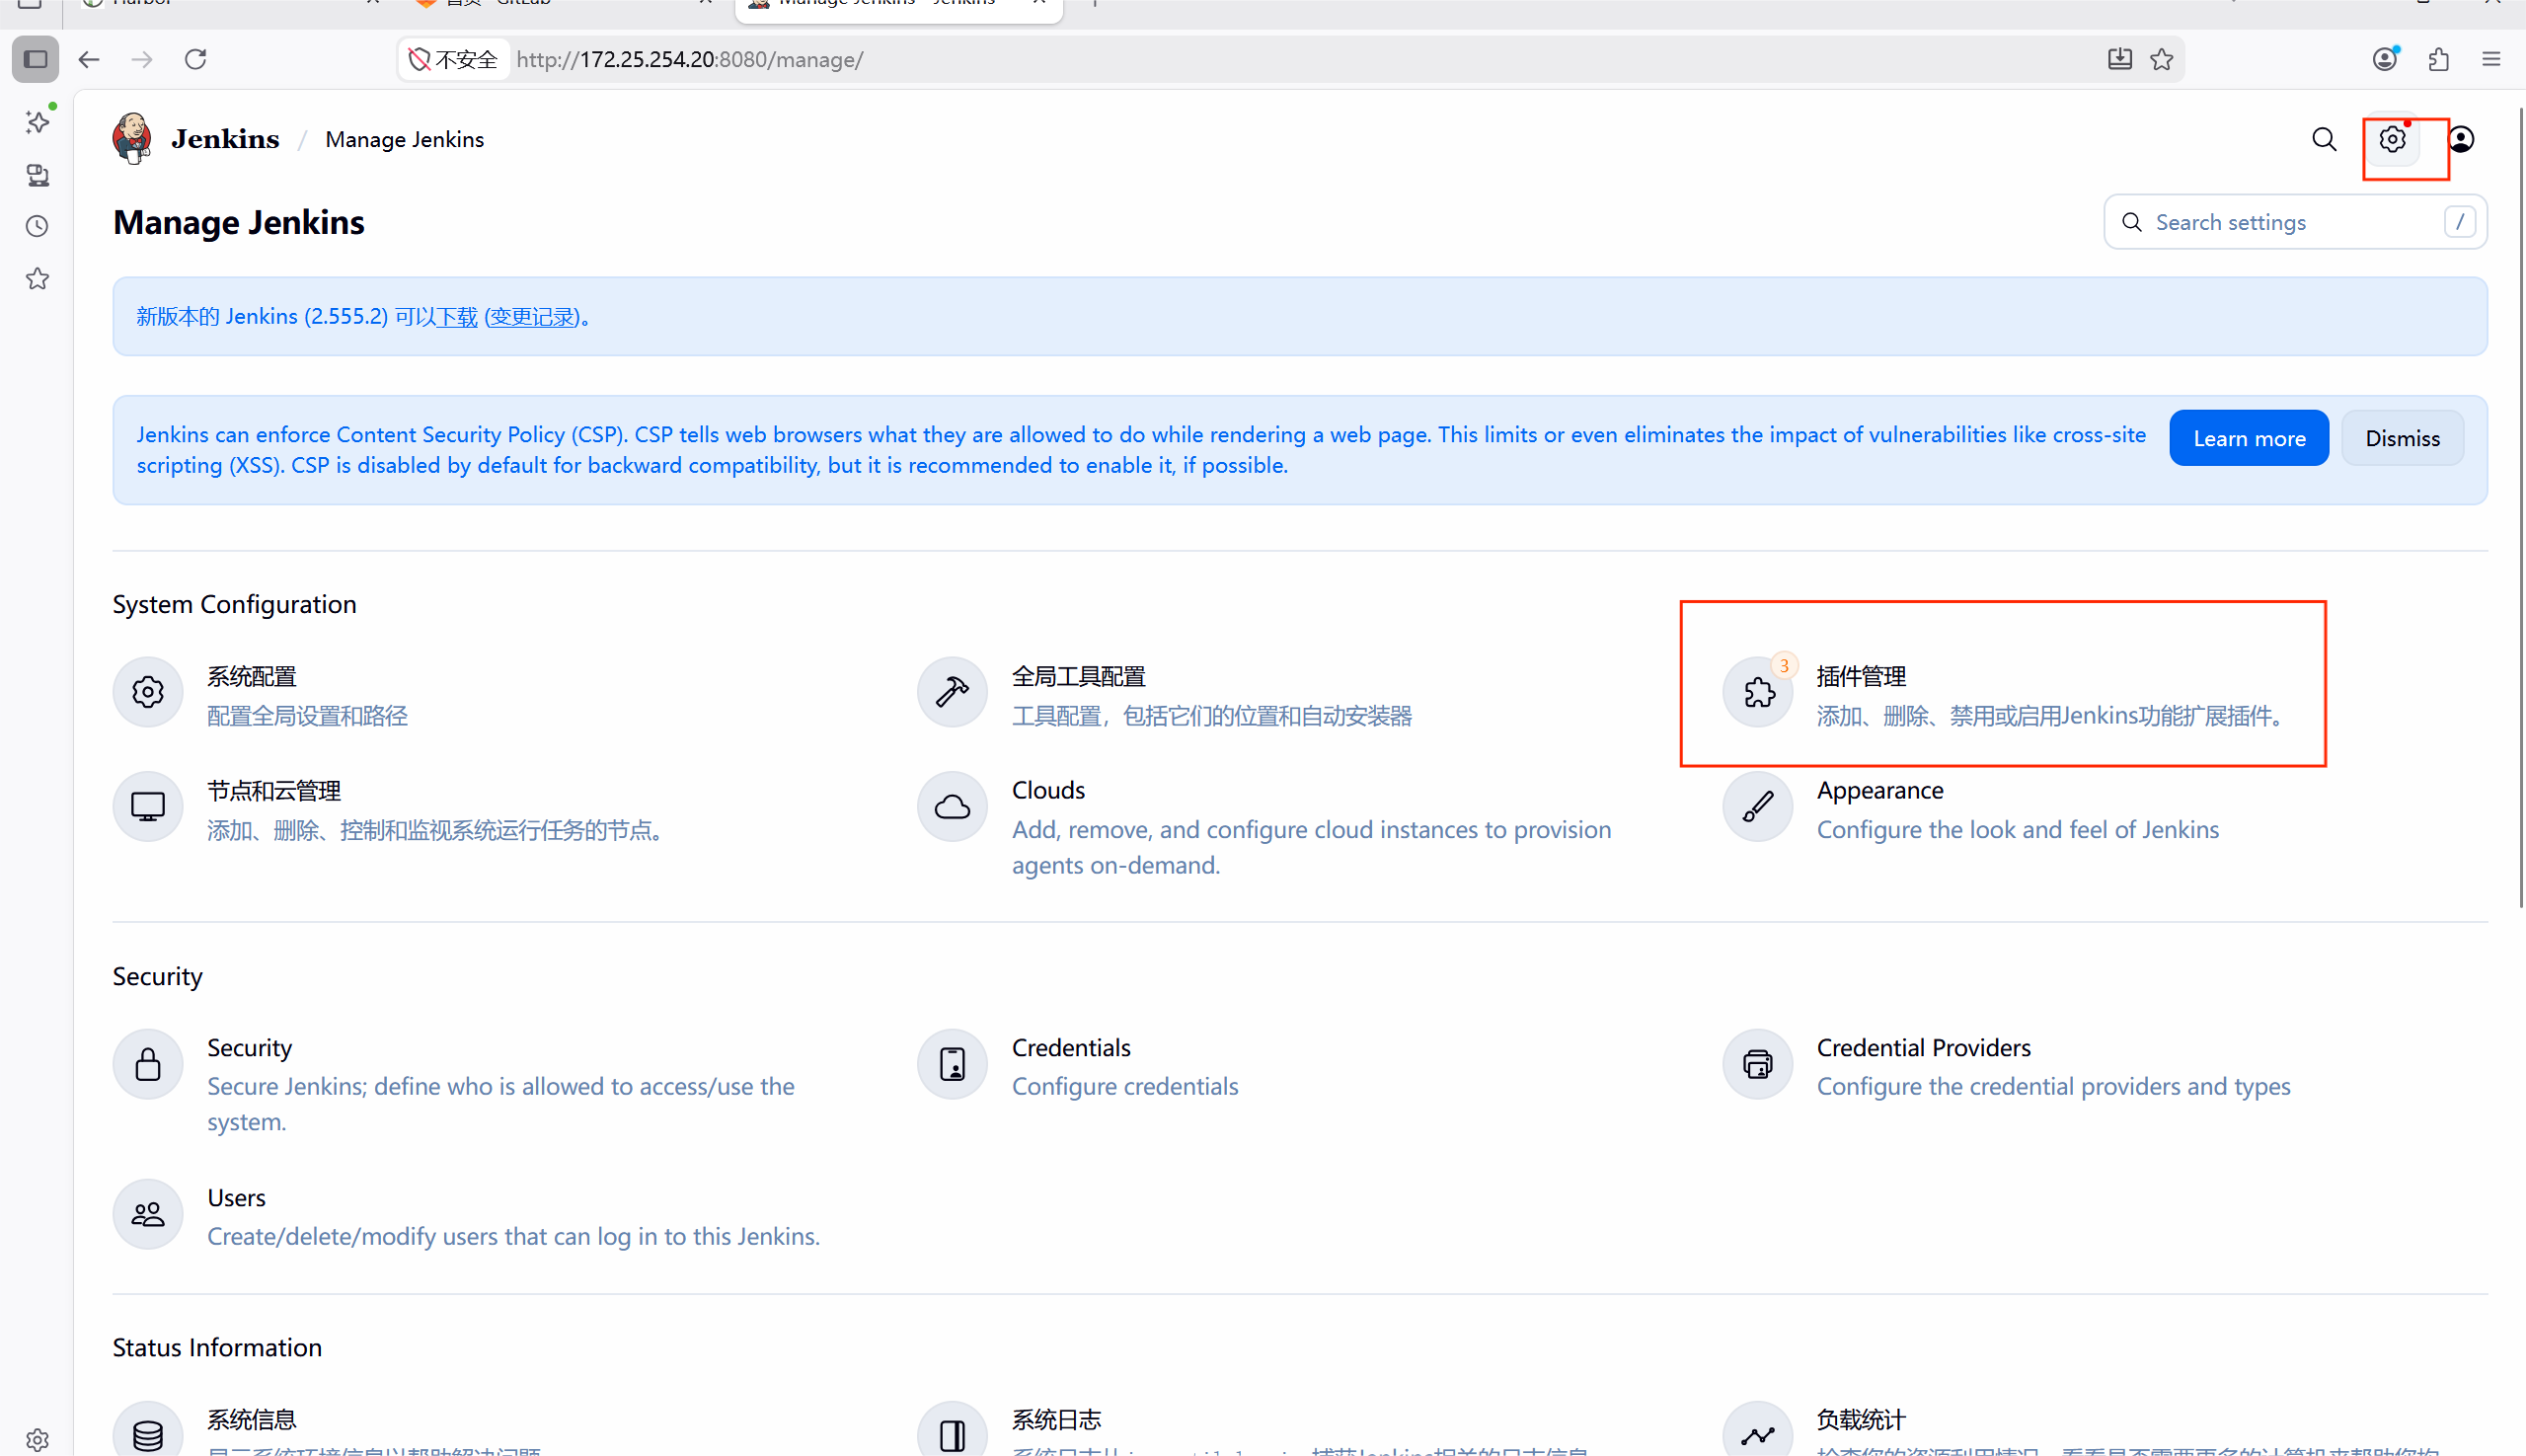
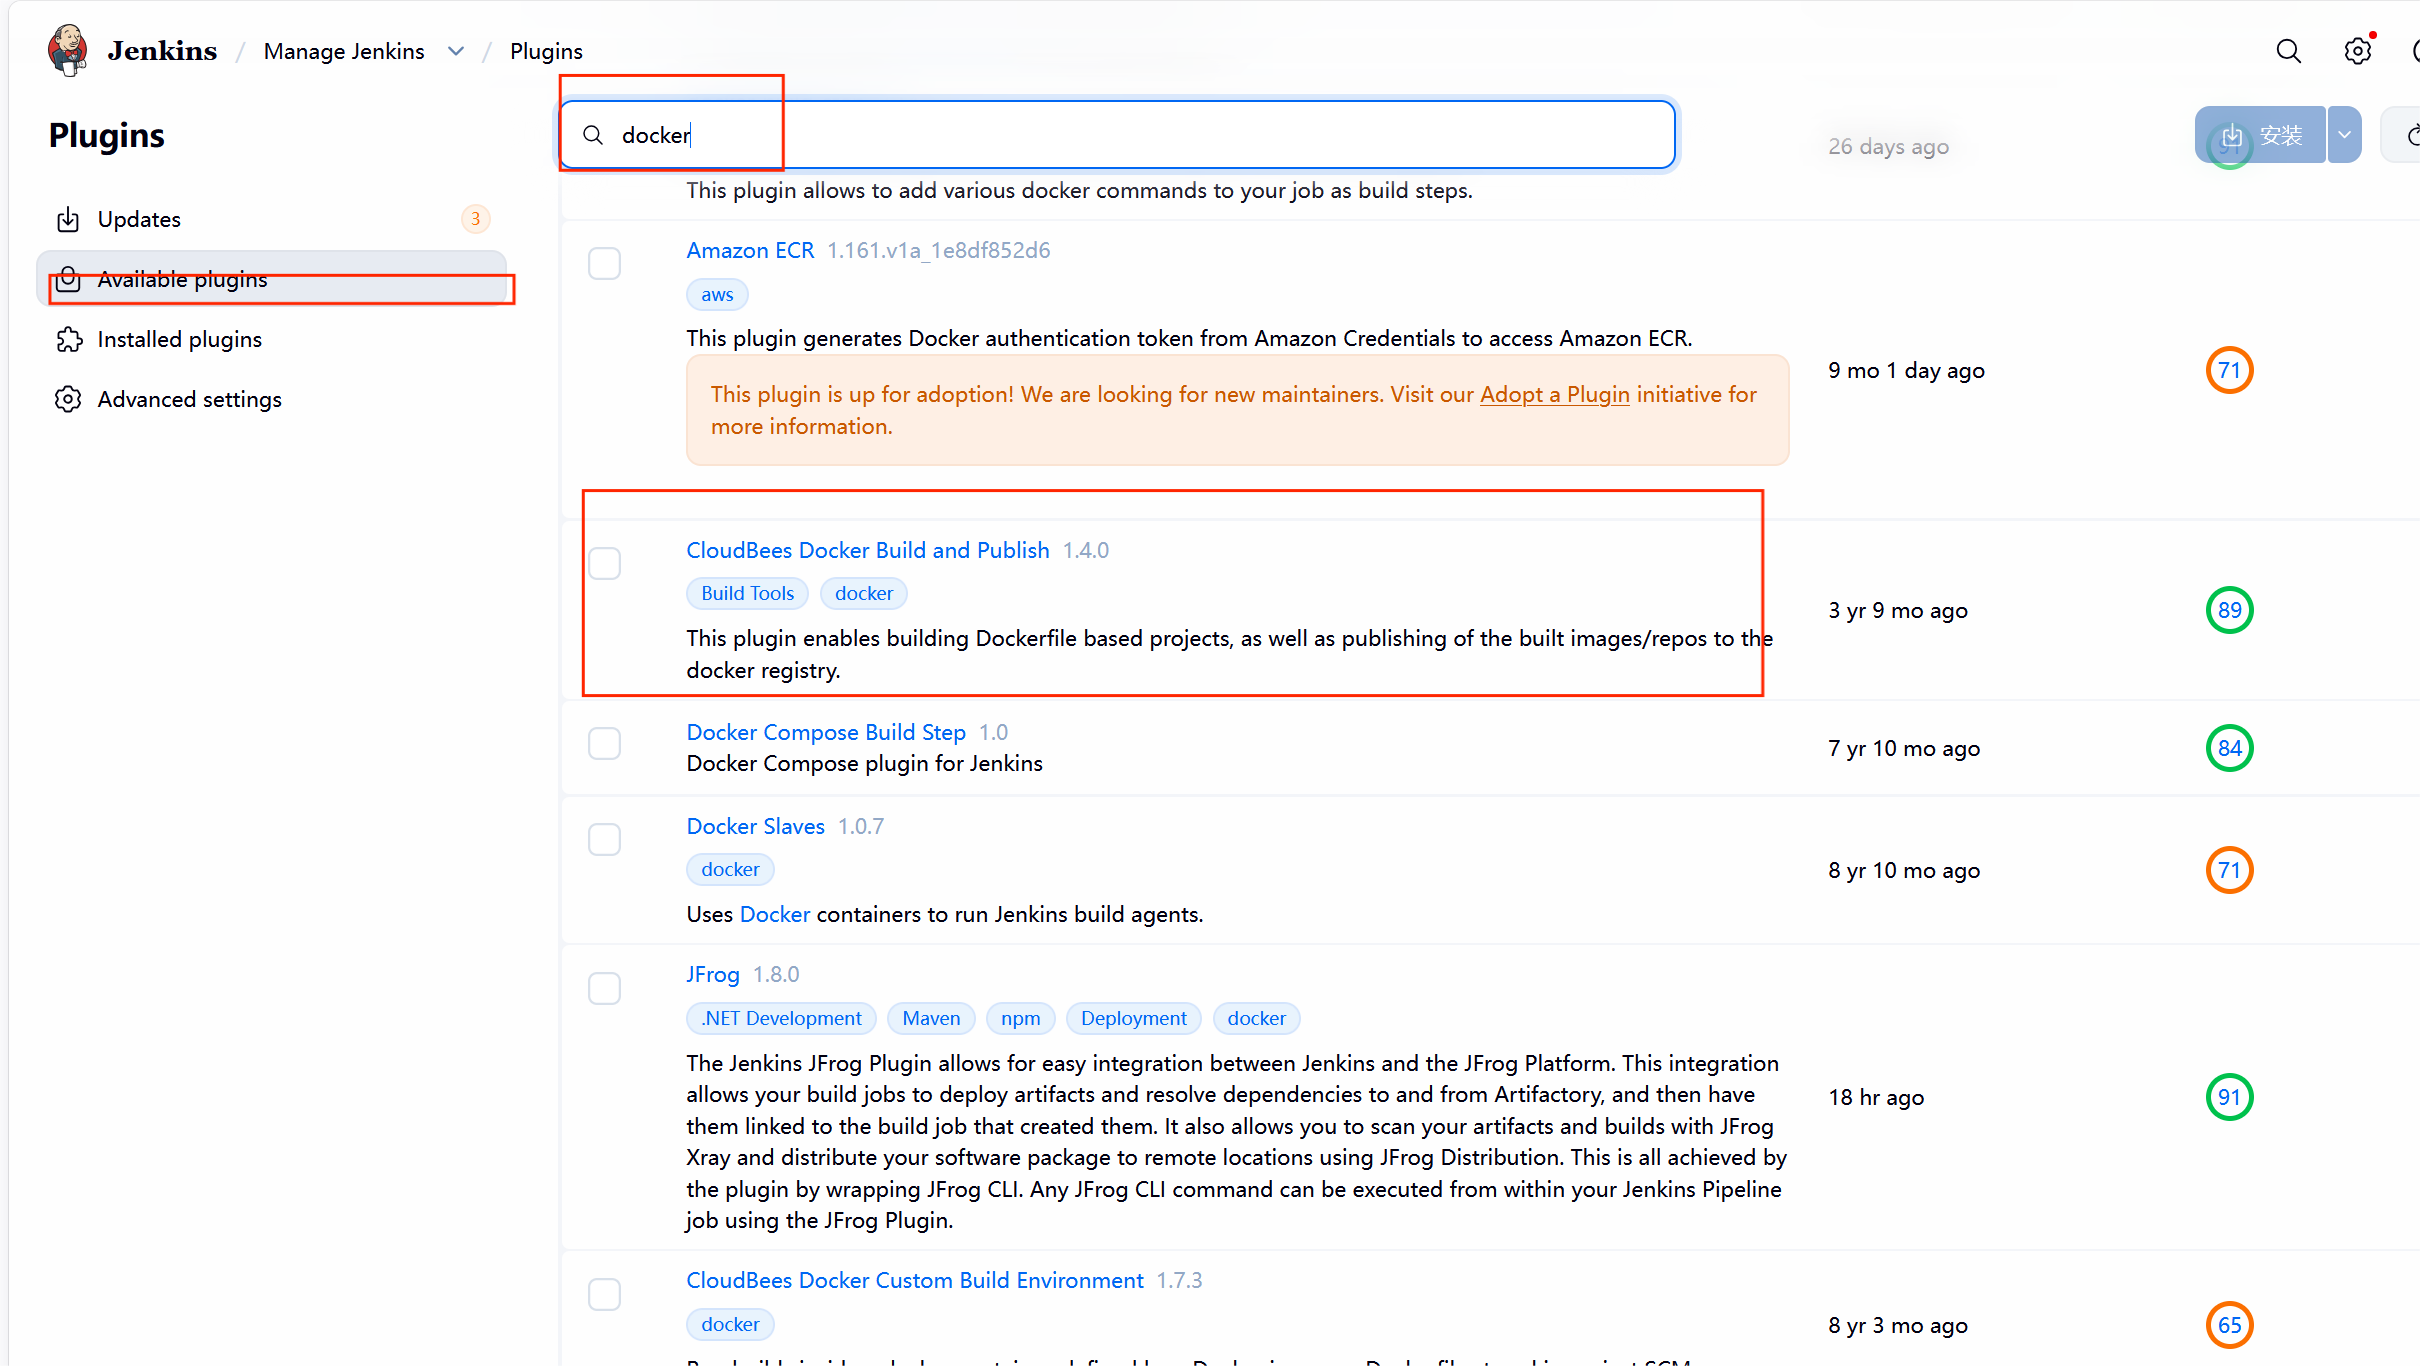
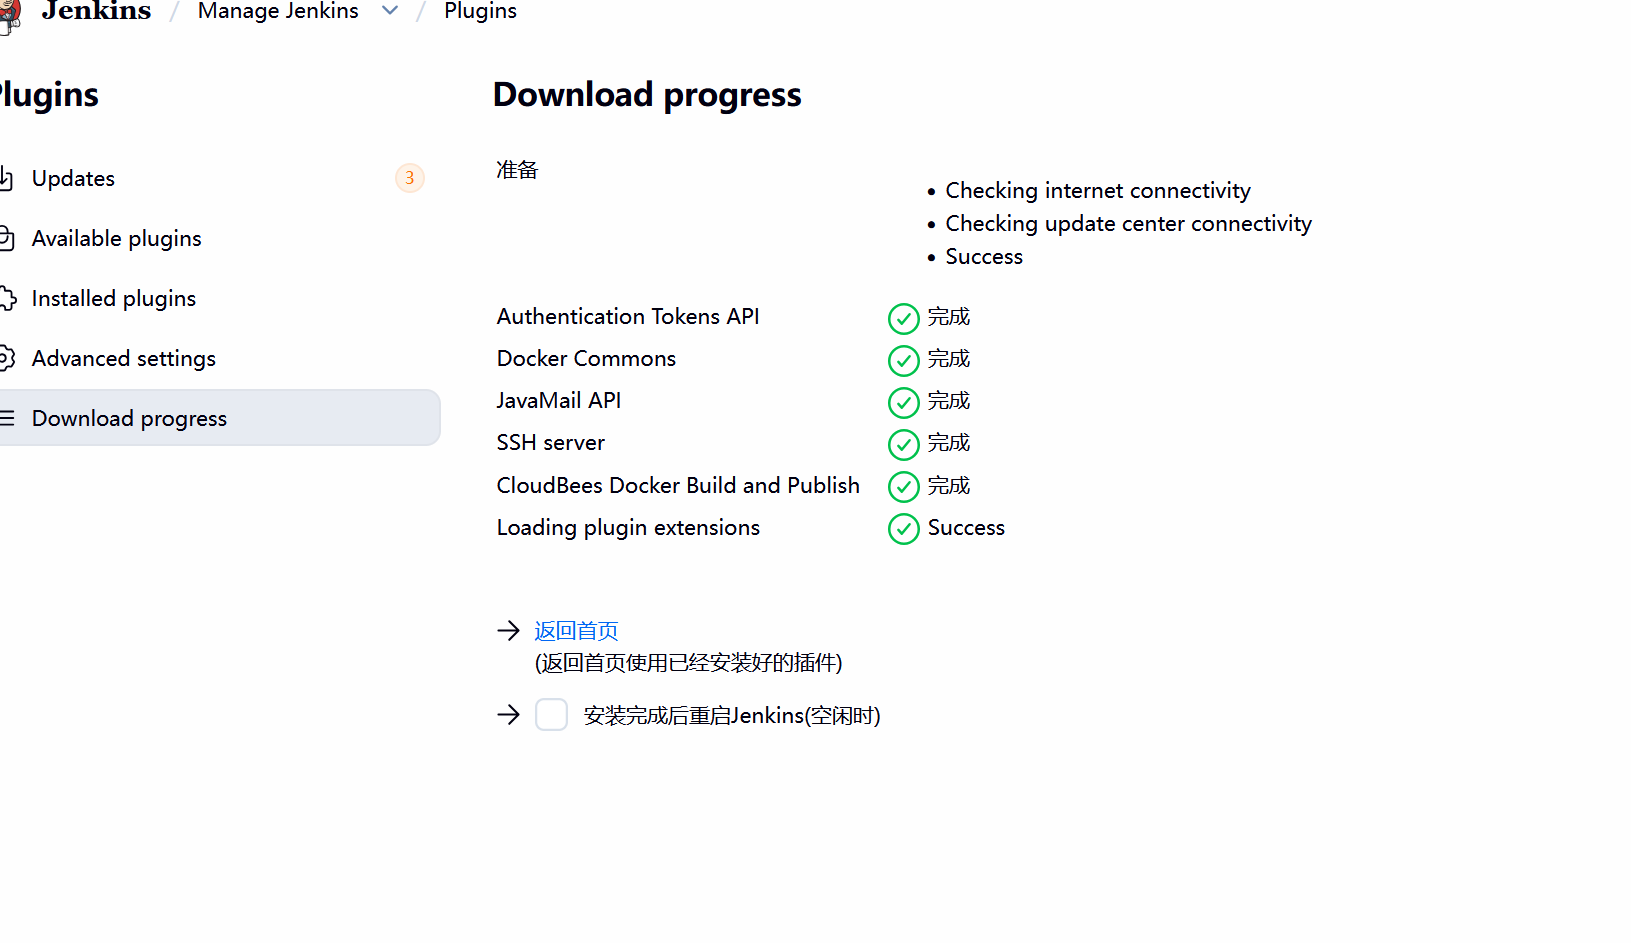
45bab356c0f0494c9f53cb842500b1c6部署插件

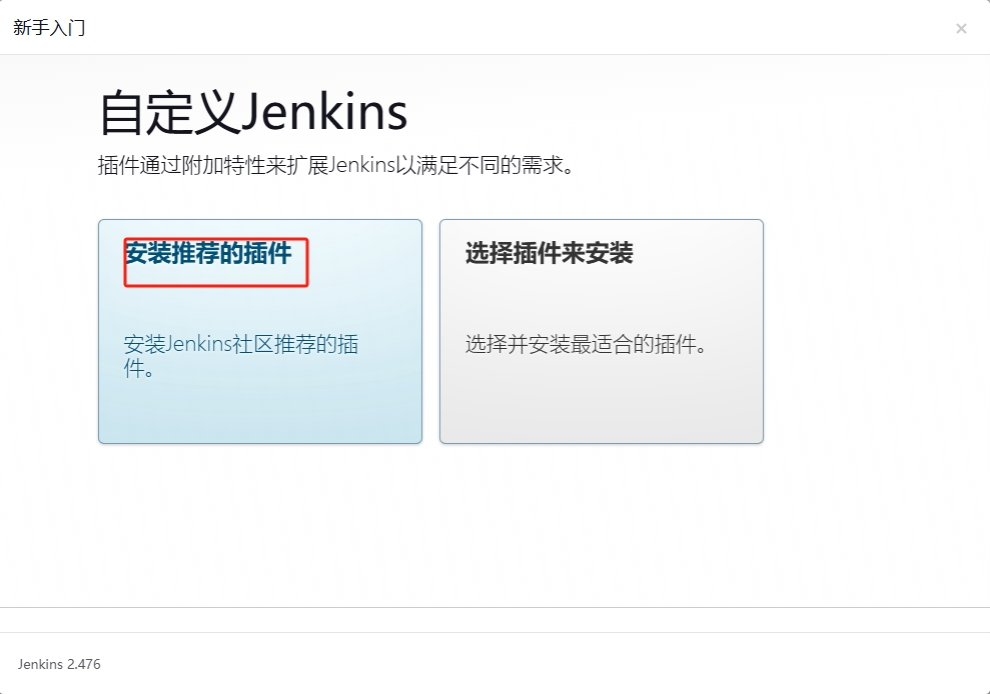
安装插件
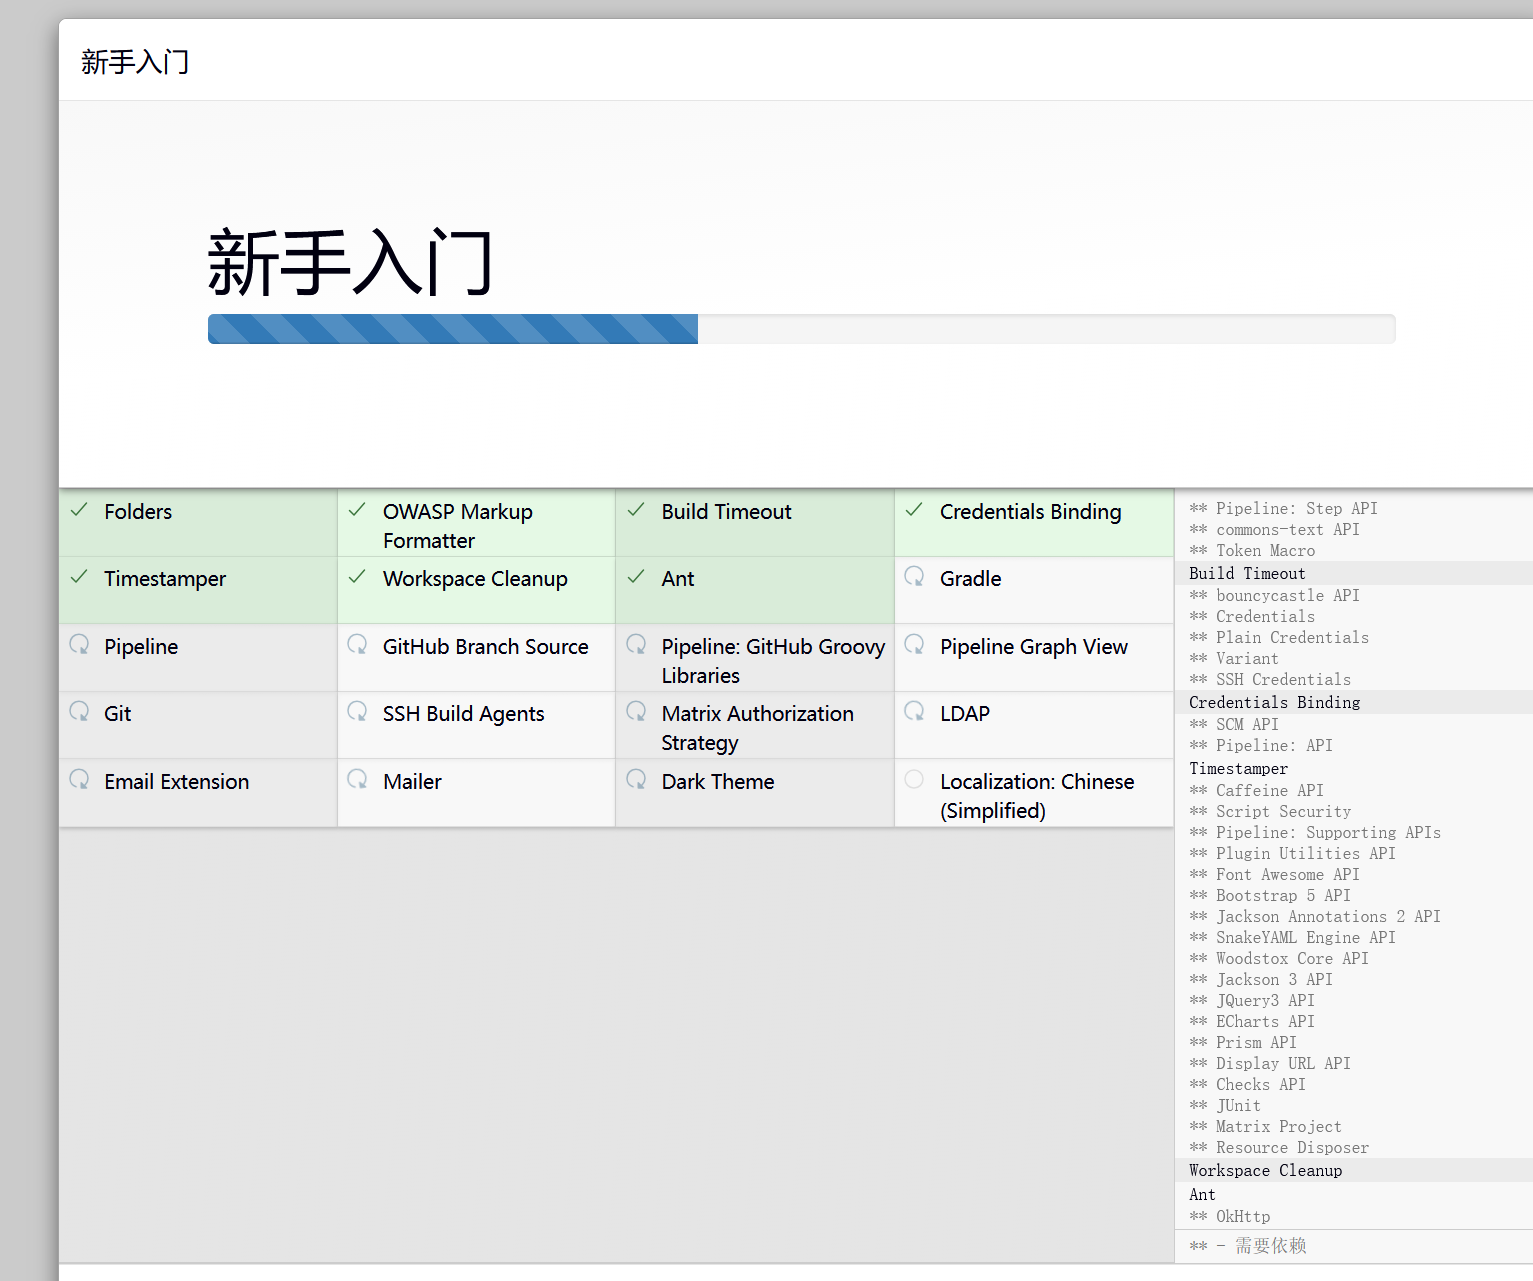
查看插件
bash
[root@jenkins ~]#  cd /var/lib/jenkins/
[root@jenkins jenkins]#  cd plugins/
[root@jenkins plugins]# ls
antisamy-markup-formatter      commons-text-api              jquery3-api.jpi           structs.jpi
antisamy-markup-formatter.jpi  commons-text-api.jpi          json-path-api             timestamper
asm-api                        credentials                   json-path-api.jpi         timestamper.jpi
asm-api.jpi                    credentials-binding           plain-credentials         token-macro
bootstrap5-api                 credentials-binding.jpi       plain-credentials.jpi     token-macro.jpi
bootstrap5-api.jpi             credentials.jpi               plugin-util-api           variant
bouncycastle-api               echarts-api.jpi.tmp           plugin-util-api.jpi       variant.jpi
bouncycastle-api.jpi           font-awesome-api              scm-api                   woodstox-core-api
build-timeout                  font-awesome-api.jpi          scm-api.jpi               woodstox-core-api.jpi
build-timeout.jpi              ionicons-api                  script-security           workflow-api
caffeine-api                   ionicons-api.jpi              script-security.jpi       workflow-api.jpi
caffeine-api.jpi               jackson3-api                  snakeyaml-engine-api      workflow-step-api
cloudbees-folder               jackson3-api.jpi              snakeyaml-engine-api.jpi  workflow-step-api.jpi
cloudbees-folder.jpi           jackson-annotations2-api      ssh-credentials           workflow-support
commons-lang3-api              jackson-annotations2-api.jpi  ssh-credentials.jpi       workflow-support.jpi
commons-lang3-api.jpi          jquery3-api                   structs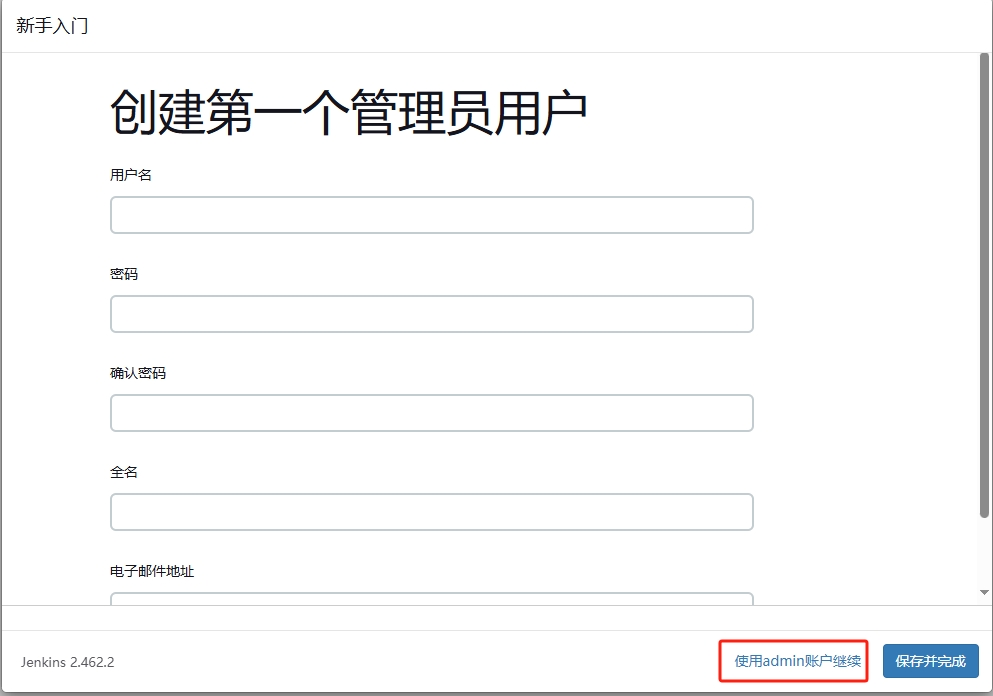
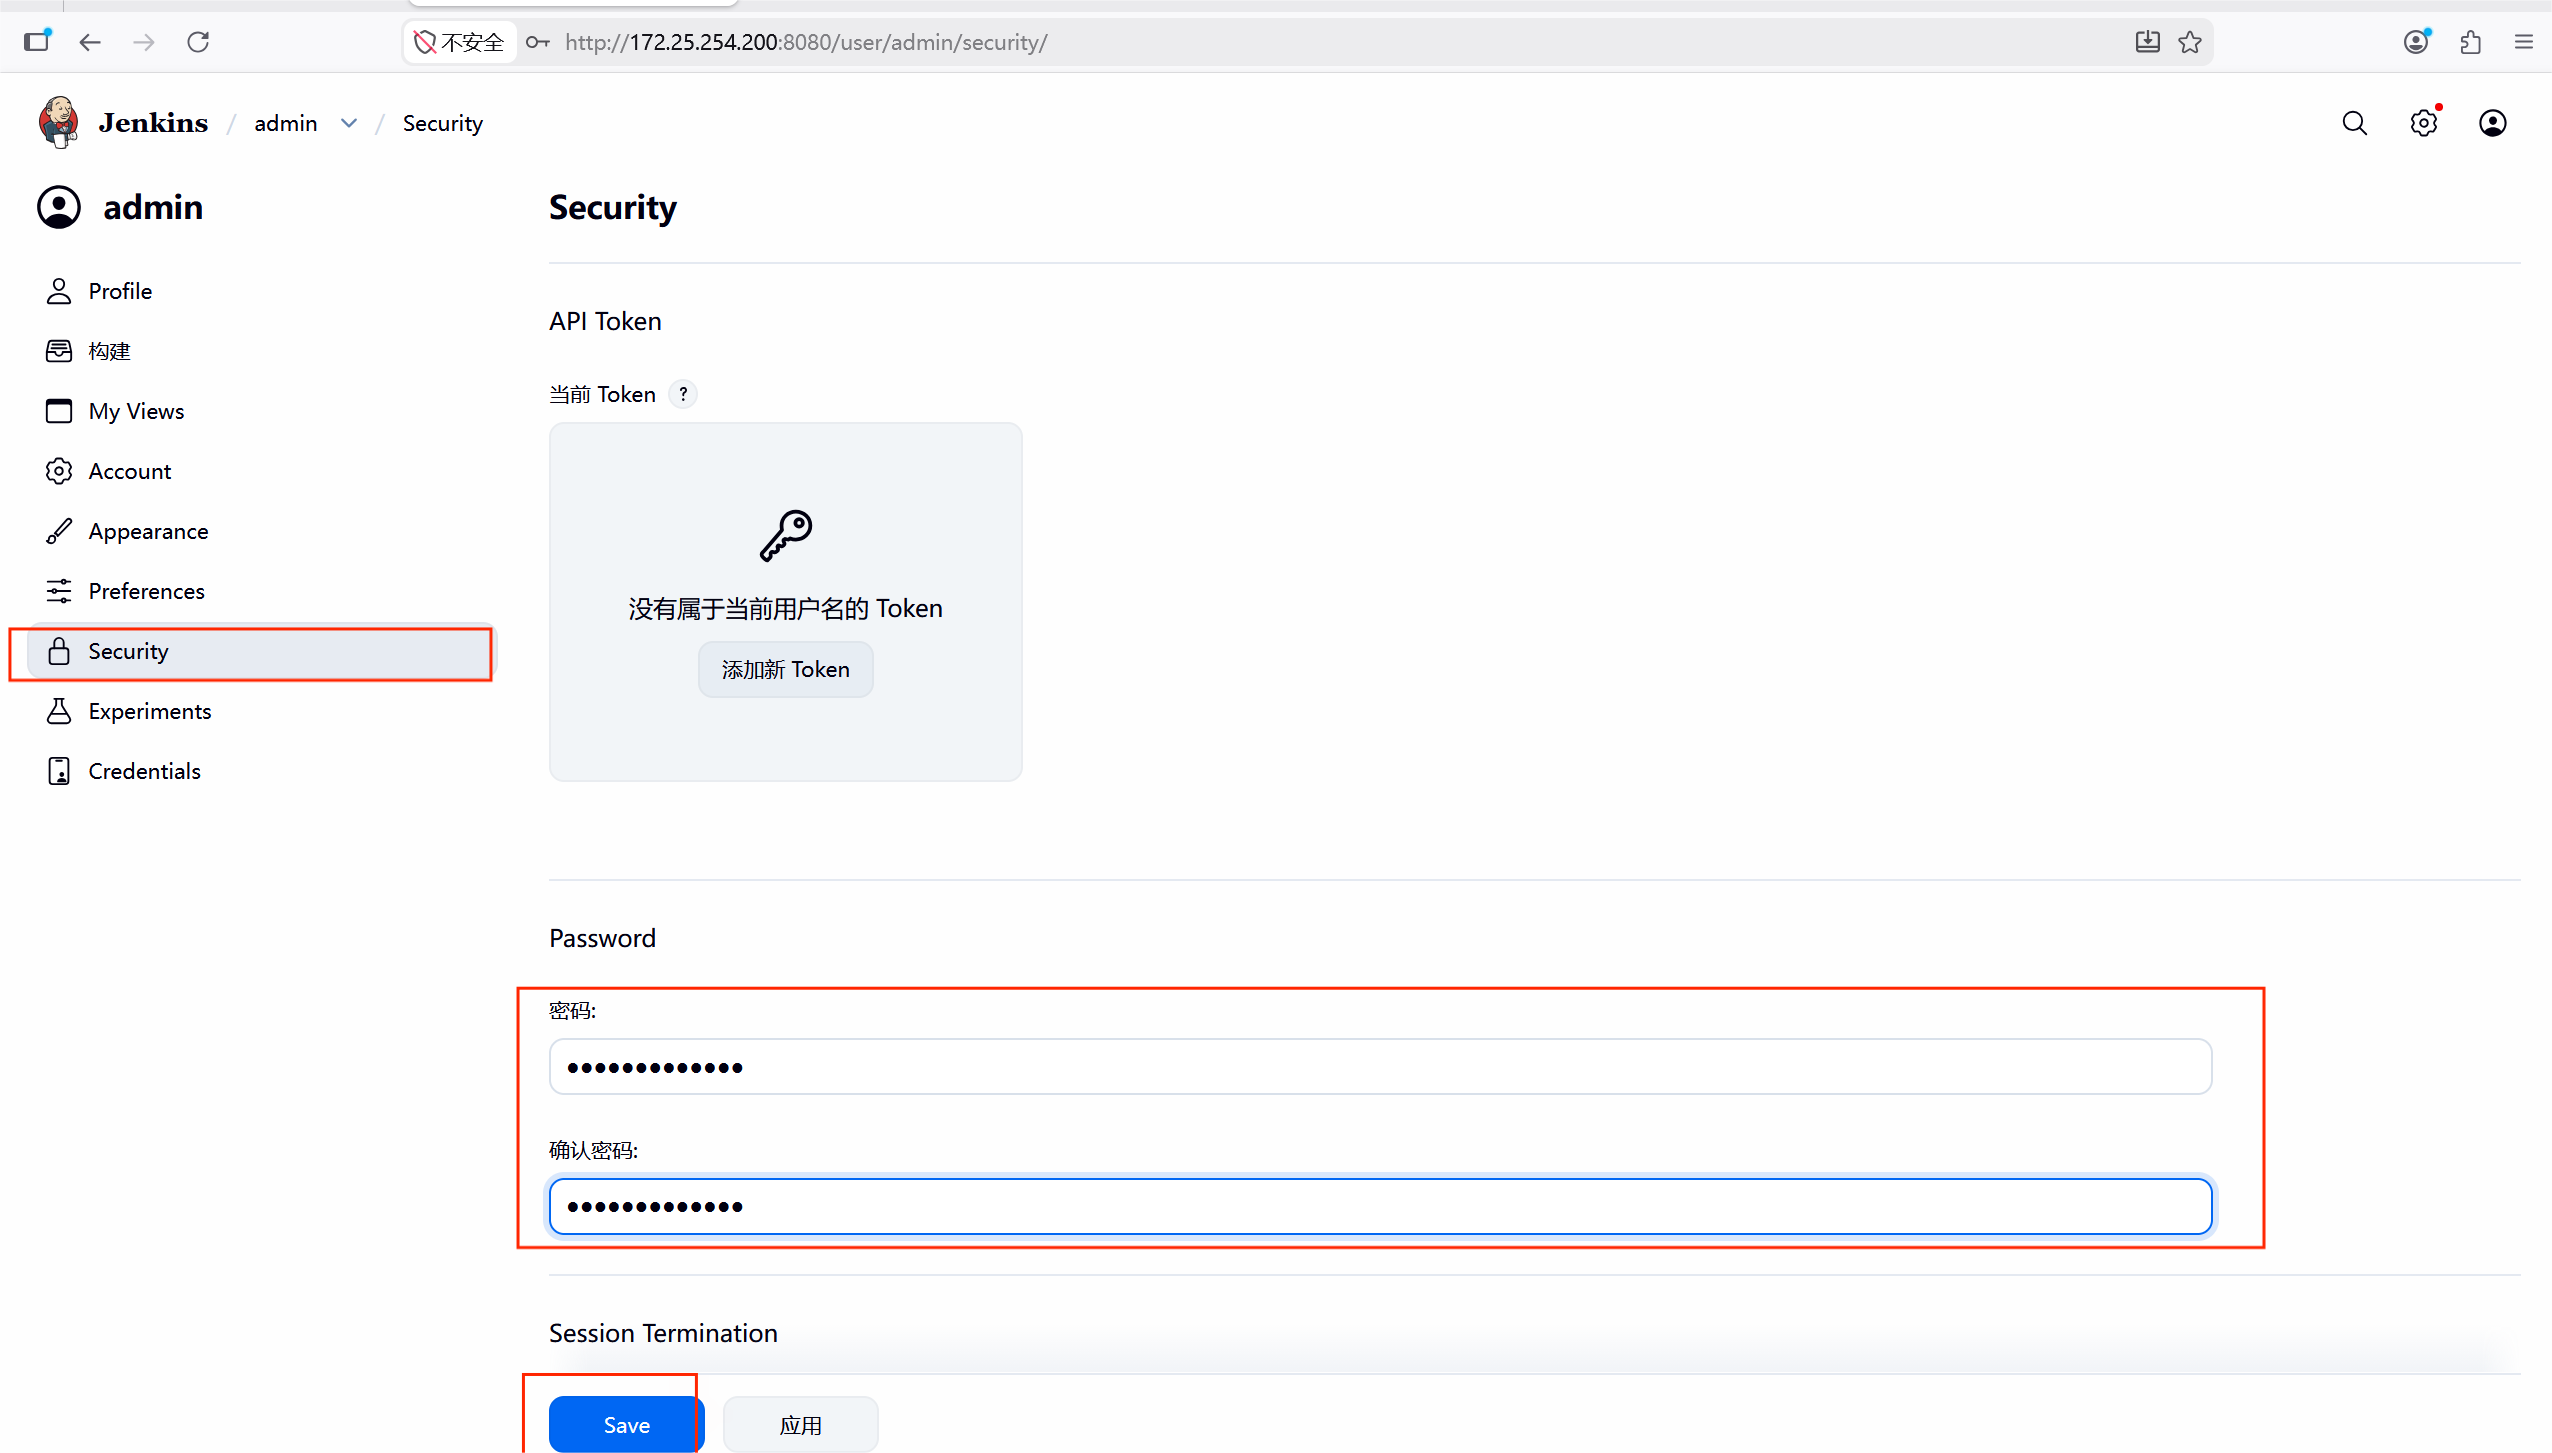
建议修改admin的密码,在admin的设置中修改即可
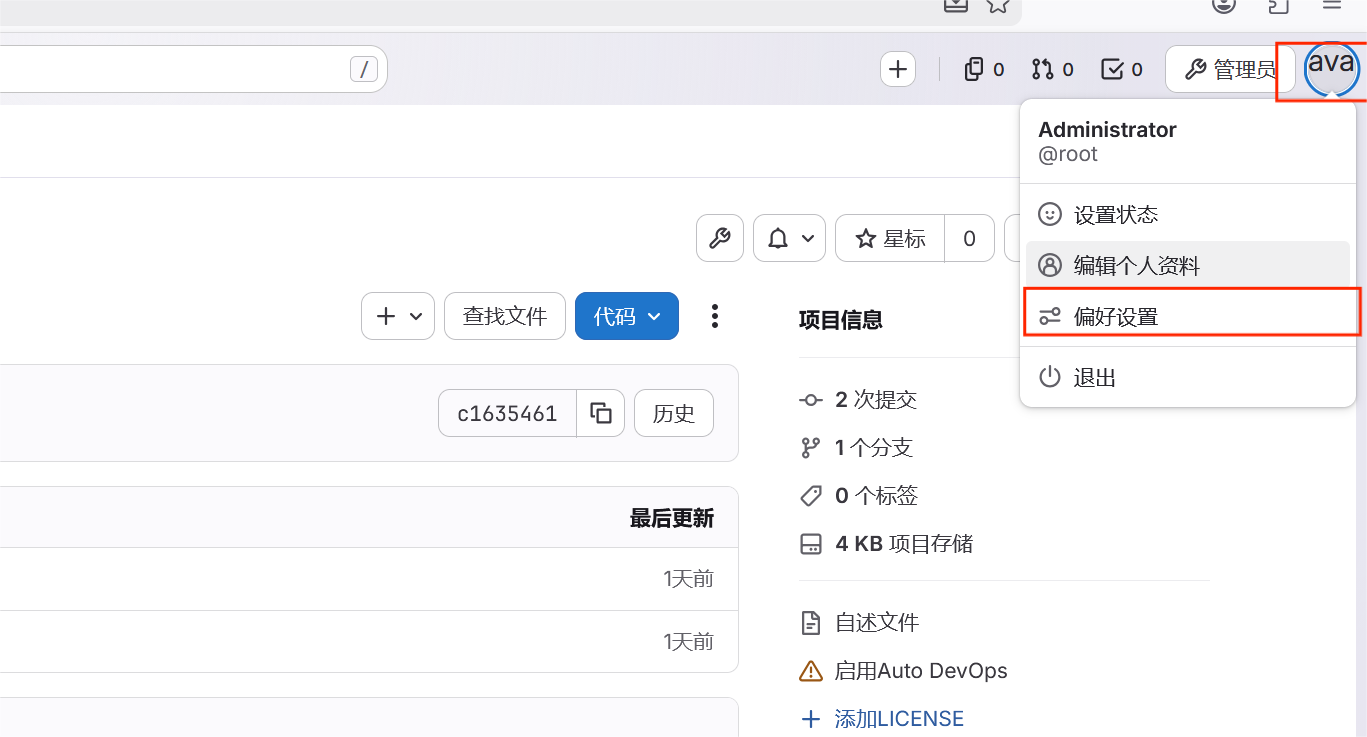
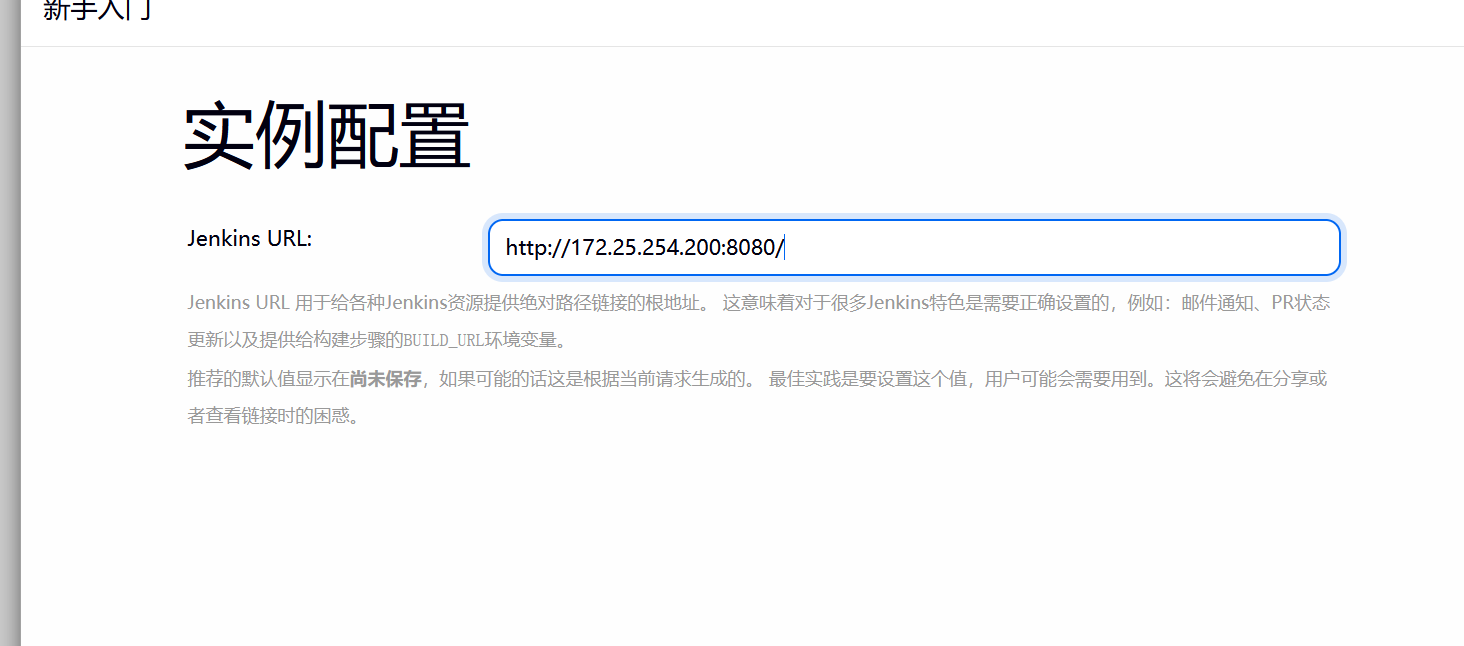
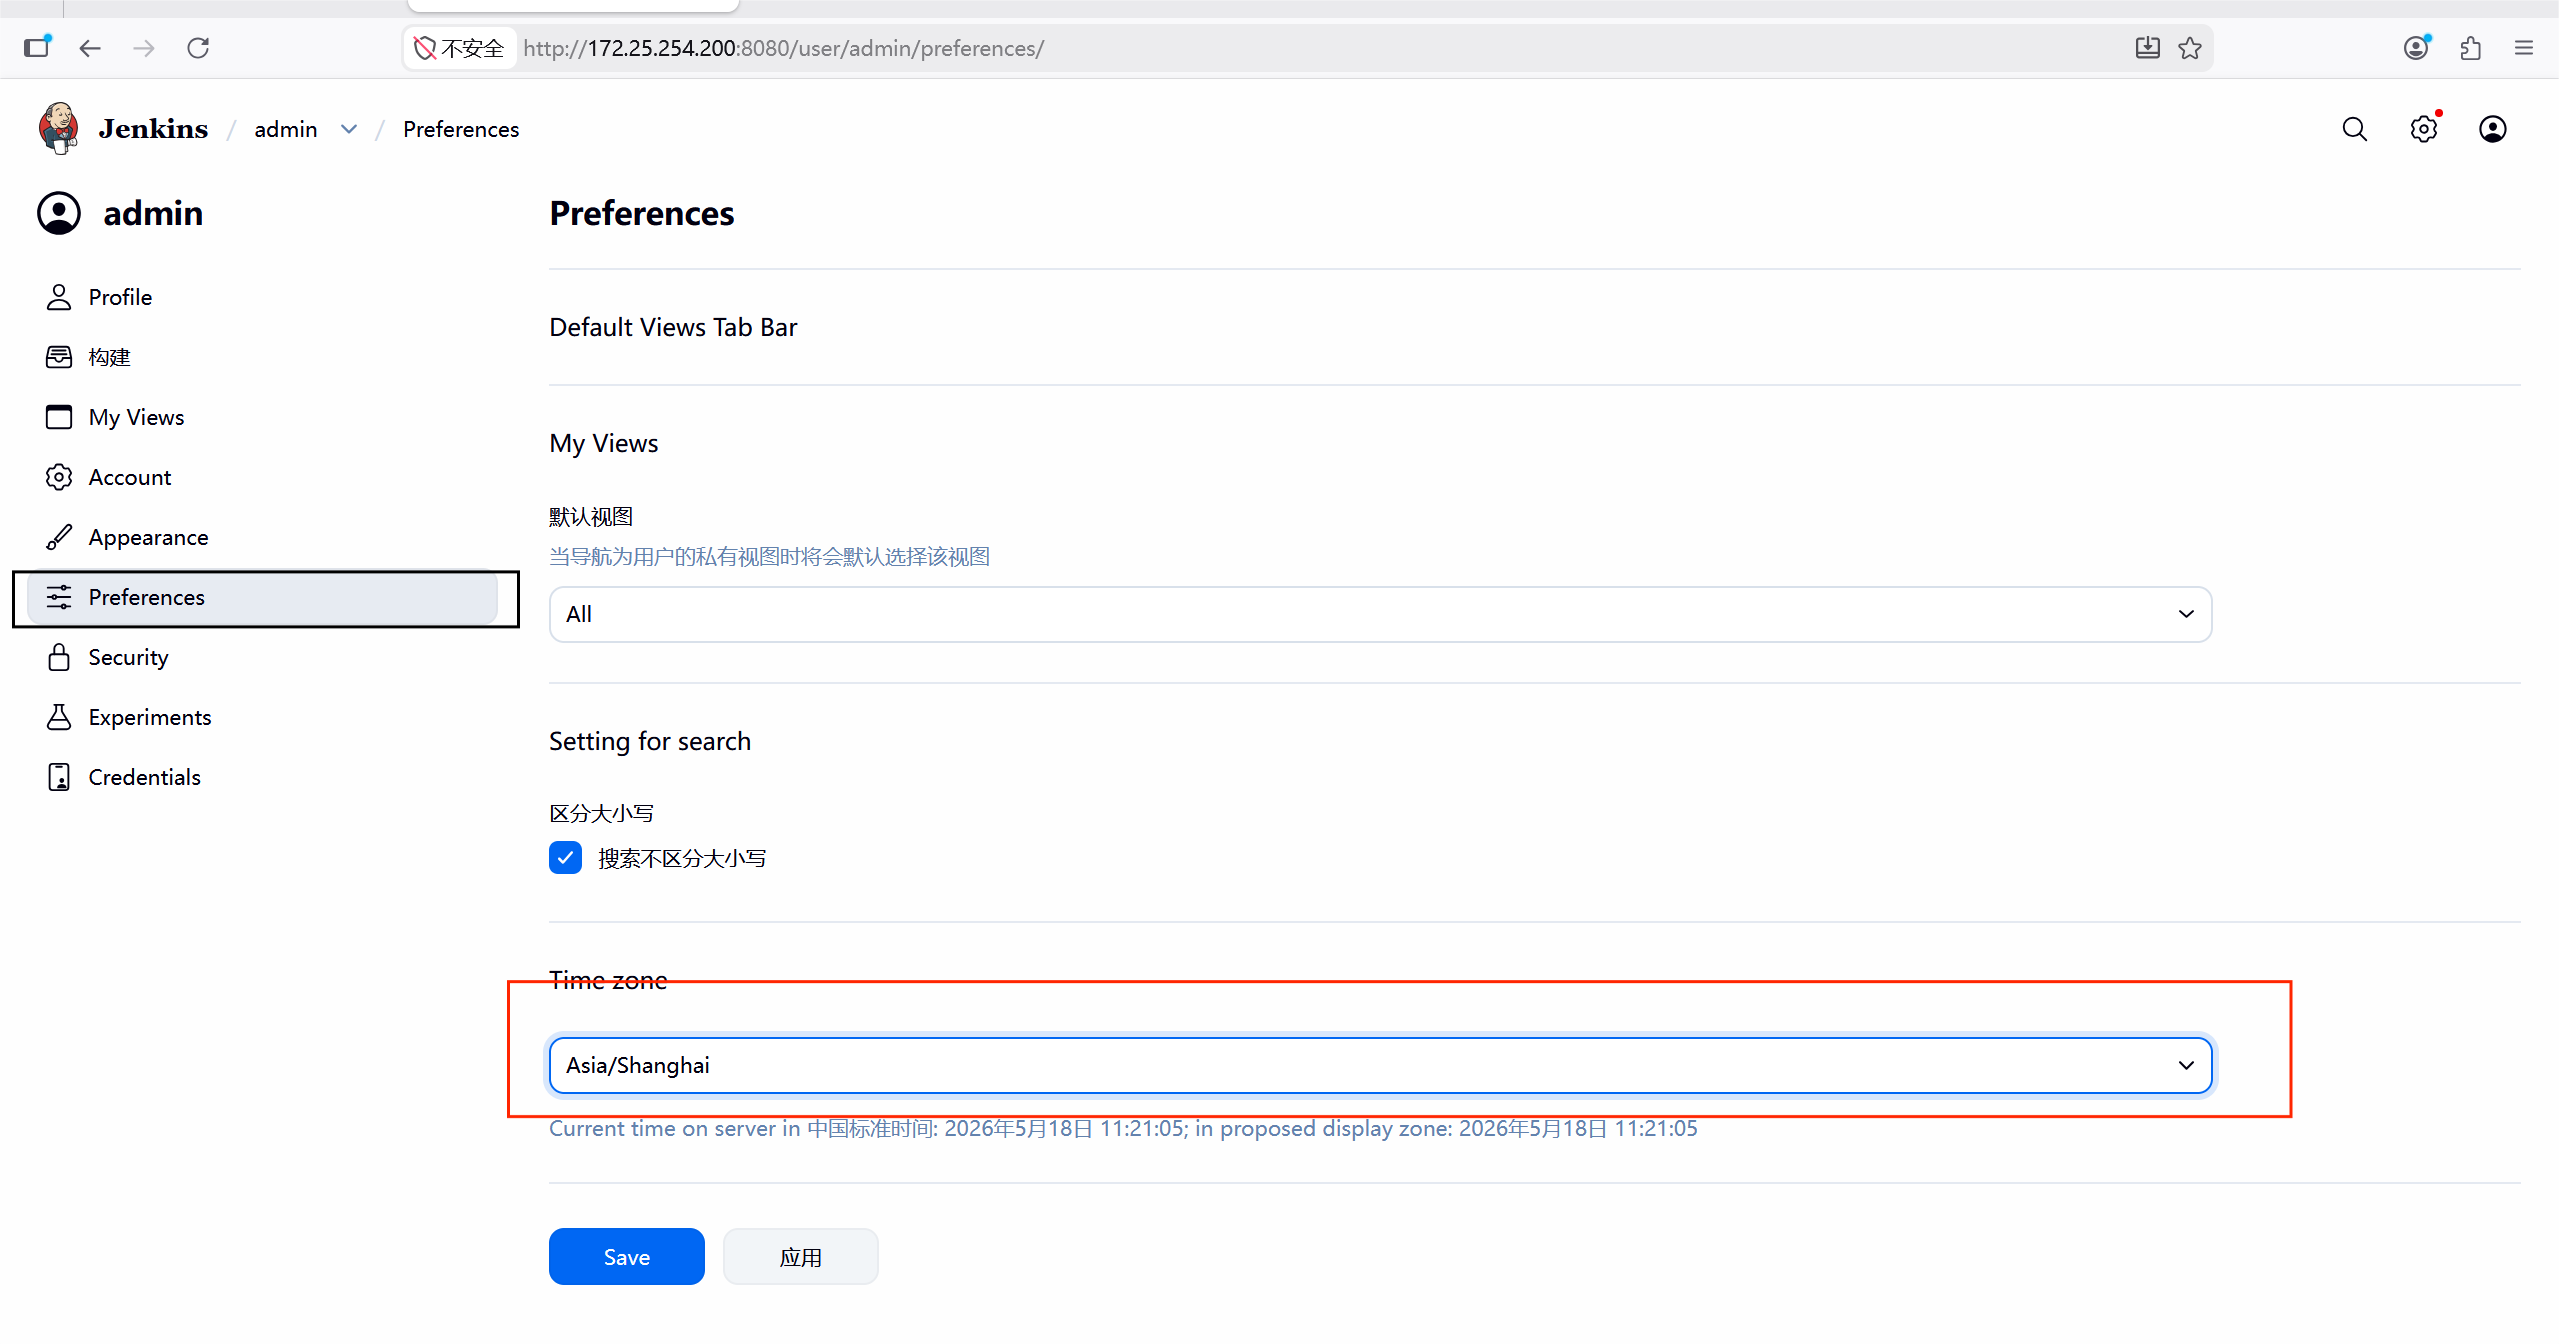
#修改时间
#修改密码
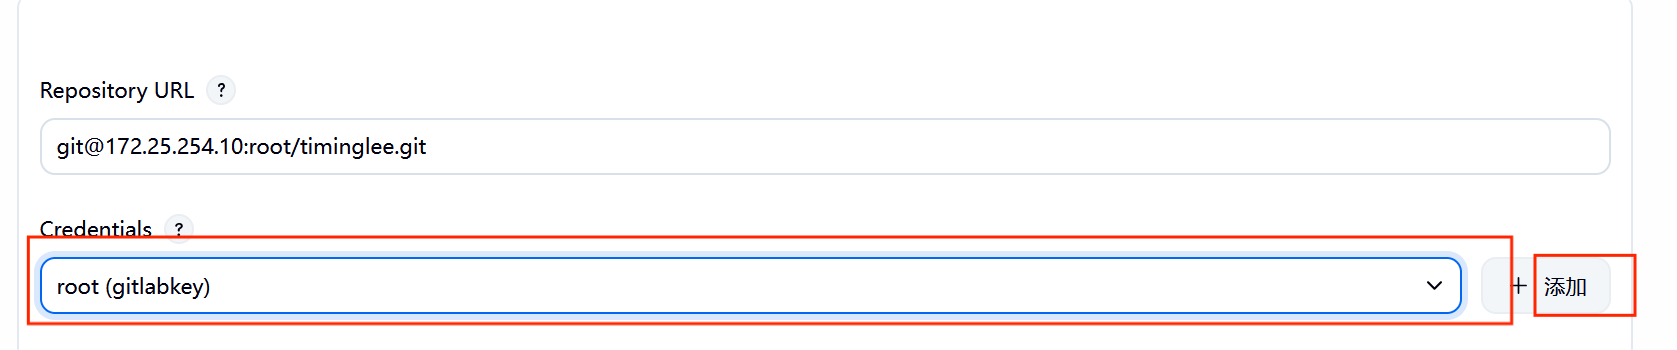
6.3 jenkins与gitlab****的整合
#然后需要到gitlab复制代码

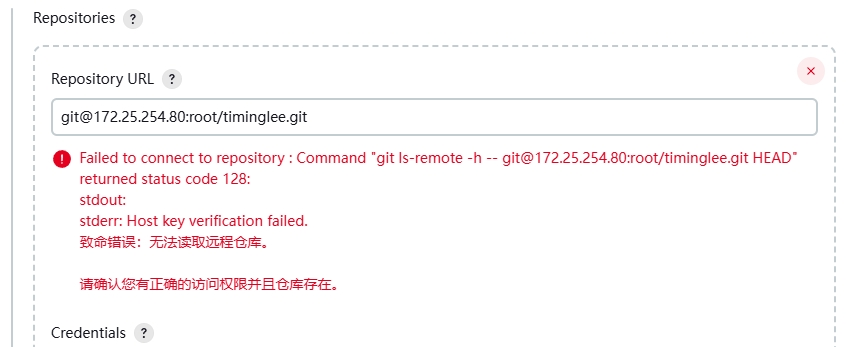
这个错误的原因是因为本机没有gitlab上的sshkey
bash
[root@jenkins ~]# ssh-keygen
Generating public/private rsa key pair.
Enter file in which to save the key (/root/.ssh/id_rsa):
Created directory '/root/.ssh'.
Enter passphrase (empty for no passphrase):
Enter same passphrase again:
Your identification has been saved in /root/.ssh/id_rsa
Your public key has been saved in /root/.ssh/id_rsa.pub
The key fingerprint is:
SHA256:uuF7wWxlker/zO5JXZ32Z1DyJM4q90rrU86XLjqroaQ root@jenkins
The key's randomart image is:
+---[RSA 3072]----+
|           .     |
|          o      |
|         . .  o o|
|        . o  o *o|
|       +So    +o+|
|       .*    ooo.|
|      oo +. =+. =|
|     .ooo oO.=ooo|
|     E++ ..B#o+o |
+----[SHA256]-----+
[root@jenkins ~]#
[root@jenkins ~]# cat /root/.ssh/id_rsa.pub
ssh-rsa AAAAB3NzaC1yc2EAAAADAQABAAABgQCjoiQu/RgGNl7bKg1zxnci9piNR01YvYlRsiBaX+Agf6A2l8v4XWUQyAMo/f/IWJlXCtqU7JWMd6R0kXArzuUfIDc86+SJMQAQxSmNUVt18asd46EibF6m6zexHTZnKhKrnTbj5Raz2NXNjYgb3yEutF2EviEEEa/vC54/+Psc3FXm/M5yyPgbiyGCG2eoEDmuK3pbGMV+D3Vfeng2dOc5olBiCs4aiOmrzuNCch1zP7axP98WgUFB6Wr/fwBEIleW4H+fokshvmV0v36RHet/hohiLyIKlIVMNOw45Egp8oQht5kfGSE4zUMz+8NhZc+uG1wGBv4cCoG2ClS1ZOOsu8CzCIvy61raceEuZh+/MwW1qeQ07Jlu/3bce6bYGKewKljSVkeY6jO1DjH462HyVbGHEp0EBP/uI50LUEGPGGna0GjjYRzqfGtng4yXwA25FGXgowf2fsbKfzN9S5We2cyhELMYxreLRHA+fZaNu+AWsoEnif/O+qnExxkqk8U= root@jenkins
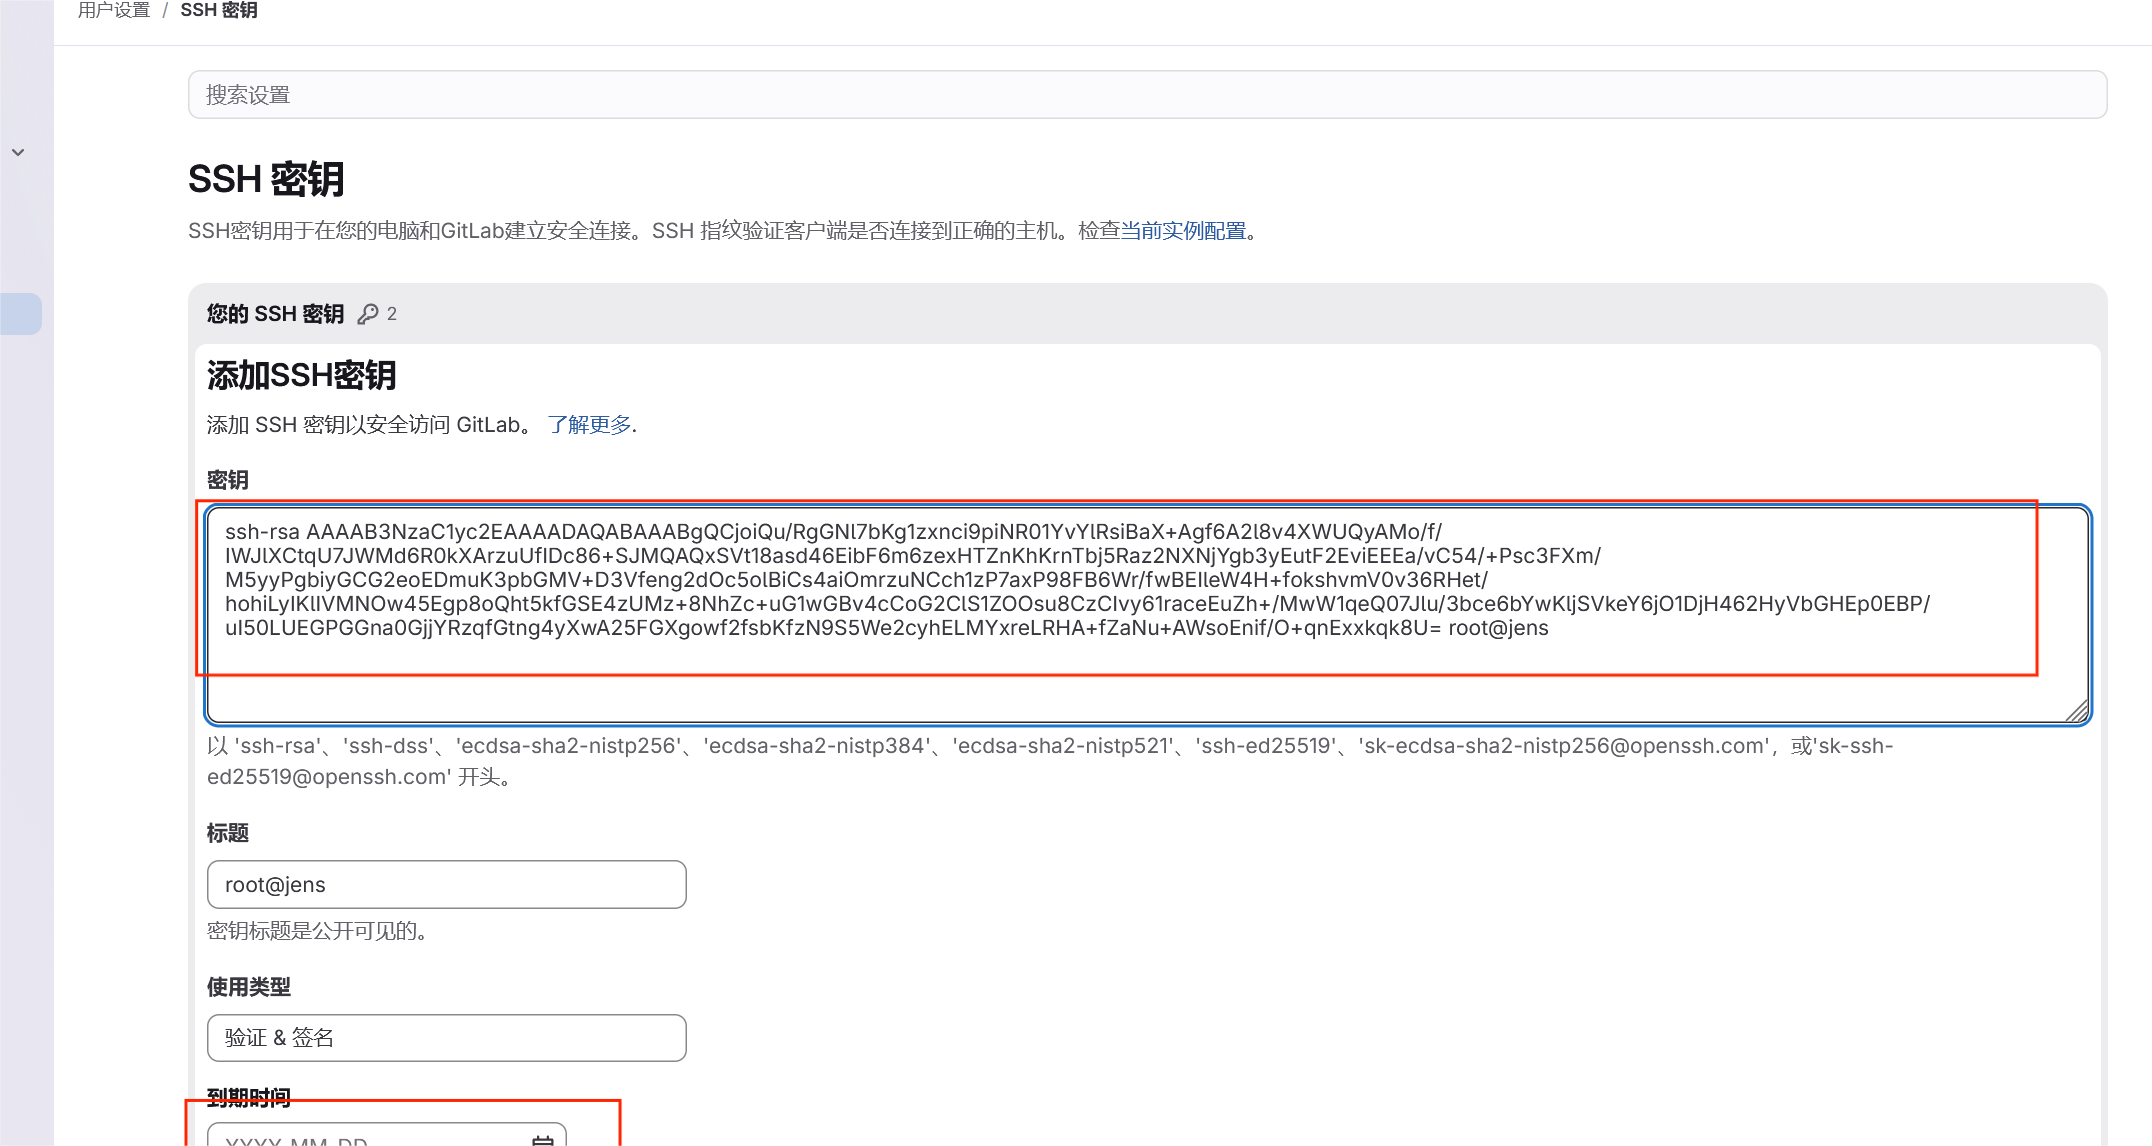
#进入jenkins

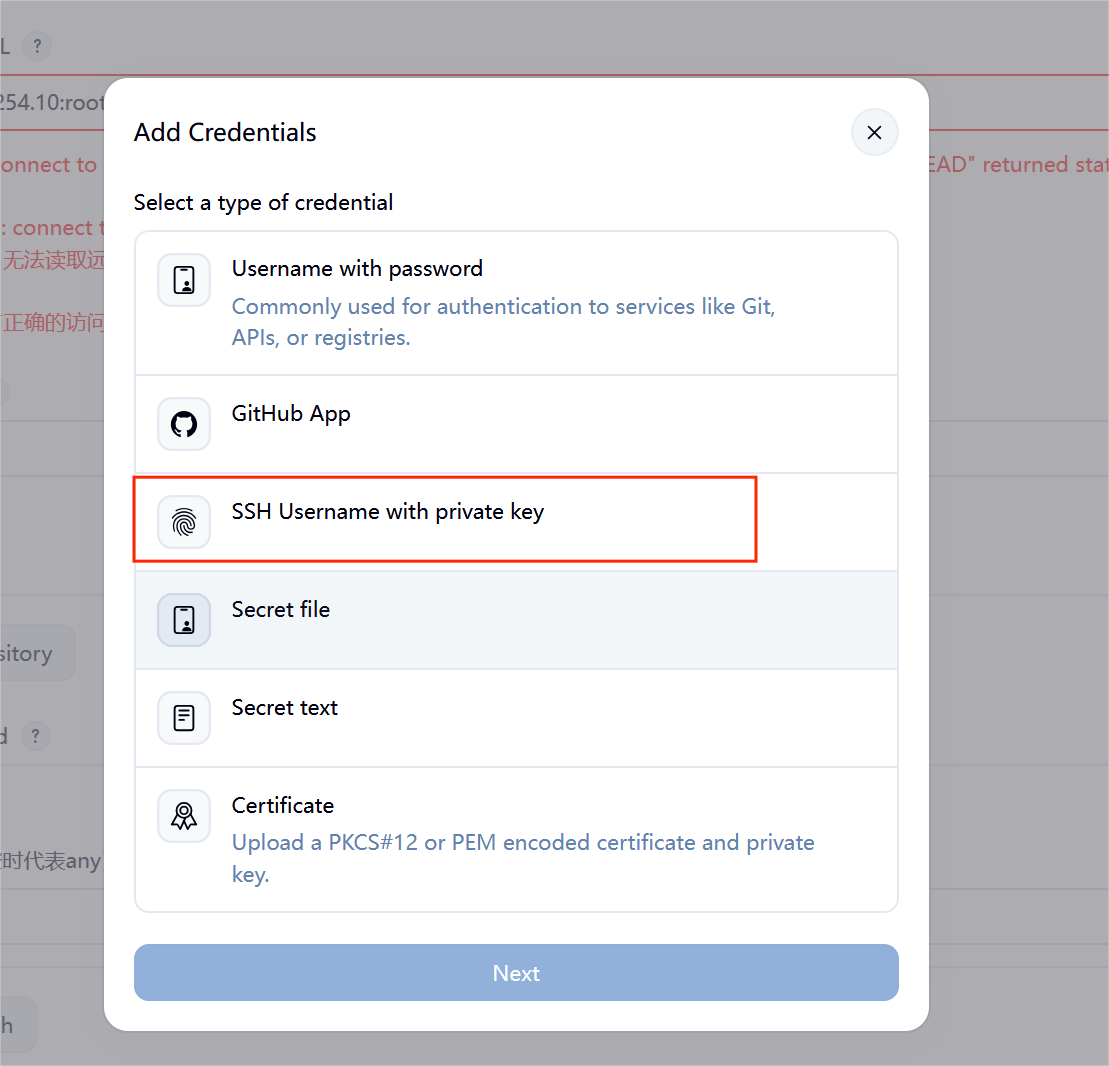
#查找私有密钥
bash
[root@jenkins ~]# cat /root/.ssh/id_rsa
-----BEGIN OPENSSH PRIVATE KEY-----
b3BlbnNzaC1rZXktdjEAAAAABG5vbmUAAAAEbm9uZQAAAAAAAAABAAABlwAAAAdzc2gtcn
NhAAAAAwEAAQAAAYEAo6IkLv0YBjZe2yoNc8Z3IvaYjUdNWL2JUbIgWl/gIH+gNpfL+F1l
EMgDKP3/yFiZVwralOyVjHekdJFwK87lHyA3POvkiTEAEMUpjVFbdfGrHeOhImxepus3sR
02ZyoSq5024+UWs9jVzY2IG98hLrRdhL4hBBGv7wueP/j7HNxV5vzOcsj4G4shghtnqBA5
rit6WxjFfg91X3p4NnTnOaJQYgrOGojpq87jQnIdcz+2sT/fFoFBQelq/38ARCJXluB/n6
JLIb5ldL9+kR3rf4aIYi8iCpSFTDTsOORIKfKEIbeZHxkhOM1DM/vDYWXPrhtcBgb+HAqB
tgpUtWTjrLvAswiL8uta2nHhLmYfvzMFtankNOyZbv923Hum2BinsCpY0lZHmOoztQ4x+O
th8lWxhxKdBAT/7iOdC1BBjxhp2tBo42Ec6nxrZ4OMl8ANuRRl4KMH9n7Gyn8zfUuVntnM
oRCzGMa3i0RwPn2WjbvgFrKBJ4n/zvqpxMcZKpPFAAAFiBhNBgsYTQYLAAAAB3NzaC1yc2
EAAAGBAKOiJC79GAY2XtsqDXPGdyL2mI1HTVi9iVGyIFpf4CB/oDaXy/hdZRDIAyj9/8hY
mVcK2pTslYx3pHSRcCvO5R8gNzzr5IkxABDFKY1RW3Xxqx3joSJsXqbrN7EdNmcqEqudNu
PlFrPY1c2NiBvfIS60XYS+IQQRr+8Lnj/4+xzcVeb8znLI+BuLIYIbZ6gQOa4relsYxX4P
dV96eDZ05zmiUGIKzhqI6avO40JyHXM/trE/3xaBQUHpav9/AEQiV5bgf5+iSyG+ZXS/fp
Ed63+GiGIvIgqUhUw07DjkSCnyhCG3mR8ZITjNQzP7w2Flz64bXAYG/hwKgbYKVLVk46y7
wLMIi/LrWtpx4S5mH78zBbWp5DTsmW7/dtx7ptgYp7AqWNJWR5jqM7UOMfjrYfJVsYcSnQ
QE/+4jnQtQQY8YadrQaONhHOp8a2eDjJfADbkUZeCjB/Z+xsp/M31LlZ7ZzKEQsxjGt4tE
cD59lo274BaygSeJ/876qcTHGSqTxQAAAAMBAAEAAAGANedSzhvXzywYAVCQD+SAGIdtZ5
TmeOYvFzd7iunsdig0yeclbRKvGWEaEWXi3ce587+Ck+5/sT80cKX8cqH8Pk2phKscpMj8
gYnBj2kOnQLYYMc8rI9QeuIffXvnEQL+FYR7sYUk/mfevpDyFmRhlPYbnH/ZdnKxJykHn4
FQj4hRz/7Vr2BewwwJJMgMVIPLzIFMFDhLzqQfAS3h7eaCySycGEAA9yLE/zDvElNvOijx
8N/eiJZZvfG7qqDWoJtDAniODTdKj5uaqCt44WExBIuOUYSWPSzegNoburEETqiYFqEMGC
KwWLh/k51pYJCD1T43Th3rHtgltzmFRli/O+kEzbtT6RfNNOHUEwrrxMgSJOcEPhd5+oi2
gCUkeK9ufWxaQ4Z0qkw9kMGWh2pBMglFbvWe7gllcCxaWc0gdrcVnblkfmMKqunZv5i2Oq
122UdFsqAp54c+qV03eh2zB50wa6PYG9HQ++A24Tbb9Sgx8D0jChIOGe7YhzTxFmsdAAAA
wB29QSep63MxyYs5M95WrsAFBYxr840F14OekL6Ybikq3W0qq69s2h3J3Et9ELBisR295g
A3vUeVoaOxIEwRxBgdZLqy9EyAlOla0QySC05dX5aWAZwEXrMQoNj23bvr9DpSdHmTxnNQ
ng9ncEs89poW2nTP5ZyqlIyrkcP7YGJZiWPQxCgCyOPHx6fLj2gXtiNf8TGMSPqt3iKqoD
D29F9964hh0J3FKzgmEpFcYN8L/HxqJZQS+H9OzD9Kn8fTswAAAMEAzzDIGRcoxnKJ6oYi
880piOJFgxSniP0v5zkVEWgIpIoIcbOwE+bJFwu49QadcfbfilJ1tvTOeWtmTzqPJnHPRB
4B/j2qQ2RVURJsvO3TVI1y+g/SurqrL7c4rTtttwNC+NI6AB9nYH5IDKD7SxV0gwinIJyX
L8JCGYED7y9h1Nmi4DHrIdScq0/uTe4jSTdDUeL7j13LX3JcKDNCbFYLzGlXnBjpSUs+5o
rhAM/T8Tp016VLsv5eLf6n0QBFrWh3AAAAwQDKLoTcCOna35eGmBD1gHIFSovI6BXb+IA9
hnnb1cNrmDzlutttwApTz1zgVO+ylHaroNA/zqoYMHdd83I5A+AekpD8Mvx6wFnZl1FhiH
B31atu4R545+aodBfNYUyjM4vEFNqy8swl3XYiaCusxWDkP/Gma/4H3MUXvc5EWD9EtxVf
rw3bEpDNCRK6tw3jwfaQn4EV+IWOJz+qZaO8q9DuGeTjhold6IfWSdloLjb19awsyiAbzM
PEkhBSydKbcKMAAAAMcm9vdEBqZW5raW5zAQIDBAUGBw==
-----END OPENSSH PRIVATE KEY-----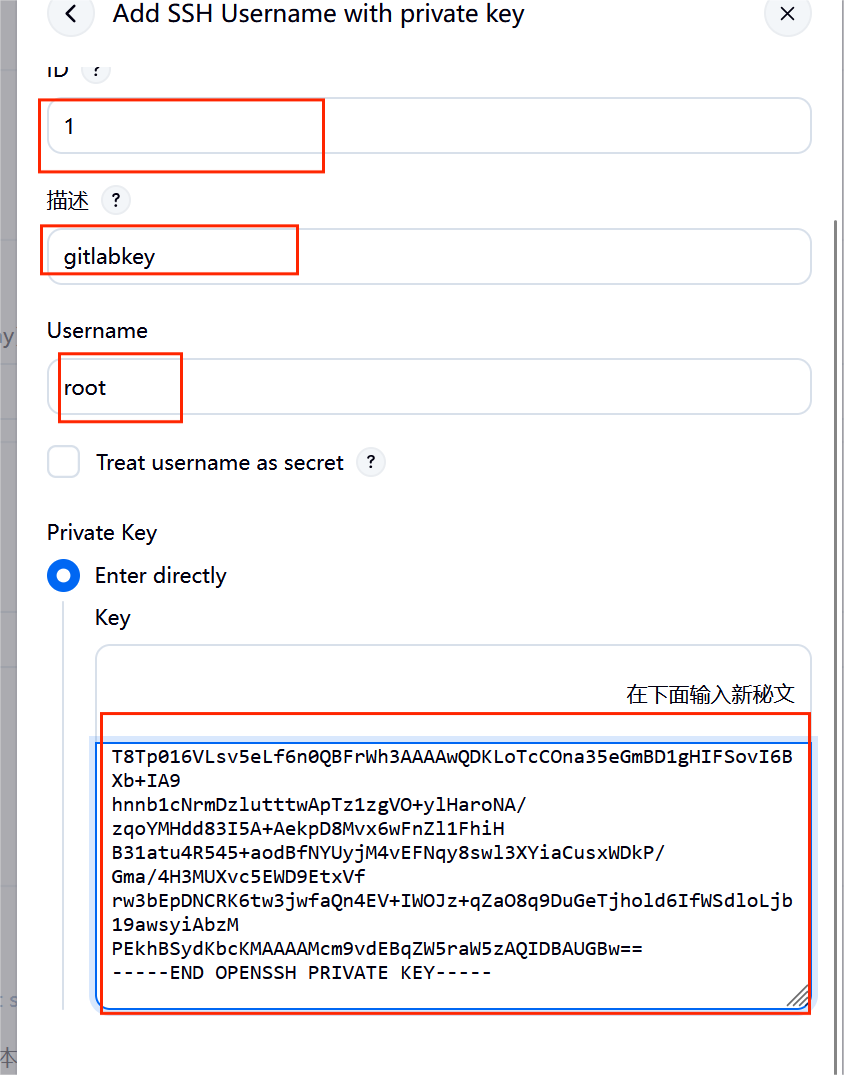
添加完成后报错依然存在,因为ssh首次连接主机是需要签名认证
bash
[root@jenkins ~]# vim /etc/ssh/ssh_config
20  Host *
33    StrictHostKeyChecking no
#完成此设定即可解
#在gitlab里面查看分支

#重新回到Jenkins
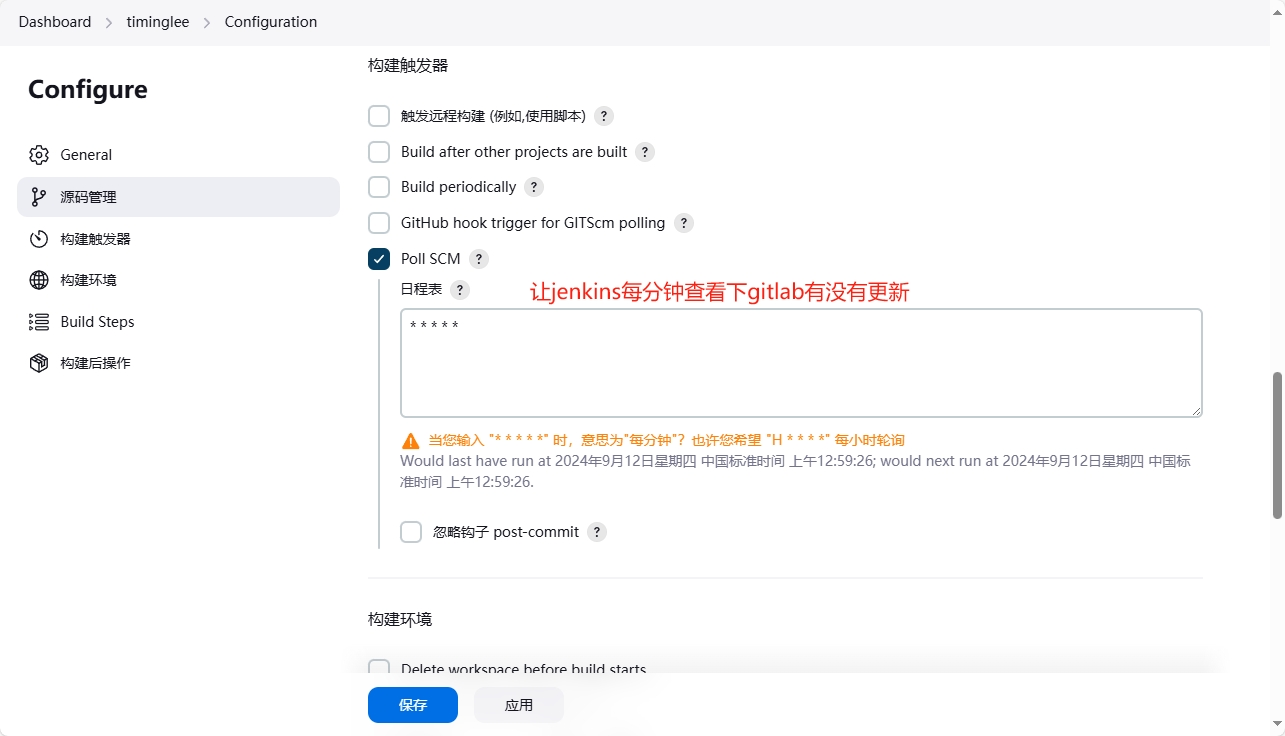
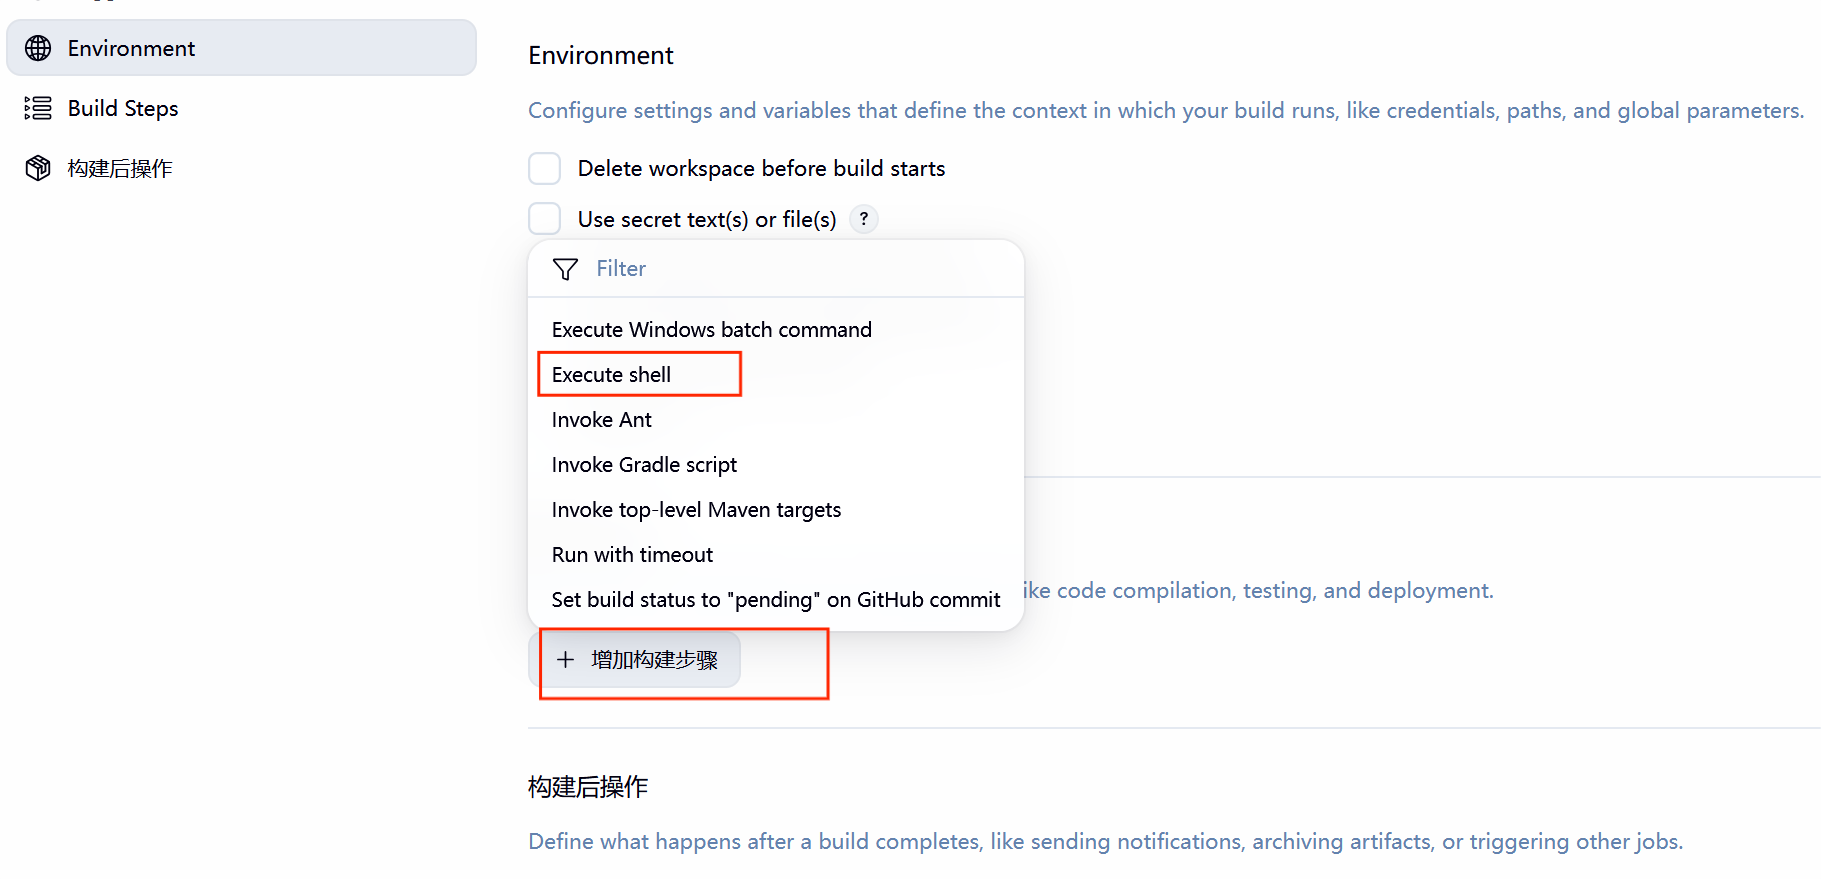
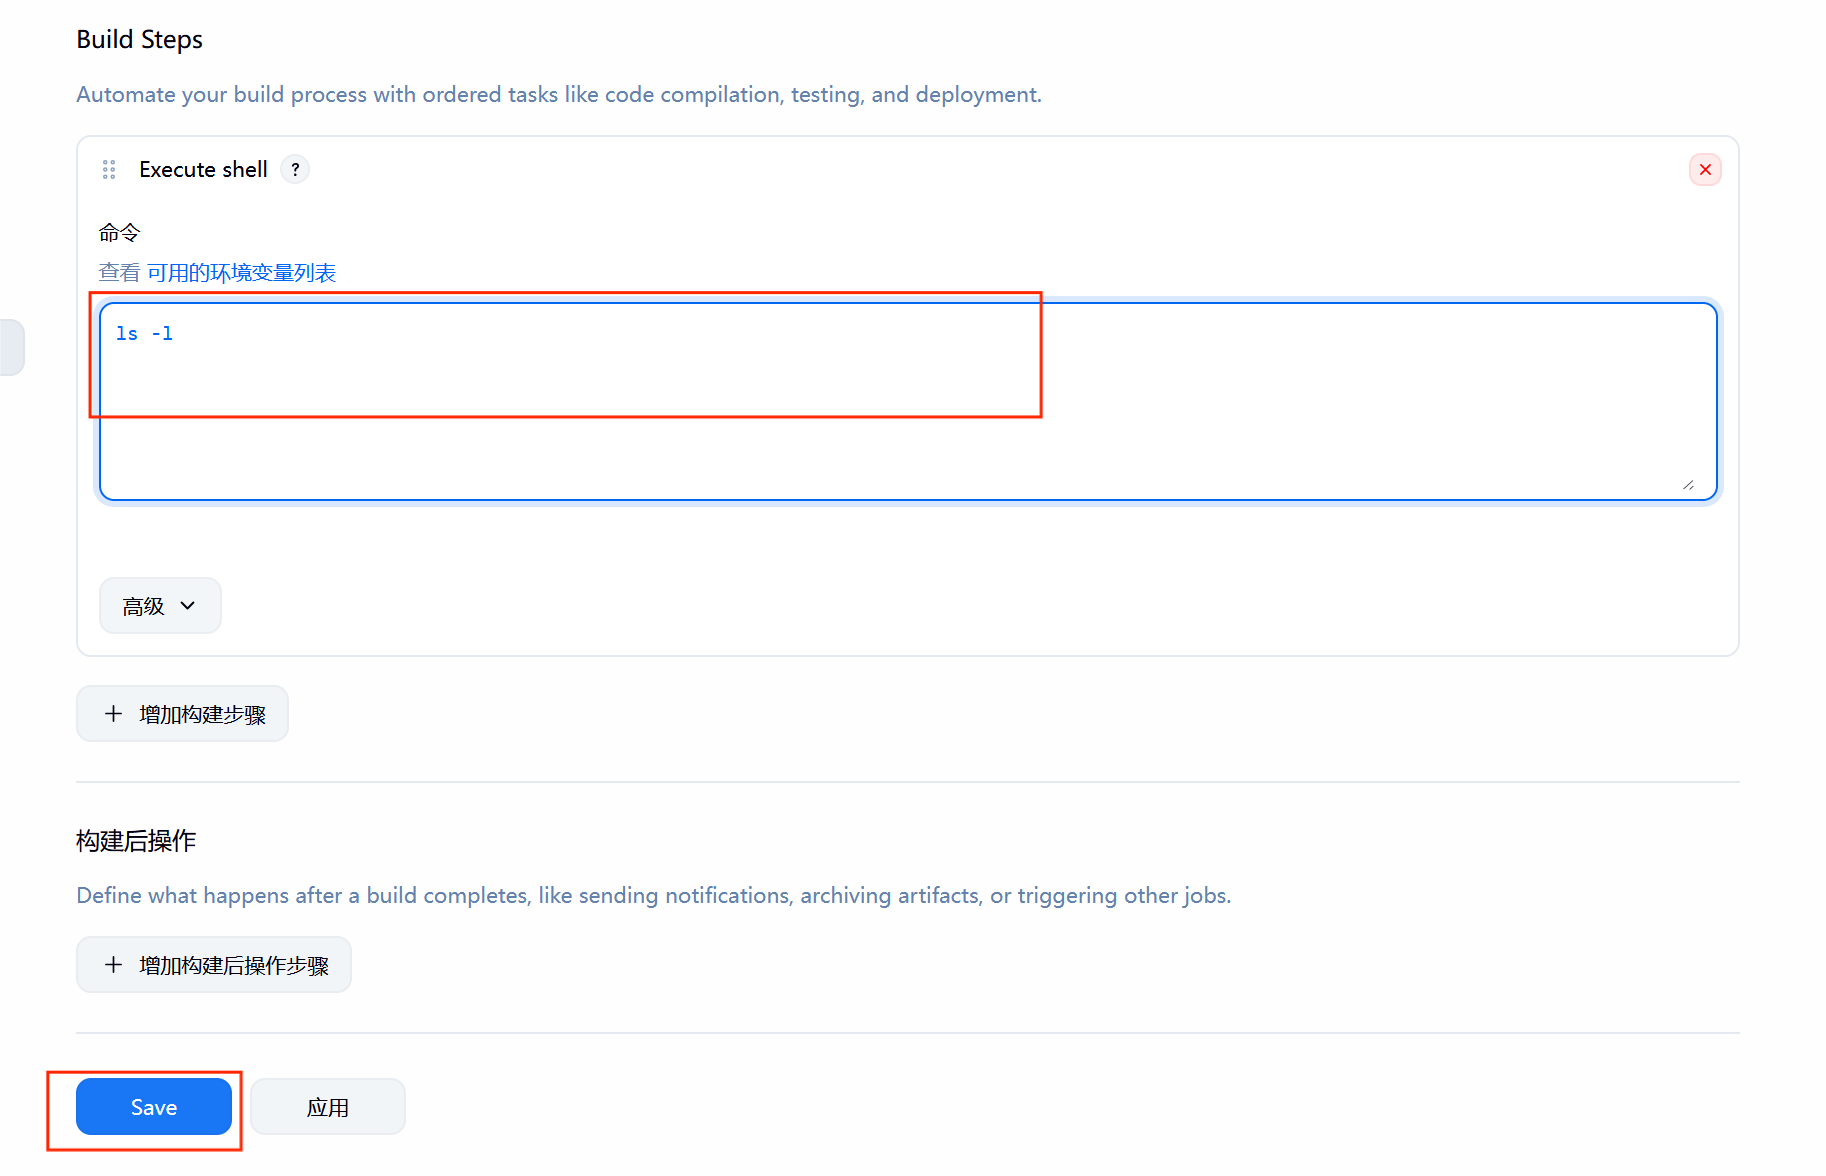
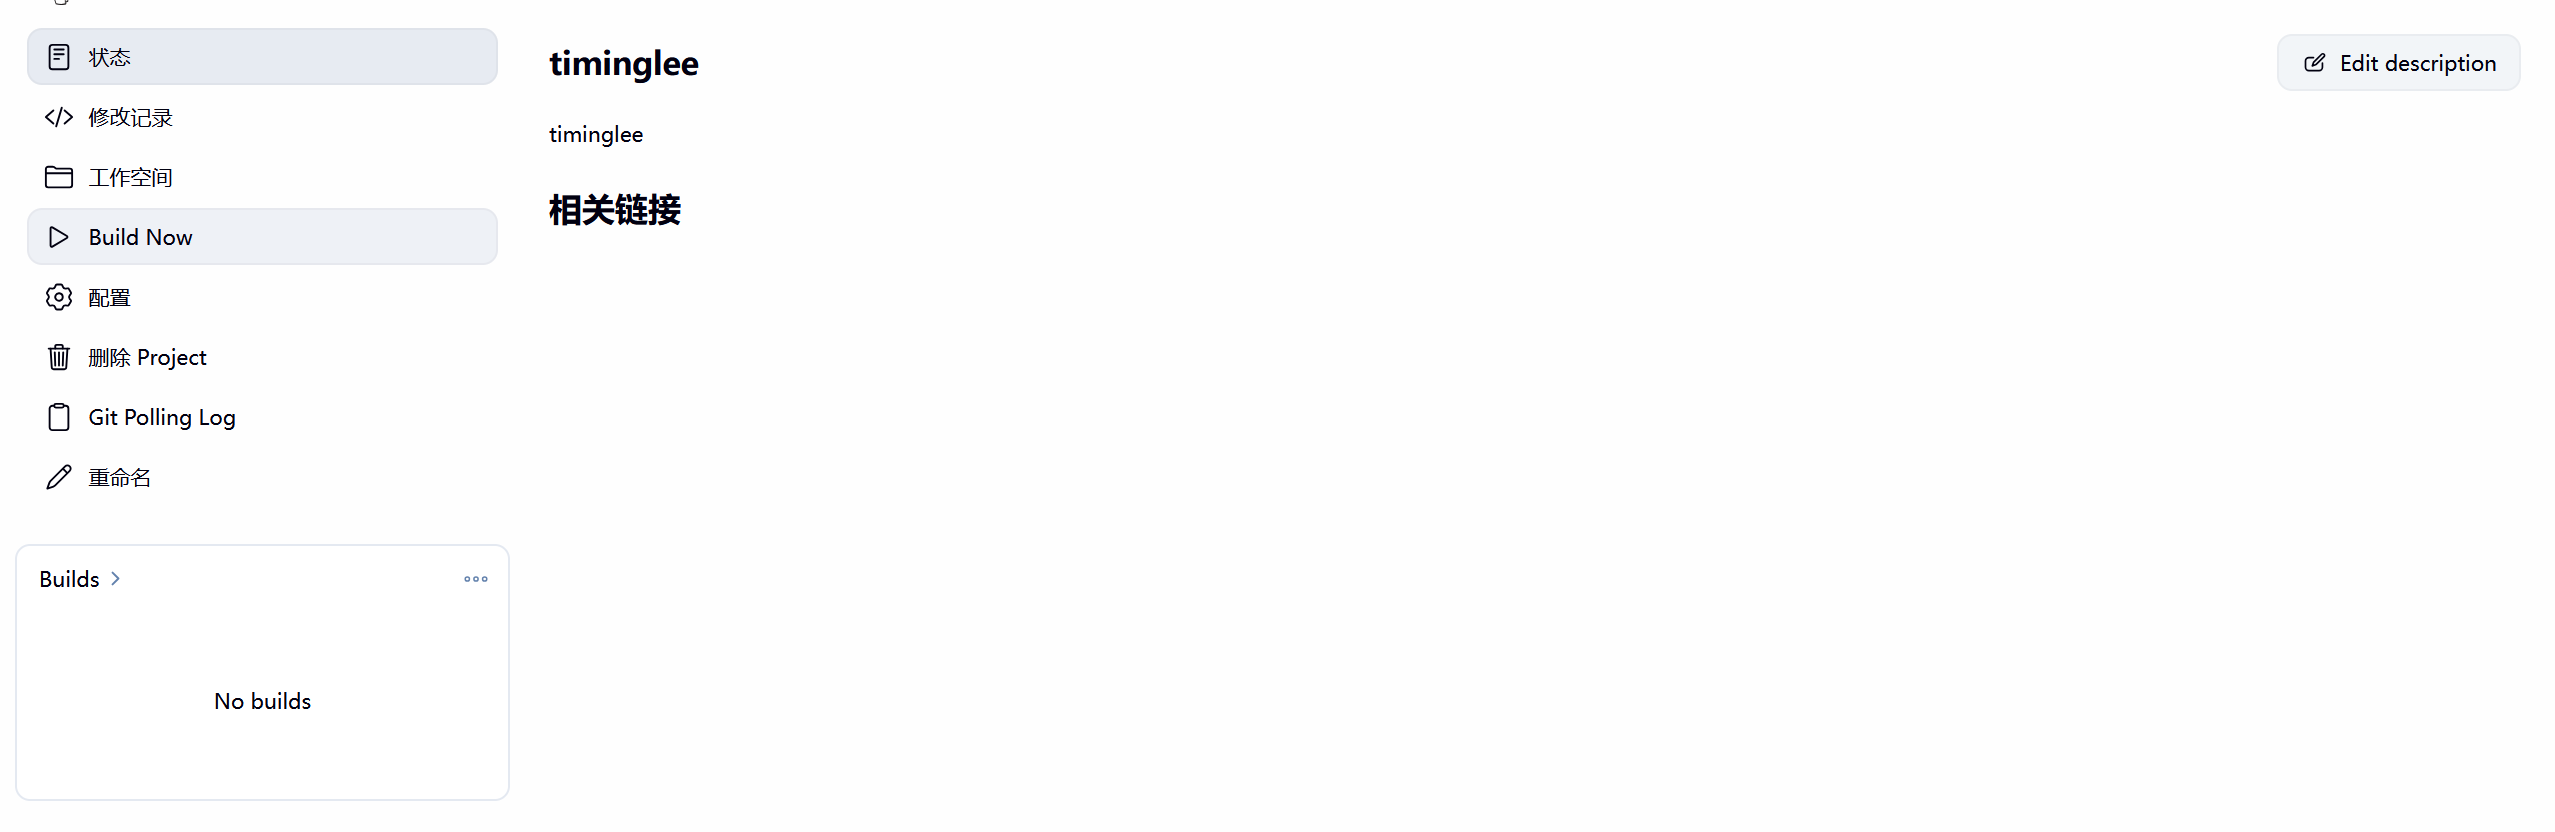
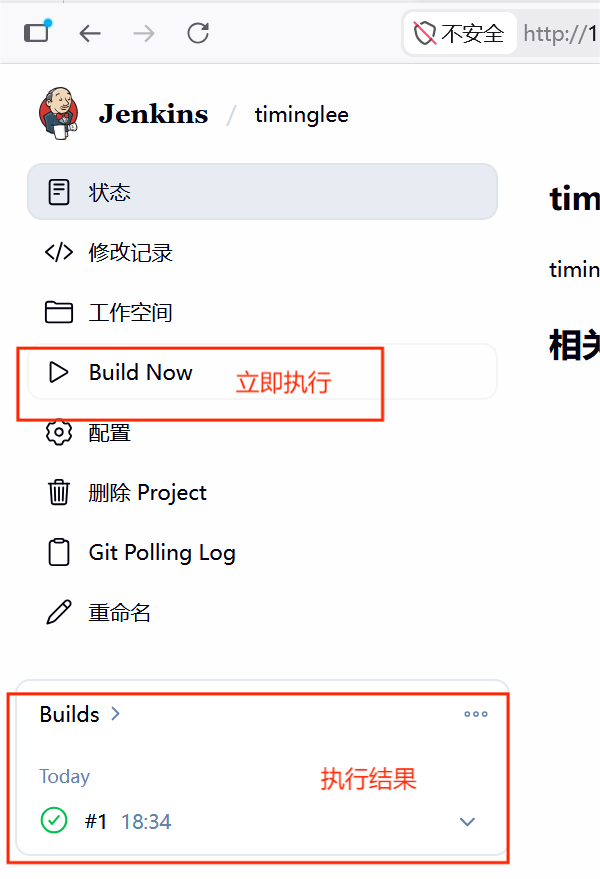

**#**测试自动触发
bash
[root@CICD-node1 ~]# cd /root/timinglee/
[root@CICD-node1 timinglee]# echo hello test > testfile
[root@CICD-node1 timinglee]# git add testfile
[root@CICD-node1 timinglee]# git commit -m "testfile v1"
[main 7ef8dd8] testfile v1
 1 file changed, 1 insertion(+)
 create mode 100644 testfile
[root@CICD-node1 timinglee]# git push -u origin main
枚举对象中: 4, 完成.
对象计数中: 100% (4/4), 完成.
使用 4 个线程进行压缩
压缩对象中: 100% (2/2), 完成.
写入对象中: 100% (3/3), 311 字节 | 311.00 KiB/s, 完成.
总共 3(差异 0),复用 0(差异 0),包复用 0(来自  0 个包)
To 172.25.254.10:root/timinglee.git
   c163546..7ef8dd8  main -> main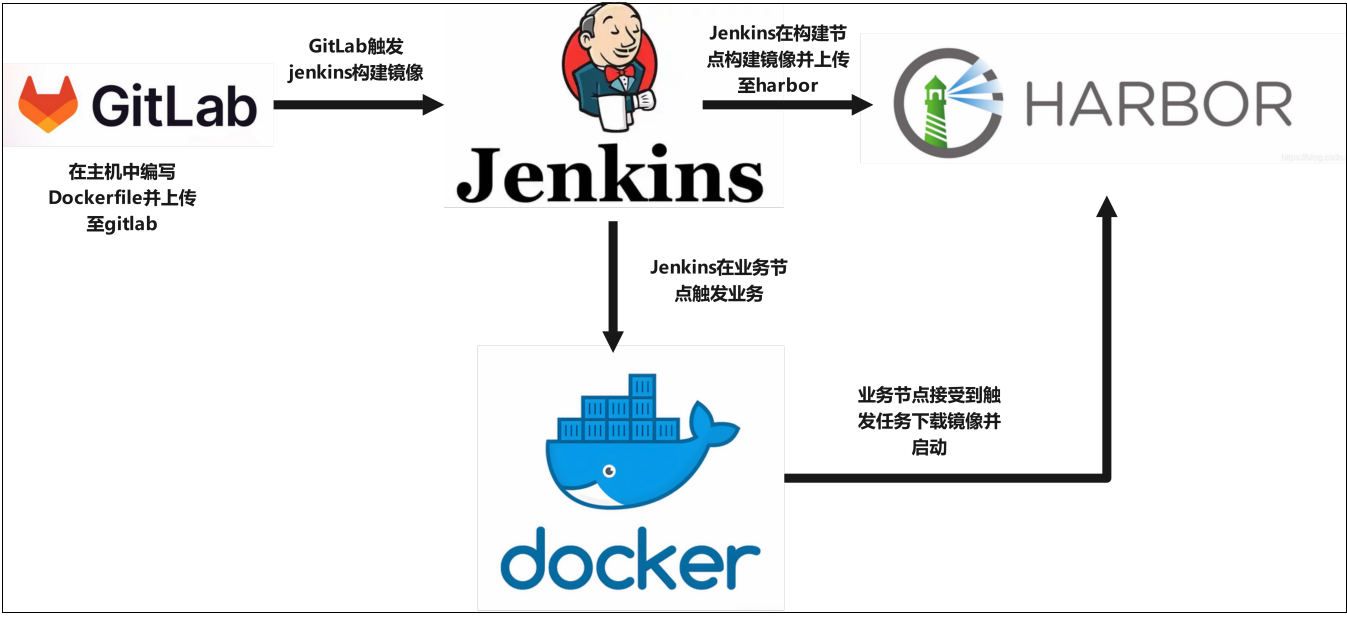
分支 'main' 设置为跟踪 'origin/main'。七**.**持续集成持续交付企业示例
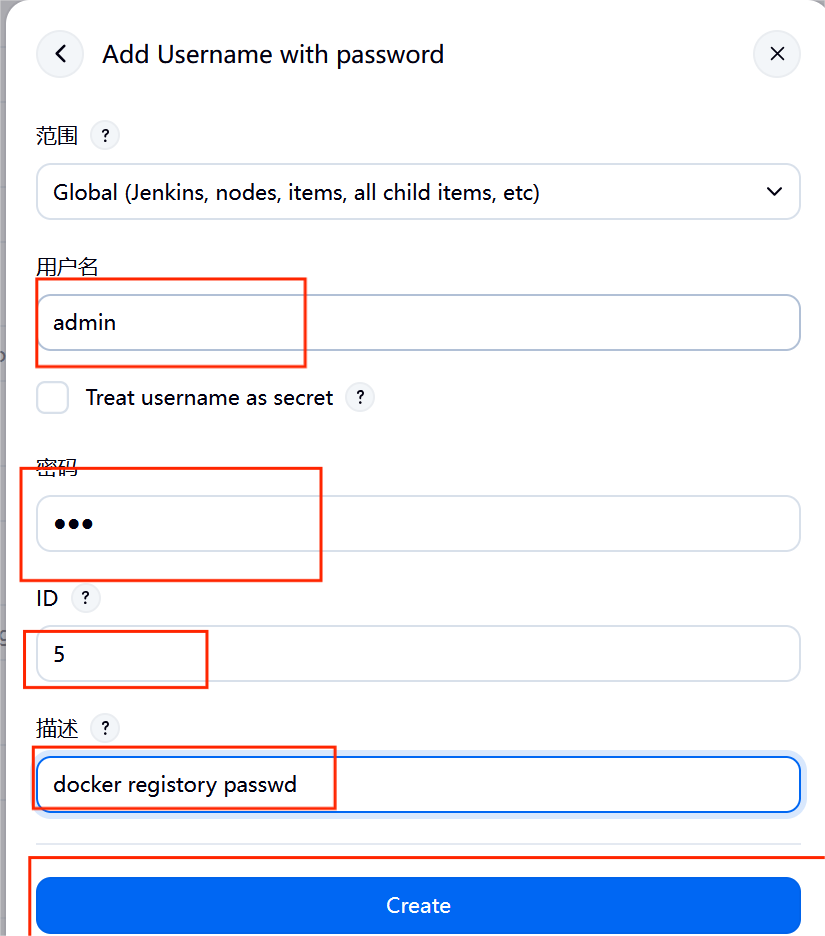
为了让容器构建镜像可以持续集成并自动上传到harbor仓库,业务主机通过持续交付自动从仓库中
下载镜像最近版本并实现业务更新
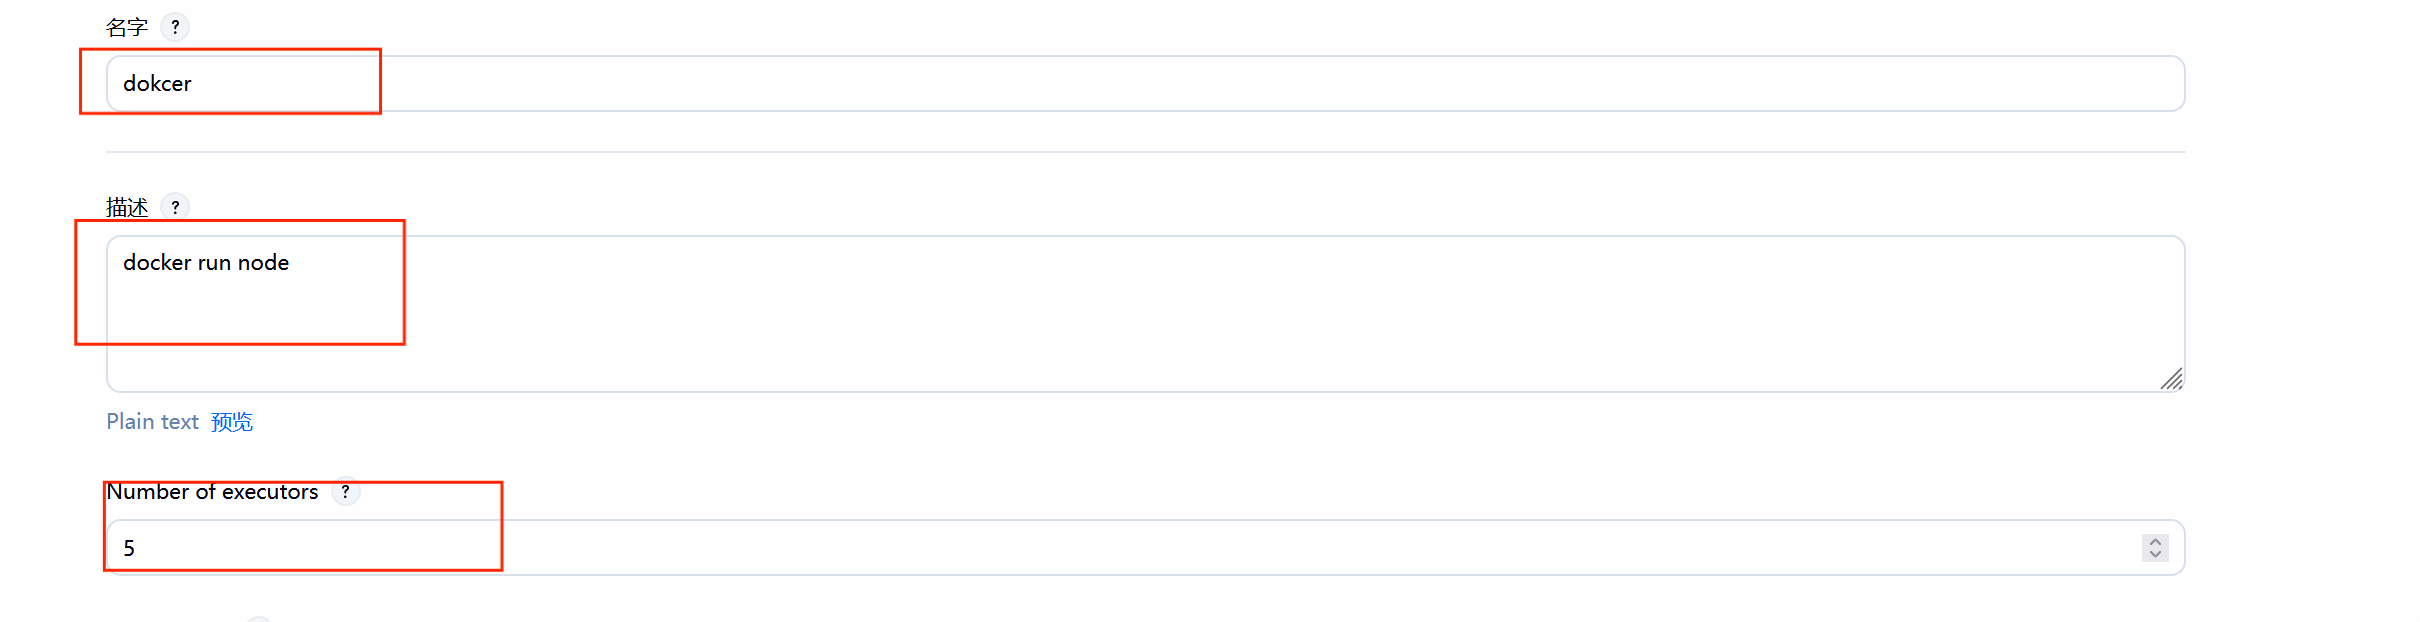
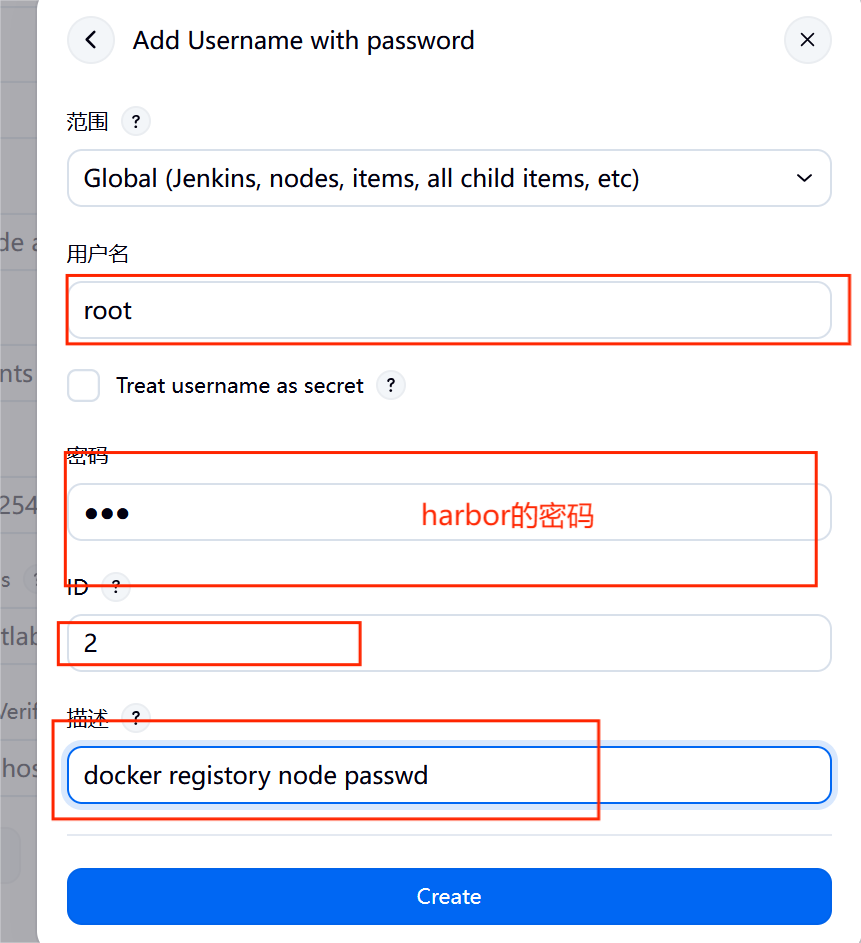
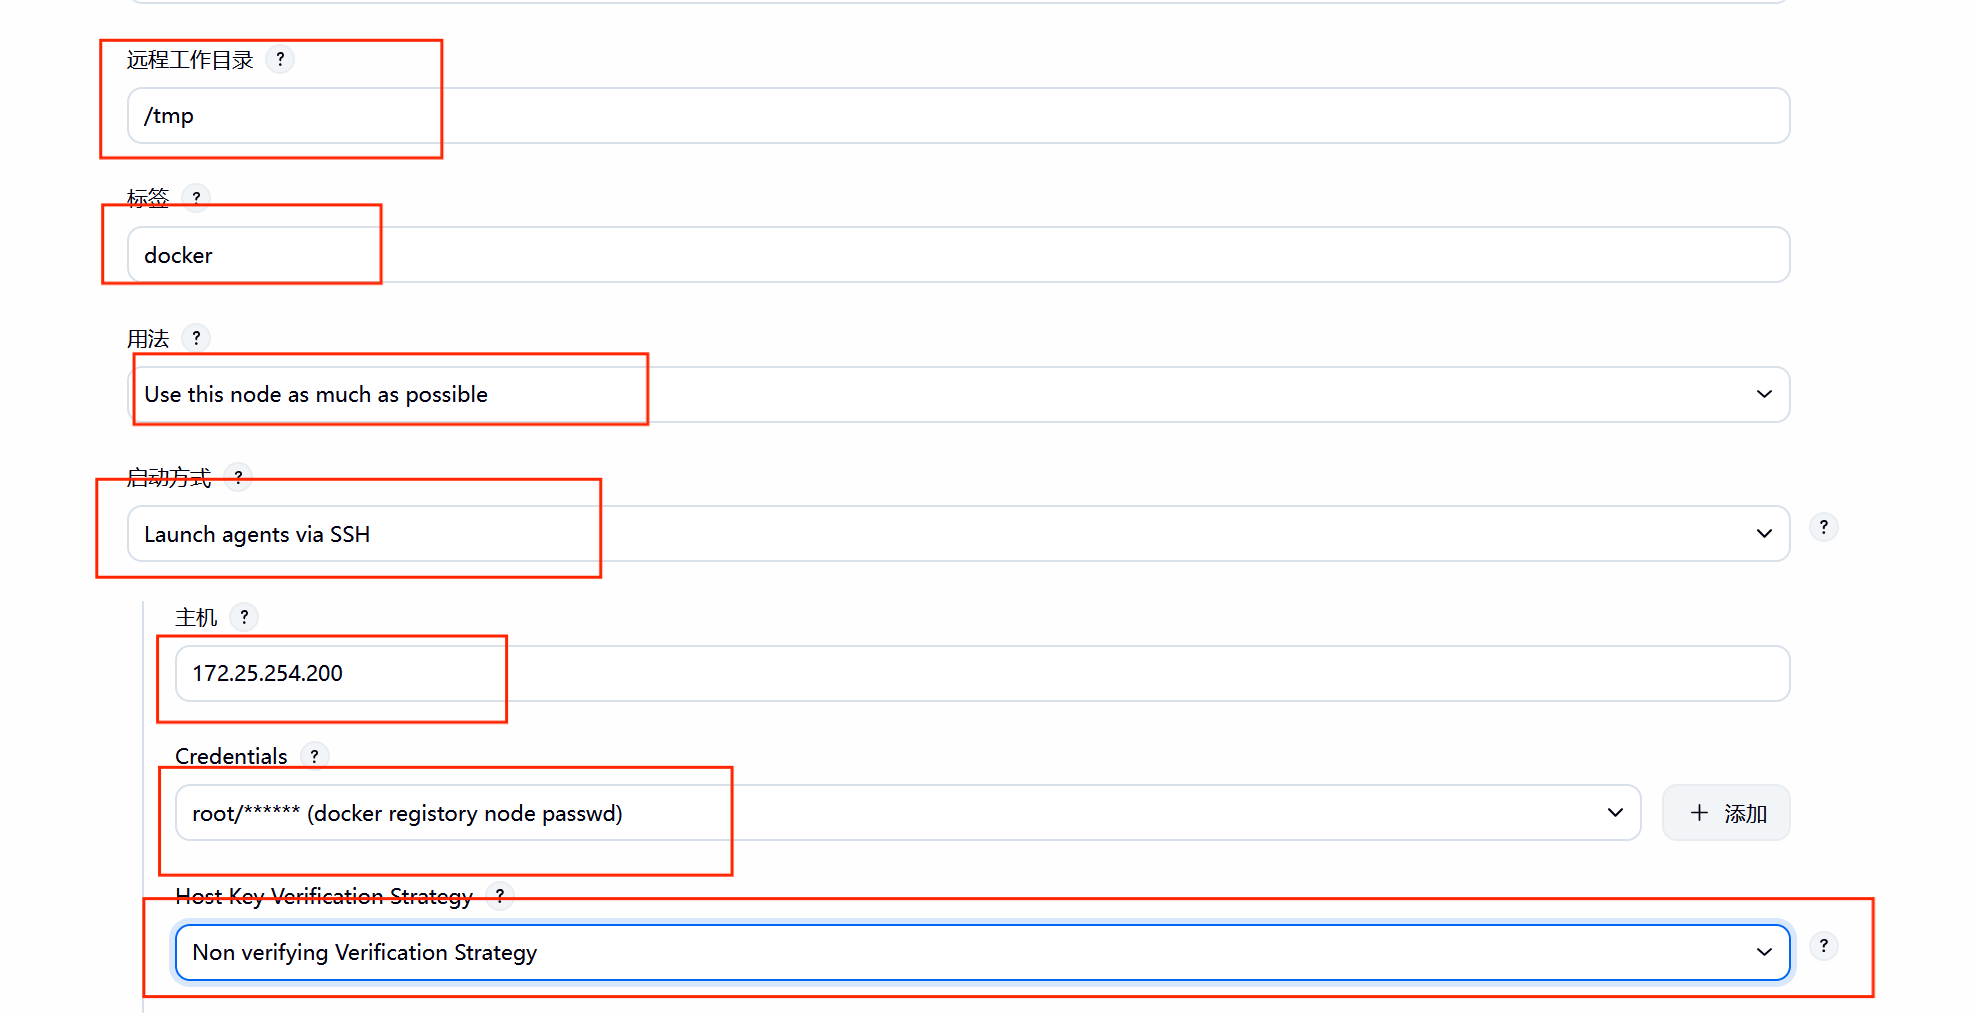
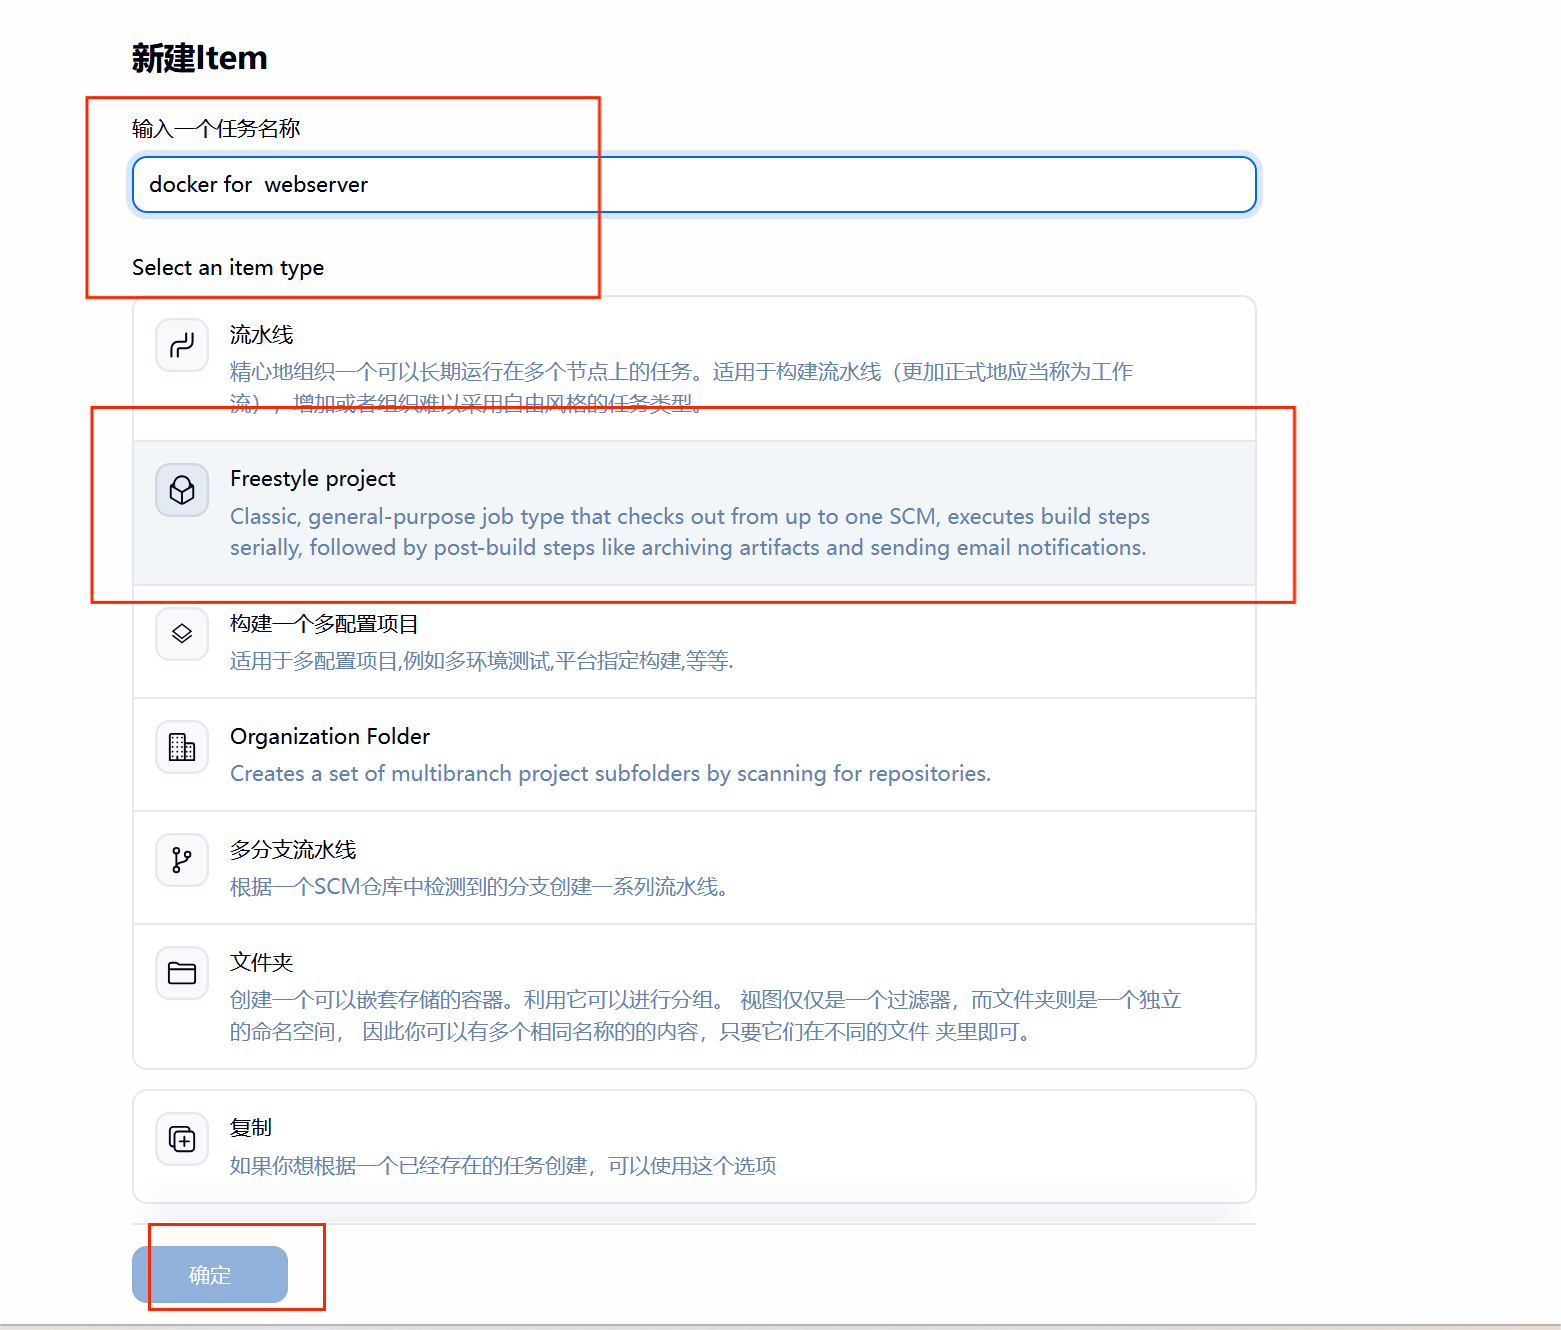
7.1在jenkins中添加registry-node
1.在业务节点中安装docker和java环境并配置其可以从仓库中下载镜像
bash
[root@docker yum.repos.d]# vim docker.repo
[docker]
name=docker
baseurl=https://mirrors.aliyun.com/docker-ce/linux/rhel/9.6/x86_64/stable/
gpgcheck=0
[root@docker yum.repos.d]# dnf search docker --showduplicates
#搜索docker的版本,建议以下版本
docker-ce-3:28.5.2-1.el9.x86_64 : The open-source application container engine
[root@docker yum.repos.d]# dnf install docker-ce-3:28.5.2-1.el9.x86_64 -y
[root@docker yum.repos.d]# systemctl enable --now docker.service
Created symlink /etc/systemd/system/multi-user.target.wants/docker.service → /usr/lib/systemd/system/docker.service.
#从harbor仓库中把认证文件复制到当前主机
[root@docker yum.repos.d]#  mkdir  /etc/docker/certs.d/reg.timinglee.org/ -p
[root@docker yum.repos.d]#  scp root@172.25.254.200:/data/certs/timinglee.org.crt
[root@docker yum.repos.d]# vim /etc/docker/daemon.json
{
"registry-mirrors":[
"https://reg.timinglee.org"
]
}
[root@docker yum.repos.d]# systemctl restart docker
#作解析
[root@docker yum.repos.d]# vim /etc/hosts
127.0.0.1   localhost localhost.localdomain localhost4 localhost4.localdomain4
::1         localhost localhost.localdomain localhost6 localhost6.localdomain6
172.25.254.40     docker
172.25.254.200    reg.timinglee.org
#验证是否可以登录
[root@docker yum.repos.d]# docker login reg.timinglee.org -u admin
.............
Login Succeeded
#查看加速器
[root@docker ~]# docker info
........
 Registry Mirrors:
  https://reg.timinglee.org/
 Live Restore Enabled: false
 Firewall Backend: iptables
#验证是否可以拉取镜像
[root@docker ~]# docker pull nginx:latest
latest: Pulling from library/nginx
f03b40093957: Pull complete
0972072e0e8a: Pull complete
a85095acb896: Pull complete
d24b987aa74e: Pull complete
6c1a86118ade: Pull complete
9989f7b33228: Pull complete
Digest: sha256:a97a153152fcd6410bdf4fb64f5622ecf97a753f07dcc89dab14509d059736cf
Status: Downloaded newer image for nginx:latest
docker.io/library/nginx:latest
bash
#在harbor仓库主机中安装java环境及git
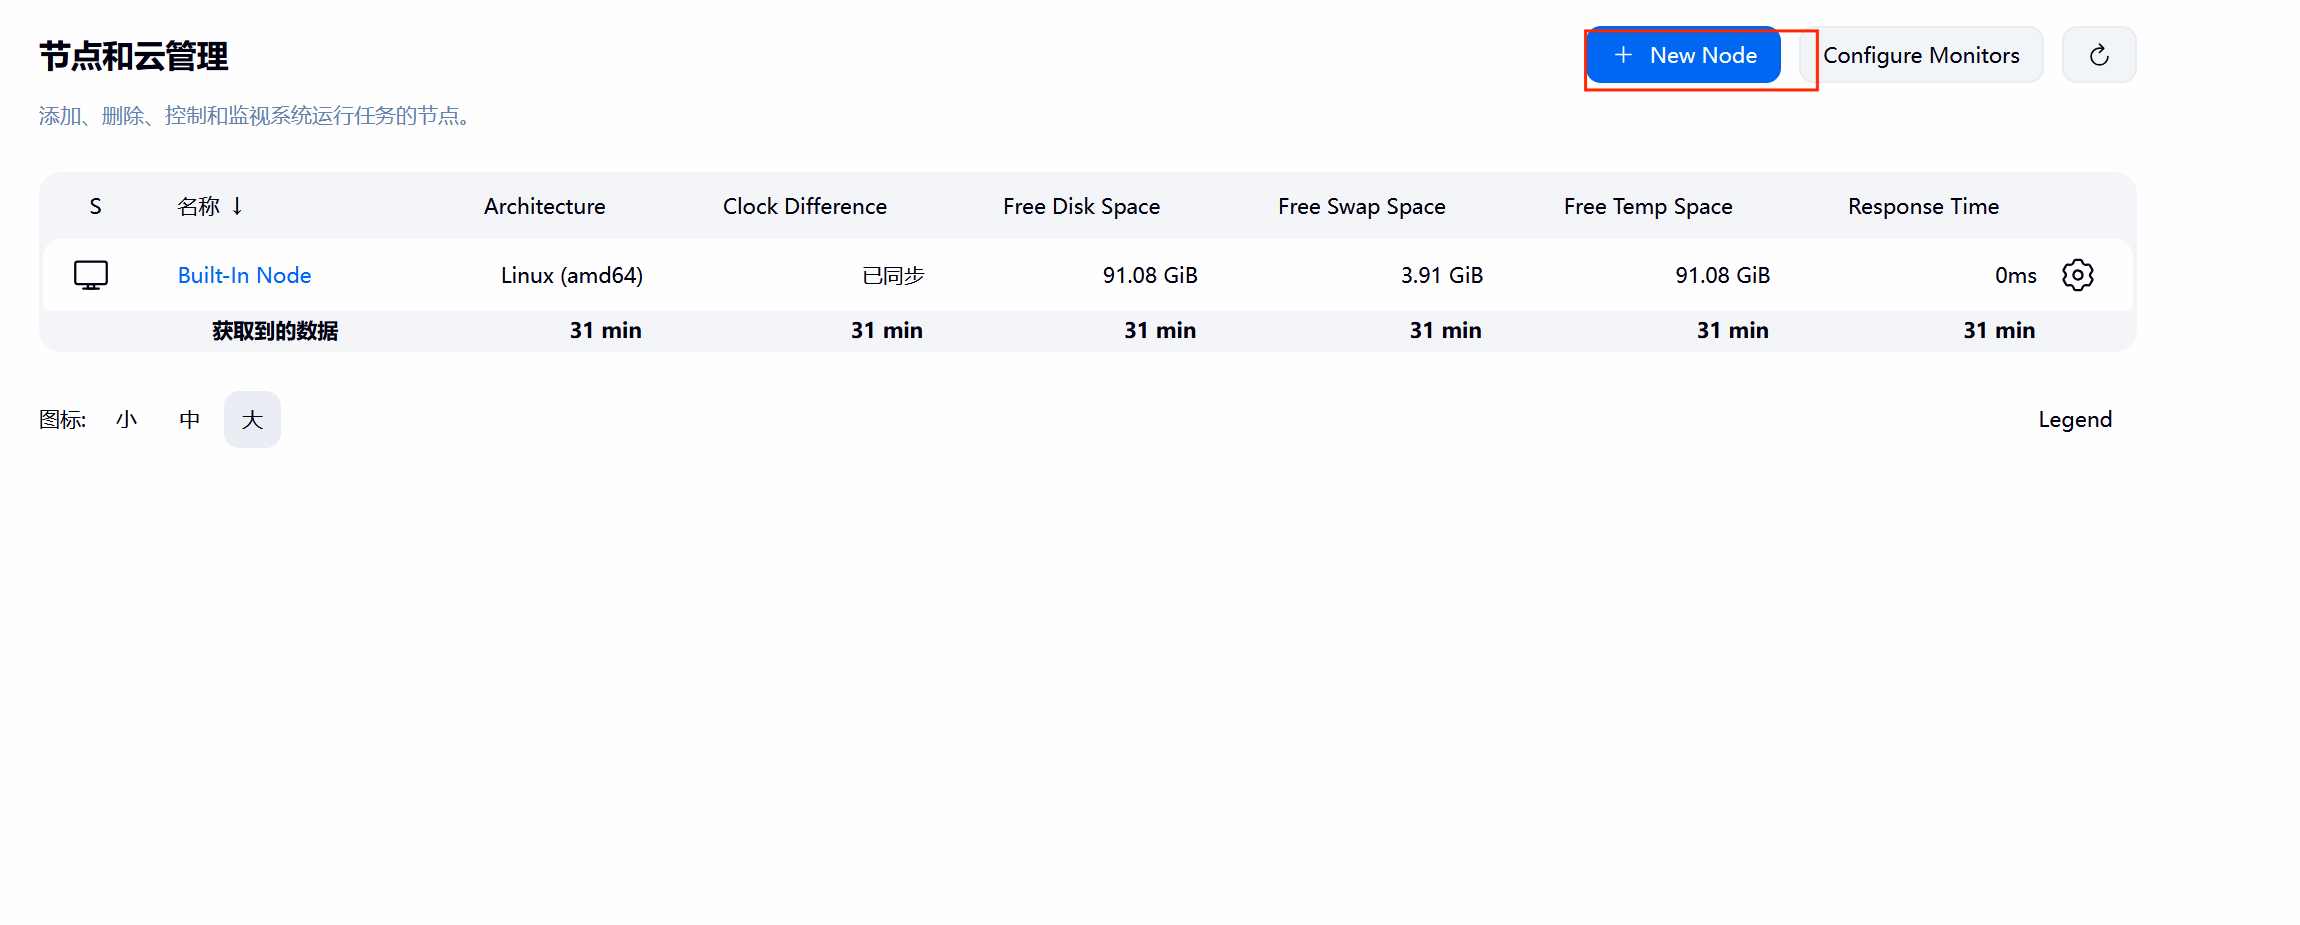
dnf install docker-ce fontconfig java-21-openjdk git -y2.部署jenkins节点
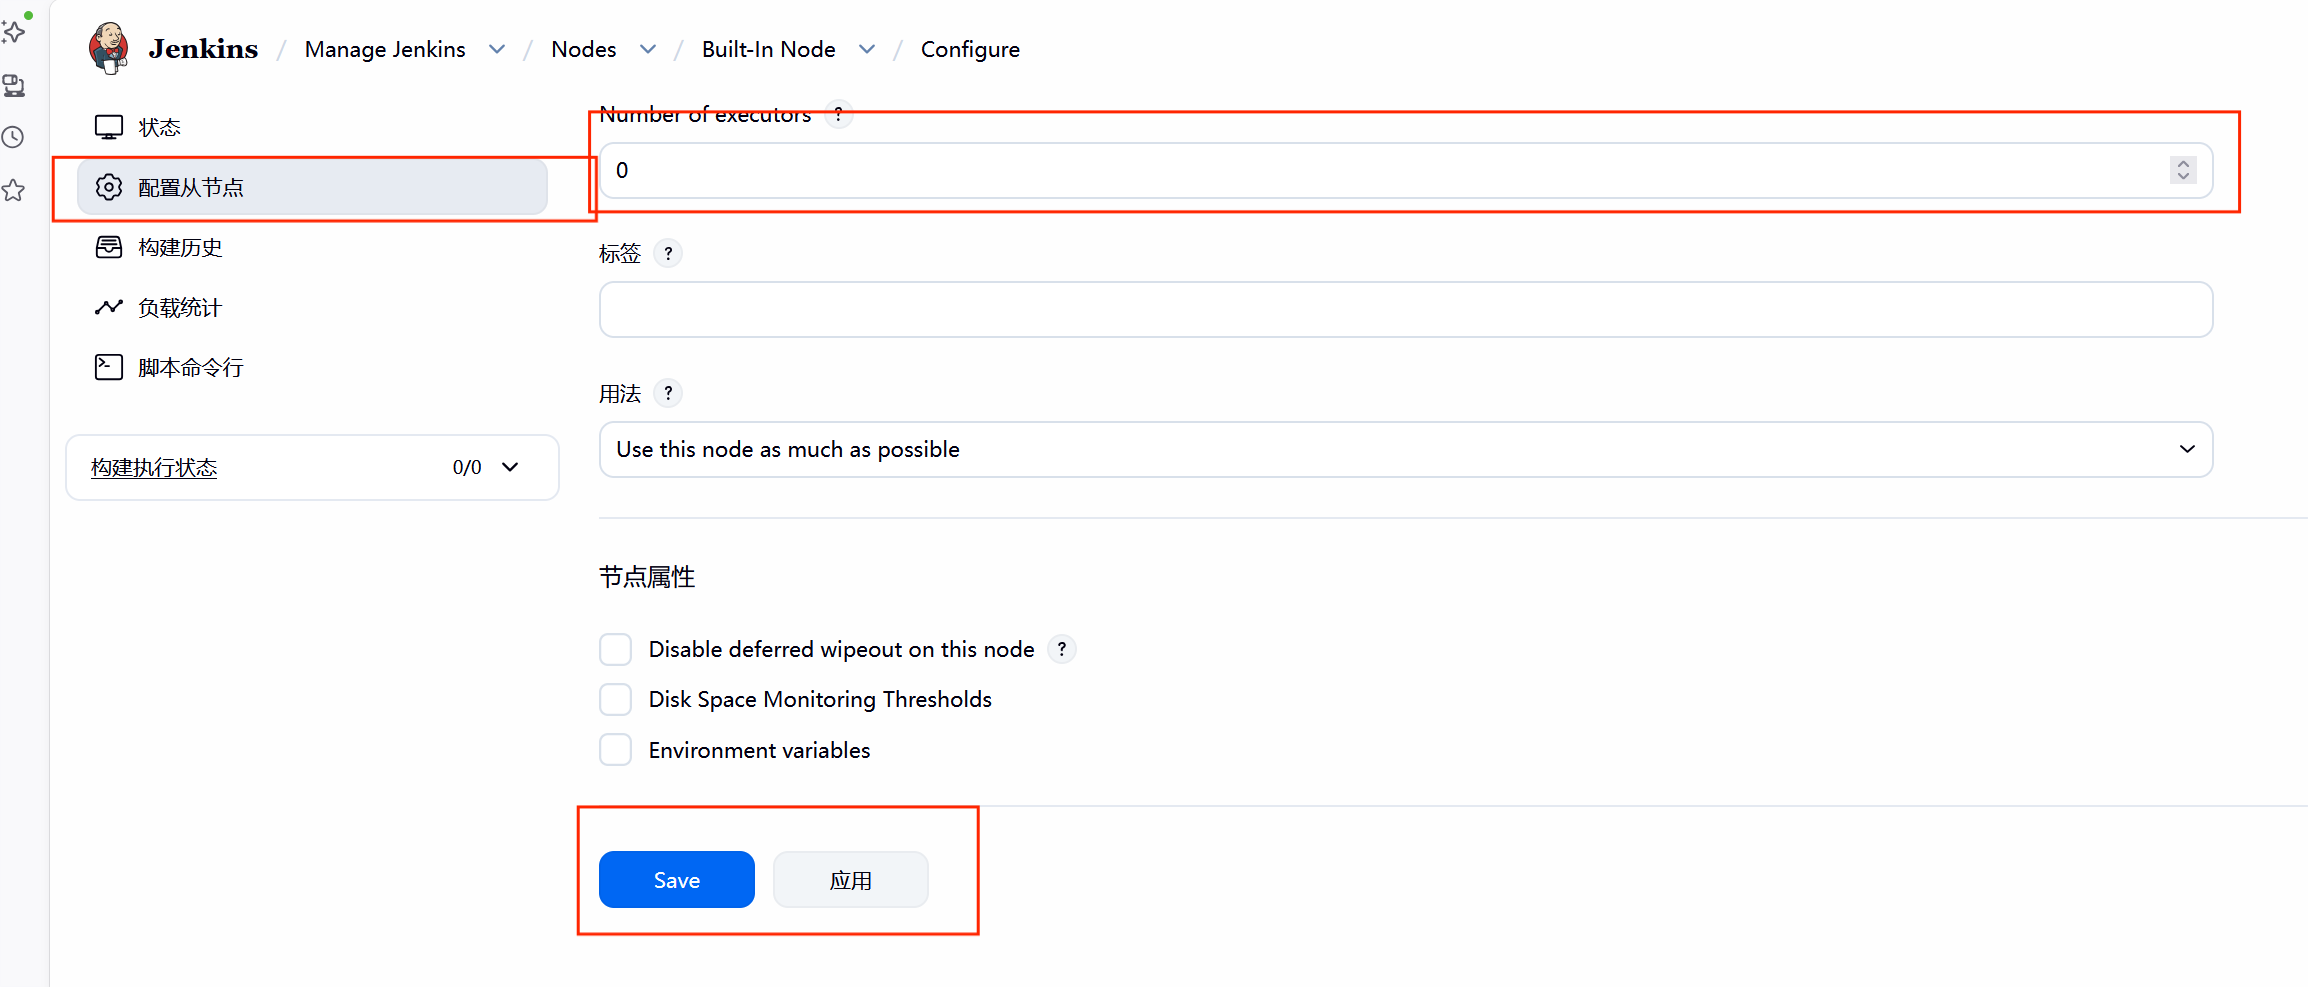
#点击齿轮
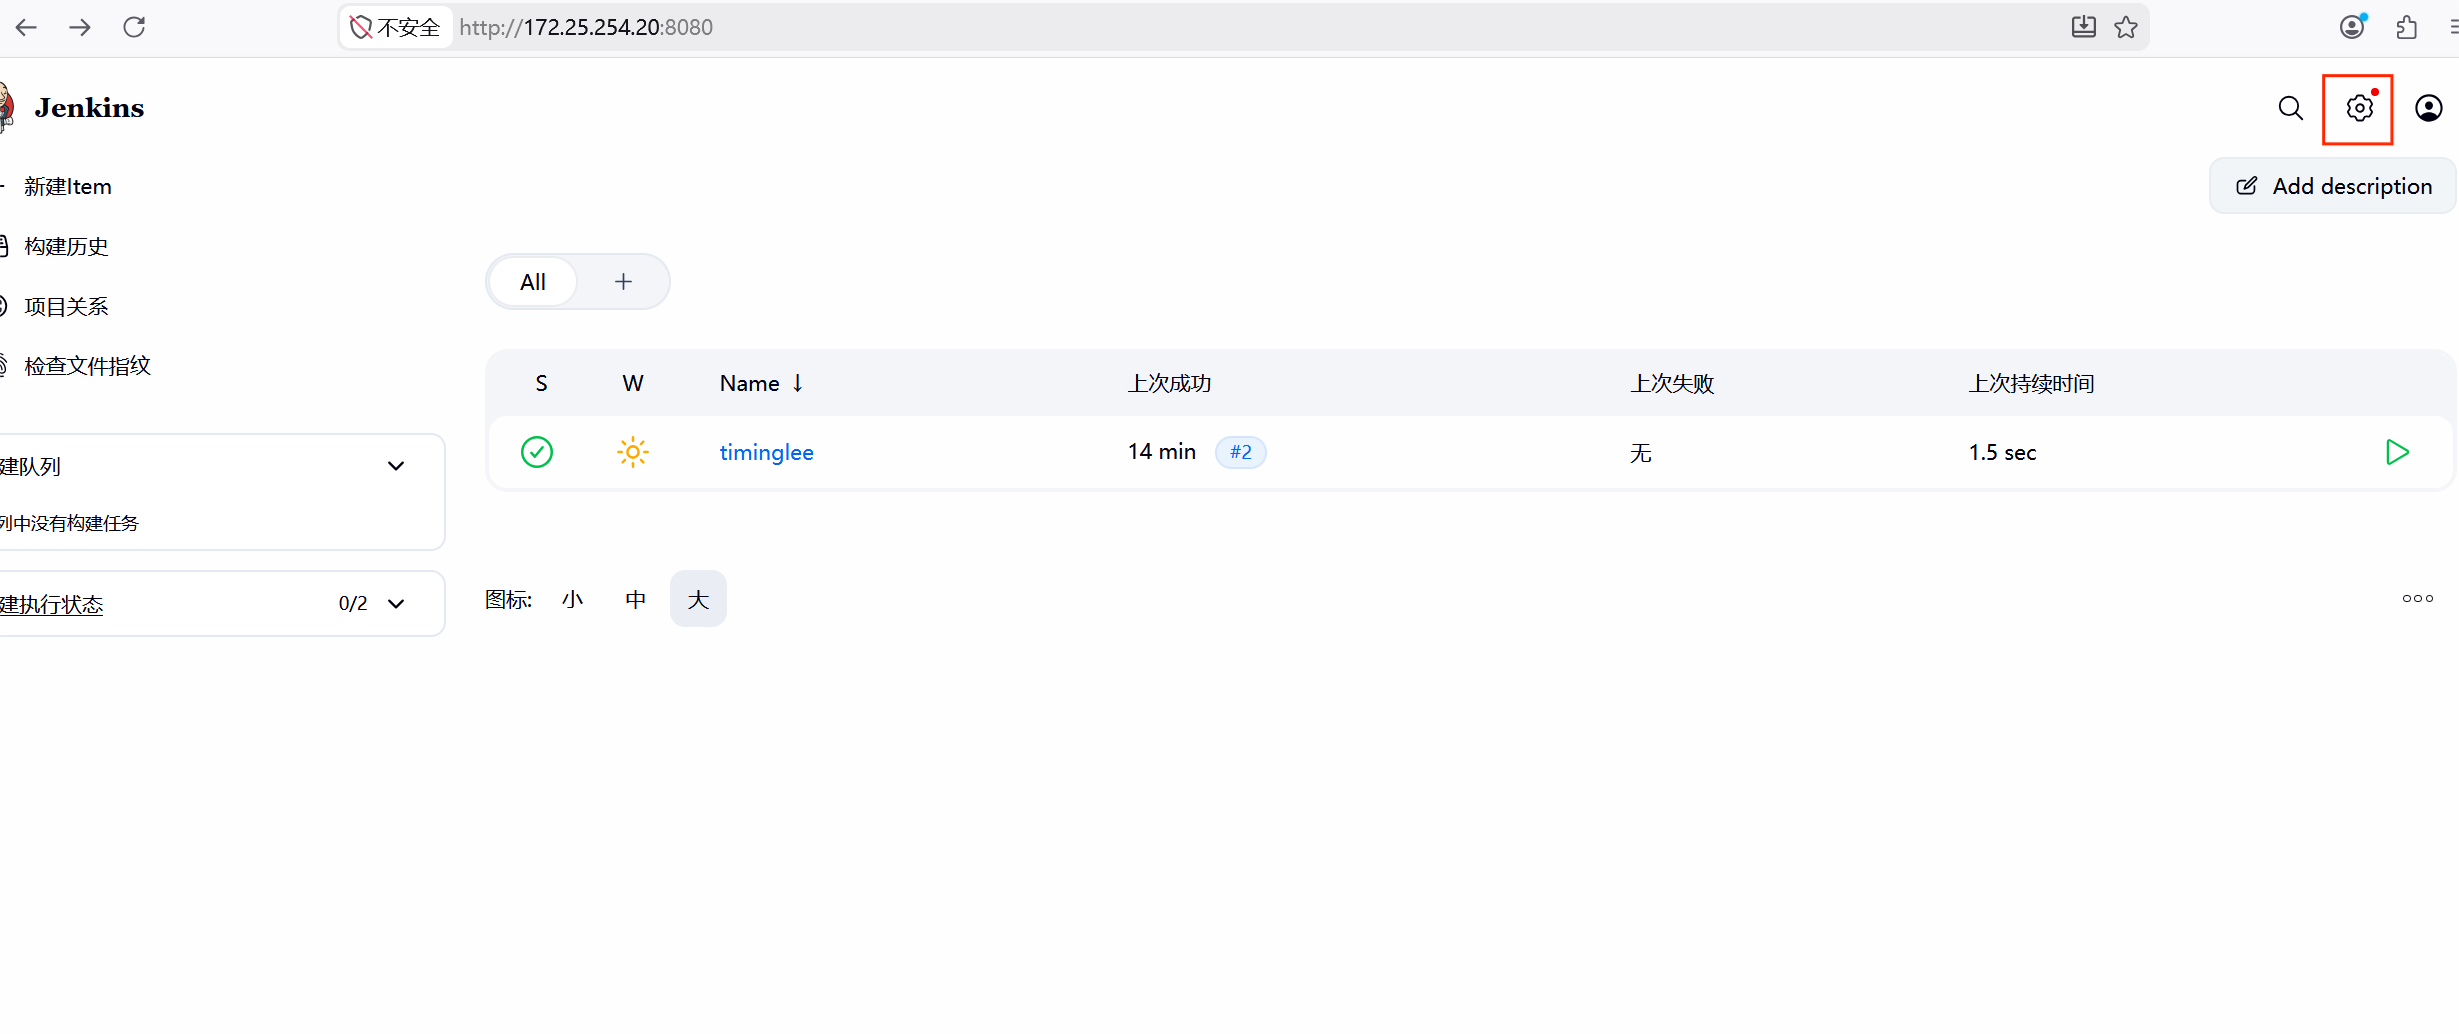
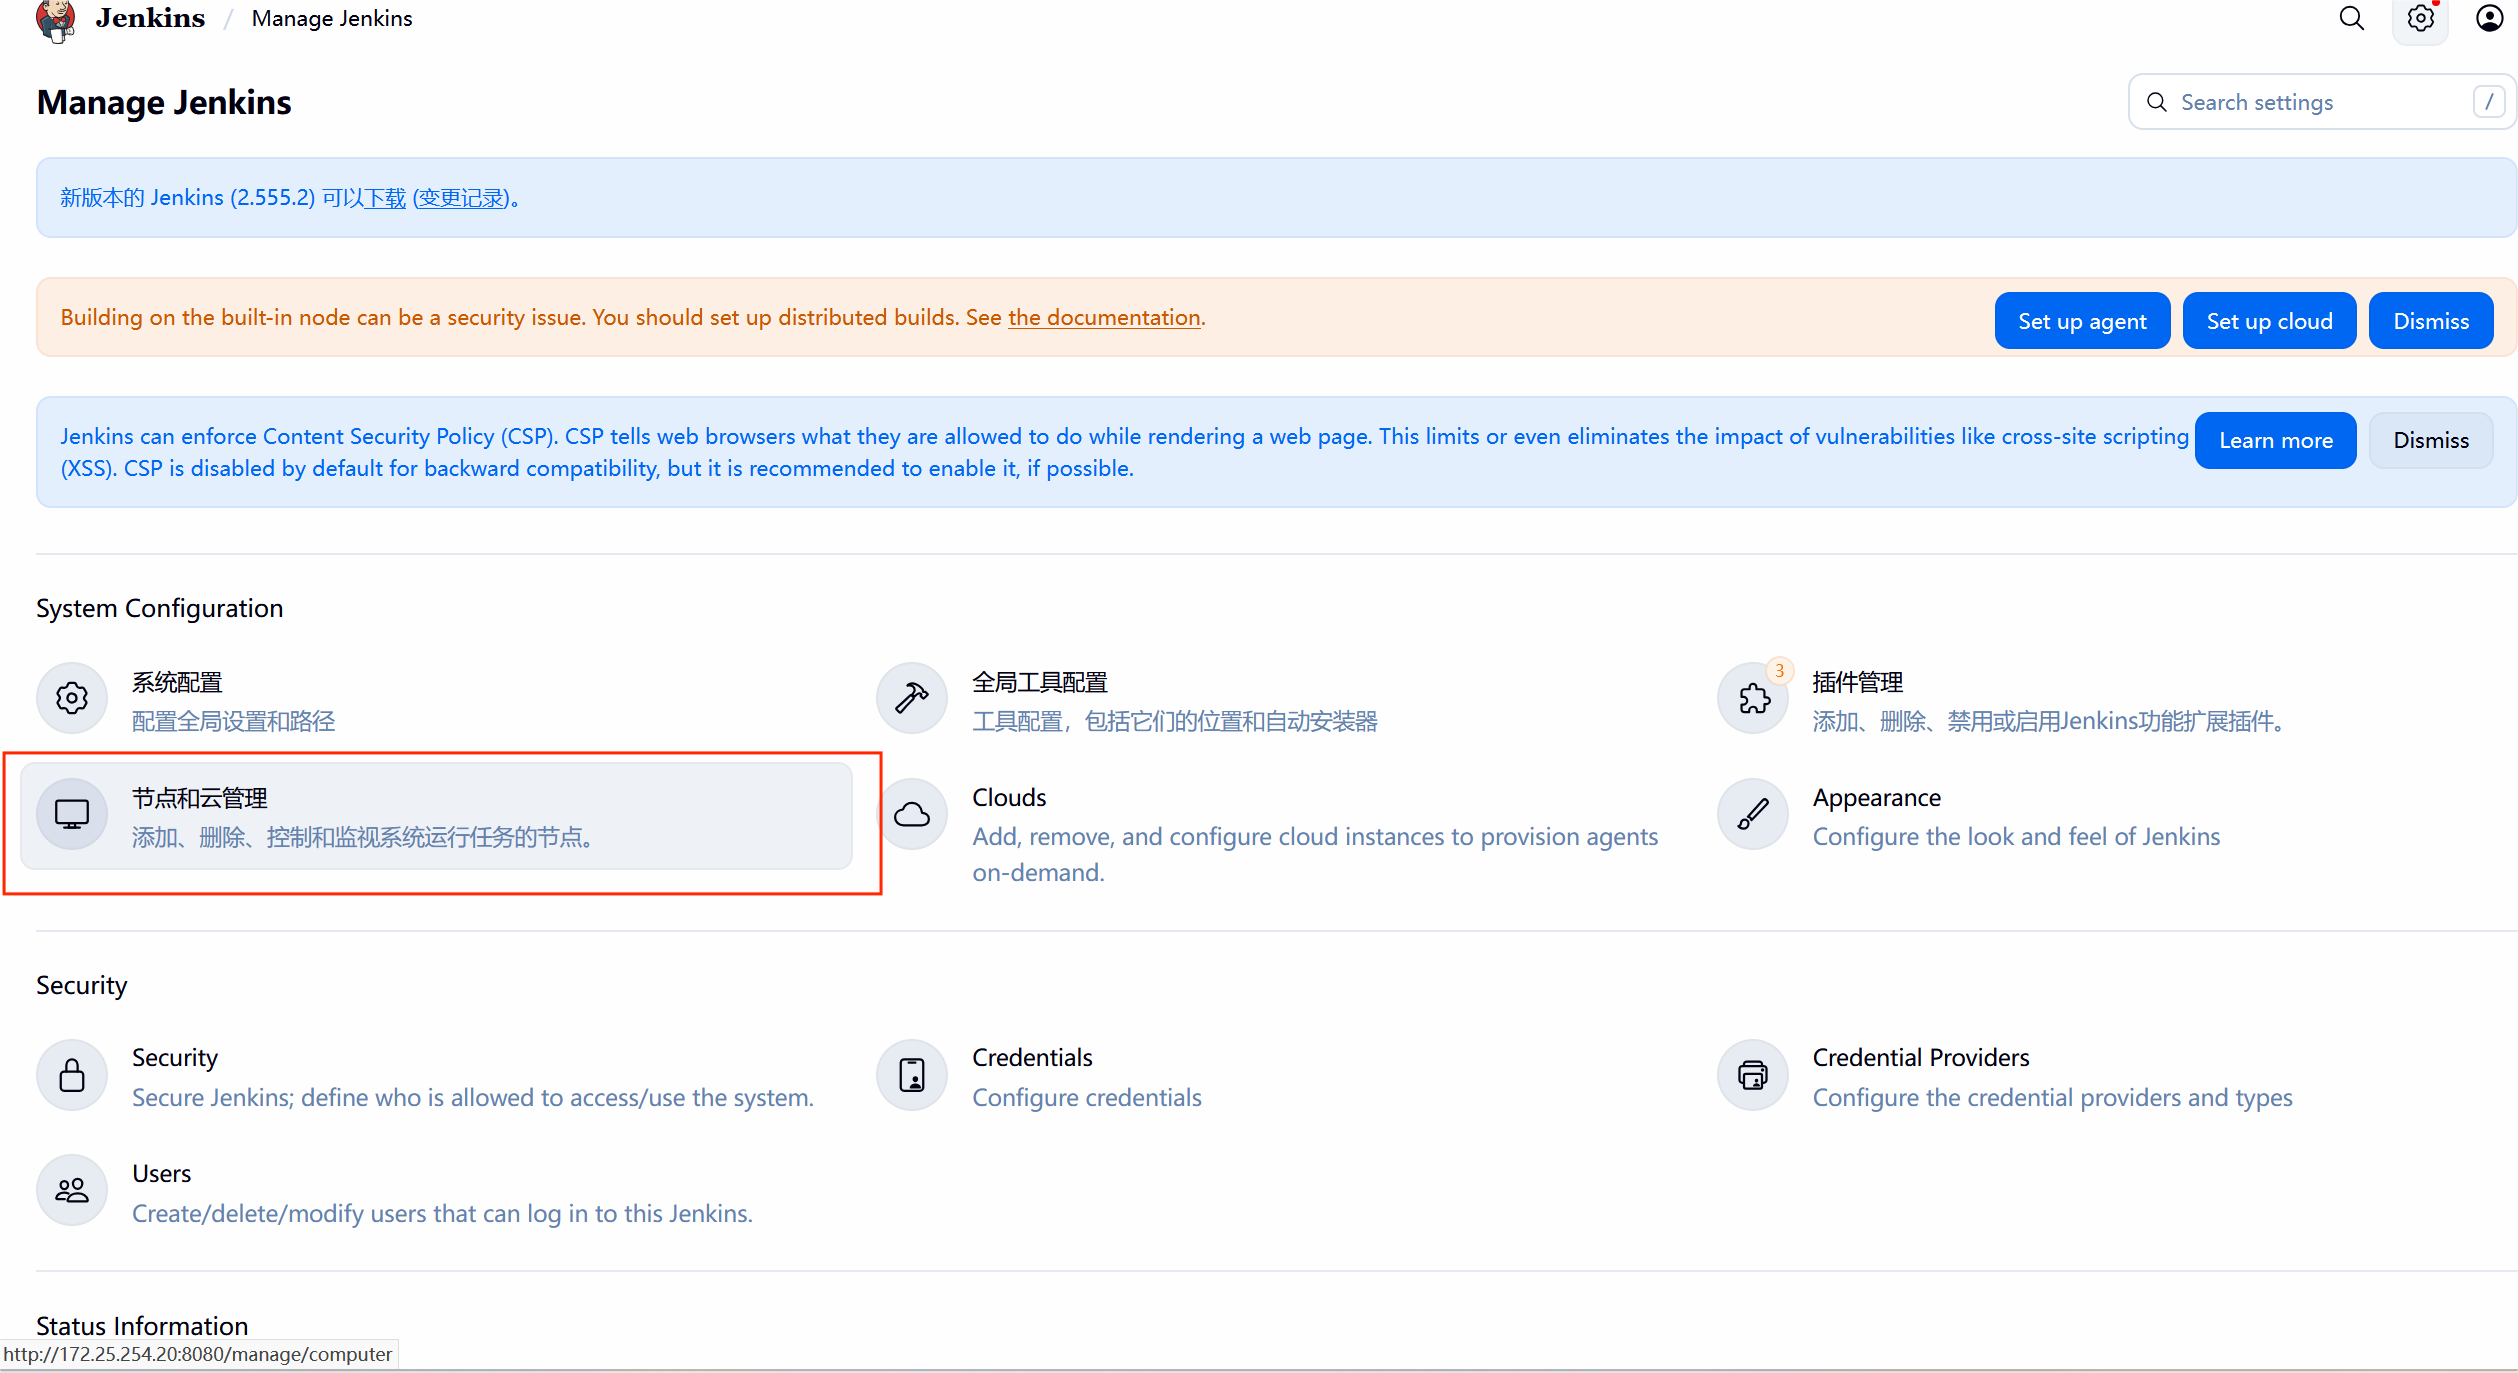
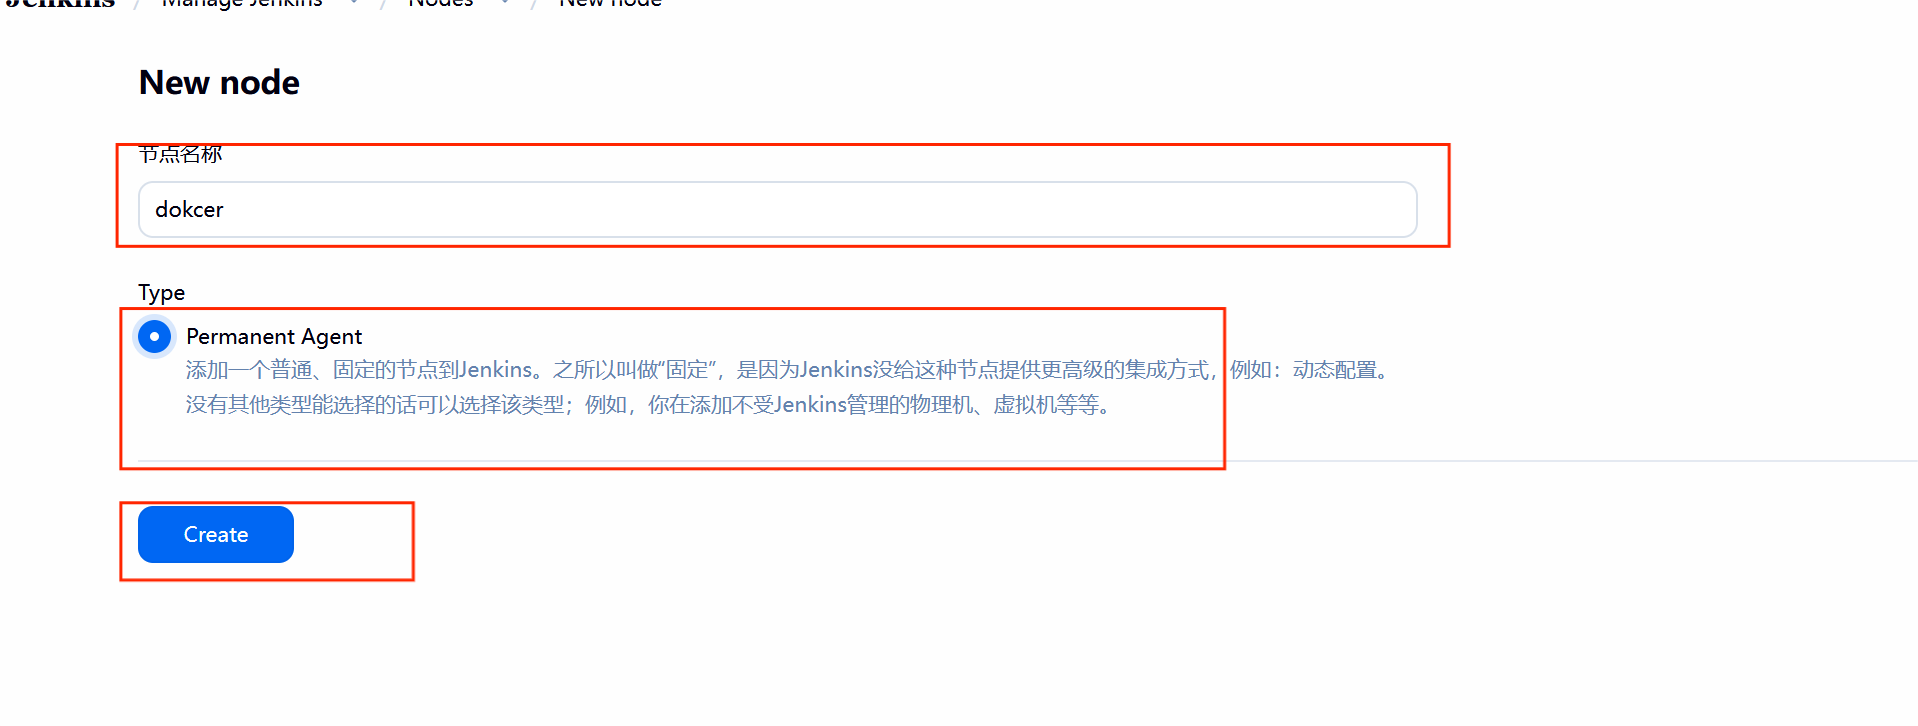
#点击应

#减少压力

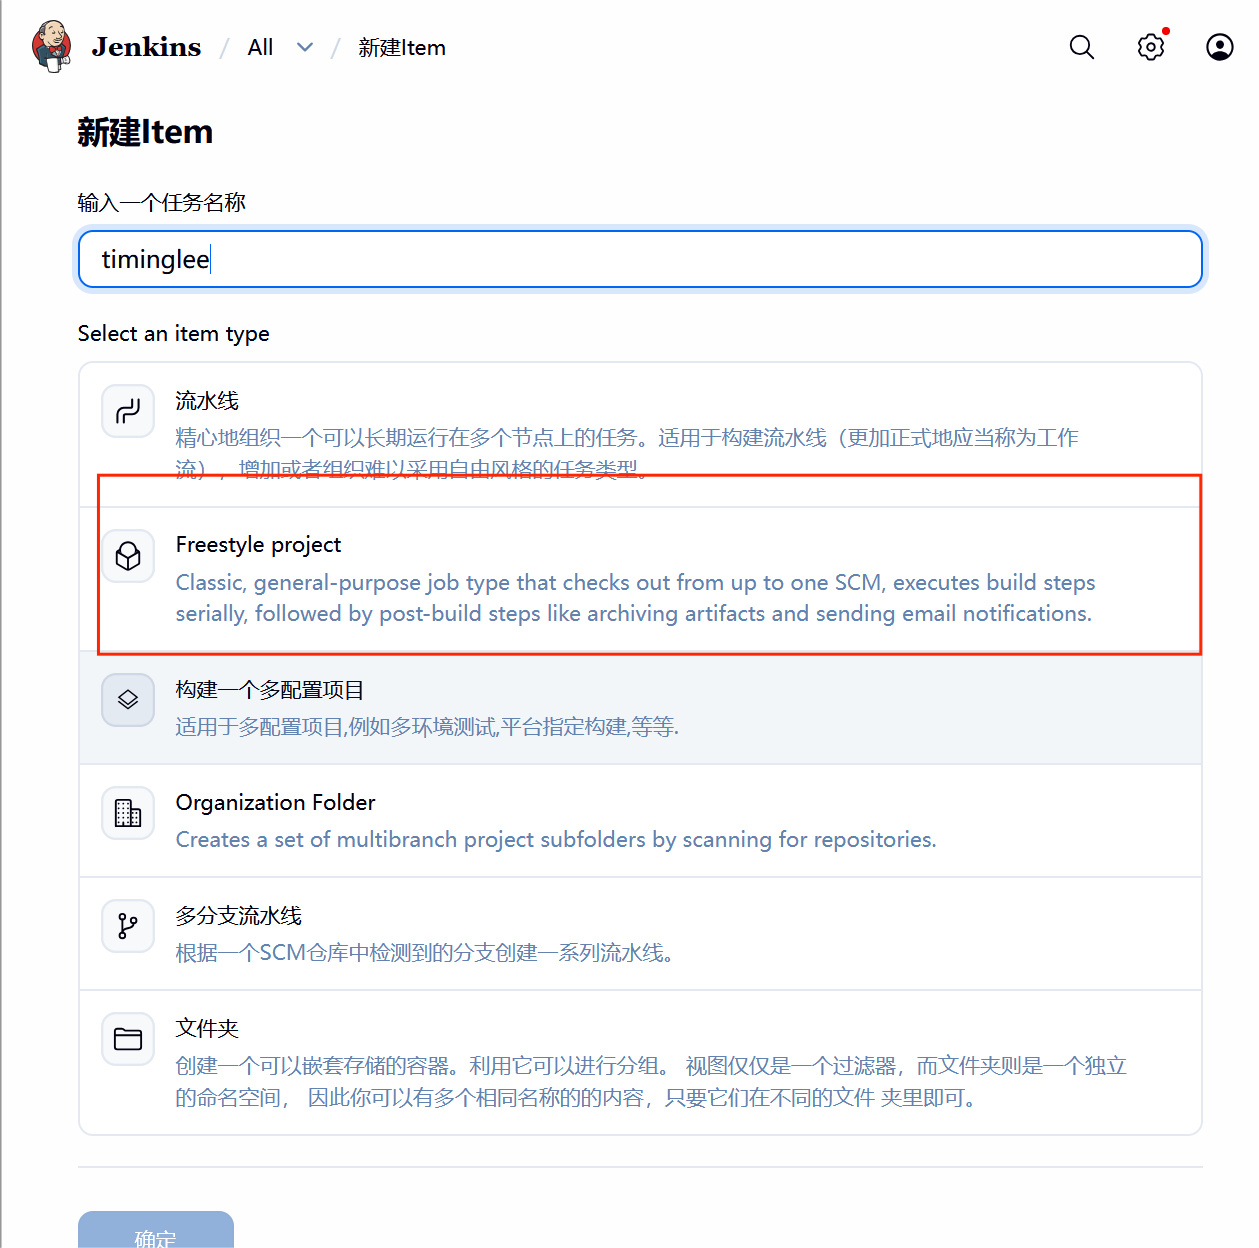
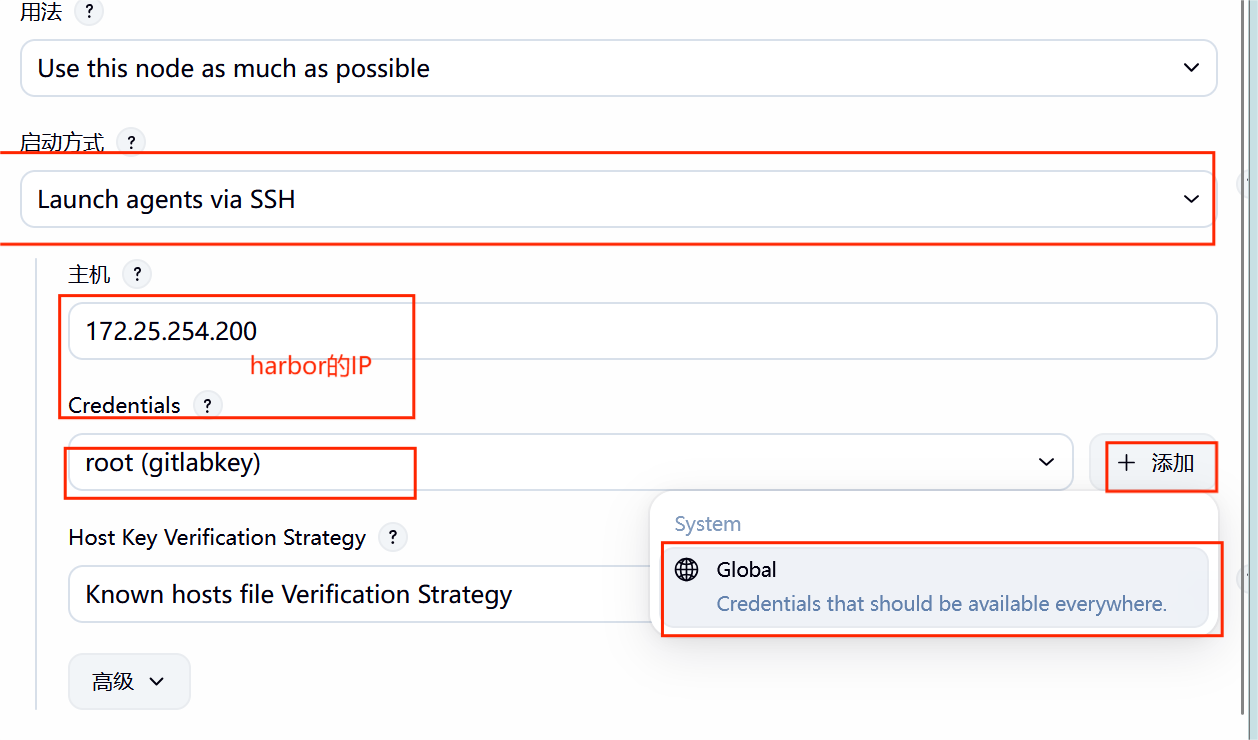
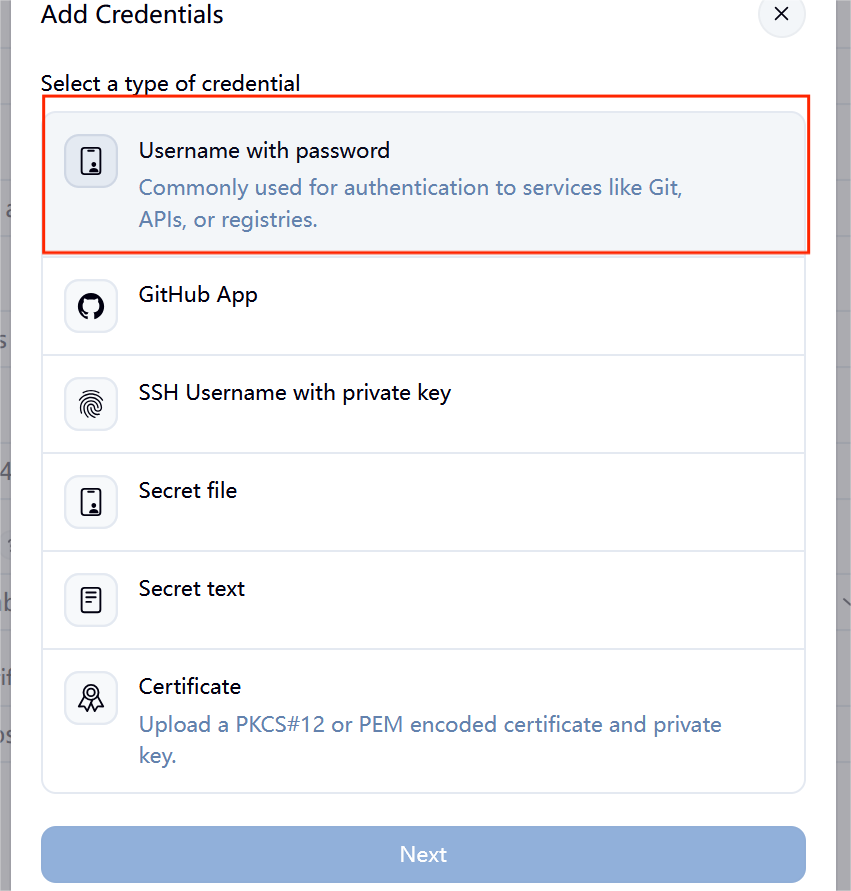
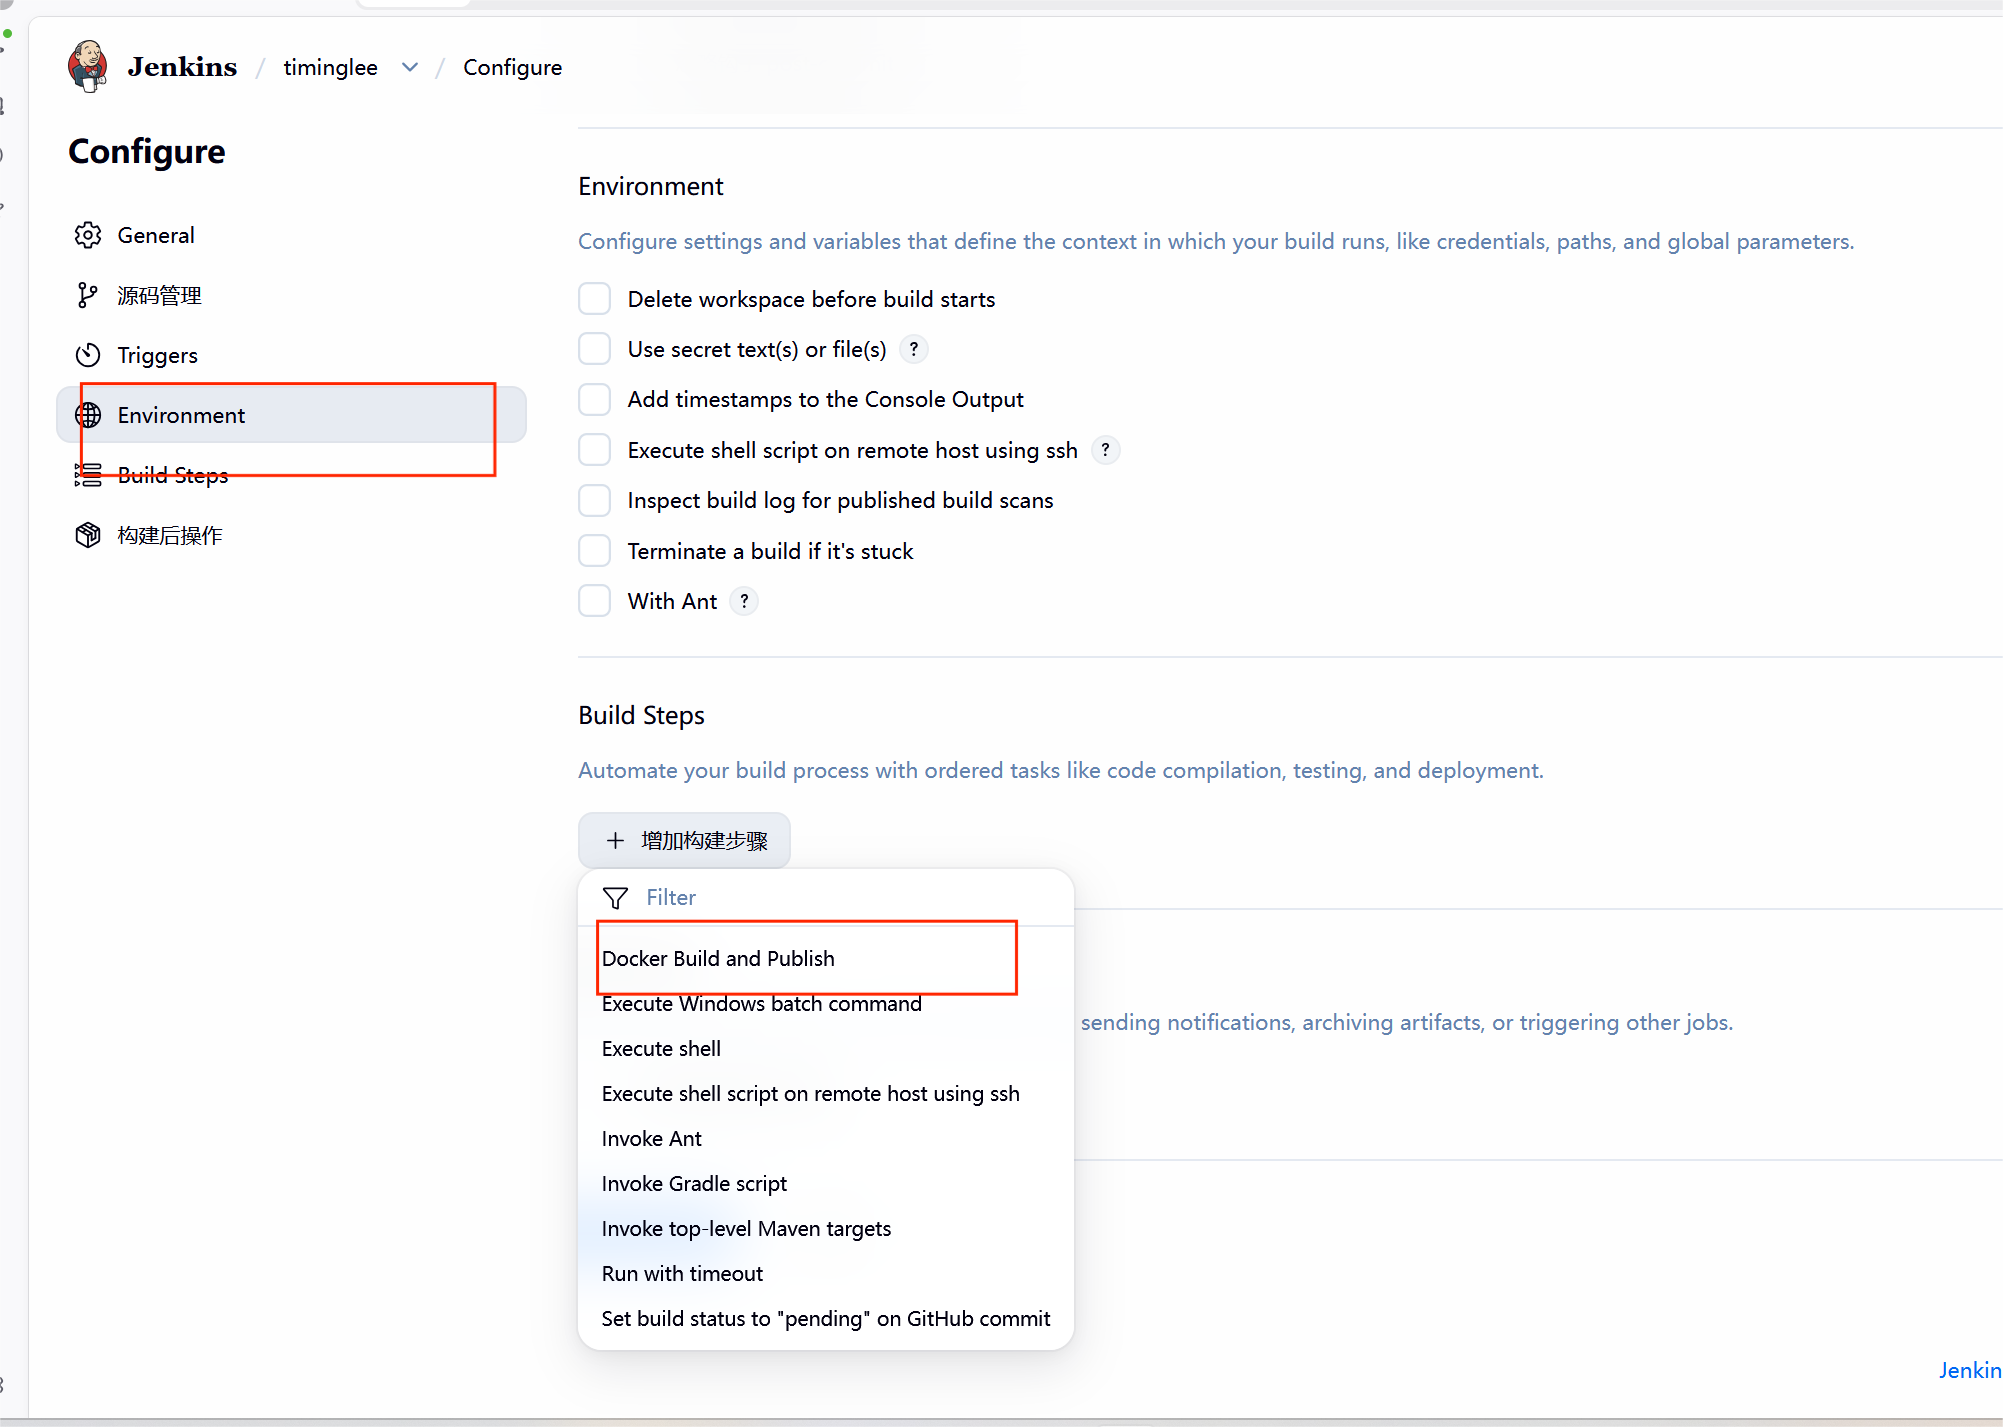
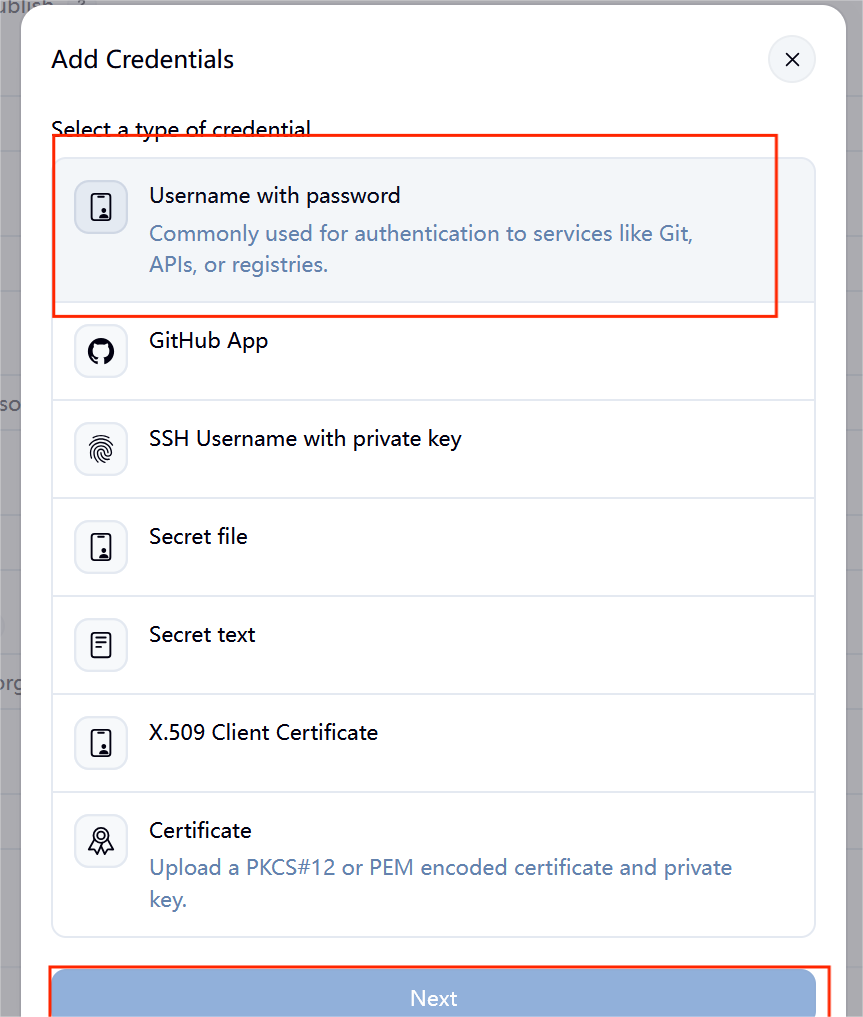
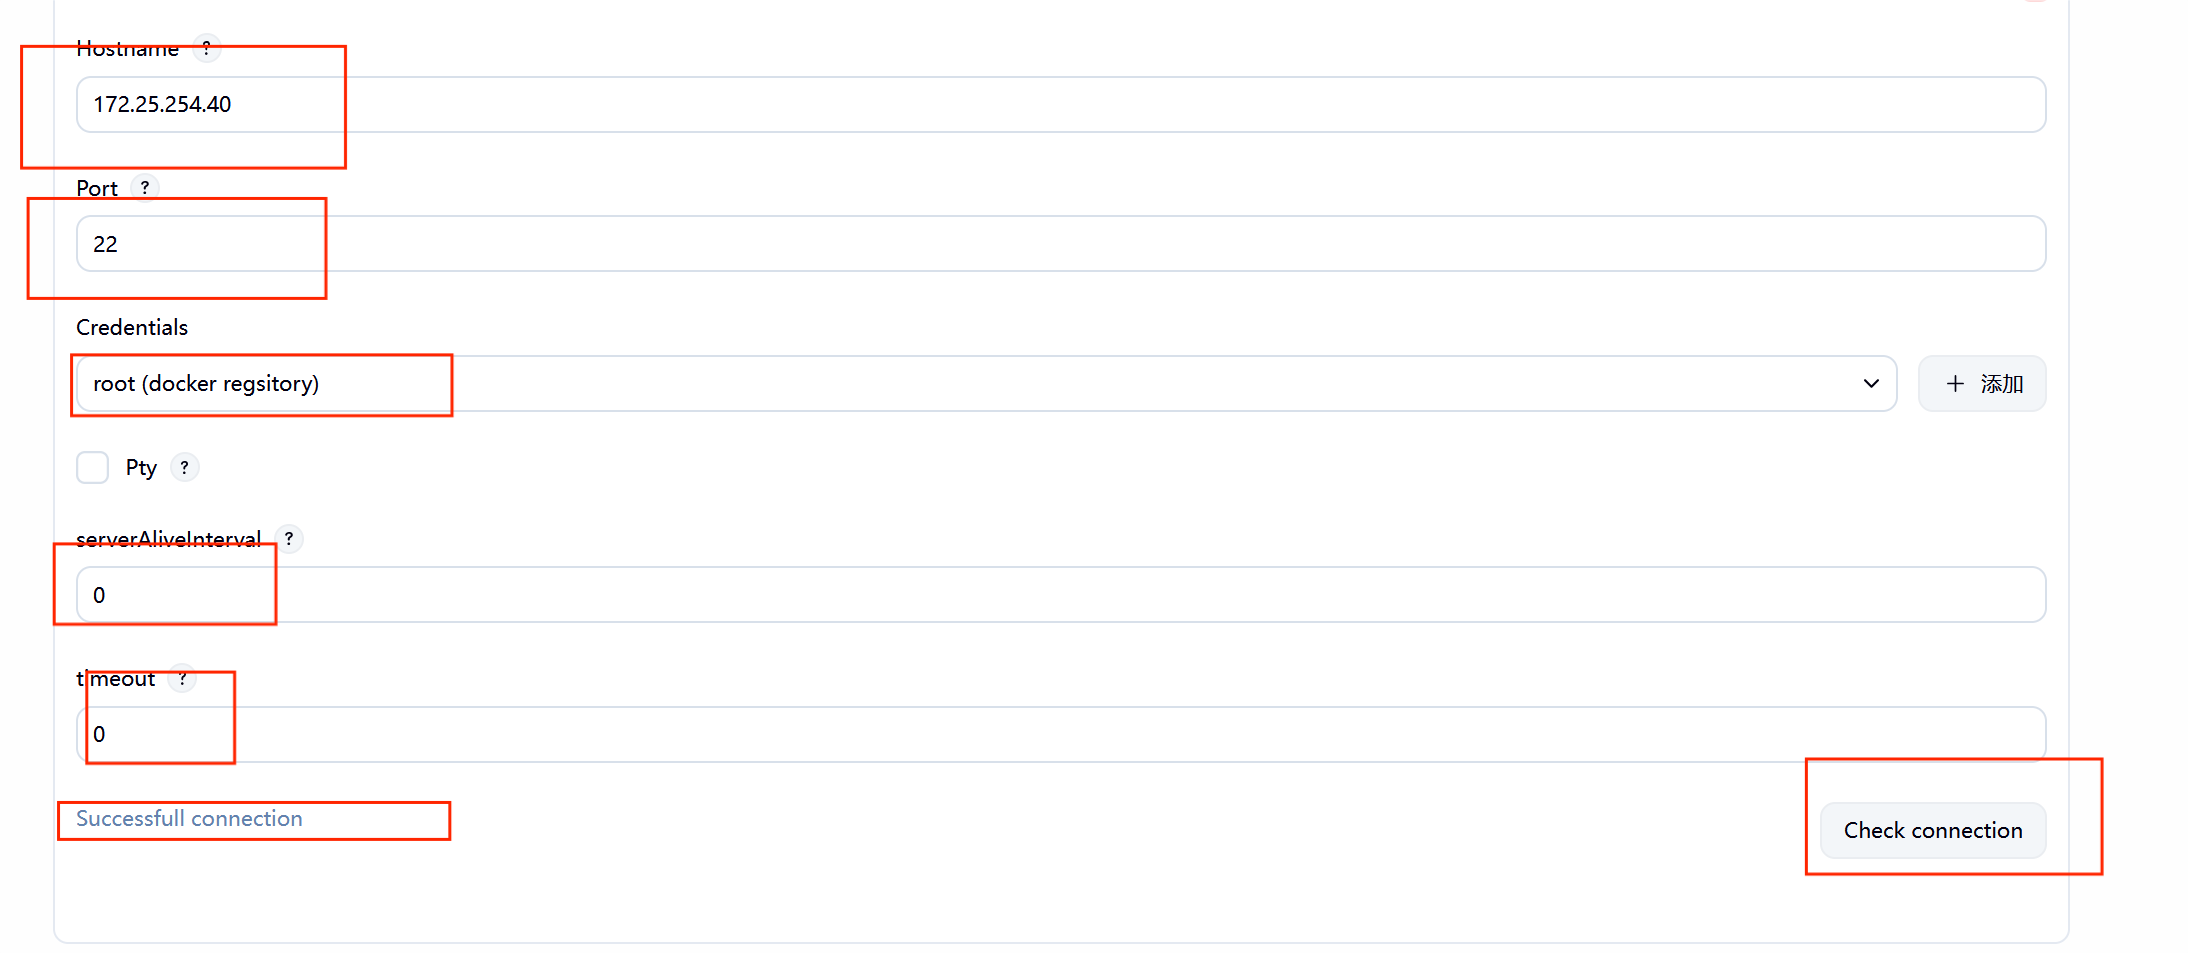
7.2****配置构建节点
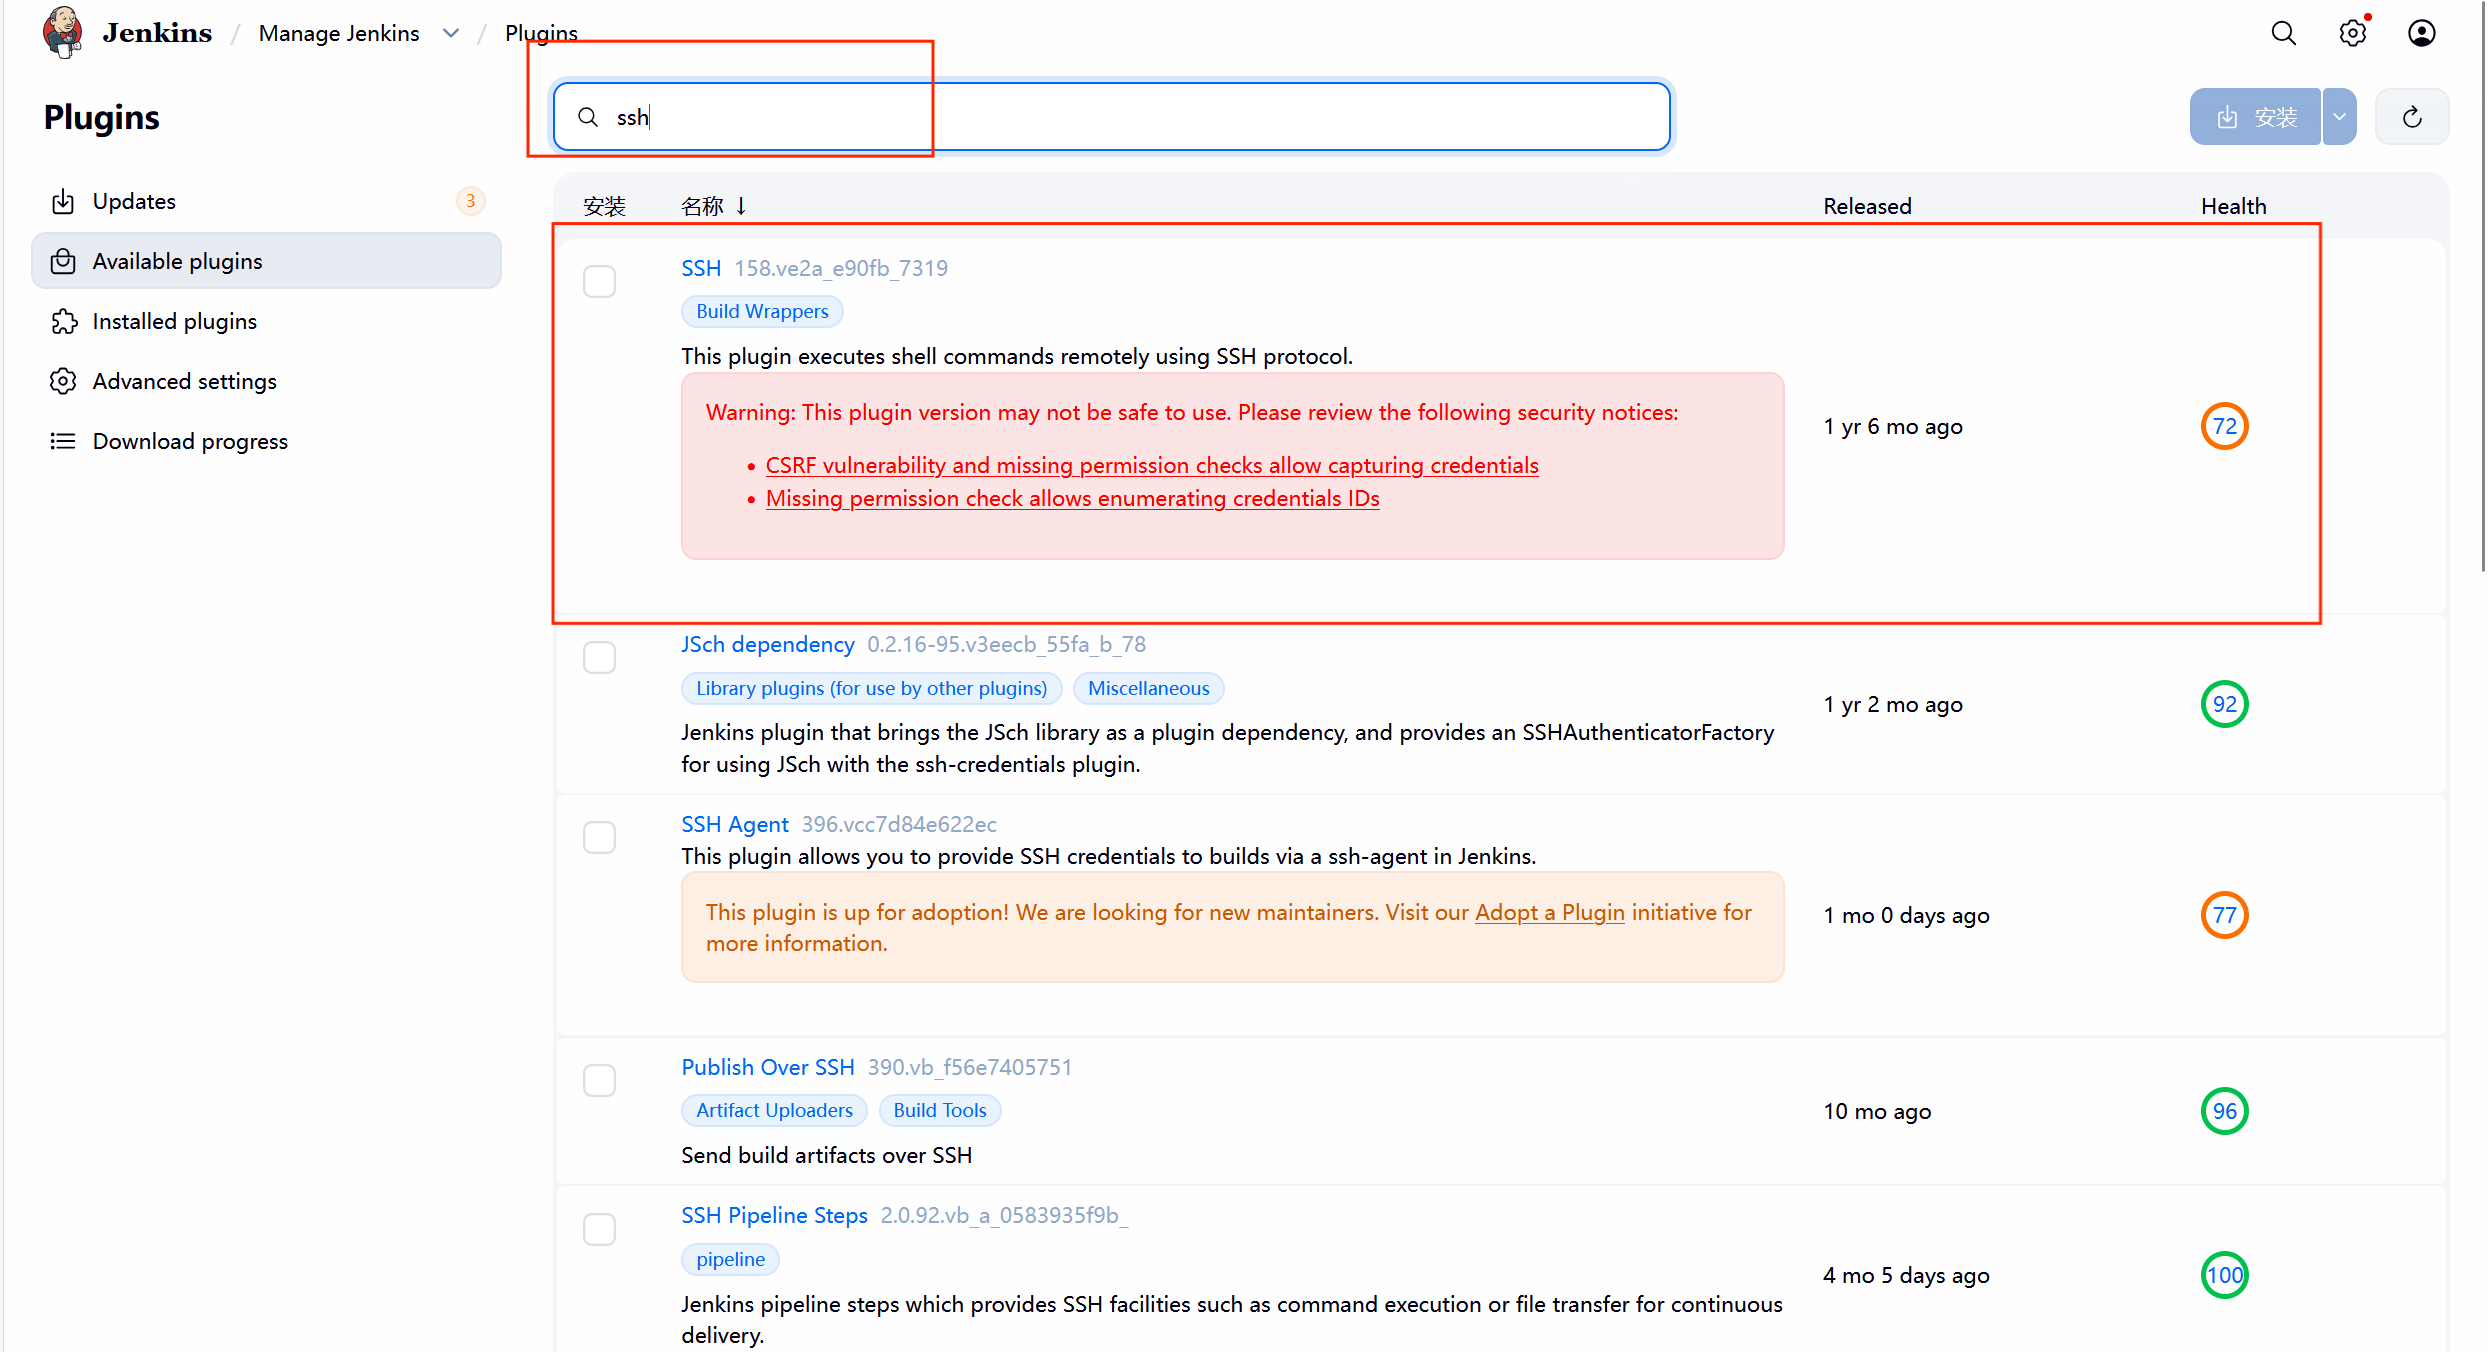
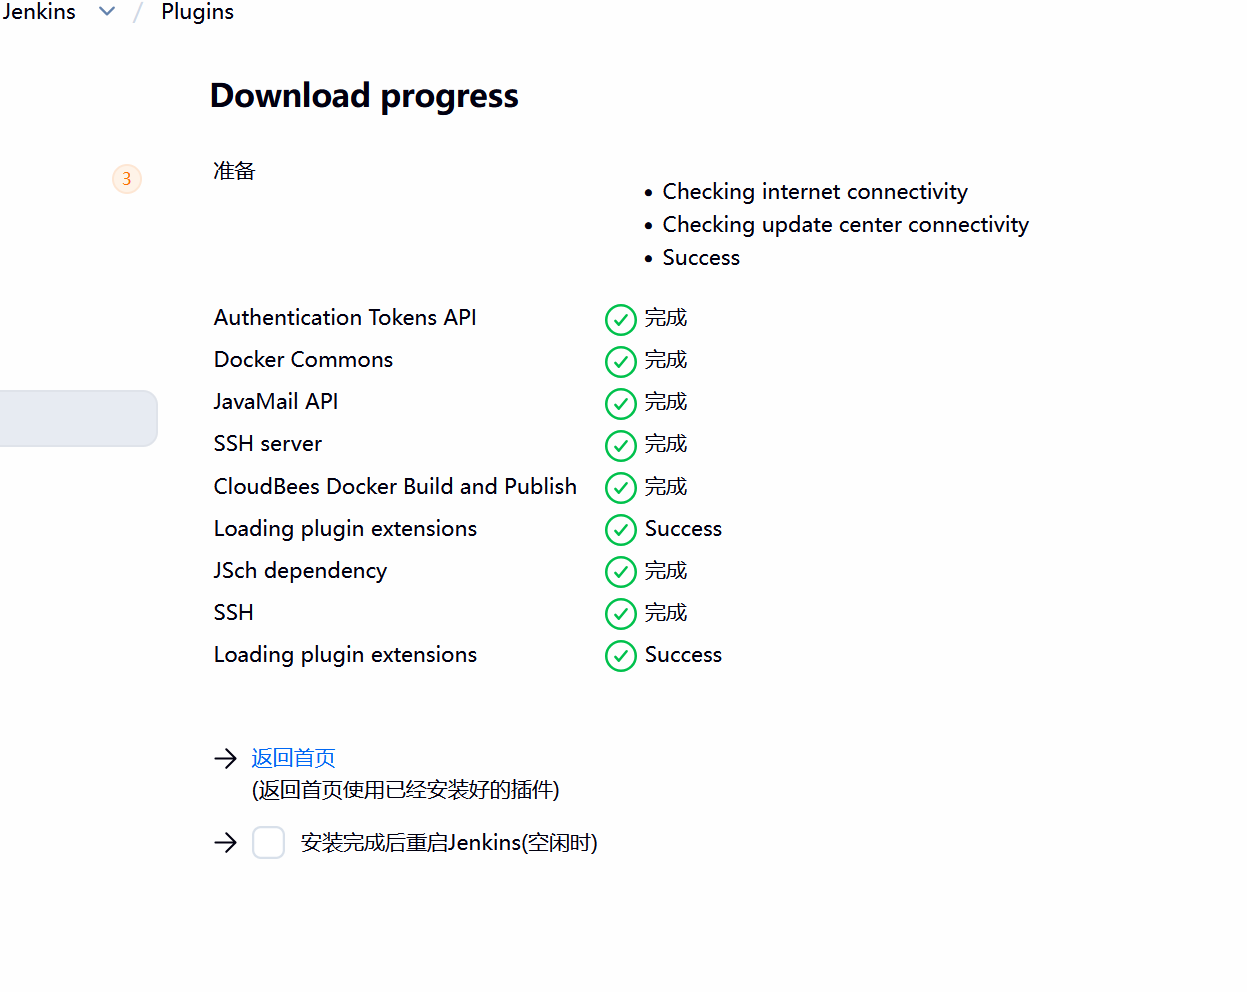
在jenkins中安装构建插件

#记得解析
bash
[root@CICD-node1 timinglee]# vim /etc/hosts
127.0.0.1 localhost localhost.localdomain localhost4 localhost4.localdomain4
::1 localhost localhost.localdomain localhost6 localhost6.localdomain6
172.25.254.10 CICD-node1
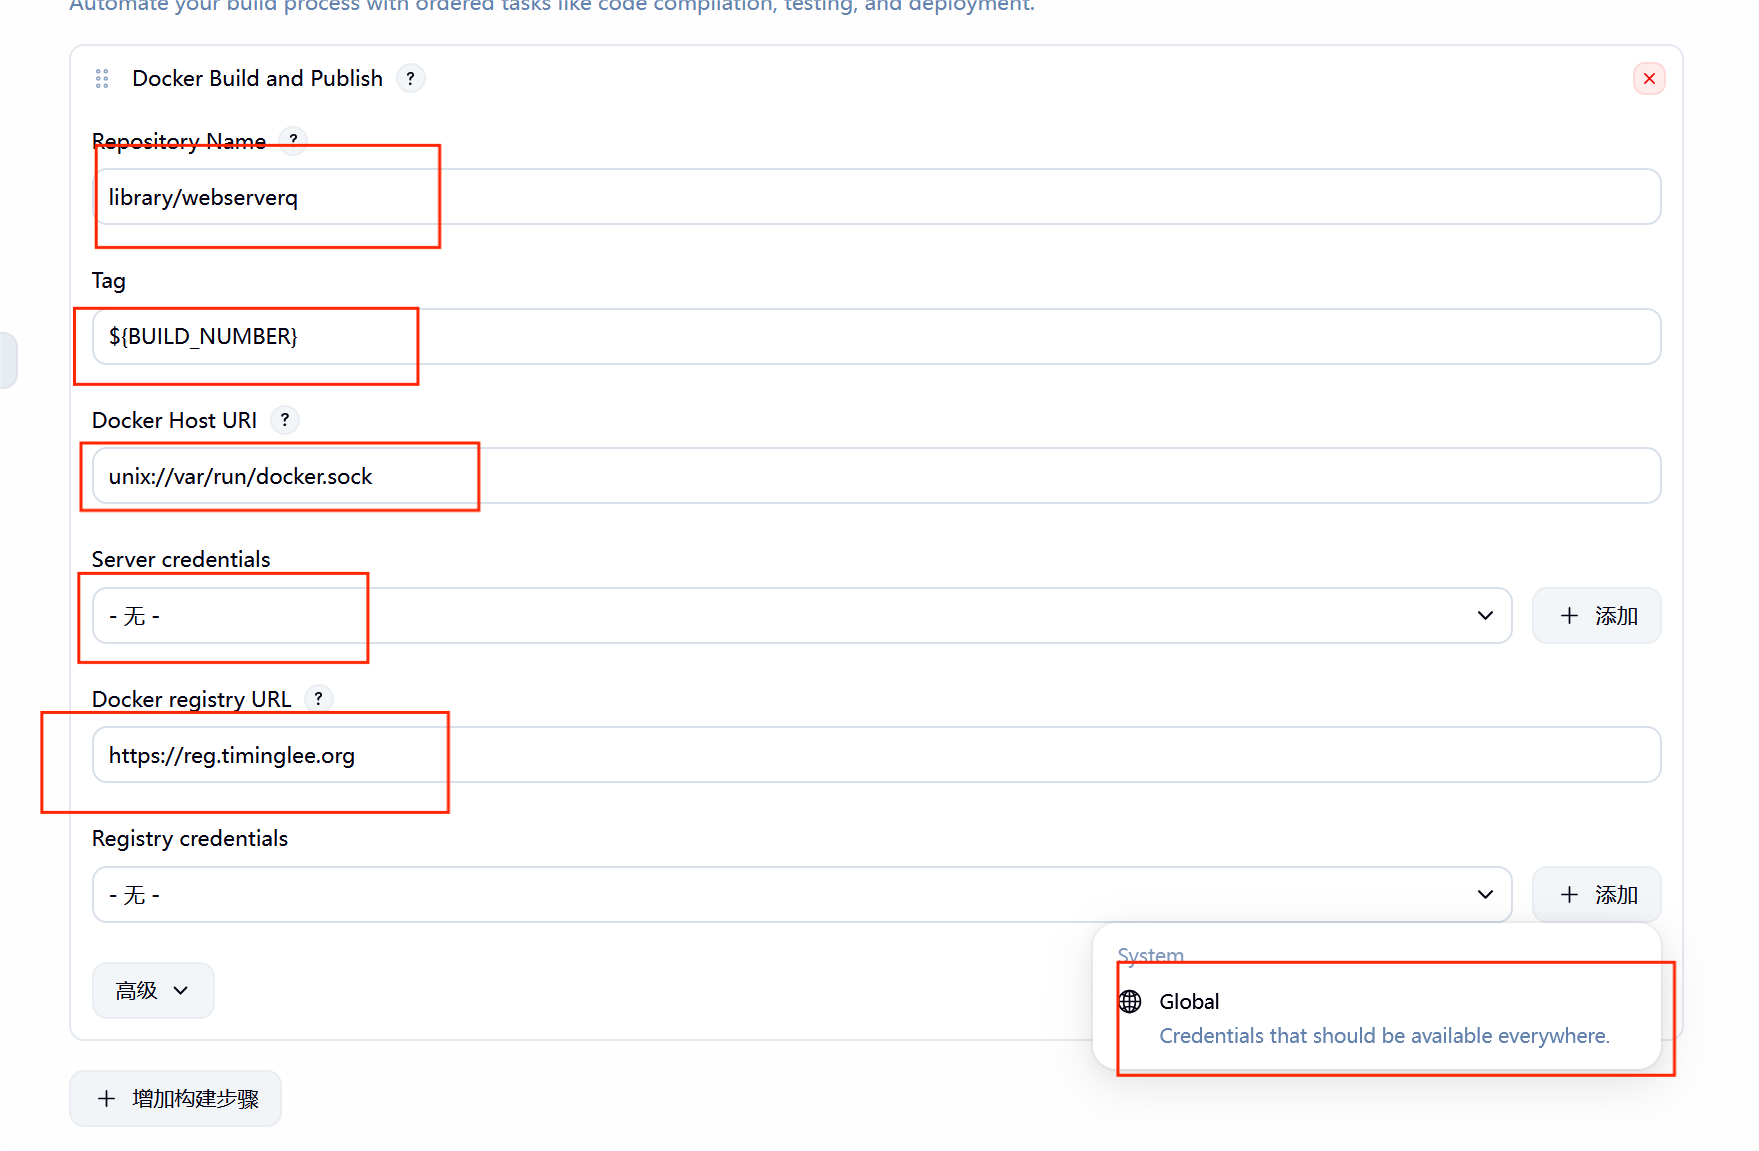
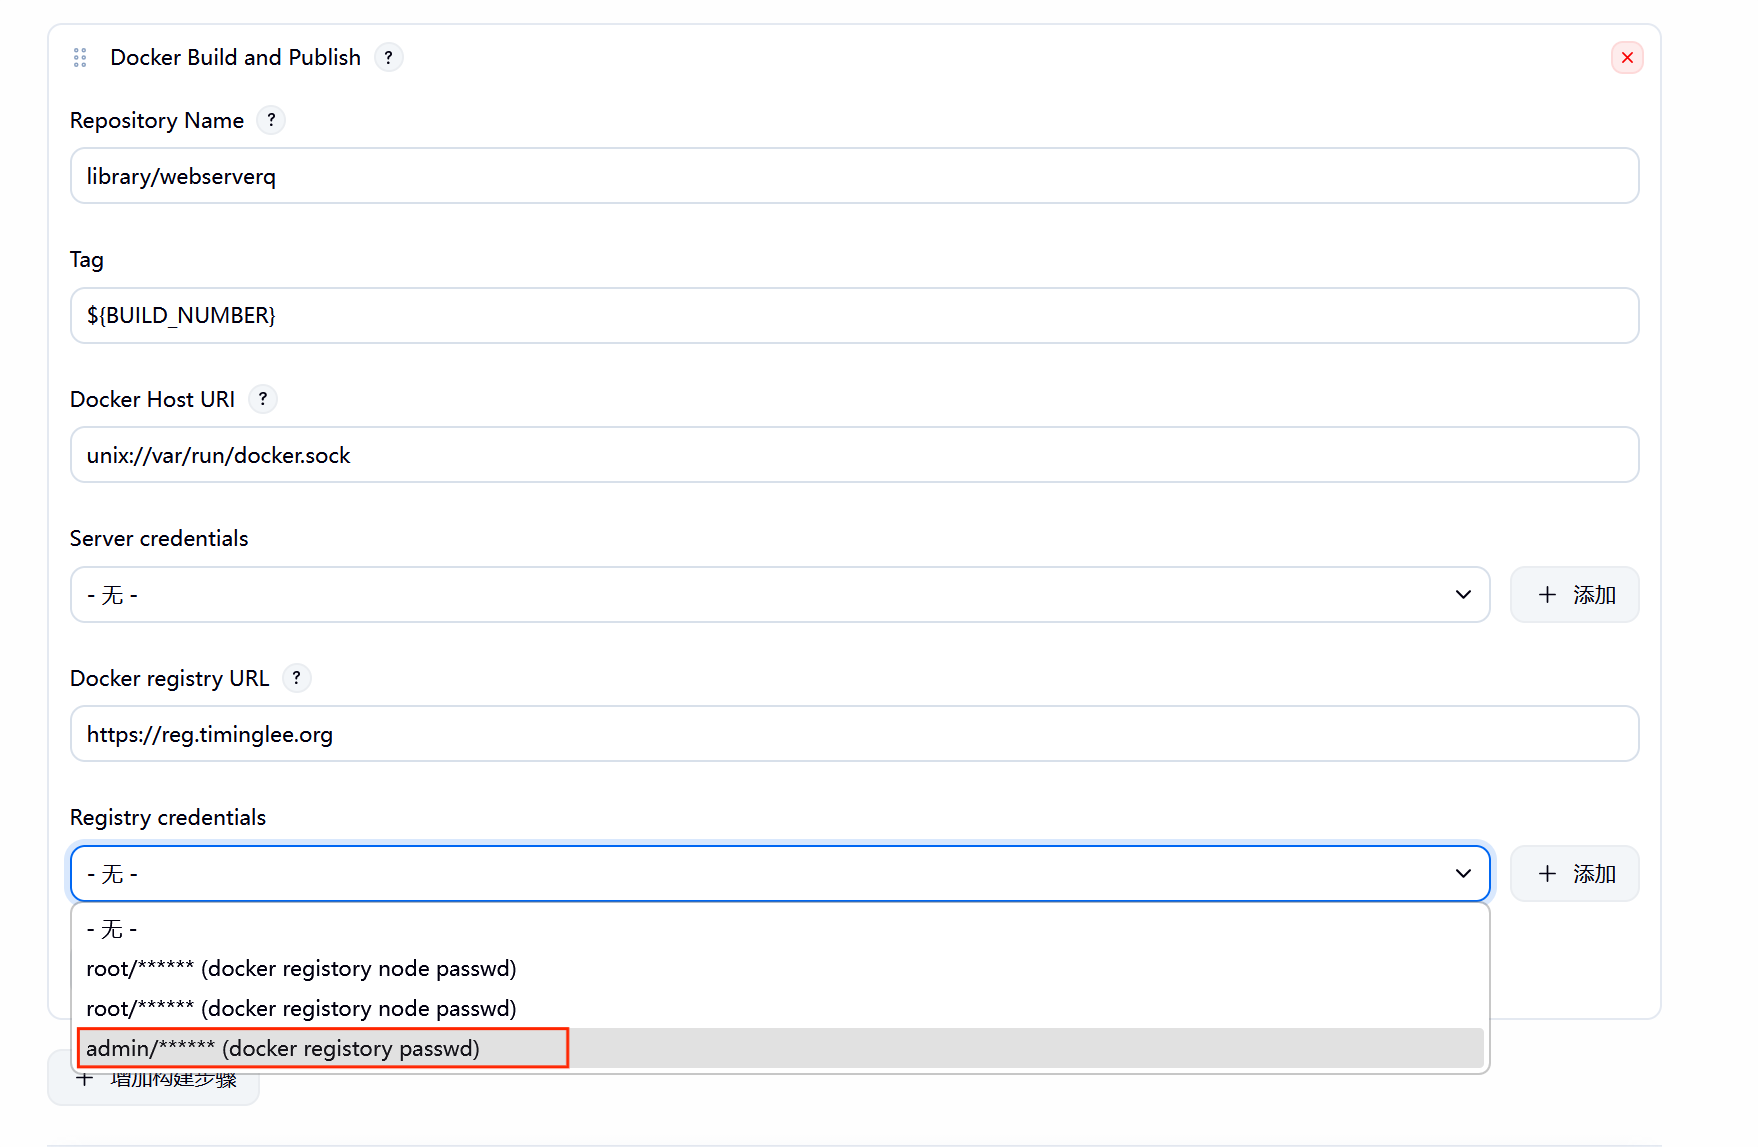
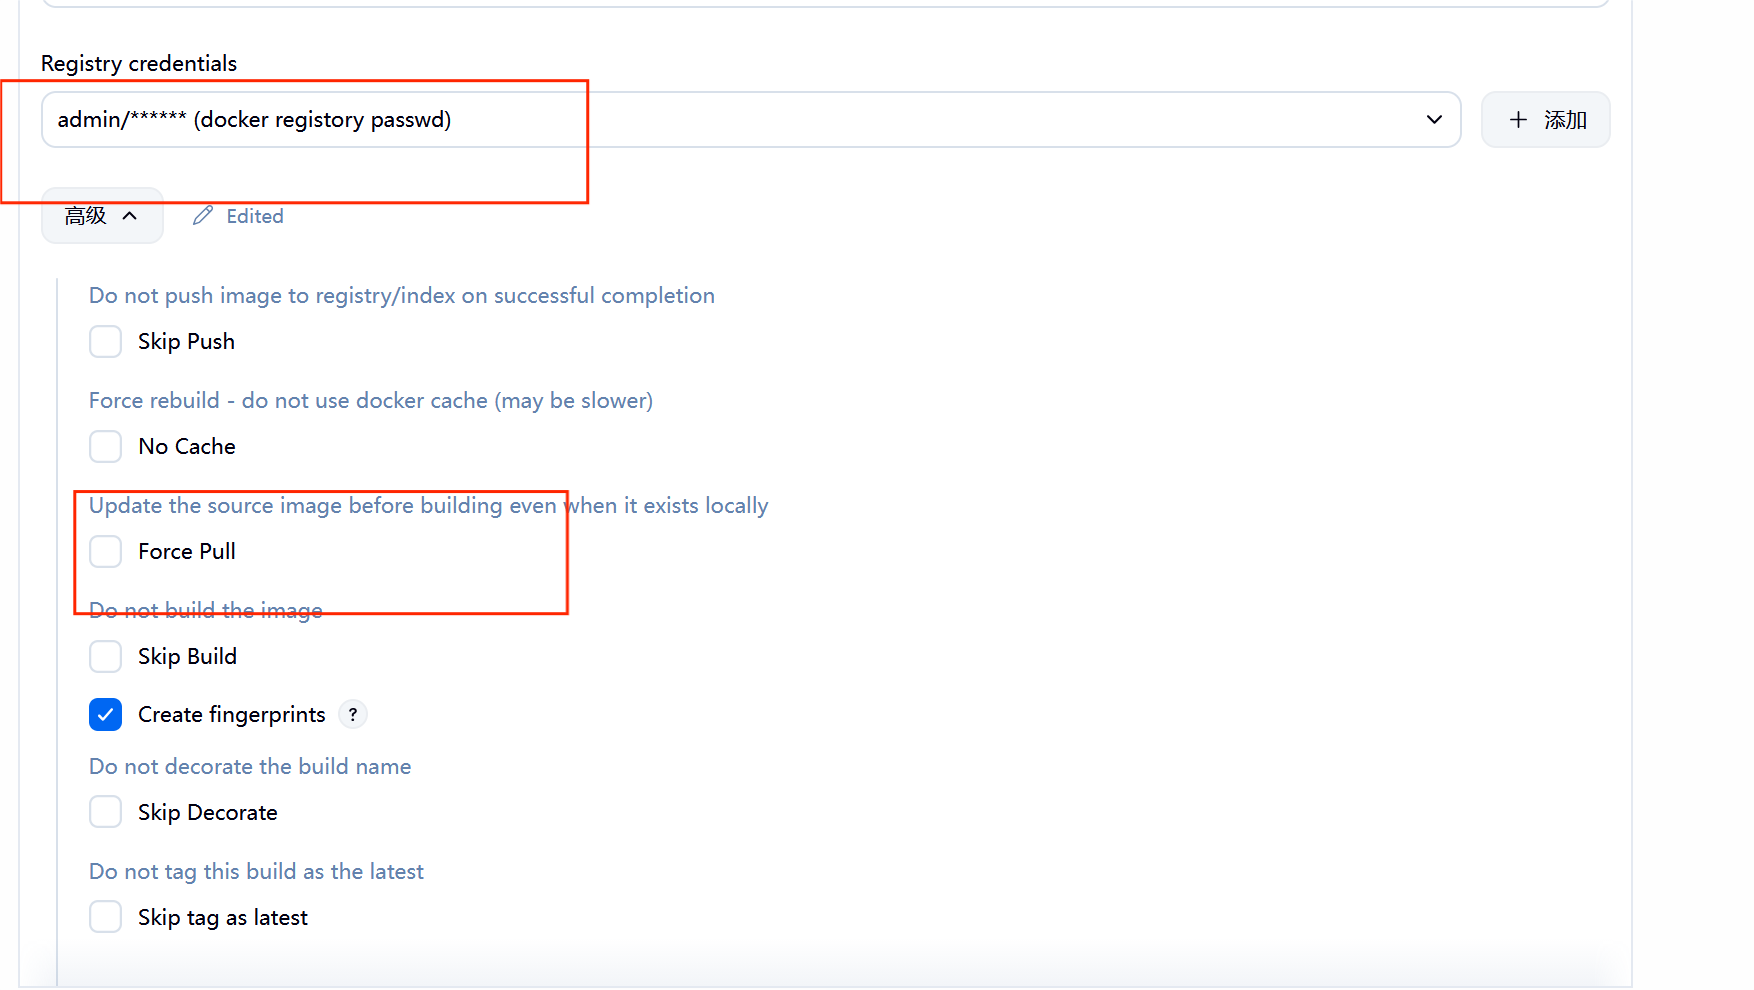
172.25.254.200 reg.timinglee.org**7.3.**测试镜像构建
bash
[root@CICD-node1 timinglee]# vim Dockerfile
FROM nginx:latest
COPY index.html /usr/share/nginx/html
[root@CICD-node1 timinglee]# vim index.html
timinglee v1
[root@CICD-node1 timinglee]# git add Dockerfile index.html
[root@CICD-node1 timinglee]# git commit -m "webserverq v1"
[main 74e60ac] webserverq v1
 2 files changed, 4 insertions(+)
 create mode 100644 Dockerfile
 create mode 100644 index.html
[root@CICD-node1 timinglee]# git push -u origin main
枚举对象中: 5, 完成.
对象计数中: 100% (5/5), 完成.
使用 4 个线程进行压缩
压缩对象中: 100% (3/3), 完成.
写入对象中: 100% (4/4), 443 字节 | 443.00 KiB/s, 完成.
总共 4(差异 0),复用 0(差异 0),包复用 0(来自  0 个包)
To 172.25.254.10:root/timinglee.git
   7ef8dd8..74e60ac  main -> main
分支 'main' 设置为跟踪 'origin/main'。
[root@CICD-node1 timinglee]# git add Dockerfile index.html
[root@CICD-node1 timinglee]# git commit -m "webserverq v1"
位于分支 main
您的分支与上游分支 'origin/main' 一致。

无文件要提交,干净的工作区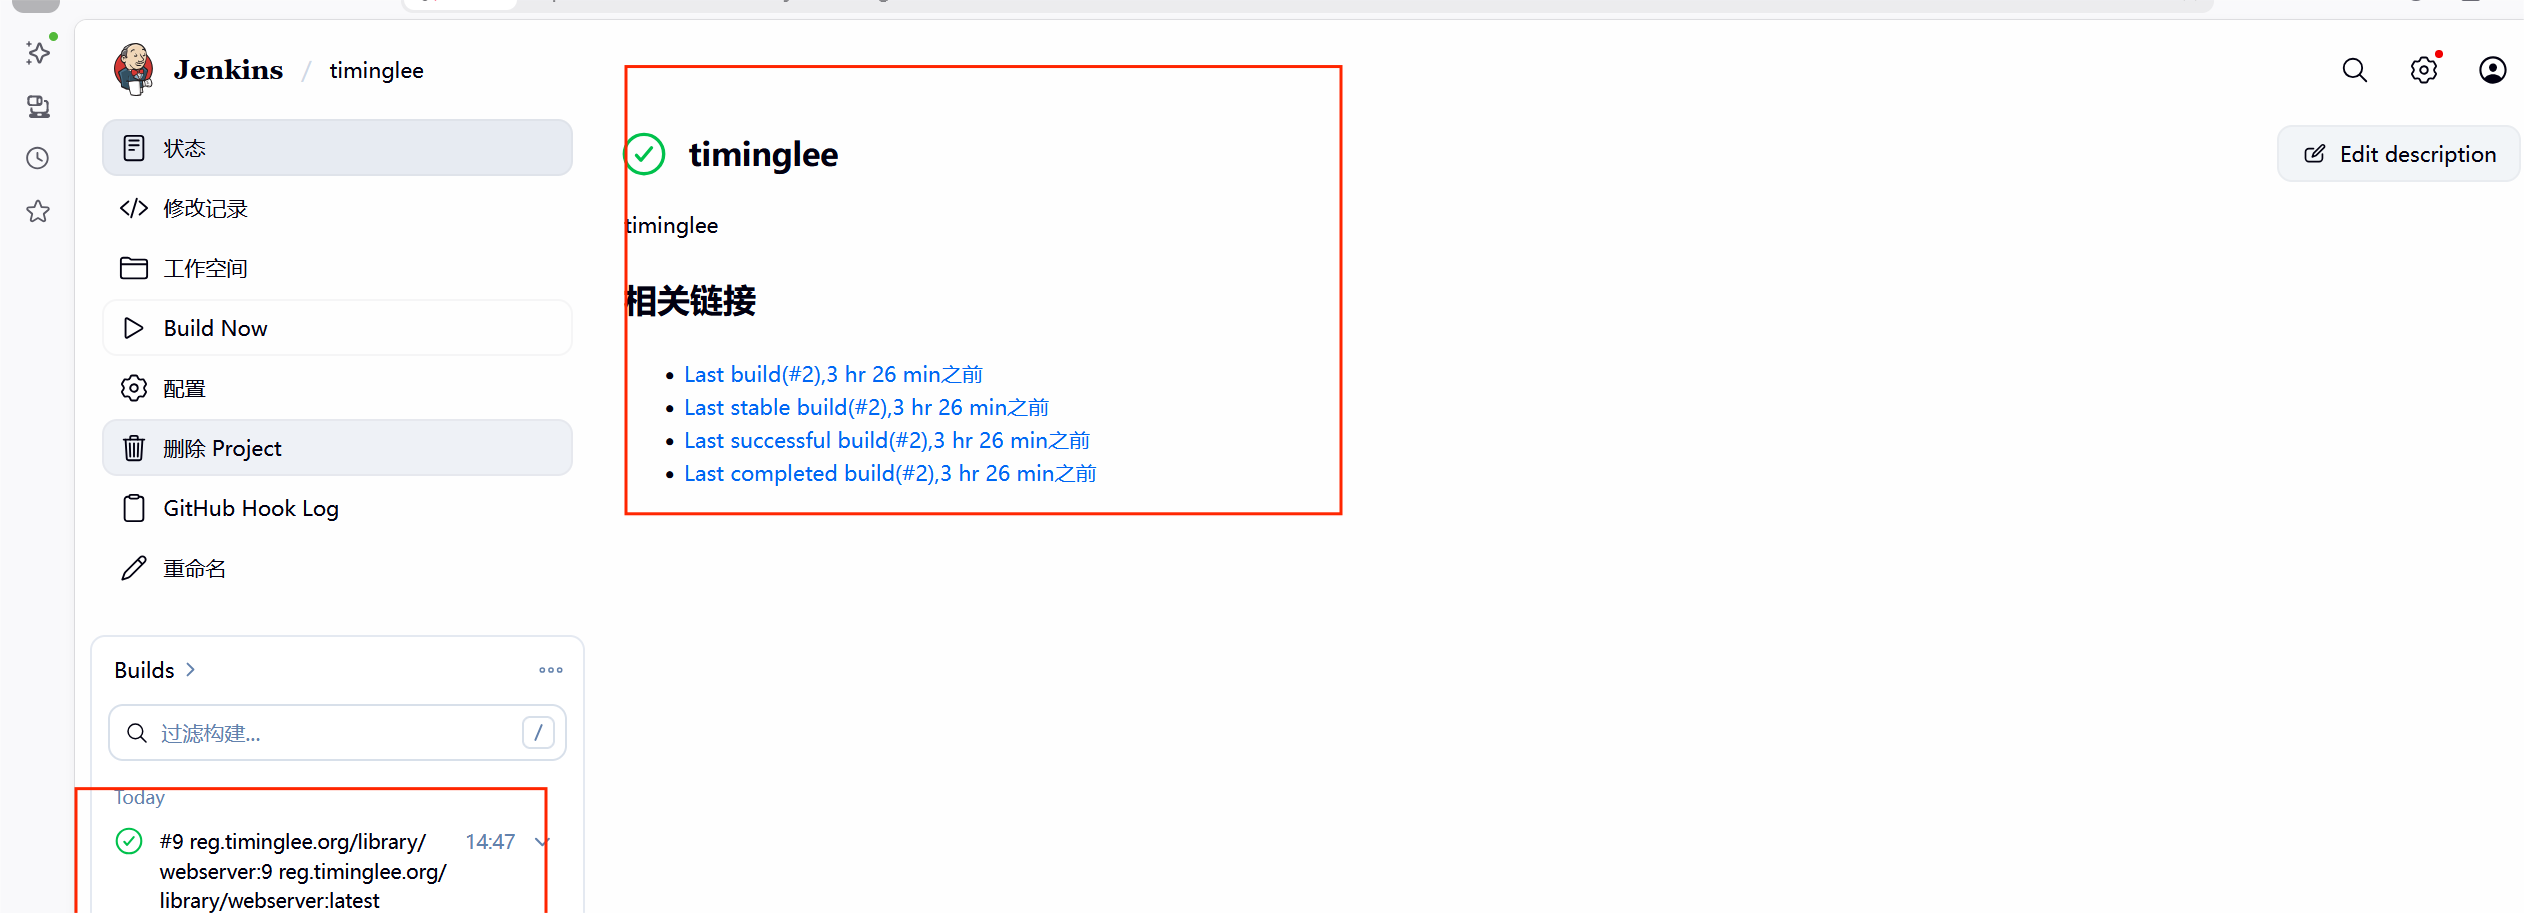
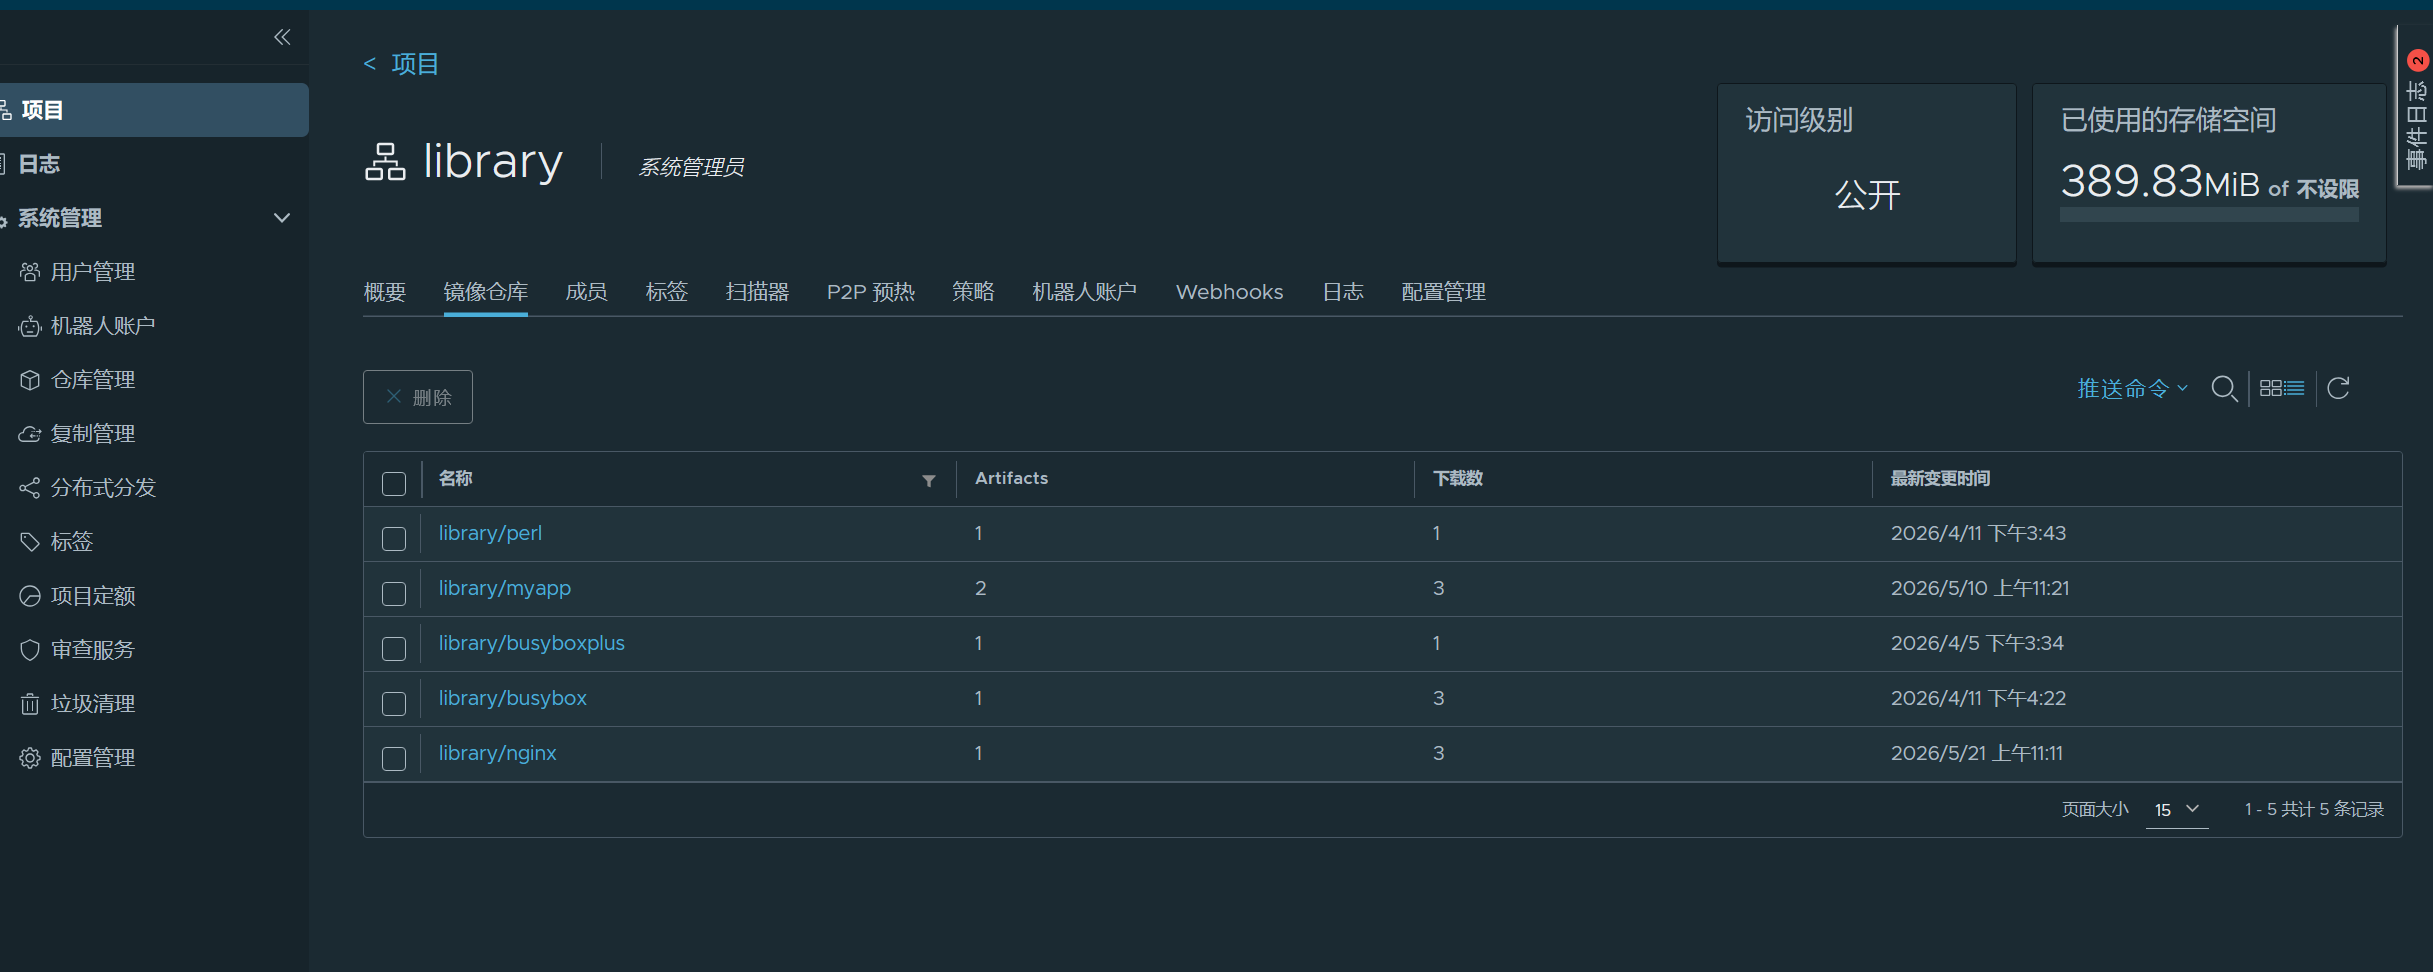
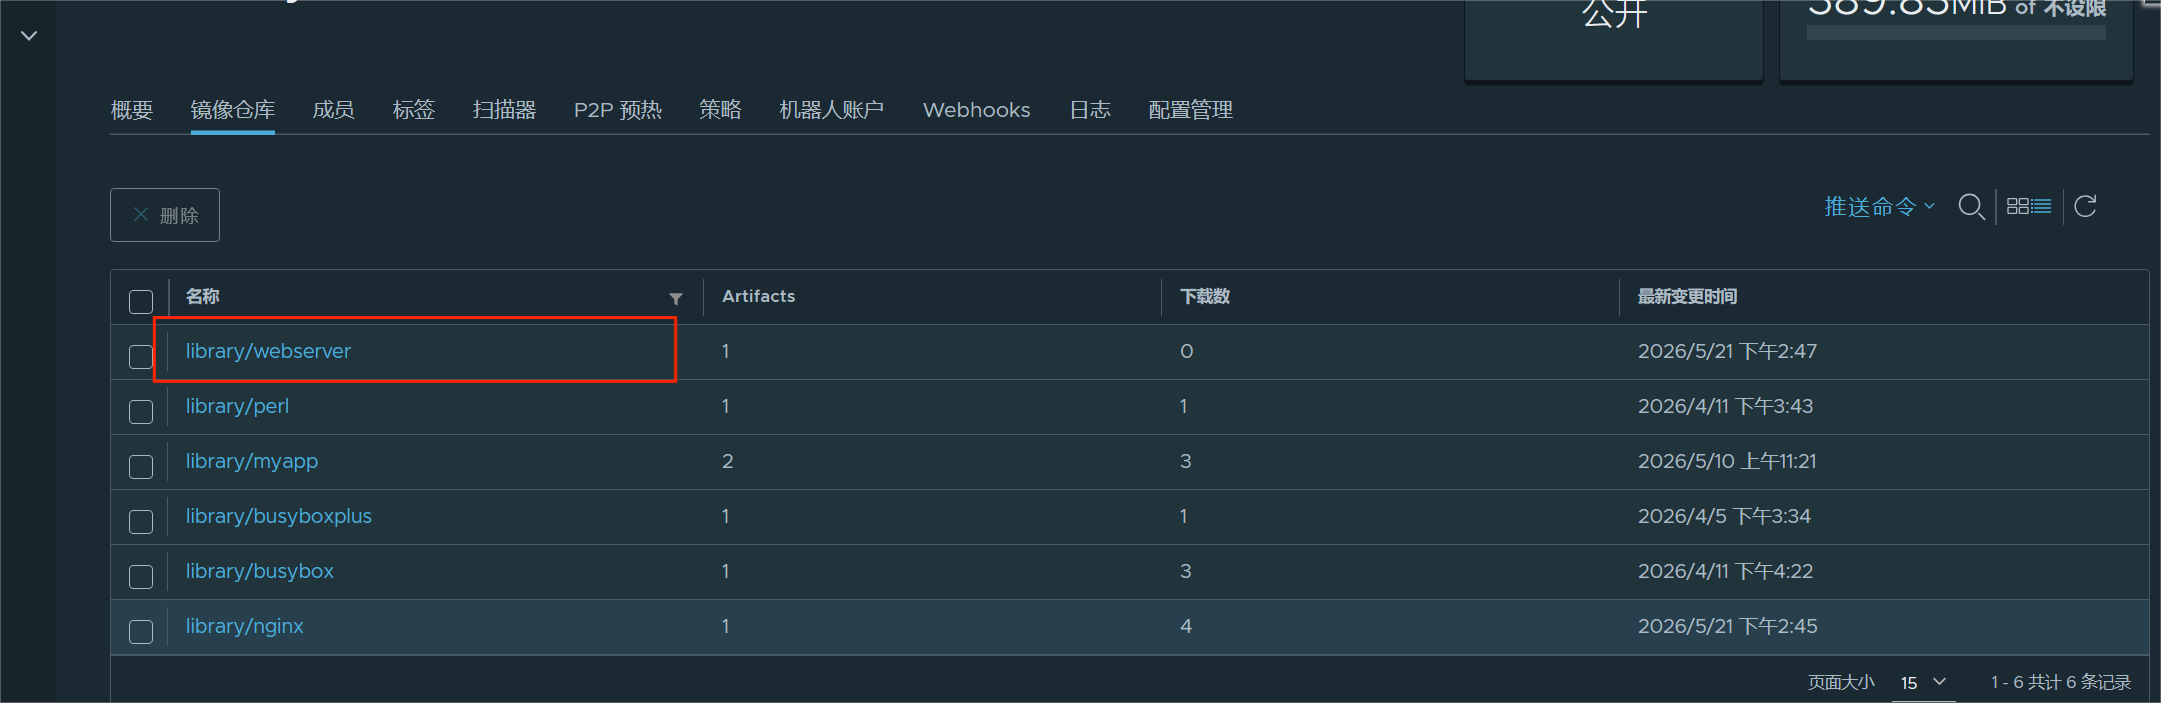
#harbor仓库也增加了
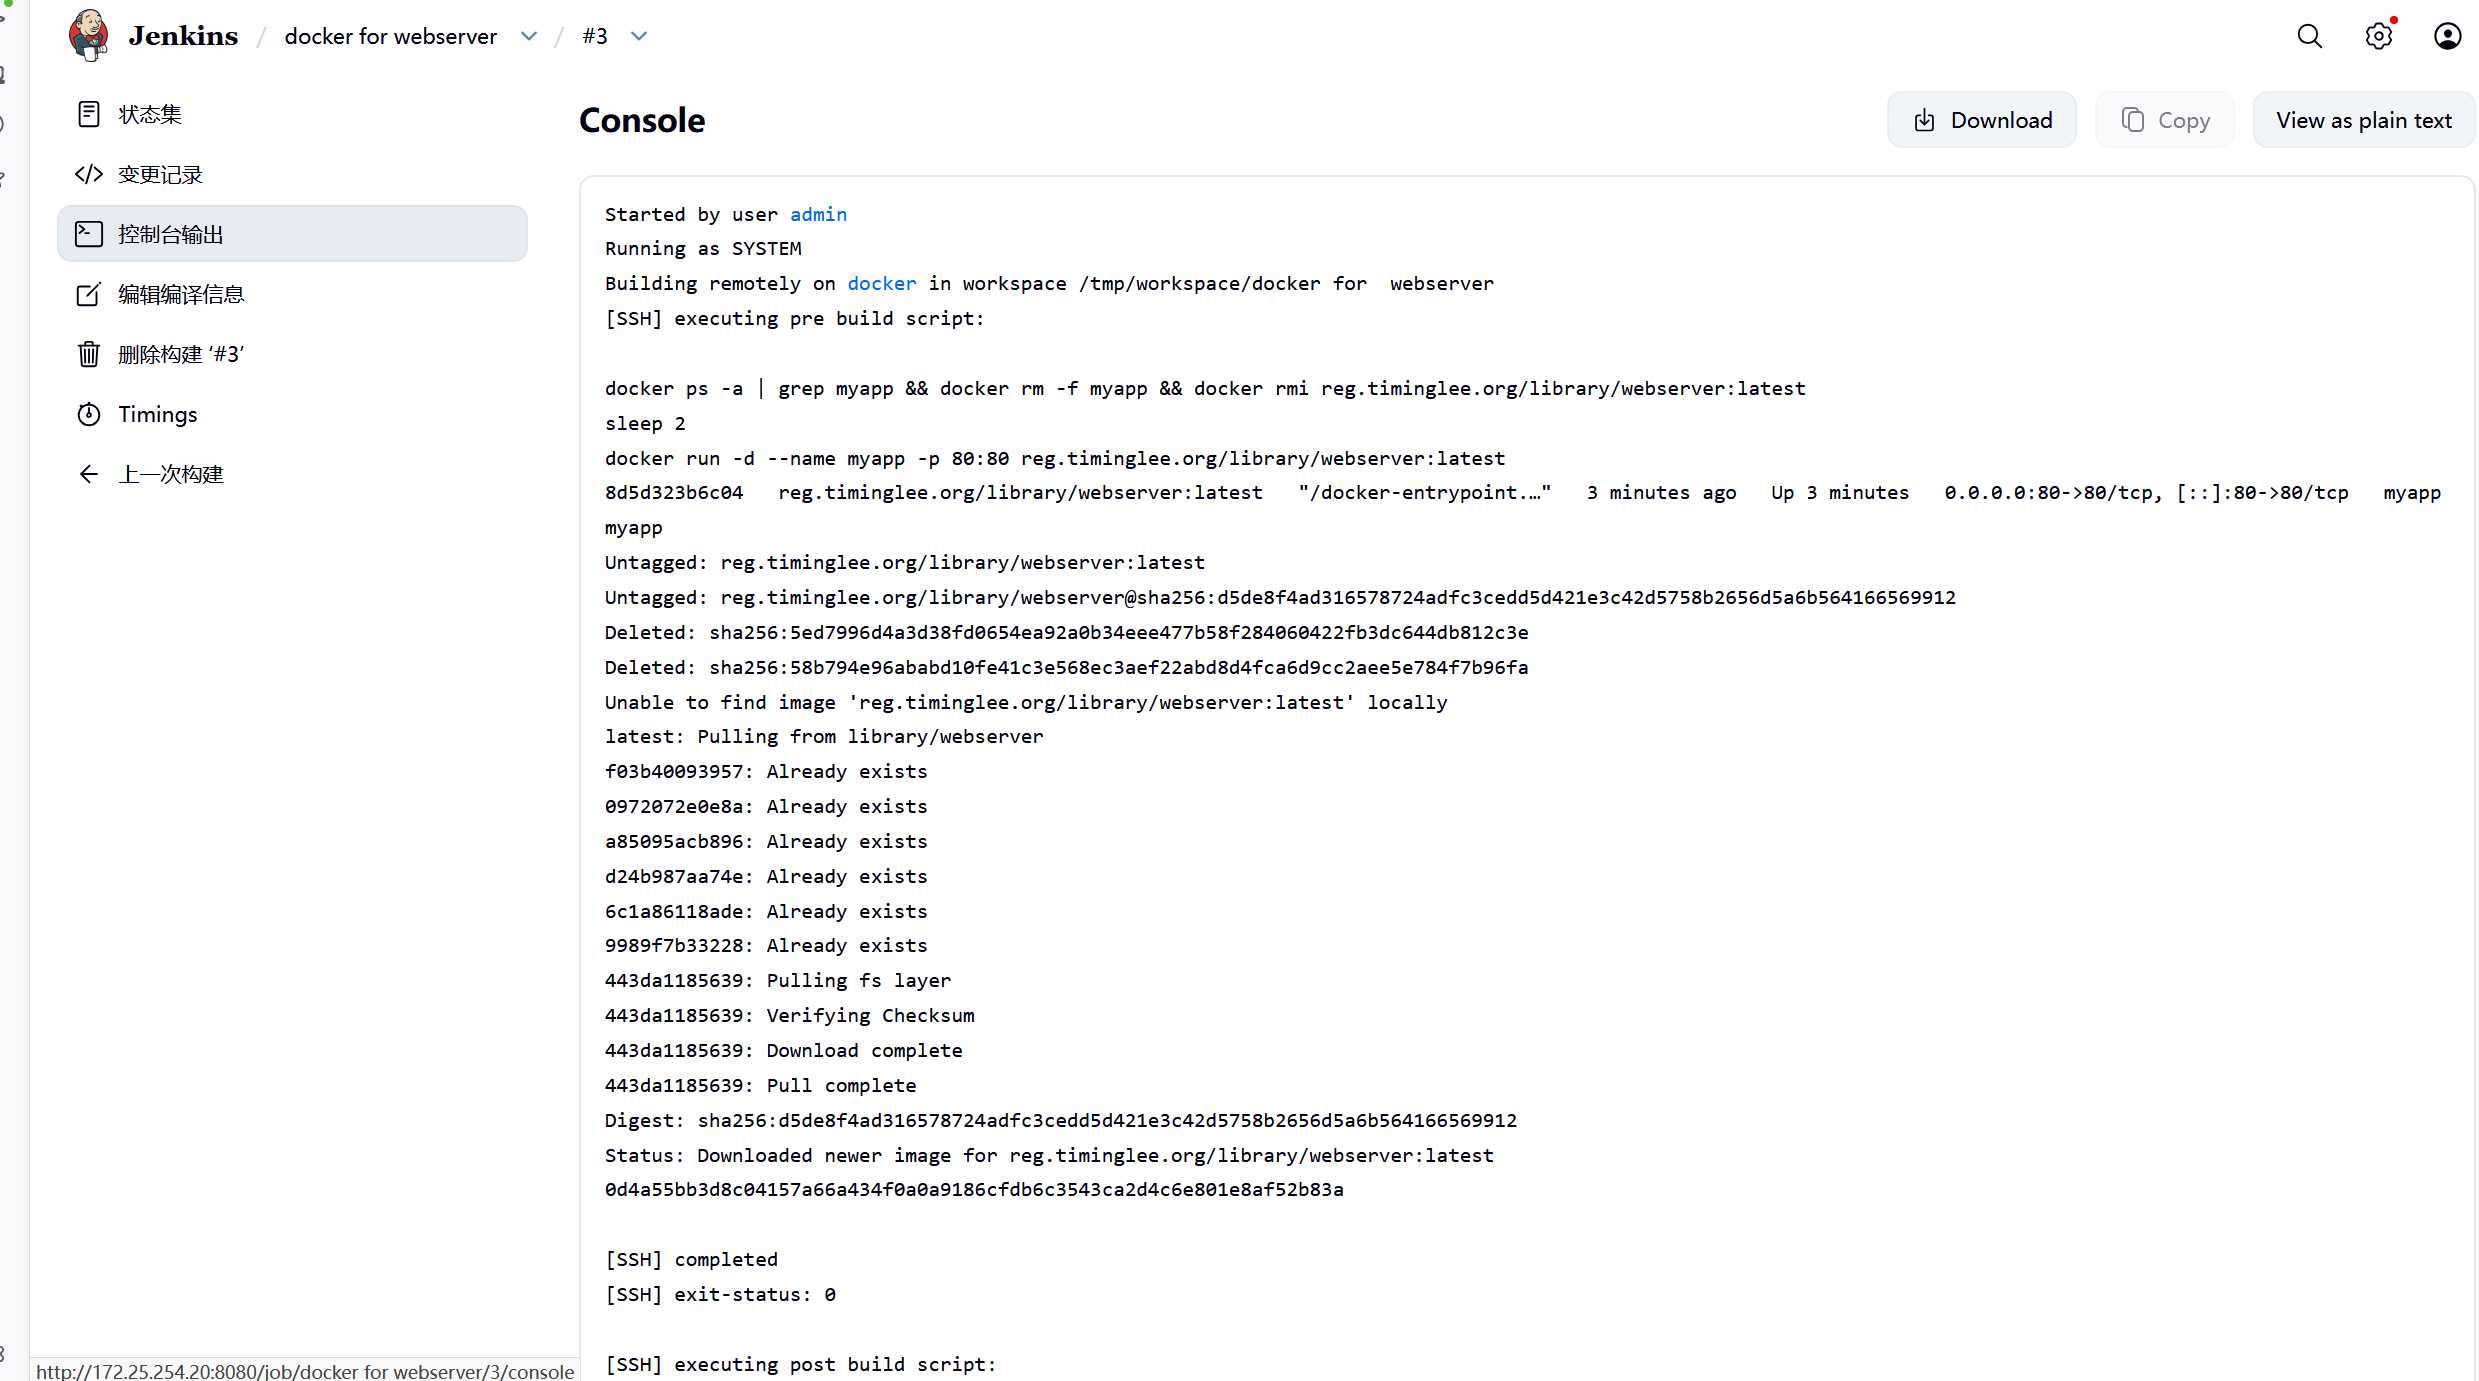
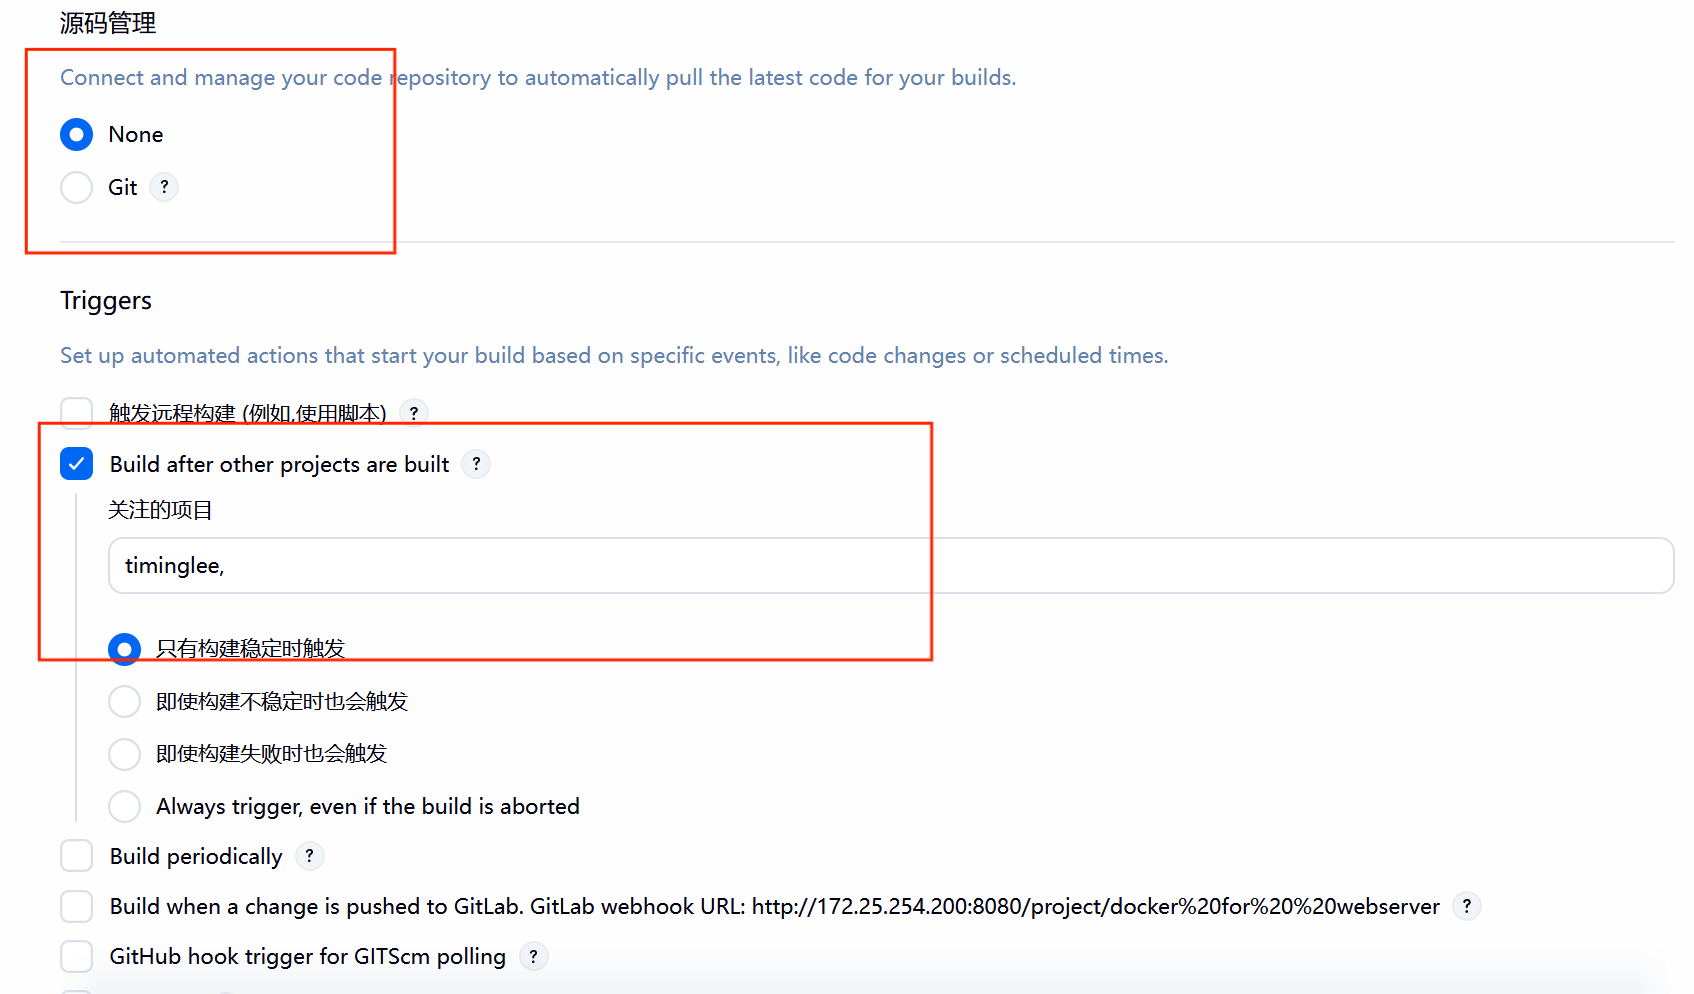
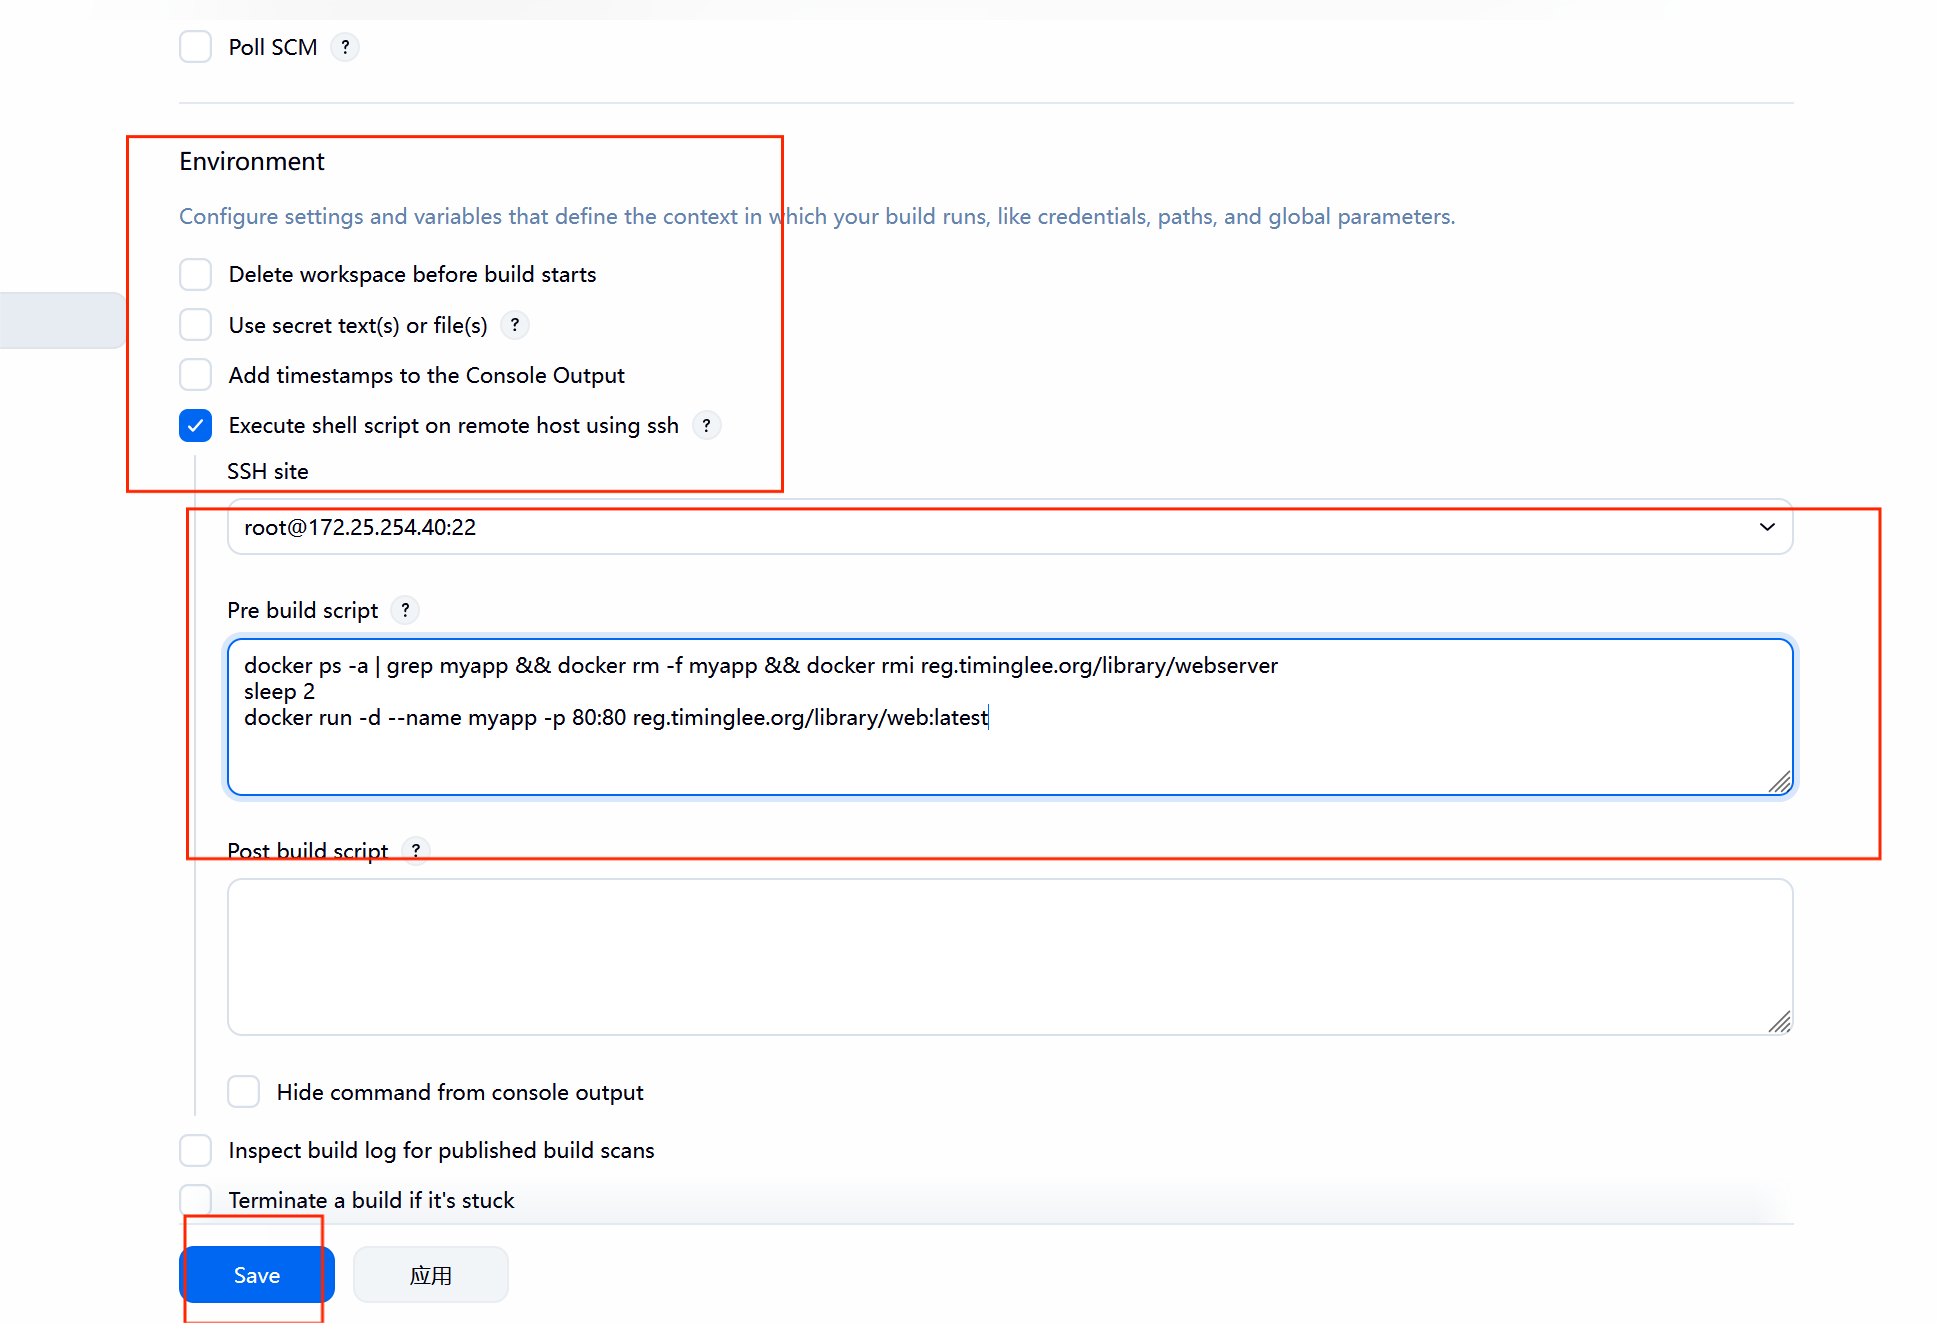
**7.4.**在业务节点自动运行

7.5****测试效果
bash
[root@CICD-node1 timinglee]# vim index.html
timinglee v10
[root@CICD-node1 timinglee]# git add  Dockerfile index.html
[root@CICD-node1 timinglee]# git commit -m "webserver v10"
[main ee4ff56] webserver v10
 1 file changed, 1 insertion(+), 1 deletion(-)
[root@CICD-node1 timinglee]# git push -u origin main
枚举对象中: 5, 完成.
对象计数中: 100% (5/5), 完成.
使用 4 个线程进行压缩
压缩对象中: 100% (2/2), 完成.
写入对象中: 100% (3/3), 262 字节 | 262.00 KiB/s, 完成.
总共 3(差异 1),复用 0(差异 0),包复用 0(来自  0 个包)
To 172.25.254.10:root/timinglee.git
   74e60ac..ee4ff56  main -> main
分支 'main' 设置为跟踪 'origin/main'。