Git Submodule 实战指南:从基础概念到 AI-Native 项目落地
适合对象:需要在多个仓库之间共享代码、组件、契约、Prompt、MCP 服务或基础设施配置的团队。
Git Submodule 的核心价值不是"把仓库放进另一个仓库",而是让主项目精确记录每个子仓库使用的是哪一次提交。它适合需要强版本锁定、独立发布、跨项目复用的场景;如果只是想把代码拆目录,Monorepo 往往更简单。
目录
- [为什么企业研发需要 AI-Native 的文档与代码管理](#为什么企业研发需要 AI-Native 的文档与代码管理 "#1-%E4%B8%BA%E4%BB%80%E4%B9%88%E4%BC%81%E4%B8%9A%E7%A0%94%E5%8F%91%E9%9C%80%E8%A6%81-ai-native-%E7%9A%84%E6%96%87%E6%A1%A3%E4%B8%8E%E4%BB%A3%E7%A0%81%E7%AE%A1%E7%90%86")
- [为什么选择 Git Submodule](#为什么选择 Git Submodule "#2-%E4%B8%BA%E4%BB%80%E4%B9%88%E9%80%89%E6%8B%A9-git-submodule")
- [先判断是否该用 Submodule](#先判断是否该用 Submodule "#3-%E5%85%88%E5%88%A4%E6%96%AD%E6%98%AF%E5%90%A6%E8%AF%A5%E7%94%A8-submodule")
- 核心概念
- 快速开始
- 常用命令速查
- [AI-Native 项目结构](#AI-Native 项目结构 "#7-ai-native-%E9%A1%B9%E7%9B%AE%E7%BB%93%E6%9E%84")
- [Vue3 前端子模块示例](#Vue3 前端子模块示例 "#8-vue3-%E5%89%8D%E7%AB%AF%E5%AD%90%E6%A8%A1%E5%9D%97%E7%A4%BA%E4%BE%8B")
- [Spring Boot 后端子模块示例](#Spring Boot 后端子模块示例 "#9-spring-boot-%E5%90%8E%E7%AB%AF%E5%AD%90%E6%A8%A1%E5%9D%97%E7%A4%BA%E4%BE%8B")
- [MCP 服务子模块示例](#MCP 服务子模块示例 "#10-mcp-%E6%9C%8D%E5%8A%A1%E5%AD%90%E6%A8%A1%E5%9D%97%E7%A4%BA%E4%BE%8B")
- 团队协作工作流
- [CI/CD 配置](#CI/CD 配置 "#12-cicd-%E9%85%8D%E7%BD%AE")
- 常见问题与排查
- 最佳实践清单
1. 为什么企业研发需要 AI-Native 的文档与代码管理
1.1 传统研发流程的割裂现状
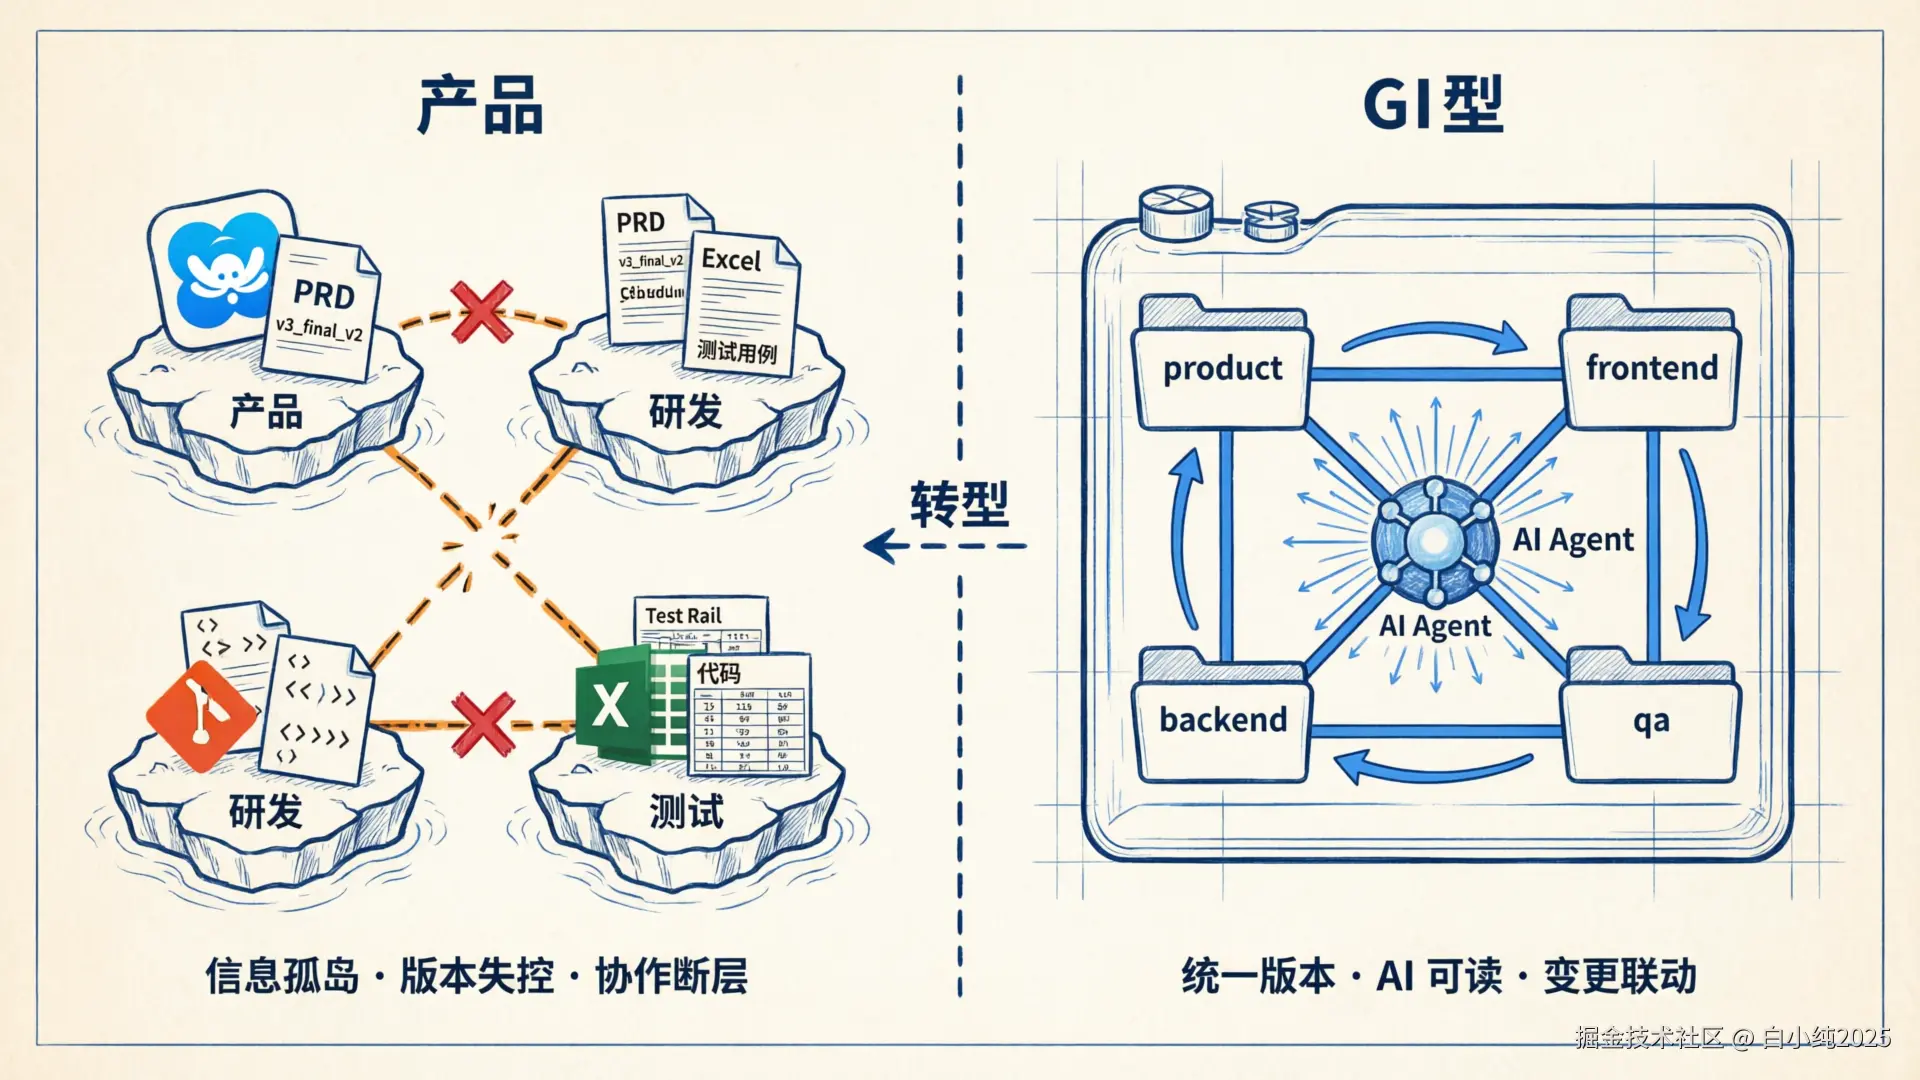
在大多数企业中,产品、研发、测试三条线各自为政,信息散落在不同系统里:
| 角色 | 常用工具 | 产出物 | 存储位置 |
|---|---|---|---|
| 产品经理 | Axure、Figma、Confluence、飞书文档 | PRD、原型、需求变更记录 | 云文档 / Wiki / 本地文件 |
| 研发工程师 | IDE、Git、Jira | 代码、技术方案、API 文档 | Git 仓库 / Confluence |
| 测试工程师 | TestRail、Excel、Postman | 测试用例、测试报告、自动化脚本 | 测试平台 / 共享盘 / Git |
这种割裂带来几个核心痛点:
信息孤岛:PRD 在飞书,代码在 GitLab,测试用例在 Excel。需求变更时,产品改了文档,研发不知道;研发改了接口,测试用例失效。没有一个地方能看到"当前这个功能,从需求到代码到测试"的完整链路。
版本失控:产品文档的"最终版_v3_确认版_改2"现象屡见不鲜。更严重的是,代码已经迭代到 v2.1,但对应的 PRD 还停留在 v1.0 的描述,没人知道哪个版本的文档对应哪个版本的代码。
协作断层:研发提测时,测试需要手动对照 PRD 和接口文档编写用例。接口变了,测试不知道;PRD 改了,研发不知道。每次迭代都在重复"你那边改了吗?改了哪里?"的沟通成本。
AI 无法介入:当文档散落在各个 SaaS 平台时,AI 工具(无论是 Copilot、Claude 还是内部 Agent)无法获取完整上下文。AI 只能看到代码,看不到需求背景和测试预期,生成的代码和建议缺乏业务语境。
1.2 AI-Native 研发的核心诉求
AI-Native 不是"在现有流程上加个 AI 插件",而是重新设计信息流,让 AI 能贯穿产品→研发→测试的全链路:
text
传统模式:
  产品(飞书) ──手动同步──→ 研发(Git) ──口头沟通──→ 测试(Excel)
       ↑                        ↑                        ↑
     各自独立               各自独立                各自独立

AI-Native 模式:
  ┌─────────────────── Git 主仓库 ───────────────────┐
  │                                                    │
  │  product/     frontend/    backend/      qa/       │
  │  (PRD+原型)   (前端代码)   (后端代码)   (测试)    │
  │                                                    │
  │         AI Agent 可访问完整上下文                   │
  │         版本锁定 · 变更可追溯 · 自动联动           │
  └────────────────────────────────────────────────────┘
AI-Native 研发对文档和代码管理的要求:
- 统一版本源:产品文档、代码、测试用例在同一个版本体系下,能回答"v2.1 发布时,PRD 是什么样的,测试覆盖了哪些场景"。
- AI 可读取:所有产出物以纯文本格式(Markdown、YAML、代码)存储在 Git 中,AI Agent 可以直接读取和理解。
- 变更联动:PRD 变更能自动触发相关代码和测试用例的 Review 提醒;接口变更能自动标记受影响的测试。
- 全链路追溯:从一个 commit 能追溯到对应的需求、设计决策和测试结果。
1.3 AI 整合后的研发流程
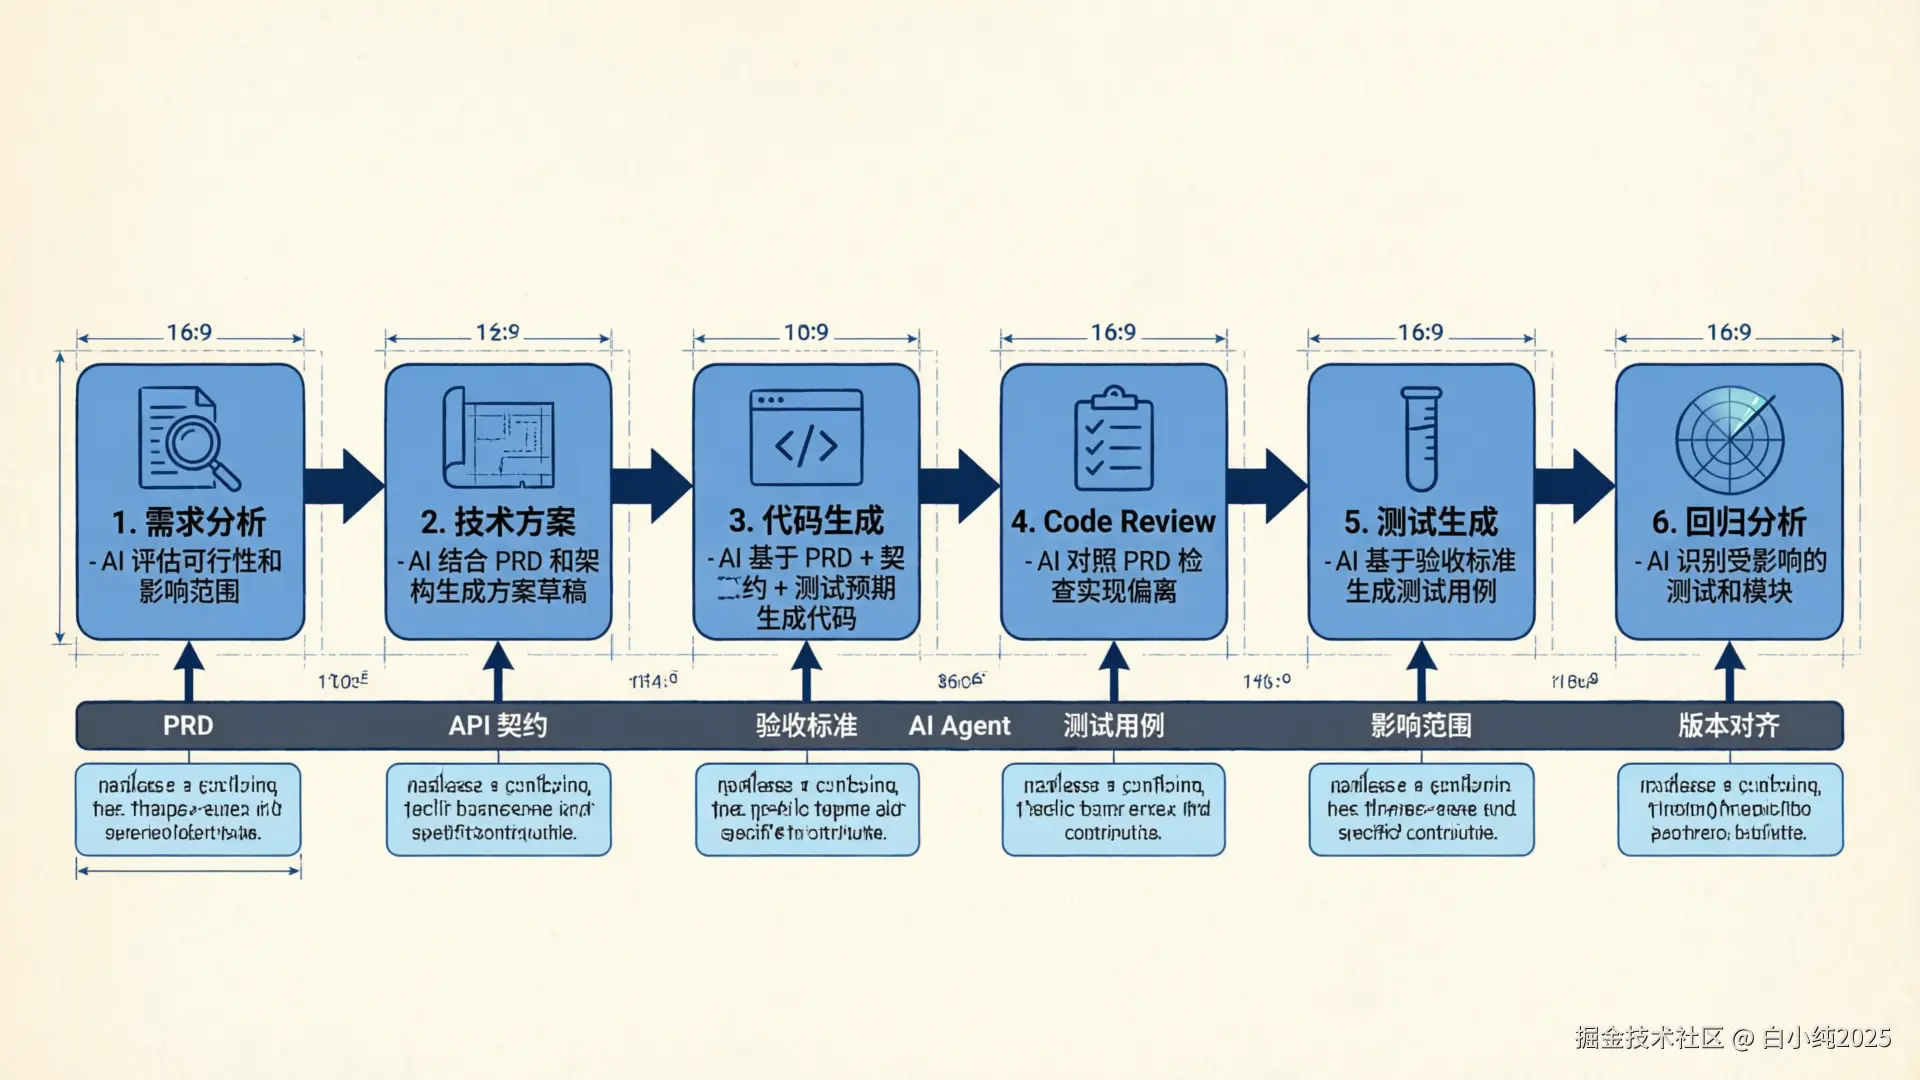
当产品、研发、测试的产出物都纳入 Git 管理后,AI 能在每个环节发挥作用:
| 环节 | AI 能做什么 | 前提条件 |
|---|---|---|
| 需求分析 | 基于历史 PRD 和代码,评估需求可行性和影响范围 | PRD 在 Git 中,AI 能读取 |
| 技术方案 | 结合 PRD 和现有架构,生成技术方案草稿 | 需求和代码在同一上下文 |
| 代码生成 | 基于 PRD + API 契约 + 测试预期,生成符合业务语境的代码 | 三者版本对齐 |
| Code Review | 对照 PRD 检查实现是否偏离需求,对照契约检查接口兼容性 | PRD 和契约可被 AI 访问 |
| 测试生成 | 基于 PRD 的验收标准和 API 契约,自动生成测试用例 | 验收标准结构化存储 |
| 回归分析 | 代码变更后,自动识别受影响的测试用例和功能模块 | 代码和测试在同一版本体系 |
| 文档同步 | 代码变更后,自动更新 API 文档和变更记录 | 文档在 Git 中可被 AI 修改 |
2. 为什么选择 Git Submodule
2.1 备选方案对比
要实现"产品+研发+测试统一管理",有几种技术路径:
| 方案 | 优势 | 劣势 | 适用场景 |
|---|---|---|---|
| Monorepo | 统一提交、联调简单、CI 一体化 | 仓库膨胀、权限粗粒度、构建慢 | 小团队、强耦合模块 |
| Git Submodule | 独立权限、独立发布、精确版本锁定 | 学习成本、操作步骤多 | 跨团队、独立节奏、需要权限隔离 |
| Git Subtree | 无需额外命令、历史合并 | 历史混杂、难以独立推送 | 单向引用、不需要回推 |
| 包管理器(npm/Maven) | 成熟生态、语义化版本 | 发布流程重、不适合非代码产出物 | 纯代码库的复用 |
| 文档平台 + Git 混合 | 各取所长 | AI 无法统一访问、版本不对齐 | 过渡阶段 |
2.2 选择 Git Submodule 的理由
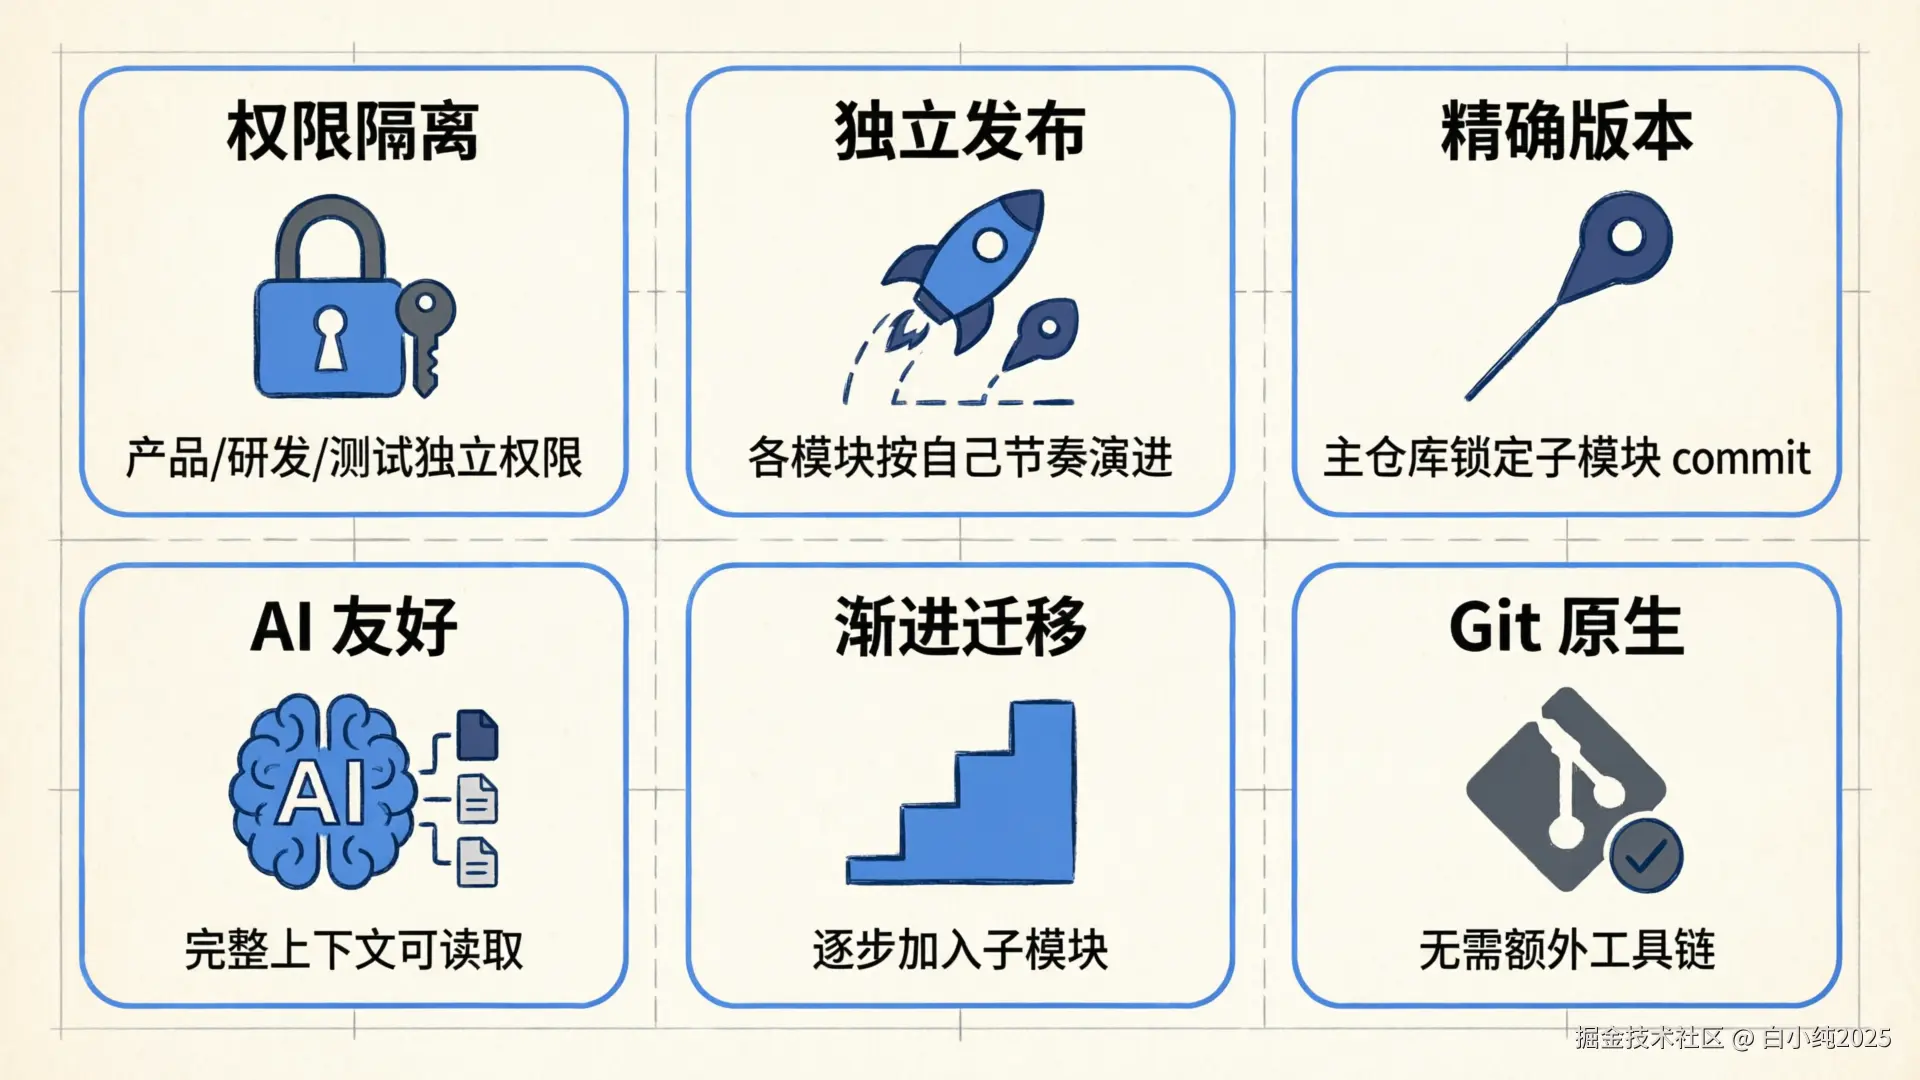
对于企业级 AI-Native 研发管理,Git Submodule 是当前最务实的选择:
权限隔离:产品文档仓库、前端仓库、后端仓库、测试仓库可以设置不同的访问权限。产品经理只需要 product 仓库的写权限,不需要接触代码仓库;实习生可以只访问文档,不能碰生产代码。
独立发布节奏:产品文档的更新频率和代码发布节奏不同。PRD 可能一天改三次,但代码一周才发一个版本。Submodule 允许各模块按自己的节奏演进,主仓库在需要时"快照"一个稳定组合。
精确版本对齐:主仓库的每个 commit 记录了"此刻产品文档是哪个版本、前端是哪个版本、后端是哪个版本、测试是哪个版本"。这就是 AI-Native 研发需要的全链路版本追溯能力。
AI 友好:所有子模块都在本地文件系统中,AI Agent(Claude Code、Cursor、自研 Agent)可以直接读取 product/ 下的 PRD、backend/ 下的代码、qa/ 下的测试用例,获得完整上下文。
渐进式迁移:不需要一次性把所有东西搬进来。可以先把产品文档仓库加为子模块,再逐步加入测试仓库、共享契约仓库。每一步都是可控的。
Git 原生:不依赖额外平台或工具链。任何支持 Git 的 CI/CD、IDE、AI 工具都能直接工作。
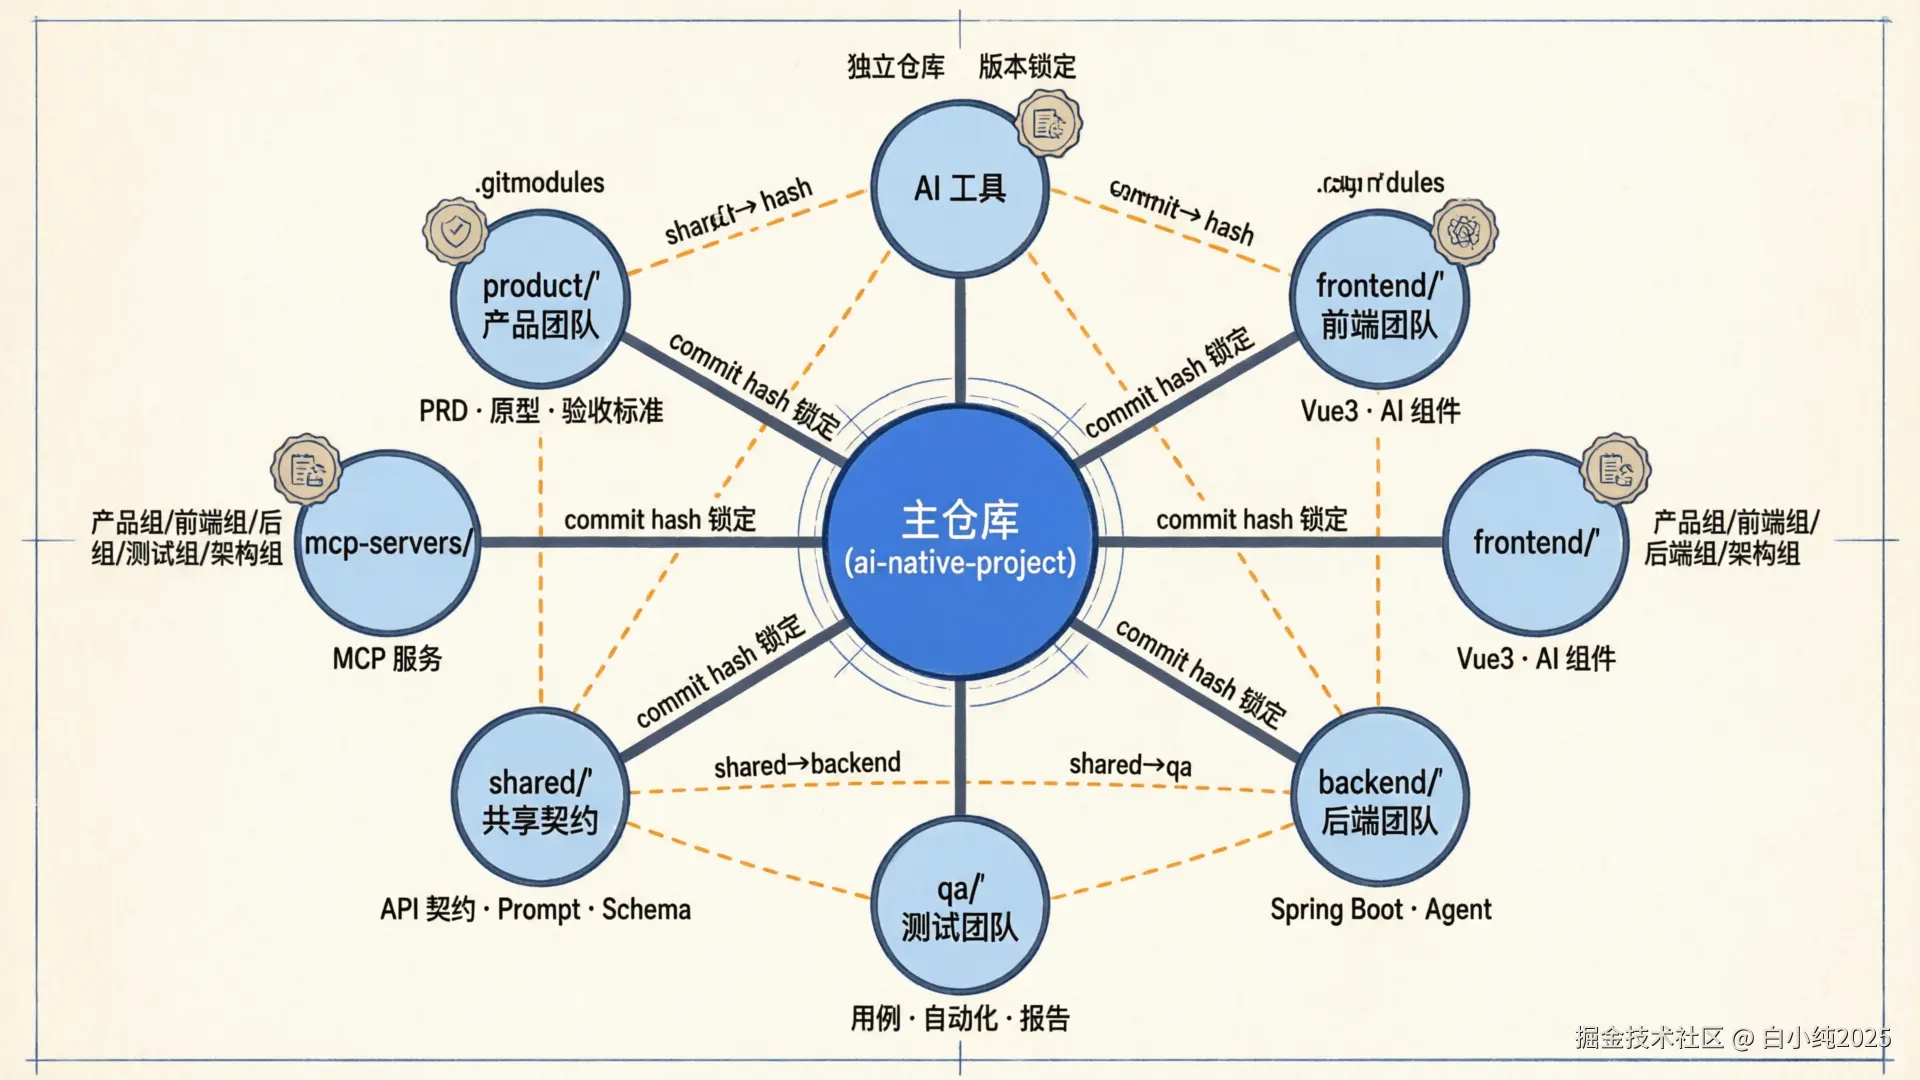
2.3 典型的 AI-Native 研发管控结构
text
ai-native-project/          ← 主仓库:研发全流程管控
├── .gitmodules
├── product/                 ← 子模块:产品团队维护
│   ├── prd/                    需求文档(Markdown)
│   ├── prototype/              原型说明
│   ├── changelog.md            需求变更记录
│   └── acceptance-criteria/    验收标准(YAML/Markdown)
├── design/                  ← 子模块:设计团队维护
│   ├── ui-specs/
│   └── interaction-flows/
├── frontend/                ← 子模块:前端团队维护
├── backend/                 ← 子模块:后端团队维护
├── shared/                  ← 子模块:API 契约、Prompt、Schema
├── qa/                      ← 子模块:测试团队维护
│   ├── test-cases/             测试用例(Markdown/YAML)
│   ├── automation/             自动化脚本
│   └── reports/                测试报告
├── mcp-servers/             ← 子模块:AI 工具服务
└── infra/ ← 基础设施配置这个结构的关键在于:每个团队在自己的仓库里自由工作,主仓库负责"对齐"。当产品经理完成 PRD 评审、研发完成开发、测试完成验证后,主仓库更新各子模块引用,形成一个"经过验证的版本组合"。
2.4 实际场景举例
场景一:需求变更追溯
产品经理修改了 product/prd/user-login.md 中的登录流程。AI Agent 检测到 PRD 变更,自动:
- 对比变更内容,识别影响的接口和页面
- 在
backend/和frontend/中标记受影响的代码文件 - 在
qa/test-cases/中标记需要更新的测试用例 - 生成变更影响报告
场景二:接口契约驱动开发
shared/api-contracts/ 中定义了新接口。AI Agent 可以:
- 基于契约为
backend/生成 Controller 骨架 - 基于契约为
frontend/生成 API 调用层 - 基于契约为
qa/生成接口测试用例 - 三方代码都引用同一份契约,版本天然对齐
场景三:发布前全链路检查
发布前,CI 在主仓库层面执行:
- 检查
product/acceptance-criteria/中的验收标准是否都有对应测试 - 检查
shared/api-contracts/的变更是否前后端都已适配 - 检查
qa/automation/的测试是否全部通过 - 生成"本次发布包含哪些需求、哪些代码变更、测试覆盖情况"的报告
3. 先判断是否该用 Submodule
了解了 AI-Native 研发管理的背景后,再来看具体技术选型。Submodule 不是所有多仓库项目的默认答案。使用前先看这张表:
| 需求 | 推荐方案 | 原因 |
|---|---|---|
| 一个主项目锁定多个独立仓库的精确版本 | Git Submodule | 主仓库记录子模块 commit,回滚和审计清晰 |
| 多包同仓开发,频繁跨包改动 | Monorepo | 本地联调、统一提交、统一 CI 更顺滑 |
| 只想复用第三方源码的一小部分 | Vendoring 或包管理器 | Submodule 的协作成本可能偏高 |
| 共享 SDK、Prompt、API 契约、MCP Server | Git Submodule | 适合独立演进,同时被多个项目固定引用 |
| 子项目需要独立权限和发布节奏 | Git Submodule | 仓库边界、权限边界和版本边界一致 |
一句话判断:如果你希望主项目"固定引用某个外部仓库的某次提交",Submodule 很合适;如果你希望所有模块像一个项目一样改、测、发,优先考虑 Monorepo。
4. 核心概念
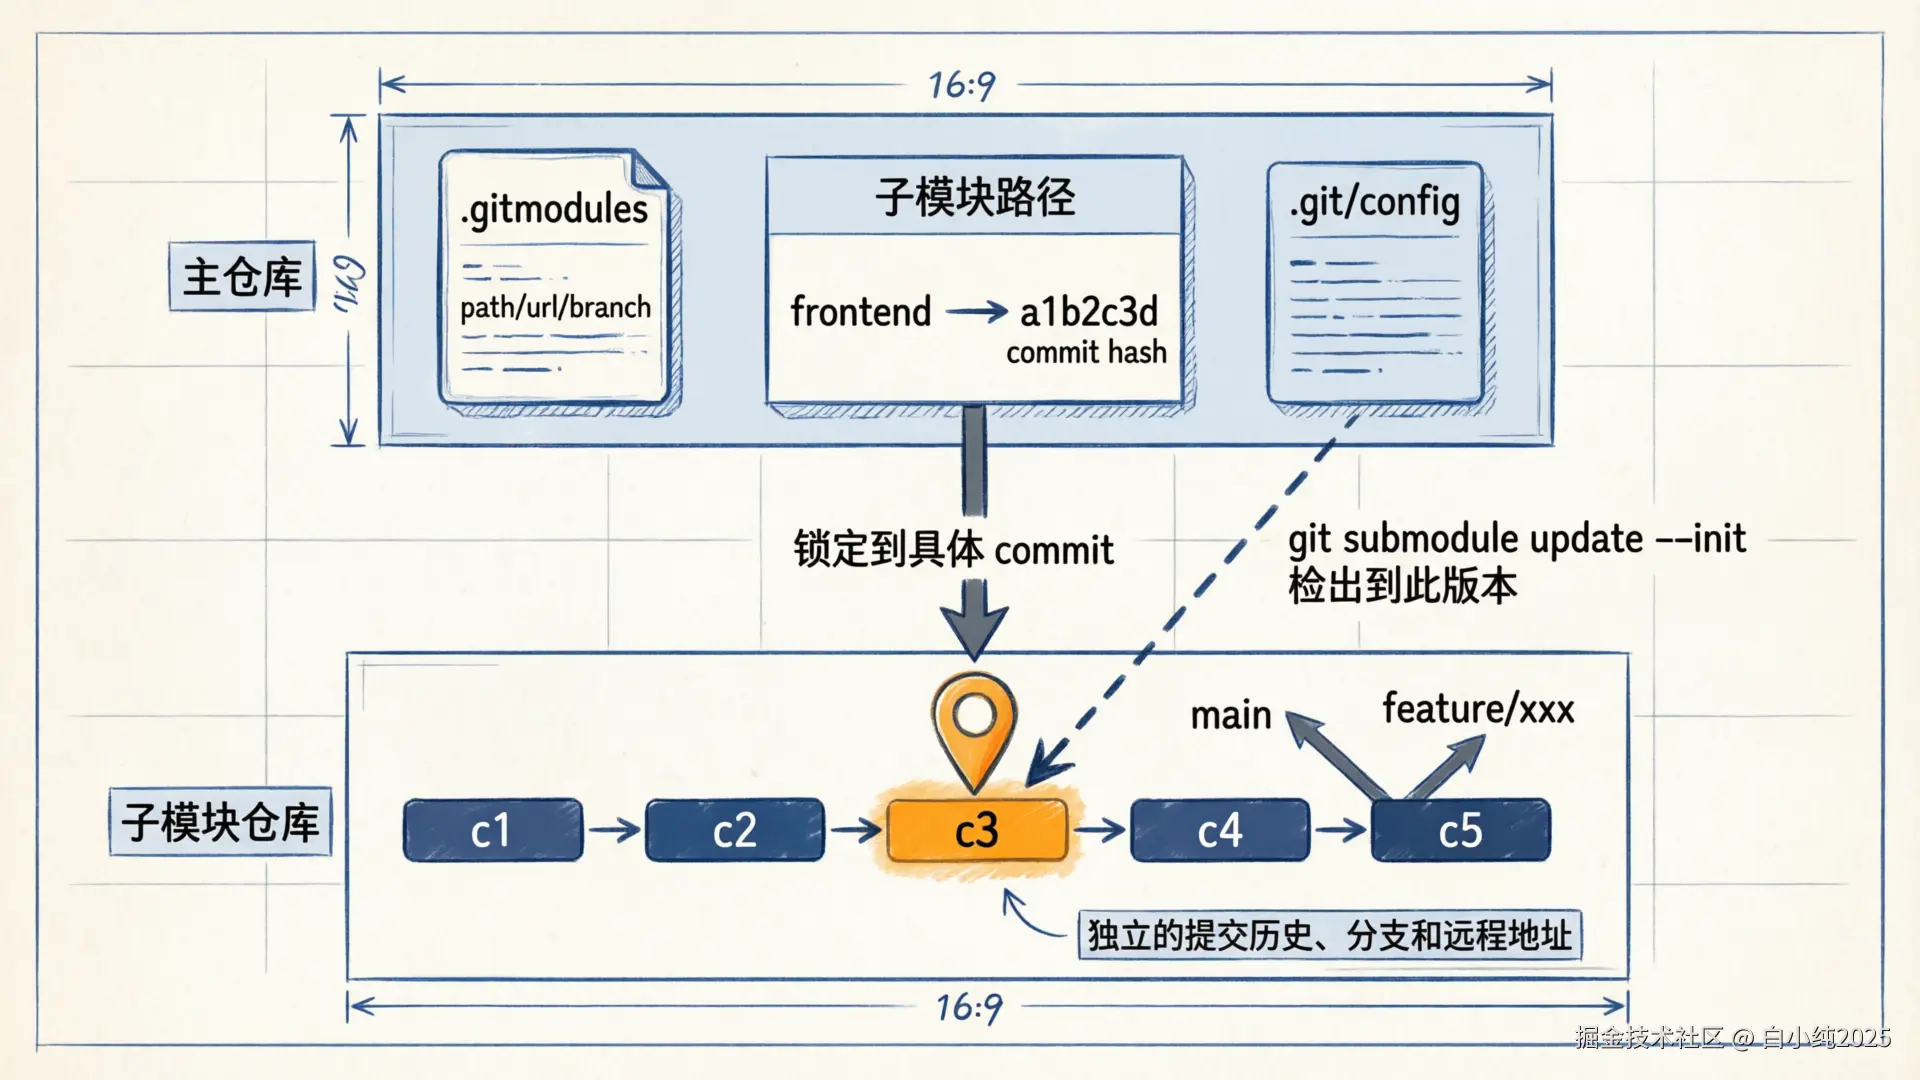
Git Submodule 允许把一个 Git 仓库挂载到另一个 Git 仓库的子目录中。子模块仍然是独立仓库,拥有自己的分支、提交历史和远程地址。
text
parent-repo/
├── src/
├── docs/
├── .gitmodules
└── frontend/            # 子模块目录
    ├── .git             # 通常是指向主仓库 .git/modules 的文件
    └── src/
主仓库不会直接保存子模块里的文件内容,而是保存:
.gitmodules:子模块名称、路径、远程地址、可选跟踪分支。- 子模块路径对应的 commit hash:主项目当前锁定的子模块版本。
.git/config中的本地子模块配置:初始化后生成,影响本地行为。
4.1 关键特性
| 特性 | 说明 |
|---|---|
| 独立版本控制 | 子模块有自己的提交历史、分支和权限模型 |
| 精确版本锁定 | 主仓库记录子模块的具体 commit,不会自动漂移 |
| 支持嵌套 | 子模块内部还可以包含子模块,克隆时需要 --recursive |
| 协作成本更高 | 更新子模块后,必须回到主仓库提交引用变更 |
4.2 最容易误解的一点
git pull 只更新主仓库本身,不等于自动更新所有子模块。克隆、切分支、拉代码之后,经常还需要执行:
bash
git submodule update --init --recursive这条命令的意思是:按照主仓库记录的 commit,把所有子模块检出到正确版本。
5. 快速开始
5.1 添加子模块
bash
git submodule add https://github.com/myorg/vue3-ai-frontend.git frontend
git submodule add https://github.com/myorg/springboot-ai-backend.git backend
git submodule add https://github.com/myorg/mcp-servers.git mcp-servers
git submodule add https://github.com/myorg/ai-shared-contracts.git shared

git commit -m "chore: add project submodules"
添加后,主仓库通常会出现两类变更:
text
.gitmodules
frontend
backend
mcp-servers
shared
这些子模块路径在 Git 中表现为特殊条目,指向子仓库的某个 commit。
5.2 克隆包含子模块的项目
推荐直接递归克隆:
bash
git clone --recursive https://github.com/myorg/ai-native-project.git如果已经普通克隆了主仓库,再补初始化:
bash
git clone https://github.com/myorg/ai-native-project.git
cd ai-native-project
git submodule update --init --recursive
5.3 更新子模块
更新到主仓库锁定的版本:
bash
git submodule update --init --recursive更新到 .gitmodules 中配置分支的最新提交:
bash
git submodule update --remote --recursive更新某一个子模块:
bash
git submodule update --remote frontend5.4 提交子模块更新
子模块里提交并推送:
bash
cd frontend
git checkout main
git pull origin main

# 修改代码后
git add .
git commit -m "feat: add AI chat component"
git push origin main
回到主仓库提交"子模块指针":
bash
cd ..
git status
git add frontend
git commit -m "chore: update frontend submodule"
git push origin main
如果忘记第二步,其他人拉主仓库时看不到你更新后的子模块版本。
6. 常用命令速查
| 目标 | 命令 |
|---|---|
| 查看子模块状态 | git submodule status |
| 初始化子模块 | git submodule init |
| 初始化并检出 | git submodule update --init --recursive |
| 克隆时递归拉取 | git clone --recursive <url> |
| 更新到主仓库锁定版本 | git submodule update --recursive |
| 更新到远程分支最新版本 | git submodule update --remote --recursive |
| 在所有子模块中执行命令 | git submodule foreach '<command>' |
同步 .gitmodules URL 到本地配置 |
git submodule sync --recursive |
| 删除子模块 | git submodule deinit -f <path> 后再 git rm -f <path> |
6.1 删除子模块
删除要分清"从主仓库移除引用"和"清理本地缓存":
bash
git submodule deinit -f frontend
git rm -f frontend
rm -rf .git/modules/frontend
git commit -m "chore: remove frontend submodule"
rm -rf .git/modules/frontend 是本地清理步骤。多人协作时,其他成员只需要拉取主仓库提交即可,不需要跟着删除你的本地缓存目录。
6.2 修改子模块远程地址
先改 .gitmodules:
ini
[submodule "frontend"]
    path = frontend
    url = git@github.com:myorg/vue3-ai-frontend.git
同步到本地配置:
bash
git submodule sync --recursive
git submodule update --init --recursive
git add .gitmodules
git commit -m "chore: update frontend submodule url"
7. AI-Native 项目结构
AI-Native 项目常见特点是模块多、演进快、依赖边界复杂。把前端、后端、MCP 服务、Prompt、评测集、共享契约拆成独立仓库,可以让团队按职责独立迭代,同时由主项目锁定可运行组合。
text
ai-native-project/
├── .gitmodules
├── docker-compose.yml
├── Makefile
├── product/                    # 产品文档,可选 Submodule
│   ├── prd/
│   ├── prototype/
│   └── ai-requirements/
├── frontend/                   # Vue3 AI 前端 Submodule
│   └── src/
│       ├── components/
│       ├── prompts/
│       └── mcp/
├── backend/                    # Spring Boot AI 后端 Submodule
│   └── src/main/java/
│       ├── ai/
│       ├── agents/
│       └── mcp/
├── mcp-servers/                # MCP 服务集合 Submodule
│   ├── filesystem-mcp/
│   └── database-mcp/
├── qa/                         # 测试与评测 Submodule
│   ├── automation/
│   └── ai-evaluation/
├── shared/                     # 共享契约 Submodule
│   ├── api-contracts/
│   ├── ai-schemas/
│   └── prompts/
└── infra/
    ├── docker/
    └── k8s/
7.1 .gitmodules 示例
ini
[submodule "frontend"]
    path = frontend
    url = https://github.com/myorg/vue3-ai-frontend.git
    branch = main

[submodule "backend"]
    path = backend
    url = https://github.com/myorg/springboot-ai-backend.git
    branch = main

[submodule "mcp-servers"]
    path = mcp-servers
    url = https://github.com/myorg/mcp-servers.git
    branch = main

[submodule "shared"]
    path = shared
    url = https://github.com/myorg/ai-shared-contracts.git
    branch = main

[submodule "qa"]
    path = qa
    url = https://github.com/myorg/ai-qa.git
    branch = main
branch = main 只影响 git submodule update --remote 的目标分支。主仓库实际记录的仍然是具体 commit。
7.2 共享契约示例
typescript
// shared/api-contracts/ChatAPI.ts
export interface AIResponse {
  id: string
  content: string
  role: 'assistant'
  metadata: {
    model: string
    tokens: number
    latency: number
  }
}

export const CHAT_ENDPOINTS = {
  CHAT: '/api/chat',
  STREAM: '/api/chat/stream',
  RAG: '/api/chat/rag',
} as const
共享契约适合单独作为子模块,因为它是前端、后端、测试、Agent 评测共同依赖的边界。
8. Vue3 前端子模块示例
8.1 创建前端仓库
bash
git init vue3-ai-frontend
cd vue3-ai-frontend
npm create vue@latest .
npm install @ai-sdk/vue ai openai

git add .
git commit -m "init: vue3 ai frontend"
git remote add origin https://github.com/myorg/vue3-ai-frontend.git
git push -u origin main
8.2 AI 聊天组件
vue
<!-- src/components/AIChat.vue -->
<template>
  <section class="ai-chat">
    <div class="messages">
      <div
        v-for="msg in messages"
        :key="msg.id"
        :class="['message', msg.role]"
      >
        {{ msg.content }}
      </div>
    </div>

    <form class="input-area" @submit.prevent="handleSubmit">
      <input v-model="input" placeholder="输入消息..." />
      <button type="submit" :disabled="isLoading">
        {{ isLoading ? '思考中...' : '发送' }}
      </button>
    </form>
  </section>
</template>

<script setup lang="ts">
import { useChat } from '@ai-sdk/vue'

const { messages, input, handleSubmit, isLoading } = useChat({
  api: '/api/chat',
})
</script>
8.3 Prompt 管理
typescript
// src/prompts/system-prompts.ts
export const SYSTEM_PROMPTS = {
  CODE_ASSISTANT: '你是一个专业的代码助手,擅长 Vue3 和 Spring Boot 开发。',
  CODE_REVIEW: '请审查代码,关注代码质量、性能问题、安全漏洞和最佳实践。',
  DOC_GENERATOR: '请为代码生成文档,包括功能描述、参数说明、返回值和使用示例。',
} as const

export type SystemPromptName = keyof typeof SYSTEM_PROMPTS

export const loadPrompt = (name: SystemPromptName) => SYSTEM_PROMPTS[name]
8.4 Vite 代理配置
typescript
// vite.config.ts
import path from 'node:path'
import { defineConfig } from 'vite'
import vue from '@vitejs/plugin-vue'

export default defineConfig({
  plugins: [vue()],
  resolve: {
    alias: {
      '@': path.resolve(__dirname, './src'),
      '@prompts': path.resolve(__dirname, './src/prompts'),
    },
  },
  server: {
    proxy: {
      '/api': { target: 'http://localhost:8080', changeOrigin: true },
      '/mcp': { target: 'http://localhost:3001', changeOrigin: true },
    },
  },
  build: {
    rollupOptions: {
      output: {
        manualChunks: {
          'ai-vendor': ['@ai-sdk/vue', 'ai'],
        },
      },
    },
  },
})
9. Spring Boot 后端子模块示例
后端子模块适合承载模型调用、RAG、Agent 编排、鉴权和业务 API。实际项目中请以团队当前 Spring Boot、Spring AI 和模型 SDK 版本为准,示例主要展示边界设计。
9.1 Maven 依赖结构
xml
<properties>
    <java.version>21</java.version>
    <spring-ai.version>${project.spring-ai.version}</spring-ai.version>
</properties>

<dependencies>
    <dependency>
        <groupId>org.springframework.boot</groupId>
        <artifactId>spring-boot-starter-webflux</artifactId>
    </dependency>

    <dependency>
        <groupId>org.springframework.ai</groupId>
        <artifactId>spring-ai-openai-spring-boot-starter</artifactId>
        <version>${spring-ai.version}</version>
    </dependency>

    <dependency>
        <groupId>org.springframework.ai</groupId>
        <artifactId>spring-ai-pgvector-store</artifactId>
        <version>${spring-ai.version}</version>
    </dependency>
</dependencies>
9.2 ChatService
java
@Service
public class ChatService {

    private final ChatClient chatClient;
    private final VectorStore vectorStore;

    public ChatService(ChatClient.Builder builder, VectorStore vectorStore) {
        this.chatClient = builder.build();
        this.vectorStore = vectorStore;
    }

    public String chat(String message) {
        return chatClient.prompt()
            .user(message)
            .call()
            .content();
    }

    public Flux<String> chatStream(String message) {
        return chatClient.prompt()
            .user(message)
            .stream()
            .content();
    }

    public String chatWithRag(String message) {
        List<Document> docs = vectorStore.similaritySearch(
            SearchRequest.query(message).withTopK(3)
        );

        String context = docs.stream()
            .map(Document::getContent)
            .collect(Collectors.joining("\n"));

        return chatClient.prompt()
            .system("基于以下上下文回答问题:\n" + context)
            .user(message)
            .call()
            .content();
    }
}
9.3 ChatController
java
@RestController
@RequestMapping("/api/chat")
public class ChatController {

    private final ChatService chatService;

    public ChatController(ChatService chatService) {
        this.chatService = chatService;
    }

    @PostMapping
    public ResponseEntity<AIResponse> chat(@RequestBody ChatRequest request) {
        String content = chatService.chat(request.getMessage());

        return ResponseEntity.ok(AIResponse.builder()
            .id(UUID.randomUUID().toString())
            .content(content)
            .role("assistant")
            .build());
    }

    @PostMapping("/stream")
    public Flux<ServerSentEvent<String>> chatStream(@RequestBody ChatRequest request) {
        return chatService.chatStream(request.getMessage())
            .map(content -> ServerSentEvent.builder(content).build());
    }

    @PostMapping("/rag")
    public ResponseEntity<AIResponse> chatWithRag(@RequestBody ChatRequest request) {
        String content = chatService.chatWithRag(request.getMessage());
        return ResponseEntity.ok(AIResponse.builder().content(content).build());
    }
}
9.4 Agent 服务
java
@Component
public class TaskAgent {

    private final ChatClient chatClient;

    public TaskAgent(ChatClient chatClient) {
        this.chatClient = chatClient;
    }

    public String executeWithTools(String message, List<Tool> tools) {
        return chatClient.prompt()
            .user(message)
            .tools(tools)
            .call()
            .content();
    }

    public String reviewCode(String code) {
        return chatClient.prompt()
            .system("你是资深代码审查专家,关注质量、安全性和性能。")
            .user(code)
            .call()
            .content();
    }
}
10. MCP 服务子模块示例
MCP(Model Context Protocol)用于标准化 AI 应用和外部工具之间的交互。把 MCP Server 独立成子模块,有利于多个 AI 应用复用同一套工具服务。
text
AI Application
├── MCP Client
├── Agent Runtime
└── Tool Registry
    ├── filesystem-mcp
    ├── database-mcp
    └── custom-tools
10.1 MCP Server(TypeScript)
typescript
// mcp-servers/filesystem/src/index.ts
import { Server } from '@modelcontextprotocol/sdk/server/index.js'
import { StdioServerTransport } from '@modelcontextprotocol/sdk/server/stdio.js'
import * as fs from 'node:fs/promises'

const server = new Server(
  { name: 'filesystem-mcp', version: '1.0.0' },
  { capabilities: { tools: {} } }
)

server.setRequestHandler('tools/list', async () => ({
  tools: [
    {
      name: 'read_file',
      description: '读取文件内容',
      inputSchema: {
        type: 'object',
        properties: {
          path: { type: 'string' },
        },
        required: ['path'],
      },
    },
    {
      name: 'write_file',
      description: '写入文件内容',
      inputSchema: {
        type: 'object',
        properties: {
          path: { type: 'string' },
          content: { type: 'string' },
        },
        required: ['path', 'content'],
      },
    },
  ],
}))

server.setRequestHandler('tools/call', async ({ params }) => {
  const { name, arguments: args } = params

  switch (name) {
    case 'read_file': {
      const content = await fs.readFile(args.path, 'utf-8')
      return { content: [{ type: 'text', text: content }] }
    }
    case 'write_file': {
      await fs.writeFile(args.path, args.content, 'utf-8')
      return { content: [{ type: 'text', text: 'OK' }] }
    }
    default:
      throw new Error(`Unknown tool: ${name}`)
  }
})

await server.connect(new StdioServerTransport())
10.2 MCP Client(Vue3)
typescript
// src/mcp/mcp-client.ts
import { Client } from '@modelcontextprotocol/sdk/client/index.js'

export const createMcpClient = async () => {
  const client = new Client({
    name: 'vue3-ai-frontend',
    version: '1.0.0',
  })

  await client.connect({
    transport: {
      type: 'stdio',
      command: 'node',
      args: ['../mcp-servers/filesystem/dist/index.js'],
    },
  })

  return client
}
10.3 后端侧 MCP 配置示例
java
@Configuration
public class McpConfig {

    @Bean
    public MCPServer mcpServer(FileService fileService, JdbcTemplate jdbcTemplate) {
        return MCPServer.builder()
            .name("springboot-mcp")
            .version("1.0.0")
            .addTool(Tool.builder()
                .name("read_file")
                .description("读取项目文件")
                .inputSchema(Schema.builder()
                    .addProperty("path", Schema.string())
                    .required("path")
                    .build())
                .execute(args -> ToolResult.success(
                    fileService.readFile(args.get("path").asText())
                ))
                .build())
            .addTool(Tool.builder()
                .name("query_database")
                .description("执行数据库查询")
                .inputSchema(Schema.builder()
                    .addProperty("sql", Schema.string())
                    .required("sql")
                    .build())
                .execute(args -> ToolResult.success(
                    jdbcTemplate.queryForList(args.get("sql").asText())
                ))
                .build())
            .build();
    }
}
11. 团队协作工作流
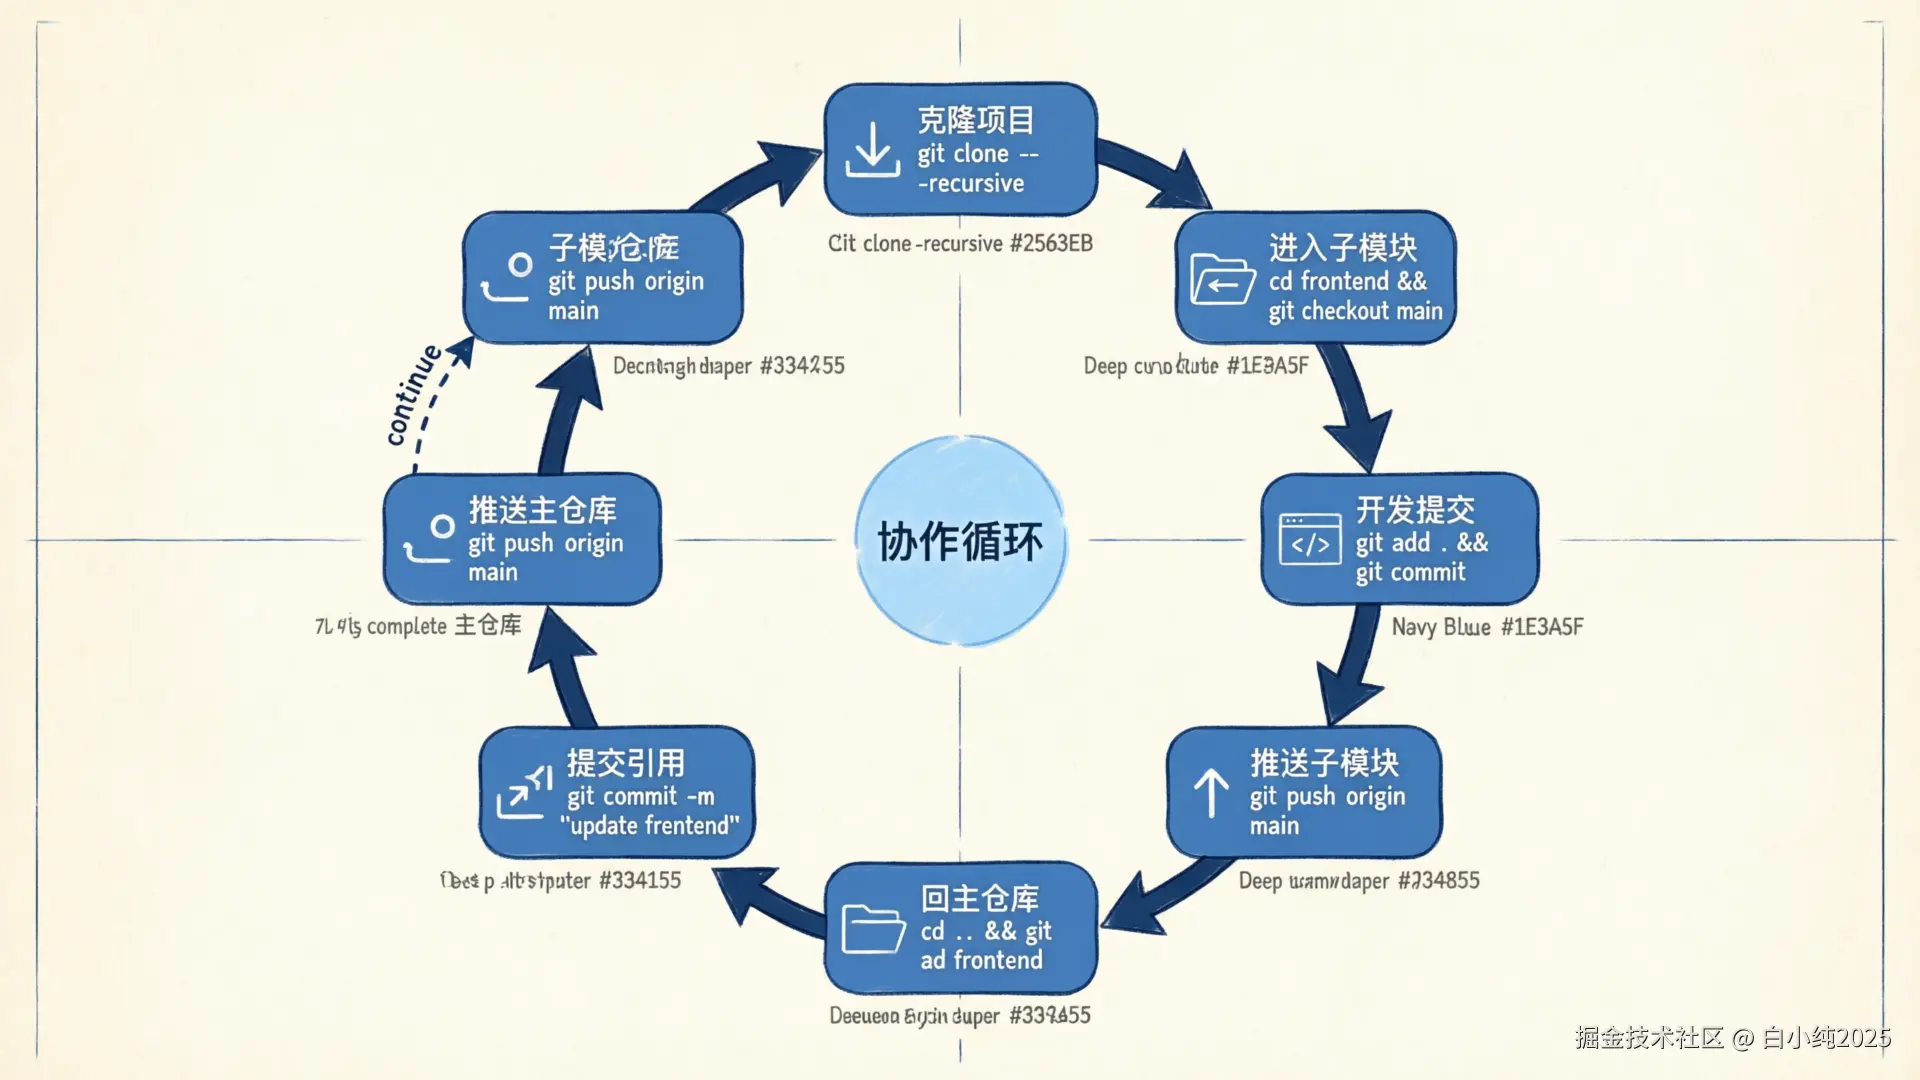
11.1 日常开发
bash
# 1. 克隆完整项目
git clone --recursive https://github.com/myorg/ai-native-project.git
cd ai-native-project

# 2. 确保子模块处于主仓库记录的版本
git submodule update --init --recursive

# 3. 进入子模块开发
cd frontend
git checkout main
git pull origin main

# 4. 提交并推送子模块
git add .
git commit -m "feat: add prompt selector"
git push origin main

# 5. 回到主仓库,提交子模块引用
cd ..
git add frontend
git commit -m "chore: update frontend submodule"
git push origin main
11.2 Code Review 时看什么
| 位置 | 关注点 |
|---|---|
| 子模块仓库 PR | 真实代码变更、测试、兼容性 |
| 主仓库 PR | 子模块 commit 是否指向预期版本 |
.gitmodules |
URL、分支、路径是否合理 |
| CI 日志 | 是否递归拉取子模块,是否存在权限问题 |
11.3 分支切换后的同步
切换主仓库分支后,子模块目录可能仍停留在旧 commit。建议固定执行:
bash
git checkout feature/demo
git submodule update --init --recursive
如果要丢弃子模块里的本地修改,先确认没有未保存工作,再进入子模块处理。不要在不了解状态时批量清理。
12. CI/CD 配置
12.1 GitHub Actions
yaml
# .github/workflows/ci.yml
name: AI-Native CI

on:
  push:
    branches: [main, develop]
  pull_request:
    branches: [main]

jobs:
  build:
    runs-on: ubuntu-latest
    strategy:
      matrix:
        module: [frontend, backend]

    steps:
      - uses: actions/checkout@v4
        with:
          submodules: recursive

      - name: Build and test ${{ matrix.module }}
        run: |
          cd ${{ matrix.module }}
          if [ "${{ matrix.module }}" = "frontend" ]; then
            npm ci
            npm run build
            npm run test:unit
          else
            ./mvnw clean package
          fi

  ai-integration-test:
    runs-on: ubuntu-latest
    needs: build

    steps:
      - uses: actions/checkout@v4
        with:
          submodules: recursive

      - name: Run AI evaluation tests
        run: |
          cd qa/ai-evaluation
          npm ci
          npm run eval:all

  deploy:
    runs-on: ubuntu-latest
    needs: ai-integration-test
    if: github.ref == 'refs/heads/main'

    steps:
      - uses: actions/checkout@v4
        with:
          submodules: recursive

      - name: Deploy to staging
        run: docker-compose -f infra/docker/production.yml up -d --build
12.2 Makefile
makefile
.PHONY: setup update dev test deploy

setup:
	git submodule update --init --recursive
	cd frontend && npm install
	cd backend && ./mvnw clean install -DskipTests
	cd qa && npm install

update:
	git submodule update --remote --recursive

dev:
	docker-compose -f infra/docker/dev.yml up -d
	cd backend && ./mvnw spring-boot:run &
	cd frontend && npm run dev

test:
	cd frontend && npm run test:unit
	cd backend && ./mvnw test
	cd qa/ai-evaluation && npm run eval:all

deploy:
	docker-compose -f infra/docker/production.yml build
	cd qa/ai-test-agents && npm run smoke -- --env production
	docker-compose -f infra/docker/production.yml up -d
13. 常见问题与排查
13.1 Submodule 通用问题
| 问题 | 常见原因 | 处理方式 |
|---|---|---|
| 子模块目录为空 | 只克隆了主仓库,未初始化子模块 | git submodule update --init --recursive |
| 子模块停留在旧版本 | 主仓库锁定的是旧 commit | 确认是否要 git submodule update --remote,再提交主仓库引用 |
| CI 中子模块不存在 | checkout 未启用递归子模块 | actions/checkout 配置 submodules: recursive |
| 拉取子模块失败 | 权限、URL、Token 或 SSH Key 配置不正确 | 检查 .gitmodules、CI Secret、Deploy Key |
| 合并冲突只显示 commit hash | 两个分支更新了不同的子模块 commit | 进入子模块选择目标 commit,回主仓库重新提交 |
| 子模块 URL 改了但本地还用旧地址 | 本地 .git/config 未同步 |
git submodule sync --recursive |
13.2 AI-Native 特有问题
| 问题 | 建议 |
|---|---|
| 模型版本不一致 | 在 shared/ai-schemas 中统一模型配置,主仓库锁定版本 |
| Prompt 版本混乱 | 将 shared/prompts 作为独立子模块,使用语义化版本和变更记录 |
| MCP 服务接口变更 | MCP 服务独立仓库管理,主项目只在验证通过后更新引用 |
| RAG 知识库不同步 | 文档子模块变更后,在 CI 中自动重建向量索引 |
| 前后端契约不一致 | 共享 api-contracts,并在 CI 中跑契约测试 |
13.3 排查顺序
遇到子模块异常时,按下面顺序看,通常能快速定位:
bash
git submodule status
git status
cat .gitmodules
git submodule sync --recursive
git submodule update --init --recursive
如果子模块内还有问题,再进入对应目录执行:
bash
cd frontend
git status
git branch -vv
git remote -v
14. 最佳实践清单
- 主仓库提交信息要说明更新了哪个子模块,以及为什么更新。
- 子模块仓库先合并、测试、推送,再更新主仓库引用。
- CI 一律使用递归 checkout,避免环境和本地不一致。
.gitmodules里的 URL 要和团队权限模型一致,统一 HTTPS 或 SSH。- 不要把频繁共同修改的强耦合代码拆成 Submodule。
- 对共享契约、Prompt、MCP 工具服务建立变更记录。
- 切换主仓库分支后,执行
git submodule update --init --recursive。 - 更新到远程最新版本后,必须回主仓库提交子模块指针。
- 删除子模块要同时处理
.gitmodules、工作区路径和本地.git/modules缓存。
结论
Git Submodule 适合管理"独立演进、精确锁定、跨项目复用"的模块。放在 AI-Native 项目中,它不仅解决代码层面的模块化问题,更重要的是打通了产品→研发→测试的全链路版本管理,让 AI Agent 能获取完整的业务上下文。
传统研发流程中,产品文档在飞书、代码在 Git、测试在 Excel 的割裂状态,本质上是把人类的沟通成本转嫁给了每一次协作。Git Submodule 提供了一种务实的整合路径:不要求所有人改变工具习惯(产品经理仍然可以用 Markdown 写 PRD),但把产出物统一纳入版本管理,让版本对齐和变更追溯成为自动化的事情,而不是靠人肉同步。
真正用好 Submodule 的关键不是命令多熟,而是团队形成一致工作流:子模块先独立验证,主仓库再更新引用,CI 始终递归拉取,问题排查先看 commit 指针和 .gitmodules。当这套机制跑顺之后,AI 工具的价值会被成倍放大------因为它终于能看到全貌了。