课程链接:www.bilibili.com/cheese/play...
代码链接:github.com/buglas/robo...
课程目标
- 了解实时动画的可视化需求
- 使用缓冲区实时播放动画
1-实时动画的需求
在机器人可视化项目中,实时动画是必不可少的。
前端开发者需要在浏览器里实时展示机器人的运动状态,从而实现机器人的远程监控功能。
机器人实时动画通常要满足以下需求:
-
实时性:展示机器人当前的运动状态。
此实时性并非绝对,因为本身数据传输就需要时间。可根据具体情况,在可承受范围内,设置一定的延迟时间,比如5s 。
-
准确性:基于时间,准确展示机器人的动画数据。
机器人可能存在多条时间线路的动画,比如机器人的位移会有一套每秒1帧的动画数据,关节会有一套每秒8帧的动画数据,我们需要做好这两者在时间上的对齐和补间。
-
流畅性:机器人动画的播放不能卡顿,在正常网速下要确保其流程性。
若确实网卡,或者请求时间过长,需要给用户反馈,使其知道原因,避免其误以为真实机器人卡顿。
2-实时数据的传输方式
在我们在说实时动画缓冲前,需要先了解动画数据。
2-1-实时数据的传输过程
在我遇到的项目中,机器人数据是这样传给前端的:硬件 → ROS → 后端 →前端
机器人会按照特定的频率向ROS 传递数据,比如每隔1s 传递一次机器人的位姿数据(机器人的位置和旋转数据)。
ROS 会按照特定的规则对机器人数据做处理和存储。
前端向后端发起数据请求后,后端会向ROS 请求相应数据,一般后端还会根据前端的具体需求,对数据做处理。
作为前端开发者,需要知道:
- 实时动画数据是按照特定频率给我们的。
- 前端获取到数据时,此数据必然是过去一段时间的机器人动画数据,因为有请求时间的延迟。
- 尽量减少数据的请求量,因为数据量会影响数据请求时间。
2-2-数据示例
以行走的机器人为例,说一下动画数据的结构和请求逻辑。
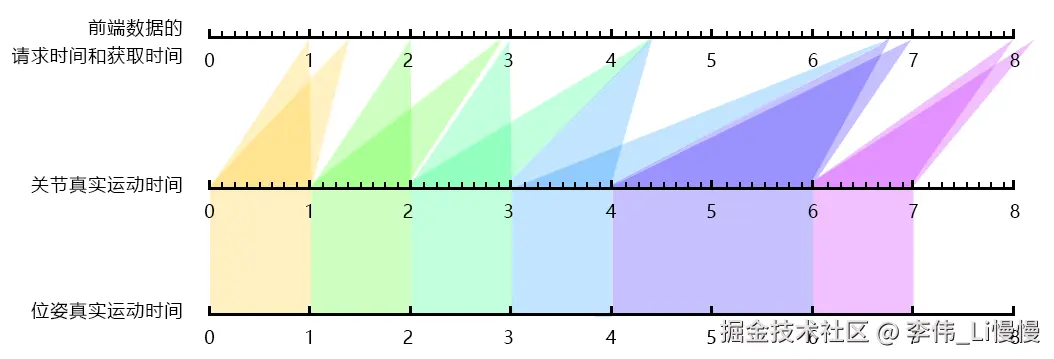
前端请求频率:后端会每隔1s 获取一次机器人的动画数据,因此前端也需要至少每隔1s 向后端请求一次数据。
请求时长的约束:数据请求时间不能过长,比如不能超过3s,若超3s,那就是后端问题。
数据采样频率:
- 机器人位姿数据的采集频率是1帧/s
- 机器人关节数据的采集频率是8帧/s
行走的机器人的位姿变化频率比较低,所以不需要频繁采样;关节的变化频率比较高,需要频繁采样。
单次请求到的数据结构如下:
ini
{
    pose_timestamp:[
        1772631875403,
        1772631875503,
    ],
    pose:[
        [0,0,0,0,0,0,1], //[x,y,z,qx,qy,qz,qw]
        [0,0,0,0,0,0,1],
    ],
    joint_names:['jointA','jointB'],
    joint_timestamp:[
        1772631875403,
        1772631876403,
        1772631877403,
        1772631878403,
        1772631879403,
        1772631880403,
        1772631881403,
        1772631882403,
    ],
    joint_values:[
        [1,2],
        [2,3],
        [3,4],
        [1,2],
        [2,3],
        [3,4],
        [1,2],
        [2,3],
    ]
}
根据实际情况,我们甚至可以再次降低低频数据的采样频率,比如每次请求,只采集一帧的位姿。
ini
{
    pose_timestamp:[
        1772631875403,
    ],
    pose:[0,0,0,0,0,0,1],
    ...
}
注:这种数据优化是需要根据机器人的实际运动情况确定的。
假如机器人是一个上蹿下跳的街舞机器人,那么位姿和关节都得有较高的采样频率。
当然,受人眼和浏览器刷新频率的限制,一般不用超过24帧/s。
3-动画数据缓冲的原理
动画数据缓冲的原理是以一定时间的动画滞后为代价,存储少量数据,实现动画流畅、准确的播放。
比如,我缓存3s 数据,然后一边播放,一边继续缓存,如下图所示:
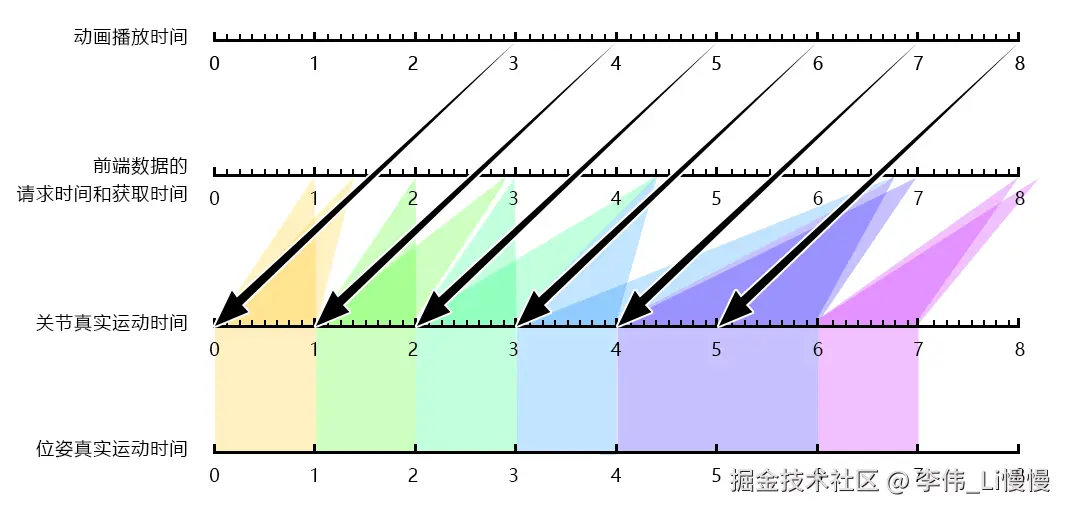
每隔一定时间,需清理过期的缓冲数据,避免卡满内存。
4-示例-多机器人实时动画场景
以多机器人实时行走动画为例,说一下实时动画缓冲的实现过程。
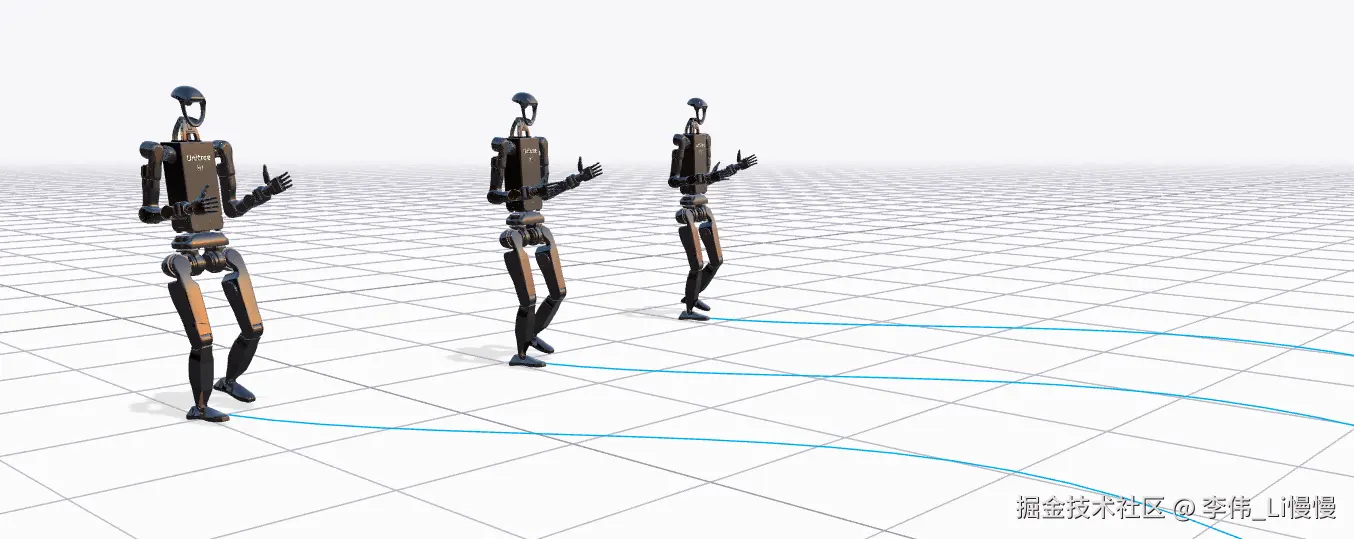

上面的机器人是宇树的H1机器人,机器人脚下的蓝色路径是规划路径。
4-1-代码架构思路
我在开发复杂动画项目的时候,一般会坚持2个原则:
- 图形与数据分离。这样可以避免图形管理和数据管理的混乱。
- 用requestAnimationFrame 管理动画时间,不用setTimeout或setInterval。后两者可控制很差,不如requestAnimationFrame 稳定。
当前项目会用到3个核心对象:
- RobotArea:机器人服务区,负责机器人图形的可视化展示。
- RobotBuffer:机器人缓冲对象,与机器人一对一关系,缓冲和清理动画化数据,做动画补间。
- RobotBufferManager:机器人缓冲对象管理器,按照特定频率请求动画数据,管理机器人缓冲对象的增、删、更新。
4-2-RobotBuffer 类
RobotBuffer的功能:
-
在第一次拿到动画数据时,初始化缓冲区。
-
下一次请求数据的时候,向缓冲区中添加数据。同时确定缓冲区是否可用。
-
在连续渲染时,若缓冲区可用,根据当前时间,在缓冲区中做补间运算。
比如第1秒的关节值是2,第2秒的关节值是4,若当前时间是1.5秒,那相应的关节值就是3。
-
每隔一段时间,清理过期数据。
整体代码如下:
- src/robot/RobotBuffer.ts
kotlin
import { Quaternion, Vector2 } from 'three'
import type { RobotBufferManager } from './RobotBufferManager'

// 机器人动画数据类型
export type RobotBufferDataType = {
  // 机器人代号,唯一
  device_number: string
  // 机器人类型
  device_type: string
  // 位姿时间戳
  pose_timestamp: number
  // 位姿 [x,y,z,qx,qy,qz,qw]
  pose: [number, number, number, number, number, number, number]
  // 路径点位
  path_points: number[]
  // 关节名称集合
  joint_names: string[]
  // 关节时间戳
  joint_timestamp: number[]
  // 关节在一定时间段内的动画数据
  joint_values: number[][]
}

/* 机器人缓冲对象 */
class RobotBuffer {
  // 缓冲对象管理器
  parent: RobotBufferManager
  // 缓冲数据
  poseTimestampBuffer: number[] = []
  poseBuffer: number[][] = []
  pathPointsBuffer: number[][] = []
  jointTimestampBuffer: number[] = []
  jointNames: string[] = []
  jointValuesBuffer: number[][] = []
  // 缓冲区是否可用
  bufferOK = false
  // 当前位置
  position = new Vector2()
  // 当前四元数
  quaternion = new Quaternion()
  // 当前关节数据
  jointValues: number[] = []
  // 当前路径
  pathPoints: number[] = []

  constructor(
    robotData: RobotBufferDataType,
    robotBufferManager: RobotBufferManager,
  ) {
    this.parent = robotBufferManager
    this.initData(robotData)
  }
  // 初始化数据
  initData(robotData: RobotBufferDataType) {
    const {
      parent: { originTime },
    } = this
    if (originTime == undefined) {
      return
    }
    const {
      pose_timestamp,
      pose,
      path_points,
      joint_names,
      joint_values,
      joint_timestamp,
    } = robotData
    // 缓冲数据
    this.poseTimestampBuffer = [pose_timestamp - originTime]
    this.poseBuffer = [pose]
    this.pathPointsBuffer = [path_points]
    this.jointNames = joint_names
    this.jointTimestampBuffer = joint_timestamp.map((time) => {
      return time - originTime
    })
    this.jointValuesBuffer = [...joint_values]
    // 位姿
    const [x, y, z, qx, qy, qz, qw] = pose
    this.position.set(x, y)
    this.quaternion.set(qx, qy, qz, qw).normalize()
    // 路径
    this.pathPoints = path_points
  }
  // 向缓冲区添加数据
  addData(robotData: RobotBufferDataType) {
    const {
      poseTimestampBuffer,
      poseBuffer,
      pathPointsBuffer,
      jointTimestampBuffer,
      jointValuesBuffer,
      parent: { originTime },
    } = this
    if (originTime == undefined) {
      return
    }
    const { pose_timestamp, pose, path_points, joint_timestamp, joint_values } =
      robotData
    poseTimestampBuffer.push(pose_timestamp - originTime)
    poseBuffer.push(pose)
    pathPointsBuffer.push(path_points)
    jointValuesBuffer.push(...joint_values)
    jointTimestampBuffer.push(
      ...joint_timestamp.map((time) => time - originTime),
    )
    this.updateBufferState()
  }

  // 更新缓冲状态
  updateBufferState() {
    const {
      poseTimestampBuffer,
      parent: { bufferDuration, minBufferCount },
    } = this
    const bufferCount = poseTimestampBuffer.length
    // 缓冲数量校验
    if (bufferCount < minBufferCount) {
      this.bufferOK = false
      return
    }
    // 缓冲时间校验
    const time1 = poseTimestampBuffer[0]
    const time2 = poseTimestampBuffer[bufferCount - 1]
    if(time1==undefined||time2==undefined){
      this.bufferOK=false
    } else {
      this.bufferOK = time2 - time1 > bufferDuration
    }
  }

  // 更新动画数据
  update(time: number) {
    const {
      poseTimestampBuffer,
      poseBuffer,
      pathPointsBuffer,
      jointTimestampBuffer,
      jointNames,
      jointValuesBuffer,
    } = this
    // 位姿补间
    this.tween(time, poseTimestampBuffer, (insert, i1, i2) => {
      const pose1 = poseBuffer[i1]
      const pose2 = poseBuffer[i2]
      if (pose1 && pose2) {
        this.position.lerpVectors(
          new Vector2(pose1[0], pose1[1]),
          new Vector2(pose2[0], pose2[1]),
          insert,
        )
        this.quaternion.slerpQuaternions(
          new Quaternion(pose1[3], pose1[4], pose1[5], pose1[6]).normalize(),
          new Quaternion(pose2[3], pose2[4], pose2[5], pose2[6]).normalize(),
          insert,
        )
      }
      this.pathPoints = pathPointsBuffer[i2] || []
    })
    // 关节补间
    this.tween(time, jointTimestampBuffer, (insert, i1, i2) => {
      const jointsValue1 = jointValuesBuffer[i1]
      const jointsValue2 = jointValuesBuffer[i2]
      if (jointsValue1 && jointsValue2) {
        this.jointValues = jointNames.map((jointName, jointIndex) => {
          const v1 = jointsValue1[jointIndex]
          const v2 = jointsValue2[jointIndex]
          if(v1==undefined||v2==undefined){
            return 0
          } else {
            return v1 + (v2 - v1) * insert
          }
        })
      }
    })
  }

  // 基于时间的补间函数
  tween(
    time: number,
    timestampBuffer: number[],
    callback = (insert: number, i1: number, i2: number) => {},
  ) {
    // 当前时间的前一帧索引
    const i1 = this.preFrameIdx(time, timestampBuffer)
    if (i1 != undefined) {
      // 当前时间的下一帧索引
      const i2 = i1 + 1
      // 当前时间的前一帧时间
      const t1 = timestampBuffer[i1]
      // 当前时间的下一帧时间
      const t2 = timestampBuffer[i2]
      if (t1 !== undefined && t2 !== undefined) {
        // 当前时间在前后2帧间的插值
        const insert = (time - t1) / (t2 - t1)
        callback(insert, i1, i2)
      }
    }
  }

  // 清理当前时间的上一帧之前的数据
  clearExpiredData(time: number) {
    const {
      poseTimestampBuffer,
      poseBuffer,
      pathPointsBuffer,
      jointTimestampBuffer,
      jointValuesBuffer,
    } = this
    // 当前时间的上一帧索引
    let idx = this.preFrameIdx(time, poseTimestampBuffer, 1)
    // 清理位姿和路径数据
    if (idx !== undefined) {
      poseTimestampBuffer.splice(0, idx)
      poseBuffer.splice(0, idx)
      pathPointsBuffer.splice(0, idx)
    }
    // 清理关节数据
    const jointTimeIdx = this.preFrameIdx(time, jointTimestampBuffer, 1)
    if (jointTimeIdx !== undefined) {
      jointTimestampBuffer.splice(0, idx)
      jointValuesBuffer.splice(0, idx)
    }
  }

  // 当前时间的前一帧索引
  preFrameIdx(time: number, timestampBuffer: number[], startIdx = 0) {
    let timeIdx: number | undefined
    for (let i = startIdx, len = timestampBuffer.length; i < len; i++) {
      if (time > (timestampBuffer[i] || 0)) {
        timeIdx = i
      } else {
        break
      }
    }
    return timeIdx
  }
}

export { RobotBuffer }
4-3-RobotBufferManager 类
RobotBufferManager 的功能:
- 按照特定的频率请求动画数据。
- 对缓冲对象进行统一初始化、添加数据、删除缓冲区、更新缓冲区。
- 向图形类传递图形相关的操作事件。
整体代码如下:
- src/robot/RobotBufferManager.ts
typescript
import { EventDispatcher} from 'three'
import { TimeController, TimeDelayController } from './utils'
import { fetchPoseList_test } from './FetchData'
import { RobotBuffer, type RobotBufferDataType } from './RobotBuffer'


/* 机器人缓冲对象管理器,图形与数据分离*/
class RobotBufferManager extends EventDispatcher<any> {
    // 机器人时间基点,即所有时间戳里最小的时间
    originTime: number | undefined
    // 动画开始的时间
    playTime: number | undefined
    // 最短缓冲时长
    bufferDuration: number = 5000
    // 最少缓冲数据量
    minBufferCount: number = 4
    // 连续请求的最短间隔时间
    minDuration: number = 1000
    // 动画数据的请求延迟工具
    delayFetchController = new TimeDelayController()
    // 销毁过期数据的时间延迟工具
    clearExpiredController = new TimeController(1000)
    // 机器人缓冲对象集合
    robotBufferMap: Map<string, RobotBuffer> = new Map()
    // 缓冲区是否可用
    bufferOK: boolean | undefined

    constructor() {
        super()
        // 监听页面的显示与隐藏
        window.addEventListener('visibilitychange', () => {
            if (document.visibilityState == 'hidden') {
                this.dispose()
            } else {
                this.delayFetchBufferData()
            }
        })
    }

    // 延时请求缓冲数据
    async delayFetchBufferData() {
        const { robotBufferMap, originTime, minDuration, delayFetchController } =
            this
        const fetchTime = Date.now()
        // 获取动画数据
        // const robotDataList = await fetchPoseList()
        // 测试
        const robotDataList = await fetchPoseList_test()
        // 延时
        const timeDiff = Date.now() - fetchTime
        const delay = Math.max(0, minDuration - timeDiff)
        delayFetchController.setDelayTime(delay)

        if (!robotDataList || !robotDataList.length) {
            return
        }
        // 若没有originTime,初始化originTime
        if (originTime == undefined) {
            this.initOriginTime(robotDataList)
        }
        // 现有的机器人device_number 集合
        const deviceNumberList = [...robotBufferMap.keys()]
        // 新增的机器人数据集合
        const newRobotDataList: RobotBufferDataType[] = []
        robotDataList.forEach((robotData: RobotBufferDataType) => {
            const { device_number } = robotData
            // 根据device_number查找机器人缓冲对象
            const robotBuffer = robotBufferMap.get(device_number)
            // 若robotBuffer,添加缓冲数据;否则,创建缓冲对象。
            if (robotBuffer) {
                //向机器人缓冲对象中添加缓冲数据
                robotBuffer.addData(robotData)
                // 从deviceNumberList删除此机器人,以备后用
                const idx = deviceNumberList.indexOf(device_number)
                deviceNumberList.splice(idx, 1)
            } else {
                // 创建机器人缓冲对象
                const robotBuffer = new RobotBuffer(robotData, this)
                this.robotBufferMap.set(device_number, robotBuffer)
                // 新机器人集合,以备后用
                newRobotDataList.push(robotData)
            }
        })
        // deviceNumberList若非空,则表示有机器人要被销毁
        deviceNumberList.forEach((device_number) => {
            // 销毁缓冲数据
            robotBufferMap.delete(device_number)
        })
        // 向图形类传递新增机器人事件
        newRobotDataList.length &&
            this.dispatchEvent({
                type: 'hasNewRobots',
                robotDataList: newRobotDataList,
            })
        // 向图形类传递销毁机器人事件
        deviceNumberList.length &&
            this.dispatchEvent({ type: 'hasOldRobots', deviceNumberList })
    }
    // 设置机器人时间基点,取所有时间戳的最小值
    initOriginTime(robotsData: RobotBufferDataType[]) {
        const times = robotsData.map(({ pose_timestamp, joint_timestamp }) => {
            if (joint_timestamp && joint_timestamp.length) {
                return Math.min(pose_timestamp, joint_timestamp[0]||0)
            } else {
                return pose_timestamp
            }
        })
        this.originTime = Math.min(...times)
    }
    // 更新动画
    update() {
        const { robotBufferMap, delayFetchController, clearExpiredController } =
            this
        // 延迟请求数据
        delayFetchController.run(() => {
            this.delayFetchBufferData()
        })
        // 判断缓冲时间和数据量是否OK
        const bufferOK = this.isBufferOk()
        if (bufferOK !== this.bufferOK) {
            this.bufferOK = bufferOK
            this.dispatchEvent({ type: 'bufferOkChange', bufferOK })
        }
        if (!bufferOK) {
            return
        }
        // 记录动画开始的时间
        if (this.playTime == undefined) {
            this.playTime = Date.now()
        }
        // 相对时间,与缓冲数据同一时间维度
        const time = Date.now() - this.playTime
        // 更新所有缓冲对象的动画数据
        robotBufferMap.forEach((robotBuffer) => {
            robotBuffer.update(time)
        })
        // 向图形类传递更新机器人的事件
        this.dispatchEvent({ type: 'updateRobots', robotBufferMap })
        // 每隔一定的时间,销毁一次过期数据
        clearExpiredController.run(() => {
            robotBufferMap.forEach((robotBuffer) => {
                robotBuffer.clearExpiredData(time)
            })
        })
    }
    // 缓冲时间和数据量是否OK
    isBufferOk() {
        const { robotBufferMap, originTime } = this
        // 基础判断
        if (originTime == undefined || !robotBufferMap.size) {
            return false
        }
        // 需要所有缓冲对象的缓冲区都有效
        for (let robotBuffer of robotBufferMap.values()) {
            if (!robotBuffer.bufferOK) {
                return false
            }
        }
        return true
    }
    // 销毁数据
    dispose() {
        this.robotBufferMap.clear()
        this.playTime = undefined
        this.originTime = undefined
    }
}

export { RobotBufferManager }
export type { RobotBufferDataType }
解释一下上面的几个知识点。
TimeDelayController 时间延迟工具可以延迟数据的请求,其代码如下:
typescript
// 时间延迟器
class TimeDelayController{
  startTime:number=Date.now()
  delayTime:number
  finished=false

  constructor(delayTime=0){
    this.delayTime=delayTime
  }
  setDelayTime(delayTime:number=0){
      this.finished=false
      this.delayTime=delayTime
      this.startTime=Date.now()
  }
  run(fn:()=>void){
      const {delayTime,startTime,finished}=this
      if(finished){return}
      const now=Date.now()
      const diff=now-startTime
      if(diff>=delayTime){
          fn()
          this.startTime=now
          this.finished=true
      }
  }
  close(){
      this.finished=true
  }
}
fetchPoseList_test() 是请求实时数据的方法,其数据是我用假数据模拟的,但代码逻辑是经过了实战验证的。
4-4-RobotArea 类
RobotArea 类的功能:
- 构建渲染环境,渲染机器人。
- 根据缓冲对象传递的事件和数据,创建、更新和删除机器人。
整体代码如下:
- src/robot/RobotArea.ts
scss
import {
    Box3,
    BufferAttribute,
    BufferGeometry,
    Color,
    DirectionalLight,
    EquirectangularReflectionMapping,
    EventDispatcher,
    Fog,
    GridHelper,
    Group,
    Line,
    LineBasicMaterial,
    LoadingManager,
    Mesh,
    MeshBasicMaterial,
    PerspectiveCamera,
    PlaneGeometry,
    Scene,
    ShadowMaterial,
    Texture,
    WebGLRenderer,
} from 'three'
import { URDFRobot } from './URDFClasses'
import { TimeController } from './utils'
import { ResourceTracker } from './ResourceTracker'
import { URDFLoader } from './URDFLoader'
import { OrbitControls } from 'three/examples/jsm/controls/OrbitControls.js'
import { HDRLoader } from 'three/examples/jsm/loaders/HDRLoader.js'
import {RobotBuffer,type RobotBufferDataType} from './RobotBuffer'
import {RobotBufferManager} from './RobotBufferManager'

/* 机器人服务区 */
class RobotArea extends EventDispatcher<any> {
    // 渲染环境
    renderer = new WebGLRenderer({
        antialias: true,
        logarithmicDepthBuffer: true,
    })
    scene = new Scene()
    camera = new PerspectiveCamera(45, 1, 1, 1000)
    orbitControls = new OrbitControls(this.camera, this.renderer.domElement)
    // 包裹所有模型的group,用于矫正以z轴为上方向的坐标系
    tfGroup = new Group()
    // 所有类型的机器人的URDF地址
    robotUrlListPromise: Promise<{ [k: string]: string }>
    // 机器人模型库,存储不同类型的机器人
    protoRobotMap = new Map<string, URDFRobot>()
    // 机器人缓冲对象管理器
    robotBufferManager = new RobotBufferManager()
    // 机器人集合
    robots = new Group()
    // 机器人路径集合
    paths = new Group()
    // 路径材质
    pathMat = new LineBasicMaterial({ color: 0x00acec })
    // 动画更新频率
    timer16f = new TimeController(1000 / 16)
    // 连续渲染帧
    continuousFrame = 0
    // 资源追踪器
    resourceTracker = new ResourceTracker()

    constructor() {
        super()
        const {
            renderer,
            scene,
            tfGroup,
            robots,
            paths,
            resourceTracker,
            orbitControls,
            camera,
            robotBufferManager,
        } = this
        // 获取所有类型的机器人的url
        this.robotUrlListPromise = this.getRobotUrlList()

        // 开启渲染器投影
        renderer.shadowMap.enabled = true
        // 场景背景色
        scene.background = new Color(0xf6f6f8)
        // 场景雾效
        scene.fog = new Fog(0xf6f6f8, 20, 50)

        // 环境光
        new HDRLoader()
            .loadAsync('/texture/venice_sunset_1k.hdr')
            .then((texture:Texture) => {
                texture.mapping = EquirectangularReflectionMapping
                scene.environment = texture
                resourceTracker.track(texture)
            })

        // 灯光
        const light = new DirectionalLight(0xffffff, 1)
        light.position.set(0, 10, 5)
        light.castShadow = true
        scene.add(light)
        resourceTracker.track(light)

        // 地面Geometry
        const floorGeometry = new PlaneGeometry(100, 100)
        // 地面
        const floorMaterial = new MeshBasicMaterial({
            color: 0xffffff,
            transparent: true,
            opacity: 0.5,
        })
        const floorMesh = new Mesh(floorGeometry, floorMaterial)
        floorMesh.rotateX(-Math.PI / 2)
        floorMesh.position.y = -0.005
        scene.add(floorMesh)
        resourceTracker.track(floorMesh)
        // 地面阴影
        const floorShadowMaterial = new ShadowMaterial({
            transparent: true,
            opacity: 0.1,
        })
        const floorShadowMesh = new Mesh(floorGeometry, floorShadowMaterial)
        floorShadowMesh.rotateX(-Math.PI / 2)
        floorShadowMesh.receiveShadow = true
        scene.add(floorShadowMesh)
        resourceTracker.track(floorShadowMesh)
        // 地面网格
        const floorGrid = new GridHelper(100, 100, 0x9c9aa5, 0xbcbac7)
        scene.add(floorGrid)
        resourceTracker.track(floorGrid)

        // 矫正z轴朝上的坐标系
        tfGroup.rotation.x = -Math.PI / 2
        tfGroup.add(robots)
        tfGroup.add(paths)
        scene.add(tfGroup)

        // 设置镜头
        camera.position.set(2,2, 6)
        orbitControls.target.set(0, 0,0)
        orbitControls.update()

        // 出现新的机器人时,需将此机器人添加到场景中
        robotBufferManager.addEventListener('hasNewRobots', ({ robotDataList }) => {
            this.createRobots(robotDataList)
        })
        // 出现无需展示的机器人,需在场景中删除此机器人和路径
        robotBufferManager.addEventListener('hasOldRobots', ({ deviceNumberList }) => {
            this.deleteRobots(deviceNumberList)
        })
        // 更新机器人
        robotBufferManager.addEventListener(
            'updateRobots',
            ({ robotBufferMap }) => {
                this.updateRobots(robotBufferMap)
            },
        )
    }

    createRobots(robotDataList: any) {
        const { protoRobotMap } = this
        // 新增机器人类型
        const newRobotTypeList = new Set<string>()
        // 新增机器人的数据
        const newRobotDataList: RobotBufferDataType[] = []
        // 若新增的机器人类型在机器人原型库中存在,则将此机器人添加到场景中;
        // 否则,先获取机器人原型,再添加到场景。
        robotDataList.forEach((robotData: any) => {
            const { device_type } = robotData
            const robot = protoRobotMap.get(device_type)
            if (robot) {
                this.addRobot(robotData, robot)
            } else {
                newRobotTypeList.add(device_type)
                newRobotDataList.push(robotData)
            }
        })
        if (newRobotTypeList.size) {
            this.robotUrlListPromise.then((robotUrlList) => {
                // 加载新类型的机器人,并添加到原型库
                this.loadURDFModels(newRobotTypeList, robotUrlList, () => {
                    // 添加新机器人
                    newRobotDataList.forEach((robotData) => {
                        const protoRobot = protoRobotMap.get(robotData.device_type)
                        protoRobot && this.addRobot(robotData, protoRobot)
                    })
                })
            })
        }
    }
    // 删除机器人
    deleteRobots(deviceNumberList: string[]) {
        const { robots, paths } = this
        deviceNumberList.forEach((deviceNumber: string) => {
            robots.getObjectByName(deviceNumber)?.removeFromParent()
            paths.getObjectByName(deviceNumber)?.removeFromParent()
        })
    }
    // 更新机器人
    updateRobots(robotBufferMap: Map<string, RobotBuffer>) {
        const { robots, paths } = this
    // 更新机器人位姿和关节
        ;(robots.children as URDFRobot[]).forEach((robot) => {
            const {
                name,
                userData: { jointMap },
            } = robot
            const robotBuffer = robotBufferMap.get(name)
            if (!robotBuffer) {
                return
            }
            const { position, quaternion, jointValues, jointNames } = robotBuffer
            // 更新位姿
            robot.position.x = position.x
            robot.position.y = position.y
            robot.quaternion.copy(quaternion)
            // 更新关节
            jointNames.forEach((jointName, jointInd) => {
                const jointValue = jointValues[jointInd]
                jointValue && jointMap.get(jointName)?.setValue(jointValue)
            })
        })
        // 更新路径
        ;(paths.children as Line[]).forEach((path) => {
            const robotBuffer = robotBufferMap.get(path.name)
            if (!robotBuffer) {
                return
            }
      path.geometry.dispose()
            path.geometry.setAttribute(
                'position',
                new BufferAttribute(new Float32Array(robotBuffer.pathPoints), 3),
            )
        })
    }

    // 获取所有机器人的url
    async getRobotUrlList() {
        return fetch('/data/urdf_list.json')
            .then((res) => res.json())
            .then(({ data }) => {
                return data
            })
    }

    // 添加机器人
    addRobot(robotData: RobotBufferDataType, protoRobot: URDFRobot) {
        const { robots, paths, pathMat, resourceTracker } = this
        const { device_number, pose } = robotData
        // 避免重复添加
        for (let robot of robots.children) {
            if (robot.name == device_number) {
                return
            }
        }
        // 创建机器人对象
        const robot = protoRobot.clone()
        robot.name = device_number
        robot.position.x = pose[0]
        robot.position.y = pose[1]
        robot.quaternion.set(pose[3], pose[4], pose[5], pose[6])
        robots.add(robot)
        // 创建机器人路径
        const path = new Line(new BufferGeometry(), pathMat)
        path.frustumCulled = false
        path.name = device_number
        paths.add(path)
        resourceTracker.track(path)
    }

    // 加载机器人
    loadURDFModels(
        newRobotTypeList: Set<string>,
        robotUrlList: { [k: string]: string },
        onLoad = () => {},
    ) {
        const { protoRobotMap, resourceTracker } = this
        // 暂存机器人
        const protoRobotMapTemp = new Map<string, URDFRobot>()
        // 批量加载机器人原型
        const manager = new LoadingManager()
        newRobotTypeList.forEach((type: string) => {
            const robotUrl = robotUrlList[type]
            if (!robotUrl) {
                console.warn('机器人url 不存在:', robotUrl)
                return
            }
            const urdfLoader = new URDFLoader(manager)
            urdfLoader.load(robotUrl, (protoRobot: any) => {
                // 此时protoRobot 中的模型文件尚未加载完成
                protoRobotMapTemp.set(type, protoRobot)
            })
        })
        manager.onError = () => {
            console.error('机器人加载出错!')
        }
        manager.onLoad = () => {
            newRobotTypeList.forEach((type: string) => {
                const protoRobot = protoRobotMapTemp.get(type)
                if (!protoRobot) {
                    return
                }
                // protoRobot 中的模型文件加载完成
                protoRobotMap.set(type, protoRobot)
                // 确保机器人落地
                const box3 = new Box3()
                box3.setFromObject(protoRobot)
                protoRobot.position.z -= box3.min.z
                resourceTracker.track(protoRobot)
            })
            onLoad()
        }
    }
    // 连续渲染
    continuousRender() {
        const { renderer, scene, camera, timer16f, robotBufferManager } = this
        // 以16帧/s的频率渲染动画
        timer16f.run(() => {
            // 更新机器人动画
            robotBufferManager.update()
            // 渲染
            renderer.render(scene, camera)
        })
        this.continuousFrame = requestAnimationFrame(
            this.continuousRender.bind(this)
        )
    }
    // 设置渲染尺寸
    resize(width: number, height: number) {
        const { renderer, camera } = this
        camera.aspect = width / height
        camera.updateProjectionMatrix()
        renderer.setSize(width, height, true)
    }
    // 清理内存
    dispose() {
        cancelAnimationFrame(this.continuousFrame)
        this.robotBufferManager.dispose()
        this.resourceTracker.dispose()
        this.renderer.dispose()
        this.orbitControls.dispose()
        this.renderer.domElement.remove()
    }
}

export { RobotArea }
TimeController 类将连续渲染的频率设置为16帧/s,代码如下:
typescript
// 线性计时器
class TimeController{
    duration:number
    startTime:number=0
    constructor(duration:number=40){
        this.duration=duration
        this.startTime=Date.now()
    }
    run(fn:()=>void){
        const {duration,startTime}=this
        const now=Date.now()
        const diff=now-startTime
        if(diff>=duration){
            fn()
            this.startTime=now
        }
    }
}
4-5-App.vue
在App.vue 中示例化RobotArea 类,便可以看到效果。
- src/App.vue
xml
<script setup lang="ts">
import { onMounted, onUnmounted, ref } from "vue";
import { RobotArea } from "./robot/RobotArea";
import { ElMessage, type MessageHandler } from "element-plus";

/* canvas 画布的Ref对象 */
const canvasWrapperRef = ref<HTMLDivElement>();

/* 机器人可视化 */
const robotArea = new RobotArea();

/* 监听缓冲状态 */
let msg:MessageHandler;
robotArea.robotBufferManager.addEventListener('bufferOkChange',({bufferOK})=>{
  ElMessage.closeAll()
  if(!bufferOK){
    msg=ElMessage({
      message:'动画数据缓冲中......',
      duration:0
    })
  }else{
    msg.close()
  }
})

/* 自适应窗口尺寸 */
window.addEventListener("resize", onResize);
function onResize() {
  const canvasWrapper = canvasWrapperRef.value;
  canvasWrapper&&robotArea.resize(canvasWrapper.clientWidth, canvasWrapper.clientHeight);
}

onMounted(() => {
  onResize();
  const canvasWrapper = canvasWrapperRef.value;
  canvasWrapper && canvasWrapper.append(robotArea.renderer.domElement);
  robotArea.continuousRender();
});

onUnmounted(() => {
  window.removeEventListener("resize", onResize);
  robotArea.dispose();
});
</script>

<template>
  <div id="canvasWrapper" ref="canvasWrapperRef">
  </div>
</template>

<style scoped>
#canvasWrapper {
  height: 100%;
  overflow: hidden;
}
</style>
总结
这一章说了机器人实时动画缓冲的原理和实现过程。
再继续延伸的话,就可以把机器人的工作站也放到服务区中,进行可视化渲染和交互。
实际项目还会更复杂,并涉及各种边界问题的判断和兼容,比如展示机器人的异常状态,哪个机器人发生异常了,就给它飘红。这些都是比较简单的业务逻辑,所以我就没有赘述。
在机器人公司的实际工作中,除了我这个课程说的内容,我们还会遇到很多跟运控、ROS或仿真相关的需求,给大家举几个例子:
- 机器人在工厂中的二维导航地图。
- 灵巧手的压力可视化。
- USD 格式的静态资产的可视化。
- 机器人标注,比如截取机器人动画的某一个时间段,或者画面的一部分。
- 三维模型的优化,比如减少模型面数,优化模型材质。
- 用表单或Echarts 展示机器人数据。
机器人在前端的可视化是相对比较浅的,并没有太多可以深挖的技术,若大家对机器人感兴趣,可以向机器仿真过度,研究其仿真算法。
算法和硬件是机器人的两大核心。
下一章我们会说一下USDA 模型的解析。