postgresql+rabbitmq集群搭建方案
方案介绍
本文档仅为示例,采用内网三台集群组成集群:192.168.1.6、192.168.1.89、192.168.1.83
其中1.6作为主服务器,1.89作为备选服务器,1.83作为兜底服务器
需要安装插件介绍
keepalived
作用说明
Keepalived 的核心作用是解决 HAProxy 自身的单点故障问题,为负载均衡层提供高可用保障。
提供虚拟 IP(VIP):Keepalived 会在多台 HAProxy 节点之间维护一个漂移的虚拟 IP。客户端只需连接这个 VIP,而非具体某个 HAProxy 的物理 IP
主备自动切换:正常情况下,VIP 只在主 HAProxy 节点上生效。如果主节点宕机或服务异常,Keepalived 会自动将 VIP 漂移到备节点,整个过程对客户端无感知。
健康检查联动:Keepalived 会持续检测 HAProxy 进程的状态(比如通过检查端口、进程或自定义脚本)。一旦发现 HAProxy 服务失效,会主动触发 VIP 切换,避免客户端被路由到已失效的负载均衡器。
通常会是这样的 2 + N 模式:
两台服务器部署 HAProxy + Keepalived 组合,形成主备关系,对外暴露一个虚拟 IP。
Patroni
它是一个Python编写的模板,用于配置和管理PostgreSQL高可用集群,利用分布式共识存储(etcd)进行领导者选举和配置管理,可以理解为它就是一个死循环,一直去分布式配置管理信息存储系统里去取数据,你可以理解为它是一个管家,管理PostgreSQL进程,自动化处理故障转移,每个安装了pgsql的机器都需要安装一个Patroni。
etcd
它的稳定性直接决定了整个高可用体系是否可靠。etcd 是通过 Raft 共识算法,为 Patroni 集群提供了一个永远不会出现"两个主库"的、绝对一致的控制中心
作用:
-
领导者选举:所有 Patroni 节点都盯着 etcd 中的同一把"领导者锁",保证有且仅有一个主库。
-
集群状态共识:集群拓扑、各节点健康状态和复制位点等关键信息,都储存在 etcd 中,所有节点看到的视图完全一致。
-
动态配置下发:修改 max_connections 等参数,Patroni 会写入 etcd,其他节点 Watch 到变化后自动响应。
HAProxy
HAProxy 在这个集群方案中的核心作用是一个 四层(TCP)负载均衡器,它为客户端提供一个统一的、高可用的入口,并将请求流量分发到后端的多台服务器上
需要注意的是:
HAProxy 本身不是高可用的,如果 HAProxy 挂了,整个入口就没了。所以生产环境通常会部署多个 HAProxy 实例,并在其上层用 Keepalived (VIP) 或云负载均衡器来保证 HAProxy 自身的冗余- 它不做连接池:HAProxy 是逐连接的转发,如果应用频繁短连接,后端 PostgreSQL 压力会很大。这通常通过追加PgBouncer解决,而非在 HAProxy 层面。
- 只做路由,不参与决策:HAProxy 完全信任 Patroni 的健康检查反馈,自身不具备任何数据库角色判断逻辑,这保证了责任清晰。
PgBouncer
PgBouncer 是 PostgreSQL 生态中最轻量、最成熟的开源连接池。在 Patroni + HAProxy 的高可用架构里,它专门解决一个关键问题:PostgreSQL 的进程模型无法承受海量短连接。
PostgreSQL 采用"一个连接一个进程"的模型,每次连接都需 fork 一个新进程,占用约 2-10MB 内存,且频繁建立/销毁连接会导致 CPU 争抢和上下文切换开销巨大。PgBouncer 通过连接复用解决了这个问题
pgsql的定时任务工具(cron)
pgsql定时执行作业的一个插件
端口使用详情
| 组件 | 节点/实例 | IP地址 | 端口 | 用途 |
|---|---|---|---|---|
| etcd (DCS) | etcd1 | 192.168.1.6 | 2379, 2380 | 集群状态存储与选主 |
| etcd2 | 192.168.1.89 | 2379, 2380 | ||
| etcd3 | 192.168.1.83 | 2379, 2380 | ||
| PostgreSQL + Patroni | pg-node1 | 192.168.1.6 | 5432, 8008 | 主库 |
| pg-node2 | 192.168.1.89 | 5432, 8008 | 备库 | |
| pg-node3 | 192.168.1.83 | 5432, 8008 | 备库 | |
| PgBouncer (连接池) | pgbouncer-1 | 192.168.1.6 | 6432 | 连接池,减少数据库连接开销 |
| pgbouncer-2 | 192.168.1.89 | 6432 | ||
| pgbouncer-3 | 192.168.1.83 | 6432 | ||
| HAProxy (读写分离) | haproxy-1 | 192.168.1.6 | 5431(写), 5430(读) | 将写请求路由到主库,读请求负载均衡到从库 |
| haproxy-2 | 192.168.1.89 | 5431(写), 5430(读) | ||
| Keepalived (VIP) | VIP | 192.168.1.100 | - | 对外提供高可用入口,故障时自动漂移 |
| keeplived-1 | 192.168.1.6 | - | MASTER(优先级100) | |
| keeplived-2 | 192.168.1.89 | - | BACKUP(优先级90) | |
| rabbitmq | rabbit-node-1 | 192.168.1.6 | 5672(AMQP),1883(MQTT) | 消息队列服务 |
| rabbit-node-2 | 192.168.1.89 | 5672(AMQP),1883(MQTT) | ||
| rabbit-node-3 | 192.168.1.83 | 5672(AMQP),1883(MQTT) |
基础配置
增加host
执行以下语句配置host
shell
echo "192.168.1.6    master" >> /etc/hosts
echo "192.168.1.89   backup" >> /etc/hosts
echo "192.168.1.83   follower" >> /etc/hosts
安装postgresql
执行以下命令进行安装
shell
sudo apt update
sudo apt install -y postgresql-common
sudo /usr/share/postgresql-common/pgdg/apt.postgresql.org.sh
sudo apt install postgresql-18
配置运行外网访问
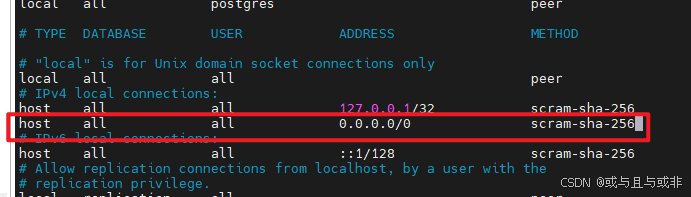
编辑 /etc/postgresql/18/main/pg_hba.conf文件,增加 0.0.0.0/0 运行外部访问
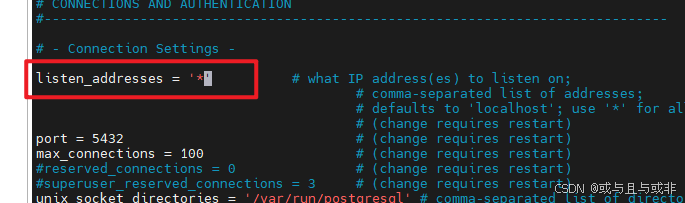
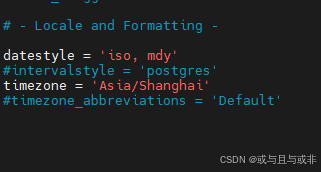
编辑 /etc/postgresql/18/main/postgresql.conf文件,修改监听地址为 *,把timezone 设置为'Asia/Shanghai'
pgsql创建集群所需用户
先执行以下命令进入数据库
shell
sudo -u postgres psql配置管理员账户设置
sql
ALTER USER postgres WITH PASSWORD '你的新密码';创建复制用户
sql
CREATE ROLE replicator WITH REPLICATION LOGIN PASSWORD '用于集群复制账户的密码';创建执行比对和回滚操作的用户
sql
CREATE USER rewind_user WITH ENCRYPTED PASSWORD '密码';

GRANT EXECUTE ON FUNCTION pg_catalog.pg_ls_dir(text, boolean, boolean) TO rewind_user;
GRANT EXECUTE ON FUNCTION pg_catalog.pg_stat_file(text, boolean) TO rewind_user;
GRANT EXECUTE ON FUNCTION pg_catalog.pg_read_binary_file(text) TO rewind_user;
GRANT EXECUTE ON FUNCTION pg_catalog.pg_read_binary_file(text, bigint, bigint, boolean) TO rewind_user;

-- 确认授权
\du rewind_user
安装rabbitmq
注意以下脚本我指定了rabbitmq版本为4.1.3
context
#!/bin/sh

sudo apt-get install curl gnupg apt-transport-https -y

## Team RabbitMQ's main signing key
curl -1sLf "https://keys.openpgp.org/vks/v1/by-fingerprint/0A9AF2115F4687BD29803A206B73A36E6026DFCA" | sudo gpg --dearmor | sudo tee /usr/share/keyrings/com.rabbitmq.team.gpg > /dev/null
## Community mirror of Cloudsmith: modern Erlang repository
curl -1sLf https://github.com/rabbitmq/signing-keys/releases/download/3.0/cloudsmith.rabbitmq-erlang.E495BB49CC4BBE5B.key | sudo gpg --dearmor | sudo tee /usr/share/keyrings/rabbitmq.E495BB49CC4BBE5B.gpg > /dev/null
## Community mirror of Cloudsmith: RabbitMQ repository
curl -1sLf https://github.com/rabbitmq/signing-keys/releases/download/3.0/cloudsmith.rabbitmq-server.9F4587F226208342.key | sudo gpg --dearmor | sudo tee /usr/share/keyrings/rabbitmq.9F4587F226208342.gpg > /dev/null

## Add apt repositories maintained by Team RabbitMQ
sudo tee /etc/apt/sources.list.d/rabbitmq.list <<EOF
## Provides modern Erlang/OTP releases
##
deb [arch=amd64 signed-by=/usr/share/keyrings/rabbitmq.E495BB49CC4BBE5B.gpg] https://ppa1.rabbitmq.com/rabbitmq/rabbitmq-erlang/deb/ubuntu noble main
deb-src [signed-by=/usr/share/keyrings/rabbitmq.E495BB49CC4BBE5B.gpg] https://ppa1.rabbitmq.com/rabbitmq/rabbitmq-erlang/deb/ubuntu noble main

# another mirror for redundancy
deb [arch=amd64 signed-by=/usr/share/keyrings/rabbitmq.E495BB49CC4BBE5B.gpg] https://ppa2.rabbitmq.com/rabbitmq/rabbitmq-erlang/deb/ubuntu noble main
deb-src [signed-by=/usr/share/keyrings/rabbitmq.E495BB49CC4BBE5B.gpg] https://ppa2.rabbitmq.com/rabbitmq/rabbitmq-erlang/deb/ubuntu noble main

## Provides RabbitMQ
##
deb [arch=amd64 signed-by=/usr/share/keyrings/rabbitmq.9F4587F226208342.gpg] https://ppa1.rabbitmq.com/rabbitmq/rabbitmq-server/deb/ubuntu noble main
deb-src [signed-by=/usr/share/keyrings/rabbitmq.9F4587F226208342.gpg] https://ppa1.rabbitmq.com/rabbitmq/rabbitmq-server/deb/ubuntu noble main

# another mirror for redundancy
deb [arch=amd64 signed-by=/usr/share/keyrings/rabbitmq.9F4587F226208342.gpg] https://ppa2.rabbitmq.com/rabbitmq/rabbitmq-server/deb/ubuntu noble main
deb-src [signed-by=/usr/share/keyrings/rabbitmq.9F4587F226208342.gpg] https://ppa2.rabbitmq.com/rabbitmq/rabbitmq-server/deb/ubuntu noble main
EOF

## RabbitMQ Start
sudo apt-get install apt-transport-https
sudo apt-get install curl gnupg apt-transport-https -y

## Team RabbitMQ's signing key
curl -1sLf "https://keys.openpgp.org/vks/v1/by-fingerprint/0A9AF2115F4687BD29803A206B73A36E6026DFCA" | sudo gpg --dearmor | sudo tee /usr/share/keyrings/com.rabbitmq.team.gpg > /dev/null
sudo tee /etc/apt/sources.list.d/rabbitmq.list <<EOF
## Modern Erlang/OTP releases
##
deb [arch=amd64 signed-by=/usr/share/keyrings/com.rabbitmq.team.gpg] https://deb1.rabbitmq.com/rabbitmq-erlang/ubuntu/noble noble main
deb [arch=amd64 signed-by=/usr/share/keyrings/com.rabbitmq.team.gpg] https://deb2.rabbitmq.com/rabbitmq-erlang/ubuntu/noble noble main

## Provides modern RabbitMQ releases
##
deb [arch=amd64 signed-by=/usr/share/keyrings/com.rabbitmq.team.gpg] https://deb1.rabbitmq.com/rabbitmq-server/ubuntu/noble noble main
deb [arch=amd64 signed-by=/usr/share/keyrings/com.rabbitmq.team.gpg] https://deb2.rabbitmq.com/rabbitmq-server/ubuntu/noble noble main
EOF

## Update package indices
sudo apt-get update -y

## Install Erlang packages
sudo apt-get install -y erlang-base \
                        erlang-asn1 erlang-crypto erlang-eldap erlang-ftp erlang-inets \
                        erlang-mnesia erlang-os-mon erlang-parsetools erlang-public-key \
                        erlang-runtime-tools erlang-snmp erlang-ssl \
                        erlang-syntax-tools erlang-tftp erlang-tools erlang-xmerl
## Install rabbitmq-server and its dependencies
sudo apt-get install rabbitmq-server=4.1.3-1 -y --fix-missing
## RabbitMQ End
rabbitmq集群相关配置
代码方面
默认情况下创建队列的时候rabbitmq x-queue-type值为classic,但是classic不支持Raft协议。需要在创建队列的时候把类型设置为quorum。这里需要注意如果是从classic改为quorum类型的时候如果之前业务里使用到了队列的优先级参数需要调整,classic支持10级,但是quorunm只有两级一种是普通一种是高优先级(1-4为普通;5-9高)这里说的是给 BasicProperties中Priority赋的值
MQ配置方面
修改erlang的cookie文件
- 查看主服务器上cookie的值
shell
cat /var/lib/rabbitmq/.erlang.cookie-
把备服务器和从服务器的cookie的值修改为主服务器上的值
vi /var/lib/rabbitmq/.erlang.cookie
-
加入集群
shell
rabbitmqctl stop_app
rabbitmqctl reset
rabbitmqctl join_cluster rabbit@master
rabbitmqctl start_app- 开启mqtt服务
shell
systemctl rabbitmq-plugins enable rabbitmq_mqtt
ststemctl rabbitmq-plugins enable rabbitmq_management
集群运维常用命令
查看队列的Leader所在位置
shell
rabbitmq-queues quorum_status 队列名称集群重新平衡
shell
rabbitmq-queues rebalance quorum查看你集群状态
shell
sudo rabbitmqctl cluster_status查看队列所属节点信息
shell
sudo rabbitmqctl list_queues name type pid | grep quorum集群问题解决
只有三台机器组成集群时,当某台机器上的rabbitmq挂掉之后,如果它是某个队列的leader,那它挂掉这个队列就无法正常使用了
1.1 执行以下命令查看是那台机器挂掉了
shell
rabbitmq-diagnostics cluster_status1.2 查看队列的leader处于那个节点上
shell
rabbitmq-queues quorum_status 队列名1.3 执行手动转移 Leader
shell
sudo rabbitmq-queues rebalance quorum --vhost-pattern ".*" --queue-pattern ".*"执行这个命令耗时会比较长,执行完成后结果如下图:

etcd安装
注意这个插件三台机器上都需要安装,最好不要放到数据库服务器上
下载
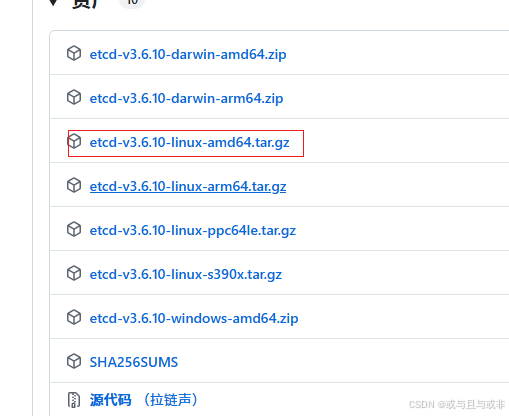
在github上下载:Releases · etcd-io/etcd
如果你的Linux是x64版本的就可以直接选择amd64
安装
解压压缩包
shell
tar -xvf etcd-v3.6.10-linux-amd64.tar.gz安装到系统
shell
cd etcd-v3.6.10-linux-amd64
shell
sudo cp etcd etcdctl /usr/local/bin/验证是否安装成功
shell
etcd --version
etcdctl version
配置
创建配置文件
shell
vi /etc/etcd/etcd.conf1.6机器上配置如下
context
name: 'etcd1'
data-dir: /var/lib/etcd
initial-cluster-token: 'patroni-cluster'
initial-cluster: 'etcd1=http://192.168.1.6:2380,etcd2=http://192.168.1.89:2380,etcd3=http://192.168.1.83:2380'
initial-cluster-state: 'new'
listen-peer-urls: http://192.168.1.6:2380
listen-client-urls: http://192.168.1.6:2379,http://localhost:2379
advertise-client-urls: http://192.168.1.6:2379
initial-advertise-peer-urls: http://192.168.1.6:2380
1.89机器上配置如下
shell
name: 'etcd2'
data-dir: /var/lib/etcd
initial-cluster-token: 'patroni-cluster'
initial-cluster: 'etcd1=http://192.168.1.6:2380,etcd2=http://192.168.1.89:2380,etcd3=http://192.168.1.83:2380'
initial-cluster-state: 'new'
listen-peer-urls: http://192.168.1.89:2380
listen-client-urls: http://192.168.1.89:2379,http://localhost:2379
advertise-client-urls: http://192.168.1.89:2379
initial-advertise-peer-urls: http://192.168.1.89:2380
1.83机器上配置如下
shell
name: 'etcd3'
data-dir: /var/lib/etcd
initial-cluster-token: 'patroni-cluster'
initial-cluster: 'etcd1=http://192.168.1.6:2380,etcd2=http://192.168.1.89:2380,etcd3=http://192.168.1.83:2380'
initial-cluster-state: 'new'
listen-peer-urls: http://192.168.1.83:2380
listen-client-urls: http://192.168.1.83:2379,http://localhost:2379
advertise-client-urls: http://192.168.1.83:2379
initial-advertise-peer-urls: http://192.168.1.83:2380
其他命令
重载 systemd 配置
shell
sudo systemctl daemon-reload设置为开机自启
shell
sudo systemctl enable --now etcd查看服务状态
shell
sudo systemctl status etcd节点子检查
shell
etcdctl endpoint health查看集群详情
shell
etcdctl member list所有节点健康检查
shell
etcdctl endpoint health --cluster -w tablePgBouncer安装
在安装了Postgresql的机器上都要安装
安装
执行以下命令进行安装
shell
sudo apt update && sudo apt install -y pgbouncer配置
修改配置文件
shell
vi /etc/pgbouncer/pgbouncer.ini主要需要注意的配置有以下几个,有些默认是被注释掉的需要恢复。
需要注意连接databases配置端口和dbname不要配置错了
context
[databases]
# 将所有数据库请求路由到本地的 PostgreSQL 服务
* = host=localhost port=5433 dbname=fsmgw user=postgres

[pgbouncer]
# 监听设置
listen_addr = 0.0.0.0
listen_port = 6432
# Unix socket 设置(可选)
unix_socket_dir = /var/run/postgresql

# 认证设置
auth_type = md5
auth_file = /etc/pgbouncer/userlist.txt

# 连接池设置
pool_mode = transaction      # 推荐使用事务级池化
default_pool_size = 50       # 每个数据库的默认连接池大小
max_client_conn = 500        # PgBouncer 能接受的最大客户端连接数

# 日志设置
logfile = /var/log/postgresql/pgbouncer.log
pidfile = /var/run/postgresql/pgbouncer.pid

# 管理设置
admin_users = postgres
stats_users = stats, postgres
配置用户认证
shell
vi /etc/pgbouncer/userlist.txt加入以下内容
context
"postgres" "数据库连接密码"服务相关命令
启动服务并查看服务是否正常
shell
sudo systemctl restart pgbouncer && systemctl status pgbouncercron安装
安装插件,注意以下命令的18是指pgsql的版本
shell
sudo apt-get install postgresql-18-cron这里单机版本下一步是直接去配置pgsql的配置文件,但是我们这里是集群安装,后续在安装Patroni的配置中进行设置
patroni安装
执行以下命令进行安装,注意以下命令的18是指pgsql的版本
shell
sudo apt install postgresql-18 patroni主服务器配置(1.6)
- 创建配置文件
shell
vi /etc/patroni/config.yml- 把以下内容复制到文件中
context
scope: "18-clusteredData"
namespace: "/postgresql-common/"
name: fsmgw-clustered-1-6

etcd3:
  hosts:
    - 192.168.1.6:2379
    - 192.168.1.89:2379
    - 192.168.1.83:2379   # 修正为 83 的 2379,删掉 2382

tags:
  failover_priority: 100

restapi:
  listen: 192.168.1.6:8008
  connect_address: 192.168.1.6:8008

bootstrap:
  method: pg_createcluster
  pg_createcluster:
    command: /usr/share/patroni/pg_createcluster_patroni
  dcs:   # 注意缩进:dcs 是 bootstrap 的子项
    ttl: 30
    loop_wait: 10
    retry_timeout: 5
    maximum_lag_on_failover: 1048576
    check_timeline: true
    postgresql:
      use_pg_rewind: true
      remove_data_directory_on_rewind_failure: true
      remove_data_directory_on_diverged_timelines: true
      use_slots: true
      pg_hba:
        - local   all   all   peer
        - host    all   all   127.0.0.1/32   scram-sha-256
        - host    all   all   ::1/128        scram-sha-256
        - host    replication   replicator   192.168.1.0/24   scram-sha-256
        - host    replication   replicator   127.0.0.1/32     scram-sha-256
        - host    all   all   192.168.1.0/24   scram-sha-256
      parameters:
        wal_log_hints: 'on'
        hot_standby_feedback: 'on'
        max_replication_slots: 10
        max_wal_senders: 10
        wal_keep_size: 1GB
        password_encryption: scram-sha-256
        shared_preload_libraries: pg_cron
        cron.database_name: fsmgw
        cron.use_background_workers: 'on'
    recovery_conf:   # 正确位置:dcs 的子项
      standby_mode: 'on'
    slots:           # 正确位置:dcs 的子项,与 postgresql、recovery_conf 同级
      fsmgw-clustered-1-6:
        type: physical
      fsmgw-clustered-1-89:
        type: physical
      fsmgw-clustered-1-83:
        type: physical

postgresql:
  create_replica_method:
    - pg_clonecluster
  pg_clonecluster:
    command: /usr/share/patroni/pg_clonecluster_patroni
  listen: 0.0.0.0:5433
  connect_address: 192.168.1.6:5433
  use_unix_socket: true
  data_dir: /data2/postgresql/18/clusteredData
  bin_dir: /usr/lib/postgresql/18/bin
  config_dir: /etc/postgresql/18/clusteredData
  pgpass: /var/lib/postgresql/18-clusteredData.pgpass
  authentication:
    replication:
      username: "replicator"
      password: "copyP@ssw0rd"
    superuser:
      username: "postgres"
      password: "maiyuan!2#"
    rewind:
      username: "rewind_user"
      password: "maiyuan!2#"
  parameters:
    unix_socket_directories: '/var/run/postgresql/'
    logging_collector: 'on'
    log_directory: '/var/log/postgresql'
    log_filename: 'postgresql-18-clusteredData.log'
    shared_buffers: '8GB' # 这里根据机器实际情况设置
effective_cache_size: '24GB' # 这里根据机器实际情况设置- 设置文件权限
shell
sudo chown postgres:postgres /etc/patroni/config.yml从服务器配置(1.89)
从服务器的配置只有config.yml文件内容的差异,其他步骤按照上面主库的操作步骤执行即可
context
scope: "18-clusteredData"
namespace: "/postgresql-common/"
name: fsmgw-clustered-1-89

etcd3:
  hosts:
    - 192.168.1.6:2379
    - 192.168.1.89:2379
    - 192.168.1.83:2379

tags:
  failover_priority: 90

restapi:
  listen: 192.168.1.89:8008
  connect_address: 192.168.1.89:8008

bootstrap:
  method: pg_createcluster
  pg_createcluster:
    command: /usr/share/patroni/pg_createcluster_patroni
  dcs:   # 注意缩进:dcs 是 bootstrap 的子项
    ttl: 30
    loop_wait: 10
    retry_timeout: 5
    maximum_lag_on_failover: 1048576
    check_timeline: true
    postgresql:
      use_pg_rewind: true
      remove_data_directory_on_rewind_failure: true
      remove_data_directory_on_diverged_timelines: true
      use_slots: true
      pg_hba:
        - local   all   all   peer
        - host    all   all   127.0.0.1/32   scram-sha-256
        - host    all   all   ::1/128        scram-sha-256
        - host    replication   replicator   192.168.1.0/24   scram-sha-256
        - host    replication   replicator   127.0.0.1/32     scram-sha-256
        - host    all   all   192.168.1.0/24   scram-sha-256
      parameters:
        wal_log_hints: 'on'
        hot_standby_feedback: 'on'
        max_replication_slots: 10
        max_wal_senders: 10
        wal_keep_size: 1GB
        password_encryption: scram-sha-256
        shared_preload_libraries: pg_cron
        cron.database_name: fsmgw
        cron.use_background_workers: 'on'
    recovery_conf:   # 正确位置:dcs 的子项
      standby_mode: 'on'
    slots:           # 正确位置:dcs 的子项,与 postgresql、recovery_conf 同级
      fsmgw-clustered-1-6:
        type: physical
      fsmgw-clustered-1-89:
        type: physical
      fsmgw-clustered-1-83:
        type: physical

postgresql:
  create_replica_method:
    - pg_clonecluster
  pg_clonecluster:
    command: /usr/share/patroni/pg_clonecluster_patroni
  listen: 0.0.0.0:5433
  connect_address: 192.168.1.89:5433
  use_unix_socket: true
  data_dir: /data2/postgresql/18/clusteredData
  bin_dir: /usr/lib/postgresql/18/bin
  config_dir: /etc/postgresql/18/clusteredData
  pgpass: /var/lib/postgresql/18-clusteredData.pgpass
  authentication:
    replication:
      username: "replicator"
      password: "copyP@ssw0rd"
    superuser:
      username: "postgres"
      password: "maiyuan!2#"
    rewind:
      username: "rewind_user"
      password: "maiyuan!2#"
  parameters:
    unix_socket_directories: '/var/run/postgresql/'
    logging_collector: 'on'
    log_directory: '/var/log/postgresql'
    log_filename: 'postgresql-18-clusteredData.log'
    shared_buffers: '2GB' # 这里根据机器实际情况设置
    effective_cache_size: '10GB' # 这里根据机器实际情况设置
备服务器配置(1.83)
备服务器的配置只有config.yml文件内容的差异,其他步骤按照上面主库的操作步骤执行即可
context
scope: "18-clusteredData"
namespace: "/postgresql-common/"
name: fsmgw-clustered-1-83

tags:
  failover_priority: 2  # 设置一个正数但不高于主库的值
etcd3:
  hosts:
    - 192.168.1.6:2379
    - 192.168.1.89:2379
    - 192.168.1.83:2379

restapi:
  listen: 192.168.1.83:8008
  connect_address: 192.168.1.83:8008

bootstrap:
  method: initdb
  initdb:
    - encoding: UTF8
    - data-checksums
    #pg_createcluster:
    # command: /usr/share/patroni/pg_createcluster_patroni

  dcs:
    # 与主库保持一致(内容相同,是全局配置)
    ttl: 30
    loop_wait: 10
    retry_timeout: 10
    maximum_lag_on_failover: 1048576
    check_timeline: true
    postgresql:
      use_pg_rewind: true
      remove_data_directory_on_rewind_failure: true
      remove_data_directory_on_diverged_timelines: true
      use_slots: true
      pg_hba:
        - local   all   all   peer
        - host    all   all   127.0.0.1/32   scram-sha-256
        - host    all   all   ::1/128        scram-sha-256
        - host    replication   replicator   192.168.1.0/24   scram-sha-256
        - host    replication   replicator   127.0.0.1/32     scram-sha-256
        - host    all   all   192.168.1.0/24   scram-sha-256
      parameters:
        max_replication_slots: 10
        max_wal_senders: 10
        wal_keep_size: 1GB
        password_encryption: scram-sha-256

postgresql:
  create_replica_method:
    - pg_clonecluster
  pg_clonecluster:
    command: /usr/share/patroni/pg_clonecluster_patroni

  listen: 0.0.0.0:5433
  connect_address: 192.168.1.83:5433
  use_unix_socket: true

  data_dir: /data/postgresql/18/clusteredData   # 备库也应使用独立路径,但建议与主库路径相同(如果磁盘布局一致)
  bin_dir: /usr/lib/postgresql/18/bin
  config_dir: /etc/postgresql/18/clusteredData
  pgpass: /var/lib/postgresql/18-clusteredData.pgpass

  authentication:
    replication:
      username: "replicator"
      password: "copyP@ssw0rd"
    superuser:
      username: "postgres"
      password: "maiyuan!2#"
    rewind:
      username: "rewind_user"
      password: "maiyuan!2#"

  parameters:
    unix_socket_directories: '/var/run/postgresql/'
    logging_collector: 'on'
    log_directory: '/var/log/postgresql'
    log_filename: 'postgresql-18-clusteredData.log'
    shared_buffers: '2GB' # 这里根据机器实际情况设置
    effective_cache_size: '10GB' # 这里根据机器实际情况设置
配置cron
这里我们执行以下命令进行配置
shell
export EDITOR=vim
patronictl -c /etc/patroni/config.yml edit-config 18-clusteredData
修改配置文件内容如下
context
check_timeline: true
loop_wait: 10
maximum_lag_on_failover: 1048576
postgresql:
  parameters:
    cron.database_name: fsmgw #cron作用的表
    cron.use_background_workers: 'on' #开启后台线程执行
    max_replication_slots: 10
    max_wal_senders: 10
    password_encryption: scram-sha-256
    shared_preload_libraries: pg_cron
    wal_keep_size: 1GB
  pg_hba:
  - local   all             all                               peer
  - host    all             all             127.0.0.1/32      scram-sha-256
  - host    all             all             ::1/128           scram-sha-256
  - host    replication     replicator      192.168.1.0/24    scram-sha-256
  - host    all             all             192.168.1.0/24    scram-sha-256
  recovery_conf:
    standby_mode: 'on'
  remove_data_directory_on_diverged_timelines: true
  remove_data_directory_on_rewind_failure: true
  use_pg_rewind: true
  use_slots: true
retry_timeout: 10
ttl: 30
在主库机器上执行以下语句创建插件
sql
sudo -u postgres psql -h 127.0.0.1 -p 5433 -d fsmgw -c "CREATE EXTENSION pg_cron;"验证是否配置成功,在集群中的任意一个机器上执行以下sql
sql
SELECT datname FROM pg_database
WHERE datname = (
    SELECT setting FROM pg_settings
    WHERE name = 'cron.database_name'
);
服务相关命令
启动服务
shell
systemctl start patroni检查服务状态
shell
journalctl -u patroni -f查看集群状态
shell
patronictl -c /etc/patroni/config.yml list强制指定leader
shell
sudo patronictl -c /etc/patroni/config.yml failover --candidate fsmgw-clustered-1-6 --force补充知识:
集群里的每个集群上patroni都有自己的配置文件在:/etc/patroni/config.yml路径下。
vi /etc/patroni/config.yml 和patronictl -c /etc/patroni/config.yml edit-config看到的内容是不同的,因为前者查看的是 Patroni 进程本身启动时读取的本地静态配置文件 ;后者查看或修改的是存储在 DCS (Distributed Configuration Store,分布式配置存储) 中的集群动态配置 。本地静态配置文件的优先级要比分布式集群中存储的配置文件优先级高 (本地配置>集群配置)
HAproxy安装
为了稳定可以配置多个HAProxy实现高可用,防止一台机器上的HAProxy服务挂了数据库直接访问不了的尴尬场景,这里我们在主库(1.6)和备库(1.89)上都安装一个HAproxy
在主库和备库上都按照以下步骤执行,配置文件不需要改动。
安装
执行以下命令进行安装
shell
sudo apt install -y haproxy配置
shell
sudo vi /etc/haproxy/haproxy.cfg按照以下格式进行配置
context
global
        log /dev/log    local0
        log /dev/log    local1 notice
        chroot /var/lib/haproxy
        stats socket /run/haproxy/admin.sock mode 660 level admin
        stats timeout 30s
        user haproxy
        group haproxy
        daemon

        # Default SSL material locations
        ca-base /etc/ssl/certs
        crt-base /etc/ssl/private

        # See: https://ssl-config.mozilla.org/#server=haproxy&server-version=2.0.3&config=intermediate
        ssl-default-bind-ciphers ECDHE-ECDSA-AES128-GCM-SHA256:ECDHE-RSA-AES128-GCM-SHA256:ECDHE-ECDSA-AES256-GCM-SHA384:ECDHE-RSA-AES256-GCM-SHA384:ECDHE-ECDSA-CHACHA20-POLY1305:ECDHE-RSA-CHACHA20-POLY1305:DHE-RSA-AES128-GCM-SHA256:DHE-RSA-AES256-GCM-SHA384
        ssl-default-bind-ciphersuites TLS_AES_128_GCM_SHA256:TLS_AES_256_GCM_SHA384:TLS_CHACHA20_POLY1305_SHA256
        ssl-default-bind-options ssl-min-ver TLSv1.2 no-tls-tickets

defaults
        log global
        mode tcp                # 使用 TCP 模式,这是 PostgreSQL 协议所必需的
        option tcplog
        retries 3
        timeout connect 10s
        timeout client 1m
        timeout server 1m
        # 确保长连接不会因空闲而被断开
        timeout client 1h
        timeout server 1h
        #errorfile 400 /etc/haproxy/errors/400.http
        #errorfile 403 /etc/haproxy/errors/403.http
        #errorfile 408 /etc/haproxy/errors/408.http
        #errorfile 500 /etc/haproxy/errors/500.http
        #errorfile 502 /etc/haproxy/errors/502.http
        #errorfile 503 /etc/haproxy/errors/503.http
        #errorfile 504 /etc/haproxy/errors/504.http


# 用于管理界面的后端配置
frontend stats
        mode http
        bind *:7000
        stats enable
        stats uri /stats
        stats refresh 10s
        stats admin if LOCALHOST

# ---------------------------------------------------------------------
# 1.pgsql 读写端口:只路由到主库
# ---------------------------------------------------------------------
listen postgres_primary
    bind *:5431
    mode tcp
    option httpchk
    http-check send meth GET uri /primary ver HTTP/1.0
    http-check expect status 200
    default-server inter 5s fall 2 rise 3 on-marked-down shutdown-sessions
    server pg-node1 192.168.1.6:6432 check port 8008
    server pg-node2 192.168.1.89:6432 check port 8008

# ---------------------------------------------------------------------
# 2.pgsql 只读端口:路由到所有健康副本 (Replicas)
# ---------------------------------------------------------------------
listen postgres_replica
    bind *:5430
    mode tcp
    balance roundrobin
    option httpchk
    http-check send meth GET uri /replica ver HTTP/1.0
    http-check expect status 200
    default-server inter 5s fall 2 rise 3 on-marked-down shutdown-sessions
    server pg-node1 192.168.1.6:6432 check port 8008
    server pg-node2 192.168.1.89:6432 check port 8008

# ---------------------------------------------------------------------
# RabbitMQ 负载均衡核心配置
# ---------------------------------------------------------------------
# RabbitMQ MQTT 代理配置
listen rabbitmq_mqtt
    bind *:1880                # 1. 监听 MQTT 默认端口
    mode tcp                   # 2. 使用四层代理模式
    balance roundrobin         # 3. 采用轮询负载均衡算法
    # 4. 后端服务器列表,配置你的RabbitMQ节点
    server rabbit-node-1 192.168.1.6:1883 check inter 5000 rise 2 fall 3
    server rabbit-node-2 192.168.1.89:1883 check inter 5000 rise 2 fall 3
    server rabbit-node-3 192.168.1.83:1883 check inter 5000 rise 2 fall 3
服务相关命令
启动服务
shell
systemctl start haproxy验证是否监听相关端口
shell
sudo netstat -tulpn | grep 5431刷新配置文件
shell
sudo systemctl reload haproxy验证是否正常运行,可前往以下页面查看集群状态
http://192.168.1.100:7000/stats
keepalived安装
它是为了保障Haproxy高可用的,所以在安装了haproxy的机器上都要安装一个keepalived.
这里我们在主库(1.6)和备库(1.89)上都安装一个。
安装
执行以下命令进行安装
shell
sudo apt install keepalived配置
创建健康检查脚本
shell
vi /etc/keepalived/check_haproxy.sh将以下内容复制到检查脚本中
context
#!/bin/bash
if pgrep haproxy > /dev/null; then
    exit 0
fi
# 尝试重启
systemctl start haproxy
sleep 2
if pgrep haproxy > /dev/null; then
    exit 0
else
    # 重启失败,停止 keepalived 释放 VIP
    systemctl stop keepalived
    exit 1
fi
授予脚本执行权限
shell
chmod +x /etc/keepalived/check_haproxy.sh主服务器配置(1.6)
创建配置文件
shell
vim /etc/keepalived/keepalived.conf将以下内容复制到配置文件中
注意以下配置文件中'eno1'为网卡名称,需要改为自己机器上的网卡名称
context
global_defs {
    router_id RABBIT1
    script_user root
    enable_script_security
}

vrrp_script chk_haproxy {
    script "/usr/bin/killall -0 haproxy"
    interval 2
    weight 2
    fall 2
    rise 2
}

vrrp_instance VI_1 {
    state MASTER
    interface eno1
    virtual_router_id 51
    priority 100
    advert_int 1
    authentication {
        auth_type PASS
        auth_pass 1111
    }
    virtual_ipaddress {
        192.168.1.100/24
    }
    track_script {
        chk_haproxy
    }
}
从服务器配置(1.89)
都需要创建配置文件和健康检查脚本,以及给健康检查脚本进行授权。这里不多赘述,不同的地方只有keepalived.conf文件的内容,因此下面只展示keepalived.conf文件内容
context
global_defs {
    router_id RABBIT2
    script_user root
    enable_script_security
}

vrrp_script chk_haproxy {
    script "/etc/keepalived/check_haproxy.sh"
    interval 2
    fall 2
    rise 2
}

vrrp_instance VI_1 {
    state BACKUP
    interface ens160
    virtual_router_id 51
    priority 90
    advert_int 1
    authentication {
        auth_type PASS
        auth_pass maiyuan!2#
    }
    virtual_ipaddress {
        192.168.1.100/24 dev ens160
    }
    track_script {
        chk_haproxy
    }
}
服务相关命令
启动服务
shell
systemctl start keepalived设置开机自启
shell
systemctl enable keepalived查看服务状态
shell
systemctl status keepalived验证 VIP 是否已绑定
shell
ip addr show eno1 | grep 192.168.1.100当配置完成之后就可以通过我们指定的ip(192.168.1.100)去访问mq和pgsql的服务了