前言
在千人千面无人考评任务中,遇到一个验电器考核,其任务是识别验电器并判断其有没有拉伸开,此时博主的第一个念头便是通过目标检测的方式识别验电器,随后计算检测框的长度来进行识别,然而,在使用目标检测的方式时,发现检测效果极差。。。。
目标检测效果拉跨
标注效果如下:
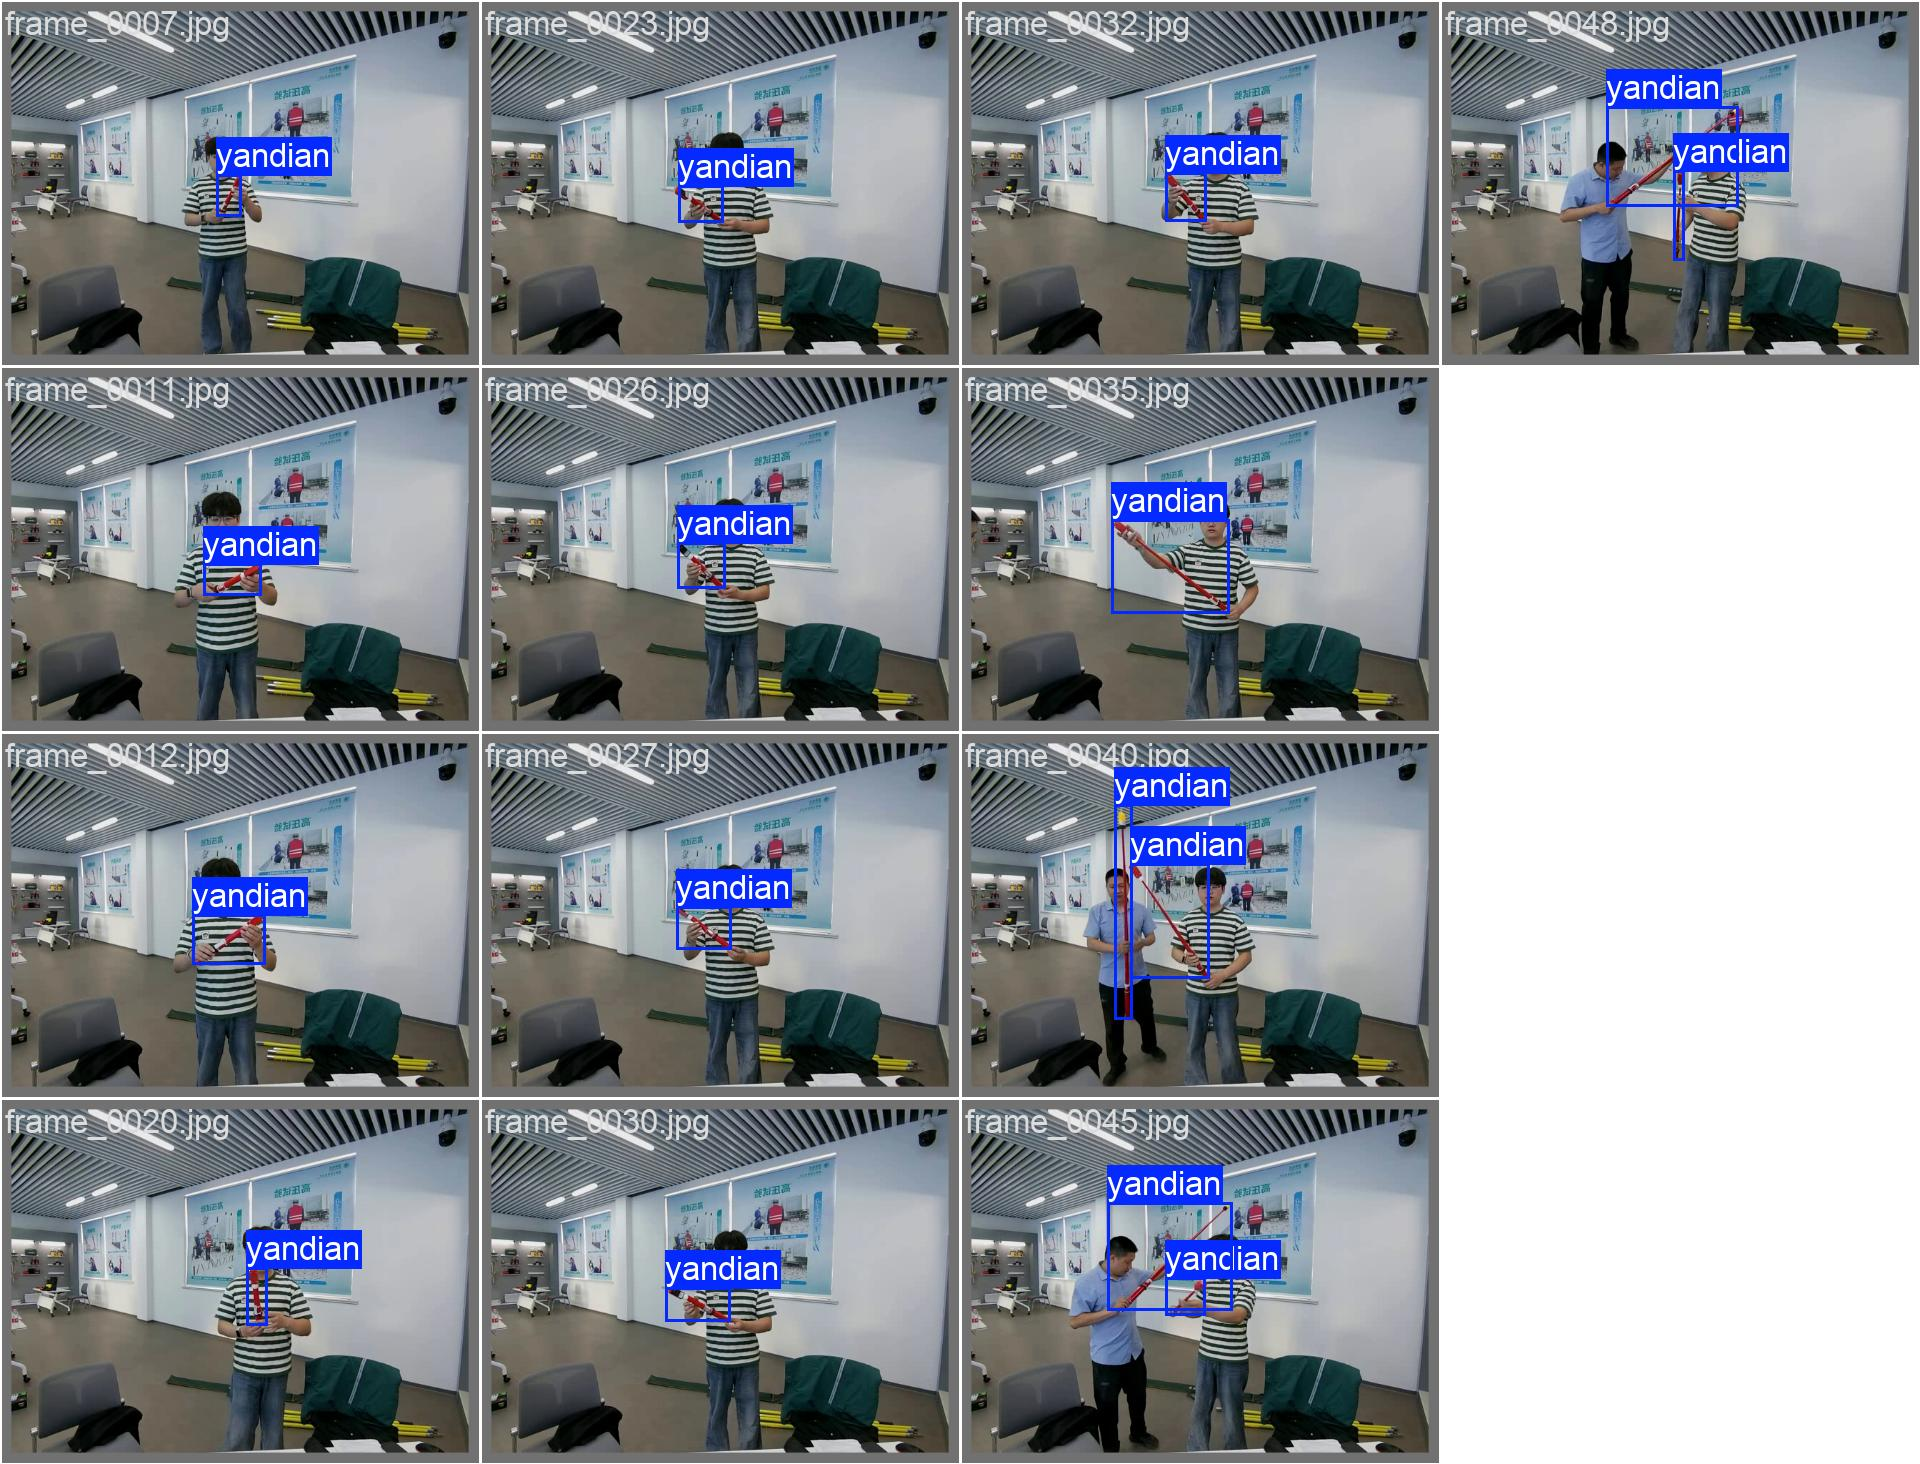
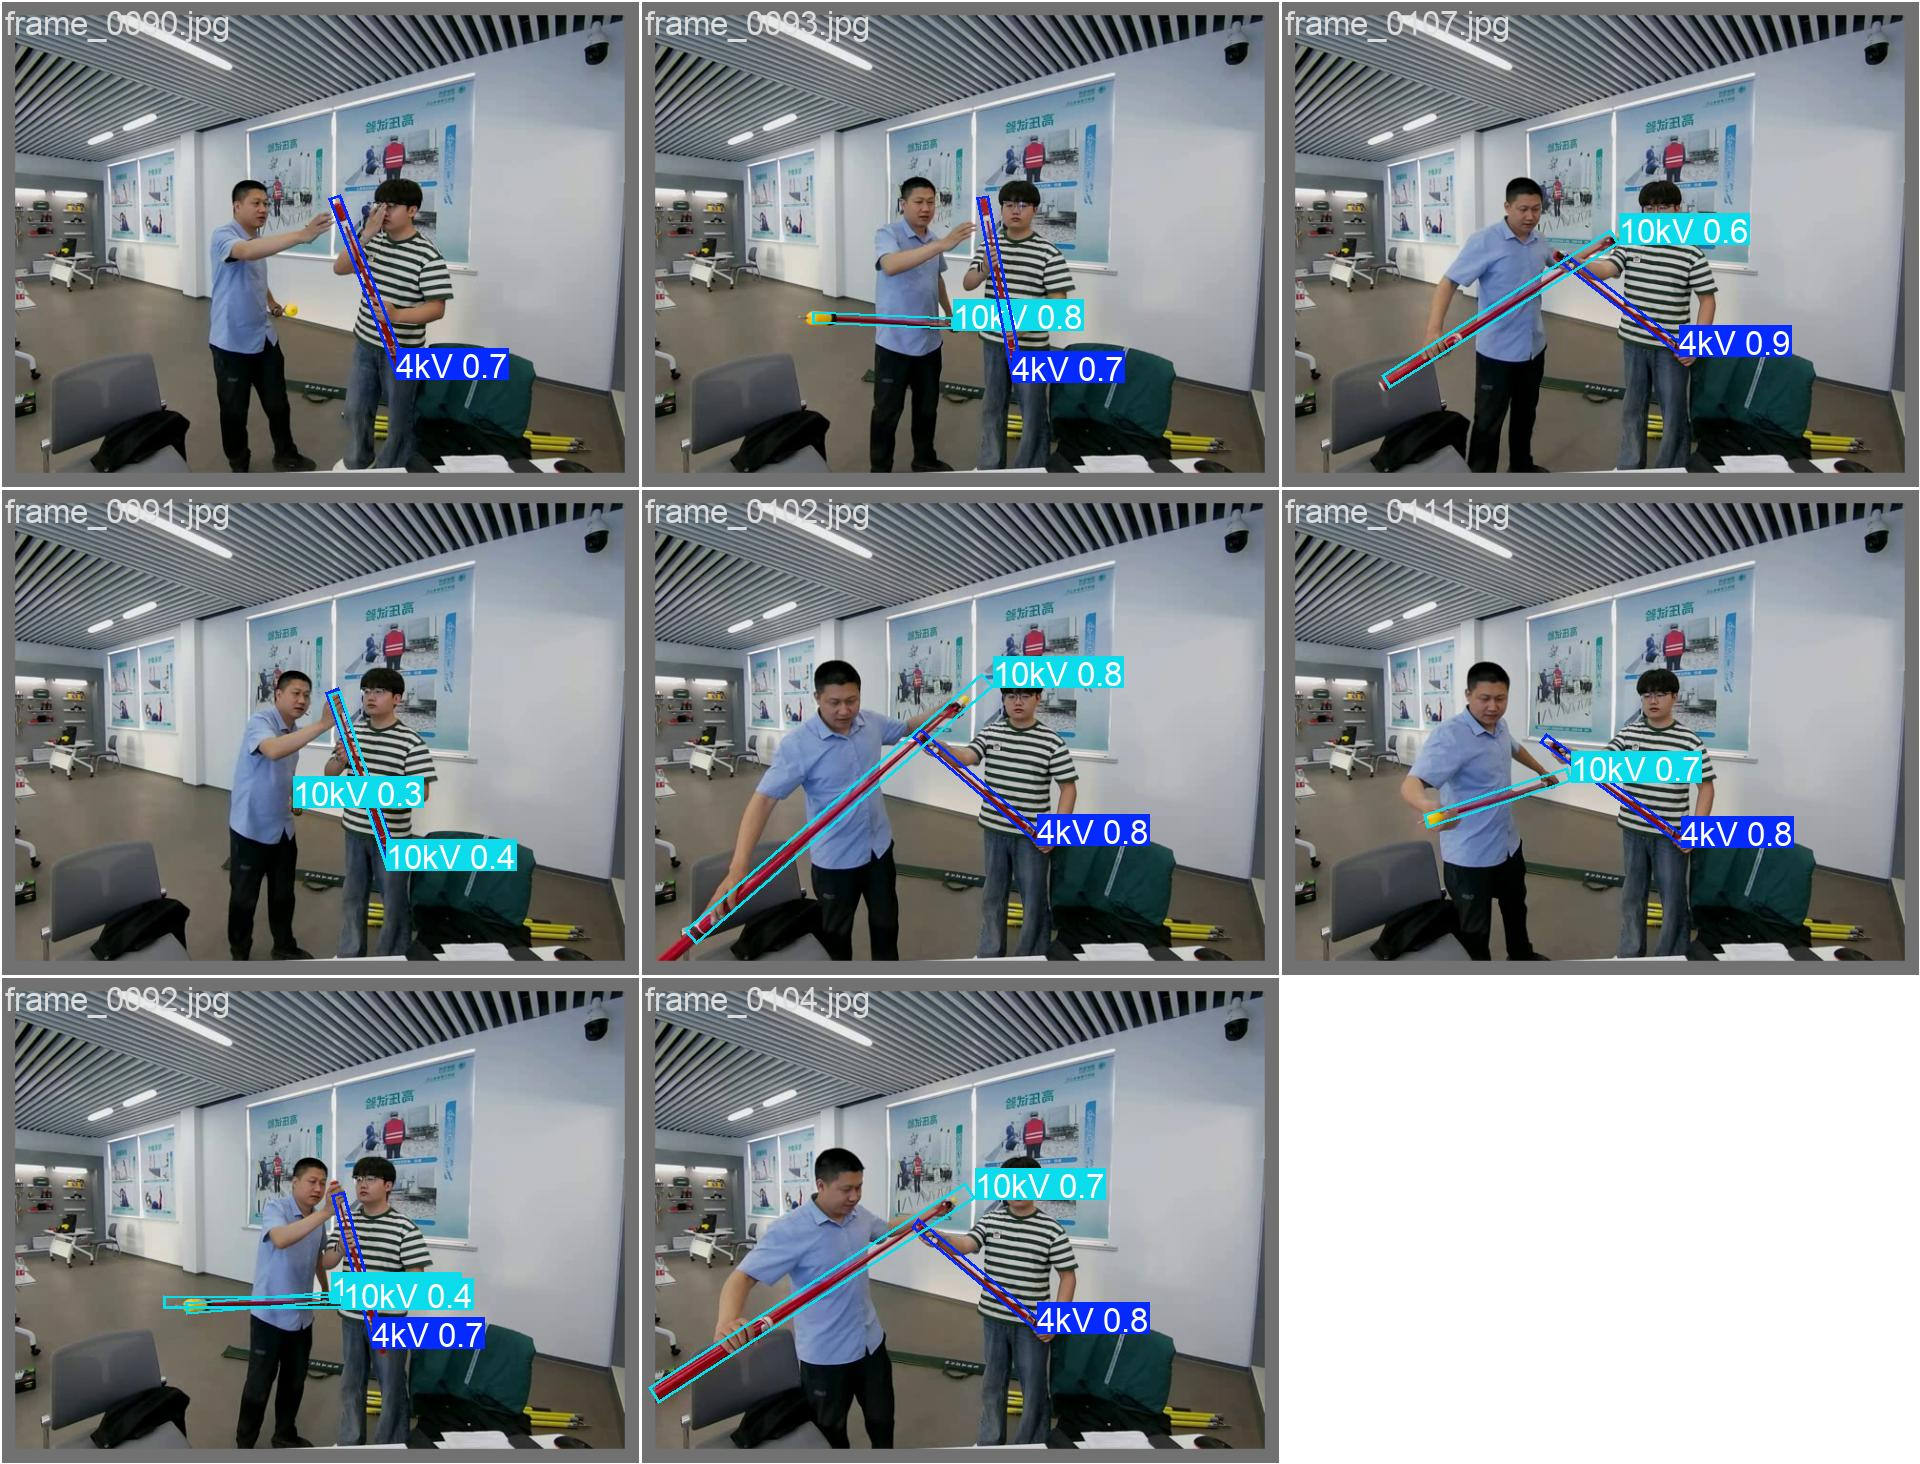
检测效果如下:
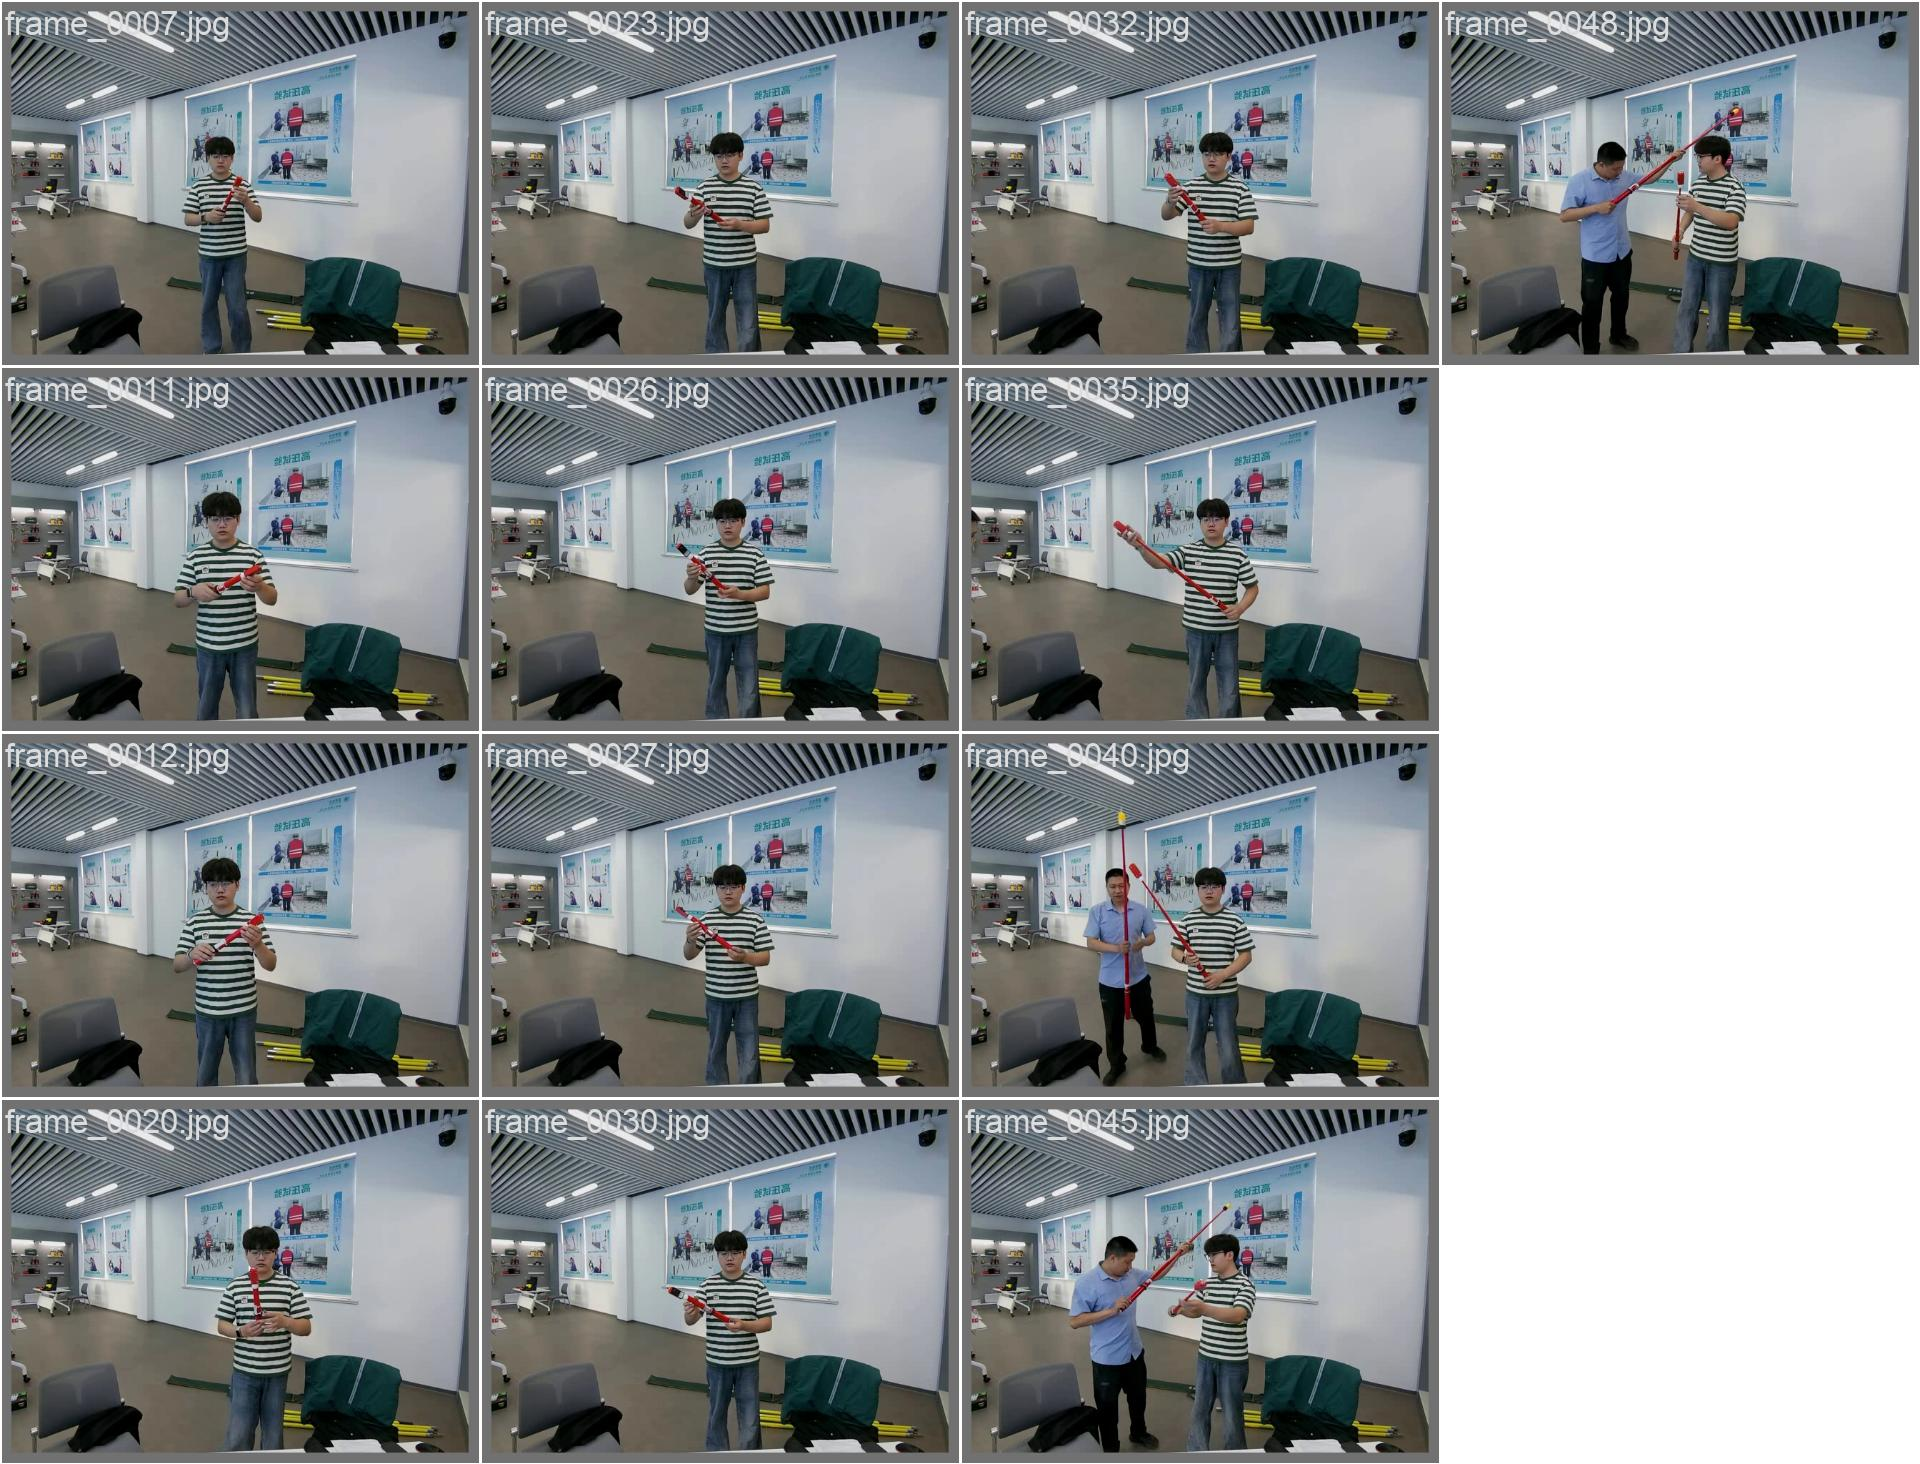
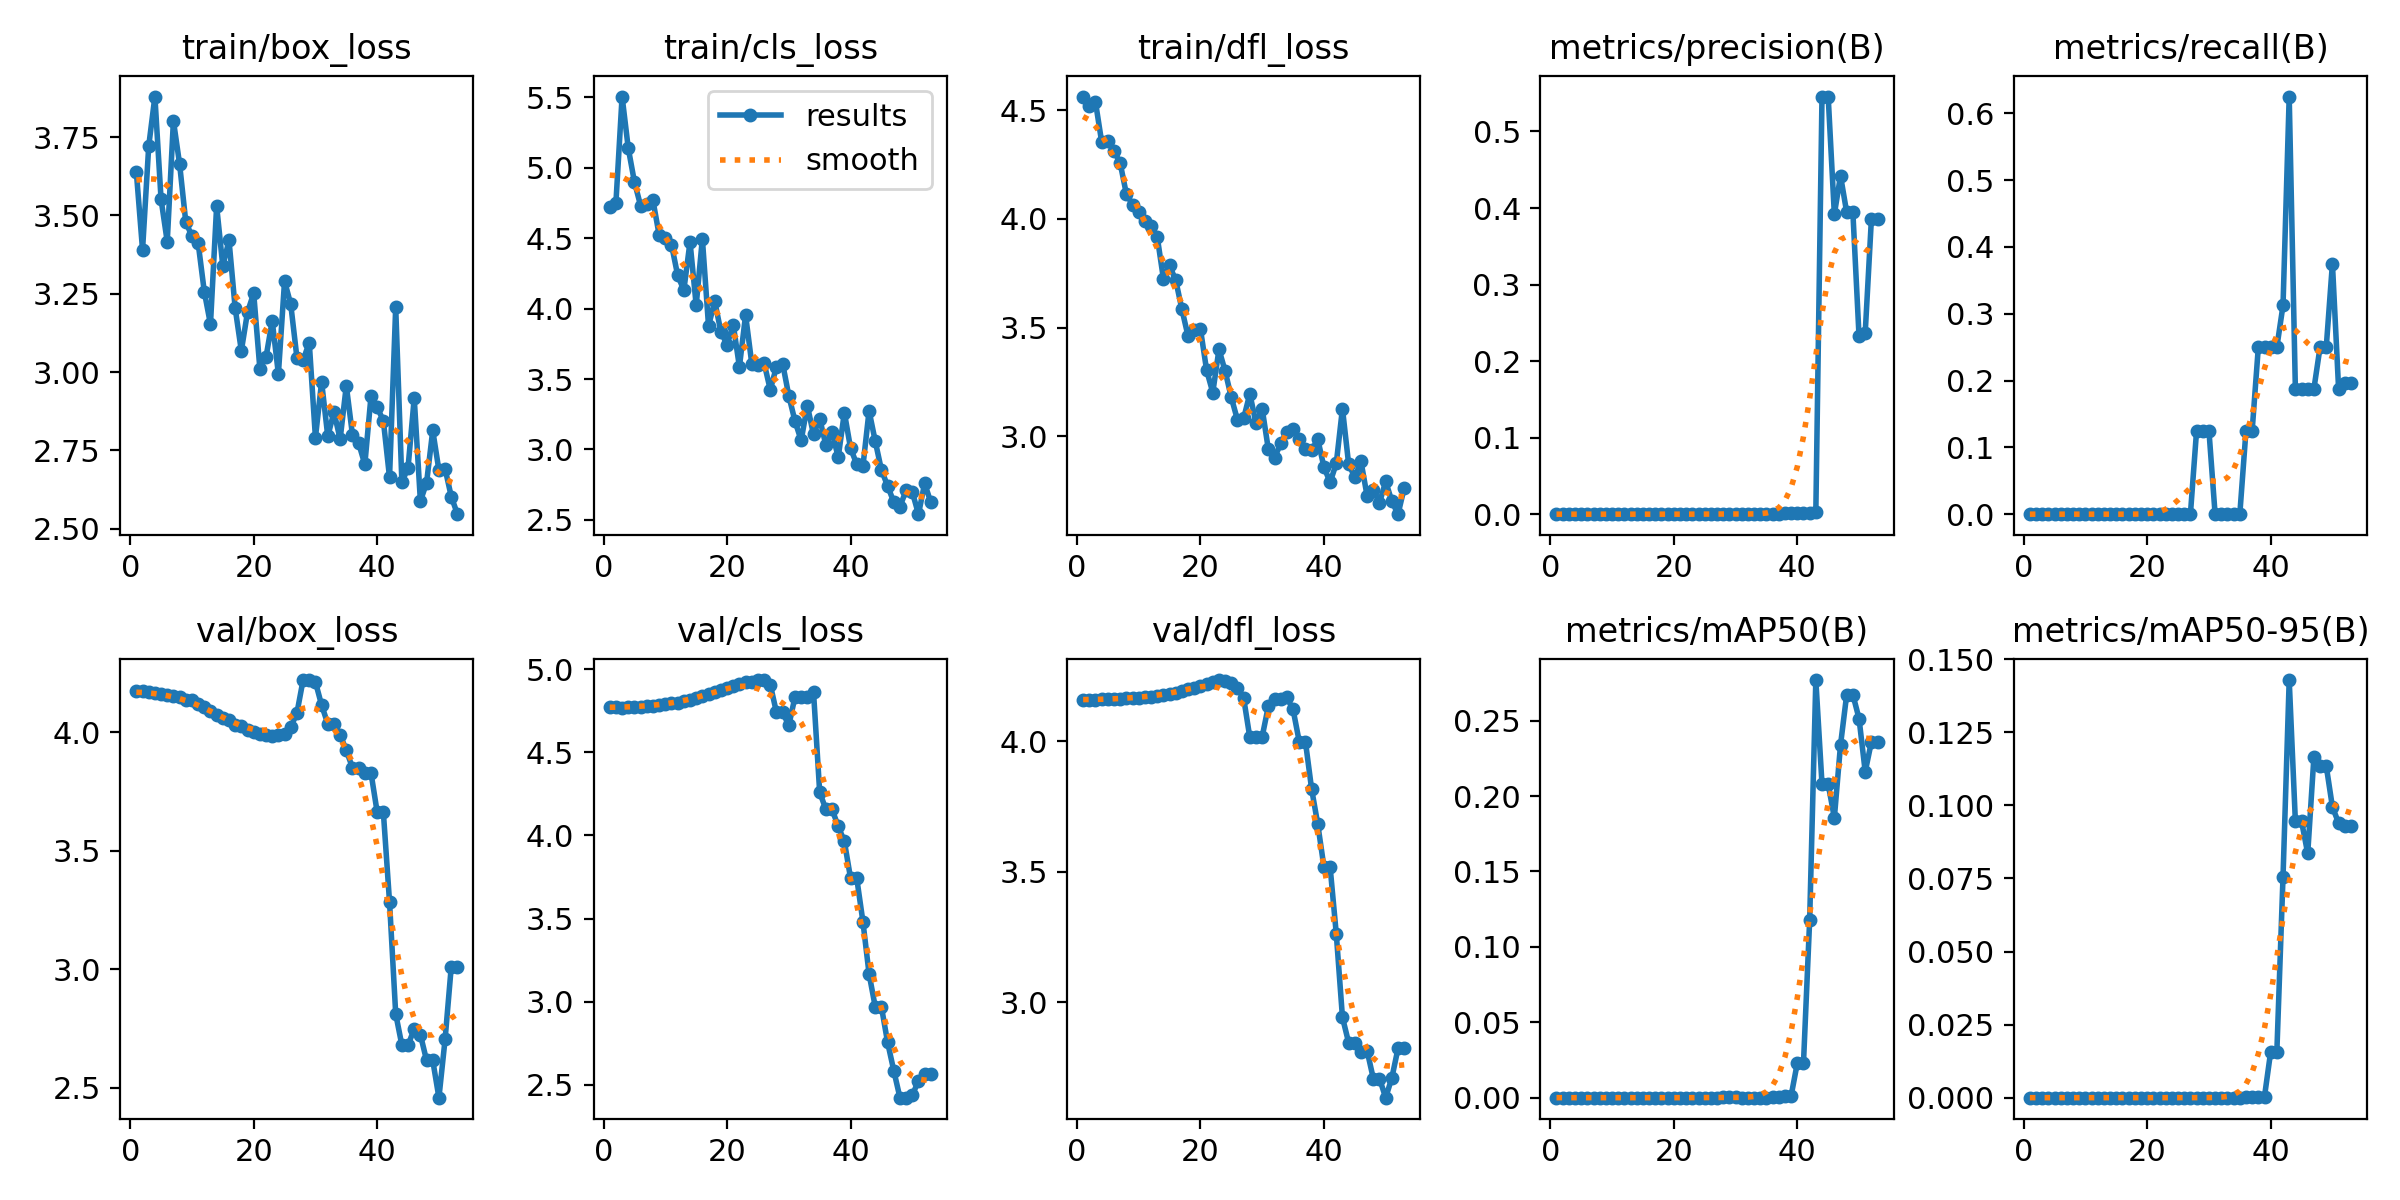
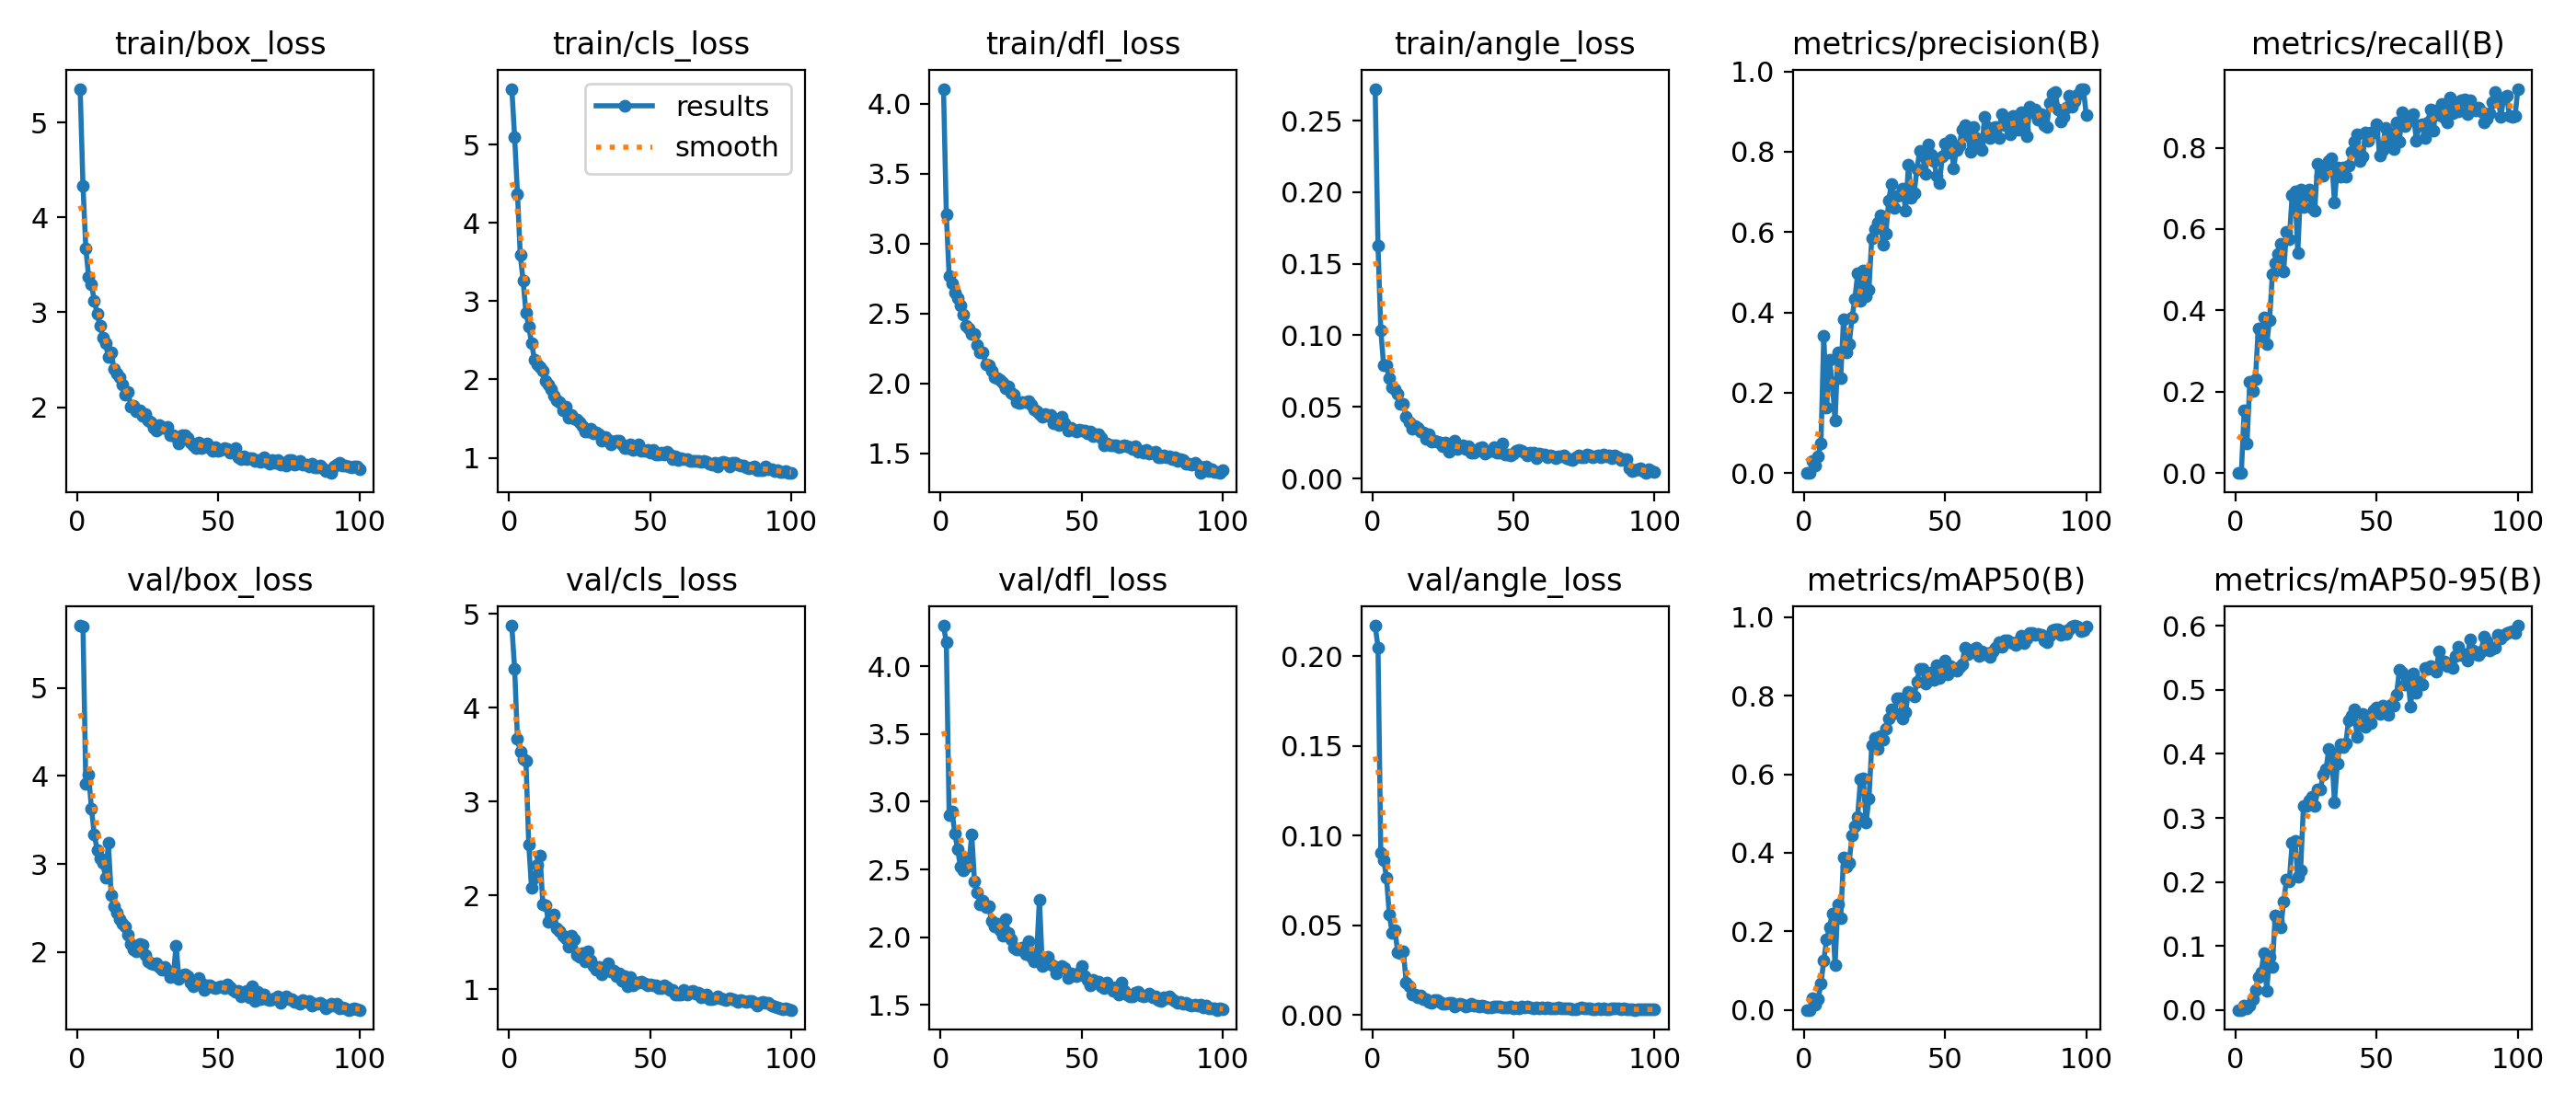
训练结果分析表明,模型的收敛过程极不稳定。究其根源,在于验电器本身属于细长型目标,当其处于倾斜状态时,常规的矩形标注框会不可避免地引入大量冗余的背景噪声。这种无效信息的混入,严重干扰了模型的特征提取,进而制约了拟合效果。
旋转目标检测
遇到这个问题后,博主果断放弃了目标检测的方式,转而采用旋转目标检测(obb)的方式,效果较为满意
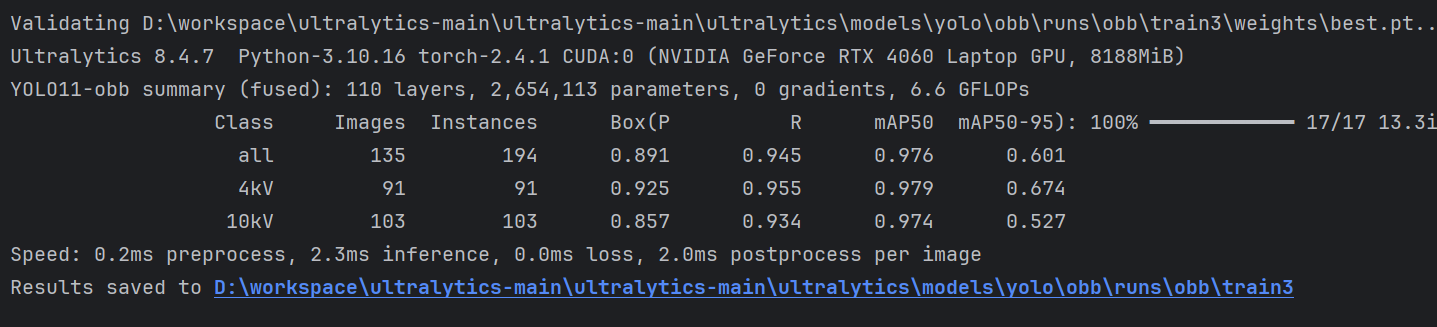
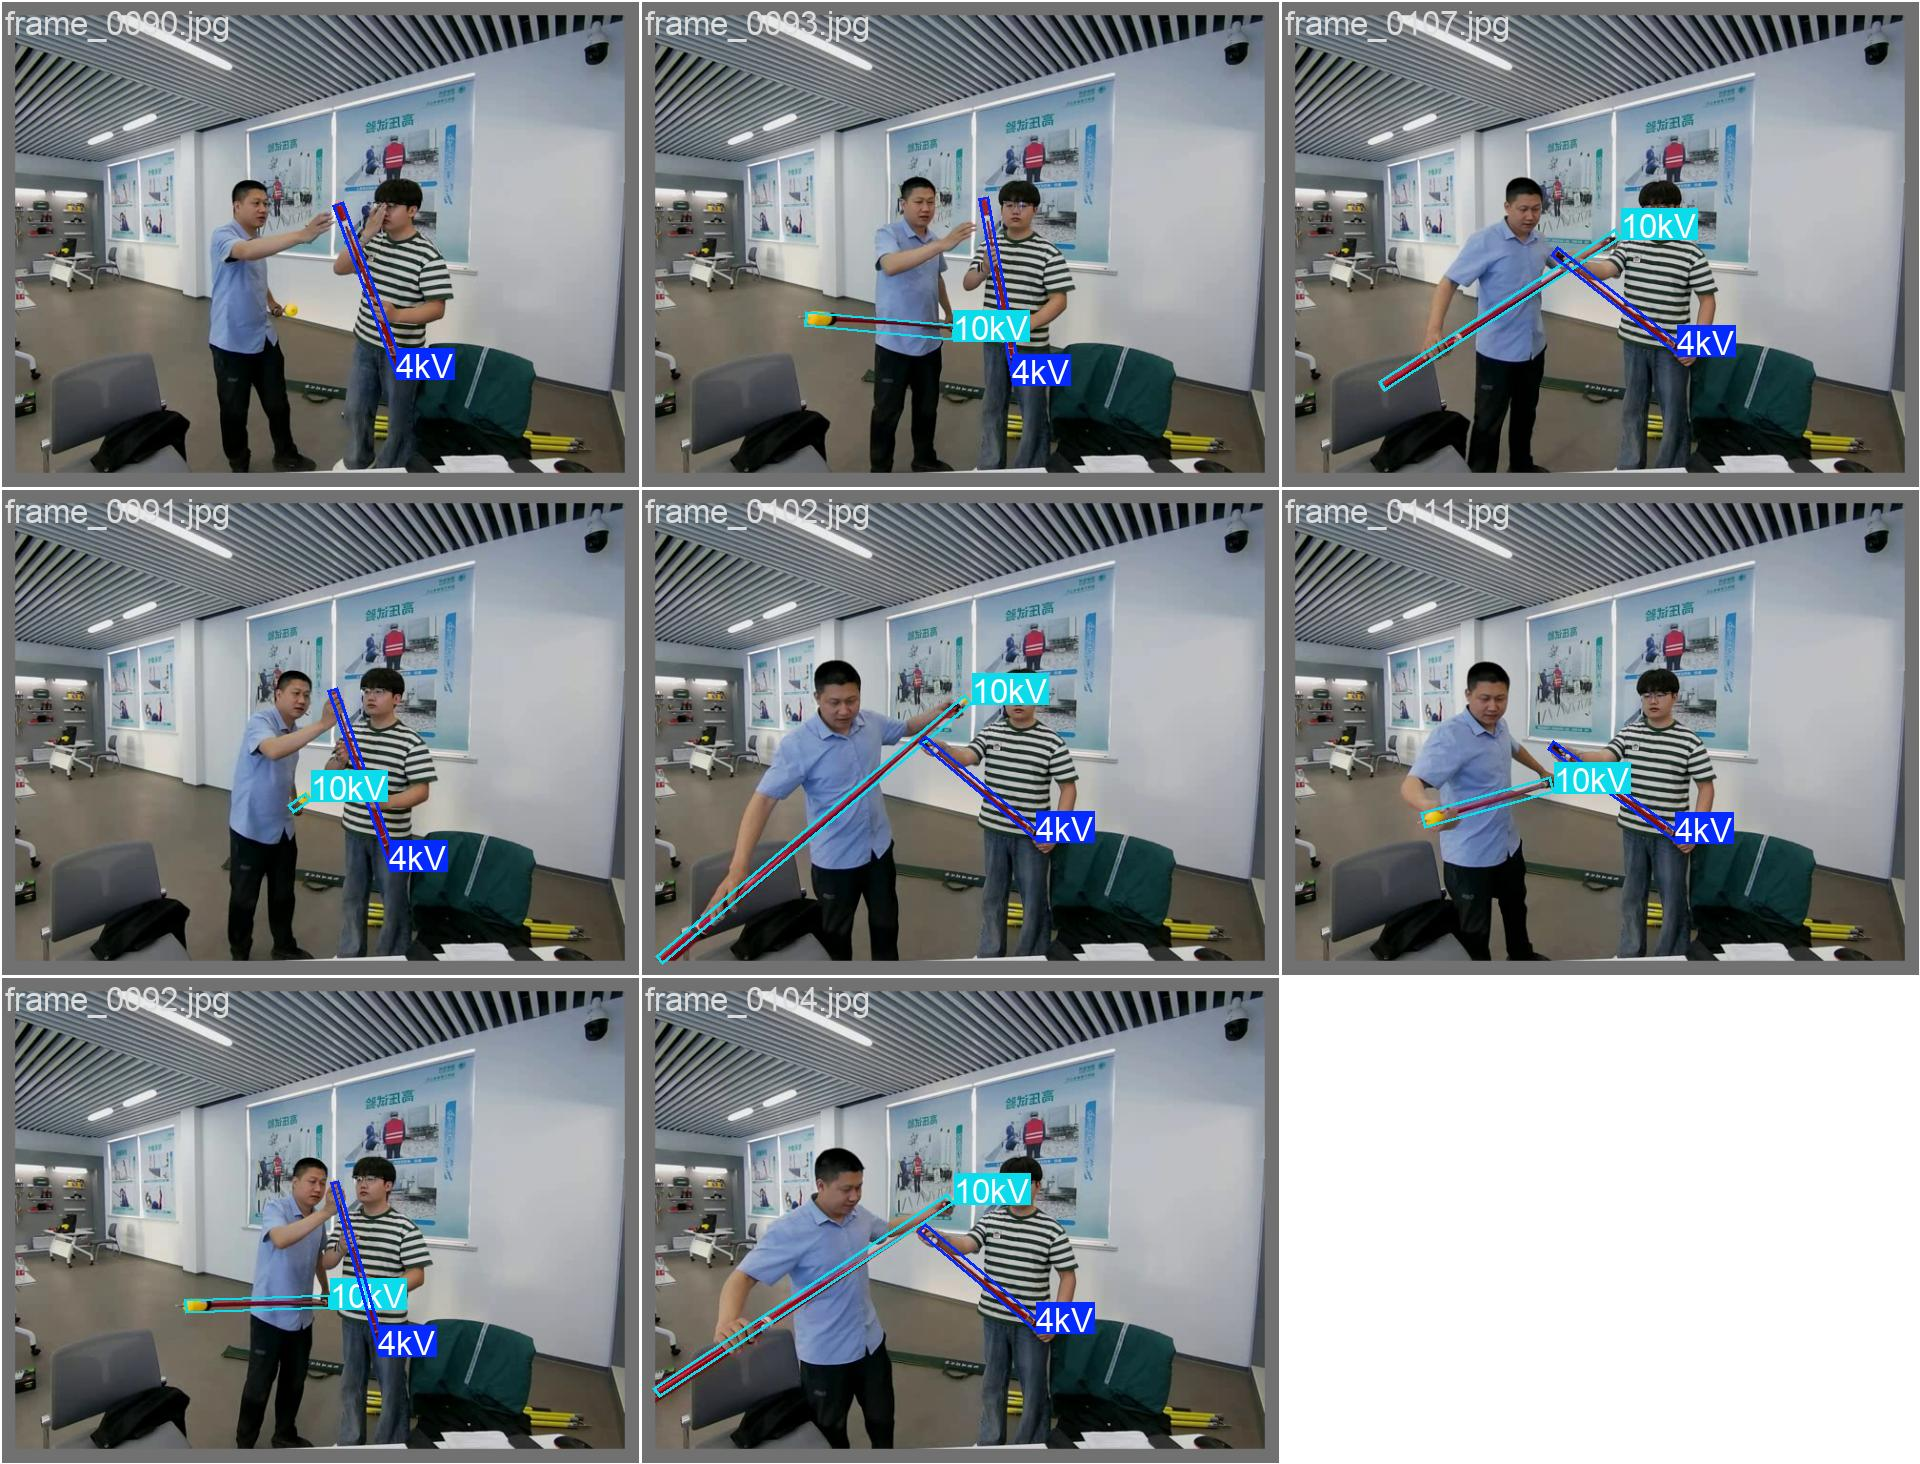
如下图所示,旋转目标检测方式能够较好的识别到验电器
从训练日志来看,模型的拟合效果很好。
模型部署
由于博主需要将模型深度集成到软件中,并最终打包为独立的 EXE 可执行文件进行分发,原生的 PyTorch(.pt)格式显然无法满足这一工程化落地的需求。具体原因如下:
| 对比维度 | 原生 PyTorch (.pt) | ONNX Runtime (.onnx) |
|---|---|---|
| 环境依赖与体积 | 极其臃肿。打包需携带完整的 PyTorch 库及各类依赖,导致 EXE 体积庞大(动辄数 GB),分发困难。 | 轻量级 。仅需携带 onnxruntime 库,依赖极少,能极大压缩 EXE 体积,便于分发和部署。 |
| 部署兼容性 | 较差。极易受目标机器 Python 版本、CUDA 驱动及 C++ 运行库的影响,常出现"在我电脑上能跑,在别人那报错"的情况。 | 极佳。作为通用的中间表示格式,跨平台、跨环境兼容性极强,在各类 Windows 环境下表现极其稳定。 |
| 推理性能上限 | 受限。默认使用 PyTorch 原生后端,虽然支持 GPU,但难以直接调用 TensorRT 等硬件专属的深度优化引擎。 | 极高。完美支持 TensorRT、OpenVINO 等高性能推理后端,能充分榨干显卡(如 RTX 3060)的算力。 |
| 显存资源管理 | 较粗糙。在多线程并发推理时,显存管理机制相对僵化,容易引发显存溢出(OOM)导致程序崩溃。 | 精细化。具备先进的显存复用与优化机制,在多线程高并发场景下显存占用更低、运行更稳健。 |
因为我们首先需要对当前的pt文件进行格式转换,导出格式为onnx
python
from ultralytics import YOLO
# 加载模型,路径为 YOLO 模型的 .pt 文件
model = YOLO(r"\runs\obb\train3\weights\best.pt")
# 导出模型,设置多种参数
model.export(
    imgsz=640,
    format="onnx",
    simplify=True, dynamic=True, half=False,
    opset=18,
    nms=False,
)随后我们需要编写onnx旋转检测的代码:
模型初始化
python
class YOLORotatedDetector:
    def __init__(self, model_path, input_size=(640, 640), conf_threshold=0.4, iou_threshold=0.1,num_class=7):
        """
        初始化检测器
        :param model_path: TFLite 模型路径
        :param input_size: 输入图像尺寸 (height, width)
        :param conf_threshold: 置信度阈值
        :param iou_threshold: IOU 阈值
        """
        self.model_path = model_path
        self.input_size = input_size
        self.num_class=num_class
        self.conf_threshold = conf_threshold
        self.iou_threshold = iou_threshold
        self.initialize_model(self.model_path)

    def initialize_model(self, path):
        cuda_options = {
            'device_id': 0,
            'gpu_mem_limit': int(1 * 1024 * 1024 * 1024),  # 2GB 上限
            'arena_extend_strategy': 'kSameAsRequested',   # 严格按需分配
            'cudnn_conv_algo_search': 'DEFAULT'            # 【关键新增】禁用穷举搜索,使用默认算法
        }
        providers = [('CUDAExecutionProvider',cuda_options), 'CPUExecutionProvider']
        self.session = ort.InferenceSession(path, providers=providers )
        # 获取输入和输出信息
        self.get_input_details()
        self.get_output_details()
        self.pad_w=0
        self.pad_h=0
        self.ratio=0
        self.ratio_w=0
        self.ratio_h=0
        self.orig_img_height=640
        self.orig_img_width=640

    def get_input_details(self):
        model_inputs = self.session.get_inputs()
        self.input_names = [model_inputs[i].name for i in range(len(model_inputs))]

        self.input_shape = model_inputs[0].shape
        self.input_height = 640 #self.input_shape[2]
        self.input_width = 640 #self.input_shape[3]

    # 获取输出信息
    def get_output_details(self):
        model_outputs = self.session.get_outputs()
self.output_names = [model_outputs[i].name for i in range(len(model_outputs))]def preprocess_image_from_array(self, image):
img_rgb = cv2.cvtColor(image, cv2.COLOR_BGR2RGB)
img_letter, self.ratio, (dw, dh) = letterbox(img_rgb, (self.input_height, self.input_width))
# 将宽高方向的填充和缩放分别保存,避免后续广播报错
self.pad_w = dw
self.pad_h = dh
self.ratio_w = self.ratio[0] if isinstance(self.ratio, tuple) else self.ratio
self.ratio_h = self.ratio[1] if isinstance(self.ratio, tuple) else self.ratio
img_norm = img_letter.astype(np.float32) / 255.0
input_tensor = np.expand_dims(img_norm.transpose(2, 0, 1), axis=0)
return input_tensor
def calculate_obb_corners(self, params):
"""
根据旋转角度计算旋转边界框的四个角点。
:param params: [x_center, y_center, width, height, angle]
:return: 四个角点坐标 (4, 2) numpy数组,浮点类型
"""
x_center, y_center, w, h, angle = params
cos_a = np.cos(angle)
sin_a = np.sin(angle)
dx = w / 2
dy = h / 2
corners = [
[x_center + dx * cos_a - dy * sin_a, y_center + dx * sin_a + dy * cos_a],
[x_center - dx * cos_a - dy * sin_a, y_center - dx * sin_a + dy * cos_a],
[x_center - dx * cos_a + dy * sin_a, y_center - dx * sin_a - dy * cos_a],
[x_center + dx * cos_a + dy * sin_a, y_center + dx * sin_a - dy * cos_a],
]
return np.array(corners, dtype=np.float32)
def xywha2poly(self, boxes):
"""
将多个 [x_center, y_center, width, height, angle] 转为多边形顶点
:param boxes: shape=(N, 5) 的数组,每一行为 [x, y, w, h, angle]
:return: polys: shape=(N, 4, 2)
"""
polys = []
for box in boxes:
poly = self.calculate_obb_corners(box)
polys.append(poly)
return np.array(polys, dtype=np.float32)
def rotated_nms(self, boxes, scores, class_ids):
"""多类别旋转框非极大值抑制 (Rotated NMS)"""
indices = []
unique_class_ids = set(class_ids)
for cls_id in unique_class_ids:
cls_mask = class_ids == cls_id
cls_boxes = boxes[cls_mask]
cls_scores = scores[cls_mask]
keep = []
order = np.argsort(cls_scores)[::-1] # 按置信度降序排序
while order.size > 0:
i = order[0]
keep.append(i)
ious = self.rotated_iou(cls_boxes[i], cls_boxes[order[1:]])
inds = np.where(ious <= self.iou_threshold)[0]
order = order[inds + 1]
indices.extend(np.where(cls_mask)[0][keep])
return indices
def rotated_iou(self, box1, boxes):
"""计算旋转框之间的 IOU"""
from shapely.geometry import Polygon
def box_to_polygon(box):
rect = ((box[0], box[1]), (box[2], box[3]), box[4])
points = cv2.boxPoints(rect)
return Polygon(points)
poly1 = box_to_polygon(box1)
polys = [box_to_polygon(box) for box in boxes]
ious = []
for poly in polys:
intersection = poly1.intersection(poly).area
union = poly1.union(poly).area
ious.append(intersection / union if union > 0 else 0)
return np.array(ious)
def postprocess_output(self, outputs):
"""后处理:解析输出并应用 NMS 及角度合并"""
predictions = np.transpose(outputs[0].squeeze()) # 去掉 batch 维度
boxes_xywh = predictions[:, :4] # [x, y, w, h]
boxes_angle = predictions[:,6:self.num_class] # [angle]
boxes = np.hstack((boxes_xywh, boxes_angle)) # 拼接成 [x, y, w, h, angle]
scores = np.max(predictions[:, 4:self.num_class-1], axis=1)
class_ids = np.argmax(predictions[:, 4:self.num_class-1], axis=1)
# 1. 过滤掉低于置信度阈值的预测
mask = scores > self.conf_threshold
boxes = boxes[mask]
scores = scores[mask]
class_ids = class_ids[mask]
if len(boxes) == 0:
return [], [], []
# 2. 先进行标准的旋转框 NMS,剔除高度重叠的冗余框
indices = self.rotated_nms(boxes, scores, class_ids)
nms_boxes = boxes[indices]
nms_scores = scores[indices]
nms_class_ids = class_ids[indices]
# 3. 再调用基于角度分组的拟合算法(将 NMS 后的干净数据传入)
final_boxes, final_scores, final_class_ids = self.group_and_fit_by_angle(
nms_boxes, nms_scores, nms_class_ids,
angle_threshold=5 # 这里保持你设定的 5 度阈值
)
if len(final_boxes) == 0:
return [], [], []
# 4. 将最终确定的 OBB 框转换为多边形顶点
polys = self.xywha2poly(final_boxes)
# 5. 坐标反解与边界校验 (LetterBox 反向映射)
polys[..., 0] -= self.pad_w # x 坐标减去宽度方向的黑边
polys[..., 1] -= self.pad_h # y 坐标减去高度方向的黑边
polys[..., 0] /= self.ratio_w
polys[..., 1] /= self.ratio_h
# 限制坐标在原始图像范围内,防止越界
polys[..., 0] = np.clip(polys[..., 0], 0, self.orig_img_width)
polys[..., 1] = np.clip(polys[..., 1], 0, self.orig_img_height)
return polys, final_scores, final_class_ids
def draw_detections(self, image, polys, scores, class_ids):
"""在图像上绘制旋转框检测结果"""
for i in range(len(polys)):
poly = polys[i].astype(np.int32) # 转换为整数类型
label = f"Class {class_ids[i]}: {scores[i]:.2f}"
color = (0, 255, 0) # 绿色框
# 绘制旋转框
cv2.polylines(image, [poly], isClosed=True, color=color, thickness=2)
# 绘制标签
label_pos = tuple(poly[0]) # 标签位置在第一个顶点附近
cv2.putText(image, label, (label_pos[0], label_pos[1] - 10),
cv2.FONT_HERSHEY_SIMPLEX, 0.5, color, 2)
return image
def run_inference(self, input_tensor):
result = self.session.run(self.output_names, {self.input_names[0]: input_tensor})
return result[0]
def detect(self, image):
"""
执行完整检测流程,接受 OpenCV 图像作为输入
:param image: OpenCV 图像 (np.ndarray)
:return: (polys, scores, class_ids, estimated_distance, movement_dict) 或 None
"""
if image is None:
print("No image provided.")
return None
# 预处理图像
self.orig_img_height, self.orig_img_width = image.shape[:2]
input_tensor = self.preprocess_image_from_array(image)
# 运行推理
outputs = self.run_inference(input_tensor)
# 后处理:解析输出
polys, scores, class_ids = self.postprocess_output(outputs)
return polys, scores, class_ids
def calculate_iou(self, box1, box2):
"""
使用 OpenCV 的 rotatedRectangleIntersection 计算两个旋转框的 IOU
:param box1: 多边形顶点数组 (4, 2)
:param box2: 多边形顶点数组 (4, 2)
:return: IOU 值
"""
rect1 = cv2.minAreaRect(np.float32(box1))
rect2 = cv2.minAreaRect(np.float32(box2))
intersection, inter_area = cv2.rotatedRectangleIntersection(rect1, rect2)
if intersection == cv2.INTERSECT_NONE:
return 0.0
# 获取两个矩形的面积
area1 = cv2.contourArea(cv2.boxPoints(rect1))
area2 = cv2.contourArea(cv2.boxPoints(rect2))
# 计算并集
union_area = area1 + area2 - inter_area
iou = inter_area / union_area
return iou