前言
书接前文:
网关 Spring Cloud Gateway - API 调用的组织者
已经通过案例实现了通过 Spring Cloud Gateway 网关调用服务 API,并已经了解了 Gateway 网关的几个核心概念:routes ,predicates,filters 。
这几个核心概念串起来就是 Gateway 的执行流程:客户端发请求,通过断言 predicates 进行匹配,若匹配上了则请求就会被发送到网关处理程序,并执行特定的请求过滤器链 fliters 。
Spring Cloud Gateway 提供了多种断言 predicate 工厂和过滤器 filter 工厂,也可以自定义断言工厂和过滤器工厂。
本文将使用以下两种方式实现网关的限流:
- 使用 Spring Cloud Gateway 的
RequestRateLimiter过滤器工厂基于Redis的限流, - 使用 Sentinel 结合 Spring Cloud Gateway 来实现网关限流。
使用 RequestRateLimiter 过滤器工厂结合 Redis 实现网关限流
配套代码仓库:https://github.com/iweidujiang/spring-cloud-alibaba-lab ,对应模块
10-gateway-rate-limit/gateway-rate-limit-service。
RequestRateLimiter GatewayFilter 工厂使用实现 RateLimiter 的限流器来确定当前请求是否被限流。如果被限流了,则默认返回 HTTP 429 - Too Many Requests 状态。
RequestRateLimiter 网关过滤器工厂采用可选的 keyResolver 参数和特定于速率限制器的参数。
KeyResolver 在源码中的定义:
java
public interface KeyResolver {
	Mono<String> resolve(ServerWebExchange exchange);
}
我们可以通过 KeyResolver 来指定限流的 key ,比如可以根据用户做限流,也可以根据 IP 来做限流,或者根据接口进行限流。
基于 Redis 的限流器
目前限流器的实现提供了基于 Redis 的实现,其使用的算法是 令牌桶算法。
基于 Redis 的限流,需要引入 spring-boot-starter-data-redis-reactive 依赖:
xml
<dependency>
    <groupId>org.springframework.boot</groupId>
    <artifactId>spring-boot-starter-data-redis-reactive</artifactId>
</dependency>
要实现限流,需要配置 Redis 连接以及在配置网关路由的时候添加 RequestRateLimiter 过滤器:
yaml
spring:
  redis:
    host: ${REDIS_HOST:127.0.0.1}
    port: ${REDIS_PORT:6379}
    password: ${REDIS_PASSWORD:}
  cloud:
    gateway:
      routes:
      - id: order-service
        uri: lb://order-service
        predicates:
          - Path=/order/**
        filters:
        - name: RequestRateLimiter
          args:
            redis-rate-limiter.replenishRate: 10
            redis-rate-limiter.burstCapacity: 20
            key-resolver: "#{@userKeyResolver}"
这里配置的是按照用户限流,其中参数 key-resolver: "#{@userKeyResolver}" 是一个 KeyResolver Bean:
java
@Configuration
public class RateLimiterConfig {
    @Bean
    public KeyResolver userKeyResolver() {
        return exchange -> Mono.just(Objects.requireNonNull(exchange.getRequest().getQueryParams().getFirst("userId")));
    }
}
#{@userKeyResolver} 是一个引用名为 userKeyResolver 的 bean 的 SpEL 表达式 。
其他配置项的含义:
- filter 的名称 name 必须为 RequestRateLimiter 。
- redis-rate-limiter.replenishRate :允许用户每秒处理的请求数。设置的数值就代表 每秒向令牌桶添加多少个令牌 。
- redis-rate-limiter.burstCapacity :令牌桶的容量,即允许在 1 秒内完成的最大请求数。设置为 0 则表示拒绝所有请求。
下面开始测试,根据配置的路由,我们通过网关访问 http://localhost:8000/order/info/2 :
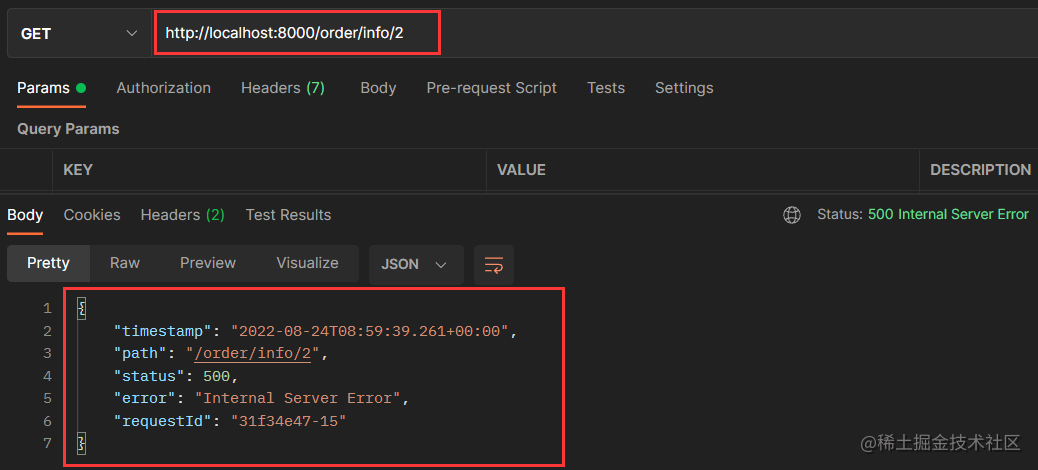
直接报错了,看一下异常信息:

根据 userKeyResolver 的配置,我们必须传入 userId 参数才能正常访问:
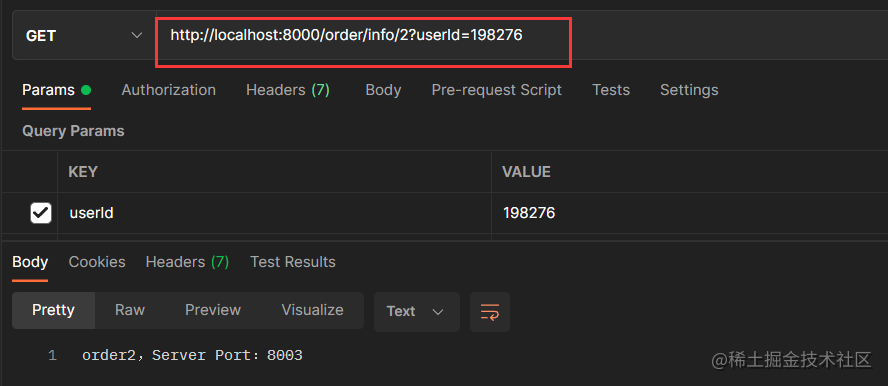
访问接口测试后, Redis 中会有对应的数据:
sh
127.0.0.1:6379> keys *
1) "request_rate_limiter.{198276}.tokens"
2) "request_rate_limiter.{198276}.timestamp"
127.0.0.1:6379>
大括号中的就是限流的 key ,这里是 userId ,就是我们访问接口时传入的参数值。Redis 的 key 中还有两个定义:
- tokens:代表当前秒对应的可用的令牌数量;
- timestamp:当前时间的秒数。
再来通过 JMeter 模拟一下同时有大量请求的情况,当请求数量超过令牌桶的容量的时候,将会限流。
1, 设置每秒有 100 个请求过来:

2, 设置通过网关请求的 url,注意要带上 userId 参数,这是根据用户限流的:

3, 执行,观察结果树:
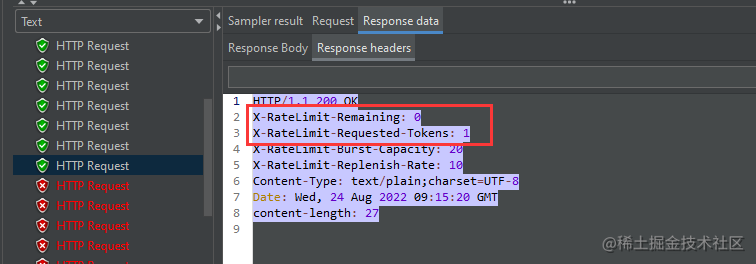
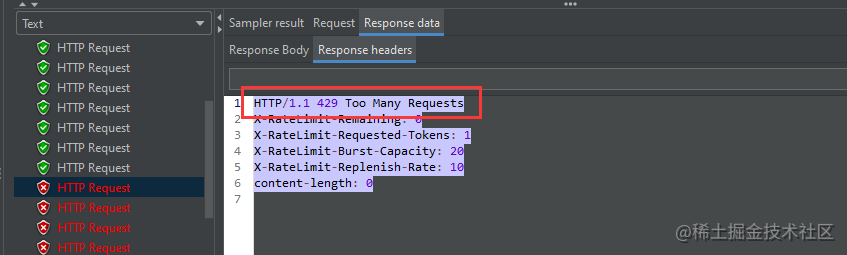
当令牌桶容量满了的时候,就不允许其他请求进来了,将返回 Too Many Requests ,限流生效。
Spring Cloud Gateway 结合 Sentinel 实现网关流量控制
Sentinel 1.6.0 引入了 Sentinel API Gateway Adapter Common 模块,此模块中包含网关限流的规则和自定义 API 的实体和管理逻辑:
GatewayFlowRule:网关限流规则,针对 API Gateway 的场景定制的限流规则,可以针对不同 route 或自定义的 API 分组 进行限流,支持针对请求中的参数、Header、来源 IP等进行定制化的限流。ApiDefinition:用户自定义的 API 定义分组,可以看做是一些 URL 匹配的组合 。比如我们可以定义一个 API 叫my_api,请求 path 模式为/foo/**和/baz/**的都归到my_api这个 API 分组下面。限流的时候可以针对这个自定义的 API 分组维度进行限流。
Spring Cloud Gateway 与 Sentinel 整合也很简单,我们还以 gateway-service 为例,当前该微服务的配置文件如下:
yaml
server:
  port: 8000
spring:
  application:
    name: gateway-service
  cloud:
    nacos:
      discovery:
        server-addr: ${NACOS_SERVER:127.0.0.1:8848}
    gateway:
      # 配置网关路由
      routes:
        - id: user-service
          uri: lb://user-service
          predicates:
            - Path=/user/**
          filters:
            - AddRequestHeader=X-Request-Home, China
        - id: order-service
          uri: lb://order-service
          predicates:
            - Path=/order/**
引入 Sentinel 以及和 Spring Cloud Gateway 整合的依赖,这里我们也把 Sentinel 数据源以及 Nacos 持久化的依赖也引进来:
xml
<!-- 服务容错 Sentinel -->
<dependency>
    <groupId>com.alibaba.cloud</groupId>
    <artifactId>spring-cloud-starter-alibaba-sentinel</artifactId>
</dependency>
<!-- Sentinel 数据源 -->
<dependency>
    <groupId>com.alibaba.cloud</groupId>
    <artifactId>spring-cloud-alibaba-sentinel-datasource</artifactId>
</dependency>
<!-- Sentinel 的 Nacos 数据源 -->
<dependency>
    <groupId>com.alibaba.csp</groupId>
    <artifactId>sentinel-datasource-nacos</artifactId>
</dependency>
<!-- Sentinel 整合 Spring Cloud Gateway -->
<dependency>
    <groupId>com.alibaba.cloud</groupId>
    <artifactId>spring-cloud-alibaba-sentinel-gateway</artifactId>
</dependency>
然后在将在配置文件中增加 sentinel.transport.dashboard 配置:
yaml
spring:
  cloud:
    sentinel:
      transport:
        dashboard: ${SENTINEL_DASHBOARD:localhost:8080}
这样可以在 Sentinel 控制面板上直观的看到网关流控配置。
启动 Sentinel Dashboard:
sh
java -Dserver.port=8080 ^
-Dcsp.sentinel.dashboard.server=localhost:8080 ^
-Dproject.name=sentinel-dashboard ^
-Dsentinel.dashboard.auth.username=sentinel ^
-Dsentinel.dashboard.auth.password=123456 ^
-jar D:\java\sentinel-dashboard-1.8.3.jar
Tip: 如果在 Linux 环境下启动,则将换行符
^替换为\。
通过网关访问一下 user-service 的 API,然后在 Sentinel Dashboard 上就能看到网管服务了,如下图所示:
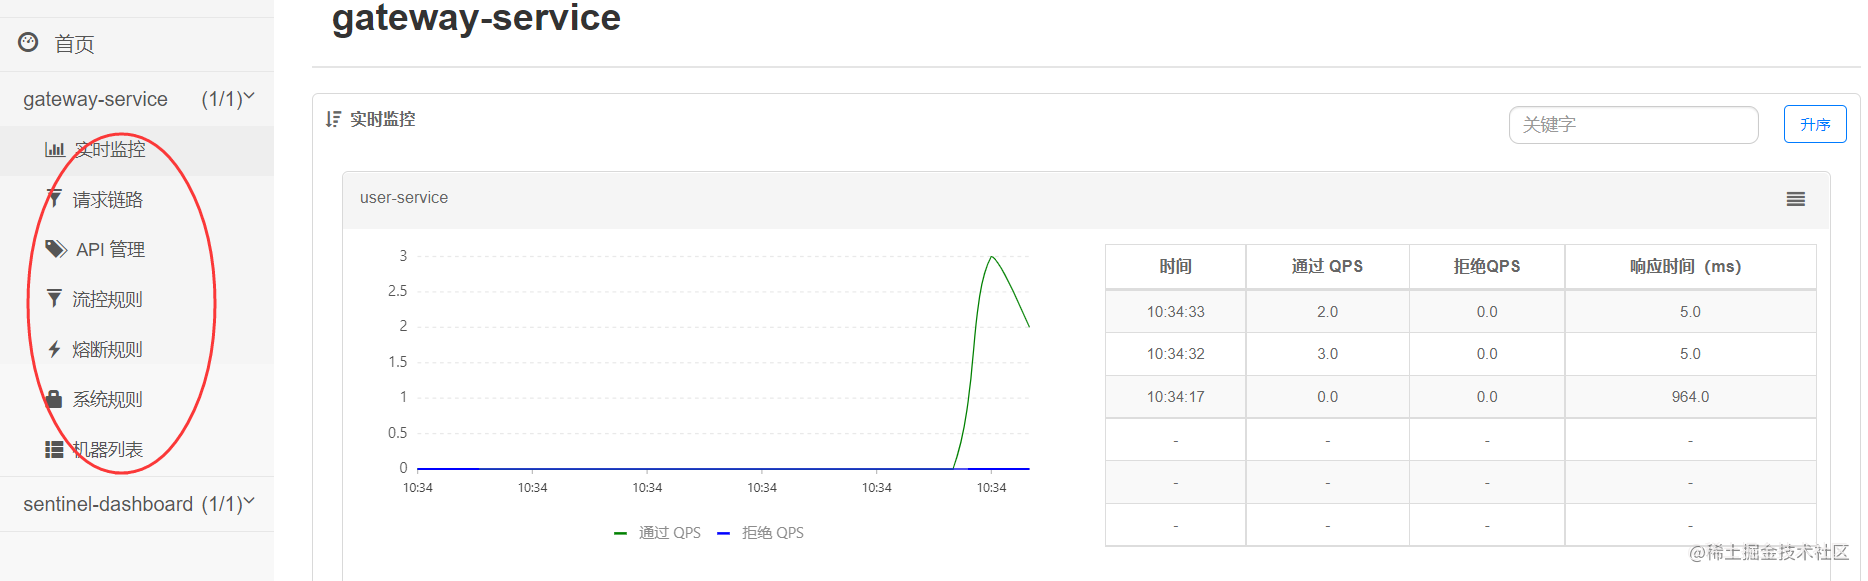
可以看到,网关服务在 Sentinel Dashboard 上的功能有些不一样,多了个 API 管理 。在 请求链路 上可以看到网关中定义的 routes :

Sentinel 的限流规则,比如热点参数、流控、熔断等都可以在 Sentinel Dashboard 上配置,网关流控规则同样也能在面板上配置:
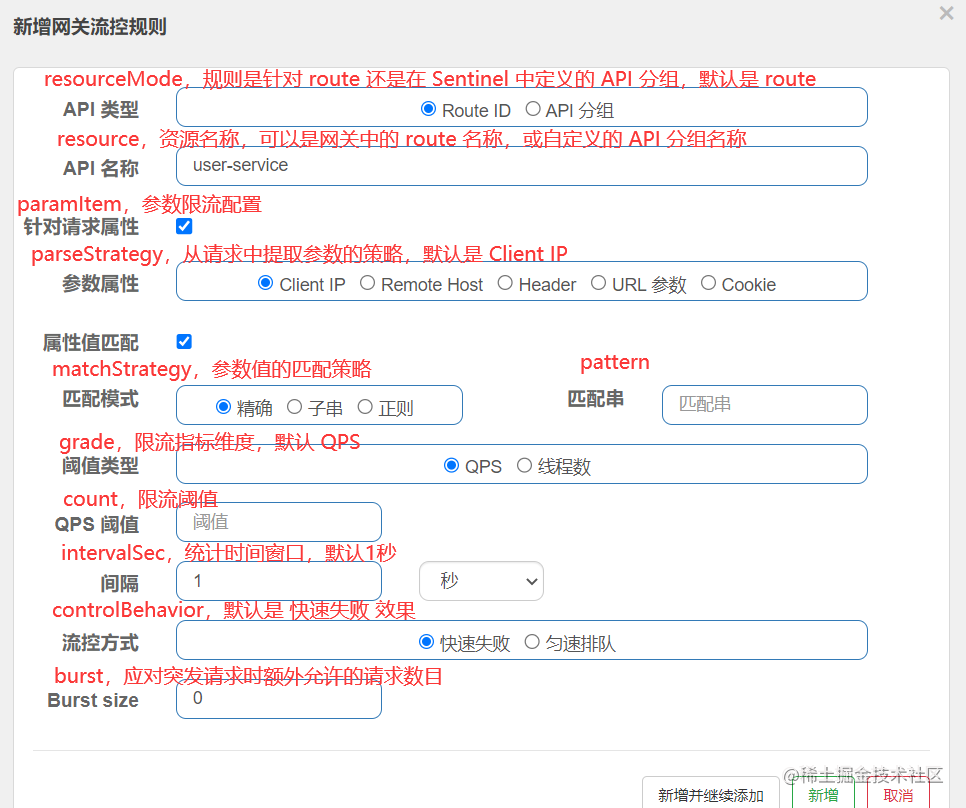
如上图所示,我已经将网关流控规则的字段对应标注上了,详细释义可见 Sentinel 官方文档:
https://sentinelguard.io/zh-cn/docs/api-gateway-flow-control.html
下面我们就开始配置网关限流,按默认配置,间隔1秒,QPS 阈值配置为 1,表示 1 秒内 QPS 大于 1 时进行限流。
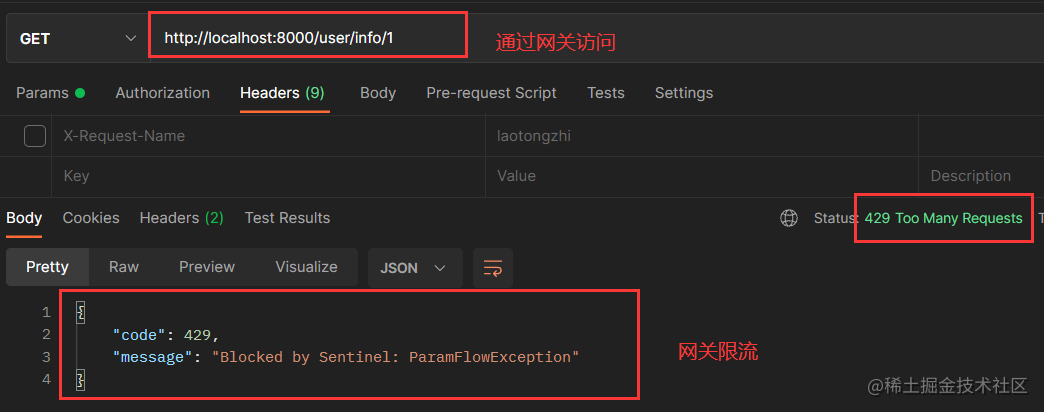
然后通过网关访问 user-service 这个 route,快速刷新,达到1秒内大于1个QPS时,就被限流了:
一般情况下,我会把流控规则持久化到 Nacos,网关流控规则的数据源类型是 gw-flow ,如果设置成了 flow 则不会生效。具体配置如下:
yaml
spring:
  cloud:
    sentinel:
      transport:
        dashboard: ${SENTINEL_DASHBOARD:localhost:8080}
      datasource:
        myGatewayRule:
          nacos:
            server-addr: ${NACOS_SERVER:127.0.0.1:8848}
            groupId: DEFAULT_GROUP
            dataId: myGatewayRule.json
            # 此处必须设置为 gw-flow 网关流控规则才会生效
            rule-type: gw-flow
Nacos 中 myGatewayRule.json 示例见仓库 10-gateway-rate-limit/config/myGatewayRule.json:
json
[
  {
    "resource": "user-service",
    "resourceMode": 0,
    "grade": 1,
    "count": 1,
    "intervalSec": 1,
    "controlBehavior": 0,
    "burst": 0,
    "maxQueueingTimeoutMs": 500,
    "paramItem": {
      "parseStrategy": 0,
      "fieldName": null,
      "pattern": null,
      "matchStrategy": 0
    }
  }
]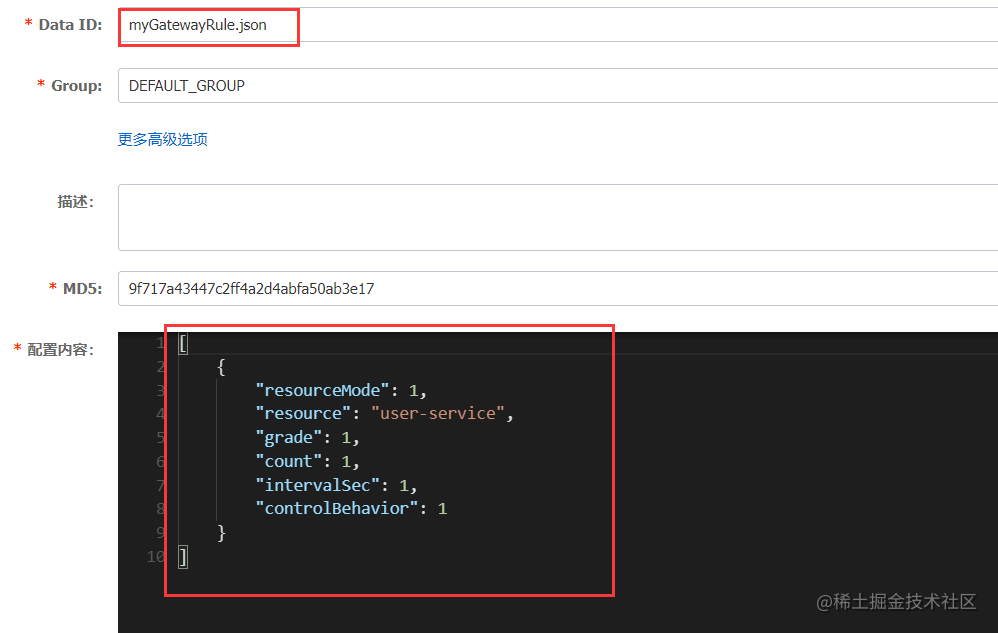
这样网关流控规则就持久化到 Nacos 中了。
Spring Cloud Gateway 后限流返回结果配置
按照前文配置了限流规则后,如果请求满足了限流的规则,那么将返回如下内容:
json
{
    "code": 429,
    "message": "Blocked by Sentinel: ParamFlowException"
}
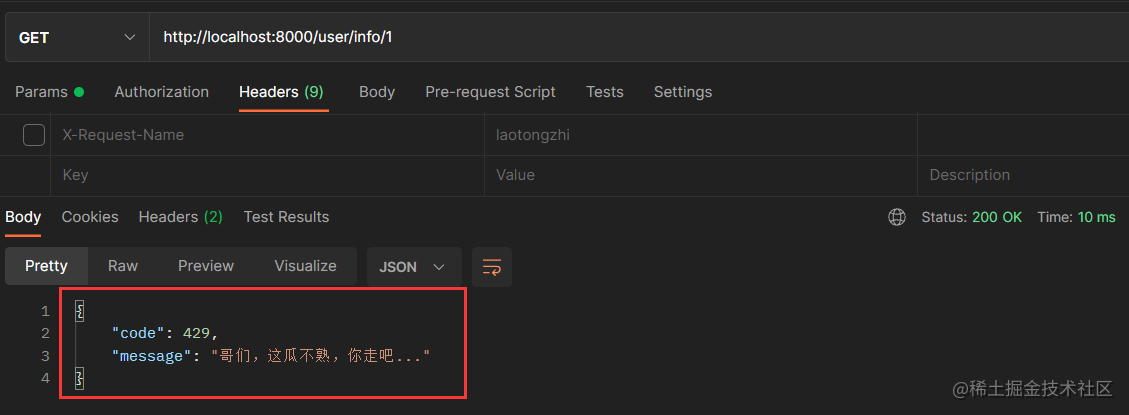
实际使用中,我们还可以定制返回结果,通过在配置文件增加 spring.cloud.sentinel.scg.fallback 配置项就能实现自定义的返回结果,比如如下配置:
yaml
spring:
  cloud:
    sentinel:
      scg:
        fallback:
          # 响应模式有 redirect 和 response 两种
          mode: response
          response-status: 200
          response-body: '{"code": 429, "message": "哥们,这瓜不熟,你走吧..."}'
          # redirect: https://google.com
限流后返回格式为:
小结
比较一下
- Spring Cloud Gateway 的过滤器工厂
RequestRateLimiter限流 - Sentinel 与 Gateway 结合的限流
这两种网关限流的实现方法,很明显使用 Sentinel 更加方便一些。
先赞后看,养成习惯。
举手之劳,赞有余香。
本文创作于 2022-08-26 。
代码仓库:https://github.com/iweidujiang/spring-cloud-alibaba-lab