首先我们需要安装对应的依赖父pom下
<dependency>
<groupId>com.google.adk</groupId>
<artifactId>google-adk</artifactId>
<version>0.4.0</version>
</dependency>
<dependency>
<groupId>com.google.adk</groupId>
<artifactId>google-adk-dev</artifactId>
<version>0.4.0</version>
</dependency>
<dependency>
<groupId>com.google.adk</groupId>
<artifactId>google-adk-spring-ai</artifactId>
<version>0.4.0</version>
</dependency>
<dependency>
<groupId>com.google.adk.samples</groupId>
<artifactId>google-adk-sample-helloworld</artifactId>
<version>0.4.0</version>
</dependency>
<dependency>
<groupId>com.google.adk</groupId>
<artifactId>google-adk-contrib-langchain4j</artifactId>
<version>0.2.0</version>
</dependency>
<!-- <dependency>-->
<!-- <groupId>dev.langchain4j</groupId>-->
<!-- <artifactId>langchain4j-core</artifactId>-->
<!-- <version>1.4.0</version>-->
<!-- </dependency>-->
<!-- <dependency>-->
<!-- <groupId>dev.langchain4j</groupId>-->
<!-- <artifactId>langchain4j-open-ai</artifactId>-->
<!-- <version>1.4.0</version>-->
<!-- </dependency>-->
<!-- spring ai 1.1.0 https://central.sonatype.com/artifact/org.springframework.ai/spring-ai-bom -->
<dependency>
<groupId>org.springframework.ai</groupId>
<artifactId>spring-ai-bom</artifactId>
<version>1.1.0-M3</version>
<type>pom</type>
<scope>import</scope>
</dependency>
<!-- langchain4j https://mvnrepository.com/artifact/dev.langchain4j/langchain4j-bom -->
<dependency>
<groupId>dev.langchain4j</groupId>
<artifactId>langchain4j-bom</artifactId>
<version>1.4.0</version>
<type>pom</type>
<scope>import</scope>
</dependency>
<!-- 设计模式框架 -->
<dependency>
<groupId>cn.bugstack.wrench</groupId>
<artifactId>xfg-wrench-starter-design-framework</artifactId>
<version>3.0.0</version>
</dependency>
app目录下
<!-- spring ai & google adk begin -->
<dependency>
<groupId>com.google.adk</groupId>
<artifactId>google-adk</artifactId>
</dependency>
<dependency>
<groupId>com.google.adk</groupId>
<artifactId>google-adk-dev</artifactId>
</dependency>
<dependency>
<groupId>com.google.adk.samples</groupId>
<artifactId>google-adk-sample-helloworld</artifactId>
</dependency>
<dependency>
<groupId>com.google.adk</groupId>
<artifactId>google-adk-contrib-langchain4j</artifactId>
</dependency>
<dependency>
<groupId>com.google.adk</groupId>
<artifactId>google-adk-spring-ai</artifactId>
</dependency>
<dependency>
<groupId>dev.langchain4j</groupId>
<artifactId>langchain4j</artifactId>
</dependency>
<dependency>
<groupId>dev.langchain4j</groupId>
<artifactId>langchain4j-core</artifactId>
</dependency>
<dependency>
<groupId>dev.langchain4j</groupId>
<artifactId>langchain4j-open-ai</artifactId>
</dependency>
<dependency>
<groupId>org.springframework.ai</groupId>
<artifactId>spring-ai-openai</artifactId>
</dependency>
<dependency>
<groupId>org.springframework.ai</groupId>
<artifactId>spring-ai-starter-mcp-client-webflux</artifactId>
</dependency>
<!-- spring ai & google adk end -->需求分析
以使用工程yml文件方式配置通用智能体配置表,允许用户在使用脚手架创建完智能体工程后,通过yml配置出自己需要的智能体,再结合业务场景做对应的开发和衔接
流程设计
-
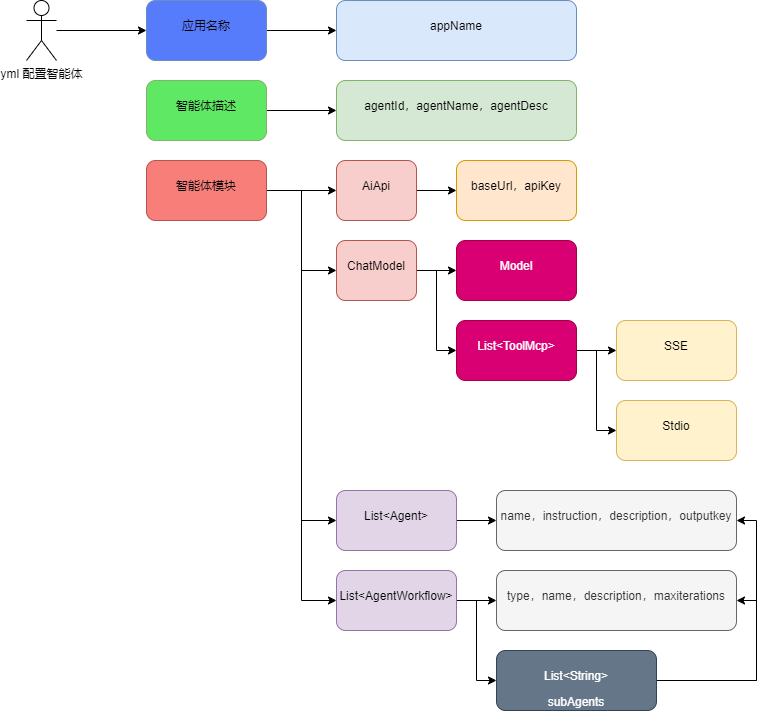
首先,一个智能体配置所需的最基本信息包括;应用名称、智能体描述、智能体模块,主要的组件类配置都在智能体模块下,AiApi 负责对接 AI 接口,ChatModel 负责模型创建(也会把 AiApi 对接),之后还要创建出 MCP 工具。
-
之后就是对于单一智能体的创建,这里可以按顺序创建出很多智能体,之后到AgentWorkflow 中进行编排,构造出一个完整的智能体
功能实现
对象设计
@Data
public class AiAgentConfigTableVO {
/**
* 应用名称
*/
private String appName;
/**
* 智能体列表
*/
private Agent agent;
@Data
public static class Agent{
/**
* 智能体ID
*/
private String agentId;
/**
* 智能体名称
*/
private String agentName;
/**
* 智能体描述
*/
private String agentDesc;
}
@Data
public static class Module{
private AiApi aiApi;
@Data
public static class AiApi{
private String baseUrl;
private String apiKey;
private String completionsPath = "/v1/chat/completions";
private String embeddingsPath = "/v1/embeddings";
}
@Data
public static class ChatModel{
private String model;
private List<ToolMcp> toolMcpList;
@Data
public static class ToolMcp{
private SSEServerParameters sse;
private StdioServerParameters stdio;
@Data
public static class SSEServerParameters {
private String name;
private String baseUri;
private String sseEndpoint;
private Integer requestTimeout = 3000;
}
@Data
public static class StdioServerParameters {
private String name;
private Integer requestTimeout = 3000;
private ServerParameters serverParameters;
@Data
public static class ServerParameters {
private String command;
private List<String> args;
private Map<String, String> env;
}
}
}
@Data
public static class Agent {
private String name;
private String instruction;
private String description;
private String outputKey;
}
@Data
public static class AgentWorkflow {
/**
* 类型;loop、parallel、sequential
*/
private String type;
private String name;
private List<String> subAgents;
private String description;
private Integer maxIterations = 3;
}
}
}
}配置yml
spring:
config:
import:
# - classpath:agent/test_agent_02.yml
- classpath:agent/test_agent.yml
配置类加载
@Slf4j
@Configuration
@EnableConfigurationProperties(AiAgentAutoConfigProperties.class)
public class AiAgentAutoConfig implements ApplicationListener<ApplicationReadyEvent> {
@Resource
private AiAgentAutoConfigProperties aiAgentAutoConfigProperties;
@Override
public void onApplicationEvent(ApplicationReadyEvent event) {
try {
log.info("😊Ai Agent 智能体装配 {}", JSON.toJSONString(aiAgentAutoConfigProperties.getTables().values()));
} catch (Exception e) {
throw new RuntimeException(e);
}
}
}
@EnableConfigurationProperties(xxx.class):是开启配置自动绑定
-
ApplicationListener监听器, -
<ApplicationReadyEvent>监听「SpringBoot 完全启动成功」这件事 , -
onApplicationEvent()当项目启动完成 → 自动调用这个方法