Spring AI Alibaba概述
Spring AI Alibaba 是构建 Agent 智能体应用最简单的方式,只需不到 10 行代码就可以构建您的智能体应用。
注意! Spring Ai Alibaba 深度集成 Spring AI 生态,它是一个专为多智能体系统和工作流编排设计的项目。因此,Spring Ai Alibaba 中的
ReactAgent实际上运行在 Graph Runtime 之上,其设计目标主要是完成工作流和多智能体编排功能。如果您正在寻找更高级的 ReactAgent 范式来构建模型驱动的智能体,请参阅我们近期发布的 AgentScope 项目。Spring Ai Alibaba 的ReactAgent部分将继续得到维护,并持续接收问题修复和关键安全补丁,我们将更专注于Spring Ai 集成与多智能体协同。
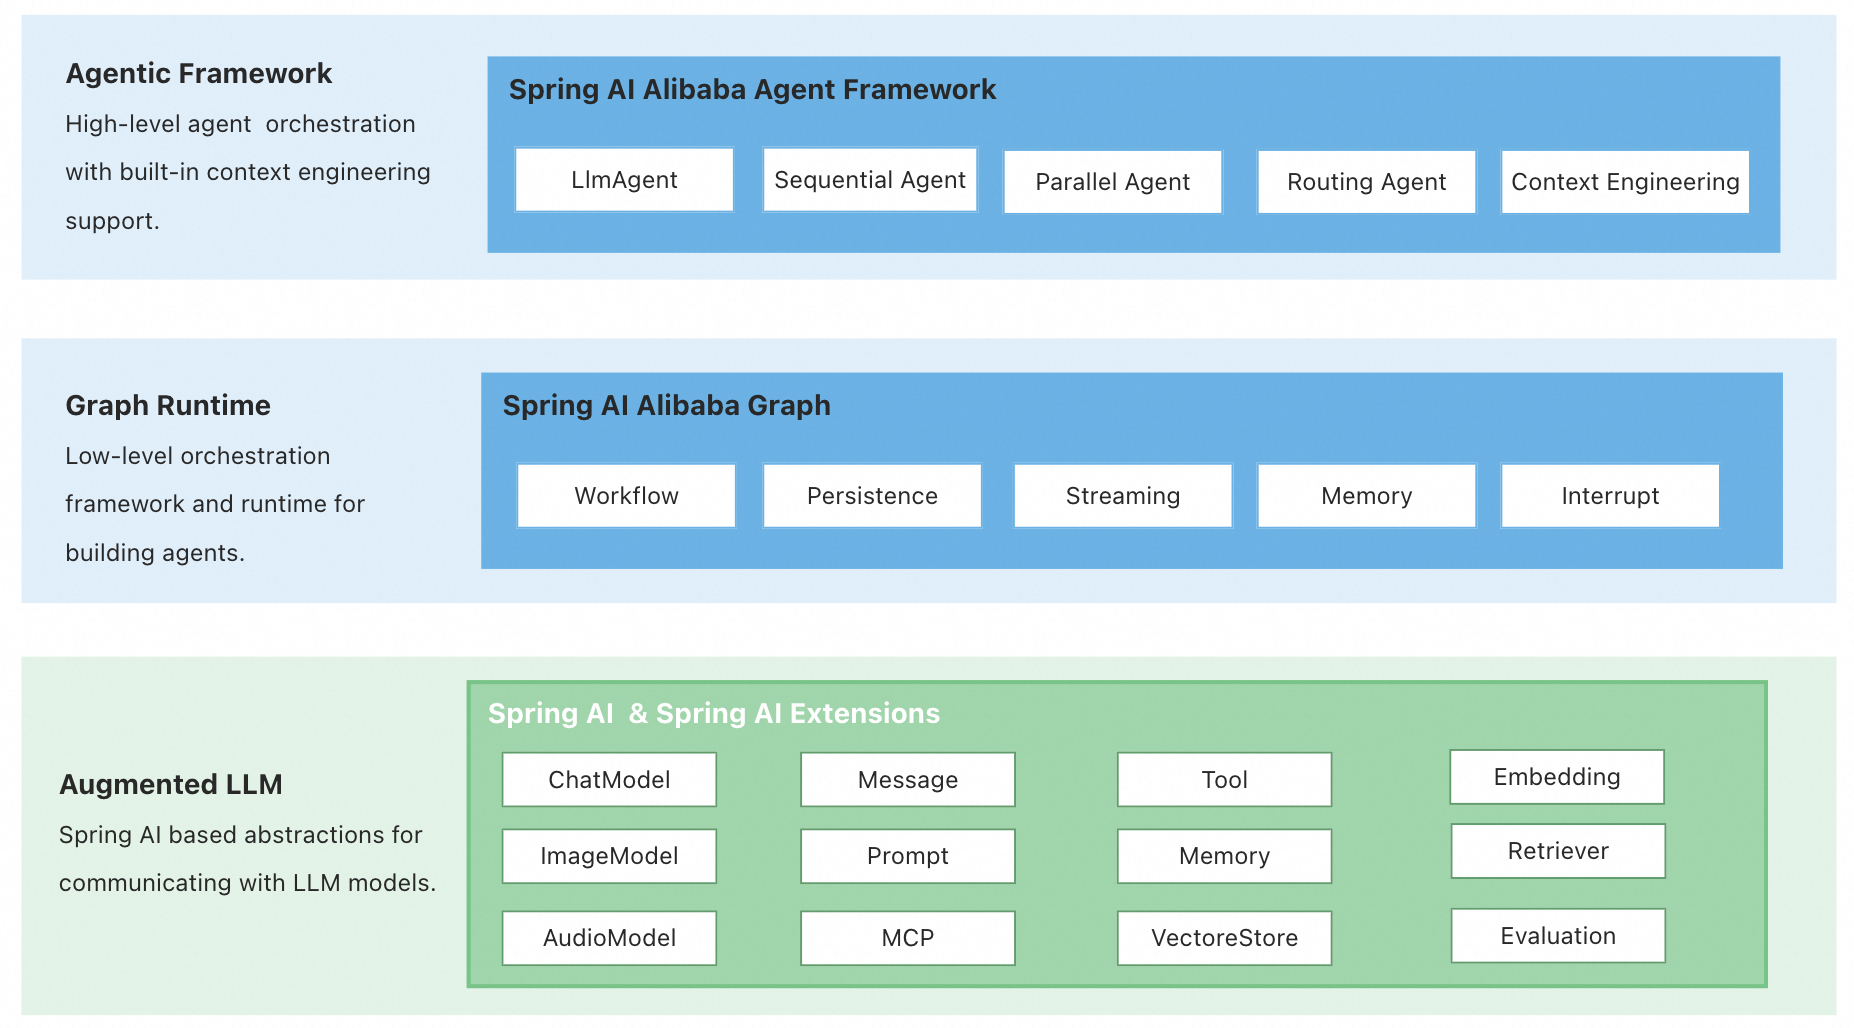
Spring AI Alibaba 项目从架构上包含如下三层:
- Agent Framework,是一个以 ReactAgent 设计理念为核心的 Agent 开发框架,使开发者能够构建具备自动上下文工程和人机交互等核心能力的Agent。
- Graph,graph 是一个低级别的工作流和多代理协调框架,能够帮助开发者实现复杂的应用程序编排,它具备丰富的预置节点和简化的图状态定义,Graph 是 Agent Framework 的底层运行时基座。
- Augmented LLM,以 Spring AI 框架底层原子抽象为基础,为构建大型语言模型(LLM)应用提供基础抽象,例如模型(Model)、工具(Tool)、多模态组件(MCP)、消息(Message)、向量存储(Vector Store)等。
设计原则
我们推荐您使用 Agent Framework 内置的 ReactAgent 抽象快速构建 Agent 应用。
如果您需要组合多个agent,Agent Framework 还预置了如 SequentialAgent(顺序代理) 、ParallelAgent(并行代理) 、RoutingAgent(路由代理) 和 LoopAgent(循环代理) 等基础多智能体工作流模式。
对于一些开发场景而言,直接使用 Graph API 也是可行的,它能为应用开发提供更灵活的编排、更直接的状态控制,适用于需要超高可靠性、大量自定义逻辑、需要精确控制延迟时的场景。
安装
<dependency>
    <groupId>com.alibaba.cloud.ai</groupId>
    <artifactId>spring-ai-alibaba-agent-framework</artifactId>
    <version>1.1.2.0</version>
</dependency>

<dependency>
    <groupId>com.alibaba.cloud.ai</groupId>
    <artifactId>spring-ai-alibaba-starter-dashscope</artifactId>
    <version>1.1.2.1</version>
</dependency>
创建 Agent
import com.alibaba.cloud.ai.dashscope.api.DashScopeApi;
import com.alibaba.cloud.ai.dashscope.chat.DashScopeChatModel;
import com.alibaba.cloud.ai.graph.agent.ReactAgent;
import com.alibaba.cloud.ai.graph.CompileConfig;

import org.springframework.ai.chat.model.ChatModel;

public class AgentExample {

    public static void main(String[] args) throws Exception {
        // 创建模型实例
        DashScopeApi dashScopeApi = DashScopeApi.builder()
            .apiKey(System.getenv("AI_DASHSCOPE_API_KEY"))
            .build();
        ChatModel chatModel = DashScopeChatModel.builder()
            .dashScopeApi(dashScopeApi)
            .build();

        // 创建 Agent
        ReactAgent agent = ReactAgent.builder()
            .name("weather_agent")
            .model(chatModel)
            .instruction("You are a helpful weather forecast assistant.")
            .build();

        // 运行 Agent
        agent.call("what is the weather in Hangzhou?");
    }
}
核心功能
-
ReactAgent:构建具有推理和行动能力的智能代理,遵循 ReAct(推理 + 行动)范式,用于迭代解决问题。
-
多代理编排 :使用内置模式(包括
SequentialAgent1、ParallelAgent、LlmRoutingAgent和LoopAgent`)组合多个代理,以执行复杂的任务。 -
上下文工程:内置快速工程、上下文管理和对话流控制的最佳实践,以提高代理的可靠性和性能。
-
人机协同:将人工反馈和审批步骤无缝集成到代理工作流程中,从而实现关键工具和操作的监督执行。
-
流式传输支持:代理响应的实时流式传输
-
错误处理:强大的错误恢复和重试机制
-
基于图的工作流:基于图的工作流运行时和 API,用于条件路由、嵌套图、并行执行和状态管理。可将工作流导出为 PlantUML 和 Mermaid 格式。
-
A2A 支持:通过 Nacos 集成支持代理间通信,实现跨服务的分布式代理协调和协作。
-
丰富的模型、工具和 MCP 支持:利用 Spring AI 的核心概念,支持多种 LLM 提供程序(DashScope、OpenAI 等)、工具调用和模型上下文协议 (MCP)。
ReactAgent
添加依赖
在你的项目中添加以下 Maven 依赖:
<dependencies>
  <!-- Spring AI Alibaba Agent Framework -->
  <dependency>
    <groupId>com.alibaba.cloud.ai</groupId>
    <artifactId>spring-ai-alibaba-agent-framework</artifactId>
    <version>1.1.2.0</version>
  </dependency>

  <!-- DashScope ChatModel 支持(如果使用其他模型,请跳转 Spring AI 文档选择对应的 starter) -->
  <dependency>
    <groupId>com.alibaba.cloud.ai</groupId>
    <artifactId>spring-ai-alibaba-starter-dashscope</artifactId>
    <version>1.1.2.0</version>
  </dependency>
</dependencies>
配置 API Key
在使用之前,需要配置你的 API Key。推荐通过环境变量设置:
export AI_DASHSCOPE_API_KEY=your_api_key_here你也可以在应用配置文件中设置(不推荐在生产环境中硬编码):
# application.yml
spring:
  ai:
    dashscope:
      api-key: ${AI_DASHSCOPE_API_KEY}
获取 API Key:
- DashScope(阿里云百炼):访问 大模型服务平台百炼控制台
- 其他模型提供商请 参考文档
构建一个基础 Agent
首先创建一个简单的 agent,它可以回答问题并调用工具。该 agent 将使用 DashScope 大模型、一个天气查询工具、以及简单的系统提示词。
// 初始化 ChatModel
DashScopeApi dashScopeApi = DashScopeApi.builder()
    .apiKey(System.getenv("AI_DASHSCOPE_API_KEY"))
    .build();

ChatModel chatModel = DashScopeChatModel.builder()
    .dashScopeApi(dashScopeApi)
    .build();

// 定义天气查询工具
public class WeatherTool implements BiFunction<String, ToolContext, String> {
    @Override
    public String apply(String city, ToolContext toolContext) {
        return "It's always sunny in " + city + "!";
    }
}

ToolCallback weatherTool = FunctionToolCallback.builder("get_weather", new WeatherTool())
    .description("Get weather for a given city")
    .inputType(String.class)
    .build();

// 创建 agent
ReactAgent agent = ReactAgent.builder()
    .name("weather_agent")
    .model(chatModel)
    .tools(weatherTool)
    .systemPrompt("You are a helpful assistant")
    .saver(new MemorySaver())
    .build();

// 运行 agent
AssistantMessage response = agent.call("what is the weather in San Francisco");
System.out.println(response.getText());
构建一个真实的 Agent
接下来,构建一个实用的天气预报 agent,演示关键的生产概念:
- 详细的 System Prom - 获得更好的 agent 行为
- 创建工具 - 与外部数据集成
- 模型配置 - 获得一致的响应
- 结构化输出 - 获得可预测的结果
- 对话记忆 - 实现类似聊天的交互
- 创建和运行 agent - 创建一个功能完整的 agent
让我们逐步完成每个步骤:
1. 定义系统提示
系统提示定义了 agent 的角色和行为。保持具体和可操作:
String SYSTEM_PROMPT = """
    You are an expert weather forecaster, who speaks in puns.

    You have access to two tools:

    - get_weather_for_location: use this to get the weather for a specific location
    - get_user_location: use this to get the user's location

    If a user asks you for the weather, make sure you know the location.
    If you can tell from the question that they mean wherever they are,
    use the get_user_location tool to find their location.
    """;
2. 创建工具
工具让模型能够通过调用你定义的函数与外部系统交互。工具可以依赖运行时上下文,也可以与 agent 的记忆交互。
注意下面的 getUserLocation 工具如何使用运行时上下文(通过 ToolContext):
import org.springframework.ai.chat.model.ToolContext;
import org.springframework.ai.tool.ToolCallback;
import org.springframework.ai.tool.annotation.ToolParam;
import org.springframework.ai.tool.function.FunctionToolCallback;

import java.util.function.BiFunction;

// 天气查询工具
public class WeatherForLocationTool implements BiFunction<String, ToolContext, String> {
    @Override
    public String apply(
        @ToolParam(description = "The city name") String city,
        ToolContext toolContext) {
        return "It's always sunny in " + city + "!";
    }
}

// 用户位置工具 - 使用上下文
public class UserLocationTool implements BiFunction<String, ToolContext, String> {
    @Override
    public String apply(
        @ToolParam(description = "User query") String query,
        ToolContext toolContext) {
        // 从上下文中获取用户信息
        String userId = "";
        if (toolContext != null && toolContext.getContext() != null) {
            RunnableConfig runnableConfig = (RunnableConfig) toolContext.getContext().get(AGENT_CONFIG_CONTEXT_KEY);
            Optional<Object> userIdObjOptional = runnableConfig.metadata("user_id");
            if (userIdObjOptional.isPresent()) {
                userId = (String) userIdObjOptional.get();
            }
        }
        if (userId == null) {
            userId = "1";
        }
        return "1".equals(userId) ? "Florida" : "San Francisco";
    }
}

// 创建工具回调
ToolCallback getWeatherTool = FunctionToolCallback
    .builder("getWeatherForLocation", new WeatherForLocationTool())
    .description("Get weather for a given city")
    .inputType(String.class)
    .build();

ToolCallback getUserLocationTool = FunctionToolCallback
    .builder("getUserLocation", new UserLocationTool())
    .description("Retrieve user location based on user ID")
    .inputType(String.class)
    .build();
提示 : 工具应该有良好的文档:它们的名称、描述和参数名称都会成为模型提示的一部分。Spring AI 的 FunctionToolCallback 支持通过 @ToolParam 注解添加元数据,并支持通过 ToolContext 参数进行运行时注入。
3. 配置模型
为你的用例配置合适的大语言模型参数:
import com.alibaba.cloud.ai.dashscope.api.DashScopeApi;
import com.alibaba.cloud.ai.dashscope.chat.DashScopeChatModel;
import com.alibaba.cloud.ai.dashscope.chat.DashScopeChatOptions;
import org.springframework.ai.chat.model.ChatModel;

DashScopeApi dashScopeApi = DashScopeApi.builder()
    .apiKey(System.getenv("AI_DASHSCOPE_API_KEY"))
    .build();

ChatModel chatModel = DashScopeChatModel.builder()
    .dashScopeApi(dashScopeApi)
    .defaultOptions(DashScopeChatOptions.builder()
        // Note: model must be set when use options build.
        .withModel(DashScopeChatModel.DEFAULT_MODEL_NAME)
        .withTemperature(0.5)
        .withMaxToken(1000)
        .build())
    .build();
根据不同的模型选择,增加依赖
<!-- DashScope-->
<dependency>
 <groupId>com.alibaba.cloud.ai</groupId>
 <artifactId>spring-ai-alibaba-starter-dashscope</artifactId>
 <version>1.1.2.1</version>
</dependency>

<!-- OpenAI-->
<dependency>
 <groupId>org.springframework.ai</groupId>
 <artifactId>spring-ai-starter-model-openai</artifactId>
 <version>1.1.2</version>
</dependency>
4. 定义响应格式
如果你需要 agent 响应匹配特定的模式,可以定义结构化响应格式。
// 使用 Java 类定义响应格式
public class ResponseFormat {
    // 一个双关语响应(始终必需)
    private String punnyResponse;

    // 如果可用的话,关于天气的任何有趣信息
    private String weatherConditions;

    // Getters and Setters
    public String getPunnyResponse() {
        return punnyResponse;
    }

    public void setPunnyResponse(String punnyResponse) {
        this.punnyResponse = punnyResponse;
    }

    public String getWeatherConditions() {
        return weatherConditions;
    }

    public void setWeatherConditions(String weatherConditions) {
        this.weatherConditions = weatherConditions;
    }
}
5. 添加记忆
为你的 agent 添加记忆以维持跨交互的状态。这允许 agent 记住之前的对话和上下文,在多次调用之间,使用同一个 threadId 即可加载之前的对话记录。
ReactAgent agent = ReactAgent.builder()
    .name("weather_agent")
    //...
    .saver(new MemorySaver())
    .build();
在调用的时候,
RunnableConfig runnableConfig = RunnableConfig.builder().threadId(threadId).build();

// 第一次调用
AssistantMessage response = agent.call("what is the weather in San Francisco today.", runnableConfig);

// 第二次调用
AssistantMessage response = agent.call("How about the weather tomorrow", runnableConfig);
注意 : 在生产环境中,使用持久化的 CheckPointer 将数据保存到数据库。更多详情参见 内存管理 文档。
6. 创建和运行 Agent
现在用所有组件组装你的 agent 并运行它!
import com.alibaba.cloud.ai.graph.agent.ReactAgent;
import com.alibaba.cloud.ai.graph.RunnableConfig;
import org.springframework.ai.chat.messages.AssistantMessage;

import java.util.HashMap;
import java.util.Map;

// 创建 agent
ReactAgent agent = ReactAgent.builder()
    .name("weather_pun_agent")
    .model(chatModel)
    .systemPrompt(SYSTEM_PROMPT)
    .tools(getUserLocationTool, getWeatherTool)
    .outputType(ResponseFormat.class)
    .saver(new MemorySaver())
    .build();

// threadId 是给定对话的唯一标识符
RunnableConfig runnableConfig = RunnableConfig.builder().threadId(threadId).addMetadata("user_id", "1").build();

// 第一次调用
AssistantMessage response = agent.call("what is the weather outside?", runnableConfig);
System.out.println(response.getText());
// 输出类似:
// Florida is still having a 'sun-derful' day! The sunshine is playing
// 'ray-dio' hits all day long! I'd say it's the perfect weather for
// some 'solar-bration'!

// 注意我们可以使用相同的 threadId 继续对话
response = agent.call("thank you!", runnableConfig);
System.out.println(response.getText());
// 输出类似:
// You're 'thund-erfully' welcome! It's always a 'breeze' to help you
// stay 'current' with the weather.
查看完整示例代码
完整示例代码请查看仓库:https://github.com/spring-ai-alibaba/examples
开启高级功能
使用 outputSchema 定义输出格式
除了使用 outputType,你还可以使用 outputSchema 来定义自定义的 JSON 格式:
String customSchema = """
    请按照以下JSON格式输出:
    {
        "title": "标题",
        "content": "内容",
        "style": "风格"
    }
    """;

ReactAgent agent = ReactAgent.builder()
    .name("schema_agent")
    .model(chatModel)
    .saver(new MemorySaver())
    .outputSchema(customSchema)
    .build();

AssistantMessage message = agent.call("帮我写一首关于春天的诗歌。");
System.out.println(message.getText());
使用 invoke 方法获取完整状态
如果需要访问完整的 agent 状态(不仅仅是最后的消息),可以使用 invoke 方法:
import com.alibaba.cloud.ai.graph.OverAllState;
import java.util.Optional;

Optional<OverAllState> result = agent.invoke("帮我写一首诗。");

if (result.isPresent()) {
    OverAllState state = result.get();
    // 访问消息历史
    List<Message> messages = state.value("messages", new ArrayList<>());
    // 访问其他状态信息
    System.out.println(state);
}
配置最大迭代次数
为防止无限循环,可以使用 ModelCallLimitHook 来限制模型调用次数:
import com.alibaba.cloud.ai.graph.agent.hook.modelcalllimit.ModelCallLimitHook;

ModelCallLimitHook hook = ModelCallLimitHook.builder()
    .runLimit(5)  // 限制最多调用 5 次
    .exitBehavior(ModelCallLimitHook.ExitBehavior.ERROR)  // 超出限制时抛出异常
    .build();

ReactAgent agent = ReactAgent.builder()
    .name("my_agent")
    .model(chatModel)
    .hooks(hook)
    .saver(new MemorySaver())
    .build();
使用 Hooks 扩展功能
ReactAgent 支持通过 Hooks 扩展功能,例如人机协同、工具注入等:
import com.alibaba.cloud.ai.graph.agent.hook.Hook;
import com.alibaba.cloud.ai.graph.agent.hook.hip.HumanInTheLoopHook;

// 创建 hook
Hook humanInTheLoopHook = HumanInTheLoopHook.builder()
 .approvalOn("getWeatherTool", ToolConfig.builder().description("Please confirm tool execution.")
    .build())
 .build();

ReactAgent agent = ReactAgent.builder()
    .name("my_agent")
    .model(chatModel)
    .hooks(humanInTheLoopHook)
    .saver(new MemorySaver())
    .build();
下一步
现在你已经创建了一个基础的 ReactAgent,你可以:
- 探索更多的工具集成
- 学习如何使用不同的 Checkpoint 实现对话持久化
- 了解如何使用 Hooks 扩展 agent 功能
- 学习如何创建多 agent 系统