第29篇|单拍按钮背后:从点击到 PhotoOutput 回调
第 29 篇从最小拍照闭环开始。很多相机教程会把重点放在"调用一次 capture",但真实项目里单拍按钮背后至少有四层状态:预览是否活着、PhotoOutput 是否可用、当前是否已有拍摄任务、照片写入后是否进入相册记录。双镜记忆相机把这些状态放在 Index.ets 中统一管理,单拍不是双拍的简化口号,而是双拍失败、设备不支持、用户只想快速拍一张时的稳定兜底能力。
本文是 21 天「智能相机开发实战」训练营中的一篇实操记录。所有代码片段都来自当前项目,配图围绕运行页面和源码关键路径展开,读完以后可以直接回到工程里按函数名定位。
本篇目标
- 读懂单拍从点击到 JPEG 回调的完整链路。
- 理解为什么拍摄前要先生成 captureId、目标路径、地点快照和水印上下文。
- 把 PhotoOutput 的回调、文件写入和相册入库对应起来。
- 知道哪些状态必须在成功或失败后复位,避免下一次拍摄被旧任务污染。
代码位置
entry/src/main/ets/pages/Index.etsentry/src/main/ets/services/GalleryRecordService.ets
一、运行效果先对齐:按钮后面是一条链路
在拍照页里,用户看到的是一个拍照入口和若干模式控件;工程里看到的是预览、输出、地点、文件、相册记录之间的传递。单拍入口会先确认 captureBusy,再检查 singlePhotoOutput、cameraSessionActive、singlePreviewLive。这些条件都满足时,才会把本次拍照的 id、路径、地点和水印状态一次性写入 pending 字段。这样做的好处是:回调晚到、用户连续点击、前摄镜像和保存失败都不会让页面进入说不清的中间态。
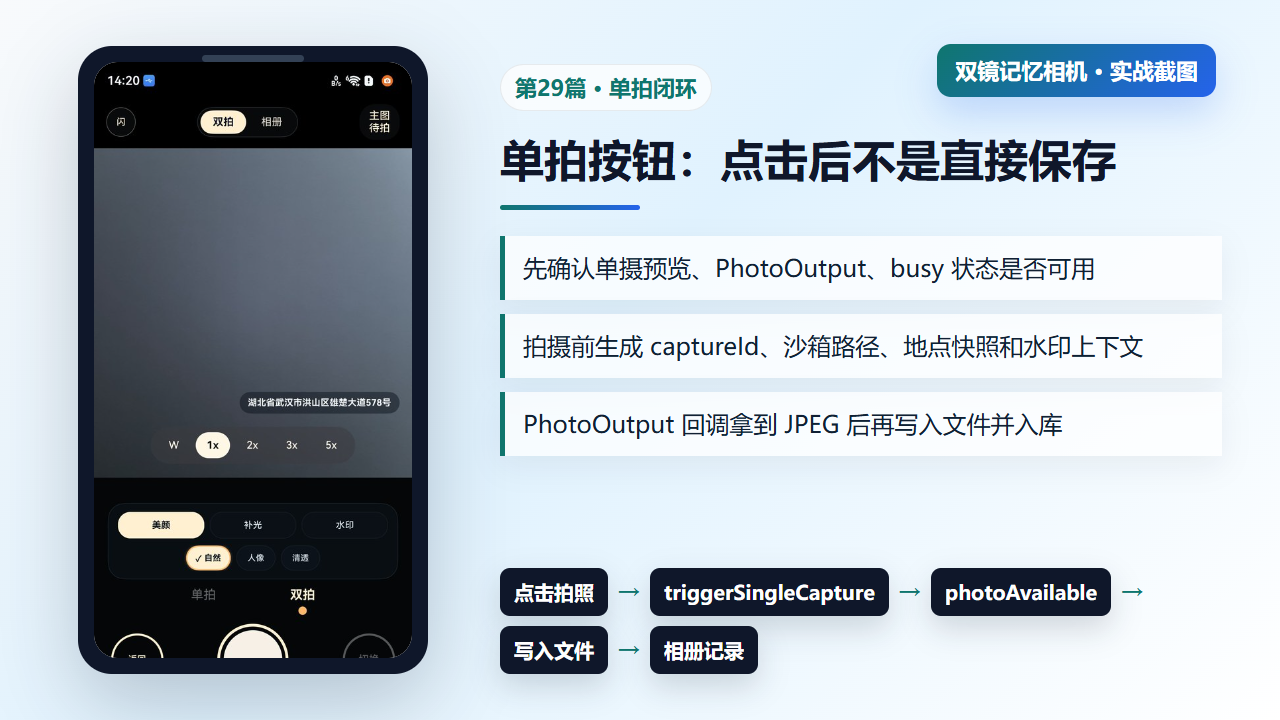
图1 单拍运行侧链路:点击、拍摄上下文、JPEG 回调、文件写入和相册记录
二、triggerSingleCapture:先武装上下文,再触发拍照
triggerSingleCapture 的关键不是最后一行 capture,而是前面的准备动作。它先拉取地点快照,再使用时间戳生成 captureId 和本地保存路径,同时把经纬度、地点标题、水印样式都放到 pending 状态里。后续 photoAvailable 回调拿到 JPEG 时,不需要再重新推导保存到哪里,也不需要猜测这张照片属于哪个地点。
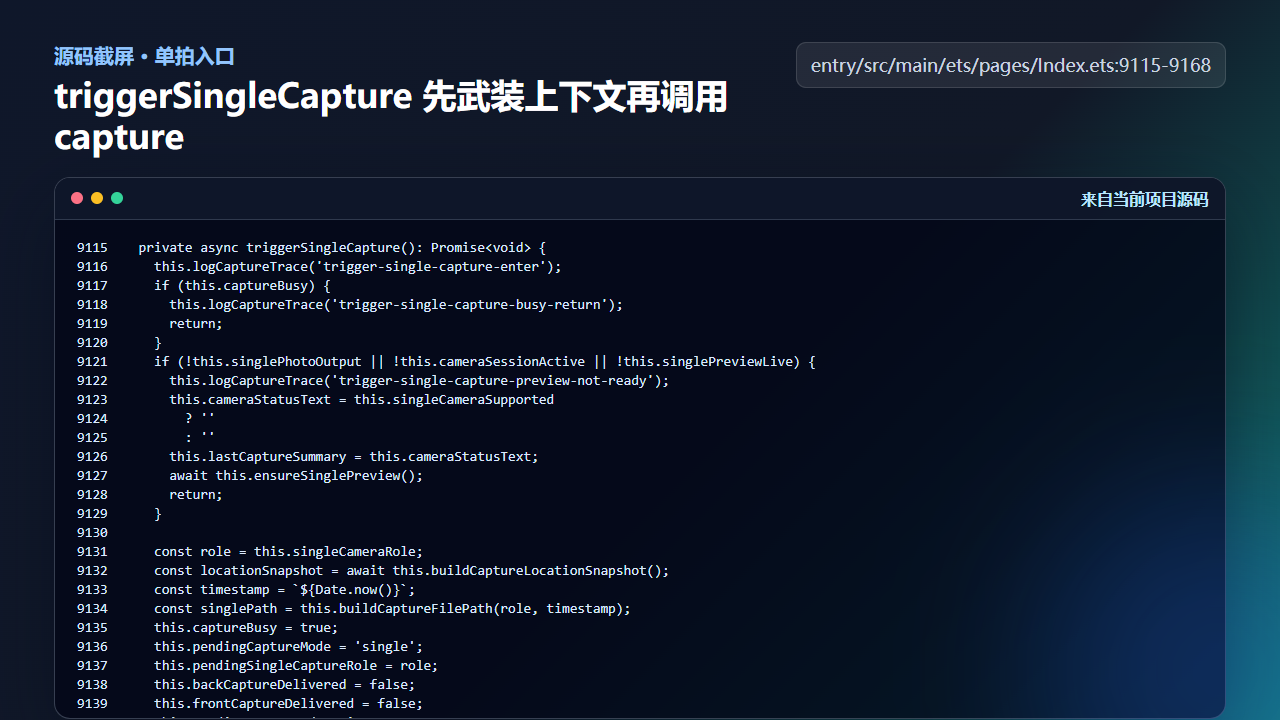
图2 triggerSingleCapture 先准备上下文再调用 PhotoOutput.capture
ts
    const role = this.singleCameraRole;
    const locationSnapshot = await this.buildCaptureLocationSnapshot();
    const timestamp = `${Date.now()}`;
    const singlePath = this.buildCaptureFilePath(role, timestamp);
    this.captureBusy = true;
    this.pendingCaptureMode = 'single';
    this.pendingSingleCaptureRole = role;
    this.backCaptureDelivered = false;
    this.frontCaptureDelivered = false;
    this.pendingCaptureId = timestamp;
    this.pendingBackCapturePath = singlePath;
    this.pendingFrontCapturePath = singlePath;
    this.pendingCaptureLatitude = locationSnapshot.latitude;
    this.pendingCaptureLongitude = locationSnapshot.longitude;
    this.pendingCapturePlace = locationSnapshot.place;
    this.pendingCaptureTitle = locationSnapshot.memoryTitle;
    this.armPendingWatermark(parseInt(timestamp, 10), locationSnapshot.place, 'single');
    this.logCaptureTrace(
      'trigger-single-capture-armed',
      `role=${role} path=${singlePath} place=${locationSnapshot.place}`
    );
    this.cameraStatusText = '';
    this.lastCaptureSummary = this.buildCaptureSummary(locationSnapshot);
    this.setPhotoOutputReady('single', false);

    const captureSetting: camera.PhotoCaptureSetting = {
      quality: this.captureQualityLevel,
      rotation: camera.ImageRotation.ROTATION_0,
      mirror: role === 'front'
    };
    try {
      await this.singlePhotoOutput.capture(captureSetting);
      this.logCaptureTrace('trigger-single-capture-request-finished', `role=${role}`);
    } catch (error) {
      const err = error as BusinessError;
      this.failDualCapture(`${this.getCameraRoleLabel(role)}拍照失败 ${err.code}`);
    }
}这段代码里有两个容易忽略的点:第一,pendingBackCapturePath 和 pendingFrontCapturePath 在单拍模式下指向同一张图,后续模型仍然可以沿用双图字段;第二,前摄时把 mirror 设置为 true,把用户预览和最终成片保持一致。
三、photoAvailable:只在有效任务中写入 JPEG
PhotoOutput 回调会经历 captureStartWithInfo、captureEnd、captureReady 和 photoAvailable。真正拿到图像数据的是 photoAvailable,项目会检查错误码、photo.main、pendingCaptureId 和 captureBusy。如果回调已经不属于当前任务,立刻释放 image 对象,避免旧回调覆盖新任务。
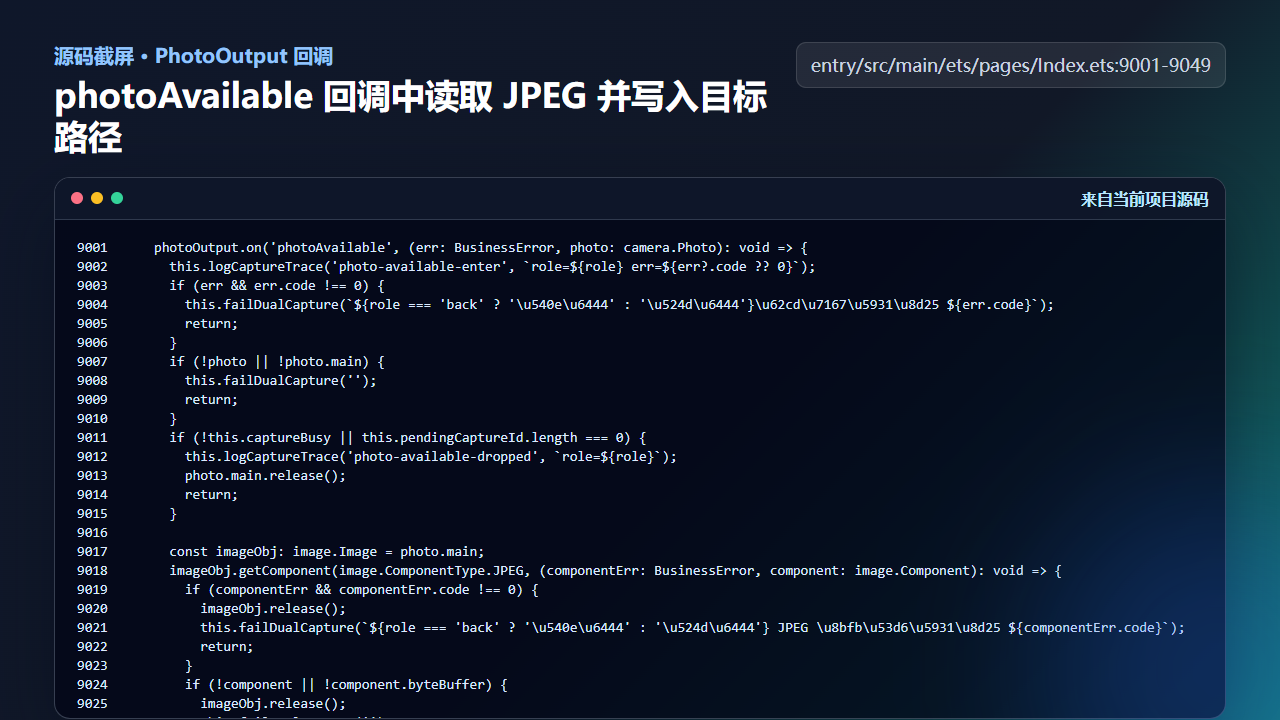
图3 photoAvailable 中读取 JPEG byteBuffer 并写入目标路径
ts
    photoOutput.on('photoAvailable', (err: BusinessError, photo: camera.Photo): void => {
      this.logCaptureTrace('photo-available-enter', `role=${role} err=${err?.code ?? 0}`);
      if (err && err.code !== 0) {
        this.failDualCapture(`${role === 'back' ? '\u540e\u6444' : '\u524d\u6444'}\u62cd\u7167\u5931\u8d25 ${err.code}`);
        return;
      }
      if (!photo || !photo.main) {
        this.failDualCapture('');
        return;
      }
      if (!this.captureBusy || this.pendingCaptureId.length === 0) {
        this.logCaptureTrace('photo-available-dropped', `role=${role}`);
        photo.main.release();
        return;
      }

      const imageObj: image.Image = photo.main;
      imageObj.getComponent(image.ComponentType.JPEG, (componentErr: BusinessError, component: image.Component): void => {
        if (componentErr && componentErr.code !== 0) {
          imageObj.release();
          this.failDualCapture(`${role === 'back' ? '\u540e\u6444' : '\u524d\u6444'} JPEG \u8bfb\u53d6\u5931\u8d25 ${componentErr.code}`);
          return;
        }
        if (!component || !component.byteBuffer) {
          imageObj.release();
          this.failDualCapture('');
          return;
        }

        const targetPath = role === 'back'
          ? this.pendingBackCapturePath
          : this.pendingFrontCapturePath;
        try {
          this.logCaptureTrace('write-capture-file-start', `role=${role} targetPath=${targetPath}`);
          const writeSuccess = this.writeCaptureFile(targetPath, component.byteBuffer);
          if (!writeSuccess) {
            this.failDualCapture('');
            return;
          }
          this.logCaptureTrace('write-capture-file-finished', `role=${role} targetPath=${targetPath}`);
          void this.markCaptureDelivered(role).catch((error: Error) => {
            this.failDualCapture(`照片入库失败:${error.message}`);
          });
        } catch (error) {
          const err = error as BusinessError;
          this.failDualCapture(`${role === 'back' ? '\u540e\u6444' : '\u524d\u6444'}\u5199\u5165\u7167\u7247\u5931\u8d25 ${err.code ?? -1}`);
        } finally {
          imageObj.release();
        }
这一段体现了相机项目的基本防线:任何异步回调都不能默认可信。只有当前确实处于拍摄中,并且 pending 上下文存在,才会写入文件并继续调用 markCaptureDelivered。
四、markCaptureDelivered:把一张照片变成相册记录
单拍模式下,交付完成后会创建一条 GalleryMoment。记录里不仅有文件路径,还有拍摄地点、经纬度、记忆标题、pairIndex 和水印信息。创建完成后,页面复位 busy、pending 路径、地点字段和水印上下文,再把记录交给 appendGalleryRecord。
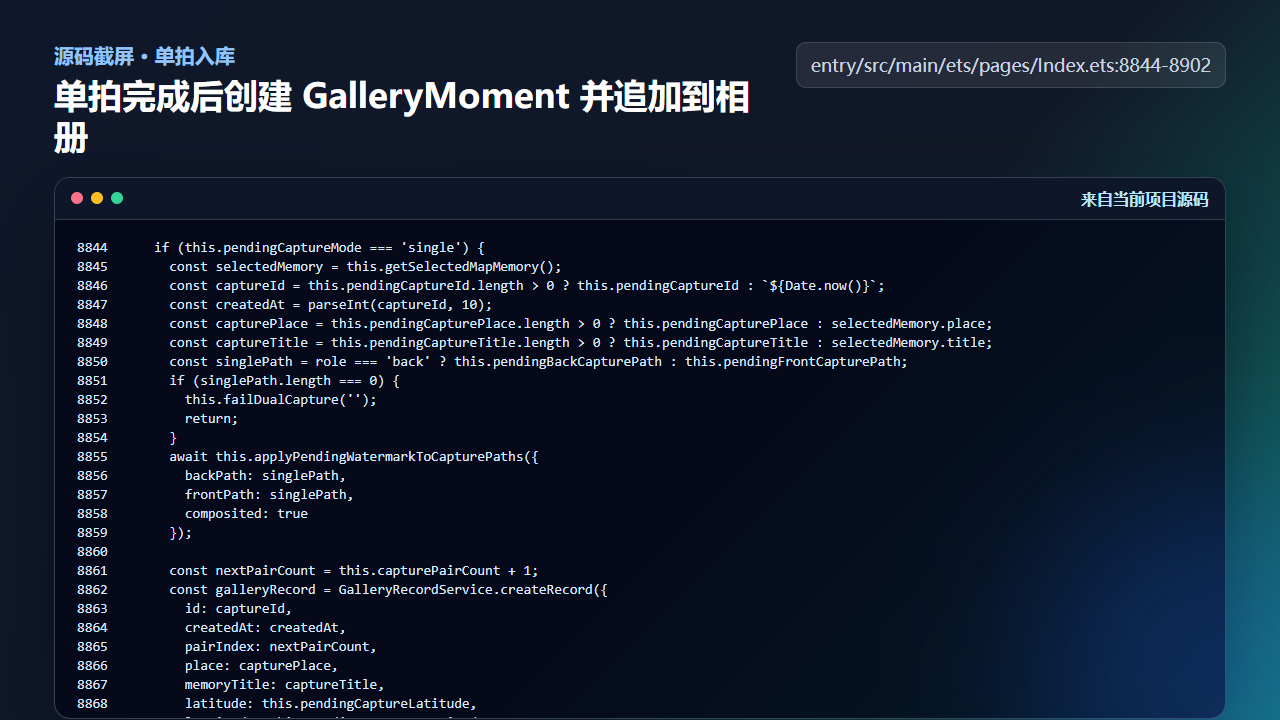
图4 单拍完成后创建 GalleryMoment 并追加到相册
ts
      const nextPairCount = this.capturePairCount + 1;
      const galleryRecord = GalleryRecordService.createRecord({
        id: captureId,
        createdAt: createdAt,
        pairIndex: nextPairCount,
        place: capturePlace,
        memoryTitle: captureTitle,
        latitude: this.pendingCaptureLatitude,
        longitude: this.pendingCaptureLongitude,
        backPath: singlePath,
        frontPath: singlePath,
        watermarkStyle: this.pendingWatermarkStyle,
        watermarkText: this.pendingWatermarkText
      });

      this.captureBusy = false;
      this.sequentialCaptureQueued = false;
      this.capturePairCount = nextPairCount;
      this.backCaptureDelivered = false;
      this.frontCaptureDelivered = false;
      this.pendingCaptureMode = 'dual';
      this.pendingSingleCaptureRole = 'back';
      this.pendingCaptureId = '';
      this.pendingBackCapturePath = '';
      this.pendingFrontCapturePath = '';
      this.pendingCaptureLatitude = 0;
      this.pendingCaptureLongitude = 0;
      this.pendingCapturePlace = '';
      this.pendingCaptureTitle = '';
      this.clearPendingWatermark();
      this.cameraStatusText = '';
      this.lastCaptureSummary = '';
      this.logCaptureTrace(
        'mark-capture-delivered-single-finished',
        `role=${role} recordId=${galleryRecord.id} pairIndex=${galleryRecord.pairIndex} singlePath=${singlePath}`
      );
      this.logCaptureTrace(
        'mark-capture-delivered-dual-finished',
        `recordId=${galleryRecord.id} pairIndex=${galleryRecord.pairIndex}`
      );
      void this.appendGalleryRecord(galleryRecord);
      return;
这里的状态复位很重要。拍照按钮如果只在成功时改一个提示文案,下一次拍摄仍可能带着旧路径或旧地点。项目把复位放在入库前完成,保证后续 UI 刷新和存储动作都拿到明确结果。
工程检查清单
- 单拍入口必须判断
captureBusy,防止连续点击触发并发写入。 - 拍照前必须生成路径和地点快照,不能等回调里再临时拼。
photoAvailable中读取 JPEG 后必须释放 image 对象。- 单拍记录复用
backPath/frontPath双字段,便于相册和双拍逻辑统一展示。 - 成功和失败都要清理 pending 状态,避免下一次拍摄继承旧上下文。
今日练习
- 在工程中搜索
triggerSingleCapture,标出它设置的所有 pending 字段。 - 真机点击一次单拍,观察按钮是否能在回调完成前阻止重复触发。
- 把
photoAvailable中的异常分支逐个读一遍,写出每个分支保护的风险点。
下一篇会继续沿着同一条工程链路往下拆:先看用户能看到的效果,再回到源码确认状态、文件和服务边界是否闭合。