SuperMap iClient3D for Cesium 如何制作3D标注
功能介绍
Cesium 中实现标注或者文字标签一般都是使用biliboard,biliboard开发简单快速,但是效果一般,只能是二维效果,一直面向屏幕。本篇文章通过生成贴图,在赋值给面或者墙体来实现三维文字效果。
效果展示
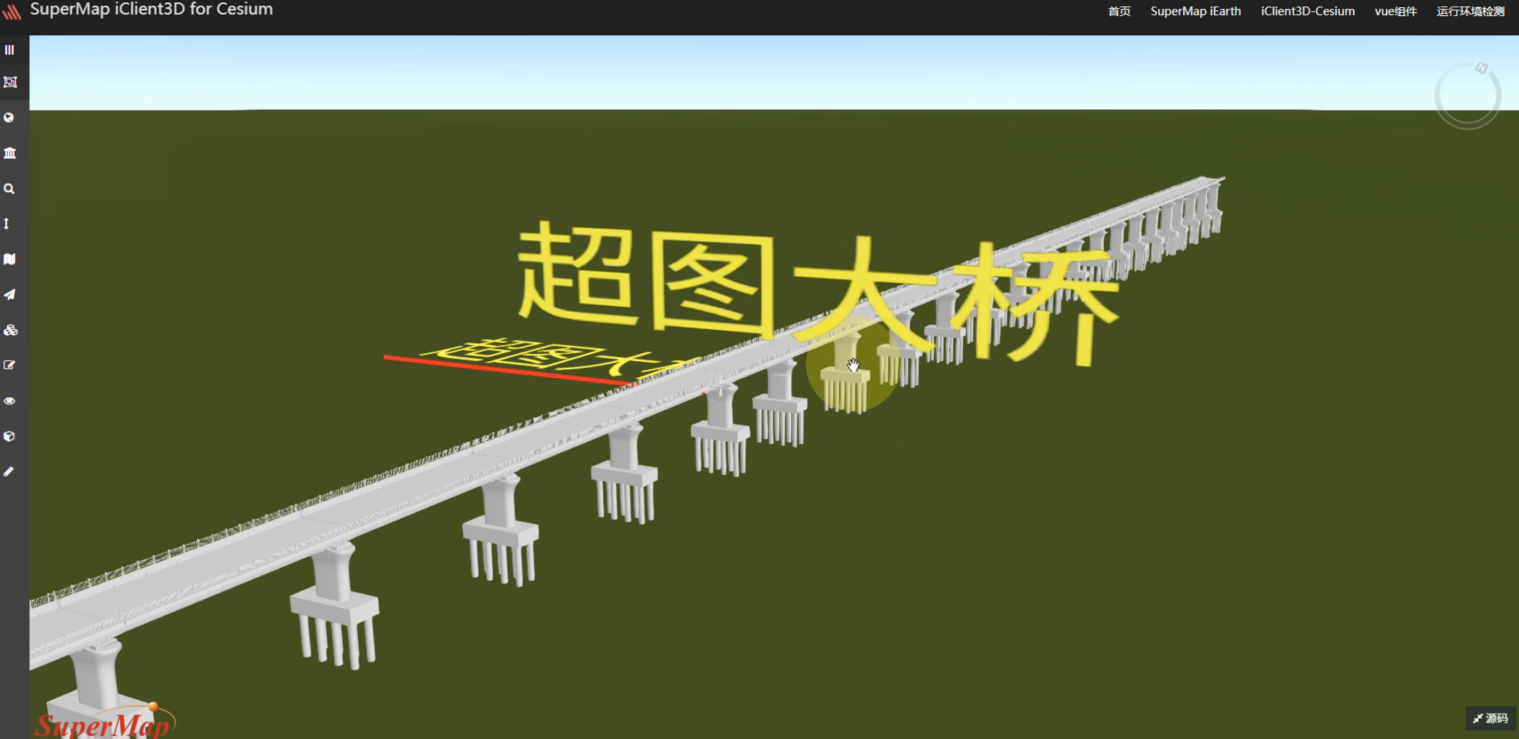
实现思路
主要实现思路是通过canvas生成一个背景透明的图片,然后通过贴到polygon或者wall上来实现三维label效果。
使用canvas生成背景透明文字图片
首先通过document创建一个canvas
javascript
//新建图片(贴图)
const canvas = document.createElement('canvas')
const ctx = canvas.getContext('2d')
然后通过下面方法,通过传入canvas,和option来创建透明文字图片具体参数可以参考text变量
javascript
// 文字内容
var text = {
 txt : '测试大桥',//文字内容
 color : 'rgb(255,255,0)',//文字颜色
 fontSize : 80,//文字大小
 position : [116.14845286822154,40.232665482746306,18.2629], // 中心坐标
 rotation : 0 // 旋转角度°(顺时针)
}

function createImage(canvas,ctx,option) {

 ctx.clearRect(0, 0, ctx.width, ctx.height)
 const txt =option.txt

 const chineseLength = txt.match(/[^\u0000-\u00ff]/g)?.length || 0
 const txtLength = (txt.length - chineseLength) / 2 + chineseLength
 const fontSize = option.fontSize

 const padding = fontSize / 4
 const canvasHeight = fontSize + padding
 const canvasWidth = txtLength * fontSize + padding * 2
 canvas.height = canvasHeight
 canvas.width = canvasWidth

 ctx.font = fontSize + 'px Arial'
 ctx.fillStyle = option.color
 ctx.fillText(txt, padding, fontSize)
 return { canvasWidth, canvasHeight }
}
创建polygon/wall并且使用自定义贴图
根据option中的中心点,自动计算ry,rx 计算wall的hierarchy,最后在material设置为图片
javascript
     function addWall(canvas,ctx,option) {
         const unitWidth = 0.000005
         const unitHeight = 6 / 20
         const coods = option.position
         const { canvasWidth, canvasHeight } = createImage(canvas,ctx,option)
         const w = unitWidth * canvasWidth / 2
         const h = unitHeight * canvasHeight

         const ry = Math.sin(option.rotation / 180 * Math.PI) * w
         const rx = Math.cos(option.rotation / 180 * Math.PI) * w
          // 水平效果
         var txtpolygon = viewer.entities.add({
             polygon: {
                     hierarchy: Cesium.Cartesian3.fromDegreesArray([
                       coods[0]- rx,
                       coods[1],
                       coods[0]- rx,
                       coods[1]- rx/3,
                       coods[0],
                       coods[1]- rx/3,
                       coods[0],
                       coods[1]]
                      ),
                      height:  coods[2],
                   material: new Cesium.ImageMaterialProperty({
                       image: canvas.toDataURL('image/png'),
                       transparent: true
                     })
             }
         }) }
存在问题
当文字图片和赋值的polygon/wall角度或者外接形状不同时,会导致文字大小不可控,文字出现变形的问题,只能一点一点调整角度进行适配。
完整代码
javascript
function onload(Cesium) {
     var viewer = new Cesium.Viewer('cesiumContainer');

     var scene = viewer.scene;
     scene.lightSource.ambientLightColor = new Cesium.Color(0.65, 0.65, 0.65, 1);

     var promise = scene.open(URL_CONFIG.SCENE_MOVINGLIGHT);

     Cesium.when(promise, function (layers) {
         // 文字内容
         var text = {
           txt : '测试大桥',
           color : 'rgb(255,255,0)',
           fontSize : 80,
           position : [116.14845286822154,40.232665482746306,18.2629], // 中心坐标
           rotation : 0 // 旋转角度°(顺时针)
         }
         //新建图片(贴图)
         const canvas = document.createElement('canvas')
         const ctx = canvas.getContext('2d')
         //创建面
         addWall(canvas,ctx,text);
     });

     function createImage(canvas,ctx,option) {

         ctx.clearRect(0, 0, ctx.width, ctx.height)
         const txt =option.txt

         const chineseLength = txt.match(/[^\u0000-\u00ff]/g)?.length || 0
         const txtLength = (txt.length - chineseLength) / 2 + chineseLength
         const fontSize = option.fontSize

         const padding = fontSize / 4
         const canvasHeight = fontSize + padding
         const canvasWidth = txtLength * fontSize + padding * 2
         canvas.height = canvasHeight
         canvas.width = canvasWidth

         ctx.font = fontSize + 'px Arial'
         ctx.fillStyle = option.color
         ctx.fillText(txt, padding, fontSize)
         return { canvasWidth, canvasHeight }
     }

     function addWall(canvas,ctx,option) {

         const unitWidth = 0.000005
         const unitHeight = 6 / 20
         const coods = option.position
         const { canvasWidth, canvasHeight } = createImage(canvas,ctx,option)
         const w = unitWidth * canvasWidth / 2
         const h = unitHeight * canvasHeight

         const ry = Math.sin(option.rotation / 180 * Math.PI) * w
         const rx = Math.cos(option.rotation / 180 * Math.PI) * w
          // 水平效果
         var txtpolygon = viewer.entities.add({
             polygon: {
                     hierarchy: Cesium.Cartesian3.fromDegreesArray([
                       coods[0]- rx,
                       coods[1],
                       coods[0]- rx,
                       coods[1]- rx/3,
                       coods[0],
                       coods[1]- rx/3,
                       coods[0],
                       coods[1]]
                      ),
                      height:  coods[2],
                   material: new Cesium.ImageMaterialProperty({
                       image: canvas.toDataURL('image/png'),
                       transparent: true
                     })
             }
         })
            // 创建线效果
     var redLine = viewer.entities.add({
         name : 'Red line on the surface',
         polyline : {
             positions : Cesium.Cartesian3.fromDegreesArrayHeights([coods[0]- rx,coods[1]- rx/3, coods[2],coods[0],coods[1]- rx/3, coods[2]]),
             width : 5,
             material : Cesium.Color.RED
         }
     });


             // 创建垂直效果
         var txtWall = viewer.entities.add({
           name: 'WallTxt',
           wall: {
             positions: Cesium.Cartesian3.fromDegreesArrayHeights([
               coods[0] - rx,
               coods[1] - ry,
               coods[2],
               coods[0] + rx,
               coods[1] + ry,
               coods[2]
             ]),
             minimumHeights: [coods[2], coods[2]],
             maximumHeights: [coods[2] + h, coods[2] + h],
             material: new Cesium.ImageMaterialProperty({
               image: canvas.toDataURL('image/png'),
               transparent: true
             })
           }
         })
      }
 }
 if (typeof Cesium !== 'undefined') {
     window.startupCalled = true;
     onload(Cesium);
 }