
MCP 系列 1/3 | 实战笔记
版本:Spring AI 1.1.6 · Spring Boot 3.5.5 · JDK 21 · MCP SDK 0.18.2(2026-06 实测)
系列导航
| 篇 | 主题 | 状态 |
|---|---|---|
| (一)架构+Client | Dream-MCP架构 + SSE/Streamable HTTP + 三层观测 | ✅ 本文 |
| (二)Server端 | 两种注册路径 + SPI平台聚合 + 踩坑 | 🔜 下一章 |
| (三)串联 | MCP+Graph+RAG完整Agent | 🔜 规划中 |
📌 关联阅读:Java后端怎么接MCP才能放心上线?
前情提要
Graph 的 Supervisor 跑通之后,学习线切到 MCP。第一天卡住的不是协议,而是 8090 连 8095 的地址写了三遍还对不上------业务 yml 一套、文档一套、Spring AI Client 还要一套。
后来才在 Dream-SaaS 里抽出 dream-ai-mcp:名册一处维护,平台统一聚合工具,日志里能看出来连的是哪个 Server。
MCP 是什么(30 秒)
MCP 就是给大模型接「外挂」的标准协议:Client 连 Server,Server 暴露 Tools,模型需要时再调用。
用 Cursor 连搜索、连数据库,背后就是这个模式。和手写 HTTP 接口相比,好处是 工具可自动发现 (list_tools),Client 不用每个集成各写一套适配。
在 Dream-SaaS 里分工:
bash
┌─────────────────────────────────────────────────────────────┐
│                        Dream-SaaS                           │
├─────────────────────────────────────────────────────────────┤
│                                                             │
│   ┌─────────────────┐              ┌─────────────────────┐  │
│   │  8090 Client    │              │   8095 Server       │  │
│   │  dream-ai-app   │◄──── SSE ───►│   code-review-agent │  │
│   │                 │              │                     │  │
│   │  拉取远程工具    │              │  暴露 review_code   │  │
│   │  给 ChatClient  │              │  等 MCP Tools       │  │
│   └─────────────────┘              └─────────────────────┘  │
│           │                                                      │
│           │ SSE                                                  │
│           ▼                                                      │
│   ┌─────────────────┐              ┌─────────────────────┐  │
│   │  智谱 web_search │              │   高德 Maps         │  │
│   │  (第三方MCP)     │              │   (第三方MCP)       │  │
│   └─────────────────┘              └─────────────────────┘  │
│                                                             │
└─────────────────────────────────────────────────────────────┘
核心分工:
- 8095(code-review-agent) --- MCP Server,对外暴露
review_code等工具 - 8090(dream-ai-app) --- MCP Client,拉远程工具给 ChatClient 用
- 智谱 web_search 等 --- 第三方 MCP Server,可选
⚠️ Supervisor 管的是进程内 Graph ;MCP 管跨服务工具。两件事可以并存,别拿 Graph 替代 MCP 建连。
散着写 MCP,我踩过三类坑
Dream-SaaS 是 一个大仓库 (审查在 8095,聚合入口在 8090,MCP 平台在 dream-ai-mcp)。
💡 项目地址:github.com/logosssss/D...
如果 MCP 不单独治理,会遇到这三个经典问题:
坑 1:URL 对不上
改个端口要全仓库搜 yml,文档和代码各说各话。
坑 2:Spring 循环依赖
@Tool 如果被注册成全局 ToolCallbackProvider,会和 CodeReviewServiceNew → ChatModel 打结,启动直接炸。
坑 3:远程调用黑盒
Client 调智谱失败,日志只有超时,看不出是哪个 connection。
解决方案:拆出 dream-ai-mcp 平台层
名册、Contributor 聚合、Client 观测放这里;业务 @Tool 仍留在 code-review-agent,平台 jar 不碰审查逻辑。
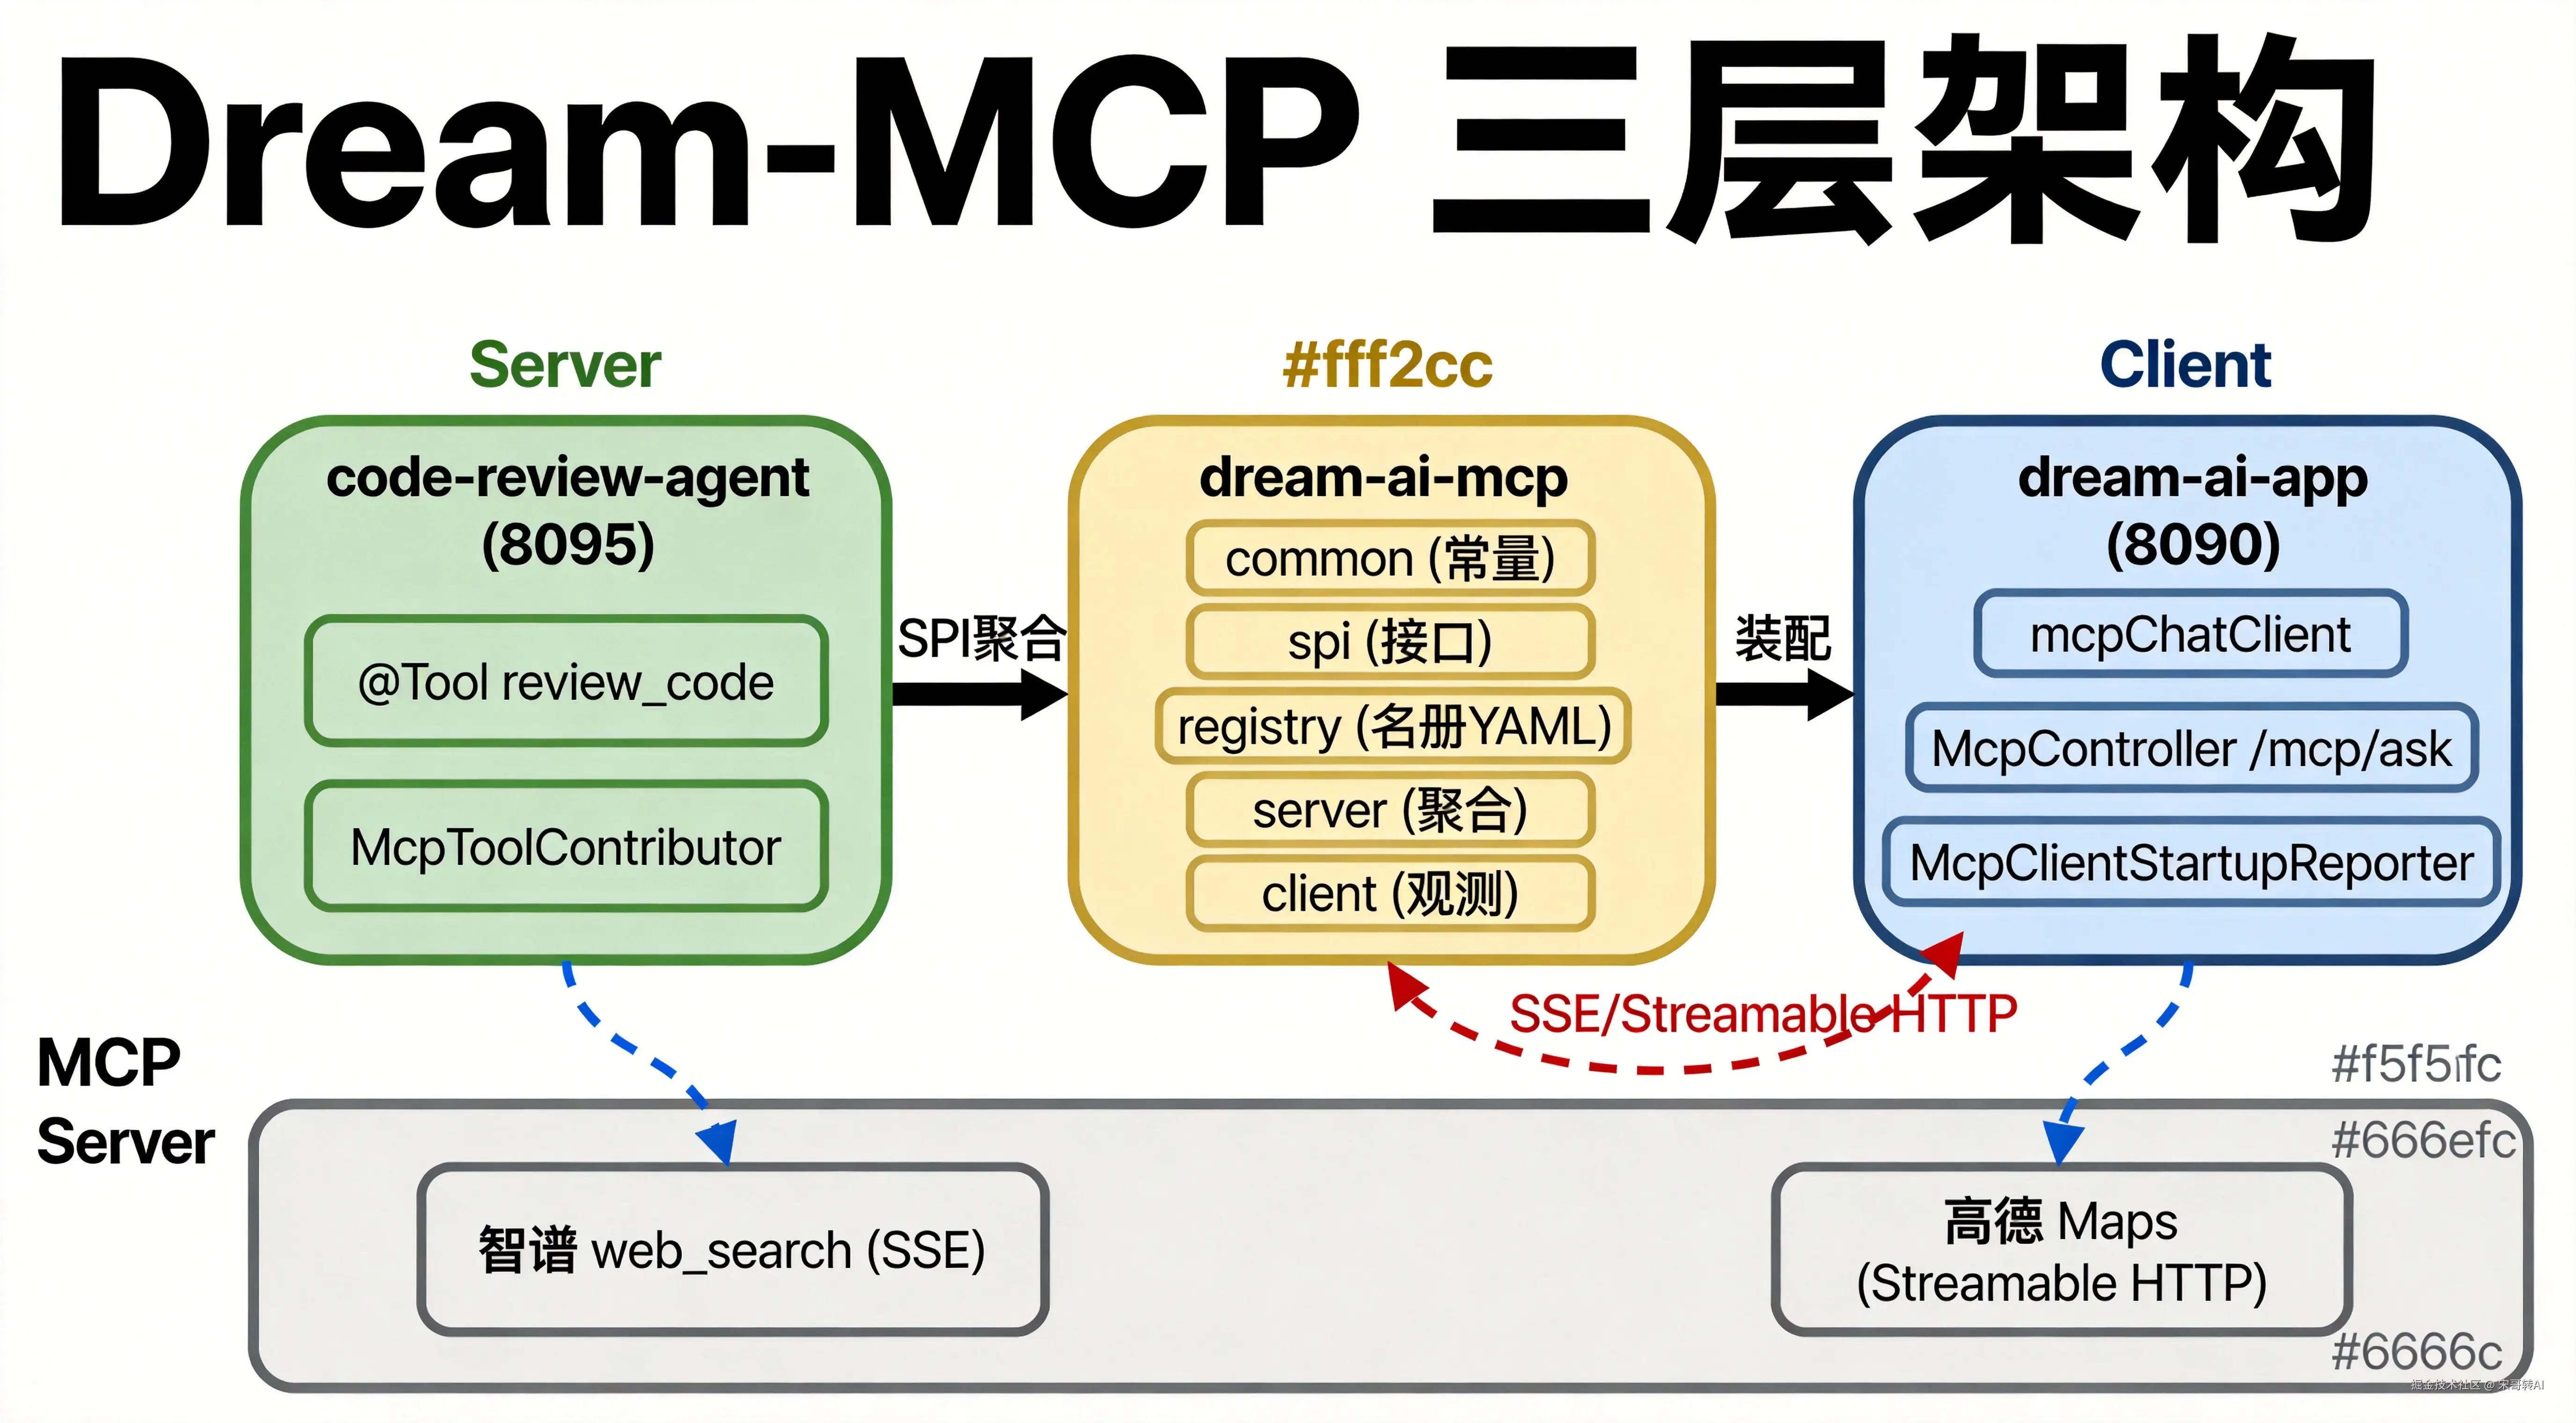
图1 · Server侧写Tool → 平台层聚合 → Client侧消费,SSE弧线回连8095
五子模块依赖
bash
dream-ai-mcp (父 POM)
├── dream-saas-mcp-common        # 模块 ID、connection 常量
├── dream-saas-mcp-spi           # McpToolContributor 接口
├── dream-saas-mcp-registry      # 名册 YAML,登记「该连谁」
├── dream-saas-mcp-server        # 聚合 Contributor 成 MCP 工具规格
└── dream-saas-mcp-client        # mcpChatClient、REST 诊断、[MCP-TOOL] 日志
这样拆的好处:
server只依赖spi,不 依赖code-review-agent。以后给 LLM 加新能力(RAG 检索、工单查询),只要在对应业务模块实现 Contributor,不用动平台 jar。
这和 Java 里「接口在 api、实现在 biz」是同一个思路,只是换成 MCP 的 Tool 暴露方式。
双轨配置:别在 8090 里抄第三遍 URL
学 MCP 配置时最容易困惑的一点:为什么同一份 YAML 里有两套路?
| 轨 | 配置前缀 | 干什么 |
|---|---|---|
| 名册 | dream-saas.mcp.registry.* |
文档化 + /mcp/status 诊断:这个应用应该连谁 |
| 建连 | spring.ai.mcp.client.sse.connections.* |
Spring AI 真正发起 SSE 连接 |
Spring AI 只认第二套;第一套是我们加的「名册层」,避免 8090、8095 各写一套 URL。
⚠️ 关键规矩: 比如
code-review-local,在 registry 的 connections 和 Spring AI 的 connections 里 必须同名 。少对齐一个键,就会出现 status 里有记录、但tools=0的鬼畜状态。
名册文件:dream-saas-mcp-registry-default.yml
bash
dream-saas:
  mcp:
    registry:
      servers:
        code-review-local:
          module-id: code-review
          url: ${MCP_CODE_REVIEW_SERVER_URL:http://127.0.0.1:8095}
          sse-endpoint: /mcp/sse
      connections:
        code-review-local:
          transport: sse
          url: http://127.0.0.1:8095
          sse-endpoint: /mcp/sse
        zhipu-web-search:
          transport: sse
          url: https://open.bigmodel.cn
          sse-endpoint: /api/mcp/web_search/sse?Authorization=${ZHIPU_API_KEY:}
        amap-maps:
          transport: streamable-http
          url: https://mcp.amap.com
          endpoint: /mcp?key=${AMAP_MAPS_API_KEY:}

spring:
  ai:
    mcp:
      client:
        sse:
          connections:
            code-review-local:
              url: http://127.0.0.1:8095
              sse-endpoint: /mcp/sse
            zhipu-web-search:
              url: https://open.bigmodel.cn
              sse-endpoint: /api/mcp/web_search/sse?Authorization=${ZHIPU_API_KEY:}
        streamable-http:
          connections:
            amap-maps:
              url: https://mcp.amap.com
              endpoint: /mcp?key=${AMAP_MAPS_API_KEY:}
8090 Client 侧配置:application-mcp.yml
bash
spring:
  ai:
    mcp:
      client:
        enabled: true
        sse:
          connections: {}   # 由名册 import 填充
        streamable-http:
          connections: {}   # 由名册 import 填充
    profile-id: dream-ai-app

dream-saas:
  mcp:
    client:
      enabled: true

spring.config.import: classpath:dream-saas-mcp-registry-default.yml
💡 8090 只做两件事:打开 Client、指定
profile-id。URL 写在名册文件里 import 进来,不在 8090 重复粘贴。
8095 Server 侧配置:application-mcp.yml
bash
spring:
  ai:
    mcp:
      server:
        enabled: true
        type: sync
        protocol: streamable
        streamable-http:
          mcp-endpoint: /mcp
        annotation-scanner:
          enabled: false    # 方式B Contributor模式,不开 scanner

dream-saas:
  mcp:
    server:
      enabled: true         # 开平台聚合
⚠️ 两个开关都要开 :
spring.ai.mcp.server.enabled打开 SSE 端点;dream-saas.mcp.server.enabled才走 Contributor 聚合出review_code。只开前一个,Inspector 能连上,工具列表却是空的------第一周很容易卡在这。
本地联调启动命令
第一轮联调建议 先只连本机 8095,别一上来全开智谱、高德。
PowerShell
bash
# 终端A --- 先起 8095 Server
cd code-review-agent
mvn spring-boot:run -Pmcp "-Dspring-boot.run.jvmArguments=-Dspring.profiles.active=mcp"

# 终端B --- 再起 8090 Client(等8095起来)
cd dream-ai-app
mvn spring-boot:run "-Dspring-boot.run.jvmArguments=-Dserver.port=8090 -Dspring.profiles.active=mcp"
验收命令
bash
# 协议面:Inspector 查 8095 工具列表
npx --yes @modelcontextprotocol/inspector --cli http://127.0.0.1:8095/mcp --method tools/list

# 集成面:8090 诊断端点
curl http://127.0.0.1:8090/mcp/tools
curl http://127.0.0.1:8090/mcp/status
预期结果:
- 日志
[MCP-CLIENT] expectedConnections只有本机 /mcp/tools大约 2 个工具名 (review_code、get_review_history)
验收通过,再加远程 MCP,一步一验收。
⚠️ 打包别忘
-Pmcp和--spring.profiles.active=mcp,否则 classpath 里根本没有 MCP Starter。
@Tool 和 MCP 别混
Spring AI 的 @Tool 是应用内调 Java 方法;MCP Tool 是跨进程、走 SSE 协议。
Dream-SaaS 的做法:
bash
┌────────────────────────────────────────────────────────────┐
│                    code-review-agent                       │
│                                                            │
│   @Service                                                  │
│   public class CodeReviewService {                         │
│       @Tool                                                 │
│       public String reviewCode(String code) { ... }        │
│   }                                                         │
└────────────────────────────────────────────────────────────┘
                            │
                            ▼  Contributor 包装
┌────────────────────────────────────────────────────────────┐
│                   dream-saas-mcp-server                    │
│                                                            │
│   @Component                                                │
│   public class CodeReviewContributor implements            │
│       McpToolContributor { ... }                         │
│                                                            │
│   // 同一个 reviewCode 方法,多一种对外暴露方式              │
└────────────────────────────────────────────────────────────┘
业务类上仍然写 @Tool ,平台层负责 转成 MCP 规格 挂到 /mcp/sse------同一套审查逻辑,多一种对外暴露方式,不是二选一。
下篇预告
第 2 篇讲 两种注册方式 + Dream-MCP 落地(含多 Server 名册):
- 方式A:
@EnableMcpServer+annotation-scanner - 方式B:
McpToolContributor+ 手动注册
第 3 篇跟 dream-ai-app 完整业务链(本机审查 + 智谱等外部 MCP)。