Linux磁盘扩容
Linux磁盘扩容的磁盘扩容分为两个场景,一个是新增一个磁盘,另一个是在原有磁盘扩容。
新增一个磁盘
1、添加磁盘
物理机添加硬盘,虚拟机新增硬盘
有条件的情况下提前备份数据
2、检查新磁盘是否被系统识别
bash
# 查看所有块设备
lsblk


[root@localhost ~]# lsblk
NAME            MAJ:MIN RM  SIZE RO TYPE MOUNTPOINT
sda               8:0    0   40G  0 disk
├─sda1            8:1    0    1G  0 part /boot
└─sda2            8:2    0   39G  0 part
  ├─centos-root 253:0    0 35.1G  0 lvm  /
  └─centos-swap 253:1    0  3.9G  0 lvm  [SWAP]
sdb               8:16   0   20G  0 disk          <-- 新磁盘
sdc               8:32   0   20G  0 disk          <-- 新磁盘
sr0              11:0    1  4.4G  0 rom  /run/media/xuxh/CentOS 7 x86_64
3、对sdb进行分区,20G为一个盘
bash
# 进入 fdisk 交互界面
sudo fdisk /dev/sdb

Welcome to fdisk (util-linux 2.23.2).
欢迎使用 fdisk(util-linux 2.23.2)。
Changes will remain in memory only, until you decide to write them.
更改将仅保留在内存中,直到您决定将其写入。
Be careful before using the write command.
使用写入命令前请务必小心。
Command (m for help): n (新建分区)
命令(按m键获取帮助):

Partition type:
分区类型:
   p   primary (0 primary, 0 extended, 4 free)
   p 主分区(0 个主分区,0 个扩展分区,4 个空闲分区)
   e   extended
   e代表"extended",即"扩展的"
Select (default p): p
选择(默认p):

Partition number (1-4, default 1):1
分区号(1-4,默认为1):
First sector (2048-41943039, default 2048): 回车
第一扇区(2048-41943039,默认值2048):
Using default value 2048
使用默认值2048
Last sector, +sectors or +size{K,M,G} (2048-41943039, default 41943039): 回车
最后一个扇区,+扇区数或+大小{K,M,G}(2048-41943039,默认值41943039):

Using default value 41943039
使用默认值41943039
Partition 1 of type Linux and of size 20 GiB is set
已设置类型为Linux、大小为20 GiB的分区1
Command (m for help):w(写入分区表并退出)

The partition table has been altered!
分区表已被更改!
Calling ioctl() to re-read partition table.
Syncing disks.
调用ioctl()函数以重新读取分区表。
正在同步磁盘。
4、对sdc进行分区,20G为5G+5G+10G(不分配)
bash
fdisk /dev/sdc
Welcome to fdisk (util-linux 2.23.2).

Changes will remain in memory only, until you decide to write them.
Be careful before using the write command.

# 分区1
Command (m for help): n
Partition type:
   p   primary (0 primary, 0 extended, 4 free)
   e   extended
Select (default p): p
Partition number (1-4, default 1): 1
First sector (2048-41943039, default 2048): 回车
Using default value 2048
Last sector, +sectors or +size{K,M,G} (2048-41943039, default 41943039): +5G
Partition 1 of type Linux and of size 5 GiB is set

# 分区2
Command (m for help): n
Partition type:
   p   primary (1 primary, 0 extended, 3 free)
   e   extended
Select (default p): p
Partition number (2-4, default 2): 2
First sector (10487808-41943039, default 10487808): 回车
Using default value 10487808
Last sector, +sectors or +size{K,M,G} (10487808-41943039, default 41943039): +5G
Partition 2 of type Linux and of size 5 GiB is set

Command (m for help): n
Partition type:
   p   primary (2 primary, 0 extended, 2 free)
   e   extended
Select (default p): p
Partition number (3,4, default 3):回车
First sector (20973568-41943039, default 20973568):回车
Using default value 20973568
Last sector, +sectors or +size{K,M,G} (20973568-41943039, default 41943039):回车
Using default value 41943039
Partition 3 of type Linux and of size 10 GiB is set

Command (m for help): w
The partition table has been altered!

Calling ioctl() to re-read partition table.
Syncing disks.
5、验证
bash
lsblk
NAME            MAJ:MIN RM  SIZE RO TYPE MOUNTPOINT
sda               8:0    0   40G  0 disk
├─sda1            8:1    0    1G  0 part /boot
└─sda2            8:2    0   39G  0 part
  ├─centos-root 253:0    0 35.1G  0 lvm  /
  └─centos-swap 253:1    0  3.9G  0 lvm  [SWAP]
sdb               8:16   0   20G  0 disk
└─sdb1            8:17   0   20G  0 part
sdc               8:32   0   20G  0 disk
├─sdc1            8:33   0    5G  0 part
├─sdc2            8:34   0    5G  0 part
└─sdc3            8:35   0   10G  0 part
sr0              11:0    1  4.4G  0 rom  /run/media/xuxh/CentOS 7 x86_64
5.1、删除错误分区
bash
lsblk
sdc               8:32   0   20G  0 disk
├─sdc1            8:33   0   15G  0 part
└─sdc3            8:35   0    5G  0 part

fdisk /dev/sdc
Welcome to fdisk (util-linux 2.23.2).

Changes will remain in memory only, until you decide to write them.
Be careful before using the write command.


Command (m for help): d
Partition number (1,3, default 3): 1
Partition 1 is deleted

Command (m for help): d
Selected partition 3
Partition 3 is deleted

Command (m for help): w
The partition table has been altered!

Calling ioctl() to re-read partition table.
Syncing disks.
删除后再重新验证一下,没问题就重新开始
6、格式化
mkfs文件系统类型也有讲究,最好是百度一下再决定下一步
bash
sudo mkfs.ext4 /dev/sdb1
sudo mkfs.ext4 /dev/sdc1
sudo mkfs.ext4 /dev/sdc2
7、挂载分区
bash
sudo mkdir -p /mnt/disk_sdb1   # 对应 sdb1
sudo mkdir -p /mnt/disk_sdc1   # 对应 sdc1
sudo mkdir -p /mnt/disk_sdc2   # 对应 sdc2
7.1、临时挂载
手动挂载,重启失效
bash
sudo mount /dev/sdb1 /mnt/disk_sdb1
sudo mount /dev/sdc1 /mnt/disk_sdc1
sudo mount /dev/sdc2 /mnt/disk_sdc2

# 验证
df -hT | grep -E "sdb1|sdc1|sdc2"

/dev/sdb1      xfs       20G  33M   20G   1% /mnt/disk_sdb1
/dev/sdc1      xfs      5.0G  33M  5.0G   1% /mnt/disk_sdc1
/dev/sdc2      xfs      5.0G  33M  5.0G   1% /mnt/disk_sdc2
7.2、永久挂载
开机自动挂载
bash
sudo blkid /dev/sdb1 /dev/sdc1 /dev/sdc2

/dev/sdb1: UUID="81d0492e-d180-4f83-a3d6-c932eba06a35" TYPE="ext4"
/dev/sdc1: UUID="83202952-2836-4d40-81bd-0c8f26660f3d" TYPE="ext4"
/dev/sdc2: UUID="fde4c7ee-7f5c-4a8e-a131-16761df483d3" TYPE="ext4"
操作前可以备份fstab,看个人
bash
sudo cp /etc/fstab /etc/fstab.bak
sudo vi /etc/fstab


UUID=81d0492e-d180-4f83-a3d6-c932eba06a35  /mnt/data_sdb1  ext4  defaults  0 0
UUID=83202952-2836-4d40-81bd-0c8f26660f3d  /mnt/data_sdc1  ext4  defaults  0 0
UUID=fde4c7ee-7f5c-4a8e-a131-16761df483d3  /mnt/data_sdc2  ext4  defaults  0 0
8、验证
bash
sudo mount -a # 不报错

df -h | grep -E "data_sdb1|data_sdc1|data_sdc2"
/dev/sdb1                 20G   45M   19G   1% /mnt/data_sdb1
/dev/sdc1                4.8G   20M  4.6G   1% /mnt/data_sdc1
/dev/sdc2                4.8G   20M  4.6G   1% /mnt/data_sdc2
原有磁盘扩容(fdisk)
把sdc3的10加到sdc2的5G,变成15G。
前提是 sdc2 和 sdc3 在磁盘上是连续的(即 sdc3 紧跟在 sdc2 后面)。根据之前的分区创建顺序(sdc1、sdc2、sdc3),它们是连续的,可以合并。
还有一种用parted操作,但是我还没试过,后面试过再补充了
1、卸载分区
bash
sudo umount /dev/sdc2 /dev/sdc32、删除分区
bash
[root@localhost /]# sudo fdisk /dev/sdc
Welcome to fdisk (util-linux 2.23.2).

Changes will remain in memory only, until you decide to write them.
Be careful before using the write command.

# 记一下分区
Command (m for help): p

Disk /dev/sdc: 21.5 GB, 21474836480 bytes, 41943040 sectors
Units = sectors of 1 * 512 = 512 bytes
Sector size (logical/physical): 512 bytes / 512 bytes
I/O size (minimum/optimal): 512 bytes / 512 bytes
Disk label type: dos
Disk identifier: 0xdb9b3529

   Device Boot      Start         End      Blocks   Id  System
/dev/sdc1            2048    10487807     5242880   83  Linux
/dev/sdc2        10487808    20973567     5242880   83  Linux
/dev/sdc3        20973568    41943039    10484736   83  Linux

# 删除分区3
Command (m for help): d
Partition number (1-3, default 3): 3
Partition 3 is deleted

# 删除分区2
Command (m for help): d
Partition number (1,2, default 2): 2
Partition 2 is deleted

# 重新创建,注意起始位置
Command (m for help): n
Partition type:
   p   primary (1 primary, 0 extended, 3 free)
   e   extended
Select (default p): p
Partition number (2-4, default 2): 2
First sector (10487808-41943039, default 10487808):
Using default value 10487808
Last sector, +sectors or +size{K,M,G} (10487808-41943039, default 41943039):
Using default value 41943039
Partition 2 of type Linux and of size 15 GiB is set

Command (m for help): w
The partition table has been altered!

Calling ioctl() to re-read partition table.

# 告警
WARNING: Re-reading the partition table failed with error 16: Device or resource busy.
The kernel still uses the old table. The new table will be used at
the next reboot or after you run partprobe(8) or kpartx(8)
Syncing disks.
说明内核仍在占用 /dev/sdc 上的某个分区(很可能是 /dev/sdc2 还在挂载中,或者有进程在使用它)。因此新分区表无法立即生效。只能重启
bash
[root@localhost ~]# lsblk
NAME            MAJ:MIN RM  SIZE RO TYPE MOUNTPOINT
sda               8:0    0   40G  0 disk
├─sda1            8:1    0    1G  0 part /boot
└─sda2            8:2    0   39G  0 part
  ├─centos-root 253:0    0 35.1G  0 lvm  /
  └─centos-swap 253:1    0  3.9G  0 lvm  [SWAP]
sdb               8:16   0   20G  0 disk
└─sdb1            8:17   0   20G  0 part /mnt/data_sdb1
sdc               8:32   0   20G  0 disk
├─sdc1            8:33   0    5G  0 part /mnt/data_sdc1
└─sdc2            8:34   0   15G  0 part /mnt/data_sdc2
sr0              11:0    1  4.4G  0 rom
重启后分区正常
3、验证文件系统
bash
 df -h /mnt/data_sdc2
Filesystem      Size  Used Avail Use% Mounted on
/dev/sdc2       4.8G   20M  4.6G   1% /mnt/data_sdc2
4、卸载/dev/sdc2
bash
sudo umount /mnt/data_sdc25、扩展文件系统
bash
# 1. 检查文件系统(此时未挂载,可以安全执行)
sudo e2fsck -f /dev/sdc2
e2fsck 1.42.9 (28-Dec-2013)
Pass 1: Checking inodes, blocks, and sizes
Pass 2: Checking directory structure
Pass 3: Checking directory connectivity
Pass 4: Checking reference counts
Pass 5: Checking group summary information
/dev/sdc2: 18/327680 files (0.0% non-contiguous), 58462/1310720 blocks


# 2. 扩展文件系统到分区大小
sudo resize2fs /dev/sdc2
resize2fs 1.42.9 (28-Dec-2013)
Resizing the filesystem on /dev/sdc2 to 3931904 (4k) blocks.
The filesystem on /dev/sdc2 is now 3931904 blocks long.


# 3. 重新挂载
sudo mount /dev/sdc2 /mnt/data_sdc2

# 4. 验证
NAME            MAJ:MIN RM  SIZE RO TYPE MOUNTPOINT
sda               8:0    0   40G  0 disk
├─sda1            8:1    0    1G  0 part /boot
└─sda2            8:2    0   39G  0 part
  ├─centos-root 253:0    0 35.1G  0 lvm  /
  └─centos-swap 253:1    0  3.9G  0 lvm  [SWAP]
sdb               8:16   0   20G  0 disk
└─sdb1            8:17   0   20G  0 part /mnt/data_sdb1
sdc               8:32   0   20G  0 disk
├─sdc1            8:33   0    5G  0 part /mnt/data_sdc1
└─sdc2            8:34   0   15G  0 part /mnt/data_sdc2
sr0              11:0    1  4.4G  0 rom
报错
1、挂在磁盘后,开机就进入维护页面
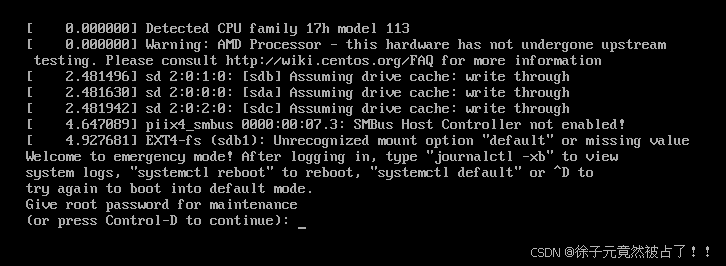
系统进入了紧急模式(emergency mode),核心原因是 /etc/fstab 文件中的挂载选项存在语法错误。具体错误为:EXT4-fs (sdb1): Unrecognized mount option "default" or missing value
应该是defaults
- 输入root密码
- 检查并修复/etc/fstab
- mount -o remount,rw /
- vi /etc/fstab
- 找到sdb1,删除default或者重新检查语句
- 重新挂载mount -a,没有报错就可以
- 重启 reboot