文章目录
- Python是什么
-
- 数据类型:
- 逻辑和运算符
-
- [布尔运算 --- and, or, not](#布尔运算 --- and, or, not)
- 数字运算
-
- [1.python中的取模 % 与 math.fmod() 是否完全相同?](#1.python中的取模 % 与 math.fmod() 是否完全相同?)
- 2.python中的**和math.pow是否完全相同呢?
- 3.运算优先级
- 字符串的学习
-
- 字符串的新建
- 字符串(文本)和二进制的区别和转化
- 字符串的格式化
- 字符串的常见方法
-
- 搜索与替换
- 拆分与合并
- 分类方法和大小写转化
-
- [1.简述 isdecimal、isdigit、isnumeric 的区别?](#1.简述 isdecimal、isdigit、isnumeric 的区别?)
- 2.lower和casefold的区别?
- 填充与去除方法
- 总结一下
Python是什么
概括来说 P y t h o n Python Python 是一门高级、解释型、跨平台、面向对象的编程语言,其实我在学它的时候还是更侧重于看它的API文档和源码,关于我的学习总结如下:
数据类型:
打开 P y t h o n Python Python官网,就可以看到:
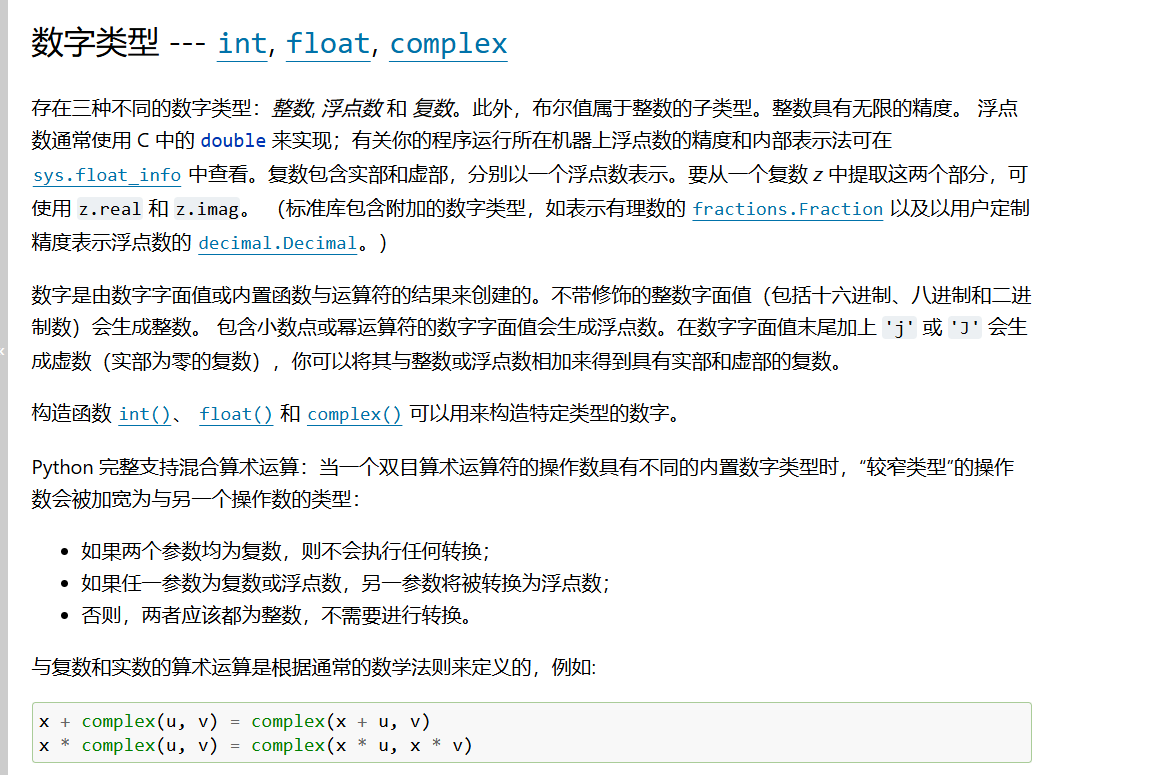
在这里提到的数据类型有 i n t int int, f l o a t float float, c o m p l e x complex complex,分别代表整数,浮点数和复数,那我提出以下几个问题:
1.python的int,float类型的数值有上限吗?
回答:对于 i n t int int而言的话, P y t h o n 3 Python3 Python3 的 i n t int int 是任意精度大整数,底层用动态数组存储数字块,数值多大就自动分配多少内存,不会像 C / C + + C/C++ C/C++ 那样溢出报错。
对于 f l o a t float float而言的话, P y t h o n Python Python 的 f l o a t float float 遵循 IEEE 754 64 位双精度浮点数,硬件固定 64 位存储,有明确边界也就是说它的范围是:
正数区间:2.225e-308 ~ 1.797e+308
负数区间:-1.797e+308 ~ -2.225e-308
py
import sys
print(sys.float_info.max)
print(sys.float_info.min)
2.布尔类型和int类型的关系?
布尔本质是 int 子类,还比较容易错:
py
print(1 == True)  # True
print(0 == False) # True
3.float里的特殊值:inf、-inf、nan分别代表什么?
其实在计算机的浮点数标准(IEEE 754)中,他们分别代表了正无穷大,负无穷大和非数,代码如下:
py
a = float("inf")
b = float("-inf")
c = float("nan")
print(a)
print(b)
print(c)
# 验证 inf 的大小关系
print(a > 100000)      # 输出: True
print(b < -100000)     # 输出: True
# 验证 nan 的特殊性
print(c == c)          # 输出: False,因为nan 和任何数都不相等,包括自己
print(c != c)          # 输出: True
# 正确的判断 nan 的方法
import math
print(math.isnan(c))   # 输出: True
4.0.0和-0.0是否完全相同?
其实并不是,因为 0.0 和 -0.0 底层有区别,但判等相等,本质上,虽然说print(0.0==-0.0)会返回True,但它的低层本质上还是不同,比如我们从二进制来看:
py
import struct
print(struct.pack('>d', 0.0).hex())   # 输出'0000000000000000'
print(struct.pack('>d', -0.0).hex())  # 输出'8000000000000000'
5.怎么判断参数类型?
在 p y t h o n python python中一般来说是用type ()来判断,用isinstance () 来比较,那它们有啥区别呢?
对于type()来说:
只读取 ob_type,严格匹配直接类型;
不识别继承关系;
不重写,无法自定义改变返回值。
而对于isinstance () 来说:
底层遍历整个继承链 MRO,递归对比所有父类,支持继承判断;还会读取 instancecheck 魔术方法支持自定义判断。
比较代码如下:
py
#int类型
a=10
print(a)
b=int(input("请输入一个数字:")) #手动输入一个数字
print(a+b)
print(type(a))
print(isinstance(a,float)) #判断a是否是float类型,输出:False
# 浮点数float类型
a=10.5
print(a)
b=float(input("请输入一个数字:"))
print(a+b)
print(type(a))
print(isinstance(a,int)) #判断a是否是int类型,输出:False
class A: pass
class B(A): pass
b = B()
print(type(b) is B)  # True
print(type(b) is A)  # False 无视父类
print(isinstance(b, A)) # True,识别继承
6.复数的用法
引用官方文件的话:
Python 完整支持混合算术运算:当一个双目算术运算符的操作数具有不同的内置数字类型时,"较窄类型"的操作数会被加宽为与另一个操作数的类型:
1.如果两个参数均为复数,则不会执行任何转换;
2.如果任一参数为复数或浮点数,另一参数将被转换为浮点数;
3.否则,两者应该都为整数,不需要进行转换。
4.与复数和实数的算术运算是根据通常的数学法则来定义的,例如:
x + complex(u, v) = complex(x + u, v)
x * complex(u, v) = complex(x * u, x * v)
本质上,总结起来就是:
规则优先级:复数 > 浮点数 > 整数(类型宽度)
代码如下:
py
# 复数的用法
# 1. 创建复数
a = complex(1, 2)
print(a)  # (1+2j)
real = float(input("请输入复数的实部:"))
imag = float(input("请输入复数的虚部:"))
b = complex(real, imag)
print(a + b)
print(type(a + b))  # <class 'complex'>
# 2. 整数 + 复数:int 自动提升为 complex(5, 0)
x = 5
z = complex(2, 3)
print(x + z)        # (7+3j)
print(type(x + z))  # <class 'complex'>
# 3. 浮点数 + 复数:float 自动提升为复数
f = 2.5
z = 1 + 4j
print(f * z)        # (2.5+10j)
print(type(f * z))  # <class 'complex'>
# 4. 读取实部、虚部(返回 float 类型)
z = 3 + 4j
print(z.real)   # 3.0  实部
print(z.imag)   # 4.0  虚部
# 5. 求复数的模(abs() 对复数求模)
print(abs(z))   # 5
逻辑和运算符
布尔运算 --- and, or, not
官方原话如下:
这些属于布尔运算,按优先级升序排列:
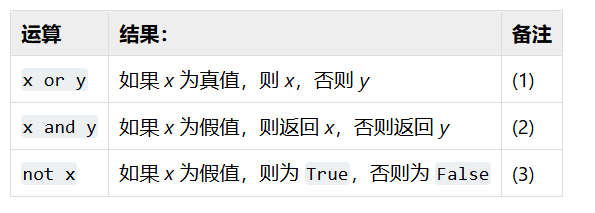
注释:
这是个短路运算符,因此只有在第一个参数为假值时才会对第二个参数求值。
这是个短路运算符,因此只有在第一个参数为真值时才会对第二个参数求值。
not 的优先级比非布尔运算符低,因此 not a == b 会被解读为 not (a == b) 而 a == not b 会引发语法错误。
代码如下:
py
# ========== 1. x or y 短路或演示 ==========
print("===== or 运算 =====")
print(3 or 5)      # x真值,返回3,短路不计算y
print(0 or 5)       # x假值,返回y=5
print("" or "hi")   # 空字符串假,返回"hi"
# 短路验证:左边为真,右侧print不会执行
10 or print("or短路:这句话不会打印")
# ========== 2. x and y 短路与演示 ==========
print("\n===== and 运算 =====")
print(0 and 9)      # x假,直接返回0,短路不计算y
print(7 and 9)      # x真,返回y=9
print([] and 123)   # 空列表假,返回[]
# 短路验证:左边为假,右侧print不会执行
0 and print("and短路:这句话不会打印")
# ========== 3. not 逻辑非、优先级演示 ==========
print("\n===== not 运算 =====")
print(not 0)        # 假取反 → True
print(not 10)       # 真取反 → False
print(not "")       # 空字符串假 → True
# not 优先级低于比较运算符
a = 1
b = 2
print(not a == b)   # 等价 not (a == b) → True
# a == not b 语法错误,正确写法加括号
print(a == (not b)) # False
# ========== 混合运算(and优先级高于or) ==========
print("\n===== 混合逻辑运算 =====")
res = 1 and 2 or 0 and 3
print("1 and 2 or 0 and 3 =", res)
x = 5
print("not x > 10 =", not x > 10)
数字运算
首先先看一段代码:
py
import math
print("===== 模拟计算机 =====")
a = float(input("请输入第一个数字: "))
s = input("请输入运算符: ")
match s:
    #加法运算
    case "+":
        b = float(input("请输入第二个数字: "))
        print(f"{a}+{b} =", a + b)
    #减法运算
    case "-":
        b = float(input("请输入第二个数字: "))
        print(f"{a}-{b} =", a - b)
    #乘法运算
    case "*":
        b = float(input("请输入第二个数字: "))
        print(f"{a}*{b} =", a * b)
    #除法运算
    case "/":
        b = float(input("请输入第二个数字: "))
        #特判除数不能为0
        if b == 0:
            print("错误:除数不能为0")
        else:
            print(f"{a}/{b} =", a / b)
    case "//":
        # 整除运算
        b = float(input("请输入第二个数字: "))
        if b == 0:
            print("错误:除数不能为0")
        else:
            print(f"{a}//{b} =", a // b)
    case "^":
        #幂次方运算
        b = float(input("请输入第二个数字: "))
        print(f"{a}^{b} =", math.pow(a, b))
    #三角函数运算
    case "sin":
        rad = math.radians(a)
        print(f"sin({a}) =", math.sin(rad))
    case "cos":
        rad = math.radians(a)
        print(f"cos({a}) =", math.cos(rad))
    case "tan":
        rad = math.radians(a)
        print(f"tan({a}) =", math.tan(rad))
    case _:
        print("不支持的运算符!")
在以上的代码中进行了常见的运算,其实它也可以用 i f if if- e l i f elif elif- e l s e else else来写,来看看它们的区别:表面上来看就是说match-case是在Python 3.10+后才出现的而其实它更加高级,就是说它的代码更简单,并可以用在更多得场景中。
再学习了官方文件后我发现以下几个问题:
1.python中的取模 % 与 math.fmod() 是否完全相同?
答:并不完全相同,因为:
% (取模):结果符号与除数(第二个参数)一致。它基于"向下取整除法"(floor division)。
math.fmod():结果符号与被除数(第一个参数)一致。它基于 C 语言的 fmod 函数,更接近"截断除法"。
比如说:
py
import math
def Mod(a, b):
    return a % b
def Mod1(a, b):
    return math.fmod(a, b)
for i in range(3):
    a = int(input("请输入a:"))
    b = int(input("请输入b:"))
    print("Python原生 % 取模:", Mod(a, b))
    print("math.fmod 取模:", Mod1(a, b))
    print("-" * 30)
#运行输出结果为:
# 请输入a:2
# 请输入b:3
# Python原生 % 取模: 2
# math.fmod 取模: 2.0
# ------------------------------
# 请输入a:-3
# 请输入b:7
# Python原生 % 取模: 4
# math.fmod 取模: -3.0
# ------------------------------
# 请输入a:-2
# 请输入b:-7
# Python原生 % 取模: -2
# math.fmod 取模: -2.0
# ------------------------------
#
# 进程已结束,退出代码为 0
在这里就可以看到其实%和math.fmod并不完全相同,在同符号的情况下是相同的,但在不同符号就会有差异以-3,7为例,就是说我的%是和第二个数字的符号相同并向下取整,那就是说-3%7=4,而我的math.fmod却是相反以第一个数字的符号相同即为除断的那种。
在此补充%的优先级问题:
% 双重用途、运算符优先级说明:优先级低于加减乘除、高于比较运算,代码如下:
py
# 1. 取模
print(7 % 3)
# 2. 字符串格式化
msg = "数字:%d,字符串:%s" % (10, "test")
print(msg)
2.python中的**和math.pow是否完全相同呢?
答:其实也不完全相同,本质上它们的返回值就不同,**会根据输入类型来看结果是啥类型,而math.pow的返回一定是个浮点型,代码如下:
py
import math
a=int(input("请输入一个数字:"))
b=int(input("请输入一个数字:"))
print(a**b)
print(math.pow(a,b))
c=float(input("请输入一个浮点数字:"))
d=float(input("请输入一个浮点数字:"))
print(c**d)
print(math.pow(c,d))
# 运行输出结果为:
# 请输入一个数字:3
# 请输入一个数字:2
# 9
# 9.0
# 请输入一个浮点数字:2.1
# 请输入一个浮点数字:1.2
# 2.4359207431734027
# 2.4359207431734027第二它们对复数的支持不同,**可以支持复数运算,但math.pow并不行,代码如下:
py
import math
a=int(input("请输入他的实部:"))
b=int(input("请输入他的虚部:"))
z=complex(a,b)
print(z**2)
print(math.pow(z,2)) #这样是会报错的
运行结果如下:
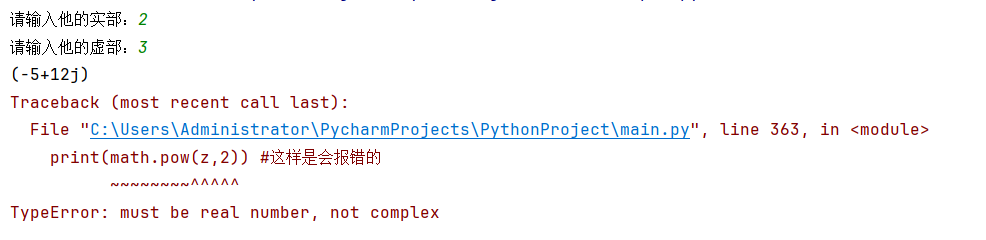
编译器说:TypeError: must be real number, not complex
就说明math.pow并不支持复数
第三 它们的精度也不相同:
1.对大整数会做精确整数运算,无精度丢失;
2.math.pow 强制转 float,超大整数直接丢失精度(浮点有 53 位有效数字限制)。
比如说我写个代码:
py
bignum=2**100
print(bignum**2)
print(math.pow(bignum,2))
#运行结果如下:
#1606938044258990275541962092341162602522202993782792835301376
#1.6069380442589903e+60
运行结果就说明了,在大数面前math.pow会以科学计数法,算不出精准结果,其实就是延续了 f l o a t float float的精度范围。
在此还补充的运算优先级 :
幂运算符优先级弱于右侧一元运算符
比如说:
py
print(2 ** -1)   # 输出0.5
print(2 ** (-3)) # 输出0.125
# 等价于 2 ** (负数),而并非 -(2**1)
print(-2 ** 2)   # -4,等价 -(2**2),一元负在左侧优先级更低
3.运算优先级
总的来说所有运算符优先级为:
先一元运算符:+x -x ~x
再幂运算 **
再乘除取模 * / // %
再加减 + -
再移位 << >>
再按位与 &
再按位异或 ^
再按位或 |
再比较 < <= > >= == !=
最后:
not
and
or
基于它我可以写出代码:
py
# 优先级运算符
# 完整表达式
res = ~ -3 ** 2 * 7 // 2 % 5 + 9 << 1 & 12 ^ 4 | 8 < 10 and not 0 or +5
print("最终结果:", res)
# 逐层拆分验证优先级
# 1.一元、幂运算:-3**2 = -(3**2) = -9
step_1 = -3 ** 2
print("1.一元负+幂:", step_1)
# 2.乘除取模:-9 *7 //2 %5
step_2 = step_1 * 7 // 2 % 5
print("2.乘除取模:", step_2)
# 3.加减:+9
step_3 = step_2 + 9
print("3.加减:", step_3)
# 4.移位 <<1
step_4 = step_3 << 1
print("4.移位:", step_4)
# 5.按位与 &12
step_5 = step_4 & 12
print("5.按位与:", step_5)
# 6.按位异或 ^4
step_6 = step_5 ^ 4
print("6.按位异或:", step_6)
# 7.按位或 |8
step_7 = step_6 | 8
print("7.按位或:", step_7)
# 8.比较 <10
step_8 = step_7 < 10
print("8.比较运算:", step_8)
# 9.not
step_9 = not 0
print("9.not运算:", step_9)
# 10.and
step_10 = step_8 and step_9
print("10.and运算:", step_10)
# 11.or,末尾一元+5
step_11 = step_10 or +5
print("11.or + 一元+:", step_11)
# 运行结果如下:
# 最终结果: 5
# 1.一元负+幂: -9
# 2.乘除取模: 3
# 3.加减: 12
# 4.移位: 24
# 5.按位与: 8
# 6.按位异或: 12
# 7.按位或: 12
# 8.比较运算: False
# 9.not运算: True
# 10.and运算: False
# 11.or + 一元+: 5
字符串的学习
还是看官方原文:
字符串的新建
官网对于字符串是这样说的:
在 Python 中处理文本数据是使用 str 对象,也称为字符串。字符串是由 Unicode 码位构成的不可变序列。字符串字面值有多种不同的写法:
单引号 : '允许包含有 "双" 引号'
双引号 : "允许嵌入 '单' 引号"
三重引号 : '''三重单引号''', """三重双引号"""
其实对于这句话的理解有以下几点:
1.Python的字符串和Java的字符串一样有不可变性,及所有的修改切片操作其实都是创造另一个新的字符串
2.由 Unicode 码位构成即是说他是由 Unicode 原生:Python3 所有字符串默认 Unicode,支持全球所有语言字符、emoji
3.对于三种初始字符串的方法代码如下:
py
a="hello world" #双引号
print(a)
print(type(a))
# 三引号
# 这个运行出来会在开始和结束都有一个换行,因为'''后的都属于字符串的内容
b='''
hello
world
'''
print(b)
print(type(b))
c='Hello World'
print(c)
print(type(c))
d='It\'s very interesting !' #这里的字符串中的'要加入\作为转义符,不然会报错
print(d)
print(type(d))
e="我说\"您好!\"" #这里的字符串中的"要加入\作为转义符,不然会报错
print(e)
print(type(e))
# 运行结果如下:
# hello world
# <class 'str'>
#
# hello
# world
#
# <class 'str'>
# Hello World
# <class 'str'>
# It's very interesting !
# <class 'str'>
# 我说"您好!"
# <class 'str'>
#
# 进程已结束,退出代码为 0
字符串(文本)和二进制的区别和转化
1.str:存储 Unicode 码位,代表人类可读文本;
2.bytes:存储原始 0~255 字节,代表二进制数据。
文本字符串可通过 .encode(encoding) 方法编码为字节串;字节串可通过 .decode(encoding) 方法解码回文本字符串。
代码如下:
py
text = "你好Python"
print("原始str文本:", text)
print("str类型:", type(text))
# 2. str.encode(编码) → 转为bytes二进制
data1 = text.encode("utf-8")
print("编码后的bytes:", data1)
print("bytes类型:", type(data1))
# 3. bytes.decode(编码) → 转回str文本
new_text = data1.decode("utf-8")
print("解码还原的str:", new_text)
print("还原后类型:", type(new_text))
# 补充易错演示:不加编码参数的str(bytes) 不会解码
print("str(data1) 不会解码,仅打印对象形式:", str(data1))
# 带编码参数才等价decode
print("str(data1, encoding='utf-8') 等价解码:", str(data1, encoding="utf-8"))
# 运行结果如下:
# 原始str文本: 你好Python
# str类型: <class 'str'>
# 编码后的bytes: b'\xe4\xbd\xa0\xe5\xa5\xbdPython'
# bytes类型: <class 'bytes'>
# 解码还原的str: 你好Python
# 还原后类型: <class 'str'>
# str(data1) 不会解码,仅打印对象形式: b'\xe4\xbd\xa0\xe5\xa5\xbdPython'
# str(data1, encoding='utf-8') 等价解码: 你好Python
字符串的格式化
根据官方文件的表格有以下几种:
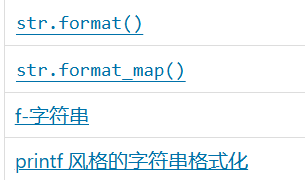
所以代码如下:
py
# int类型
age = int(input())
# float类型
height = float(input())
# str类型
name = str(input())
# 1. printf风格 % 格式化
print("我的名字叫%s,今年%d岁,身高%.2f米" % (name, age, height))
# 2. format 数字索引占位
print("我的名字叫{0},今年{1}岁,身高{2:.2f}米".format(name, age, height))
# 3. f-string f字符串格式化
print(f"我的名字叫{name},今年{age}岁,身高{height:.2f}米")
# 4. format 空占位符简化写法
print("我的名字叫{},今年{}岁,身高{}米".format(name, age, height))
# 5. 纯 + 字符串拼接(数字手动转str)
print("我的名字是" + name + ",的年龄是" + str(age) + "岁" + ",我的身高是" + str(height) + "米")
# 6. format_map 字典映射格式化(图片里补充的format_map)
info = {"name": name, "age": age, "height": height}
print("我的名字叫{name},今年{age}岁,身高{height:.2f}米".format_map(info))
# 运行结果如下:
# 18
# 1.98
# 张三
# 我的名字叫张三,今年18岁,身高1.98米
# 我的名字叫张三,今年18岁,身高1.98米
# 我的名字叫张三,今年18岁,身高1.98米
# 我的名字叫张三,今年18岁,身高1.98米
# 我的名字是张三,的年龄是18岁,我的身高是1.98米
# 我的名字叫张三,今年18岁,身高1.98米
字符串的常见方法
搜索与替换
官方表格
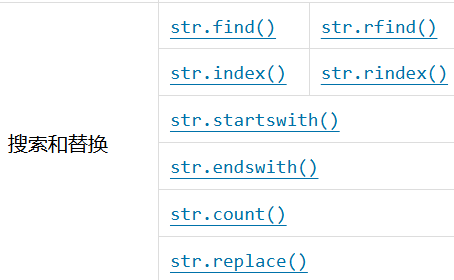
1.搜索方法如下:
py
# 1. str.find(sub, start, end) 正向查找,找不到返回 -1
print("hello world".find("world"))        # 6
print("hello world".find("world", 0, 5))  # -1,0~5不含world
print("hello world".find("world", 6))     # 6
print("hello world".find("world", 6, 11)) # 6
# 2.str.rfind(sub, start, end) 反向查找,找不到返回 -1
print("hello world".rfind("world"))        # 6
print("hello world".rfind("world", 0, 5))  # -1
print("hello world".rfind("world", 6))     # 6
print("hello world".rfind("world", 6, 11)) # 6
# 3. str.index(sub, start, end) 正向查找,找不到抛 ValueError
print("hello world".index("world"))        # 6
# print("hello world".index("world", 0, 5)) # 区间内找不到,报错,注释避免崩溃
print("hello world".index("world", 6))     # 6
print("hello world".index("world", 6, 11)) # 6
# 4. str.rindex(sub, start, end) 反向查找,找不到抛 ValueError
print("hello world".rindex("world"))        # 6
# print("hello world".rindex("world", 0, 5)) # 区间内找不到,报错,注释避免崩溃
print("hello world".rindex("world", 6))     # 6
print("hello world".rindex("world", 6, 11)) # 6
# 5. str.startswith(sub) str.endswith(sub) 判断是否以sub开头/结尾
print("hello world".endswith("world"))
print("hello world".startswith("hello"))
问题:Python中字符串的find方法和index方法的区别:
本质上来说它们在找不到的时候,是由不同的反应的,就是说我们的find方法在找不到的时候是会输出-1,而index在找不到的时候是输出ValueError,而且会抛异常,其实可以看作index方法的底层是在如果找不到了的时候会多经过一个异常,就是比find方法多一个异常的处理。
2.替换方法:
py
# 5. str.replace(old, new, count) 替换子串,count代表替换前几个
print("hello world".replace("world", "python"))
print("hello world".replace("world", "python", 1))
补:count方法是查找字符串中的字串出项的个数
py
# 6.str.count统计子串出现的次数str.count(sub, start, end)
print("hello world hello world".count("hello"))
print("hello world hello world".count("hello", 0, 5))
print("hello world hello world".count("hello", 6))
拆分与合并
官方表格如下:
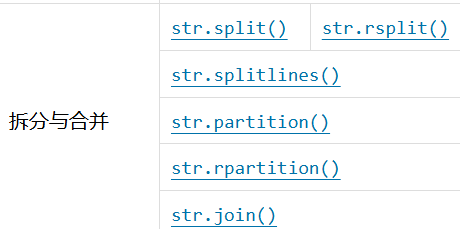
代码如下:
py
# 拆分与合并方法
#1. str.split(sep, maxsplit) 分割字符串,默认sep为空格,maxsplit为-1,返回列表
print("hello world hello world".split())
# 无参数:自动分割任意空白(空格/制表/换行),连续空白合并分割
# ['hello', 'world', 'hello', 'world']
print("hello world hello world".split(" "))
# 指定空格分割,多个空格会产生空元素
# ['hello', 'world', 'hello', 'world']
print("hello world hello world".split(" ", 1))
# maxsplit=1:从左向右只分割1次
# ['hello', 'world hello world']
#2.str.rsplit(sep, maxsplit) 反向分割字符串,默认sep为空格,maxsplit为-1,返回列表
print("hello world hello world".rsplit())
# 无参数和split效果一致
# ['hello', 'world', 'hello', 'world']
print("hello world hello world".rsplit(" "))
# 全分割,同split
# ['hello', 'world', 'hello', 'world']
print("hello world hello world".rsplit(" ", 1))
# 从右往左只分割1次
# ['hello world hello', 'world']
#3. str.partition(sep) 分割字符串,返回元组(before, sep, after)
print("hello world hello world".partition(" "))
# 找到第一个分隔符,分成三段
# ('hello', ' ', 'world hello world')
print("hello world hello world".rpartition(" "))
# 找到最后一个分隔符,分成三段
# ('hello world hello', ' ', 'world')
#4. str.join(iterable) 合并字符串,iterable为可迭代对象,返回字符串
print("-".join(["hello", "world", "hello", "world"]))
# 用-连接每一项
# hello-world-hello-world
print("".join(["hello", "world", "hello", "world"]))
# 空字符直接拼接
# helloworldhelloworld
#5.str.splitlines(keepends)
print("hello\nworld\nhello\nworld".splitlines())
# keepends默认False,丢弃换行符
# ['hello', 'world', 'hello', 'world']
print("hello\nworld\nhello\nworld".splitlines(True))
# keepends=True,保留换行符\n
# ['hello\n', 'world\n', 'hello\n', 'world']
print("hello\r\nworld\r\nhello\r\nworld".splitlines())
# 兼容\r\n、\n、\r各类换行符,统一切割
# ['hello', 'world', 'hello', 'world']
分类方法和大小写转化
官方表格如下:
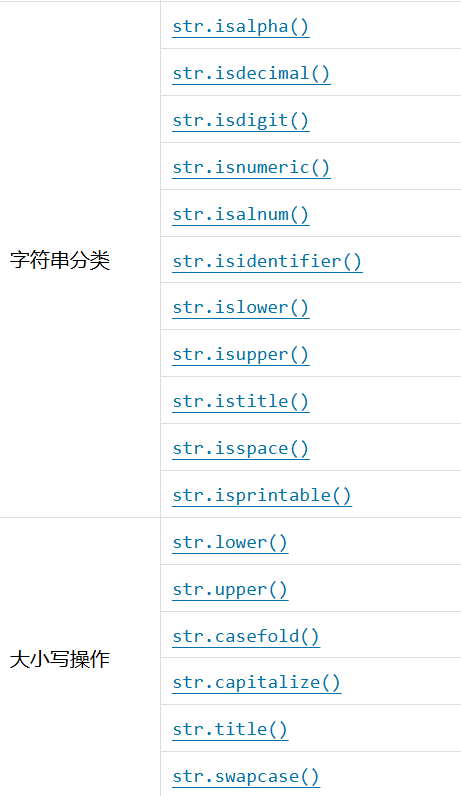
示意代码如下:
py
s = input()
for i in range(len(s)):
    char = s[i]
    if char.isalpha():
        print(f"{char}:我是字母")
    elif char.isdecimal():
        print(f"{char}:我是十进制数字")
    elif char.isdigit():
        print(f"{char}:我是数字字符")
    elif char.isnumeric():
        print(f"{char}:我是所有数字字符(汉字/罗马/分数等)")
    elif char.isalnum():
        print(f"{char}:我是字母或数字")
    elif char.isidentifier():
        print(f"{char}:可作为标识符字符")
    elif char.islower(): #判断是否全是小写字母
        print(f"{char}:纯小写字母")
        char1 = char.upper()
        print(f"{char1}:转换成大写字母")
    elif char.isupper(): #判断是否全大写字母
        print(f"{char}:纯大写字母")
        char2 = char.lower()
        print(f"{char2}:转换成小写字母")
    elif char.istitle(): #判断首字母是否大写
        print(f"{char}:首字母大写格式")
        char3 = char.title()
        print(f"{char3}:转换成首字母大写格式")
    elif char.isspace():
        print(f"{char}:我是空白字符(空格/tab/换行)")
    elif char.isprintable():
        print(f"{char}:可打印字符")
    else:
        print(f"{char}:其他特殊符号")
s1=s.swapcase() #转换大小写
print(s1)
s2=s.title() #每个单词首字母大写,其余小写
print(s2)
s3=s.capitalize() #第一个单词首字母大写,其余全部小写
print(s3)
s4=s.casefold() #强制转换成小写
print(s4)
提出以下几个问题:
1.简述 isdecimal、isdigit、isnumeric 的区别?
本质上来说是一个包含关系即:isdecimal() ⊂ isdigit() ⊂ isnumeric()
对于isdecimal(),它适用于判断十进制数字字符
对于isdigit(),它适用于判断十进制数字 + 上标 / 下标数字(² ³ ₃)
对于isnumeric(),它使用与判断阿拉伯数字、汉字数字、罗马数字、分数 ½、货币符号,范围最大
2.lower和casefold的区别?
一句话说就是lower一般只支持英文字母的小写变化,而casefold适用于更多语言的变化,且更严格,比如说代码:
py
s1 = "Straße" #包含德语字母
s2 = "strasse"
print(s1.lower() == s2)    # False
print(s1.casefold() == s2) # True
填充与去除方法
官方表格如下:
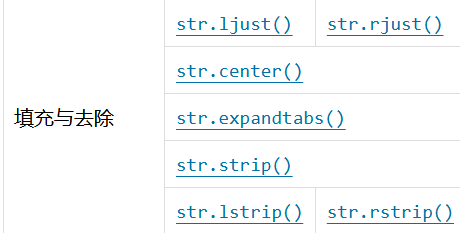
这里其实加一个 l l l代表左边的操作,加一个 r r r代表右边的操作。。。
代码如下:
py
#填充方法
text = "python"
# ljust:左对齐,右侧填充
print(text.ljust(10, "*"))  # 输出python****
# rjust:右对齐,左侧填充
print(text.rjust(10, "*"))  # 输出****python
# center:居中,两侧填充,总长度不足时右侧多1个填充符
print(text.center(10, "*")) # 输出**python**
# 删除方法
s = "**hello**"
# strip:去除左右两端
print(s.strip("*")) # 输出hello
# lstrip:只去除左侧
print(s.lstrip("*")) # 输出hello**
# rstrip:只去除右侧
print(s.rstrip("*")) # 输出**hello
# expandtabs () 替换制表符 \t 为空格
s1 = "a\tb\tc"
print(s1.expandtabs(4)) # a   b   c (一个tab换成4个空格)
易错理解:
strip() 到底是怎么去除字符的?
其实这个方法在删除部分字串的时候是从两边来看的就是说从两头来看向中间一直删去目标字串,知道没发现为止,比如说:
py
print("abc123abc456bca".strip("abc")) # 输出123abc456总结一下
本质上这是我最近学习python在看官方源文件的时候并询问AI一些易错点的总结,我觉得我在学习第四门语言python的时候,是要多看源码(在之前学习C,C++,Java的时候都只会写代码,并没有理解它们们),要多理解一些易错点和问题所在,我现在还在学习list及相关内容,希望能在以后能更深的学习,更上一城楼!