一、redis集群介绍
Redis Cluster 是 Redis 官方提供的分布式、高可用数据分片解决方案。它彻底改变了 Redis 单机或主从架构的局限,使 Redis 能够水平扩展以支撑海量数据和高并发场景。
1.核心定位与解决的问题
在 Redis Cluster 出现之前,Redis 主要面临两个瓶颈:
- 容量瓶颈:单机内存上限受限于物理硬件,无法存储 TB 级数据。
- 可用性瓶颈:主从+哨兵模式虽能故障转移,但写入能力仍受限于单主节点,且无法自动分片。
Redis Cluster 通过去中心化架构同时解决了这两个问题,实现了:
- 数据自动分片:将数据分散到多个节点,突破单机内存限制。
- 线性水平扩展:增加节点即可线性提升存储容量和读写吞吐。
- 原生高可用:内置故障检测与自动主从切换,无需依赖外部哨兵组件。
2. 三大核心技术原理
哈希槽分片机制
Redis Cluster 没有使用一致性哈希,而是采用了固定数量的哈希槽设计:
- 整个集群被划分为 16384 个槽位。
- 每个 Key 通过公式
CRC16(key) % 16384计算出所属槽位。 - 每个主节点负责一部分槽位,所有主节点的槽位并集必须覆盖全部 16384 个槽,集群才能正常提供服务。
Gossip 去中心化通信
集群没有中心化的元数据管理节点(如 ZooKeeper),所有节点地位平等:
- 节点之间通过 Gossip 协议定期交换状态信息(PING/PONG/MEET/FAIL)。
- 客户端可以连接集群中任意一个节点发起请求,该节点会根据槽位映射表将请求路由到正确的节点。
- 当客户端访问了错误节点时,节点会返回
MOVED(永久重定向)或ASK(临时重定向)响应,引导客户端修正本地缓存的路由表。
内置故障转移
每个主节点可配置一个或多个从节点:
- 当主节点宕机超过
cluster-node-timeout时间,其他主节点会将其标记为FAIL。 - 该主节点的从节点发起选举,获得超过半数主节点投票后晋升为新主节点。
- 整个过程全自动完成,通常在秒级内恢复服务。
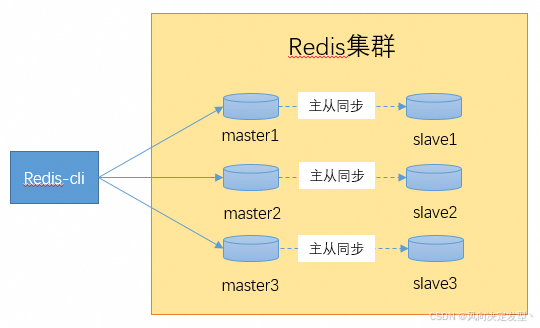
3.集群架构
以 3 主 3 从为例。真实生产环境可以酌情增加节点数量。
二、集群搭建
1.编译安装
bash
[root@test soft]# wget https://download.redis.io/releases/redis-6.2.14.tar.gz
--2026-07-03 11:06:21--  https://download.redis.io/releases/redis-6.2.14.tar.gz
Resolving download.redis.io (download.redis.io)... 104.18.27.34, 104.18.26.34, 2606:4700::6812:1b22, ...
Connecting to download.redis.io (download.redis.io)|104.18.27.34|:443... connected.
HTTP request sent, awaiting response... 200 OK
Length: 2496149 (2.4M) [application/octet-stream]
Saving to: 'redis-6.2.14.tar.gz'
100%[====================================================================================================================================================================>] 2,496,149   1.08MB/s   in 2.2s
2026-07-03 11:06:24 (1.08 MB/s) - 'redis-6.2.14.tar.gz' saved [2496149/2496149]
[root@test soft]# ls /opt/
docmost  etcd  git  helm  prometheus  soft  terraform  web_app
[root@test soft]# tar zxf redis-6.2.14.tar.gz ^C
[root@test soft]# tar zxf redis-6.2.14.tar.gz -C /opt/
[root@test soft]# ls /opt/
docmost  etcd  git  helm  prometheus  redis-6.2.14  soft  terraform  web_app
[root@test soft]# cd ../redis-6.2.14/
[root@test redis-6.2.14]# ls
00-RELEASENOTES  CONDUCT       COPYING  INSTALL   MANIFESTO  redis.conf  runtest-cluster    runtest-sentinel  src    TLS.md
BUGS             CONTRIBUTING  deps     Makefile  README.md  runtest     runtest-moduleapi  sentinel.conf     tests  utils
[root@test redis-6.2.14]# make && make install
此处省去数万字。。。。。。
Hint: It's a good idea to run 'make test' ;)
make[1]: Leaving directory /opt/redis-6.2.14/src' cd src && make install make[1]: Entering directory /opt/redis-6.2.14/src'
CC Makefile.dep
make[1]: Leaving directory /opt/redis-6.2.14/src' make[1]: Entering directory /opt/redis-6.2.14/src'
Hint: It's a good idea to run 'make test' ;)
INSTALL redis-server
INSTALL redis-benchmark
INSTALL redis-cli
make[1]: Leaving directory `/opt/redis-6.2.14/src'
编译安装完成之后可以看到src目录下多出了几个redis的执行文件
bash
[root@test redis-6.2.14]# ./src/
mkreleasehdr.sh  modules/         redis-benchmark  redis-check-aof  redis-check-rdb  redis-cli        redis-sentinel   redis-server     redis-trib.rb
[root@test redis-6.2.14]# ll -F src/ | grep '\*'
-rwxrwxr-x 1 root root     735 Oct 18  2023 mkreleasehdr.sh*
-rwxr-xr-x 1 root root 4830608 Jul  3 13:10 redis-benchmark*    ##redis压测工具
-rwxr-xr-x 1 root root 9548176 Jul  3 13:10 redis-check-aof*    ##redis aof文件检查工具
-rwxr-xr-x 1 root root 9548176 Jul  3 13:10 redis-check-rdb*    ##redis rdb文件检查工具
-rwxr-xr-x 1 root root 5004720 Jul  3 13:10 redis-cli*          ##redis客户端
-rwxr-xr-x 1 root root 9548176 Jul  3 13:10 redis-sentinel*     ##redis哨兵
-rwxr-xr-x 1 root root 9548176 Jul  3 13:10 redis-server*       ##redis启动命令
-rwxrwxr-x 1 root root    3600 Oct 18  2023 redis-trib.rb*      ##redis集群创建工具
2.创建集群配置
环境有限,将6个节点全部放在同一台机器上面,并且将data、logs、各节点配置单独管理。若是生产环境,3主3从最起码要分布在两台机器上面,以保证redis集群的可用性。
bash
[root@test redis-6.2.14]# mkdir cluster
[root@test redis-6.2.14]# cd cluster/
[root@test cluster]# mkdir data logs redis-6379 redis-6380 redis-6381 redis-6382 redis-6383 redis-6384
[root@test cluster]# ls
data  logs  redis-6379  redis-6380  redis-6381  redis-6382  redis-6383  redis-6384
每个redis节点都是一个独立的数据仓库,启动、日志及配置都需要单独管理。为了保证集群的配置统一,则需要有一个集群通用配置,再搭配各节点配置。其中如:淘汰策略、内存大小、集群认证等配置均可由通用配置管理。日志数据目录,端口地址等配置可由各节点配置管理。所以上面步骤中创建了redis-6379..6384这6个目录,单独存放各节点配置。
创建通用配置
bash
[root@test redis-6.2.14]# cp redis.conf redis-common.conf
[root@test redis-6.2.14]# egrep -v '^#|^$' redis-common.conf
tcp-backlog 511
timeout 0
tcp-keepalive 300
databases 16
always-show-logo no
set-proc-title yes
proc-title-template "{title} {listen-addr} {server-mode}"
save 3600 1                          #重要配置
save 300 100                         #重要配置
save 60 10000                        #重要配置
stop-writes-on-bgsave-error yes
rdbcompression yes                   #重要配置
rdbchecksum yes                      #重要配置
rdb-del-sync-files no
replica-serve-stale-data yes
replica-read-only yes
repl-diskless-sync no
repl-diskless-sync-delay 5
repl-diskless-load disabled
repl-disable-tcp-nodelay no
replica-priority 100
acllog-max-len 128
maxmemory 50MB                       #重要配置
maxmemory-policy volatile-lru        #重要配置
lazyfree-lazy-eviction yes           #重要配置
lazyfree-lazy-expire yes             #重要配置
lazyfree-lazy-server-del yes         #重要配置
replica-lazy-flush no
lazyfree-lazy-user-del no
lazyfree-lazy-user-flush no
oom-score-adj no
oom-score-adj-values 0 200 800
disable-thp yes
appendonly no
appendfilename "appendonly.aof"
appendfsync everysec
no-appendfsync-on-rewrite no
auto-aof-rewrite-percentage 100
auto-aof-rewrite-min-size 64mb
aof-load-truncated yes
aof-use-rdb-preamble yes
lua-time-limit 5000
cluster-enabled yes
cluster-node-timeout 15000
slowlog-log-slower-than 10000
slowlog-max-len 128
latency-monitor-threshold 0
notify-keyspace-events ""
hash-max-ziplist-entries 512
hash-max-ziplist-value 64
list-max-ziplist-size -2
list-compress-depth 0
set-max-intset-entries 512
zset-max-ziplist-entries 128
zset-max-ziplist-value 64
hll-sparse-max-bytes 3000
stream-node-max-bytes 4096
stream-node-max-entries 100
activerehashing yes
client-output-buffer-limit normal 0 0 0
client-output-buffer-limit replica 256mb 64mb 60
client-output-buffer-limit pubsub 32mb 8mb 60
hz 10
dynamic-hz yes
aof-rewrite-incremental-fsync yes
rdb-save-incremental-fsync yes
activedefrag yes                #重要配置
jemalloc-bg-thread yesredis淘汰策略可参考博客:redis淘汰策略-CSDN博客
各节点配置以6379为例:
bash
[root@test redis-6.2.14]# cat cluster/redis-6379/redis-6379.conf
include /opt/redis-6.2.14/redis-common.conf
bind 172.17.49.10
protected-mode yes
port 6379
daemonize yes
pidfile /opt/redis-6.2.14/cluster/logs/redis-6379.pid
loglevel notice
logfile "/opt/redis-6.2.14/cluster/logs/redis-6379.log"
dbfilename dump-6379.rdb
dir /opt/redis-6.2.14/cluster/data/
cluster-config-file /opt/redis-6.2.14/cluster/redis-6379/nodes-6379.conf
[root@test redis-6.2.14]# ls cluster/redis-63{79..84}/
cluster/redis-6379/:
redis-6379.conf
cluster/redis-6380/:
redis-6380.conf
cluster/redis-6381/:
redis-6381.conf
cluster/redis-6382/:
redis-6382.conf
cluster/redis-6383/:
redis-6383.conf
cluster/redis-6384/:
redis-6384.conf
3.创建集群
将6个redis数据库逐个启动(为方便后期集群维护,可以写一个启动脚本)
bash
[root@test redis-6.2.14]# cd cluster/
[root@test cluster]# redis-server ./redis-6379/redis-6379.conf
[root@test cluster]# redis-server ./redis-6380/redis-6380.conf
[root@test cluster]# redis-server ./redis-6381/redis-6381.conf
[root@test cluster]# redis-server ./redis-6382/redis-6382.conf
[root@test cluster]# redis-server ./redis-6383/redis-6383.conf
[root@test cluster]# redis-server ./redis-6384/redis-6384.conf
[root@test cluster]# ps -ef | grep redis-server
root     15464     1  0 15:16 ?        00:00:01 redis-server 172.17.49.10:6380 [cluster]
root     15982     1  0 15:17 ?        00:00:01 redis-server 172.17.49.10:6381 [cluster]
root     16026     1  0 15:17 ?        00:00:00 redis-server 172.17.49.10:6382 [cluster]
root     16056     1  0 15:17 ?        00:00:01 redis-server 172.17.49.10:6383 [cluster]
root     16087     1  0 15:17 ?        00:00:00 redis-server 172.17.49.10:6384 [cluster]
root     16312     1  0 15:17 ?        00:00:00 redis-server 172.17.49.10:6379 [cluster]
root     20660 26776  0 15:28 pts/1    00:00:00 grep --color=auto redis-server
使用redis-cli工具创建集群
在 Redis 3.x/4.x 时代,由于
redis-cli不支持集群管理,redis-trib.rb是唯一的官方运维入口。Redis ≥ 5.0 :直接使用
redis-cli --cluster
bash
[root@test redis-6.2.14]# redis-cli --cluster create 172.17.49.10:6379 172.17.49.10:6380 172.17.49.10:6381 172.17.49.10:6382 172.17.49.10:6383 172.17.49.10:6384 --cluster-replicas 1
>>> Performing hash slots allocation on 6 nodes...
Master[0] -> Slots 0 - 5460
Master[1] -> Slots 5461 - 10922
Master[2] -> Slots 10923 - 16383
Adding replica 172.17.49.10:6383 to 172.17.49.10:6379
Adding replica 172.17.49.10:6384 to 172.17.49.10:6380
Adding replica 172.17.49.10:6382 to 172.17.49.10:6381
>>> Trying to optimize slaves allocation for anti-affinity
[WARNING] Some slaves are in the same host as their master
M: a81efce80978e1f58b64aecbc62146054efb5425 172.17.49.10:6379
   slots:[0-5460] (5461 slots) master
M: 8c9baa52eac09acdb2adb50812ca17521d221837 172.17.49.10:6380
   slots:[5461-10922] (5462 slots) master
M: 80f017b95605c04a6e4cf1bf5c664d5c2b70637d 172.17.49.10:6381
   slots:[10923-16383] (5461 slots) master
S: 9fb79ae483cebd9b623c46dd3c850d752868d43c 172.17.49.10:6382
   replicates 8c9baa52eac09acdb2adb50812ca17521d221837
S: 330bf4ddaac4d0598de76b47869317e3d25e3def 172.17.49.10:6383
   replicates 80f017b95605c04a6e4cf1bf5c664d5c2b70637d
S: 8fd7a180d6b923684f19db11c4052f222133f912 172.17.49.10:6384
   replicates a81efce80978e1f58b64aecbc62146054efb5425
Can I set the above configuration? (type 'yes' to accept): yes
>>> Nodes configuration updated
>>> Assign a different config epoch to each node
>>> Sending CLUSTER MEET messages to join the cluster
Waiting for the cluster to join
.
>>> Performing Cluster Check (using node 172.17.49.10:6379)
M: a81efce80978e1f58b64aecbc62146054efb5425 172.17.49.10:6379
   slots:[0-5460] (5461 slots) master
   1 additional replica(s)
S: 9fb79ae483cebd9b623c46dd3c850d752868d43c 172.17.49.10:6382
   slots: (0 slots) slave
   replicates 8c9baa52eac09acdb2adb50812ca17521d221837
M: 8c9baa52eac09acdb2adb50812ca17521d221837 172.17.49.10:6380
   slots:[5461-10922] (5462 slots) master
   1 additional replica(s)
S: 330bf4ddaac4d0598de76b47869317e3d25e3def 172.17.49.10:6383
   slots: (0 slots) slave
   replicates 80f017b95605c04a6e4cf1bf5c664d5c2b70637d
M: 80f017b95605c04a6e4cf1bf5c664d5c2b70637d 172.17.49.10:6381
   slots:[10923-16383] (5461 slots) master
   1 additional replica(s)
S: 8fd7a180d6b923684f19db11c4052f222133f912 172.17.49.10:6384
   slots: (0 slots) slave
   replicates a81efce80978e1f58b64aecbc62146054efb5425
[OK] All nodes agree about slots configuration.
>>> Check for open slots...
>>> Check slots coverage...
[OK] All 16384 slots covered.
查看集群状态
bash
[root@test redis-6.2.14]# redis-cli -h 172.17.49.10 -p 6379 cluster info
cluster_state:ok
cluster_slots_assigned:16384
cluster_slots_ok:16384
cluster_slots_pfail:0
cluster_slots_fail:0
cluster_known_nodes:6
cluster_size:3
cluster_current_epoch:6
cluster_my_epoch:1
cluster_stats_messages_ping_sent:170
cluster_stats_messages_pong_sent:174
cluster_stats_messages_sent:344
cluster_stats_messages_ping_received:169
cluster_stats_messages_pong_received:170
cluster_stats_messages_meet_received:5
cluster_stats_messages_received:344
[root@test redis-6.2.14]# redis-cli -h 172.17.49.10 -p 6379 info Replication
# Replication
role:master
connected_slaves:1
slave0:ip=172.17.49.10,port=6384,state=online,offset=280,lag=1
master_failover_state:no-failover
master_replid:ace9eefb9e18dde3a83fbd9c13cc392074464f39
master_replid2:0000000000000000000000000000000000000000
master_repl_offset:280
second_repl_offset:-1
repl_backlog_active:1
repl_backlog_size:1048576
repl_backlog_first_byte_offset:1
repl_backlog_histlen:280
查看node.conf
bash
[root@test cluster]# cd redis-6379/
[root@test redis-6379]# ls
nodes-6379.conf  redis-6379.conf
[root@test redis-6379]# cat nodes-6379.conf
a81efce80978e1f58b64aecbc62146054efb5425 172.17.49.10:6379@16379 myself,master - 0 1783064103000 1 connected 0-5460
9fb79ae483cebd9b623c46dd3c850d752868d43c 172.17.49.10:6382@16382 slave 8c9baa52eac09acdb2adb50812ca17521d221837 0 1783064105178 2 connected
8c9baa52eac09acdb2adb50812ca17521d221837 172.17.49.10:6380@16380 master - 0 1783064106181 2 connected 5461-10922
330bf4ddaac4d0598de76b47869317e3d25e3def 172.17.49.10:6383@16383 slave 80f017b95605c04a6e4cf1bf5c664d5c2b70637d 0 1783064105000 3 connected
80f017b95605c04a6e4cf1bf5c664d5c2b70637d 172.17.49.10:6381@16381 master - 0 1783064104174 3 connected 10923-16383
8fd7a180d6b923684f19db11c4052f222133f912 172.17.49.10:6384@16384 slave a81efce80978e1f58b64aecbc62146054efb5425 0 1783064104000 1 connected
vars currentEpoch 6 lastVoteEpoch 0
至此集群搭建完成。
redis配置解析可参考我另外一篇博客:redis配置详解-CSDN博客
4.测试集群可用性
停掉 6379 端口的服务,看看主从会不会自动切换。
bash
[root@test redis-6379]# cat nodes-6379.conf
a81efce80978e1f58b64aecbc62146054efb5425 172.17.49.10:6379@16379 myself,master - 0 1783064103000 1 connected 0-5460
9fb79ae483cebd9b623c46dd3c850d752868d43c 172.17.49.10:6382@16382 slave 8c9baa52eac09acdb2adb50812ca17521d221837 0 1783064105178 2 connected
8c9baa52eac09acdb2adb50812ca17521d221837 172.17.49.10:6380@16380 master - 0 1783064106181 2 connected 5461-10922
330bf4ddaac4d0598de76b47869317e3d25e3def 172.17.49.10:6383@16383 slave 80f017b95605c04a6e4cf1bf5c664d5c2b70637d 0 1783064105000 3 connected
80f017b95605c04a6e4cf1bf5c664d5c2b70637d 172.17.49.10:6381@16381 master - 0 1783064104174 3 connected 10923-16383
8fd7a180d6b923684f19db11c4052f222133f912 172.17.49.10:6384@16384 slave a81efce80978e1f58b64aecbc62146054efb5425 0 1783064104000 1 connected
vars currentEpoch 6 lastVoteEpoch 0
从 nodes-6379.conf 文件能看出,6379 的从节点是 6384,我们停止 6379。
bash
[root@test redis-6379]# ps -ef | grep redis-server
root      5495 26776  0 16:10 pts/1    00:00:00 grep --color=auto redis-server
root     15464     1  0 15:16 ?        00:00:05 redis-server 172.17.49.10:6380 [cluster]
root     15982     1  0 15:17 ?        00:00:05 redis-server 172.17.49.10:6381 [cluster]
root     16026     1  0 15:17 ?        00:00:05 redis-server 172.17.49.10:6382 [cluster]
root     16056     1  0 15:17 ?        00:00:05 redis-server 172.17.49.10:6383 [cluster]
root     16087     1  0 15:17 ?        00:00:05 redis-server 172.17.49.10:6384 [cluster]
root     16312     1  0 15:17 ?        00:00:05 redis-server 172.17.49.10:6379 [cluster]
[root@test redis-6379]# kill 16312
查看6379的日志及进程,确定6379已退出
bash
[root@test logs]# ps -ef | grep redis-server
root      9717 26776  0 16:21 pts/1    00:00:00 grep --color=auto redis-server
root     15464     1  0 15:16 ?        00:00:06 redis-server 172.17.49.10:6380 [cluster]
root     15982     1  0 15:17 ?        00:00:06 redis-server 172.17.49.10:6381 [cluster]
root     16026     1  0 15:17 ?        00:00:06 redis-server 172.17.49.10:6382 [cluster]
root     16056     1  0 15:17 ?        00:00:06 redis-server 172.17.49.10:6383 [cluster]
root     16087     1  0 15:17 ?        00:00:06 redis-server 172.17.49.10:6384 [cluster]
[root@test logs]# tail redis-6379.log
23331:C 03 Jul 2026 15:35:04.033 * RDB: 0 MB of memory used by copy-on-write
16312:M 03 Jul 2026 15:35:04.073 * Background saving terminated with success
16312:M 03 Jul 2026 15:35:04.073 * Synchronization with replica 172.17.49.10:6384 succeeded
16312:M 03 Jul 2026 15:35:06.984 # Cluster state changed: ok
16312:signal-handler (1783066783) Received SIGTERM scheduling shutdown...
16312:M 03 Jul 2026 16:19:43.105 # User requested shutdown...
16312:M 03 Jul 2026 16:19:43.105 * Saving the final RDB snapshot before exiting.
16312:M 03 Jul 2026 16:19:43.107 * DB saved on disk
16312:M 03 Jul 2026 16:19:43.107 * Removing the pid file.
16312:M 03 Jul 2026 16:19:43.107 # Redis is now ready to exit, bye bye...
查看集群信息,能看到6379的状态是fail,6384的的角色自动切换为master
bash
[root@test logs]# redis-cli -h 172.17.49.10 -p 6380 cluster nodes
330bf4ddaac4d0598de76b47869317e3d25e3def 172.17.49.10:6383@16383 slave 80f017b95605c04a6e4cf1bf5c664d5c2b70637d 0 1783067036005 3 connected
80f017b95605c04a6e4cf1bf5c664d5c2b70637d 172.17.49.10:6381@16381 master - 0 1783067035000 3 connected 10923-16383
a81efce80978e1f58b64aecbc62146054efb5425 172.17.49.10:6379@16379 master,fail - 1783066788829 1783066782000 1 disconnected
8fd7a180d6b923684f19db11c4052f222133f912 172.17.49.10:6384@16384 master - 0 1783067034000 7 connected 0-5460
9fb79ae483cebd9b623c46dd3c850d752868d43c 172.17.49.10:6382@16382 slave 8c9baa52eac09acdb2adb50812ca17521d221837 0 1783067035001 2 connected
8c9baa52eac09acdb2adb50812ca17521d221837 172.17.49.10:6380@16380 myself,master - 0 1783067034000 2 connected 5461-10922介绍一个重点参数:cluster_my_epoch,此参数在集群刚搭建好的时候是 1。查看集群信息时此参数的值为 2,说明集群状态变更了一次。
bash
[root@test logs]# redis-cli -h 172.17.49.10 -p 6380 cluster info
cluster_state:ok
cluster_slots_assigned:16384
cluster_slots_ok:16384
cluster_slots_pfail:0
cluster_slots_fail:0
cluster_known_nodes:6
cluster_size:3
cluster_current_epoch:7
cluster_my_epoch:2
cluster_stats_messages_ping_sent:3017
cluster_stats_messages_pong_sent:3062
cluster_stats_messages_meet_sent:1
cluster_stats_messages_fail_sent:4
cluster_stats_messages_auth-ack_sent:1
cluster_stats_messages_sent:6085
cluster_stats_messages_ping_received:3062
cluster_stats_messages_pong_received:3018
cluster_stats_messages_auth-req_received:1
cluster_stats_messages_received:6081
启动6379后自动同步集群信息及master数据
bash
[root@test redis-6.2.14]# cd cluster/
[root@test cluster]# redis-server ./redis-6379/
nodes-6379.conf  redis-6379.conf
[root@test cluster]# redis-server ./redis-6379/redis-6379.conf
[root@test cluster]# ps -ef | grep redis-server
root     12413     1  0 16:27 ?        00:00:00 redis-server 172.17.49.10:6379 [cluster]
root     12462 26776  0 16:27 pts/1    00:00:00 grep --color=auto redis-server
root     15464     1  0 15:16 ?        00:00:07 redis-server 172.17.49.10:6380 [cluster]
root     15982     1  0 15:17 ?        00:00:07 redis-server 172.17.49.10:6381 [cluster]
root     16026     1  0 15:17 ?        00:00:07 redis-server 172.17.49.10:6382 [cluster]
root     16056     1  0 15:17 ?        00:00:07 redis-server 172.17.49.10:6383 [cluster]
root     16087     1  0 15:17 ?        00:00:07 redis-server 172.17.49.10:6384 [cluster]
[root@test cluster]# tail -20 logs/redis-6379.log
12413:M 03 Jul 2026 16:27:43.234 * DB loaded from disk: 0.000 seconds
12413:M 03 Jul 2026 16:27:43.234 * Ready to accept connections
12413:M 03 Jul 2026 16:27:43.236 # Configuration change detected. Reconfiguring myself as a replica of 8fd7a180d6b923684f19db11c4052f222133f912
12413:S 03 Jul 2026 16:27:43.236 * Before turning into a replica, using my own master parameters to synthesize a cached master: I may be able to synchronize with the new master with just a partial transfer.
12413:S 03 Jul 2026 16:27:43.236 * Connecting to MASTER 172.17.49.10:6384
12413:S 03 Jul 2026 16:27:43.237 * MASTER <-> REPLICA sync started
12413:S 03 Jul 2026 16:27:43.237 # Cluster state changed: ok
12413:S 03 Jul 2026 16:27:43.238 * Non blocking connect for SYNC fired the event.
12413:S 03 Jul 2026 16:27:43.238 * Master replied to PING, replication can continue...
12413:S 03 Jul 2026 16:27:43.238 * Trying a partial resynchronization (request a59818eac90688152afe0836345dfbd05310768d:1).
12413:S 03 Jul 2026 16:27:43.239 * Full resync from master: ddebed55738d1f8c241d34da63ea1a57762cea04:3738
12413:S 03 Jul 2026 16:27:43.239 * Discarding previously cached master state.
12413:S 03 Jul 2026 16:27:43.314 * MASTER <-> REPLICA sync: receiving 177 bytes from master to disk
12413:S 03 Jul 2026 16:27:43.314 * MASTER <-> REPLICA sync: Flushing old data
12413:S 03 Jul 2026 16:27:43.314 * MASTER <-> REPLICA sync: Loading DB in memory
12413:S 03 Jul 2026 16:27:43.317 * Loading RDB produced by version 6.2.14
12413:S 03 Jul 2026 16:27:43.317 * RDB age 0 seconds
12413:S 03 Jul 2026 16:27:43.317 * RDB memory usage when created 2.53 Mb
12413:S 03 Jul 2026 16:27:43.317 # Done loading RDB, keys loaded: 0, keys expired: 0.
12413:S 03 Jul 2026 16:27:43.317 * MASTER <-> REPLICA sync: Finished with success
三、客户端连接与使用
集群搭建并验证可用性之后,接下来演示如何通过 redis-cli 命令行工具和 Python 客户端(redis-py-cluster)连接 Redis 集群,并进行简单的读写操作。
1. 使用 redis-cli 连接集群
Redis 5.0 及以上版本的 redis-cli 内置了集群模式,使用 -c 参数即可自动处理槽位重定向:
bash
[root@test ~]# redis-cli -c -h 172.17.49.10 -p 6379
172.17.49.10:6379> set name "redis-cluster"
-> Redirected to slot [5798] located at 172.17.49.10:6380
OK
172.17.49.10:6380> get name
"redis-cluster"
172.17.49.10:6380> set age 30
-> Redirected to slot [741] located at 172.17.49.10:6379
OK
172.17.49.10:6379> get age
"30"
172.17.49.10:6379> cluster keyslot name
(integer) 5798
172.17.49.10:6379> cluster keyslot age
(integer) 741从输出可以看到,redis-cli -c 自动跟随 MOVED 重定向,客户端无需手动切换节点即可完成跨槽位的读写操作。
2. 使用 Python 客户端连接集群
Python 生态中最常用的 Redis 集群客户端是 redis-py-cluster。首先安装依赖:
bash
pip install redis-py-cluster以下是一个完整的连接与读写示例:
python
from rediscluster import RedisCluster
集群节点列表(只需提供部分节点,客户端会自动发现全部节点)
startup_nodes = [
{"host": "172.17.49.10", "port": 6379},
{"host": "172.17.49.10", "port": 6380},
{"host": "172.17.49.10", "port": 6381},
]
创建集群连接(skip_full_coverage_check=False 表示要求所有槽位都有覆盖)
rc = RedisCluster(
startup_nodes=startup_nodes,
decode_responses=True,
skip_full_coverage_check=False,
)
写入数据
rc.set("user:1001", "Alice")
rc.set("user:1002", "Bob")
rc.set("counter", 1)
读取数据
print("user:1001 =", rc.get("user:1001"))
print("user:1002 =", rc.get("user:1002"))
原子自增操作
rc.incr("counter")
print("counter =", rc.get("counter"))
批量写入(pipeline 在集群模式下需按槽位分组,此处仅演示单条)
rc.set("session:abc123", "active")
print("session:abc123 =", rc.get("session:abc123"))
关闭连接
rc.close()
运行上述脚本,预期输出如下:
text
user:1001 = Alice
user:1002 = Bob
counter = 2
session:abc123 = active
3. 注意事项
- 槽位覆盖 :集群必须覆盖全部 16384 个槽位才能正常读写,否则客户端会抛出
ClusterDownError。 - Pipeline 限制:Redis 集群模式下,pipeline 中的命令必须属于同一个槽位,否则需要按节点分组发送。
- 事务支持 :集群不支持跨槽位的
MULTI/EXEC事务,建议使用 Lua 脚本实现原子操作。 - 连接池 :
redis-py-cluster内部维护了连接池,生产环境中建议复用RedisCluster实例,避免频繁创建和销毁连接。