文章目录
- QT_QT布局详解
-
- 核心布局类
- 总结
- 通用方法与属性(所有布局共有)
- 特有属性
-
- [QGridLayout 特有方法](#QGridLayout 特有方法)
- [QFormLayout 特有方法](#QFormLayout 特有方法)
- [QStackedLayout 特有方法](#QStackedLayout 特有方法)
- [Qt 对齐方式速查](#Qt 对齐方式速查)
QT_QT布局详解
Qt 的布局管理器(Layout Manager)是 Qt GUI 开发中用于自动管理控件位置和尺寸的核心机制。它能实现窗口缩放自适应、统一间距管理、复杂界面嵌套等功能,避免手动计算坐标的繁琐工作。Qt 提供了多种内置布局管理器,均继承自抽象基类 QLayout。
核心布局类
QHBoxLayout(水平布局)
将控件按从左到右(或从右到左)的顺序水平排列:
cpp
QHBoxLayout *layout = new QHBoxLayout;
layout->addWidget(new QPushButton("One"));
layout->addWidget(new QPushButton("Two"));
layout->addWidget(new QPushButton("Three"));
widget->setLayout(layout);
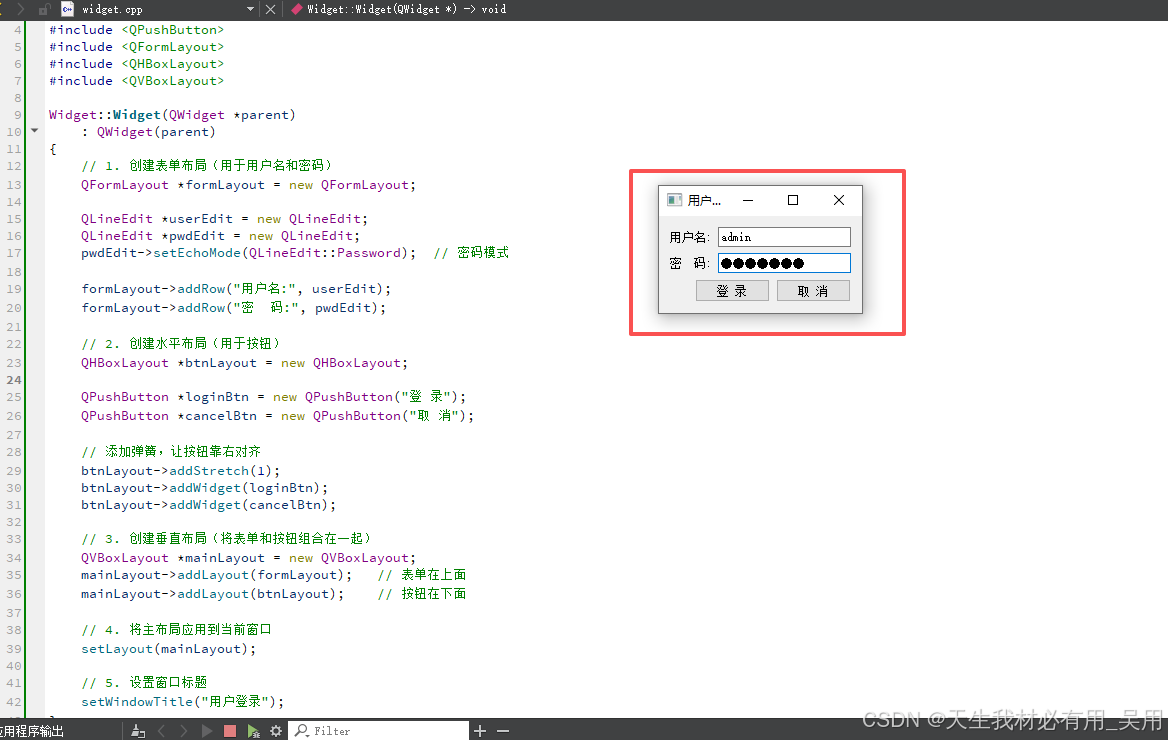
实例
cpp
#include "widget.h"
#include <QLabel>
#include <QLineEdit>
#include <QPushButton>
#include <QFormLayout>
#include <QHBoxLayout>
#include <QVBoxLayout>

Widget::Widget(QWidget *parent)
    : QWidget(parent)
{
    // 1. 创建表单布局(用于用户名和密码)
    QFormLayout *formLayout = new QFormLayout;

    QLineEdit *userEdit = new QLineEdit;
    QLineEdit *pwdEdit = new QLineEdit;
    pwdEdit->setEchoMode(QLineEdit::Password);  // 密码模式

    formLayout->addRow("用户名:", userEdit);
    formLayout->addRow("密  码:", pwdEdit);

    // 2. 创建水平布局(用于按钮)
    QHBoxLayout *btnLayout = new QHBoxLayout;

    QPushButton *loginBtn = new QPushButton("登 录");
    QPushButton *cancelBtn = new QPushButton("取 消");

    // 添加弹簧,让按钮靠右对齐
    btnLayout->addStretch(1);
    btnLayout->addWidget(loginBtn);
    btnLayout->addWidget(cancelBtn);

    // 3. 创建垂直布局(将表单和按钮组合在一起)
    QVBoxLayout *mainLayout = new QVBoxLayout;
    mainLayout->addLayout(formLayout);   // 表单在上面
    mainLayout->addLayout(btnLayout);    // 按钮在下面

    // 4. 将主布局应用到当前窗口
    setLayout(mainLayout);

    // 5. 设置窗口标题
    setWindowTitle("用户登录");
}

Widget::~Widget()
{
}
QVBoxLayout(垂直布局)
将控件按从上到下的顺序垂直排列:
cpp
QVBoxLayout *layout = new QVBoxLayout;
layout->addWidget(new QLabel("Label"));
layout->addWidget(new QPushButton("Button"));
widget->setLayout(layout);
实例
cpp
#include "widget.h"
#include <QLabel>
#include <QLineEdit>
#include <QPushButton>
#include <QFormLayout>
#include <QHBoxLayout>
#include <QVBoxLayout>
#include <QLabel>
#include <QFrame>

Widget::Widget(QWidget *parent)
    : QWidget(parent)
{
    // 假设在 Widget 的构造函数中
    QVBoxLayout *mainLayout = new QVBoxLayout;

    // 1. 标题(加大加粗)
    QLabel *titleLabel = new QLabel("⚙️ 系统设置");
    QFont titleFont = titleLabel->font();
    titleFont.setPointSize(16);
    titleFont.setBold(true);
    titleLabel->setFont(titleFont);
    mainLayout->addWidget(titleLabel);

    // 2. 分隔线
    QFrame *line = new QFrame;
    line->setFrameShape(QFrame::HLine);
    mainLayout->addWidget(line);

    // 3. 输入区域(嵌套水平布局)
    QHBoxLayout *inputLayout = new QHBoxLayout;
    inputLayout->addWidget(new QLabel("用户名:"));
    QLineEdit *nameEdit = new QLineEdit;
    nameEdit->setPlaceholderText("请输入用户名");
    inputLayout->addWidget(nameEdit);
    mainLayout->addLayout(inputLayout);

    // 4. 按钮区域(嵌套水平布局,靠右对齐)
    QHBoxLayout *btnLayout = new QHBoxLayout;
    btnLayout->addStretch(1);  // 弹簧把按钮推到右边
    btnLayout->addWidget(new QPushButton("确认"));
    btnLayout->addWidget(new QPushButton("取消"));
    mainLayout->addLayout(btnLayout);

    // 5. 状态提示(底部)
    QLabel *statusLabel = new QLabel("就绪");
    statusLabel->setStyleSheet("color: gray;");
    mainLayout->addWidget(statusLabel);

    // 应用布局
    setLayout(mainLayout);
    setWindowTitle("垂直布局进阶示例");
}

Widget::~Widget()
{
}
效果
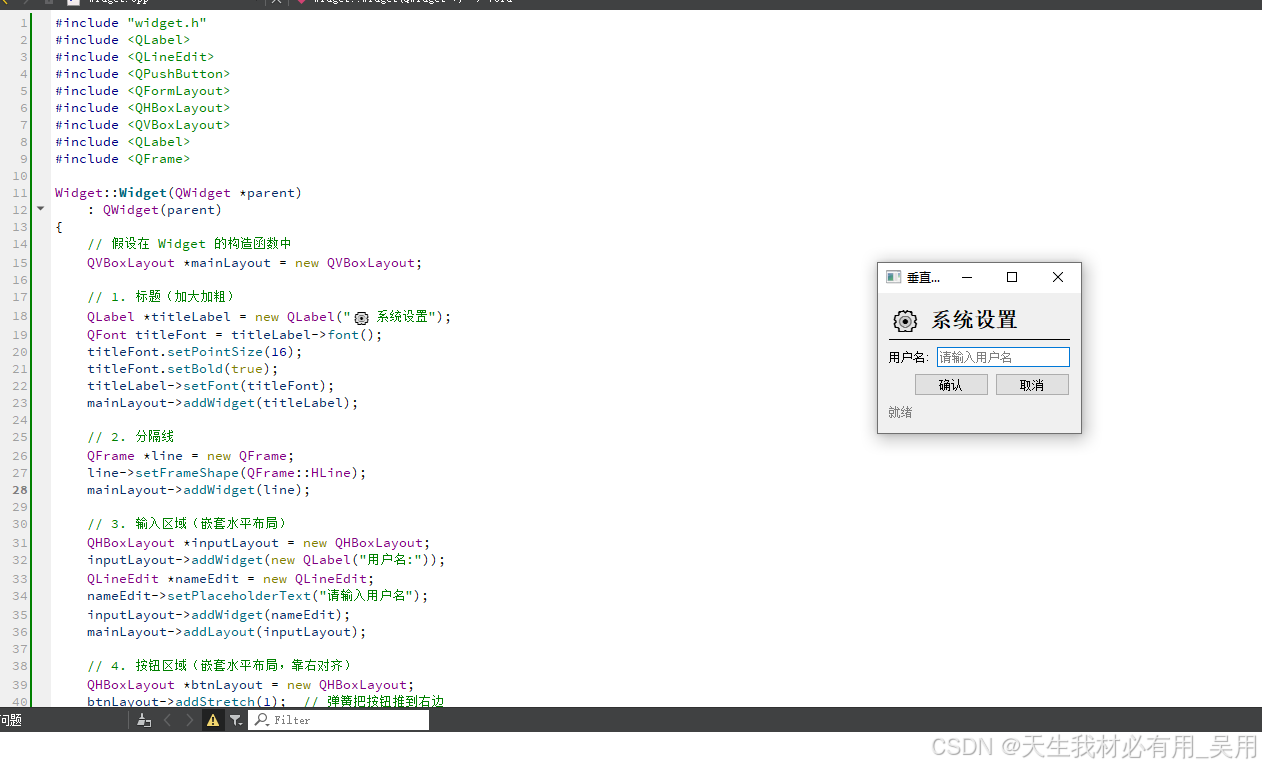
QGridLayout(网格布局)
将控件放置在二维网格中,支持跨行跨列:
cpp
QGridLayout *layout = new QGridLayout;
layout->addWidget(new QLabel("Label1"), 0, 0);
layout->addWidget(new QLabel("Label2"), 0, 1, 1, 2);  // 跨2列
layout->addWidget(new QPushButton("Button"), 1, 0, 1, 3);  // 跨3列
widget->setLayout(layout);
实例
cpp
#include "widget.h"
#include <QLabel>          // 标签控件
#include <QLineEdit>       // 单行输入框
#include <QPushButton>     // 按钮控件
#include <QFormLayout>     // 表单布局
#include <QHBoxLayout>     // 水平布局
#include <QVBoxLayout>     // 垂直布局
#include <QGridLayout>     // 网格布局
#include <QLabel>          // 标签控件(重复包含,可省略)
#include <QFrame>          // 框架控件(用于分隔线等)

Widget::Widget(QWidget *parent)
    : QWidget(parent)      // 调用父类构造函数,parent为父窗口指针
{
    // ============================================================
    // 步骤1:创建主网格布局对象
    // ============================================================
    // QGridLayout 将窗口划分为行和列的网格,每个控件可以占据一个或多个单元格
    QGridLayout *layout = new QGridLayout;

    // ============================================================
    // 步骤2:创建并添加标题标签(第0行)
    // ============================================================
    // addWidget(控件, 起始行, 起始列, 行跨数, 列跨数)
    // 这里占用了第0行的全部4列,实现标题居中
    QLabel *titleLabel = new QLabel("计算器");

    // 获取当前字体,设置字号为14,加粗
    QFont titleFont = titleLabel->font();
    titleFont.setPointSize(14);      // 字体大小14点
    titleFont.setBold(true);         // 加粗
    titleLabel->setFont(titleFont);  // 应用新字体

    // 设置标签文字水平居中
    titleLabel->setAlignment(Qt::AlignCenter);

    // 将标题添加到布局:第0行,第0列开始,占1行,跨4列
    layout->addWidget(titleLabel, 0, 0, 1, 4);

    // ============================================================
    // 步骤3:创建并添加结果显示框(第1行)
    // ============================================================
    // 用于显示输入的数字和计算结果
    QLineEdit *resultEdit = new QLineEdit;

    // setReadOnly(true) 设置为只读模式,用户不能直接编辑
    // 只能通过按钮来输入内容
    resultEdit->setReadOnly(true);

    // 设置文字右对齐,符合计算器的显示习惯
    resultEdit->setAlignment(Qt::AlignRight);

    // 初始显示"0"
    resultEdit->setText("0");

    // setMinimumHeight(40) 设置最小高度为40像素
    // 让显示区域更明显,便于阅读
    resultEdit->setMinimumHeight(40);

    // 添加到布局:第1行,第0列开始,占1行,跨4列
    layout->addWidget(resultEdit, 1, 0, 1, 4);

    // ============================================================
    // 步骤4:第三行 - 功能按钮(第2行)
    // ============================================================
    // 每个按钮单独占一个单元格,不跨列
    // 第2行,第0列:清除按钮
    layout->addWidget(new QPushButton("C"), 2, 0);
    // 第2行,第1列:正负号切换按钮
    layout->addWidget(new QPushButton("±"), 2, 1);
    // 第2行,第2列:百分号按钮
    layout->addWidget(new QPushButton("%"), 2, 2);
    // 第2行,第3列:除法运算符
    layout->addWidget(new QPushButton("÷"), 2, 3);

    // ============================================================
    // 步骤5:第四行 - 数字按钮 7, 8, 9 和乘法(第3行)
    // ============================================================
    layout->addWidget(new QPushButton("7"), 3, 0);  // 第3行第0列
    layout->addWidget(new QPushButton("8"), 3, 1);  // 第3行第1列
    layout->addWidget(new QPushButton("9"), 3, 2);  // 第3行第2列
    layout->addWidget(new QPushButton("×"), 3, 3);  // 第3行第3列:乘法

    // ============================================================
    // 步骤6:第五行 - 数字按钮 4, 5, 6 和减法(第4行)
    // ============================================================
    layout->addWidget(new QPushButton("4"), 4, 0);  // 第4行第0列
    layout->addWidget(new QPushButton("5"), 4, 1);  // 第4行第1列
    layout->addWidget(new QPushButton("6"), 4, 2);  // 第4行第2列
    layout->addWidget(new QPushButton("-"), 4, 3);  // 第4行第3列:减法

    // ============================================================
    // 步骤7:第六行 - 数字按钮 1, 2, 3 和加法(第5行)
    // ============================================================
    layout->addWidget(new QPushButton("1"), 5, 0);  // 第5行第0列
    layout->addWidget(new QPushButton("2"), 5, 1);  // 第5行第1列
    layout->addWidget(new QPushButton("3"), 5, 2);  // 第5行第2列
    layout->addWidget(new QPushButton("+"), 5, 3);  // 第5行第3列:加法

    // ============================================================
    // 步骤8:第七行 - 0, 小数点, 等号(第6行)
    // ============================================================
    // addWidget(控件, 起始行, 起始列, 行跨数, 列跨数)
    // "0" 按钮占2列(第0列和第1列),让它更大更易点击
    layout->addWidget(new QPushButton("0"), 6, 0, 1, 2);

    // 小数点按钮:第6行,第2列,占1行1列(默认)
    layout->addWidget(new QPushButton("."), 6, 2);

    // 等号按钮:第6行,第3列,占1行1列(默认)
    layout->addWidget(new QPushButton("="), 6, 3);

    // ============================================================
    // 步骤9:设置布局的外观参数
    // ============================================================
    // setSpacing(5) 设置控件之间的间距为5像素
    // 让按钮之间有小间隙,视觉上更清晰
    layout->setSpacing(5);

    // setContentsMargins(左, 上, 右, 下)
    // 设置布局内容与窗口边缘的边距为10像素
    // 避免控件紧贴窗口边框
    layout->setContentsMargins(10, 10, 10, 10);

    // ============================================================
    // 步骤10:统一设置所有按钮的高度
    // ============================================================
    // layout->count() 返回布局中控件的总数量
    for (int i = 0; i < layout->count(); ++i) {
        // layout->itemAt(i) 获取第i个布局项
        // ->widget() 将布局项转换为QWidget指针
        QWidget *widget = layout->itemAt(i)->widget();

        // dynamic_cast<QPushButton*>(widget) 尝试将widget转换为QPushButton*
        // 如果转换成功(即widget确实是QPushButton),则条件为真
        // 这样只处理按钮,不处理QLabel和QLineEdit
        if (widget && dynamic_cast<QPushButton*>(widget)) {
            // setFixedHeight(50) 将按钮高度固定为50像素
            // 使所有按钮大小一致,界面更整齐
            widget->setFixedHeight(50);
        }
    }

    // ============================================================
    // 步骤11:将布局应用到窗口
    // ============================================================
    // setLayout() 将创建的布局设置为当前窗口的主布局
    // 窗口会按照布局规则自动排列所有子控件
    setLayout(layout);

    // ============================================================
    // 步骤12:设置窗口属性
    // ============================================================
    // 设置窗口标题栏显示的文字
    setWindowTitle("网格布局 - 计算器");

    // resize(宽度, 高度) 设置窗口初始大小
    // 300像素宽,400像素高
    resize(300, 400);
}

// ============================================================
// 析构函数
// ============================================================
// Qt的对象树机制会自动删除子控件,所以析构函数通常为空
// 不需要手动delete,Qt会帮我们管理内存
Widget::~Widget()
{
}
效果
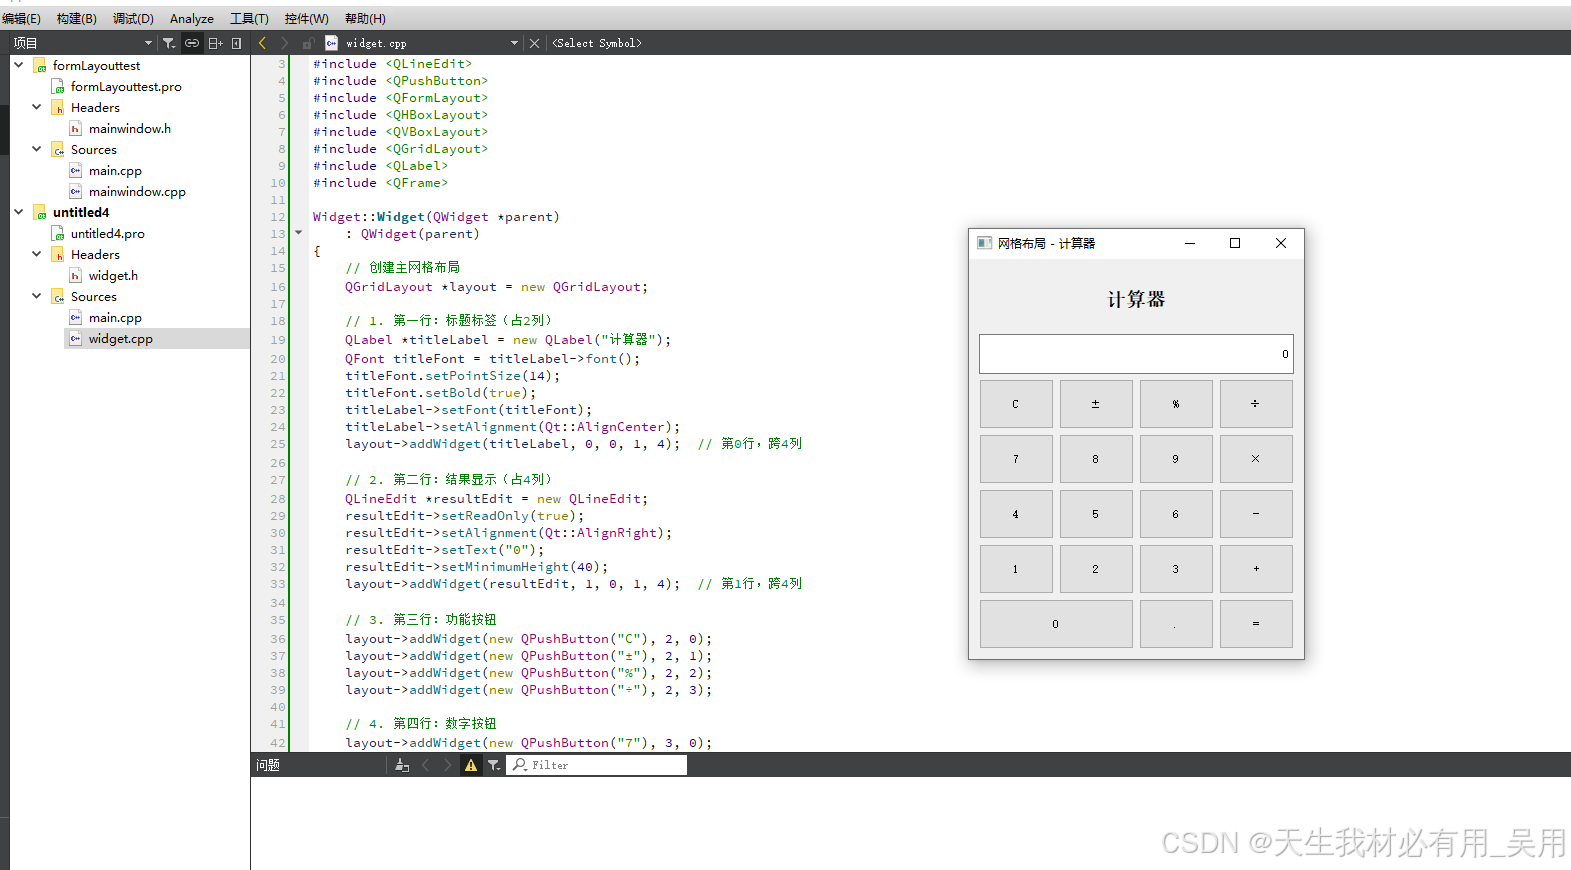
QFormLayout(表单布局)
专为标签-输入框形式的表单设计,自动对齐:
cpp
QFormLayout *layout = new QFormLayout;
layout->addRow(new QLabel("Name:"), new QLineEdit);
layout->addRow(new QLabel("Age:"), new QSpinBox);
widget->setLayout(layout);
示例
cpp
#include "widget.h"
#include <QLabel>
#include <QLineEdit>
#include <QPushButton>
#include <QFormLayout>
#include <QHBoxLayout>
#include <QVBoxLayout>
#include <QGridLayout>
#include <QLabel>
#include <QFrame>
#include <QSpinBox>          // 数字输入框
#include <QComboBox>         // 下拉选择框
#include <QDateEdit>         // 日期选择框
#include <QTextEdit>         // 多行文本输入框

Widget::Widget(QWidget *parent)
    : QWidget(parent)
{
    // ============================================================
    // 步骤1:创建表单布局
    // ============================================================
    // QFormLayout 以两列形式排列:左列是标签,右列是输入控件
    // 自动处理标签和输入框的对齐
    QFormLayout *formLayout = new QFormLayout;

    // ============================================================
    // 步骤2:添加各种类型的输入行
    // ============================================================

    // 2.1 单行文本输入(姓名)
    // addRow(标签文本, 输入控件)
    QLineEdit *nameEdit = new QLineEdit;
    nameEdit->setPlaceholderText("请输入姓名");  // 灰色提示文字
    formLayout->addRow("姓名:", nameEdit);

    // 2.2 数字输入(年龄)
    QSpinBox *ageSpin = new QSpinBox;
    ageSpin->setRange(1, 150);        // 设置范围 1-150
    ageSpin->setValue(18);            // 默认值18
    ageSpin->setSuffix(" 岁");        // 显示单位
    formLayout->addRow("年龄:", ageSpin);

    // 2.3 下拉选择(性别)
    QComboBox *genderCombo = new QComboBox;
    genderCombo->addItem("男");       // 添加选项
    genderCombo->addItem("女");
    genderCombo->addItem("保密");
    formLayout->addRow("性别:", genderCombo);

    // 2.4 日期选择(出生日期)
    QDateEdit *birthEdit = new QDateEdit;
    birthEdit->setDisplayFormat("yyyy-MM-dd");  // 日期显示格式
    birthEdit->setCalendarPopup(true);          // 允许弹出日历选择
    formLayout->addRow("出生日期:", birthEdit);

    // 2.5 下拉选择(学历)
    QComboBox *eduCombo = new QComboBox;
    eduCombo->addItem("博士");
    eduCombo->addItem("硕士");
    eduCombo->addItem("本科");
    eduCombo->addItem("专科");
    eduCombo->addItem("高中");
    eduCombo->addItem("初中及以下");
    formLayout->addRow("学历:", eduCombo);

    // 2.6 多行文本输入(个人简介)
    QTextEdit *introEdit = new QTextEdit;
    introEdit->setPlaceholderText("请输入个人简介...");
    introEdit->setMaximumHeight(80);   // 限制高度,避免占用太多空间
    formLayout->addRow("个人简介:", introEdit);

    // ============================================================
    // 步骤3:添加分割线(视觉分隔)
    // ============================================================
    QFrame *line = new QFrame;
    line->setFrameShape(QFrame::HLine);  // 水平分割线
    line->setFrameShadow(QFrame::Sunken);
    formLayout->addRow(line);            // 占一整行

    // ============================================================
    // 步骤4:添加按钮行(使用水平布局嵌套)
    // ============================================================
    // 创建水平布局来放置两个按钮
    QHBoxLayout *btnLayout = new QHBoxLayout;

    QPushButton *submitBtn = new QPushButton("提交");
    QPushButton *clearBtn = new QPushButton("清空");
    QPushButton *cancelBtn = new QPushButton("取消");

    // 添加弹簧,让按钮靠右对齐
    btnLayout->addStretch(1);
    btnLayout->addWidget(submitBtn);
    btnLayout->addWidget(clearBtn);
    btnLayout->addWidget(cancelBtn);

    // 将水平布局作为一行添加到表单(占两列)
    // addRow(布局) 可以让布局占满整行
    formLayout->addRow(btnLayout);

    // ============================================================
    // 步骤5:设置表单布局的外观参数
    // ============================================================
    // 设置标签和输入框之间的间距
    formLayout->setSpacing(10);

    // 设置表单的整体边距(左,上,右,下)
    formLayout->setContentsMargins(20, 20, 20, 20);

    // 设置标签的宽度策略(让标签右对齐)
    formLayout->setLabelAlignment(Qt::AlignRight);

    // 设置表单行之间的垂直间距
    formLayout->setVerticalSpacing(10);

    // ============================================================
    // 步骤6:应用布局到窗口
    // ============================================================
    setLayout(formLayout);

    // ============================================================
    // 步骤7:设置窗口属性
    // ============================================================
    setWindowTitle("个人信息登记表");
    resize(400, 450);  // 宽度400,高度450

    // ============================================================
    // 步骤8:连接信号与槽(按钮功能)
    // ============================================================
    // 提交按钮点击事件
    connect(submitBtn, &QPushButton::clicked, this, [=]() {
        // 收集所有输入数据
        QString name = nameEdit->text();
        int age = ageSpin->value();
        QString gender = genderCombo->currentText();
        QString birth = birthEdit->text();
        QString edu = eduCombo->currentText();
        QString intro = introEdit->toPlainText();

        // 简单验证
        if (name.isEmpty()) {
            // 可以弹出提示框,这里简单显示在标题栏
            setWindowTitle(" 请输入姓名!");
            return;
        }

        // 显示提交成功
        setWindowTitle(QString(" 提交成功!姓名:%1,年龄:%2")
                      .arg(name).arg(age));
    });

    // 清空按钮点击事件
    connect(clearBtn, &QPushButton::clicked, this, [=]() {
        nameEdit->clear();              // 清空姓名
        ageSpin->setValue(18);          // 年龄重置为18
        genderCombo->setCurrentIndex(0); // 性别选第一个
        birthEdit->setDate(QDate::currentDate()); // 日期设为今天
        eduCombo->setCurrentIndex(2);   // 学历选"本科"
        introEdit->clear();             // 清空简介
        setWindowTitle("个人信息登记表"); // 恢复标题
    });

    // 取消按钮点击事件
    connect(cancelBtn, &QPushButton::clicked, this, [=]() {
        close();  // 关闭窗口
    });
}

Widget::~Widget()
{
}
效果
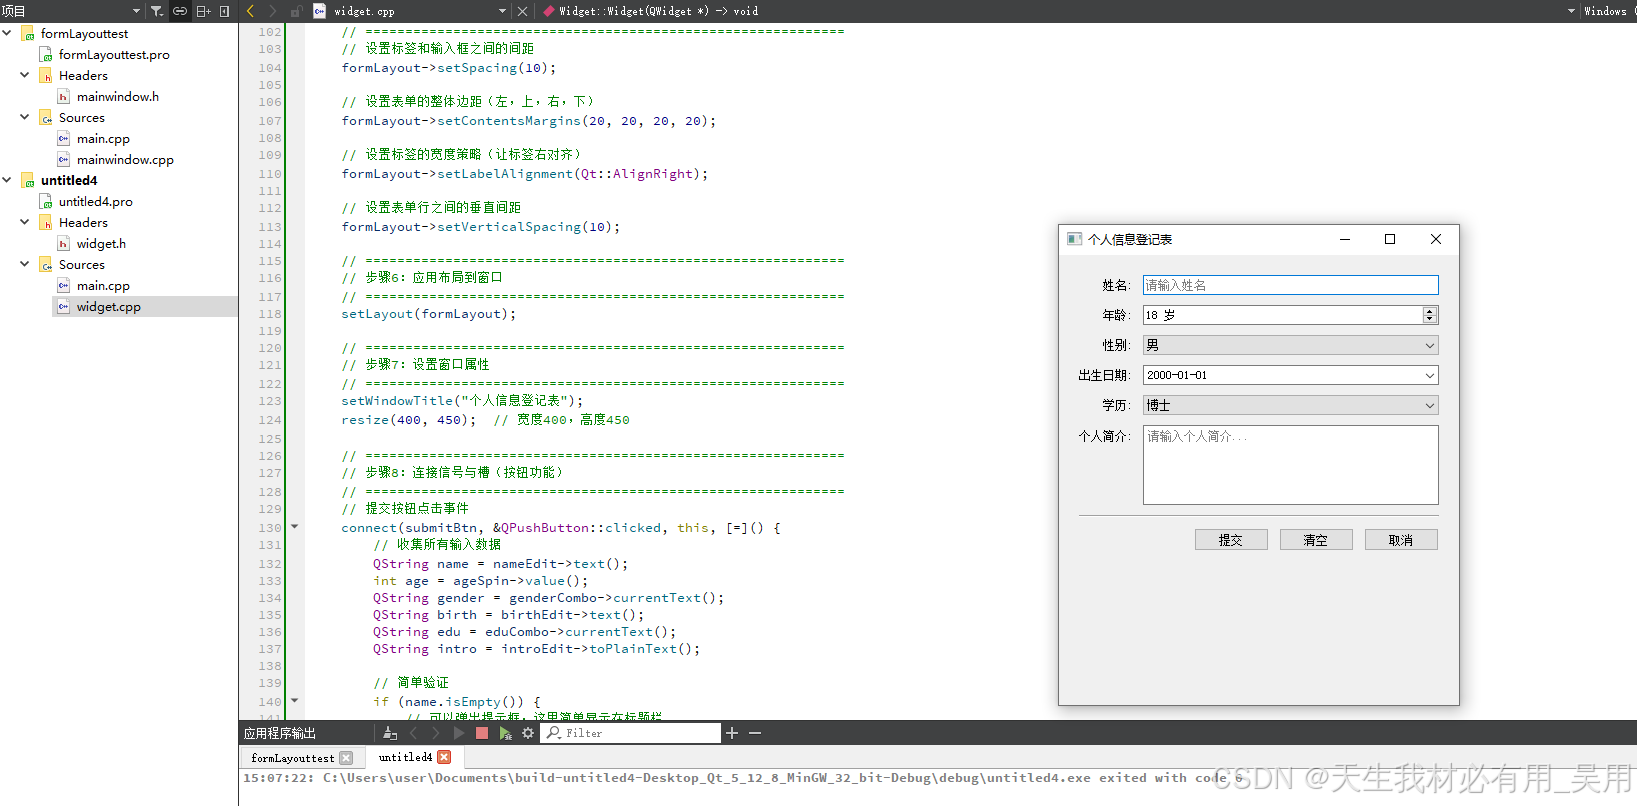
QStackedLayout(堆叠布局)
多个控件/布局叠在一起,每次只显示一个,适合页面切换场景:
cpp
QStackedLayout *stacked = new QStackedLayout;
stacked->addWidget(page1);
stacked->addWidget(page2);
stacked->setCurrentIndex(0);  // 切换到指定页面
示例
cpp
#include "widget.h"
#include <QLabel>
#include <QLineEdit>
#include <QPushButton>
#include <QFormLayout>
#include <QHBoxLayout>
#include <QVBoxLayout>
#include <QGridLayout>
#include <QLabel>
#include <QFrame>
#include <QStackedLayout>    // 堆叠布局
#include <QComboBox>         // 下拉选择框
#include <QSpinBox>          // 数字输入框
#include <QTextEdit>         // 多行文本
#include <QRadioButton>      // 单选按钮
#include <QButtonGroup>      // 按钮组
#include <QDateEdit> // 日期选择
#include <QCheckBox>         // 复选框

Widget::Widget(QWidget *parent)
    : QWidget(parent)
{
    // ============================================================
    // 步骤1:创建三个页面(每个页面是一个QWidget)
    // ============================================================
    // 页面1:欢迎页
    QWidget *page1 = new QWidget;
    // 页面2:设置页
    QWidget *page2 = new QWidget;
    // 页面3:完成页
    QWidget *page3 = new QWidget;

    // ============================================================
    // 步骤2:创建堆叠布局并添加页面
    // ============================================================
    // QStackedLayout 只显示一个页面,其他页面隐藏
    // 通过 setCurrentIndex() 切换显示
    QStackedLayout *stackedLayout = new QStackedLayout;
    stackedLayout->addWidget(page1);  // 索引0
    stackedLayout->addWidget(page2);  // 索引1
    stackedLayout->addWidget(page3);  // 索引2
    stackedLayout->setCurrentIndex(0); // 默认显示第1页(索引0)

    // ============================================================
    // 步骤3:创建导航按钮(上一页/下一页)
    // ============================================================
    QPushButton *prevBtn = new QPushButton("上一页");
    QPushButton *nextBtn = new QPushButton("下一页 ➡");
    QPushButton *finishBtn = new QPushButton("完成");

    // 默认禁用"上一页"(因为当前在第1页)
    prevBtn->setEnabled(false);
    // 默认隐藏"完成"按钮(最后才显示)
    finishBtn->setVisible(false);

    // ============================================================
    // 步骤4:创建底部导航栏的水平布局
    // ============================================================
    QHBoxLayout *navLayout = new QHBoxLayout;
    navLayout->addStretch(1);          // 左侧弹簧,把按钮推到右边
    navLayout->addWidget(prevBtn);
    navLayout->addWidget(nextBtn);
    navLayout->addWidget(finishBtn);

    // ============================================================
    // 步骤5:创建主布局(垂直布局,堆叠布局在上,导航栏在下)
    // ============================================================
    QVBoxLayout *mainLayout = new QVBoxLayout;
    mainLayout->addLayout(stackedLayout, 1);  // 堆叠布局占主要空间(拉伸因子1)
    mainLayout->addLayout(navLayout);         // 导航栏在底部
    setLayout(mainLayout);

    // ============================================================
    // 步骤6:填充页面1 - 欢迎页
    // ============================================================
    QVBoxLayout *page1Layout = new QVBoxLayout(page1);

    // 欢迎标题
    QLabel *welcomeLabel = new QLabel("欢迎使用设置向导");
    QFont welcomeFont = welcomeLabel->font();
    welcomeFont.setPointSize(20);
    welcomeFont.setBold(true);
    welcomeLabel->setFont(welcomeFont);
    welcomeLabel->setAlignment(Qt::AlignCenter);

    // 欢迎描述
    QLabel *descLabel = new QLabel(
        "本向导将帮助您完成基本设置。\n\n"
        "点击「下一页」开始配置您的个人信息。"
    );
    descLabel->setAlignment(Qt::AlignCenter);
    descLabel->setWordWrap(true);  // 自动换行

    // 添加弹簧让内容垂直居中
    page1Layout->addStretch(1);
    page1Layout->addWidget(welcomeLabel);
    page1Layout->addWidget(descLabel);
    page1Layout->addStretch(1);

    // ============================================================
    // 步骤7:填充页面2 - 设置页(个人信息表单)
    // ============================================================
    QFormLayout *page2Layout = new QFormLayout(page2);
    page2Layout->setSpacing(15);
    page2Layout->setContentsMargins(30, 30, 30, 30);

    // 表单标题
    QLabel *formTitle = new QLabel("个人信息设置");
    QFont formFont = formTitle->font();
    formFont.setPointSize(14);
    formFont.setBold(true);
    formTitle->setFont(formFont);
    page2Layout->addRow(formTitle);

    // 添加分割线
    QFrame *line = new QFrame;
    line->setFrameShape(QFrame::HLine);
    page2Layout->addRow(line);

    // 姓名输入
    QLineEdit *nameEdit = new QLineEdit;
    nameEdit->setPlaceholderText("请输入您的姓名");
    page2Layout->addRow("姓名:", nameEdit);

    // 年龄输入
    QSpinBox *ageSpin = new QSpinBox;
    ageSpin->setRange(1, 150);
    ageSpin->setValue(25);
    ageSpin->setSuffix(" 岁");
    page2Layout->addRow("年龄:", ageSpin);

    // 性别选择
    QComboBox *genderCombo = new QComboBox;
    genderCombo->addItem("男");
    genderCombo->addItem("女");
    genderCombo->addItem("保密");
    page2Layout->addRow("性别:", genderCombo);

    // 兴趣爱好(多选,使用水平布局)
    QHBoxLayout *hobbyLayout = new QHBoxLayout;
    QCheckBox *hobby1 = new QCheckBox("阅读");
    QCheckBox *hobby2 = new QCheckBox("音乐");
    QCheckBox *hobby3 = new QCheckBox("运动");
    QCheckBox *hobby4 = new QCheckBox("旅行");
    hobbyLayout->addWidget(hobby1);
    hobbyLayout->addWidget(hobby2);
    hobbyLayout->addWidget(hobby3);
    hobbyLayout->addWidget(hobby4);
    hobbyLayout->addStretch(1);
    page2Layout->addRow("爱好:", hobbyLayout);

    // 个人简介
    QTextEdit *introEdit = new QTextEdit;
    introEdit->setPlaceholderText("请简单介绍一下自己...");
    introEdit->setMaximumHeight(80);
    page2Layout->addRow("简介:", introEdit);

    // ============================================================
    // 步骤8:填充页面3 - 完成页
    // ============================================================
    QVBoxLayout *page3Layout = new QVBoxLayout(page3);

    // 完成图标
    QLabel *doneLabel = new QLabel("设置完成!");
    QFont doneFont = doneLabel->font();
    doneFont.setPointSize(22);
    doneFont.setBold(true);
    doneLabel->setFont(doneFont);
    doneLabel->setAlignment(Qt::AlignCenter);

    // 完成描述
    QLabel *doneDescLabel = new QLabel(
        "您的设置已成功保存。\n\n"
        "点击「完成」按钮关闭向导。"
    );
    doneDescLabel->setAlignment(Qt::AlignCenter);
    doneDescLabel->setWordWrap(true);

    // 显示用户输入摘要
    QLabel *summaryLabel = new QLabel;
    summaryLabel->setAlignment(Qt::AlignCenter);
    summaryLabel->setStyleSheet("color: #666; background-color: #f5f5f5; padding: 10px;");
    summaryLabel->setWordWrap(true);

    page3Layout->addStretch(1);
    page3Layout->addWidget(doneLabel);
    page3Layout->addWidget(doneDescLabel);
    page3Layout->addWidget(summaryLabel);
    page3Layout->addStretch(1);

    // ============================================================
    // 步骤9:连接信号与槽 - 实现页面切换逻辑
    // ============================================================

    // 9.1 "下一页"按钮:切换到下一个页面
    connect(nextBtn, &QPushButton::clicked, this, [=]() {
        int currentIndex = stackedLayout->currentIndex();
        int totalPages = stackedLayout->count();

        // 如果当前不是最后一页,切换到下一页
        if (currentIndex < totalPages - 1) {
            stackedLayout->setCurrentIndex(currentIndex + 1);

            // 更新按钮状态
            prevBtn->setEnabled(true);

            // 如果到达最后一页
            if (currentIndex + 1 == totalPages - 1) {
                // 最后一页:隐藏"下一页",显示"完成"
                nextBtn->setVisible(false);
                finishBtn->setVisible(true);

                // 更新摘要信息(收集用户输入)
                QString name = nameEdit->text().isEmpty() ? "未填写" : nameEdit->text();
                QString age = QString::number(ageSpin->value());
                QString gender = genderCombo->currentText();

                // 获取选中的爱好
                QStringList hobbies;
                if (hobby1->isChecked()) hobbies << "阅读";
                if (hobby2->isChecked()) hobbies << "音乐";
                if (hobby3->isChecked()) hobbies << "运动";
                if (hobby4->isChecked()) hobbies << "旅行";
                QString hobbyStr = hobbies.isEmpty() ? "未选择" : hobbies.join("、");

                // 更新摘要标签
                summaryLabel->setText(
                    QString("📋 您的信息摘要:\n\n"
                            "姓名:%1\n"
                            "年龄:%2 岁\n"
                            "性别:%3\n"
                            "爱好:%4")
                    .arg(name).arg(age).arg(gender).arg(hobbyStr)
                );
            }
        }
    });

    // 9.2 "上一页"按钮:切换到上一个页面
    connect(prevBtn, &QPushButton::clicked, this, [=]() {
        int currentIndex = stackedLayout->currentIndex();

        if (currentIndex > 0) {
            stackedLayout->setCurrentIndex(currentIndex - 1);

            // 更新按钮状态
            if (currentIndex - 1 == 0) {
                prevBtn->setEnabled(false);  // 第一页禁用"上一页"
            }

            // 如果从最后一页返回,恢复"下一页"按钮
            if (currentIndex == stackedLayout->count() - 1) {
                nextBtn->setVisible(true);
                finishBtn->setVisible(false);
            }
        }
    });

    // 9.3 "完成"按钮:关闭窗口
    connect(finishBtn, &QPushButton::clicked, this, [=]() {
        // 可以在这里添加保存数据到文件的逻辑
        // 然后关闭窗口
        close();
    });

    // ============================================================
    // 步骤10:设置窗口属性
    // ============================================================
    setWindowTitle("QStackedLayout - 设置向导");
    resize(500, 450);
}

Widget::~Widget()
{
}
效果
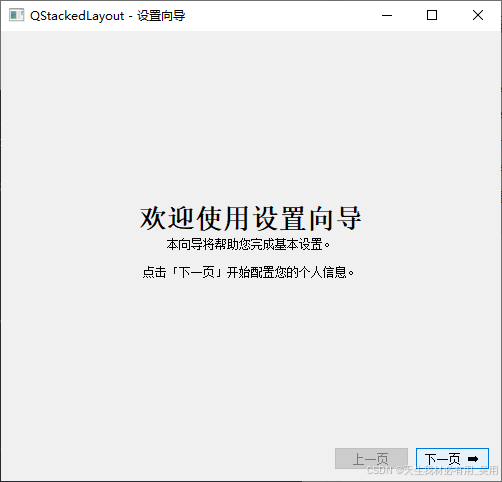
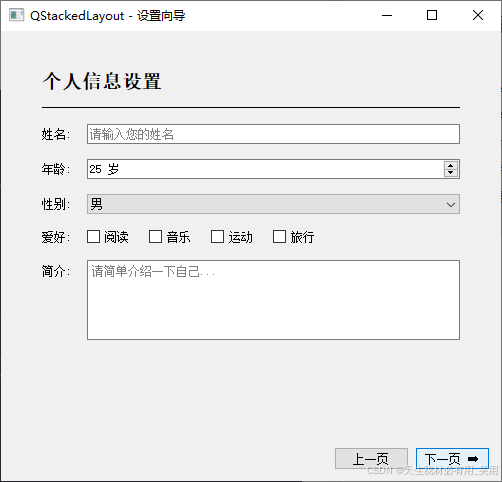
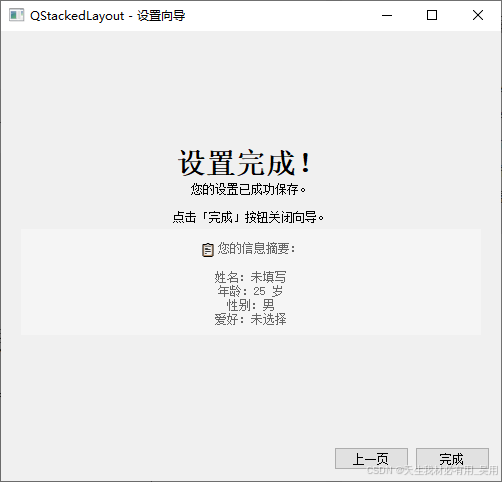
总结
各布局核心特性对比
| 布局 | 排列方式 | 核心特性 | 适用场景 |
|---|---|---|---|
| QHBoxLayout | 水平一行 | 从左到右排列 | 工具栏、按钮组 |
| QVBoxLayout | 垂直一列 | 从上到下排列 | 侧边栏、主结构 |
| QGridLayout | 二维网格 | 支持跨行跨列 | 计算器、表格 |
| QFormLayout | 两列表单 | 标签+输入配对 | 登录、设置界面 |
| QStackedLayout | 堆叠 | 每次只显示一个 | 向导、标签页 |
通用方法与属性(所有布局共有)
添加元素
| 方法 | 说明 |
|---|---|
addWidget(QWidget*) |
添加控件 |
addLayout(QLayout*) |
添加子布局(嵌套) |
insertWidget(int, QWidget*) |
在指定位置插入控件 |
insertLayout(int, QLayout*) |
在指定位置插入子布局 |
addStretch(int) |
添加弹性空间(仅 QBoxLayout 子类) |
移除元素
| 方法 | 说明 |
|---|---|
removeWidget(QWidget*) |
移除控件(不删除对象) |
takeAt(int) |
取出并移除指定位置的布局项 |
clear() |
清空所有布局项(不删除对象) |
遍历与查找
| 方法 | 说明 |
|---|---|
count() |
获取布局项总数 |
itemAt(int) |
获取指定位置的布局项 |
indexOf(QWidget*) |
获取控件的索引位置 |
parentWidget() |
获取布局所属的父窗口 |
空间与间距
| 方法/属性 | 说明 |
|---|---|
setSpacing(int) |
设置控件之间的间距 |
spacing() |
获取当前间距 |
setContentsMargins(int, int, int, int) |
设置边距(左,上,右,下) |
contentsMargins() |
获取边距信息 |
setContentsMargins(QMargins) |
以 QMargins 对象形式设置边距 |
大小策略
| 属性/方法 | 说明 |
|---|---|
setSizeConstraint(QLayout::SizeConstraint) |
设置布局大小约束 |
setMenuBar(QMenuBar*) |
为布局设置菜单栏 |
SizeConstraint 枚举值:
| 值 | 说明 |
|---|---|
QLayout::SetDefaultConstraint |
默认,最小尺寸为首选尺寸 |
QLayout::SetFixedSize |
窗口固定为布局首选大小(不可调整) |
QLayout::SetMinimumSize |
窗口最小尺寸为布局首选尺寸 |
QLayout::SetMaximumSize |
窗口最大尺寸为布局首选尺寸 |
QLayout::SetMinAndMaxSize |
最小和最大都设置为布局首选尺寸 |
QLayout::SetNoConstraint |
无约束,可任意调整 |
特有属性
QGridLayout 特有方法
| 方法 | 说明 |
|---|---|
addWidget(QWidget*, int row, int col) |
添加到指定单元格 |
addWidget(QWidget*, int row, int col, int rowSpan, int colSpan) |
跨行跨列添加 |
addLayout(QLayout*, int row, int col) |
添加子布局到指定位置 |
setRowStretch(int row, int stretch) |
设置行的拉伸因子 |
setColumnStretch(int col, int stretch) |
设置列的拉伸因子 |
rowCount() |
获取行数 |
columnCount() |
获取列数 |
cellRect(int row, int col) |
获取单元格矩形区域 |
QFormLayout 特有方法
| 方法 | 说明 |
|---|---|
addRow(QWidget*) |
添加一个占两列的控件 |
addRow(QLayout*) |
添加一个占两列的子布局 |
addRow(const QString&, QWidget*) |
添加标签+控件对 |
addRow(QLabel*, QWidget*) |
添加标签+控件对(标签可自定义) |
insertRow(int, ...) |
在指定位置插入行 |
removeRow(int) |
移除指定行 |
setLabelAlignment(Qt::Alignment) |
设置标签对齐方式 |
labelAlignment() |
获取标签对齐方式 |
setFormAlignment(Qt::Alignment) |
设置表单整体对齐方式 |
setVerticalSpacing(int) |
设置行间距 |
setHorizontalSpacing(int) |
设置列间距 |
labelForField(QWidget*) |
获取某个输入控件对应的标签 |
getLayoutPosition() |
获取布局位置信息 |
QStackedLayout 特有方法
| 方法 | 说明 |
|---|---|
addWidget(QWidget*) |
添加页面(返回索引) |
insertWidget(int, QWidget*) |
在指定位置插入页面 |
removeWidget(QWidget*) |
移除指定页面 |
setCurrentIndex(int) |
切换到指定索引的页面 |
setCurrentWidget(QWidget*) |
切换到指定控件页面 |
currentIndex() |
获取当前页面索引 |
currentWidget() |
获取当前页面控件指针 |
count() |
获取页面总数 |
setStackingMode(QStackedLayout::StackingMode) |
设置堆叠模式 |
StackingMode 枚举值:
| 值 | 说明 |
|---|---|
QStackedLayout::StackOne |
只显示当前页面(默认) |
QStackedLayout::StackAll |
所有页面都显示(用于动画效果) |
Qt 对齐方式速查
| 枚举值 | 说明 |
|---|---|
Qt::AlignLeft |
左对齐 |
Qt::AlignRight |
右对齐 |
Qt::AlignHCenter |
水平居中 |
Qt::AlignTop |
顶部对齐 |
Qt::AlignBottom |
底部对齐 |
Qt::AlignVCenter |
垂直居中 |
Qt::AlignCenter |
完全居中 |
Qt::AlignJustify |
两端对齐 |
Qt::AlignAbsolute |
绝对对齐 |
组合使用示例:
cpp
Qt::AlignTop | Qt::AlignRight       // 右上角
Qt::AlignBottom | Qt::AlignHCenter  // 底部居中
end