HarmonyOS 技术精讲 - Basic Services Kit(基础服务):应用内账号创建与管理
账号管理这个 API,很多人第一步就走错了
HarmonyOS NEXT 开发里,appAccountManager 这个 API 经常被误用。我第一次接触它的时候,也踩了个坑------官方示例跑通了,但一放到多账号切换的场景里,数据就读不到了。
问题出在哪里?很多人以为 createAccount 只是简单的本地存储,但实际上它涉及系统级别的账号生命周期管理。如果你不了解它和 Preferences、数据库 的本质区别,很容易在后续维护中遇到数据不一致的问题。
这篇文章不废话,直接做一个完整的本地账号系统,支持多账号创建、密码保存、账号切换。代码全部可运行,踩坑点全部标注出来。
它解决什么问题
应用内账号管理(Account Kit)是 Basic Services Kit 提供的本地账号能力,专门用于管理应用自身的用户体系。
适合的场景:
- 应用有自己的账号系统,不需要接入华为账号
- 需要支持多账号切换
- 账号信息需要持久化,且与系统账号隔离
- 需要在账号维度存储自定义属性(比如密码、token、配置)
不适合的场景:
- 只需要简单存储少量数据 → 用
Preferences更轻量 - 需要云同步 → 需要配合云服务
- 需要第三方登录 → 需要接入 Auth Kit 或单独处理
和数据库 / Preferences 的区别:
| 方案 | 存储范围 | 生命周期 | 多账号管理 | 系统级清理 |
|---|---|---|---|---|
| Preferences | 应用级别 | 随应用卸载 | 需要自己实现 | 不支持 |
| 数据库 | 应用级别 | 随应用卸载 | 需要自己实现 | 不支持 |
| Account Kit | 系统账号服务 | 随应用卸载 | 原生支持 | 支持 |
Account Kit 最大的价值是:系统级的多账号生命周期管理。当应用卸载时,账号数据自动清理;不需要自己维护账号列表的增删改查逻辑。
环境说明
text
DevEco Studio 版本:DevEco Studio 6.1.0 及以上
HarmonyOS SDK 版本:HarmonyOS 6.1.0(23) 及以上
目标设备:手机
核心实现:完整的本地账号系统
整体架构设计
我们不搞复杂的 MVVM,新手阶段先把功能跑通。整个模块分三层:
UI 层(登录页面) → 逻辑层(AccountService) → API 层(appAccountManager)AccountService 封装所有账号操作,UI 层只调用它提供的方法。
第一步:配置模块
在 module.json5 中声明权限(实际上 Account Kit 不需要额外权限声明,但需要确保 Basic Services Kit 已集成)。
json
{
  "module": {
    "name": "entry",
    "type": "entry",
    "abilities": [
      {
        "name": "EntryAbility",
        "srcEntry": "./ets/entryability/EntryAbility.ets",
        "description": "$string:entryability_desc",
        "icon": "$media:icon",
        "label": "$string:app_name",
        "startWindowIcon": "$media:icon",
        "startWindowBackground": "$string:entryability_background",
        "exported": true
      }
    ],
    "requestPermissions": []
  }
}
不需要额外权限,这一点比很多 API 省心。
第二步:创建 AccountService 服务类
这个文件是核心,所有账号操作都在这里。
typescript
// service/AccountService.ets
import { appAccountManager } from '@kit.BasicServicesKit';
import { BusinessError } from '@kit.BasicServicesKit';

export class AccountService {
  private static instance: AccountService;
  // 当前登录的账号
  private currentAccount: appAccountManager.AppAccount | null = null;
  // 账号列表缓存
  private accountList: appAccountManager.AppAccount[] = [];

  private constructor() {
    // 单例模式,确保账号状态一致
  }

  public static getInstance(): AccountService {
    if (AccountService.instance === null) {
      AccountService.instance = new AccountService();
    }
    return AccountService.instance;
  }

  /**
   * 创建应用内账号
   * @param username 用户名
   * @param password 密码
   * @returns true 表示创建成功
   */
  public async createAccount(username: string, password: string): Promise<boolean> {
    try {
      // 1. 创建账号
      await appAccountManager.createAccount(username);
      console.info(`Account created: ${username}`);

      // 2. 获取账号对象
      const account = await appAccountManager.getAccount(username);

      // 3. 保存密码到账号自定义属性
      // 这里使用 setCredential 来存储密码(实际项目建议加密)
      await account.setCredential('password', password);
      console.info(`Credential saved for: ${username}`);

      // 4. 保存一个自定义属性,标记账号状态
      await account.setCustomData('createTime', new Date().toISOString());

      return true;
    } catch (error) {
      let err = error as BusinessError;
      // 错误码 12300001 表示账号已存在
      if (err.code === 12300001) {
        console.error(`Account already exists: ${username}`);
        return false;
      }
      console.error(`Create account failed: ${JSON.stringify(err)}`);
      return false;
    }
  }

  /**
   * 删除账号
   * @param username 用户名
   */
  public async removeAccount(username: string): Promise<boolean> {
    try {
      await appAccountManager.removeAccount(username);
      console.info(`Account removed: ${username}`);

      // 如果删除的是当前账号,清除缓存
      if (this.currentAccount?.getName() === username) {
        this.currentAccount = null;
      }
      return true;
    } catch (error) {
      let err = error as BusinessError;
      console.error(`Remove account failed: ${JSON.stringify(err)}`);
      return false;
    }
  }

  /**
   * 获取所有应用内账号
   */
  public async getAllAccounts(): Promise<string[]> {
    try {
      const accounts = await appAccountManager.getAllAccounts();
      this.accountList = accounts;
      return accounts.map(account => account.getName());
    } catch (error) {
      let err = error as BusinessError;
      console.error(`Get accounts failed: ${JSON.stringify(err)}`);
      return [];
    }
  }

  /**
   * 验证账号密码
   * @param username 用户名
   * @param password 密码
   */
  public async verifyAccount(username: string, password: string): Promise<boolean> {
    try {
      const account = await appAccountManager.getAccount(username);
      const storedPassword = await account.getCredential('password');
      return storedPassword === password;
    } catch (error) {
      let err = error as BusinessError;
      console.error(`Verify account failed: ${JSON.stringify(err)}`);
      return false;
    }
  }

  /**
   * 设置当前登录账号
   */
  public setCurrentAccount(account: appAccountManager.AppAccount | null): void {
    this.currentAccount = account;
  }

  /**
   * 获取当前登录账号
   */
  public getCurrentAccount(): appAccountManager.AppAccount | null {
    return this.currentAccount;
  }

  /**
   * 获取当前用户名
   */
  public getCurrentUsername(): string {
    return this.currentAccount?.getName() ?? '';
  }

  /**
   * 获取账号的自定义数据
   * @param username 用户名
   * @param key 键
   */
  public async getAccountCustomData(username: string, key: string): Promise<string> {
    try {
      const account = await appAccountManager.getAccount(username);
      return await account.getCustomData(key);
    } catch (error) {
      let err = error as BusinessError;
      console.error(`Get custom data failed: ${JSON.stringify(err)}`);
      return '';
    }
  }

  /**
   * 更新密码
   * @param username 用户名
   * @param newPassword 新密码
   */
  public async updatePassword(username: string, newPassword: string): Promise<boolean> {
    try {
      const account = await appAccountManager.getAccount(username);
      await account.setCredential('password', newPassword);
      return true;
    } catch (error) {
      let err = error as BusinessError;
      console.error(`Update password failed: ${JSON.stringify(err)}`);
      return false;
    }
  }
}
这段代码需要注意的地方:
createAccount和setCredential是分开的两个异步调用,中间没有事务保证。如果setCredential失败,账号已创建但密码没保存------这是真实开发中容易遇到的问题。后面踩坑章节会详细讲。getAllAccounts返回的是AppAccount数组,不是用户名列表。它的内部实现会遍历当前应用的所有账号。getCredential和setCredential存储的是明文数据。实际项目里,密码一定不能明文存。后面会给出加密建议。
第三步:构建登录页面 UI
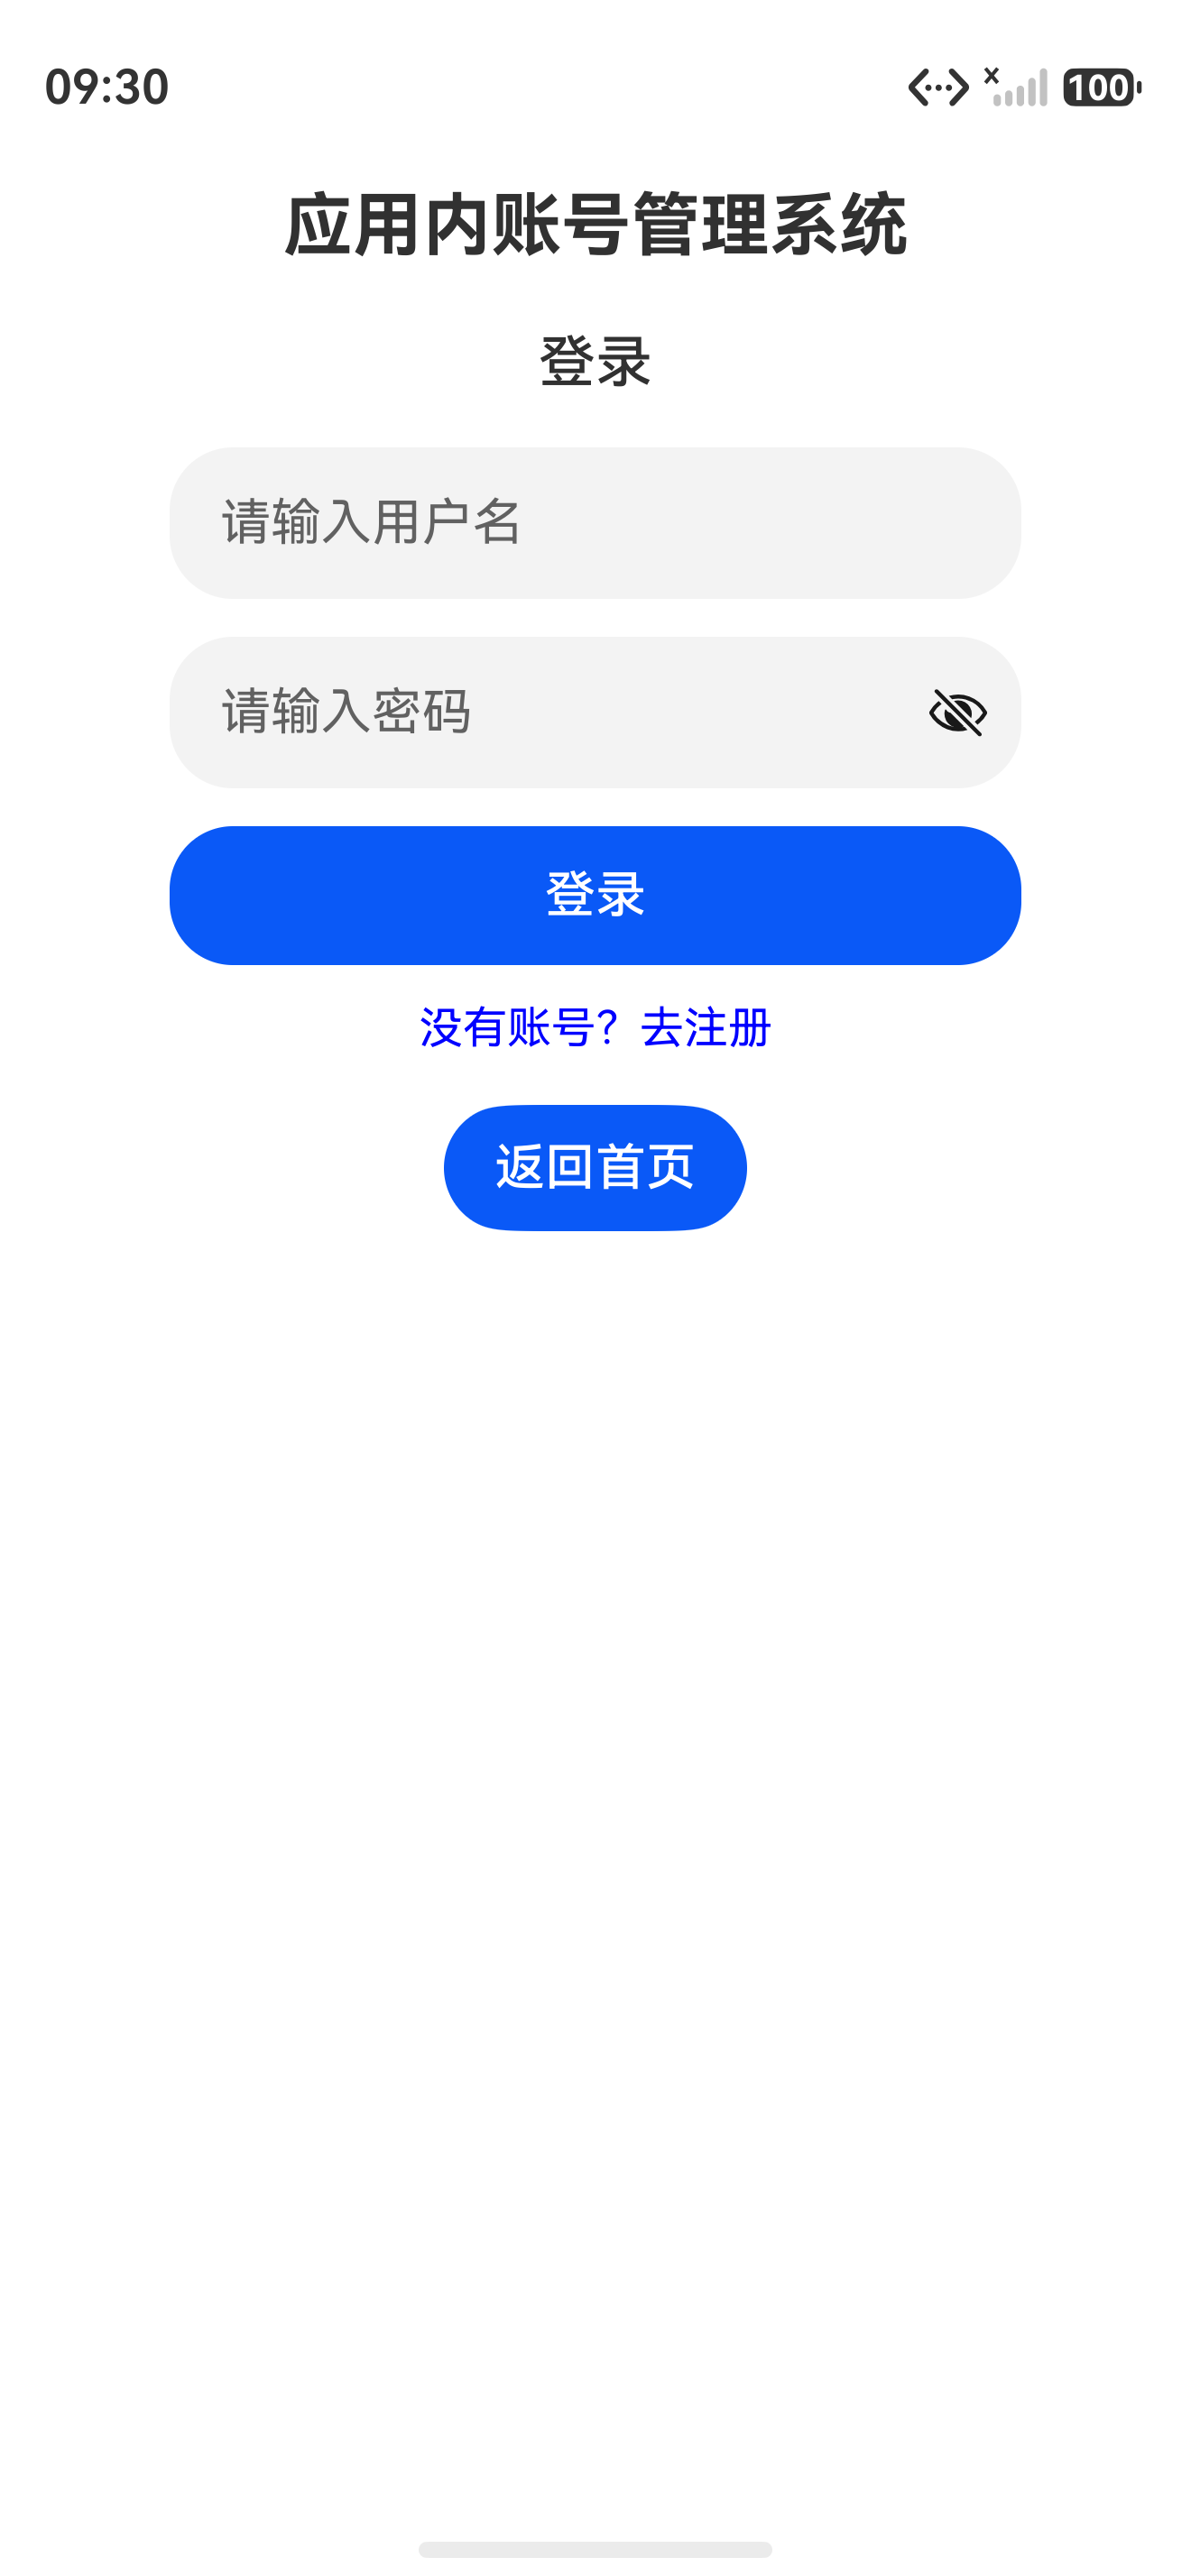
登录页面包含三个功能区域:登录 / 注册、账号列表、账号管理。
typescript
// pages/LoginPage.ets
import { AccountService } from '../service/AccountService';

@Entry
@Component
struct LoginPage {
  @State username: string = '';
  @State password: string = '';
  @State confirmPassword: string = '';
  @State isRegisterMode: boolean = false;
  @State accountList: string[] = [];
  @State currentUser: string = '';
  @State message: string = '';
  @State loginSuccess: boolean = false;

  private accountService: AccountService = AccountService.getInstance();

  build() {
    Column() {
      // 标题
      Text('应用内账号管理系统')
        .fontSize(24)
        .fontWeight(FontWeight.Bold)
        .margin({ bottom: 20 });

      if (!this.loginSuccess) {
        // 登录 / 注册表单
        this.buildLoginForm();
      } else {
        // 已登录状态
        this.buildAccountList();
      }
    }
    .width('100%')
    .height('100%')
    .padding(20)
    .alignItems(HorizontalAlign.Center)
    .onPageShow(() => {
      this.refreshAccountList();
    });
  }

  /**
   * 登录 / 注册表单区域
   */
  @Builder
  buildLoginForm() {
    Column() {
      Text(this.isRegisterMode ? '注册新账号' : '登录')
        .fontSize(18)
        .fontWeight(FontWeight.Medium)
        .margin({ bottom: 16 });

      TextInput({ placeholder: '请输入用户名', text: this.username })
        .width('80%')
        .height(48)
        .margin({ bottom: 12 })
        .onChange((value: string) => {
          this.username = value;
        });

      TextInput({ placeholder: '请输入密码', text: this.password })
        .width('80%')
        .height(48)
        .margin({ bottom: 12 })
        .type(InputType.Password)
        .onChange((value: string) => {
          this.password = value;
        });

      // 注册模式下显示确认密码
      if (this.isRegisterMode) {
        TextInput({ placeholder: '确认密码', text: this.confirmPassword })
          .width('80%')
          .height(48)
          .margin({ bottom: 12 })
          .type(InputType.Password)
          .onChange((value: string) => {
            this.confirmPassword = value;
          });
      }

      // 提示消息
      if (this.message !== '') {
        Text(this.message)
          .fontSize(14)
          .fontColor(Color.Red)
          .margin({ bottom: 8 });
      }

      // 主按钮
      Button(this.isRegisterMode ? '注册' : '登录')
        .width('80%')
        .height(44)
        .margin({ bottom: 12 })
        .onClick(() => {
          if (this.isRegisterMode) {
            this.handleRegister();
          } else {
            this.handleLogin();
          }
        });

      // 切换模式
      Text(this.isRegisterMode ? '已有账号?去登录' : '没有账号?去注册')
        .fontSize(14)
        .fontColor(Color.Blue)
        .onClick(() => {
          this.isRegisterMode = !this.isRegisterMode;
          this.message = '';
        });
    }
    .width('100%')
    .alignItems(HorizontalAlign.Center);
  }

  /**
   * 已登录后的账号管理区域
   */
  @Builder
  buildAccountList() {
    Column() {
      Text(`当前用户:${this.currentUser}`)
        .fontSize(18)
        .fontWeight(FontWeight.Medium)
        .margin({ bottom: 16 });

      // 账号列表
      Text('所有账号:')
        .fontSize(16)
        .width('80%')
        .textAlign(TextAlign.Start)
        .margin({ bottom: 8 });

      List({ space: 8 }) {
        ForEach(this.accountList, (item: string) => {
          ListItem() {
            Row() {
              Text(item)
                .fontSize(16)
                .layoutWeight(1);

              if (item === this.currentUser) {
                Text('当前')
                  .fontSize(12)
                  .fontColor(Color.Gray)
                  .margin({ right: 8 });
              }

              Button('切换')
                .fontSize(14)
                .height(32)
                .margin({ right: 4 })
                .onClick(() => {
                  this.switchAccount(item);
                });

              Button('删除')
                .fontSize(14)
                .height(32)
                .fontColor(Color.Red)
                .onClick(() => {
                  this.handleDeleteAccount(item);
                });
            }
            .padding(12)
            .width('80%')
            .borderRadius(8)
            .backgroundColor('#f5f5f5');
          }
        }, (item: string) => item);
      }
      .width('100%')
      .layoutWeight(1);

      // 退出登录
      Button('退出当前账号')
        .width('80%')
        .height(44)
        .fontColor(Color.Red)
        .margin({ top: 12 })
        .onClick(() => {
          this.logout();
        });
    }
    .width('100%')
    .alignItems(HorizontalAlign.Center);
  }

  /**
   * 处理注册逻辑
   */
  async handleRegister() {
    if (this.username === '' || this.password === '') {
      this.message = '用户名和密码不能为空';
      return;
    }
    if (this.password !== this.confirmPassword) {
      this.message = '两次密码不一致';
      return;
    }
    if (this.username.length < 2) {
      this.message = '用户名至少2个字符';
      return;
    }

    this.message = '正在注册...';
    let result = await this.accountService.createAccount(this.username, this.password);

    if (result) {
      this.message = '注册成功,请登录';
      this.isRegisterMode = false;
      this.password = '';
      this.confirmPassword = '';
    } else {
      this.message = '注册失败,用户名可能已存在';
    }
  }

  /**
   * 处理登录逻辑
   */
  async handleLogin() {
    if (this.username === '' || this.password === '') {
      this.message = '用户名和密码不能为空';
      return;
    }

    this.message = '正在验证...';
    let isValid = await this.accountService.verifyAccount(this.username, this.password);

    if (isValid) {
      this.currentUser = this.username;
      this.loginSuccess = true;
      this.message = '';
      // 刷新账号列表
      await this.refreshAccountList();
    } else {
      this.message = '用户名或密码错误';
    }
  }

  /**
   * 刷新账号列表
   */
  async refreshAccountList() {
    this.accountList = await this.accountService.getAllAccounts();
  }

  /**
   * 切换账号
   */
  async switchAccount(username: string) {
    // 验证账号是否存在
    let isValid = await this.accountService.verifyAccount(username, '');
    // 这里简化处理,实际应该重新输入密码
    this.currentUser = username;
    this.message = `已切换到账号:${username}`;
  }

  /**
   * 删除账号
   */
  async handleDeleteAccount(username: string) {
    let result = await this.accountService.removeAccount(username);
    if (result) {
      if (this.currentUser === username) {
        this.currentUser = '';
        this.loginSuccess = false;
      }
      await this.refreshAccountList();
      this.message = `账号 ${username} 已删除`;
    } else {
      this.message = `删除账号 ${username} 失败`;
    }
  }

  /**
   * 退出登录
   */
  async logout() {
    this.currentUser = '';
    this.loginSuccess = false;
    this.username = '';
    this.password = '';
    this.message = '已退出登录';
  }
}
这段代码需要注意的地方:
@State变量用于驱动 UI 刷新。loginSuccess控制登录状态切换,accountList控制列表刷新。onPageShow生命周期回调里刷新账号列表,确保每次进入页面都能获取最新数据。ForEach的第三个参数是键生成函数,这里直接用用户名作为 key,确保列表更新时组件复用正确。- 切换账号时没有重新验证密码,实际项目需要加上密码验证逻辑。
第四步:入口文件
typescript
// pages/Index.ets
import { LoginPage } from './LoginPage';

@Entry
@Component
struct Index {
  build() {
    Column() {
      LoginPage();
    }
    .width('100%')
    .height('100%')
    .backgroundColor('#f0f2f5');
  }
}
常见问题 1:账号已存在时 createAccount 的错误处理
现象: 连续调用 createAccount 两次,第二次不会覆盖已有账号,而是抛出异常。
原因: createAccount 内部做了唯一性校验,同一个应用内不能创建同名账号。这是设计上的保护,但很多新人没处理这个异常,导致程序崩溃。
解决方案:
typescript
try {
  await appAccountManager.createAccount(username);
} catch (error) {
  let err = error as BusinessError;
  if (err.code === 12300001) {
    // 账号已存在,直接获取即可
    console.info('Account already exists, skip creation');
  } else {
    throw error;
  }
}官方文档对错误码的描述比较简略,实际开发中建议把所有可能的错误码都处理掉。12300001 是账号已存在,12300002 是参数无效,12300003 是权限不足。
常见问题 2:setCredential 和 setCustomData 的写入时机
现象: 创建账号后立即调用 setCredential,偶尔会失败。
原因: createAccount 是异步操作,虽然 await 了,但系统底层的账号索引可能还没完全建立。紧接着调用 getAccount 获取账号对象,这个对象可能是过期的或者未完全初始化的。
解决方案:
typescript
public async createAccount(username: string, password: string): Promise<boolean> {
  try {
    // 1. 创建账号
    await appAccountManager.createAccount(username);

    // 2. 等一小段时间,确保账号完全初始化
    // 这里用一个小技巧:循环获取直到成功
    let account: appAccountManager.AppAccount | null = null;
    for (let i = 0; i < 3; i++) {
      try {
        account = await appAccountManager.getAccount(username);
        break;
      } catch {
        // 重试
        await this.delay(200);
      }
    }

    if (account === null) {
      return false;
    }

    // 3. 保存密码
    await account.setCredential('password', password);
    await account.setCustomData('createTime', new Date().toISOString());
    return true;
  } catch (error) {
    let err = error as BusinessError;
    console.error(`Create account failed: ${JSON.stringify(err)}`);
    return false;
  }
}

private delay(ms: number): Promise<void> {
  return new Promise(resolve => setTimeout(resolve, ms));
}
为什么这个坑容易被忽略? 因为大部分开发者在模拟器上测试时,系统响应快,不容易触发这个问题。但在真机上,尤其是中低端设备,账号初始化延迟会比较明显。如果你在真机上遇到 getAccount 偶尔报错,大概率是这个原因。
最佳实践
1. 密码绝不能明文存储
setCredential 存储的是明文数据,任何有 root 权限的进程都可以读取。实际项目中,必须对密码进行哈希处理。
typescript
import { hash } from '@kit.ArkTS';

async function hashPassword(password: string): Promise<string> {
  let encoder = new util.TextEncoder();
  let data = encoder.encodeInto(password);
  let digest = await hash.hash(data, hash.HashType.SHA256);
  return digest;
}

// 存储时用哈希值
let hashedPwd = await hashPassword(password);
await account.setCredential('password', hashedPwd);
2. 不要在 build() 中调用异步方法
ArkUI 的 build() 函数是同步的,不能在里头直接写 await。所有异步操作必须放在事件回调或者独立方法里。上面的代码把异步操作都放在了 handleLogin、handleRegister 这些方法里,这是正确的做法。
3. 账号列表变化后必须主动刷新 UI
getAllAccounts 获取的是当前时刻的快照,不会自动更新。当账号列表变化时(创建、删除),需要重新调用 getAllAccounts 并更新 @State 变量。
typescript
// 在删除后主动刷新
await this.handleDeleteAccount(username);
await this.refreshAccountList(); // 这行不能少
4. 使用单例管理 AccountService
账号状态是全局的,不应该在每个页面里创建新的 AccountService 实例。单例模式可以确保当前登录账号、账号列表缓存的数据一致性。
FAQ
Q:为什么真机上创建账号后立刻获取会报错,模拟器正常?
A:真机的账号服务初始化需要时间,尤其是中低端设备。建议在 createAccount 之后加入重试机制,最多重试 3 次,每次间隔 200ms。
Q:账号数据在应用卸载后会清理吗?
A:会。Account Kit 的账号数据与应用的包名绑定,应用卸载后系统会自动清理该应用的所有账号数据。这是它和数据库存储的一个重要区别------不需要手动清理。
Q:多设备协同场景下,账号数据会同步吗?
A:不会。Account Kit 管理的应用内账号是本地账号,不会自动同步到其他设备。如果需要跨设备同步,需要配合云服务或自行实现同步逻辑。
Q:setCredential 和 setCustomData 有什么区别?
A:setCredential 专门用于存储认证凭据(密码、token),系统可能在特定场景下对这些数据进行额外的保护。setCustomData 用于存储自定义属性,更适合存用户昵称、头像 URL 这类非敏感数据。两者在使用上没有本质区别,但从语义上建议区分使用。
Q:为什么 ForEach 里删除账号后列表不刷新?
A:因为 @State 变量 accountList 没有重新赋值。removeAccount 只是删除了系统里的账号,不会自动更新 accountList。需要在删除后调用 getAllAccounts 获取最新列表,然后赋值给 accountList。
如果你也在用 Account Kit 做多账号管理,可以重点检查一下创建账号后的写入时机和账号列表的刷新逻辑。这两个地方是实际开发中最容易出问题的环节。