说明
安装部署Intel PCCS及其他软件。在Intel CPU的机器部署Intel SGX所需软件。
参考资料
Intel可信计算文档:https://cc-enabling.trustedservices.intel.com/ IntelAPI文档:https://api.portal.trustedservices.intel.com/content/documentation.html GitHub下载加速:https://gh-proxy.com/ 安装Intel开发环境:https://cc-enabling.trustedservices.intel.com/intel-sgx-sw-installation-guide-linux/01/introduction/ 容器镜像加速:https://1ms.run/
准备服务器
Intel CPU,BIOS和BMC需是最新版本。操作系统推荐使用Ubuntu22及更高版本。服务器应可访问互联网,且可访问Intel官网及GitHub。
配置BIOS
以厂商服务器配置说明书为准。 特殊配置,部分服务器的SGX配置有下图所示开关,务必选择完整重置SGX的配置。其他SGX开关尽可能都打开。 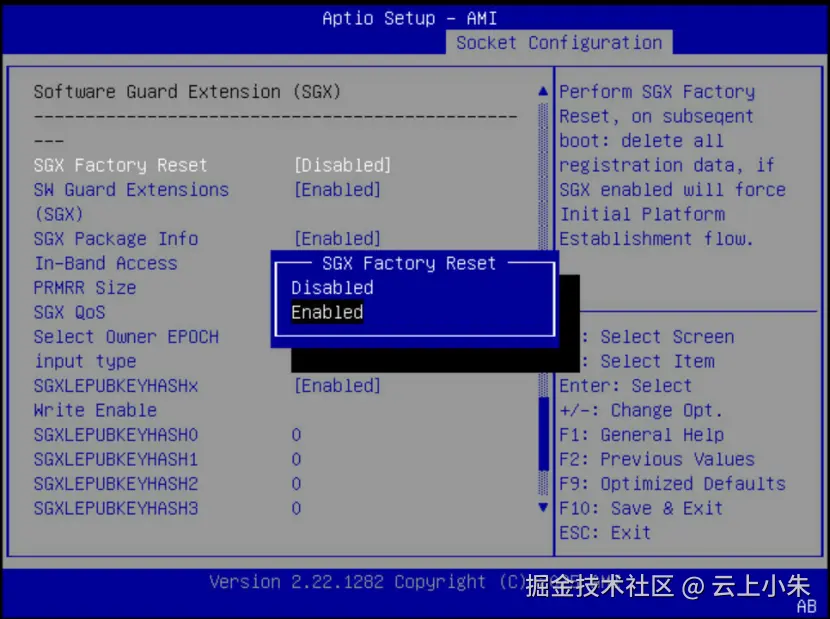 例如下图所示,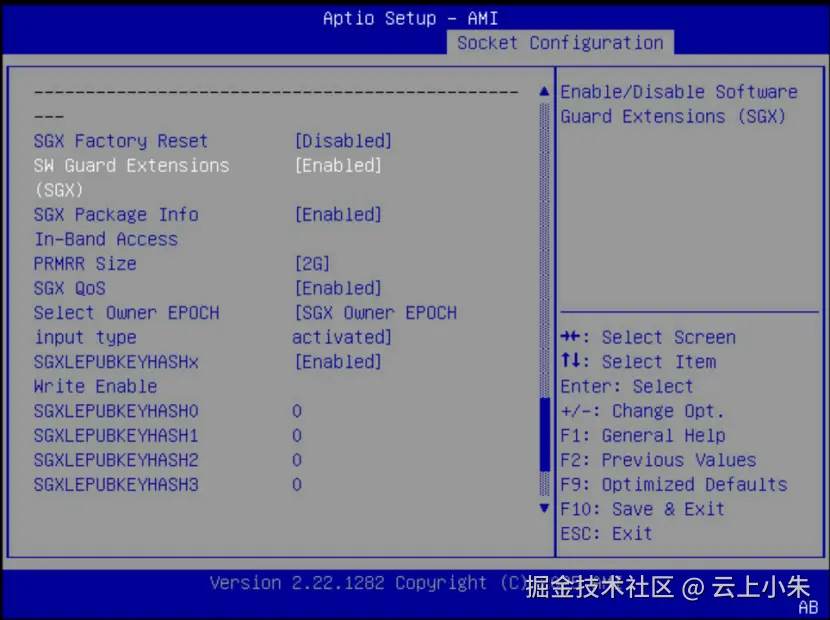
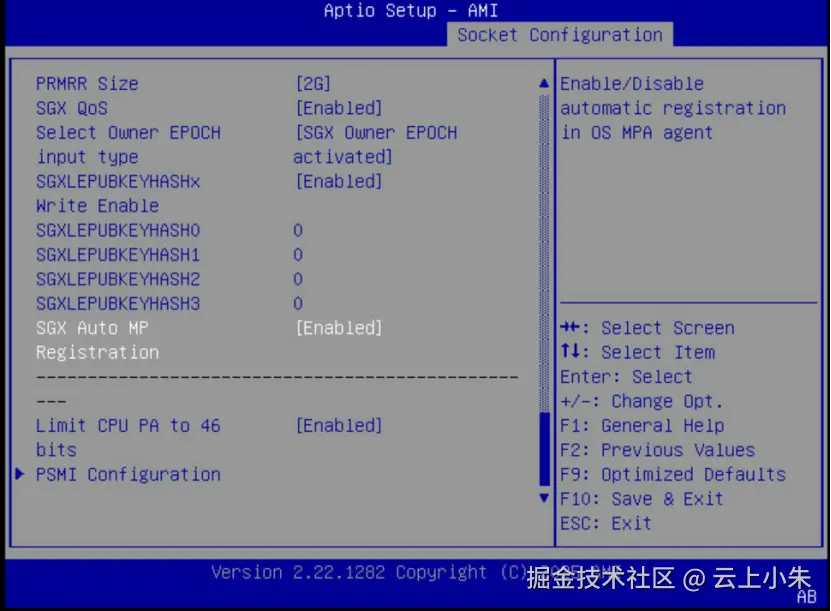 配置后保存并重启主机。
安装操作系统
注意:修改BIOS配置后,务必重装系统使配置生效在系统内。 推荐安装Ubuntu22及更高版本。当前Intel推荐Ubuntu24 LTS。按照系统引导标准流程安装即可。
检查系统时间
时间差异会导致请求Intel证书失败。
bash
timedatectl set-ntp false
timedatectl set-timezone Asia/Shanghai
修改配置文件
bash
vim /etc/systemd/timesyncd.conf配置内容如下,
bash
[Time]
NTP=ntp.aliyun.com ntp1.aliyun.com ntp.tencent.com
FallbackNTP=ntp.ubuntu.com
RootDistanceMaxSec=5
PollIntervalMinSec=32
PollIntervalMaxSec=2048
使配置生效,
bash
systemctl daemon-reload
systemctl restart systemd-timesyncd
timedatectl set-ntp true
hwclock --systohc
检查时间
bash
systemctl daemon-reload
systemctl restart systemd-timesyncd
timedatectl set-ntp true
hwclock --systohc
确认SGX可用
确认服务器已开启SGX功能,
bash
apt update
apt install -y cpuid
ls /dev | grep sgx
cpuid | grep SGX
dmesg | grep sgx
配置Intel订阅
订阅用于认证CPU,务必使用长期使用的邮箱注册。邮箱丢失后续重新注册并重新认证设备。
订阅英特尔软件防护扩展配置认证服务
浏览器访问https://api.portal.trustedservices.intel.com/provisioning-certification 注册并登录网站, 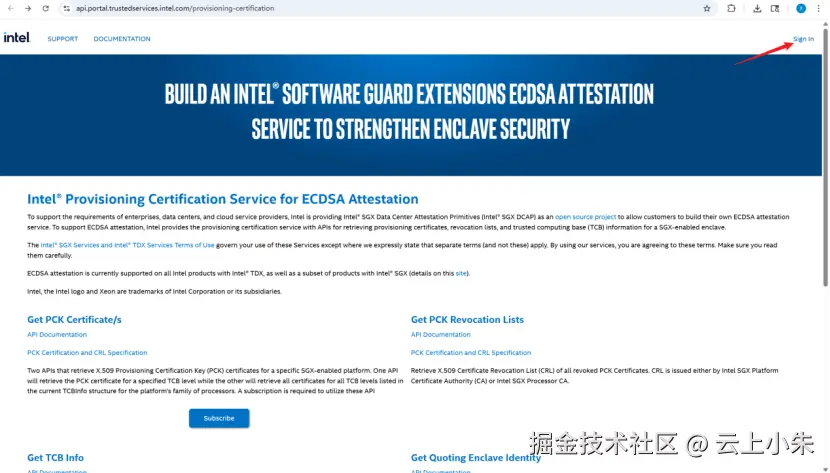
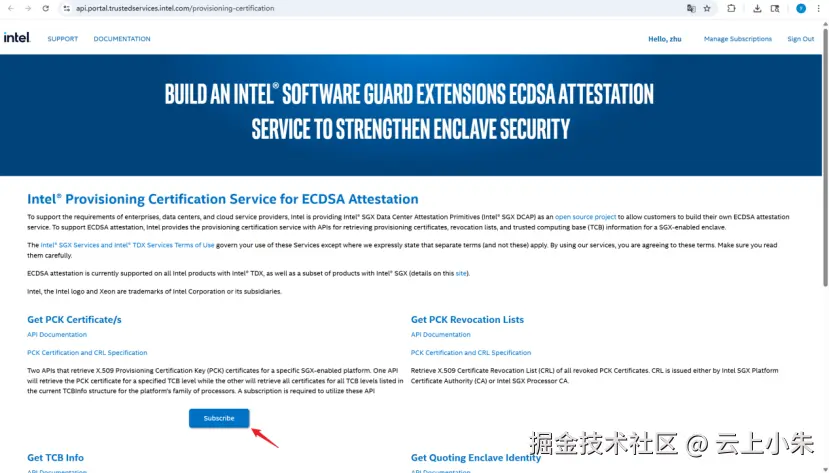
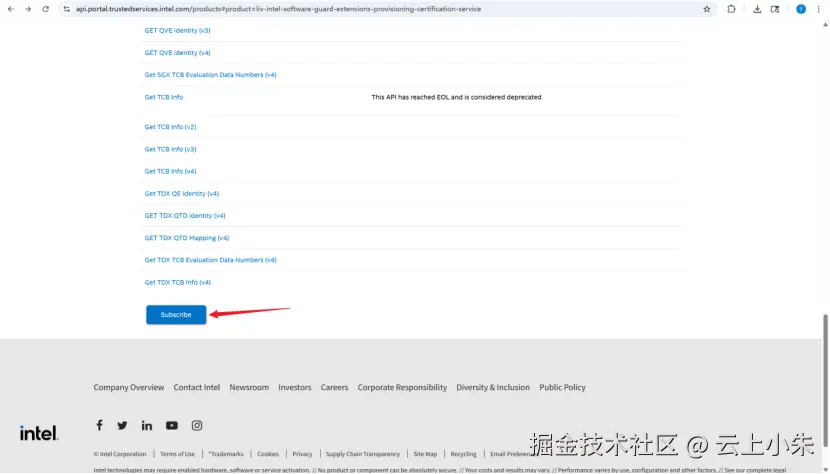
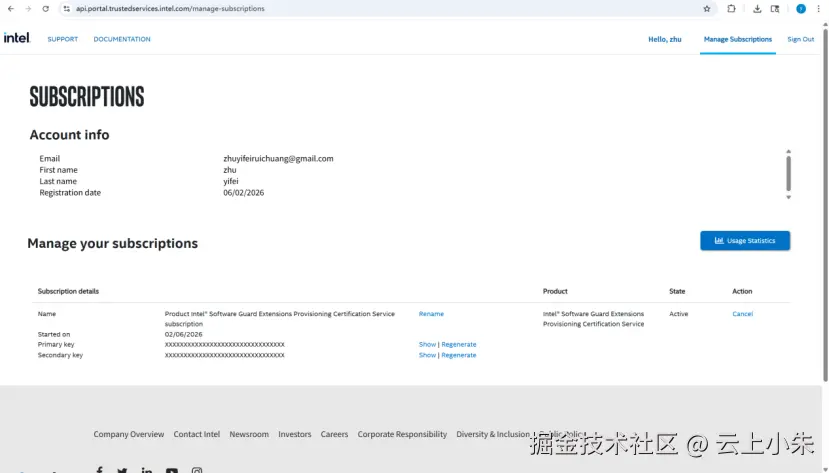
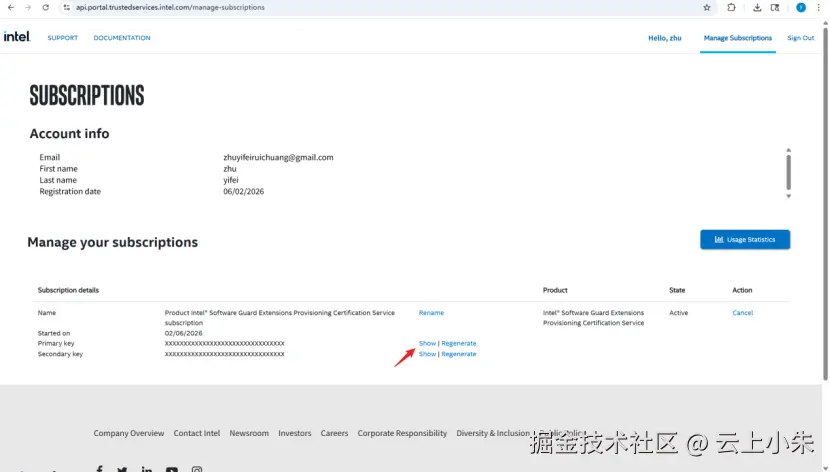
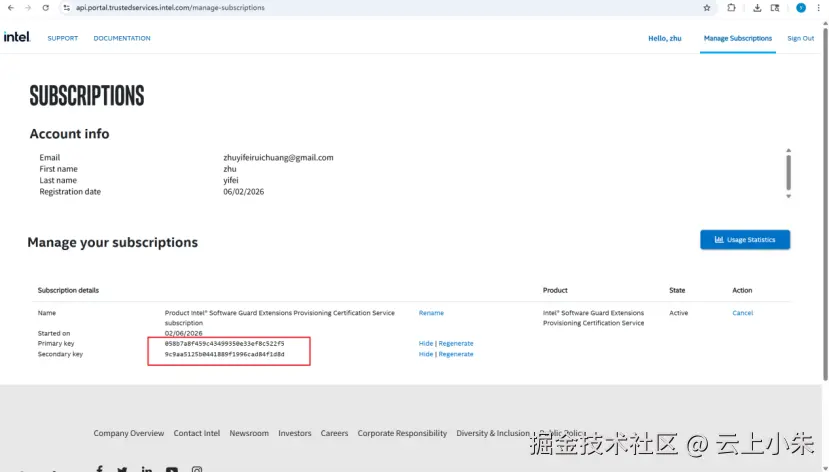 将获取的密钥保存。
安装环境依赖包
bash
apt update
apt install -y cracklib-runtime build-essential python3 libssl-dev libcurl4-openssl-dev libprotobuf-dev curl python-is-python3 wget debhelper zip pkgconf libboost-dev libboost-system-dev libboost-thread-dev protobuf-c-compiler libprotobuf-c-dev protobuf-compiler
配置Intel软件源
注意:不同操作系统命令不同,详见注释。
bash
mkdir -p /opt/intel /etc/apt/keyrings
cd /opt/intel

wget https://download.01.org/intel-sgx/sgx_repo/ubuntu/intel-sgx-deb.key

cat intel-sgx-deb.key | sudo tee /etc/apt/keyrings/intel-sgx-keyring.asc > /dev/null

# Ubuntu 24
wget https://download.01.org/intel-sgx/latest/dcap-latest/linux/distro/ubuntu24.04-server/sgx_debian_local_repo.tgz

# Ubuntu22
wget https://download.01.org/intel-sgx/latest/dcap-latest/linux/distro/ubuntu22.04-server/sgx_debian_local_repo.tgz

tar -zxf sgx_debian_local_repo.tgz

# ubuntu 24
echo 'deb [signed-by=/etc/apt/keyrings/intel-sgx-keyring.asc arch=amd64] file:///opt/intel/sgx_debian_local_repo noble main' | sudo tee /etc/apt/sources.list.d/intel-sgx-local.list

# ubuntu 22
echo 'deb [signed-by=/etc/apt/keyrings/intel-sgx-keyring.asc arch=amd64] file:///opt/intel/sgx_debian_local_repo jammy main' | sudo tee /etc/apt/sources.list.d/intel-sgx-local.list

apt-get update
安装nodejs
注意:低版本会导致Intel的软件不可用。
bash
curl -fsSL https://deb.nodesource.com/setup_24.x | sudo -E bash -
apt install -y nodejs
检查版本
bash
nodejs --version安装Intel PCCS
操作系统需联网
bash
apt install -y --no-install-recommends sgx-dcap-pccs网络状态不好时,可配置网络代理, 
 选1
选1 
 端口不冲突时可使用默认端口,
  此处填写订阅获取的密钥,

此处随意填写,自己务必记住, 
 备份配置文件
bash
cp /opt/intel/sgx-dcap-pccs/config/default.json /opt/intel/sgx-dcap-pccs/config/default.json.bak修改配置文件
bash
vim /opt/intel/sgx-dcap-pccs/config/default.json内容如下,需检查配置, 若使用默认数据库, ApiKey是在Intel订阅获取的。 hosts表示对外提供服务的IP HTTPS_PORT是PCCS对外提供服务的端口。 UserTokenHash和AdminTokenHash是user password和admin password 使用sha512加密计算后的数值。
bash
{
    "HTTPS_PORT" : 8081,
    "hosts" : "0.0.0.0",
    "uri": "https://api.trustedservices.intel.com/sgx/certification/v4/",
    "ApiKey" : "058b7a8f459c43499350e33ef8c522f5",
    "proxy" : "",
    "RefreshSchedule": "0 0 1 * * *",
    "UserTokenHash" : "3f15fb99a7120297e35a9e47ae3b6a2399af47c1baaf28ebbdff7e7e8cb9b93952a926312b0d03f8a6bb9a962c6eec89a51191c7a98a79696d66afc9ac626683",
    "AdminTokenHash" : "a1102957491b9ce5441e111f7725f2fd0201bc32465e2536e5182d1c5e3f6b0965355c09f2c8b9111ab6d18a73b75f0f3a06e788bd2a6dff4ddc7c4da6ada603",
    "CachingFillMode" : "LAZY",
    "OPENSSL_FIPS_MODE" : false,
    "LogLevel" : "info",
    "DB_CONFIG" : "sqlite",
    "sqlite" : {
        "options" : {
            "dialect": "sqlite",
            "define": {
                "freezeTableName": true
            },
            "logging" : false,
            "storage": "pckcache.db"
        }
    }
}
若使用MySQL数据库,需已有可用的MySQL, database是MySQL中数据库的名字。 username和password是可以访问上述数据库的账户信息。 host是MySQL的IP或者域名,需要在当前主机可直接访问到。 ca是ssl配置证书的绝对路径,默认不启用ssl。
bash
{
    "HTTPS_PORT": 8081,
    "hosts": "127.0.0.1",
    "uri": "https://api.trustedservices.intel.com/sgx/certification/v4/",
    "ApiKey": "",
    "proxy": "",
    "RefreshSchedule": "0 0 1 * * *",
    "UserTokenHash": "",
    "AdminTokenHash": "",
    "CachingFillMode": "LAZY",
    "OPENSSL_FIPS_MODE": false,
    "LogLevel": "info",
    "DB_CONFIG": "mysql",
    "mysql": {
        "database": "pckcache",
        "username": "root",
        "password": "root@123",
        "options": {
            "host": "mysql-intel",
            "port": "3306",
            "dialect": "mysql",
            "pool": {
                "max": 5,
                "min": 0,
                "acquire": 30000,
                "idle": 10000
            },
            "define": {
                "freezeTableName": true
            },
            "logging": false
        },
        "ssl": {
            "required": false,
            "ca": "/opt/intel/intel.ca"
        }
    }
}
重启使服务生效,
bash
systemctl restart pccs.service
systemctl status pccs.service
检查服务状态
bash
lsof -i :8081
systemctl status pccs.service
验证服务可用
bash
curl -k -G "https://localhost:8081/sgx/certification/v4/rootcacrl"检查服务日志
bash
journalctl -u pccs配置文件默认路径 /opt/intel/sgx-dcap-pccs/config/default.json 检查数据库配置文件,
bash
apt install -y sqlite3
sqlite3 /opt/intel/sgx-dcap-pccs/pckcache.db ".tables"
查看部署的版本
bash
dpkg -l | grep sgx-dcap-pccs应不低于下图所示版本, 
特殊情况
因Intel PCCS代码仓库变更,无法稳定复现部署操作。可采用下述方法临时解决服务故障。
bash
cd /opt/intel
git clone https://github.com/intel/confidential-computing.tee.dcap.pccs.git
cd confidential-computing.tee.dcap.pccs/service
./cleanup.sh
./install.sh
./startup.sh
部署SGX-SDK
下载最新文件,例如当前sgx_linux_x64_sdk_2.28.100.1.bin,根据操作系统选择。 Ubuntu22,
bash
wget https://download.01.org/intel-sgx/latest/dcap-latest/linux/distro/ubuntu22.04-server/sgx_linux_x64_sdk_2.28.100.1.binUbuntu24
bash
wget https://download.01.org/intel-sgx/latest/dcap-latest/linux/distro/ubuntu24.04-server/sgx_linux_x64_sdk_2.28.100.1.bin部署软件
bash
chmod +x sgx_linux_x64_sdk_2.28.100.1.bin
./sgx_linux_x64_sdk_2.28.100.1.bin
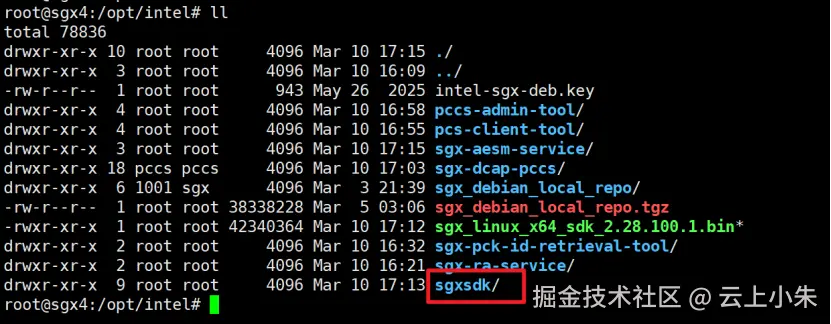
根据提示输入yes, 根据提示,复制命令,使环境配置生效
bash
source /root/sgxsdk/environment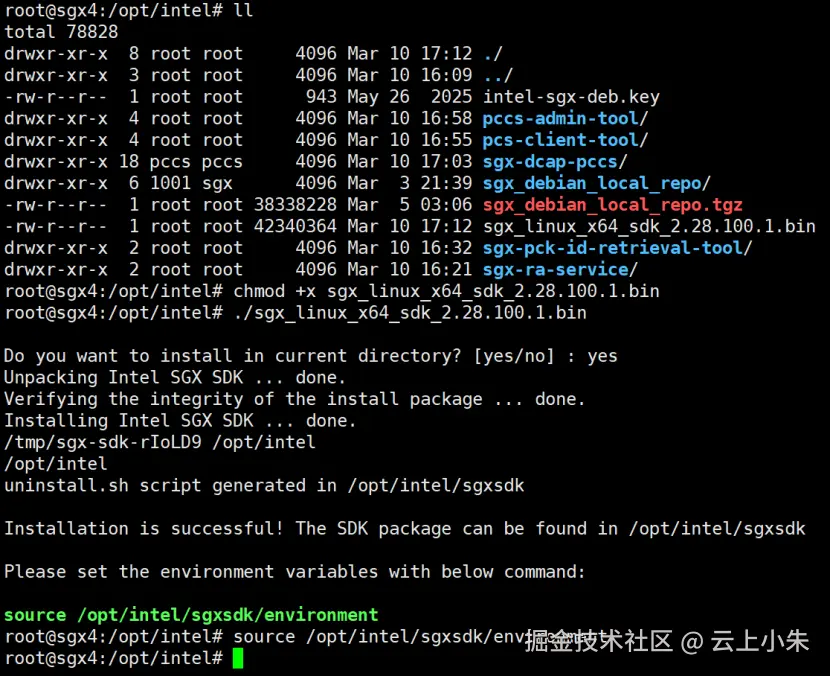
部署SGX-PSW
用于向PCCS申请认证
安装软件
bash
# 安装launch service
apt-get install -y libsgx-launch libsgx-urts

# 安装EPID-based attestation service
apt-get install -y libsgx-epid libsgx-urts

# 安装algorithm agnostic attestation service
apt-get install -y libsgx-quote-ex libsgx-urts

# DCAP ECDSA-based service
apt-get install -y libsgx-dcap-ql

# 若启用 ECDSA 认证,需安装QPL
apt-get install -y libsgx-dcap-default-qpl
查询服务状态
bash
systemctl restart aesmd.service
systemctl status aesmd.service
服务状态正常时, 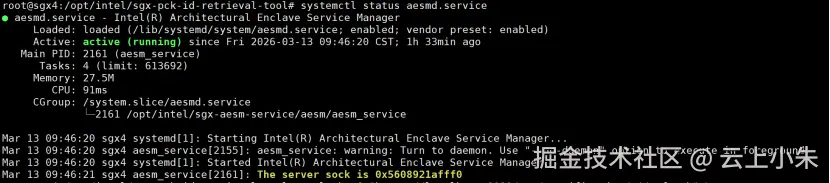 服务状态异常时需重启服务,
部署Intel DCAP
用于安装Intel完整开发环境,使用Intel测试用例调测SGX可用性。 获取最新代码
bash
cd /opt/intel
git clone https://github.com/intel/confidential-computing.tee.dcap
cd cd confidential-computing.tee.dcap/
安装基础工具
bash
apt-get install -y \
  build-essential \
  cmake \
  git \
  wget \
  curl \
  zip \
  debhelper \
  pkg-config \
  dkms \
  gnupg \
  python-is-python3 \
  python3 \
  libssl-dev \
  libcurl4-openssl-dev \
  libboost-dev \
  libboost-system-dev \
  libboost-thread-dev \
  protobuf-c-compiler \
  libprotobuf-c-dev \
  protobuf-compiler \
  libprotobuf-dev \
  libsgx-urts \
  libsgx-dcap-ql \
  libsgx-dcap-default-qpl \
  libsgx-enclave-common-dev \
  libsgx-dcap-ql-dev \
  libsgx-dcap-default-qpl-dev \
  tee-appraisal-tool \
  libsgx-aesm-ecdsa-plugin-dbgsym \
  libsgx-aesm-pce-plugin-dbgsym \
  libsgx-aesm-quote-ex-plugin-dbgsym \
  libsgx-dcap-default-qpl-dbgsym \
  libsgx-dcap-ql-dbgsym \
  libsgx-dcap-quote-verify-dbgsym \
  libsgx-enclave-common-dbgsym \
  libsgx-pce-logic-dbgsym \
  libsgx-qe3-logic-dbgsym \
  libsgx-quote-ex-dbgsym \
  libsgx-ra-network-dbgsym \
  libsgx-ra-uefi-dbgsym \
  libsgx-tdx-logic-dbgsym \
  libsgx-uae-service-dbgsym \
  libsgx-urts-dbgsym \
  libtdx-attest-dbgsym \
  sgx-aesm-service-dbgsym \
  sgx-pck-id-retrieval-tool-dbgsym \
  sgx-ra-service-dbgsym \
  tdx-qgs-dbgsym \
  tee-appraisal-tool-dbgsym \
  libsgx-dcap-quote-verify-dev
运行测试用例
备份配置文件
bash
cp /etc/sgx_default_qcnl.conf /etc/sgx_default_qcnl.conf.bak修改配置文件
bash
vim /etc/sgx_default_qcnl.conf内容如下, user_token是部署PCCS时输入的user password。
bash
{
  "pccs_url": "https://localhost:8081/sgx/certification/v4/",
  "user_token": "user@123",
  "use_secure_cert": false,
  "pccs_api_version": "3.1",
  "retry_times": 6,
  "retry_delay": 10,
  "pck_cache_expire_hours": 168,
  "verify_collateral_cache_expire_hours": 168,
  "local_cache_only": false
}
重启aesmd,确认服务运行中,
bash
systemctl restart aesmd.service
systemctl status aesmd.service
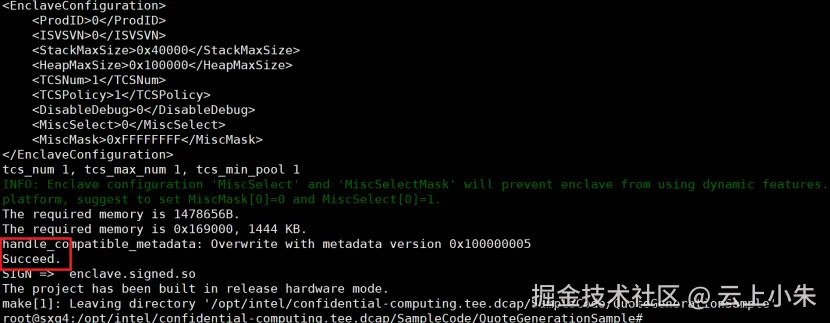
运行测试用例QuoteGeneration,
bash
cd SampleCode/QuoteGenerationSample/
make
./app
成功时如下所示, 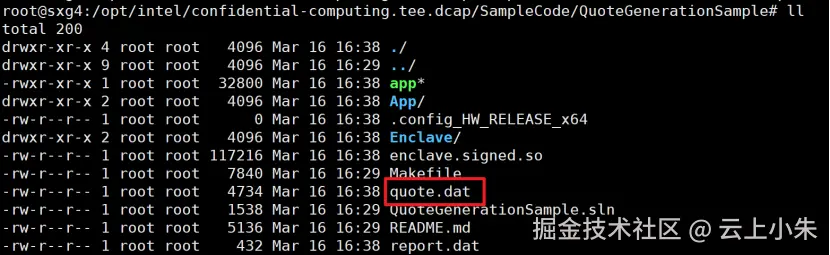
 运行测试用例QuoteVerification,
bash
cd ../QuoteVerificationSample/
make
openssl genrsa -out private_key.pem -3 3072
/opt/intel/sgxsdk/bin/x64/sgx_sign sign -key private_key.pem -enclave enclave.so -out enclave.signed.so -config Enclave/linux/Enclave.config.xml
./app
成功如下所示, 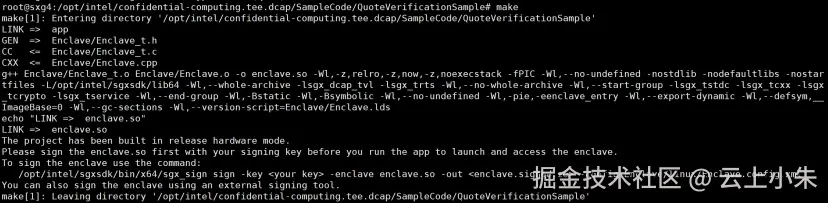
运行occlum测试用例
测试当前环境可使用SGX功能。 在主机安装occlum专用内核驱动,22.04是操作系统版本号。 注意:非必须,但occlum推荐。
bash
apt install --install-recommends linux-generic-hwe-22.04部署测试容器
bash
# 配置基础资源
mkdir -p /dev/sgx
ln -sf ../sgx_enclave /dev/sgx/enclave
ln -sf ../sgx_provision /dev/sgx/provision

# 2. 创建测试容器,二选一即可。
# 特权模式
docker run -it --privileged -v /dev/sgx:/dev/sgx occlum/occlum:latest-ubuntu20.04

# 非特权模式
docker run -it --device /dev/sgx/enclave --device /dev/sgx/provision occlum/occlum:latest-ubuntu20.04
在测试容器内运行测试用例,确认SGX功能可用
bash
cd /opt/intel/sgxsdk/SampleCode/SampleEnclave && make && ./app成功时可见下图, 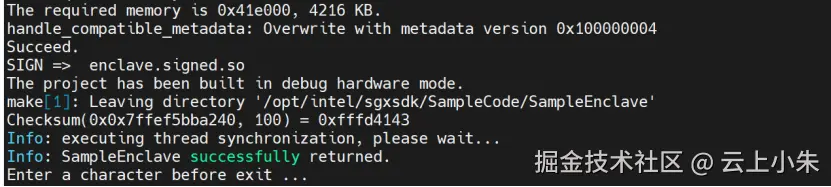
平台注册
需将CPU注册至Intel,使SGX功能被许可。 任选一个方法能成功即可。
安装常用工具
bash
apt install -y intel-tee-pcs-client-tool sgx-ra-service sgx-pck-id-retrieval-tool csvtool intel-tee-pccs-admin-toolMPA方法
不推荐。此方法存在虚假认证。 查看注册结果
bash
cat /var/log/mpa_registration.log
journalctl -u mpa_registration_tool
配置文件
bash
/etc/mpa_registration.conf可见以下信息, 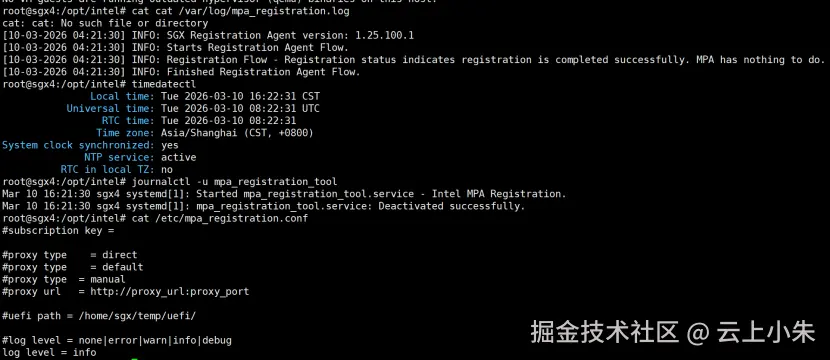 重启系统后再次确认查询信息。 下图所示表示CPU注册到Intel成功,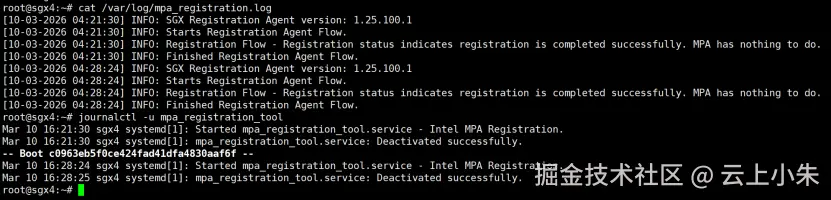
PCK方法
不稳定。
配置文件
bash
PCKIDRetrievalTool -f host_$(hostnamectl --static).csv 获取平台清单,注意,bin文件必须有容量,不应是空文件。若是空文件,需重置BIOS中SGX配置,并重装操作系统。
bash
bash -c "csvtool col 6 host_$(hostnamectl --static).csv | xxd -r -p > host_$(hostnamectl --static)_pm.bin"手动注册
bash
curl -i \
--data-binary @host_$(hostnamectl --static)_pm.bin \
-X POST "https://api.trustedservices.intel.com/sgx/registration/v1/platform" \
-H "Content-Type: application/octet-stream"
PCK+PCCS方法
相对稳定。
不启用TLS时,
bash
PCKIDRetrievalTool -url https://localhost:8081 -user_token 'user@123' -use_secure_cert false
# 或
PCKIDRetrievalTool -url https://127.0.0.1:8081 -user_token user@123 -use_secure_cert false
若操作成功, 
 若操作失败,

若数据不完整,可强制刷新PCCS数据缓存,获取新的Intel认证数据, admin-token是配置PCCS时的admin password
bash
curl -k -G "https://localhost:8081/sgx/certification/v4/refresh" \
     -H "admin-token: admin@123"
查看日志
bash
journalctl -u pccs -f -n 20
tail -f /opt/intel/sgx-dcap-pccs/logs/pccs_server.log
若注册成功, 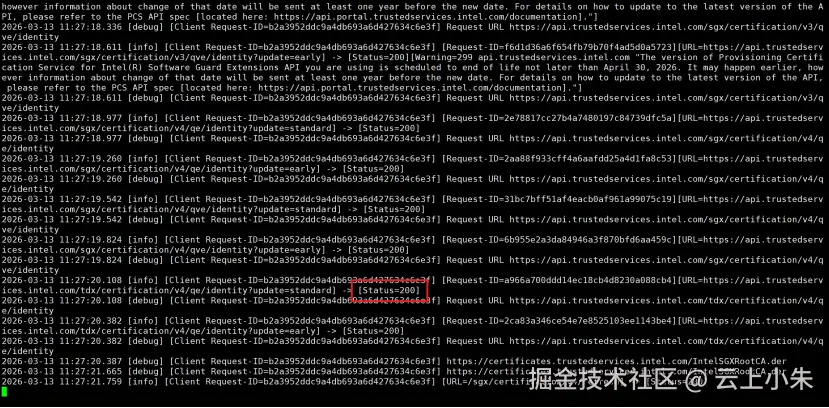
若刷新缓存成功,  若注册失败,

故障排查
注册时可能发生故障。 安装基础工具
bash
apt-get install -y msr-tools检查功能,输出是0,标识SGX功能正常,否则是硬件SGX故障,
bash
rdmsr 0xCE -f 27:27
rdmsr 0x503
输出的第三位非0时,需更新BIOS,并确认SGX功能全开启。
bash
rdmsr 0x8b -0 -f 63:32检查配置文件
/etc/sgx_default_qcnl.conf是aesmd.service使用的
bash
root@sgx4:/opt/intel/sgx-pck-id-retrieval-tool# cat /etc/sgx_default_qcnl.conf
{
  "pccs_url": "https://localhost:8081/sgx/certification/v4/",
  "user_token": "user@123",
  "use_secure_cert": false,
  "pccs_api_version": "3.1",
  "retry_times": 6,
  "retry_delay": 10,
  "pck_cache_expire_hours": 168,
  "verify_collateral_cache_expire_hours": 168,
  "local_cache_only": false
}
/opt/intel/sgx-dcap-pccs/config/default.json是pccs.service使用的
bash
root@sgx4:/opt/intel/sgx-pck-id-retrieval-tool# cat /opt/intel/sgx-dcap-pccs/config/default.json
{
    "HTTPS_PORT" : 8081,
    "hosts" : "0.0.0.0",
    "uri": "https://api.trustedservices.intel.com/sgx/certification/v4/",
    "ApiKey" : "058b7a8f459c43499350e33ef8c522f5",
    "proxy" : "",
    "RefreshSchedule": "0 0 1 * * *",
    "UserTokenHash" : "3f15fb99a7120297e35a9e47ae3b6a2399af47c1baaf28ebbdff7e7e8cb9b93952a926312b0d03f8a6bb9a962c6eec89a51191c7a98a79696d66afc9ac626683",
    "AdminTokenHash" : "a1102957491b9ce5441e111f7725f2fd0201bc32465e2536e5182d1c5e3f6b0965355c09f2c8b9111ab6d18a73b75f0f3a06e788bd2a6dff4ddc7c4da6ada603",
    "CachingFillMode" : "LAZY",
    "OPENSSL_FIPS_MODE" : false,
    "LogLevel" : "debug",
    "DB_CONFIG" : "sqlite",
    "sqlite" : {
        "options" : {
            "dialect": "sqlite",
            "define": {
                "freezeTableName": true
            },
            "logging" : false,
            "storage": "pckcache.db"
        }
    }
}
查询验证
浏览器访问api.portal.trustedservices.intel.com/usage-stati... ,登录注册Intel订阅的账户,查看下图所示,应看到成功的数量增加,否则均是注册失败,