第一章 前置知识点
第01节 简单了解 Zygote
关于 Zygote 前期的内容,简单了解一下。
Zygote 是 Android 系统中的一个孵化器进程 ,由 init 进程通过解析 init.rc 文件启动。它的核心作用包括:
[1] 预加载资源:
	在启动时加载常用的 Java 类、系统资源(如主题、字体)和共享库,避免每个应用进程重复加载,从而加速应用启动。

[2] 进程孵化:
	通过 fork() 系统调用复制自身,生成新的进程。
	由于 Zygote 已经预加载了运行时环境,fork 出的子进程可以快速继承这些资源,无需重新初始化 Dalvik/ART 虚拟机。

[3] 创建 SystemServer:
	Zygote 启动后,会立即 fork 出 SystemServer 进程,
	SystemServer 负责启动所有系统服务(如 ActivityManagerService、PackageManagerService 等)。
基础的启动流程图
init.rc → app_process (Zygote)
    ↓
ZygoteInit.main()
    ↓
ZygoteInit.startSystemServer()
    ↓
forkSystemServer()   // 内部调用 fork 创建子进程
    ↓ fork
handleSystemServerProcess()   // 子进程中执行
    ↓ 反射调用
SystemServer.main()
关于 ZygoteInit.java 核心代码介绍
代码位置,需要采用科学上网,在浏览器中打开
https://cs.android.com/android/platform/superproject/+/android-10.0.0_r41:frameworks/base/core/java/com/android/internal/os/ZygoteInit.java我们可以看到部分代码片段,片段1: 存在一个 main 方法
java
// 行号:  819行的位置
public static void main(String argv[]) {

    // 行号 902 行的位置
    // forkSystemServer  方法返回一个 Runnable 在子进程中执行
    if (startSystemServer) {
        Runnable r = forkSystemServer(abiList, zygoteSocketName, zygoteServer);
        if (r != null) {
            r.run();
            return;
        }
    }
}
我们再看看部分代码片段,片段2:存在一个线程类
java
// 行号: 724行的位置
private static Runnable forkSystemServer(String abiList, String socketName,
            ZygoteServer zygoteServer) {
        long capabilities = posixCapabilitiesAsBits(
                OsConstants.CAP_IPC_LOCK,
                OsConstants.CAP_KILL,
                OsConstants.CAP_NET_ADMIN,
                OsConstants.CAP_NET_BIND_SERVICE,
                OsConstants.CAP_NET_BROADCAST,
                OsConstants.CAP_NET_RAW,
                OsConstants.CAP_SYS_MODULE,
                OsConstants.CAP_SYS_NICE,
                OsConstants.CAP_SYS_PTRACE,
                OsConstants.CAP_SYS_TIME,
                OsConstants.CAP_SYS_TTY_CONFIG,
                OsConstants.CAP_WAKE_ALARM,
                OsConstants.CAP_BLOCK_SUSPEND
        );
        /* Containers run without some capabilities, so drop any caps that are not available. */
        StructCapUserHeader header = new StructCapUserHeader(
                OsConstants._LINUX_CAPABILITY_VERSION_3, 0);
        StructCapUserData[] data;
        try {
            data = Os.capget(header);
        } catch (ErrnoException ex) {
            throw new RuntimeException("Failed to capget()", ex);
        }
        capabilities &= ((long) data[0].effective) | (((long) data[1].effective) << 32);

        /* Hardcoded command line to start the system server */
        String args[] = {
                "--setuid=1000",
                "--setgid=1000",
                "--setgroups=1001,1002,1003,1004,1005,1006,1007,1008,1009,1010,1018,1021,1023,"
                        + "1024,1032,1065,3001,3002,3003,3006,3007,3009,3010",
                "--capabilities=" + capabilities + "," + capabilities,
                "--nice-name=system_server",
                "--runtime-args",
                "--target-sdk-version=" + VMRuntime.SDK_VERSION_CUR_DEVELOPMENT,
                "com.android.server.SystemServer",
        };
在上面片段的最后一行,可以看到参数: com.android.server.SystemServer
注意了,这个类,就是 SystemServer 的全路径啊。
关于 Zygote 的内容其实有很多,这里不做过的介绍,但是我们目前只是作为一个基础的了解,主要掌握下面的一句话即可:
Zygote 启动后,通过 fork 创建 SystemServer 子进程,并在子进程中通过反射调用 SystemServer.main() 方法
第02节 简单了解 SystemServer
前面介绍了 Zygote 我们了解到,他启动了 com.android.server.SystemServer
那么这个在什么位置呢?
代码位置,需要采用科学上网,在浏览器中打开
https://cs.android.com/android/platform/superproject/+/android-10.0.0_r41:frameworks/base/services/java/com/android/server/SystemServer.java有什么作用呢?
SystemServer 是 Android 系统核心服务的宿主进程,负责启动和管理几乎所有系统级服务
例如: ActivityManagerService、PackageManagerService、WindowManagerService 等
他的启动由 Zygote 进程触发。
基础启动流程
init.rc → app_process (Zygote)
    ↓
ZygoteInit.main()
    ↓
ZygoteInit.startSystemServer()
    ↓ fork
handleSystemServerProcess()
    ↓
SystemServer.main()
    ↓
SystemServer.run()
    ├── createSystemContext()
    ├── startBootstrapServices()
    │   ├── Installer
    │   ├── ActivityManagerService
    │   ├── PackageManagerService
    │   └── ...
    ├── startCoreServices()
    │   ├── BatteryService
    │   ├── UsageStatsService
    │   └── ...
    ├── startOtherServices()
    │   ├── WindowManagerService
    │   ├── InputManagerService
    │   ├── NotificationManagerService
    │   └── ... (约 80+ 个服务)
    └── mActivityManagerService.systemReady()
        ├── startSystemUi()
        ├── Watchdog.start()
        └── sys.boot_completed = 1
第二章 SystemUI启动
第01节 流程图
基础流程图
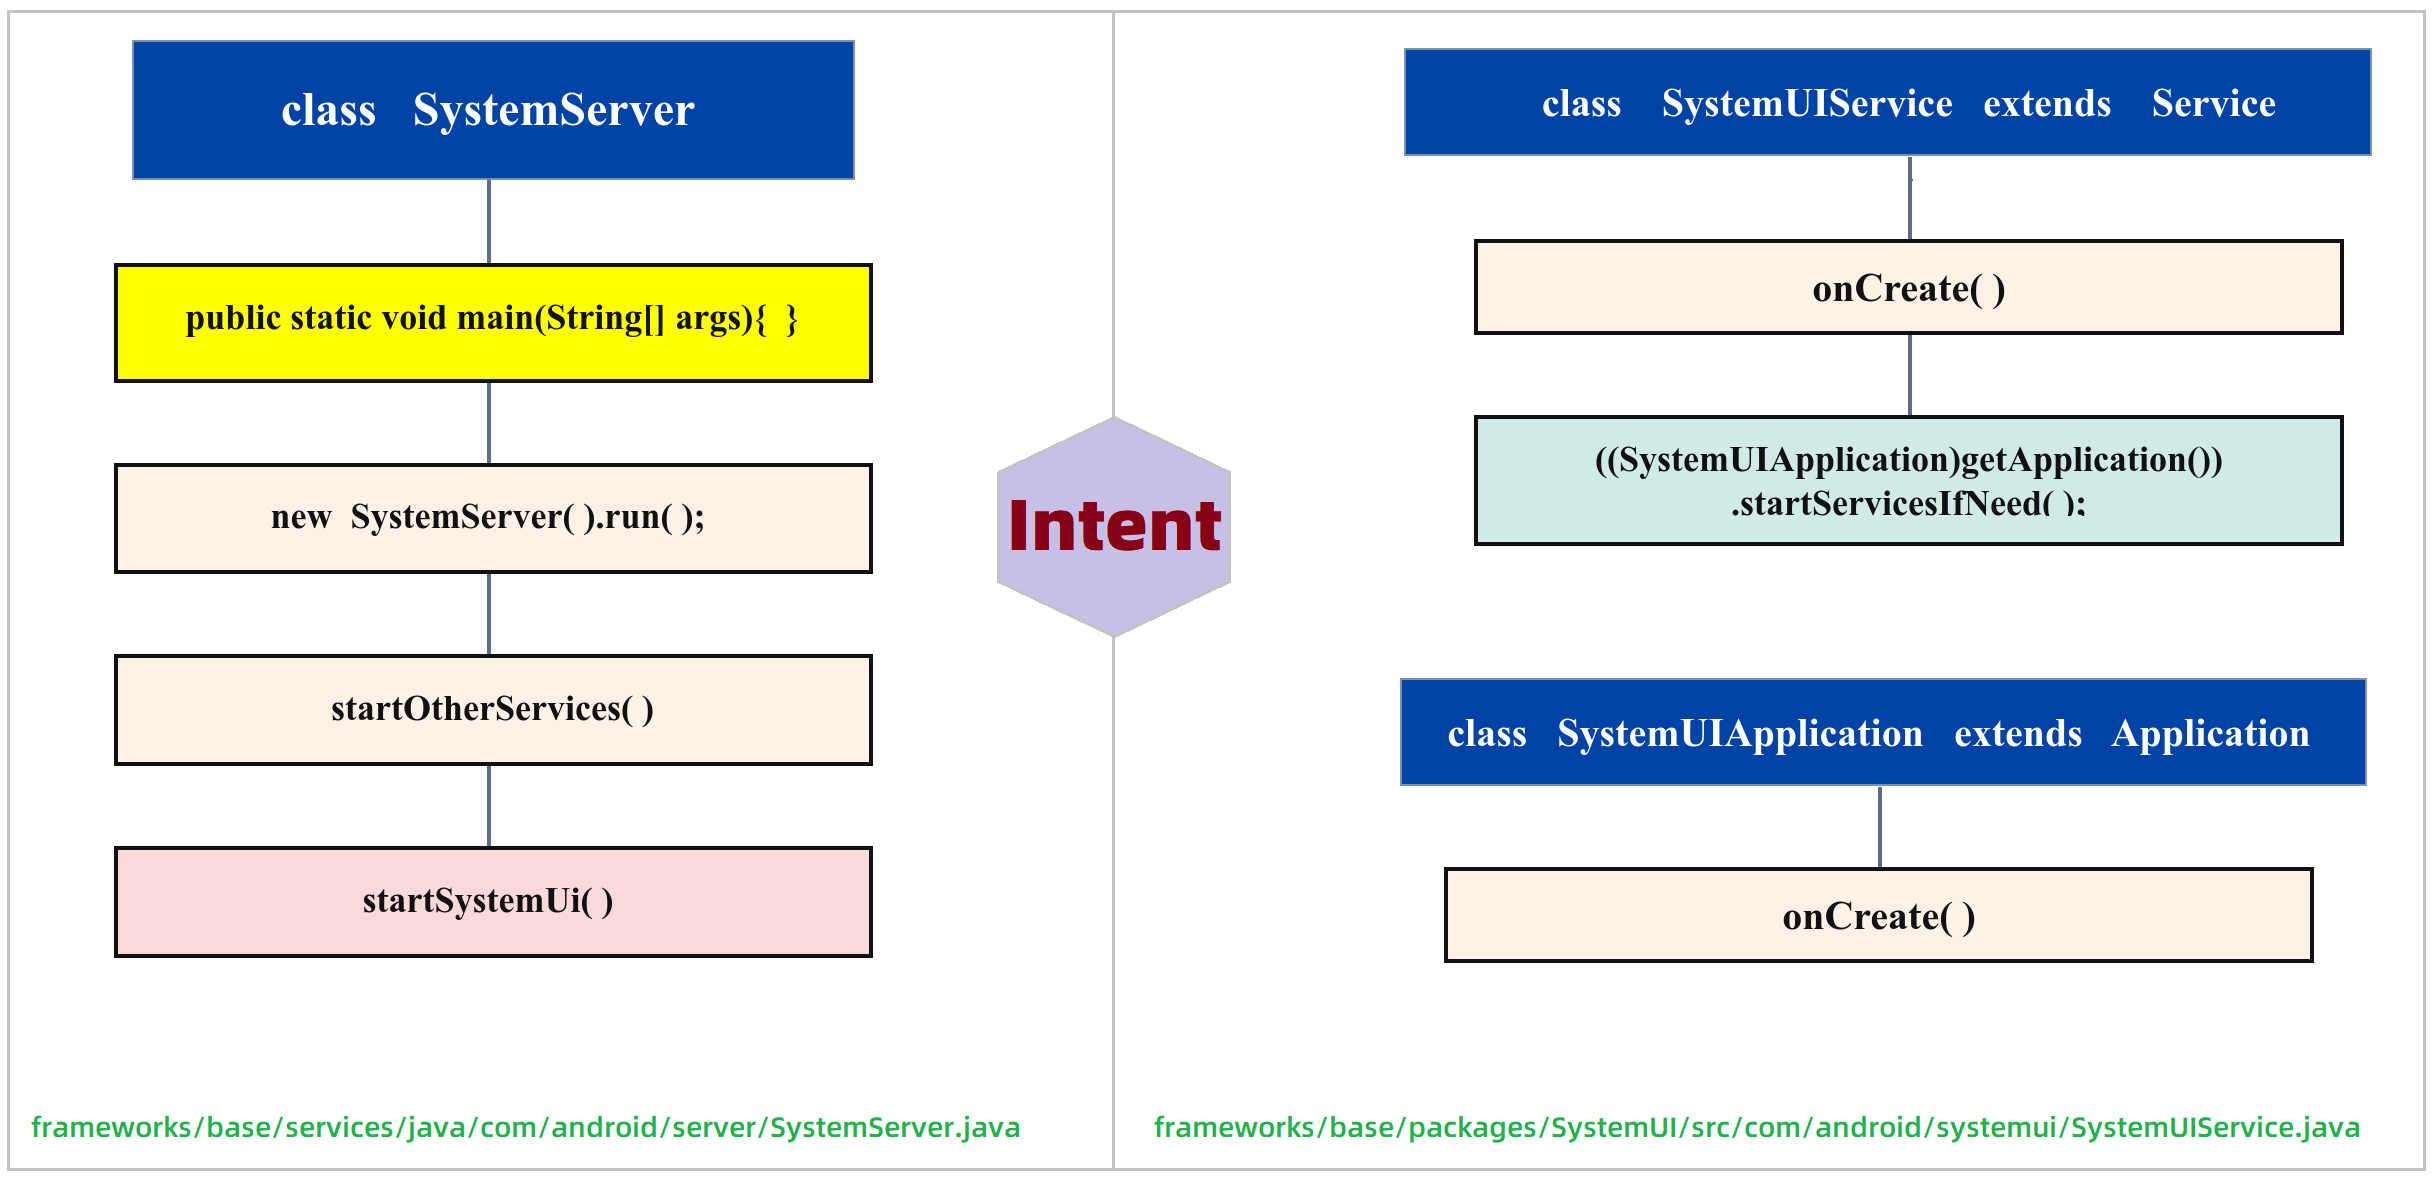
第02节 SystemServer的核心代码
代码位置,需要采用科学上网,在浏览器中打开
https://cs.android.com/android/platform/superproject/+/android-10.0.0_r41:frameworks/base/services/java/com/android/server/SystemServer.java代码片段1
java
public final class SystemServer {
	// 行号:  349行
    public static void main(String[] args) {
        new SystemServer().run();
    }
}
这里说明,在
main方法中,执行了 当前类的run( )方法
代码片段2
java
public final class SystemServer {
	// 行号: 371行  --- 行号 554 行
	private void run() {

        // 行号: 508 行
        // Start services.
        try {
            traceBeginAndSlog("StartServices");
            startBootstrapServices();
            startCoreServices();
            startOtherServices();
            SystemServerInitThreadPool.shutdown();
        } catch (Throwable ex) {
            Slog.e("System", "******************************************");
            Slog.e("System", "************ Failure starting system services", ex);
            throw ex;
        } finally {
            traceEnd();
        }
	}
}
这里需要注意一下,他按照了一定的顺序启动服务。
1、第一项
startBootstrapServices()2、第二项
startCoreServices()3、第三项
startOtherServices()
需要注意的是,我们 SystemUI 他的启动,就是在 第三项 startOtherService( ) 方法当中
片段3
java
public final class SystemServer {
	// 行号:  878 行  ---- 行号 2261 行
	private void startOtherServices() {
        // 行号: 2085 行
        try {
            startSystemUi(context, windowManagerF);
        } catch (Throwable e) {
        	reportWtf("starting System UI", e);
        }
	}
}
在这里启动了启动 SystemUI 的方法
片段4
java
public final class SystemServer {
	// 行号:  2325 行  ---- 行号 2333 行
    private static void startSystemUi(Context context, WindowManagerService windowManager) {
        Intent intent = new Intent();
        intent.setComponent(new ComponentName("com.android.systemui",
                "com.android.systemui.SystemUIService"));
        intent.addFlags(Intent.FLAG_DEBUG_TRIAGED_MISSING);
        //Slog.d(TAG, "Starting service: " + intent);
        context.startServiceAsUser(intent, UserHandle.SYSTEM);
        windowManager.onSystemUiStarted();
    }
}
这里可以明显的看到,他通过
Intent意图,调用startServiceAsUser方法,启动了Service类需要注意的是全路径是
com.android.systemui.SystemUIService
第03节 SystemUIService 的核心代码
代码位置,需要采用科学上网,在浏览器中打开
https://cs.android.com/android/platform/superproject/+/android-10.0.0_r41:frameworks/base/packages/SystemUI/src/com/android/systemui/SystemUIService.java片段1
java
public class SystemUIService extends Service {

    @Override
    public void onCreate() {
        super.onCreate();
        // 行号: 40行
        ((SystemUIApplication) getApplication()).startServicesIfNeeded();

        // 下面的代码省略
    }
}
在这里,我们可以明显看到,它调用了
SystemUIApplication的startServicesIfNeeded()方法
第04节 SystemUIApplication 的流程图
代码位置,需要采用科学上网,在浏览器中打开
https://cs.android.com/android/platform/superproject/+/android-10.0.0_r41:frameworks/base/packages/SystemUI/src/com/android/systemui/SystemUIApplication.java第一阶段
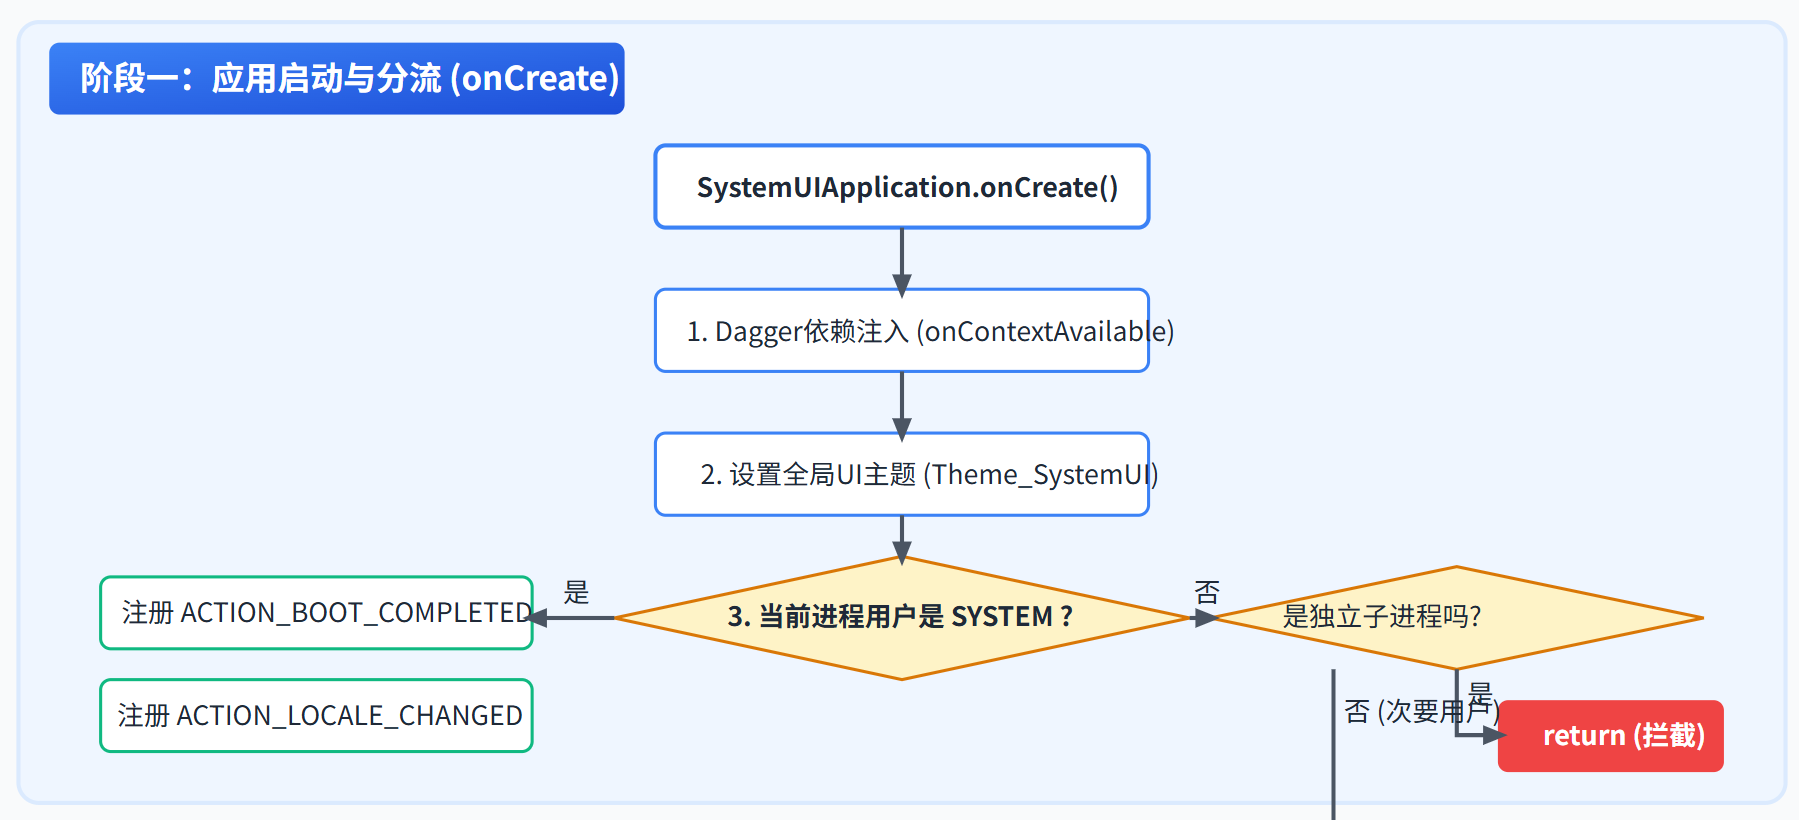
第二阶段
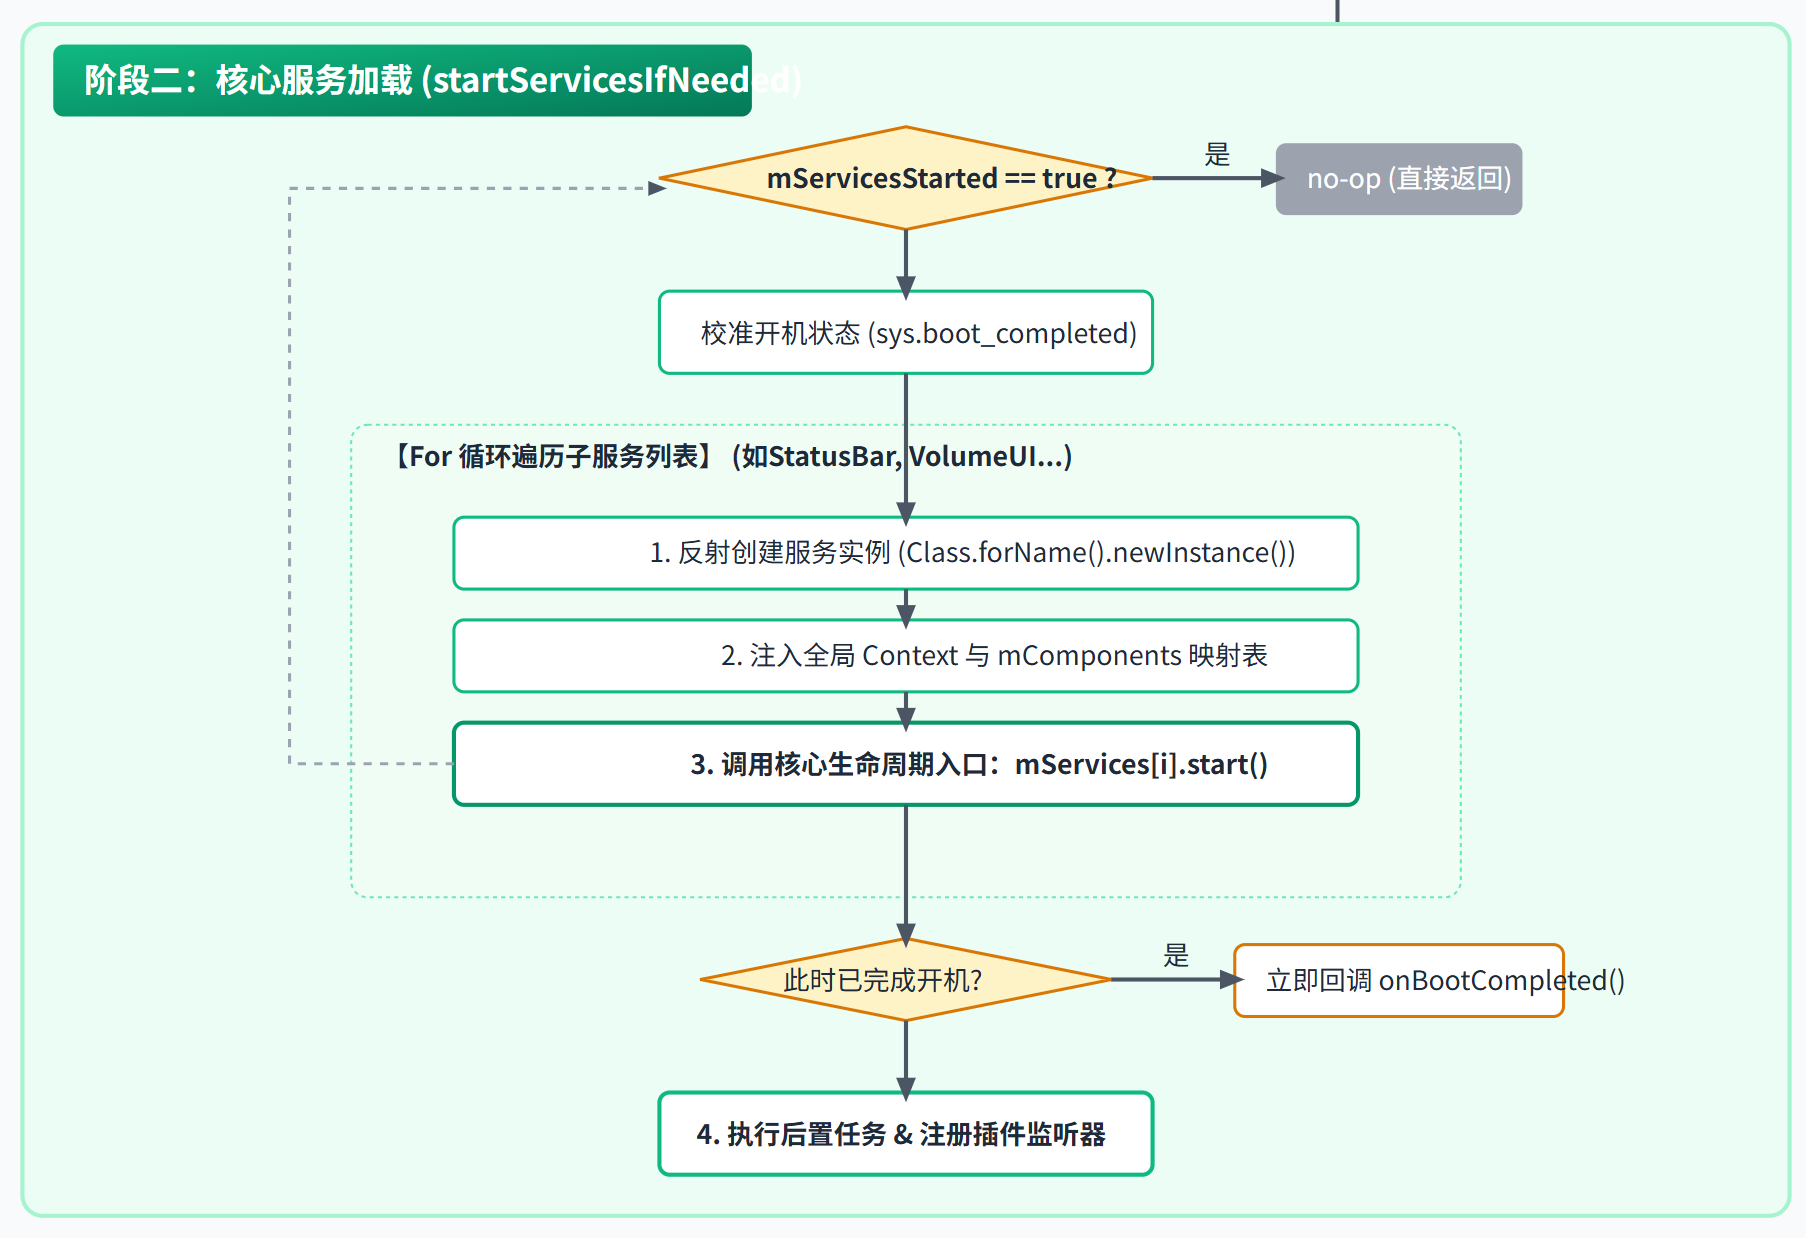
第三阶段
核心流程介绍
========================================================================================
                         SystemUIApplication 核心生命周期与流程
========================================================================================

【 阶段一:应用启动与分流 】

     [系统触发] SystemUIApplication 启动
                   │
                   ▼
               onCreate()
                   │
                   ▼
     1. 触发 Dagger 依赖注入 ────► mContextAvailableCallback.onContextAvailable()
                   │
                   ▼
     2. 设置全局 UI 样式Theme ───► setTheme(R.style.Theme_SystemUI)
                   │
                   ▼
     3. 进程与用户权限分流 [条件判断]
                   │
         ┌─────────┴────────────────────────┐
         │ (是 SYSTEM 主用户)                │ (否 / 次要用户或子进程)
         ▼                                  ▼
   [主进程注册广播]                     [子进程/多用户过滤]
     ├─► ACTION_BOOT_COMPLETED              ├─► 是截图等独立子进程? ──► [直接 return 拦截]
     └─► ACTION_LOCALE_CHANGED              └─► 是次要用户(Secondary)? ─► [启动次要服务]
                                                         │
                                                         ▼
                                          startSecondaryUserServicesIfNeeded()
                                                         │
                                                         ▼
                                            (加载 PerUser 配置文件)
                                                         │
                                                         ▼
───────────────────────────────────────────► 【 阶段二:核心服务加载 】
                                             startServicesIfNeeded(names)
                                                         │
    ┌────────────────────────────────────────────────────┤
    │ [检查防重]                                         ▼
    ├─► mServicesStarted == true? ──► (已启动,直接退出)  mServicesStarted == false
    │                                                    │
    │ [校准开机状态]                                      ▼
    └─► sys.boot_completed == "1"? ──► mBootCompleted = true
                                                         │
                                                         ▼
                                               [ 遍历服务列表循环 ]
                                             (例如: StatusBar, VolumeUI...)
                                                         │
                                      ┌──────────────────┴──────────────────┐
                                      ▼                                     ▼
                                [反射创建实例]                         [生命周期绑定]
                            Class.forName(clsName)               mServices[i].mContext = this
                                 .newInstance()                  mServices[i].mComponents = mComponents
                                      │                                     │
                                      └──────────────────┬──────────────────┘
                                                         │
                                                         ▼
                                               mServices[i].start() (组件初始化入口)
                                                         │
                                             [开机就绪检查]
                                             if (mBootCompleted) ────► mServices[i].onBootCompleted()
                                                         │
                                                ( 循环下一个服务... )
                                                         │
                                                         ▼
                                            [推迟的初始化任务执行]
                                        executePostInitTasks()
                                                         │
                                                         ▼
                                            [注册 Overlay 插件监听]
                                        PluginManager.addPluginListener()
                                                         │
                                                         ▼
                                            标记 mServicesStarted = true
                                                         │
─────────────────────────────────────────────────────────┴──────────────────────────────
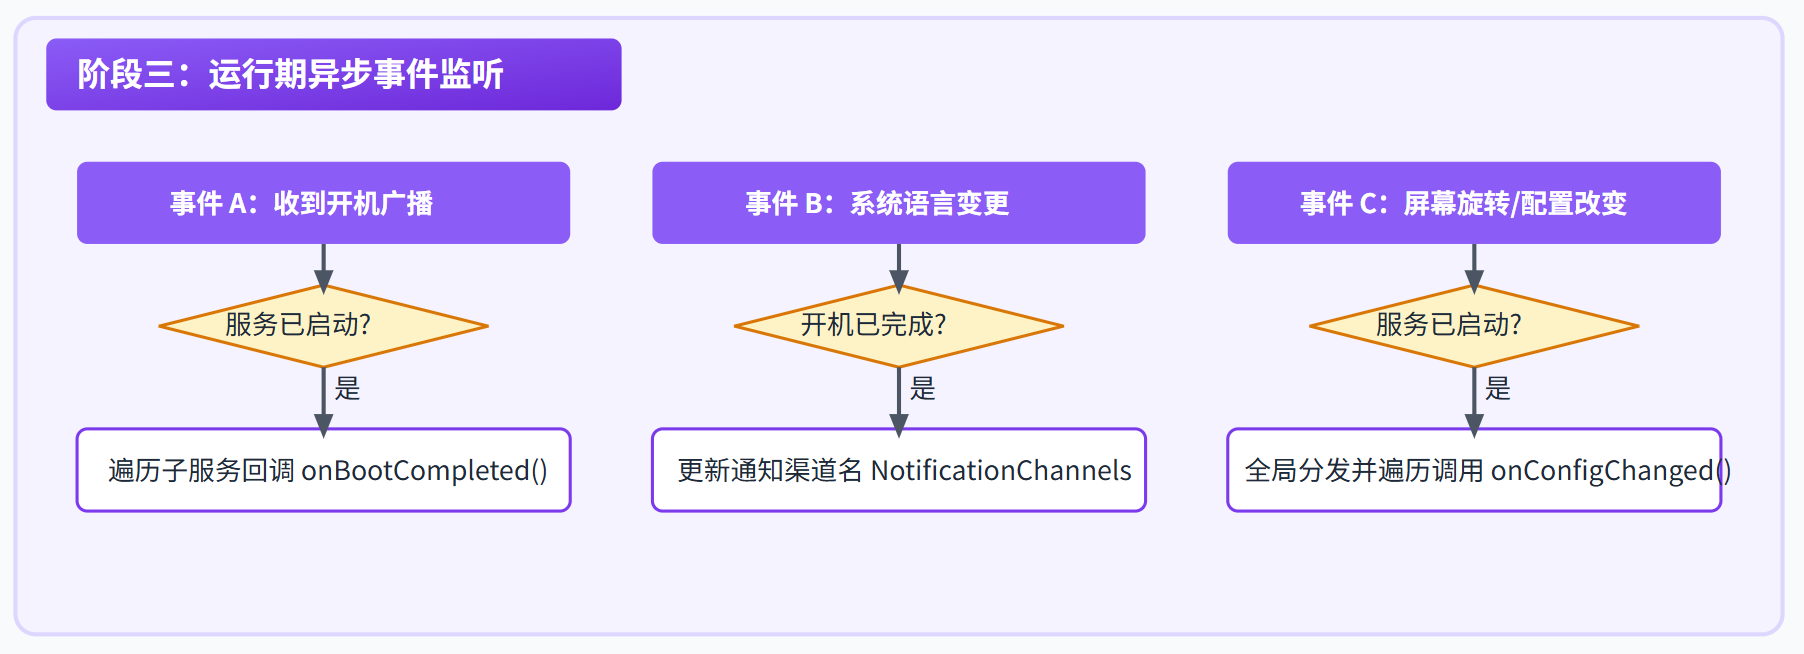
【 阶段三:运行期异步事件触发 】

  ▲ [事件 A: 收到开机广播]                        ▲ [事件 B: 语言切换]            ▲ [事件 C: 旋转/深色模式]
  │ (ACTION_BOOT_COMPLETED)                      │ (ACTION_LOCALE_CHANGED)      │ (onConfigurationChanged)
  │                                              │                              │
  ▼                                              ▼                              ▼
 检查 mServicesStarted?                         检查 mBootCompleted?           检查 mServicesStarted?
  │                                              │                              │
  ├─►(是) ──► 遍历 mServices                     ├─►(是) ──► 更新通知渠道名     ├─►(是) ──► 触发全局
  │           调用 .onBootCompleted()            │           NotificationChannels          ConfigurationController
  └─►(否) ──► 放弃处理                           │           .createAll()                  │
                                                 └─►(否) ──► 放弃处理                       ▼
                                                                                遍历 mServices
                                                                                调用 .onConfigurationChanged()
========================================================================================
第05节 附录 SystemUIApplication 代码
代码位置,需要采用科学上网,在浏览器中打开
https://cs.android.com/android/platform/superproject/+/android-10.0.0_r41:frameworks/base/packages/SystemUI/src/com/android/systemui/SystemUIApplication.java完整代码,去掉 注释压缩部分代码的内容
java
package com.android.systemui;

import android.app.ActivityThread;
import android.app.Application;
import android.content.BroadcastReceiver;
import android.content.Context;
import android.content.Intent;
import android.content.IntentFilter;
import android.content.pm.ApplicationInfo;
import android.content.res.Configuration;
import android.os.Handler;
import android.os.Looper;
import android.os.Process;
import android.os.SystemProperties;
import android.os.Trace;
import android.os.UserHandle;
import android.util.ArraySet;
import android.util.Log;
import android.util.TimingsTraceLog;

import com.android.systemui.plugins.OverlayPlugin;
import com.android.systemui.plugins.PluginListener;
import com.android.systemui.shared.plugins.PluginManager;
import com.android.systemui.statusbar.phone.DozeParameters;
import com.android.systemui.statusbar.phone.StatusBar;
import com.android.systemui.statusbar.phone.StatusBarWindowController;
import com.android.systemui.util.NotificationChannels;

import java.util.HashMap;
import java.util.Map;

public class SystemUIApplication extends Application implements SysUiServiceProvider {

    public static final String TAG = "SystemUIService";
    private static final boolean DEBUG = false;

    private SystemUI[] mServices;
    private boolean mServicesStarted;
    private boolean mBootCompleted;
    private final Map<Class<?>, Object> mComponents = new HashMap<>();
    private ContextAvailableCallback mContextAvailableCallback;

    public SystemUIApplication() {
        super();
        Log.v(TAG, "SystemUIApplication constructed.");
    }

    @Override
    public void onCreate() {
        super.onCreate();
        Log.v(TAG, "SystemUIApplication created.");

        TimingsTraceLog log = new TimingsTraceLog("SystemUIBootTiming", Trace.TRACE_TAG_APP);
        log.traceBegin("DependencyInjection");
        mContextAvailableCallback.onContextAvailable(this);
        log.traceEnd();
        setTheme(R.style.Theme_SystemUI);

        if (Process.myUserHandle().equals(UserHandle.SYSTEM)) {
            IntentFilter bootCompletedFilter = new IntentFilter(Intent.ACTION_BOOT_COMPLETED);
            bootCompletedFilter.setPriority(IntentFilter.SYSTEM_HIGH_PRIORITY);
            registerReceiver(new BroadcastReceiver() {
                @Override
                public void onReceive(Context context, Intent intent) {
                    if (mBootCompleted) return;

                    if (DEBUG) Log.v(TAG, "BOOT_COMPLETED received");
                    unregisterReceiver(this);
                    mBootCompleted = true;
                    if (mServicesStarted) {
                        final int N = mServices.length;
                        for (int i = 0; i < N; i++) {
                            mServices[i].onBootCompleted();
                        }
                    }


                }
            }, bootCompletedFilter);

            IntentFilter localeChangedFilter = new IntentFilter(Intent.ACTION_LOCALE_CHANGED);
            registerReceiver(new BroadcastReceiver() {
                @Override
                public void onReceive(Context context, Intent intent) {
                    if (Intent.ACTION_LOCALE_CHANGED.equals(intent.getAction())) {
                        if (!mBootCompleted) return;
                        NotificationChannels.createAll(context);
                    }
                }
            }, localeChangedFilter);
        } else {
            String processName = ActivityThread.currentProcessName();
            ApplicationInfo info = getApplicationInfo();
            if (processName != null && processName.startsWith(info.processName + ":")) {
                return;
            }
            startSecondaryUserServicesIfNeeded();
        }
    }

    public void startServicesIfNeeded() {
        String[] names = getResources().getStringArray(R.array.config_systemUIServiceComponents);
        startServicesIfNeeded("StartServices", names);
    }


    void startSecondaryUserServicesIfNeeded() {
        String[] names = getResources().getStringArray(R.array.config_systemUIServiceComponentsPerUser);
        startServicesIfNeeded("StartSecondaryServices", names);
    }

    private void startServicesIfNeeded(String metricsPrefix, String[] services) {
        if (mServicesStarted) {
            return;
        }
        mServices = new SystemUI[services.length];

        if (!mBootCompleted) {
            if ("1".equals(SystemProperties.get("sys.boot_completed"))) {
                mBootCompleted = true;
                if (DEBUG) {
                    Log.v(TAG, "BOOT_COMPLETED was already sent");
                }
            }
        }

        Log.v(TAG, "Starting SystemUI services for user " + Process.myUserHandle().getIdentifier() + ".");

        TimingsTraceLog log = new TimingsTraceLog("SystemUIBootTiming", Trace.TRACE_TAG_APP);
        log.traceBegin(metricsPrefix);

        final int N = services.length;
        for (int i = 0; i < N; i++) {
            String clsName = services[i];
            if (DEBUG) Log.d(TAG, "loading: " + clsName);
            log.traceBegin(metricsPrefix + clsName);
            long ti = System.currentTimeMillis();
            Class cls;
            try {
                cls = Class.forName(clsName);
                Object o = cls.newInstance();
                if (o instanceof SystemUI.Injector) {
                    o = ((SystemUI.Injector) o).apply(this);
                }
                mServices[i] = (SystemUI) o;
            } catch(ClassNotFoundException ex){
                throw new RuntimeException(ex);
            } catch (IllegalAccessException ex) {
                throw new RuntimeException(ex);
            } catch (InstantiationException ex) {
                throw new RuntimeException(ex);
            }

            mServices[i].mContext = this;
            mServices[i].mComponents = mComponents;
            if (DEBUG) Log.d(TAG, "running: " + mServices[i]);
            mServices[i].start();
            log.traceEnd();

            ti = System.currentTimeMillis() - ti;
            if (ti > 1000) {
                Log.w(TAG, "Initialization of " + cls.getName() + " took " + ti + " ms");
            }
            if (mBootCompleted) {
                mServices[i].onBootCompleted();
            }
        }
        Dependency.get(InitController.class).executePostInitTasks();
        log.traceEnd();
        final Handler mainHandler = new Handler(Looper.getMainLooper());
        Dependency.get(PluginManager.class).addPluginListener(
                new PluginListener<OverlayPlugin>() {
                    private ArraySet<OverlayPlugin> mOverlays = new ArraySet<>();

                    @Override
                    public void onPluginConnected(OverlayPlugin plugin, Context pluginContext) {
                        mainHandler.post(new Runnable() {
                            @Override
                            public void run() {
                                StatusBar statusBar = getComponent(StatusBar.class);
                                if (statusBar != null) {
                                    plugin.setup(statusBar.getStatusBarWindow(),
                                            statusBar.getNavigationBarView(), new Callback(plugin),
                                            DozeParameters.getInstance(getBaseContext()));
                                }
                            }
                        });
                    }

                    @Override
                    public void onPluginDisconnected(OverlayPlugin plugin) {
                        mainHandler.post(new Runnable() {
                            @Override
                            public void run() {
                                mOverlays.remove(plugin);
                                Dependency.get(StatusBarWindowController.class).setForcePluginOpen(mOverlays.size() != 0);
                            }
                        });
                    }

                    class Callback implements OverlayPlugin.Callback {
                        private final OverlayPlugin mPlugin;

                        Callback(OverlayPlugin plugin) {
                            mPlugin = plugin;
                        }

                        @Override
                        public void onHoldStatusBarOpenChange() {
                            if (mPlugin.holdStatusBarOpen()) {
                                mOverlays.add(mPlugin);
                            } else {
                                mOverlays.remove(mPlugin);
                            }
                            mainHandler.post(new Runnable() {
                                @Override
                                public void run() {
                                    Dependency.get(StatusBarWindowController.class)
                                        .setStateListener(b -> mOverlays.forEach(o -> o.setCollapseDesired(b)));
                                    Dependency.get(StatusBarWindowController.class)
                                        .setForcePluginOpen(mOverlays.size() != 0);
                                }
                            });
                        }
                    }
                }, OverlayPlugin.class, true);

        mServicesStarted = true;
    }

    @Override
    public void onConfigurationChanged(Configuration newConfig) {
        if (mServicesStarted) {
            SystemUIFactory.getInstance().getRootComponent()
                    .getConfigurationController().onConfigurationChanged(newConfig);
            int len = mServices.length;
            for (int i = 0; i < len; i++) {
                if (mServices[i] != null) {
                    mServices[i].onConfigurationChanged(newConfig);
                }
            }
        }
    }

    @SuppressWarnings("unchecked")
    public <T> T getComponent(Class<T> interfaceType) {
        return (T) mComponents.get(interfaceType);
    }

    public SystemUI[] getServices() {
        return mServices;
    }

    void setContextAvailableCallback(ContextAvailableCallback callback) {
        mContextAvailableCallback = callback;
    }

    interface ContextAvailableCallback {
        void onContextAvailable(Context context);
    }
}