test_skip
import pytest

version = "V1R2"
@pytest.fixture
def login():
    print("前置")
    yield
    print("后置")

def test_001(login):
    print("测试用例:添加成员")

@pytest.mark.skip
def test_002(login):
    print("测试用例:修改成员")

@pytest.mark.skip(reason="功能有缺陷未处理")
def test_003(login):
    print("测试用例:修改成员")

@pytest.mark.skipif(version == "V1R1",reason = "功能有缺陷未处理")
def test_004(login):
    print("测试用例:修改成员")
UI自动化测试环境搭建
'''
selenium+pytest+数据驱动去实现一个UI自动化测试框架
UI自动化测试是投入产出比(ROI)最低的测试类型。它脆弱(UI易变)、昂贵(编写和维护耗时)、运行慢。
实现功能:
    1)代码分层管理
    2)数据的分层管理(数据驱动)
    3)支持生成测试报告
    4)支持日志的记录和打印,方便定位问题
    5)将测试报告发送给其他测试人员

POM模型去实现:page object model
    将页面元素的定位,和基本操作封装为一个类,基础类
    通过其他类去继承该基础类,提高代码的复用率,并且方便维护代码

代码分层:
    测试层:整个框架的入口,是测试的总入口
    data层:数据层,可以存储测试数据文件,配置数据文件
    pageobject层:核心层,业务逻辑层,类里面实现了对某些功能的逻辑处理
    base层:基础层 定位元素操作元素的基础类 文件进行读取解析类 日志管理器
    报告层:生成的报告数据和报告文件
    日志层:存储日志文件
'''
自动化测试代码分层管理
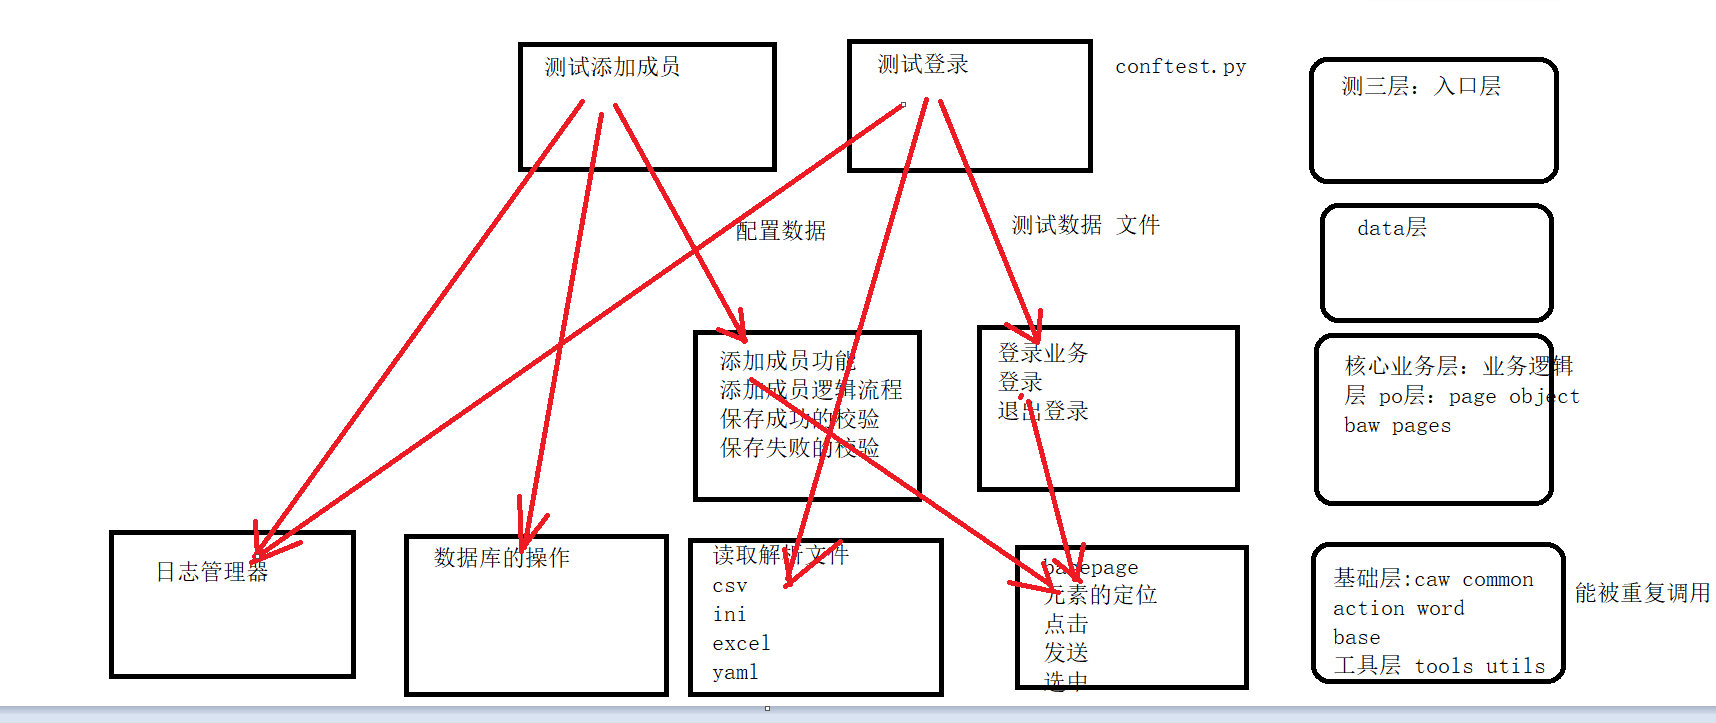
basepage(基础层,元素定位,点击,发送等)
'''
获取驱动的函数
基础类
    关闭浏览器
    打开某个页面
    定位元素
    点击
    发送信息
    切换iframe
    切换到默认层
    切换到上一层
    选中 根据文本
    根据下拉框选中
    根据value选中
    截图
'''
import time

from selenium import webdriver
from selenium.webdriver.support import expected_conditions
from selenium.webdriver.support.select import Select
from selenium.webdriver.support.wait import WebDriverWait


def get_Driver(browser="Edge"):
    if browser=='Chrome':
        driver = webdriver.Chrome()
    elif browser=="Firefox":
        driver = webdriver.Firefox()
    elif browser=="Safari":
        driver = webdriver.Safari()
    else:
        driver = webdriver.Edge()

    return driver


class BasePage:
    def __init__(self,driver):
        self.driver = driver

    # 打开网页
    def open(self,url):
        self.driver.get(url)
        # 窗口最大化
        self.driver.maximize_window()
        # 隐式等待
        self.driver.implicitly_wait(3)

    # 关闭
    def close(self):
        self.driver.close()

    # 退出
    def quit(self):
        self.driver.quit()

    # 定位元素
    def locator_element(self,locatorstr):
        """
        定位元素
        :param locatorstr: 定位元素的字符串,格式类似于 id = xxx   class name =  xxx  tag name=xxx
        :return:
        """
        try:
            # 处理字符串
            s = locatorstr.split('=')
            locator = (s[0].strip(),s[1].strip())
            a = WebDriverWait(self.driver, 3, 0.3).until(expected_conditions.presence_of_element_located(locator=locator))
            print(f"定元素【{locatorstr}】成功")
            return a
        except Exception as e:
            print(f"定元素【{locatorstr}】出错,{e}")


    # 点击
    def click(self,locatorstr):
        try:
            self.locator_element(locatorstr).click()
            print(f"点击元素【{locatorstr}】成功")
        except Exception as e:
            print(f"点击元素【{locatorstr}】出错,{e}")

    # 发送信息
    def send(self,locatorstr,text):
        try:
            self.locator_element(locatorstr).send_keys(text)
            print(f"给元素【{locatorstr}】,发送【{text}】成功")
        except Exception as e:
            print(f"给元素【{locatorstr}】,发送【{text}】出错,{e}")

    # 切入iframe
    def enter_Iframe(self,locatorstr):
        try:
            # 切换到iframe中
            self.driver.switch_to.frame(self.locator_element(locatorstr))
            print(f"切入iframe【{locatorstr}】成功")
        except Exception as e:
            print(f"切入iframe【{locatorstr}】出错,{e}")

    # 切换到默认层
    def switch_To_Default_Content(self):
        try:
            self.driver.switch_to.default_content()
            print(f"切换到最外层成功")
        except Exception as e:
            print(f"切换到最外层出错,{e}")

    # 切换到上一层
    def switch_To_Parent_Frame(self):
        try:
            self.driver.switch_to.parent_frame()
            print(f"切换到上一层成功")
        except Exception as e:
            print(f"切换到上一层出错,{e}")

    # 根据下拉框选中
    def select_By(self,locatorstr):
        try:
            select = Select(self.locator_element(locatorstr))
            print(f"选择下拉框【{locatorstr}】成功")
            return select
        except Exception as e:
            print(f"选择下拉框【{locatorstr}】出错,{e}")

    # 下拉框根据文本选中内容
    def select_By_Text(self,locatorstr,visible_text):
        try:
            self.select_By(locatorstr).select_by_visible_text(visible_text)
            print(f"选择下拉框文本选中内容【{locatorstr}】成功")
        except Exception as e:
            print(f"选择下拉框文本选中内容【{locatorstr}】出错,{e}")

    # 下拉框根据value选中
    def select_By_Value(self,locatorstr,value):
        try:
            self.select_By(locatorstr).select_by_value(value)
            print(f"选择下拉框value选中内容【{locatorstr}】成功")
        except Exception as e:
            print(f"选择下拉框value选中内容【{locatorstr}】出错,{e}")

    # 截图
    def takeScreenshot(self):
        try:
            filename = time.strftime("%Y%m%d%H%M%S", time.localtime())
            self.driver.save_screenshot(f'xinqidian_ranzhi_index_{filename}.png')
            print(f"截图成功")
        except Exception as e:
            print(f"截图出错,{e}")


if __name__ == '__main__':
    driver = get_Driver()
    # 打开网页
    bp = BasePage(driver)
    bp.open("http://127.0.0.1/ranzhi/www")
    # 发送信息
    bp.send("id = account",'admin')
    bp.send("id = password",'123456')
    bp.click("id = submit")
    # 点击后台管理
    bp.click("id = s-menu-superadmin")
    time.sleep(1)
    # 切换到iframe中
    bp.enter_Iframe("id = iframe-superadmin")
    # 点击添加成员
    bp.click("link text = 添加成员")
    time.sleep(2)
    # 添加用户名
    bp.send("id = account","lucy")
    # 添加真实姓名
    bp.send("id = realname","伍二宝")
    # 选择性别
    bp.click("id = genderm")
    # 选择部门
    # 下拉框:创建select对象
    # 根据文本选中
    bp.select_By_Text("id = dept","/市场部")
    # 选择角色
    # 下拉框:创建select对象
    # 根据value选中
    bp.select_By_Value("id = role","pm")
    # 添加密码
    bp.send("id = password1","123456")
    # 重复密码
    bp.send("id = password2","123456")
    # 添加邮箱
    bp.send("id = email","1584561@163.com")
    # 点击保存
    bp.click("id = submit")
    time.sleep(10)
    # 截图
    bp.takeScreenshot()
    # iframe切换默认层
    bp.switch_To_Default_Content()
    # 签退
    bp.click("link text = 签退")
read_file(解析文件方法)
'''
获取项目路径
解析csv
解析ini
解析excel
'''
import configparser
import os.path


def get_project_path():
    # 获取父路径
    path = os.path.dirname(__file__)
    path = os.path.dirname(path)
    return path

# 解析ini文件
def read_ini(filename,section,key):
    """
    解析ini文件,返回一个字符串类型
    :param filename: 文件名称
    :param section: 节点名
    :param key: 关键词
    :return: value值
    """
    # 获取完整的文件路径
    filepath = get_project_path()+"\\data\\"+filename
    cp = configparser.ConfigParser()
    cp.read(filepath,encoding='utf-8')
    value = cp.get(section,key)
    return value

if __name__ == '__main__':
    url = read_ini('evn.ini','evn','url')
    print(url)

    dbinfo = read_ini('evn.ini','mysql','dbinfo')
    print(dbinfo)
    d = eval(dbinfo)
    print(type(d)) #<class 'dict'>
evn.ini(数据ini文件)
[evn] ;节点,起分类作用
url=http://127.0.0.1/ranzhi/www
user=admin
pwd=123456

[mysql]
dbinfo={"user":'root','pwd':'123456','host':'127.0.0.1','port':3306,'database':'ranzhi','charset':'utf8'}