第9章 HarmonyOs图解 Java UI 开发
HarmonyOS 学习系统 | 阶段二:进阶实战期
建议学习时长:2-3 周
学习目标
| 序号 | 能力 |
|---|---|
| 1 | 理解 Java UI 框架的组件树结构和命令式编程模型 |
| 2 | 掌握常用 UI 组件(Text、Button、Image、TextField 等)的使用 |
| 3 | 熟练使用四种布局(Directional、Dependent、Stack、Table) |
| 4 | 能独立实现完整的 UI 界面(如登录页面) |
核心图解
内容讲解
9.1 Java UI 框架
Java UI 开发就像搭积木:
- Component(组件) = 各种形状的积木块(Text=文字积木、Button=按钮积木、Image=图片积木)
- ComponentContainer(容器) = 积木底板------用来放积木的板子
- LayoutConfig(布局配置) = 积木的摆放规则------这块放左边、那块放右边
- 组件树 = 搭好的积木城堡------有层级关系的整体结构
- DirectionalLayout = 单向排列架------积木只能横排或竖排
- DependentLayout = 自由摆放桌------积木可以相对于其他积木自由放置
- StackLayout = 堆叠桌------积木一层叠一层
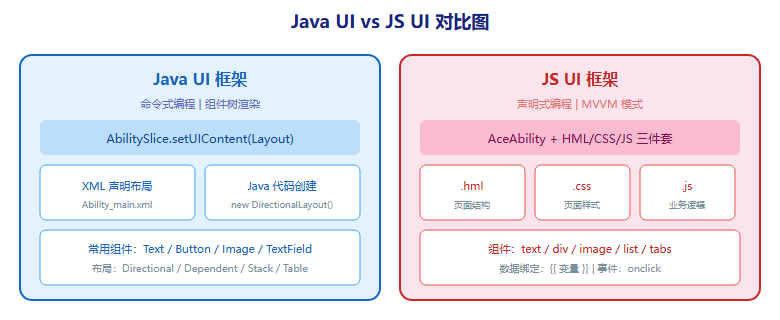
Java UI 框架提供了两类核心对象:Component(组件基类)和 ComponentContainer(容器基类)。所有 UI 操作都应在主线程进行。
两种创建 UI 的方式:
- XML 声明布局 :在
resources/base/layout/目录下创建 XML 文件,通过setUIContent(ResourceTable.Layout_xxx)加载 - Java 代码创建 :在 AbilitySlice 中直接通过
new DirectionalLayout()等创建组件
9.2 常用组件
| 组件 | 用途 | 常用方法 |
|---|---|---|
| Text | 显示文本 | setText(), setTextColor(), setTextSize(), setTruncationMode() |
| Button | 点击按钮 | setClickedListener(), setText() |
| Image | 显示图片 | setPixelMap(), setScaleMode(), setImageAndScaleMode() |
| TextField | 文本输入框 | getText(), setText(), setHint(), setInputType() |
| Checkbox | 复选框 | setChecked(), setCheckedStateChangedListener() |
| RadioButton / RadioContainer | 单选按钮 | setMarked(), setRadioStateChangedListener() |
| Switch | 开关 | setChecked(), setOnStateChangedListener() |
| ProgressBar | 进度条 | setProgressValue(), setMaxValue(), setViceProgressValue() |
| RoundProgressBar | 圆形进度条 | 同上 + setViceProgress() |
| ListContainer | 列表 | setItemProvider(), setOnItemClickListener() |
| TabList / Tab | 选项卡 | setTabSelectedListener(), selectTab() |
| ScrollView | 滚动视图 | 包裹子组件实现滚动 |
| PageSlider | 滑动翻页 | setProvider(), setPageChangedListener() |
组件 ID 查找
在 AbilitySlice 中通过 ID 查找组件:
java
Text text = (Text) findComponentById(ResourceTable.Id_text_helloworld);
text.setText("新的文本内容");
注意 :必须使用 ResourceTable.Id_xxx 常量引用,不能直接使用字符串。
按钮点击事件
java
Button button = (Button) findComponentById(ResourceTable.Id_btn_login);
button.setClickedListener(new Component.ClickedListener() {
    @Override
    public void onClick(Component component) {
        // 处理点击逻辑
        new ToastDialog(getContext())
            .setText("登录成功")
            .show();
    }
});
9.3 常用布局
| 布局 | 排列方式 | 生活类比 | 适用场景 |
|---|---|---|---|
| DirectionalLayout | 水平或垂直单向排列 | 排队:要么横排要么竖排 | 表单、列表项、工具栏 |
| DependentLayout | 相对于其他组件定位 | 自由摆放:你想放哪就放哪 | 复杂页面、登录界面 |
| StackLayout | 组件堆叠 | 叠罗汉:一层叠一层 | 悬浮按钮、图片叠加文字 |
| TableLayout | 表格行列布局 | 棋盘:按行列排列 | 计算器、网格展示 |
DirectionalLayout 示例(XML)
xml
<DirectionalLayout
    xmlns:ohos="http://schemas.huawei.com/res/ohos"
    ohos:width="match_parent"
    ohos:height="match_parent"
    ohos:orientation="vertical">

    <Text
        ohos:width="match_parent"
        ohos:height="50vp"
        ohos:text="用户名"
        ohos:text_size="16fp"
        ohos:left_margin="20vp"
        ohos:top_margin="20vp" />

    <TextField
        ohos:id="$+id:input_username"
        ohos:width="match_parent"
        ohos:height="45vp"
        ohos:hint="请输入用户名"
        ohos:left_margin="20vp"
        ohos:top_margin="5vp" />
</DirectionalLayout>
DependentLayout 示例(XML)------登录界面
xml
<DependentLayout
    xmlns:ohos="http://schemas.huawei.com/res/ohos"
    ohos:width="match_parent"
    ohos:height="match_parent">

    <Text
        ohos:id="$+id:title"
        ohos:width="match_content"
        ohos:height="match_content"
        ohos:text="用户登录"
        ohos:text_size="28fp"
        ohos:top_margin="60vp"
        ohos:horizontal_center="true" />

    <TextField
        ohos:id="$+id:username"
        ohos:width="300vp"
        ohos:height="50vp"
        ohos:hint="请输入用户名"
        ohos:below="$id:title"
        ohos:top_margin="30vp"
        ohos:horizontal_center="true" />

    <TextField
        ohos:id="$+id:password"
        ohos:width="300vp"
        ohos:height="50vp"
        ohos:hint="请输入密码"
        ohos:input_type="PASSWORD"
        ohos:below="$id:username"
        ohos:top_margin="15vp"
        ohos:horizontal_center="true" />

    <Button
        ohos:id="$+id:login_btn"
        ohos:width="300vp"
        ohos:height="50vp"
        ohos:text="登录"
        ohos:background_element="$graphic:button_bg"
        ohos:below="$id:password"
        ohos:top_margin="20vp"
        ohos:horizontal_center="true" />
</DependentLayout>
DependentLayout 的常用定位属性:
| 属性 | 说明 |
|---|---|
above |
在指定组件上方 |
below |
在指定组件下方 |
left_of |
在指定组件左侧 |
right_of |
在指定组件右侧 |
aligned_left |
与指定组件左对齐 |
aligned_right |
与指定组件右对齐 |
aligned_top |
与指定组件顶部对齐 |
aligned_bottom |
与指定组件底部对齐 |
horizontal_center |
水平居中(值为 true) |
vertical_center |
垂直居中(值为 true) |
9.4 图形资源 (graphic)
组件的背景、形状等通过 resources/base/graphic/ 目录下的 XML 文件定义:
xml
<!-- graphic/button_bg.xml -->
<?xml version="1.0" encoding="utf-8"?>
<shape xmlns:ohos="http://schemas.huawei.com/res/ohos"
    ohos:shape="rectangle">
    <corners ohos:radius="25vp"/>
    <solid ohos:color="#007DFF"/>
</shape>
常用图形属性:
| 属性 | 说明 |
|---|---|
ohos:shape |
形状:rectangle/oval/line/ring |
ohos:radius |
圆角半径 |
ohos:cornerRadius |
各角分别设置圆角 |
solid |
填充颜色 |
stroke |
边框(宽度+颜色) |
gradient |
渐变色 |
代码速查卡
| 组件/操作 | API | 说明 |
|---|---|---|
| 查找组件 | findComponentById(ResourceTable.Id_xxx) |
返回 Component,需强转 |
| 设置文本 | text.setText("内容") |
Text/Button 通用 |
| 设置颜色 | text.setTextColor(Color.RED) |
使用 Color 常量 |
| 点击事件 | component.setClickedListener(listener) |
所有组件可用 |
| 加载布局 | setUIContent(ResourceTable.Layout_xxx) |
必须在 onStart() 中调用 |
| 弹出提示 | new ToastDialog(ctx).setText("msg").show() |
短暂提示 |
| 设置背景 | component.setBackgroundElement() |
传入 graphic 资源 |
与 Android/iOS 对比
| 特性 | HarmonyOS (Java UI) | Android (View) | iOS (UIKit) |
|---|---|---|---|
| 布局文件 | XML (ohos 命名空间) | XML (android 命名空间) | Storyboard / XIB / 代码 |
| 线性布局 | DirectionalLayout | LinearLayout | UIStackView |
| 相对布局 | DependentLayout | ConstraintLayout / RelativeLayout | Auto Layout |
| 帧布局 | StackLayout | FrameLayout | 重叠视图 |
| 列表 | ListContainer | RecyclerView | UITableView |
| 图形资源 | graphic/ XML | drawable/ XML | 不支持 XML 定义 |
| ID 查找 | ResourceTable.Id_xxx | R.id.xxx | outlet 连接 |
⚠️ 踩坑回忆录
刚开始用 Java UI 做布局时,我把 setUIContent() 写在了 onActive() 里,结果每次切回页面都会重新加载布局,导致状态丢失。setUIContent() 必须在 onStart() 中调用 ,这是 AbilitySlice 的生命周期决定的。另外,通过 ID 查找组件时要用 ResourceTable.Id_xxx 而不是直接写字符串,我一开始写了 findComponentById("text_helloworld"),报了 NullPointerException,改成 findComponentById(ResourceTable.Id_text_helloworld) 才解决。
还有一个坑:DependentLayout 中引用其他组件时,被引用的组件必须定义在前面(XML 中先出现),否则编译会报错找不到组件。这个顺序依赖是 DependentLayout 的一大特点。
必做实操任务
| 序号 | 任务 | 难度 |
|---|---|---|
| 1 | 使用 DirectionalLayout 实现一个简单的表单页面(姓名+电话+提交按钮) | ★★☆ |
| 2 | 使用 DependentLayout 实现一个完整的登录界面 | ★★☆ |
| 3 | 创建圆形按钮背景的 graphic 资源文件 | ★☆☆ |
| 4 | 使用 ListContainer 实现一个简单的列表展示 | ★★★ |
| 5 | 实现登录页面,输入验证并弹出 Toast 提示 | ★★★ |
学习检查清单
- 能说出 Java UI 框架的核心类(Component、ComponentContainer)
- 能使用至少 5 种常用 UI 组件
- 能使用 DirectionalLayout 实现垂直/水平排列
- 能使用 DependentLayout 实现相对定位
- 能创建和使用 graphic 资源定义组件背景
- 理解 setUIContent() 必须在 onStart() 中调用的原因
- 能写出完整的登录界面
进阶方向
- 学习 TableLayout 和自定义布局
- 深入学习 ListContainer 的 BaseItemProvider 适配器模式
- 学习自定义组件和自定义绘制