写在前面
最近接触到很多需要用 Node.js 进行异步编程的任务,刚好遇到一个比较有代表性的,整理出来分享给大家,顺带再谈谈过程中 AI 辅助编程存在的问题,以及我为什么依旧对古法编程仍抱有一丝希望。欢迎评论留言。
一、背景介绍
在 Node.js 异步编程的所有相关话题中,业内公认难度较大的,当属 限定最高并发总数的异步任务的批量执行 了。最近刚好就遇到这样的场景:为了节省云存储的流量,需要在本地把所有的 png 图片压缩成体积更小的 webp 格式,提炼成一个异步任务可以表示为:
js
const asyncTask = async (arg1, arg2) => { ... }现在的问题是,这样的图片有上百张,将来说不定有上千张,直接用 for 循环去执行这些异步任务就是一个典型的 不带并发总量限制的异步任务的批量执行 。而我想要的是更安全的方案:并发总量 完全自主可控。
二、峰回路转
不曾想在 B 站 偶然看到一篇由渡一团队的谢杰大佬分享的技术帖,里面探讨的面试题正好就是我要找的答案(意想不到的惊喜 Serendipity 了属于是):
实现一个
Scheduler类,实现最多同时运行n个异步任务。实例方法add(fn)接收一个返回Promise的回调函数,方法本身则返回一个在该任务完成时resolve的Promise:
js// 要求:最多并发 2 个任务,输出顺序应为 2 3 1 4 const timeout = (t, tag) => new Promise( r => setTimeout(() => (console.log(tag), r(tag)), t)); class Scheduler { /* TODO */ } const scheduler = new Scheduler(2); const addTask = (t, tag) => scheduler.add(() => timeout(t, tag)); addTask(1000, '1'); addTask(500, '2'); addTask(300, '3'); addTask(400, '4'); // 期望打印:2 3 1 4
三、拿来主义
那就直接照搬过来改改:
js
// Scheduler.js
class Scheduler {
  constructor(ConcurrencyCount = 3) {
    this.ConcurrencyCount = ConcurrencyCount; // 最大并发数
    this.tasks = []; // 等待队列
    this.runningCount = 0; // 当前正在执行的数量
    this.completedCount = 0; // 已完成任务数
  }

  add(task) {
    const { promise, resolve, reject } = Promise.withResolvers();
    this.tasks.push({ task, resolve, reject });
    this._run();
    return promise;
  }

  _run() {
    while (this.runningCount < this.ConcurrencyCount && this.tasks.length > 0) {
      const { task, resolve, reject } = this.tasks.shift();
      this.runningCount++;

      task().then(resolve)
        .catch(reject)
        .finally(() => {
          this.runningCount--;
          this.completedCount++;
          this._run(); // 尝试调度下一个任务
        });
    }
  }
}
然后在入口文件 index.js 中导入这个 Scheduler 类:
js
import { Scheduler } from "./Scheduler.js";
import { tasks } from './tasks.js';

const concurrency = 7
const scheduler = new Scheduler(concurrency)
for (const [lbl, num] of tasks) {
  scheduler.add(async () => await markSeatOnMap(lbl, num));
}
由于每执行完一个任务都会打印一句话,于是得到了如下结果:
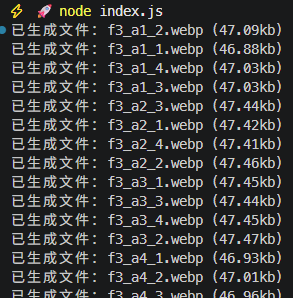
【图1】第一版异步执行结果
为了验证运行时确实只有七个异步任务在执行,我又在 _run() 方法的 finally 代码块加了状态日志:
js
// Scheduler.js
class Scheduler {
  // -- snip --
  _run() {
    while (this.runningCount < this.ConcurrencyCount && this.tasks.length > 0) {
      // -- snip --
      task().then(resolve)
        .catch(reject)
        .finally(() => {
          console.log(`\t\trun: ${this.runningCount}, done: ${this.completedCount}, queued: ${this.tasks.length}`)
          this.runningCount--;
          this.completedCount++;
          this._run(); // 尝试调度下一个任务
        });
    }
  }
}
于是执行状态也监控到了,确实并发数最高为 7:
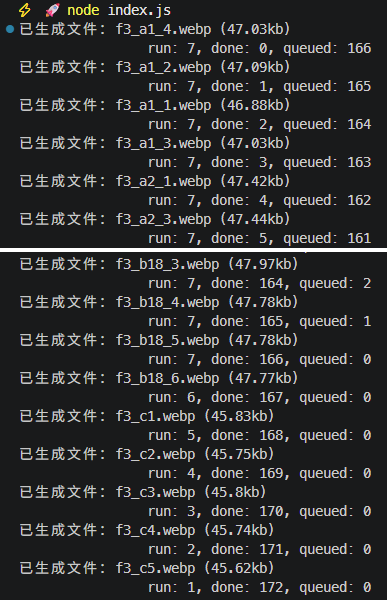
【图2】带状态日志的第二版执行结果
四、DIY 扩展:反推每个执行队列中异步任务的实际执行顺序
从上一步得到的这张截图中,我们还可以推断出每个异步任务被分配到了哪一条并发执行的【流水线】(即执行队列)上:
-
最先完成的是
(a1, 4),对应 四 号线,因此第8个任务会被分发到 四 号线执行; -
接着完成的是
(a1, 2),对应 二 号线,因此第9个任务会被分发到 二 号线执行; -
然后完成的是
(a1, 1),对应 一 号线,因此第10个任务会被分发到 一 号线执行; -
再然后完成了
(a2, 1),对应 五 号线,因此第11个任务会被分发到 五 号线执行; -
再然后完成了
(a2, 3),对应 七 号线,因此第12个任务会被分发到 七 号线执行;......
以此类推,直到最后一个任务被分发到最后一轮空出的那条执行线路上,整个任务分发过程才会结束。
由于每次执行的异步任务用时各不相同,每轮的执行顺序也完全不同。
于是好奇心又上来了:能否将每条线路上每个异步任务实际的执行顺序也批量统计出来?
这个问题我一开始我的思路不对,觉得挺困难的,于是求助了国内主流的几款 AI 大模型,结果还是不出意料地让人失望了:每款大模型都按照我给的错误思路,老老实实地从日志文件反推异步执行顺序,完全没能跳出我的思维误区,从实时运行的角度给出更简单的解决方案,最终全军覆没了。
主动调整思路后的古法编程版,我将关注重点放在了任务触发前后这两个状态位上:在封装的任务对象 task 上挂几个状态值,类似去银行柜台排队,除了自己的总编号外,还要记录被分配到的窗口编号。具体代码如下:
js
// 理论执行顺序(排队顺序)
let queuing_order = 0;
// 临时栈(用于确定空缺位)
const stack = [];
// 临时栈的空缺位
let free_idx = -1;
// 开始阶段并行数有富余时,用于初始化临时栈
let seed = 0;
// 模拟线程池
const lines = new Map([
  ['0', []],
  ['1', []],
  ['2', []],
  ['3', []],
  ['4', []],
  ['5', []],
  ['6', []],
])

export class Scheduler {
  // -- snip --
  _run() {
    while (this.runningCount < this.concurrencyCount && this.tasks.length > 0) {
      const { task, resolve, reject } = this.tasks.shift();
      this.runningCount++;

      task.order = ++queuing_order // 真实执行顺序
      if(free_idx < 0){
        stack.push(task)
        task.thread = seed++;
      } else {
        stack.splice(free_idx, 1, task)
        task.thread = free_idx
      }

      task()
        .then(resolve)
        .catch(reject)
        .finally(() => {
          console.log(`\t\trun: ${this.runningCount}, done: ${this.completedCount}, queued: ${this.tasks.length}`)
          this.runningCount--;
          this.completedCount++;

          free_idx = stack.findIndex(t => t.order === task.order)
          stack.splice(free_idx, 1, '@')
          lines.get(`${task.thread}`).push(task.order)

          if(this.tasks.length === 0 && this.runningCount === 0) {
            console.log()
            console.log('line1:', lines.get('0').map(n => `${n}`.padStart(3, ' ')).join(','));
            console.log('line2:', lines.get('1').map(n => `${n}`.padStart(3, ' ')).join(','));
            console.log('line3:', lines.get('2').map(n => `${n}`.padStart(3, ' ')).join(','));
            console.log('line4:', lines.get('3').map(n => `${n}`.padStart(3, ' ')).join(','));
            console.log('line5:', lines.get('4').map(n => `${n}`.padStart(3, ' ')).join(','));
            console.log('line6:', lines.get('5').map(n => `${n}`.padStart(3, ' ')).join(','));
            console.log('line7:', lines.get('6').map(n => `${n}`.padStart(3, ' ')).join(','));
          }

          this._run(); // 尝试调度下一个任务
        });
    }
  }
}
这是最终运行的结果:

【图3】调整思路后得到的实际执行顺序
该截图和最开始的手动分析完全一致,当然还有很多细节有待完善,这里就不展开了。
五、其他优化空间
在最新版第四版的《Node.js Design Patterns 》一书中,也对这个控制模式进行了介绍,只不过书中的案例更加复杂,需要递归地爬取指定深度的网页链接。这本书我感觉应该算是讲 Node.js 异步编程最深刻的一本经典教材了,从最开始的回调函数讲到 Promise、再升级到后来的 async / await 语法糖,完整演示同一个问题在不同设计模式下的实现方法,值得反复回味。书中给出的控制总并发的 class 类是这样写的:
js
import { EventEmitter } from 'node:events'

export class TaskQueue extends EventEmitter {
  constructor(concurrency) {
    super()
    this.concurrency = concurrency
    this.running = 0
    this.queue = []
  }

  pushTask(task) {
    this.queue.push(task)
    process.nextTick(this.next.bind(this))
    return this
  }

  next() {
    if (this.running === 0 && this.queue.length === 0) {
      return this.emit('empty')
    }

    while (this.running < this.concurrency && this.queue.length > 0) {
      const task = this.queue.shift()
      task()
        .catch(err => {
          this.emit('taskError', err)
        })
        .finally(() => {
          this.running--
          this.next()
        })
      this.running++
    }
  }

  stats() {
    return {
      running: this.running,
      scheduled: this.queue.length,
    }
  }
}
确实考虑得很全面,把统计状态直接放到 stats() 方法了。这就是经典教材的魅力。