前言
这一期来讲解STL中的list。在前文我们详细剖析了 vector 的底层实现、扩容机制与迭代器失效问题,可以看出 vector 依托连续内存带来了极高的访问效率,但也导致其在头部、中部插入删除场景性能较差。为了弥补这一短板,C++ STL 提供了基于链表实现的 list 容器。list 采用双向不连续链式存储结构,彻底规避了内存扩容与元素挪动问题,在任意位置增删元素都能保持稳定效率。本文将从实际使用场景出发,全面讲解 list 的常用接口、特性优势、适用场景,并深入剖析其底层双向链表结构、节点设计、迭代器特性及失效机制,帮助彻底掌握 list 的核心原理,建立完整的 STL 容器知识体系。
常用接口
list构造
list<int> lt;
list<int> lt2(5, 1);
list<int> lt3(lt2);

list<int> lt4(lt2.begin(), lt2.end());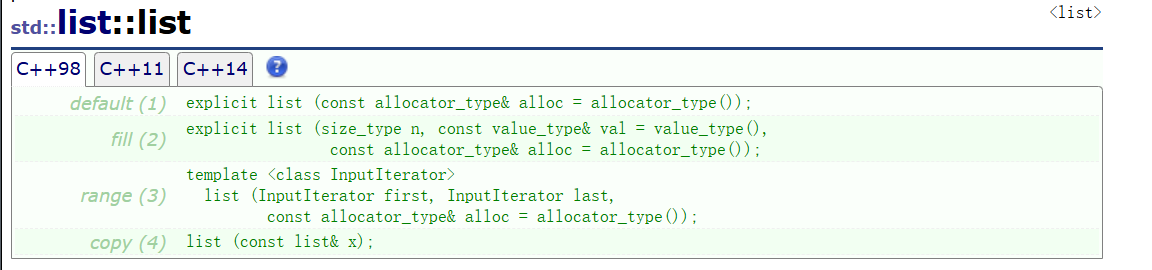
迭代器遍历
//迭代器
list<int>::iterator it = lt.begin();
while (it != lt.end())
{
	cout << *it << " ";
	it++;
}
cout << endl;
//范围for
for (auto& e : lt)
{
	cout << e << " ";

}
cout << endl;
虽然于之前sring,vector中便利的方式一样但是其底层大不相同。这点在后面介绍。
push_back和emplace_back
push_back并不陌生,是进行尾插的,emplace_back功能与push_back类似也是尾插。但也有区别。这区别目前用不到后面在讨论。
struct A
{
public:
	A(int a1 = 1, int a2 = 1)
		:_a1(a1)
		, _a2(a2)
	{
		cout << "A(int a1 = 1, int a2 = 1)" << endl;
	}

	A(const A& aa)
		:_a1(aa._a1)
		, _a2(aa._a2)
	{
		cout << "A(const A& aa)" << endl;
	}

	int _a1;
	int _a2;
};

list<A> lt;
A aa(1, 1);
lt.push_back(aa);
lt.push_back(A(1,1));
//lt.push_back((1, 1));


lt.emplace_back(aa);
lt.emplace_back(A(1,1));
lt.emplace_back((1,1));
insert、find和erase
这些接口也是很常见的在学过前面的知识后。
list<int> lt;
lt.push_back(1);
lt.push_back(2);
lt.push_back(3);
lt.push_back(4);
lt.push_back(5);

auto it = lt.begin();
lt.insert(++it, 10);


int x = 0;
cin >> x;
it = find(lt.begin(), lt.end(), x);
if (it != lt.end())
{
	lt.erase(it);
}
merge、unique和remove
merge这个是合并两个链表的。先分别排序,然后取消的一个个链接,最后在给到一个链表中。
unique是去除重复数据保留一个(前提是有序)。
remove删除值。
splice
剪切在粘贴
// 一个链表节点转移给另一个链表
	std::list<int> mylist1, mylist2;
	std::list<int>::iterator it;

	// set some initial values:
	for (int i = 1; i <= 4; ++i)
		mylist1.push_back(i);      // mylist1: 1 2 3 4

	for (int i = 1; i <= 3; ++i)
		mylist2.push_back(i * 10);   // mylist2: 10 20 30

	it = mylist1.begin();
	++it;                         // points to 2

	mylist1.splice(it, mylist2); // mylist1: 1 10 20 30 2 3 4
								  // mylist2 (empty)
								  // "it" still points to 2 (the 5th element
一些主要接口实现过后就来手撕一下list吧。
底层实现
list是一个链表,因此需要节点。先来创建节点
创建节点
//创建节点
template<class T>
struct list_node
{
	T _data;
	list_node<T>* _next;
	list_node<T>* _prev;

	//构造
	list_node(const T& data = T())
		:_data(data)
		,_next(nullptr)
		,_prev(nullptr)
	{ }
};
迭代器的实现
上面使用时发现其与之前没多大区别,但是由于list是由一个个节点构成,并不连续,因此其底层需要更复杂。
//普通迭代器
template<class T>
struct list_iterator
{
	typedef list_node Node;
	typedef list_iterator<T> self;
	Node* _node;

	list_iterator(const Node* node)
	{
		:_node(node)
		{ }
	}

	//重载*
	T& operator*()
	{
		return _node->date;
	}

	//重载->
	T* operator->()
	{
		return&_node->_data;
	}


	//重载++和--
	//前置
	self& opertor++()
	{
		_node = _node->next;
		return *this;
	}

	self& opertor--()
	{
		_node = _node->prev;
		return *this;
	}


	//后置
	self operator++(int)
	{
		self tmp(*this);
		_node = _node->next;
		return tmp;
	}

	self operator++(int)
	{
		self tmp(*this);
		_node = _node->prev;
		return tmp;
	}

	bool operator!=(const self& s)const
	{
		return _node != s._node;
	}

	bool operator==(const self& s)const
	{
		return _node == s._node;
	}

};

//const迭代器
template<class T>
struct const_list_iterator
{
	typedef list_node Node;
	typedef const_list_iterator<T> self;
	Node* _node;

	const_list_iterator(const Node* node)
	{
		:_node(node)
		{
		}
	}

	//重载*
	const T& operator*()
	{
		return _node->date;
	}

	//重载->
	const T* operator->()
	{
		return&_node->_data;
	}


	//重载++和--
	//前置
	self& opertor++()
	{
		_node = _node->next;
		return *this;
	}

	self& opertor--()
	{
		_node = _node->prev;
		return *this;
	}


	//后置
	self operator++(int)
	{
		self tmp(*this);
		_node = _node->next;
		return tmp;
	}

	self operator++(int)
	{
		self tmp(*this);
		_node = _node->prev;
		return tmp;
	}

	bool operator!=(const self& s)const
	{
		return _node != s._node;
	}

	bool operator==(const self& s)const
	{
		return _node == s._node;
	}
};
从代码可以看出普通迭代器与const迭代器有很多相同的,因此可以写个模板
//迭代器
template<class T,class Ref,class Ptr>
struct list_iterator
{
	typedef list_node Node;
	typedef list_iterator<T,Ref,Ptr> self;
	Node* _node;

	list_iterator(const Node* node)
	{
		:_node(node)
		{
		}
	}

	//重载*
	Ref operator*()
	{
		return _node->date;
	}

	//重载->
	Ptr operator->()
	{
		return&_node->_data;
	}


	//重载++和--
	//前置
	self& opertor++()
	{
		_node = _node->next;
		return *this;
	}

	self& opertor--()
	{
		_node = _node->prev;
		return *this;
	}


	//后置
	self operator++(int)
	{
		self tmp(*this);
		_node = _node->next;
		return tmp;
	}

	self operator++(int)
	{
		self tmp(*this);
		_node = _node->prev;
		return tmp;
	}

	bool operator!=(const self& s)const
	{
		return _node != s._node;
	}

	bool operator==(const self& s)const
	{
		return _node == s._node;
	}
};
这样用哪个迭代器就直接是哪个了。
接下来就可以构建链表了,先将整体架构写出来。
template<class T>
class list
{
	typedef list_node Node;
public:
	typedef list_iterator<T,T&,T*> iterator;
	typedef list_iterator<T, const T&, const T*>const iterator;


private:
	Node* _head;
	size_t _size;
};
首先将迭代器给写进去
iterator begin()
{
	/*iterator it(head->next);
	return it;*/
	//上面的太麻烦了可以直接隐式类型转换
	return _head->_next;
}

iterator end()
{
	return _head;
}


const iterator begin()
{
	return _head->_next;
}

const iterator end()
{
	return _head;
}
这个比较难的实现后来实现一个类中几乎必不可少的一些成员函数,默认成员函数。
默认成员函数
//哨兵位
void empty_init()
{
	_head = new Node;
	_head->next = _head;
	_head_ > prev = _head;
}

//构造
list()
{
	empty_init;
}

list(initilize_list<T>il)
{
	empty_init();
	for (auto& e : il)
	{
		push_back(e);
	}
}


//拷贝
list(const list<T>& lt)
{
	empty_init();
	for (auto& e : lt)
	{
		push_back(e);
	}
}


//赋值
list<T> operator=( list<T> lt)
{
	swap(lt);
	return *this;
}

void swap(list<T>& lt)
{
	std::swap(_head, lt._head);
	std::swap(_szie, lt._size);
}


//析构
~list()
{
	clear();
	delete _head;
	_head = nullptr;
}


void clear()
{
	auto it = lt.begin();
	while (it != lt.end())
	{
		it = erase(it);
	}
}
这里的第二个构造函数上期中也有提到,这里不过多赘述。在上面有遇到push_back所以接下来来实现这个。erase放到后面和insert一起实现。
尾删,尾插,头删和头插
然后这里还有一些尾删尾插,头删在这里一起实现。都是直接调用insert和erase
void push_back(const T& x)
{
	/*Node* newnode = new Node(x);
	Node* ptail = _head->_prev;

	ptail->_next = newnode;
	newnode->prev = ptail;
	newnode->next = _head;
	_head->_prev = newnode;
	_size++;*/
	insert(end(, x);
}


void push_front(const T& x)
{
	insert(begin(), x);
}


void pop_back(const T& x)
{
	erase(--end());
}

void pop_front(const T& x)
{
	erase(begin());
}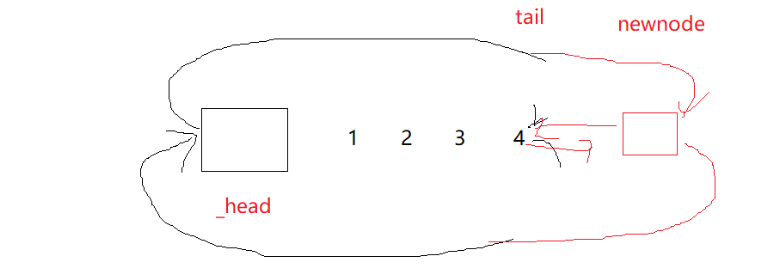
这里可以看到可以直接用insert进行尾插。接下来实现insert和erase
insert&erase
iterator erase(iterator pos)
{
	assert(pos != end());
	Node* prev = pos->_prev;
	Node* next = pos->_next;

	prev->_next = next;
	next->_prev = prev;
	delete pos._node;
	_size--;
	return next;
}


iterator insert(iterator pos, const T& x)
{
	Node* cur = pos._node;
	Node* prev = pos->_prev;

	Node* newnode = new node(x);
	//  prev   newnode    cur
	prev->next = newnode;
	newnode->_prev = prev;
	newnode->_next = cur;
	cur->_prev = newnode;
	++_size;
	return newnode;
}
这里erase过后迭代器会失效,erase过后这个节点就被删除了没了,因此就失效了。
接下来还剩一些简单函数就直接实现了。
size_t size()const
{
	return _size;
}


bool empty()const
{
	return _size == 0;
}
这底下是list的一些测试
void test_op1()
{
	srand(time(0));
	const int N = 1000000;

	list<int> lt1;
	vector<int> v;

	for (int i = 0; i < N; ++i)
	{
		auto e = rand() + i;
		lt1.push_back(e);
		v.push_back(e);
	}

	int begin1 = clock();
	// 排序
	sort(v.begin(), v.end());
	int end1 = clock();

	int begin2 = clock();
	lt1.sort();
	int end2 = clock();

	printf("vector sort:%d\n", end1 - begin1);
	printf("list sort:%d\n", end2 - begin2);
}

void test_op2()
{
	srand(time(0));
	const int N = 1000000;

	list<int> lt1;
	list<int> lt2;

	for (int i = 0; i < N; ++i)
	{
		auto e = rand()+i;
		lt1.push_back(e);
		lt2.push_back(e);
	}

	int begin1 = clock();
	// 拷贝vector
	vector<int> v(lt2.begin(), lt2.end());

	// 排序
	sort(v.begin(), v.end());

	// 拷贝回lt2
	lt2.assign(v.begin(), v.end());

	int end1 = clock();

	int begin2 = clock();
	lt1.sort();
	int end2 = clock();

	printf("list copy vector sort copy list sort:%d\n", end1 - begin1);
	printf("list sort:%d\n", end2 - begin2);
}

#include"List.h"

// 10:35
int main()
{
	//test_list6();
	//test_op2();

	bit::test_list4();

	return 0;
}
因为这里的大多数逻辑都与之前在学习c时的链表大差不差因此就没有多细。
这期就结束了。
感谢支持!!!