SpringBoot的Web开发能力,由SpringMVC提供。
自动配置流程分析
1.需要在pom.xml文件中导入需要使用的场景
spring-boot-starter-web
XML
<dependency>
      <groupId>org.springframework.boot</groupId>
      <artifactId>spring-boot-starter-web</artifactId>
</dependency>
2.在场景spring-boot-starter-web 的配置文件中会导入一个
spring-boot-starter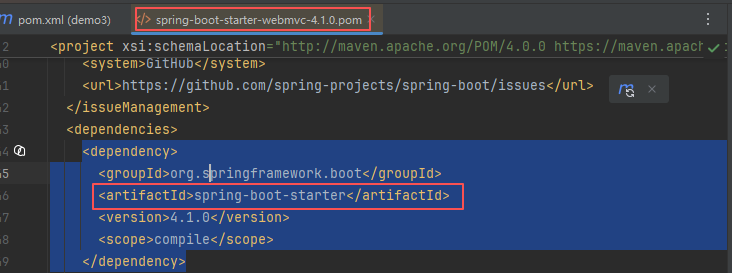
3.在这个starter中又会导入一个
spring-boot-autoconfigure 自动配置功能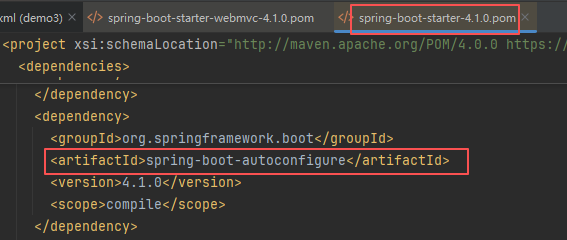
4.自动配置它配置了那些东西啦,由于springboot启动时候需要用到
@SpringBootApplication 注解。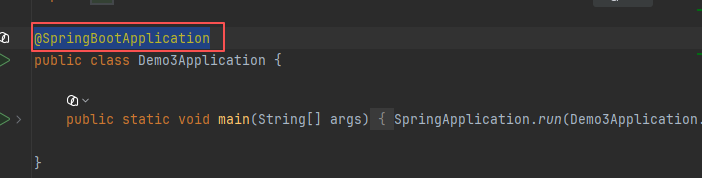
在@SpringBootApplication 注解上又使用了**@EnableAutoConfiguration**开启自动配置功能注解
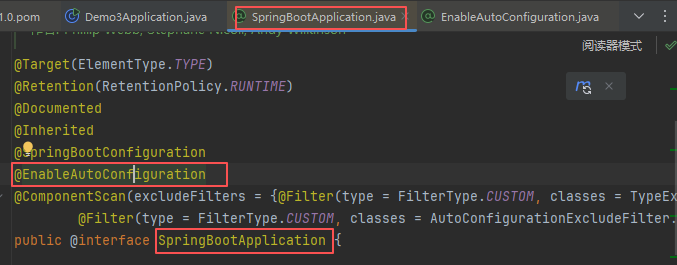
开启自动配置注解上又使用了自动批量导入组件功能
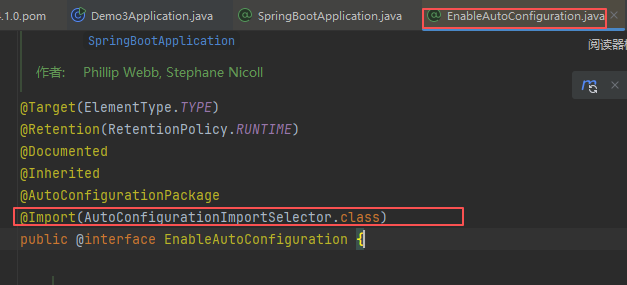
那我们查看下他是从哪里批量导入的组件,进入到AutoConfigurationImportSelector类中
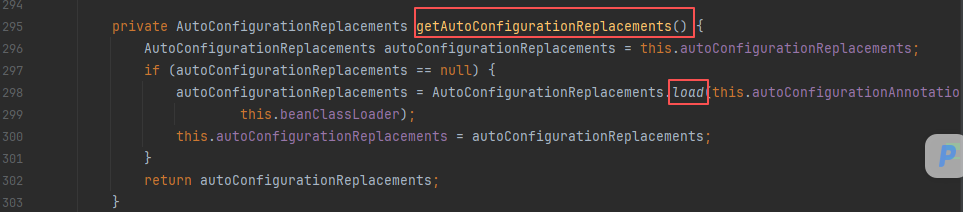
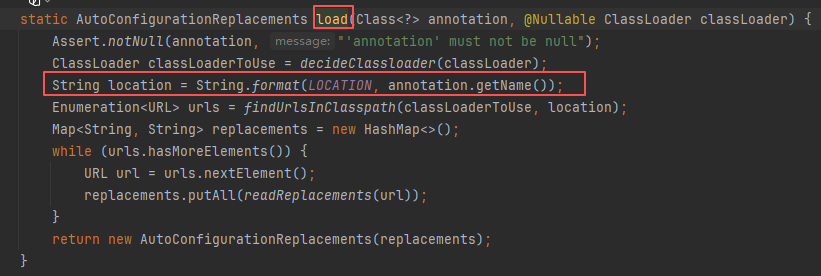

最后加载路径:
"META-INF/spring/%org.springframework.boot.autoconfigure.AutoConfiguration.imports"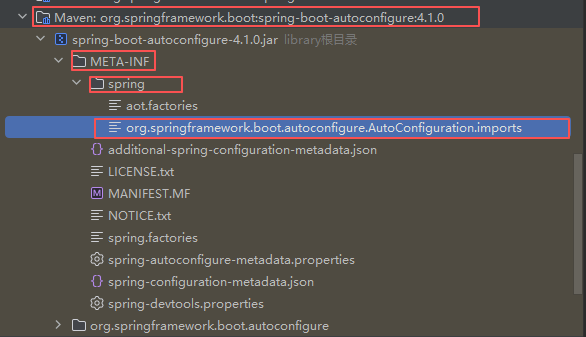
注意:
Boot3 及更早:所有自动配置类全部写在 spring-boot-autoconfigure.jar 内部的 AutoConfiguration.imports 文件里(包含 webmvc、redis、jdbc 等所有配置)
Boot4:不再存在单一大包 autoconfigure,各个功能独立拆分所以4.0需要在webmvc包中查找。
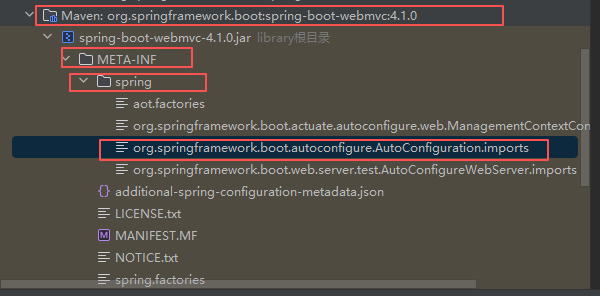
XML
org.springframework.boot.webmvc.autoconfigure.DispatcherServletAutoConfiguration
org.springframework.boot.webmvc.autoconfigure.WebMvcAutoConfiguration
org.springframework.boot.webmvc.autoconfigure.WebMvcObservationAutoConfiguration
org.springframework.boot.webmvc.autoconfigure.actuate.endpoint.web.WebMvcHealthEndpointExtensionAutoConfiguration
org.springframework.boot.webmvc.autoconfigure.actuate.web.mappings.WebMvcMappingsAutoConfiguration
org.springframework.boot.webmvc.autoconfigure.error.ErrorMvcAutoConfiguration
绑定了配置文件的一堆配置项
·1、SpringMVC的所有配置:spring.mvc
·2、Web场景通用配置:spring.web
·3、文件上传配置:spring.servlet.multipart
·4、服务器的配置:server:如:编码方式
默认配置规则
在官方文档中已有说明:
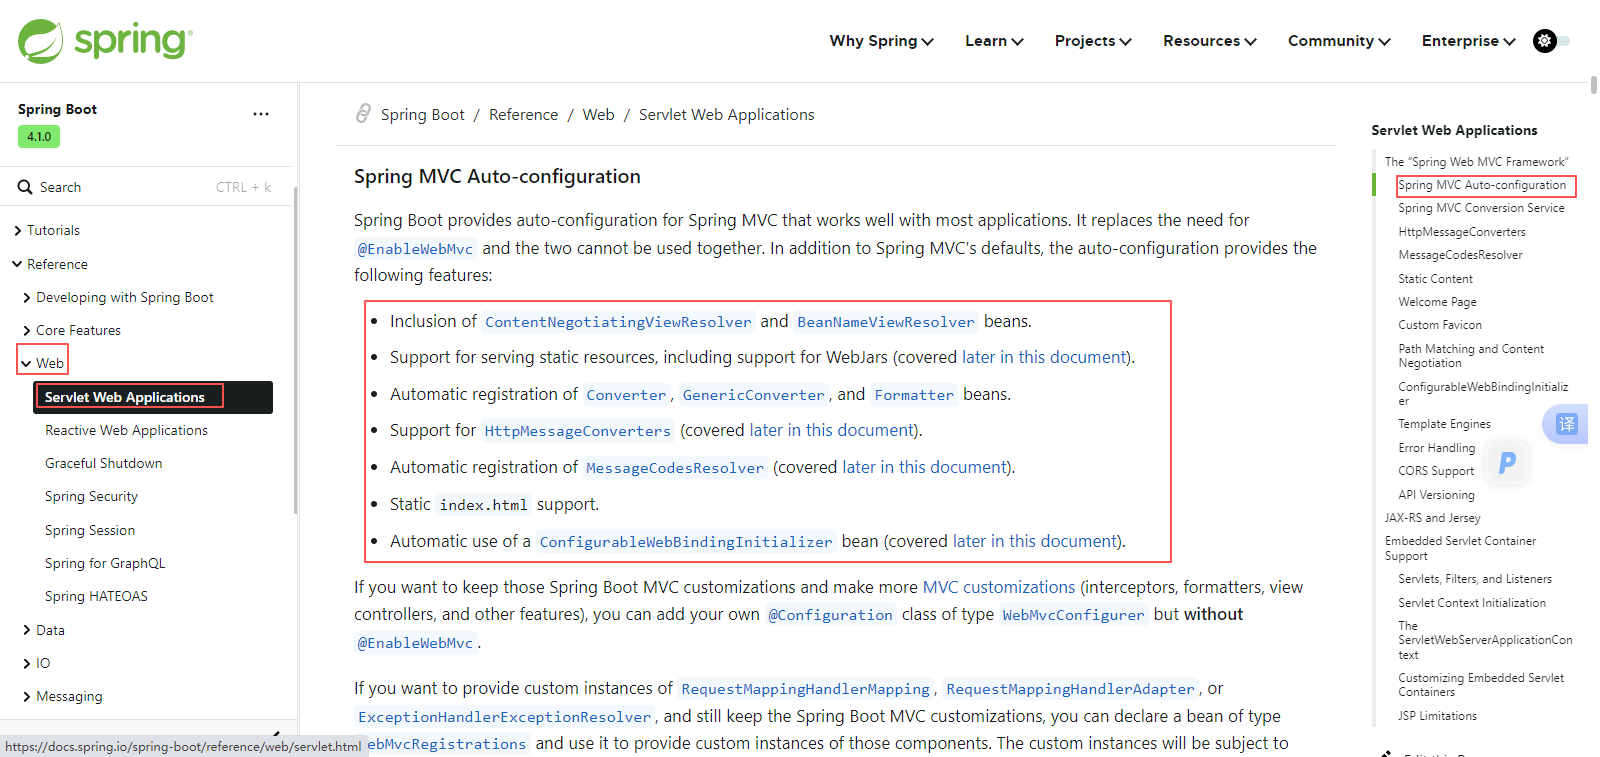
1.包含了ContentNegotiatingViewResolver 和 BeanNameViewResolver 组件,方便视图解析
2.默认的静态资源处理机制:静态资源放在static文件夹下即可直接访问
3.自动注册了Converter,GenericConvVerter,Formatter 组件,适配常见的数据类型转换 和格式化需求。
4.支持HttpMessageConverters ,可以方便返回json等数据类型
5.注册MessageCodesResolver ,方便国际化及错误消息处理
6.支持静态index.html
7.自动使用ConfigurableWebBindinglnitializer, 实现消息处理、数据绑定、类型转化等功能
静态配置规则
java
//在这些配置之后才执行自动配置
@AutoConfiguration(after = { DispatcherServletAutoConfiguration.class, TaskExecutionAutoConfiguration.class },
		afterName = "org.springframework.boot.validation.autoconfigure.ValidationAutoConfiguration")
//如果这是一个web应用配置才会生效,类型为SERVLET
@ConditionalOnWebApplication(type = Type.SERVLET)
//容器中有这些组件才会生效
@ConditionalOnClass({ Servlet.class, DispatcherServlet.class, WebMvcConfigurer.class })
//容器中没有WebMvcConfigurationSupport配置才会生效
@ConditionalOnMissingBean(WebMvcConfigurationSupport.class)
//优先级排序
@AutoConfigureOrder(Ordered.HIGHEST_PRECEDENCE + 10)
@ImportRuntimeHints(WebResourcesRuntimeHints.class)
public final class WebMvcAutoConfiguration {

}
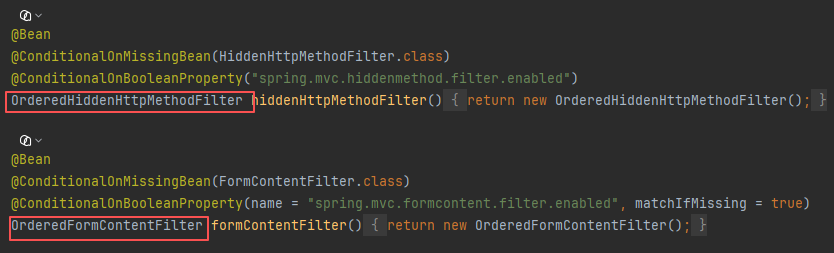
这个WebMvcAutoConfiguration 类下面放了两个Filter:
HiddenHttpMethodFilter ;页面表单交Rest请求 (GET、POST、PUT、DELETE)
FormContentFilter:表单内容Filter,GET(数据放URL后面)、POST(数据放请求体)请求可以携带数据,PUT、DELETE的请求体数据会被忽略
这个文件中还有一个类实现了WebMvcConfigurer 他是用于向容器中增加配置的。

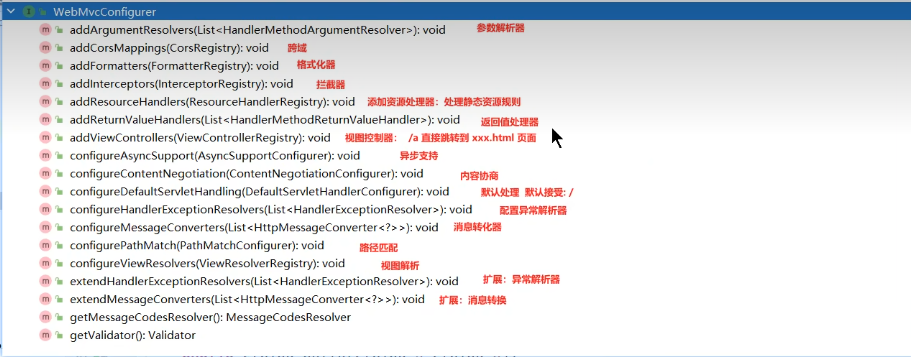
给容器中放了WebMvcConfigurer组件;给SpringMVC添加各种定制功能
所有的功能最终会和配置文件进行绑定
WebMvcProperties.class:spring.mvc 配置文件
WebProperties.class:spring.web配置文件
如下方法实现了静态资源规则:
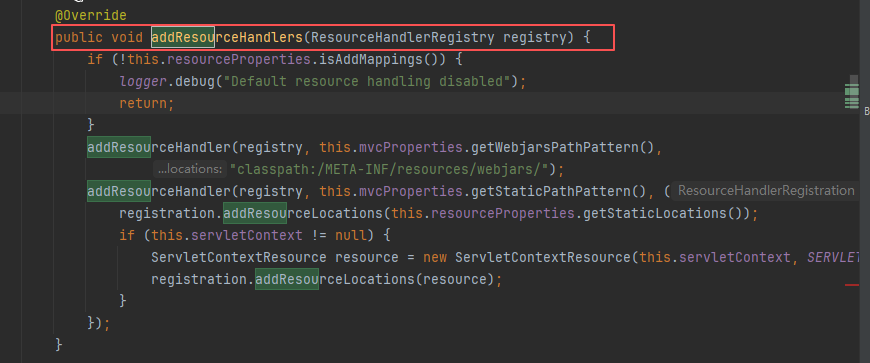
资源查找的两个方法分析
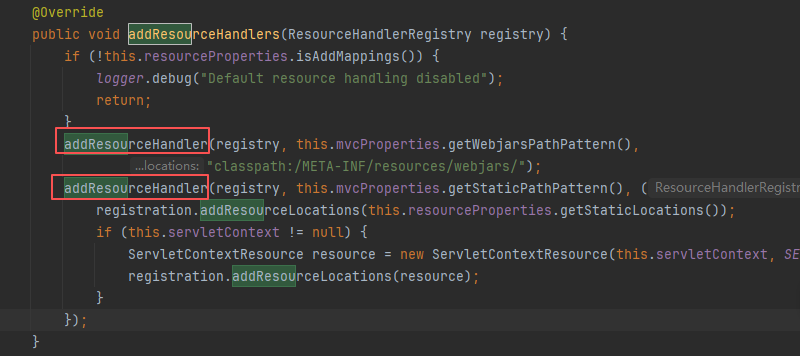
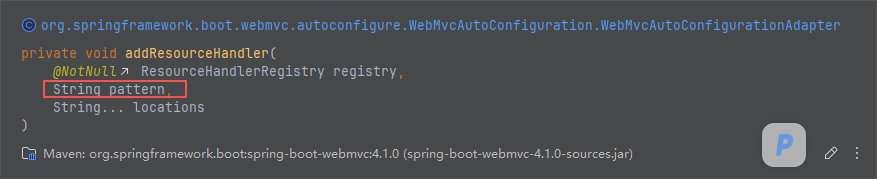 第一个方法规则:我们看到addResourceHandler方法第二个参数是需要传递路径上面调用了
getWebjarsPathPattern()方法获取路径。跟踪进去看到这个方法调用了一个私有变量路径写死"/webjars/**"
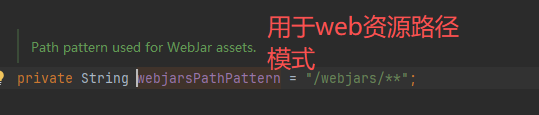
第二个方法:调用了
this.mvcProperties.getStaticPathPattern()它又调用了自己类中变量 staticPathPattern


跟踪方法,第三个参数返回值是

最终就是:
第一个方法规则:
访问:/webjars/** 路径就会去
classpath:/META-INF/resources/webjars/  路径下找资源,
作用:可以直接访问第三方包下的静态资源
第二个方法规则:
访问:/** 路径就会去类路径下四个位置查找资源
classpath:/META-INF/resources/
classpath:/resources/
classpath:/static/
classpath:/public/
静态资源设置了缓存
如果服务这个资源没有发生变化,下次访问的时候就可以直接让浏览器用自己缓存中的东西,而不用给服务器发请求。
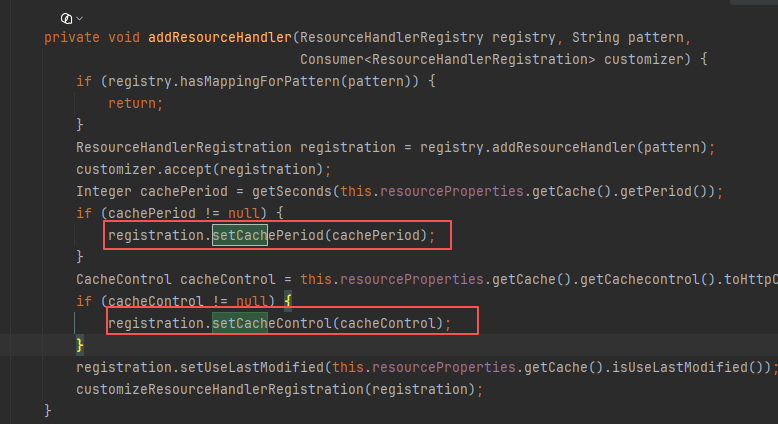
setCachePeriod(cachePeriod)设置缓存周期,以秒为单位。默认0秒setCacheControl(cacheControl)设置Http控制,默认没有控制。参考HTTP 缓存 - HTTP | MDNsetUseLastModified() 是否使用最后一次修改。如果要进行这些规则修改需要在application.yaml配置文件中使用:spring.web
欢迎页规则
在这个文件中还有一个类:
EnableWebMvcConfiguration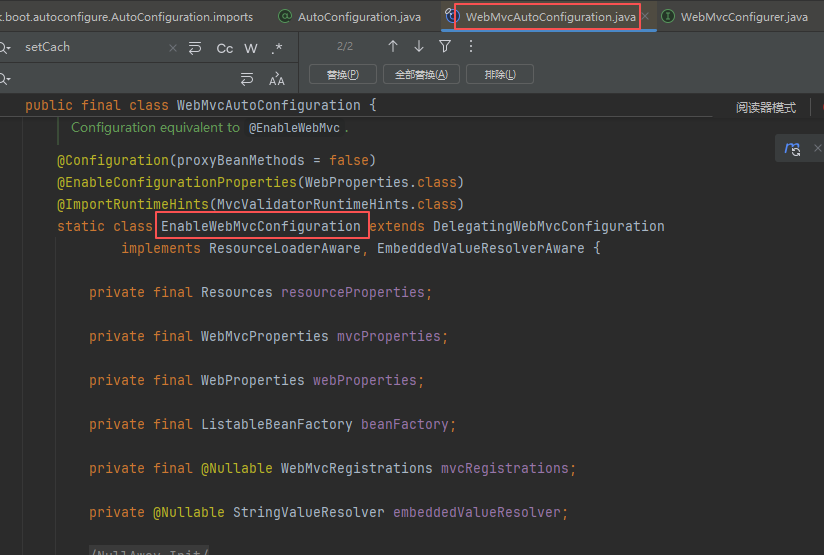
它下面又有两个handlerMapping方法(handlerMapping的都是用于处理请求的):
welcomePageHandlerMapping() 有欢迎页面规则welcomePageNotAcceptableHandlerMapping()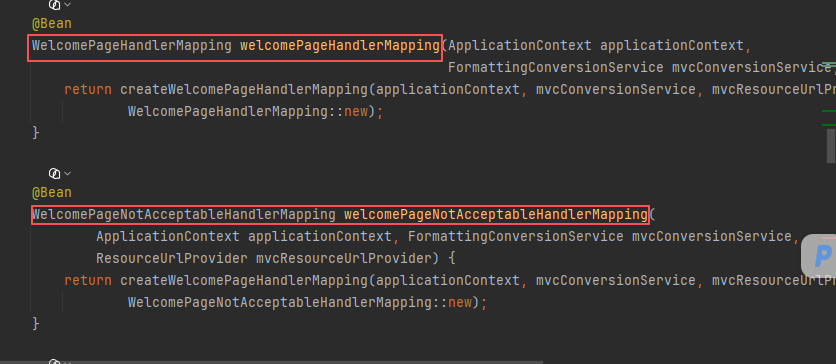
最终:欢迎页会到静态资源中的四个目录中取查找index.html,如果找到就展示。
Favicon图标
只要是Favicon.ico放在了静态资源目录下就会自动被找到。
自定义静态资源的规则
方式一:配置方式
spring.mvc
方式二:代码方式
1.在主程序创建一个目录,并创建一个类
2.这个类需要添加注解@Configuration 告诉程序这是一个配置类
3.让这个类实现 WebMvcConfigurer 接口
4.重写接口中的方法,静态资源需要重写addResourceHandlers() 方法
java
@Configuration // 配置类
public class Myconfig implements WebMvcConfigurer {
    @Override
    public void addResourceHandlers(ResourceHandlerRegistry registry) {
        //保留以前配置
        WebMvcConfigurer.super.addResourceHandlers(registry);

        //自己的自定义配置
        registry.addResourceHandler("/static/**").addResourceLocations("classpath:/static/");
    }

}
第二种代码写法:
不用实现WebMvcConfigurer 接口,在类方法中匿名创建WebMvcConfigurer接口实现类,重写addResourceHandlers()方法
java
@Configuration // 配置类
public class Myconfig {
    @Bean
    public WebMvcConfigurer webMvcConfigurer () {
      return new WebMvcConfigurer (){
           @Override
            public void addResourceHandlers(ResourceHandlerRegistry registry) {
                //保留以前配置
                WebMvcConfigurer.super.addResourceHandlers(registry);

                //自己的自定义配置

 registry.addResourceHandler("/static/**").addResourceLocations("classpath:/static/");
            }

        }

    }

}
为什么在容器中放入一个WebMvcConfiguration组件就能实现配置生效
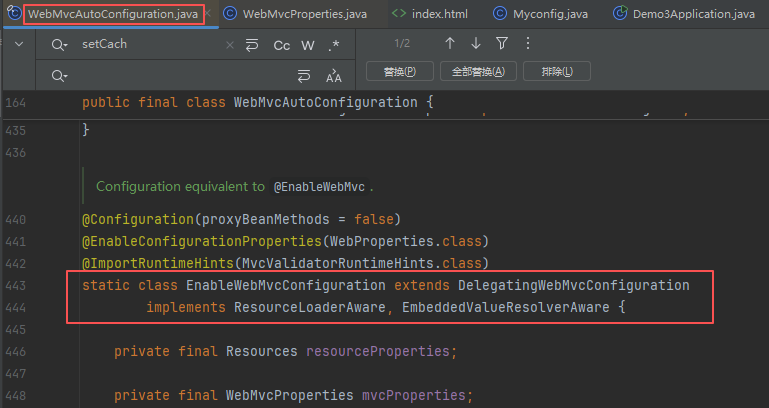
1.WebMvcAutoConfiguration是一个自动配置类,它里面有一个EnableWebMvcConfiguration类
2.EnableWebMvcConfiguration 继承与 DelegatingWebMvcConfiguration,这两个都生效
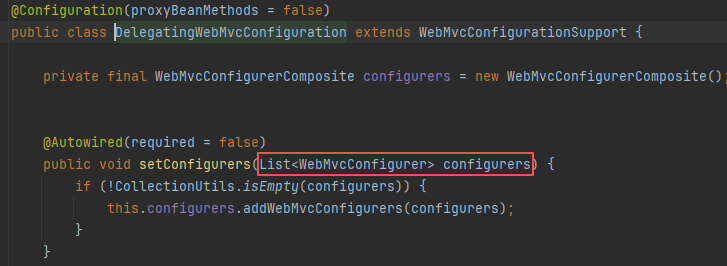
3.DelegatingwebMvcConfiguration 利用DI把容器中所有WebMvcConfigurer 注入进来
别人调用 DelegatingwebMvcConfiguration 的方法配置底层规则,而它调用所有 WebMvcConfigure
r的配置底层方法。
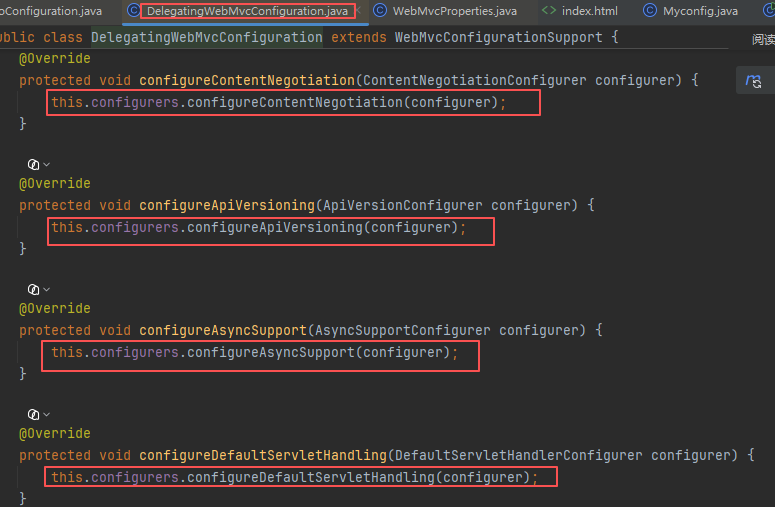
同理,使用相同的思路也能配置其他比如拦截器等。
路径匹配
Spring5.3之后加入了更多的请求路径匹配的实现策略;
以前只支持 AntPathMatcher策略,现在提供了PathPatternParser策略。并且可以让我们指定到底使用那种策略。
1.AntPathMatcher 风格路径用法
Ant风格的路径模式语法具有以下规则:
*: 表示任意数量的字符。
?: 表示任意一个字符。
** : 表示任意数量的目录。
{} : 表示一个命名的模式占位符。
: 表示字符集合,例如a-z表示小写字母。
+ :表示可以有多个
示例:

表示:a开头的任意多个字符路径下,b开头的后面一个字符串路径,
例如:
·*.html匹配任意名称,扩展名为.html的文件。
·/folder1/*/*.java 匹配在folder1路径下的任意两级目录下的.java文件。
/folder2/**/*.jsp匹配在folder2路径下任意目录深度的.jsp文件。
·/{type}{}id}.html 匹配任意文件名为(id).html,在任意命名的(type)目录下的文件。
注意:Ant风格的路径模式语法中的特殊字符需要转义,如:
·要匹配文件路径中的星号,则需要转义为\\*。
·要匹配文件路径中的问号,则需要转义为\\?。
AntPathMatcher 与 PathPatternParser
PathPatternParser 在jmh基准测试下,有6~8倍吞吐量提升,降低30%~40%空间分配率
PathPatternParser 兼容 AntPathMatcher语法,并支持更多类型的路径模式
PathPatternParser"**"多段匹配的支持仅允许在模式末尾使用
注意新版PathPatternParser 不支持 ** 双星号 在路径中间。如果配置在了中间需要配置为老版本的Ant匹配策略
spring.mvc.pathmatch.matching-strategy=ant_path_matcher
内容协商功能
一个接口适配多端不同接口
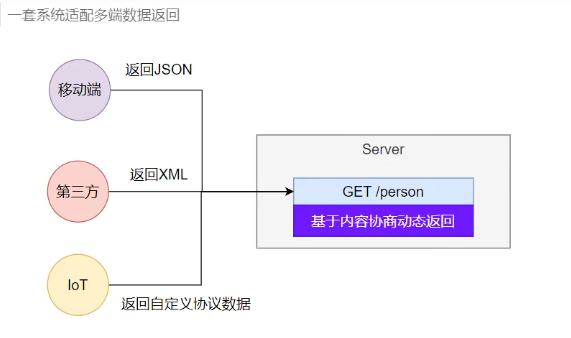
1.多端内容适配
1.默认规则
SpringBoot多端内容适配。
1.1.基于请求头内容协商:
客户端向服务端发送请求,携带HTTP标准的Accept请求头。
- **Accept:**application/json、text/xml、text/yaml
- 服务端根据客户端请求头期望的数据类型进行动态返回
1.2.基于请求参数内容协商:
- 发送请求 GET /projects/spring-boot?format=json
- 匹配到**@GetMapping("/projects/spring-boot")**
- 根据参数协商,优先返回json类型数据**需要开启参数匹配设置**
- 发送请求GET/projects/spring-boot?format=xml,优先返回 xml类型数据
- 如果使用**?format=xml 请求方式需要开启配置 spring.mvc.contentneqotiation.favor-parameter=true**
- 如果想参数名不是format 那么可以配置:spring.mvc.contentnegotiation.parameter-name=type 这里配置的type,以后请求就使用?type=xml
SpringBoot项目导入json包默认支持返回值json格式,如果需要返回值解析成xml需要导入包:
需要在bean类上添加注解**@JacksonXmlRootElement()**
SpringBoot4以上用下面这个依赖:
XML
<dependency>
    <groupId>tools.jackson.dataformat</groupId>
    <artifactId>jackson-dataformat-xml</artifactId>
</dependency>
SpringBoot3用下面这个依赖:
<dependency>
    <groupId>com.fasterxml.jackson.dataformat</groupId>
    <artifactId>jackson-dataformat-xml</artifactId>
</dependency>
核心区别
com.fasterxml.jackson.dataformat |
tools.jackson.dataformat |
|
|---|---|---|
| Jackson 版本 | 2.x(旧版) | 3.x(新版) |
| groupId | com.fasterxml.jackson.* |
tools.jackson.* |
| Java 包名 | com.fasterxml.jackson.dataformat.xml |
tools.jackson.dataformat.xml |
| Spring Boot 版本 | SB 3.x 及以前 | SB 4.0 默认使用 |
| 最低 JDK | Java 8 | Java 17 |
| Spring Boot 3.x (Jackson 2) | Spring Boot 4.x (Jackson 3) | |
|---|---|---|
| 依赖 | com.fasterxml.jackson.dataformat:jackson-dataformat-xml |
tools.jackson.dataformat:jackson-dataformat-xml |
| 注解包名 | com.fasterxml.jackson.dataformat.xml.annotation |
tools.jackson.dataformat.xml.annotation |
| 根元素注解 | @JacksonXmlRootElement |
@JacksonXmlRootElement(不变) |
| 属性注解 | @JacksonXmlProperty |
@JacksonXmlProperty(不变) |
| 包装器注解 | @JacksonXmlElementWrapper |
@JacksonXmlElementWrapper(不变) |
java
@JacksonXmlRootElement(localName = "employee")
@Data
public class Employee {
    @JacksonXmlProperty(localName = "id")
    private Integer id;

    @JacksonXmlProperty(localName = "name")
    private String name;
}
自定义数据返回类型
localhost:8080/cat?format=json 返回数据就是json类型格式的数据。
localhost:8080/cat?format=xml 返回数据就是xml类型格式的数据。
如果我想要返回自己定义的格式啦?
例如:我想服务器给我返回数据是yaml格式数据?
localhost:8080/cat?format =yaml
我们想要自定义数据格式返回需要熟悉底层原理,熟悉底层原理只要熟悉HttpMessageConverter底层是如何工作的。
1. @ResponseBody 由 HttpMessageConverter 处理的
标注了@ResponseBody 的返回值将会由支持它的 HttpMessageConverter 写给浏览器
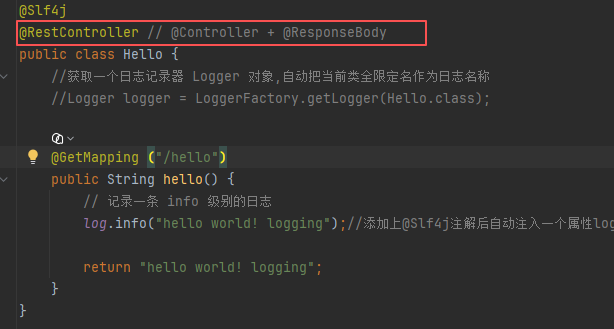
由于Controller类上使用了注解@RestController ,这个注解又是 @Controller + @ResponseBody组合,在类上标注了@ResponseBody等于给类中所有方法都标注注解@ResponseBody
Spring MVC 采用前端控制器模式 (Front Controller),DispatcherServlet 是所有 HTTP 请求的单一入口。
当请求到达时,Servlet 容器(Tomcat 等)将请求交给 DispatcherServlet,它负责"分发"给后续组件处理:
完整调用链路(@ResponseBody 场景)
HTTP Request
    ↓
Tomcat → HttpServletRequest/HttpServletResponse
    ↓
DispatcherServlet.doService() → doDispatch()
    ↓
HandlerMapping → 找到 @RequestMapping 对应的 HandlerMethod
    ↓
DispatcherServlet → 获取 HandlerAdapter(默认 RequestMappingHandlerAdapter)
    ↓
HandlerAdapter.handle() → 调用 Controller 方法
    ↓
Controller 方法返回带 @ResponseBody 注解的对象
    ↓
RequestResponseBodyMethodProcessor 处理返回值
    ↓
HttpMessageConverter.write() 序列化(如 JSON)
    ↓
写入 HttpServletResponse.getOutputStream()
    ↓
Tomcat 发送 HTTP Response
关键步骤详解
1. 请求进入 DispatcherServlet
DispatcherServlet 继承自 FrameworkServlet,后者实现了 HttpServlet.service(),将所有 HTTP 方法(GET/POST/PUT/DELETE 等)统一路由到 processRequest(),最终调用 DispatcherServlet.doService()。
在 doService() 中,DispatcherServlet 会设置一些请求属性(如 WebApplicationContext、LocaleResolver 等),然后调用核心的 doDispatch() 方法。
2. 查找处理器:HandlerMapping
doDispatch() 内部遍历所有注册的 HandlerMapping,找到能处理当前请求的处理器。对于注解驱动的 Controller,使用的是 RequestMappingHandlerMapping,它会根据 URL 和方法注解匹配到具体的 HandlerMethod。
3. 获取适配器:HandlerAdapter
找到处理器后,DispatcherServlet 再遍历 HandlerAdapters,找到支持该处理器的适配器。对于 @RequestMapping 标注的方法,匹配的是 RequestMappingHandlerAdapter。
4. 执行 Controller 方法
RequestMappingHandlerAdapter 内部会:
-
用参数解析器(
HandlerMethodArgumentResolver)解析方法入参 -
调用 Controller 方法
-
用返回值处理器(
HandlerMethodReturnValueHandler)处理返回值
5. @ResponseBody 的识别与处理
当 Controller 方法或类上有 @ResponseBody(或 @RestController)时,返回值处理器链中,RequestResponseBodyMethodProcessor 会匹配并接管处理。
RequestResponseBodyMethodProcessor 的核心逻辑:
-
根据请求的
Accept头进行内容协商(Content Negotiation),确定响应的 MediaType -
遍历
RequestMappingHandlerAdapter中注册的HttpMessageConverter列表 -
调用
canWrite(Class, MediaType)找到能处理该返回值类型和 MediaType 的转换器 -
调用
write()将 Java 对象序列化并写入响应流
6. HttpMessageConverter 序列化
HttpMessageConverter 是实际做"对象 ↔ HTTP 报文体"转换的组件。
以返回 JSON 为例:
-
默认使用
MappingJackson2HttpMessageConverter(需要 Jackson 依赖) -
它调用 Jackson 的
ObjectMapper将 Java 对象序列化为 JSON 字符串 -
设置响应头
Content-Type: application/json -
写入
HttpServletResponse.getOutputStream()
write() 方法的典型实现:
7. 跳过视图解析
关键点 :当 HttpMessageConverter 接管了响应后,Controller 方法返回给 DispatcherServlet 的 ModelAndView 为 null。DispatcherServlet 检测到 ModelAndView == null 时,不会执行任何视图解析和渲染逻辑,直接结束请求处理
案例实现yaml数据格式返回(springboot3)
1.添加依赖(Jackson 2)
XML
<dependency>
    <groupId>com.fasterxml.jackson.dataformat</groupId>
    <artifactId>jackson-dataformat-yaml</artifactId>
</dependency>
2.配置application.properties中配置增加一个媒体类型
java
spring.mvc.contentnegotiation.media-types.yaml=application/yaml3.写一个配置类实现WebMvcConfigurer 接口重写实现它的 configureMessageConverters()方法或extendMessageConverters()方法
configureMessageConverters:清空原有全部转换器,只保留你自己的extendMessageConverters:追加,保留 spring 默认 json 转换器,只新增你的,绝大多数业务场景用这个- **注意:**application.properties添加的媒体类型和super()方法中写的一致
java
import org.springframework.http.HttpInputMessage;
import org.springframework.http.HttpOutputMessage;
import org.springframework.http.MediaType;
import org.springframework.http.converter.AbstractHttpMessageConverter;
import org.springframework.http.converter.HttpMessageNotReadableException;
import org.springframework.http.converter.HttpMessageNotWritableException;
import org.springframework.lang.NonNull;
import org.springframework.lang.Nullable;

import java.io.IOException;
import java.nio.charset.StandardCharsets;

/**
 * SpringBoot4(SpringFramework7) 自定义消息转换器
 */
public class MyCustomHttpMessageConverter extends AbstractHttpMessageConverter<Object> {

   private ObjectMapper objectMapper = null;//把对象转成yaml

 // 声明支持的MediaType,例如 text/plain;charset=UTF-8
    public MyCustomHttpMessageConverter() {
         //通过父类构造方法传入类型告诉SpringBoot这个MessageConverter支持哪种媒体类型
        super(new MediaType("application", "yaml", Charset.forName("uTF-8")));

         // 1. 先配置 YAMLFactory,禁用文档开始标记 ---
        YAMLFactory factory = YAMLFactory.builder()
                .disable(YAMLWriteFeature.WRITE_DOC_START_MARKER)
               .build();
        objectMapper =new ObjectMapper (factory );
    }

    /**
     * 判断是否支持该目标Class类型
     */
    @Override
    protected boolean supports(@NonNull Class<?> clazz) {
        // 返回true代表处理这个类型;示例全部放行,实际按需写逻辑
        return Object.class.isAssignableFrom(clazz);
    }

    /**
     * 请求体读取:http请求报文 → java对象
     */
    @Override
    protected Object readInternal(@NonNull Class<?> clazz, @NonNull HttpInputMessage inputMessage)
            throws IOException, HttpMessageNotReadableException {
        // 读取inputMessage.getBody()输入流,反序列化为对象
        return null;
    }

    /**
     * 对象写出:java对象 → http响应报文输出流
     */
    @Override
    protected void writeInternal(@NonNull Object t, @NonNull HttpOutputMessage outputMessage)
            throws IOException, HttpMessageNotWritableException {
        // 将对象序列化写入 outputMessage.getBody()
            //try-with写法,自动关流
            try(OutputStream os=outputMessage.getBody()) {
            this.yamlmapper.writeValue(os, o);
        }
    }


}
java
@Configuration
public class WebConfig implements WebMvcConfigurer {

    @Override
    public void configureMessageConverters(List<HttpMessageConverter<?>> converters) {
        // 方式1:add 添加到末尾,优先级低
        converters.add(new MyCustomHttpMessageConverter());

        // 方式2:add(0,xxx) 放到列表第一个,最高优先级,优先执行你的转换器
        // converters.add(0, new MyCustomHttpMessageConverter());
    }
}
springboot4返回yaml
1.导入依赖
java
<!-- Jackson 3 的 YAML 支持 -->
<dependency>
    <groupId>tools.jackson.dataformat</groupId>
    <artifactId>jackson-dataformat-yaml</artifactId>
</dependency>
使用包中的YAMLMapper 转换对象为yaml格式
java
//    public static void main(String[] args) {
//        User user = new User();
//        user.setName("张三");
//        user.setAge(18);
//        user.setEmail("dfsdfds@qq.com");
//
//        // 1. 先配置 YAMLFactory,禁用文档开始标记 ---
//        YAMLFactory factory = YAMLFactory.builder()
//                .disable(YAMLWriteFeature.WRITE_DOC_START_MARKER)
//                .build();
//        YAMLMapper mapper = new YAMLMapper(factory);
//
//        String yaml = mapper.writeValueAsString(user);
//
//        System.out.println(yaml);
//    }
application.yml添加对应的媒体类型spring.mvc.contentnegotiation.media-types.yaml=application/yaml
注意:配置为application/yaml 访问浏览器后application/yaml 不是浏览器标准支持的 MIME 类型,所以浏览器没有内置渲染逻辑。显示在浏览器可以配置为text/yaml 但这样就失去了 YAML 的语义,客户端也无法区分这是 YAML 还是普通文本
java
spring:
  mvc:
    contentnegotiation:

      # 启用基于请求参数的内容协商
      favor-parameter: true
      # 参数名默认为 format,这里显式声明
      parameter-name: format
      # 注册 format=yaml 对应的媒体类型
      media-types:
        yaml: application/yaml

      # 不带 format 参数时,默认返回 JSON
      default-content-type: application/json
3.配置类 重写configureMessageConverters 方法添加YAML 的 HttpMessageConverter
写一个类继承制AbstractHttpMessageConverter<Object>抽象类
或实现HttpMessageConverter接口
java
import org.springframework.http.HttpInputMessage;
import org.springframework.http.HttpOutputMessage;
import org.springframework.http.MediaType;
import org.springframework.http.converter.AbstractHttpMessageConverter;
import org.springframework.http.converter.HttpMessageNotReadableException;
import org.springframework.http.converter.HttpMessageNotWritableException;
import org.springframework.lang.NonNull;
import org.springframework.lang.Nullable;

import java.io.IOException;
import java.nio.charset.StandardCharsets;

/**
 * SpringBoot4(SpringFramework7) 自定义消息转换器
 */
public class MyCustomHttpMessageConverter extends AbstractHttpMessageConverter<Object> {

   private ObjectMapper objectMapper = null;//把对象转成yaml

 // 声明支持的MediaType,例如 text/plain;charset=UTF-8
    public MyCustomHttpMessageConverter() {
         //通过父类构造方法传入类型告诉SpringBoot这个MessageConverter支持哪种媒体类型
        super(new MediaType("application", "yaml", Charset.forName("uTF-8")));

         // 1. 先配置 YAMLFactory,禁用文档开始标记 ---
        YAMLFactory factory = YAMLFactory.builder()
                .disable(YAMLWriteFeature.WRITE_DOC_START_MARKER)
               .build();
        objectMapper =new ObjectMapper (factory );
    }

    /**
     * 判断是否支持该目标Class类型
     */
    @Override
    protected boolean supports(@NonNull Class<?> clazz) {
        // 返回true代表处理这个类型;示例全部放行,实际按需写逻辑
        return Object.class.isAssignableFrom(clazz);
    }

    /**
     * 请求体读取:http请求报文 → java对象
     */
    @Override
    protected Object readInternal(@NonNull Class<?> clazz, @NonNull HttpInputMessage inputMessage)
            throws IOException, HttpMessageNotReadableException {
        // 读取inputMessage.getBody()输入流,反序列化为对象
        return null;
    }

    /**
     * 对象写出:java对象 → http响应报文输出流
     */
    @Override
    protected void writeInternal(@NonNull Object t, @NonNull HttpOutputMessage outputMessage)
            throws IOException, HttpMessageNotWritableException {
        // 将对象序列化写入 outputMessage.getBody()
            //try-with写法,自动关流
            try(OutputStream os=outputMessage.getBody()) {
            this.yamlmapper.writeValue(os, o);
        }
    }


}- WebMvcConfigurer#
configureMessageConverters(HttpMessageConverters.ServerBuilder builder)(新 Builder 方式) - SpringBoot 专用:
ServerHttpMessageConvertersCustomizerBean(生产最推荐)
方式一:写配置类实现接口方式
java
@Configuration // 配置类
public class Myconfig implements WebMvcConfigurer {

    @Override
    public void configureMessageConverters(HttpMessageConverters.ServerBuilder builder) {
        // addCustomConverter:添加自定义转换器,放到转换器列表最前面,优先级最高
         builder.addCustomConverter(new MyCustomHttpMessageConverter());
    }
方式二:配置类使用注解@Bean方式注入到容器
java
@Configuration
public class MyConfig {

    /**
     * SpringBoot4 服务端MVC消息转换器自定义
     */
    @Bean
    public ServerHttpMessageConvertersCustomizer serverHttpMessageConvertersCustomizer() {
        return builder -> {
            // 添加自定义转换器,放到头部,优先执行
            builder.addCustomConverter(new MyCustomHttpMessageConverter());
        };
    }
}- Controller方法
java
@RestController
public class UserController {

    @GetMapping("/user")
    public User getUser() {
        User user = new User();
        user.setName("张三");
        user.setAge(18);
        user.setEmail("dfsdfds@qq.com");
        return user;
    }
}
模版引擎
由于SpringBoot使用了嵌入式Servlet容器。所以JSP默认是不能使用的。
如果需要服务端页面渲染,优先考虑使用 模板引擎。
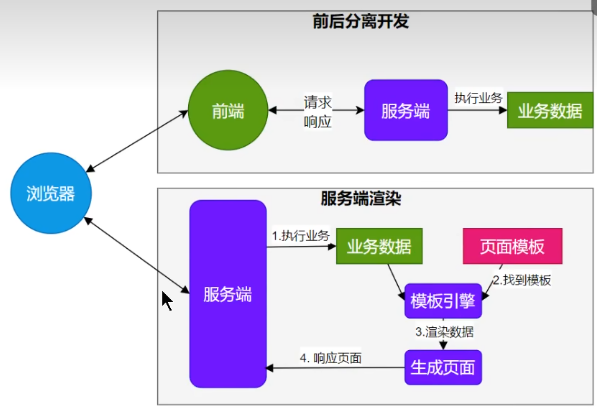
官方推荐使用Thymeleaf: www.thymeleaf.org 是服务器渲染端
整合Thymeleaf
1.导入依赖包
java
<dependency>

    <groupId>org.springframework.boot</groupId>
    <artifactId>spring-boot-starter-thymeleaf</artifactId>
</dependency>
2.配置spring.thymeleaf
自动配置原理
- 开启了 org.springframework.boot.autoconfigure.thymeleaf. ThymeleafAutoConfiguration 自动
配置
2.属性绑定在 ThymeleafProperties 中,对应配置文件 spring.thymeleaf 内容
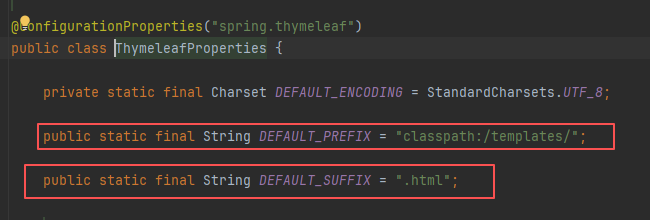
3.所有的模板页面默认在classpath:/templates文件夹下
在自动配置属性中有两个默认属性:前缀和后缀
页面展示demo
1.导入依赖包后,再Controller文件夹下写一个HelloController
java
@Controller //这个注解用于前后端不分离的项目
//@RestController //这个注解用于前后端分离的项目
public class HelloController {

    @GetMapping ("/hello2")
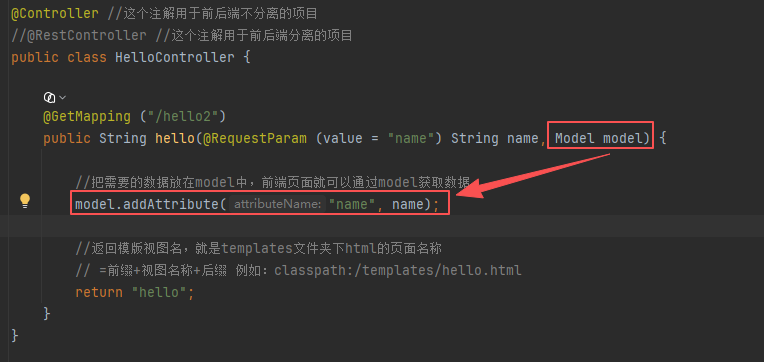
    public String hello(@RequestParam (value = "name") String name, Model model) {

        //把需要的数据放在model中,前端页面就可以通过model获取数据
        model.addAttribute("name", name);

        //返回模版视图名,就是templates文件夹下html的页面名称
        // =前缀+视图名称+后缀 例如:classpath:/templates/hello.html
        return "hello";
    }
}
2.在templates下添加页面
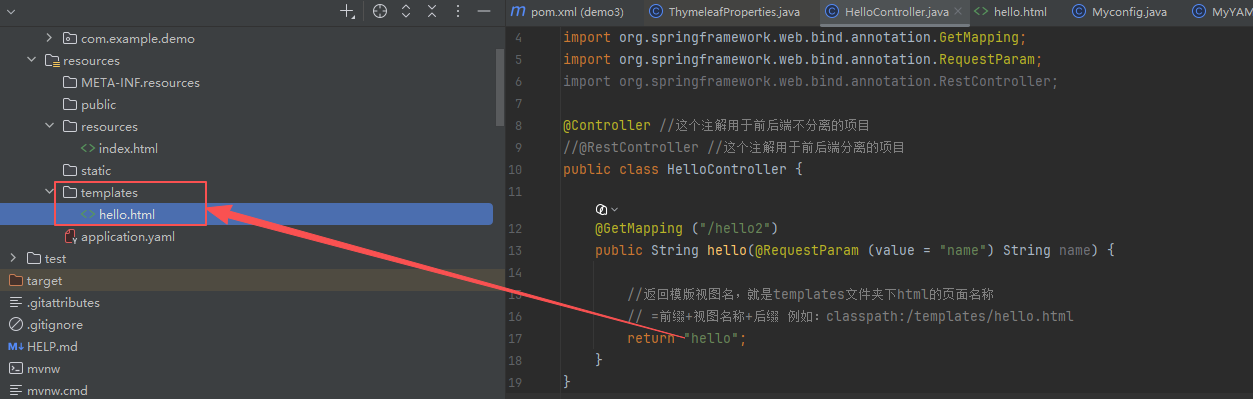
3.如果请求中需要带参数请求,并把结果展示到页面需要把结果放到Model 中。
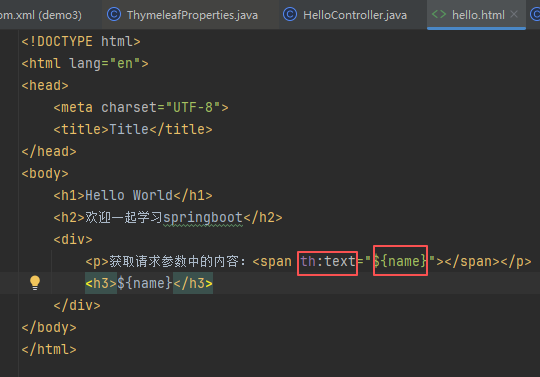
4.页面中获取动态数据需要使用到 th:text="${}"
thymeleaf基础语法
如果需要在HTML 页面中有自动提示功能需要在页面的html标签中添加
xmlns:th="http://www.thymeleaf.org"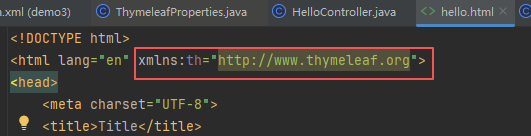
th:xxx:动态渲染指定的html标签属性值、或者th指令(遍历、判断等)
th:text:标签体内文本值渲染,原文本输出。
th:utext:标签体内文本值渲染,但是带有html标签会被浏览器解析
th:属性 :标签指定属性渲染,这里的属性就是html标签中的属性例如src ,style等
th:attr:标签任意多个属性渲染,例如:<img
src="1.jpg" style="width:30@px;" th:attr="src={imgUrl}, style=istyle}" />
th:if
th:each
..:其他th指令
表达式:动态取值
${} :变量取值
@{} :url路径,如果项目配置根路经(server.servlet.context-path=/demo)改变也不受影响。
#{} :国际化消息
~{} :片段引用
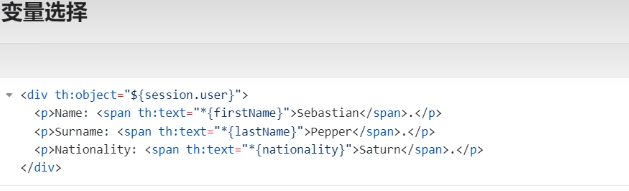
*{} :变量选择:需要配合th:object绑定对象
内置对象和系统工具
- param:请求参数对象
- session:session对象
- application :application对象
- #execInfo:模板执行信息
- #messages:国际化消息
- #uris:uri/url工具
- #conversions:类型转换工具
- #dates:日期工具,是java.util.Date 对象的工具类
- #calendars :类似#dates,只不过是 java.util.Calendar 对象的工具类
- #temporals : JDK8+ java.time APl 工具类
- #numbers:数字操作工具
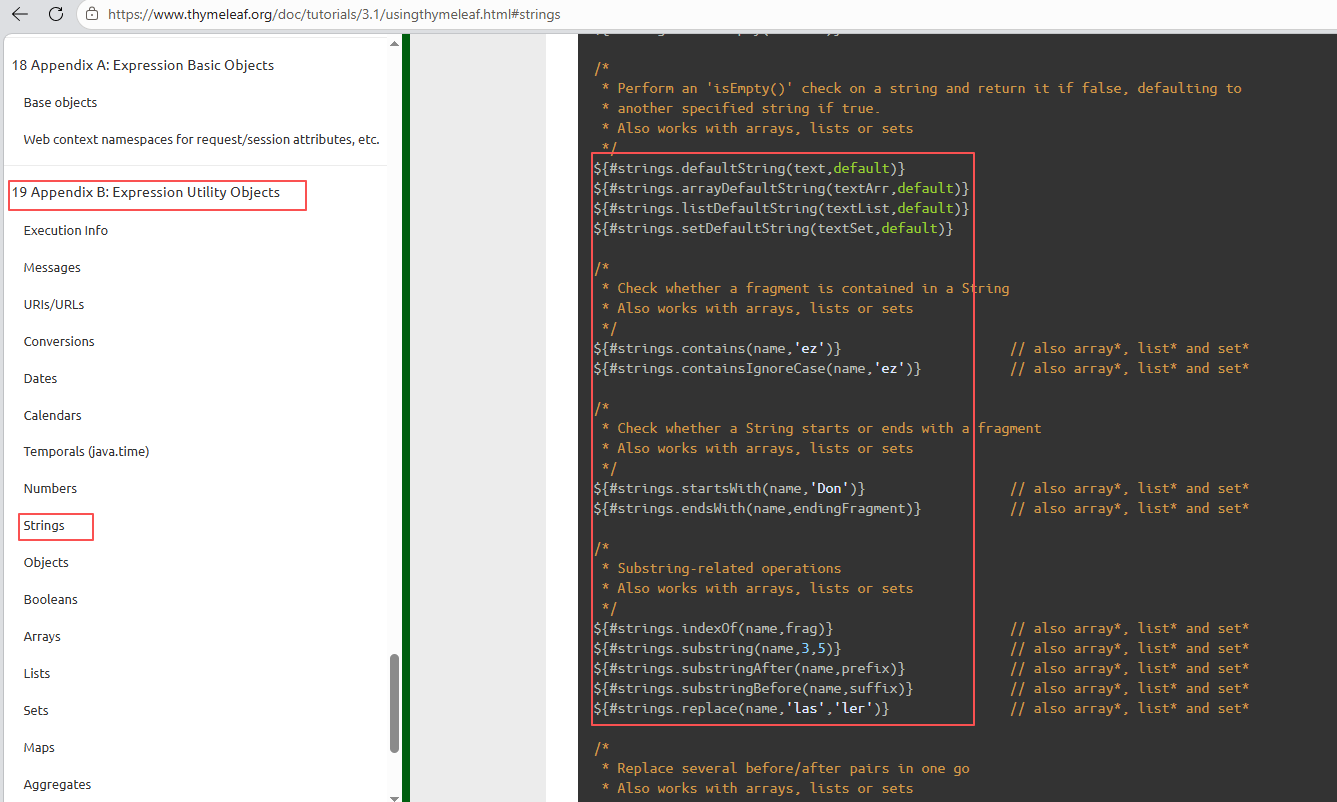
- #strings:字符串操作
- #objects:对象操作
- #bools:bool操作
- #arrays :array工具
- #lists :list工具
- #sets:set工具
- #maps:map工具
- #aggregates:集合聚合工具(sum.avg)
- #ids:id生成工具
使用方法参考官网:Tutorial: Using Thymeleaf
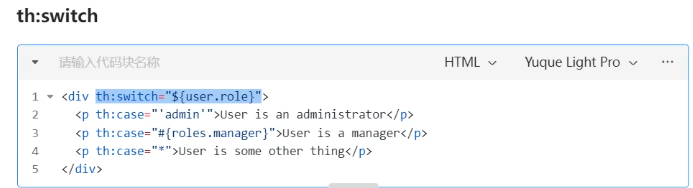
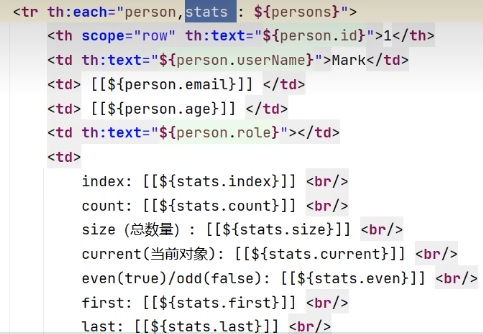
th:each 循环遍历
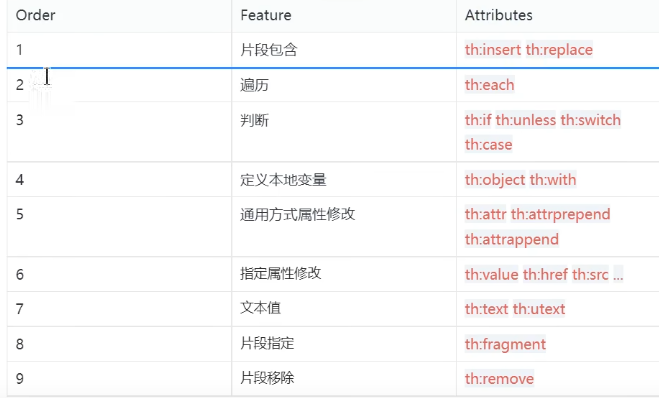
属性优先级
模版片段
1.先把公共部分抽取出来,写到一个html页面中。然后在th:fragment标签取一个名称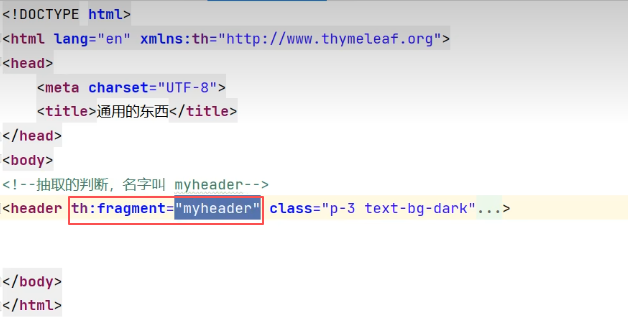
2.使用抽取出来的模版片段,在需要使用模版片段位置写上
th:replace=**~{}**标签,第一个common是模版名称common.html ,第二个参数myheader 就是片段名称

springboot热启动插件
修改html页面代码,直接在浏览器可以看到效果不用重新启动项目,但是需要按下ctrl+F9
java
<dependency>
    <groupId>org.springframework.boot</groupId>
    <artifactId>spring-boot-devtools</artifactId>
</dependency>
国际化配置
1.Spring Boot 在类路径根下查找messages资源绑定文件。resources文件夹下名为:messages.properties
messages.properties : 默认
messages_zh_CN.properties:中文环境
messages_en_US.properties:英语环境
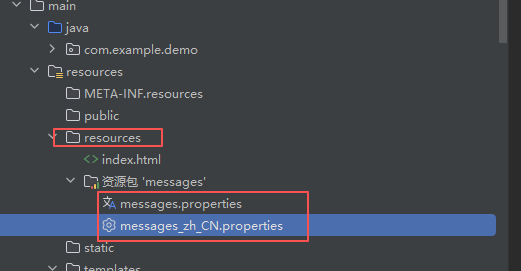
2.在文件中填写上对应的中英文
3.在页面中可以使用表达式#{}获取国际化的配置项值

错误处理
SpringMVC的错误处理机制依然保留,MVC处理不了,才会交给boot进行处理
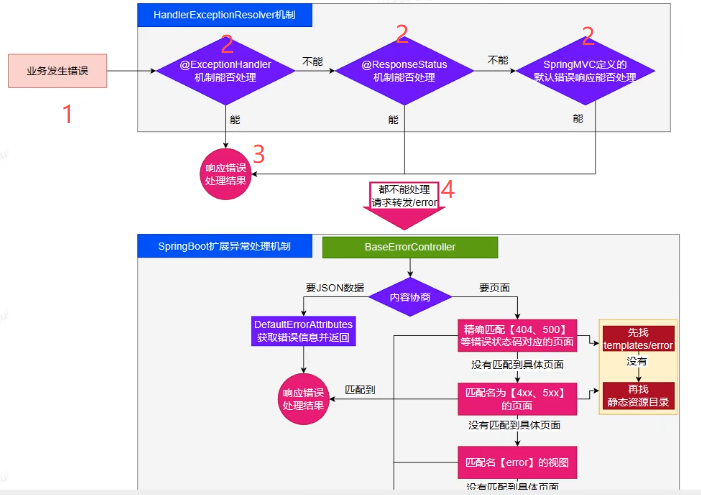
1-4是原来springMVC处理错误的规则:
如果我们在自己写的控制器方法上添加了 @ExceptionHandler(Exception.class),发生错误时候就会来调取当前控制器内部处理错误的方法。
java
@Controller //这个注解用于前后端不分离的项目
//@RestController //这个注解用于前后端分离的项目
public class HelloController {
    @ResponseBody //把错误消息返回到页面上
    @ExceptionHandler(Exception.class)  //捕获所有异常
    public String handleException(Exception e){
        return "你访问的页面发生了错误"+"错误信息:"+e.getMessage();
    }
}
如果统一处理所有控制器中异常,创建一个类添加注解@ControllerAdvice
java
@ControllerAdvice //这个类是处理所有@Controller抛出的异常
public class GlobeExceptionHandler {

    @ResponseBody //把错误消息返回到页面上
    @ExceptionHandler(Exception.class)  //捕获所有异常
    public String handleException(Exception e){
        return "你访问的页面发生了错误---------------"+"错误信息:"+e.getMessage();
    }
}
如果没有springMVC处理异常的相关方法,就会按照下面处理:
解析一个错误页,如果发生了500,404、503、403这些错误,springboot框架会去查找类路径下模板引擎,默认在classpath:/templates/error/精确码.html(例如:500.html)
如果没有模板引擎,在静态资源文件夹下找 精确码.html
如果还是匹配不到就在classpath:/templates/error/5xx.html ,classpath:/templates/error/4xx.html
如果没有模板引擎,在静态资源文件夹下找 5xx.html,4xx.html
如果模板引擎路径templates下有 error.html页面,就直接渲染,没有使用springboot框架提供的默认error模型视图白页。
WEB新特性
1.Problemdetails
错误信息返回新格式
RFC 7807: https://www.rfc-editor.org/rfc/rfc7807
默认这个配置是关闭的,如果需要开启需要在application.properties中配置:
#problemdetails默认 false是关闭的
spring.mvc.problemdetails.enabled=true
2.函数式WEB
SpringMvC5.2 以后允许我们使用函数式的方式,定义Web的请求处理流程。
函数式接口
Web请求处理的方式:
-
@Controller+@RequestMapping :耦合式(路由、业务耦合)
-
函数式Web: 分离式(路由、业务分离)
web函数式核心对象
核心四大对象
1、RouterFunction:定义路由信息。发什么请求,谁来处理
2、RequestPredicate:定义请求:请求规则。请求方式(GET、POST)、请求参数
-
ServerRequest:封装请求完整数据
-
ServerResponse:封装响应完整数据
web函数式步骤:
1.创建一个配置类添加注解@Configuration,创建一个方法返回值是RouterFunction<ServerResponse>
java
@Configuration //标记这是一个配置类
public class WebFunctionConfig {

    @Bean  //使用@Bean注解标记这是一个Bean时候方法中的UserHandler类会被自动注入到容器中
    public RouterFunction<ServerResponse> userRouter(UserHandler userHandler){
        return RouterFunctions.route() //路由函数工具定义路由信息
                // 定义路由信息,参数1:请求路径,参数2:请求条件,参数3:请求处理逻辑
                .GET("/user/{id}", RequestPredicates.accept(MediaType.ALL), userHandler::getUser)
                .PUT("/user", RequestPredicates.accept(MediaType.ALL), userHandler::updateUser)
                .build();

    }

}
2.将参数3 处理响应数据,专门写一个类处理逻辑部分
这个类中的方法必须是返回ServerResponse ,因为参数3 需要的是RouterFunction<ServerResponse>
java
@Service // 标记这是一个服务类
public class UserHandler {


    public  ServerResponse getUser(ServerRequest request) {
        return ServerResponse.ok().body("User " + request.pathVariable("id"));
    }

    public ServerResponse updateUser(ServerRequest serverRequest) {
        return ServerResponse.ok().body("Update User " + serverRequest.body(User.class));
    }
}
MSS整合
SpringBoot整合 Spring.SpringMVc MyBatis进行数据访问场景开发
1.创建项目导入需要mysql驱动包,mybatis包
XML
     <!-- web场景 -->
        <dependency>
            <groupId>org.springframework.boot</groupId>
            <artifactId>spring-boot-starter-webmvc</artifactId>
        </dependency>
        <!-- 数据库场景 -->
        <dependency>
            <groupId>com.mysql</groupId>
            <artifactId>mysql-connector-j</artifactId>
            <scope>runtime</scope>
        </dependency>

        <!-- mybatis场景 -->
        <dependency>
            <groupId>org.mybatis.spring.boot</groupId>
            <artifactId>mybatis-spring-boot-starter</artifactId>
        </dependency>
        <!-- lombok场景 用于bean -->
        <dependency>
            <groupId>org.projectlombok</groupId>
            <artifactId>lombok</artifactId>
            <optional>true</optional>
        </dependency>
2.在配置文件中application.properties进行配置数据库
XML
spring.application.name=demo4

// 数据库连接信息
spring.datasource.url=jdbc:mysql://localhost:3306/demo?useUnicode=true&characterEncoding=utf8&zeroDateTimeBehavior=convertToNull&transformedBitIsBoolean=true&allowMultiQueries=true&useSSL=false&allowPublicKeyRetrieval=true
spring.datasource.username=root
spring.datasource.password=root
spring.datasource.driver-class-name=com.mysql.cj.jdbc.Driver
3.写数据库相对应的bean对象
java
@Data // getter setter toString
public class User {
    private int id;
    private String name;
    private int age;
}
4.写mapper接口,写业务查询方法。方法中传递的每一个参数我们都使用@Param进行签名,在sql语句中使用签名参数进行取值。
java
public interface  Usermapping {


    /**
     * 根据id查询用户
     * 每一个mapper方法都有一个标签SQL语句对应
     *所有的参数都使用@Param("xx")进行签名,使用指定签名的名称在SQL中取值
     * @param id
     * @return
     */
    public User getUserById(@Param("id") int id);

}
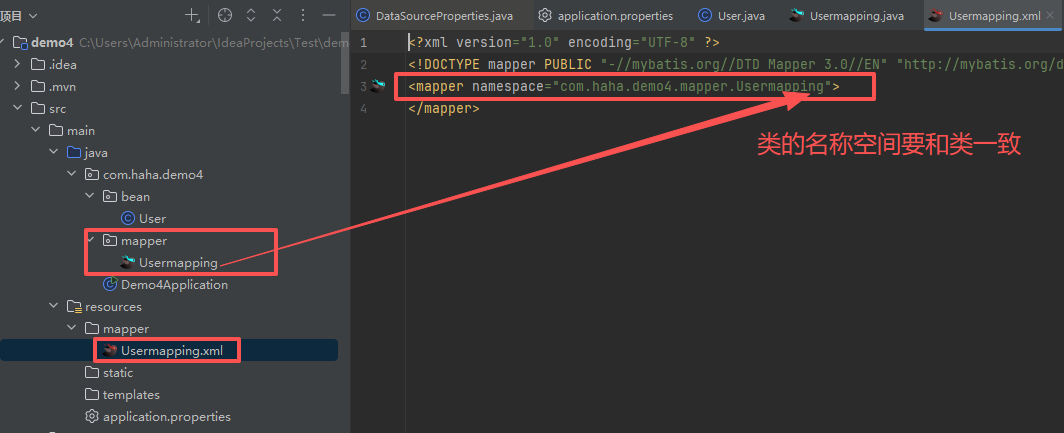
点击提示会自动在mapper.xml文件中生成相应的sql语句

安装插件MyBatisX,在写好mapper接口后可以选择提示自动生成

安装好插件后,在写好mapper接口后可以选择提示自动生成mapper.xml
XML
<?xml version="1.0" encoding="UTF-8" ?>
<!DOCTYPE mapper PUBLIC "-//mybatis.org//DTD Mapper 3.0//EN" "http://mybatis.org/dtd/mybatis-3-mapper.dtd" >
<mapper namespace="com.haha.demo4.mapper.Usermapping">

    <!-- 根据id查询用户  -->
    <select id="getUserById" resultType="com.haha.demo4.bean.User">
        select * from user where id=#{id}
    </select>
</mapper>
以上我们写的mapper接口要让mybatis知道在哪里,需要在主入口类上添加注解@MpperScan 扫描到我们mapper接口。
java
@MapperScan("com.haha.demo4.mapper") // 扫描mapper接口


@SpringBootApplication
public class Demo4Application {

    public static void main(String[] args) {
        SpringApplication.run(Demo4Application.class, args);
    }

}
而且还要在application.properties配置xxxxmapper.xml文件在哪里。
XML
#MyBatis的配置项
mybatis.mapper-locations=classpath:/mapper/*.xml
5.在写一个Controller方法,请求获取数据
java
@RestController
public class UserController {

    @Autowired // 自动注入接口
    Usermapping usermapping;
    @GetMapping("/user/{id}")
    public User getUserById(@PathVariable("id") int id){

        return  usermapping.getUserById( id);
    }
}
注意:如果Bean中写的字段名称和数据库中不相同时候,
解决方式一:使用取别名方式
 解决方式二:如果名称符合驼峰命名,可以开启配置
java
#打开驼峰命名规则配置
mybatis.configuration.map-underscore-to-camel-case=true
springboot3基本特性
springApplication
自定义banner
在application.properties 中配置banner的位置
java
spring.banner.location=classpath:banner.txt把我们只做的banner复制到banner.txt中即可。
自定义springApplication
方式一:将原来的一句分解成多句,启动进行中间设置
java
@SpringBootApplication
public class Demo4Application {

    public static void main(String[] args) {


        SpringApplication app = new SpringApplication(Demo4Application.class);
        app.setBannerMode(Banner.Mode.OFF);
        app.run(args);
}方式二:使用SpringApplicationBuilder 对象进行流式编写
java
@SpringBootApplication
public class Demo4Application {

    public static void main(String[] args) {


        new SpringApplicationBuilder()
                .main(Demo4Application.class)
                .sources(Demo4Application.class)
                .bannerMode(Banner.Mode.OFF)
                .run(args);
    }

}
@profile("标记")
容器中的组件上都可以使用它。
使用方法:
1.在类上或方法上添加注解,可以标注多个标记**@profile({"标记","标记"})**
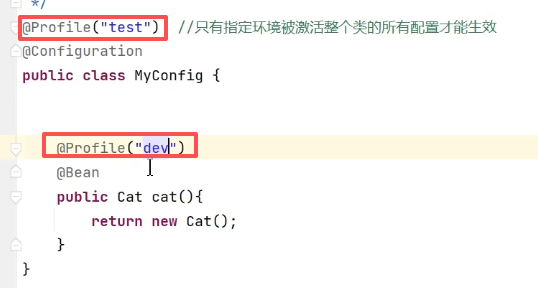
2.使用注解生效,在application.properties配置文件中进行激活注解
java
spring.profiles.active=dev,test 设置多个表示多个一起生效。
java
#包含指定环境,不管你激活哪个环境,这个都要有。总是要生效的环境
spring.profiles.include=dev,test
命令行激活: 当打包成jar包后可以在后面使用 - - 加配置文件中的配置内容
java
java-jarxxx.jar --spring.profiles.active=devspringboot3核心原理
事件和监听器
1.生命周期监听
作用:用于监听应用的生命周期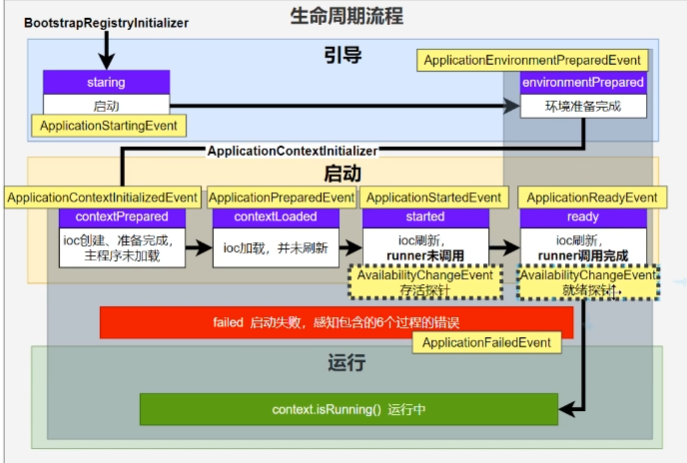
自定义监听器(SpringApplicationRunListener)
1.编写一个类实现SpringApplicationRunListener 接口,重写 里面所有方法
java
public class MyApplicationListenner implements SpringApplicationRunListener {
    @Override
    public void starting(ConfigurableBootstrapContext bootstrapContext) {
        System.out.println("=====starting正在启动=======");
    }

    @Override
    public void environmentPrepared(ConfigurableBootstrapContext bootstrapContext, ConfigurableEnvironment environment) {
        System.out.println("==========environmentPrepared环境准备完成============");
    }

    @Override
    public void contextPrepared(ConfigurableApplicationContext context) {
        System.out.println("==========contextPrepared上下文ioc容器准备完成============");
    }
    @Override
    public void contextLoaded(ConfigurableApplicationContext context) {
        System.out.println("==========contextLoaded上下文ioc容器加载完成============");
    }

    @Override
    public void started(ConfigurableApplicationContext context,  Duration timeTaken) {
        System.out.println("==========started启动完成============");
    }

    @Override
    public void ready(ConfigurableApplicationContext context,  Duration timeTaken) {
        System.out.println("==========ready准备就绪============");
    }

    @Override
    public void failed(@Nullable ConfigurableApplicationContext context, Throwable exception) {
        System.out.println("==========failed启动失败============");
    }
}
2.在META-INF/spring.factories中配置org.springframework.boot.SpringApplicationRunListener=自己实现的类,还可以指定一个有参构造器,接受两个参数(springApplication application,String\[\] args)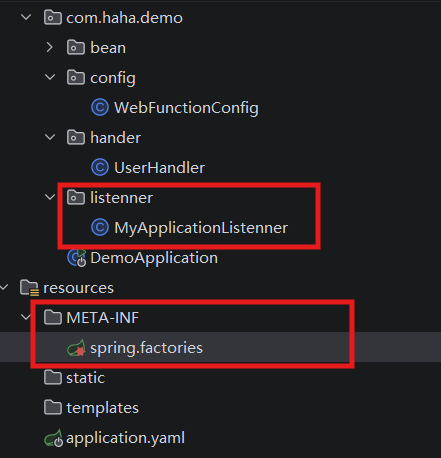
java
org.springframework.boot.SpringApplicationRunListener=com.haha.demo.listenner.MyApplicationListenner运行后结果:
java
已连接到地址为 ''127.0.0.1:52958',传输: '套接字'' 的目标虚拟机

=====starting正在启动=======

==========environmentPrepared环境准备完成============

  .   ____          _            __ _ _
 /\\ / ___'_ __ _ _(_)_ __  __ _ \ \ \ \
( ( )\___ | '_ | '_| | '_ \/ _` | \ \ \ \
 \\/  ___)| |_)| | | | | || (_| |  ) ) ) )
  '  |____| .__|_| |_|_| |_\__, | / / / /
 =========|_|==============|___/=/_/_/_/

 :: Spring Boot ::                (v4.1.0)

==========contextPrepared上下文ioc容器准备完成============

2026-08-09T22:03:59.946+08:00  INFO 15712 --- [demo] [           main] com.haha.demo.DemoApplication            : Starting DemoApplication using Java 26.0.2 with PID 15712 (C:\Users\LuoDeLiang\IdeaProjects\demo\target\classes started by LuoDeLiang in C:\Users\LuoDeLiang\IdeaProjects\demo)
2026-08-09T22:03:59.953+08:00  INFO 15712 --- [demo] [           main] com.haha.demo.DemoApplication            : No active profile set, falling back to 1 default profile: "default"

==========contextLoaded上下文ioc容器加载完成============

2026-08-09T22:04:00.940+08:00  INFO 15712 --- [demo] [           main] o.s.boot.tomcat.TomcatWebServer          : Tomcat initialized with port 8080 (http)
2026-08-09T22:04:00.956+08:00  INFO 15712 --- [demo] [           main] o.apache.catalina.core.StandardService   : Starting service [Tomcat]
2026-08-09T22:04:00.957+08:00  INFO 15712 --- [demo] [           main] o.apache.catalina.core.StandardEngine    : Starting Servlet engine: [Apache Tomcat/11.0.22]
2026-08-09T22:04:01.017+08:00  INFO 15712 --- [demo] [           main] b.w.c.s.WebApplicationContextInitializer : Root WebApplicationContext: initialization completed in 1002 ms
2026-08-09T22:04:01.461+08:00  INFO 15712 --- [demo] [           main] o.s.boot.tomcat.TomcatWebServer          : Tomcat started on port 8080 (http) with context path '/'
2026-08-09T22:04:01.467+08:00  INFO 15712 --- [demo] [           main] com.haha.demo.DemoApplication            : Started DemoApplication in 2.139 seconds (process running for 3.204)

==========started启动完成============
==========ready准备就绪============
还有以下每个阶段感知接口:
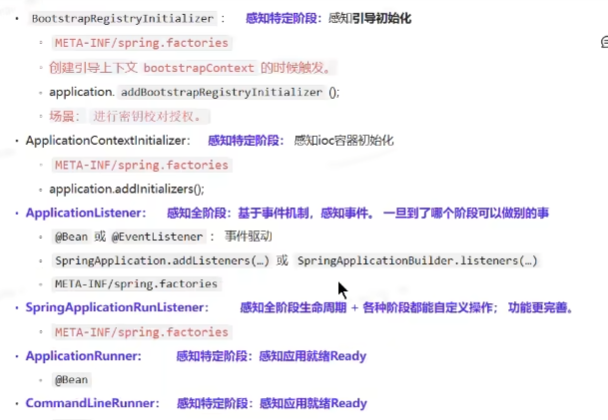
SpringBoot基于事件驱动开发
以前模式
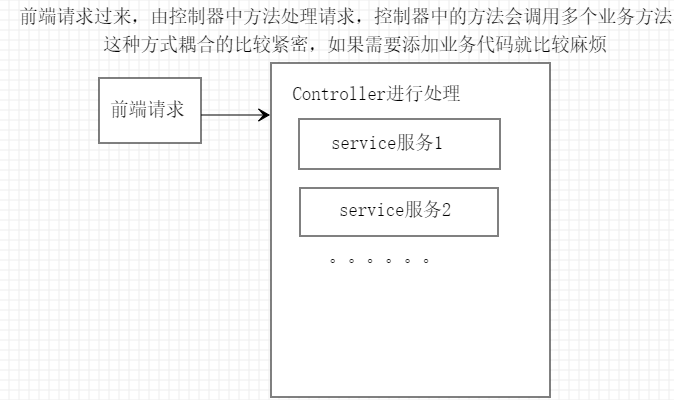
使用发布订阅模式
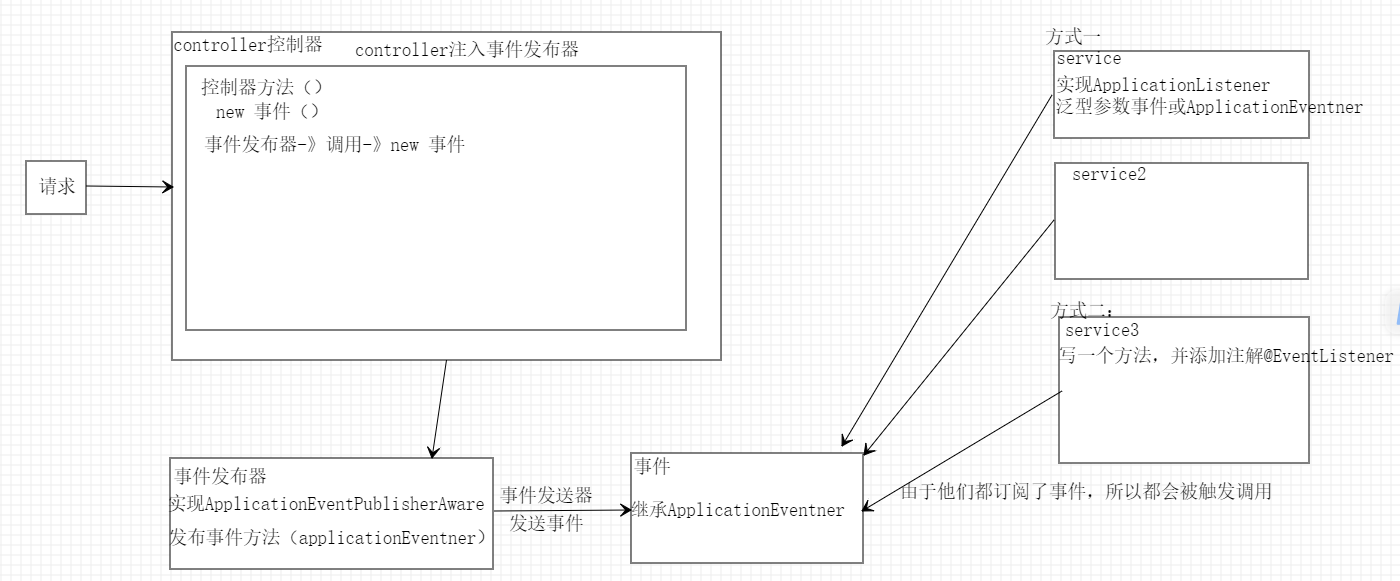
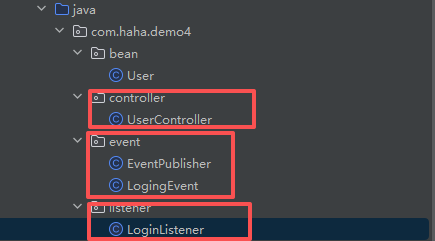
1.事件发布器实现ApplicationEventPublisherAware 获取到底层发布对象
类上添加注解,将对象添加到容器中@Component @Service等
java
@Component
public class EventPublisher implements ApplicationEventPublisherAware {

    // 底层发布者对象
    private ApplicationEventPublisher applicationEventPublisher;

    /**
     * 获取底层发布者对象
     * @param applicationEventPublisher
     */
    @Override
    public void setApplicationEventPublisher(ApplicationEventPublisher applicationEventPublisher) {
        this.applicationEventPublisher=applicationEventPublisher;
    }

    /**
     * 发布事件
     * @param event
     */
    public void publish(ApplicationEvent  event){
        // 发布事件
        applicationEventPublisher.publishEvent(event);
    }
}
2.定义发布的事件,继承ApplicationEvent
我们写的发布方法 publish(ApplicationEvent event) 参数是ApplicationEvent
java
// 自定义事件类:登录事件,继承 Spring 的 ApplicationEvent
public class LogingEvent extends ApplicationEvent {
    // 使用构造方法,传入用户对象 数据源Use对象作为事件源存入父类
    //父类内部保存这个 source,后面监听方可以通过 event.getSource() 获取到 User 对象
    public LogingEvent(User sourceUser) {
        super(sourceUser);
    }
}
3.在控制器方法中发布事件
java
@RestController
public class UserController {

    @Autowired // 自动注入接口
    Usermapping usermapping;

    @Autowired // 自动注入发布者
    EventPublisher eventPublisher;

    @GetMapping("/user/{id}")
    public User getUserById(@PathVariable("id") int id){

        User user = usermapping.getUserById( id);
        //准备好事件
        LogingEvent logingEvent = new LogingEvent(user);
        //发布事件
        eventPublisher.publish(logingEvent);

        return  usermapping.getUserById( id);
    }
}
4.写监听器接收这个事件,并使用注解,添加对象到容器中@Component @Service等
方式一:实现监听器 ApplicationListener< ApplicationEvent>
java
@Component
public class LoginListener implements ApplicationListener<LogingEvent> {
    @Override
    public void onApplicationEvent(LogingEvent event) {
        User source = (User) event.getSource();
        System.out.println("用户:" + source.getName() + " 存在了");
    }
}
方式二:使用@EventListener 注解
java
@Component
public class TestListener {

    @EventListener
    public void handleLoginEvent( LogingEvent event){
        User source = (User) event.getSource();
        System.out.println("用户:" + source.getName() + " 存在了");

    }
}
这两种方式都可以写成service,如果后面需要增加业务只需要订阅LogingEvent 事件,并添加监听注解即可。
例如:
java
@Service
public class ServiceUser {

    @EventListener
    public void GetUser( LogingEvent event){
        User source = (User) event.getSource();
        System.out.println("用户:" + source.getName() + " 存在了");

    }
}
自定义Starter
核心作用
- 代码复用,消除重复配置 多个项目需要同一套功能,不用每个项目都写一遍 Bean、配置类、导入一堆 jar。
举例:封装登录事件、工具类、mybatis 扩展、自定义加密解密、统一日志、统一返回封装。 引入 starter,直接注入 Bean 就能用。
-
自动装配,开箱即用 借助
META‑INF/spring/org.springframework.boot.autoconfigure.imports文件,项目引入依赖后,SpringBoot 自动加载配置类,不需要手动写@EnableXXX(也可以做开关注解)。 不需要开发者手动 new 对象、写 @Bean。 -
业务能力封装、对外提供组件 把内部通用业务逻辑封装成 starter,团队内各个业务项目直接引入,统一业务规则。 比如:统一用户鉴权组件、消息推送组件、流程工具组件。
-
统一版本管理,解决依赖冲突 Starter 内部管理好所需要的第三方 jar 版本,使用方不用关心各个子依赖版本,减少版本冲突问题。
自定义starter步骤:
1.创建自定义starter项目,引入spring-boot-starter基础依赖
2.编写模块功能,引入模块所有需要的依赖。编写xxxAutoConfiguration自动配置类
3.编配置文件META-INF/spring/org.springframework.boot.autoconfigure.AutoConfiguration.impo
rts指定启动需要加载的自动配置
4.打包成 jar,其他项目引入 maven 依赖。其他项目引入即可使用
5.项目启动,SpringBoot 读取 imports 文件,自动创建里面定义的 Bean,直接 @Autowired 注入使用
自定义配置文件中属性提示
java
 <!-- 配置属性文件提示 -->
        <dependency>
            <groupId>org.springframework.boot</groupId>
            <artifactId>spring-boot-configuration-processor</artifactId>
            <optional>true</optional>
        </dependency>
示例:
1.创建一项目模块,把公共部分代码抽取出来放到源代码根目录下:
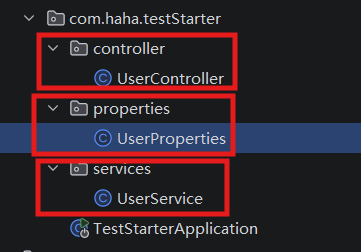
controller代码:
java
@RestController
public class UserController {

    @Autowired
    UserService userService; //注入服务层对象

    @GetMapping("/user")
    public String getUser() {
        //调用服务层获取数据,返回结果给浏览器
       return  userService.getUser();

    }
}
services服务层代码:
java
@Service
public class UserService {

    //注入属性对象
    @Autowired
     UserProperties userProperties;

    public String getUser() {
        //调用属性对象的方法,返回属性设置值
        return userProperties.getUsername() + " ------------" + userProperties.getAge();

    }
}
属性类:用于在application.properties 中配置
@ConfigurationProperties(prefix = "user")
@Configuration
java
@ConfigurationProperties(prefix = "user")
@Configuration
@Data
public class UserProperties {

    private String username;
    private int age;
}
2.导入这个项目必须要使用到的依赖包
XML
 <dependencies>
        <dependency>
            <groupId>org.springframework.boot</groupId>
            <artifactId>spring-boot-starter</artifactId>
        </dependency>
        <dependency>
            <groupId>org.springframework.boot</groupId>
            <artifactId>spring-boot-starter-webmvc</artifactId>
        </dependency>

        <dependency>
            <groupId>org.projectlombok</groupId>
            <artifactId>lombok</artifactId>
            <optional>true</optional>
        </dependency>

        <dependency>
            <groupId>org.springframework.boot</groupId>
            <artifactId>spring-boot-starter-test</artifactId>
            <scope>test</scope>
        </dependency>
</dependencies>3.删除这个模块中的main方法主函数类
4.写一个自动配置类 xxxAutoConfiguration
由于别人的项目导入我们的依赖包后,springboot只能扫描加载自己classpath目录下的文件,扫描不到我们的包,所以我们需要在我们的自动配置类中导入我们需要的所有组件
java
@Configuration
@Import({UserService.class, UserController.class, UserProperties.class})
public class UserAutoConfiguration {
}
5.现在我们自己的starten,就是一个半自动的,只要别人导入我们的包,在主程序类上配置@import(UserAutoConfiguration.class) 就能使用
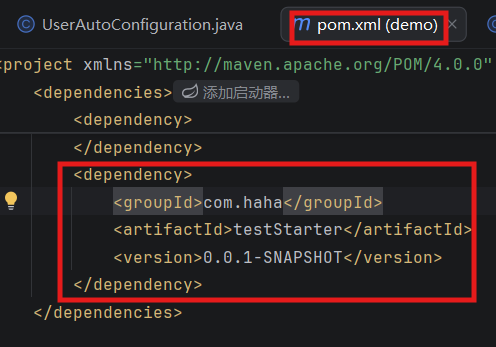
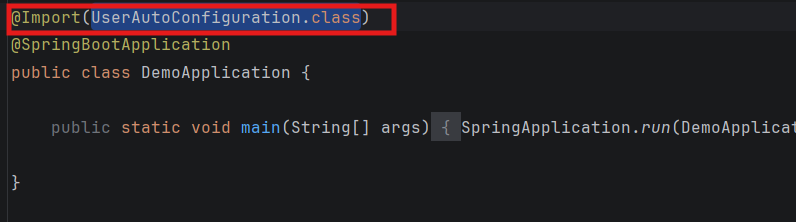
自定义一个注解
我们还可以在改变成别人导入我们依赖,添加一个注解@EnableUser 就能使用
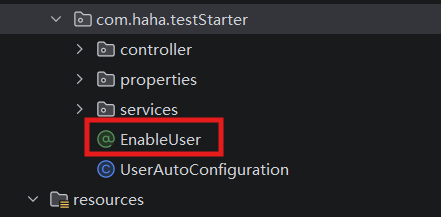
java
@Retention(RetentionPolicy.RUNTIME) // 表示注解在运行时保留
@Target(ElementType.TYPE) // 表示注解可以用于类、接口、枚举
@Documented // 表示注解可以被文档化
@Import(UserAutoConfiguration.class) //导入自己自动配置类
public @interface EnableUser {

}
现在使用导入包后,只需要在主入口类上添加注解@EnableUser
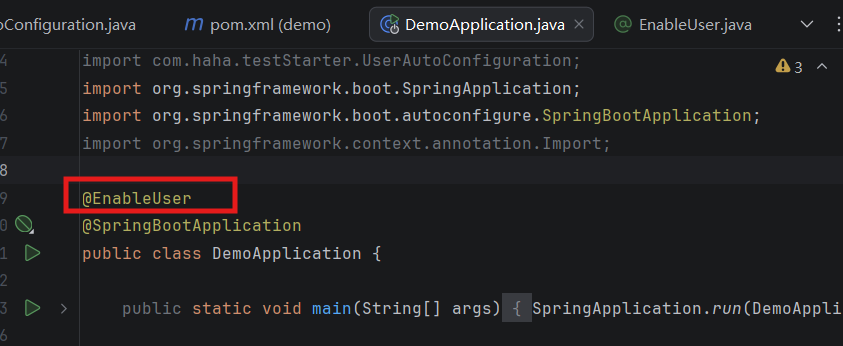
终极处理方式:导入包后自动导入全部组件
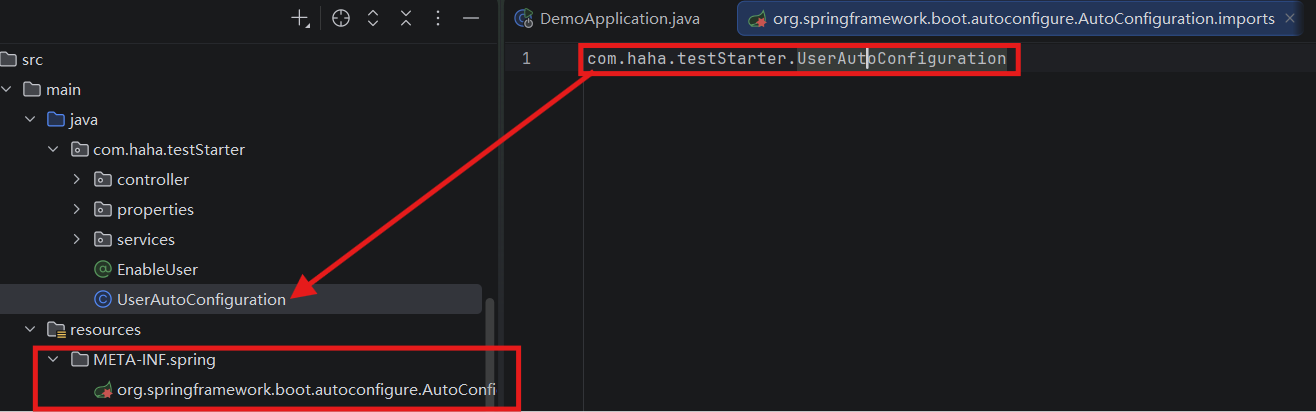
在资源目录下创建META-INF/spring/文件夹,并放入名称为org.springframework.boot.autoconfigure.AutoConfiguration.impo
rts 文件,在文件中写上加载的自动配置类路径
META-INF/spring/org.springframework.boot.autoconfigure.AutoConfiguration.impo
rts