一、Spring 是什么?
Spring 是包含众多工具方法的 IoC 容器。
1.1 什么是容器?
容器是用来容纳某种物品的装置。例如生活中的水杯、垃圾桶、冰箱等等这些都是容器。
1.2 什么是 IoC?
IoC 是控制反转,Bean 的控制权发生了反转。
什么是控制反转?也就是控制权反转。什么的控制权发生了反转?获取依赖对象的过程发生了反转,也就是说,当需要某个对象时,传统开发模式中需要自己通过 new 创建对象,现在不需要再进行创建,把创建对象的任务交给容器,程序中只需要依赖注入就可以了。
这个容器称为:IoC 容器,Spring 是 IoC 容器,所以有时 Spring 也称为 Spring 容器。
控制反转是一种思想,在生活也是处处体现。
比如自动驾驶,传统驾驶方式,车辆的横向和纵向驾驶权由驾驶员来控制,现在交给了驾驶自动化系统控制。
比如招聘,企业的员工招聘、入职、解雇等控制权,由老板交给 HR 来处理。
1.3 IoC 介绍
接下来我们通过案例来了解一下什么是 IoC。
**需求:**造一辆车
1.3.1 传统开发
我们的实现思路是这样的:
先设计轮子,然后根据轮子的大小设计出底盘,接着根据底盘设计车身,最后根据车身设计好整个汽车。这里就出现了一个"依赖"关系:汽车依赖车身,车身依赖底盘,底盘依赖车轮子。

java
public class Main {
    public static void main(String[] args) {
        Car car = new Car();
        car.run();
    }
}

public class Car {
    private Framework framework;

    public Car() {
        framework = new Framework();
        System.out.println("car create...");
    }

    public void run() {
        System.out.println("car run...");
    }
}

public class Framework {
    private Bottom bottom;

    public Framework() {
        bottom = new Bottom();
        System.out.println("Framework create...");
    }
}

public class Bottom {
    private Tire tire;

    public Bottom() {
        tire = new Tire();
        System.out.println("Bottom create...");
    }
}

public class Tire {
    private int size = 17;

    public Tire() {
        System.out.println("tire create...");
        System.out.println("size: " + size);
    }
}
1.3.2 问题分析
这样设计看起来没问题,但是可维护性却很低。
接下来需求有了变更:随着对车的需求量越来越大,个性化需求也会越来越多,我们需要加工多尺寸轮胎。
java
public class Main {
    public static void main(String[] args) {
        Car car = new Car(30);
        car.run();
    }
}

public class Car {
    private Framework framework;

    public Car(int size) {
        framework = new Framework(size);
        System.out.println("car create...");
    }

    public void run() {
        System.out.println("car run...");
    }
}

public class Framework {
    private Bottom bottom;

    public Framework(int size) {
        bottom = new Bottom(size);
        System.out.println("Framework create...");
    }
}

public class Bottom {
    private Tire tire;

    public Bottom(int size) {
        tire = new Tire(size);
        System.out.println("Bottom create...");
    }
}

public class Tire {
    private int size;

    public Tire(int size) {
        this.size = size;
        System.out.println("tire create...");
        System.out.println("size: " + size);
    }
}
这是修改后的代码。
修改的代码如图所示:
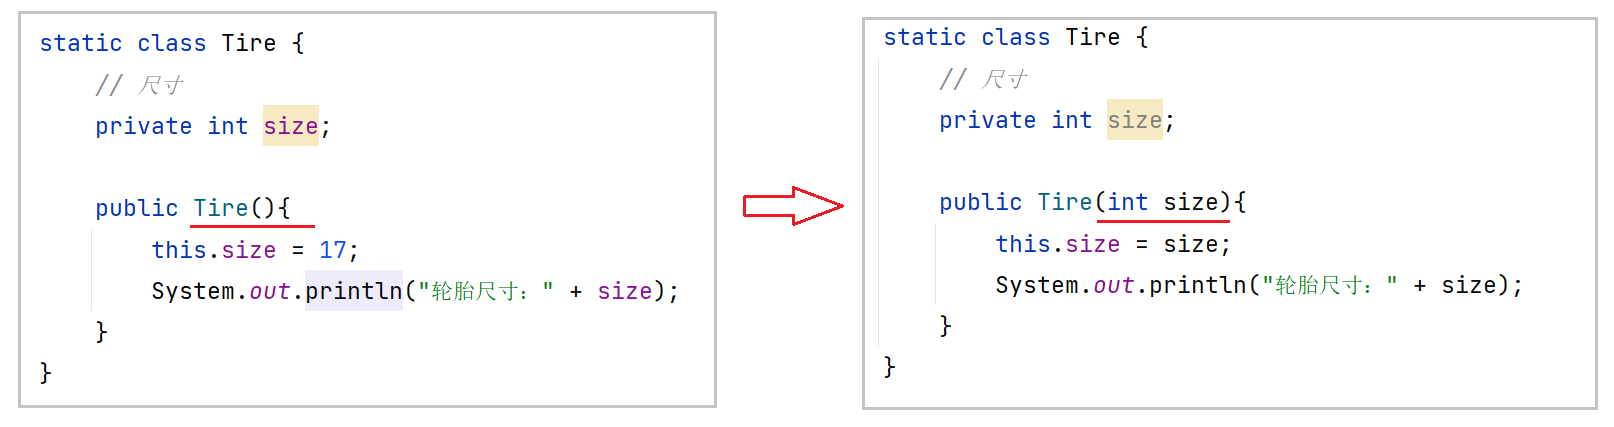
修改后代码会继续进行报错,需要继续进行修改。
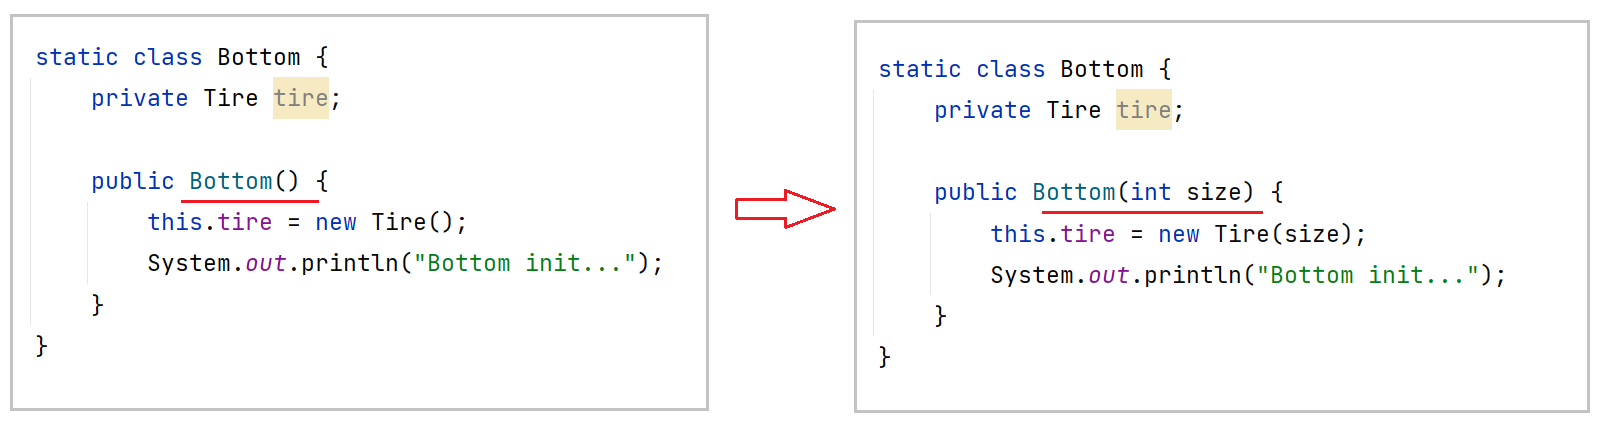
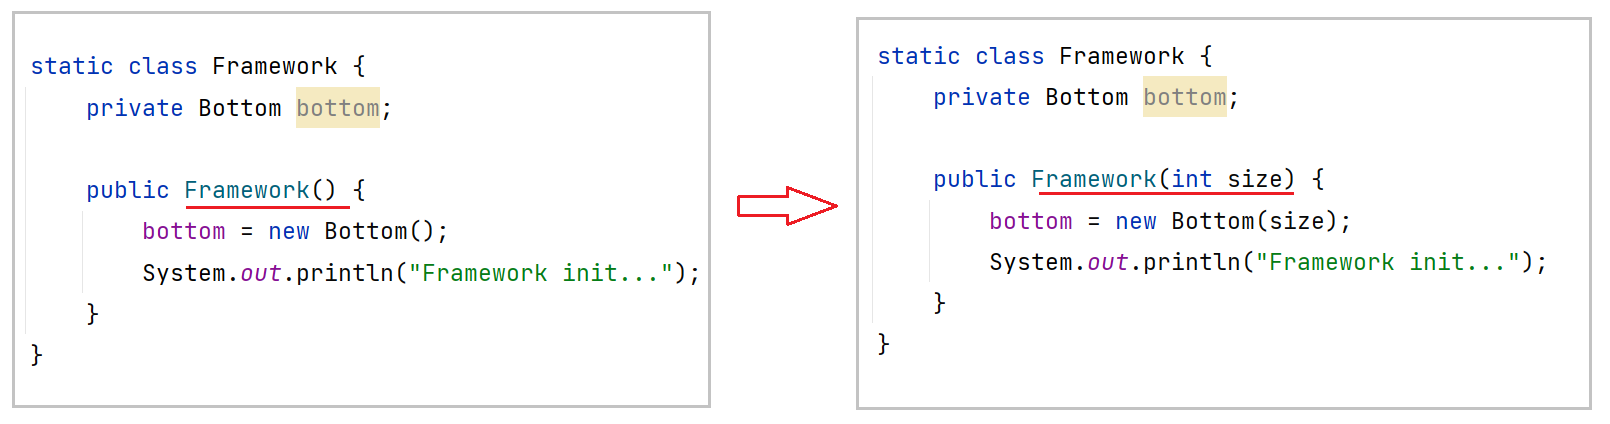
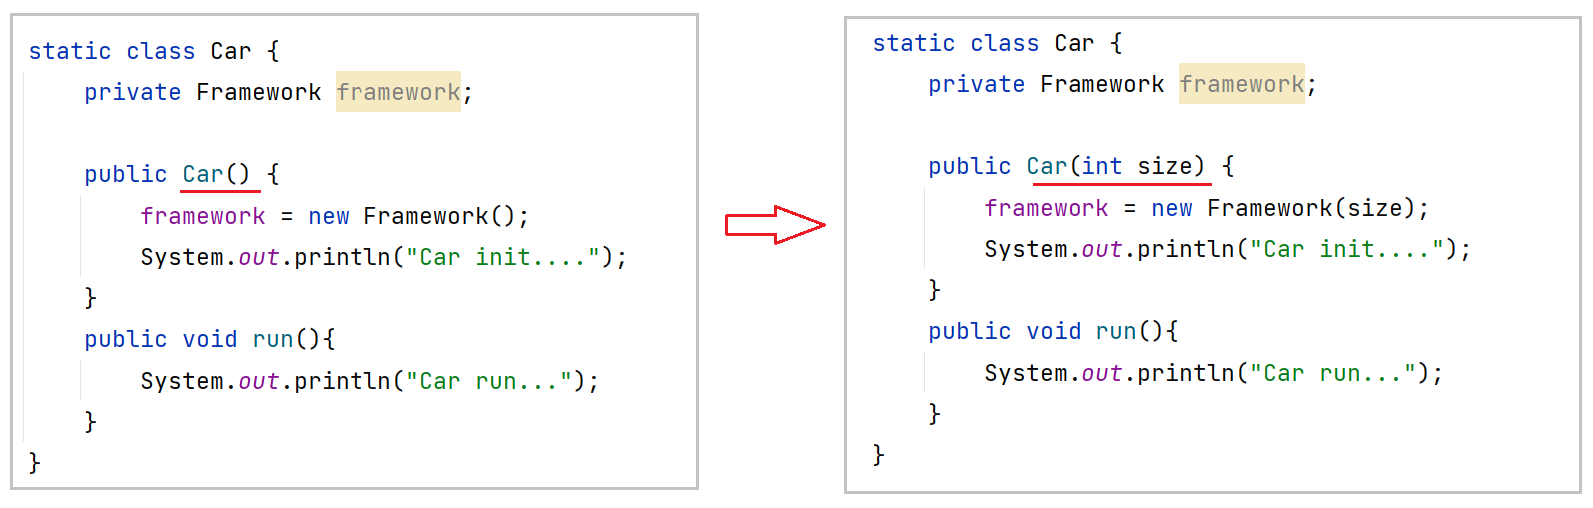
从以上代码可以看出,以上程序的问题是:当最底层代码改动后,整个调用链上的所有代码都需要修改。
程序的耦合度非常高(修改一处代码,影响其他处的代码修改)。
1.3.3 解决方案
我们尝试换一种思路,我们先设计汽车的大概样子,然后根据汽车的样子来设计车身,根据车身来设计底盘.最后根据底盘来设计轮子.这时候,依赖就倒置过来了:轮子依赖底盘,底盘依赖车身,车身依赖汽车.
这就类似我们打造一辆完整的汽车,如果所有的配件都是自己造,那么当客户需求发生改变的时候,比如轮胎的尺寸不再是原来的尺寸了,那我们要自己动来改了,但如果我们是把轮胎外包出去,那么即使是轮胎的尺寸发生改变了,我们就只需要想代理工厂下订单就行了,我们自身是不需要出力的.

java
public class Main {
    public static void main(String[] args) {

        Tire tire=new Tire(30);
        Bottom bottom=new Bottom(tire);
        Framework framework=new Framework(bottom);
        Car car=new Car(framework);
        car.run();
        }
}
public class Car {
    private Framework framework;

    public Car(Framework framework) {

        this.framework=framework;
        System.out.println("car create...");
    }

    public void run() {
        System.out.println("car run...");
    }
}
public class Framework {
    private Bottom bottom;

    public Framework(Bottom bottom) {

        this.bottom=bottom;
        System.out.println("Framework create...");
    }
}
public class Bottom {
    private Tire tire;

    public Bottom(Tire tire) {

        this.tire=tire;
        System.out.println("Bottom create...");

    }
}
public class Tire {
    private int size;

    public Tire(int size) {
        this.size=size;
        System.out.println("tire create...");
        System.out.println("size:"+size);
    }
}
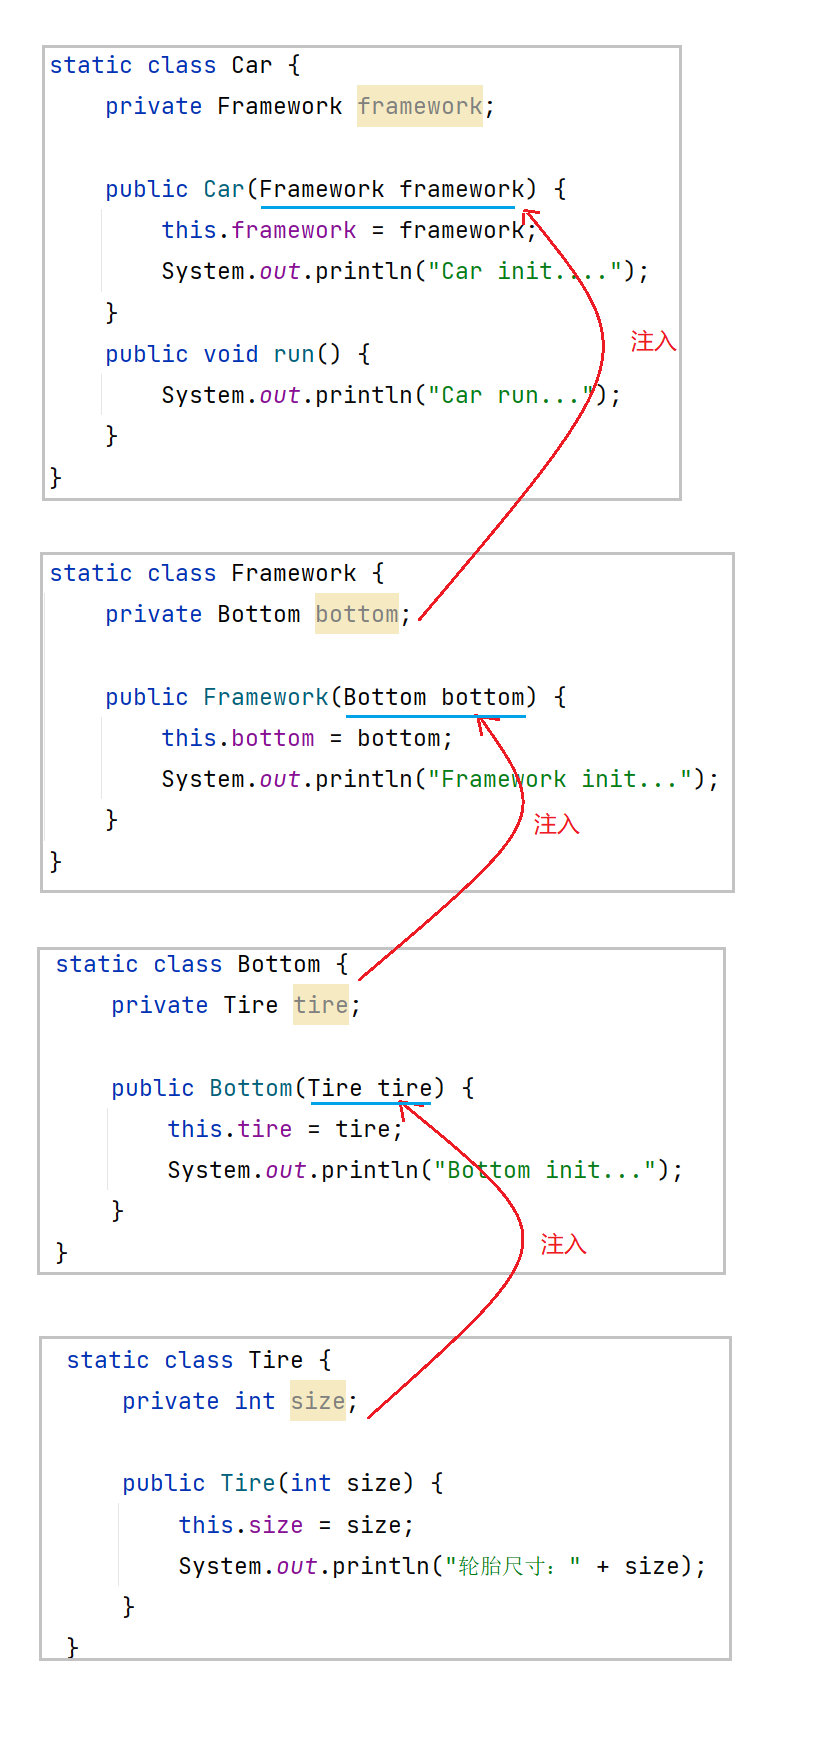
代码经过以上调整,无论底层类如何变化,整个调用链是不用做任何改变的,这样就完成了代码之间的解耦,从而实现了更加灵活,通用的程序设计了.
1.3.4 IoC优势
在传统的代码中对象创建顺序是:Car->Framework->Bottom->Tire
改进之后解耦的代码的对象创建顺序是:Tire->Bottom->Framework->Car
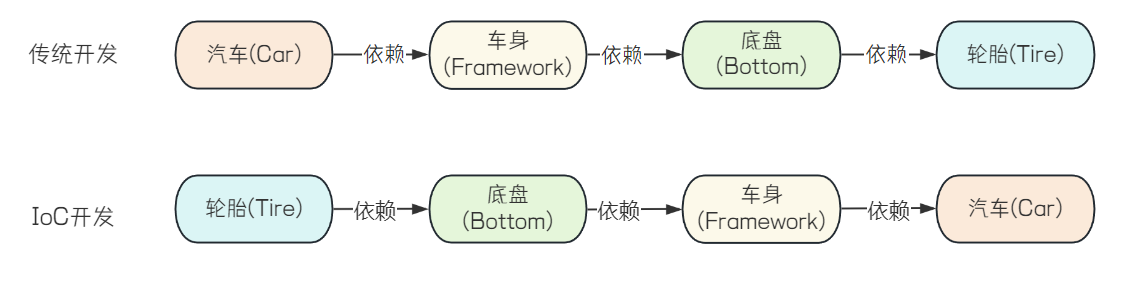
我们发现一个规律,通常程序的实现代码,类的创建顺序是反的,传统代码是Car控制并创建了Framework,Framework创建了Botom,依次往下,二改进之后的控制权发生的反转,不再是使用对象创建并控制依赖对象了,而是把依赖对象注入当前对象中,依赖对象的控制权不再由当前类控制了.
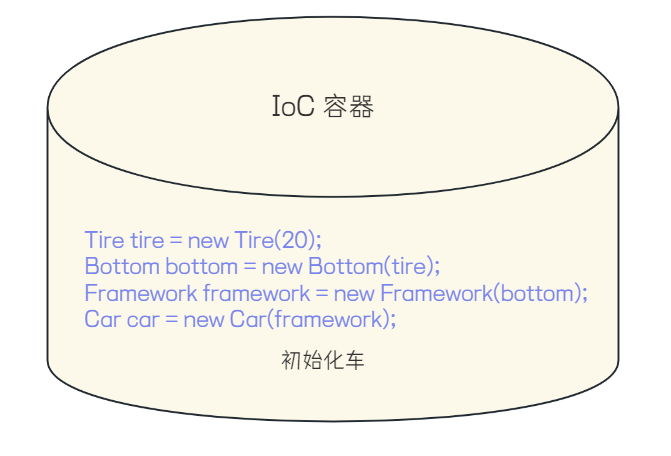
这部分代码,就是IoC容器做的工作.
从上面可以看出来,IoC容器具备以下优点:
资源不有使用资源的双方管理,而又不使用的第三方管理,这可以带来很多好处.第一,资源集中管理,实现资源的配置和易管理.第二,降低了使用双方依赖程度,也就是我们说的耦合度.
- 资源集中管理:IoC容器会帮我们管理一些资源,我们需要使用时,只需要从IoC容器中去获取就可以了
- 我们在创建实例的时候不需要了解其中的细节,降低了使用资源双方的依赖程度,也就是耦合度.
Spring就是一种IoC容器,帮助我们来做了这些资源管理.
1.4DI
DI:(依赖注入):容器在运行期间,动态的为应用程序提供运行时所依赖的资源,称之为依赖注入.
Spring是一个IoC容器,作为容器,那么它就具备两个最基础的功能:
- 存
- 取
二.IoC详解
前面我们提到IoC控制反转,也就是将对象的控制权交给Spring的IoC容器,由IoC容器创建及管理对象,也就是bean的存储
2.1Bean的存储
想把某个对象交给IoC容器管理,需要在类上添加一个注解.Spring框架为了更好的服务Web应用程序,提供了更丰富的注解.
共有两类注解类型可以实现:
- 类注解:@Controller,@Service,@Component,@Configuration
- 方法注解:@Bean
2.1.1@Controller
使用@Controller存储bean的代码如下所示:
java
@Controller
public class UserController {
    public void sayHi(){
        System.out.println("hi,UserController");
    }
}
如何在Spring容器中获取对象
java
@SpringBootApplication
public class SpringIoCCsdnDemoApplication {

    public static void main(String[] args) {

    ApplicationContext context= SpringApplication.run(SpringIoCCsdnDemoApplication.class, args);

        UserController userController =(UserController) context.getBean("userController");
        userController.sayHi();

        UserController bean = context.getBean(UserController.class);
        bean.sayHi();
//        (context.getBean("userController", UserController.class))
        UserController bean1 = context.getBean("userController", UserController.class);
        bean1.sayHi();


    }

}
2.1.2 Beam命名约定
比如
类名:UserController,Bean的名称:userController
类名:AccountManager,Bean的名称:accountmanager
类名:AccountService,Bean的名称:accountService
类名:UController,Bean的名称:UController
类名:AManager,Bean的名称:AManager
2.1.3 @Service
java
@Service
public class ServiceController {
    public void saiHi(){
        System.out.println("hi,serviceController!");
    }
}
在Spring容器中获取
java
    ServiceController serviceController =(ServiceController) context.getBean("serviceController");
        serviceController.saiHi();
        ServiceController bean = context.getBean(ServiceController.class);
        bean.saiHi();
        ServiceController bean1 = context.getBean("serviceController", ServiceController.class);
        bean1.saiHi();
        System.out.println(serviceController);
        System.out.println(bean);
        System.out.println(bean1);
2.1.4@Repository
java
@Repository
public class ReposityController {
    public void sayHi(){
        System.out.println("hi,ReposityController");
    }
}
从Spring仓库中获取
java
        ReposityController bean = context.getBean(ReposityController.class);
        System.out.println(bean);
        bean.sayHi();
        ReposityController bean1 = context.getBean("reposityController", ReposityController.class);
        System.out.println(bean1);
        bean1.sayHi();
        ReposityController reposityController =(ReposityController) context.getBean("reposityController");
        reposityController.sayHi();
        System.out.println(reposityController);
2.1.5 @Compoent
java
@Component
public class CompoentController {
    public void sayHi(){
        System.out.println("hi,CompoentController");
    }
}
从Spring仓库中获取
java
        CompoentController bean =(CompoentController) context.getBean("compoentController");
        System.out.println(bean);
        bean.sayHi();
        CompoentController bean1 = context.getBean(CompoentController.class);
        bean1.sayHi();
        System.out.println(bean1);
        CompoentController compoentController = context.getBean("compoentController", CompoentController.class);
        compoentController.sayHi();
        System.out.println(compoentController);
3.1.6 @Configuration
java
@Configuration
public class ConfigurationController {
    public void sayHi(){
        System.out.println("hi,ConfigurationController");
    }
}
从Spring仓库中获取
java
        ConfigurationController bean = context.getBean(ConfigurationController.class);
        System.out.println(bean);
        bean.sayHi();

        ConfigurationController configurationController =(ConfigurationController) context.getBean("configurationController");
        configurationController.sayHi();
        System.out.println(configurationController);

        ConfigurationController bean1 = context.getBean("configurationController", ConfigurationController.class);
        bean1.sayHi();
        System.out.println(bean1);
2.2为啥么要这么多注解?
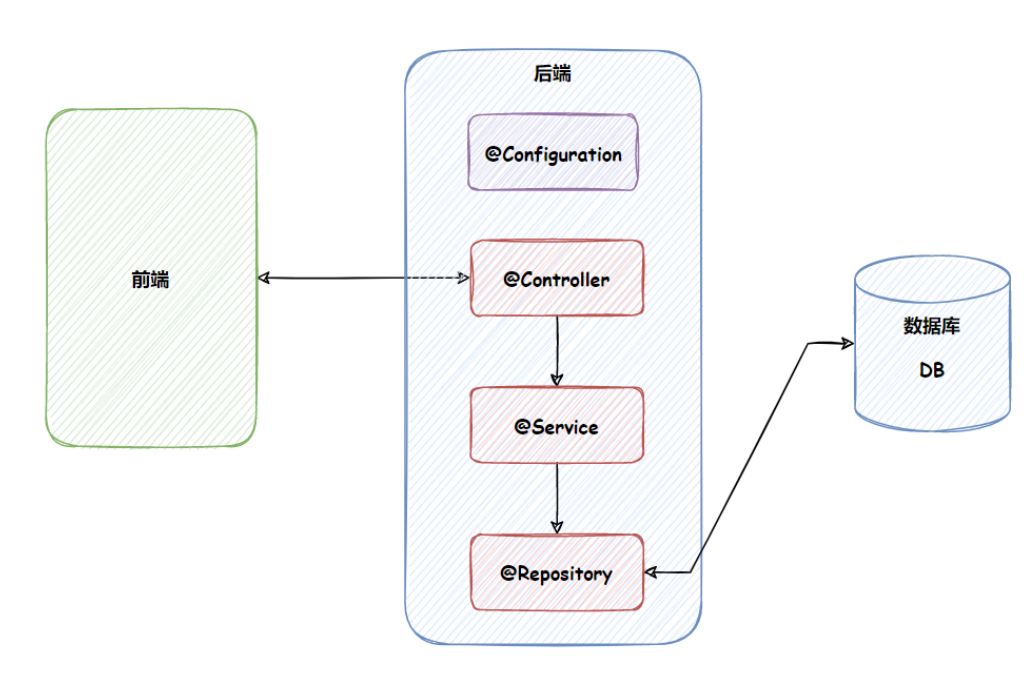
- @Controller:控制层,接收请求,对请求进行处理,并进行响应
- @Service:业务逻辑层,处理具体的业务逻辑
- @Repository:数据访问层,也称为持久层,负责数据访问操作
- @Configuration:配置层,处理项目中的一些配置信息
应用分层,调用流程如下:
类注解之间的关系
查看@Controller/@Service/@Repository/@Configuration等注解的源码大线:
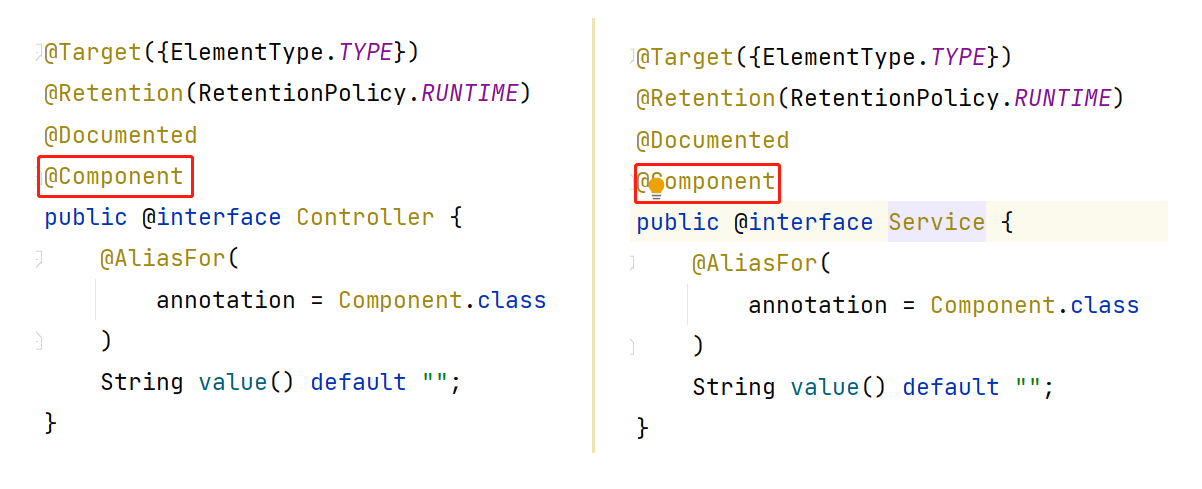
其实这些注解里面都有一个@Compoent,说明它们本身就是属于@Compoent的"子类".@Component是一个元注解,也就是说可以注解其他类注解,@Controller,@Service,@Repository等.这些注解被称为@Component的衍生注解,@Controller,@Service和@Repository用于具体的用例分类(分别在控制层,业务逻辑层,持久化层),在开发过程中,如果你要在业务逻辑使用@Component或@Service,显然@Srevice是更好的选择.
2.3方法注解@Bean
类注解是添加到某个类上的,但是存在两个问题:
- 使用外部包里的类,没办法添加类注解
- 一个类,需要多个对象,比如多个数据源
这种场景,我们就需要使用方法注解@Bean
java
@Component
public class BeanController {
    @Bean
   public User user(){
        User user=new User();
        user.setName("zhangsan");
        user.setAge(18);
        return user;
    }
}
        User user= context.getBean(BeanController.class).user();
        System.out.println(user);
定义多个对象
java
  @Bean
   public User user1(){
        User user=new User();
        user.setName("zhangsan");
        user.setAge(18);
        return user;
    }
    @Bean
    public User user2(){
        User user=new User();
        user.setName("lisi");
        user.setAge(18);
        return user;
    }
     User user= context.getBean(User.class);
        System.out.println(user);
运行结果

报错信息显示:期望只有一个匹配,结果发现了两个user1,user2
java
        User user1 =(User) context.getBean("user1");
        System.out.println(user1);
        User user2=(User) context.getBean("user2");
        System.out.println(user2);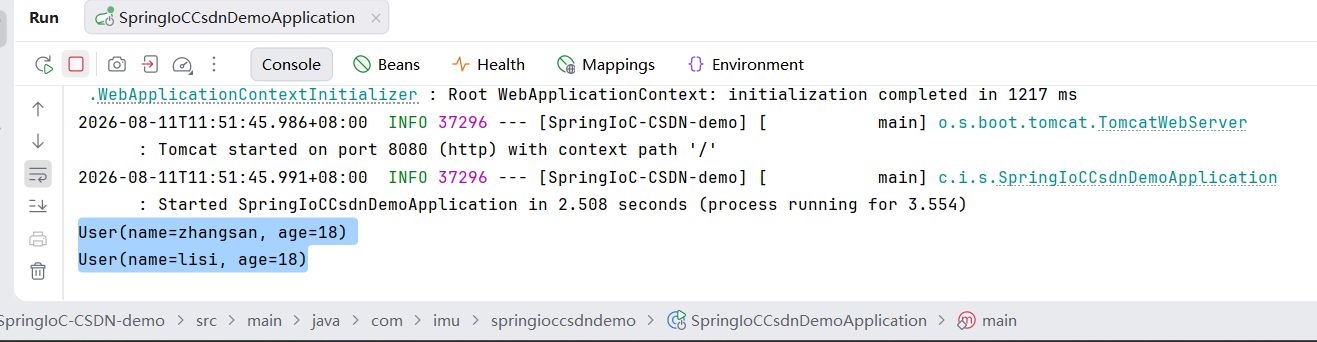
name={}可以省略,如下代码所示:
java
    @Bean({"u1","user"})
    public User user(){
        User user=new User();
        user.setAge(19);
        user.setName("lisi");
        return user;
    }
只有一个名称时,{}也可以省略
java
    @Bean("u2")
    public User user1(){
        User user=new User();
        user.setAge(19);
        user.setName("lisi");
        return user;
    }
2.4扫描路径
使用前面学习的四个注解声明的bean,一定会生效吗?
不一定(原因:bean想要生效,还需要被Spring扫描)
三.DI详解
关于依赖注入,Spring也给我们提供了三种方式:
- 属性注入
- 构造方法注入
- Setter注入
3.1属性注入
属性注入是使用@Autowired实现的.将Service类注入到Controller类中.
java
@Service
public class UserService {
    public void sayHi(){
        System.out.println("hi,userService");
    }
}
@Controller
public class UserInjection {
    @Autowired
    private UserService userService;

    public void sayHi1(){
        userService.sayHi();
        System.out.println("hi,userInjection");
    }
}
去掉@Autowired,在运行一下程序看看结果

3.2构造方法注入
java
@Controller
public class UserInjection2 {
//    @Autowired
    private UserService userService;
    @Autowired
    public UserInjection2(UserService service) {
        this.userService=service;
    }
    public void sayhi2(){
        userService.sayHi();
        System.out.println("hi,userInjection2");
    }
}
注意事项:如果类只有一个构造方法,那么@Autowired注解可以省略;如果类中有多个构造方法,那么需要添加上@Autowired来明确指定到底使用哪个构造方法.
3.3Setter注入
Setter注入和属性的Setter方法实现类似,只不过在设置set方法的时候需要加上@Autowired注解
java
@Controller
public class UserInjection3 {
    private UserService userService;
    @Autowired
    public void setUserService(UserService userService) {
        this.userService = userService;
    }
    public void sayhi1(){
        userService.sayHi();
        System.out.println("hi,UserInjection3");
    }
}
3.4三种注入优缺点分析
属性注入
优点:简洁,方便;
缺点:
只能用于IoC容器,如果是非IoC容器不可用,并且只有在使用的时候才会出现NPE(空指针异常)
不能注入一个Final修饰的属性
构造函数注入
优点:
可以注入final修饰的属性
注入的对象不会被修改
依赖对象在使用前一定会被完全初始化,因为依赖是在类的构造方法中执行的,二构造方法是在类加载阶段就会执行的方法
通用性好,构造方法是JDK支持的,所以更换任何框架,都是适用的
缺点:
注入多个对象时,代码会比较繁琐
Setter注入
优点:方便在类实例之后,重新对该对象进行配置或者注入
缺点:
不能注入一个FInal修饰的属性
注入对象可能会改变,因为setter方法可能会被多次调用,就会被修改的风险