1.数组的操作
1.1 数组(矩阵)操作函数表
核心模块 Core 专门提供了一些全局函数用于对数组(矩阵)进行操作。常用函数如表所示。
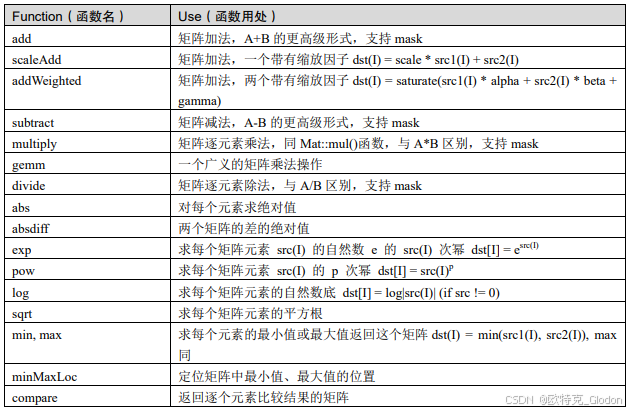
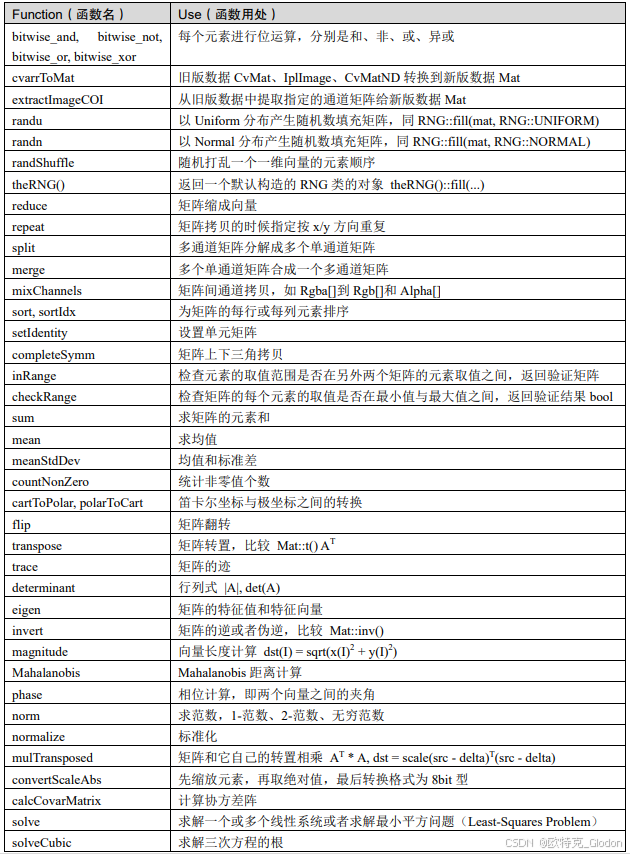
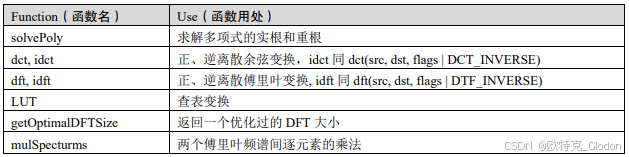
1.2 寻找数组中最小值和最大值的位置(minMaxLoc)
全局函数 minMaxLoc 用于寻找数组中的最大值和最小值及其位置,该极值检测遍历整个矩阵,当掩码部位空时,遍历指定的特殊区域。此函数不适用于多通道阵列。如果需要在所有通道中查找最小元素或最大元素,首先使用 Mat::reshape 将数组重新解释为单个通道,或者可以使用extractImageCOI、mixChannels 或 split 提取特定通道。函数 minMaxLoc 声明如下:
cpp
void cv::minMaxLoc (InputArray src, double * minVal, double * maxVal = 0, Point
*minLoc = 0, Point * maxLoc = 0, InputArray mask = noArray() );
其中参数 src 表示输入的单通道数组(矩阵);参数 minVal 指向返回的最小值的指针,如果传 NULL,就表示不要求最小值;maxVal 指向返回的最大值的指针,如果传 NULL,就表示不要求最大值;minLoc 指向返回最小值的位置(2d 情况下),如果传 NULL,就表示不要求;maxLoc指向返回最小值的位置(2d 情况下),如果传 NULL,就表示不要求;mask 用于指定下级矩阵的操作掩码。
cpp
#include <iostream>
#include <opencv2/core/core.hpp>
#include <opencv2/highgui/highgui.hpp>
#pragma comment(lib, "opencv_world4140d.lib") //引用引入库
using namespace std;
using namespace cv;

int main()
{
	Mat image, image_3c;
	image.create(Size(256, 256), CV_8UC1);
	image_3c.create(Size(256, 256), CV_8UC3); //3 通道的图像
	image.setTo(0);
	image_3c.setTo(0);
	image.at<uchar>(10, 200) = 255; //第 10 行、第 200 列处赋值 255
	image_3c.at<uchar>(10, 200) = 255;//第 10 行、第 300 列处赋值
	double maxVal = 0; //最大值一定要赋初值,否则运行时会报错
	Point maxLoc;
	minMaxLoc(image, NULL, &maxVal, NULL, &maxLoc);
	cout << "单通道图像最大值: " << maxVal << endl;
	double min_3c, max_3c;
	minMaxLoc(image_3c, &min_3c, &max_3c, NULL, NULL);
	cout << "3 通道图像最大值: " << max_3c << endl;
	imshow("image", image);
	imshow("image_3c", image_3c);
	waitKey(0);
	return 0;
}
在代码中,我们利用全局函数 minMaxLoc 查找了单通道和多通道矩阵中的像素最大值。注意,多通道在使用 minMaxLoc 函数时不能给出其最大值和最小值坐标,因为每个像素点其实有多个坐标,所以无法给出。
cpp
单通道图像最大值: 255
3 通道图像最大值: 255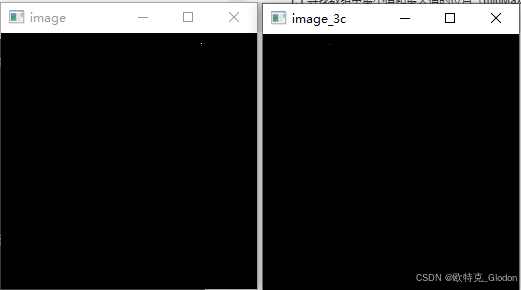
2.XML 和 YAML 文件读写
2.1 YAML 文件简介
编程免不了要写配置文件,写配置也是一门学问。YAML 是专门用来写配置文件的语言,非常简洁和强大,远比 JSON 格式方便。YAML 语言的设计目标是方便人类读写。它实质上是一种通用的数据串行化格式。YAML 的基本语法规则如下:
(1)大小写敏感。
(2)使用缩进表示层级关系。
(3)缩进时不允许使用 Tab 键,只允许使用空格。
(4)缩进的空格数目不重要,只要相同层级的元素左侧对齐即可。
YAML 支持的数据结构有三种:
(1)对象:键值对的集合,又称为映射(Mapping)、哈希(Hash)、字典(Dictionary)。
(2)数组:一组按次序排列的值,又称为序列(Sequence)、列表(List)。
(3)纯量(Scalar):单个的、不可再分的值。
由于实现简单,解析成本很低,YAML 特别适合在脚本语言中使用,比如 Ruby、Java、Perl、Python、PHP、JavaScript、Go。除了 Java 和 Go 外,其他都是脚本语言。写 YAML 要比写 XML快得多(无须关注标签或引号),并且比 INI 文档功能更强。比如以下就是一个 YAML 文件:
c
%YAML:1.0
---
frameCount: 5
calibrationDate: "Wed Aug 1 11:13:44 2018\n"
cameraMatrix: !!opencv-matrix
 rows: 3
 cols: 3
 dt: d
 data: [ 1000., 0., 320., 0., 1000., 240., 0., 0., 1. ]
disCoeffs: !!opencv-matrix
 rows: 5
 cols: 1
 dt: d
 data: [ 1.0000000000000001e-01, 1.0000000000000000e-02,
 -1.0000000000000000e-03, 0., 0. ]
features:
 - { x:41, y:227, lbp:[ 0, 1, 1, 1, 1, 1, 0, 1 ] }
 - { x:260, y:449, lbp:[ 0, 0, 1, 1, 0, 1, 1, 0 ] }
 - { x:598, y:78, lbp:[ 0, 1, 0, 0, 1, 0, 1, 0 ] }
2.2 写入和读取 YAML\XML 文件的基本步骤
(1)创建 cv::FileStorage 对象,并打开文件。
(2)使用<<写入数据,或者使用>>读取数据。
(3)使用 cv::FileStorage::release()关闭文件。
2.3 XML、YAML 文件的打开
有两种方法来实例化 FileStorage 对象。
方法 1:
cpp
FileStorage fs(fileName,FileStorage::WRITE); //实例化对象 fs
//fs 设定为写入操作
//读取操作时,实例化对象方式写为 FileStorage::READ
方法 2:
cpp
FileStorage fs; //实例化对象 fs
fs.open(fileName,FileStorage::WRITE);
2.4 文本和数字的输入和输出
写入文件使用<<运算符,例如:
cpp
fs << "iterationNr" << 100;读取文件使用>>运算符,例如:
cpp
int itNr;
fs["iterationNr"] >> itNr;
itNr = (int) fs["iterationNr"];
2.5 OpenCV 数据结构的输入和输出
和基本的 C++形式相同,例如:
cpp
Mat R = Mat_<uchar >::eye (3, 3),
T = Mat_<double>::zeros(3, 1);
fs << "R" << R; // Write cv::Mat
fs << "T" << T;
fs["R"] >> R; // Read cv::Mat
fs["T"] >> T;
2.6 vector(arrays)和 maps 的输入和输出
vector 要注意在第一个元素前加上"",在最后一个元素前加上"",例如:
cpp
fs << "strings" << "["; // text - string sequence
fs << "image1.jpg" << "Awesomeness" << "11.jpg";
fs << "]"; // close sequence
对于 map 结构的操作使用的符号是"{"和"}",例如:
cpp
fs << "Mapping"; // text - mapping
fs << "{" << "One" << 1;
fs << "Two" << 2 << "}";
读取这些结构的时候,会用到 FileNode 和 FileNodeIterator 数据结构。FileStorage 类的\[\]操作符会返回 FileNode 数据类型,对于一连串的 node,可以使用 FileNodeIterator 结构,例如:
cpp
FileNode n = fs["strings"]; // Read string sequence - Get node
if (n.type() != FileNode::SEQ)
{
  cerr << "strings is not a sequence! FAIL" << endl;
  return 1;
}
FileNodeIterator it = n.begin(), it_end = n.end(); // Go through the node
for (; it != it_end; ++it)
cout << (string)*it << endl;
2.7 文件关闭
文件关闭操作会在 FileStorage 结构销毁时自动进行,也可调用 fs.release()函数实现。
【例 】生成 YAML 文件并读取
cpp
#include <iostream>
#include <ctime>
#include <iomanip>
#include <sstream>
#include <opencv2/opencv.hpp>
#include <time.h>
using namespace std;
using namespace cv;
#pragma comment(lib, "opencv_world4140d.lib") //引用引入库

int writeYaml()
{
	//初始化
	FileStorage fs("test.yaml", FileStorage::WRITE);
	//开始文件写入
	fs << "frameCount" << 5;
	time_t rawtime;

	//time(&rawtime);
	//fs << "calibrationDate" << asctime(localtime(&rawtime));

	struct tm timeinfo;
	char buffer[32];
	time(&rawtime);
	localtime_s(&timeinfo, &rawtime);  // 安全版本
	asctime_s(buffer, sizeof(buffer), &timeinfo);  // 安全版本

	// 移除 asctime 返回的换行符
	std::string timeStr(buffer);
	if (!timeStr.empty() && timeStr.back() == '\n')
	{
		timeStr.pop_back();
	}
	fs << "calibrationDate" << timeStr;

	//Mat cameraMatrix = (Mat_<double>(3, 3) << 1000, 0, 320, 0, 1000, 240, 0,0, 1);
	int a[3][3] = { 1000, 0, 320, 0, 1000, 240, 0, 0, 1 };
	Mat cameraMatrix(3, 3, CV_32S, a);

	//Mat_<double> disCoeffs = (Mat_<double>(5, 1) << 0.1, 0.01, -0.001, 0, 0);
	double b[5][1] = { 0.1, 0.01, -0.001, 0.0, 0.0 };
	Mat disCoeffs(5, 1, CV_64F, b);

	fs << "cameraMatrix" << cameraMatrix << "disCoeffs" << disCoeffs;
	fs << "features" << "[";
	for (int i = 0; i < 3; i++)
	{
		int x = rand() % 640;
		int y = rand() % 480;
		uchar lbp = rand() % 256;
		fs << "{:" << "x" << x << "y" << y << "lbp" << "[:";
		for (int j = 0; j < 8; j++)
		{
			fs << ((lbp >> j) & 1);
		}
		fs << "]" << "}";
	}
	fs << "]";
	fs.release();
	printf("文件读写完毕,请在工程目录下查看生成的文件。\n");
	return 0;
}

int readYaml()
{
	// 改变 console 字体颜色
	system("color 6F");
	//初始化
	FileStorage fs2("test.yaml", FileStorage::READ);
	// 第一种方法:对 FileNote 操作
	int frameCount = (int)fs2["frameCount"];
	std::string date;
	//第二种方法:使用 FileNote 运算符
	fs2["calibrationDate"] >> date;
	Mat cameraMatrix2, disCoeffs2;
	fs2["cameraMatrix"] >> cameraMatrix2;
	fs2["disCoeffs"] >> disCoeffs2;
	cout << "framCount: " << frameCount << endl
		<< "calibration date: " << date << endl
		<< "camera matrix: " << cameraMatrix2 << endl
		<< "distortion coeffs: " << disCoeffs2 << endl;
	FileNode features = fs2["features"];
	FileNodeIterator it = features.begin(), it_end = features.end();
	int idx = 0;
	std::vector<uchar> lbpval;
	//使用 FileNoteIterator 遍历序列
	for (; it != it_end; ++it, ++idx)
	{
		cout << "feature #" << idx << ": ";
		cout << "x=" << (int)(*it)["x"] << ", y =" << (int)(*it)["y"] << ", lbp: (";
		(*it)["lbp"] >> lbpval;
		for (int i = 0; i < (int)lbpval.size(); i++)
		{
			cout << " " << (int)lbpval[i];
		}
		cout << ")" << endl;
	}
	fs2.release();
	printf("\n 文件读取完毕,请输入任意键结束程序~");
	getchar();
	return 0;
}

int main()
{
	writeYaml();
	puts("YAML 文件读取内容如下:");
	readYaml();
}
运行如下:
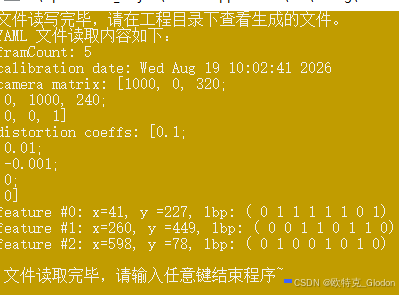
在代码中,我们新建了一个 YAML 文件并写入数据,然后读取该文件的内容,并在终端显示出来。
【例 】同时支持 XML 和 YAML 的读写
cpp
#include <iostream>
#include <opencv2/core.hpp>
#include <iostream>
#include <string>
using namespace cv;
using namespace std;
#pragma comment(lib, "opencv_world4140d.lib") //引用引入库

class MyData
{
public:
	MyData() : A(0), X(0), id()
	{}
	explicit MyData(int) : A(97), X(CV_PI), id("mydata1234") // explicit to avoid implicit conversion
	{}
	void write(FileStorage& fs) const //Write serialization for this class
	{
		fs << "{" << "A" << A << "X" << X << "id" << id << "}";
	}
	void read(const FileNode& node) //Read serialization for this class
	{
		A = (int)node["A"];
		X = (double)node["X"];
		id = (string)node["id"];
	}

public: // Data Members
	int A;
	double X;
	string id;
};

//These write and read functions must be defined for the serialization in FileStorage to work
static void write(FileStorage& fs, const std::string&, const MyData& x)
{
	x.write(fs);
}

static void read(const FileNode& node, MyData& x, const MyData& default_value
	= MyData()) {
	if (node.empty())
		x = default_value;
	else
		x.read(node);
}

// This function will print our custom class to the console
static ostream& operator<<(ostream& out, const MyData& m)
{
	out << "{ id = " << m.id << ", ";
	out << "X = " << m.X << ", ";
	out << "A = " << m.A << "}";
	return out;
}

int main(int ac, char** av)
{
	string filename = "test.xml";
	{
		//write
		Mat R = Mat_<uchar>::eye(3, 3),
			T = Mat_<double>::zeros(3, 1);
		MyData m(1);
		FileStorage fs(filename, FileStorage::WRITE);
		// or:
		// FileStorage fs;
		// fs.open(filename, FileStorage::WRITE);
		fs << "iterationNr" << 100;
		fs << "strings" << "["; // text - string sequence
		fs << "image1.jpg" << "Awesomeness" << "../data/baboon.jpg";
		fs << "]"; // close sequence
		fs << "Mapping"; // text - mapping
		fs << "{" << "One" << 1;
		fs << "Two" << 2 << "}";
		fs << "R" << R; // cv::Mat
		fs << "T" << T;
		fs << "MyData" << m; // your own data structures
		fs.release(); // explicit close
		cout << "Write Done." << endl;
	}
	{
		//read
		cout << endl << "Reading: " << endl;
		FileStorage fs;
		fs.open(filename, FileStorage::READ);
		int itNr;
		//fs["iterationNr"] >> itNr;
		itNr = (int)fs["iterationNr"];
		cout << itNr << endl;
		if (!fs.isOpened())
		{
			cerr << "Failed to open " << filename << endl;
			return 1;
		}
		FileNode n = fs["strings"]; // Read string sequence - Get node
		if (n.type() != FileNode::SEQ)
		{
			cerr << "strings is not a sequence! FAIL" << endl;
			return 1;
		}

		FileNodeIterator it = n.begin(), it_end = n.end(); // Go through the node
		for (; it != it_end; ++it)
		{
			cout << (string)*it << endl;
		}

		n = fs["Mapping"]; // Read mappings from a sequence
		cout << "Two " << (int)(n["Two"]) << "; ";
		cout << "One " << (int)(n["One"]) << endl << endl;
		MyData m;
		Mat R, T;
		fs["R"] >> R; // Read cv::Mat
		fs["T"] >> T;
		fs["MyData"] >> m; // Read your own structure_
		cout << endl
			<< "R = " << R << endl;
		cout << "T = " << T << endl << endl;
		cout << "MyData = " << endl << m << endl << endl;
		//Show default behavior for non existing nodes
		cout << "Attempt to read NonExisting (should initialize the data structure with its default).";
		fs["NonExisting"] >> m;
		cout << endl << "NonExisting = " << endl << m << endl;
	}
	cout << endl << "Tip: Open up " << filename << " with a text editor to see the serialized data." << endl;
}
运行如下:
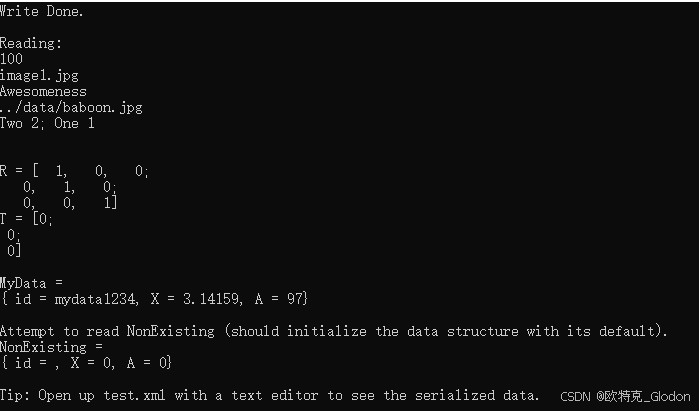
代码根据 filename 的文件名来创建不同类型的文件,如果是 YAML,比如 test.yaml,就会新建并产生 XML 数据到文件中。文件写入完毕后,开始读并在终端显示。