前言
本文将从零开始,系统梳理 PyTorch 张量的创建方法、数值运算、形状变换以及自动梯度的计算与更新,通过大量可运行的代码示例,帮助你快速建立起 PyTorch 编程的底层认知,为后续构建和训练复杂的神经网络打下坚实基础。
深度学习简介
深度学习概念

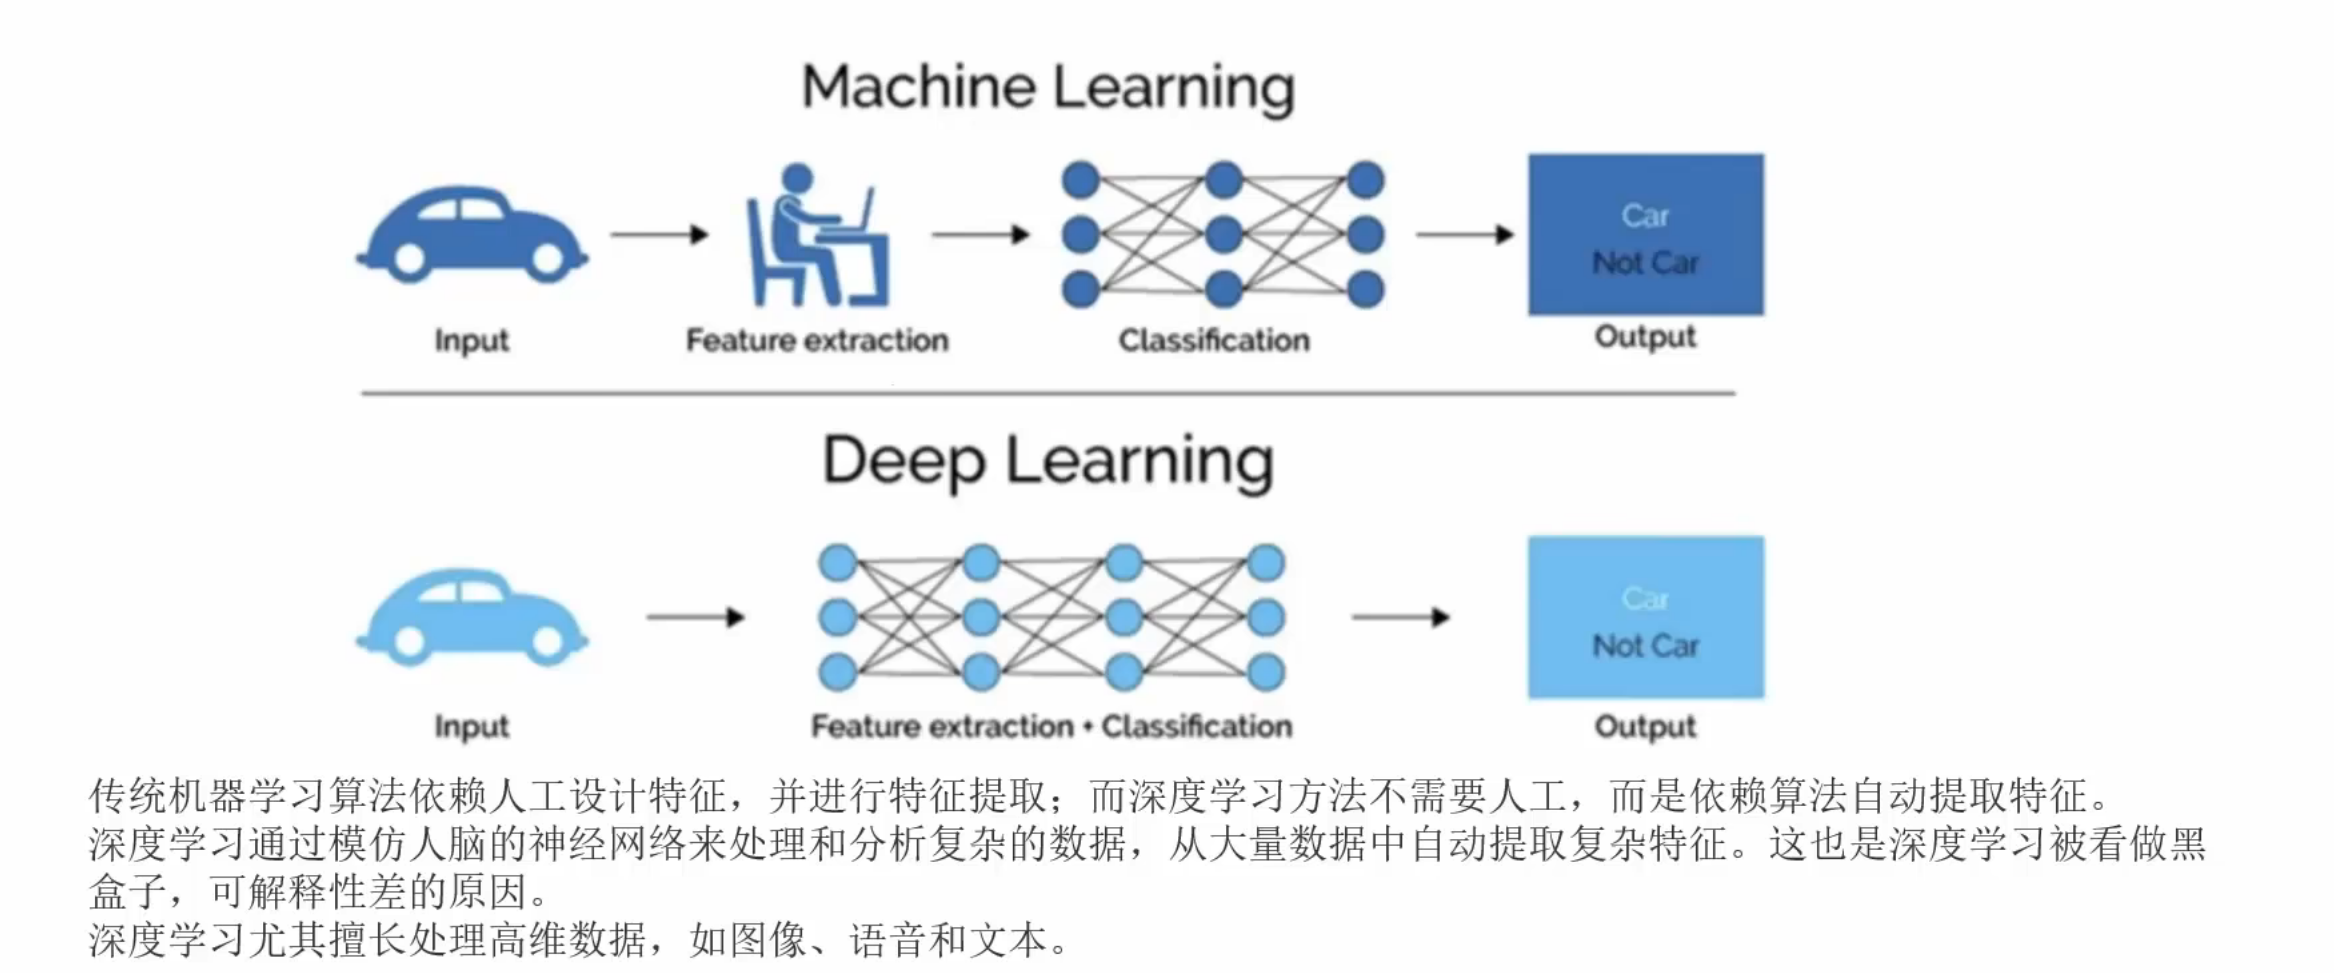
深度学习是机器学习的一类算法, 以人工神经网络为结构, 可以实现自动提取特征
深度学习核心思想是人工神经网络为结构, 自动提取特征
深度学习特点
自动提取特征
解释性差
大量数据和高性能计算能力
非线性转换(引入非线性因素)
深度学习模型
- ANN 人工神经网络 感知机
- CNN 卷积神经网络 图像/视频
- RNN 循环神经网络 NLP
- transformer RNN衍生出来的
- 自编学习器
- ...
深度学习应用场景
- 自然语言处理NLP
- 生成式AI AIGC 大模型
- 机器翻译
- 语音识别
- ...
- 计算机视觉CV
- 图像识别
- 面部解锁
- 视频合成
- ...
- 推荐系统
- 电影
- 音乐
- 文章
- 视频
- 商品
PyTorch框架简介
- pytorch是深度学习的框架, python的第三方包, 数据是以张量类型存在
- pytorch特点
- 数据类型是张量类型
- 自动微分模块, 自动求导/梯度
- 可以在GPU/TPU/NPU上运行, 加速运行
- 兼容各种平台 系统/硬件(显卡)
张量创建
什么是张量
- 张量是矩阵, 可以是多维
- 0维->标量
- 1维->1 2 3 4 5
- 2维->\[1 2 3,4 5 6]
- 3维...
- 张量是通过类创建出来的对象, 提供各种方法和属性
PyTorch中的张量就是元素为同一种数据类型的多维矩阵。在PyTorch中,张量以"类"的形式封装起来,对张量的一些运算、处理的方法被封装在类中。
PyTorch张量与NumPy数组类似,但PyTorch的张量具有GPU加速的能力(通过CUDA),这使得深度学习模型能够高效地在GPU上运行。
PyTorch提供了对张量的强大支持,可以进行高效的数值计算、矩阵操作、自动求导等。
张量是PyTorch中的核心数据抽象,PyTorch 支持各种张量子类型。通常地,一维张量称为向量/矢量(vector),二维张量称为矩阵(matrix)

基本创建方式
- torch.tensor(data=): 指定数据
- torch.Tensor(data=, size=): 指定数据或形状
- torch.IntTensor(data=)/FloatTensor(): 指定数据
python
def dm01():
    # 标量 张量
    t1 = torch.tensor(5)
    print(f't1: {t1},type: {t1.type()}')
    print('-' * 23)

    # 二维列表 张量
    data = [[1, 2, 3], [2, 4, 6]]
    t2 = torch.tensor(data)
    print(f't2: {t2},type: {t2.type()}')

    # numpy nd数组 张量
    data = np.random.randint(0, 10, (2, 3))
    t3 = torch.tensor(data)
    print(f't3: {t3},type: {t3.type()}')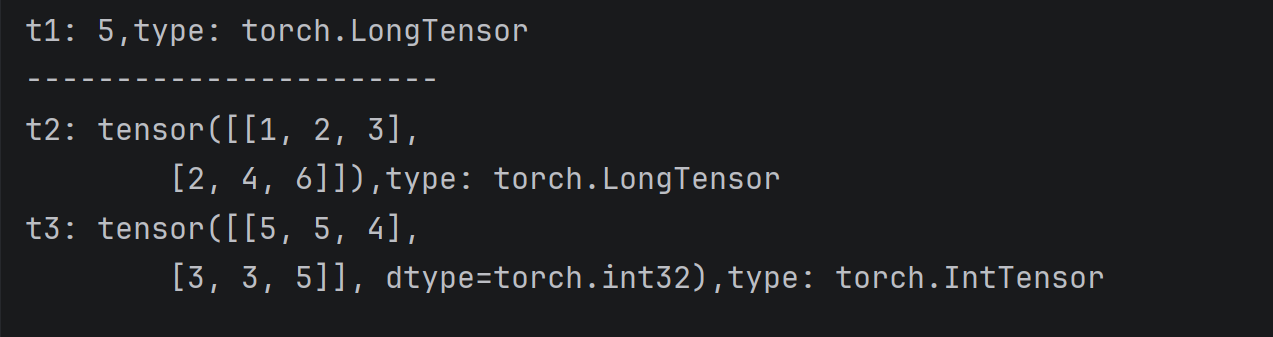
python
def dm02():
    # 2行3列的张量
    t4 = torch.Tensor(2,3)
    print(f't4: {t4},type: {t4.type()}')
python
def dm03():
    # 标量 张量
    t1 = torch.IntTensor(5)
    print(f't1: {t1},type: {t1.type()}')
    print('-' * 23)

    # 二维列表 张量
    data = [[1, 2, 3], [2, 4, 6]]
    t2 = torch.IntTensor(data)
    print(f't2: {t2},type: {t2.type()}')

    # numpy nd数组 张量
    data = np.random.randint(0, 10, (2, 3))
    t3 = torch.IntTensor(data)
    print(f't3: {t3},type: {t3.type()}')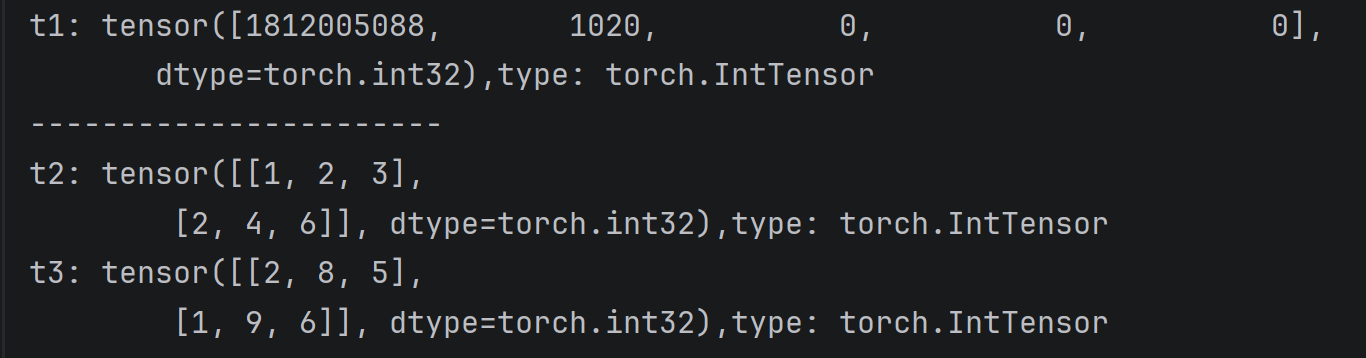
线性和随机张量
- 线性张量
- torch.arange()
- torch.linspace()
- 随机张量
- torch.rand()/randn()
- torch.randint()
- torch.initial_seed()
- torch.manual_seed()
python
def dm01():
    # 创建指定范围的线性向量
    t1 = torch.arange(0,10,2)
    print(f't1: {t1}, type: {t1.type()}')
    print('-' * 30)
    # 创建指定范围的线性张量  等差数列
    # 参1:起始值,参2:结束值,参3:元素个数
    t2 = torch.linspace(1,10,4)
    print(f't2: {t2}, type: {t2.type()}')
python
def dm02():
    # 设置随机种子
    # torch.initial_seed() # 默认采用当前系统的时间戳作为随机种子
    torch.manual_seed(3) # 设置随机种子
    # 创建随机变量
    # 均匀分布的(0,1)随机张量
    t1 = torch.rand(size=(2, 3))
    print(f't1: {t1}, type: {t1.type()}')
    print('-' * 30)
    # 符合正态分布的随机张量
    t2 = torch.randn(size=(2, 3))
    print(f't2: {t2}, type: {t2.type()}')
    print('-' * 30)

    # 创建随机整数变量
    t3 = torch.randint(low=0, high=10, size=(3, 5))
    print(f't3: {t3}, type: {t3.type()}')
    print('-' * 30)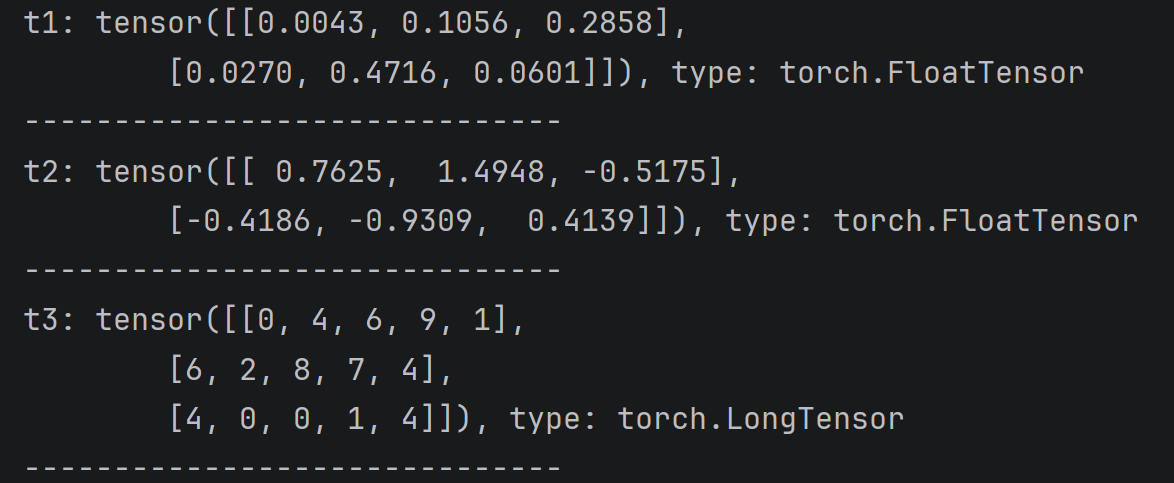
0/1/指定值张量
- torch.ones/zeros/full(size=, fill_value=)
- torch.ones_like/zeros_like/full_like(input=tensor, fill_value=)
python
import torch

def dm01():

    t1 = torch.ones(2,3)
    print(f't1: {t1}, type: {t1.type()}')
    print('-' * 30)

    t2 = torch.tensor([[1, 2],[3, 4], [5, 6]])
    print(f't2: {t2}, type: {t2.type()}')
    print('-' * 30)
    # 基于t2的形状,创建全1张量
    t3 = torch.ones_like(t2)
    print(f't3: {t3}, type: {t3.type()}')
    print('-' * 30)
    t1 = torch.zeros(2, 3)
    print(f't1: {t1}, type: {t1.type()}')
    print('-' * 30)

    t2 = torch.tensor([[1, 2], [3, 4], [5, 6]])
    print(f't2: {t2}, type: {t2.type()}')
    print('-' * 30)
    # 基于t2的形状,创建全0张量
    t3 = torch.zeros_like(t2)
    print(f't3: {t3}, type: {t3.type()}')
    print('-' * 30)
    # 创建全为指定值张量
    t1 = torch.full(size=(2, 3), fill_value=7)
    print(f't1: {t1}, type: {t1.type()}')
    print('-' * 30)

    t2 = torch.tensor([[1, 2], [3, 4], [5, 6]])
    print(f't2: {t2}, type: {t2.type()}')
    print('-' * 30)
    # 基于t2的形状,创建全指定值张量
    t3 = torch.full_like(t2,fill_value=7)
    print(f't3: {t3}, type: {t3.type()}')
if __name__ == '__main__':
    dm01()
python
t1: tensor([[1., 1., 1.],
        [1., 1., 1.]]), type: torch.FloatTensor
------------------------------
t2: tensor([[1, 2],
        [3, 4],
        [5, 6]]), type: torch.LongTensor
------------------------------
t3: tensor([[1, 1],
        [1, 1],
        [1, 1]]), type: torch.LongTensor
------------------------------
t1: tensor([[0., 0., 0.],
        [0., 0., 0.]]), type: torch.FloatTensor
------------------------------
t2: tensor([[1, 2],
        [3, 4],
        [5, 6]]), type: torch.LongTensor
------------------------------
t3: tensor([[0, 0],
        [0, 0],
        [0, 0]]), type: torch.LongTensor
------------------------------
t1: tensor([[7, 7, 7],
        [7, 7, 7]]), type: torch.LongTensor
------------------------------
t2: tensor([[1, 2],
        [3, 4],
        [5, 6]]), type: torch.LongTensor
------------------------------
t3: tensor([[7, 7],
        [7, 7],
        [7, 7]]), type: torch.LongTensor
指定元素类型张量
- tensor.type(dtype=)
- tensor.half()/float()/double()/short()/int()/long()
python
import torch


# torch.tensor(data=, dtype=):
# dtype: 指定元素类型, 浮点类型默认是float32

# tensor.type(dtype=): 修改张量元素类型
# torch.float32
# torch.FloatTensor
# torch.cuda.FloatTensor
def dm01():
	t1 = torch.tensor(data=[[1., 2., 3.], [4., 5., 6.]], dtype=torch.float16)
	print('t1的元素类型->', t1.dtype)
	# 转换成float32
	t2 = t1.type(dtype=torch.FloatTensor)
	t3 = t1.type(dtype=torch.int64)
	print('t2的元素类型->', t2.dtype)
	print('t3的元素类型->', t3.dtype)


# tensor.half()/float()/double()/short()/int()/long()
def dm02():
	t1 = torch.tensor(data=[1, 2])
	print('t1的元素类型->', t1.dtype)
	# t2 = t1.half()
	t2 = t1.int()
	print(t2)
	print('t2的元素类型->', t2.dtype)


if __name__ == '__main__':
	# dm01()
	dm02()
张量类型转换
张量转换为NumPy数组
python
def dm01():
    # 创建张量
    t1 = torch.tensor([1, 2,3, 4, 5])
    print(f't1: {t1},type: {t1.type()}')

    # 张量 -> numpy
    # n1 = t1.numpy() 共享内存
    n1 = t1.numpy().copy()
    print(f'n1: {n1},type: {type(n1)}')

    n1[0] = 100
    print(f't1: {t1}')
    print(f'n1: {n1}')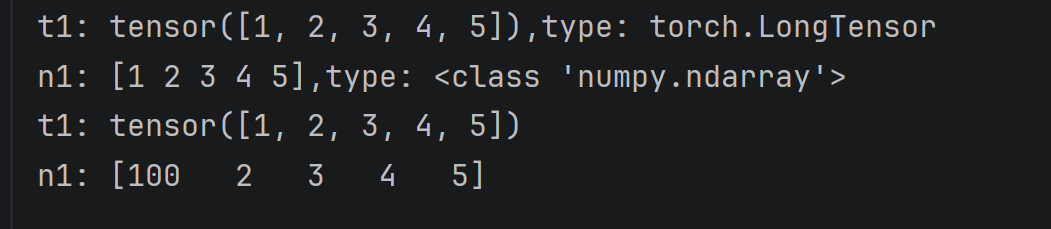
NumPy数组转换为张量
python
def dm02():
    n1 = np.array([11, 22, 33])
    print(f'n1: {n1},type: {type(n1)}')
    # 把上述numpy数组转换成张量
    # t1 = torch.from_numpy(n1).type(torch.float32)
    t1 = torch.from_numpy(n1)  # 共享内存
    print(f't1: {t1},type: {t1.type()}')

    t2 = torch.tensor(n1)
    print(f't2: {t2},type: {t2.type()}')

    n1[0] = 100
    print(f'n1: {n1}')
    print(f't1: {t1}')
    print(f't2: {t2}')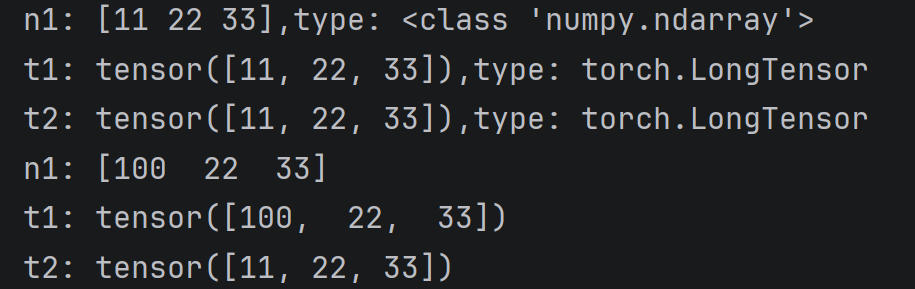
张量数值计算
基本运算
+-*/-- tensor/torch.add() sub() mul() div() neg()
tensor/torch.add_()sub_()mul_()div_()neg_()
python
# 运算: 张量和数值之间运算, 张量和张量之间运算
# + - * / -
# add(other=) sub() mul() div() neg()  不修改原张量
# add_() sub_() mul_() div_() neg_()  修改原张量

def dm01():
	# 创建张量
	t1 = torch.tensor(data=[1, 2, 3, 4])
	# 张量和数值运算
	t2 = t1 + 10
	print('t2->', t2)
	# 张量之间运算, 对应位置的元素进行计算
	t3 = t1 + t2
	print('t3->', t3)

	# add() 不修改原张量
	t1.add(other=100)
	t4 = torch.add(input=t1, other=100)
	print('t4->', t4)

	# neg_() 修改原张量, 负号
	t5 = t1.neg_()
	print('t1->', t1)
	print('t5->', t5)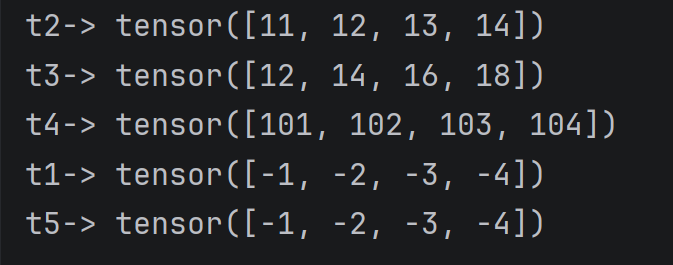
点乘运算
- 对应位置的元素进行乘法计算, 一般要求张量形状相同
python
def dm02():
	# 定义张量 2行3列
	t1 = torch.tensor(data=[[1, 2, 3],[4, 5, 6]])
	print(f't1: {t1}')

	# 定义张量,2行3列
	t2 = torch.tensor(data=[[1, 2, 3],[4, 5, 6]])
	print(f't2: {t2}')

	# 张量点乘操作
	t3 = t1 * t2
	print(f't3: {t3}')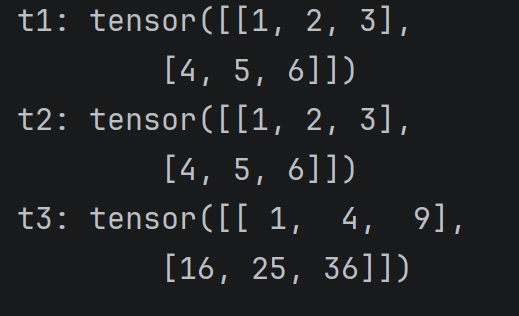
矩阵乘法运算
第一个矩阵的行数据和第二个矩阵的列数据相乘
python
import torch


# 矩阵乘法: (n, m) * (m, p) = (n, p)  第一个矩阵的行和第二个矩阵的列相乘  @  torch.matmul(input=, ohter=)
def dm01():
	# (2, 2)
	t1 = torch.tensor(data=[[1, 2],
							[3, 4]])
	# (2, 3)
	t2 = torch.tensor(data=[[5, 6, 7],
							[8, 9, 10]])

	# @
	t3 = t1 @ t2
	print('t3->', t3)
	# torch.matmul(): 不同形状, 只要后边维度符合矩阵乘法规则即可
	t4 = torch.matmul(input=t1, other=t2)
	print('t4->', t4)


if __name__ == '__main__':
	dm01()
张量运算函数
- mean()
- sum()
- min()/max()
- dim: 按不同维度计算
- exp(): 指数
- sqrt(): 平方根
- pow(): 幂次方
- log()/log2()/log10(): 对数
python
import torch


def dm01():
	# 创建张量
	t1 = torch.tensor(data=[[1., 2, 3, 4],
							[5, 6, 7, 8]])

	# dim=0 按列
	# dim=1 按行
	# 平均值
	print('所有值平均值->', t1.mean())
	print('按列平均值->', t1.mean(dim=0))
	print('按行平均值->', t1.mean(dim=1))
	# 求和
	print('所有值求和->', t1.sum())
	print('按列求和->', t1.sum(dim=0))
	print('按行求和->', t1.sum(dim=1))
	# sqrt: 开方 平方根
	print('所有值开方->', t1.sqrt())
	# pow: 幂次方  x^n
	# exponent:几次方
	print('幂次方->',torch.pow(input=t1, exponent=2))
	# exp: 指数 e^x  张量的元素值就是x
	print('指数->', torch.exp(input=t1))
	# log: 对数  log(x)->以e为底  log2()  log10()
	print('以e为底对数->', torch.log(input=t1))
	print('以2为底对数->', t1.log2())
	print('以10为底对数->', t1.log10())


if __name__ == '__main__':
	dm01()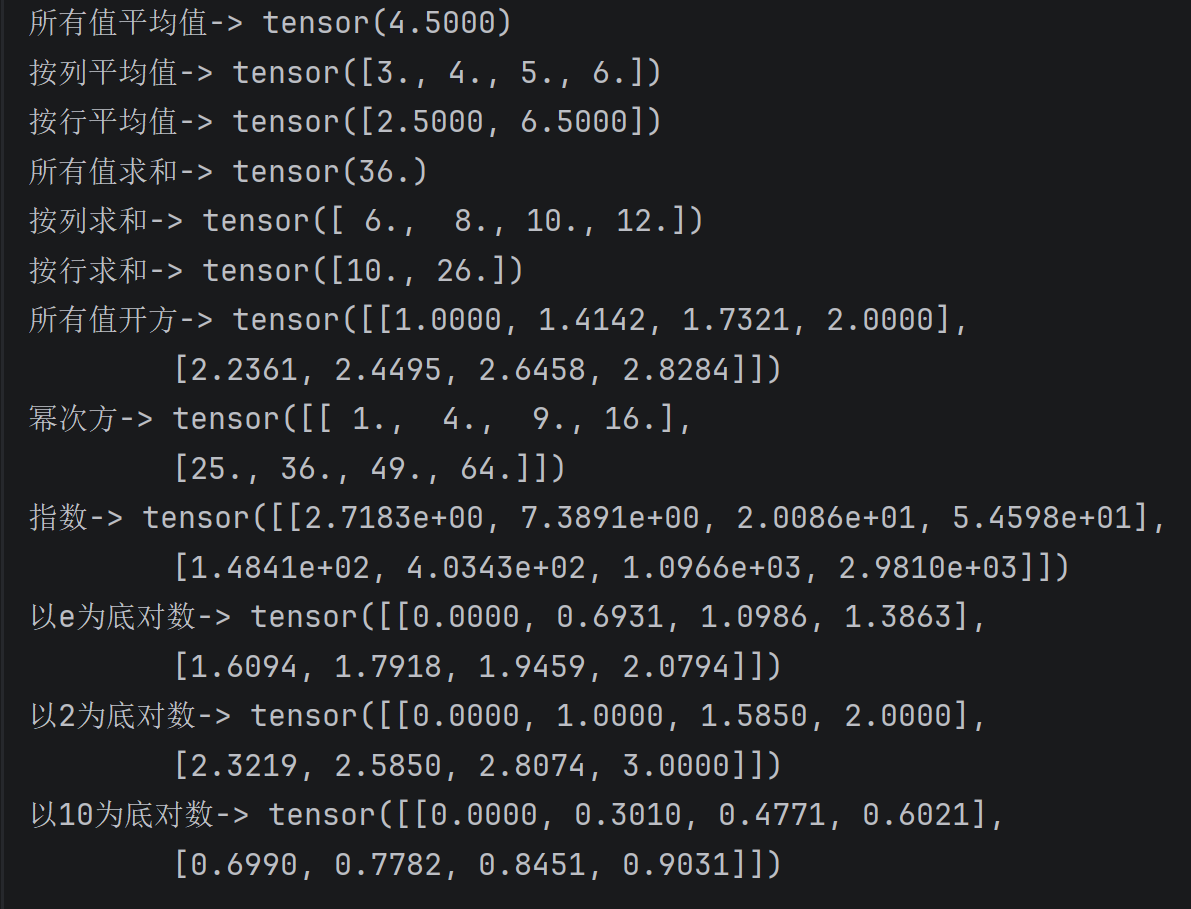
张量索引操作
python
import torch

# 下标从左到右从0开始(0->第一个值), 从右到左从-1开始
# data[行下标, 列下标]
# data[0轴下标, 1轴下标, 2轴下标]

def dm01():
	# 创建张量
	torch.manual_seed(0)
	data = torch.randint(low=0, high=10, size=(4, 5))
	print('data->', data)
	# 根据下标值获取对应位置的元素
	# 行数据 第一行
	print('data[0] ->', data[0])
	# 列数据 第一列
	print('data[:, 0]->', data[:, 0])
	# 根据下标列表取值
	# 第二行第三列的值和第四行第五列值
	print('data[[1, 3], [2, 4]]->', data[[1, 3], [2, 4]])
	# [[1], [3]: 第二行第三列 第二行第五列值   第四行第三列 第四行第五列值
	print('data[[[1], [3]], [2, 4]]->', data[[[1], [3]], [2, 4]])
	# 根据布尔值取值
	# 第二列大于6的所有行数据
	print(data[:, 1] > 6)
	print('data[data[:, 1] > 6]->', data[data[:, 1] > 6])
	# 第三行大于6的所有列数据
	print('data[:, data[2]>6]->', data[:, data[2] > 6])
	# 根据范围取值  切片  [起始下标:结束下标:步长]
	# 第一行第三行以及第二列第四列张量
	print('data[::2, 1::2]->', data[::2, 1::2])

	# 创建三维张量
	data2 = torch.randint(0, 10, (3, 4, 5))
	print("data2->", data2)
	# 0轴第一个值
	print(data2[0, :, :])
	# 1轴第一个值
	print(data2[:, 0, :])
	# 2轴第一个值
	print(data2[:, :, 0])


if __name__ == '__main__':
	dm01()
python
data-> tensor([[4, 9, 3, 0, 3],
        [9, 7, 3, 7, 3],
        [1, 6, 6, 9, 8],
        [6, 6, 8, 4, 3]])
data[0] -> tensor([4, 9, 3, 0, 3])
data[:, 0]-> tensor([4, 9, 1, 6])
data[[1, 3], [2, 4]]-> tensor([3, 3])
data[[[1], [3]], [2, 4]]-> tensor([[3, 3],
        [8, 3]])
tensor([ True,  True, False, False])
data[data[:, 1] > 6]-> tensor([[4, 9, 3, 0, 3],
        [9, 7, 3, 7, 3]])
data[:, data[2]>6]-> tensor([[0, 3],
        [7, 3],
        [9, 8],
        [4, 3]])
data[::2, 1::2]-> tensor([[9, 0],
        [6, 9]])
data2-> tensor([[[6, 9, 1, 4, 4],
         [1, 9, 9, 9, 0],
         [1, 2, 3, 0, 5],
         [5, 2, 9, 1, 8]],

        [[8, 3, 6, 9, 1],
         [7, 3, 5, 2, 1],
         [0, 9, 3, 1, 1],
         [0, 3, 6, 6, 7]],

        [[9, 6, 3, 4, 5],
         [0, 8, 2, 8, 2],
         [7, 5, 0, 0, 8],
         [1, 9, 6, 1, 0]]])
tensor([[6, 9, 1, 4, 4],
        [1, 9, 9, 9, 0],
        [1, 2, 3, 0, 5],
        [5, 2, 9, 1, 8]])
tensor([[6, 9, 1, 4, 4],
        [8, 3, 6, 9, 1],
        [9, 6, 3, 4, 5]])
tensor([[6, 1, 1, 5],
        [8, 7, 0, 0],
        [9, 0, 7, 1]])
张量形状操作
reshape
reshape 函数可以在保证张量数据不变的前提下改变数据的维度,将其转换成指定的形状。
python
# reshape(shape=(行,列)): 修改连续或非连续张量的形状, 不改数据
# -1: 表示自动计算行或列   例如:  (5, 6) -> (-1, 3) -1*3=5*6 -1=10  (10, 3)
def dm01():
	torch.manual_seed(0)
	t1 = torch.randint(0, 10, (5, 6))
	print('t1->', t1)
	print('t1的形状->', t1.shape)
	# 形状修改为 (2, 15)
	t2 = t1.reshape(shape=(2, 15))
	t3 = t1.reshape(shape=(2, -1))
	print('t2->', t2)
	print('t2的形状->', t2.shape)
	print('t3->', t3)
	print('t3的形状->', t3.shape)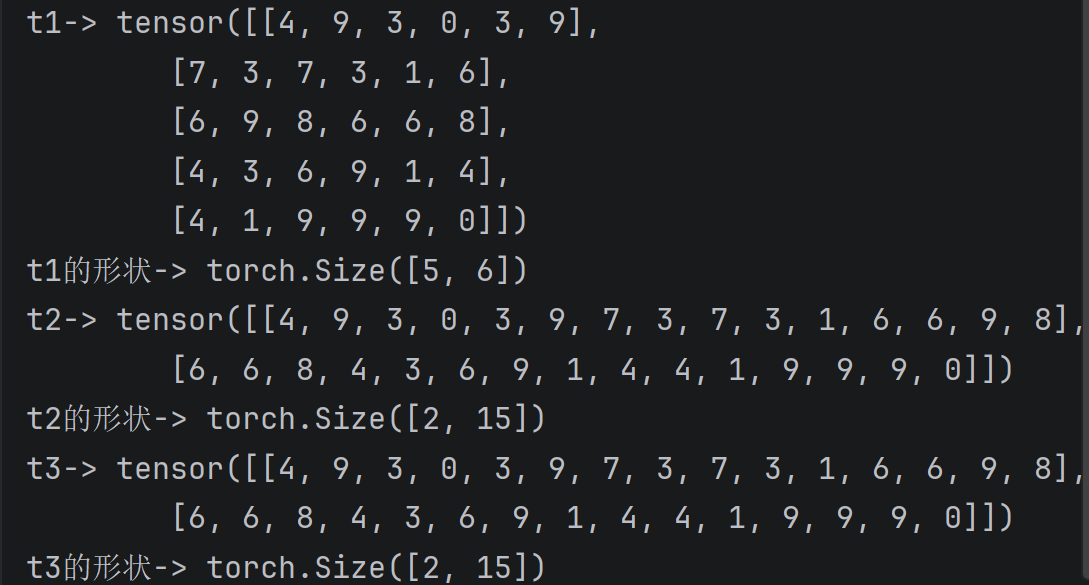
squeeze和unsqueeze
Squeeze函数删除形状为1的维度(降维),unsqueeze函数添加形状为1的维度(升维)
python
# squeeze(dim=): 删除值为1的维度, dim->指定维度, 维度值不为1不生效  不设置dim,删除所有值为1的维度
# 例如: (3,1,2,1) -> squeeze()->(3,2)  squeeze(dim=1)->(3,2,1)
# unqueeze(dim=): 在指定维度上增加值为1的维度  dim=-1:最后维度
def dm02():
	torch.manual_seed(0)
	# 四维
	t1 = torch.randint(0, 10, (3, 1, 2, 1))
	print('t1->', t1)
	print('t1的形状->', t1.shape)
	# squeeze: 降维
	t2 = torch.squeeze(t1)  # 不指定 dim,默认把所有大小为 1 的维度全部删掉
	print('t2->', t2)
	print('t2的形状->', t2.shape)
	# dim: 指定维度
	t3 = torch.squeeze(t1, dim=1)
	print('t3->', t3)
	print('t3的形状->', t3.shape)
	# unsqueeze: 升维
	# (3, 2)->(1, 3, 2)
	# t4 = t2.unsqueeze(dim=0)
	# 最后维度 (3, 2)->(3, 2, 1)
	t4 = t2.unsqueeze(dim=-1)
	print('t4->', t4)
	print('t4的形状->', t4.shape)
python
t1-> tensor([[[[4],
          [9]]],


        [[[3],
          [0]]],


        [[[3],
          [9]]]])
t1的形状-> torch.Size([3, 1, 2, 1])
t2-> tensor([[4, 9],
        [3, 0],
        [3, 9]])
t2的形状-> torch.Size([3, 2])
t3-> tensor([[[4],
         [9]],

        [[3],
         [0]],

        [[3],
         [9]]])
t3的形状-> torch.Size([3, 2, 1])
t4-> tensor([[[4],
         [9]],

        [[3],
         [0]],

        [[3],
         [9]]])
t4的形状-> torch.Size([3, 2, 1])
transpose和permute
transpose函数可以实现交换张量形状的指定维度,例如:一个张量的形状为(2,3,4)可以通过 transpose 函数把3和4进行交换,将张量的形状变为(2,4,3)。permute函数可以一次交换更多的维度。
permute 是 PyTorch 中最灵活的"轴重排"工具。它的作用非常简单粗暴:不增加维度,不减少维度,仅仅把原有的轴(维度)按照你指定的新顺序"调换位置"。
python
# 调换维度
# torch.permute(input=,dims=): 改变张量任意维度顺序
# input: 张量对象
# dims: 改变后的维度顺序, 传入轴下标值 (1,2,3)->(3,1,2)
# torch.transpose(input=,dim0=,dim1=): 改变张量两个维度顺序
# dim0: 轴下标值, 第一个维度
# dim1: 轴下标值, 第二个维度
# (1,2,3)->(2,1,3) 一次只能交换两个维度
def dm03():
	torch.manual_seed(0)
	t1 = torch.randint(low=0, high=10, size=(3, 4, 5))
	print('t1->', t1)
	print('t1形状->', t1.shape)
	# 交换0维和1维数据
	# t2 = t1.transpose(dim0=1, dim1=0)
	t2 = t1.permute(dims=(1, 0, 2))
	print('t2->', t2)
	print('t2形状->', t2.shape)
	# t1形状修改为 (5, 3, 4)
	t3 = t1.permute(dims=(2, 0, 1))
	print('t3->', t3)
	print('t3形状->', t3.shape)
python
t1-> tensor([[[4, 9, 3, 0, 3],
         [9, 7, 3, 7, 3],
         [1, 6, 6, 9, 8],
         [6, 6, 8, 4, 3]],

        [[6, 9, 1, 4, 4],
         [1, 9, 9, 9, 0],
         [1, 2, 3, 0, 5],
         [5, 2, 9, 1, 8]],

        [[8, 3, 6, 9, 1],
         [7, 3, 5, 2, 1],
         [0, 9, 3, 1, 1],
         [0, 3, 6, 6, 7]]])
t1形状-> torch.Size([3, 4, 5])
t2-> tensor([[[4, 9, 3, 0, 3],
         [6, 9, 1, 4, 4],
         [8, 3, 6, 9, 1]],

        [[9, 7, 3, 7, 3],
         [1, 9, 9, 9, 0],
         [7, 3, 5, 2, 1]],

        [[1, 6, 6, 9, 8],
         [1, 2, 3, 0, 5],
         [0, 9, 3, 1, 1]],

        [[6, 6, 8, 4, 3],
         [5, 2, 9, 1, 8],
         [0, 3, 6, 6, 7]]])
t2形状-> torch.Size([4, 3, 5])
t3-> tensor([[[4, 9, 1, 6],
         [6, 1, 1, 5],
         [8, 7, 0, 0]],

        [[9, 7, 6, 6],
         [9, 9, 2, 2],
         [3, 3, 9, 3]],

        [[3, 3, 6, 8],
         [1, 9, 3, 9],
         [6, 5, 3, 6]],

        [[0, 7, 9, 4],
         [4, 9, 0, 1],
         [9, 2, 1, 6]],

        [[3, 3, 8, 3],
         [4, 0, 5, 8],
         [1, 1, 1, 7]]])
t3形状-> torch.Size([5, 3, 4])
view和contiguous
view 函数也可以用于修改张量的形状,只能用于修改连续的张量。在PyTorch中,有些张量的底层数据在内存中的存储顺序与其在张量中的逻辑顺序不一致,view 函数无法对这样的张量进行变形处理,例如:一个张量经过了transpose或者permute 函数的处理之后,就无法使用view 函数进行形状操作。
python
# tensor.view(shape=): 修改连续张量的形状, 操作等同于reshape()
# tensor.is_contiugous(): 判断张量是否连续, 返回True/False  张量经过transpose/permute处理变成不连续
# tensor.contiugous(): 将张量转为连续张量
def dm05():
	torch.manual_seed(23)
	# 定义张量
	t1 = torch.randint(1, 10, (2, 3))
	print(f't2: {t1}, shape: {t1.shape}')
	# 判断张量是否连续,即张量中的顺序和内存中存储数据是否一致
	# print(t1.is_contiguous()) # True

	# 通过修改view()函数,修改上述张量的形状
	t2 = t1.view(3,2)
	print(f't2: {t2}, shape: {t2.shape}')
	print(t2.is_contiguous()) # True

	# 通过 transpose()交换维度 ->  交换之后,不连续了
	t3 = t1.transpose(0,1)
	print(f't3: {t3}, shape: {t3.shape}')
	print(t3.is_contiguous()) # False

	# view只能处理连续的张量
	# t4 = t3.view(2,3) t3不连续报错

	# 可以通过 contiguous()函数处理,先变为连续张量再通过view修改形状
	t5 = t3.contiguous().view(2, 3)
	print(f't5: {t5}, shape: {t5.shape}')
	print(t5.is_contiguous())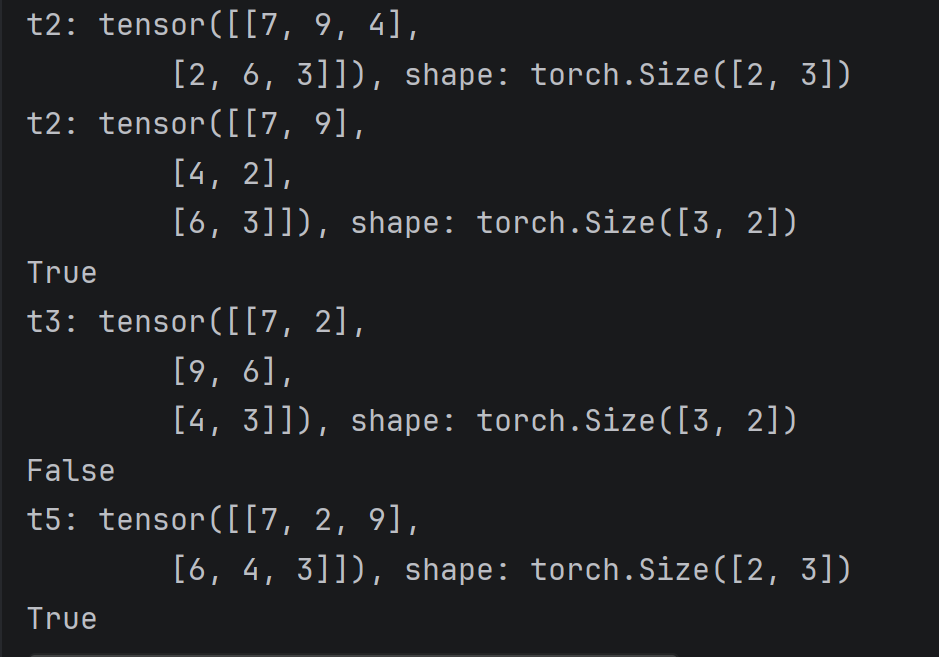
张量拼接操作
cat/concat
torch.cat(函数可以将多个张量根据指定的维度拼接起来,不改变维度数。
torch.stackQ函数会在一个新的维度上连接一系列张量,这会增加一个新维度,并且所有输入张量的形状必须完全相同。
python
def dm01():
    torch.manual_seed(23)
    t1 = torch.randint(1, 10, (2, 3))
    print(f't1: {t1}, shape: {t1.shape}')
    t2 = torch.randint(1, 10, (2, 3))
    print(f't2: {t2}, shape: {t2.shape}')
    t3 = torch.cat([t1, t2], dim=0) # (2,3) + (2,3) = (4,3)
    print(f't3: {t3}, shape: {t3.shape}')
    t4 = torch.concat([t1, t2], dim=1)
    print(f't4: {t4}, shape: {t4.shape}')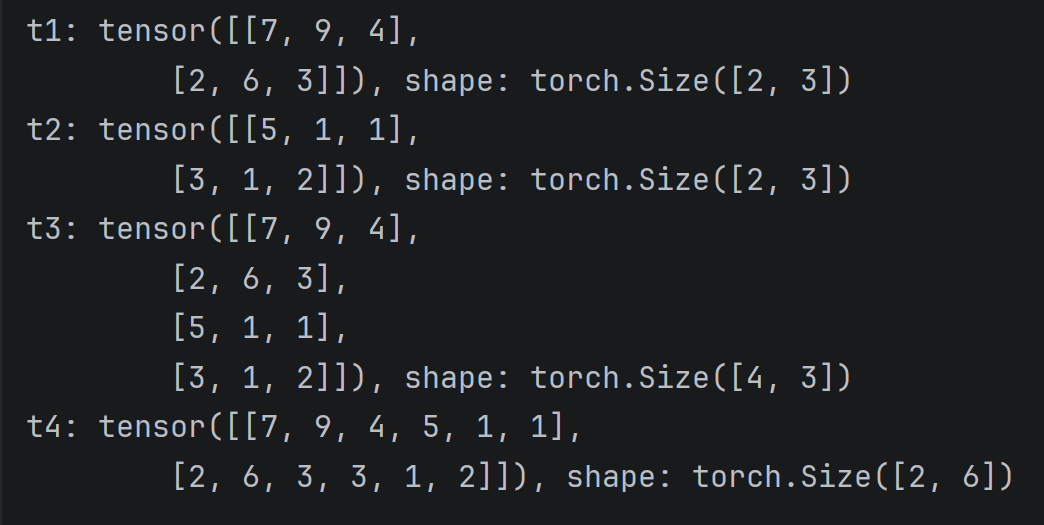
torch.stack 新增加的维度,大小严格等于你传入的张量个数
自动微分模块
梯度计算
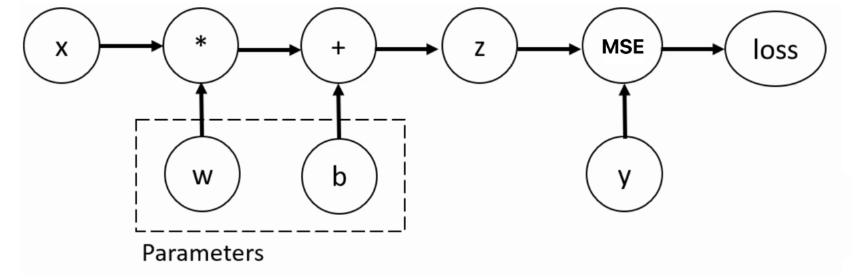
训练神经网络时,最常用的算法就是反向传播。在该算法中,参数(模型权重)会根据损失函数关于对应参数的梯度进行调整。为了计算这些梯度,PyTorch内置了名为torch.autograd的微分模块。它支持任意计算图的自动梯度计算:
python
"""
梯度: 求导,求微分 上山下山最快的方向
梯度下降法: W1=W0-lr*梯度   lr是可调整已知参数  W0:初始模型的权重,已知  计算出W0的梯度后更新到W1权重
pytorch中如何自动计算梯度 自动微分模块
注意点: ①loss标量和w向量进行微分  ②梯度默认累加,计算当前的梯度, 梯度值是上次和当前次求和  ③梯度存储.grad属性中
"""
def dm01():
    # 定义变量 记录初始的权重
    # 参1:初始值 参2:是否自动微分(求导) 参3:数据类型
    w = torch.tensor(10,requires_grad=True,dtype=torch.float)
    # 定义loss变量,表示损失函数
    loss = 2 * w ** 2
    # print(f'梯度函数类型:{type(loss.grad_fn)}')
    # 代入权重更新公式 W新 = W旧 - 梯度 * 学习率
    # 计算梯度 梯度 = 损失函数的导数
    loss.backward()
    # 代入权重更新公式
    w.data = w.data - 0.01 * w.grad

    print(f'更新后的权重:{w}')
梯度下降法求最优解
python
"""
① 创建自动微分w权重张量
② 自定义损失函数 loss=w**2+20  后续无需自定义,导入不同问题损失函数模块
③ 前向传播 -> 先根据上一版模型计算预测y值, 根据损失函数计算出损失值
④ 反向传播 -> 计算梯度
⑤ 梯度更新 -> 梯度下降法更新w权重
"""
def dm02():
    w = torch.tensor(10, requires_grad=True, dtype=torch.float)
    loss = w ** 2 + 20
    # 利用梯度下降法,循环迭代100,求最优解
    print(f'开始权重初始值:{w},(0.01 * 2.grad): 无,loss: {loss}')
    # 迭代100次
    for i in range(1,101):
        # 正向计算(前向传播)
        loss = w ** 2 + 20
        # 梯度清零
        if w.grad is not None:
            w.grad.zero_()
        # 反向传播
        loss.sum().backward()
        # 梯度更新
        w.data = w.data - 0.01 * w.grad
        # 打印本次梯度更新后权重参数
        print(f'第 {i} 次迭代权重参数:{w},(0.01 * w.grad): {0.01 * w.grad:.5f},loss: {loss:.5f}')

    print(f'最终结果权重:{w}, 梯度: {w.grad:.5f}, loss: {loss:.5f}')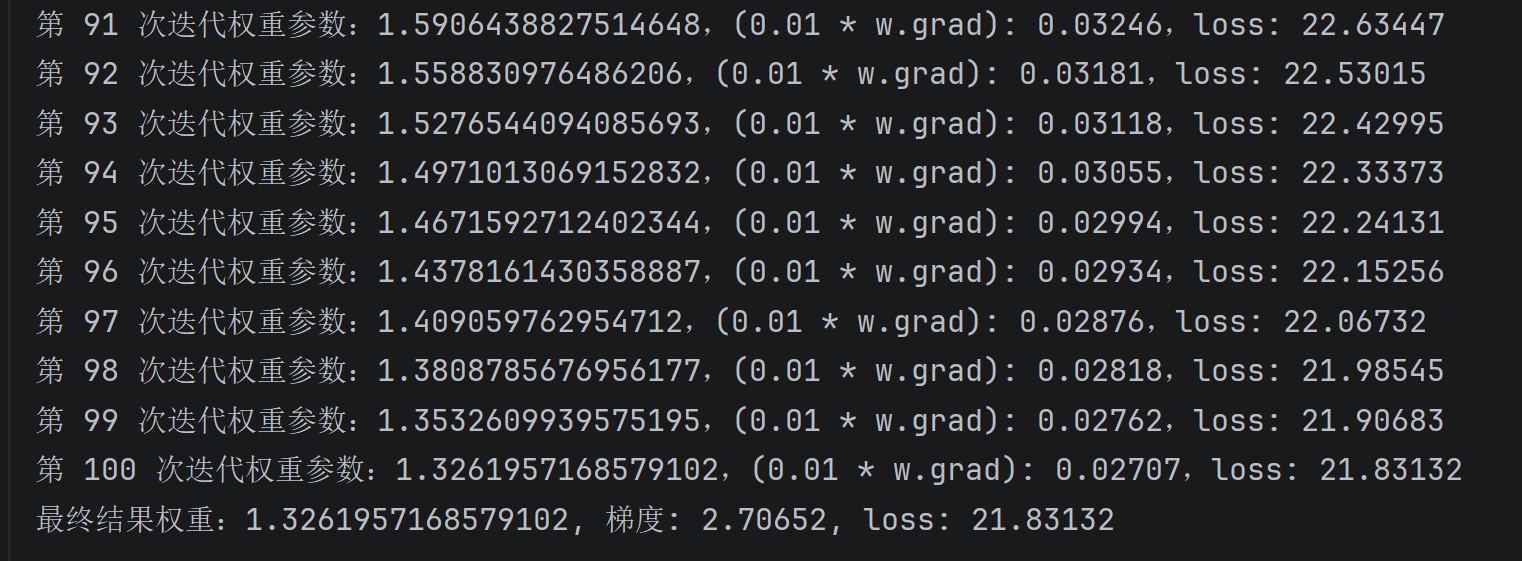
梯度计算注意点
不能将自动微分的张量转换成numpy数组,会发生报错,可以通过detach(方法实现
python
def dm01():
	x1 = torch.tensor(data=10, requires_grad=True, dtype=torch.float32)
	print('x1->', x1)
	# 判断张量是否自动微分 返回True/False
	print(x1.requires_grad)
	# 调用detach()方法对x1进行剥离, 得到新的张量,不能自动微分,数据和原张量共享
	x2 = x1.detach()
	print(x2.requires_grad)
	print(x1.data)
	print(x2.data)
	print(id(x1.data))
	print(id(x2.data))
	# 自动微分张量转换成numpy数组
	n1 = x2.numpy()
	print('n1->', n1)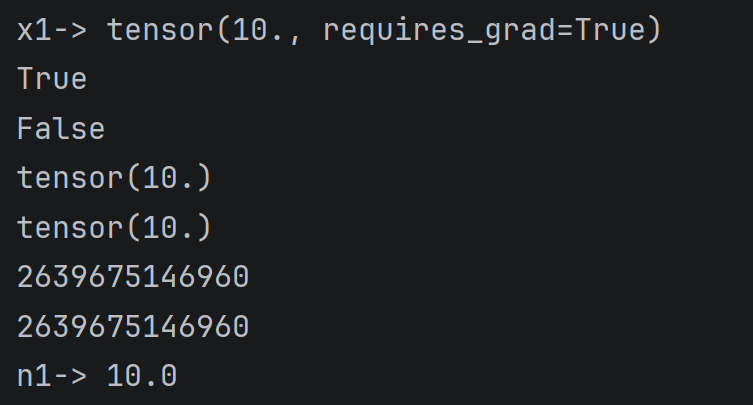
自动微分模块应用
python
import torch
import torch.nn as nn  # 损失函数,优化器函数,模型函数


def dm01():
	# todo:1-定义样本的x和y
	x = torch.ones(size=(2, 5))
	y = torch.zeros(size=(2, 3))
	print('x->', x)
	print('y->', y)
	# todo:2-初始模型权重 w b 自动微分张量
	w = torch.randn(size=(5, 3), requires_grad=True)
	b = torch.randn(size=(3,), requires_grad=True)
	print('w->', w)
	print('b->', b)
	# todo:3-初始模型,计算预测y值
	y_pred = torch.matmul(x, w) + b
	print('y_pred->', y_pred)
	# todo:4-根据MSE损失函数计算损失值
	# 创建MSE对象, 类创建对象
	criterion = nn.MSELoss()
	loss = criterion(y_pred, y)
	print('loss->', loss)
	# todo:5-反向传播,计算w和b梯度
	loss.sum().backward()
	print('w.grad->', w.grad)
	print('b.grad->', b.grad)


if __name__ == '__main__':
	dm01()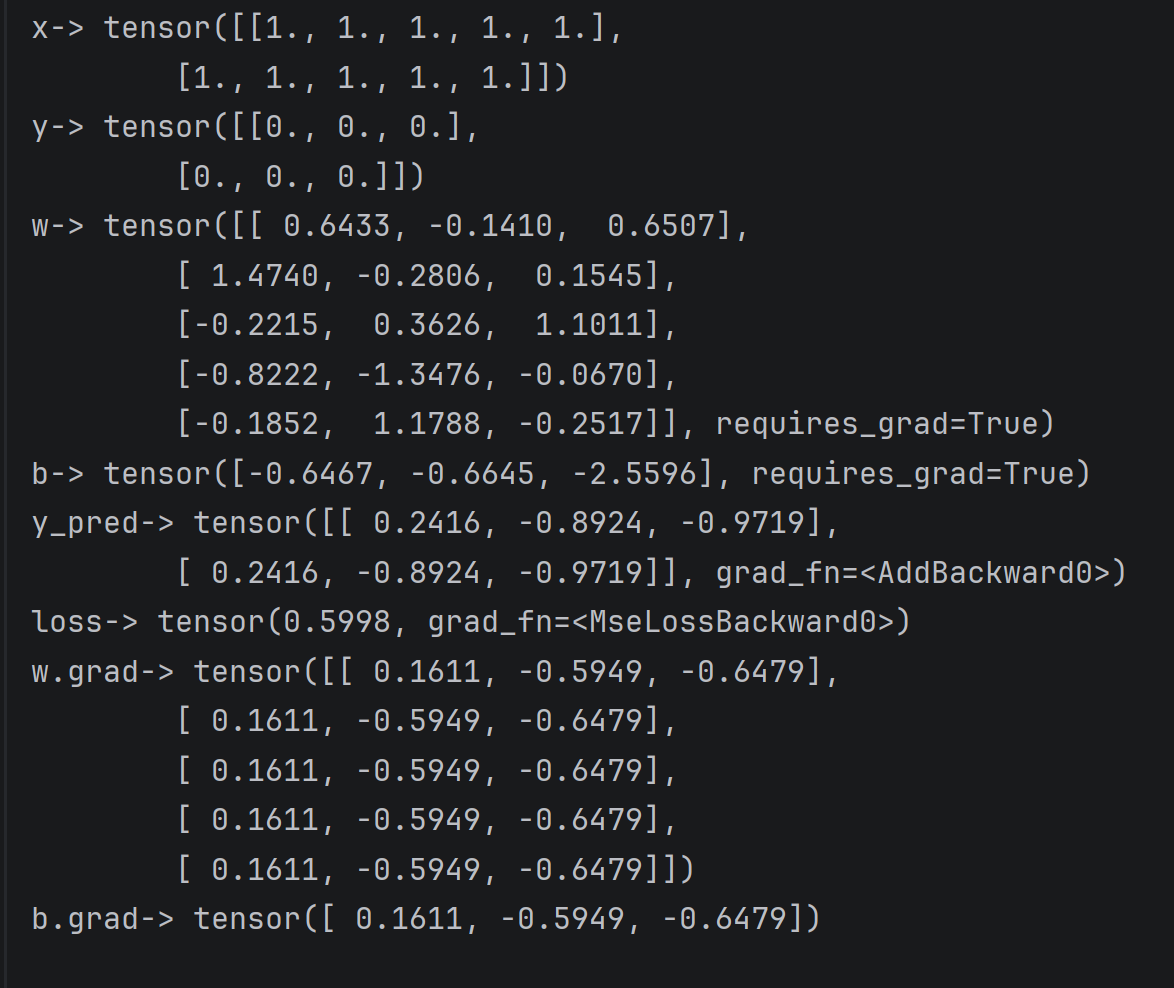
总结
深度学习的世界广阔而精彩,PyTorch 为你铺好了坚实的基石。愿你在接下来的学习旅程中,乘风破浪,构建属于自己的智能模型!🚀