前言
本文基于 cri-docker(Docker 作为 CRI 容器运行时) 搭建一套 Kubernetes v1.36.3 集群,节点规划为 1 个 Master + 2 个 Node ,网络插件采用 Calico(关闭 IPIP/VXLAN,使用 BGP 模式)。操作命令来自真实实验环境,按步骤复制粘贴即可,适合初学 Kubernetes 的同学照着做。
小提示 :cri-docker 与 containerd 是两种 CRI 容器运行时,二选一安装即可,不要同时安装。本文主体走 cri-docker 路线(4.2.1),4.2.2 同时附上 containerd 方式供参考。
一、环境准备与节点规划
开始前先用 VMware/VirtualBox 克隆三台 CentOS/RHEL 虚拟机 ,分别作为 Master、Node01、Node02。三台主机的 IP 与主机名规划如下(文中以 192.168.194.x 网段为例,请按你实际网段修改):
| 角色 | 主机名 | 计划 IP | 别名 |
|---|---|---|---|
| Master | k8s-master01 |
192.168.194.11 |
m1 |
| Node01 | k8s-node01 |
192.168.194.12 |
n1 |
| Node02 | k8s-node02 |
192.168.194.13 |
n2 |
| Harbor | hb.reg.com |
192.168.194.20 |
harbor |
文中用到
m1、n1、n2、harbor这些别名,方便后续scp拷贝文件时短命令直接使用。
二、集群准备(Master / Node01 / Node02)
2.1 配置 Master 节点
克隆一台 k8s-1 虚拟机用作 Master,按下面步骤配置。
2.1.1 修改主机名
bash
[root@localhost ~]# hostnamectl hostname k8s-master01 && bash2.1.2 修改网卡
先查看当前网卡信息:
bash
[root@k8s-master01 ~]# ls /etc/NetworkManager/system-connections/
ens160.nmconnection
[root@k8s-master01 ~]# ip a
2: ens160: <BROADCAST,MULTICAST,UP,LOWER_UP> mtu 1500 qdisc mq state UP group default qlen 1000
    link/ether 00:0c:29:eb:22:8e brd ff:ff:ff:ff:ff:ff
修改 ens160 的 IP 为静态 IP:
bash
[root@k8s-master01 ~]# nmcli c m ens160 ipv4.method manual ipv4.addresses 192.168.194.11/24 ipv4.dns "223.5.5.5 8.8.8.8" ipv4.gateway 192.168.10.2 connection.autoconnect yes
[root@k8s-master01 ~]# nmcli c up ens160
Connection successfully activated (D-Bus active path: /org/freedesktop/NetworkManager/ActiveConnection/4)
⚠️ 网关地址(
gateway)请按你实际路由器的地址修改,文中192.168.10.2仅为示例。
2.1.3 配置主机映射
bash
[root@k8s-master01 ~]# cat > /etc/hosts <<EOF
192.168.194.11 k8s-master01 m1
192.168.194.12 k8s-node01 n1
192.168.194.13 k8s-node02 n2
192.168.194.20 hb.reg.com harbor
EOF配置完成后,给 Master 做个快照(防止后续操作失误,方便回滚)。
2.2 配置 Node01 节点
克隆一台 k8s-2 虚拟机用作 Node01。
2.2.1 修改主机名
bash
[root@localhost ~]# hostnamectl hostname k8s-node01 && bash2.2.2 修改网卡
bash
[root@k8s-node01 ~]# ls /etc/NetworkManager/system-connections/
ens160.nmconnection
[root@k8s-node01 ~]# ip a
2: ens160: <BROADCAST,MULTICAST,UP,LOWER_UP> mtu 1500 qdisc mq state UP group default qlen 1000
    link/ether 00:0c:29:eb:22:8e brd ff:ff:ff:ff:ff:ff
    altname enp3s0
    inet 192.168.10.134/24 brd 192.168.10.255 scope global dynamic noprefixroute ens160
修改 ens160 的 IP:
bash
[root@k8s-node01 ~]# nmcli c m ens160 ipv4.method manual ipv4.addresses 192.168.194.12/24 ipv4.dns "223.5.5.5 8.8.8.8" ipv4.gateway 192.168.194.2 connection.autoconnect yes
[root@k8s-node01 ~]# nmcli c up ens160
Connection successfully activated (D-Bus active path: /org/freedesktop/NetworkManager/ActiveConnection/4)
2.2.3 配置主机映射
bash
[root@k8s-node01 ~]# cat > /etc/hosts <<EOF
192.168.194.11 k8s-master01 m1
192.168.194.12 k8s-node01 n1
192.168.194.13 k8s-node02 n2
192.168.194.20 hb.reg.com harbor
EOF
配置好后,给 Node01 做一个快照。
2.3 配置 Node02 节点
克隆一台 k8s-3 虚拟机用作 Node02。
2.3.1 修改主机名
bash
[root@192 ~]# hostnamectl hostname k8s-node02 && bash2.3.2 修改网卡
bash
[root@k8s-node02 ~]# ls /etc/NetworkManager/system-connections/
ens160.nmconnection
[root@k8s-node02 ~]# ip a
2: ens160: <BROADCAST,MULTICAST,UP,LOWER_UP> mtu 1500 qdisc mq state UP group default qlen 1000
    link/ether 00:0c:29:eb:22:8e brd ff:ff:ff:ff:ff:ff
    altname enp3s0
    inet 192.168.10.135/24 brd 192.168.10.255 scope global dynamic noprefixroute ens160
修改 ens160 的 IP(注意此处是单数 address,写法略有差异,但效果一致):
bash
[root@k8s-node02 ~]# nmcli c m ens160 ipv4.method manual ipv4.address 192.168.194.13/24 ipv4.dns "223.5.5.5 8.8.8.8" ipv4.gateway 192.168.194.2 connection.autoconnect yes
[root@k8s-node02 ~]# nmcli c up ens160
Connection successfully activated (D-Bus active path: /org/freedesktop/NetworkManager/ActiveConnection/4)
2.3.3 配置主机映射
bash
[root@k8s-node02 ~]# cat > /etc/hosts <<EOF
192.168.194.11 k8s-master01 m1
192.168.194.12 k8s-node01 n1
192.168.194.13 k8s-node02 n2
192.168.194.20 hb.reg.com harbor
EOF
配置好后,给 Node02 做一个快照。
三、搭建 Kubernetes 集群
⚠️ 本节 3.1、3.2、3.3 的安装操作需要在 k8s-1、k8s-2、k8s-3 三台机器上全部执行(除非特别标注只作用于 Master)。
3.1 安装 Docker
3.1.1 添加 docker 源
bash
dnf install yum-utils -y
yum-config-manager --add-repo https://mirrors.aliyun.com/docker-ce/linux/rhel/docker-ce.repo
3.1.2 安装 docker
bash
dnf install docker-ce docker-ce-cli containerd.io docker-buildx-plugin docker-compose-plugin -y3.1.3 配置 docker
bash
cat > /etc/docker/daemon.json <<EOF
{
    "default-ipc-mode": "shareable",
    "data-root": "/data/docker",
    "exec-opts": ["native.cgroupdriver=systemd"],
    "log-driver": "json-file",
    "log-opts": {
        "max-size": "100m",
        "max-file": "50"
    },
    "insecure-registries": ["https://hb.reg.com"],
    "registry-mirrors": [
        "https://docker.m.daocloud.io",
        "https://docker.ims.run"
    ]
}
EOF
解释:
data-root指定 Docker 数据目录;exec-opts设置 cgroup 驱动为systemd(与 kubelet 保持一致,避免 cgroupfs 冲突);insecure-registries用于访问自建 Harbor 私仓;registry-mirrors为国内镜像加速。
3.1.4 启动 docker
bash
systemctl enable --now docker3.1.5 验证 docker
bash
[root@localhost ~]# docker version
Client: Docker Engine - Community
 Version:           29.6.2
 API version:       1.55
 Go version:        go1.26.5
 Git commit:        dfc4efb
 Built:             Thu Jul 16 16:15:33 2026
 OS/Arch:           linux/amd64
 Context:           default

Server: Docker Engine - Community
 Engine:
  Version:          29.6.2
  API version:      1.55 (minimum version 1.40)
  Go version:       go1.26.5
  Git commit:       3d80467
  Built:            Thu Jul 16 16:11:37 2026
  OS/Arch:          linux/amd64
  Experimental:     false
 containerd:
  Version:          v2.2.6
  GitCommit:        11ce9d5f3c68c941867e82890e93e815c1304f1b
 runc:
  Version:          1.3.6
  GitCommit:        v1.3.6-0-g491b69ba
 docker-init:
  Version:          0.19.0
  GitCommit:        de40ad0
看到 Server: 那段能正常输出,说明 Docker 已成功启动。
3.2 安装 CRI 容器运行时
CRI 为容器运行时接口,常见有 cri-docker 和 containerd 两种,二选一安装即可,不要都装。这里给出两条路线。
3.2.1 方案一:安装 cri-docker(本文主线)
(1)下载 cri-docker
bash
wget https://github.com/Mirantis/cri-dockerd/releases/download/v0.4.6/cri-dockerd-0.4.6.amd64.tgz(2)解压文件
bash
tar -xf cri-dockerd-0.4.6.amd64.tgz(3)将文件复制到 /usr/bin 目录
bash
cp cri-docker/cri-docker /usr/bin/(4)设置可执行权限
bash
chmod +x /usr/bin/cri-docker(5)配置 cri-docker 服务
bash
cat > /usr/lib/systemd/system/cri-docker.service <<EOF
[Unit]
Description=CRI Interface for Docker Application Container Engine
Documentation=https://docs.mirantis.com
After=network-online.target firewalld.service docker.service
Wants=network-online.target
Requires=cri-docker.socket

[Service]
Type=notify
ExecStart=/usr/bin/cri-dockerd --container-runtime-endpoint fd:// --network-plugin=cni --pod-infra-container-image=registry.k8s.io/pause:3.10.2
ExecReload=/bin/kill -s HUP $MAINPID
TimeoutSec=0
RestartSec=2
Restart=always

StartLimitBurst=3

StartLimitInterval=60s

LimitNOFILE=infinity
LimitNPROC=infinity
LimitCORE=infinity

TasksMax=infinity
Delegate=yes
KillMode=process

[Install]
WantedBy=multi-user.target
EOF
💡 进阶说明 :这个 unit 文件也可以直接从
cri-dockerd-0.4.6.amd64.tgz包内的packaging/systemd/目录获取,然后修改/etc/systemd/system/cri-docker.service,为Service.ExecStart增加--network-plugin和--pod-infra-container-image两个选项。其中--pod-infra-container-image(pause 根容器镜像)的 tag 需根据你的 Kubernetes 版本来定,例如本教程为3.10.2。
(6)配置 cri-docker 套接字
bash
cat > /usr/lib/systemd/system/cri-docker.socket <<EOF
[Unit]
Description=CRI Docker Socket for the API
PartOf=cri-docker.service

[Socket]
ListenStream=%t/cri-dockerd.sock
SocketMode=0660
SocketUser=root
SocketGroup=docker

[Install]
WantedBy=sockets.target
EOF
拷贝 cri-docker 服务与套接字到 Node 节点:
bash
[root@k8s-master01 ~]# scp cri-docker.service cri-docker.socket n1:/usr/lib/systemd/system
cri-docker.service                                                                                                         100%  665   939.5KB/s   00:00
cri-docker.socket                                                                                                          100%  204   584.0KB/s   00:00
[root@k8s-master01 ~]# scp cri-docker.service cri-docker.socket n2:/usr/lib/systemd/system
cri-docker.service                                                                                                         100%  665     1.3MB/s   00:00
cri-docker.socket                                                                                                          100%  204   675.6KB/s   00:00
上传并加载 pause 根容器镜像:
bash
[root@k8s-master01 ~]# docker load -i pause_3.10.2.tar.gz
Loaded image: registry.k8s.io/pause:3.10.2
[root@k8s-master01 ~]# docker images
                                                                                                                              i Info →   U  In Use
IMAGE                          ID             DISK USAGE   CONTENT SIZE   EXTRA
registry.k8s.io/pause:3.10.2   9aec5a02507b       1.06MB          318kB
(7)启动 cri-docker 服务
bash
systemctl daemon-reload
systemctl enable --now cri-docker
systemctl is-active cri-docker
systemctl is-active 返回 active 即启动成功。
3.2.2 方案二:安装 containerd(二选一,供参考)
这种方式见这篇文章:
3.3 安装 Kubernetes
3.3.1 配置仓库
(1)添加 Kubernetes 源
bash
cat <<EOF | tee /etc/yum.repos.d/kubernetes.repo
[kubernetes]
name=Kubernetes
baseurl=https://mirrors.aliyun.com/kubernetes-new/core/stable/v1.36/rpm/
enabled=1
gpgcheck=1
gpgkey=https://mirrors.aliyun.com/kubernetes-new/core/stable/v1.36/rpm/repodata/repomd.xml.key
EOF
(2)安装 kubernetes
bash
yum install -y kubelet kubeadm kubectl三个工具的作用分别如下:
| 工具 | 作用 |
|---|---|
| kubeadm | 集群初始化工具,用于一键搭建 / 加入集群 |
| kubelet | 节点代理服务,运行在每个节点上,负责管理容器并上报状态 |
| kubectl | 命令行客户端,用户向集群下发指令的交互工具 |
(3)让 kubelet 开机自启
bash
systemctl enable kubelet注意:此时 kubelet 会因缺少配置而启动失败,属正常现象,
kubeadm init会补齐配置,无需担心。
(4)验证安装
bash
[root@k8s-master01 ~]# kubeadm version
kubeadm version: &version.Info{Major:"1", Minor:"36", EmulationMajor:"", EmulationMinor:"", MinCompatibilityMajor:"", MinCompatibilityMinor:"", GitVersion:"v1.36.3", GitCommit:"0f29094e5b73085e3802ecc1298ecae13866bfe6", GitTreeState:"clean", BuildDate:"2026-07-22T18:09:52Z", GoVersion:"go1.26.5", Compiler:"gc", Platform:"linux/amd64"}
(5)查看所需镜像
bash
[root@k8s-master01 ~]# kubeadm config images list
registry.k8s.io/kube-apiserver:v1.36.3
registry.k8s.io/kube-controller-manager:v1.36.3
registry.k8s.io/kube-scheduler:v1.36.3
registry.k8s.io/kube-proxy:v1.36.3
registry.k8s.io/coredns/coredns:v1.14.2
registry.k8s.io/pause:3.10.2
registry.k8s.io/etcd:3.6.8-0

# 获取镜像:从阿里云镜像仓库拉取后,改 tag 推送到自建 Harbor
images=$(kubeadm config images list --kubernetes-version=1.36.3 | awk -F "/" '{print $NF}')
for i in $(images)
do
    docker pull registry.aliyuncs.com/google_containers/$i
    docker tag registry.aliyuncs.com/google_containers/$i harbor.registry.com/k8s/$i
    docker push harbor.registry.com/k8s/$i
    docker rmi registry.aliyuncs.com/google_containers/$i
done
📌 注意 :Master 节点需要导入全部 镜像;Node 节点只需导入
kube-proxy、coredns、pause这三个镜像。
3.4 初始化主节点
此操作只在 k8s-master01 节点执行。
官方文档:https://kubernetes.io/zh-cn/docs/reference/setup-tools/kubeadm/kubeadm-init/#custom-image
bash
kubeadm init --apiserver-advertise-address=192.168.194.11 \
--image-repository=registry.aliyuncs.com/google_containers \
--kubernetes-version=1.36.3 \
--service-cidr=10.10.0.0/12 \
--pod-network-cidr=10.244.0.0/16 \
--ignore-preflight-errors=all \
--cri-socket unix:///var/run/cri-dockerd.sock
⚠️ 红色(加粗)部分
--apiserver-advertise-address改成你自己的 Master 节点 IP。
各参数含义:
| 参数 | 说明 |
|---|---|
--apiserver-advertise-address |
指定 Master 主机的 IP 地址 |
--image-repository |
指定控制平面镜像仓库(默认 registry.k8s.io),此处用阿里云镜像加速 |
--kubernetes-version=1.36.3 |
固定集群版本,避免自动升级导致兼容性问题 |
--service-cidr=10.10.0.0/12 |
指定 Service 资源的网络范围 |
--pod-network-cidr=10.244.0.0/16 |
指定 Pod 的网络范围,需与后面 Calico 配置保持一致 |
--ignore-preflight-errors=all |
跳过所有前置检查错误 |
--cri-socket unix:///var/run/cri-dockerd.sock |
指定 CRI 的 socket 路径(cri-docker 用这个;若用 containerd 则为 unix:///run/containerd/containerd.sock) |
命令执行后输出(关键日志):
bash
[init] Using Kubernetes version: v1.36.3
[preflight] Running pre-flight checks
[preflight] Pulling images required for setting up a Kubernetes cluster
[preflight] This might take a minute or two, depending on the speed of your internet connection
[preflight] You can also perform this action beforehand using 'kubeadm config images pull'
W0727 10:53:18.622170    5240 checks.go:907] detected that the sandbox image "registry.k8s.io/pause:3.10.2" of the container runtime is inconsistent with that used by kubeadm. It is recommended to use "registry.aliyuncs.com/google_containers/pause:3.10.2" as the CRI sandbox image.
[certs] Using certificateDir folder "/etc/kubernetes/pki"
[certs] Generating "ca" certificate and key
[certs] Generating "apiserver" certificate and key
[certs] apiserver serving cert is signed for DNS names [k8s-master01 kubernetes kubernetes.default kubernetes.default.svc.cluster.local] and IPs [10.0.0.1 192.168.194.11]
[certs] Generating "apiserver-kubelet-client" certificate and key
[certs] Generating "front-proxy-ca" certificate and key
[certs] Generating "front-proxy-client" certificate and key
[certs] Generating "etcd/ca" certificate and key
[certs] Generating "etcd/server" certificate and key
[certs] etcd/server serving cert is signed for DNS names [k8s-master01 localhost] and IPs [192.168.194.11 127.0.0.1 ::1]
[certs] Generating "etcd/peer" certificate and key
[certs] etcd/peer serving cert is signed for DNS names [k8s-master01 localhost] and IPs [192.168.194.11 127.0.0.1 ::1]
[certs] Generating "etcd/healthcheck-client" certificate and key
[certs] Generating "apiserver-etcd-client" certificate and key
[certs] Generating "sa" key and public key
[kubeconfig] Using kubeconfig folder "/etc/kubernetes"
[kubeconfig] Writing "admin.conf" kubeconfig file
[kubeconfig] Writing "super-admin.conf" kubeconfig file
[kubeconfig] Writing "kubelet.conf" kubeconfig file
[kubeconfig] Writing "controller-manager.conf" kubeconfig file
[kubeconfig] Writing "scheduler.conf" kubeconfig file
[etcd] Creating static Pod manifest for local etcd in "/etc/kubernetes/manifests"
[control-plane] Using manifest folder "/etc/kubernetes/manifests"
[control-plane] Creating static Pod manifest for "kube-apiserver"
[control-plane] Creating static Pod manifest for "kube-controller-manager"
[control-plane] Creating static Pod manifest for "kube-scheduler"
[kubelet-start] Writing kubelet environment file with flags to file "/var/lib/kubelet/kubeadm-flags.env"
[kubelet-start] Writing kubelet configuration to file "/var/lib/kubelet/instance-config.yaml"
[patches] Applied patch of type "application/strategic-merge-patch+json" to target "kubeletconfiguration"
[kubelet-start] Writing kubelet configuration to file "/var/lib/kubelet/config.yaml"
[kubelet-start] Starting the kubelet
[wait-control-plane] Waiting for the kubelet to boot up the control plane as static Pods from directory "/etc/kubernetes/manifests"
[kubelet-check] Waiting for a healthy kubelet at http://127.0.0.1:10248/healthz. This can take up to 4m0s
[kubelet-check] The kubelet is healthy after 539.349µs
[control-plane-check] Waiting for healthy control plane components. This can take up to 4m0s
[control-plane-check] Checking kube-apiserver at https://192.168.194.11:6443/livez
[control-plane-check] Checking kube-controller-manager at https://127.0.0.1:10257/healthz
[control-plane-check] Checking kube-scheduler at https://127.0.0.1:10259/livez
[control-plane-check] kube-scheduler is healthy after 3.451971ms
[control-plane-check] kube-controller-manager is healthy after 4.228132ms
[control-plane-check] kube-apiserver is healthy after 1.50375793s
[upload-config] Storing the configuration used in ConfigMap "kubeadm-config" in the "kube-system" Namespace
[kubelet] Creating a ConfigMap "kubelet-config" in namespace kube-system with the configuration for the kubelets in the cluster
[upload-certs] Skipping phase. Please see --upload-certs
[mark-control-plane] Marking the node k8s-master01 as control-plane by adding the labels: [node-role.kubernetes.io/control-plane node.kubernetes.io/exclude-from-external-load-balancers]
[mark-control-plane] Marking the node k8s-master01 as control-plane by adding the taints [node-role.kubernetes.io/control-plane:NoSchedule]
[bootstrap-token] Using token: bkey2t.b5mr4s5qvtimzbdi
[bootstrap-token] Configuring bootstrap tokens, cluster-info ConfigMap, RBAC Roles
[bootstrap-token] Configured RBAC rules to allow Node Bootstrap tokens to get nodes
[bootstrap-token] Configured RBAC rules to allow Node Bootstrap tokens to post CSRs in order for nodes to get long term certificate credentials
[bootstrap-token] Configured RBAC rules to allow the csrapprover controller automatically approve CSRs from a Node Bootstrap Token
[bootstrap-token] Configured RBAC rules to allow certificate rotation for all node client certificates in the cluster
[bootstrap-token] Configured RBAC rules to allow the API server kubelet client certificate to access the kubelet API
[bootstrap-token] Creating the "cluster-info" ConfigMap in the "kube-public" namespace
[kubelet-finalize] Updating "/etc/kubernetes/kubelet.conf" to point to a rotatable kubelet client certificate and key
[addons] Applied essential addon: CoreDNS
[addons] Applied essential addon: kube-proxy

Your Kubernetes control-plane has initialized successfully!

To start using your cluster, you need to run the following as a regular user:

  mkdir -p $HOME/.kube
  sudo cp -i /etc/kubernetes/admin.conf $HOME/.kube/config
  sudo chown $(id -u):$(id -g) $HOME/.kube/config

Alternatively, if you are the root user, you can run:

  export KUBECONFIG=/etc/kubernetes/admin.conf

You should now deploy a pod network to the cluster.
Run "kubectl apply -f [podnetwork].yaml" with one of the options listed at:
  https://kubernetes.io/docs/concepts/cluster-administration/addons/

Then you can join any number of worker nodes by running the following on each as root:

kubeadm join 192.168.194.11:6443 --token bkey2t.b5mr4s5qvtimzbdi \
        --discovery-token-ca-cert-hash sha256:a65e6e61df6e25fa81ad15e88d4c531484779ceb1e840e7a86c77c110baaddd8
上面这段日志的核心解读 (便于理解 kubeadm init 到底做了什么):
- 初始化阶段
[init]:声明使用的 K8s 版本。 - 预检查阶段
[preflight]:检查系统环境是否满足要求(swap 关闭、内核版本、端口占用等),并拉取控制平面镜像。这里会有一条关于 pause 镜像不一致的告警,属正常提示,可忽略(不影响功能)。 - 证书阶段
[certs]:在/etc/kubernetes/pki生成集群各类证书,包括ca(根证书)、apiserver、etcd、front-proxy、sa(Service Account)等。 - kubeconfig 阶段
[kubeconfig]:生成admin.conf、super-admin.conf、kubelet.conf、controller-manager.conf、scheduler.conf等不同身份的访问配置文件。 - 控制平面阶段
[control-plane]:生成kube-apiserver、kube-controller-manager、kube-scheduler、etcd的静态 Pod(static Pod)清单 ,放在/etc/kubernetes/manifests/,由 kubelet 自动拉起。 - 健康检查
[control-plane-check]:等待kube-apiserver等控制平面组件就绪(分别探测:6443/livez、:10257/healthz、:10259/livez)。 - 控制面标签/污点
[mark-control-plane]:给 Master 打上node-role.kubernetes.io/control-plane标签,并添加NoSchedule污点,阻止普通 Pod 调度到 Master。 - 引导令牌(bootstrap-token):生成加入集群需要的 token,并配置相关 RBAC 规则。
- 附加组件:部署 CoreDNS(集群 DNS,负责服务发现)和 kube-proxy(负责网络代理与负载均衡)。
最关键的初始化成功标志 是打印出 Your Kubernetes control-plane has initialized successfully!,以及末尾的 kubeadm join ... 命令(用于工作节点加入)。
3.5 创建 .kube 目录
根据提示,在 Master 家目录下创建 .kube 目录,并将 admin.conf 复制过去:
bash
[root@k8s-master01 ~]# mkdir -p $HOME/.kube
[root@k8s-master01 ~]# sudo cp -i /etc/kubernetes/admin.conf $HOME/.kube/config
[root@k8s-master01 ~]# sudo chown $(id -u):$(id -g) $HOME/.kube/config
执行后查看节点:
bash
[root@k8s-master01 ~]# kubectl get node
NAME           STATUS     ROLES           AGE   VERSION
k8s-master01   NotReady   control-plane   75s   v1.36.3
可以看到集群已出现一个节点(此时还是 NotReady,因为还没装网络插件,属正常)。
3.6 增加工作节点
在 Node01 和 Node02 上分别执行上面的 kubeadm join 命令加入集群。
Node01 节点:
bash
[root@k8s-node01 ~]# kubeadm join 192.168.194.11:6443 --token bkey2t.b5mr4s5qvtimzbdi \
        --discovery-token-ca-cert-hash sha256:a65e6e61df6e25fa81ad15e88d4c531484779ceb1e840e7a86c77c110baaddd8 \
        --cri-socket unix:///var/run/cri-dockerd.sock
[preflight] Running pre-flight checks
[preflight] Reading configuration from the "kubeadm-config" ConfigMap in namespace "kube-system"...
[preflight] Use 'kubeadm init phase upload-config kubeadm --config your-config-file' to re-upload it.
W0727 10:57:08.683757    4627 utils.go:69] The recommended value for "bindAddress" in "KubeProxyConfiguration" is: ::; the provided value is: 0.0.0.0
[kubelet-start] Writing kubelet configuration to file "/var/lib/kubelet/instance-config.yaml"
[patches] Applied patch of type "application/strategic-merge-patch+json" to target "kubeletconfiguration"
[kubelet-start] Writing kubelet configuration to file "/var/lib/kubelet/config.yaml"
[kubelet-start] Writing kubelet environment file with flags to file "/var/lib/kubelet/kubeadm-flags.env"
[kubelet-start] Starting the kubelet
[kubelet-check] Waiting for a healthy kubelet at http://127.0.0.1:10248/healthz. This can take up to 4m0s
[kubelet-check] The kubelet is healthy after 501.014458ms
[kubelet-start] Waiting for the kubelet to perform the TLS Bootstrap

This node has joined the cluster:
* Certificate signing request was sent to apiserver and a response was received.
* The Kubelet was informed of the new secure connection details.

Run 'kubectl get nodes' on the control-plane to see this node join the cluster.
⚠️ 末尾的
--cri-socket unix:///var/run/cri-dockerd.sock必须加,因为底层容器运行时是 Docker(cri-docker);如果用的是原生 containerd 就不需要加这段。
Node02 节点:
bash
[root@k8s-node02 ~]# kubeadm join 192.168.194.11:6443 --token bkey2t.b5mr4s5qvtimzbdi \
        --discovery-token-ca-cert-hash sha256:a65e6e61df6e25fa81ad15e88d4c531484779ceb1e840e7a86c77c110baaddd8 \
        --cri-socket unix:///var/run/cri-dockerd.sock
[preflight] Running pre-flight checks
[preflight] Reading configuration from the "kubeadm-config" ConfigMap in namespace "kube-system"...
[preflight] Use 'kubeadm init phase upload-config kubeadm --config your-config-file' to re-upload it.
W0727 10:57:12.008529    4626 utils.go:69] The recommended value for "bindAddress" in "KubeProxyConfiguration" is: ::; the provided value is: 0.0.0.0
[kubelet-start] Writing kubelet configuration to file "/var/lib/kubelet/instance-config.yaml"
[patches] Applied patch of type "application/strategic-merge-patch+jst" to target "kubeletconfiguration"
[kubelet-start] Writing kubelet configuration to file "/var/lib/kubelet/config.yaml"
[kubelet-start] Writing kubelet environment file with flags to file "/var/lib/kubelet/kubeadm-flags.env"
[kubelet-start] Starting the kubelet
[kubelet-check] Waiting for a healthy kubelet at http://127.0.0.1:10248/healthz. This can take up to 4m0s
[kubelet-check] The kubelet is healthy after 500.884942ms
[kubelet-start] Waiting for the kubelet to perform the TLS Bootstrap

This node has joined the cluster:
* Certificate signing request was sent to apiserver and a response was received.
* The Kubelet was informed of the new secure connection details.

Run 'kubectl get nodes' on the control-plane to see this node join the cluster.
join 命令参数解析:
| 参数 | 说明 |
|---|---|
kubeadm join <masterIP>:6443 |
指定 Master 节点 IP 和 API 端口 |
--token |
引导令牌;若过期,用 kubeadm token create --print-join-command 重新生成 |
--discovery-token-ca-cert-hash |
用于验证 Master 证书的哈希值 |
--cri-socket unix:///var/run/cri-dockerd.sock |
指定 CRI 的 socket 路径 |
3.7 查看集群状态
在 Master 上查看当前集群节点:
bash
[root@k8s-master01 ~]# kubectl get node
NAME           STATUS     ROLES           AGE     VERSION
k8s-master01   NotReady   control-plane   4m21s   v1.36.3
k8s-node01     NotReady   <none>          52s     v1.36.3
k8s-node02     NotReady   <none>          49s     v1.36.3
三个节点都已创建,但都处于 NotReady 状态------因为还没装网络插件(CNI)。接下来部署 Calico。
四、部署 Calico 网络插件
Kubernetes 集群要正常工作,所有容器必须工作在一个扁平的网络空间里,这就需要部署网络插件(CNI)。下面用 Calico 实现,只需在 Master 节点安装即可。
4.1 下载配置文件
浏览器打开 Calico 官方安装文档:
text
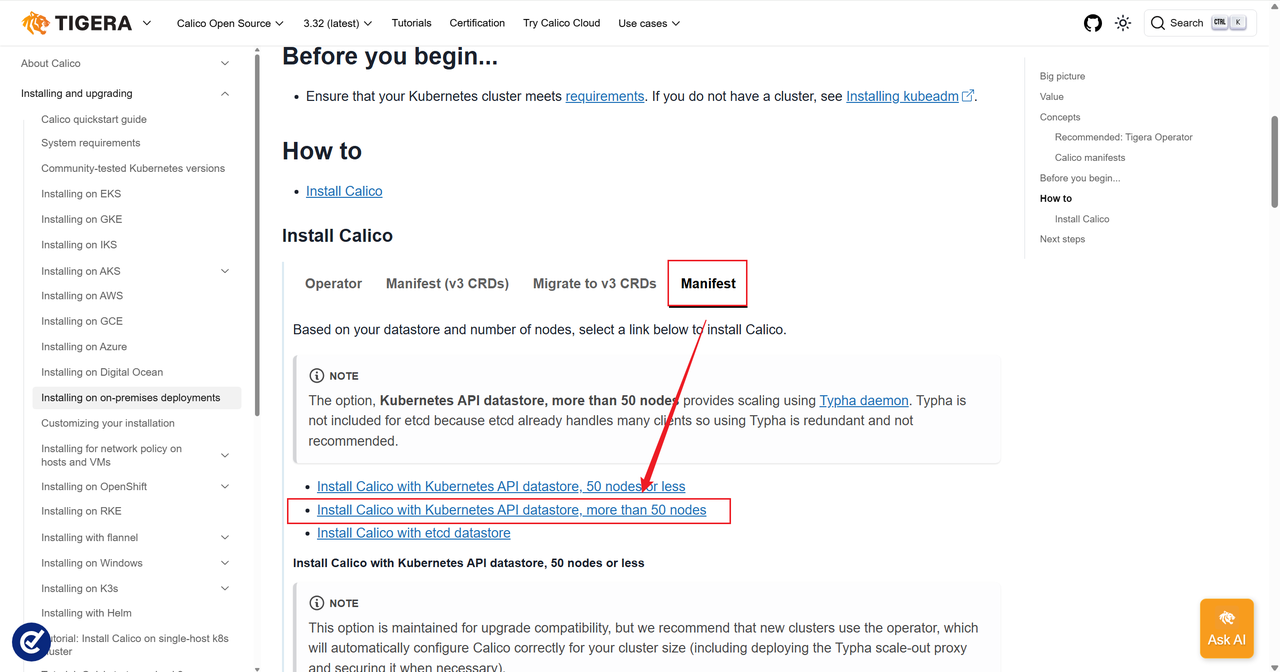
https://docs.tigera.io/calico/latest/getting-started/kubernetes/self-managed-onprem/onpremises#install-calico点击 Manifest 下的 "Install Calico with Kubernetes API datastore, more than 50 nodes":
复制命令将配置文件下载到本地:
bash
# 1. 下载配置文件
[root@k8s-master01 ~]# curl https://raw.githubusercontent.com/projectcalico/calico/v3.32.1/manifests/calico-typha.yaml -o calico.yaml
  % Total    % Received % Xferd  Average Speed   Time    Time     Time  Current
                                 Dload  Upload   Total   Spent    Left  Speed
100  347k  100  347k    0     0    99k      0  0:00:03  0:00:03 --:--:--   99k
查看是否下载成功:
bash
[root@k8s-master01 ~]# ls
calico.yaml  etcd_3.6.8.tar.gz  k8s-images_v1.36.3.tar.gz
查看所需镜像:
bash
[root@k8s-master01 ~]# grep image calico.yaml
          image: quay.io/calico/cni:v3.32.1
          imagePullPolicy: IfNotPresent
          image: quay.io/calico/cni:v3.32.1
          imagePullPolicy: IfNotPresent
          image: quay.io/calico/node:v3.32.1
          imagePullPolicy: IfNotPresent
          image: quay.io/calico/node:v3.32.1
          imagePullPolicy: IfNotPresent
          image: quay.io/calico/kube-controllers:v3.32.1
          imagePullPolicy: IfNotPresent
        - image: quay.io/calico/typha:v3.32.1
          imagePullPolicy: IfNotPresent
4.2 修改配置文件
将 calico.yaml 中的 CALICO_IPV4POOL_CIDR 改为初始化集群时 --pod-network-cidr=10.244.0.0/16 指定的地址,并把 CALICO_IPV4POOL_IPIP 和 CALICO_IPV4POOL_VXLAN 都关闭(使用 BGP 模式):
bash
[root@k8s-master01 ~]# vim calico.yaml
kind: DaemonSet
# Enable IPIP
- name: CALICO_IPV4POOL_IPIP
#  value: "Always"
  value: "Off"      # 这里 Always 改为 Off
# Enable or Disable VXLAN on the default IP pool.
- name: CALICO_IPV4POOL_VXLAN
  value: "Never"
# Enable or Disable VXLAN on the default IPv6 IP pool.
- name: CALICO_IPV6POOL_VXLAN
  value: "Never"

# no effect. This should fall within `--cluster-cidr`
# - name: CALICO_IPV4POOL_CIDR
#   value: "192.168.0.0/16"
- name: CALICO_IPV4POOL_CIDR
  value: "10.244.0.0/16"       # 将 192.168.0.0/16 改为 10.244.0.0/16

# Disable file logging so `kubectl logs` works.
修改完成后保存退出。
4.3 上传镜像文件
由于 Calico 镜像在国内很难下载,可提前下载好并上传到网盘,再从网盘下载到本地导入集群中。注意:三个节点都需要导入。 需要导入的镜像 calico-images_v3.32.1.tar.gz 分别放在三个节点的家目录:
bash
# 1. master01 节点
[root@k8s-master01 ~]# ls
anaconda-ks.cfg  calico-images_v3.32.1.tar.gz  calico.yaml

# 2. node01 节点
[root@k8s-node01 ~]# ls
anaconda-ks.cfg  calico-images_v3.32.1.tar.gz

# 3. node02 节点
[root@k8s-node02 ~]# ls
anaconda-ks.cfg  calico-images_v3.32.1.tar.gz
4.4 导入镜像文件
在三个节点上分别通过 docker load 导入 Calico 镜像:
bash
# 1. master01 节点
[root@k8s-master01 ~]# docker load -i calico-images_v3.32.1.tar.gz
37c1775e0302: Loading layer [==================================================>]  3.693MB/3.693MB
9ad9e3f4f50f: Loading layer [==================================================>]  78.75MB/78.75MB
Loaded image: calico/kube-controllers:v3.32.1
f3dac1398271: Loading layer [==================================================>]  70.16MB/70.16MB
Loaded image: calico/typha:v3.32.1
ac1e39af291c: Loading layer [==================================================>]  216.1MB/216.1MB
5f70bf18a086: Loading layer [==================================================>]  1.024kB/1.024kB
Loaded image: calico/cni:v3.32.1
55c8cc0817d5: Loading layer [==================================================>]  380.4MB/380.4MB
Loaded image: calico/node:v3.32.1

# 2. node01 节点
[root@k8s-node01 ~]# docker load -i calico-images_v3.32.1.tar.gz
37c1775e0302: Loading layer [==================================================>]  3.693MB/3.693MB
9ad9e3f4f50f: Loading layer [==================================================>]  78.75MB/78.75MB
Loaded image: calico/kube-controllers:v3.32.1
f3dac1398271: Loading layer [==================================================>]  70.16MB/70.16MB
Loaded image: calico/typha:v3.32.1
ac1e39af291c: Loading layer [==================================================>]  216.1MB/216.1MB
5f70bf18a086: Loading layer [==================================================>]  1.024kB/1.024kB
Loaded image: calico/cni:v3.32.1
55c8cc0817d5: Loading layer [==================================================>]  380.4MB/380.4MB
Loaded image: calico/node:v3.32.1

# 3. node02 节点
[root@k8s-node02 ~]# docker load -i calico-images_v3.32.1.tar.gz
37c1775e0302: Loading layer [==================================================>]  3.693MB/3.693MB
9ad9e3f4f50f: Loading layer [==================================================>]  78.75MB/78.75MB
Loaded image: calico/kube-controllers:v3.32.1
f3dac1398271: Loading layer [==================================================>]  70.16MB/70.16MB
Loaded image: calico/typha:v3.32.1
ac1e39af291c: Loading layer [==================================================>]  216.1MB/216.1MB
5f70bf18a086: Loading layer [==================================================>]  1.024kB/1.024kB
Loaded image: calico/cni:v3.32.1
55c8cc0817d5: Loading layer [==================================================>]  380.4MB/380.4MB
Loaded image: calico/node:v3.32.1
4.5 安装网络插件
在 master01 节点上执行:
bash
[root@k8s-master01 ~]# kubectl apply -f calico.yaml
poddisruptionbudget.policy/calico-kube-controllers created
poddisruptionbudget.policy/calico-typha created
serviceaccount/calico-kube-controllers created
serviceaccount/calico-node created
serviceaccount/calico-cni-plugin created
configmap/calico-config created
customresourcedefinition.apiextensions.k8s.io/bgpconfigurations.crd.projectcalico.org created
customresourcedefinition.apiextensions.k8s.io/bgpfilters.crd.projectcalico.org created
customresourcedefinition.apiextensions.k8s.io/bgppeers.crd.projectcalico.org created
customresourcedefinition.apiextensions.k8s.io/blockaffinities.crd.projectcalico.org created
customresourcedefinition.apiextensions.k8s.io/caliconodestatuses.crd.projectcalico.org created
customresourcedefinition.apiextensions.k8s.io/clusterinformations.crd.projectcalico.org created
customresourcedefinition.apiextensions.k8s.io/felixconfigurations.crd.projectcalico.org created
customresourcedefinition.apiextensions.k8s.io/globalnetworkpolicies.crd.projectcalico.org created
customresourcedefinition.apiextensions.k8s.io/globalnetworksets.crd.projectcalico.org created
customresourcedefinition.apiextensions.k8s.io/hostendpoints.crd.projectcalico.org created
customresourcedefinition.apiextensions.k8s.io/ipamblocks.crd.projectcalico.org created
customresourcedefinition.apiextensions.k8s.io/ipamconfigs.crd.projectcalico.org created
customresourcedefinition.apiextensions.k8s.io/ipamhandles.crd.projectcalico.org created
customresourcedefinition.apiextensions.k8s.io/ippools.crd.projectcalico.org created
Warning: unrecognized format "cidr"
customresourcedefinition.apiextensions.k8s.io/ipreservations.crd.projectcalico.org created
customresourcedefinition.apiextensions.k8s.io/kubecontrollersconfigurations.crd.projectcalico.org created
customresourcedefinition.apiextensions.k8s.io/networkpolicies.crd.projectcalico.org created
customresourcedefinition.apiextensions.k8s.io/networksets.crd.projectcalico.org created
customresourcedefinition.apiextensions.k8s.io/stagedglobalnetworkpolicies.crd.projectcalico.org created
customresourcedefinition.apiextensions.k8s.io/stagedkubernetesnetworkpolicies.crd.projectcalico.org created
customresourcedefinition.apiextensions.k8s.io/stagednetworkpolicies.crd.projectcalico.org created
customresourcedefinition.apiextensions.k8s.io/tiers.crd.projectcalico.org created
customresourcedefinition.apiextensions.k8s.io/clusternetworkpolicies.policy.networking.k8s.io created
clusterrole.rbac.authorization.k8s.io/calico-kube-controllers created
clusterrole.rbac.authorization.k8s.io/calico-node created
clusterrole.rbac.authorization.k8s.io/calico-cni-plugin created
clusterrole.rbac.authorization.k8s.io/calico-tier-getter created
clusterrolebinding.rbac.authorization.k8s.io/calico-kube-controllers created
clusterrolebinding.rbac.authorization.k8s.io/calico-node created
clusterrolebinding.rbac.authorization.k8s.io/calico-cni-plugin created
clusterrolebinding.rbac.authorization.k8s.io/calico-tier-getter created
service/calico-typha created
daemonset.apps/calico-node created
deployment.apps/calico-kube-controllers created
deployment.apps/calico-typha created
五、验证集群
安装完成后,查看当前集群状态:
bash
[root@k8s-master01 ~]# kubectl get node
NAME           STATUS   ROLES           AGE    VERSION
k8s-master01   Ready    control-plane   3h27m  v1.36.3
k8s-node01     Ready    <none>          3h14m  v1.36.3
k8s-node02 Ready <none> 3h14m v1.36.3此时三个节点全部处于 Ready 状态,说明集群搭建成功!🎉
可以再执行 kubectl get pods -A 查看系统组件运行情况:
bash
kubectl get pods -A看到 kube-system 命名空间下的 coredns、calico、kube-proxy 等 Pod 都处于 Running 状态,即可确认集群完全可用。
常见坑点与注意事项
- 容器运行时二选一 :cri-docker 和 containerd 不要同时安装,否则会冲突。
- cri-socket 参数 :初始化/加入集群时,若用 cri-docker 必须带
--cri-socket unix:///var/run/cri-dockerd.sock;用 containerd 则用unix:///run/containerd/containerd.sock。 - Pod 网段一致 :
kubeadm init的--pod-network-cidr(如10.244.0.0/16)必须与 Calico 配置里的CALICO_IPV4POOL_CIDR保持一致,否则网络异常。 - Aliyun/sandbox 镜像告警可忽略 :初始化时那条 pause 镜像不一致的
W告警,不影响功能,可忽略。 - 节点 NotReady :若 join 后节点仍
NotReady,通常是网络插件未部署或镜像未导入,检查kubectl get pods -A。 - kubelet 启动失败属正常 :安装阶段
systemctl enable kubelet后 kubelet 会因为缺配置报错,kubeadm init会补齐,属正常现象。 - 网关/网段按实际修改 :文中的 IP 网段
192.168.194.x、网关、hosts 映射都是示例,务必改成你环境的真实值。