62 Mybatis
4.01-mybatis的基本概述
课程目标:我们把mybatis一共分为4个部分
第一部分:mybatis基本概述,mybatis入门案例的搭建,自定义mybatis框架
第二部分:mybatis的基本使用,mybatis的参数和返回值深入,mybatis传统dao的开发方式,mybatis核心配置文件详解
第三部分:mybatis多表操作,mybatis事务控制
第四部分:mybatis缓存和注解开发,逆向工程,mybatis源码追踪
什么是框架
框架就是一套解决方案,不同的框架解决不同的问题。框架帮助我们封装了很多细节,使用开发者使用极简单的方式就可以实现功能,大大的提高了开发效率。简而言之,框架其实就是某种应用的半成品,就是一组组件,供你选用完成你自己的系统。简单说就是使用别人搭好的舞台,你来做表演。而且,框架一般是成熟的,不断升级的软件。
框架要解决的问题
框架要解决的最重要的一个问题是技术整合的问题,在 J2EE 的 框架中,有着各种各样的技术,不同的软件企业需要从 J2EE 中选择不同的技术,这就使得软件企业最终的应用依赖于这些技术,技术自身的复杂性和技术的风险性将会直接对应用造成冲击。而应用是软件企业的核心,是竞争力的关键所在,因此应该将应用自身的设计和具体的实现技术解耦。这样,软件企业的研发将集中在应用的设计上,而不是具体的技术实现,技术实现是应用的底层支撑,它不应该直接对应用产生影响。
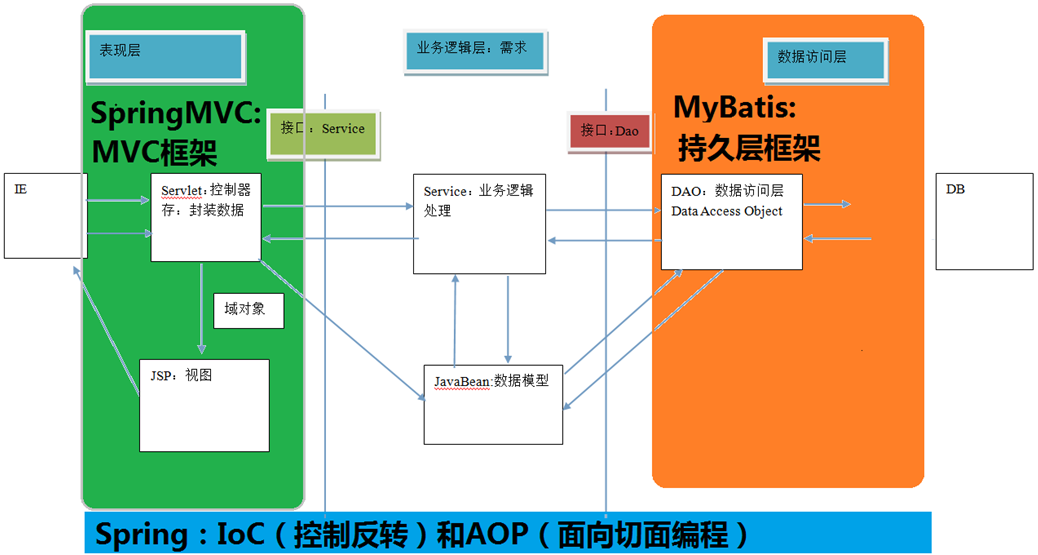
我们今天要学习的就是基于数据访问层操作的Mybatis框架。
我们先回顾一下我们学习过的基于操作数据访问层的技术解决方案:
Jdbc:Connection StateMent PreparedStatement
JdbcTemplate ,Spring对jdbc简单封装 。
Apache的DbUtils,和Jdbctemplate很像,也是对jdbc的简单封装。
那我们为什么还需要学习Mybatis呢?
其实上面的技术都不是框架,Jdbc只能说是操作数据访问层的一种规范。而 JdbcTemplate 技术和 DbUtils 技术都是参照了Jdbc技术进行封装的组件,这种封装是粗犷的,不够细致,在使用的过程中还有大量的细节需要我们去处理。
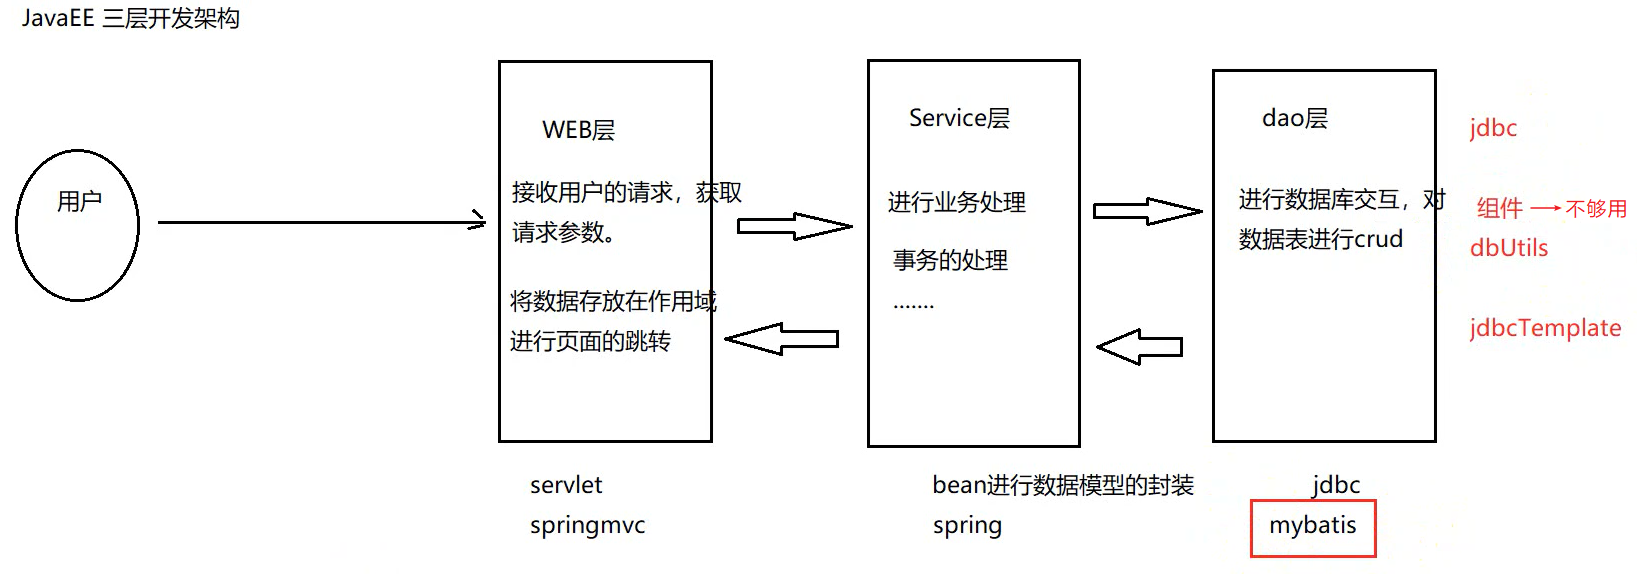
那我们为什么需要学习Mybatis?接下来我们分析一段代码。
java
//传统jdbc代码分析
public class TestJdbc {
	public static void main(String[] args) {
		try {
            //加载数据库驱动
            Class.forName("com.mysql.jdbc.Driver");
            //创建连接对象
            String url = "jdbc:mysql://192.168.10.137:3306/ssm";
            Connection connection = DriverManager.getConnection(url, "root", "Admin123!");
            //准备sql语句
            String sql = "select * from account";
            //准备PreparedStatement对象
            PreparedStatement pst = connection.prepareStatement(sql);
            //执行sql语句
            ResultSet rs = pst.executeQuery();
            //遍历结果集
            while(rs.next()){
                Integer id = rs.getInt("id");
                String name = rs.getString("name");
                Double money = rs.getDouble("money");
                System.out.println(id + " " + name + " " + money);
            }
            //关闭资源
            rs.close();
            pst.close();
            connection.close();
        } catch (Exception e) {
            e.printStackTrace();
        }
    }
}
那么这段代码有什么问题呢?
1、数据库连接创建、释放频繁造成系统资源浪费从而影响系统性能,如果使用数据库连接池可解决此问题。
2、Sql 语句在代码中硬编码,造成代码不易维护,实际应用sql变化的可能较大,sql变动需要改变 java 代码。
3、使用 preparedStatement 向占有位符号传参数存在硬编码,因为 sql 语句的where 条件不一定,可能多也可能少,修改 sql 还要修改代码,系统不易维护。
4、对结果集解析存在硬编码(查询列名),sql 变化导致解析代码变化,系统不易维护,如果能将数据库记录封装成 pojo 对象解析比较方便。
mybatis的基本概述
mybatis 是一个优秀的基于 java 的持久层框架,它内部封装了 jdbc ,使开发者只需要关注 sql 语句本身, 而不需要花费精力去处理加载驱动、创建连接、创建
statement 等繁杂的过程。mybatis 通过 xml 或注解的方式将要执行的各种 statement 配置起来,并通过 java对象和 statement 中 sql 的动态参数进行映射生成最终执行的 sql 语句,最后由mybatis 框架执行 sql 并将结果映射为 java 对象并返回。
采用 ORM(对象关系映射) 思想解决了实体和数据库映射的问题,对 jdbc 进行了封装,屏蔽了 jdbcapi 底层访问细节,使我们不用与 jdbc api 打交道,就可以完成对数据库的持久化操作。
4.02-搭建mybatis的入门案例
Navicat运行以下sql文件:
sql
-- 删除表 `user` 如果存在
DROP TABLE IF EXISTS `user`;

-- 创建表 `user`
CREATE TABLE `user` (
  `id` INT(11) NOT NULL AUTO_INCREMENT,
  `username` VARCHAR(32) NOT NULL COMMENT '用户名称',
  `birthday` DATETIME DEFAULT NULL COMMENT '生日',
  `sex` CHAR(1) DEFAULT NULL COMMENT '性别',
  `address` VARCHAR(256) DEFAULT NULL COMMENT '地址',
  PRIMARY KEY (`id`)
) ENGINE=InnoDB DEFAULT CHARSET=utf8;

-- 插入数据到 `user` 表
INSERT INTO `user` (`id`, `username`, `birthday`, `sex`, `address`) VALUES
(41, '老王', '2018-02-27 17:47:08', '男', '上海'),
(42, '小二王', '2018-03-02 15:09:37', '女', '四川成都'),
(43, '小二王', '2018-03-04 11:34:34', '女', '中国上海'),
(45, '老刘', '2018-03-04 12:04:06', '男', '北京昌平'),
(46, '王', '2018-03-07 17:37:26', '男', '北京'),
(48, '小艾', '2018-03-08 11:44:00', '女', '上海');

-- 删除表 `account` 如果存在
DROP TABLE IF EXISTS `account`;

-- 创建表 `account`
CREATE TABLE `account` (
  `ID` INT(11) NOT NULL COMMENT '编号',
  `UID` INT(11) DEFAULT NULL COMMENT '用户编号',
  `MONEY` DOUBLE DEFAULT NULL COMMENT '金额',
  PRIMARY KEY (`ID`),
  KEY `FK_Reference_8` (`UID`),
  CONSTRAINT `FK_Reference_8` FOREIGN KEY (`UID`) REFERENCES `user` (`id`)
) ENGINE=InnoDB DEFAULT CHARSET=utf8;

-- 插入数据到 `account` 表
INSERT INTO `account` (`ID`, `UID`, `MONEY`) VALUES
(1, 41, 1000),
(2, 45, 1000),
(3, 41, 2000);

-- 删除表 `role` 如果存在
DROP TABLE IF EXISTS `role`;

-- 创建表 `role`
CREATE TABLE `role` (
  `ID` INT(11) NOT NULL COMMENT '编号',
  `ROLE_NAME` VARCHAR(30) DEFAULT NULL COMMENT '角色名称',
  `ROLE_DESC` VARCHAR(60) DEFAULT NULL COMMENT '角色描述',
  PRIMARY KEY (`ID`)
) ENGINE=InnoDB DEFAULT CHARSET=utf8;

-- 插入数据到 `role` 表
INSERT INTO `role` (`ID`, `ROLE_NAME`, `ROLE_DESC`) VALUES
(1, '院长', '学院领导'),
(2, '总裁', '公司老板'),
(3, '校长', '学校负责人');

-- 删除表 `user_role` 如果存在
DROP TABLE IF EXISTS `user_role`;

-- 创建表 `user_role`
CREATE TABLE `user_role` (
  `UID` INT(11) NOT NULL COMMENT '用户编号',
  `RID` INT(11) NOT NULL COMMENT '角色编号',
  PRIMARY KEY (`UID`, `RID`),
  KEY `FK_Reference_10` (`RID`),
  CONSTRAINT `FK_Reference_10` FOREIGN KEY (`RID`) REFERENCES `role` (`ID`),
  CONSTRAINT `FK_Reference_9` FOREIGN KEY (`UID`) REFERENCES `user` (`id`)
) ENGINE=InnoDB DEFAULT CHARSET=utf8;

-- 插入数据到 `user_role` 表
INSERT INTO `user_role` (`UID`, `RID`) VALUES
(41, 1),
(45, 1),
(41, 2);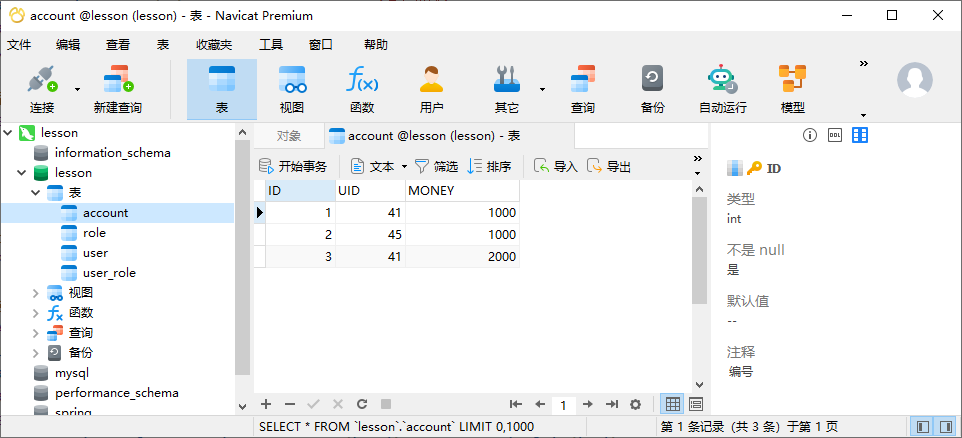
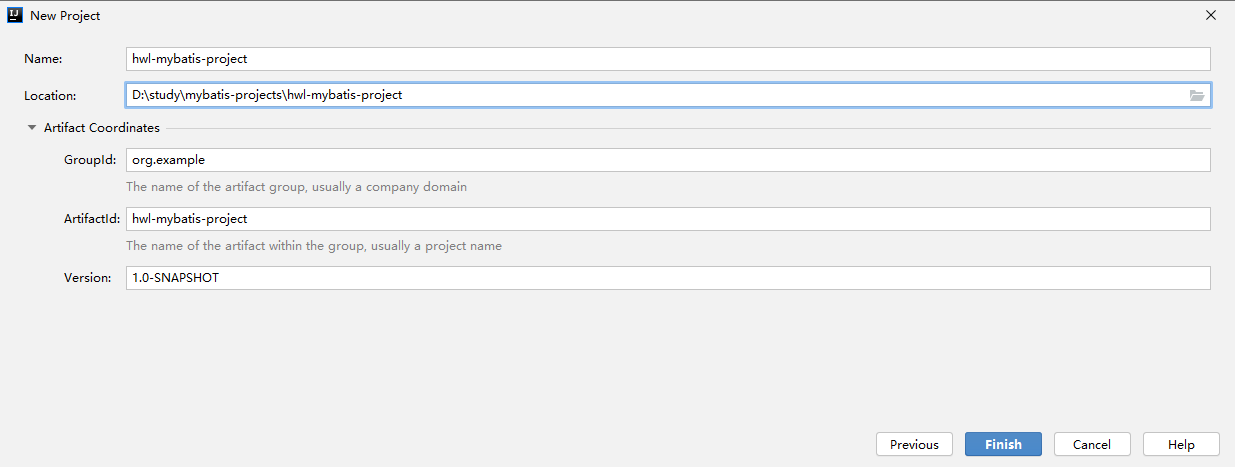
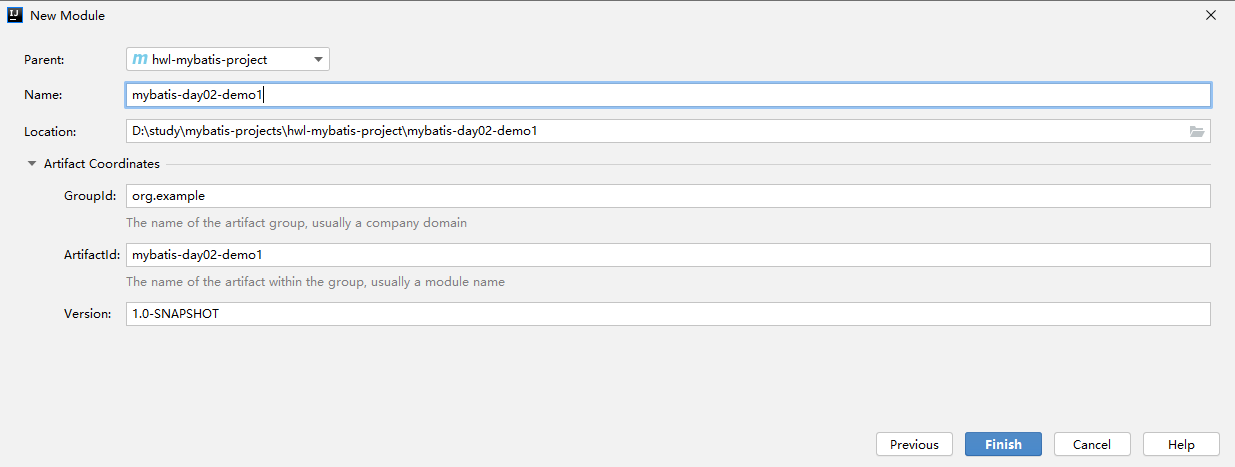
新建一个父工程:
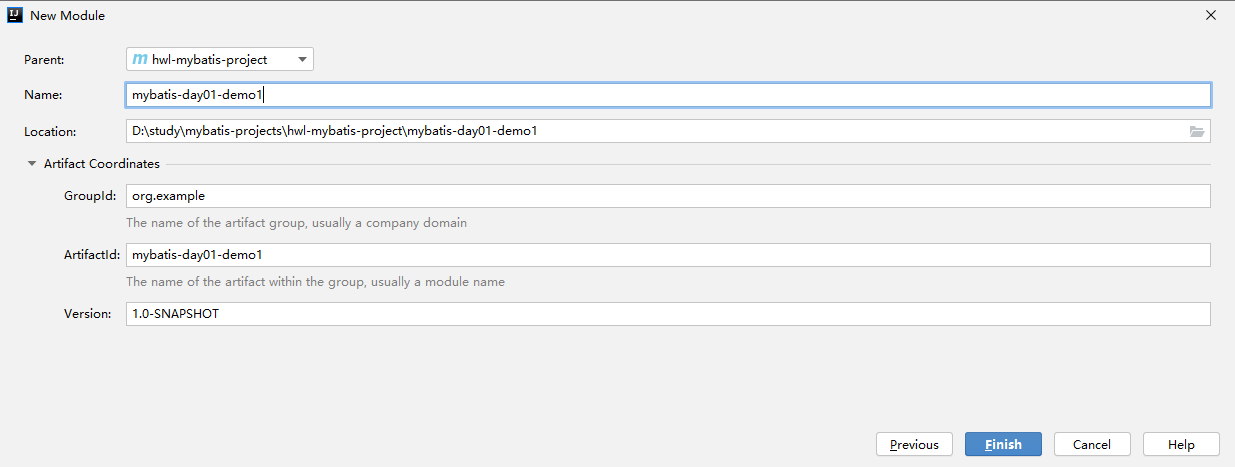
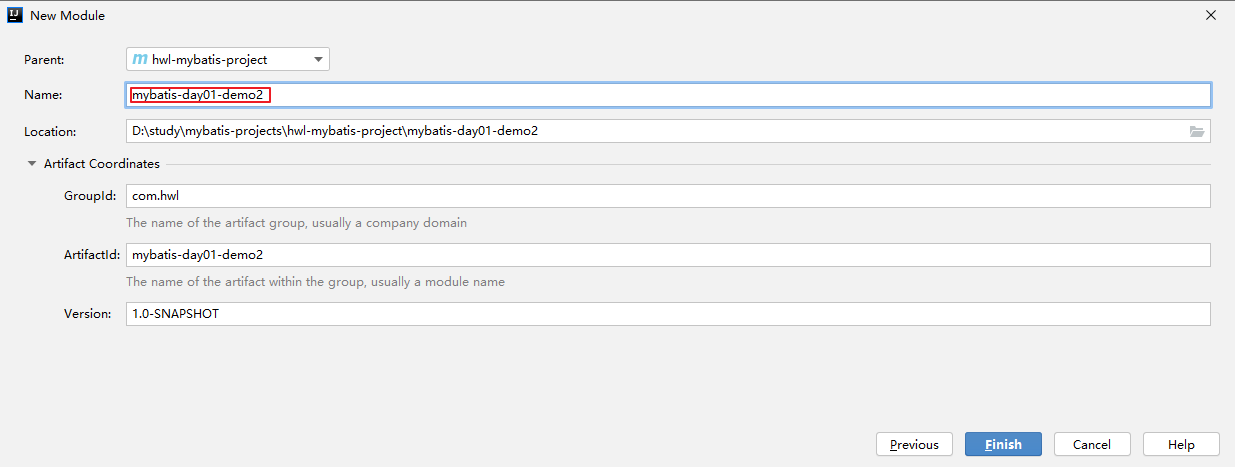
新建一个子模块:
创建maven工程,添加对应坐标:
在子模块的pom.xml中:
xml
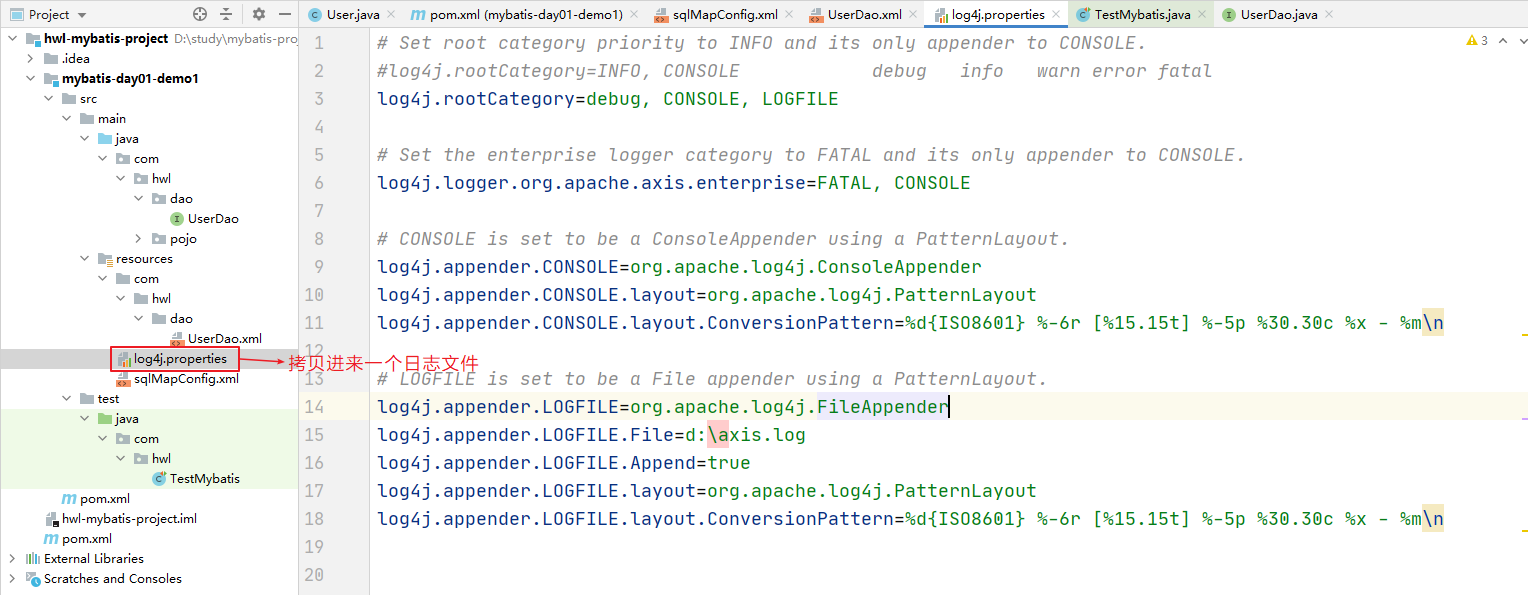
<dependencies>
    <!--mybatis-->
    <dependency>
        <groupId>org.mybatis</groupId>
        <artifactId>mybatis</artifactId>
        <version>3.4.5</version>
    </dependency>
    <!--junit单元测试-->
    <dependency>
        <groupId>junit</groupId>
        <artifactId>junit</artifactId>
        <version>4.10</version>
        <scope>test</scope>
    </dependency>
    <!--数据库驱动-->
    <dependency>
        <groupId>mysql</groupId>
        <artifactId>mysql-connector-java</artifactId>
        <version>8.0.25</version>
    </dependency>
    <!--log4j-->
    <dependency>
        <groupId>log4j</groupId>
        <artifactId>log4j</artifactId>
        <version>1.2.12</version>
    </dependency>
</dependencies>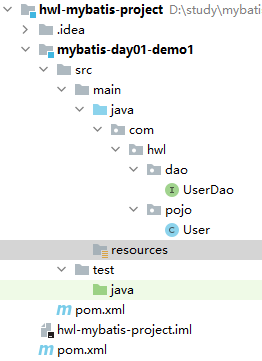
编写实体类:
java
/**
 * pojo 与 数据表user形成映射关系
 * 定义的规则:
 *    1、实体类的字段和数据表中字段的名称保持一致。
 *    2、实体类的字段的数据类型必须和数据表中字段的数据类型一致
 */
public class User {
    private Integer id;
    private String username;
    private Date birthday;
    private String sex;
    private String address;

    public Integer getId() {return id;}

    public void setId(Integer id) {this.id = id;}

    public String getUsername() {return username;}

    public void setUsername(String username) {this.username = username;}

    public Date getBirthday() {return birthday;}

    public void setBirthday(Date birthday) {this.birthday = birthday;}

    public String getSex() {return sex;}

    public void setSex(String sex) {this.sex = sex;}

    public String getAddress() {return address;}

    public void setAddress(String address) {this.address = address;}

    @Override
    public String toString() {
        return "User{" + "id=" + id + ", username='" + username + '\'' + ", birthday=" + birthday + ", sex='" + sex + '\'' + ", address='" + address + '\'' + '}';
    }
}
编写持久层接口:
java
public interface UserDao {
    //查询所有的用户信息
    List<User> findAll();
}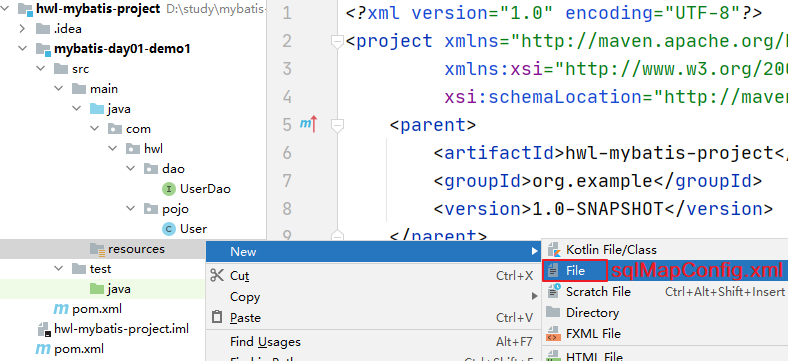
编写mybatis的核心配置文件 sqlMapConfig.xml:
xml
<?xml version="1.0" encoding="UTF-8"?>
<!DOCTYPE configuration PUBLIC "-//mybatis.org//DTD Config 3.0//EN"
        "http://mybatis.org/dtd/mybatis-3-config.dtd">
<configuration>
    <!--配置mybatis的环境-->
    <environments default="mysql">
        <!--配置连接mysql的具体信息-->
        <environment id="mysql">
            <!--配置事务类型 JDBC-->
            <transactionManager type="JDBC"/>
            <!--配置数据源 POOLED UNPOOLED-->
            <dataSource type="POOLED">
                <!--配置连接数据库的驱动 url 用户名 密码-->
                <property name="driver" value="com.mysql.jdbc.Driver"/>
                <property name="url" value="jdbc:mysql://localhost:3306/lesson"/>
                <property name="username" value="root"/>
                <property name="password" value="root"/>
            </dataSource>
        </environment>
    </environments>

    <!--在核心配置文件里面导入接口的映射文件-->
    <mappers>
        <mapper resource="com/hwl/dao/UserDao.xml"/>  <!--注意这里是斜杠-->
    </mappers>
</configuration>
在resources文件夹下,创建与UserDao.java相同的路径。
编写持久层接口对应的映射文件UserDao.xml
xml
<?xml version="1.0" encoding="UTF-8"?>
<!DOCTYPE mapper
        PUBLIC "-//mybatis.org//DTD Mapper 3.0//EN"
        "http://mybatis.org/dtd/mybatis-3-mapper.dtd">
<!--namespace 命名空间 值必须唯一-->
<mapper namespace="com.hwl.dao.UserDao">
    <!--
        select标签,执行查询操作的标签
            id:接口的方法名称
            resultType:描述的是接口的返回值类型(若接口的返回值是List、Set集合,那么这个属性值必须定义为接口的泛型)
    -->
    <select id="findAll" resultType="com.hwl.pojo.User">
        select * from user
    </select>
</mapper>
测试
写测试类,看能不能查到:
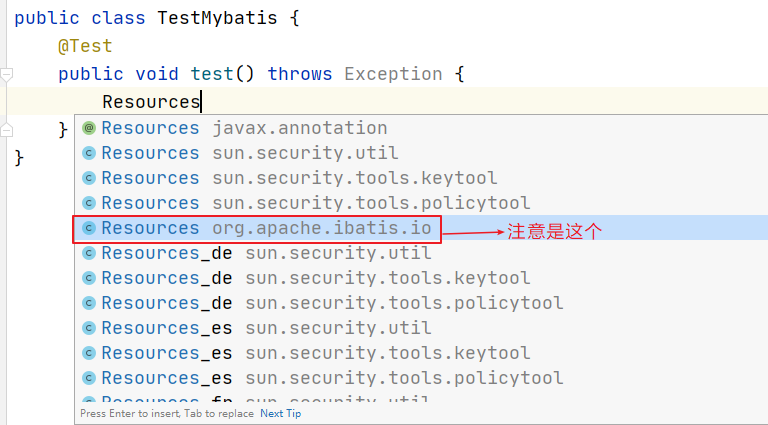
java
public class TestMybatis {
    @Test
    public void test() throws Exception {
        //加载mybatis的核心配置文件
        InputStream in = Resources.getResourceAsStream("sqlMapConfig.xml");
        //创建SqlSessionFactoryBuilder
        SqlSessionFactoryBuilder builder = new SqlSessionFactoryBuilder();
        //创建SqlSessionFactory 对象(构建这设计模式,屏蔽了SqlSessionFactory创建的细节)
        SqlSessionFactory sessionFactory = builder.build(in);
        //创建SqlSession对象(工厂模式)
        SqlSession sqlSession = sessionFactory.openSession();
        //通过sqlSession生成接口的代理对象(动态代理的思想)
        UserDao userDao = sqlSession.getMapper(UserDao.class);
        List<User> userList = userDao.findAll();
        userList.forEach(user -> {
            System.out.println(user);
        });
        //关闭资源
        sqlSession.close();
        in.close();
    }
}
最终结构:
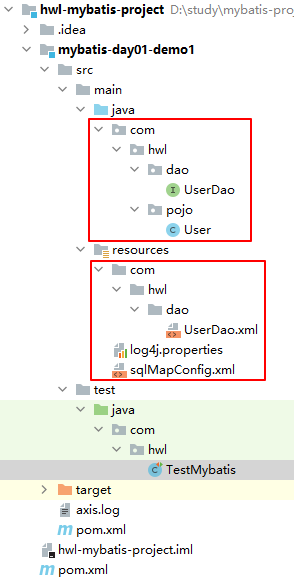
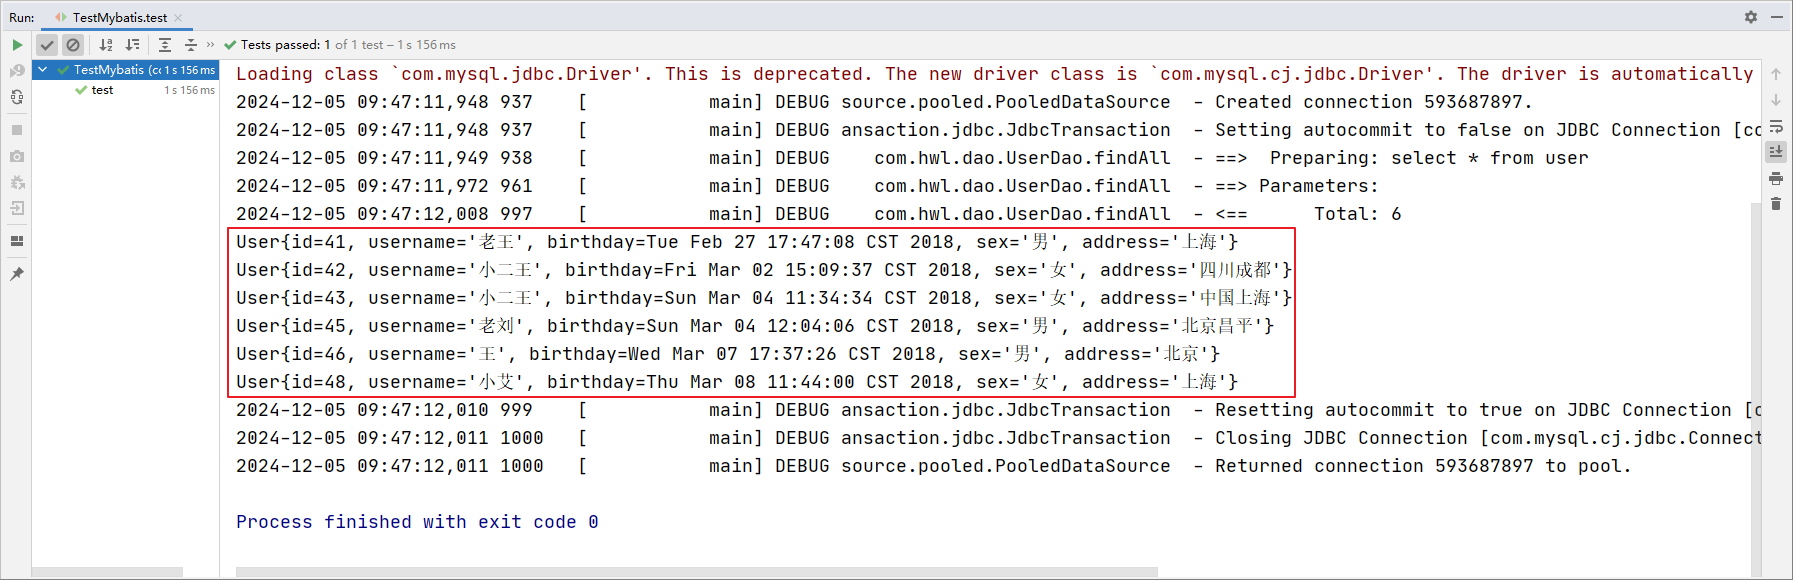
到这里,我们整个 mybatis 入门案例搭建成功。
tex
总结搭建mybatis入门案例的步骤:
1、导入mybatis相关的依赖
2、创建pojo,将pojo和数据表进行关联映射  定义接口
3、创建mybatis的核心配置文件sqlMapConfig.xml
4、创建接口的映射文件
     接口所在的目录 和接口文件所在的目录保持一致。
5、编写测试代码
4.03-自定义mybatis框架
(这节内容很多,2025年4月30日重新补充)
我们已经通过案例体验到了mybatis 的魅力。现在我们来看它的测试类,有几个对象我们需要搞清楚他们的作用,进而需要理解 mybatis 的整个工作流程和执行原理。
-
Resources加载配置文件,有一种是使用类加载进行加载,我们通过这个类的类加载器进行资源的加载。
-
SqlSessionFactoryBuilder构建 SqlSessionFactory 工厂对象需要的对象。采用了构建者模式,屏蔽了对象构建的细节。
-
SqlSessionFactory创建 SqlSession 对象所用。使用工厂模式创建,目的就是解耦合。
-
SqlSession创建代理对象,调用接口里面的方法。使用了代理模式。
下面我们就自己来手写 mybatis 框架,体验其工作原理。
流程分析
主要就是这个动态代理。
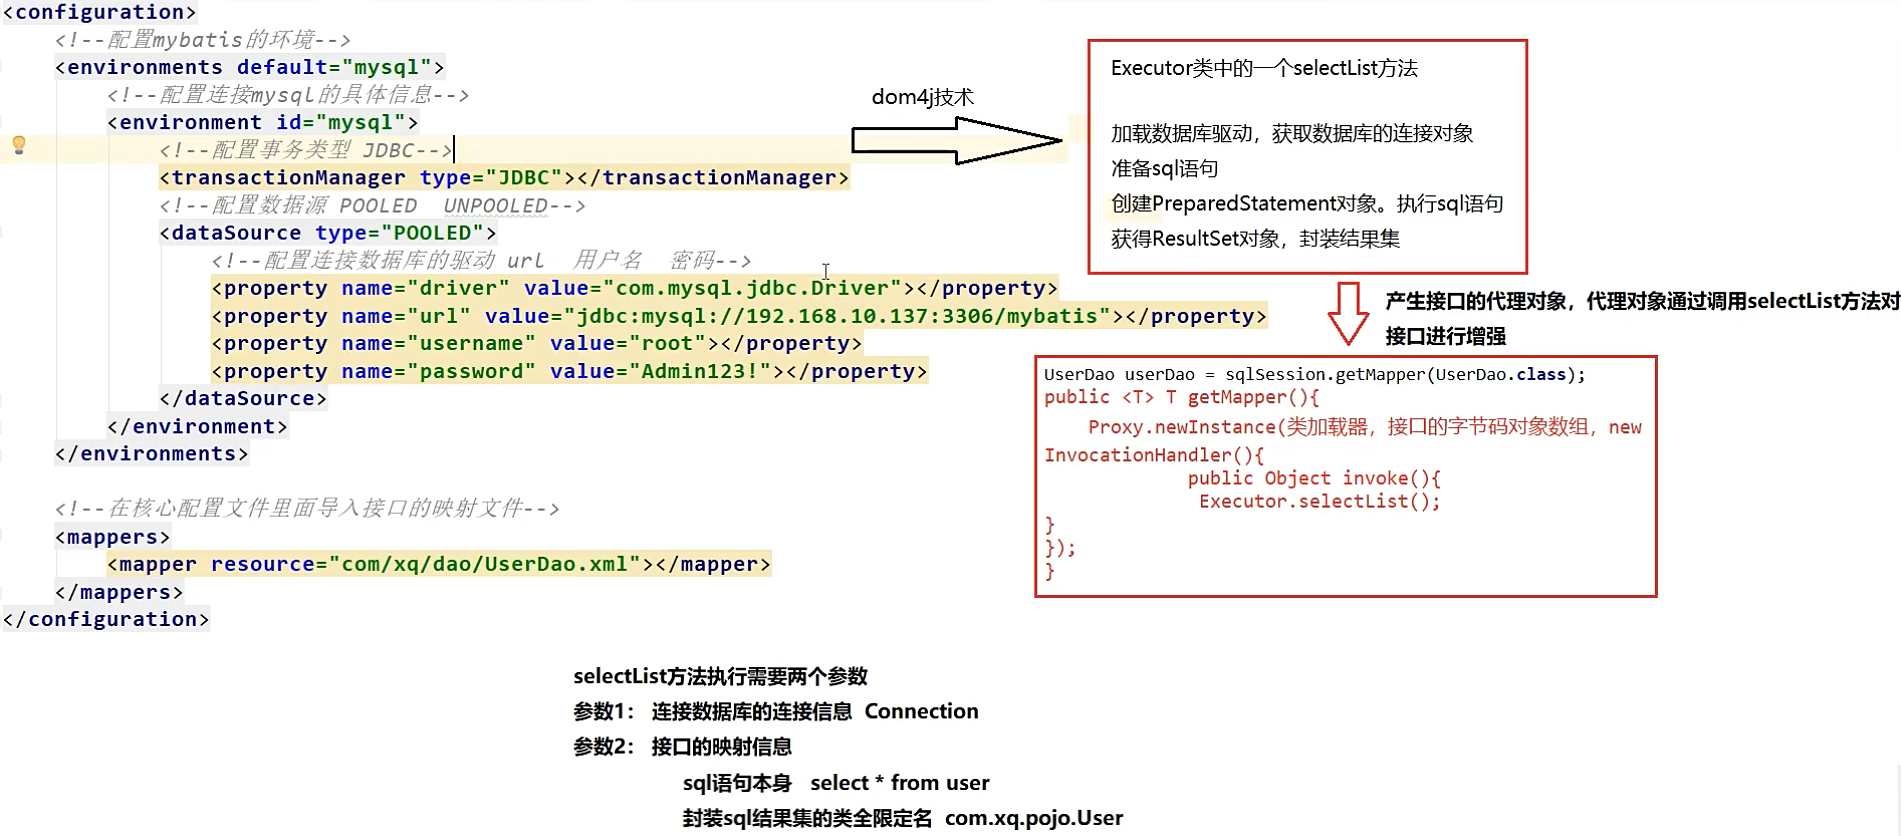
搭建环境
xml
<!--注意,这些是用来解析mybatis的核心配置文件,mybatis就不要导入了-->
<dependencies>
    <!--数据库驱动,注意这里用的是MySQL8版本-->
    <dependency>
        <groupId>mysql</groupId>
        <artifactId>mysql-connector-java</artifactId>
        <version>8.0.25</version>
    </dependency>
    <!--junit单元测试-->
    <dependency>
        <groupId>junit</groupId>
        <artifactId>junit</artifactId>
        <version>4.13</version>
        <scope>test</scope>
    </dependency>
    <!--dom4j的依赖-->
    <dependency>
        <groupId>dom4j</groupId>
        <artifactId>dom4j</artifactId>
        <version>1.6.1</version>
    </dependency>
    <dependency>
        <groupId>jaxen</groupId>
        <artifactId>jaxen</artifactId>
        <version>1.1.6</version>
    </dependency>
    <!--log4j-->
    <dependency>
        <groupId>log4j</groupId>
        <artifactId>log4j</artifactId>
        <version>1.2.12</version>
    </dependency>
</dependencies>
接下来,要自定义一个Mybatis框架:
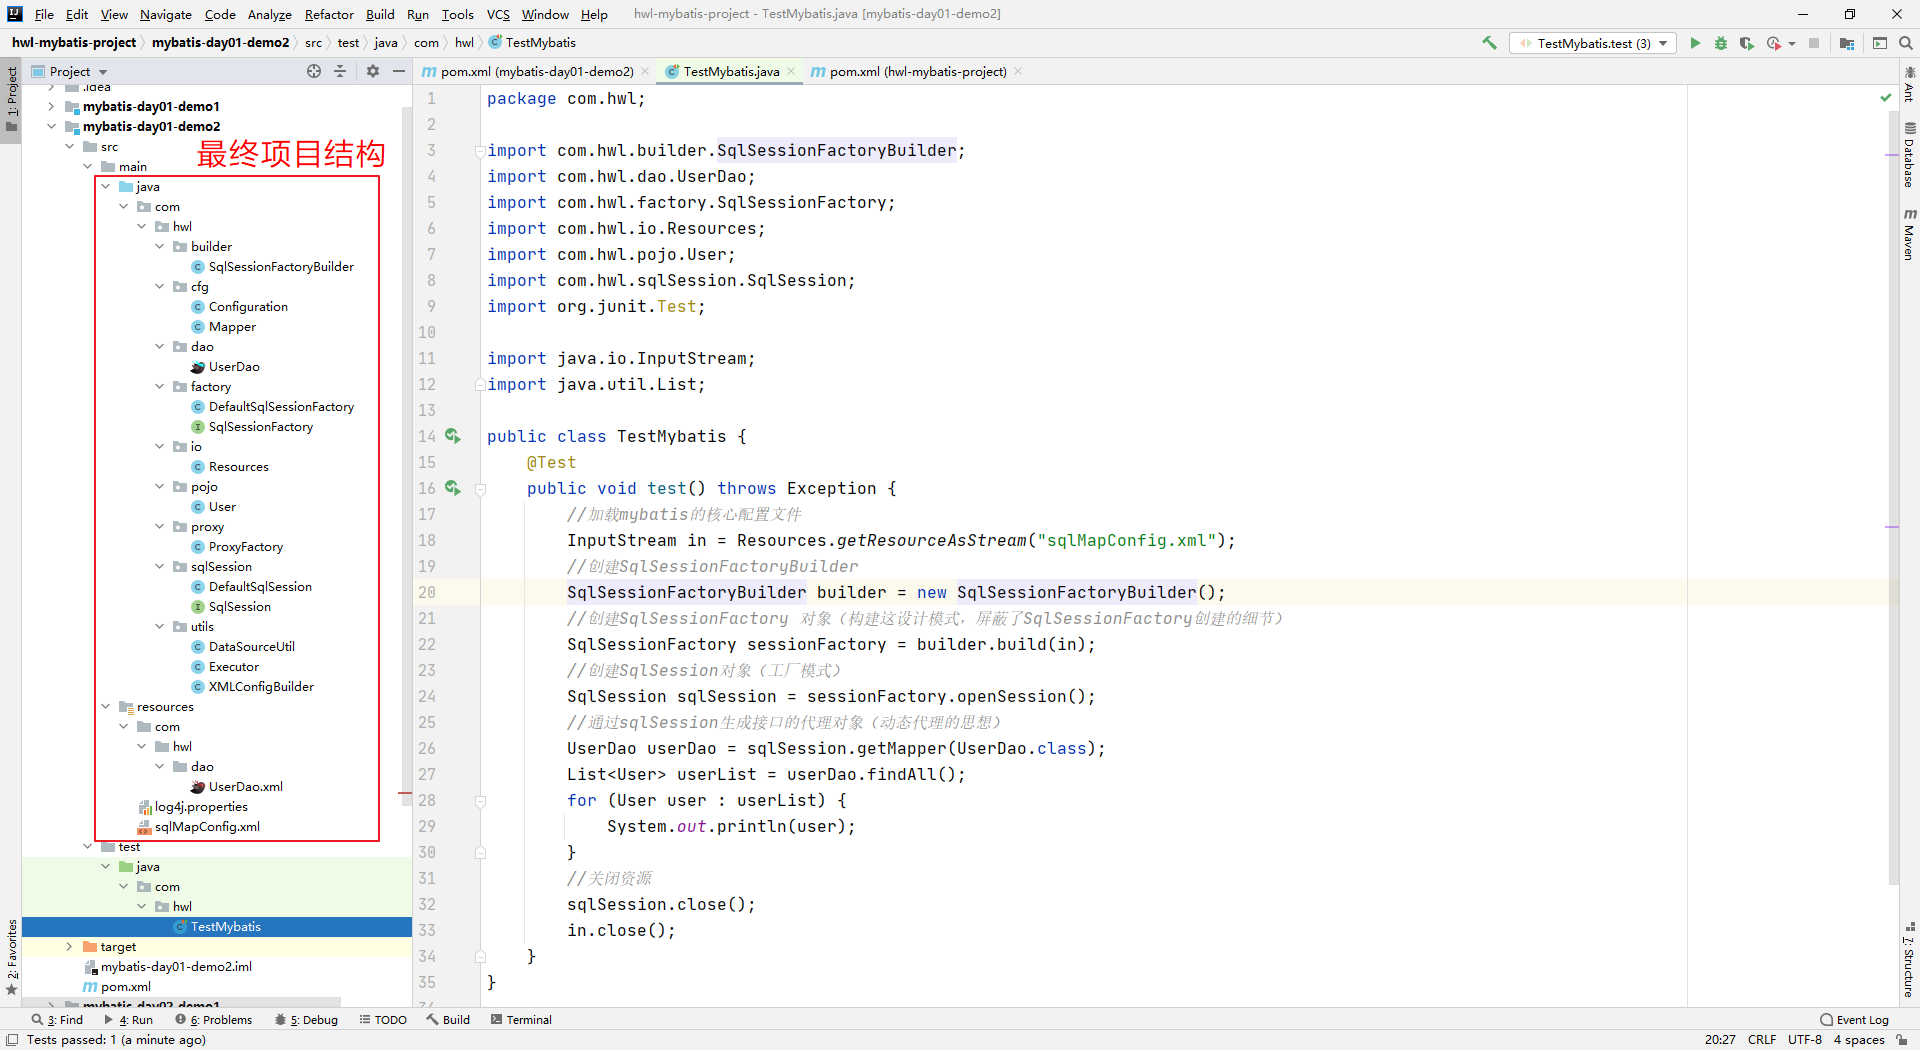
先引入3个工具类: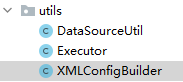
① XMLConfigBuilder 类,主要是用来解析XML配置文件。
② DataSourceUtil 类,主要是用来获取数据库连接对象。
③ Executor 类,主要是用来获取结果数据集,封装我们想要的数据。
java
/**
 *  使用dmo4j的技术去解析xml核心配置文件
 */
public class XMLConfigBuilder {
    /**
     * 解析主配置文件,把里面的内容填充到DefaultSqlSession所需要的地方
     * 使用的技术:
     *      dom4j+xpath
     */
    public static Configuration loadConfiguration(InputStream config){
        try{
            //定义封装连接信息的配置对象(mybatis的配置对象)
            Configuration cfg = new Configuration();

            //1.获取SAXReader对象
            SAXReader reader = new SAXReader();
            //2.根据字节输入流获取Document对象
            Document document = reader.read(config);
            //3.获取根节点
            Element root = document.getRootElement();
            //4.使用xpath中选择指定节点的方式,获取所有property节点
            List<Element> propertyElements = root.selectNodes("//property");
            //5.遍历节点
            for(Element propertyElement : propertyElements){
                //判断节点是连接数据库的哪部分信息
                //取出name属性的值
                String name = propertyElement.attributeValue("name");
                if("driver".equals(name)){
                    //表示驱动
                    //获取property标签value属性的值
                    String driver = propertyElement.attributeValue("value");
                    cfg.setDriver(driver);
                }
                if("url".equals(name)){
                    //表示连接字符串
                    //获取property标签value属性的值
                    String url = propertyElement.attributeValue("value");
                    cfg.setUrl(url);
                }
                if("username".equals(name)){
                    //表示用户名
                    //获取property标签value属性的值
                    String username = propertyElement.attributeValue("value");
                    cfg.setUsername(username);
                }
                if("password".equals(name)){
                    //表示密码
                    //获取property标签value属性的值
                    String password = propertyElement.attributeValue("value");
                    cfg.setPassword(password);
                }
            }
            //取出mappers中的所有mapper标签,判断他们使用了resource还是class属性
            List<Element> mapperElements = root.selectNodes("//mappers/mapper");
            //遍历集合
            for(Element mapperElement : mapperElements){
                //判断mapperElement使用的是哪个属性
                Attribute attribute = mapperElement.attribute("resource");
                if(attribute != null){
                    System.out.println("使用的是XML");
                    //表示有resource属性,用的是XML
                    //取出属性的值
                    String mapperPath = attribute.getValue();//获取属性的值"com/hwl/dao/UserDao.xml"
                    //把映射配置文件的内容获取出来,封装成一个map
                    Map<String, Mapper> mappers = loadMapperConfiguration(mapperPath);
                    //给configuration中的mappers赋值
                    cfg.setMappers(mappers);
                }else{
                    System.out.println("使用的是注解");
                    //表示没有resource属性,用的是注解
                    //获取class属性的值
                    String daoClassPath = mapperElement.attributeValue("class");
                    //根据daoClassPath获取封装的必要信息
                    Map<String,Mapper> mappers = loadMapperAnnotation(daoClassPath);
                    //给configuration中的mappers赋值
                    cfg.setMappers(mappers);
                }
            }
            //返回Configuration
            return cfg;
        }catch(Exception e){
            throw new RuntimeException(e);
        }finally{
            try {
                config.close();
            }catch(Exception e){
                e.printStackTrace();
            }
        }

    }

    /**
     * 根据传入的参数,解析XML,并且封装到Map中
     * @param mapperPath    映射配置文件的位置
     * @return  map中包含了获取的唯一标识(key是由dao的全限定类名和方法名组成)
     *          以及执行所需的必要信息(value是一个Mapper对象,里面存放的是执行的SQL语句和要封装的实体类全限定类名)
     */
    private static Map<String, Mapper> loadMapperConfiguration(String mapperPath)throws IOException {
        InputStream in = null;
        try{
            //定义返回值对象
            Map<String,Mapper> mappers = new HashMap<String,Mapper>();
            //1.根据路径获取字节输入流
            in = Resources.getResourceAsStream(mapperPath);
            //2.根据字节输入流获取Document对象
            SAXReader reader = new SAXReader();
            Document document = reader.read(in);
            //3.获取根节点
            Element root = document.getRootElement();
            //4.获取根节点的namespace属性取值
            String namespace = root.attributeValue("namespace");//是组成map中key的部分
            //5.获取所有的select节点
            List<Element> selectElements = root.selectNodes("//select");
            //6.遍历select节点集合
            for(Element selectElement : selectElements){
                //取出id属性的值      组成map中key的部分
                String id = selectElement.attributeValue("id");
                //取出resultType属性的值  组成map中value的部分
                String resultType = selectElement.attributeValue("resultType");
                //取出文本内容            组成map中value的部分
                String queryString = selectElement.getText();
                //创建Key
                String key = namespace+"."+id;
                //创建Value
                Mapper mapper = new Mapper();
                mapper.setQueryString(queryString);
                mapper.setResultType(resultType);
                //把key和value存入mappers中
                mappers.put(key,mapper);
            }
            return mappers;
        }catch(Exception e){
            throw new RuntimeException(e);
        }finally{
            in.close();
        }
    }

    /**
     * 根据传入的参数,得到dao中所有被select注解标注的方法。
     * 根据方法名称和类名,以及方法上注解value属性的值,组成Mapper的必要信息
     * @param daoClassPath
     * @return
     */
    private static Map<String,Mapper> loadMapperAnnotation(String daoClassPath)throws Exception{
        //定义返回值对象
        Map<String,Mapper> mappers = new HashMap<String, Mapper>();

        //1.得到dao接口的字节码对象
        Class daoClass = Class.forName(daoClassPath);
        //2.得到dao接口中的方法数组
        Method[] methods = daoClass.getMethods();
        //3.遍历Method数组
        for(Method method : methods){
            //取出每一个方法,判断是否有select注解
           /* boolean isAnnotated = method.isAnnotationPresent(Select.class);
            if(isAnnotated){
                //创建Mapper对象
                Mapper mapper = new Mapper();
                //取出注解的value属性值
                Select selectAnno = method.getAnnotation(Select.class);
                String queryString = selectAnno.value();
                mapper.setQueryString(queryString);
                //获取当前方法的返回值,还要求必须带有泛型信息
                Type type = method.getGenericReturnType();//List<User>
                //判断type是不是参数化的类型
                if(type instanceof ParameterizedType){
                    //强转
                    ParameterizedType ptype = (ParameterizedType)type;
                    //得到参数化类型中的实际类型参数
                    Type[] types = ptype.getActualTypeArguments();
                    //取出第一个
                    Class domainClass = (Class)types[0];
                    //获取domainClass的类名
                    String resultType = domainClass.getName();
                    //给Mapper赋值
                    mapper.setResultType(resultType);
                }
                //组装key的信息
                //获取方法的名称
                String methodName = method.getName();
                String className = method.getDeclaringClass().getName();
                String key = className+"."+methodName;
                //给map赋值
                mappers.put(key,mapper);
            }*/
        }
        return mappers;
    }
}
java
/**
 * 用于创建数据源的工具类
 */
public class DataSourceUtil {

    /**
     * 用于获取一个连接
     * @param cfg
     * @return
     */
    public static Connection getConnection(Configuration cfg){
        try {
            Class.forName(cfg.getDriver());
            return DriverManager.getConnection(cfg.getUrl(), cfg.getUsername(), cfg.getPassword());
        }catch(Exception e){
            throw new RuntimeException(e);
        }
    }
}
注意这个Executor工具类的 selectList 方法,注释掉的是 mysql5.7 的版本的写法。这里困扰了很久。不改的话会报参数不匹配异常。主要原因是:MySQL 8.x 驱动(mysql-connector-java-8.0.25),它默认会将 datetime 字段映射为 java.time.LocalDateTime,而不是 java.sql.Timestamp 或 java.util.Date。
java
/**
 * 负责执行SQL语句,并且封装结果集
 */
public class Executor {

    /*public <E> List<E> selectList(Mapper mapper, Connection conn) {
        PreparedStatement pstm = null;
        ResultSet rs = null;
        try {
            //1.取出mapper中的数据
            String queryString = mapper.getQueryString();//select * from user
            String resultType = mapper.getResultType();//com.hwl.pojo.User
            Class domainClass = Class.forName(resultType);
            //2.获取PreparedStatement对象
            pstm = conn.prepareStatement(queryString);
            //3.执行SQL语句,获取结果集
            rs = pstm.executeQuery();
            //4.封装结果集
            List<E> list = new ArrayList<E>();//定义返回值
            while(rs.next()) {
                //实例化要封装的实体类对象
                E obj = (E)domainClass.newInstance();

                //取出结果集的元信息:ResultSetMetaData
                ResultSetMetaData rsmd = rs.getMetaData();
                //取出总列数
                int columnCount = rsmd.getColumnCount();
                //遍历总列数
                for (int i = 1; i <= columnCount; i++) {
                    //获取每列的名称,列名的序号是从1开始的
                    String columnName = rsmd.getColumnName(i);
                    //根据得到列名,获取每列的值
                    Object columnValue = rs.getObject(columnName);
                    //给obj赋值:使用Java内省机制(借助PropertyDescriptor实现属性的封装)
                    PropertyDescriptor pd = new PropertyDescriptor(columnName,domainClass);//要求:实体类的属性和数据库表的列名保持一种
                    //获取它的写入方法
                    Method writeMethod = pd.getWriteMethod();
                    //把获取的列的值,给对象赋值
                    writeMethod.invoke(obj,columnValue);
                }
                //把赋好值的对象加入到集合中
                list.add(obj);
            }
            return list;
        } catch (Exception e) {
            throw new RuntimeException(e);
        } finally {
            release(pstm,rs);
        }
    }*/
    public <E> List<E> selectList(Mapper mapper, Connection conn) {
        PreparedStatement pstm = null;
        ResultSet rs = null;
        try {
            String queryString = mapper.getQueryString(); // SQL 语句
            String resultType = mapper.getResultType();   // 实体类全类名
            Class<?> domainClass = Class.forName(resultType);

            pstm = conn.prepareStatement(queryString);
            rs = pstm.executeQuery();

            List<E> list = new ArrayList<>();
            ResultSetMetaData rsmd = rs.getMetaData();
            int columnCount = rsmd.getColumnCount();

            while (rs.next()) {
                E obj = (E) domainClass.getDeclaredConstructor().newInstance();

                for (int i = 1; i <= columnCount; i++) {
                    String columnName = rsmd.getColumnLabel(i); // 支持SQL别名
                    Object columnValue = rs.getObject(columnName);

                    try {
                        PropertyDescriptor pd = new PropertyDescriptor(columnName, domainClass);
                        Method writeMethod = pd.getWriteMethod();
                        Class<?> paramType = writeMethod.getParameterTypes()[0];

                        if (columnValue != null) {
                            if (paramType == java.util.Date.class) {
                                if (columnValue instanceof Timestamp) {
                                    columnValue = new java.util.Date(((Timestamp) columnValue).getTime());
                                } else if (columnValue instanceof java.time.LocalDateTime) {
                                    columnValue = java.util.Date.from(((java.time.LocalDateTime) columnValue)
                                            .atZone(java.time.ZoneId.systemDefault())
                                            .toInstant());
                                }
                            }
                        }
                        writeMethod.invoke(obj, columnValue);

                    } catch (IllegalArgumentException e) {
                        throw new RuntimeException("字段赋值失败:字段 [" + columnName + "] 类型不匹配,值=" + columnValue, e);
                    }
                }

                list.add(obj);
            }
            return list;
        } catch (Exception e) {
            throw new RuntimeException(e);
        } finally {
            release(pstm, rs);
        }
    }

    private void release(PreparedStatement pstm, ResultSet rs) {
        if (rs != null) {
            try {
                rs.close();
            } catch (Exception e) {
                e.printStackTrace();
            }
        }

        if (pstm != null) {
            try {
                pstm.close();
            } catch (Exception e) {
                e.printStackTrace();
            }
        }
    }
}
编码实现
-
先把pojo和dao接口复制过来
javapublic class User { private Integer id; private String username; private Date birthday; private String sex; private String address; public Integer getId() {return id;} public void setId(Integer id) {this.id = id;} public String getUsername() {return username;} public void setUsername(String username) {this.username = username;} public Date getBirthday() {return birthday;} public void setBirthday(Date birthday) {this.birthday = birthday;} public String getSex() {return sex;} public void setSex(String sex) {this.sex = sex;} public String getAddress() {return address;} public void setAddress(String address) {this.address = address;} @Override public String toString() { return "User{" + "id=" + id + ", username='" + username + '\'' + ", birthday=" + birthday +", sex='" + sex + '\'' + ", address='" + address + '\'' + '}'; } }javapublic interface UserDao { //查询所有的用户信息 List<User> findAll(); } -
编写资源加载类,使用类加载器加载配置资源
javapublic class Resources { public static InputStream getResourceAsStream(String fileName) { //根据文件名称,使用类加载器加载指定的配置文件 return Resources.class.getClassLoader().getResourceAsStream(fileName); } } -
编写SqlSessionFactoryBuilder类
作用:加载配置资源,并将配置资源封装成Configuration对象,并将该资源对象传到工厂对象中。
javapublic class SqlSessionFactoryBuilder { //定义一个build方法 public SqlSessionFactory build(InputStream in) { //通过加载xml配置文件,生成一个Configuration对象 Configuration configuration = XMLConfigBuilder.loadConfiguration(in); return new DefaultSqlSessionFactory(configuration); } }
此时还没有配置类,那就创建
-
创建Configuration配置类
javapublic class Configuration { private String driver; private String url; private String username; private String password; private Map<String, Mapper> mappers = new HashMap<String, Mapper>(); public String getDriver() {return driver;} public void setDriver(String driver) {this.driver = driver;} public String getUrl() {return url;} public void setUrl(String url) {this.url = url;} public String getUsername() {return username;} public void setUsername(String username) {this.username = username;} public String getPassword() {return password;} public void setPassword(String password) {this.password = password;} public Map<String, Mapper> getMappers() {return mappers;} public void setMappers(Map<String, Mapper> mappers) {this.mappers = mappers;} }并创建Mapper类(前面分析过,用来封装sql语句和查询结果集的实体全限定名的)
javapublic class Mapper { private String queryString; private String resultType; public String getQueryString() {return queryString;} public void setQueryString(String queryString) {this.queryString = queryString;} public String getResultType() {return resultType;} public void setResultType(String resultType) {this.resultType = resultType;} } -
创建工厂
先创建SqlSessionFactory接口:
javapublic interface SqlSessionFactory { //获取SqlSession对象 SqlSession openSession(); }由于工厂的类型也可以多样化定义,所以我们把工厂定义为接口,以后想设计什么样的工厂,我们只需要实现这个接口就可以了。
javapublic class DefaultSqlSessionFactory implements SqlSessionFactory{ private Configuration cfg; //把外界的Configuration传入它的成员变量,构造函数传参 public DefaultSqlSessionFactory(Configuration cfg) { this.cfg = cfg; } @Override public SqlSession openSession() { return new DefaultSqlSession(cfg); } } -
定义SqlSession对象
javapublic interface SqlSession { //获取代理对象的方法 <T> T getMapper(Class<T> tClass); //释放资源的方法 void close(); }为了提高这个方法的可重用性,这个方法定义为泛型方法。
由于这里面获取代理对象的方式有多种可以实现,所以也将SqlSession定义为接口。以后想用什么方式获取代理对象,只需要实现这个接口即可。
我们创建这个接口的是实现类DefaultSqlSession:
javapublic class DefaultSqlSession implements SqlSession { private Configuration cfg; private Connection conn; public DefaultSqlSession(Configuration cfg) { this.cfg = cfg; //通过工具类得到 conn this.conn = DataSourceUtil.getConnection(cfg); } @Override public <T> T getMapper(Class<T> tClass) { //使用jdk动态代理技术进行增强 return (T) Proxy.newProxyInstance(tClass.getClassLoader(), new Class[]{tClass}, new ProxyFactory(cfg.getMappers(), conn)); } @Override public void close() { try { conn.close(); } catch (SQLException throwables) { throwables.printStackTrace(); } } }getMapper是在产生代理对象。其中的第三个参数,这个ProxyFactory我们实现了InvocationHandler接口。目的就是为了对接口的方法进行增强!!!而我们之前分析的selectList就是增强的方法!!!然而Executor类里面的selectList方法执行需要两个参数。分别是Map<String, Mapper> mappers 和Connection conn。所以需要将这个两个参数准备好。而Configuration对象从SqlSessionFactoryBuilder就一直传递过来啦。所以我们只需要在DefaultSqlSession构造函数里面初始化连接对象即可。
-
定义ProxyFactory类
javapublic class ProxyFactory implements InvocationHandler { private Map<String, Mapper> mappers; private Connection conn; public ProxyFactory(Map<String, Mapper> mappers, Connection conn) { this.mappers = mappers; this.conn = conn; } //增强的方法 @Override public Object invoke(Object proxy, Method method, Object[] args) throws Throwable { //获取方法名称 String methodName = method.getName(); //获取方法所在的类的名称 String className = method.getDeclaringClass().getName(); //拼接key值 String key = className + "." + methodName; //获取Map集合中的mapper对象 Mapper mapper = mappers.get(key); if (mapper == null) { throw new IllegalArgumentException("传入的参数有误"); } return new Executor().selectList(mapper, conn); } }
总结
下面我们通过一幅图来对上面的案例进行总结:
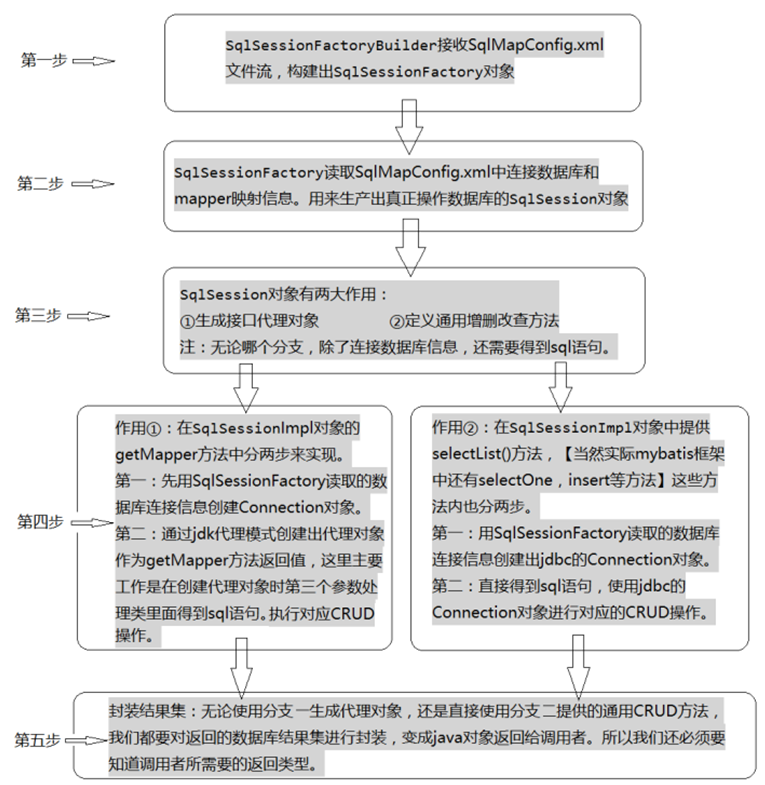
其他一些配置代码:
UserDao.xml(记得把之前写的mybatis的头去掉):
xml
<!--namespace 命名空间 值必须唯一-->
<mapper namespace="com.hwl.dao.UserDao">
    <!--
        select标签,执行查询操作的标签
            id:接口的方法名称
            resultType:描述的是接口的返回值类型(若接口的返回值是List、Set集合,那么这个属性值必须定义为接口的泛型)
    -->
    <select id="findAll" resultType="com.hwl.pojo.User">
        SELECT * FROM user
    </select>
</mapper>
sqlMapConfig.xml(同样把之前写的mybatis的头去掉):
xml
<configuration>
    <!--配置mybatis的环境-->
    <environments default="mysql">
        <!--配置连接mysql的具体信息-->
        <environment id="mysql">
            <!--配置事务类型 JDBC-->
            <transactionManager type="JDBC"/>
            <!--配置数据源 POOLED UNPOOLED-->
            <dataSource type="UNPOOLED">
                <!--配置连接数据库的驱动 url 用户名 密码-->
                <property name="driver" value="com.mysql.cj.jdbc.Driver"/>
                <property name="url" value="jdbc:mysql://localhost/lesson"/>
                <property name="username" value="root"/>
                <property name="password" value="root"/>
            </dataSource>
        </environment>
    </environments>

    <mappers>
        <mapper resource="com/hwl/dao/UserDao.xml"/>
    </mappers>
</configuration>
测试类:
java
public class TestMybatis {
    @Test
    public void test() throws Exception {
        //加载mybatis的核心配置文件
        InputStream in = Resources.getResourceAsStream("sqlMapConfig.xml");
        //创建SqlSessionFactoryBuilder
        SqlSessionFactoryBuilder builder = new SqlSessionFactoryBuilder();
        //创建SqlSessionFactory 对象(构建者设计模式,屏蔽了SqlSessionFactory创建的细节)
        SqlSessionFactory sessionFactory = builder.build(in);
        //创建SqlSession对象(工厂模式)
        SqlSession sqlSession = sessionFactory.openSession();
        //通过sqlSession生成接口的代理对象(动态代理的思想)
        UserDao userDao = sqlSession.getMapper(UserDao.class);
        List<User> userList = userDao.findAll();
        for (User user : userList) {
            System.out.println(user);
        }
        //关闭资源
        sqlSession.close();
        in.close();
    }
}
启动测试,成功~
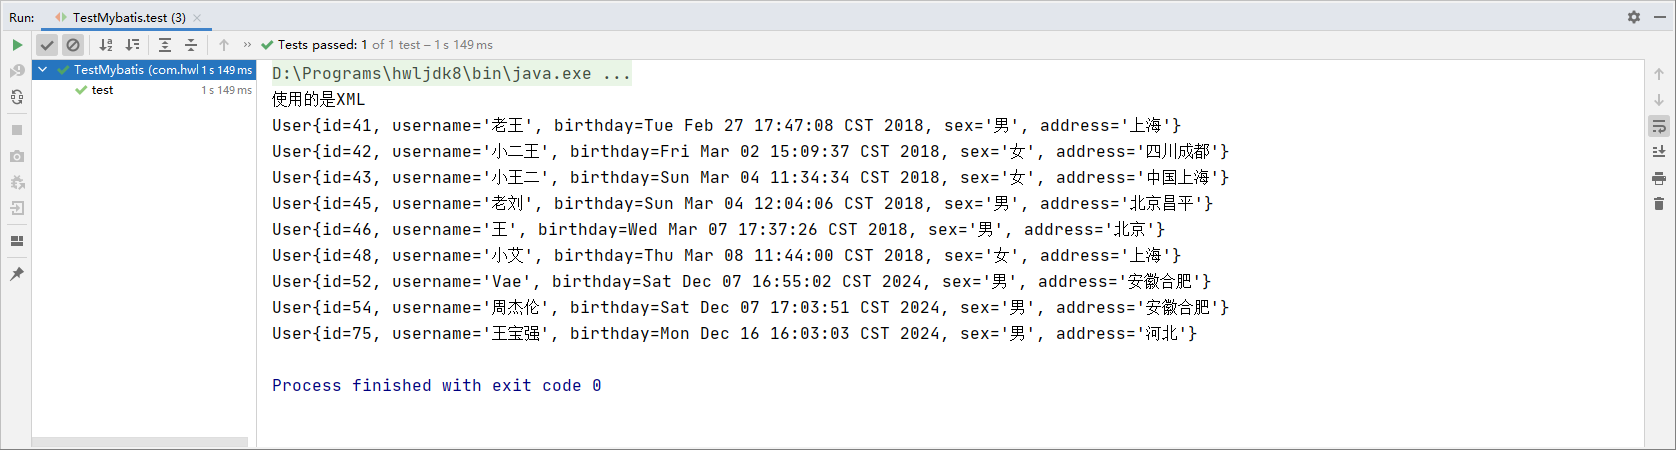
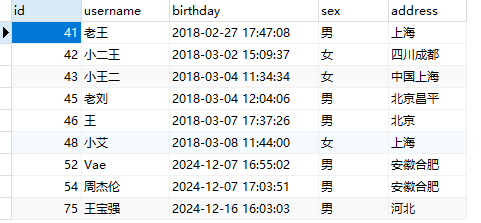
4.04-mybatis单表操作之简单查询
下面介绍基本的增删改查操作:
sqlMapConfig.xml
xml
<?xml version="1.0" encoding="UTF-8"?>
<!DOCTYPE configuration PUBLIC "-//mybatis.org//DTD Config 3.0//EN"
        "http://mybatis.org/dtd/mybatis-3-config.dtd">
<configuration>
    <environments default="mybatis">
        <environment id="mybatis">
            <!--配置事务类型 JDBC-->
            <transactionManager type="JDBC"/>
            <dataSource type="POOLED">  <!--后面分析为什么写POOLED-->
                <!--配置连接数据库的驱动 url 用户名 密码-->
                <property name="driver" value="com.mysql.jdbc.Driver"/>
                <property name="url" value="jdbc:mysql://localhost:3306/lesson"/>
                <property name="username" value="root"/>
                <property name="password" value="root"/>
            </dataSource>
        </environment>
    </environments>
    <mappers>
        <mapper resource="com/hwl/dao/UserDao.xml"/>
    </mappers>
</configuration>
实体类User
java
public class User {
    private Integer id;
    private String username;
    private Date birthday;
    private String sex;
    private String address;

    public Integer getId() {return id;}

    public void setId(Integer id) {this.id = id;}

    public String getUsername() {return username;}

    public void setUsername(String username) {this.username = username;}

    public Date getBirthday() {return birthday;}

    public void setBirthday(Date birthday) {this.birthday = birthday;}

    public String getSex() {return sex;}

    public void setSex(String sex) {this.sex = sex;}

    public String getAddress() {return address;}

    public void setAddress(String address) {this.address = address;}

    @Override
    public String toString() {
        return "User{" + "id=" + id + ", username='" + username + '\'' + ", birthday=" + birthday + ", sex='" + sex + '\'' + ", address='" + address + '\'' + '}';
    }
}
UserDao接口,这里先写一个查找所有,复习一下:
查询所有
java
public interface UserDao {
    //查询所有用户信息
    List<User> findAll();
}
UserDao.xml
xml
<?xml version="1.0" encoding="UTF-8"?>
<!DOCTYPE mapper
        PUBLIC "-//mybatis.org//DTD Mapper 3.0//EN"
        "http://mybatis.org/dtd/mybatis-3-mapper.dtd">
<mapper namespace="com.hwl.dao.UserDao">
    <!--查询所有用户信息-->
    <select id="findAll" resultType="com.hwl.pojo.User">
        select * from user
    </select>
</mapper>
java
public class TestMybatis {
    @Test
    public void test01() throws Exception {
        InputStream in = Resources.getResourceAsStream("sqlMapConfig.xml");
        SqlSessionFactoryBuilder builder = new SqlSessionFactoryBuilder();
        SqlSessionFactory sessionFactory = builder.build(in);
        SqlSession sqlSession = sessionFactory.openSession();
        UserDao userDao = sqlSession.getMapper(UserDao.class);
        List<User> userList = userDao.findAll();
        for (User user : userList) {
            System.out.println(user);
        }
        sqlSession.close();
        in.close();
    }
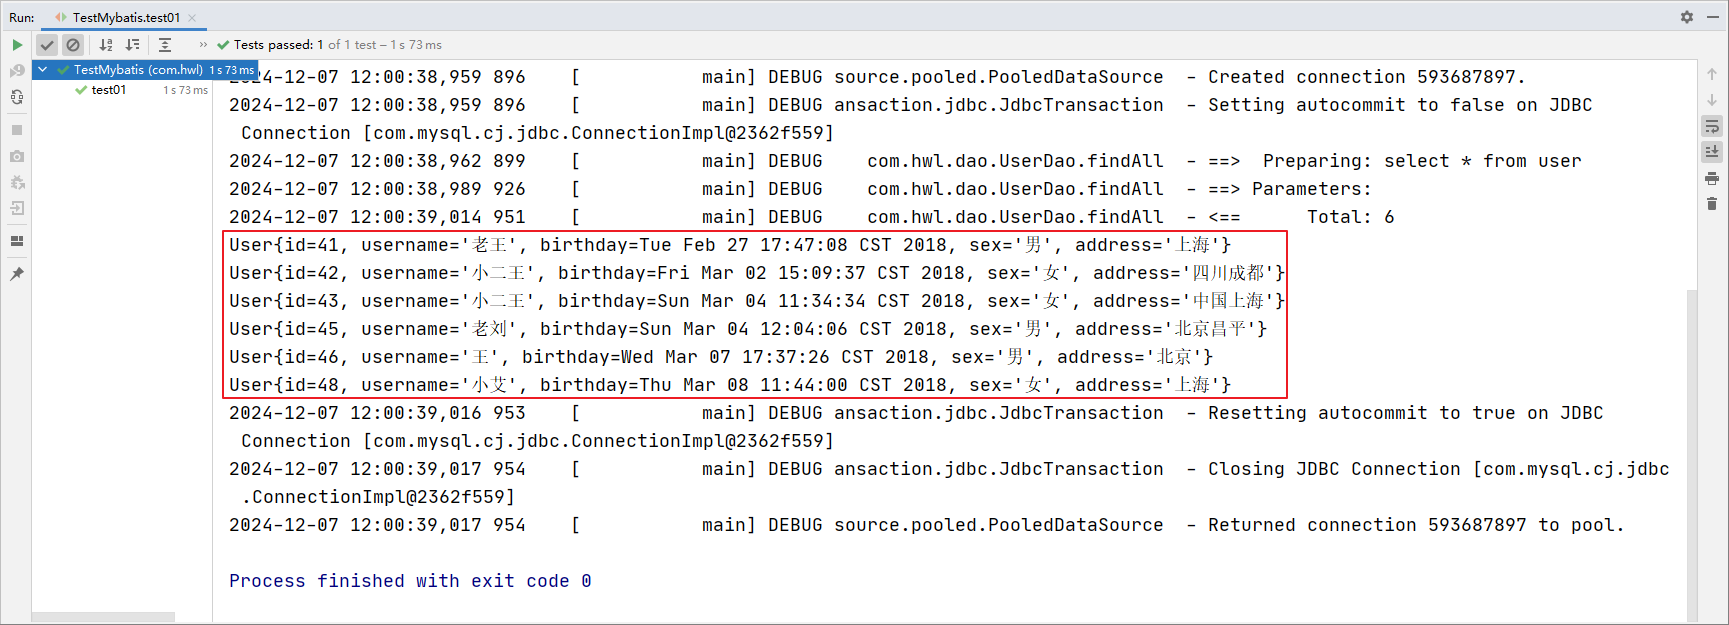
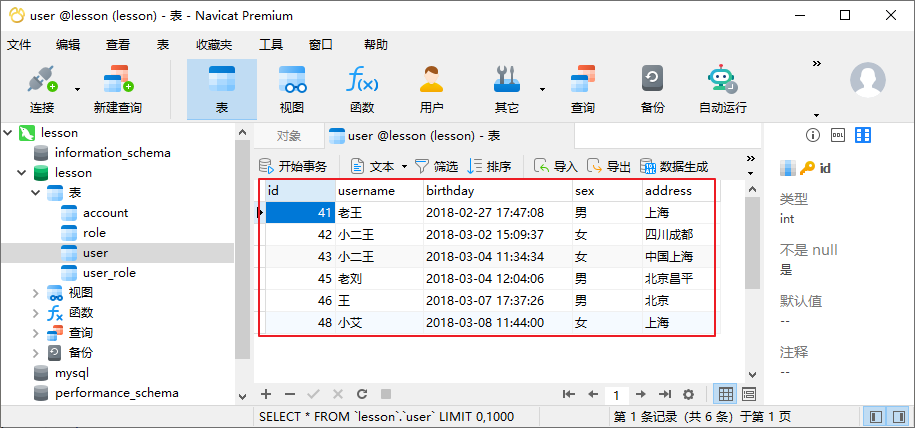
}
查找单个用户
java
public class TestMybatis {
    SqlSession sqlSession;
    UserDao userDao;

    @Before  //在@Test注解修饰的方法之前执行
    public void before() throws Exception {
        InputStream in = Resources.getResourceAsStream("sqlMapConfig.xml");
        SqlSessionFactoryBuilder builder = new SqlSessionFactoryBuilder();
        SqlSessionFactory sessionFactory = builder.build(in);
        sqlSession = sessionFactory.openSession();
        userDao = sqlSession.getMapper(UserDao.class);
    }

    @After  //在@Test方法执行之后执行
    public void after() throws Exception {
        sqlSession.close();
    }

    //查询单个用户
    @Test
    public void test02() throws Exception {
        User user = userDao.findUserById(48);
        System.out.println(user);
    }
}
java
//根须id查找用户信息
User findUserById(Integer id);
xml
<!--根据id查询对应的用户信息-->
<select id="findUserById" resultType="com.hwl.pojo.User" parameterType="int">
    select * from User where id = #{id}
</select>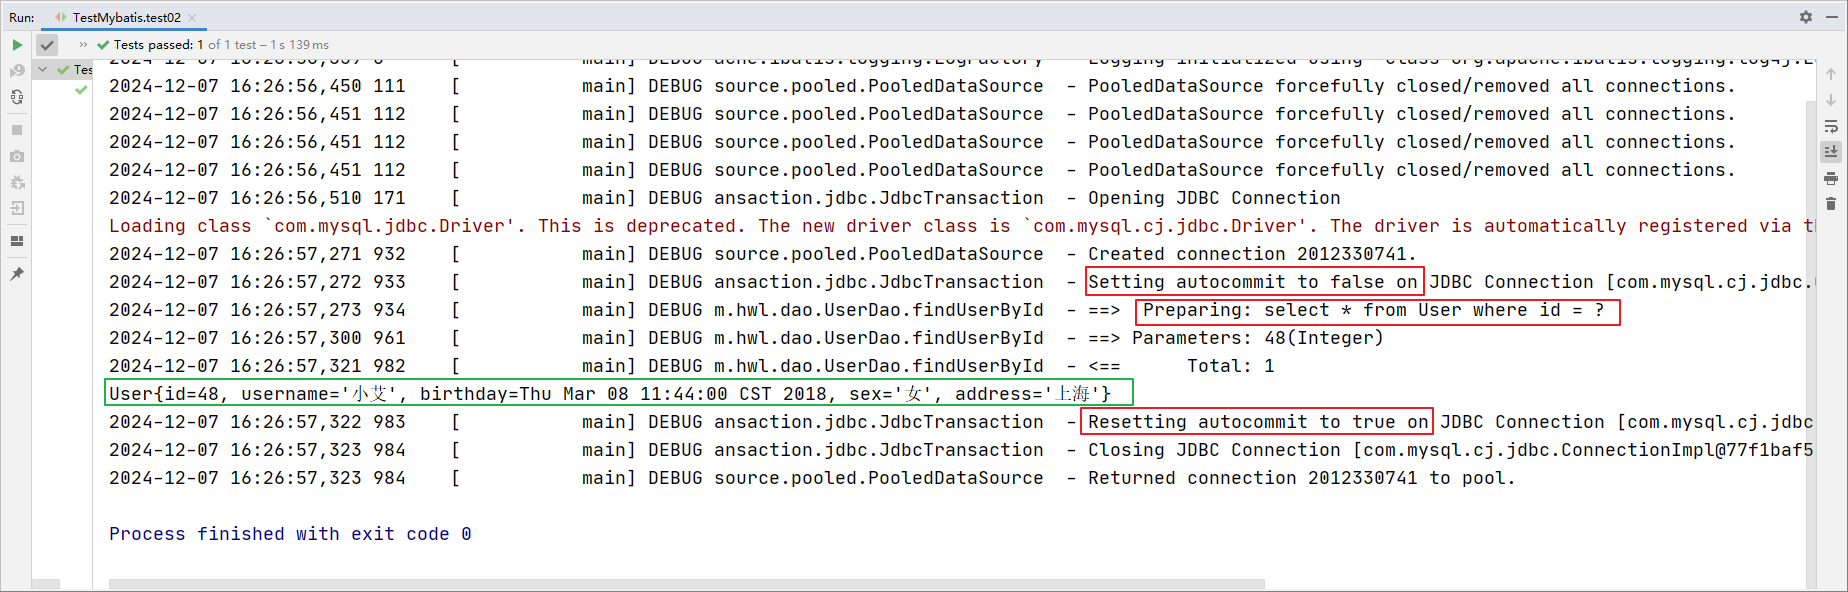
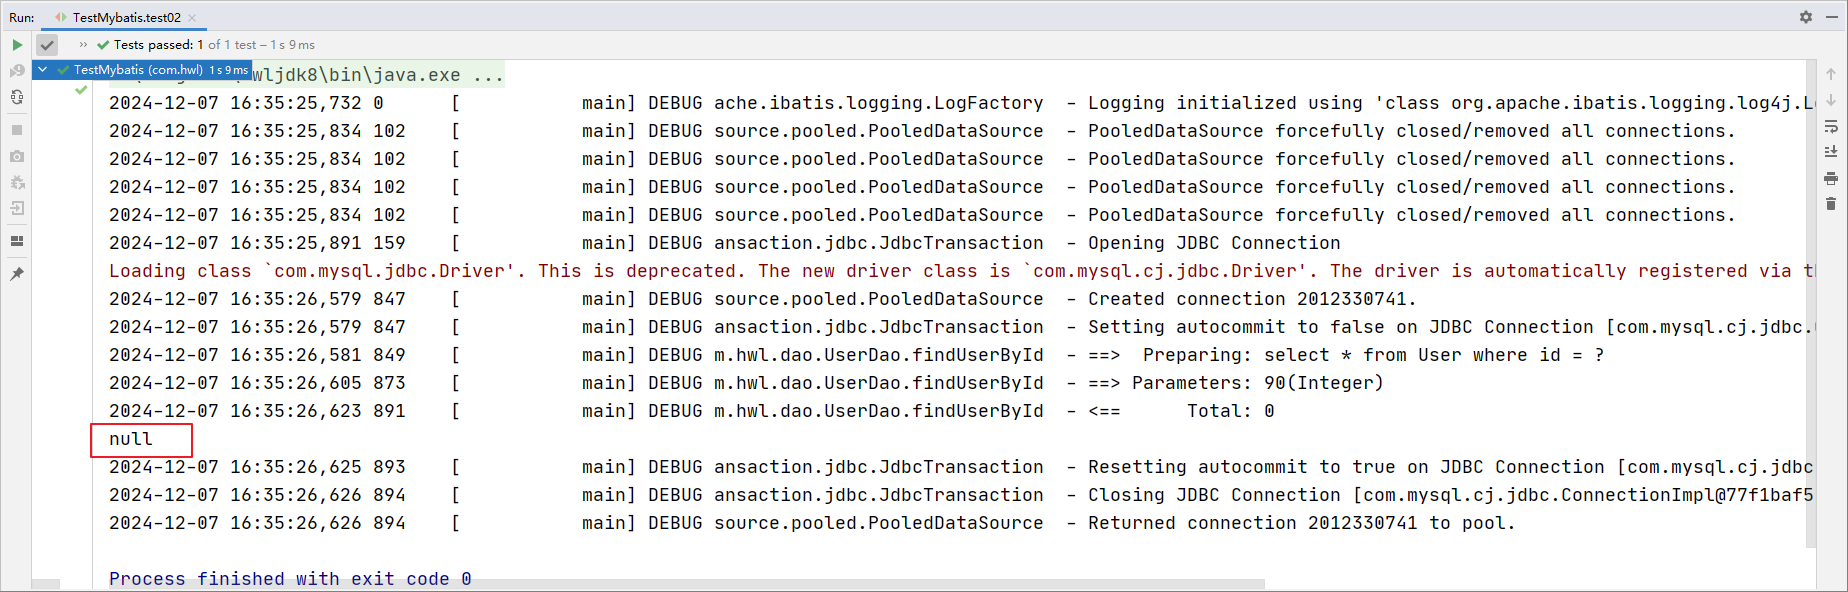
若把48改为不存在的90
4.05-mybatis单表操作之更新操作
新增用户
在接口中添加方法:
java
//新增用户
void addUser(User user);
xml
<insert id="addUser" parameterType="com.hwl.pojo.User">
    insert into user(username, birthday, sex, address) values(#{username}, #{birthday}, #{sex}, #{address})
</insert>
java
@Test
public void test03() throws Exception {
    User user = new User();
    user.setUsername("Vae");
    user.setBirthday(new Date());
    user.setSex("男");
    user.setAddress("安徽合肥");
    userDao.addUser(user);
}
运行
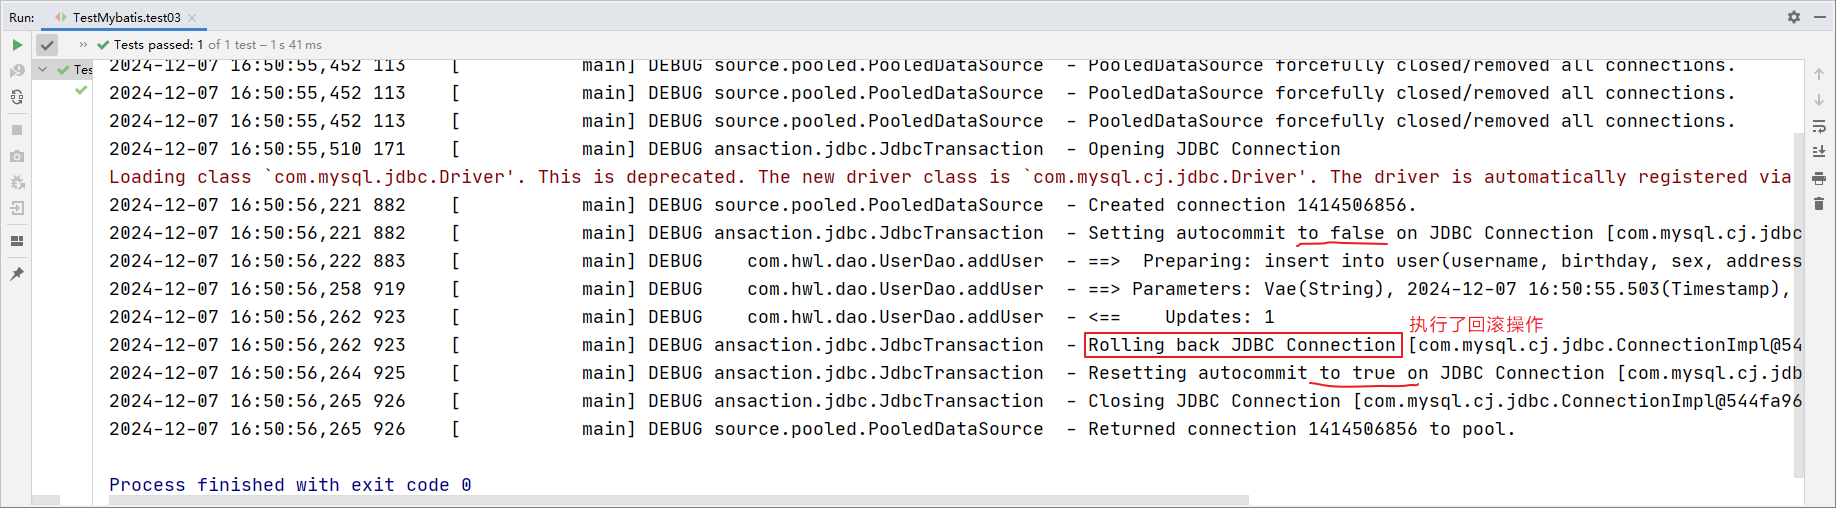
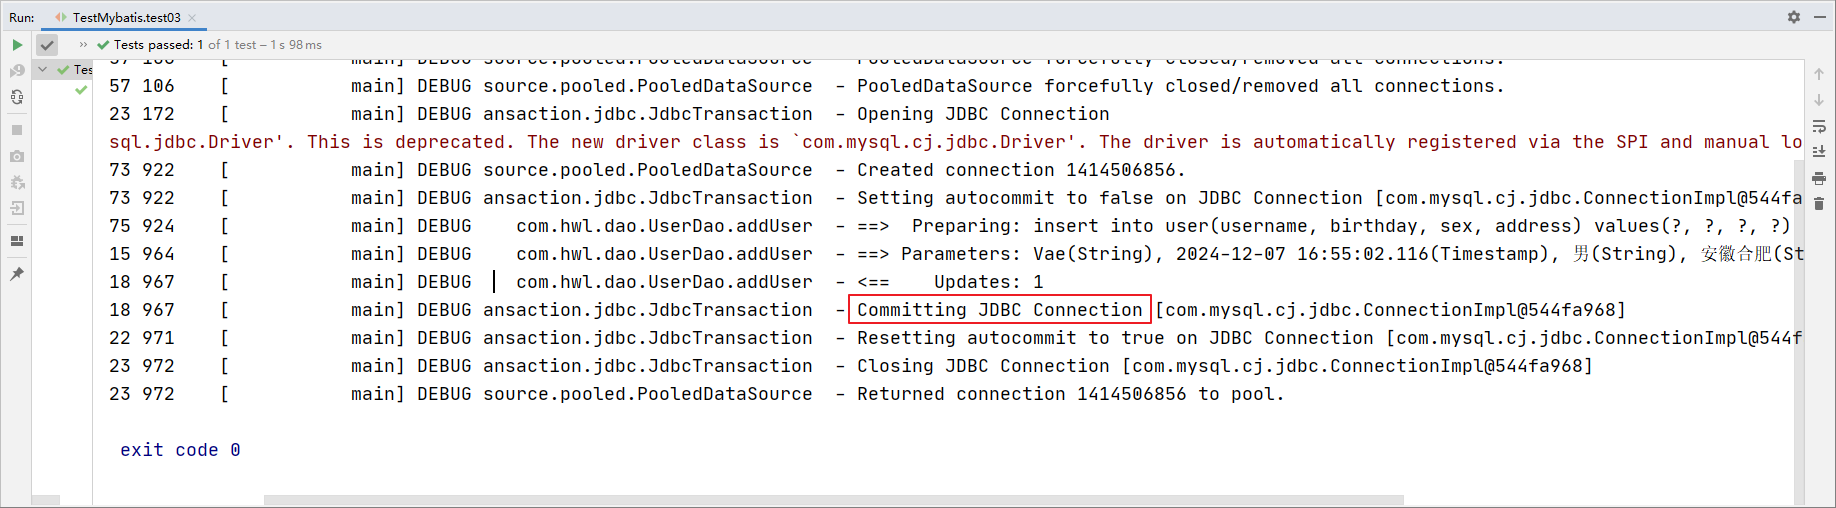
但是刷新数据库,这条数据并没有写入数据库里面。原因是它自动执行了回滚操作,所以我们需要自己去手动提交
java
@Test
public void test03() throws Exception {
    User user = new User();
    user.setUsername("Vae");
    user.setBirthday(new Date());
    user.setSex("男");
    user.setAddress("安徽合肥");
    userDao.addUser(user);
    sqlSession.commit();
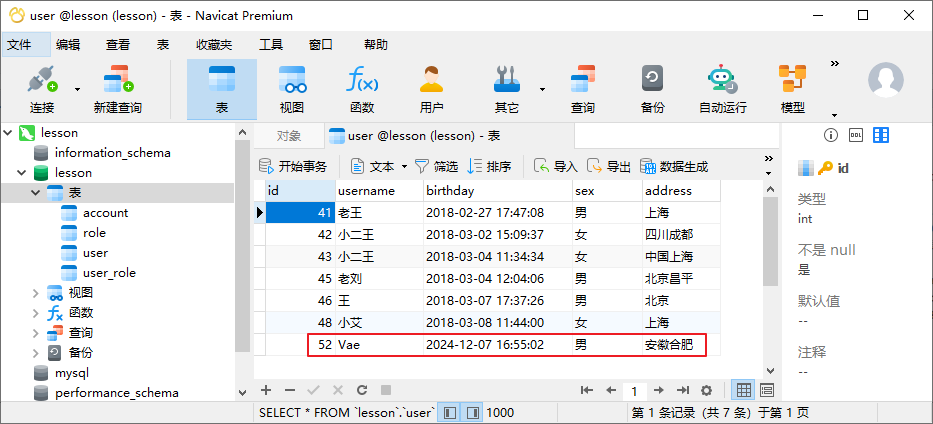
}
获取新增用户的主键id
在某些场景下,需要获取新增的用户的主键id,有以下2种方法
方法1:
xml
<insert id="addUser" parameterType="com.hwl.pojo.User">
    <selectKey keyColumn="id" keyProperty="id" resultType="int">
        select last_insert_id()
    </selectKey>
    insert into user(username, birthday, sex, address) values(#{username}, #{birthday}, #{sex}, #{address})
</insert>
java
@Test
public void test03() throws Exception {
    User user = new User();
    user.setUsername("周杰伦");
    user.setBirthday(new Date());
    user.setSex("男");
    user.setAddress("安徽合肥");
    userDao.addUser(user);
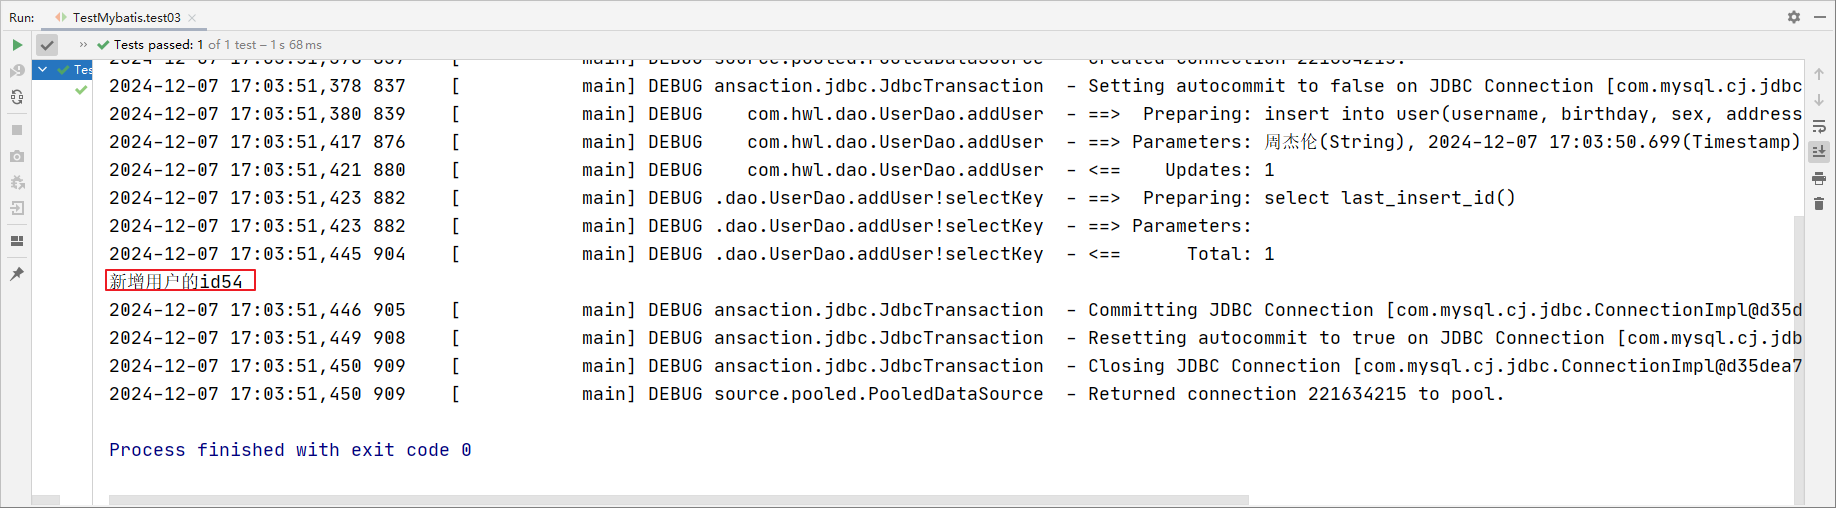
    System.out.println("新增用户的id" + user.getId());
    sqlSession.commit();
}
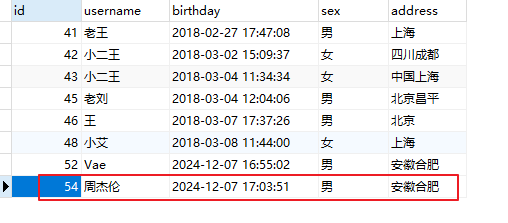
方法2(更简便):
xml
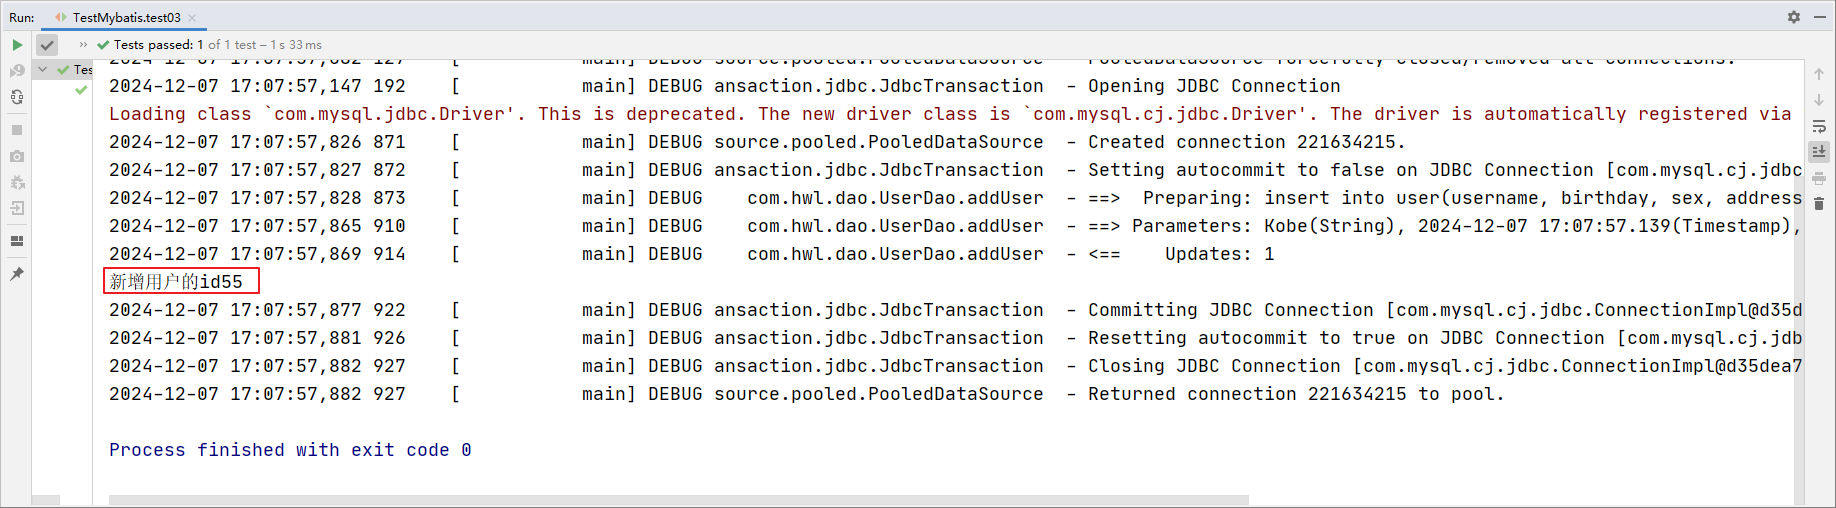
<insert id="addUser" parameterType="com.hwl.pojo.User" useGeneratedKeys="true" keyProperty="id" keyColumn="id">
    <!--<selectKey keyColumn="id" keyProperty="id" resultType="int">
        select last_insert_id()
    </selectKey>-->
    insert into user(username, birthday, sex, address) values(#{username}, #{birthday}, #{sex}, #{address})
</insert>
java
@Test
public void test03() throws Exception {
    User user = new User();
    user.setUsername("Kobe");
    user.setBirthday(new Date());
    user.setSex("男");
    user.setAddress("安徽合肥");
    userDao.addUser(user);
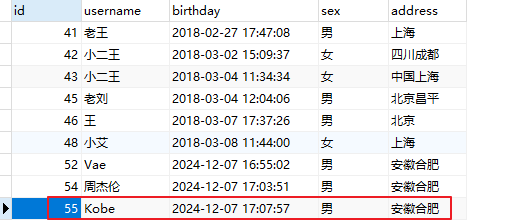
    System.out.println("新增用户的id" + user.getId());
    sqlSession.commit();
}
修改用户
在持久层接口中添加方法
java
//修改用户
void updateUser(User user);
xml
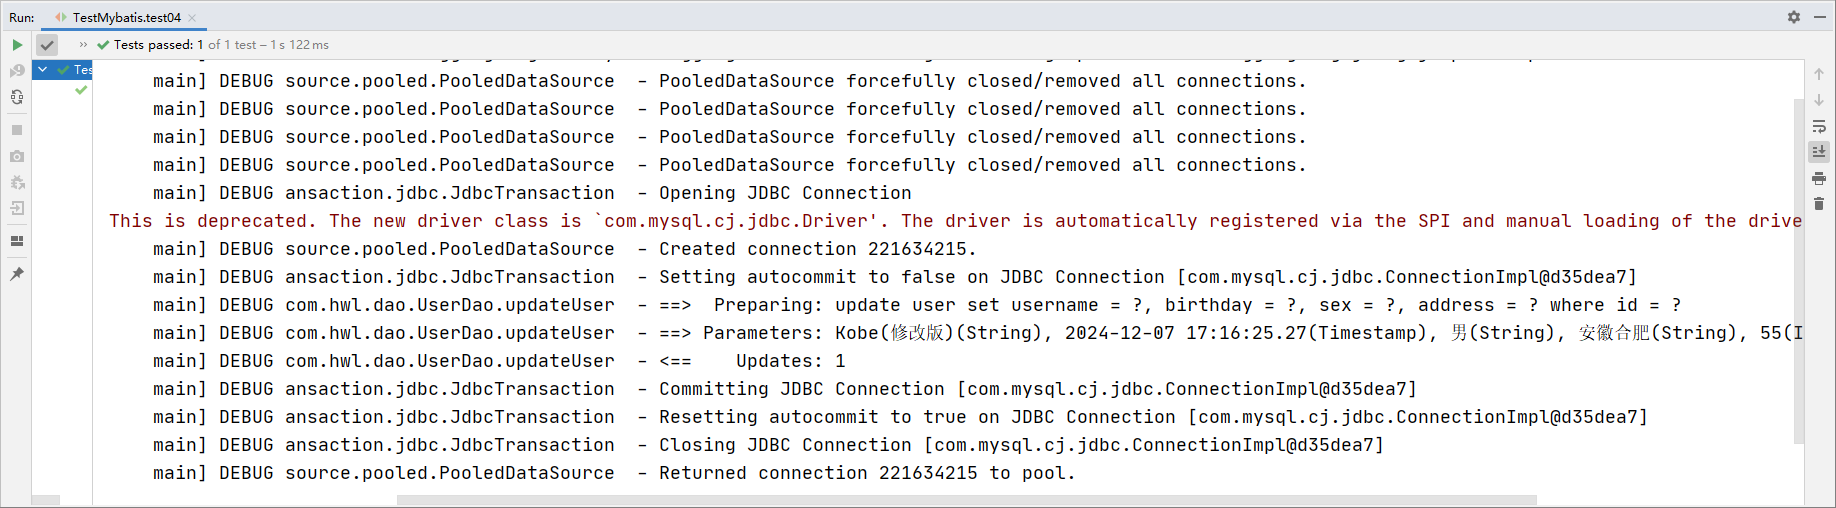
<update id="updateUser" parameterType="com.hwl.pojo.User">
    update user set username = #{username}, birthday = #{birthday}, sex = #{sex}, address = #{address} where id = #{id}
</update>
java
@Test
public void test04() throws Exception {
    User user = new User();
    user.setId(55);
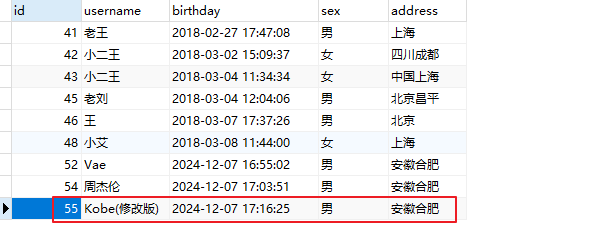
    user.setUsername("Kobe(修改版)");
    user.setBirthday(new Date());
    user.setSex("男");
    user.setAddress("安徽合肥");
    userDao.updateUser(user);
    sqlSession.commit();
}
删除用户
在接口中添加删除的方法
java
//删除用户
void deleteUser(Integer id);
xml
<delete id="deleteUser" parameterType="int">
    delete from user where id = #{id}
</delete>
java
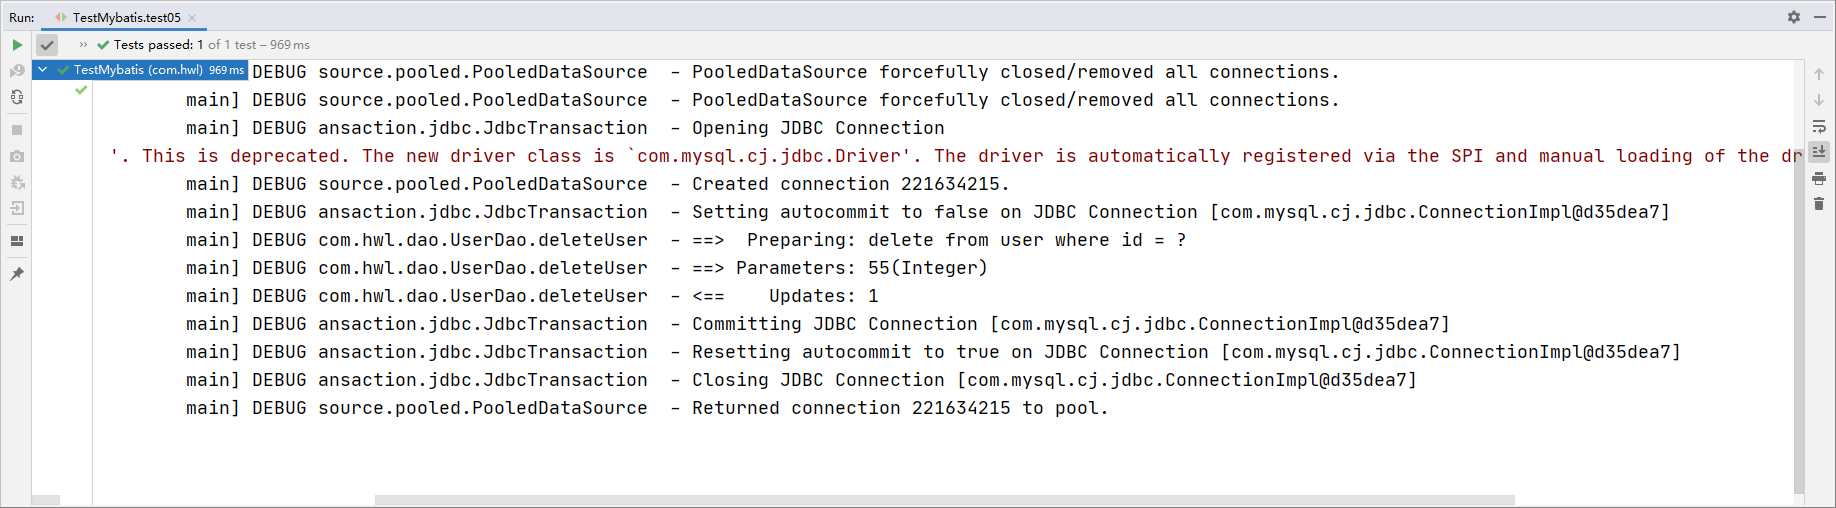
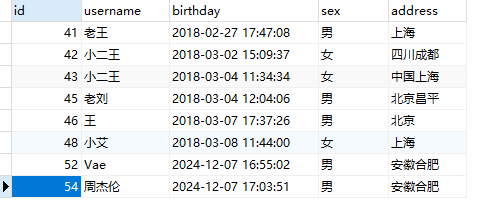
@Test
public void test05() throws Exception {
    userDao.deleteUser(55);
    sqlSession.commit();
}
4.06-mybatis单表操作之模糊查询&聚合函数查询
介绍两种模糊查询的方法
方法 1 :
java
//模糊查询1 根据用户名进行模糊查询
List<User> findUserByUserName(String username);
xml
<select id="findUserByUserName" parameterType="String" resultType="com.hwl.pojo.User">
    select * from user where username like #{username}
</select>
java
@Test
public void test06() throws Exception {
    List<User> userList = userDao.findUserByUserName("%王%");
    for (User user : userList) {
        System.out.println(user);
    }
}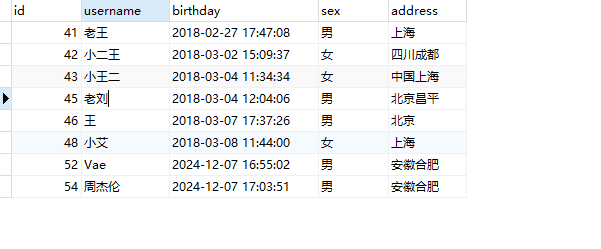
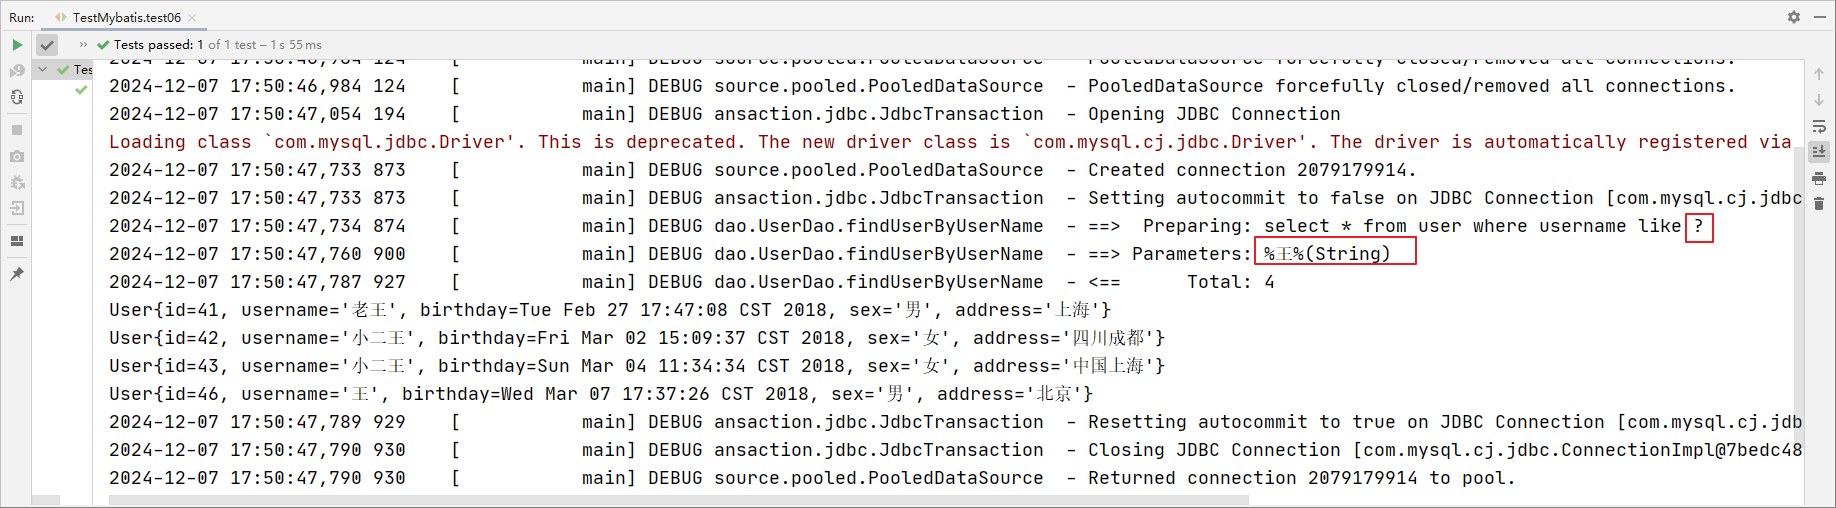
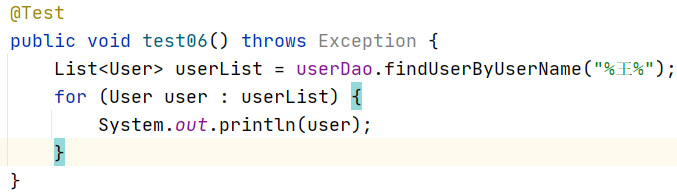
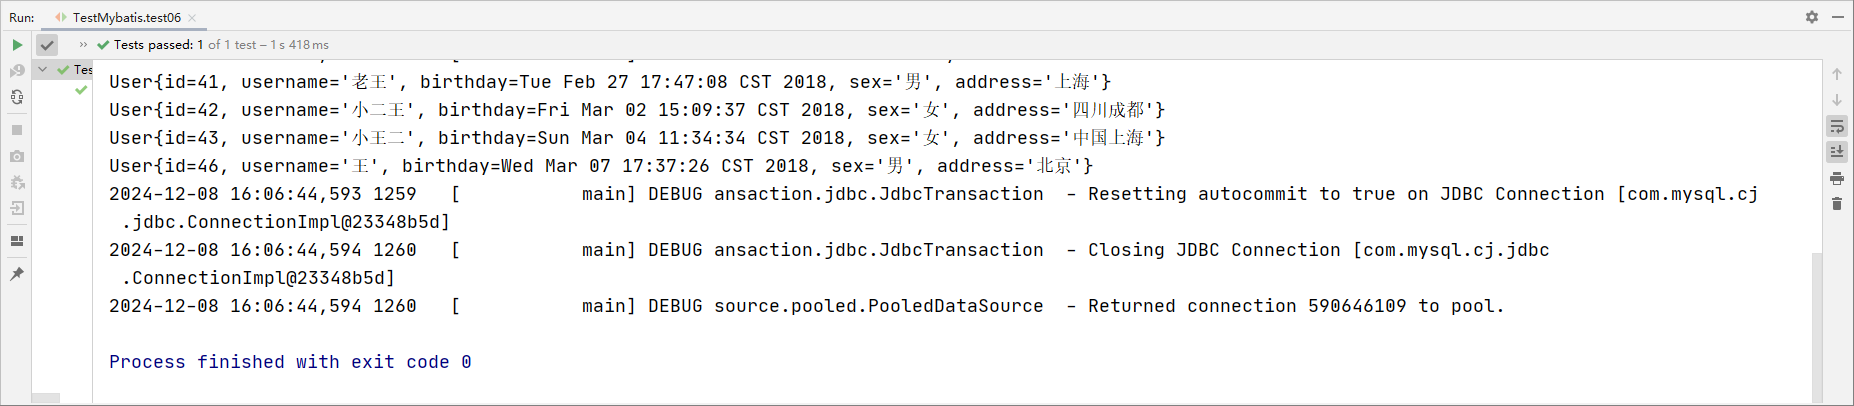
我们在配置文件中没有加入%来作为模糊查询的条件,所以在传入字符串实参时,就需要给定模糊查询的标识 %。配置文件中的 #{username}也只是一个占位符,所以SQL 语句显示为 ?
方法 2:
java
//模糊查询2 根据用户名进行模糊查询
List<User> findUserByUserName2(String username);
xml
<select id="findUserByUserName2" parameterType="String" resultType="com.hwl.pojo.User">
    select * from user where username like '%${value}%'
</select>
java
@Test
public void test07() throws Exception {
    List<User> userList = userDao.findUserByUserName2("王");
    for (User user : userList) {
        System.out.println(user);
    }
}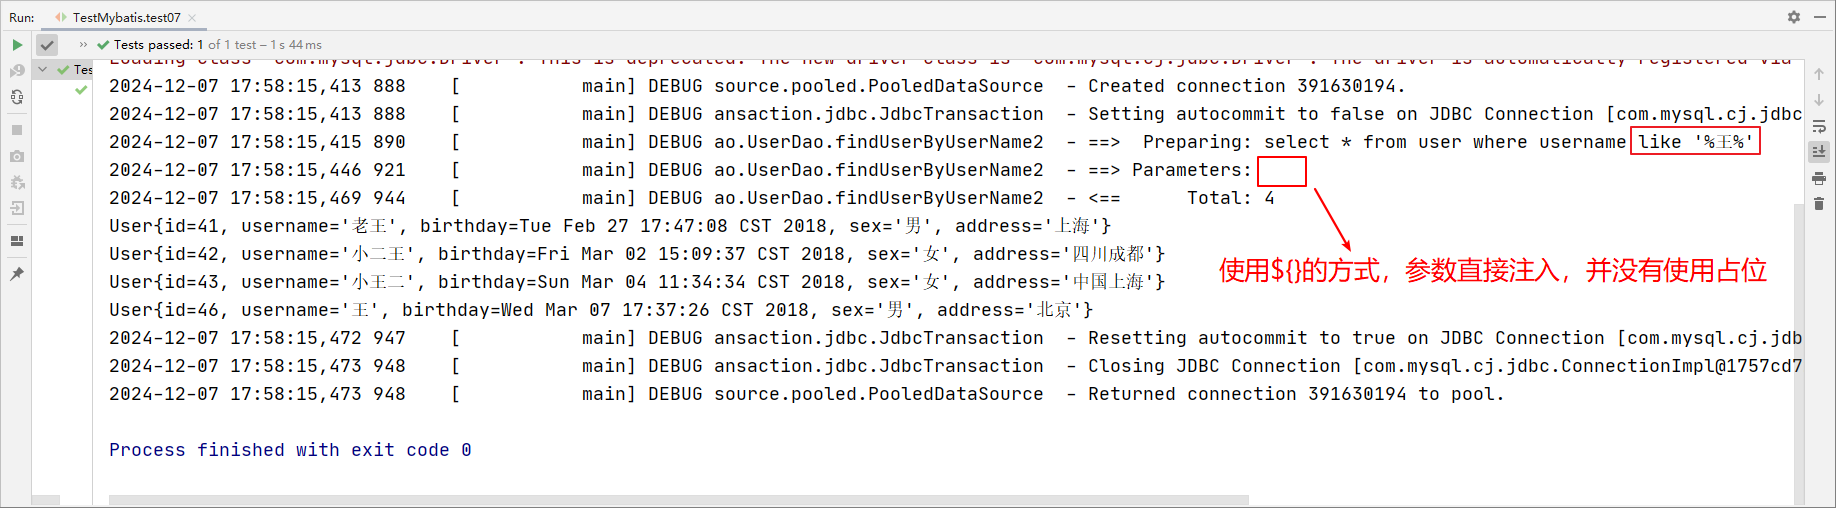
可以发现,我们在程序代码中就不需要加入模糊查询的匹配符 % 了,这两种方式的实现效果是一样的,但执行的语句是不一样的。
总结:
#{} 和 ${} 的区别(常见面试题)
| 项目 | #{}(占位符) |
${}(字符串拼接) |
|---|---|---|
| 作用方式 | 使用 预编译参数占位符 (?) |
直接将内容拼接进 SQL 语句中 |
| 类型处理 | MyBatis 会自动进行 Java 类型到 JDBC 类型的转换 | 不进行类型转换 |
| 安全性 | 可以防止 SQL 注入 | 存在 SQL 注入风险,需谨慎使用 |
| 使用场景 | 大多数参数传入场景,如查询、插入条件等 | 动态拼接表名、列名等结构(避免用于值) |
| 接收参数 | 支持简单类型、JavaBean、Map 等 | 同样支持多种类型;若是简单类型,只能写 value |
✅ 面试简洁说法(建议背诵版):
#{} 是 MyBatis 的预编译占位符,会被替换为 ?,支持类型转换并能防止 SQL 注入;${} 是字符串拼接,会直接把参数内容拼进 SQL 中,无法防注入,通常用于动态表名或列名拼接,慎用于数据值部分。
下面是一个清晰的SQL 注入示例对比 ,可以帮助你在面试中更有说服力地解释 #{} 与 ${} 的区别:
SQL 注入风险对比(模拟示例)
-
使用
#{}(安全)xml<select id="getUser" resultType="User"> SELECT * FROM user WHERE username = #{username} </select>传入参数:
javausername = "admin' OR '1'='1"最终执行的 SQL:
sqlSELECT * FROM user WHERE username = ? -- 参数安全绑定为字符串 "admin' OR '1'='1"结果: 仍然只匹配 username 为
"admin' OR '1'='1"的记录,不会注入成功 -
使用
${}(存在注入风险)xml<select id="getUser" resultType="User"> SELECT * FROM user WHERE username = '${username}' </select>传入参数:
javausername = admin' OR '1'='1最终执行的 SQL:
sqlSELECT * FROM user WHERE username = 'admin' OR '1'='1'结果: 条件永远为真,将返回整个用户表,严重的 SQL 注入 ❌
面试中强调的要点:
${}可以被注入,因为它不做任何过滤或预编译;#{}使用预编译方式处理参数,是默认、安全的选择;${}仅在拼接动态结构(如表名、列名)时使用,且要严格验证来源。
聚合函数查询
java
//聚合函数查询
Integer getTotal();
xml
<select id="getTotal" resultType="int">
    select count(*) from user
</select>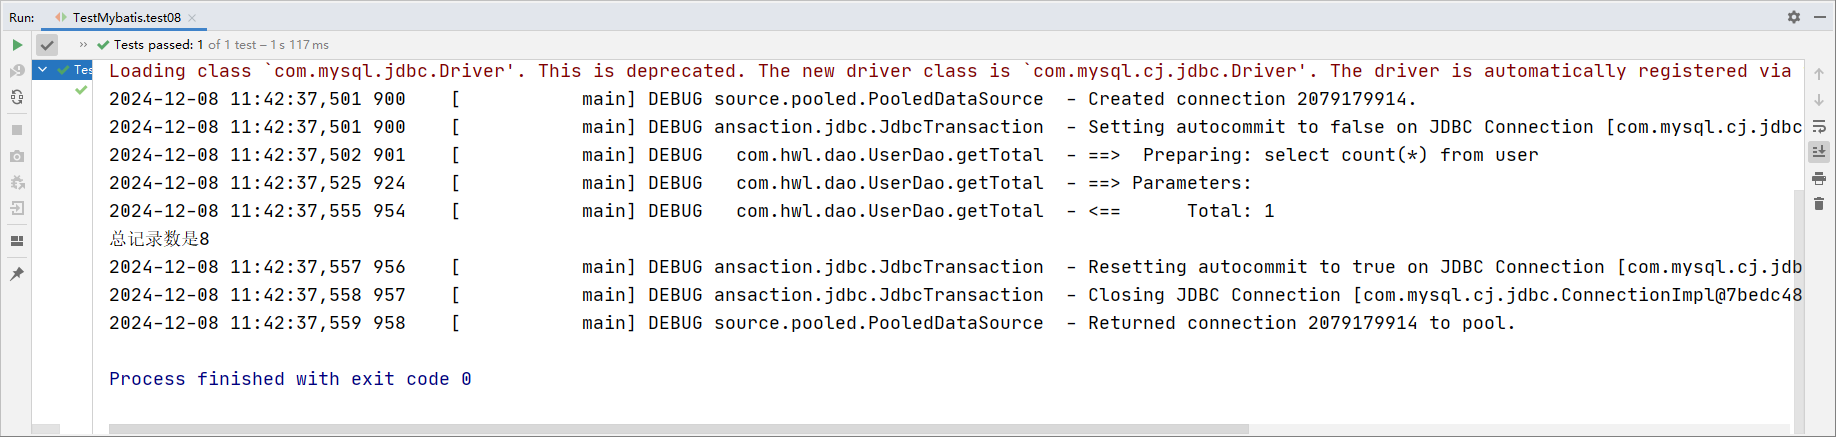
4.07-mybatis接口中传递多个参数的问题
如果我们在接口中传入多个参数,对参数的位置不加以指定的话,那么执行结果一定会报错。所以在传递多个参数的时候,一定要指明参数对应的位置。
2种方法
方法1(不推荐):
xml
<!--
  解决接口中存在多个参数的问题
  ${param1}  ${param2} 或者 ${arg0} ${arg1}
-->
<select id="findUserBySexAndAddress" resultType="com.hwl.pojo.User">
    select * from user where sex = '${param1}' and address = '${param2}'
</select>
java
//mybatis中接口存在多个参数的问题
List<User> findUserBySexAndAddress(String sex, String address);
java
@Test
public void test09() throws Exception {
    List<User> userList = userDao.findUserBySexAndAddress("男", "安徽合肥");
    userList.forEach(user -> System.out.println(user));
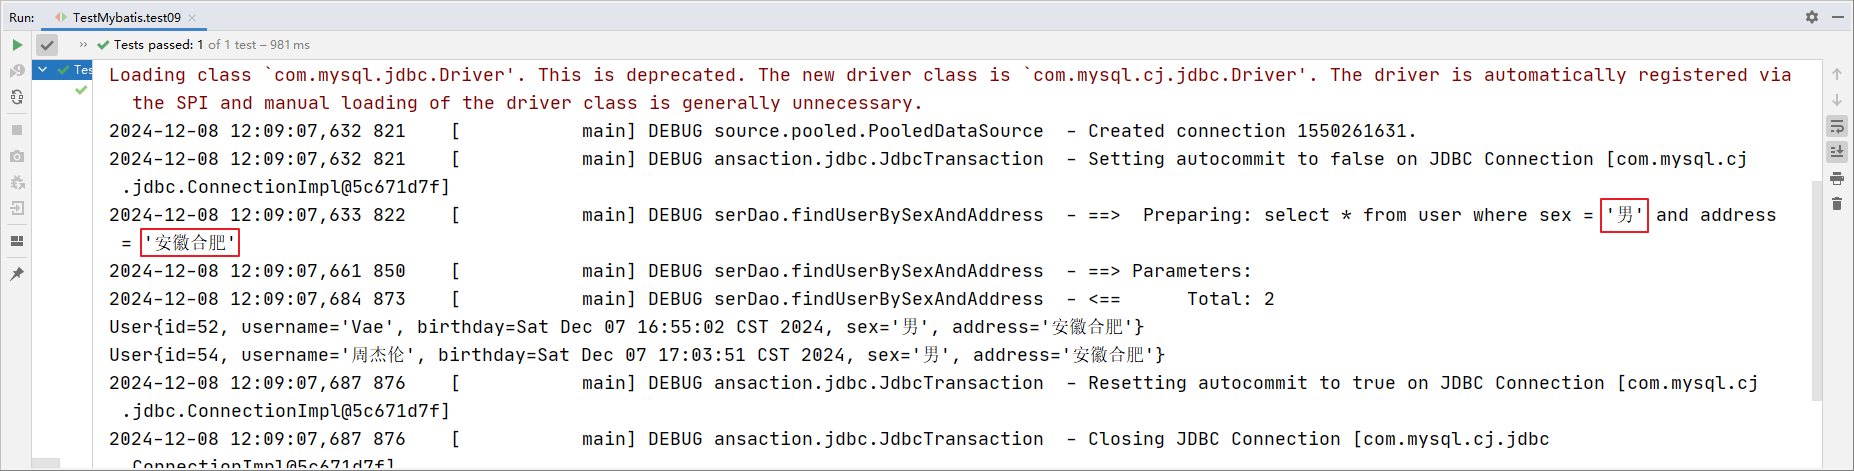
}
方法2(用Map,推荐使用):
java
//使用map解决接口方法中多个参数的问题
List<User> findUserByMap(Map<String, Object> map);
xml
<!--
  使用Map集合解决多个参数的问题(推荐使用)
   #{} 里面的值定义为map集合的key值
-->
<select id="findUserByMap" parameterType="map" resultType="com.hwl.pojo.User">
    select * from user where sex = #{sex} and address = #{address}
</select>
java
@Test
public void test10() throws Exception {
    HashMap<String, Object> map = new HashMap<>();
    map.put("sex", "男");
    map.put("address", "安徽合肥");
    List<User> userList = userDao.findUserByMap(map);
    userList.forEach(user -> System.out.println(user));
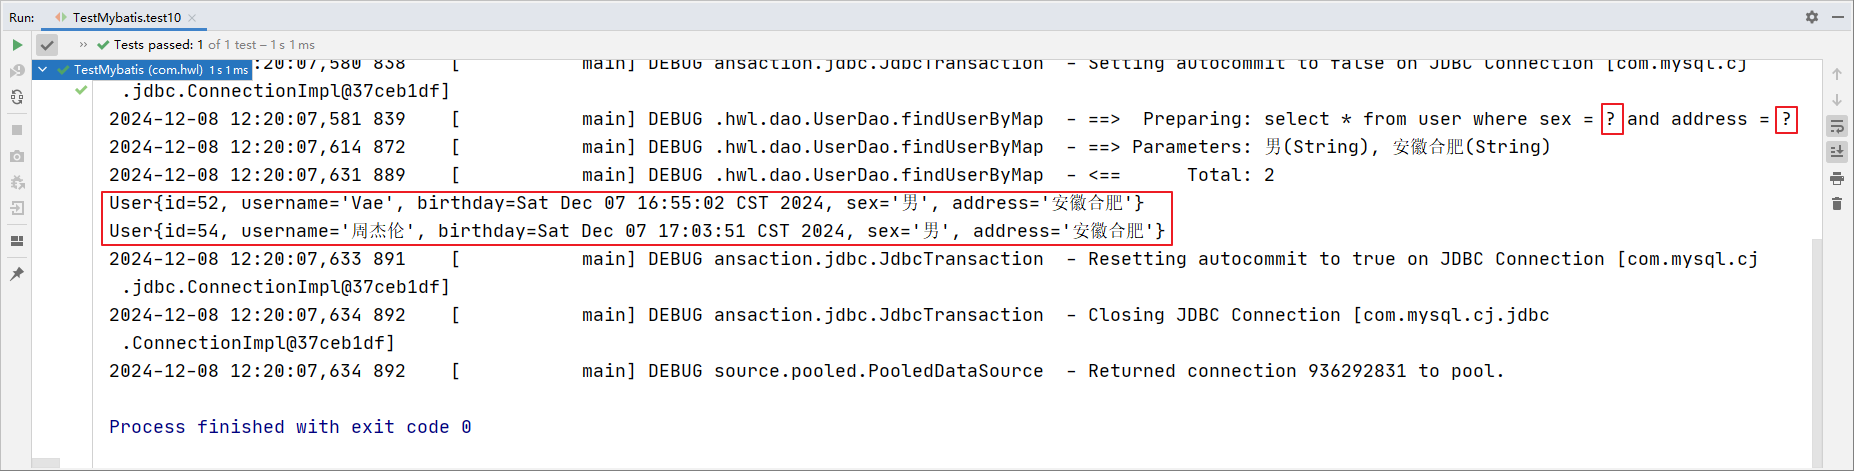
}
4.08-输入参数parameterType详解
我们在上一章节中已经介绍了 SQL 语句传参,使用标签的 parameterType 属性来设定。该属性的取值可以是基本类型,引用类型(例如:String 类型),还可以是实体类类型(POJO 类)。同时也可以使用实体类的包装类,本章节将介绍如何使用实体类的包装类作为参数传递。
但是需要注意的是:
基本类型和 String 我们可以直接写类型名称 ,也可以使用包名.类名的方式,例如:java.lang.String
比如之前的案例中,parameterType 是直接写的 String

其实也可以写成完整的:

但是对于实体类类型 ,目前我们只能使用全限定类名。
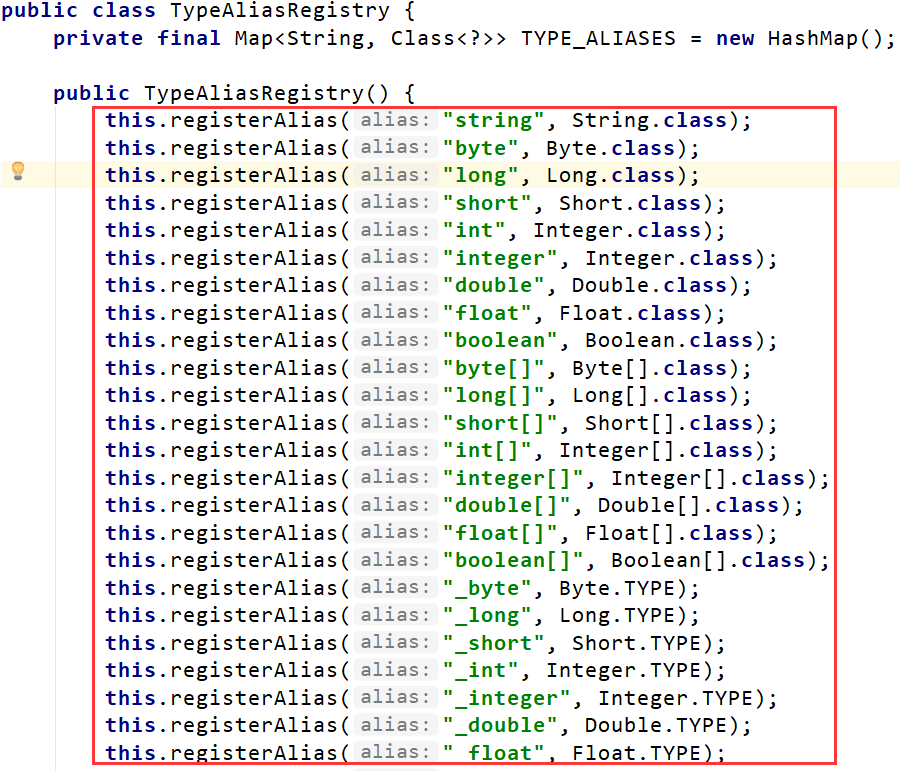
究其原因,是 mybaits 在加载时已经把常用的数据类型注册了别名,从而我们在使用时可以不写包名,而我们的是实体类并没有注册别名,所以必须写全限定类名。后面将讲解如何注册实体类的别名。
txt
parameterType: 定义接口形参的数据类型  默认的写法是 参数数据类型的全限定名
mybatis对这些数据类型的全限定名做了别名的设置 在TypeAliasRegistry类里面进行了相关的别名设置
如果输入参数的数据类型是string或者其他基本数据类型,我们占位符里面的内容是可以任意指定的
如果我们的输入参数的数据类型是自定义的pojo。那么占位符里面的数据千万不能随意定义(必须要和pojo实体类的成员属性名称保持一致)
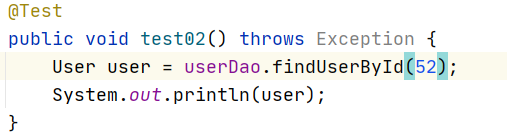

照样查得到。
但是,如果传 pojo 类:

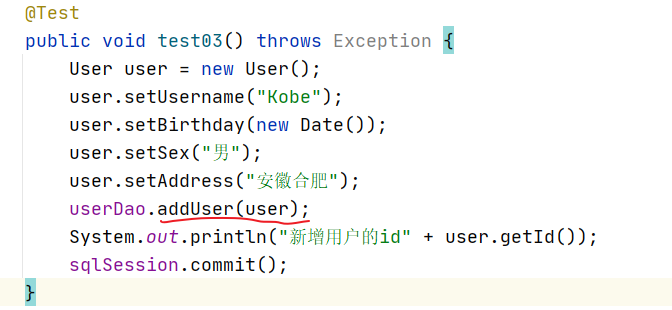
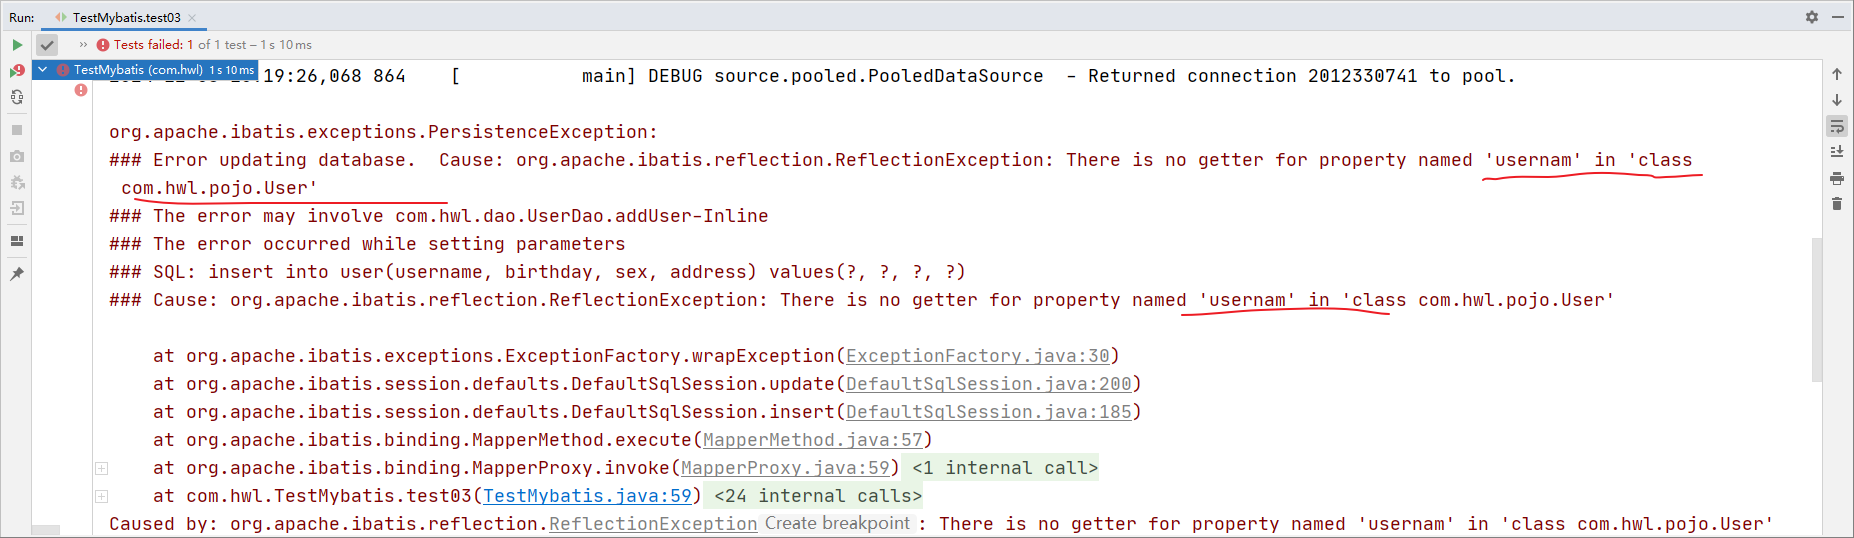
就报错了,必须要和实体类里的属性保持一致
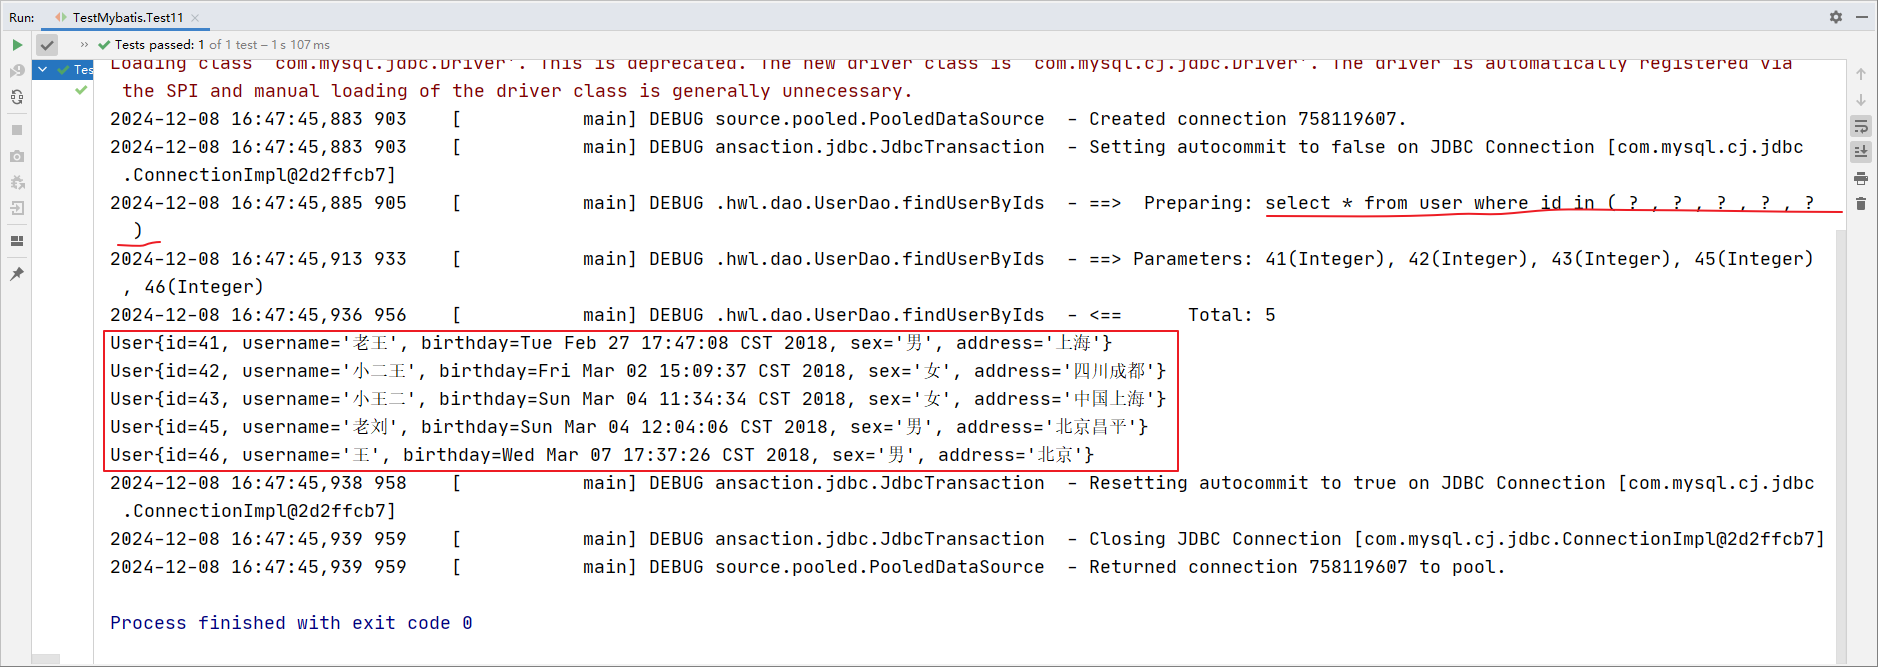
又引入一个新的需求:根据 id 的集合查询相关的用户信息,给你很多的 id,查询对应的用户信息,用 MySQL 很好解决:
sql
select * from user where id in(41, 43, 45, 50);但是如何用 MyBatis 把它查询出来?
java
// 这里引入一个类QueryVO,包装ids,开发中常这么做
List<User> findUserByIds(QueryVo queryVO);
xml
<!--
   根据id的集合查询对应的用户信息
   foreach:循环遍历的标签
      collection: QueryVo里面的集合类型的变量名称
      item:遍历的集合的元素的别名
      separator:用逗号对遍历的元素的值进行分割
          select * from user where id in (41,43,45,50)
      open: 描述的是括号的开始部分
      close:描述的是括号的结束部分
-->
<select id="findUserByIds" parameterType="com.hwl.pojo.QueryVo" resultType="com.hwl.pojo.User">
    select * from user where id in
    <foreach collection="ids" item="id" separator="," open="(" close=")">
        #{id}
    </foreach>
</select>
java
package com.hwl.pojo;
public class QueryVo {
    private List<Integer> ids;

    public List<Integer> getIds() {return ids;}

    public void setIds(List<Integer> ids) {this.ids = ids;}
}
java
@Test
public void Test11(){
    QueryVo queryVo = new QueryVo();
    List<Integer> ids = new ArrayList<>();
    ids.add(41);
    ids.add(42);
    ids.add(43);
    ids.add(45);
    ids.add(46);
    queryVo.setIds(ids);
    List<User> userList = userDao.findUserByIds(queryVo);
    userList.forEach(user -> System.out.println(user));
}
4.09-输出参数resultType和resultMap详解
resultType 属性可以指定结果集的类型,它支持基本类型和实体类类型
前面的CRUD案例中已经对此属性进行过应用了
需要注意的是,它和parameterType一样,如果注册过类型别名的,可以直接使用别名。没有注册过的使用全限定名。
使用实体类的全限定类名,还有一个要求,实体类中的属性名称必须和查询语句中的列名保持一致,否则无法实现封装。
新建一个module演示:
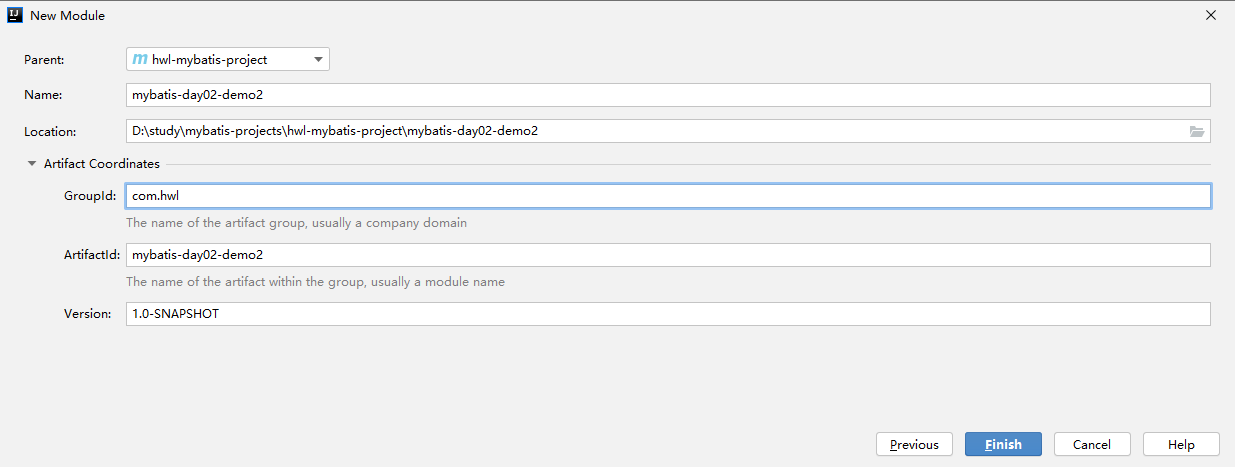
引入依赖:
xml
<dependencies>
    <!--mybatis-->
    <dependency>
        <groupId>org.mybatis</groupId>
        <artifactId>mybatis</artifactId>
        <version>3.4.5</version>
    </dependency>
    <!--junit单元测试-->
    <dependency>
        <groupId>junit</groupId>
        <artifactId>junit</artifactId>
        <version>4.10</version>
        <scope>test</scope>
    </dependency>
    <!--数据库驱动-->
    <dependency>
        <groupId>mysql</groupId>
        <artifactId>mysql-connector-java</artifactId>
        <version>8.0.25</version>
    </dependency>
    <!--log4j-->
    <dependency>
        <groupId>log4j</groupId>
        <artifactId>log4j</artifactId>
        <version>1.2.12</version>
    </dependency>
</dependencies>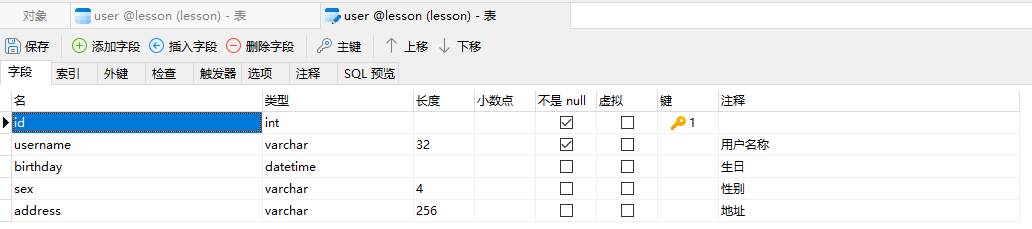
java
/**
 * 实体 演示数据表字段和实体类字段名称不一致的问题
 */
public class User {
    //除了userName,其他的都跟数据库表属性名称不一样,并且userName驼峰命名法,测试它是否区分大小写
    private Integer userId;
    private String userName;
    private Date userBirthday;
    private String userSex;
    private String userAddress;

    //getter、setter、toString
}
java
public interface UserDao {
    List<User> findAll();
}
UserDao.xml:
xml
<?xml version="1.0" encoding="UTF-8"?>
<!DOCTYPE mapper
        PUBLIC "-//mybatis.org//DTD Mapper 3.0//EN"
        "http://mybatis.org/dtd/mybatis-3-mapper.dtd">
<mapper namespace="com.hwl.dao.UserDao">
    <!--查询所有用户信息-->
    <select id="findAll" resultType="com.hwl.pojo.User">
        select * from user
    </select>
</mapper>
测试:
java
@Test
public void test01(){
    List<User> userList = userDao.findAll();
    for (User user : userList) {
        System.out.println(user);
    }
}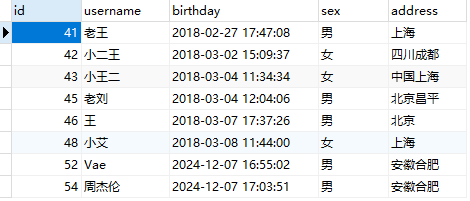
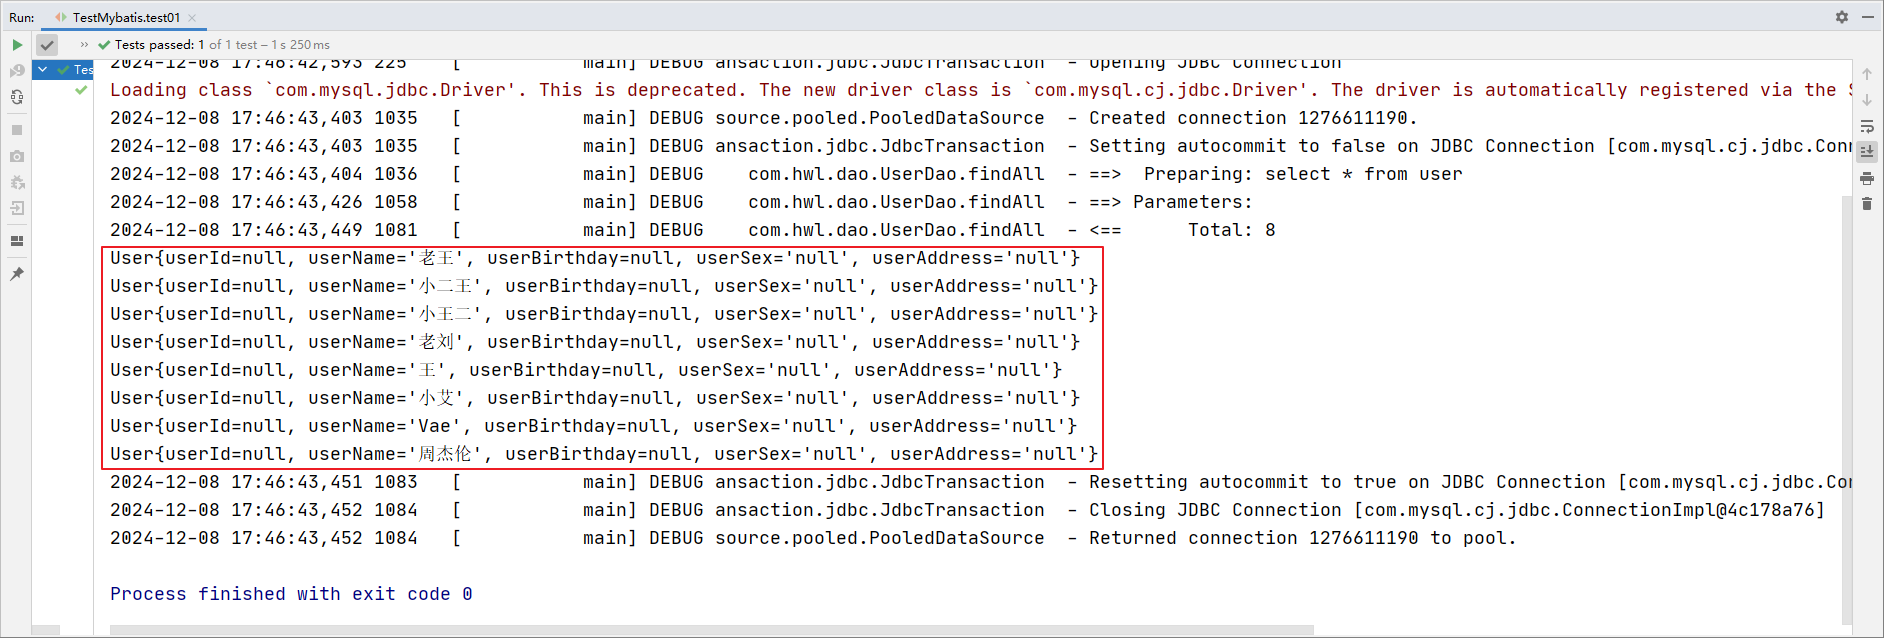
结果:目前这样写是无法封装数据结果集的,因为数据表字段名称和实体类字段名称不一致(忽略大小写情况除外)。
解决问题的方案:
方法1:通过取别名的方式可以解决问题,给查询的字段取别名,别名就是实体类属性名称。
方法2:手动解决实体字段和数据表字段不一致的问题。resultMap 标签解决字段不一致的问题
下面演示方法1:
xml
<!--查询所有用户信息-->
<select id="findAll" resultType="com.hwl.pojo.User">
    select id as userId, username as userName, birthday as userBirthday, sex as userSex, address as userAddress from user
</select>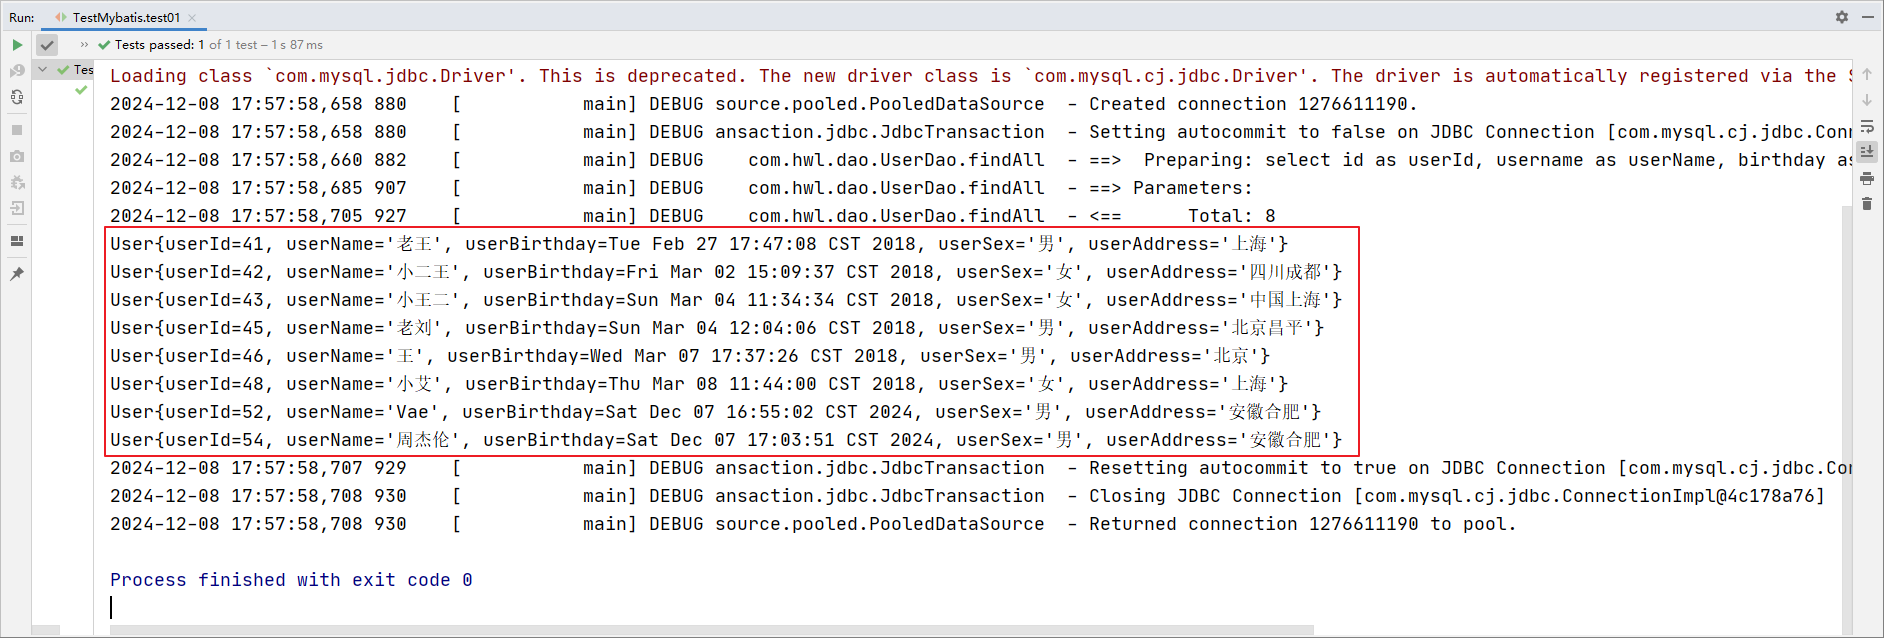
下面演示方法2(通过resultMap标签):
xml
<!--
  resultMap标签: 这个标签的作用是解决实体字段和数据表字段不一致的问题。
     id: 值任意,需要保证值是唯一的
     type: 描述实体的全限定名
 id标签:用来做主键字段的映射关系。
     property: 描述实体类的名称
     column:描述的是数据表字段的名称
 result标签:用来描述非主键字段的映射关系
     property: 描述实体类的名称
     column:描述的是数据表字段的名称
 问题: resultMap属性和resultType属性的区别?
-->
<resultMap id="userMap" type="com.hwl.pojo.User">
    <id property="userId" column="id"/>
    <result property="userName" column="username"/>
    <result property="userBirthday" column="birthday"/>
    <result property="userSex" column="sex"/>
    <result property="userAddress" column="address"/>
</resultMap>

<!--
    id:接口的名称
    resultMap: 值引用resultMap标签中的id的值
-->
<select id="findAll" resultMap="userMap">
    select * from user
</select>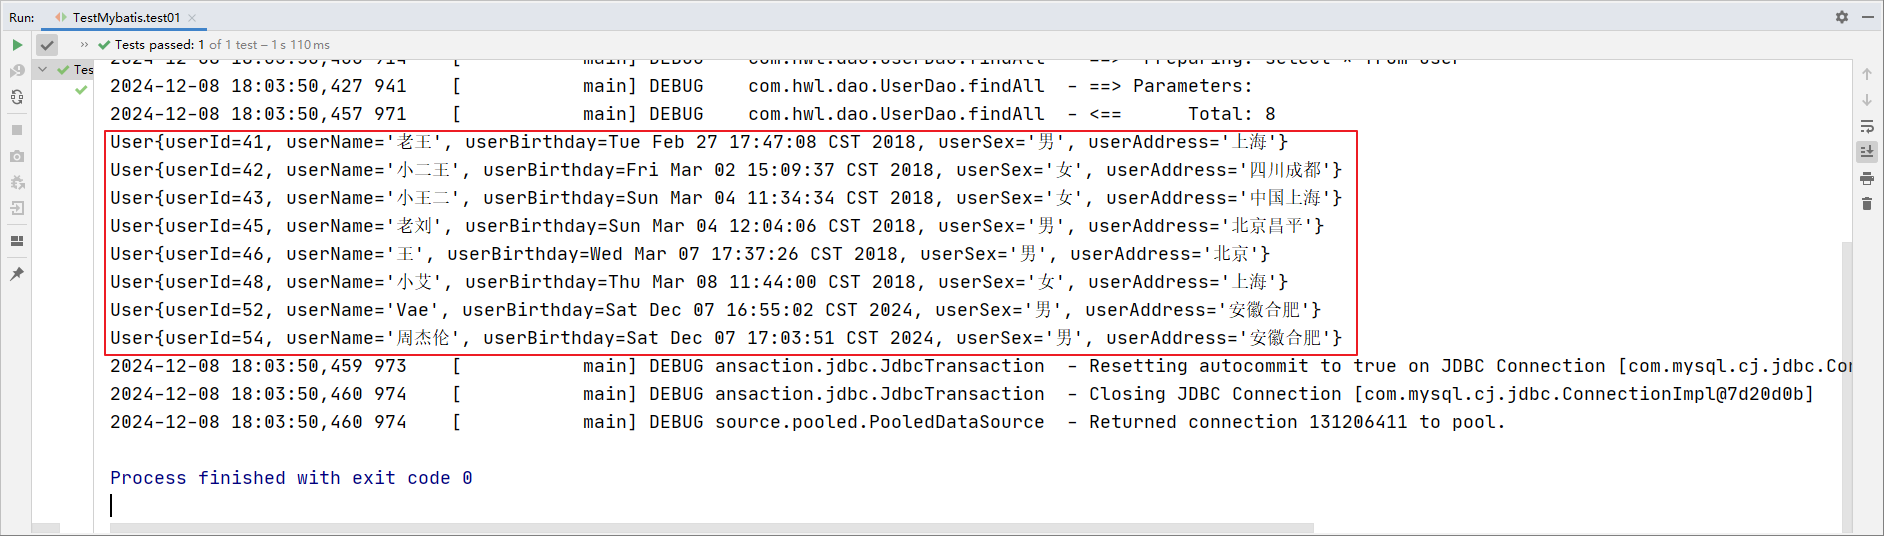
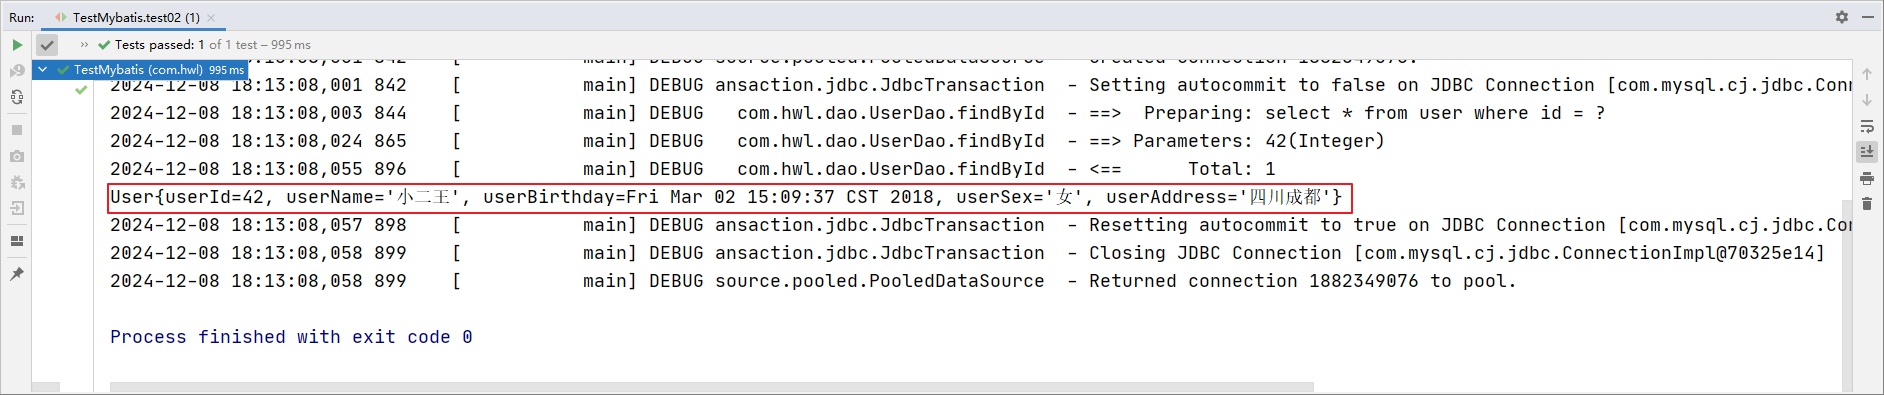
resultMap 也可以复用,比如在 userDao 接口中重写一个根据 id 查询的方法 findById
xml
<select id="findById" resultMap="userMap">
    select * from user where id = #{id}
</select>
java
User findById(Integer id);
java
@Test
public void test02(){
    System.out.println(userDao.findById(42));
}
4.10-mybatis传统dao开发(了解即可)
使用Mybatis开发Dao,通常有2个方法,即原始Dao开发方式和Mapper接口代理开发方式。而现在主流的开发方式是接口代理开发方式,这种方式总体上更加简便。现在简要介绍下基于传统编写Dao实现类的开发方式。
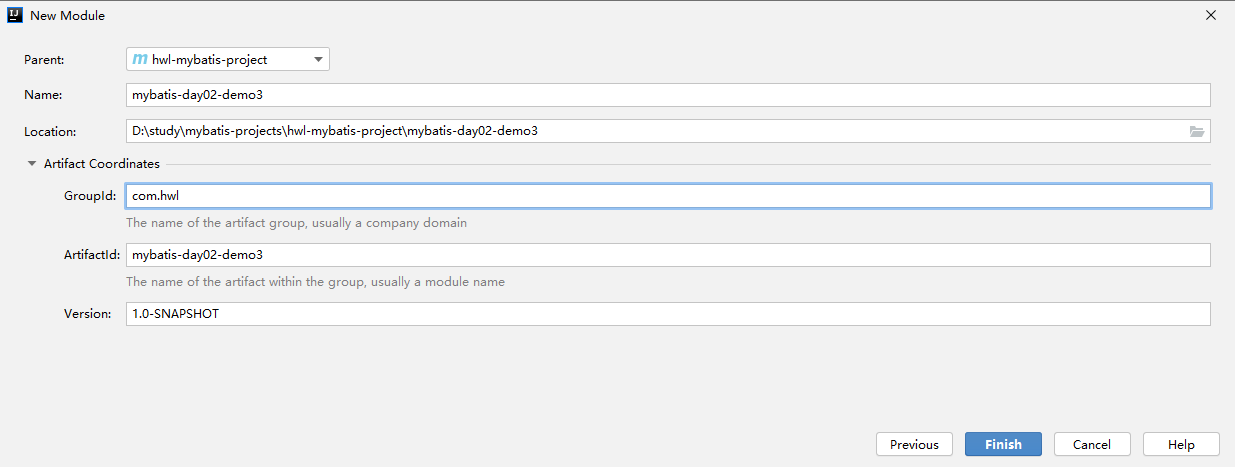
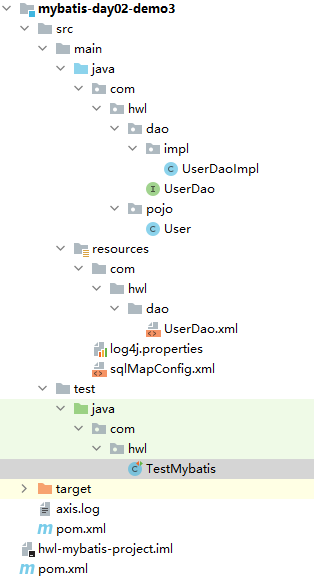
引入依赖,跟前面一样。
java
public class User {
    private Integer id;
    private String username;
    private Date birthday;
    private String sex;
    private String address;
	//getter、setter、toString
}
java
public interface UserDao {
    //查询所有的用户信息
    List<User> findAll();

    //根据id查询用户
    User findUserById(Integer id);

    //保存用户信息
    void addUser(User user);

    //修改用户
    void updateUser(User user);

    //删除用户
    void deleteUserById(Integer id);
}
java
public class UserDaoImpl implements UserDao {
    private SqlSessionFactory sqlSessionFactory;

    public UserDaoImpl(SqlSessionFactory sqlSessionFactory) {
        this.sqlSessionFactory = sqlSessionFactory;
    }

    public List<User> findAll() {
        SqlSession sqlSession = sqlSessionFactory.openSession();
        List<User> userList = sqlSession.selectList("com.hwl.dao.UserDao.findAll");
        sqlSession.close();
        return userList;
    }

    public User findUserById(Integer id) {
        SqlSession sqlSession = sqlSessionFactory.openSession();
        User user = sqlSession.selectOne("com.hwl.dao.UserDao.findUserById", id);
        sqlSession.close();
        return user;
    }

    public void addUser(User user) {
        SqlSession sqlSession = sqlSessionFactory.openSession();
        sqlSession.insert("com.hwl.dao.UserDao.addUser",user);
        sqlSession.commit();
        sqlSession.close();
    }

    public void updateUser(User user) {
        SqlSession sqlSession = sqlSessionFactory.openSession();
        sqlSession.update("com.hwl.dao.UserDao.updateUser",user);
        sqlSession.commit();
        sqlSession.close();
    }

    public void deleteUserById(Integer id) {
        SqlSession sqlSession = sqlSessionFactory.openSession();
        sqlSession.delete("com.hwl.dao.UserDao.deleteUserById",id);
        sqlSession.commit();
        sqlSession.close();
    }
}
xml
<?xml version="1.0" encoding="UTF-8"?>
<!DOCTYPE mapper
        PUBLIC "-//mybatis.org//DTD Mapper 3.0//EN"
        "http://mybatis.org/dtd/mybatis-3-mapper.dtd">
<mapper namespace="com.hwl.dao.UserDao">

    <!--查询所有用户信息的方法-->
    <select id="findAll" resultType="com.hwl.pojo.User">
        select * from user
    </select>

    <!--根据id查询用户信息-->
    <select id="findUserById" resultType="com.hwl.pojo.User" parameterType="int">
        select * from user where id = #{abc}
    </select>

    <!--新增用户-->
    <insert id="addUser" parameterType="com.hwl.pojo.User" useGeneratedKeys="true" keyProperty="id" keyColumn="id">
        insert into user(username,birthday,sex,address) values(#{username},#{birthday},#{sex},#{address})
    </insert>

    <!--修改用户信息-->
    <update id="updateUser" parameterType="com.hwl.pojo.User">
        update user set username = #{username},birthday = #{birthday},sex = #{sex},address = #{address} where id = #{id}
    </update>

    <!--删除用户信息-->
    <delete id="deleteUserById" parameterType="int">
        delete from user where id = #{id}
    </delete>
</mapper>
测试:
java
public class TestMybatis {
    SqlSessionFactory sqlSessionFactory;

    @Before
    public void before() throws Exception{
        InputStream in = Resources.getResourceAsStream("sqlMapConfig.xml");
        SqlSessionFactoryBuilder builder = new SqlSessionFactoryBuilder();
        sqlSessionFactory = builder.build(in);
    }

    //查询所有
    @Test
    public void test01() throws Exception{
        UserDao userDao = new UserDaoImpl(sqlSessionFactory);
        List<User> userList = userDao.findAll();
        for(User user : userList){
            System.out.println(user);
        }
    }
    //根据id查询
    @Test
    public void test02() throws Exception{
        UserDao userDao = new UserDaoImpl(sqlSessionFactory);
        System.out.println(userDao.findUserById(50));
    }

    //保存
    @Test
    public void test03() throws Exception{
        UserDao userDao = new UserDaoImpl(sqlSessionFactory);
        User user = new User();
        user.setUsername("小芳");
        user.setBirthday(new Date());
        user.setSex("女");
        user.setAddress("中国");
        userDao.addUser(user);
    }

    //修改的操作
    @Test
    public void test04() throws Exception{
        UserDao userDao = new UserDaoImpl(sqlSessionFactory);
        User user = new User();
        user.setId(53);
        user.setUsername("小奥尼尔");
        user.setSex("男");
        user.setBirthday(new Date());
        user.setAddress("美国");
        userDao.updateUser(user);
    }

    //删除操作
    @Test
    public void test05() throws Exception{
        UserDao userDao = new UserDaoImpl(sqlSessionFactory);
        userDao.deleteUserById(53);
    }
}
演示就省略了。
4.11-sqlmapConfig.xml核心配置文件详解
SqlMapConfig.xml 中配置的内容和顺序
txt
-properties(属性)
  --property

-settings(全局配置参数)
  --setting

-typeAliases(类型别名)
  --typeAliase
  --package

-typeHandlers(类型处理器)

-objectFactory(对象工厂)

-plugins(插件)

-environments(环境集合属性对象)
  --environment(环境子属性对象)
  ---transactionManager(事务管理)
  ---dataSource(数据源)

-mappers(映射器)
  --mapper
  --package
properties标签
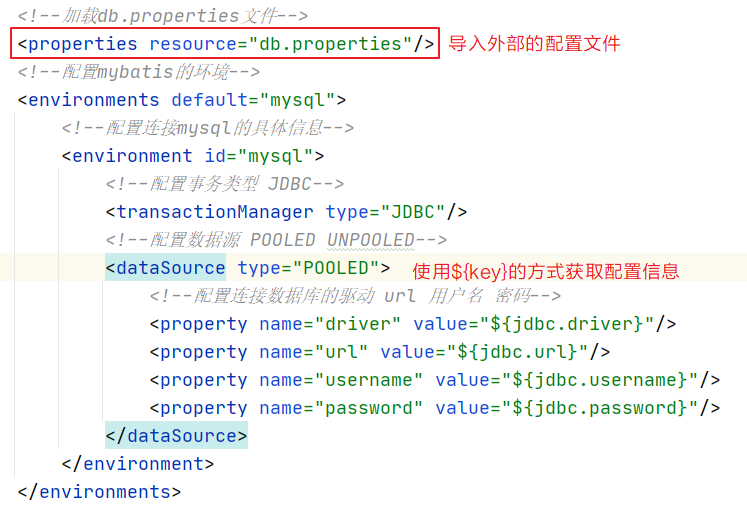
我们一般会把数据库配置信息定义在一个独立的配置文件里面,比如 db.properties。那么我们如何在mybatis的核心配置文件里面加载外部的数据库配置信息呢?
比如在之前写的mybatis-day01-demo1里面写:
properties
jdbc.driver=com.mysql.jdbc.Driver
jdbc.url=jdbc:mysql://localhost/lesson
jdbc.username=root
jdbc.password=root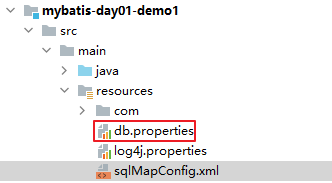
typeAliases标签
在前面我们讲的Mybatis支持的默认别名,我们也可以采用自定义别名的方式来开发
配置别名的方式有2种:
- 第一种
以
举例,可以看到之前写的
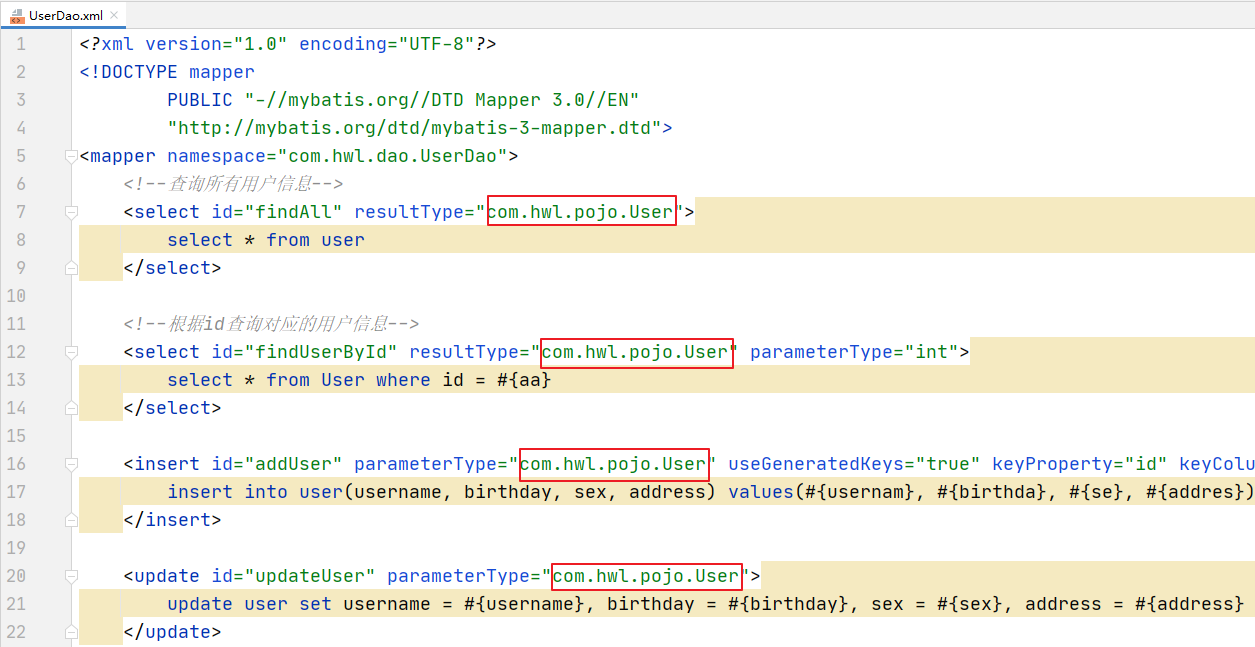
很麻烦,现在在sqlMapConfig.xml里面配置别名:
xml
<typeAliases>
    <typeAlias type="com.hwl.pojo.User" alias="user"/>
</typeAliases>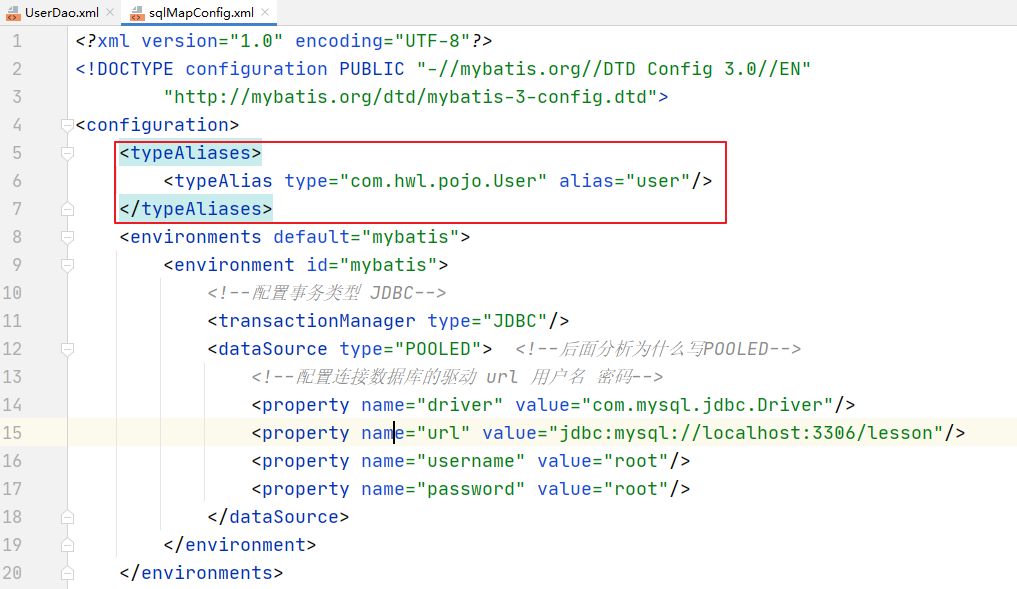
注意:typeAliases 标签一定要定义在 environments 标签的上面,注意顺序
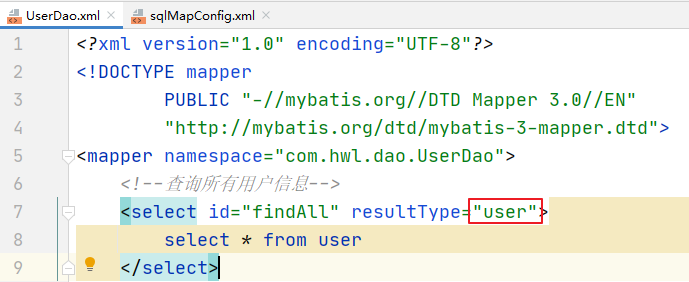
修改映射文件,使用别名替换:
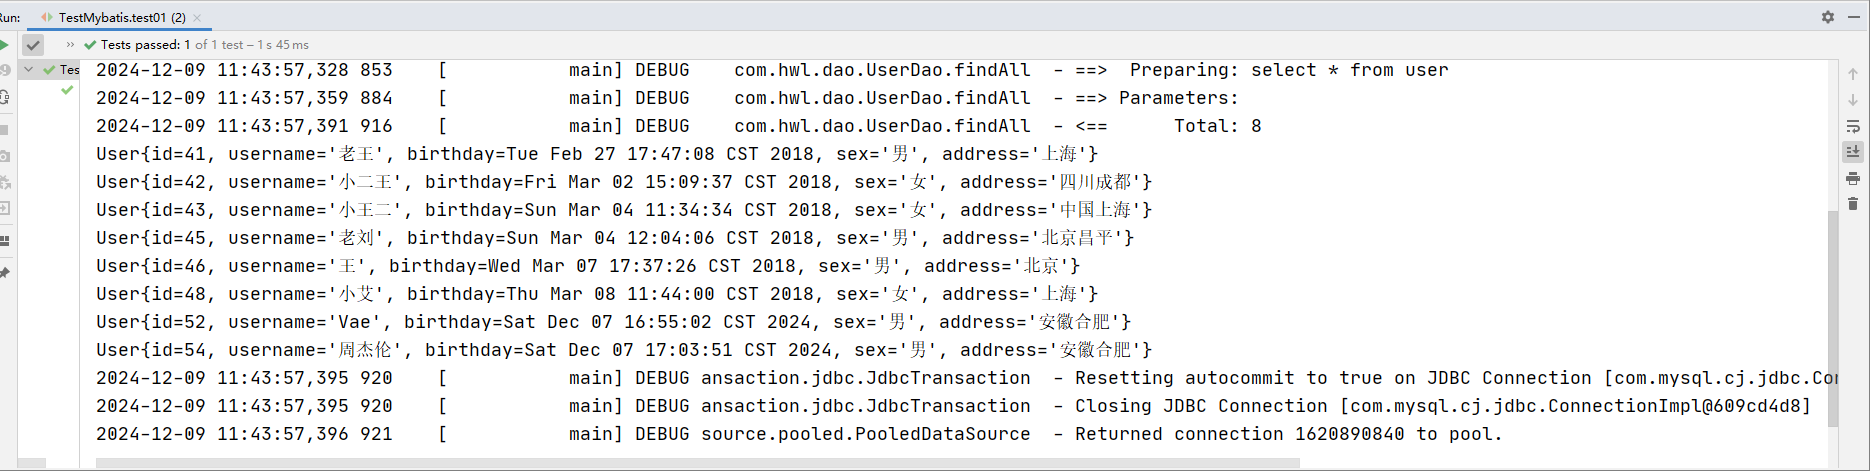
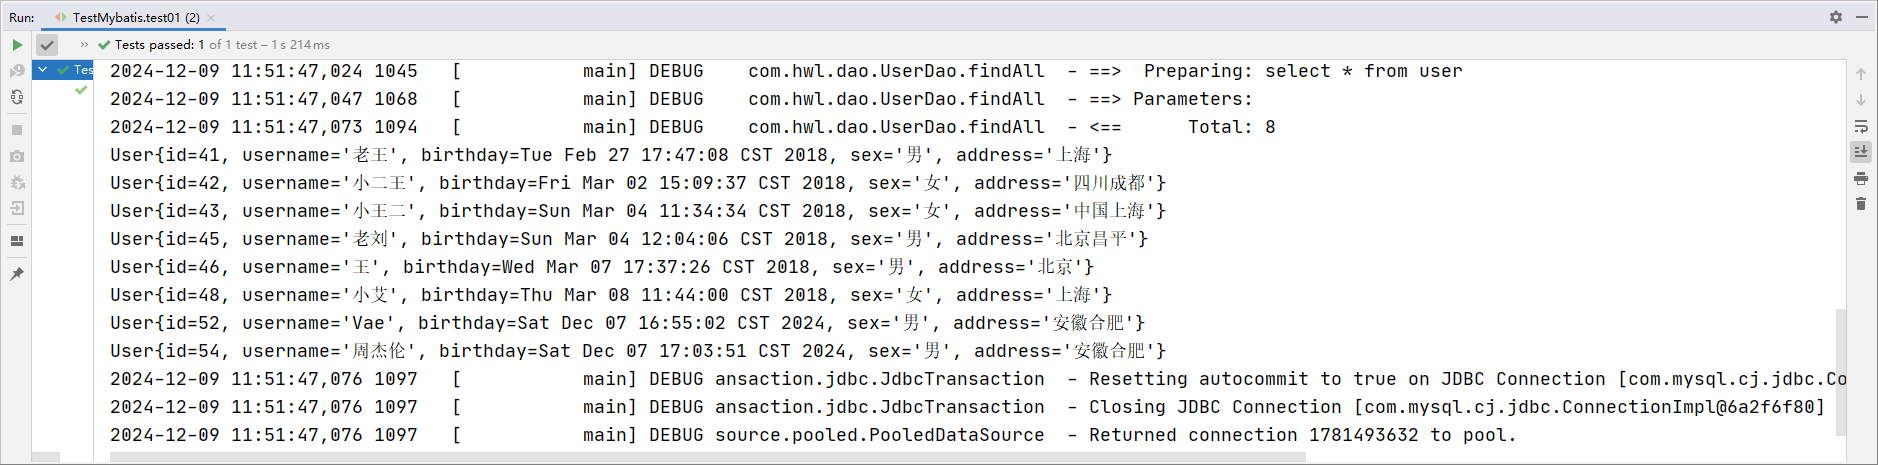
运行无误
- 第二种
xml
<typeAliases>
    <!--package:描述需要取别名的类所在的包路径  默认情况下,别名就是当前包路径下面的类的名称的小写-->
    <package name="com.hwl.pojo"/>
</typeAliases>
Mappers标签
Mappers标签里面定义mapper标签。作用是用来在核心配置文件里面引入映射文件。
-
第一种:
xml<mappers> <mapper resource="com/hwl/dao/UserDao.xml"/> </mappers> -
第二种:
使用mapper 接口类路径。如果我们使用注解开发的时候,就需要使用这个路径
xml<mappers> <mapper class="com.hwl.dao.UserDao"/> </mappers> -
第三种:
xml<mappers> <!--批量导入映射文件--> <package name="com.hwl.dao"/> </mappers>注意:这种方法要求 mapper 接口名称和 mapper 映射文件名称相同,且放在同一个目录中。
4.12-mybatis连接池的实现
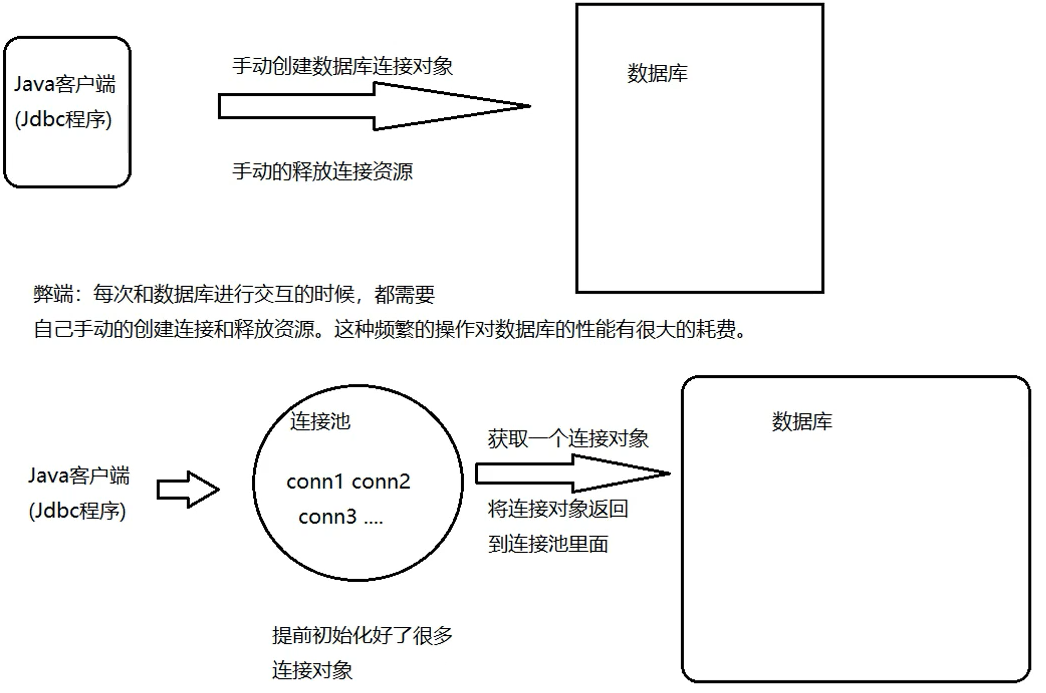
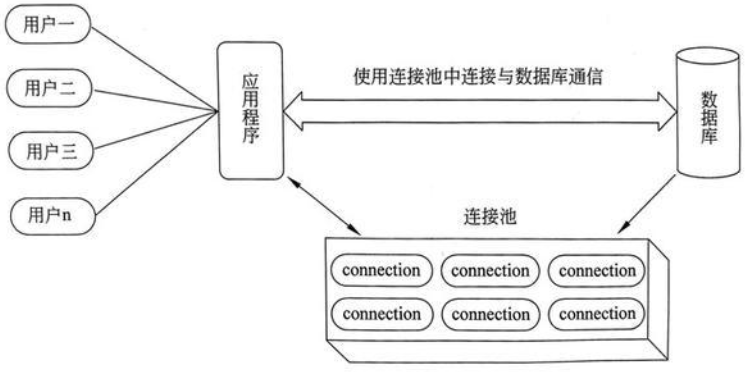
我们在前面的 Web 课程中也学习过类似的连接池技术,而在 Mybatis 中也有连接池技术,但是它采用的是自己的连接池技术。在Mybatis的 sqlMapConfig.xml 配置文件中,通过来实现 Mybatis中连接池的配置。用连接池的目的主要是为了减少我们获取连接所消耗的时间。
在 Mybatis 中我们将它的数据源 dataSource 分为以下几类:
可以看出 Mybatis 将它自己的数据源分为三类:

UNPOOLED:不使用连接池的数据源 每次连接数据库都要创建新的数据库连接对象。POOLED:使用连接池的数据源采用传统的javax.sql.DataSource规范中的连接池,mybatis有针对规范的实现。JNDI:使用 JNDI 实现的数据源。
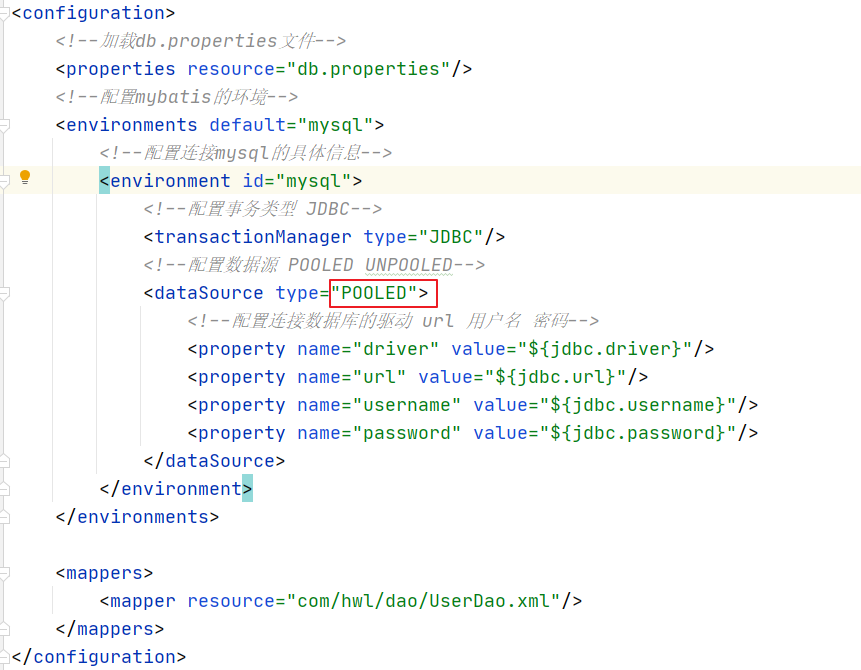
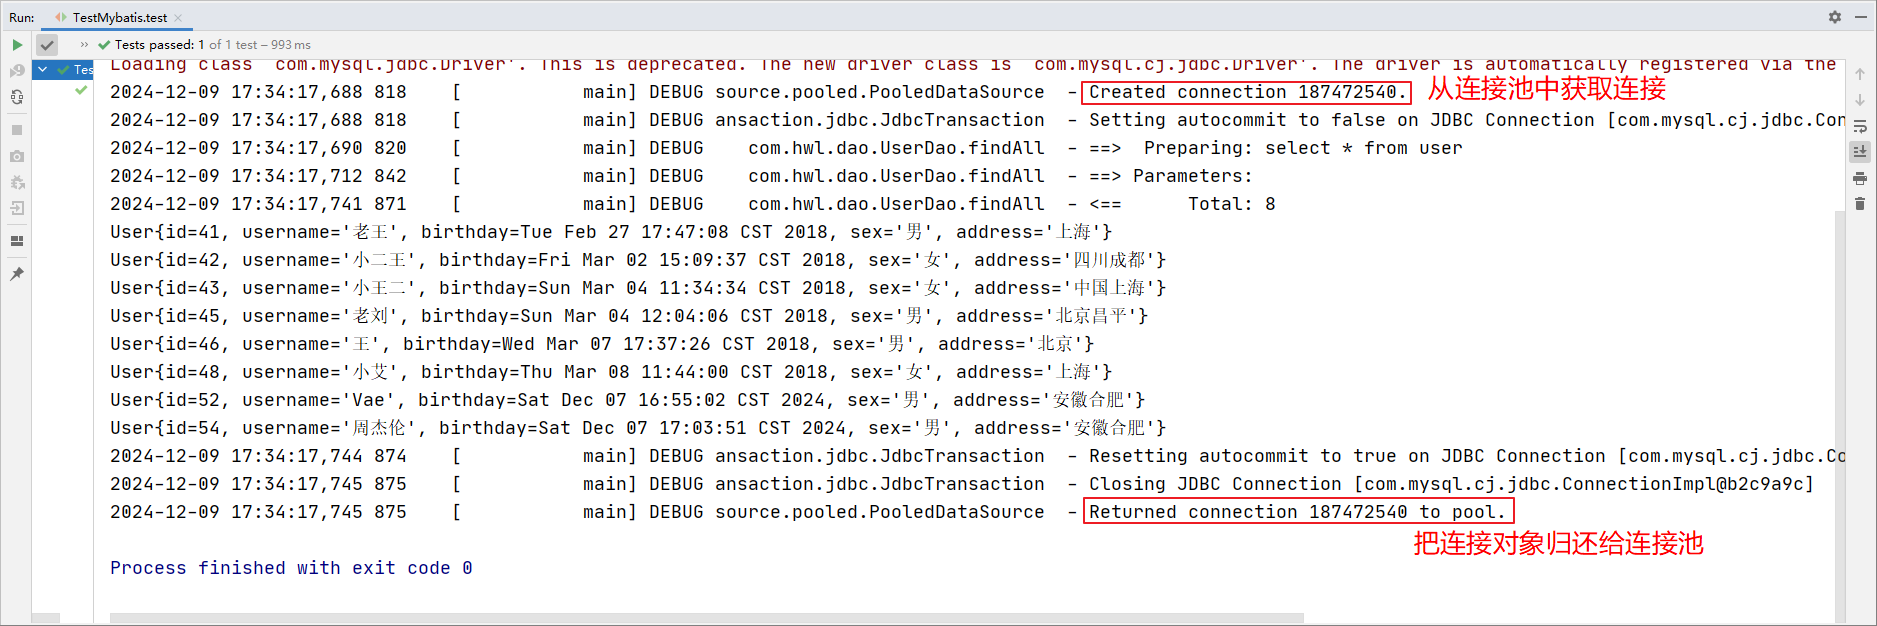
改为UNPOOLED:
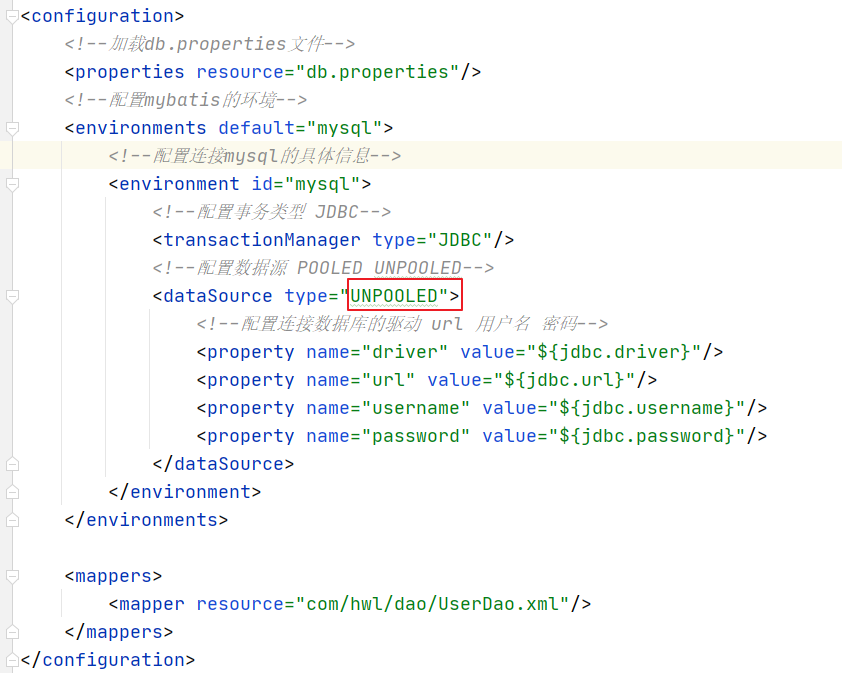
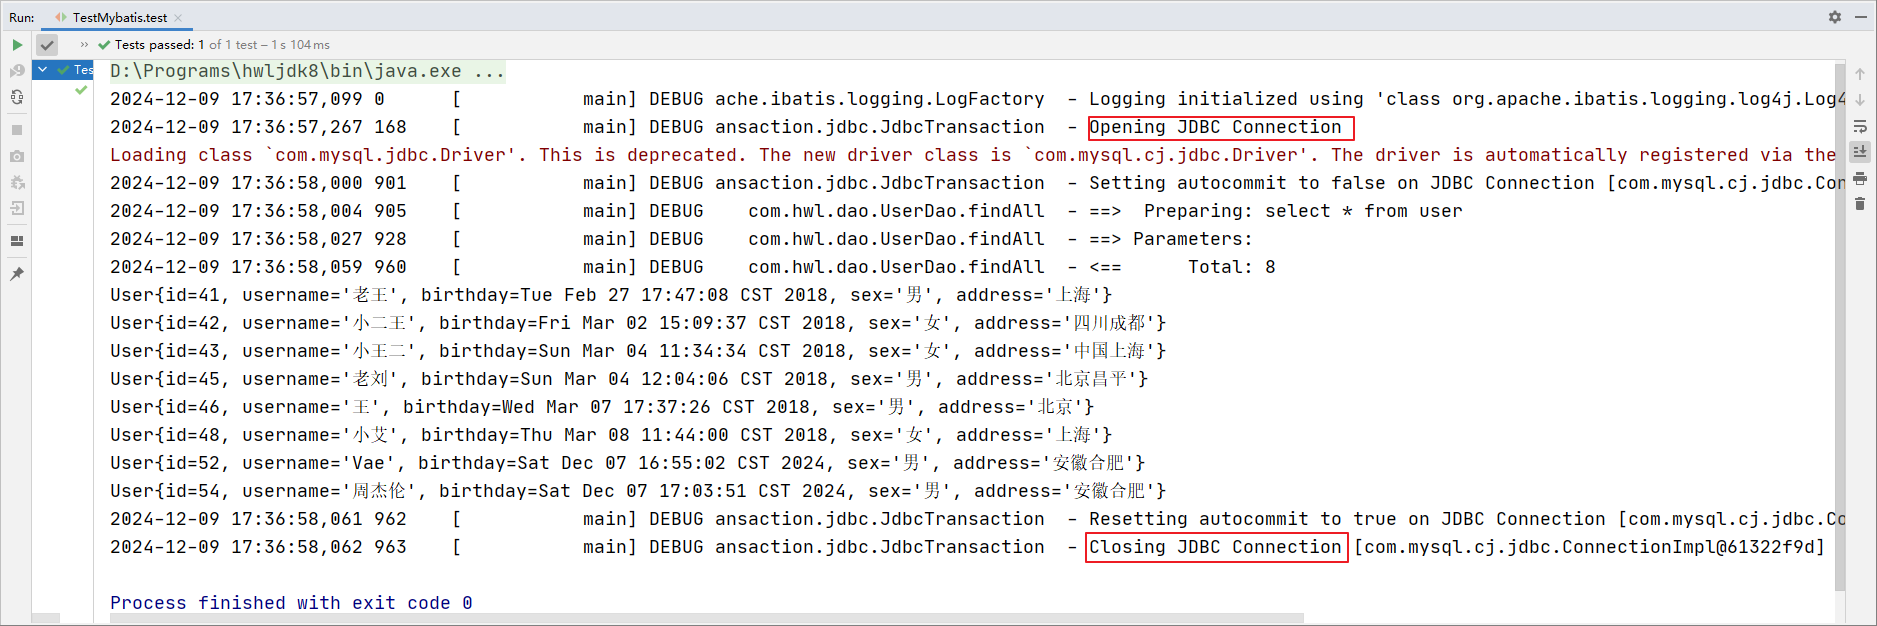
下面简单看看源码
描述POOLED连接类池类型的类是PooledDataSource;描述UNPOOLED连接类型的类UnpooledDataSource。
我们打开IDEA Ctrl+N:
- 我们先查看UnpooledDataSource的获取连接的源码 。
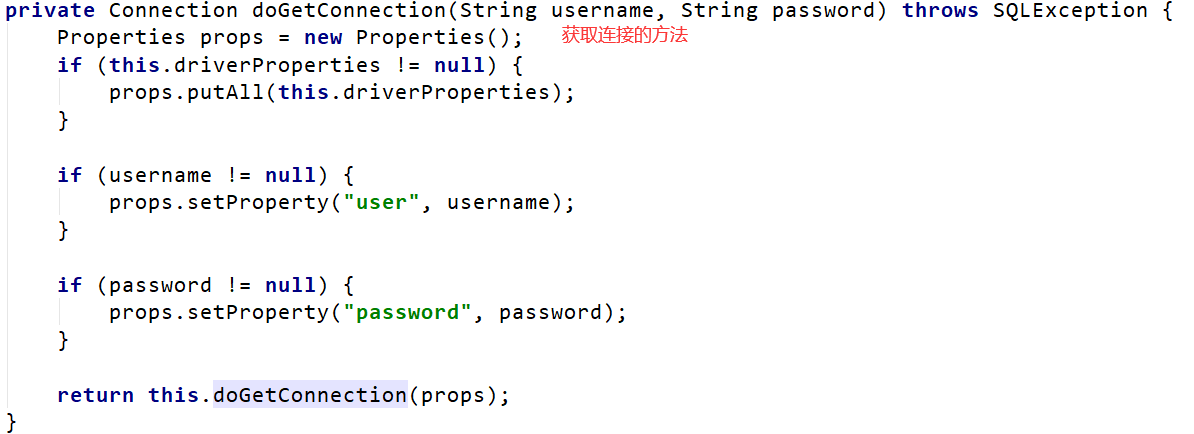

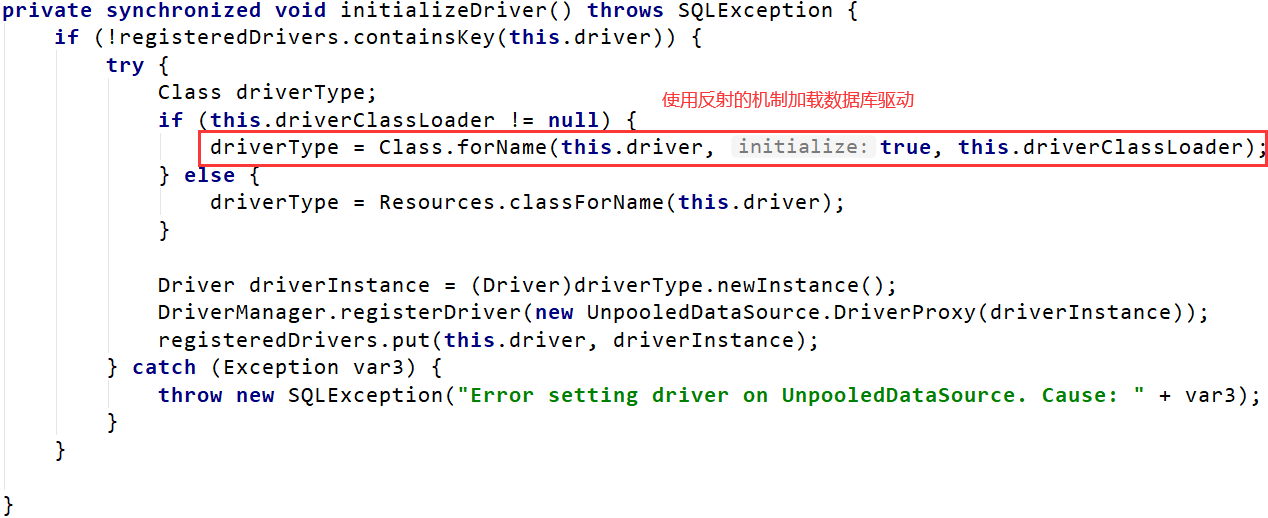
-
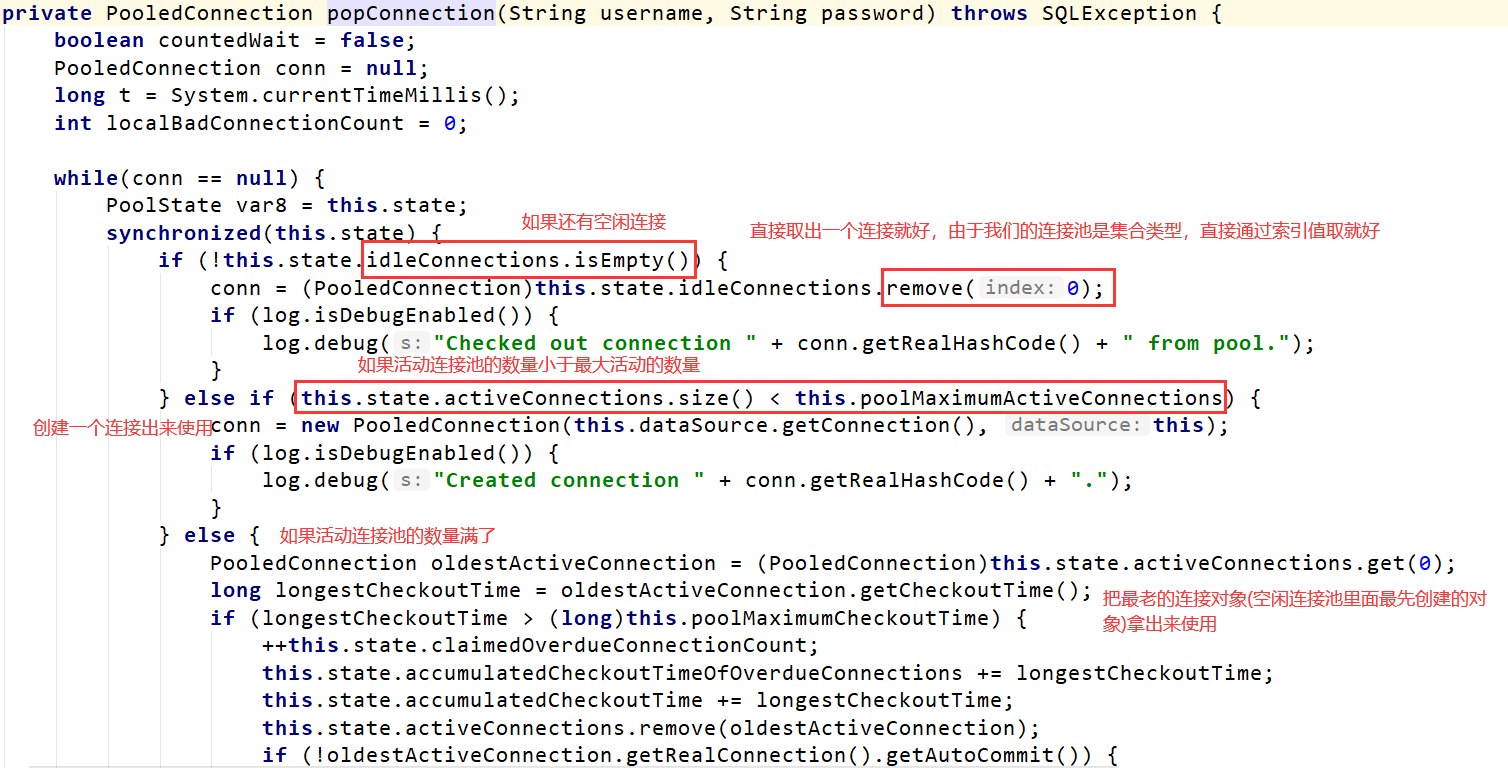
我们再查看PooledDataSource 的源码。
通过这部分源码,我们发现UnpooledDataSource获取连接是传统的jdbc获取连接的方式

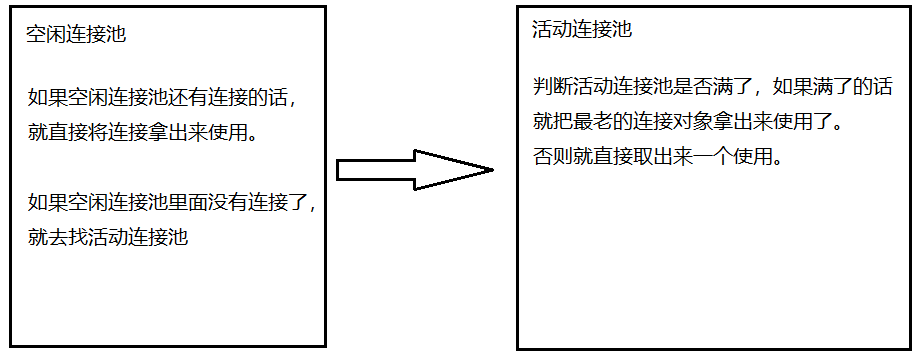
下面我们通过一个图来描述 mybatis 的连接池 :
4.13-mybatis的事务实现
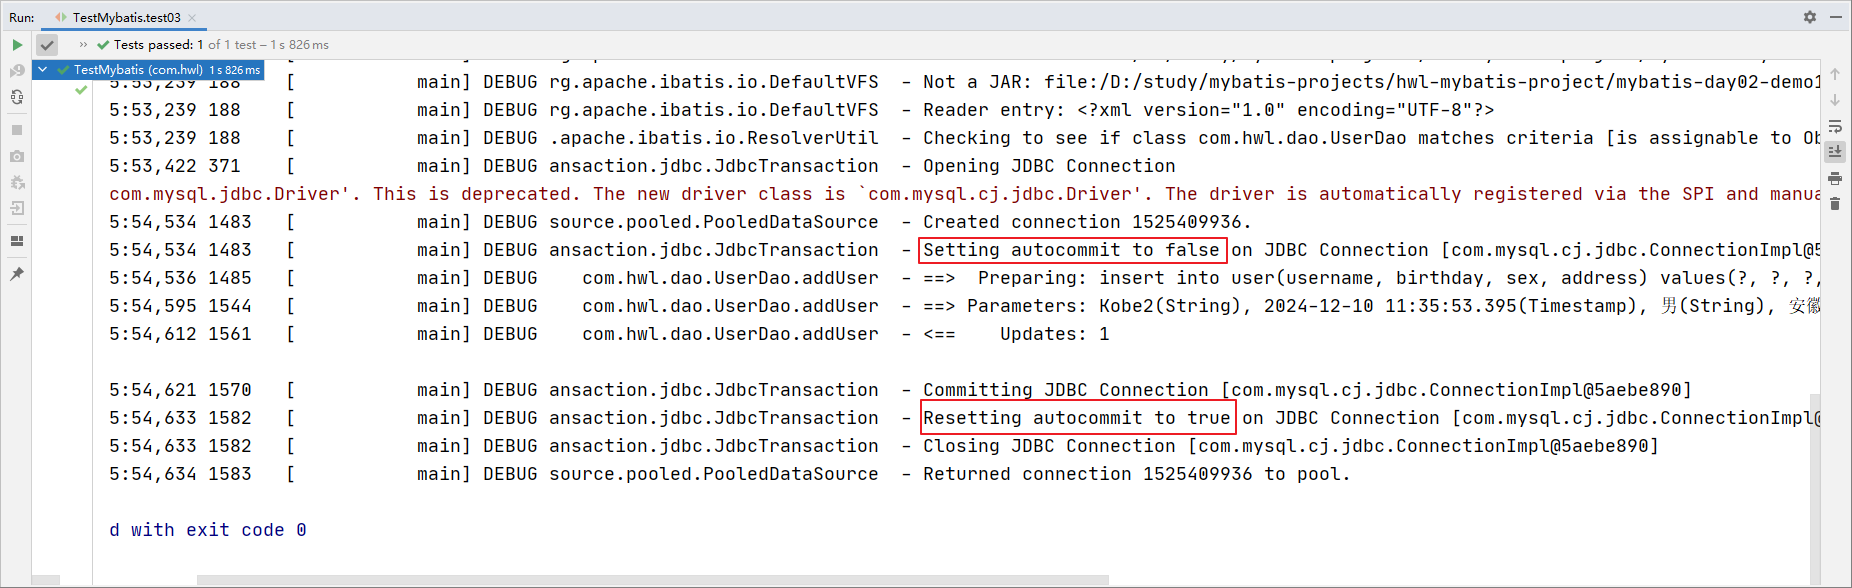
之前写的,只要是更新,都需要写
其实可以在创建sqlSession的时候,就关闭事务的自动提交
之前是这样的:

java
@Test
public void test03() throws Exception {
User user = new User();
user.setUsername("Kobe2");
user.setBirthday(new Date());
user.setSex("男");
user.setAddress("安徽合肥");
userDao.addUser(user);
System.out.println("新增用户的id" + user.getId());
sqlSession.commit(); //提交事务
}
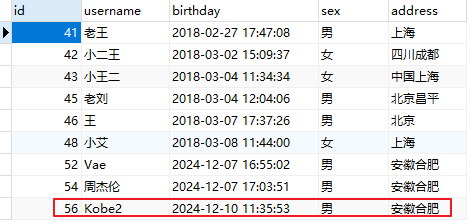
现在改为
默认不写是false
java
//关闭事务的手动提交,以后就不需要自己写 sqlSession.commit() 了。
//也就是说,这句的意思是:把它设置为true=设置事务的自动提交
sqlSession = sessionFactory.openSession(true);
java
@Test
public void test03() throws Exception {
User user = new User();
user.setUsername("Kobe3");
user.setBirthday(new Date());
user.setSex("男");
user.setAddress("安徽合肥");
userDao.addUser(user);
System.out.println("新增用户的id" + user.getId());
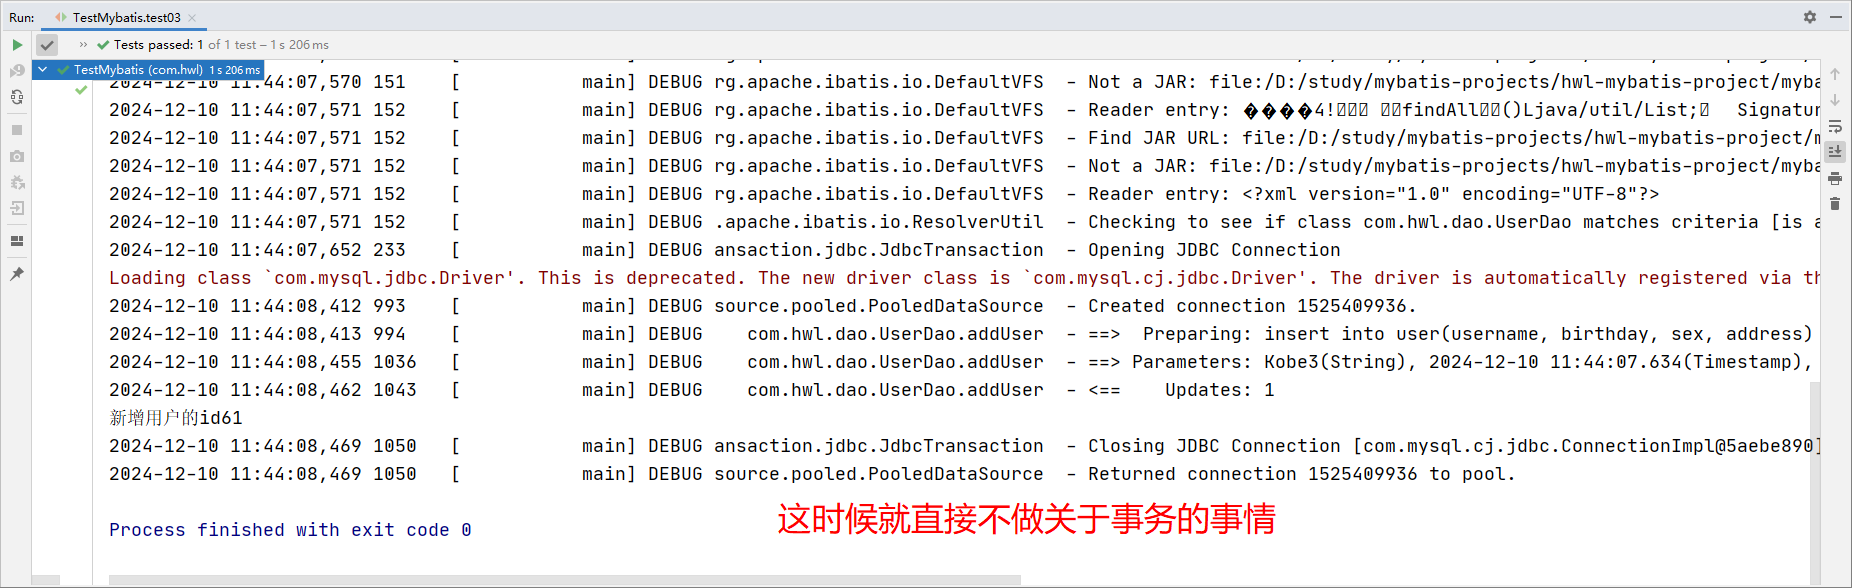
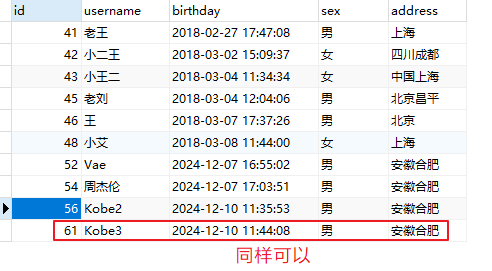
//不写提交事务的语句 sqlSession.commit();
}
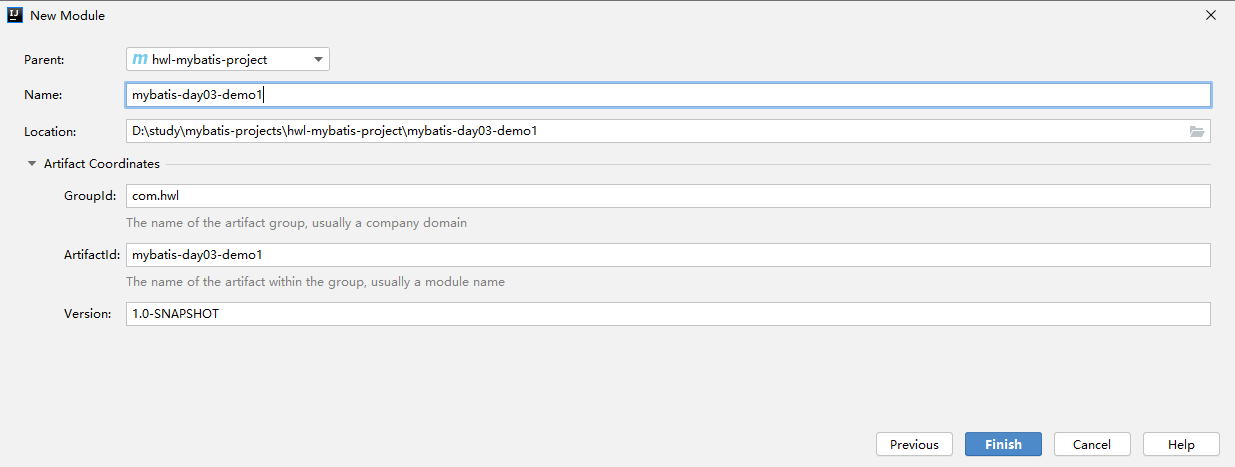
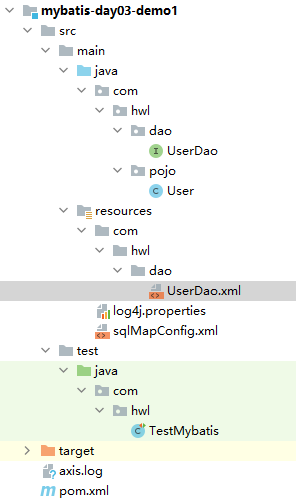
4.14-动态sql之if标签
Mybatis的映射文件中,前面我们的 SQL都是比较简单的,有些时候业务逻辑复杂时,我们的SQL是动态变化的,此时在前面的学习中我们的SQL就不能满足要求了。
java
public interface UserDao {
//动态查询
List<User> findByCondition(User user);
}UserDao.xml:
xml
<?xml version="1.0" encoding="UTF-8"?>
<!DOCTYPE mapper
PUBLIC "-//mybatis.org//DTD Mapper 3.0//EN"
"http://mybatis.org/dtd/mybatis-3-mapper.dtd">
<mapper namespace="com.hwl.dao.UserDao">
<!--动态查询
if标签 用来做条件判断的
test属性:描述的是判断条件 如果为true 就执行if标签里面的内容 否则不执行
-->
<select id="findByCondition" parameterType="user" resultType="user"> /*user 设置了别名的*/
select * from user where 1=1
<if test="username != null and username != ''">
and username = #{username}
</if>
<if test="birthday != null and birthday != ''">
and birthday = #{birthday}
</if>
<if test="sex != null and sex != ''">
and sex = #{sex}
</if>
<if test="address != null and address != ''">
and address = #{address}
</if>
</select>
</mapper>sqlMapConfig.xml:
xml
<?xml version="1.0" encoding="UTF-8"?>
<!DOCTYPE configuration PUBLIC "-//mybatis.org//DTD Config 3.0//EN"
"http://mybatis.org/dtd/mybatis-3-config.dtd">
<configuration>
<typeAliases>
<!--package:描述需要取别名的类所在的包路径 默认情况下,别名就是当前包路径下面的类的名称的小写-->
<package name="com.hwl.pojo"/>
</typeAliases>
<environments default="mybatis">
<environment id="mybatis">
<transactionManager type="JDBC"/>
<dataSource type="POOLED">
<!--配置连接数据库的驱动 url 用户名 密码-->
<property name="driver" value="com.mysql.jdbc.Driver"/>
<property name="url" value="jdbc:mysql://localhost:3306/lesson"/>
<property name="username" value="root"/>
<property name="password" value="root"/>
</dataSource>
</environment>
</environments>
<mappers>
   <!--批量导入映射文件-->
   <package name="com.hwl.dao"/>
</mappers>
</configuration>
java
public class TestMybatis {
    SqlSession sqlSession;
    UserDao userDao;

    @Before  //在@Test注解修饰的方法之前执行
    public void before() throws Exception {
        InputStream in = Resources.getResourceAsStream("sqlMapConfig.xml");
        SqlSessionFactoryBuilder builder = new SqlSessionFactoryBuilder();
        SqlSessionFactory sessionFactory = builder.build(in);
        //关闭事务的手动提交,以后就不需要自己写 sqlSession.commit() 了
        sqlSession = sessionFactory.openSession(true);
        userDao = sqlSession.getMapper(UserDao.class);
    }

    @After  //在@Test方法执行之后执行
    public void after() throws Exception {
        sqlSession.close();
    }

    @Test
    public void Test01() {
        User user = new User();
        //这里只提供sex和address,那么if标签满足的就只有sex和address
        user.setSex("男");
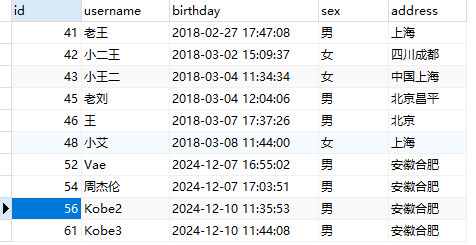
        user.setAddress("安徽合肥");
        List<User> userList = userDao.findByCondition(user);
        userList.forEach(System.out::println);
    }
}
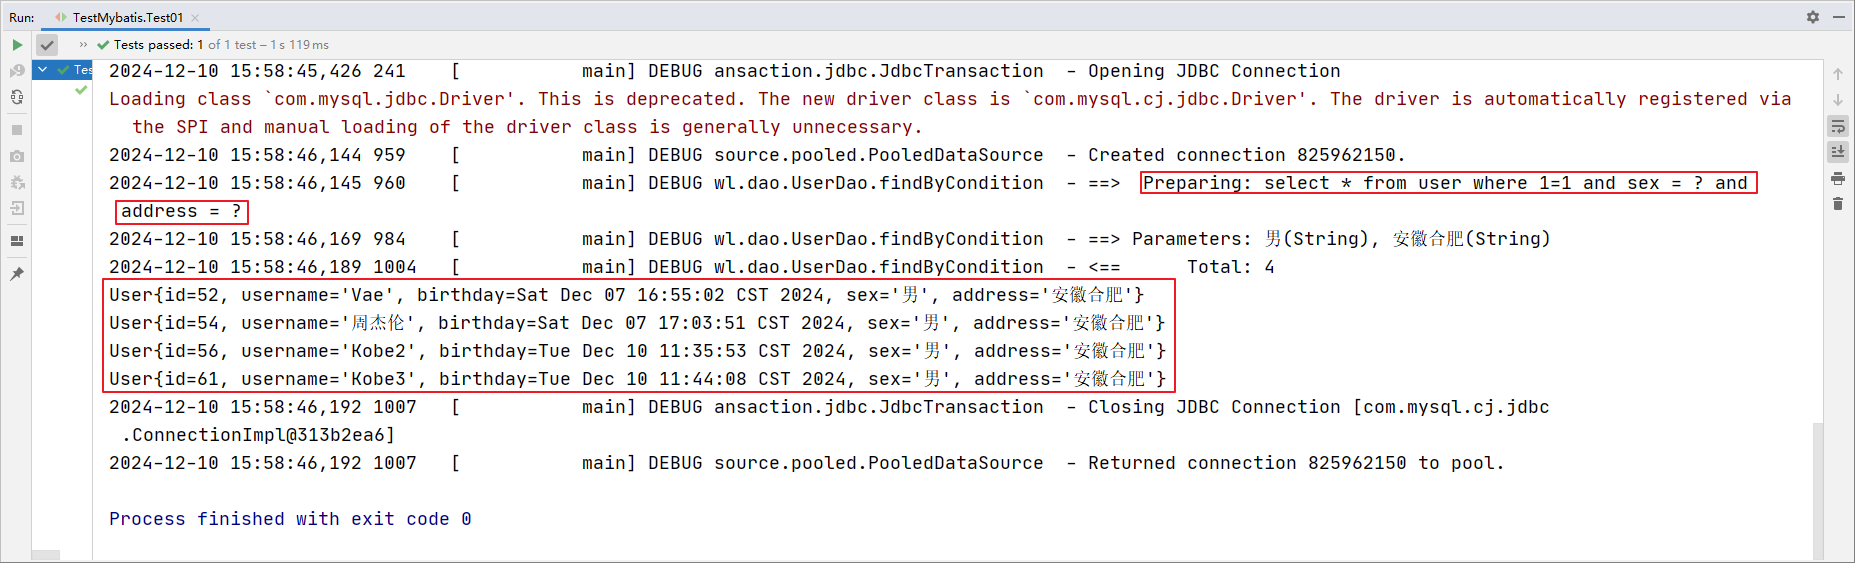
4.15-动态sql之where标签
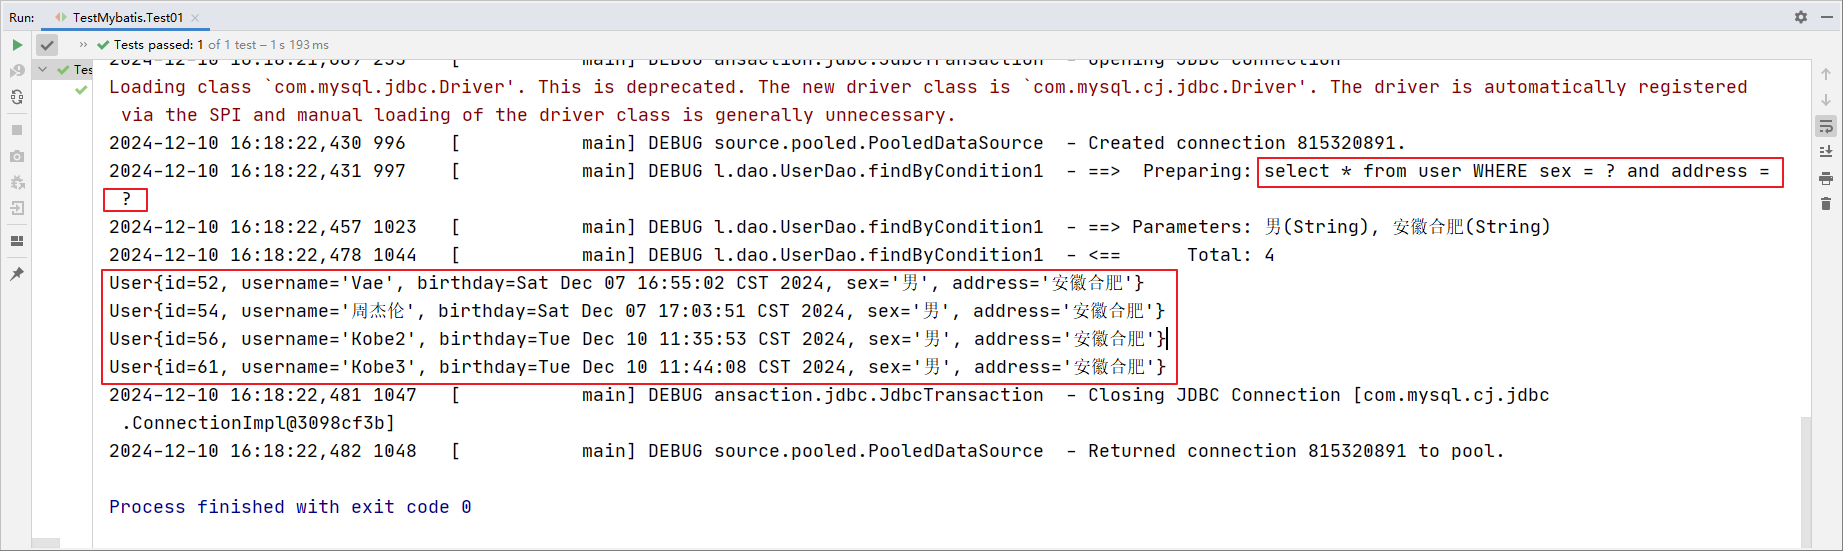
为了简化上面 where 1=1 的条件拼装,我们引入where标签。
使用 where 标签将 if 标签代码块包起来,将 1=1 条件去掉。
java
//动态查询2
List<User> findByCondition1(User user);
xml
<select id="findByCondition1" parameterType="user" resultType="user">
    select * from user
    <where>
        <if test="username != null and username != ''">
            and username = #{username}
        </if>
        <if test="birthday != null and birthday != ''">
            and birthday = #{birthday}
        </if>
        <if test="sex != null and sex != ''">
            and sex = #{sex}
        </if>
        <if test="address != null and address != ''">
            and address = #{address}
        </if>
    </where>
</select>
java
@Test
public void Test01() {
    User user = new User();
    user.setSex("男");
    user.setAddress("安徽合肥");
    List<User> userList = userDao.findByCondition1(user);
    userList.forEach(System.out::println);
}
4.16-动态sql之set标签
我们可以通过set标签来实现动态修改
定义接口:
java
//动态修改
void updateUserByCondition(User user);
定义接口的映射配置文件:
xml
<update id="updateUserByCondition" parameterType="user">
    update user
    <set>
        <if test="username != null and username != ''">
            username = #{username},
        </if>
        <if test="birthday != null and birthday != ''">
            birthday = #{birthday},
        </if>
        <if test="sex != null and sex != ''">
            sex = #{sex},
        </if>
        <if test="address != null and address != ''">
            address = #{address},
        </if>
    </set>
    where id = #{id}
</update>
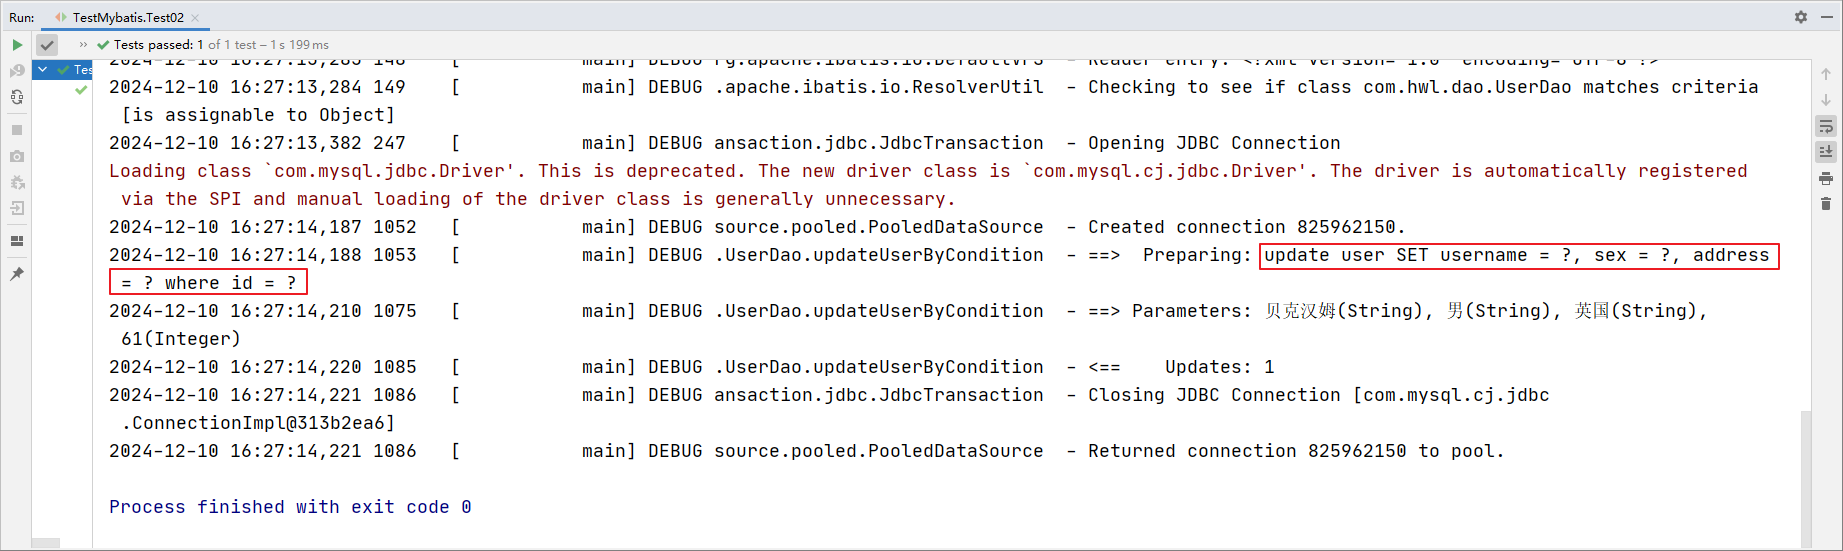
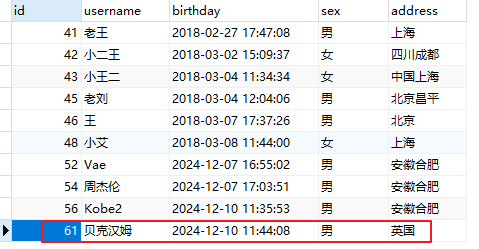
java
@Test
public void Test02() {
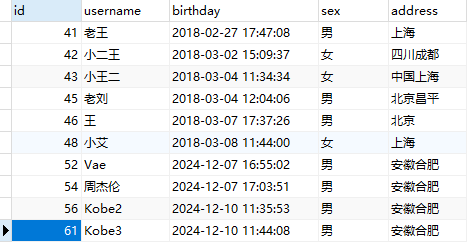
    User user = new User();
    user.setId(61);
    user.setUsername("贝克汉姆");
    user.setSex("男");
    user.setAddress("英国");
    userDao.updateUserByCondition(user);
}
4.17-动态sql之新增操作
若要实现动态新增
首先分析要写的sql语句:
sql
insert into `user`(username, birthday, sex, address) values (?,?,?,?);这里定义两个sql片段解决:
xml
<!--
    描述sql片段
    id:定义sql片段的名称 自定义 唯一即可
    trim标签  去除满足条件的if标签中的内容的最后一个逗号
-->
<sql id="key">
    <trim suffixOverrides=",">
        <if test="username != null and username != ''">
            username,
        </if>
        <if test="birthday != null and birthday != ''">
            birthday,
        </if>
        <if test="sex != null and sex != ''">
            sex,
        </if>
        <if test="address != null and address != ''">
            address,
        </if>
    </trim>
</sql>

<sql id="value">
    <trim suffixOverrides=",">
        <if test="username != null and username != ''">
            #{username},
        </if>
        <if test="birthday != null and birthday != ''">
            #{birthday},
        </if>
        <if test="sex != null and sex != ''">
            #{sex},
        </if>
        <if test="address != null and address != ''">
            #{address},
        </if>
    </trim>
</sql>

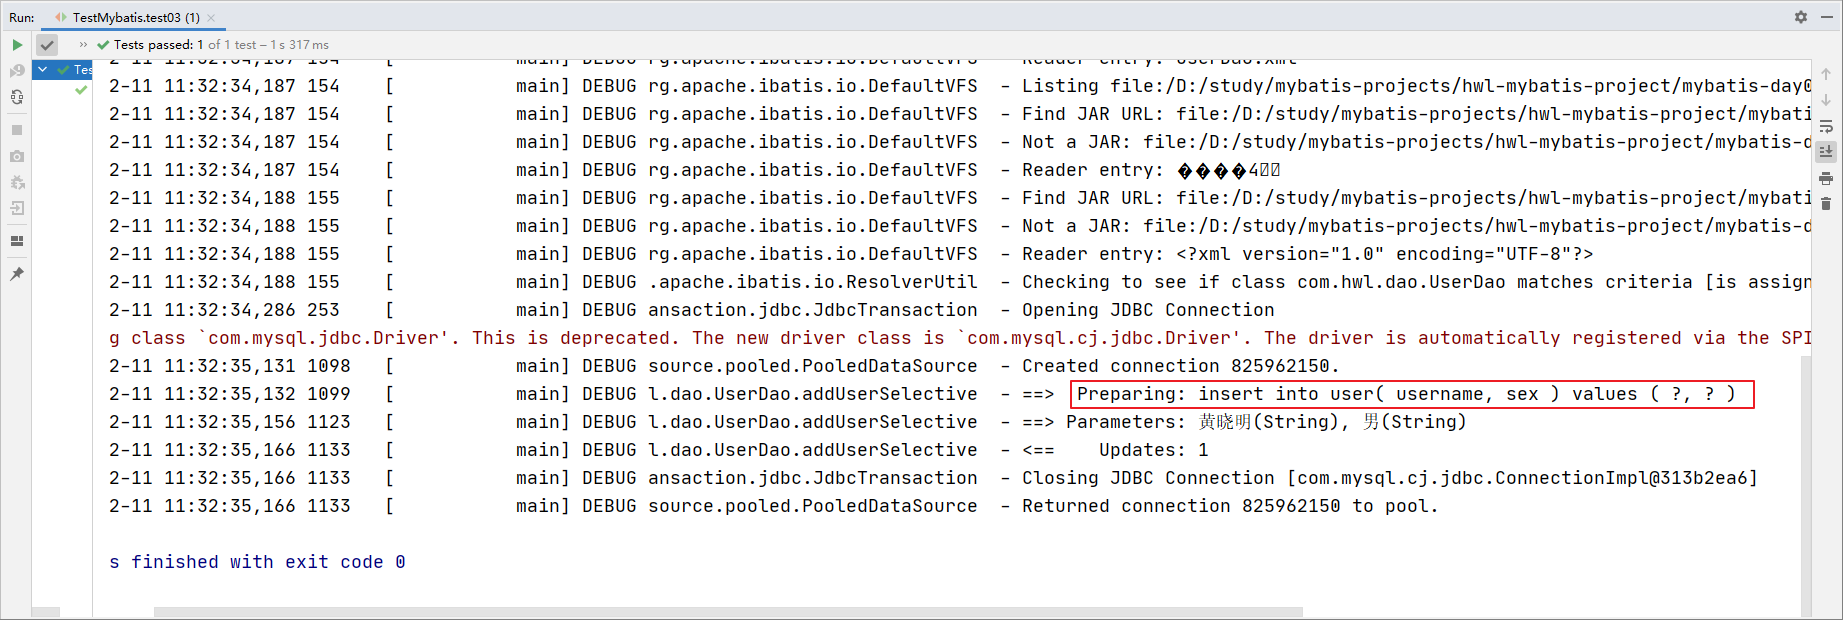
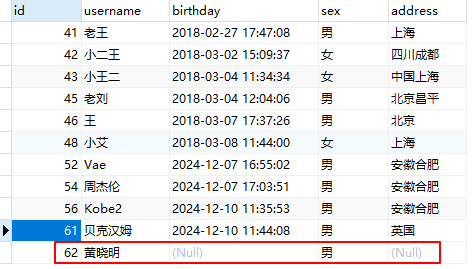
<insert id="addUserSelective" parameterType="user">
    insert into user(<include refid="key"/>) values (<include refid="value"/>)
</insert>
java
@Test
public void test03() throws Exception {
    User user = new User();
    user.setUsername("黄晓明");
    user.setSex("男");
    userDao.addUserSelective(user);
}
4.18-动态sql之choose when otherwise标签
<choose>:表示选择结构的开始;<when>:每个when标签内都需要一个test属性,它是判断条件;<otherwise>:可选,所有when都不满足时执行的 SQL。
注意:在 <choose> 中只有第一个符合条件的 <when> 会被执行,其余的会被忽略 ,类似于 if...else if...else 结构。
定义接口:
java
//动态查询
List<User> findByCondition2(User user);
定义接口的映射文件:
xml
<!--
  choose when otherwise
  这种标签类似于java中的if...else if ... else分支
  如果有一个when分支满足条件,即使后面的when分支也满足条件,那么都不会执行。
  如果不满足所有的when分支,那么就执行otherwise分支。
  注意和if标签的区别。
-->
<select id="findByCondition2" parameterType="user" resultType="user">
    select * from user
    <where>
        <choose>
            <when test="username != null and username != ''">
                username = #{username}
            </when>
            <when test="birthday != null and birthday != ''">
                birthady = #{birthady}
            </when>
            <when test="sex != null and sex != ''">
                sex = #{sex}
            </when>
            <when test="address != null and address != ''">
                address = #{address}
            </when>
            <otherwise>
                id = #{id}
            </otherwise>
        </choose>
    </where>
</select>
java
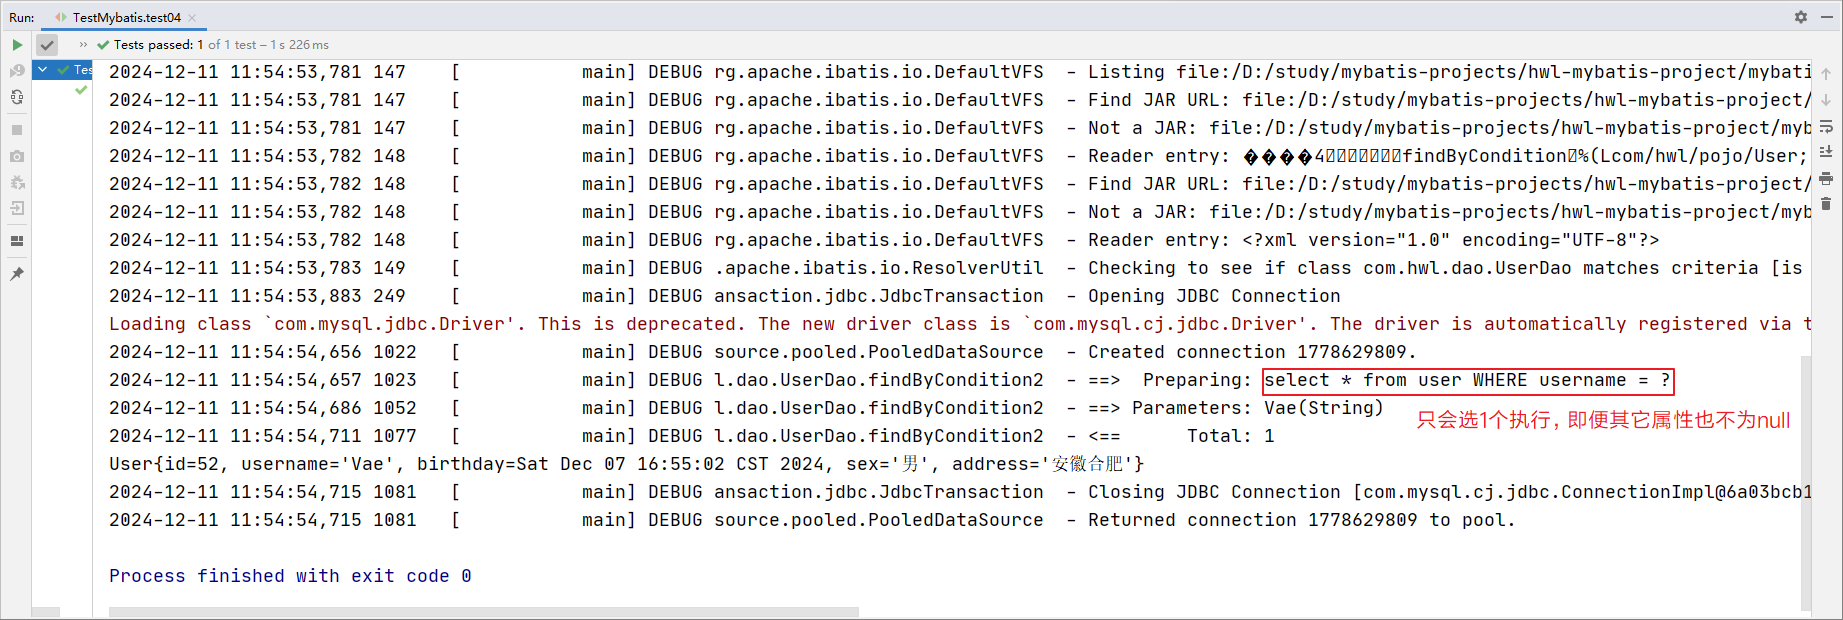
@Test
public void test04() throws Exception {
    User user = new User();
    user.setUsername("Vae");
    user.setSex("男");
    user.setAddress("安徽合肥");
    user.setId(52);
    List<User> userList = userDao.findByCondition2(user);
    userList.forEach(System.out::println);
}
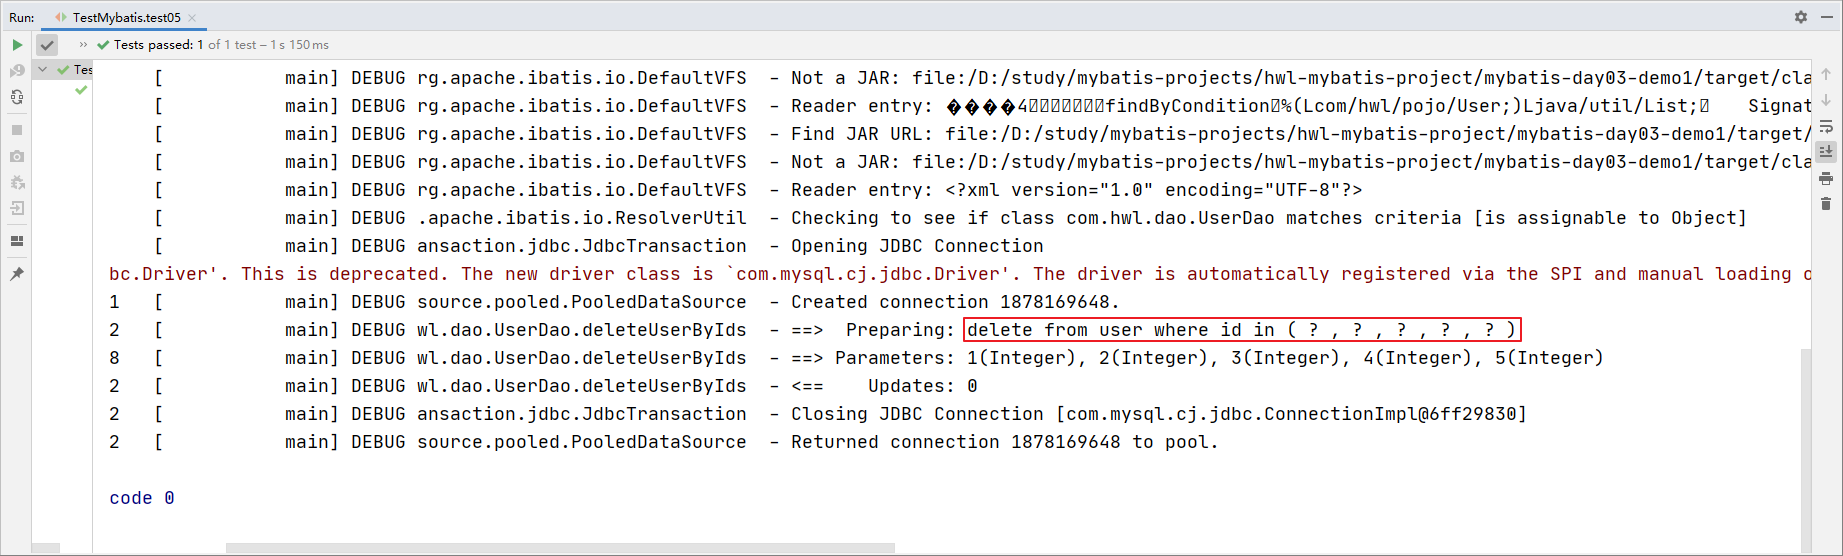
只留id,再运行:
java
@Test
    public void test04() throws Exception {
        User user = new User();
//        user.setUsername("Vae");
//        user.setSex("男");
//        user.setAddress("安徽合肥");
        user.setId(52);
        List<User> userList = userDao.findByCondition2(user);
        userList.forEach(System.out::println);
    }
4.19-动态sql之foreach标签
这里演示用 foreach 标签完成批量删除数据。
方法1(将批量id封装到一个数组里面):
定义接口:
java
//批量删除 将id存放在数组里面
void deleteUserByIds(Integer[] ids);
定义接口的映射文件:
xml
<!--
   批量删除用户(根据id批量删除 将id封装到数组里面)
   当我们将数组或者list集合作为参数传递给 mybatis,那么mybatis会自动的将其包装在一个Map集合中。用其名称
   作为 key。value就是数组或者集合的本身。所以我们在获取这个数组或集合的时候,需要通过key值来取。
   {"array", ids}
   {"list", list}
-->
<delete id="deleteUserByIds">
    delete from user where id in
    (
        <foreach collection="array" item="id" separator=",">
            #{id}
        </foreach>
    )
</delete>
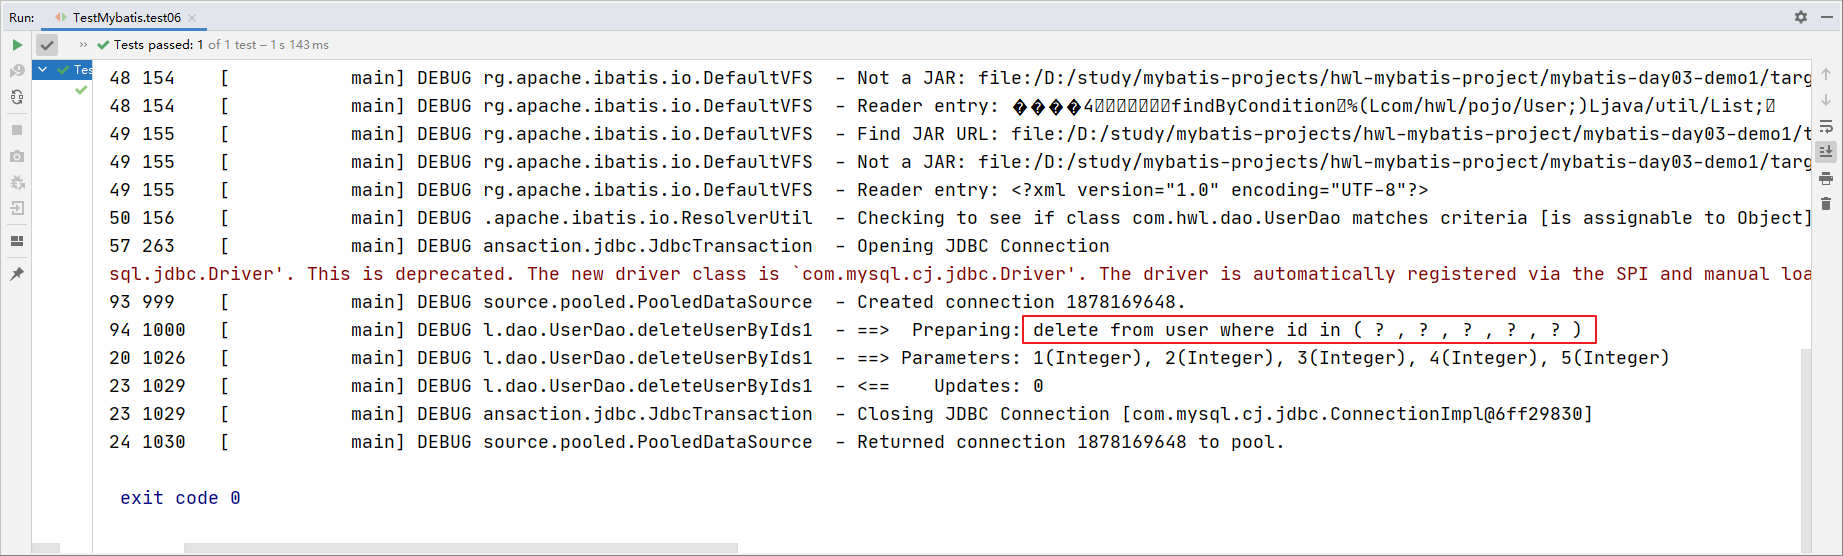
java
//批量删除 传递的是数组对象
@Test
public void test05() throws Exception{
    Integer[] ids = {1, 2, 3, 4, 5};
    userDao.deleteUserByIds(ids);
}
方法2(将批量id封装到一个List集合里面):
定义接口:
java
//批量删除 将id存放在list集合里面
void deleteUserByIds1(List<Integer> ids);
定义接口的映射文件:
xml
<delete id="deleteUserByIds1">
    delete from user where id in
    (
    <foreach collection="list" item="id" separator=",">
        #{id}
    </foreach>
    )
</delete>
注意:collection属性里面只能写 list。
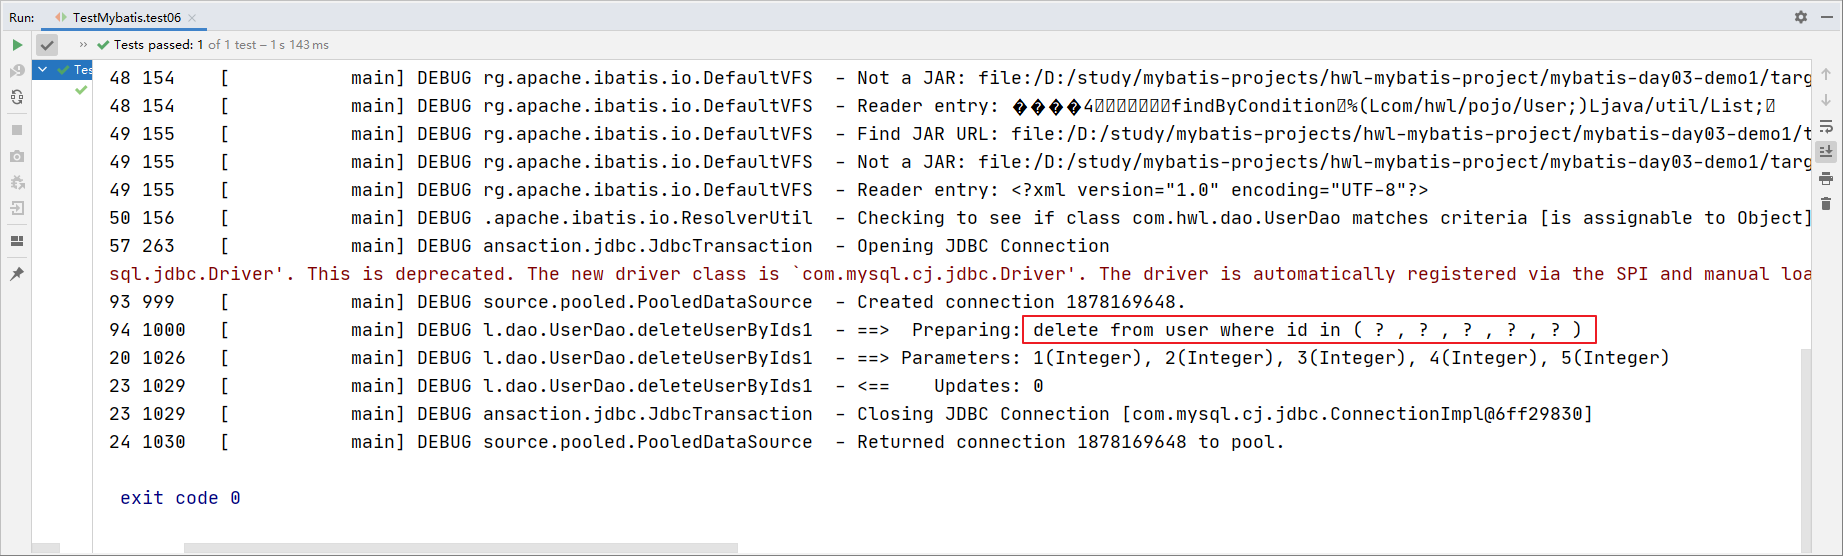
java
//批量删除 传递的是List集合
@Test
public void test06() throws Exception {
    List<Integer> aa = new ArrayList<>();
    aa.add(1);
    aa.add(2);
    aa.add(3);
    aa.add(4);
    aa.add(5);
    userDao.deleteUserByIds1(aa);
}
总结:
当我们将一个 单独的 List 或数组对象 作为参数传递给 MyBatis 时,MyBatis 会自动将其包装成一个 Map 对象,以便在 SQL 映射文件中使用。包装后的 Map 会使用默认的键名:
- 对于
List或Set,键为"list"; - 对于数组,键为
"array"。
因此,在 <foreach> 标签中使用时,collection 属性应对应写为 list 或 array,以正确引用传入的集合参数。
4.20-mybatis之批处理
需求:批量新增一批数据。
解决问题的方案有两种:
方法1:将批量新增的数据 放在List集合里面,遍历集合循环新增数据即可。(不推荐)
java
//批量新增
void addUser(User user);
xml
<insert id="addUser" parameterType="user">
    insert into user(username, birthday, sex, address) values (#{username}, #{birthday}, #{sex}, #{address})
</insert>
java
@Test
public void test07() throws Exception {
    List<User> list = new ArrayList<>();
    User user1 = new User();
    user1.setUsername("数据1");
    user1.setSex("男");
    user1.setBirthday(new Date());
    user1.setAddress("数据1");

    User user2 = new User();
    user2.setUsername("数据2");
    user2.setSex("男");
    user2.setBirthday(new Date());
    user2.setAddress("数据2");

    User user3 = new User();
    user3.setUsername("数据3");
    user3.setSex("男");
    user3.setBirthday(new Date());
    user3.setAddress("数据3");

    list.add(user1);
    list.add(user2);
    list.add(user3);
    for (User user : list) {
        userDao.addUser(user);
    }
    sqlSession.commit();  //经自己测试,后面的方法2 必须要写这条语句 才能加到数据库中去
}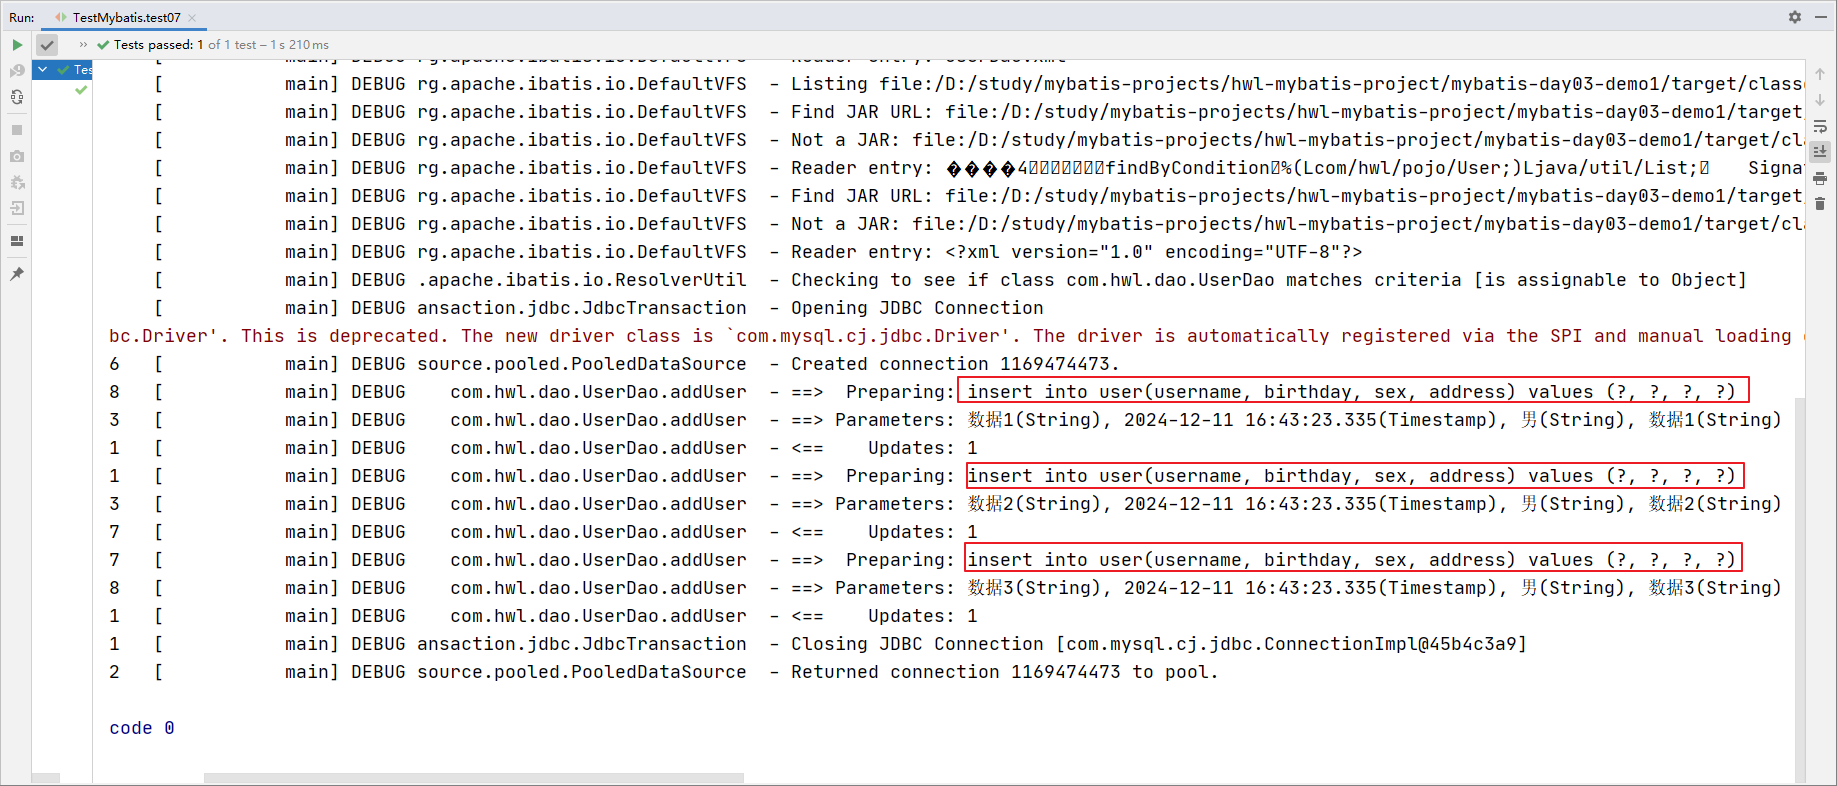
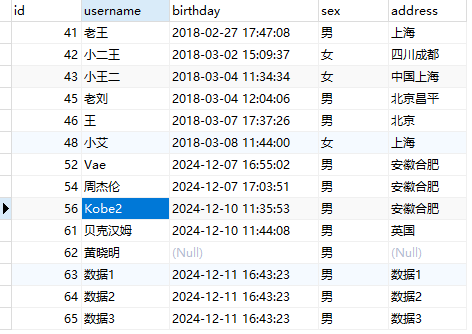
虽然没有问题,但是如果新增的数据很多,由于insert语句多次执行,造成执行效率很低
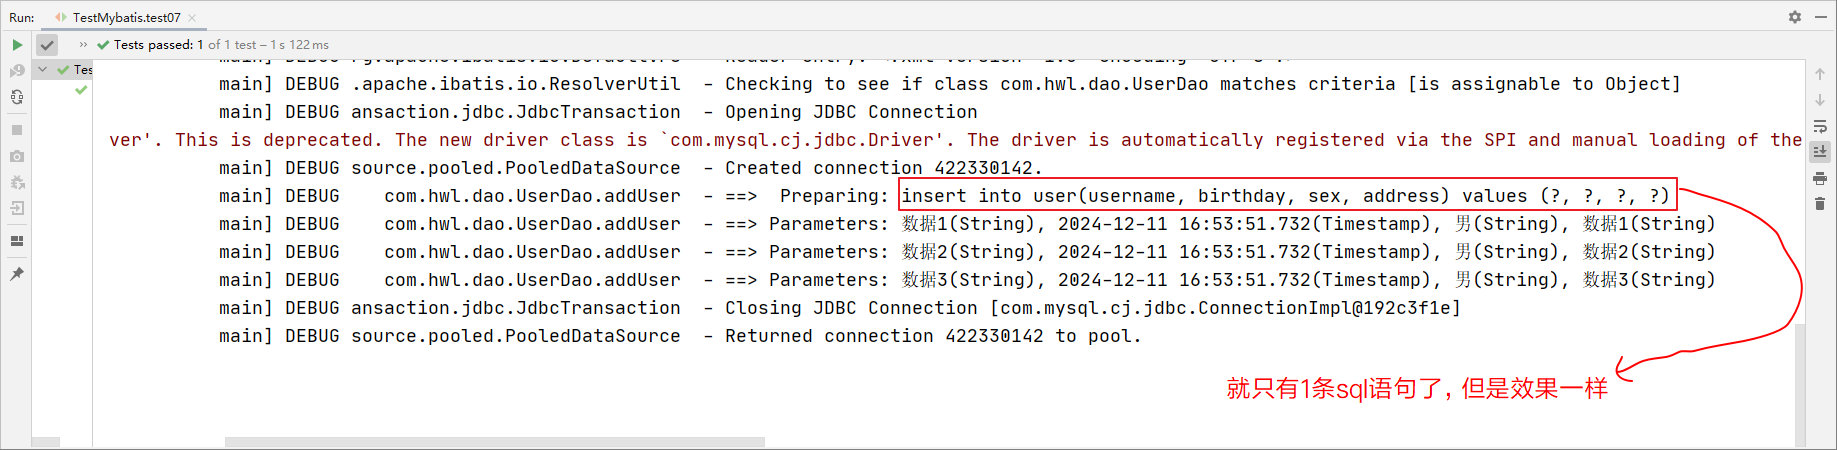
方法2:开启批处理指令,使用批处理的方式进行数据的新增。
如何开启批处理?
-
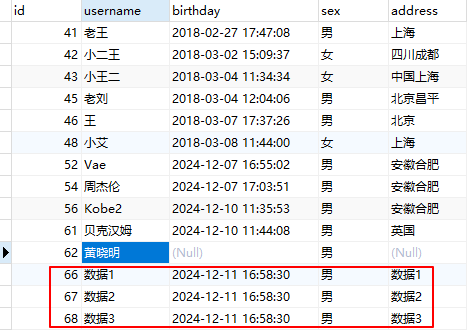
方式1:在mybatis 的核心配置文件 sqlMapConfig.xml 中开启 。
xml<settings> <setting name="defaultExecutorType" value="BATCH"/> </settings>之前插入的数据删掉,重新执行:
-
方式2:在创建
sqlSession对象的时候,指定开启批处理。javasqlSession = sessionFactory.openSession(ExecutorType.BATCH, false); //创建sqlSession对象的时候开启批处理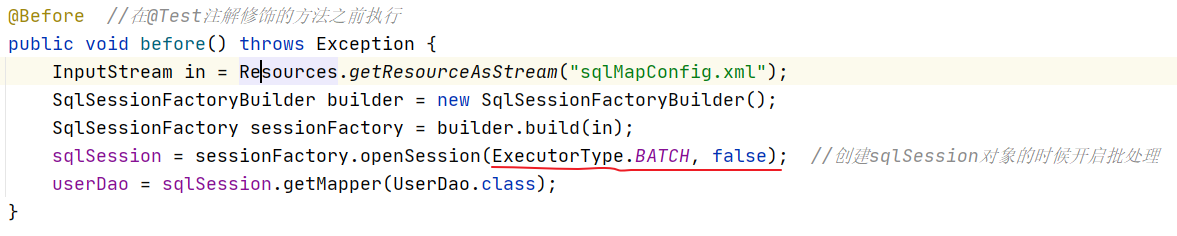

之前插入的数据删掉,重新执行:
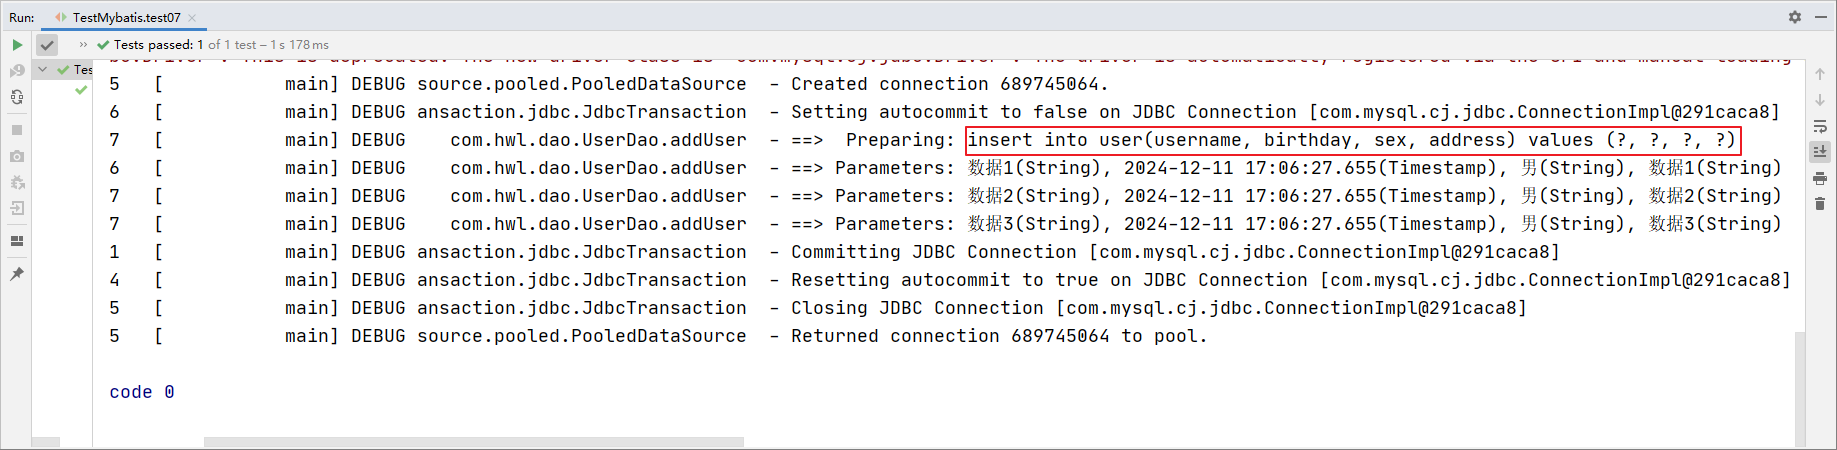
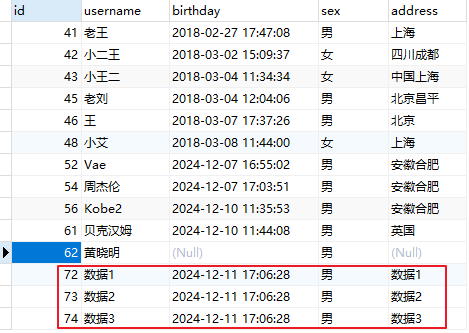
4.21-mybatis多表查询之1对1
提出一个需求:查询所有的账户信息及其对应的用户信息
注意:因为一个账户信息只能供某个用户使用,所以从查询账户信息出发→关联查询用户信息为一对一查询。
如果从用户信息出发→查询用户的账户信息则为一对多查询,因为一个用户可以有多个账户。
通过分析,可以写出mysql的查询语句
sql
-- 假设对于user表,只查询用户名和地址
SELECT account.*,`user`.username, `user`.address from account, `user` where account.UID = `user`.id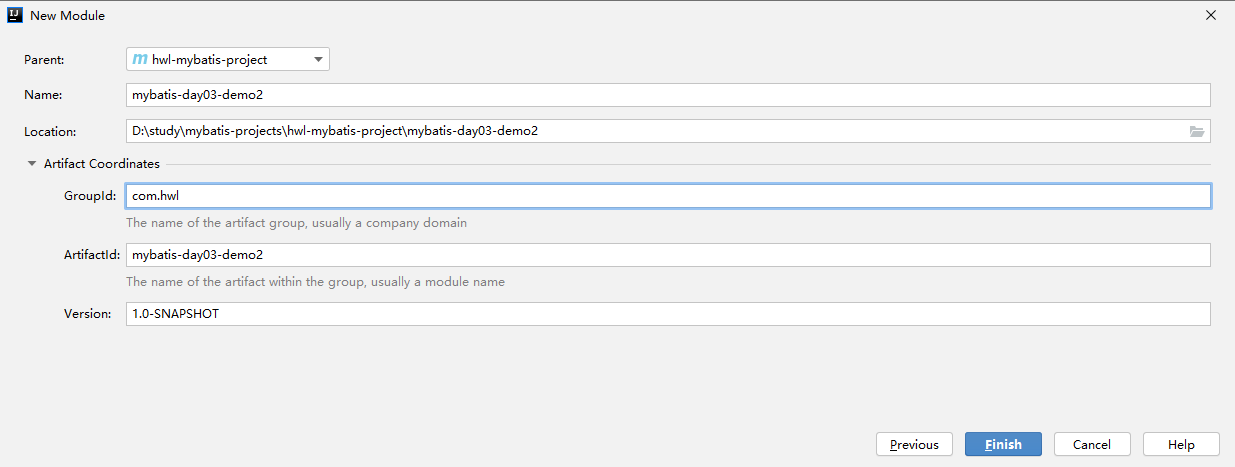
引入对应的依赖,配置文件等
java
public class Account {
    private Integer id;
    private Integer uid;
    private Double money;

    //getter、setter、toString
}
下面介绍 2 种方式
- 方式1:
首先很自然的想到:
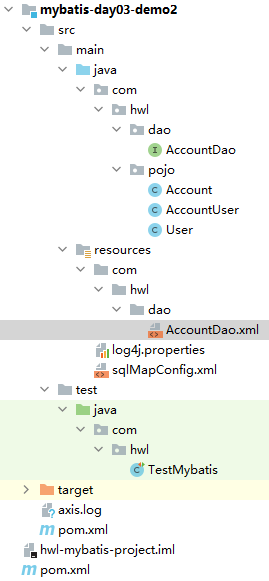
java
public interface AccountDao {
    List<Account> findAll();
}
xml
<?xml version="1.0" encoding="UTF-8"?>
<!DOCTYPE mapper
        PUBLIC "-//mybatis.org//DTD Mapper 3.0//EN"
        "http://mybatis.org/dtd/mybatis-3-mapper.dtd">
<mapper namespace="com.hwl.dao.AccountDao">
    <!--查询所有的账户信息及其对应的用户信息-->
    <select id="findAll" resultType="com.hwl.pojo.Account">
        SELECT account.*, `user`.username, `user`.address from account, `user` where account.UID = `user`.id
    </select>
</mapper>
java
public class TestMybatis {
    SqlSession sqlSession;
    AccountDao accountDao;

    //在@Test注解修饰的方法之前执行
    @Before
    public void before() throws Exception{
        //加载核心的配置文件
        InputStream in = Resources.getResourceAsStream("sqlMapConfig.xml");
        //构建SqlSessionFactoryBuilder对象
        SqlSessionFactoryBuilder builder = new SqlSessionFactoryBuilder();
        //构建SqlSessionFactory对象
        SqlSessionFactory factory = builder.build(in);
        //生成SqlSession对象 开启批处理
        sqlSession = factory.openSession(ExecutorType.BATCH,false);//关闭事务的手动提交
        accountDao = sqlSession.getMapper(AccountDao.class);
    }

    @After //在@Test方法执行之后执行
    public void after() throws Exception{
        sqlSession.close();
    }

    @Test
    public void test01(){
        List<Account> accountList = accountDao.findAll();
        for (Account account : accountList) {
            System.out.println(account);
        }
    }
}
运行测试,却只能查到Account表:
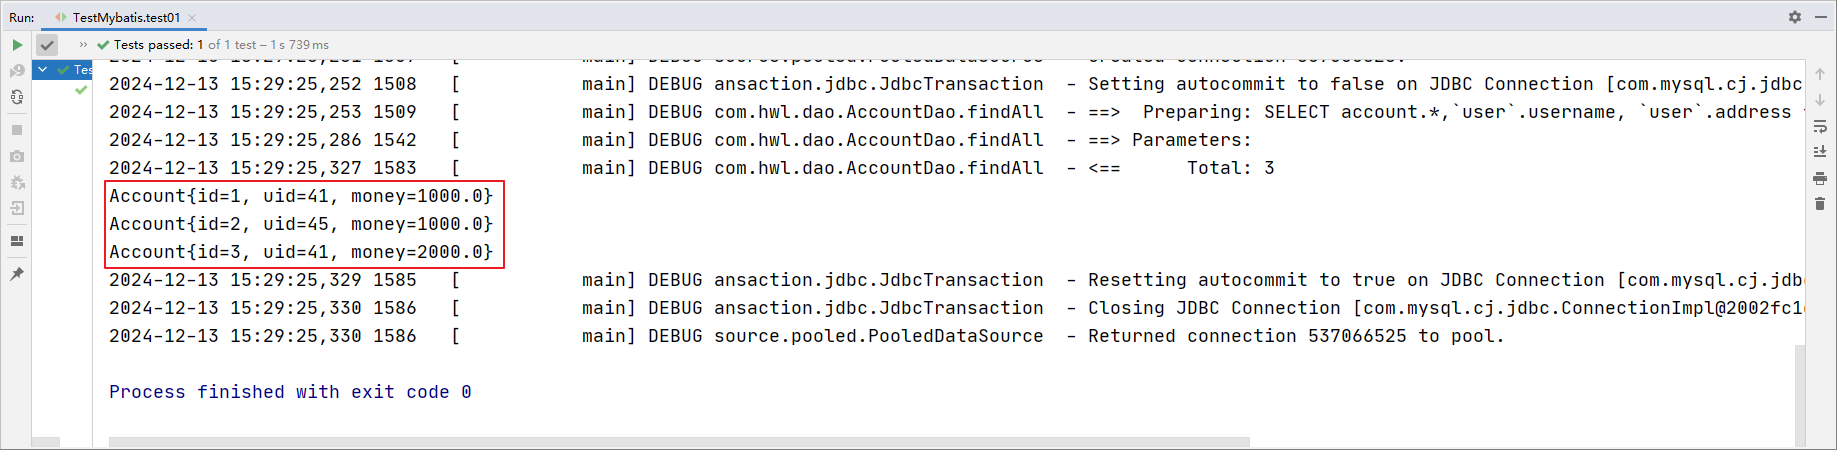
改进:新建一个 AccountUser 实体类,继承 Account 实体类
java
public class AccountUser extends Account{
    private String username;
    private String address;

    //getter、setter、toString
}这样AccountUser类就既包括了账户信息,也包括了用户信息
java
List<AccountUser> findAll();
xml
<!--查询所有的账户信息及其对应的用户信息-->
<select id="findAll" resultType="com.hwl.pojo.AccountUser">
    SELECT account.*,`user`.username, `user`.address from account, `user` where account.UID = `user`.id
</select>
java
@Test
public void test01() {
    List<AccountUser> accountList = accountDao.findAll();
    for (AccountUser accountUser : accountList) {
        System.out.println("账户id" + accountUser.getId() + "  账户的用户id:" + accountUser.getUid() + "  账户金额:" + accountUser.getMoney() + "  用户名:" + accountUser.getUsername() + "  地址:" + accountUser.getAddress());
    }
}
- 方式2(更通用,不像刚才这种用继承的思想去做,通过ResultMap字段进行映射):
使用 resultMap,定义专门的 resultMap 用于映射一对一查询结果。通过面向对象的(has a)关系可以得知,我们可以在 Account 中 加入一个 User 类的对象来代表这个账户是哪个用户的。
java
public class User {
    private Integer id;
    private String username;
    private Date birthday;
    private String sex;
    private String address;

    // getter、setter、toString
}
java
public class Account {
    private Integer id;
    private Integer uid;
    private Double money;
    // 维护一个User实体,并创建对应的getter、setter方法
    private User user;

    //getter、setter、toString
}
定义接口:
java
public interface AccountDao {
    List<Account> findAll();
}
定义接口的映射文件 AccountDao.xml:
xml
<?xml version="1.0" encoding="UTF-8"?>
<!DOCTYPE mapper
        PUBLIC "-//mybatis.org//DTD Mapper 3.0//EN"
        "http://mybatis.org/dtd/mybatis-3-mapper.dtd">
<mapper namespace="com.hwl.dao.AccountDao">
    <resultMap id="accountMap" type="com.hwl.pojo.Account">
        <id property="id" column="id"/>
        <result property="uid" column="uid"/>
        <result property="money" column="money"/>
        <!--
            association标签:进行1对1关联查询的时候 进行字段映射
            javaType:user对应的数据类型
        -->
        <association property="user" javaType="com.hwl.pojo.User">
            <id property="id" column="id"/>
            <result property="username" column="username"/>
            <result property="birthday" column="birthday"/>
            <result property="sex" column="sex"/>
            <result property="address" column="address"/>
        </association>
    </resultMap>
    <!--这时候就不用resultType,而是使用resultMap-->
    <select id="findAll" resultMap="accountMap">
        SELECT account.*,`user`.username, `user`.address from account, `user` where account.UID = `user`.id
    </select>
</mapper>
测试:
java
@Test
public void test01() {
    List<Account> accountList = accountDao.findAll();
    for (Account account : accountList) {
        System.out.println(account);
    }
}
4.22-mybatis多表操作之1对多
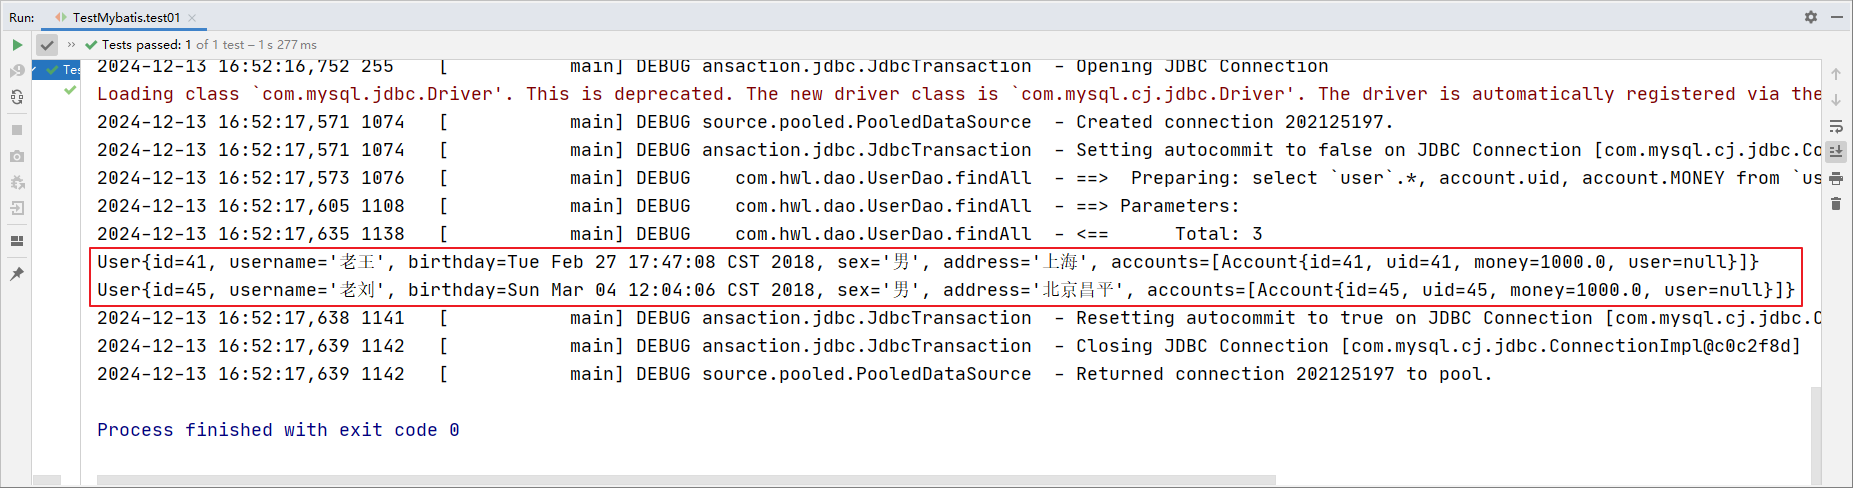
需求:查询所有用户信息及其关联的账户信息。(用户对账户是1对多的关系)
还是先写出sql语句
sql
SELECT `user`.*, account.uid, account.MONEY from `user`, account WHERE account.UID = `user`.id
java
public class User {
    private Integer id;
    private String username;
    private Date birthday;
    private String sex;
    private String address;
	//一个用户可能有多个账户,因此用集合包装起来
    private List<Account> accounts;

    //getter、setter方法

    @Override
    public String toString() {
        return "User{" + "id=" + id + ", username='" + username + '\'' + ", birthday=" + birthday + ", sex='" + sex + '\'' +
                ", address='" + address + '\'' + ", accounts=" + accounts + '}';
    }
}
java
public interface UserDao {
    List<User> findAll();
}
UserDao.xml
xml
<?xml version="1.0" encoding="UTF-8"?>
<!DOCTYPE mapper
        PUBLIC "-//mybatis.org//DTD Mapper 3.0//EN"
        "http://mybatis.org/dtd/mybatis-3-mapper.dtd">
<mapper namespace="com.hwl.dao.UserDao">
    <resultMap id="userMap" type="com.hwl.pojo.User">
        <id property="id" column="id"/>
        <result property="username" column="username"/>
        <result property="birthday" column="birthday"/>
        <result property="sex" column="sex"/>
        <result property="address" column="address"/>
		<!--
           collection:用于一对多关联查询的时候 需要指定字段的映射关系  ofType指定集合元素的数据类型
              property: 实体中的属性的字段名称
        -->
        <collection property="accounts" ofType="com.hwl.pojo.Account">
            <id property="id" column="id"/>
            <result property="uid" column="uid"/>
            <result property="money" column="money"/>
        </collection>
    </resultMap>
	<!--
       查询所有的用户信息及其关联的账户信息
    -->
    <select id="findAll" resultMap="userMap">
        select `user`.*, account.uid, account.MONEY from `user`, account WHERE account.UID = `user`.id
    </select>
</mapper>
java
public class TestMybatis {
    SqlSession sqlSession;
    UserDao userDao;

    //在@Test注解修饰的方法之前执行
    @Before
    public void before() throws Exception {
        //加载核心的配置文件
        InputStream in = Resources.getResourceAsStream("sqlMapConfig.xml");
        //构建SqlSessionFactoryBuilder对象
        SqlSessionFactoryBuilder builder = new SqlSessionFactoryBuilder();
        //构建SqlSessionFactory对象
        SqlSessionFactory factory = builder.build(in);
        //生成SqlSession对象 开启批处理
        sqlSession = factory.openSession(ExecutorType.BATCH, false);//关闭事务的手动提交
        userDao = sqlSession.getMapper(UserDao.class);
    }

    @After //在@Test方法执行之后执行
    public void after() throws Exception {
        sqlSession.close();
    }

    @Test
    public void test01() {
        List<User> userList = userDao.findAll();
        for (User user : userList) {
            System.out.println(user);
        }
    }
}
4.23-mybatis多表操作之多对多
需求:查询所有角色信息及其对应的用户信息。(Role 与 User 是多对多)
role表:
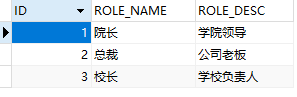
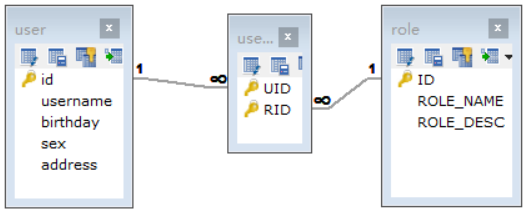
通过前面的学习,我们使用Mybatis 实现一对多关系的维护。多对多关系其实我们看成是双向的一对多关系。
用户与角色之间的多对多关系模型如下:
sql
-- 查询角色及其对应的用户信息
-- user表 和 role表
-- 主表和关联表之间是1对多
SELECT r.*, u.username, u.address FROM `user` as u, role as r, user_role as ur where u.id = ur.UID and r.id = ur.RID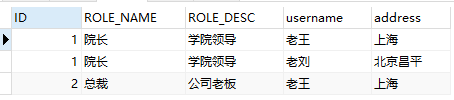
java
public class Role {
    private Integer roleId;
    private String roleName;
    private String roleDesc;
    //多对多的关系
    private List<User> users;

    //getter、setter方法

    @Override
    public String toString() {
        return "Role{" +"roleId=" + roleId + ", roleName='" + roleName + '\'' +", roleDesc='" + roleDesc + '\'' +
                ", users=" + users +'}';
    }
}
java
public class User {
    private Integer id;
    private String username;
    private Date birthday;
    private String sex;
    private String address;

    //getter、setter方法
    @Override
    public String toString() {
        return "User{" + "id=" + id + ", username='" + username + '\'' + ", birthday=" + birthday + ", sex='" + sex + '\'' + ", address='" + address + '\'' + '}';
    }
}
java
public interface RoleDao {
    //查询所有角色信息及其对应的用户信息
    List<Role> findAll();
}
RoleDao.xml
xml
<?xml version="1.0" encoding="UTF-8"?>
<!DOCTYPE mapper
        PUBLIC "-//mybatis.org//DTD Mapper 3.0//EN"
        "http://mybatis.org/dtd/mybatis-3-mapper.dtd">

<mapper namespace="com.hwl.dao.RoleDao">
    <resultMap id="roleMap" type="com.hwl.pojo.Role">
        <id property="roleId" column="id"/>
        <result property="roleName" column="role_name"/>
        <result property="roleDesc" column="role_desc"/>

        <collection property="users" ofType="com.hwl.pojo.User">
            <id property="id" column="id"/>
            <result property="username" column="username"/>
            <result property="birthday" column="birthday"/>
            <result property="sex" column="sex"/>
            <result property="address" column="address"/>
        </collection>
    </resultMap>

    <select id="findAll" resultMap="roleMap">
        SELECT r.*, u.username, u.address FROM
            `user` as u,
            role as r,
            user_role as ur
            where u.id = ur.UID and r.id = ur.RID
    </select>
</mapper>
java
public class TestMybatis {
    SqlSession sqlSession;
    RoleDao roleDao;

    //在@Test注解修饰的方法之前执行
    @Before
    public void before() throws Exception {
        //加载核心的配置文件
        InputStream in = Resources.getResourceAsStream("sqlMapConfig.xml");
        //构建SqlSessionFactoryBuilder对象
        SqlSessionFactoryBuilder builder = new SqlSessionFactoryBuilder();
        //构建SqlSessionFactory对象
        SqlSessionFactory factory = builder.build(in);
        //生成SqlSession对象 开启批处理
        sqlSession = factory.openSession(ExecutorType.BATCH, false);//关闭事务的手动提交
        roleDao = sqlSession.getMapper(RoleDao.class);
    }

    @After //在@Test方法执行之后执行
    public void after() throws Exception {
        sqlSession.close();
    }

    @Test
    public void test01() {
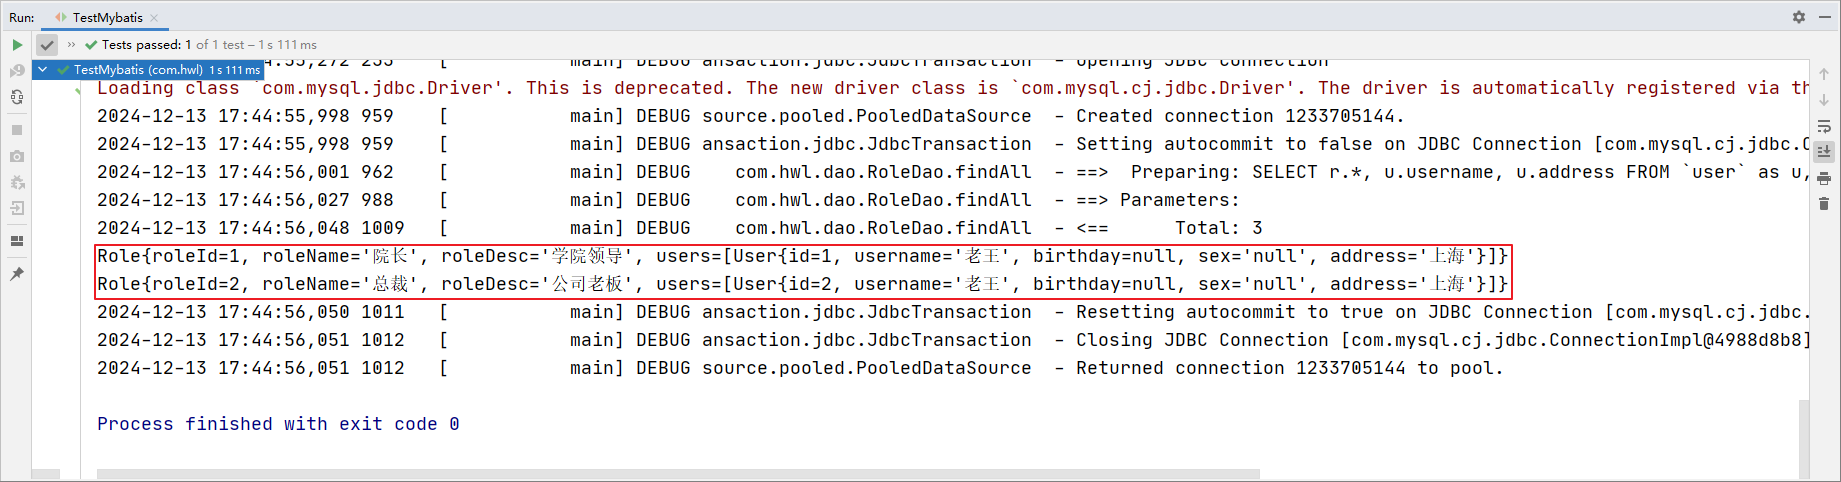
        List<Role> roleList = roleDao.findAll();
        for (Role role : roleList) {
            System.out.println(role);
        }
    }
}
4.24-使用association实现延迟加载
问题:
在一对多中,当我们一个用户,它有100个账户。
在查询用户 的时候,要不要把关联的账户查询出来?
在查询账户 的时候,要不要把关联的用户查询出来?
答案:
在查询用户时,用户下的账户信息应该是什么时候用,什么时候查询。
在查询账户时,账户所属的用户信息应该是随着账户信息一起查询出来的。
什么是延迟加载 :在真正使用数据的时候才发起查询,不用的时候不查询。按需加载(延迟加载)。在 MyBatis 中,"懒加载"、"延时加载"、"延迟加载"这三个术语本质上是一个意思 ,都指的是:在真正使用某个关联对象或字段时才去加载它的数据,而不是在查询主对象时就立即加载。
什么是立即加载:不管用不用,只要一调用方法,立马查询出来。
本节可与4.21节多表查询1对1,对照着看,后面两节也是,分别是1对多,多对多。
下面这个例子实现的是,查 Account 表,与此同时,选择性地查与之对应的 User 表。是多对一。
首先还是导入对应的 pom.xml 依赖,配置文件等
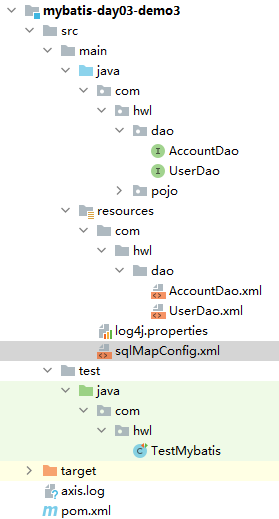
java
public class Account {
    private Integer id;
    private Integer uid;
    private Double money;

    private User user;

    //getter、setter、toString
}
java
public class User {
    private Integer id;
    private String username;
    private Date birthday;
    private String sex;
    private String address;

    //getter、setter、toString
}
AccountDao:
java
public interface AccountDao {
    //加载账户信息及对应的用户信息
    List<Account> findAll();
}
AccountDao.xml:
xml
<?xml version="1.0" encoding="UTF-8"?>
<!DOCTYPE mapper
        PUBLIC "-//mybatis.org//DTD Mapper 3.0//EN"
        "http://mybatis.org/dtd/mybatis-3-mapper.dtd">
<mapper namespace="com.hwl.dao.AccountDao">
    <resultMap id="accountMap" type="com.hwl.pojo.Account">
        <id property="id" column="id"/>
        <result property="uid" column="uid"/>
        <result property="money" column="money"/>
        <!--Account已经有了 可以去拿它的uid -->
        <!--
           根据已有的账户信息,去查询对应的用户信息
           column: 要传递给select映射的参数
           select: 要进行关联查询的方法(接口的全限定名 + "." + 方法名称)
           fetchType="lazy" 配置懒加载策略(也可以在mybatis的核心配置文件里面去配)
        -->
        <association property="user" column="uid" select="com.hwl.dao.UserDao.findUserById"/>
    </resultMap>
    <select id="findAll" resultMap="accountMap">
        select * from account
    </select>
</mapper>
UserDao:
java
public interface UserDao {
    //根据用户id查询对应的用户信息
    User findUserById(Integer id);
}
UserDao.xml:
xml
<?xml version="1.0" encoding="UTF-8"?>
<!DOCTYPE mapper
        PUBLIC "-//mybatis.org//DTD Mapper 3.0//EN"
        "http://mybatis.org/dtd/mybatis-3-mapper.dtd">
<mapper namespace="com.hwl.dao.UserDao">
    <select id="findUserById" parameterType="int" resultType="com.hwl.pojo.User">
        select * from user where id = #{id}
    </select>
</mapper>
java
@Test
    public void test01() {
        List<Account> accountList = accountDao.findAll();
//        for (Account account : accountList) {
//            System.out.println(account);
//        }
    }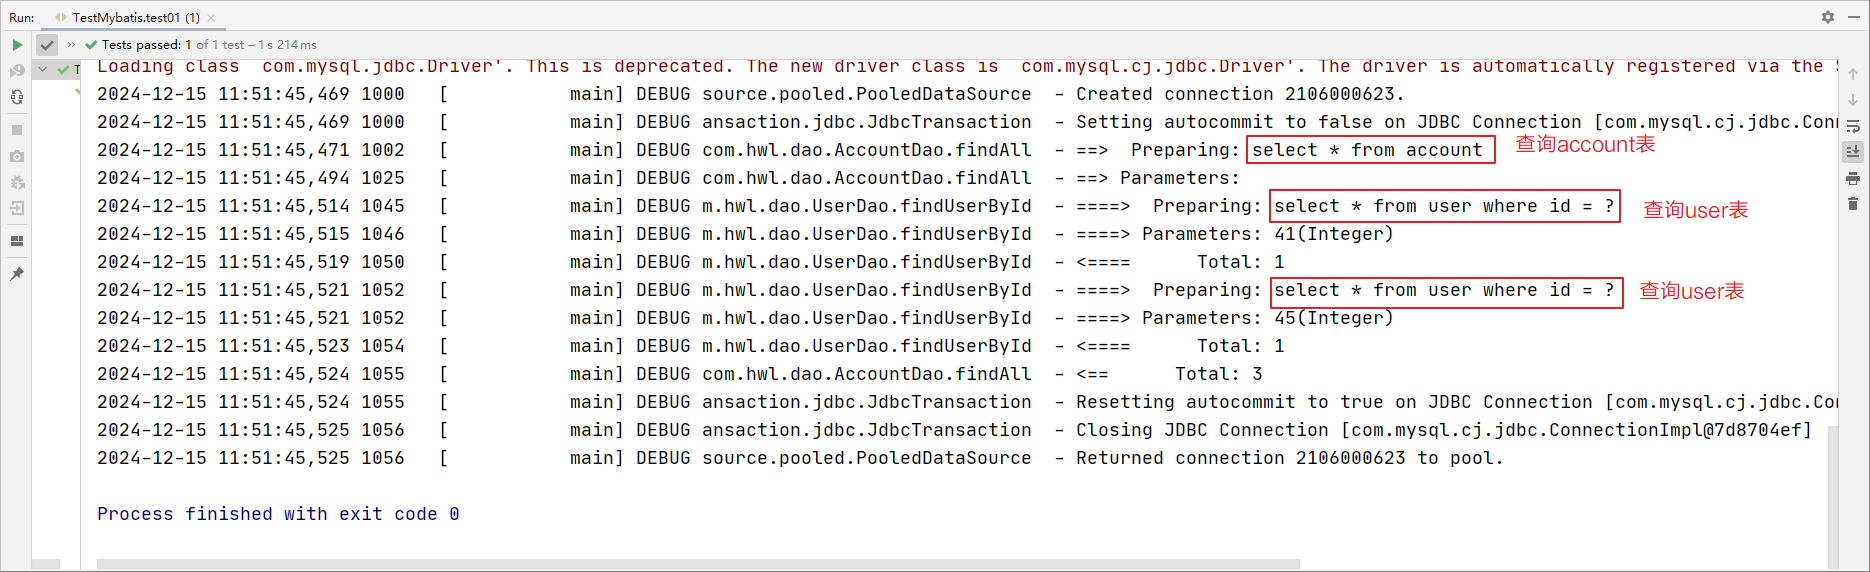
可见,没有出现延迟加载的效果
还需要配置下,两种方法
-
方法1:在 sqlMapConfig.xml 中文件中添加延迟加载的配置。
xml<settings> <setting name="lazyLoadingEnabled" value="true"/> <!--mybatis3.4.1版本后可以不写,默认为false。--> <setting name="aggressiveLazyLoading" value="false"/> </settings>再次运行:
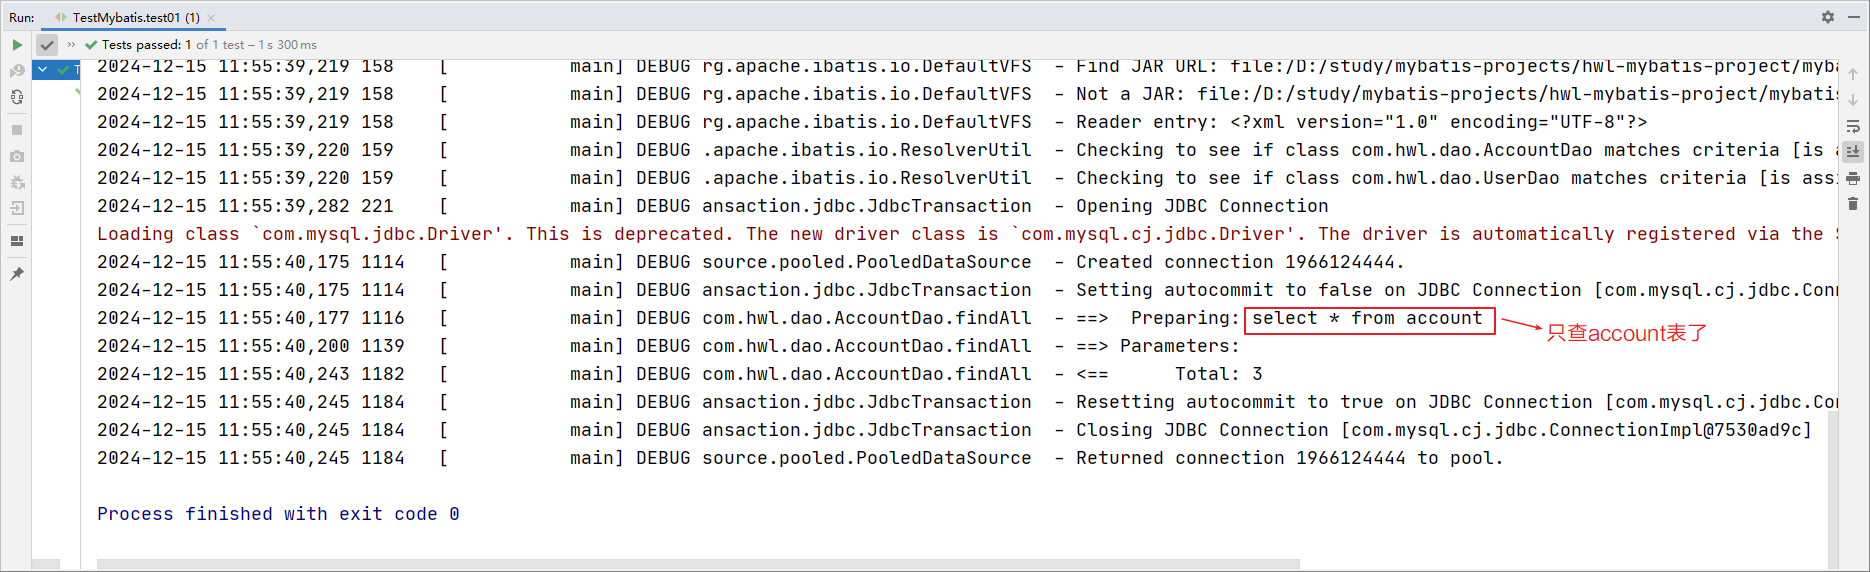
-
方法2:在AccountDao.xml 中的
association标签中添加属性fetchType="lazy"。xml<association property="user" column="uid" select="com.hwl.dao.UserDao.findUserById" fetchType="lazy"/>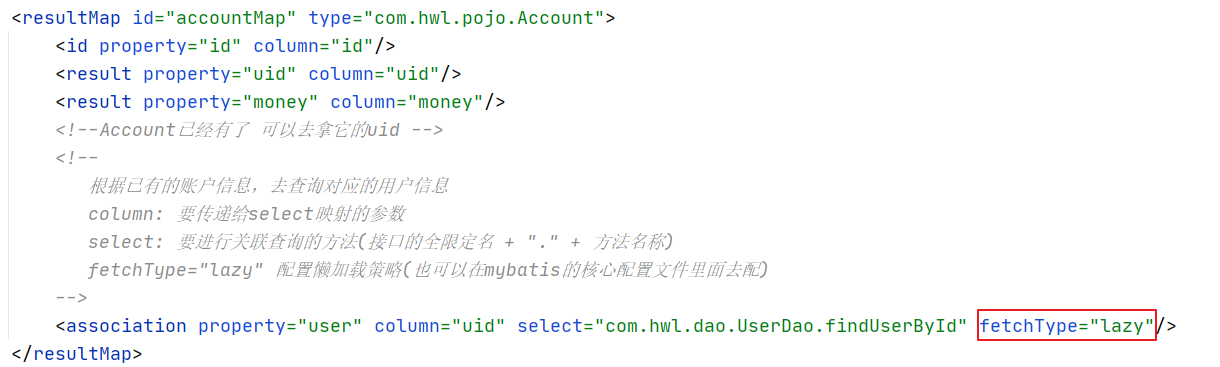
依然可以实现一对一(多对一)形式的懒加载。
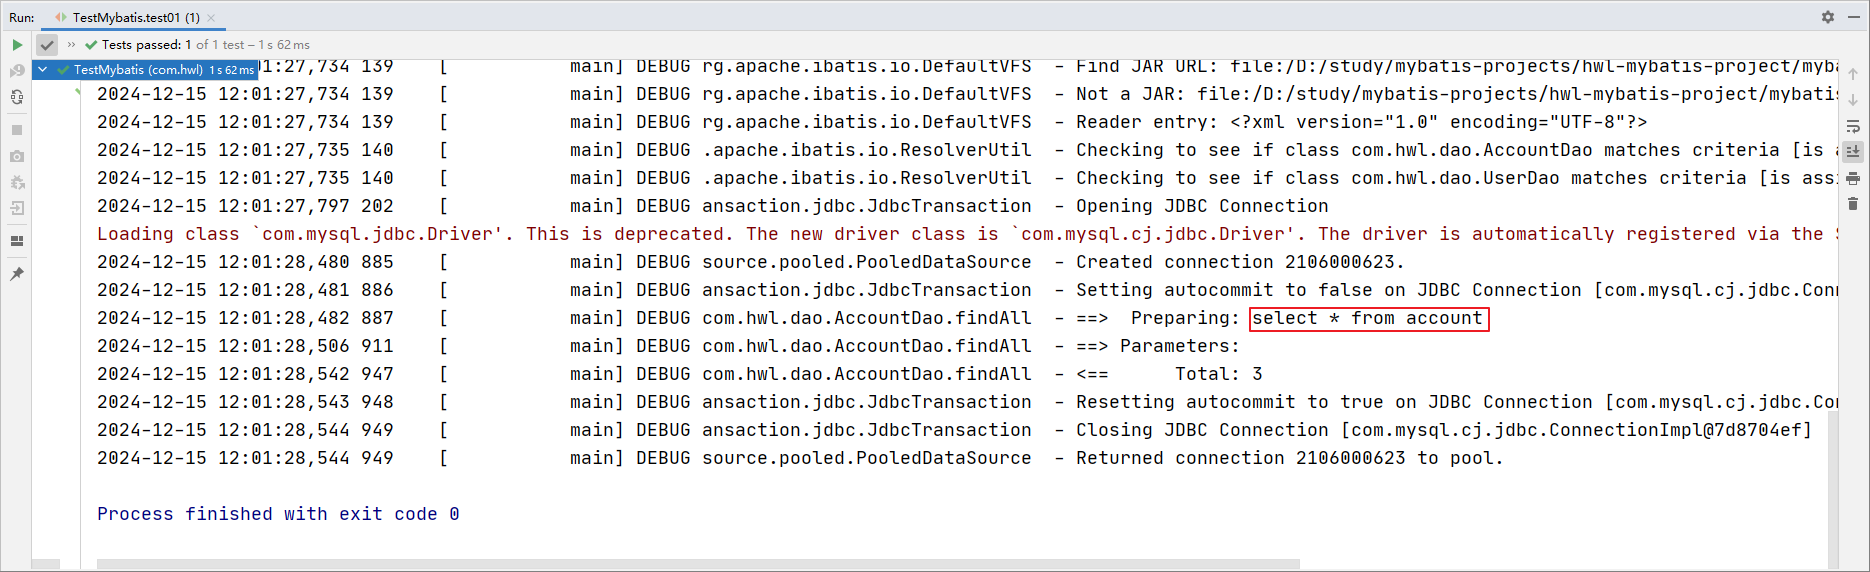
4.25-使用collection实现延迟加载
同样我们也可以在一对多关系配置的结点中配置延迟加载策略。 节点中也有select属性,column属性。
需求:
查询用户对象时,同时查询该用户所拥有的账户信息(一对多)。
java
public class User {
    private Integer id;
    private String username;
    private Date birthday;
    private String sex;
    private String address;

    private List<Account> accounts;

    //getter、setter、toString
}
java
public class Account {
    private Integer id;
    private Integer uid;
    private Double money;
    //getter、setter、toString
}
java
public interface UserDao {
    //查询用户信息及其对应的账户信息
    List<User> findAll();
}
java
public interface AccountDao {
    //根据用户id查询对应的账户信息
    List<Account> findAccountByUid(Integer id);
}
UserDao.xml:
xml
<?xml version="1.0" encoding="UTF-8"?>
<!DOCTYPE mapper
        PUBLIC "-//mybatis.org//DTD Mapper 3.0//EN"
        "http://mybatis.org/dtd/mybatis-3-mapper.dtd">
<mapper namespace="com.hwl.dao.UserDao">
    <resultMap id="userMap" type="com.hwl.pojo.User">
        <id property="id" column="id"/>
        <result property="username" column="username"/>
        <result property="birthday" column="birthday"/>
        <result property="sex" column="sex"/>
        <result property="address" column="address"/>
        <!--
            select:用户关联信息的查询接口方法
            column:进行select中方法查询需要携带的条件
        -->
        <collection property="accounts" column="id" select="com.hwl.dao.AccountDao.findAccountByUid" fetchType="lazy"/>
    </resultMap>
    <select id="findAll" resultMap="userMap">
        SELECT * from user
    </select>
</mapper>
AccountDao.xml:
xml
<?xml version="1.0" encoding="UTF-8"?>
<!DOCTYPE mapper
        PUBLIC "-//mybatis.org//DTD Mapper 3.0//EN"
        "http://mybatis.org/dtd/mybatis-3-mapper.dtd">
<mapper namespace="com.hwl.dao.AccountDao">
    <select id="findAccountByUid" parameterType="int" resultType="com.hwl.pojo.Account">
        select * from account where uid = #{id}
    </select>
</mapper>
java
@Test
public void test01(){
    List<User> userList = userDao.findAll();
}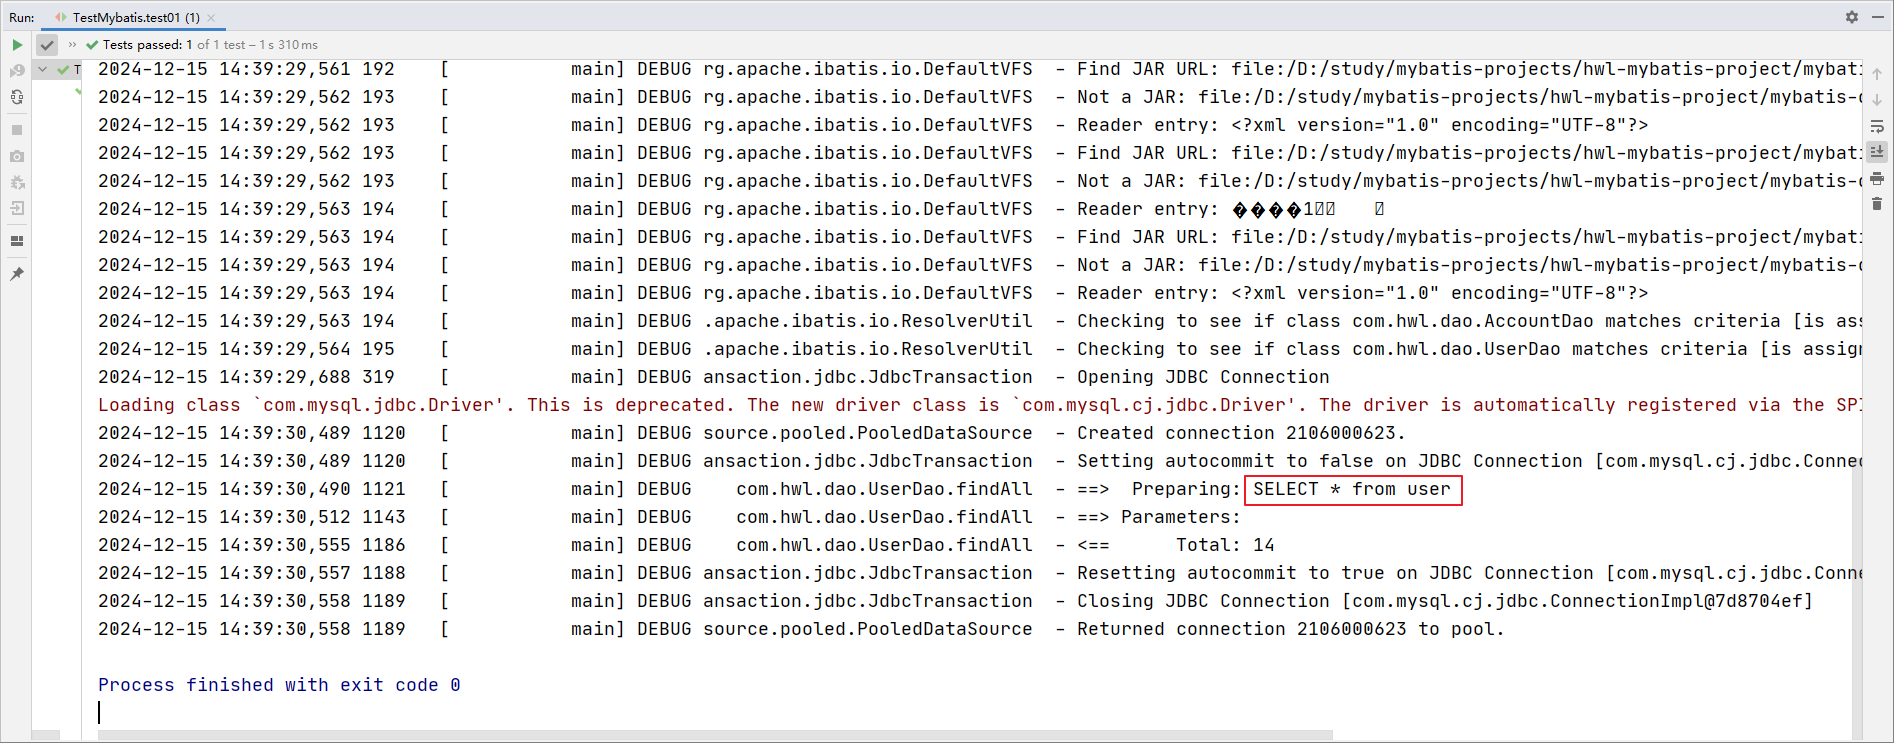
若把懒加载去掉:
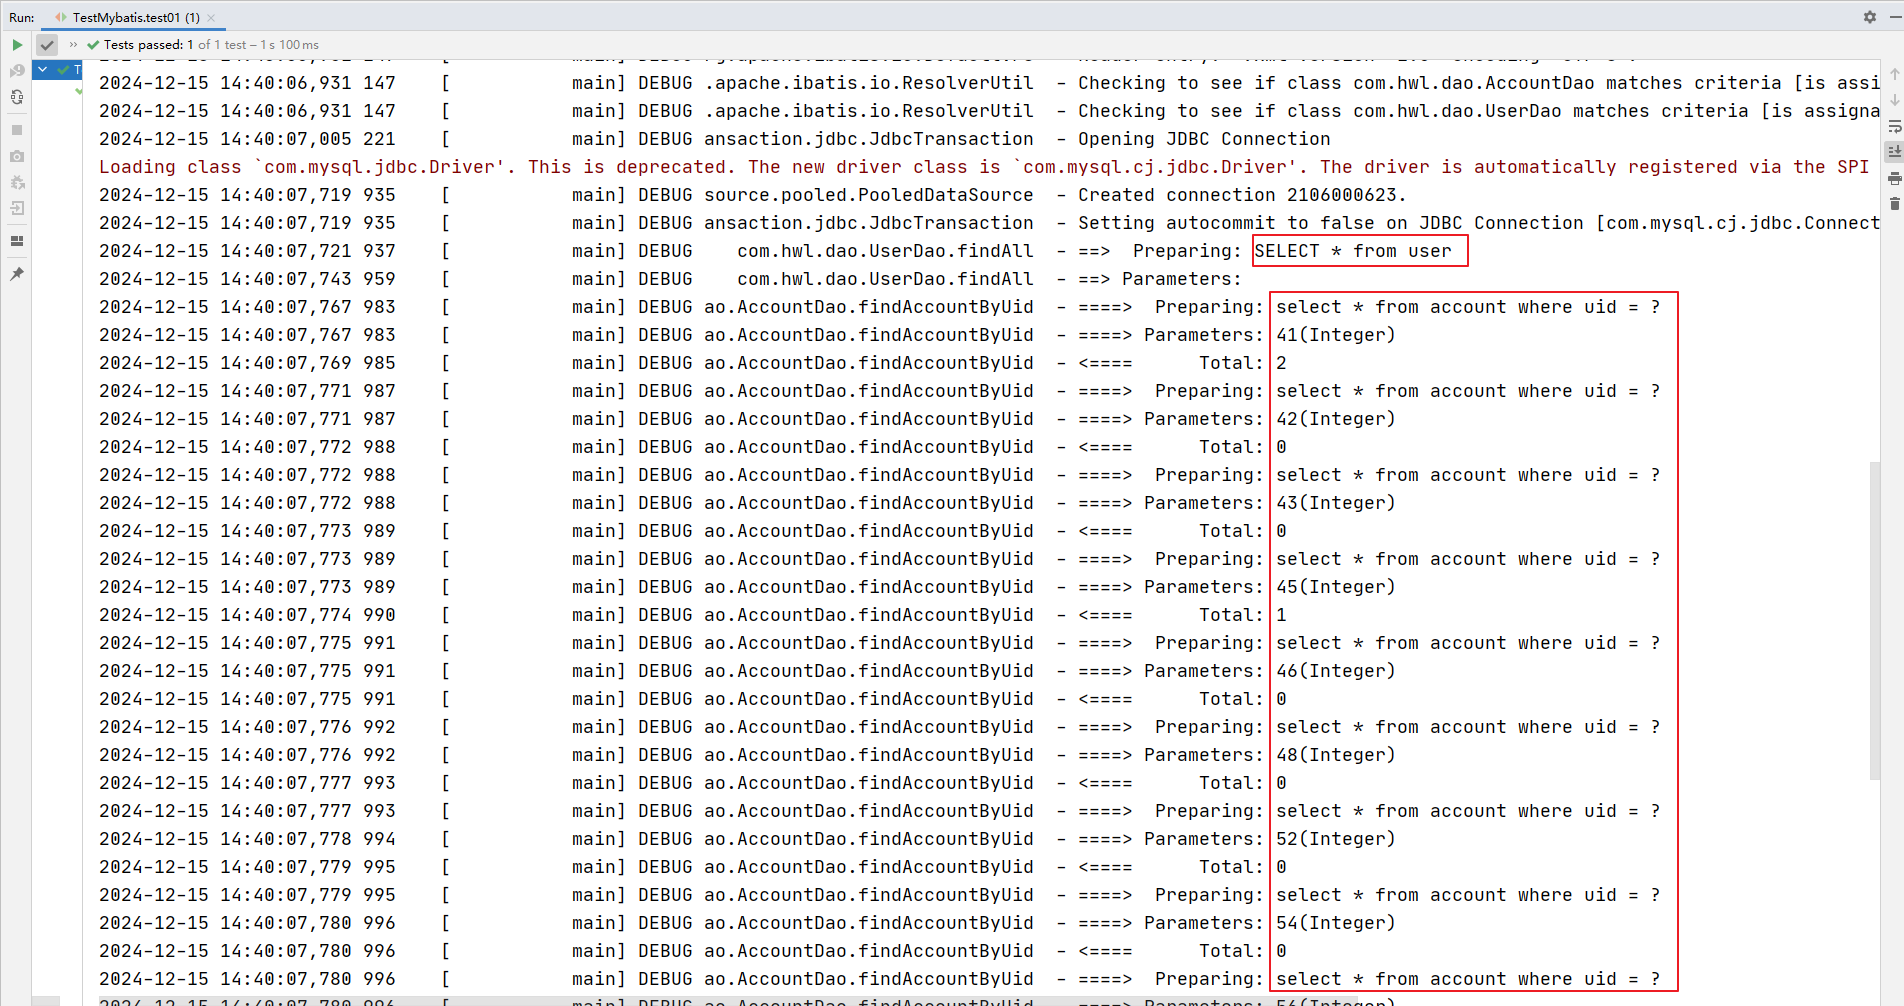
4.26-mybatis基于多对多延时加载
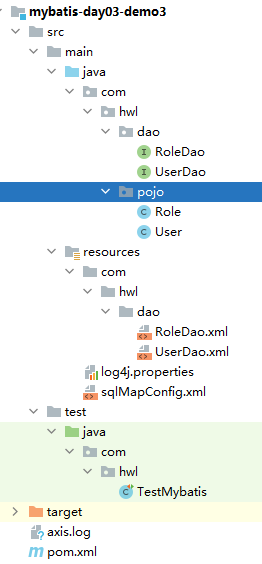
java
public class User {
    private Integer id;
    private String username;
    private Date birthday;
    private String sex;
    private String address;
    //一个用户可能有多个角色
    private List<Role> roles;

    //getter、setter、toString
}
java
public class Role {
    private Integer id;
    private String role_name;
    private String role_desc;

    //getter、setter、toString
}
UserDao:
java
public interface UserDao {
    //查询用户信息及其对应的角色信息
    List<User> findAll();
}
UserDao.xml:
xml
<?xml version="1.0" encoding="UTF-8"?>
<!DOCTYPE mapper
        PUBLIC "-//mybatis.org//DTD Mapper 3.0//EN"
        "http://mybatis.org/dtd/mybatis-3-mapper.dtd">
<mapper namespace="com.hwl.dao.UserDao">
    <resultMap id="userMap" type="com.hwl.pojo.User">
        <id  property="id" column="id"/>
        <result property="username" column="username"/>
        <result property="birthday" column="birthday"/>
        <result property="sex" column="sex"/>
        <result property="address" column="address"/>
        <collection property="roles" column="id" select="com.hwl.dao.RoleDao.findRoleByUId" fetchType="lazy"/>
    </resultMap>
    <select id="findAll" resultMap="userMap">
        select * from user
    </select>
</mapper>
RoleDao:
java
public interface RoleDao {
    List<Role> findRoleByUId(Integer id);
}
RoleDao.xml:
xml
<?xml version="1.0" encoding="UTF-8"?>
<!DOCTYPE mapper
        PUBLIC "-//mybatis.org//DTD Mapper 3.0//EN"
        "http://mybatis.org/dtd/mybatis-3-mapper.dtd">
<mapper namespace="com.hwl.dao.RoleDao">
    <!--根据用户id查询对应的角色信息-->
    <select id="findRoleByUId" parameterType="int" resultType="com.hwl.pojo.Role">
        select * from role where id in (
            select rid from user_role where uid = #{id})
    </select>
</mapper>
java
@Test
public void test01(){
    List<User> userList = userDao.findAll();
//        for (User user : userList) {
//            System.out.println(user);
//        }
}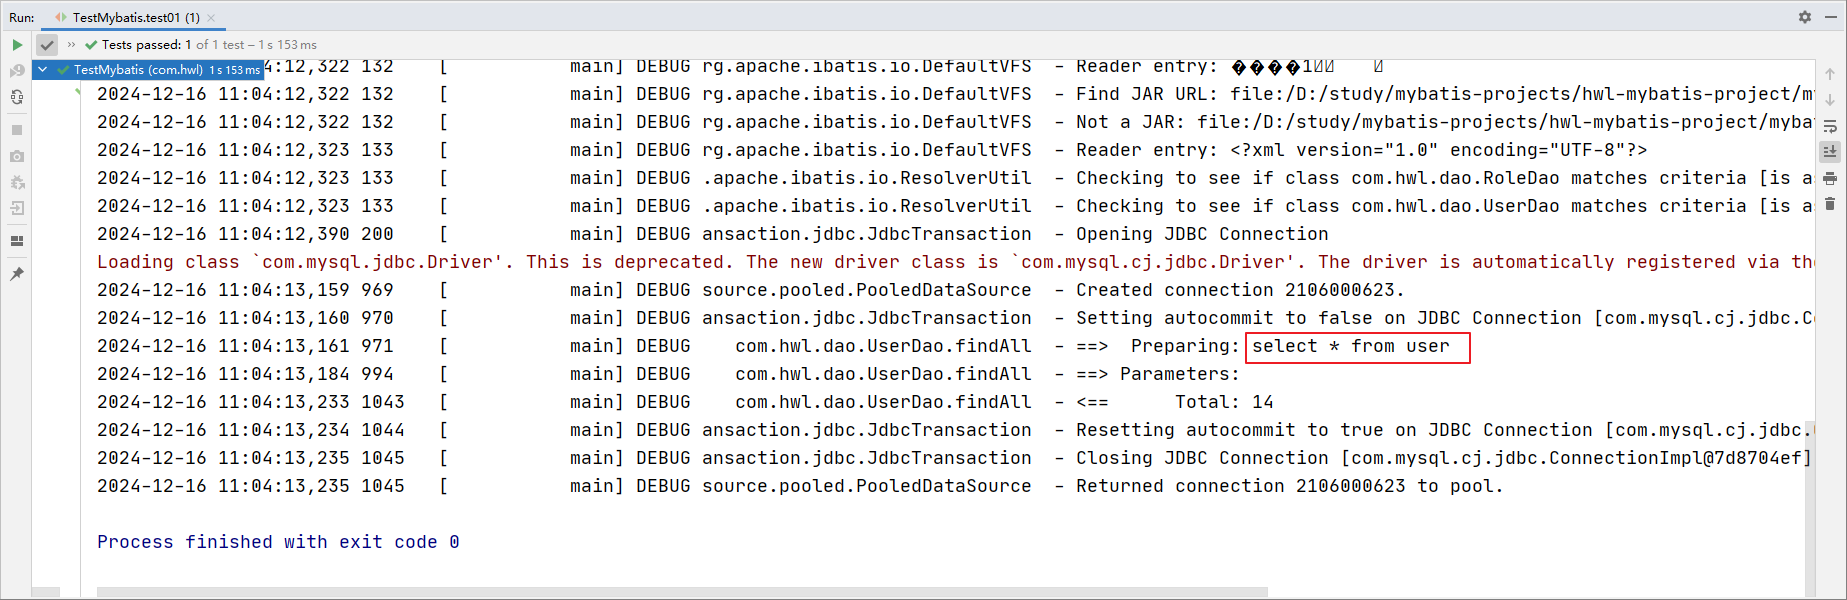
移除懒加载:
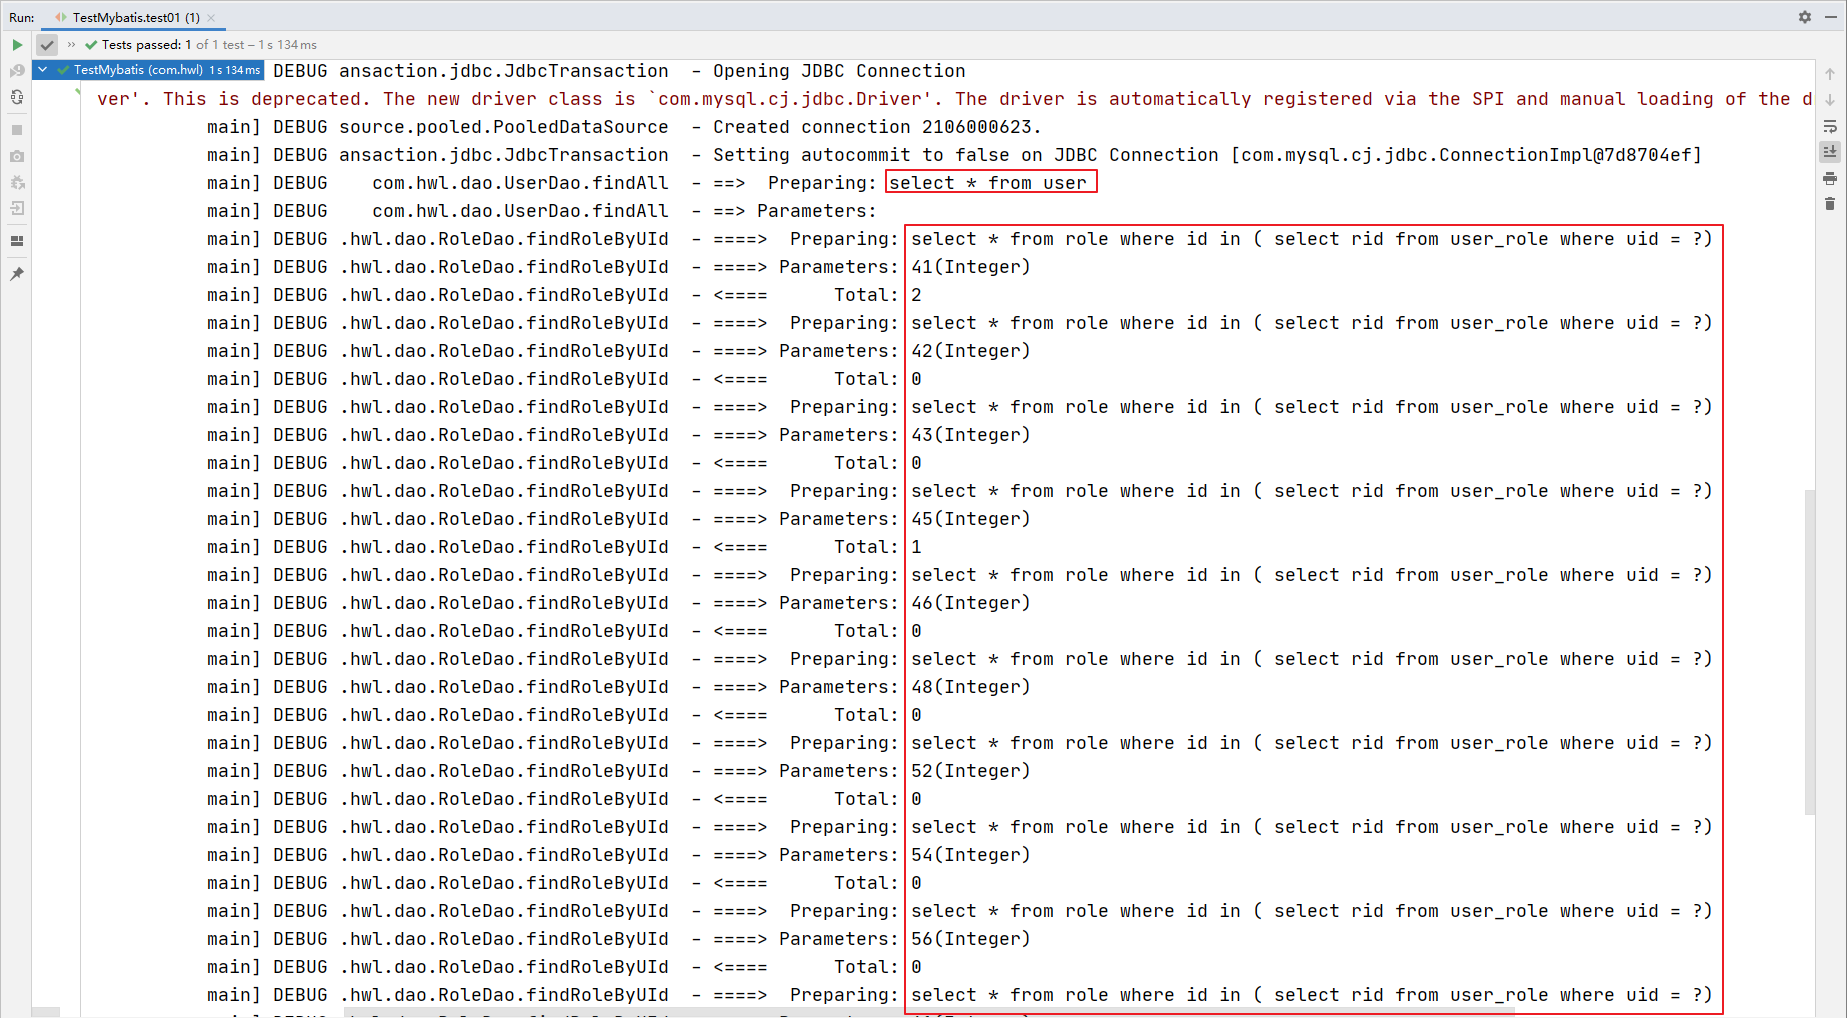
4.27-mybatis一级缓存
-
什么是缓存?
缓存就是存在内存中的数据
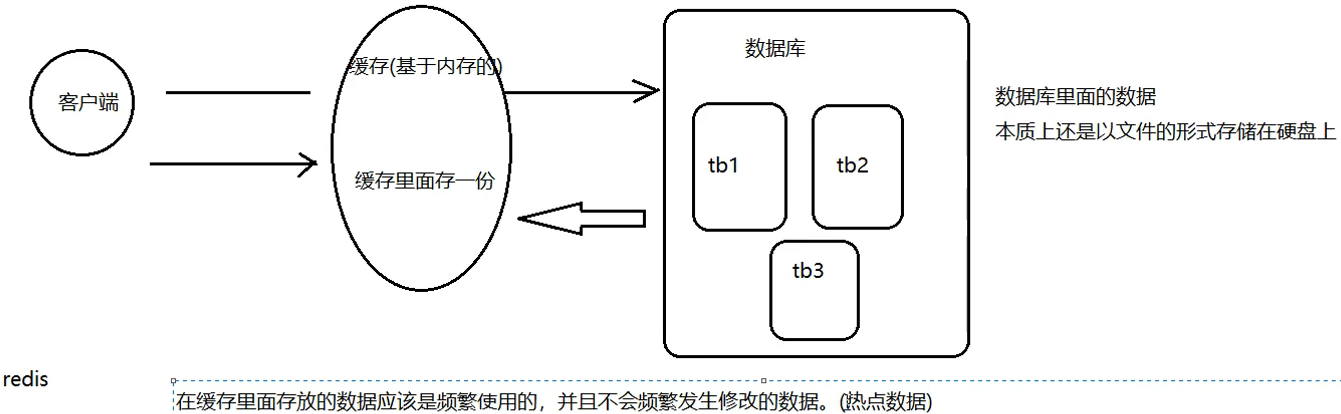
-
为什么使用缓存?
减少和数据库交互的次数,提高执行效率
-
什么样的数据能使用缓存,什么样的数据不适合使用缓存?
- 适用于缓存:经常查询,且不经常改变的数据;数据的正确与否对最终结果影响不大的
- 不适用于缓存:经常改变的,数据的正确与否对结果影响很大的。比如:商品的库存、银行的汇率、股市的股价等
-
MyBatis中的一级缓存和二级缓存:
-
一级缓存:它指的是 mybatis 中的 SqlSession 对象的缓存。当我们执行完查询之后,查询的结果会同时存在 SqlSession 为我们提供的一块区域中。该区域的结构是一个 Map。
当我们再次查询同样的数据,mybatis 会先去 SqlSession中查询是否有,有的话直接拿出来用。当 SqlSession 对象消失时,mybatis 的一级缓存也就消失了
-
二级缓存:它指的是 mybatis 中 SqlSessionFactory 对象的缓存,由同一个 SqlSessionFactory 对象创建的,SqlSession 共享其缓存
-
证明一级缓存的存在
一级缓存是 SqlSession 级别的缓存,只要 SqlSession 没有 flush(刷新)或 close,它就存在。
用以前写的代码举例:
java
@Test
public void test02() throws Exception {
    User user1 = userDao.findUserById(52);
    System.out.println("第1次查询:" + user1);
    User user2 = userDao.findUserById(52);
    System.out.println("第2次查询:" + user2);
    sqlSession.close();
}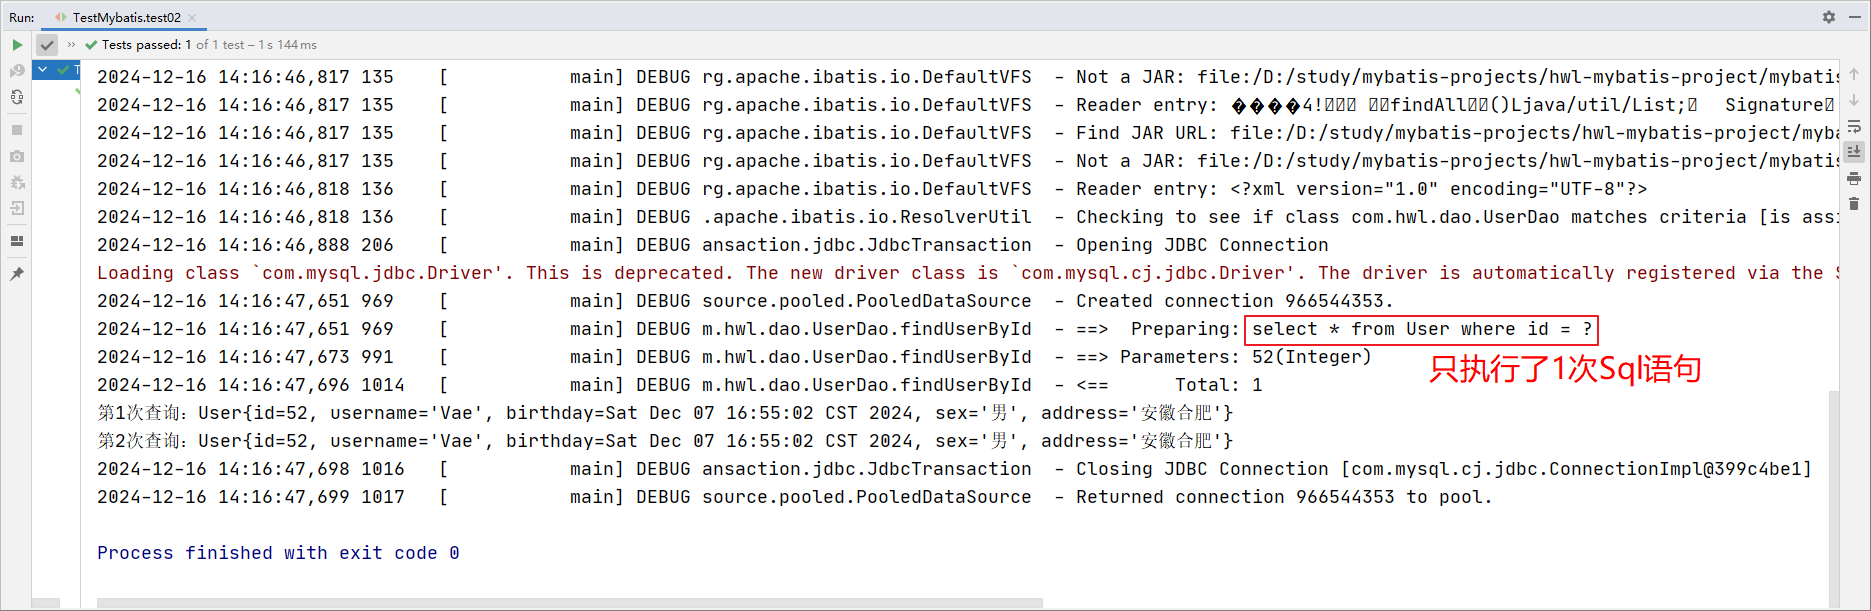
我们可以发现,虽然在上面的代码中我们查询了两次,但最后只执行了一次数据库操作,这就是 Mybatis 提供给我们的一级缓存在起作用了。因为一级缓存的存在,导致第二次查询 id 为 52 的记录时,并没有发出 sql 语句从数据库中查询数据,而是从一级缓存中查询。
测试清空缓存
java
@Test
public void testFindUserById() throws Exception{
    User user1 = userDao.findUserById(52);
    System.out.println("第1次查询:" + user1);
    sqlSession.close();
    //重新获取SqlSession对象
    SqlSession sqlSession = sessionFactory.openSession(true);
    userDao = sqlSession.getMapper(UserDao.class);
    User user2 = userDao.findUserById(52);
    System.out.println("第2次查询:" + user2);
    this.sqlSession.close();
}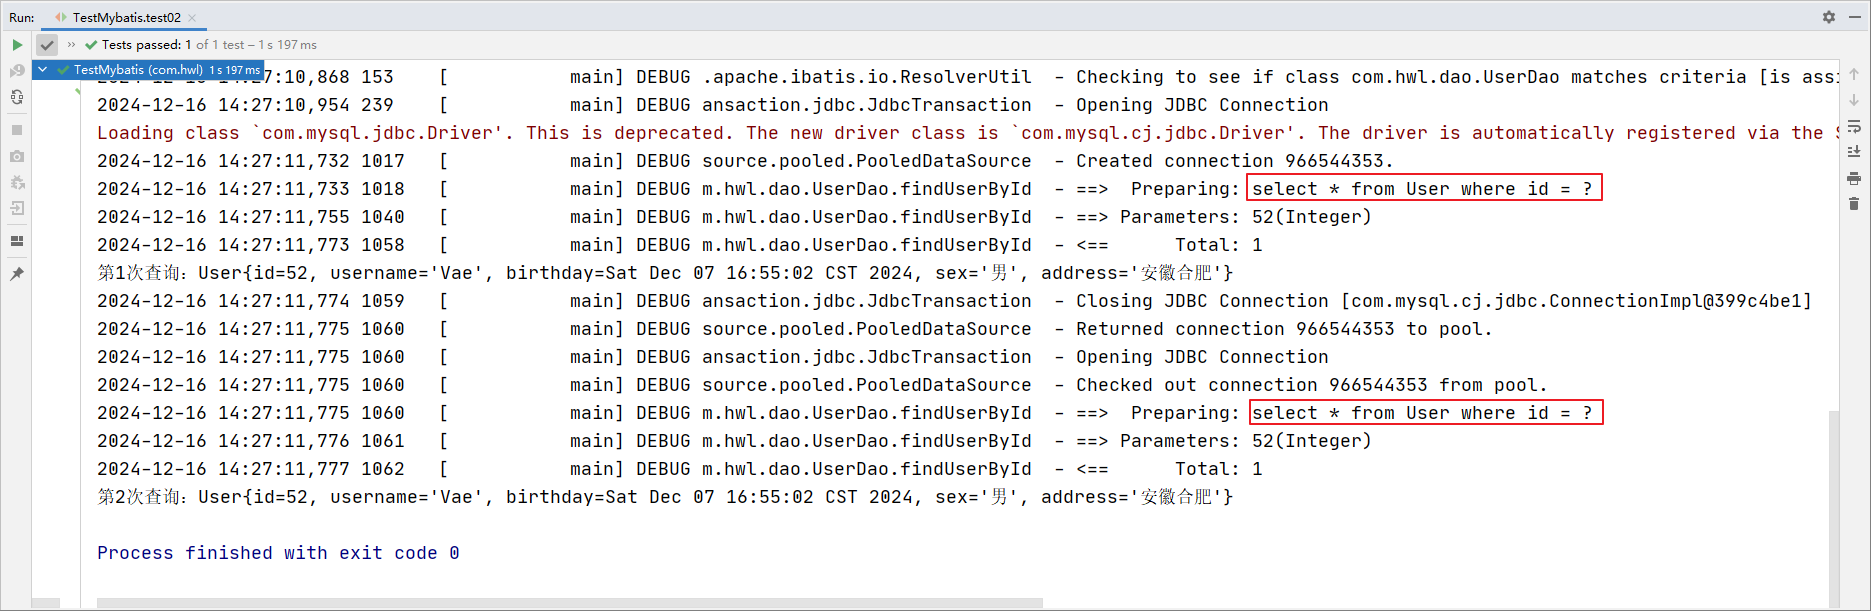
测试缓存同步
问题:如果数据库里面的数据发生变化,缓存里面的数据会同步更新吗?不会
java
@Test
public void testClearCache() throws Exception {
    SqlSession sqlSession = sessionFactory.openSession();
    UserDao userDao = sqlSession.getMapper(UserDao.class);
    //根据id查询用户
    User user1 = userDao.findUserById(52);
    System.out.println(user1);
    //更新用户信息
    user1.setUsername("许嵩");
    user1.setAddress("北京市海淀区");
    userDao.updateUser(user1);
    //再次查询id为52的用户
    User user2 = userDao.findUserById(52);
    System.out.println(user2);
    System.out.println(user1 == user2);
}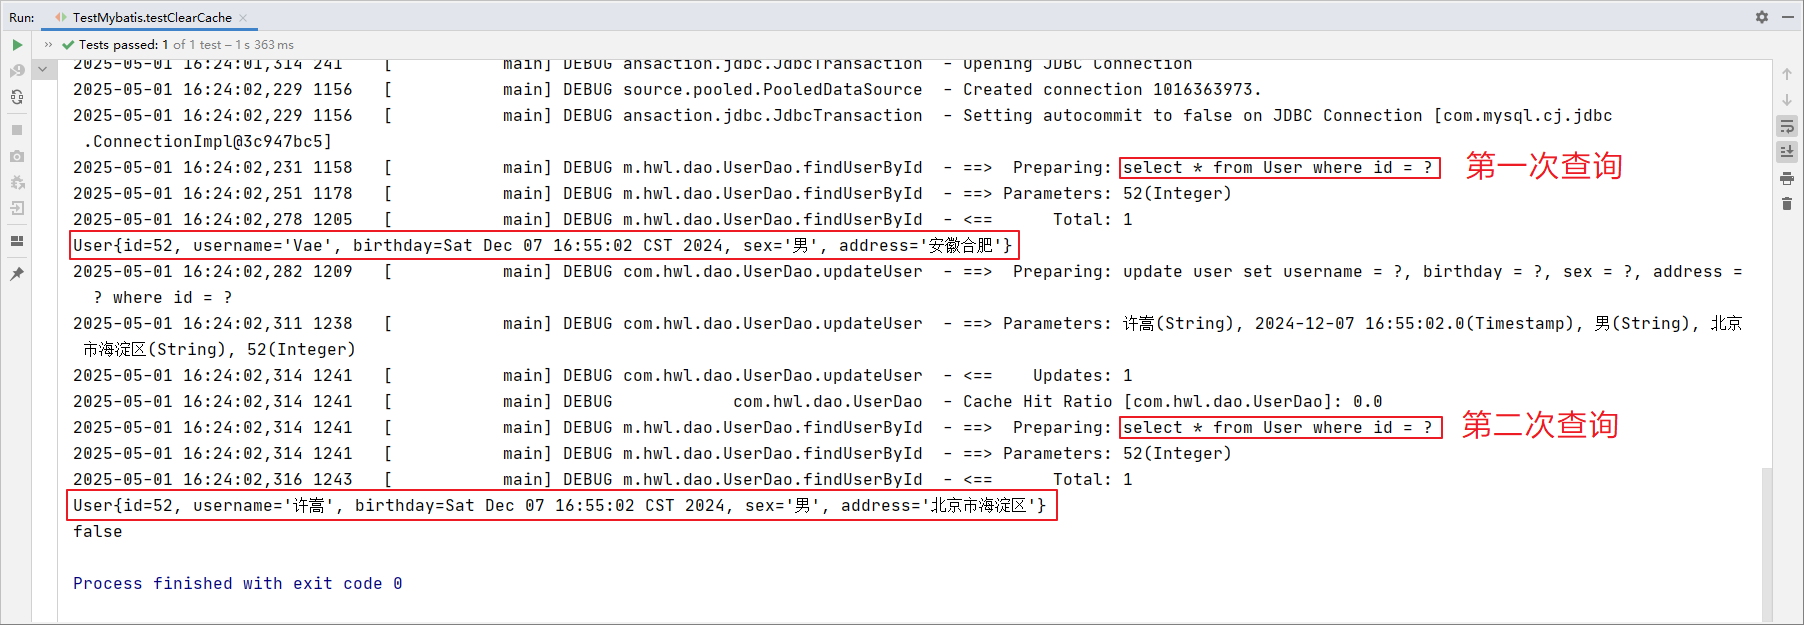
也就是说第二次获取数据,并没有从缓存里面获取,而是直接查询了数据库。
为什么?
当调用 SqlSession 的修改,添加,删除,commit(),close() 等方法时,就会清空一级缓存。
4.28-mybatis二级缓存
这一节了解下就可以了
二级缓存是 mapper 映射级别的缓存,多个 SqlSession 去操作同一个 Mapper 映射的 sql 语句,多个 SqlSession 可以共用二级缓存,二级缓存是跨 SqlSession的。
二级缓存结构图:
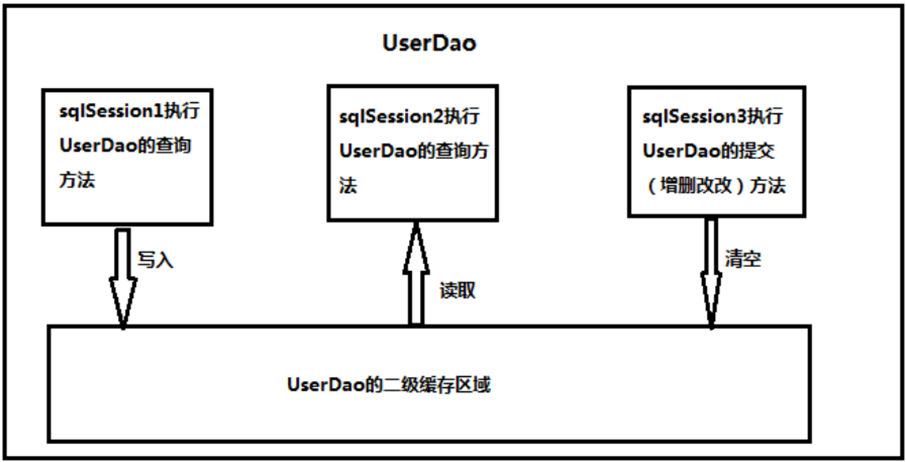
解读:
第一次调用 mapper 下的SQL去查询用户信息。查询到的信息会存到该 mapper 对应的二级缓存区域内。
第二次调用相同 namespace 下的 mapper 映射文件中相同的 SQL 去查询用户信息。会去对应的二级缓存内取结果。
如果调用相同 namespace 下的 mapper 映射文件中的增删改SQL,并执行了commit 操作。此时会清空该 namespace 下的二级缓存。
测试二级缓存
-
第一步 在 sqlMapConfig.xml 文件开启二级缓存:
xml<!--开启二级缓存的支持--> <settings> <setting name="cacheEnabled" value="true"/> </settings>因为
cacheEnabled的取值默认就为true,所以这一步可以省略不配置。为true代表开启二级缓存;为false代表不开启二级缓存。 -
第二步 配置相关的 Mapper 映射文件
xml<cache> </cache>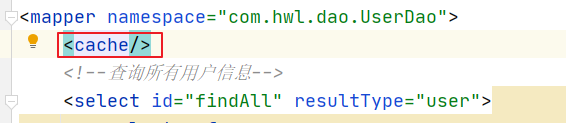
-
第三步 配置
statement上面的useCache属性
-
测试二级缓存
java@Test public void test02() throws Exception { SqlSession sqlSession1 = sessionFactory.openSession(); UserDao dao1 = sqlSession1.getMapper(UserDao.class); User user1 = dao1.findUserById(52); System.out.println(user1); sqlSession1.close(); // 一级缓存消失 SqlSession sqlSession2 = sessionFactory.openSession(); UserDao dao2 = sqlSession2.getMapper(UserDao.class); User user2 = dao2.findUserById(52); System.out.println(user2); sqlSession2.close(); // 一级缓存消失 猜测会再次查询数据库 System.out.println(user1 == user2); }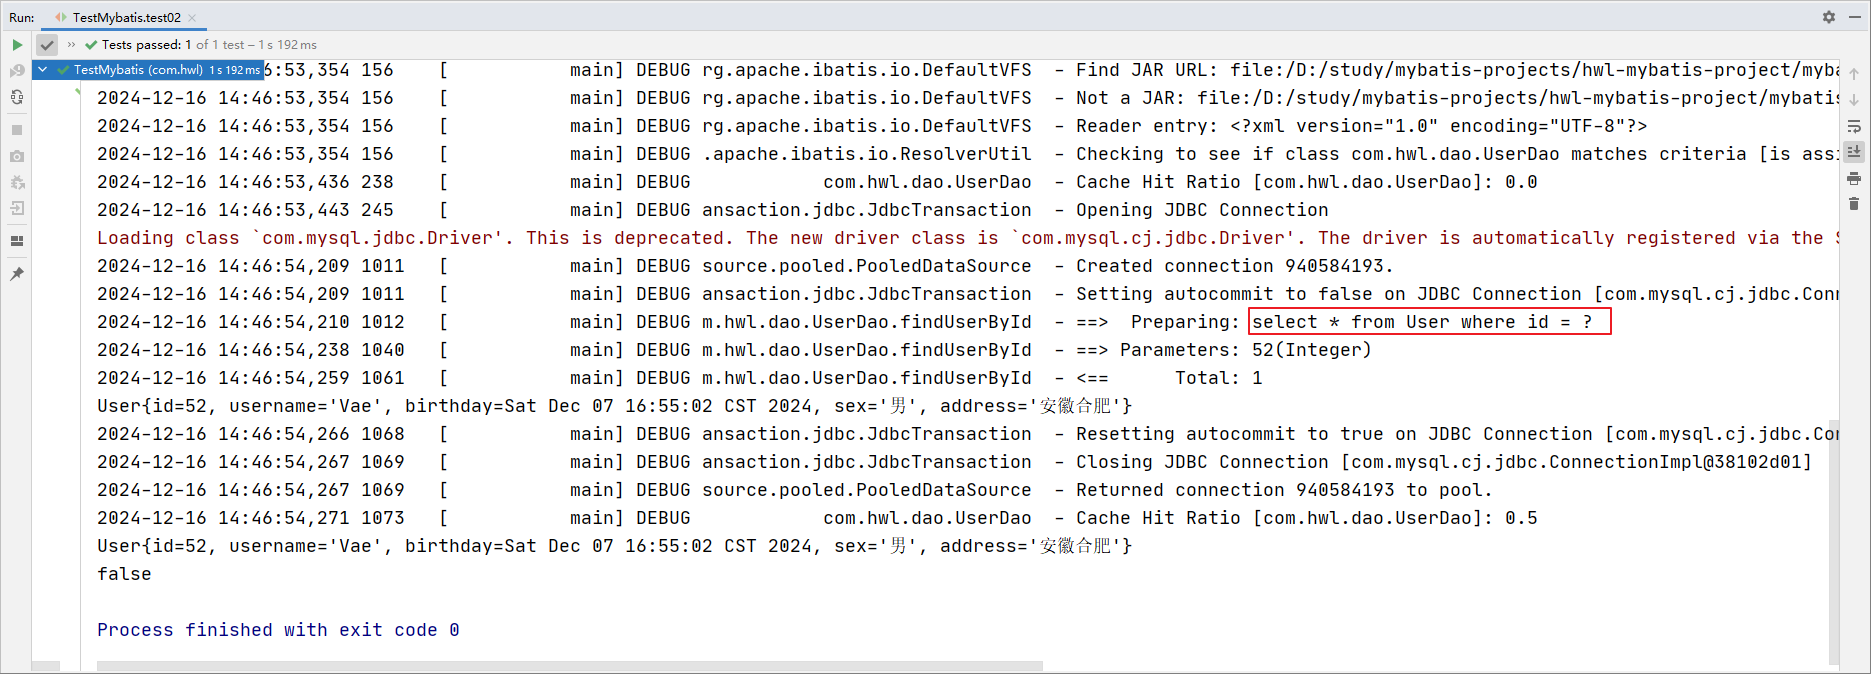
经过上面的测试,我们发现执行了 2 次查询,并且在执行第一次查询后,我们关闭了一级缓存,再去执行第二次查询时,我们发现并没有对数据库发出 sql 语句 ,所以此时的数据就只能是来自于我们所说的二级缓存。
注意:
当我们在使用二级缓存时,所缓存的类一定要实现 java.io.Serializable 接口,这种就可以使用序列化方式来保存对象。
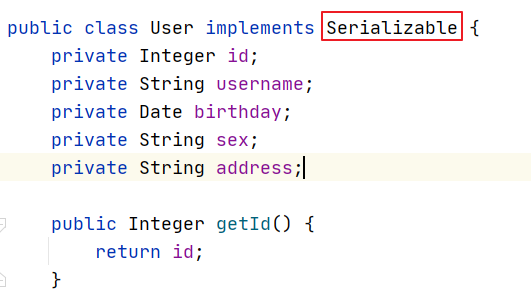
总结:
- 先查询二级缓存,因为二级缓存中可能会有其他程序已经查出来的数据,可以拿来直接使用
- 如果二级缓存没有命中,再查询一级缓存
- 如果一级缓存也没有命中,则查询数据库
- SqlSession 关闭之后,一级缓存中的数据会写入二级缓存
4.29-mybatis注解开发之基本crud操作
这几年来注解开发越来越流行,Mybatis 也可以使用注解开发方式,这样我们就可以减少编写 Mapper 映射文件了。本次我们先围绕一些基本的 CRUD 来学习,再学习复杂映射关系。
Mybatis 的常用注解说明:
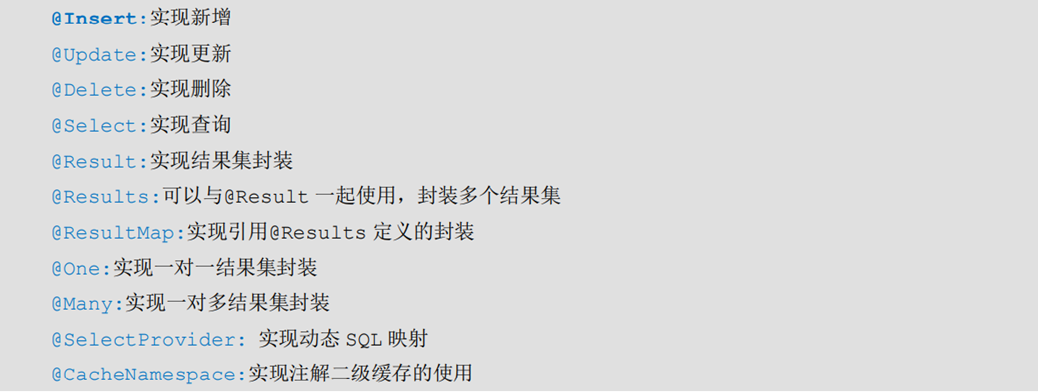
数据库的数据
user 表:
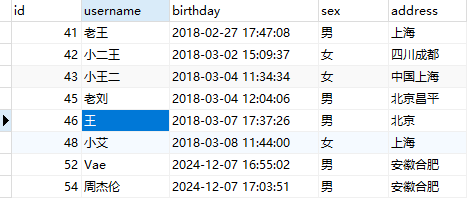
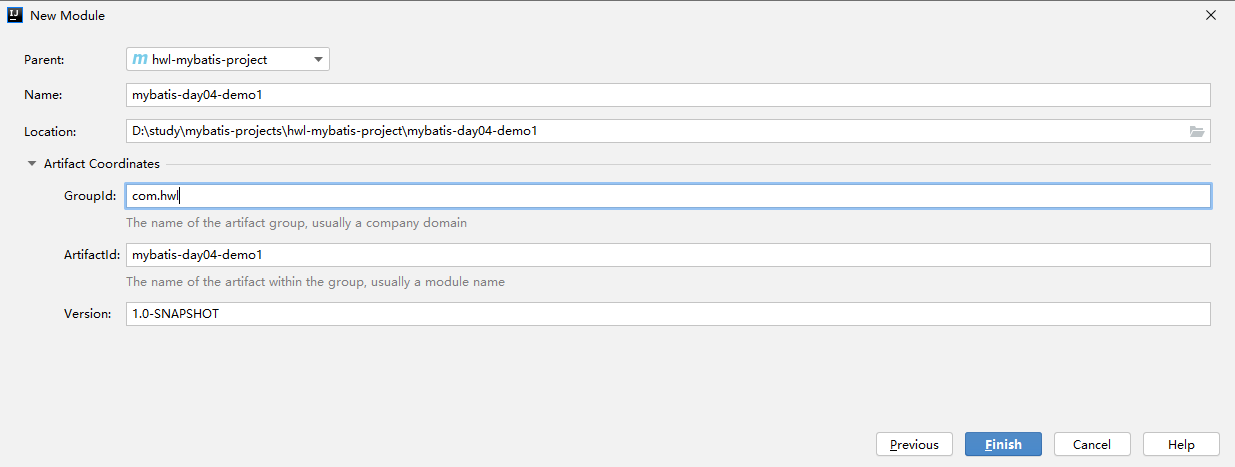
既然要通过注解的方式实现,就不再去写 xml 文件了
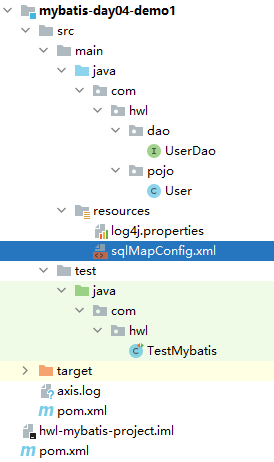
查询全部
java
public interface UserDao {
    //查询所有用户的信息
    @Select("select * from user")
    List<User> findAll();
}
Java
@Test
public void test01() throws Exception {
    List<User> userList = userDao.findAll();
    for (User user : userList) {
        System.out.println(user);
    }
}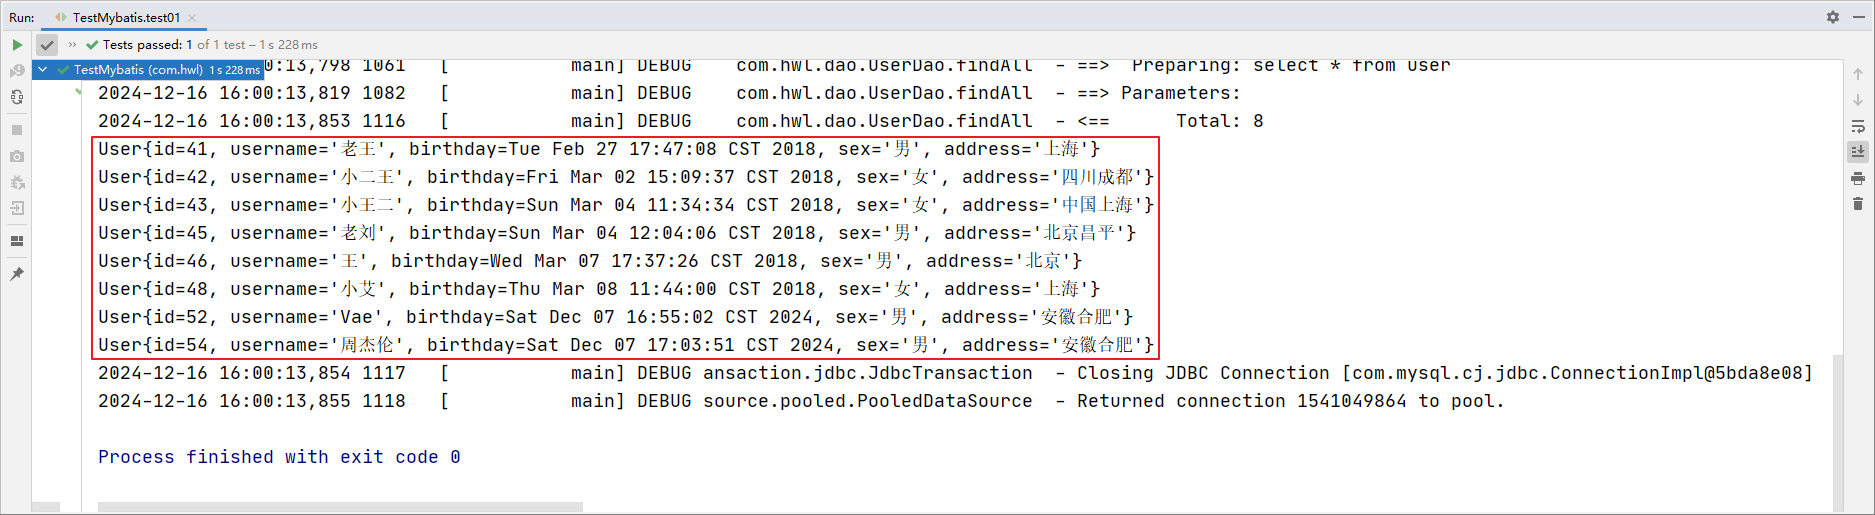
按照id查询
java
@Select("select *  from user where id = #{id}")
User findUserById(Integer id);
java
@Test
public void test02() throws Exception {
    User user = userDao.findUserById(52);
    System.out.println(user);
}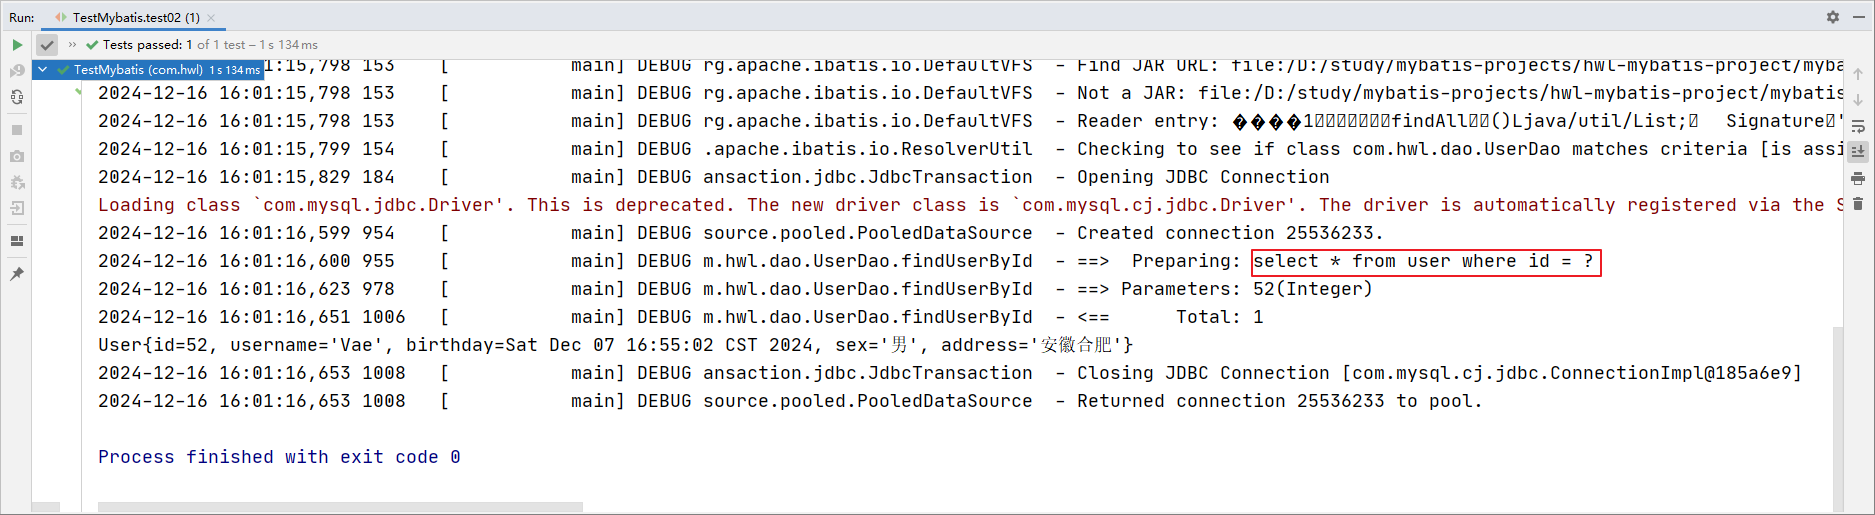
新增
java
@Insert("insert into user(username, birthday, sex, address) values(#{username} ,#{birthday} ,#{sex} ,#{address})")
void addUser(User user);
java
@Test
public void test03() throws Exception {
    User user = new User();
    user.setUsername("王宝强");
    user.setSex("男");
    user.setBirthday(new Date());
    user.setAddress("河北");
    userDao.addUser(user);
}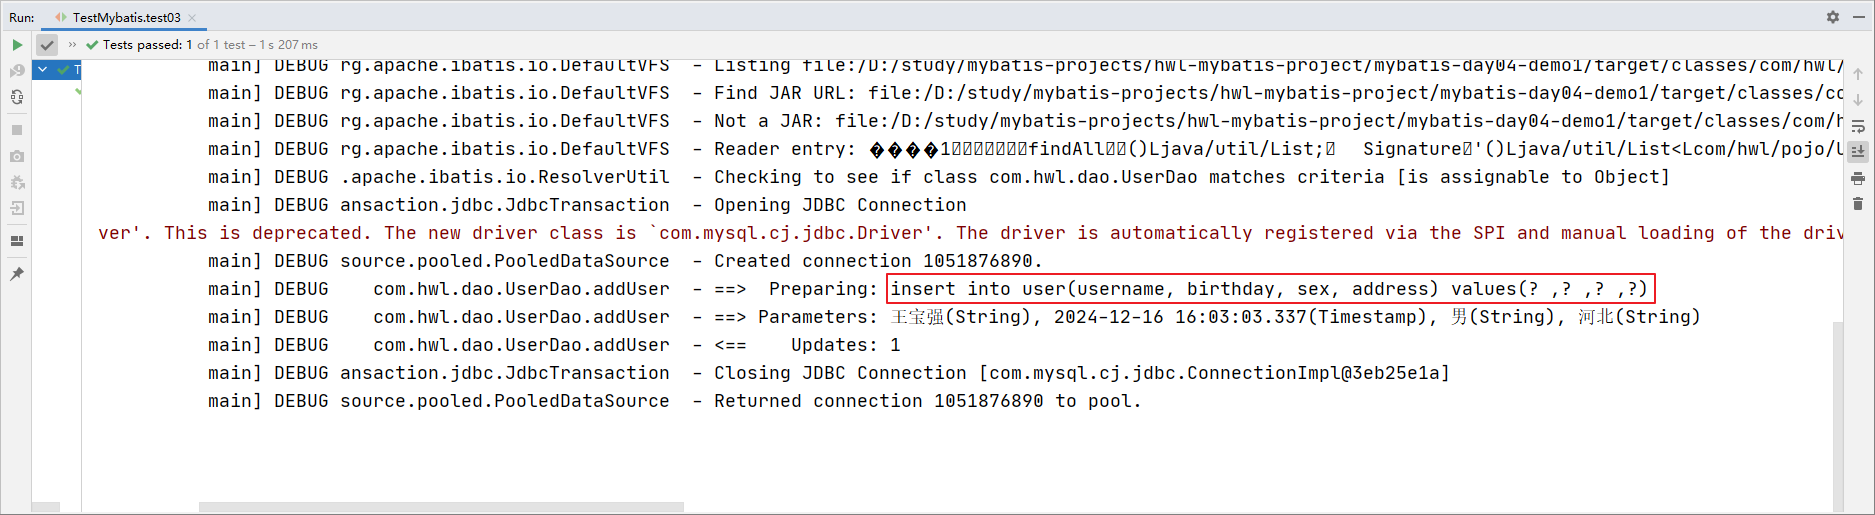
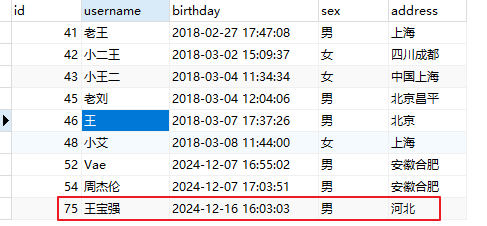
若要获得新增数据的主键呢?
java
/**
 * @param user
 * @SelectKey 注解 用来描述新增之后主键字段回显。
 * keyProperty 主键对应的实体字段的名称
 * keyColumn 主键字段的名称
 * resultType: 主键的数据类型
 * before: 生成主键的时机 false 在新增之后,生成主键
 * statement: 查询主键的sql
 */
@Insert("insert into user(username,birthday,sex,address) values(#{username},#{birthday},#{sex},#{address})")
@SelectKey(keyProperty = "id", keyColumn = "id", resultType = Integer.class, before = false, statement = {"select last_insert_id()"})
public void addUser(User user);
java
@Test
public void test04() throws Exception{
    User user = new User();
    user.setUsername("张信哲");
    user.setSex("男");
    user.setBirthday(new Date());
    user.setAddress("中国");
    userDao.addUser(user);
    System.out.println("新增的主键是:" + user.getId());
}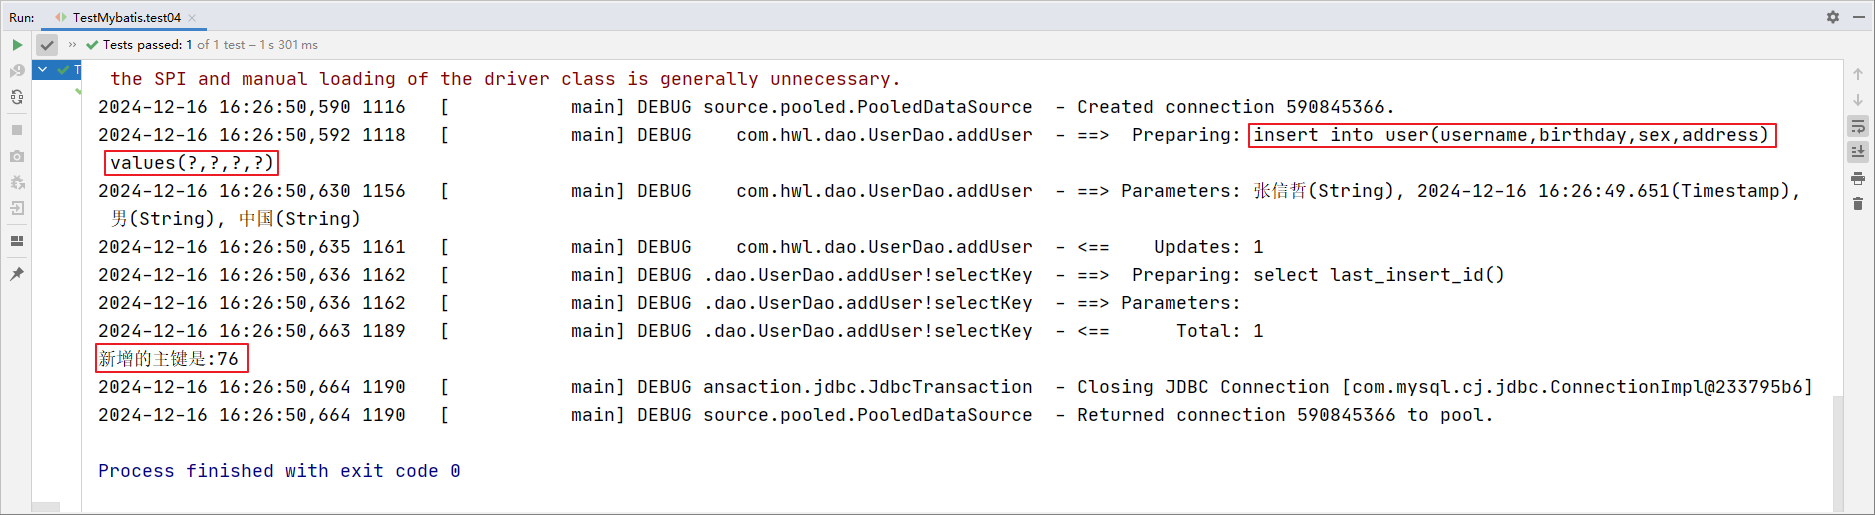
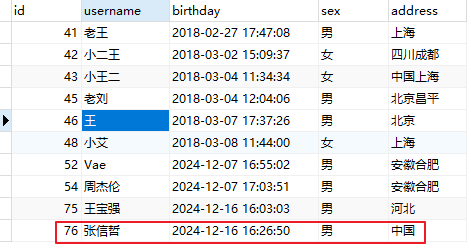
修改
java
@Update("update user set username = #{username},birthday = #{birthday},sex = #{sex},address = #{address} where id = #{id}")
public void updateUser(User user);
java
@Test
public void test05() throws Exception{
    User user = new User();
    user.setId(76);
    user.setUsername("李连杰");
    user.setSex("男");
    user.setBirthday(new Date());
    user.setAddress("美国");
    userDao.updateUser(user);
}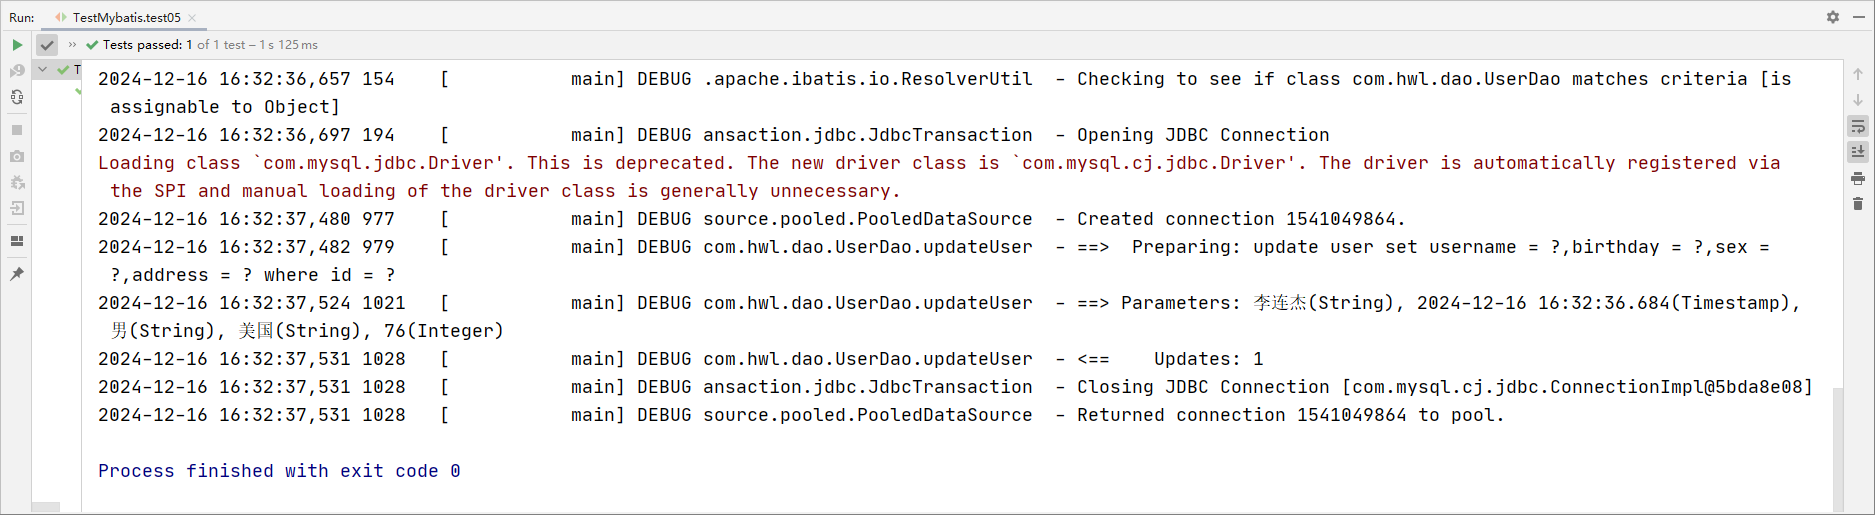
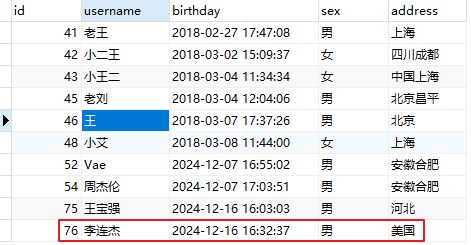
删除
java
@Delete("delete from user where id = #{id}")
void deleteUserById(Integer id);
java
@Test
public void test06() throws Exception{
    userDao.deleteUserById(76);
}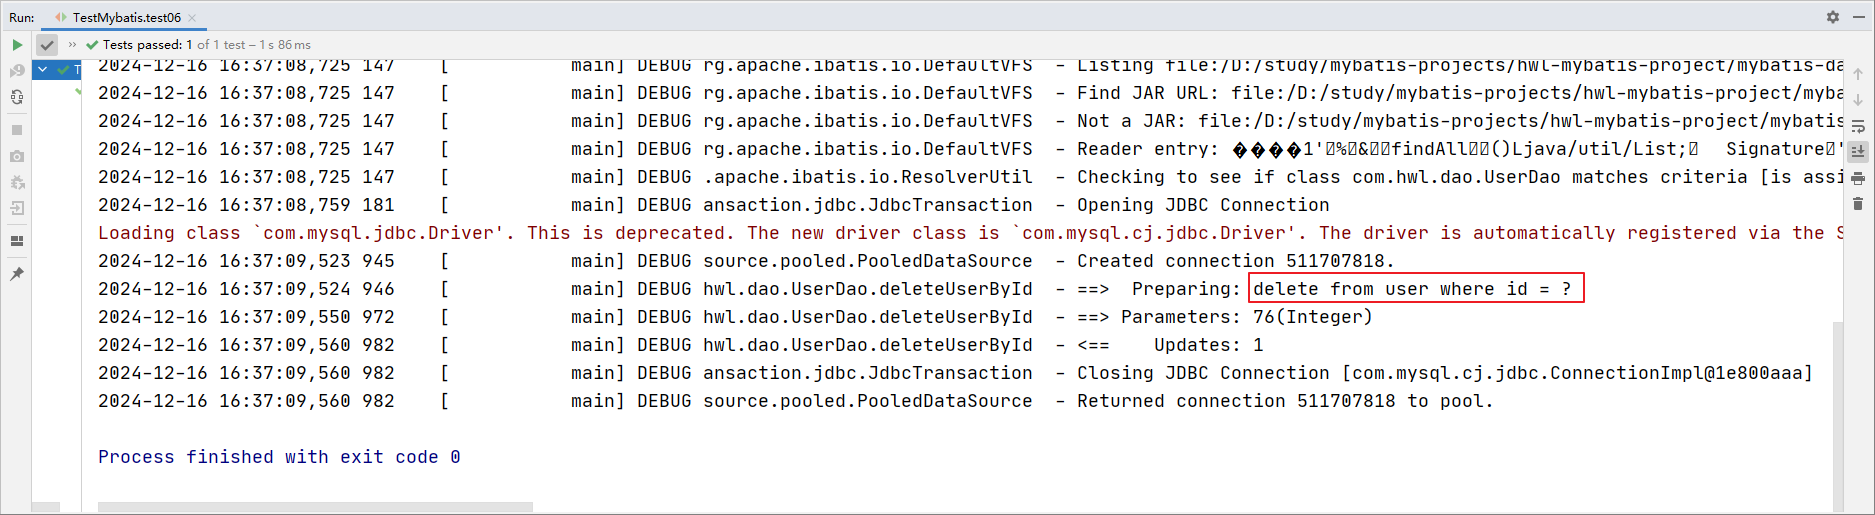
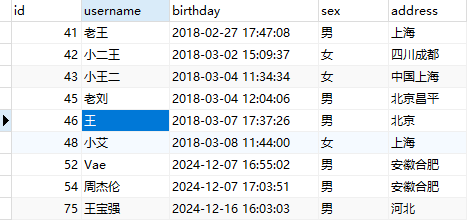
聚合统计
java
@Select("select count(*) from user")
Integer getCount();
java
@Test
public void test07() throws Exception{
    System.out.println(userDao.getCount());
}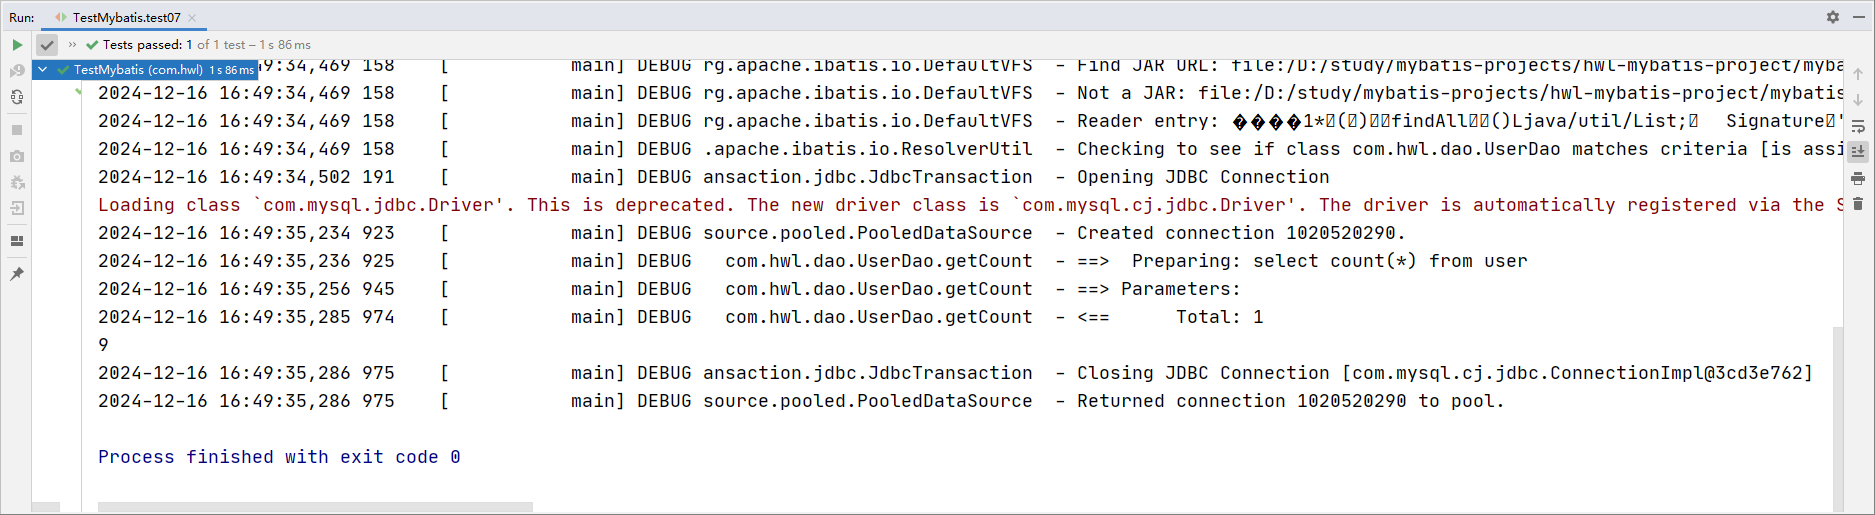
4.30-mybatis注解开发解决前后字段不一致的问题
实现复杂关系映射之前我们可以在映射文件中通过配置来实现,在使用注解开发时我们需要借助:@Results 注解,@Result 注解,@One 注解,@Many 注解。
java
public class User {
    // 故意把属性名称设置为与数据库表的名称不一样
    private Integer userId;
    private String userName;
    private Date userBirthday;
    private String userSex;
    private String userAddress;
	// getter、setter、tostring
}
java
/**
 * 基于前后字段不一致的情形
 * @return
 */
@Results(id = "userMap", value = {
        @Result(id = true, property = "userId", column = "id"),
        @Result(property = "userName", column = "username"),
        @Result(property = "userBirthday", column = "birthday"),
        @Result(property = "userSex", column = "sex"),
        @Result(property = "userAddress", column = "address")
})
@Select("select * from user")
List<User> findAll();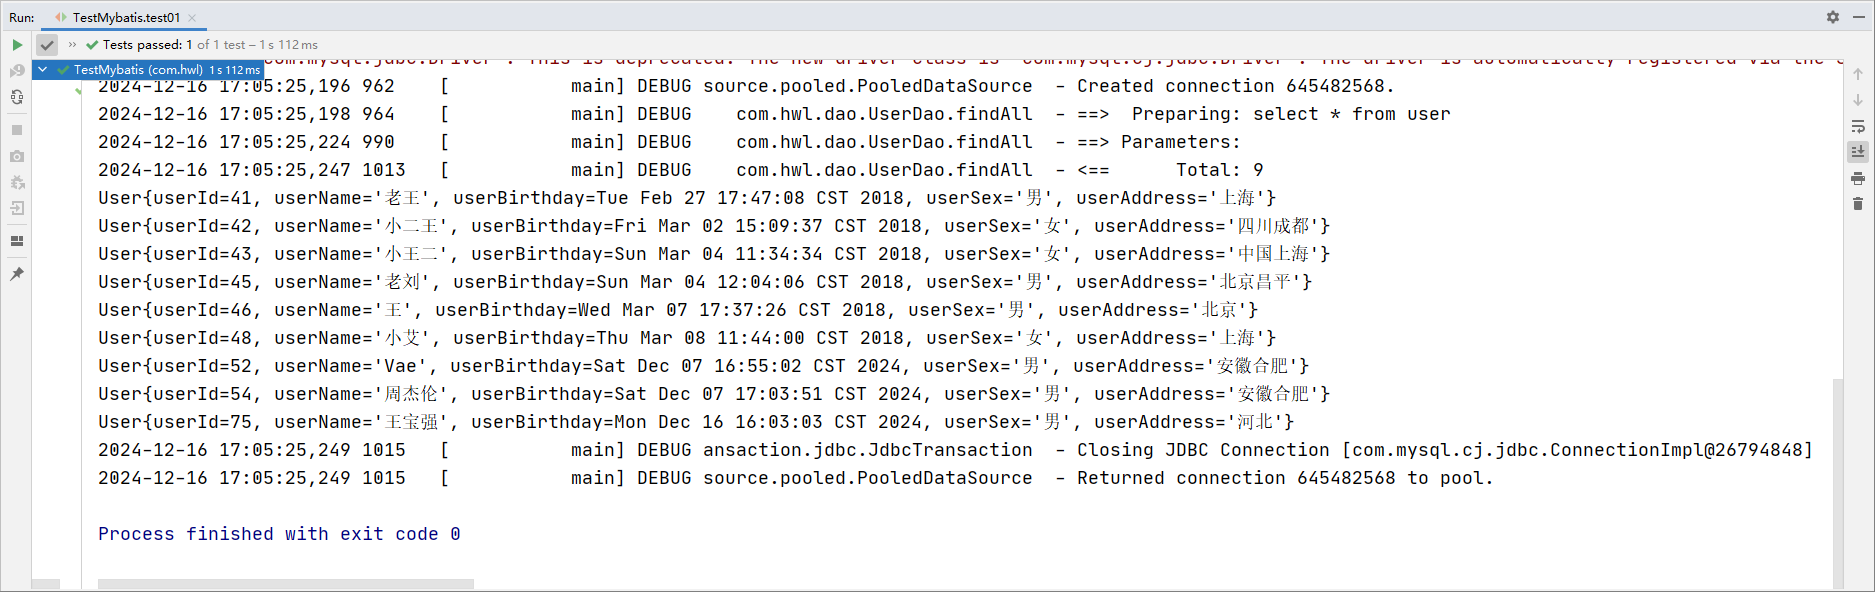
@Results定义了,也可以复用
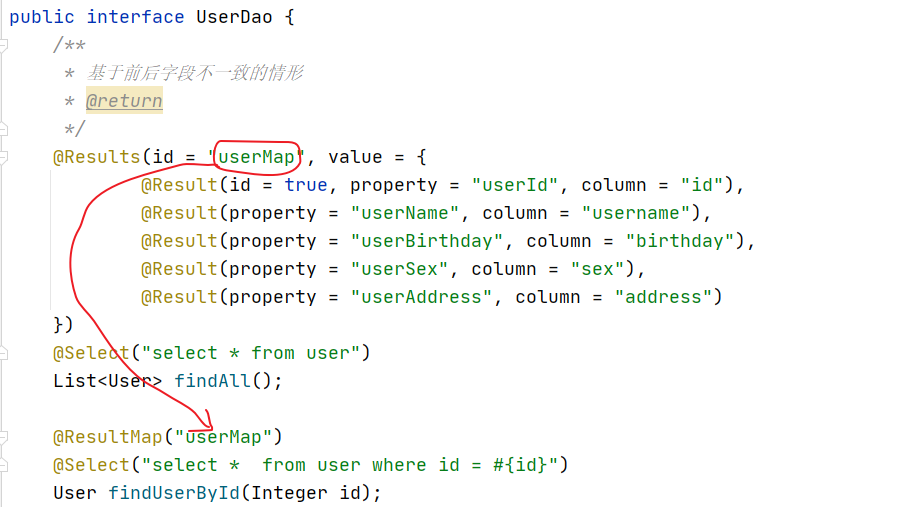
比如要根据 id 查询:
java
@ResultMap("userMap")
@Select("select * from user where id = #{id}")
User findUserById(Integer id);
java
@Test
public void test02() throws Exception {
    User user = userDao.findUserById(52);
    System.out.println(user);
}
4.31-mybatis注解开发之1对1关联查询操作
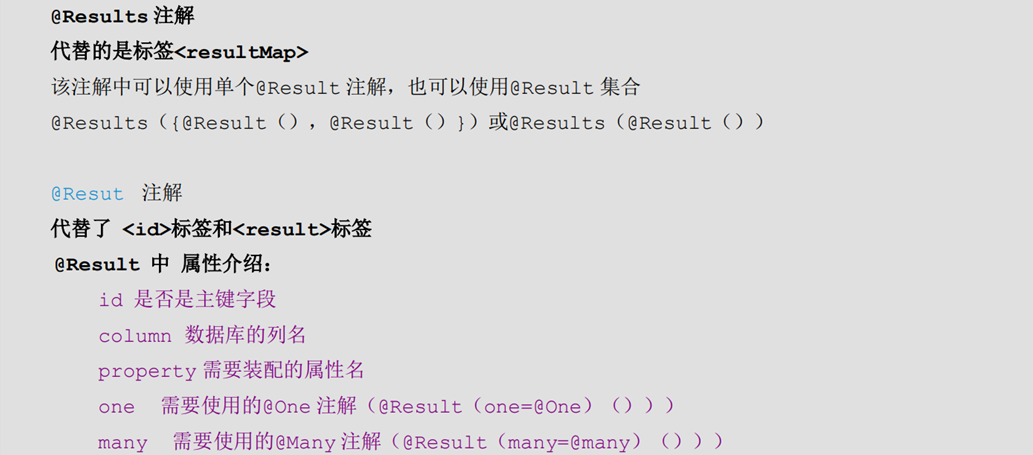
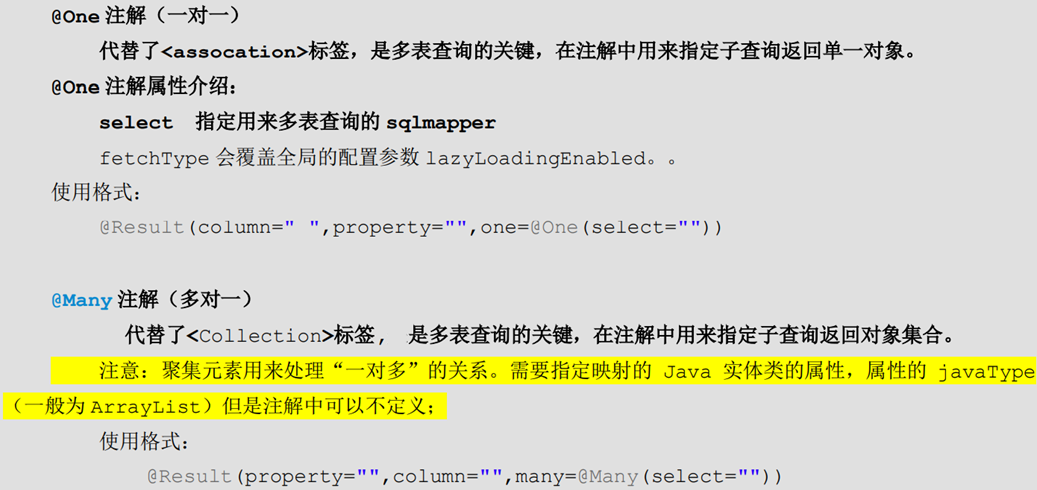
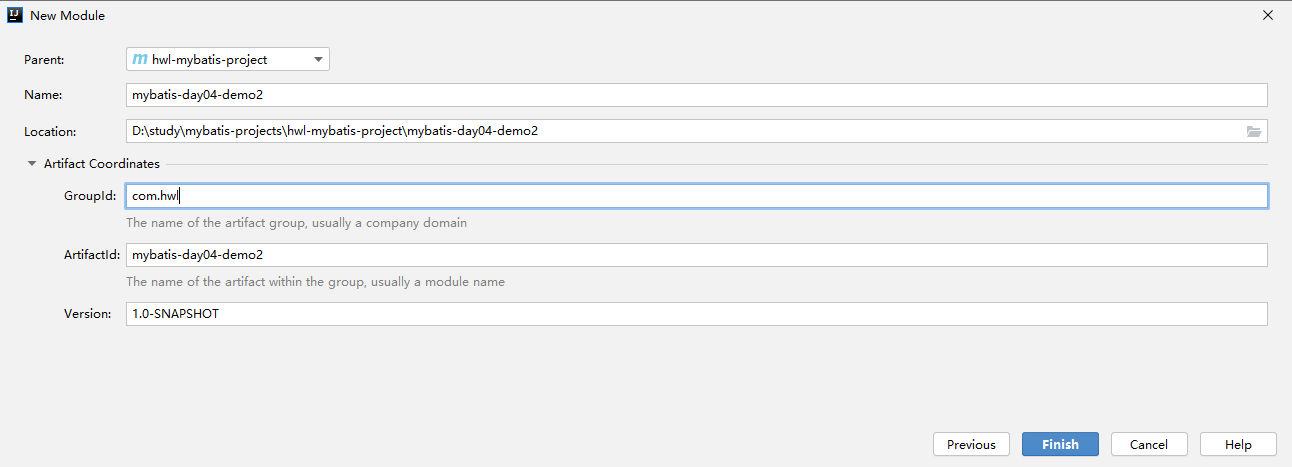
需求:加载账户信息时并且加载该账户的用户信息(一对一),根据情况可实现延迟加载。(注解方式实现)
java
public class User {
    private Integer userId;
    private String userName;
    private Date userBirthday;
    private String userSex;
    private String userAddress;

    //getter、setter、toString
}
java
public class Account {
    private Integer id;
    private Integer uid;
    private Double money;
    private User user;

    //getter、setter、toString
}
java
public interface AccountDao {
    //查询账户信息及其关联的用户信息
    @Results(id = "accountMap", value = {
            @Result(id = true, property = "id", column = "id"),
            @Result(property = "uid", column = "uid"),
            @Result(property = "money", column = "money"),
            @Result(property = "user", column = "uid", one = @One(select = "com.hwl.dao.UserDao.findUserById", fetchType = FetchType.LAZY))
    })
    @Select("select * from account")
    List<Account> findAll();
}
(这里可以对比一下,之前用 xml 时候的写法)
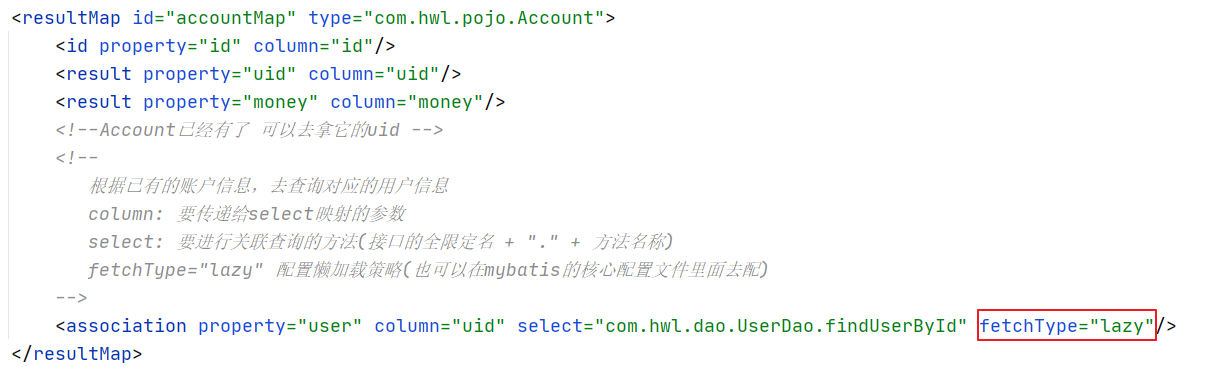
java
public interface UserDao {
    @Results(id = "userMap", value={
            @Result(id = true, property = "userId", column = "id"),
            @Result(property = "userName", column = "username"),
            @Result(property = "userBirthday", column = "birthday"),
            @Result(property = "userSex", column = "sex"),
            @Result(property = "userAddress", column = "address")
    })
    @Select("select * from user where id = #{id}")
    User findUserById(Integer id);
}
java
@Test
public void test01() throws Exception {
    List<Account> accountList = accountDao.findAll();
//        for (Account account : accountList) {
//            System.out.println(account);
//        }
}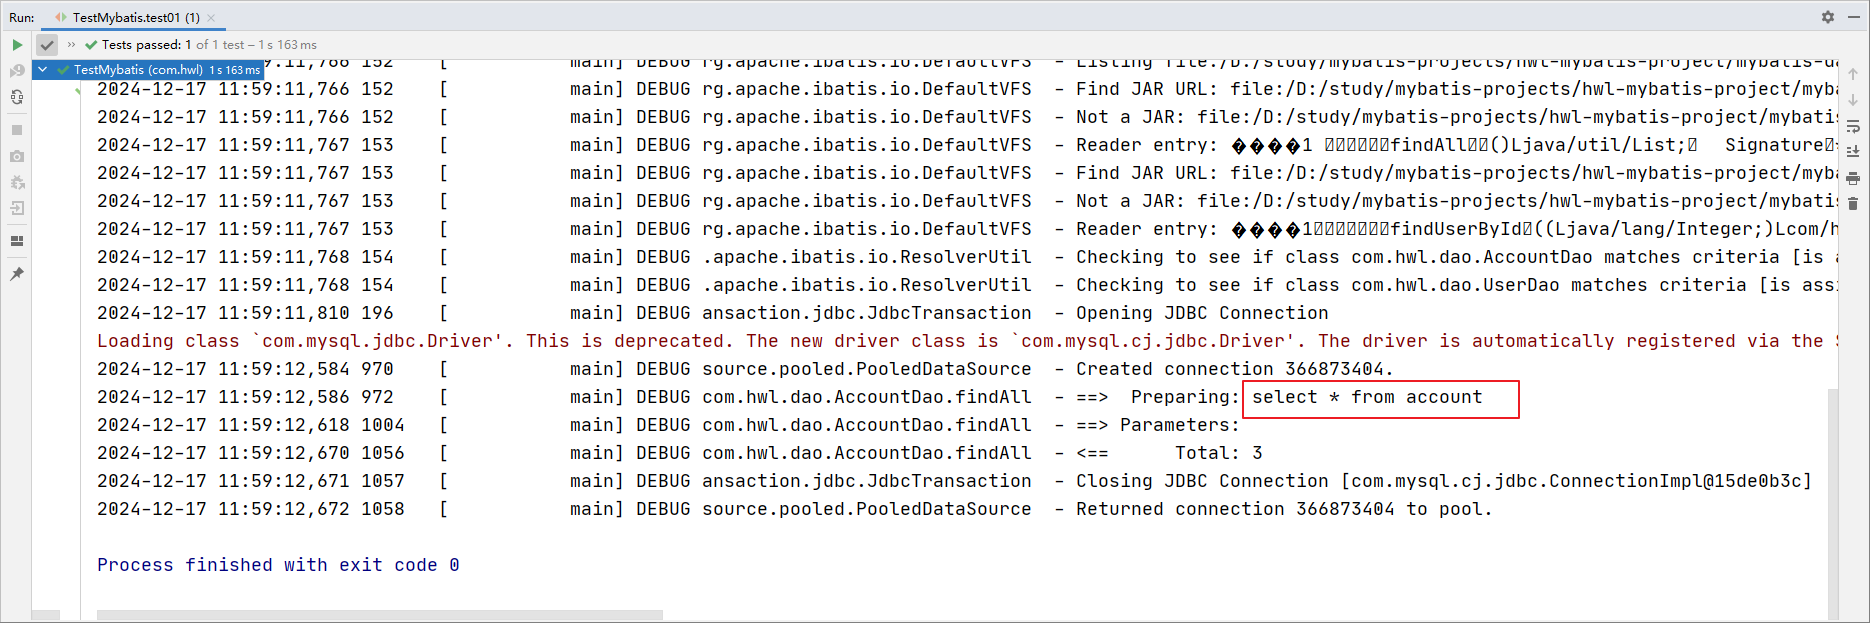
java
@Test
public void test01() throws Exception {
    List<Account> accountList = accountDao.findAll();
    for (Account account : accountList) {
        System.out.println(account);
    }
}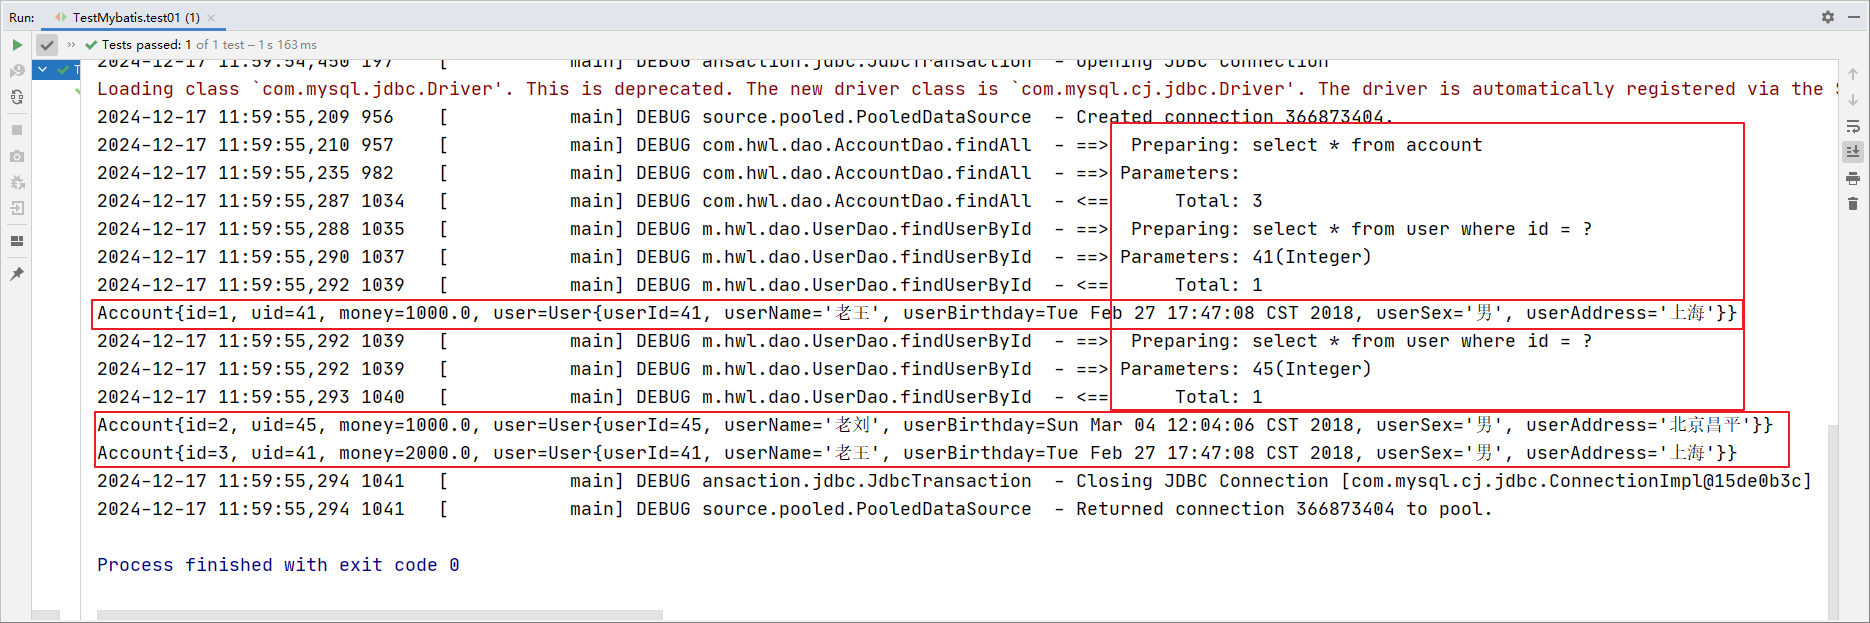
4.32-mybatis注解开发之1对多关联查询操作
需求:查询用户信息时,也要查询他的账户列表(1对多)。使用注解方式实现。
分析:一个用户具有多个账户信息,所以形成了用户(User)与账户(Account)之间的1对多关系。
java
public class Account {
    private Integer id;
    private Integer uid;
    private Double money;

    //getter、setter、toString
}
java
public class User {
    private Integer userId;
    private String userName;
    private Date userBirthday;
    private String userSex;
    private String userAddress;
    //一对多关系映射:主表方法应该包含一个从表方的集合引用
    private List<Account> accounts;

    //getter、setter、toString
}
java
public interface UserDao {
    @Results(id = "userMap", value={
            @Result(id = true, property = "userId", column = "id"),
            @Result(property = "userName", column = "username"),
            @Result(property = "userBirthday", column = "birthday"),
            @Result(property = "userSex", column = "sex"),
            @Result(property = "userAddress", column = "address"),
            @Result(property = "accounts", column = "id", many = @Many(select = "com.hwl.dao.AccountDao.findAccountByUid"))
    })
    @Select("select * from user")
    List<User> findAll();
}
java
public interface AccountDao {
    //根据用户id查询对应的账户信息
    @Select("select * from account where uid = #{id}")
    List<Account> findAccountByUid(Integer id);
}
java
@Test
public void test01() throws Exception {
    List<User> userList = userDao.findAll();
    for (User user : userList) {
        System.out.println(user);
    }
}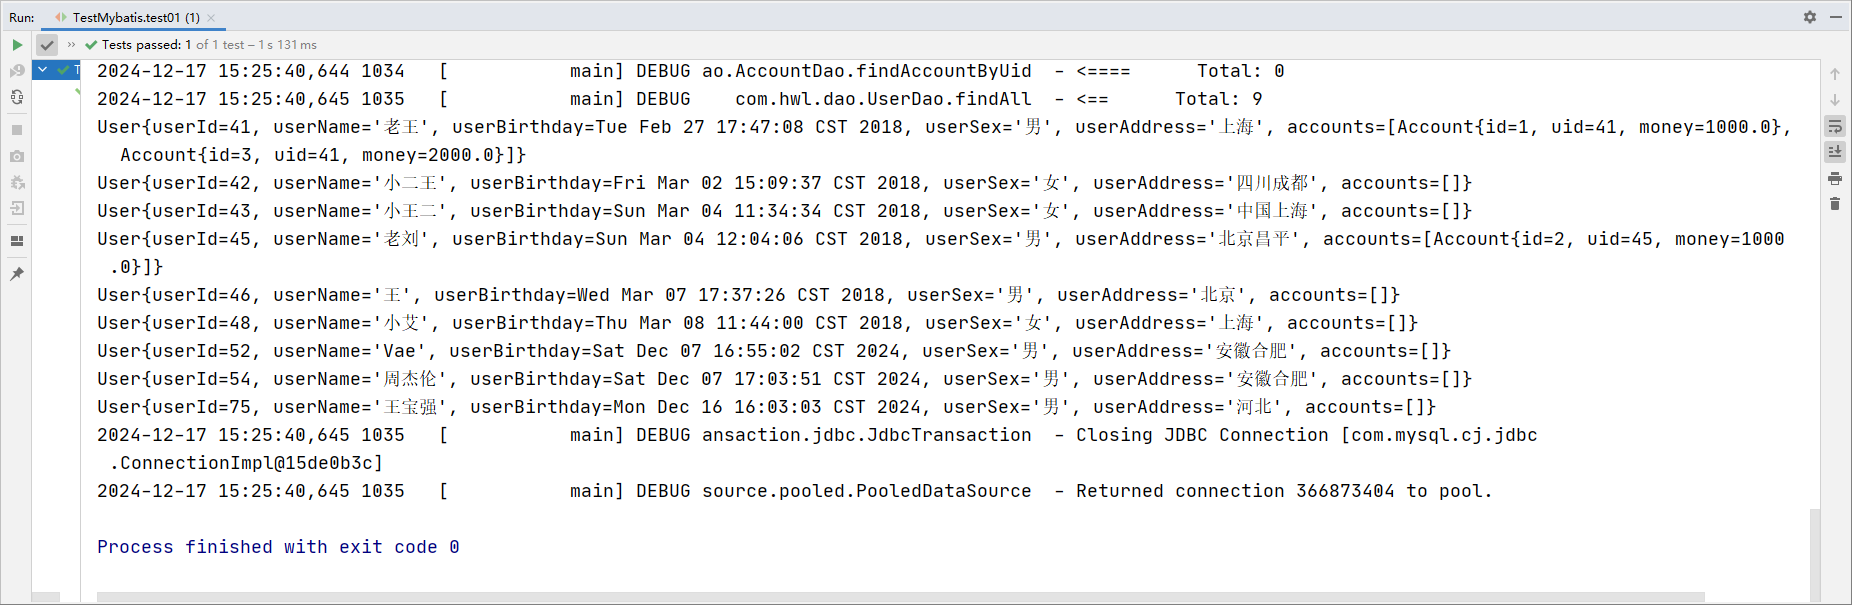
4.33-mybatis逆向工程生成
(2025年5月2日补充)
逆向工程其实就是代码生成器,根据已经提供的数据表,mybatis框架反向生成 java实体类,接口以及接口对应的映射文件。(只能基于单表)
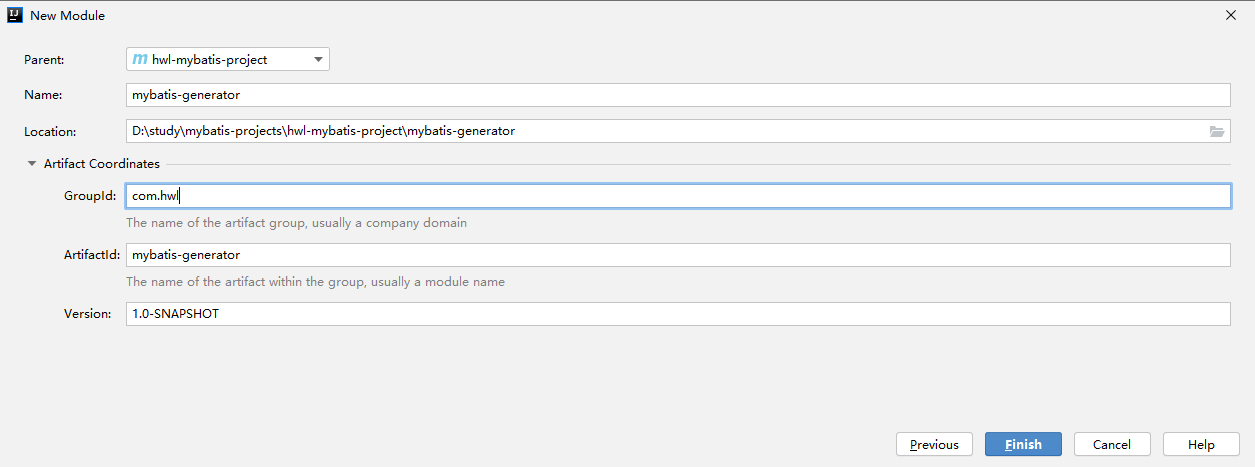
先添加依赖和插件:
xml
<dependencies>
<!-- MyBatis核心依赖包 -->
<dependency>
<groupId>org.mybatis</groupId>
<artifactId>mybatis</artifactId>
<version>3.5.9</version>
</dependency>
<!-- junit测试 -->
<dependency>
<groupId>junit</groupId>
<artifactId>junit</artifactId>
<version>4.13.2</version>
<scope>test</scope>
</dependency>
<!-- MySQL驱动 -->
<dependency>
<groupId>mysql</groupId>
<artifactId>mysql-connector-java</artifactId>
<version>8.0.25</version>
</dependency>
<!-- log4j日志 -->
<dependency>
<groupId>log4j</groupId>
<artifactId>log4j</artifactId>
<version>1.2.17</version>
</dependency>
<!--分页插件-->
<dependency>
<groupId>com.github.pagehelper</groupId>
<artifactId>pagehelper</artifactId>
<version>5.2.0</version>
</dependency>
</dependencies>
<!-- 控制Maven在构建过程中相关配置 -->
<build>
<!-- 构建过程中用到的插件 -->
<plugins>
<!-- 具体插件,逆向工程的操作是以构建过程中插件形式出现的 -->
<plugin>
<groupId>org.mybatis.generator</groupId>
<artifactId>mybatis-generator-maven-plugin</artifactId>
<version>1.3.0</version>
<!-- 插件的依赖 -->
<dependencies>
<!-- 逆向工程的核心依赖 -->
<dependency>
<groupId>org.mybatis.generator</groupId>
<artifactId>mybatis-generator-core</artifactId>
<version>1.3.2</version>
</dependency>
<!-- 数据库连接池 -->
<dependency>
<groupId>com.mchange</groupId>
<artifactId>c3p0</artifactId>
<version>0.9.2</version>
</dependency>
<!-- MySQL驱动 -->
<dependency>
<groupId>mysql</groupId>
<artifactId>mysql-connector-java</artifactId>
<version>8.0.25</version>
</dependency>
</dependencies>
</plugin>
<!--告诉Maven使用Java 8来编译项目-->
<plugin>
<groupId>org.apache.maven.plugins</groupId>
<artifactId>maven-compiler-plugin</artifactId>
<configuration>
<source>8</source>
<target>8</target>
</configuration>
</plugin>
</plugins>
</build>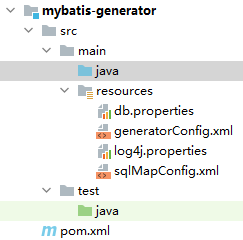
db.properties:
properties
jdbc.driver=com.mysql.cj.jdbc.Driver
jdbc.url=jdbc:mysql://localhost/lesson
jdbc.username=root
jdbc.password=rootsqlMapConfig.xml:
xml
<?xml version="1.0" encoding="UTF-8"?>
<!DOCTYPE configuration PUBLIC "-//mybatis.org//DTD Config 3.0//EN"
"http://mybatis.org/dtd/mybatis-3-config.dtd">
<configuration>
<!--加载db.properties文件-->
<properties resource="db.properties"></properties>
<!--配置mybatis的环境-->
<environments default="mysql">
<!--配置连接mysql的具体信息-->
<environment id="mysql">
<!--配置事务类型 JDBC-->
<transactionManager type="JDBC"/>
<!--配置数据源 POOLED UNPOOLED-->
<dataSource type="POOLED">
<!--配置连接数据库的驱动 url 用户名 密码-->
<property name="driver" value="${jdbc.driver}"/>
<property name="url" value="${jdbc.url}"/>
<property name="username" value="${jdbc.username}"/>
<property name="password" value="${jdbc.password}"/>
</dataSource>
</environment>
</environments>
<!--在核心配置文件里面导入接口的映射文件-->
<mappers>
<package name="com.hwl.mapper"/>
</mappers>
</configuration>创建逆向工程的配置文件。注意:逆向工程的文件名必须是: generatorConfig.xml
generatorConfig.xml:
xml
<?xml version="1.0" encoding="UTF-8"?>
<!DOCTYPE generatorConfiguration
PUBLIC "-//mybatis.org//DTD MyBatis Generator Configuration 1.0//EN"
"http://mybatis.org/dtd/mybatis-generator-config_1_0.dtd">
<generatorConfiguration>
<!--
targetRuntime: 执行生成的逆向工程的版本
MyBatis3Simple: 生成基本的CRUD(低配)
MyBatis3: 生成带条件的CRUD(高配)
-->
<context id="DB2Tables" targetRuntime="MyBatis3Simple">
<!-- 添加这一行 -->
<property name="overwrite" value="true"/>
<!-- 数据库的连接信息 -->
<jdbcConnection driverClass="com.mysql.cj.jdbc.Driver"
connectionURL="jdbc:mysql://localhost:3306/lesson"
userId="root"
password="root">
<!-- 添加这个属性以确保只连接到指定的数据库 -->
<property name="nullCatalogMeansCurrent" value="true"/>
</jdbcConnection>
<!-- javaBean的生成策略-->
<javaModelGenerator targetPackage="com.hwl.pojo" targetProject=".\src\main\java">
<!--
是否生成子包。如果为true com.hwl.pojo生成的保姆那个带有层级目录
false com.hwl.pojo就是一个包名
-->
<property name="enableSubPackages" value="true"/>
<!--
通过数据表字段生成pojo。如果字段名称带空格,会去掉空格
-->
<property name="trimStrings" value="true"/>
</javaModelGenerator>
<!-- SQL映射文件的生成策略 -->
<sqlMapGenerator targetPackage="com.hwl.mapper"
targetProject=".\src\main\resources">
<property name="enableSubPackages" value="true"/>
</sqlMapGenerator>
<!-- Mapper接口的生成策略 -->
<javaClientGenerator type="XMLMAPPER"
targetPackage="com.hwl.mapper" targetProject=".\src\main\java">
<property name="enableSubPackages" value="true"/>
</javaClientGenerator>
<!-- 逆向分析的表 -->
<!-- tableName设置为*号,可以对应所有表,此时不写domainObjectName -->
<!-- domainObjectName属性指定生成出来的实体类的类名 -->
<table tableName="user" domainObjectName="User"/>
</context>
</generatorConfiguration>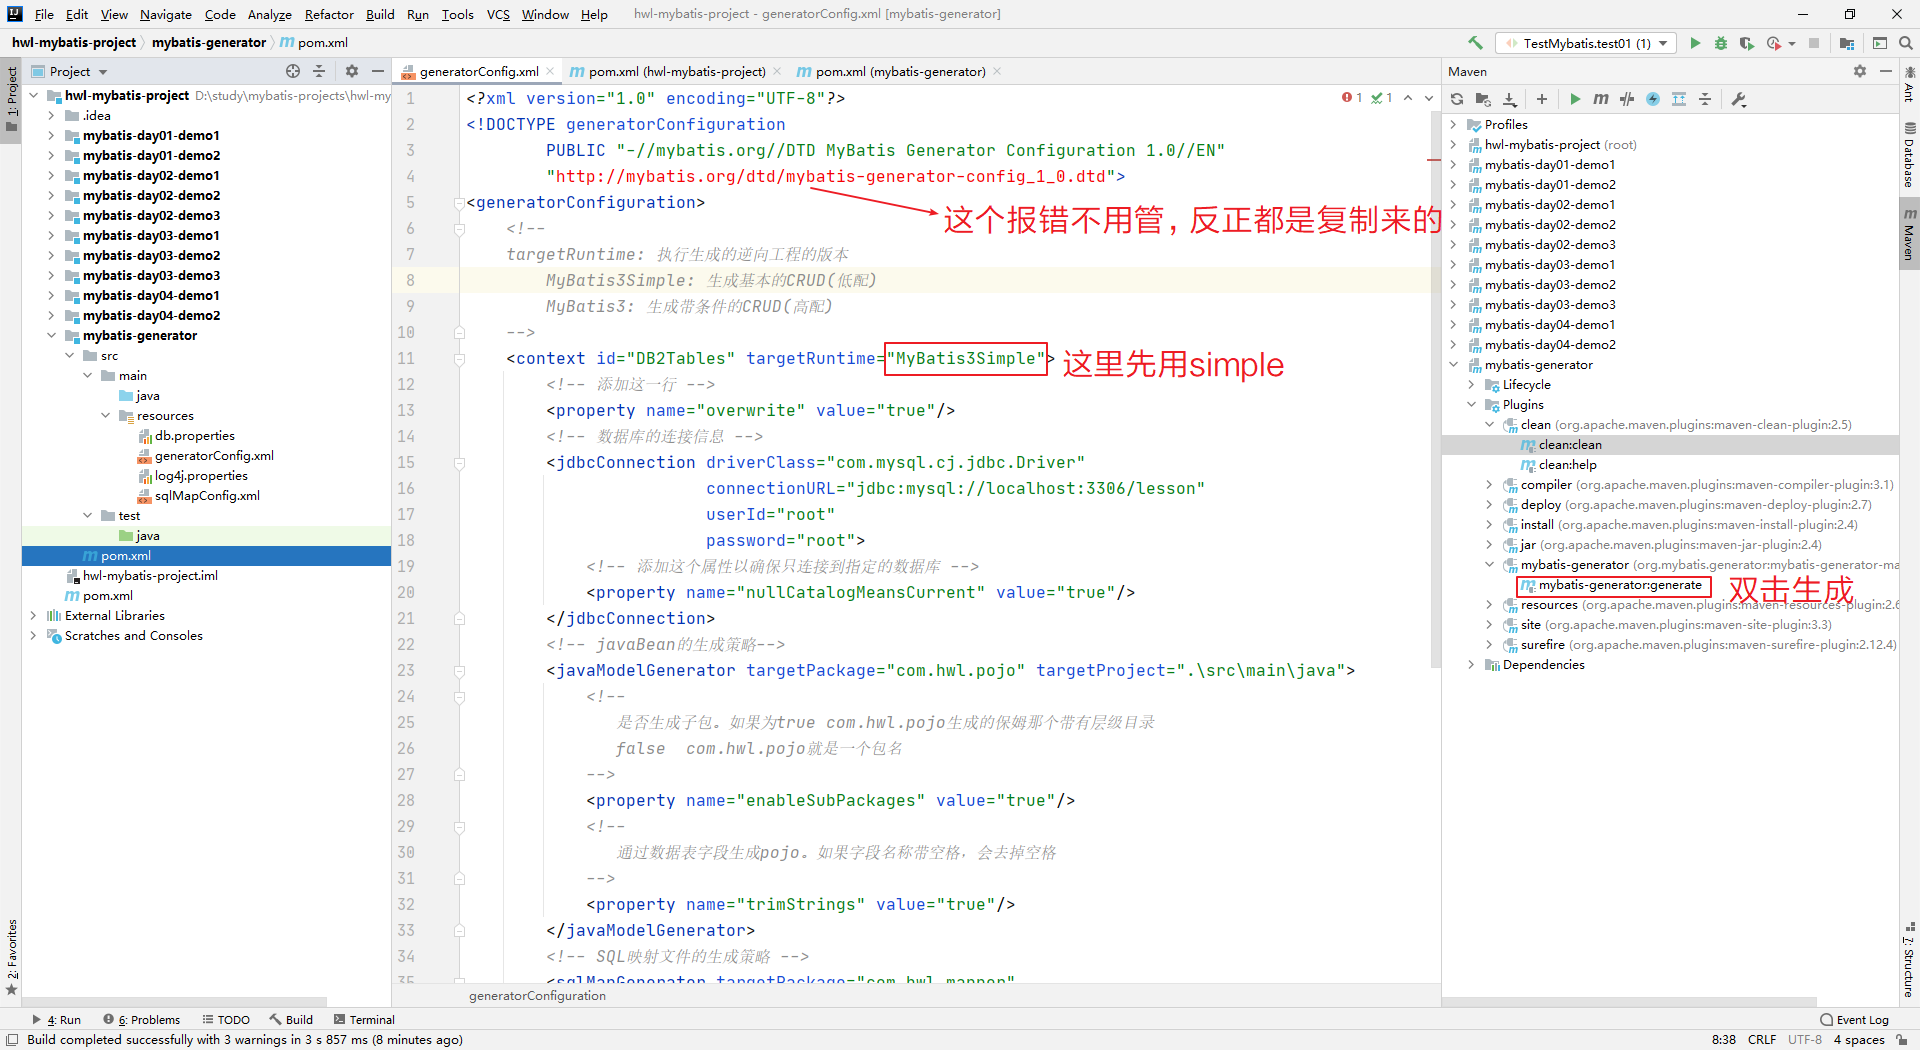
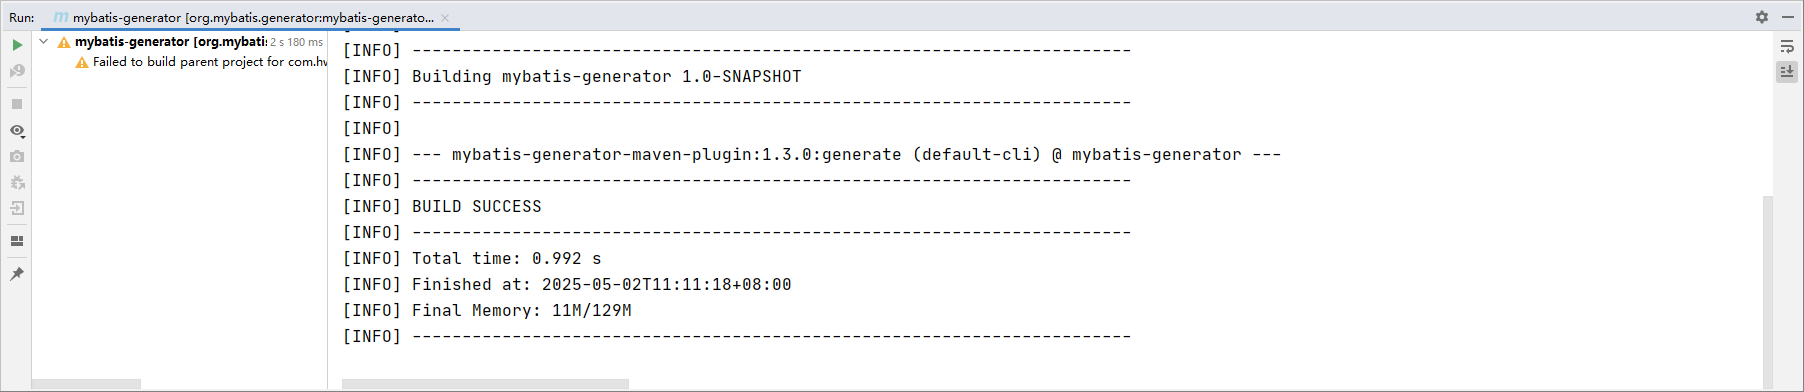
创建之后的效果如下:
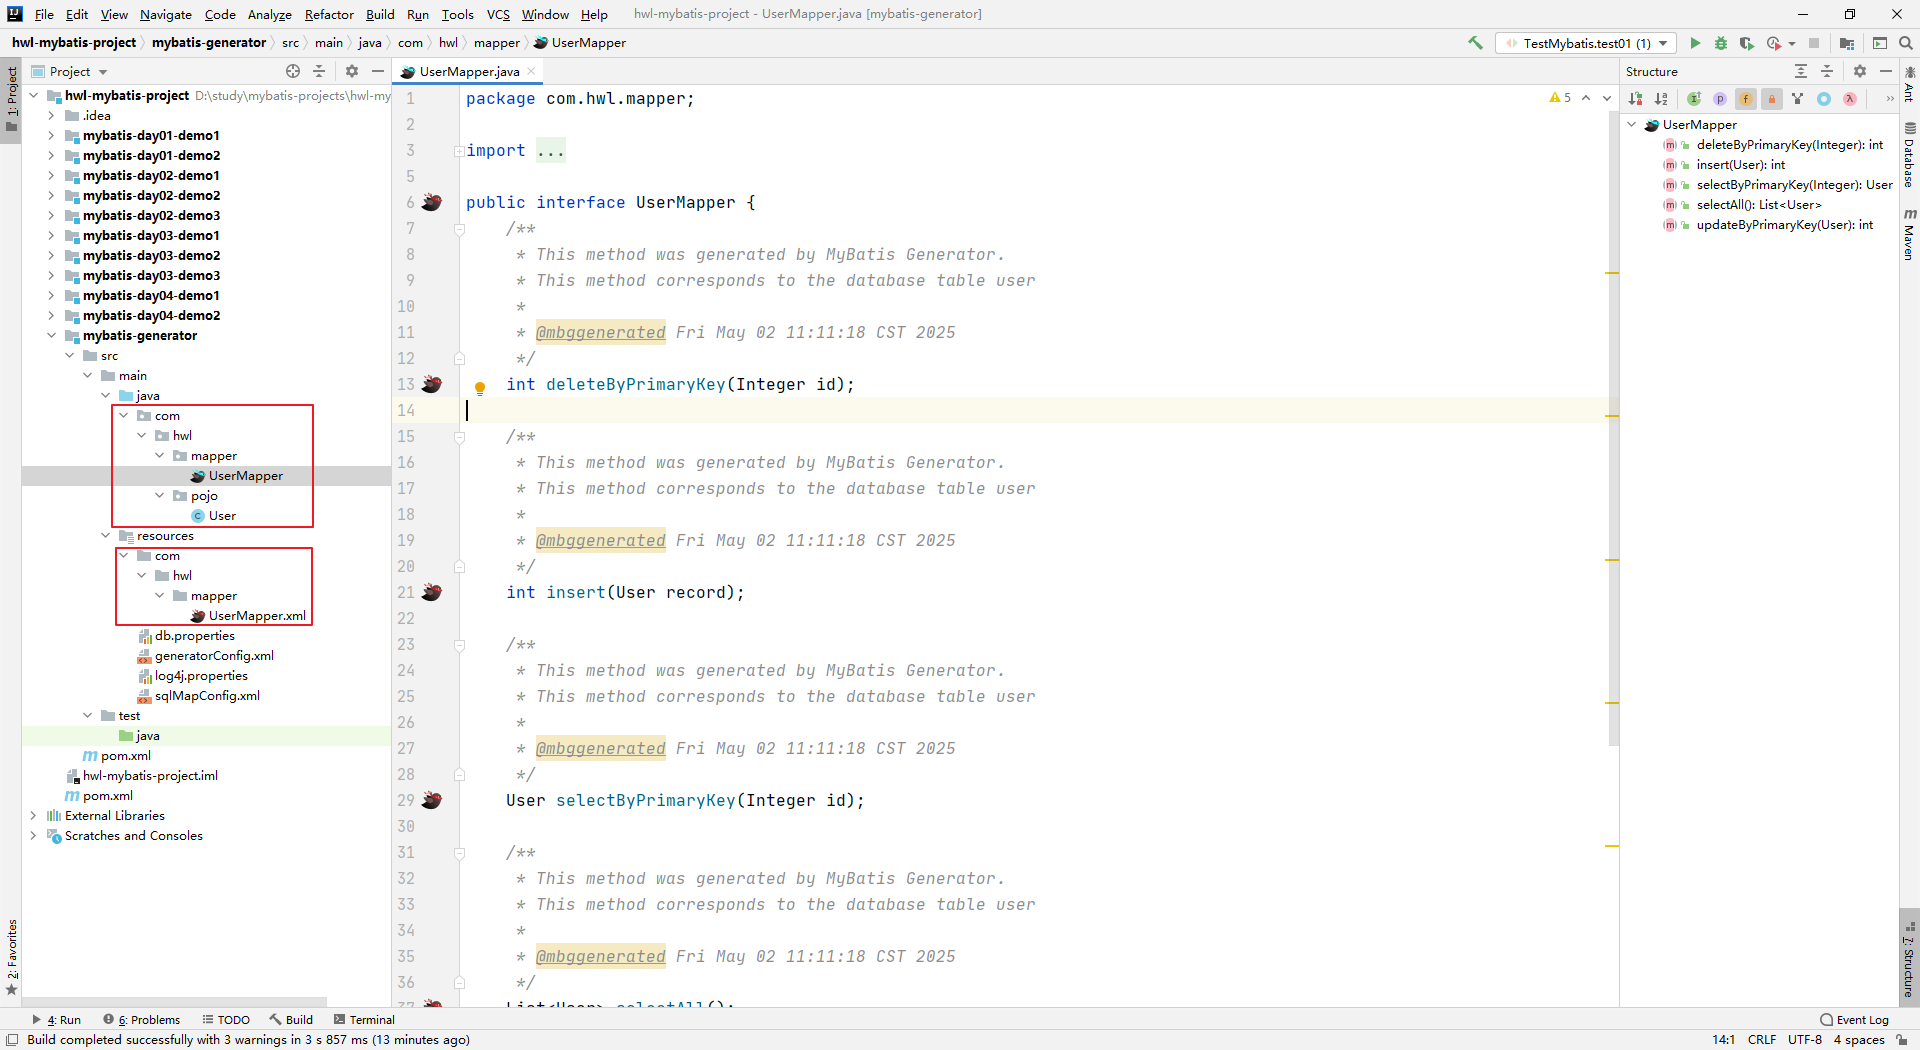
4.34-mybatis逆向工程的简单使用
上面生成的逆向工程,我们发现接口里面只有简单的 crud 基本操作,如果碰上复杂的操作。比如根据复杂条件进行 crud,我们还是需要自己定义接口实现。那么我们可以生成对复杂条件封装的逆向工程。
注意:在生成之前,把之前生成的资源(pojo mapper Usermapper.xml)全部删除掉。
我们只需要修改 mybatis 逆向工程配置文件就可以了:
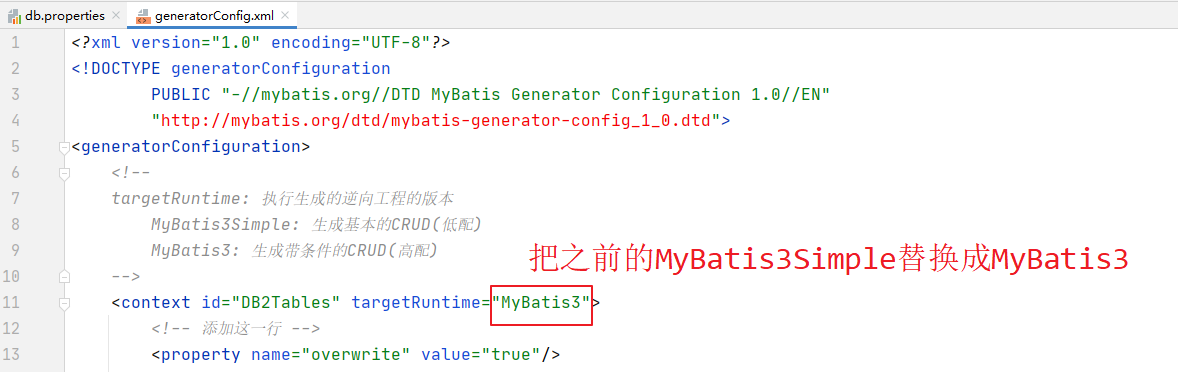
双击插件运行,运行之后的效果如下:
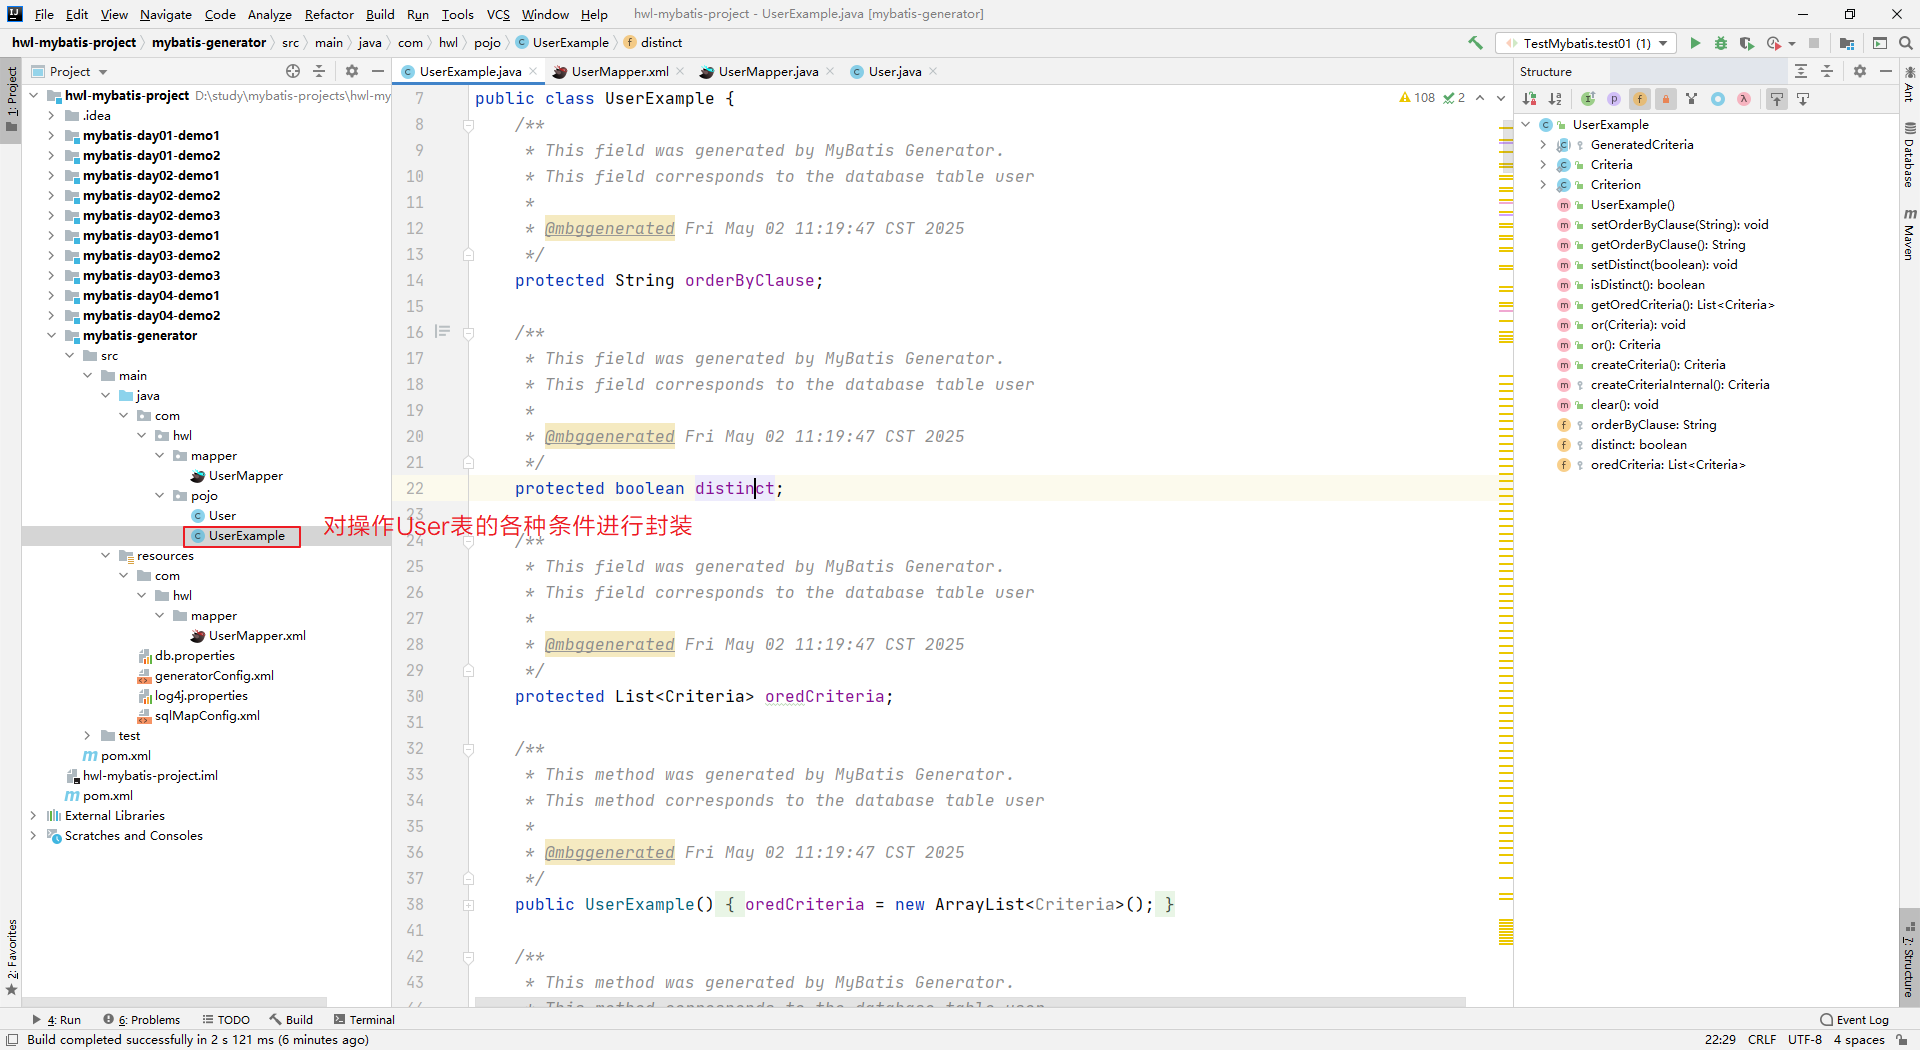
我们发现多了一个 XXMapperExample 类。这个类就是对对应数据表的各种条件进行封装。
使用逆向工程
我们通过逆向工程生成好实体 mapper 及其对应的映射文件之后,我们现在来简单使用这些功能。
我们先搭建测试环境:
java
public class TestMybatis {
SqlSession sqlSession;
UserMapper userMapper;
//在@Test注解修饰的方法之前执行
@Before
public void init() throws Exception{
InputStream in = Resources.getResourceAsStream("SqlMapConfig.xml");
SqlSessionFactoryBuilder builder = new SqlSessionFactoryBuilder();
SqlSessionFactory sqlSessionFactory = builder.build(in);
sqlSession = sqlSessionFactory.openSession();
userMapper = sqlSession.getMapper(UserMapper.class);
}
//在@Test注解修饰的方法之后执行
@After
public void after(){
sqlSession.close();
}
}查询操作
首先,可以在生成的 User类里面加上 toString 方法,它默认没有生成。方便后续好展示查询结果。
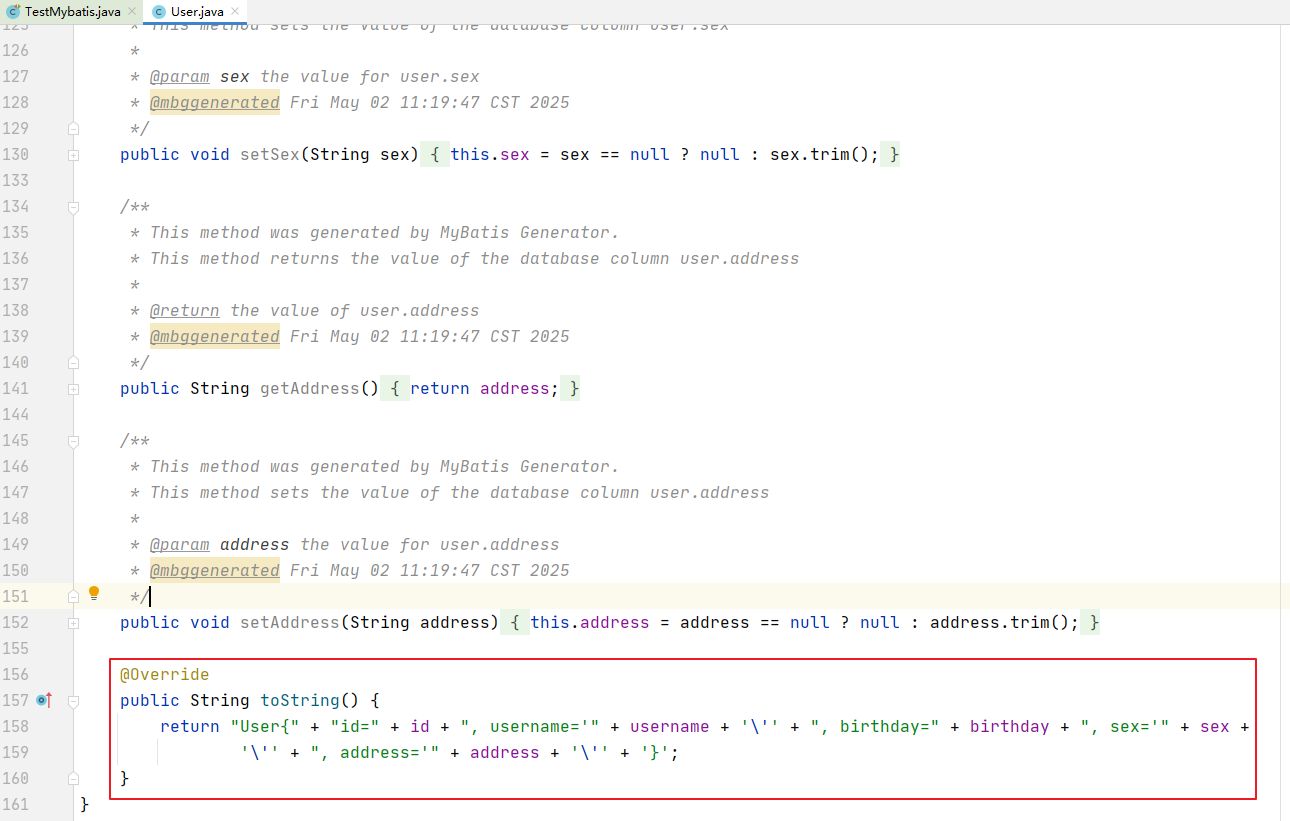
数据库表里的数据:
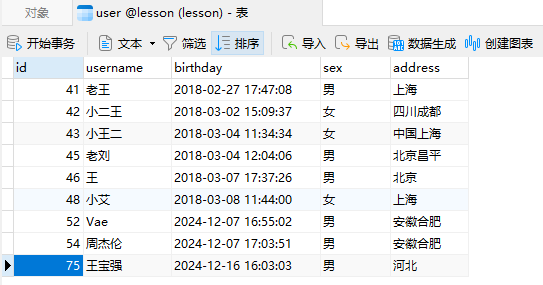
-
简单的全表查询
java@Test public void test01(){ List<User> userList = userMapper.selectByExample(null); for (User user : userList) { System.out.println(user); } }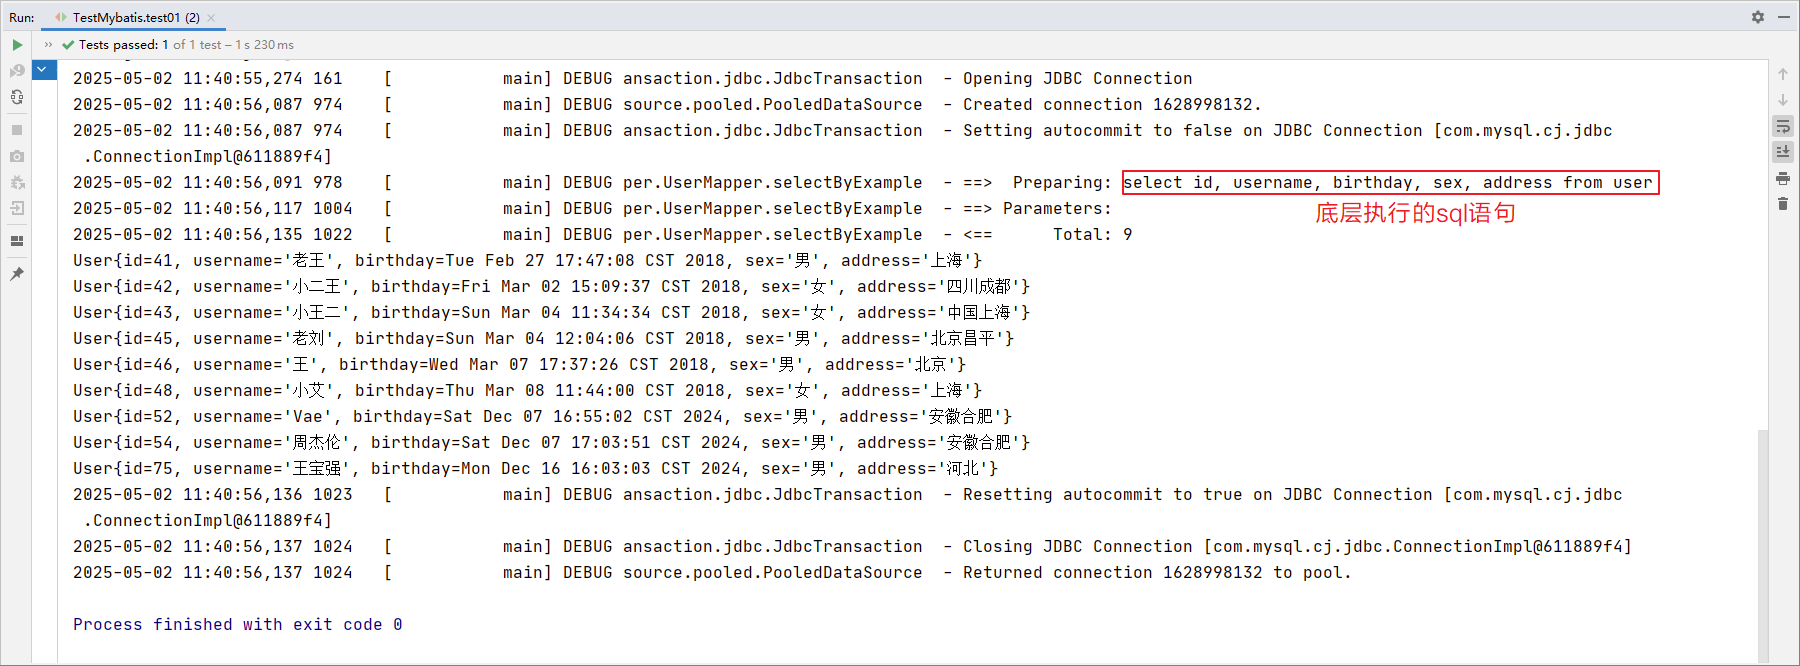
-
复杂条件封装
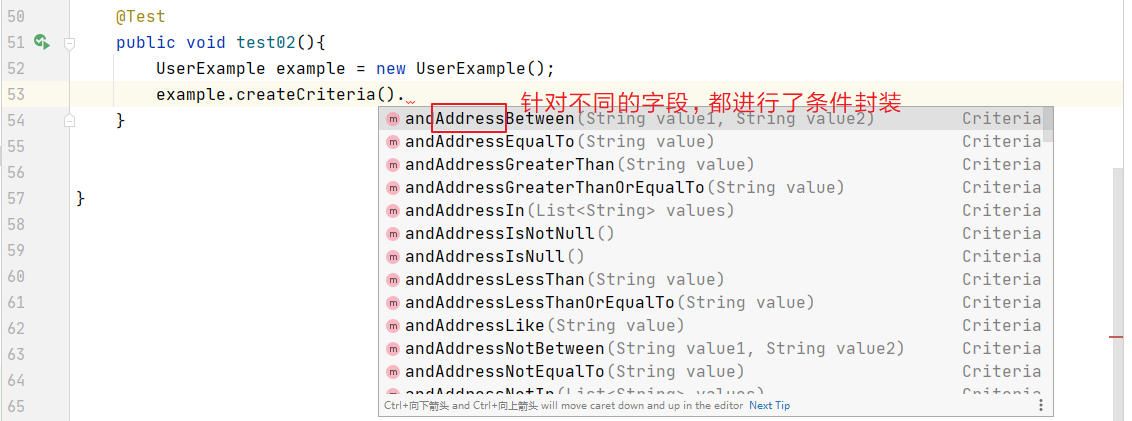 java
java@Test public void test02(){ UserExample example = new UserExample(); example.createCriteria().andAddressEqualTo("安徽合肥").andSexEqualTo("男"); List<User> userList = userMapper.selectByExample(example); for (User user : userList) { System.out.println(user); } }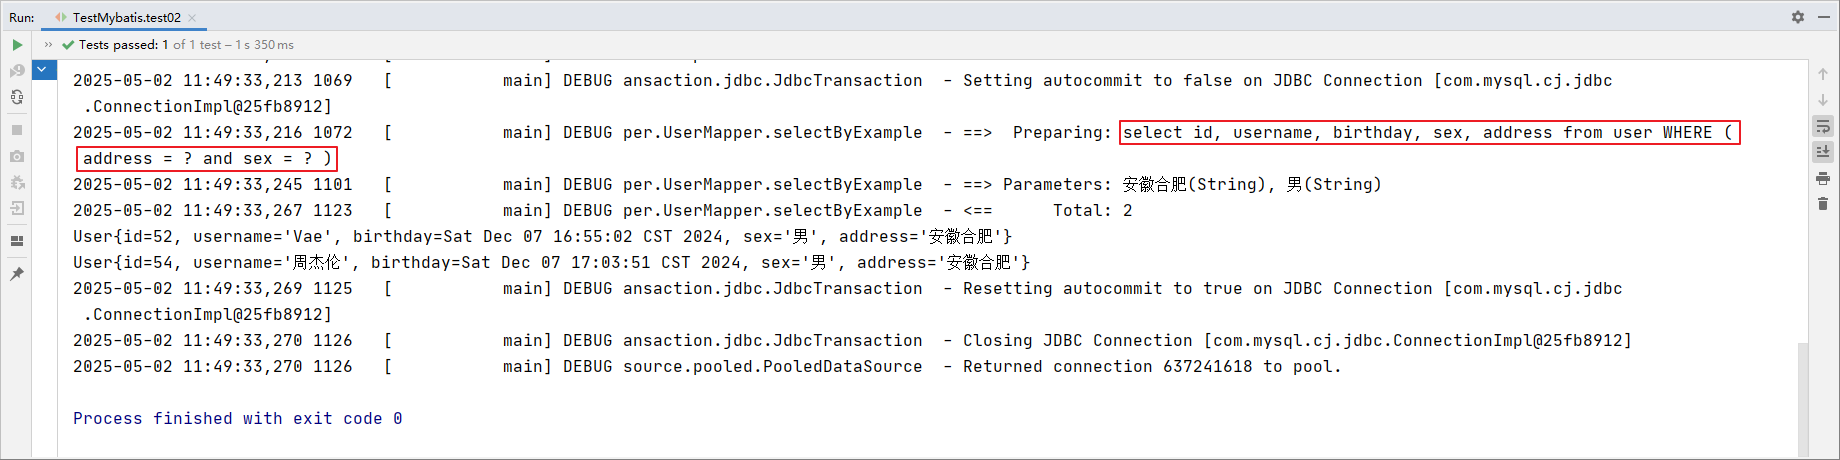
也可以通过or关键字进行拼接:
java@Test public void test02(){ UserExample example = new UserExample(); example.createCriteria().andAddressEqualTo("安徽合肥").andSexEqualTo("男"); example.or().andIdLessThan(45); List<User> userList = userMapper.selectByExample(example); for (User user : userList) { System.out.println(user); } }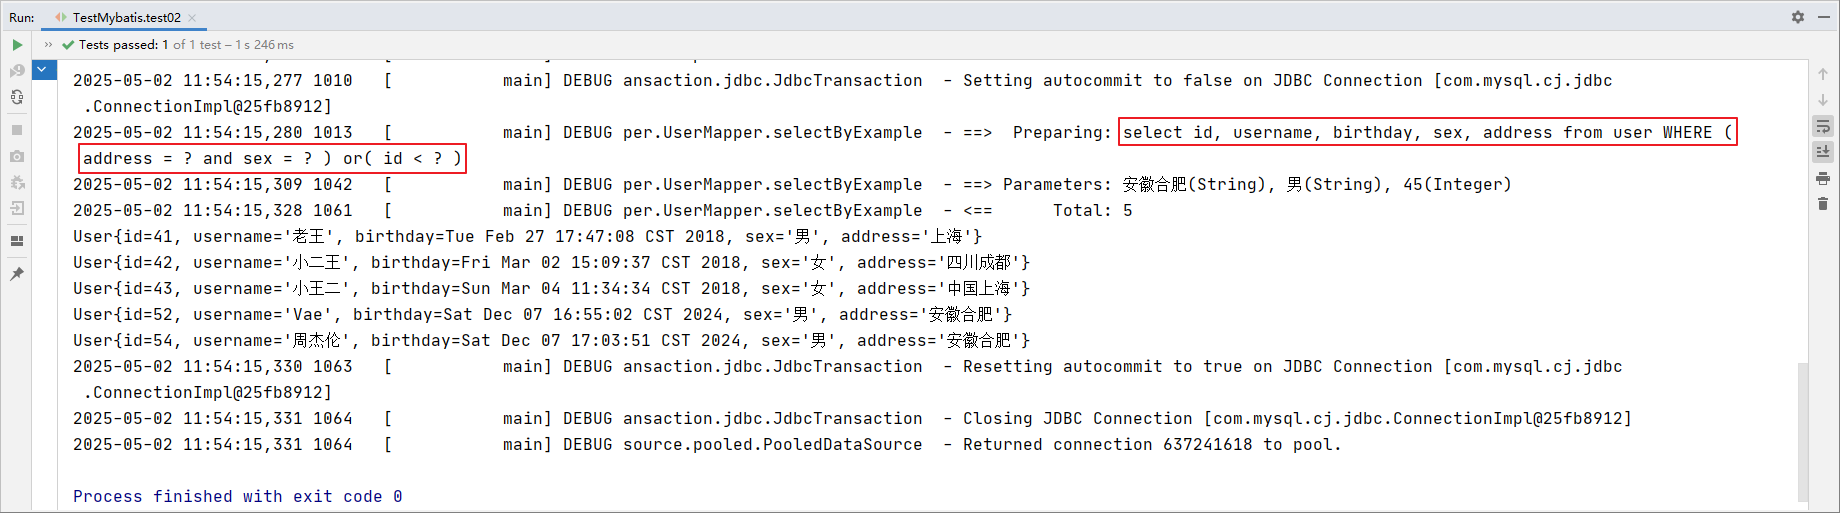
-
模糊查询
java@Test public void test03(){ UserExample example = new UserExample(); example.createCriteria().andUsernameLike("%王%"); List<User> userList = userMapper.selectByExample(example); for (User user : userList) { System.out.println(user); } }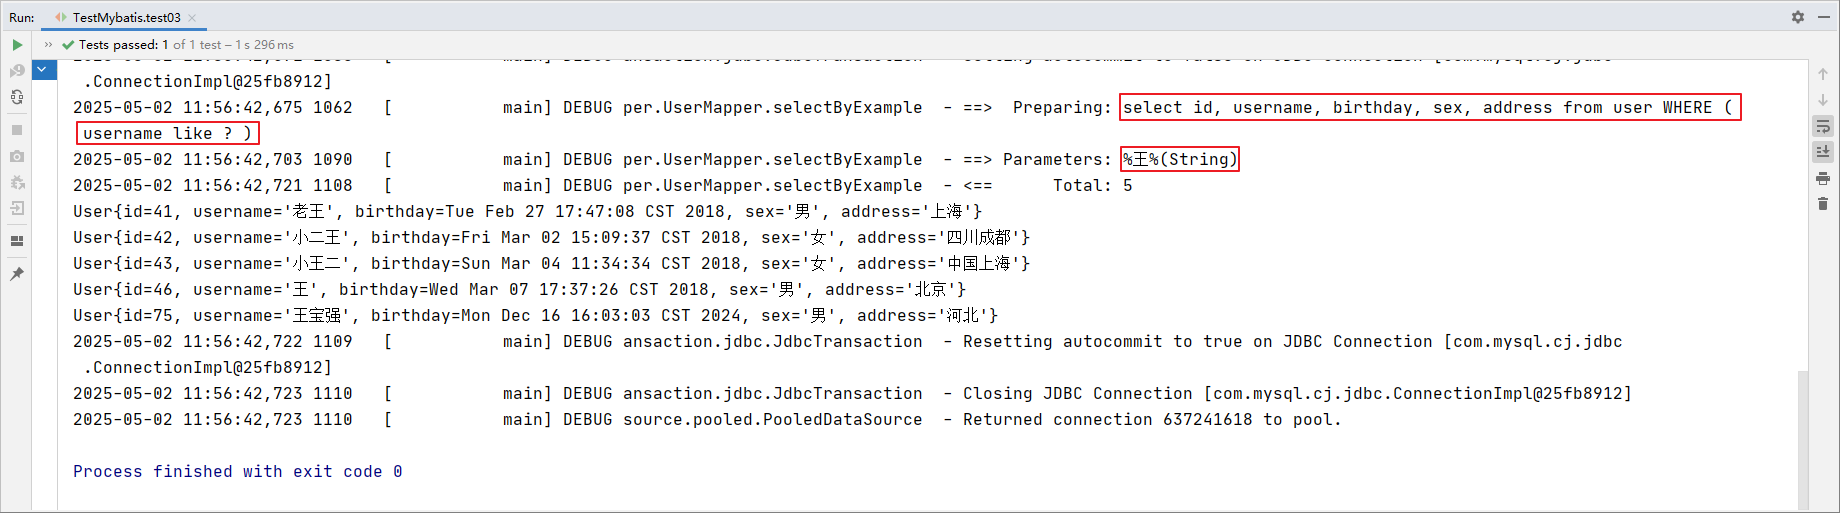
更新操作
-
根据主键更新(以修改为例)
java@Test public void test04(){ User user = new User(); user.setId(48); user.setUsername("王菲"); user.setSex("女"); user.setAddress("北京"); user.setBirthday(new Date()); userMapper.updateByPrimaryKey(user); sqlSession.commit(); }
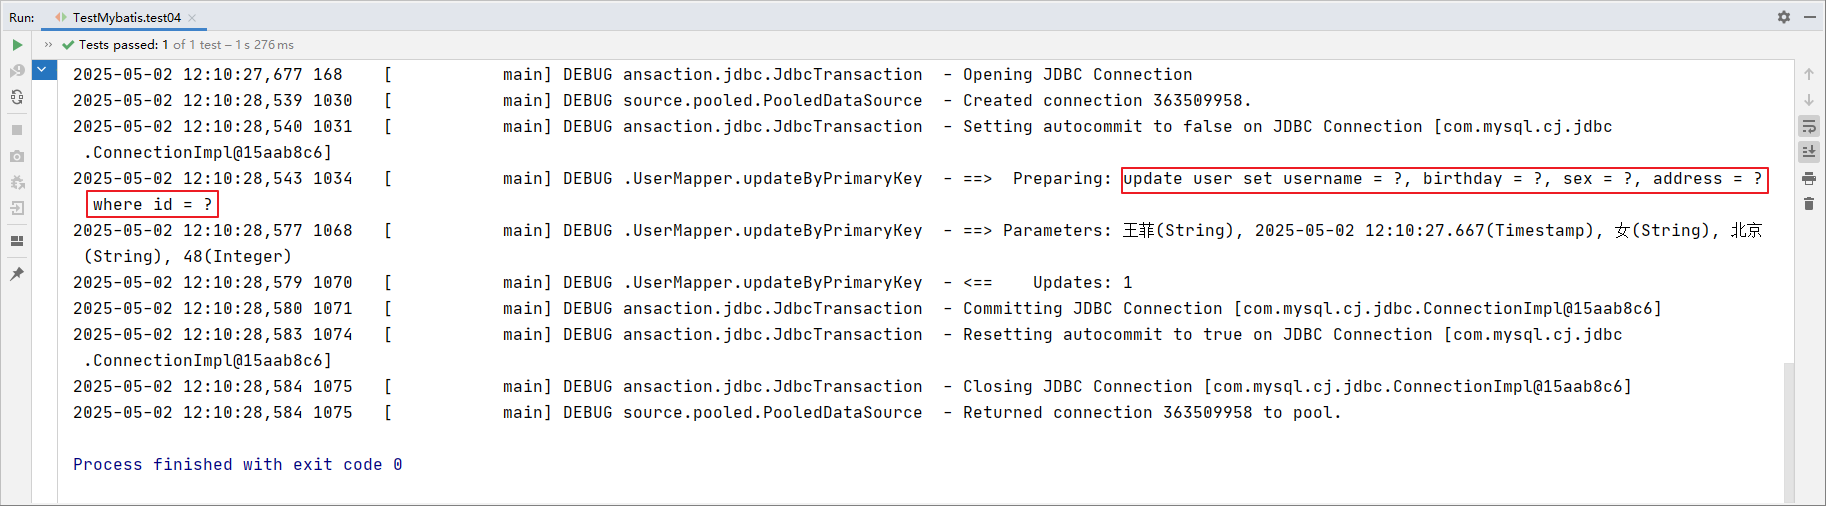
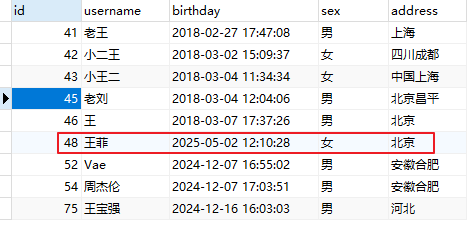
-
如果我们修改的部分字段设置为 null 呢?比如把 sex 设置为 null
java@Test public void test04(){ User user = new User(); user.setId(48); user.setUsername("王菲"); user.setSex(null); // sex设置为null user.setAddress("北京"); user.setBirthday(new Date()); userMapper.updateByPrimaryKey(user); sqlSession.commit(); }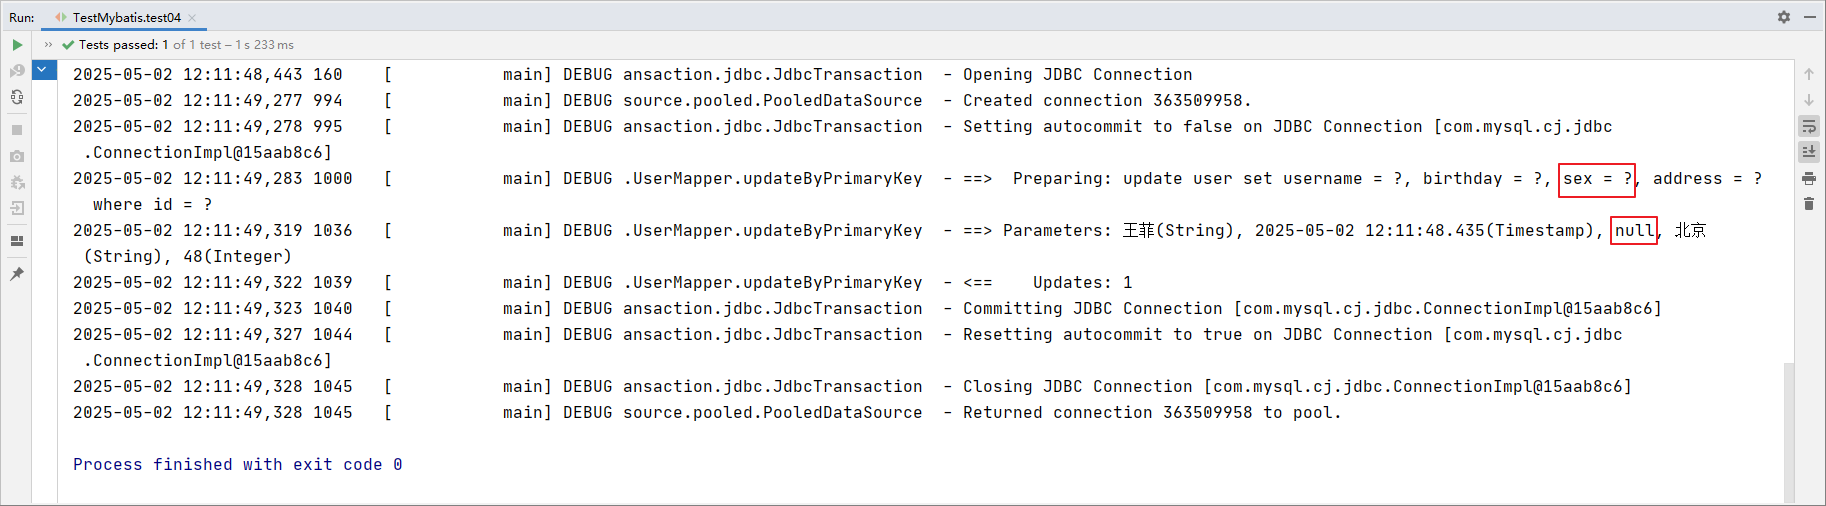
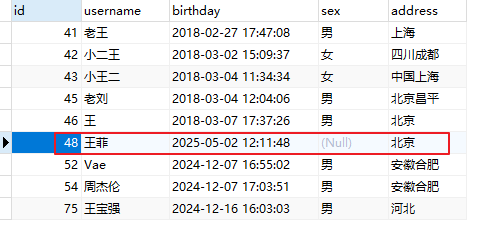
此时我们发现,updateByPrimaryKey 方法会把值为 null 的字段也进行了修改。
如果我们不想把值为null的字段进行修改呢?可以使用另外一个方法。-
可以把方法换为updateByPrimaryKeySelective:
java@Test public void test04(){ User user = new User(); user.setId(48); user.setUsername("王菲"); user.setSex(null); user.setAddress("北京"); user.setBirthday(new Date()); //userMapper.updateByPrimaryKey(user); userMapper.updateByPrimaryKeySelective(user); sqlSession.commit(); }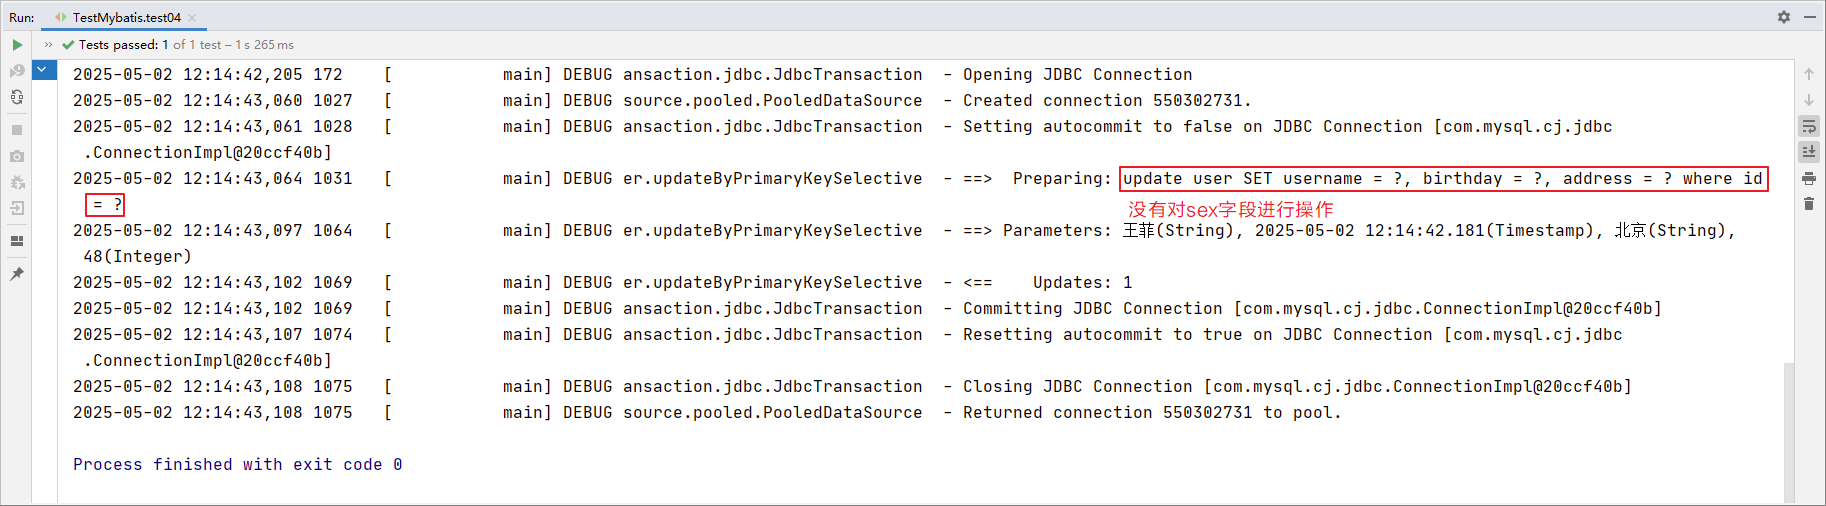
新增的操作和这个类似,就不再演示。
4.35-mybatis分页插件
由于逆向工程跟他视频演示的有差异,这里在前面写的module 演示
演示
- 添加分页查询相关的依赖
xml
<!--分页插件-->
<dependency>
<groupId>com.github.pagehelper</groupId>
<artifactId>pagehelper</artifactId>
<version>5.2.0</version>
</dependency>- 在sqlMapConfig.xml 里面配置分页插件(注意跟其它的标签的顺序)
xml
<!--配置分页插件-->
<plugins>
<plugin interceptor="com.github.pagehelper.PageInterceptor"/>
</plugins>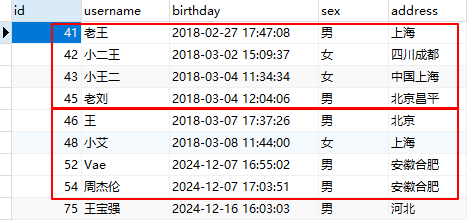
java
@Test
public void test01() throws Exception {
//开启分页操作
// 参数2表示查询第2页的数据(页码从1开始计数)
// 参数4表示每页显示4条记录
// 执行后,紧接着的查询会返回第2页的4条数据(即第5-8条记录)
PageHelper.startPage(2, 4);
List<User> userList = userDao.findAll();
for (User user : userList) {
System.out.println(user);
}
}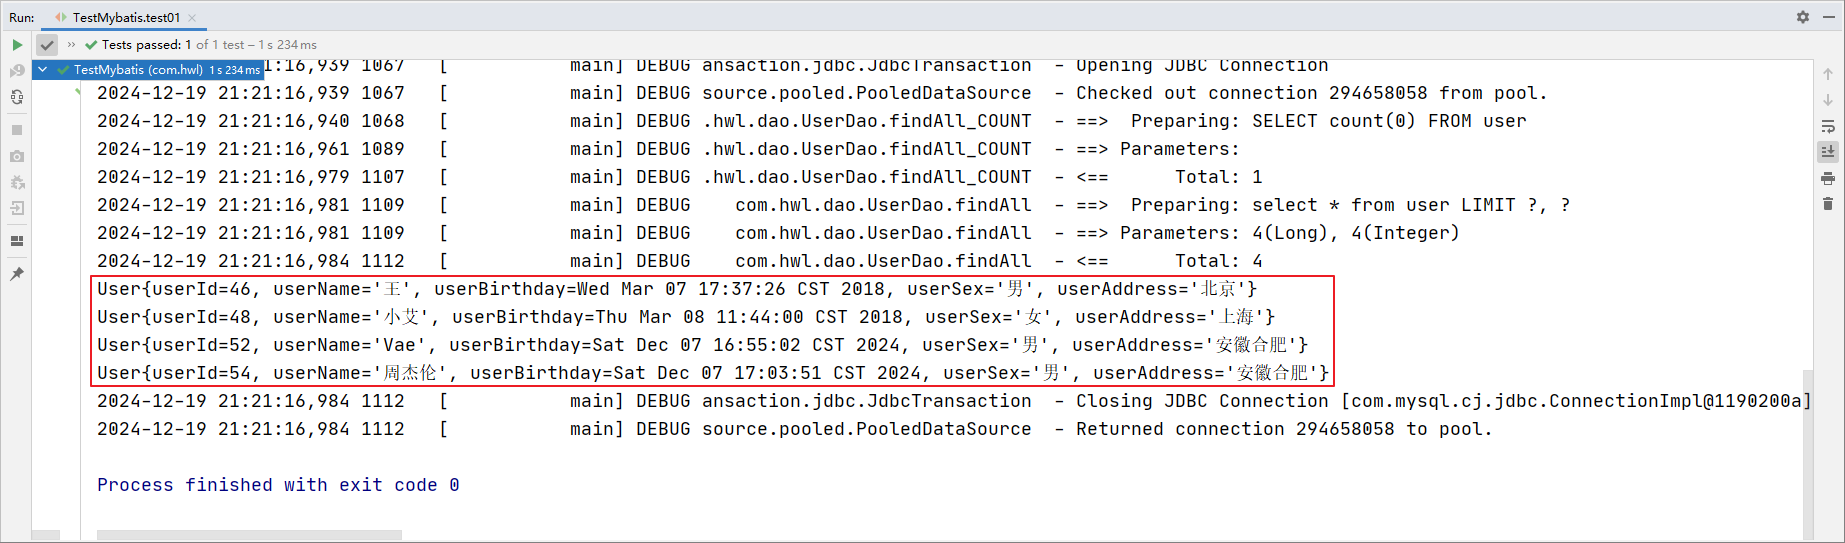
也可以创建分页模型对象:
java
@Test
public void test01() throws Exception {
//开启分页操作
PageHelper.startPage(2, 4);
List<User> userList = userDao.findAll();
//创建分页模型对象
PageInfo<User> pageInfo = new PageInfo<User>(userList);
System.out.println(pageInfo);
for (User user : userList) {
System.out.println(user);
}
}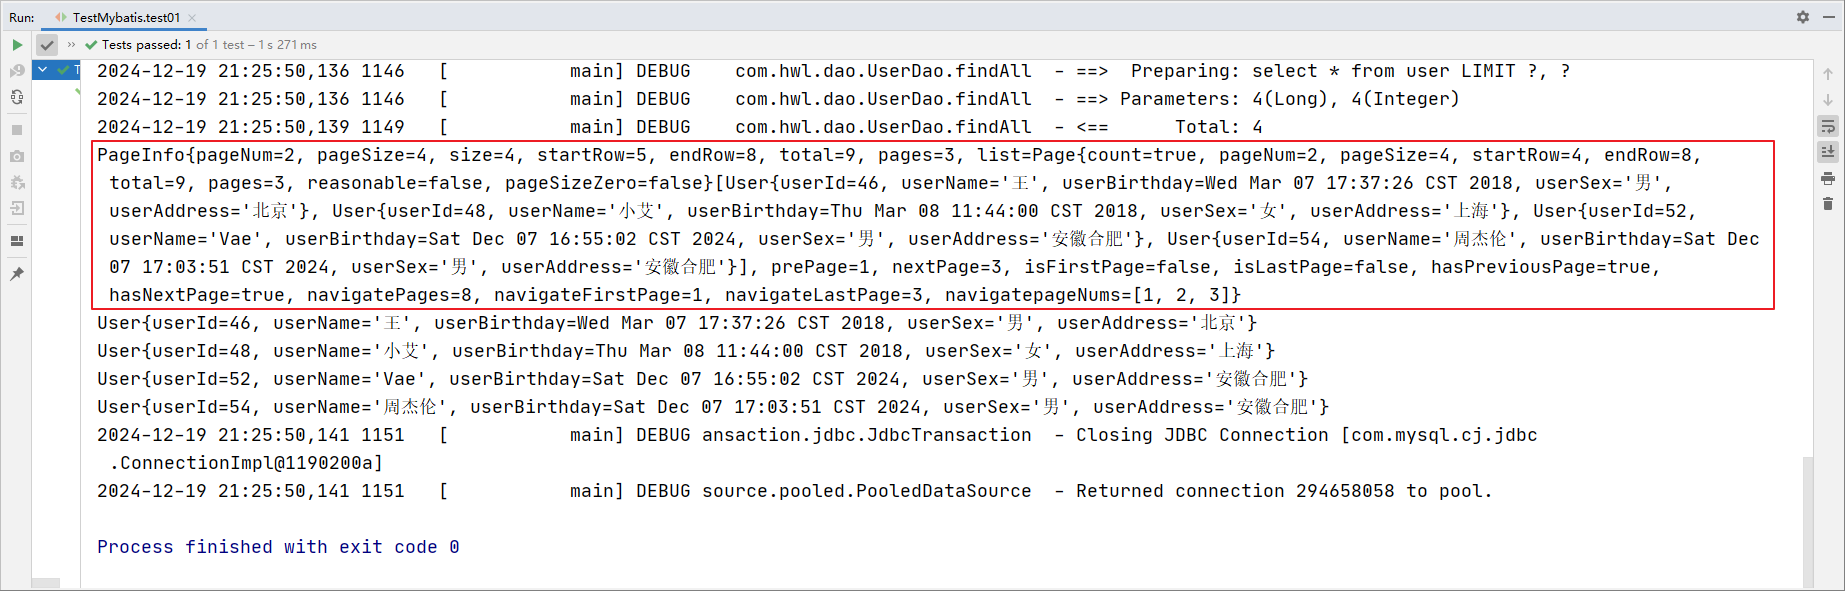
属性解读:
- pageNum:当前页的页码
- pageSize:每页显示的条数
- size:当前页现实的真实条数
- total:总记录数
- pages:总页数
- prePage:上一页的页码
- nextPage:下一页的页码
- isFirstPage/isLastPage:是否为第一页/最后一页
- hasPreviousPage/hasNextPage:是否存在上一页/下一页
- navigatePages:导航分页的页码数
- navigatepageNums:导航分页的页码,1, 2, 3
4.36-mybatis源码追踪之SqlSessionFactory初始化
4.37-mybatis源码追踪之SqlSessionFactory初始化总结
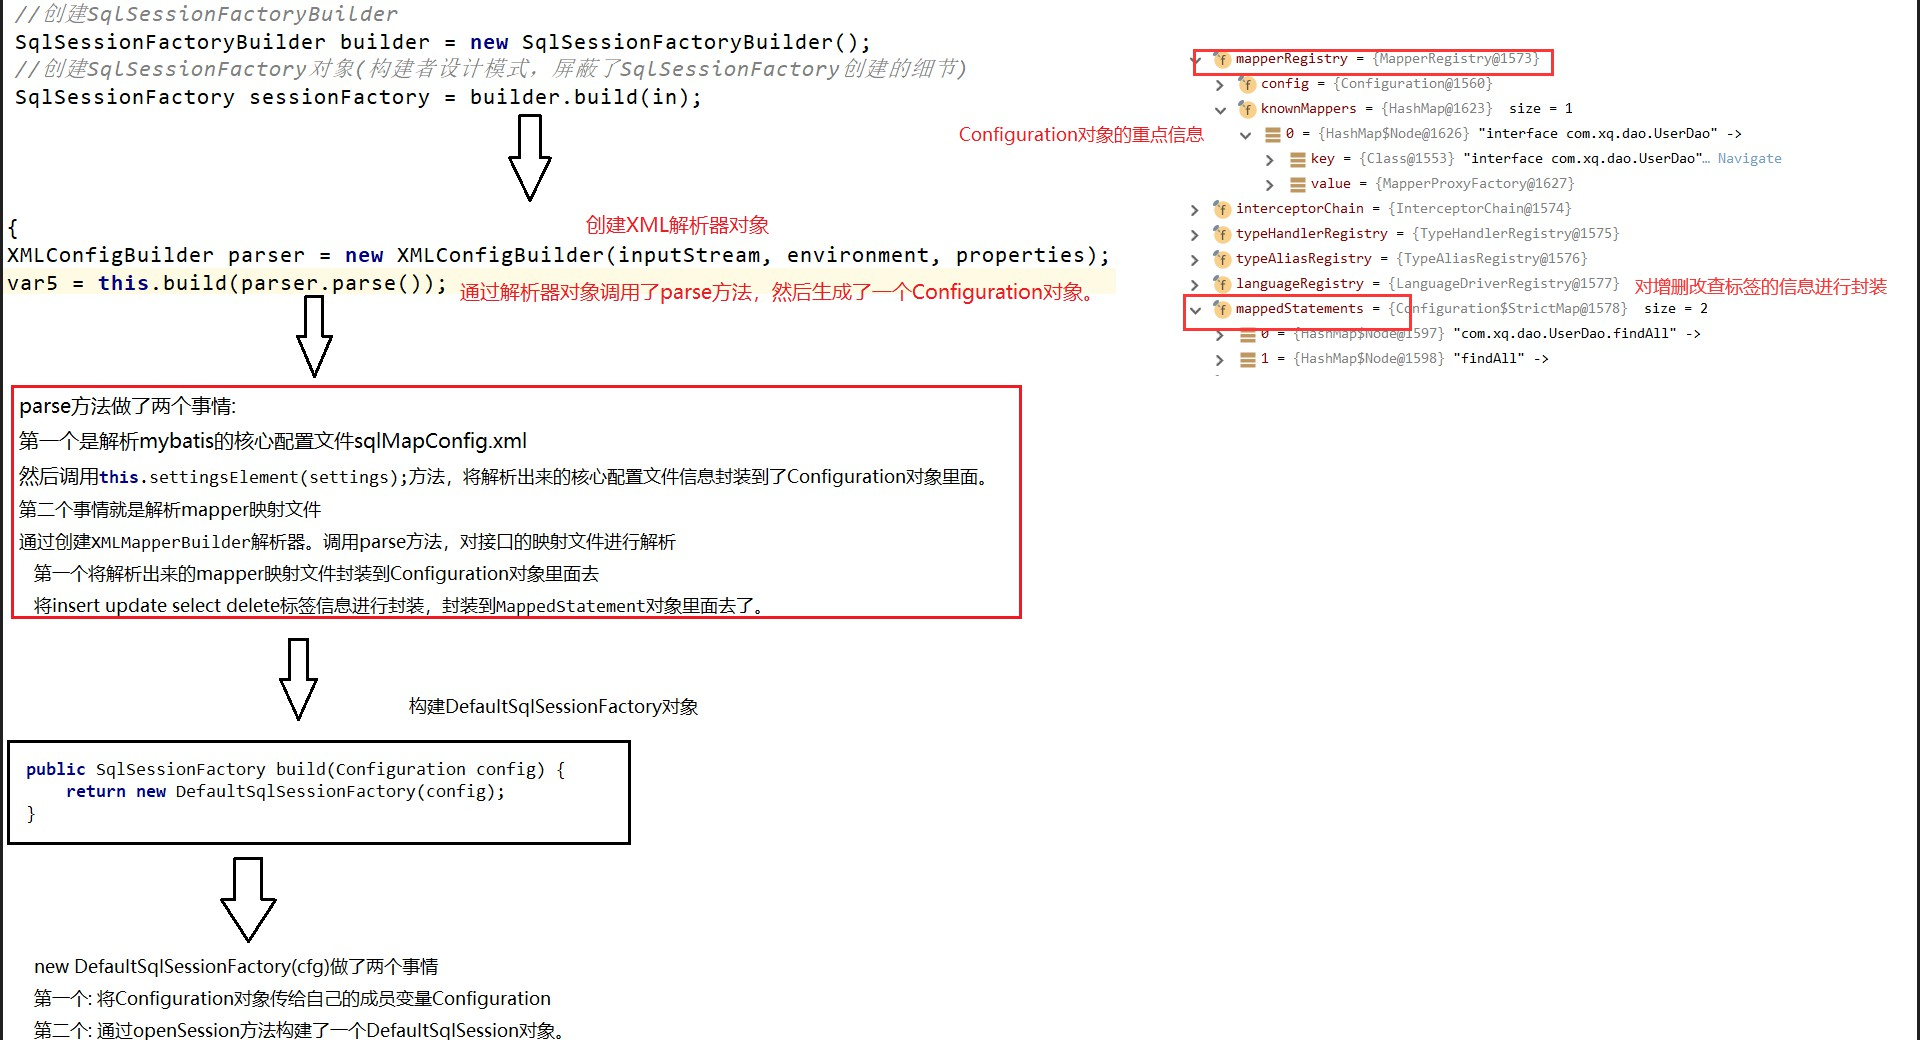
4.38-mybatis源码追踪之SqlSession对象创建流程
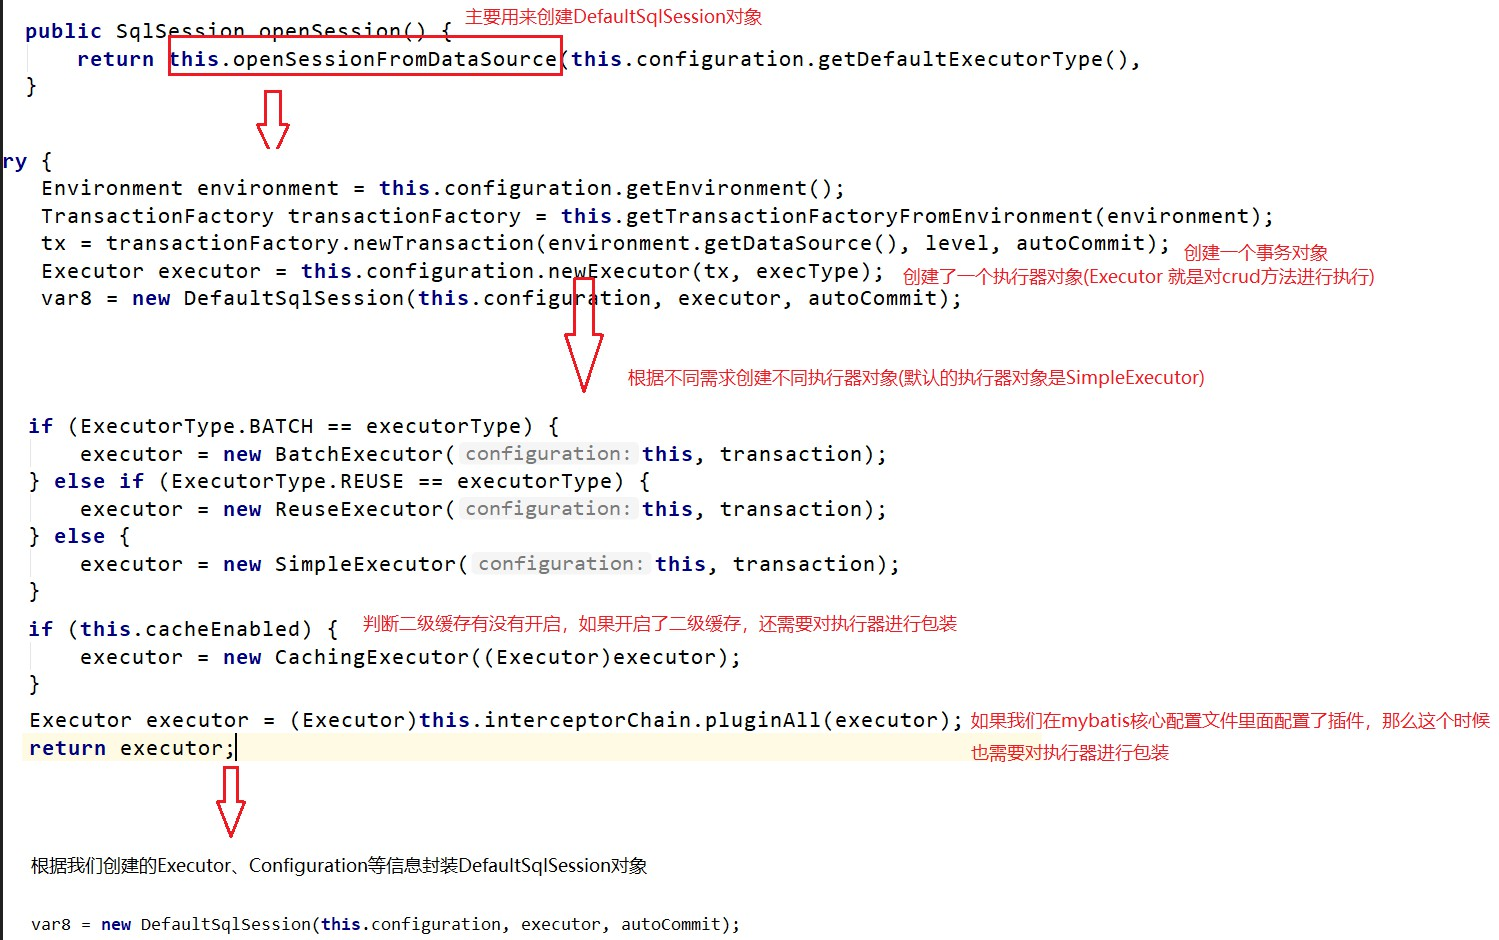
4.39-mybatis源码追踪之getMapper方法的具体实现
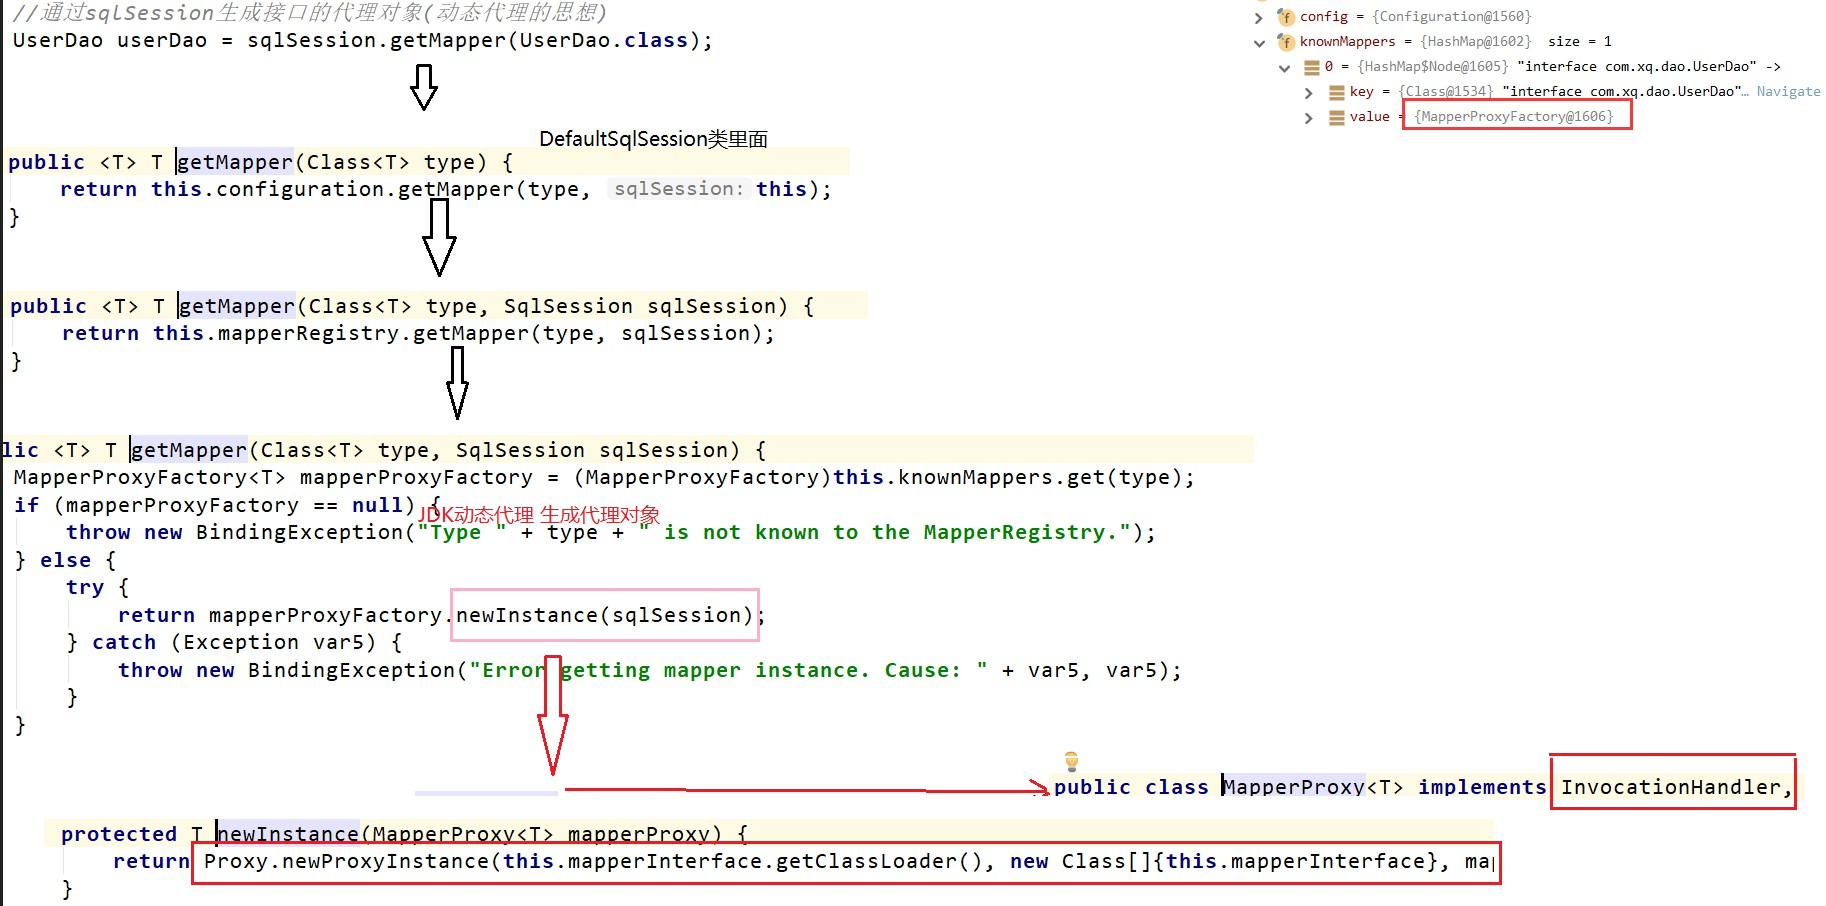
63 SSM整合
5.1-分析案例需求,搭建聚合工程
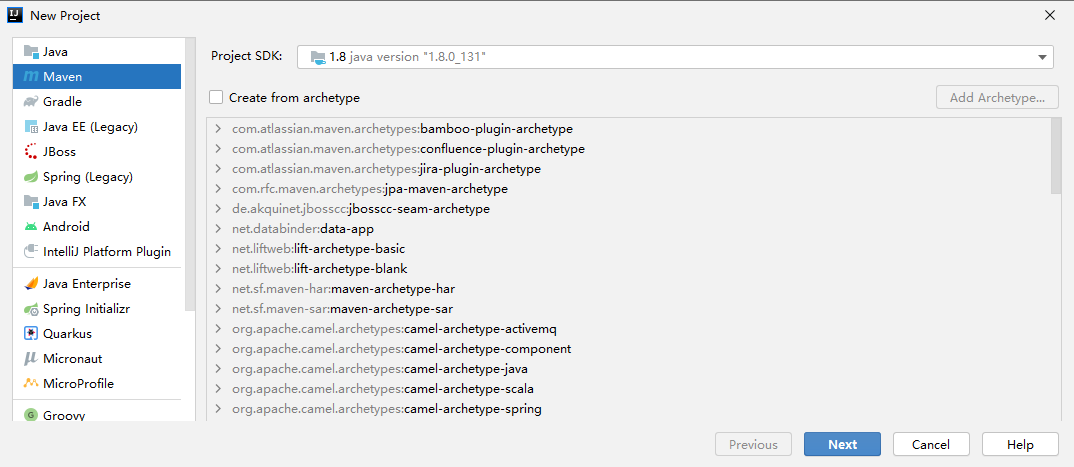
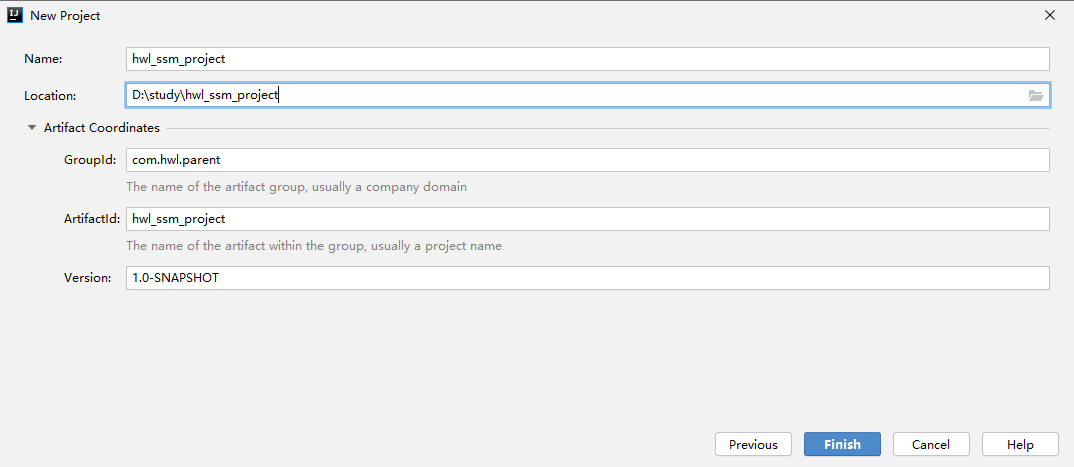
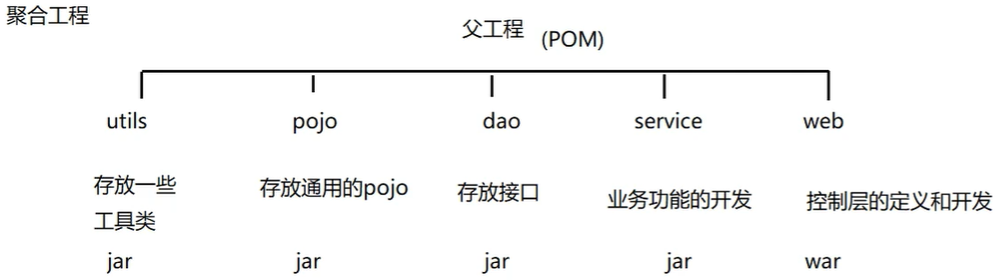
引入相关的依赖:
xml
<!--定义依赖的版本号-->
<properties>
<spring.version>5.0.2.RELEASE</spring.version>
<slf4j.version>1.6.6</slf4j.version>
<log4j.version>1.2.12</log4j.version>
<oracle.version>11.2.0.1.0</oracle.version>
<mybatis.version>3.4.5</mybatis.version>
<spring.security.version>5.0.1.RELEASE</spring.security.version>
<mysql.version>8.0.25</mysql.version>
</properties>
<dependencies>
<!-- spring -->
<dependency>
<groupId>org.aspectj</groupId>
<artifactId>aspectjweaver</artifactId>
<version>1.6.8</version>
</dependency>
<dependency>
<groupId>org.springframework</groupId>
<artifactId>spring-aop</artifactId>
<version>${spring.version}</version>
</dependency>
<dependency>
<groupId>org.springframework</groupId>
<artifactId>spring-context</artifactId>
<version>${spring.version}</version>
</dependency>
<dependency>
<groupId>org.springframework</groupId>
<artifactId>spring-context-support</artifactId>
<version>${spring.version}</version>
</dependency>
<dependency>
<groupId>org.springframework</groupId>
<artifactId>spring-web</artifactId>
<version>${spring.version}</version>
</dependency>
<dependency>
<groupId>org.springframework</groupId>
<artifactId>spring-orm</artifactId>
<version>${spring.version}</version>
</dependency>
<dependency>
<groupId>org.springframework</groupId>
<artifactId>spring-beans</artifactId>
<version>${spring.version}</version>
</dependency>
<dependency>
<groupId>org.springframework</groupId>
<artifactId>spring-core</artifactId>
<version>${spring.version}</version>
</dependency>
<dependency>
<groupId>org.springframework</groupId>
<artifactId>spring-test</artifactId>
<version>${spring.version}</version>
</dependency>
<dependency>
<groupId>org.springframework</groupId>
<artifactId>spring-webmvc</artifactId>
<version>${spring.version}</version>
</dependency>
<dependency>
<groupId>org.springframework</groupId>
<artifactId>spring-tx</artifactId>
<version>${spring.version}</version>
</dependency>
<dependency>
<groupId>junit</groupId>
<artifactId>junit</artifactId>
<version>4.12</version>
<scope>test</scope>
</dependency>
<dependency>
<groupId>javax.servlet</groupId>
<artifactId>javax.servlet-api</artifactId>
<version>3.1.0</version>
<scope>provided</scope>
</dependency>
<dependency>
<groupId>javax.servlet.jsp</groupId>
<artifactId>jsp-api</artifactId>
<version>2.0</version>
<scope>provided</scope>
</dependency>
<dependency>
<groupId>jstl</groupId>
<artifactId>jstl</artifactId>
<version>1.2</version>
</dependency>
<!-- log start -->
<dependency>
<groupId>log4j</groupId>
<artifactId>log4j</artifactId>
<version>${log4j.version}</version>
</dependency>
<dependency>
<groupId>org.slf4j</groupId>
<artifactId>slf4j-api</artifactId>
<version>${slf4j.version}</version>
</dependency>
<dependency>
<groupId>org.slf4j</groupId>
<artifactId>slf4j-log4j12</artifactId>
<version>${slf4j.version}</version>
</dependency>
<!-- log end -->
<!--mybatis-->
<dependency>
<groupId>org.mybatis</groupId>
<artifactId>mybatis</artifactId>
<version>${mybatis.version}</version>
</dependency>
<dependency>
<groupId>org.mybatis</groupId>
<artifactId>mybatis-spring</artifactId>
<version>1.3.0</version>
</dependency>
<!--数据源-->
<dependency>
<groupId>c3p0</groupId>
<artifactId>c3p0</artifactId>
<version>0.9.1.2</version>
<type>jar</type>
<scope>compile</scope>
</dependency>
<!--分页插件-->
<dependency>
<groupId>com.github.pagehelper</groupId>
<artifactId>pagehelper</artifactId>
<version>5.1.2</version>
</dependency>
<!--springSecurity-->
<dependency>
<groupId>org.springframework.security</groupId>
<artifactId>spring-security-web</artifactId>
<version>${spring.security.version}</version>
</dependency>
<dependency>
<groupId>org.springframework.security</groupId>
<artifactId>spring-security-config</artifactId>
<version>${spring.security.version}</version>
</dependency>
<dependency>
<groupId>org.springframework.security</groupId>
<artifactId>spring-security-core</artifactId>
<version>${spring.security.version}</version>
</dependency>
<dependency>
<groupId>org.springframework.security</groupId>
<artifactId>spring-security-taglibs</artifactId>
<version>${spring.security.version}</version>
</dependency>
<!--数据库驱动-->
<dependency>
<groupId>mysql</groupId>
<artifactId>mysql-connector-java</artifactId>
<version>${mysql.version}</version>
</dependency>
<dependency>
<groupId>javax.annotation</groupId>
<artifactId>jsr250-api</artifactId>
<version>1.0</version>
</dependency>
</dependencies>
<!--tomcat7插件-->
<build>
<plugins>
<plugin>
<groupId>org.apache.tomcat.maven</groupId>
<artifactId>tomcat7-maven-plugin</artifactId>
<version>2.2</version>
</plugin>
</plugins>
</build>删掉父工程的src目录,因为用不到。接着创建子模块。
创建pojo
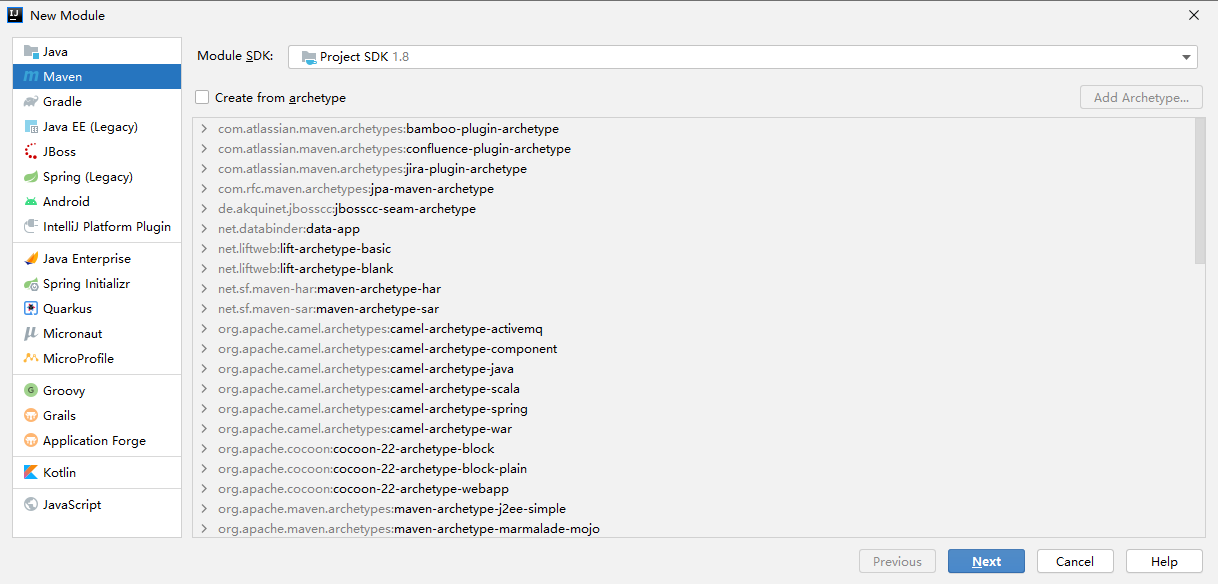
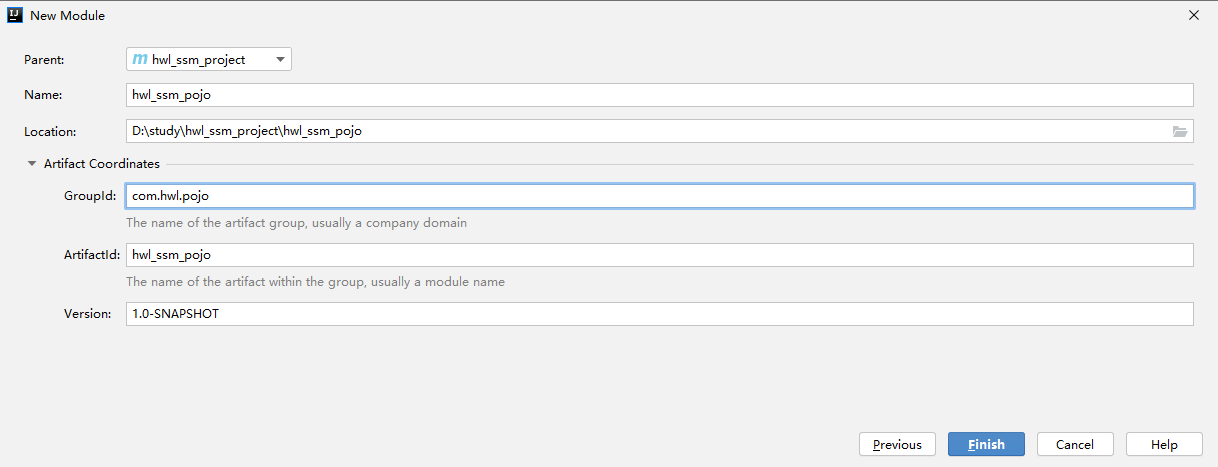
并创建好包: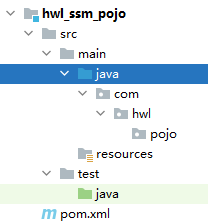
创建dao
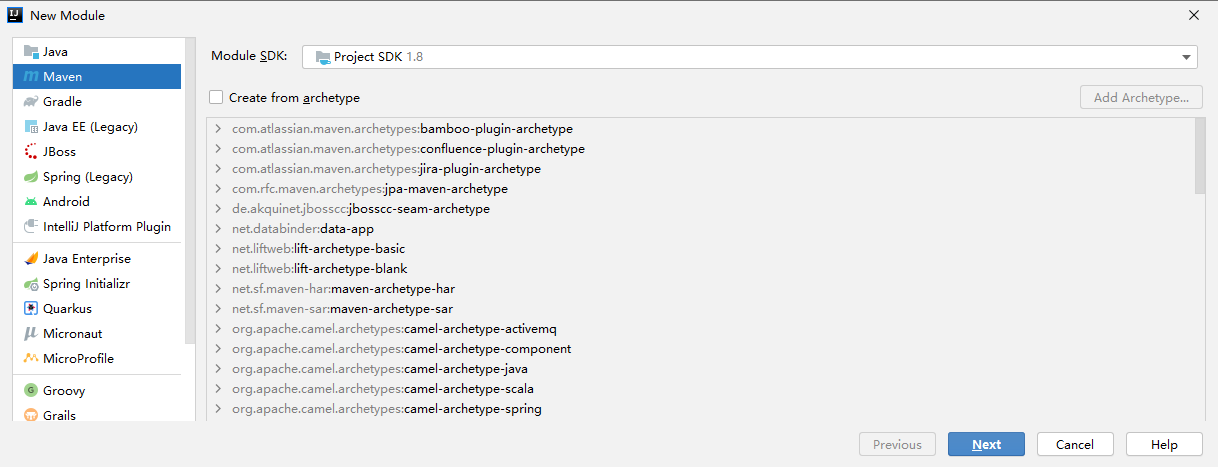
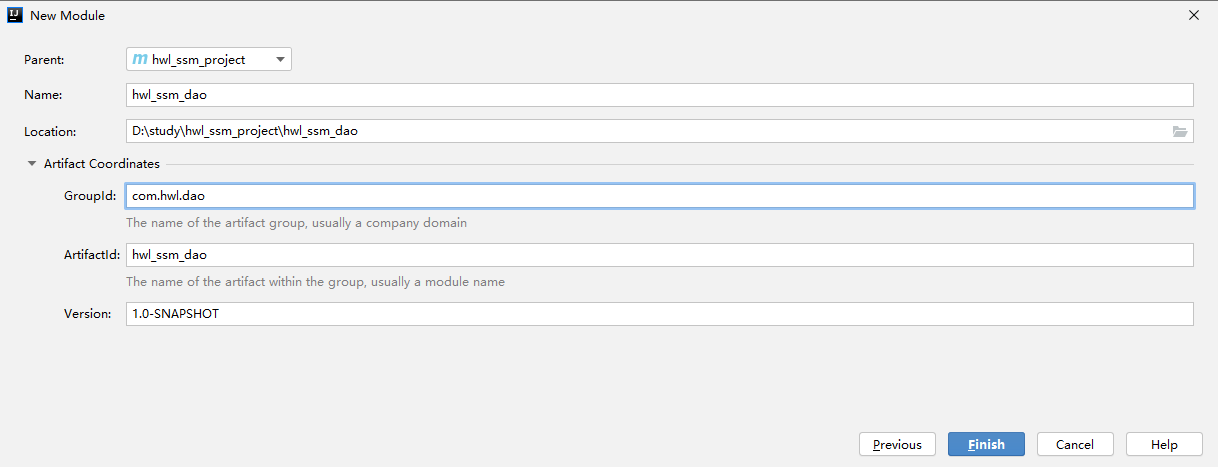
创建包: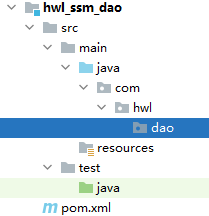
创建utils
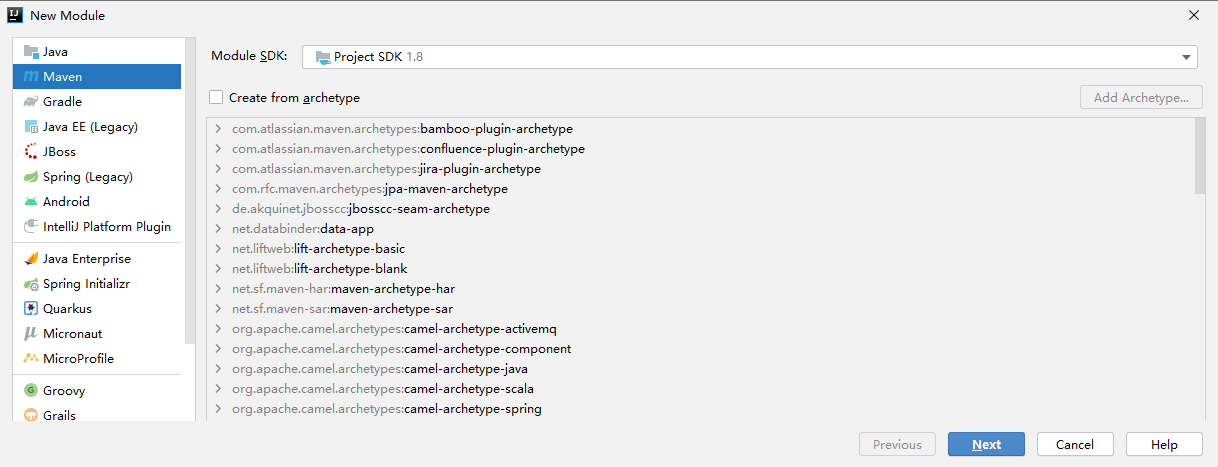
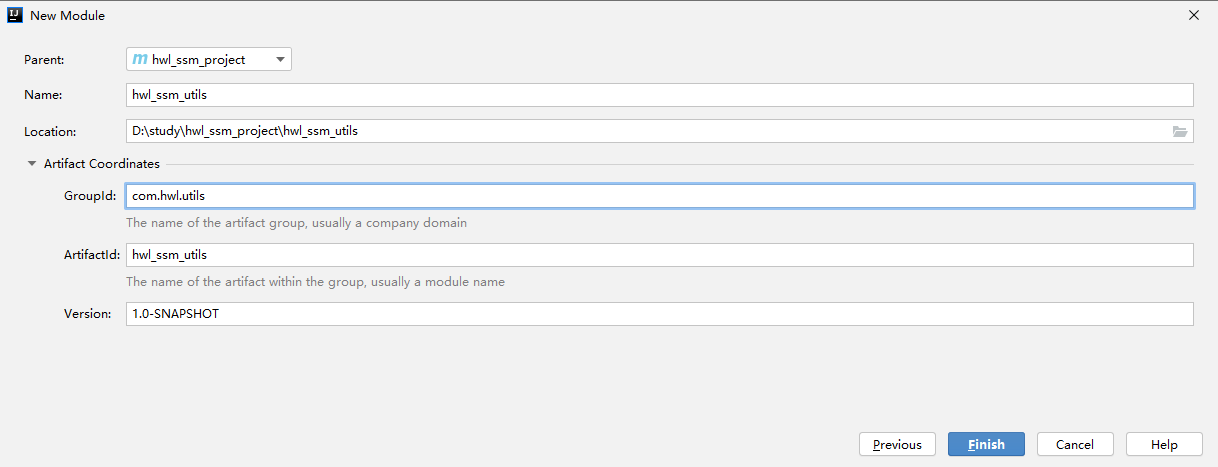
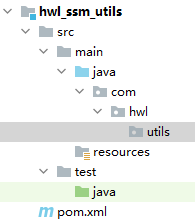
创建service
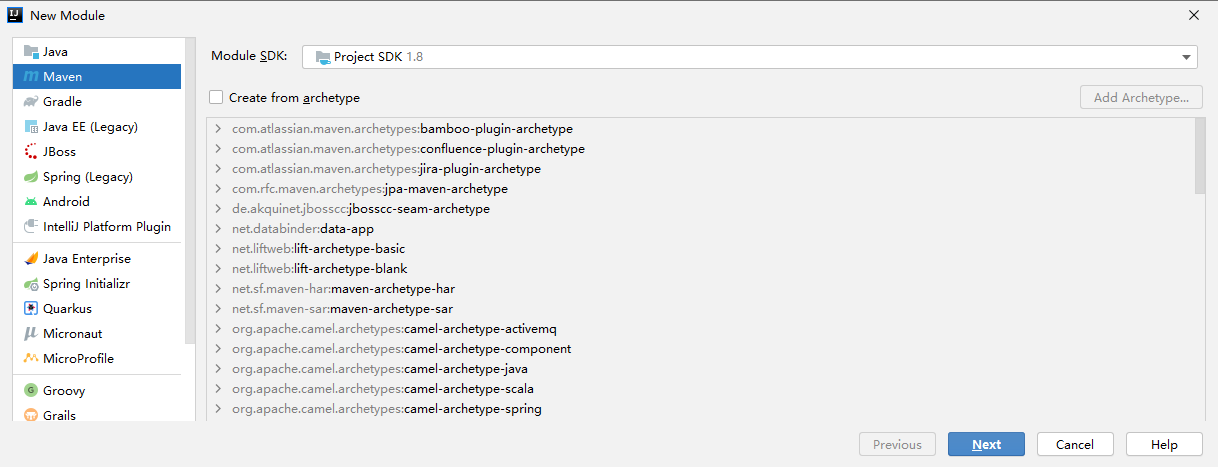
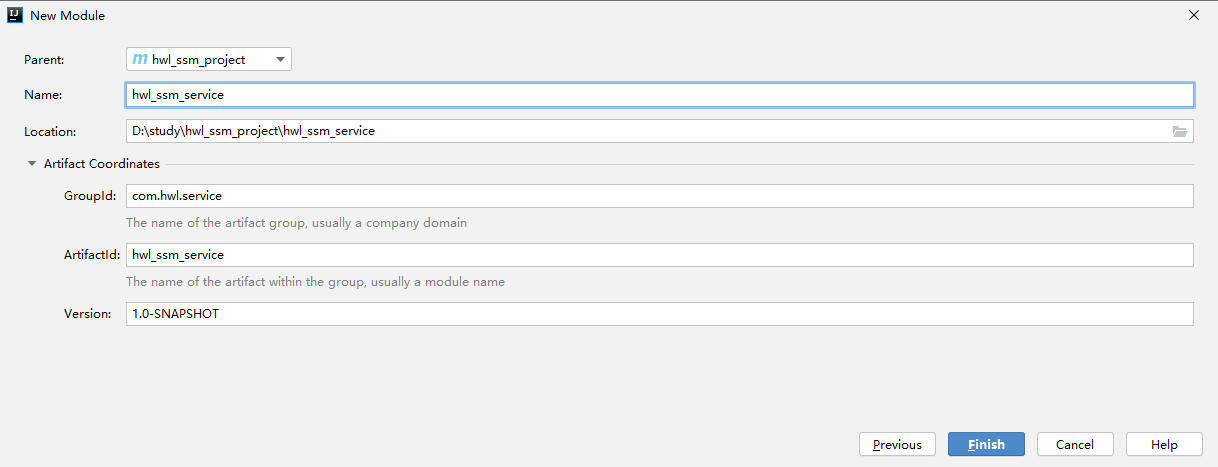
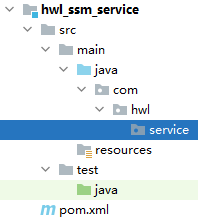
创建web
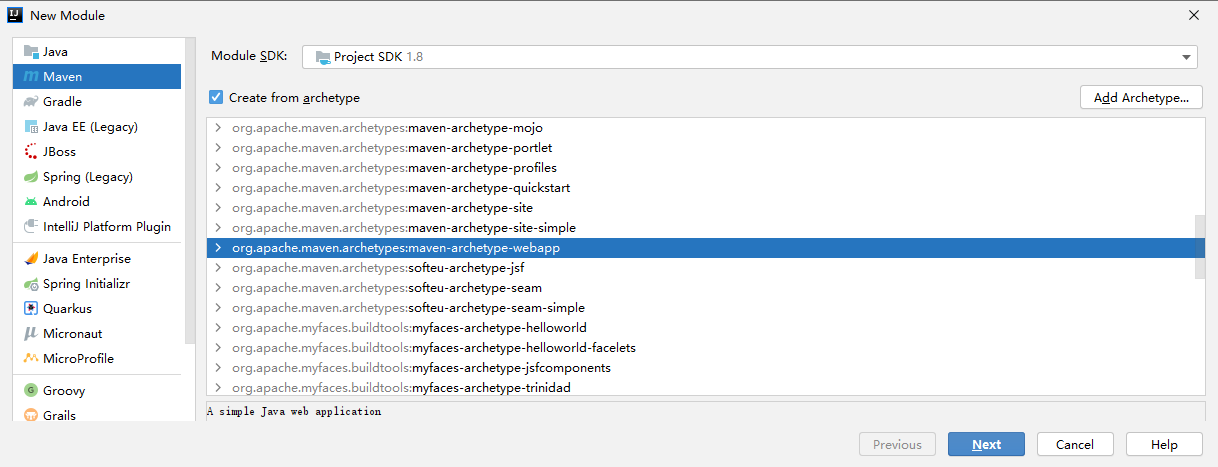
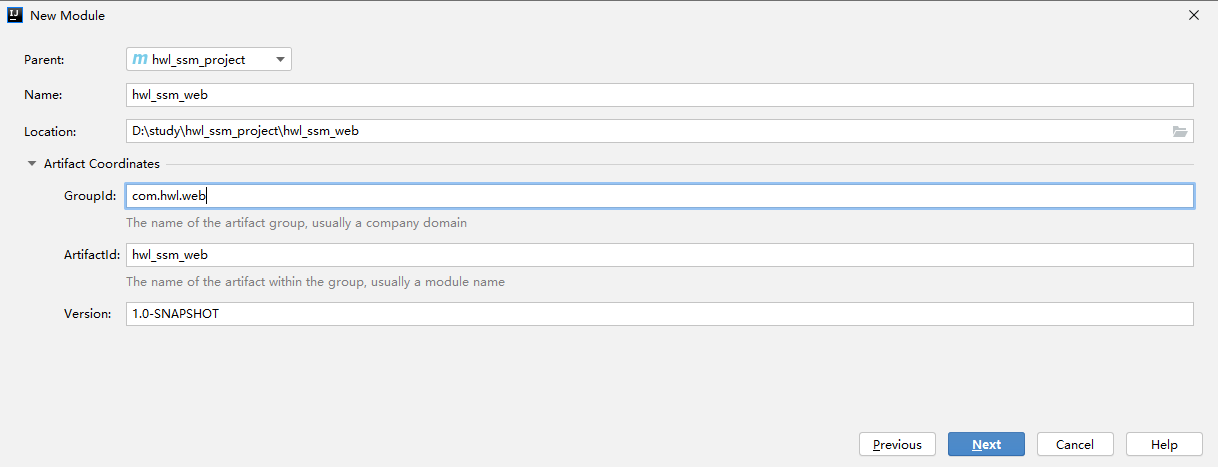
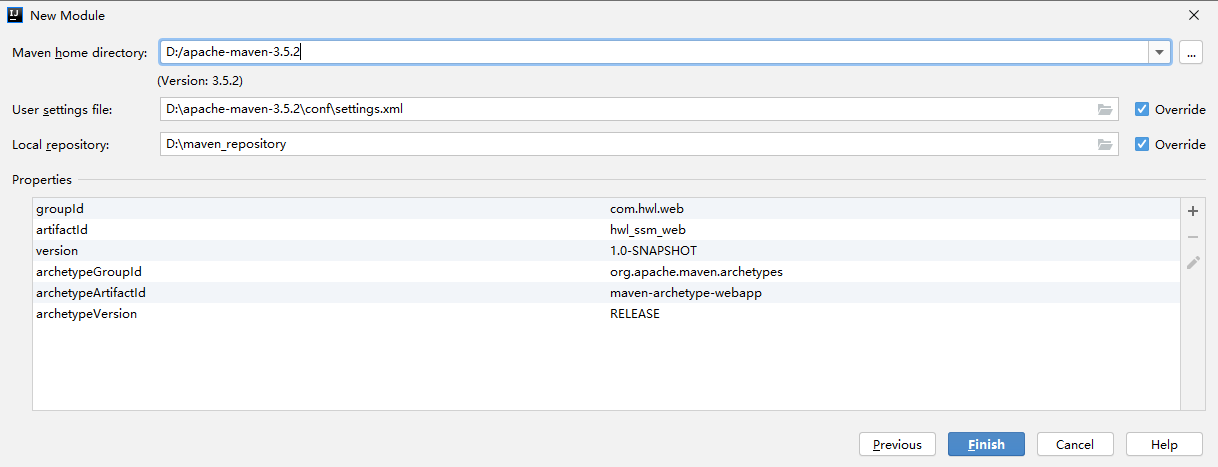
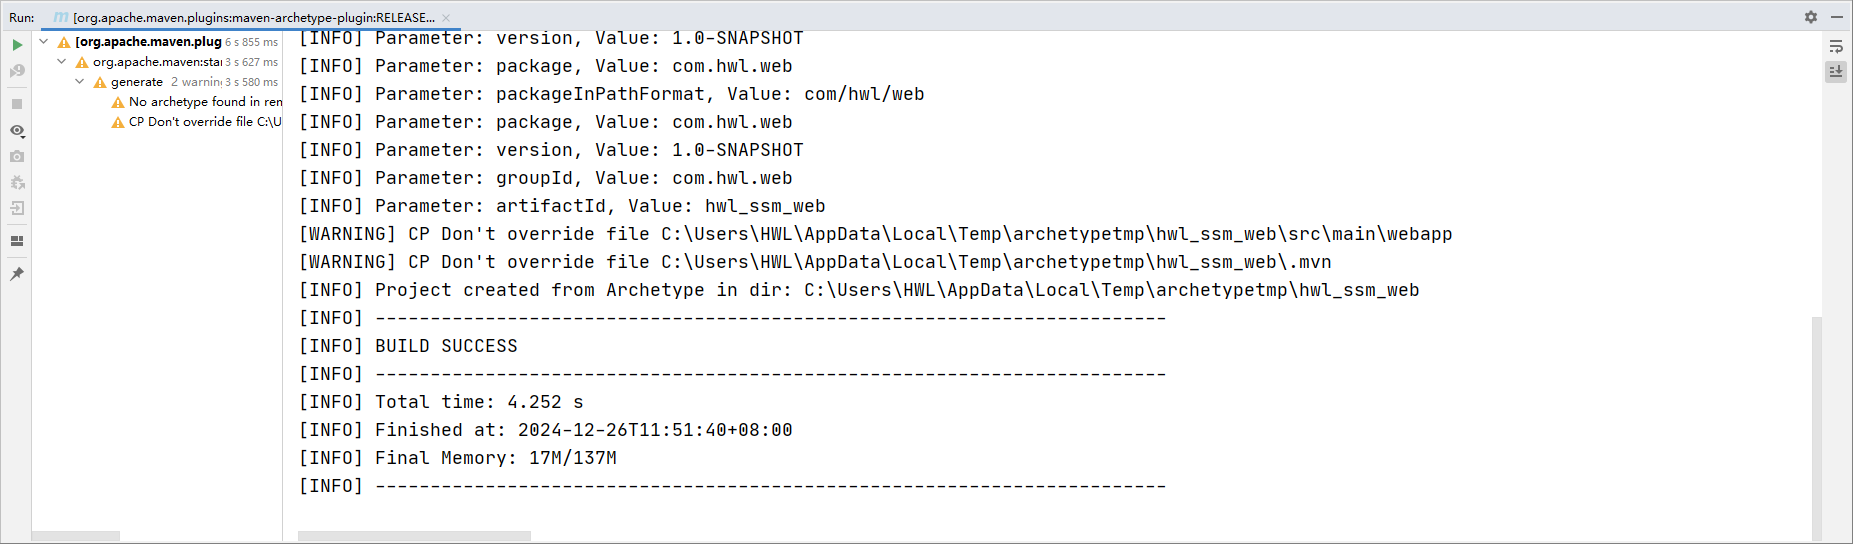
自己建个java和resources包(因为没有自动创建):
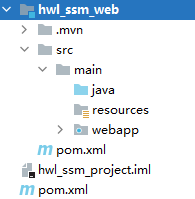
5.2-整合spring的环境
spring环境的整合包括以下四个方面:
- 开启包扫描
- 定义数据源
- 定义事务管理器
- 相关事务的配置(编程式事务的控制、声明式事务的控制、注解式事务的控制)
- 在web.xml配置文件里面 使用监听器加载spring的配置文件
hwl_ssm_web模块里面:
applicationContext.xml:
xml
<?xml version="1.0" encoding="UTF-8"?>
<beans xmlns="http://www.springframework.org/schema/beans"
xmlns:xsi="http://www.w3.org/2001/XMLSchema-instance"
xmlns:context="http://www.springframework.org/schema/context" xmlns:tx="http://www.springframework.org/schema/tx"
xsi:schemaLocation="http://www.springframework.org/schema/beans
http://www.springframework.org/schema/beans/spring-beans.xsd http://www.springframework.org/schema/context
http://www.springframework.org/schema/context/spring-context.xsd http://www.springframework.org/schema/tx http://www.springframework.org/schema/tx/spring-tx.xsd">
<!--
开启包扫描:主要扫描service dao
-->
<context:component-scan base-package="com.hwl.dao"/>
<context:component-scan base-package="com.hwl.service"/>
<!--读取properties配置文件-->
<context:property-placeholder location="classpath:db.properties"/>
<!--定义数据源-->
<bean id="dataSource" class="com.mchange.v2.c3p0.ComboPooledDataSource">
<property name="driverClass" value="${jdbc.driver}"/>
<property name="jdbcUrl" value="${jdbc.url}"/>
<property name="user" value="${jdbc.username}"/>
<property name="password" value="${jdbc.password}"/>
</bean>
<!--定义事务管理器-->
<bean id="transactionManager" class="org.springframework.jdbc.datasource.DataSourceTransactionManager">
<property name="dataSource" ref="dataSource"/>
</bean>
<!--这里用简单的注解来控制事务,注意这里头不能选错了,很容易选错-->
<tx:annotation-driven transaction-manager="transactionManager"/>
</beans>db.properties:
properties
jdbc.driver=com.mysql.jdbc.Driver
jdbc.url=jdbc:mysql://localhost:3306/hotel
jdbc.username=root
jdbc.password=rootweb.xml:
xml
<?xml version="1.0" encoding="UTF-8"?>
<web-app
version="4.0"
xmlns="http://xmlns.jcp.org/xml/ns/javaee"
xmlns:javaee="http://xmlns.jcp.org/xml/ns/javaee"
xmlns:xml="http://www.w3.org/XML/1998/namespace"
xmlns:xsi="http://www.w3.org/2001/XMLSchema-instance"
xsi:schemaLocation="http://xmlns.jcp.org/xml/ns/javaee http://xmlns.jcp.org/xml/ns/javaee/web-app_4_0.xsd">
<display-name>Archetype Created Web Application</display-name>
<!--配置spring配置文件的路径-->
<context-param>
<param-name>contextConfigLocation</param-name>
<param-value>classpath:applicationContext.xml</param-value>
</context-param>
<!--配置监听器-->
<listener>
<listener-class>org.springframework.web.context.ContextLoaderListener</listener-class>
</listener>
</web-app>5.3-整合springmvc的环境
springmvc环境的整合包括以下四个方面:
- 包扫描 扫描Controller
- 配置视图解析器
- 设置静态资源不过滤
- 开启对处理器适配器,处理器映射器的支持
- 配置前端控制器,编码过滤器,在web.xml中配置
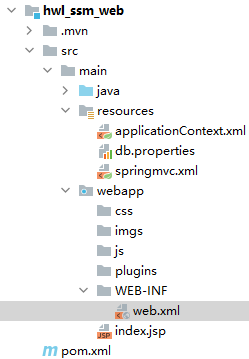
新建一个springmvc.xml:
xml
<?xml version="1.0" encoding="UTF-8"?>
<beans xmlns="http://www.springframework.org/schema/beans"
xmlns:xsi="http://www.w3.org/2001/XMLSchema-instance"
xmlns:context="http://www.springframework.org/schema/context"
xmlns:mvc="http://www.springframework.org/schema/mvc"
xsi:schemaLocation="http://www.springframework.org/schema/beans
http://www.springframework.org/schema/beans/spring-beans.xsd
http://www.springframework.org/schema/context
http://www.springframework.org/schema/context/spring-context.xsd
http://www.springframework.org/schema/mvc
http://www.springframework.org/schema/mvc/spring-mvc.xsd">
<context:component-scan base-package="com.hwl.controller"/>
<!--配置视图解析器-->
<bean id="viewResolver" class="org.springframework.web.servlet.view.InternalResourceViewResolver">
<!--视图解析的规则-->
<property name="prefix" value="/pages/"/>
<property name="suffix" value=".jsp"/>
</bean>
<!--设置静态资源不过滤-->
<mvc:resources mapping="/css/**" location="/css/"/>
<mvc:resources mapping="/img/**" location="/img/"/>
<mvc:resources mapping="/plugins/**" location="/plugins/"/>
<!--开启对处理器适配器,处理器映射器的支持-->
<mvc:annotation-driven/>
</beans>web.xml里面继续添加内容:
xml
<?xml version="1.0" encoding="UTF-8"?>
<web-app
version="4.0"
xmlns="http://xmlns.jcp.org/xml/ns/javaee"
xmlns:javaee="http://xmlns.jcp.org/xml/ns/javaee"
xmlns:xml="http://www.w3.org/XML/1998/namespace"
xmlns:xsi="http://www.w3.org/2001/XMLSchema-instance"
xsi:schemaLocation="http://xmlns.jcp.org/xml/ns/javaee
http://xmlns.jcp.org/xml/ns/javaee/web-app_4_0.xsd">
<display-name>Archetype Created Web Application</display-name>
<!--配置spring配置文件的路径-->
<context-param>
<param-name>contextConfigLocation</param-name>
<param-value>classpath:applicationContext.xml</param-value>
</context-param>
<!--配置监听器-->
<listener>
<listener-class>org.springframework.web.context.ContextLoaderListener</listener-class>
</listener>
<!--配置前端控制器-->
<servlet>
<servlet-name>dispatcherServlet</servlet-name>
<servlet-class>org.springframework.web.servlet.DispatcherServlet</servlet-class>
<!--设置编码过滤器的格式-->
<init-param>
<param-name>contextConfigLocation</param-name>
<param-value>classpath:springmvc.xml</param-value>
</init-param>
</servlet>
<servlet-mapping>
<servlet-name>dispatcherServlet</servlet-name>
<url-pattern>*.do</url-pattern>
</servlet-mapping>
<!--配置编码过滤器-->
<filter>
<filter-name>characterEncodingFilter</filter-name>
<filter-class>org.springframework.web.filter.CharacterEncodingFilter</filter-class>
<!--设置编码过滤器的格式,这里不写的话会导致中文乱码,具体在5.9节体现-->
<init-param>
<param-name>encoding</param-name>
<param-value>UTF-8</param-value>
</init-param>
</filter>
<filter-mapping>
<filter-name>characterEncodingFilter</filter-name>
<url-pattern>/*</url-pattern>
</filter-mapping>
</web-app>5.4-整合mybatis&tomcat
整合mybatis
- 将sqlSessionFactory交给spring容器管理
- MapperScannerConfigurer 扫描接口,来获取接口的代理对象
在spring的配置文件applicationContext.xml进行mybatis的相关配置。添加以下代码:
xml
<!--将sqlSessionFactory这个bean交给spring容器管理-->
<bean id="sqlSessionFactory" class="org.mybatis.spring.SqlSessionFactoryBean">
<!--注入数据源-->
<property name="dataSource" ref="dataSource"/>
<!--PageHelper插件-->
<!-- 传入PageHelper的插件 -->
<property name="plugins">
<array>
<!-- 传入插件的对象 -->
<bean class="com.github.pagehelper.PageInterceptor">
<property name="properties">
<props>
<!--使用mysql的分页语句-->
<prop key="helperDialect">mysql</prop>
<prop key="reasonable">true</prop>
</props>
</property>
</bean>
</array>
</property>
</bean>
<!--
扫描dao接口,生成接口的代理对象
-->
<bean id="mapperScannerConfigurer" class="org.mybatis.spring.mapper.MapperScannerConfigurer">
<property name="basePackage" value="com.hwl.dao"/>
</bean>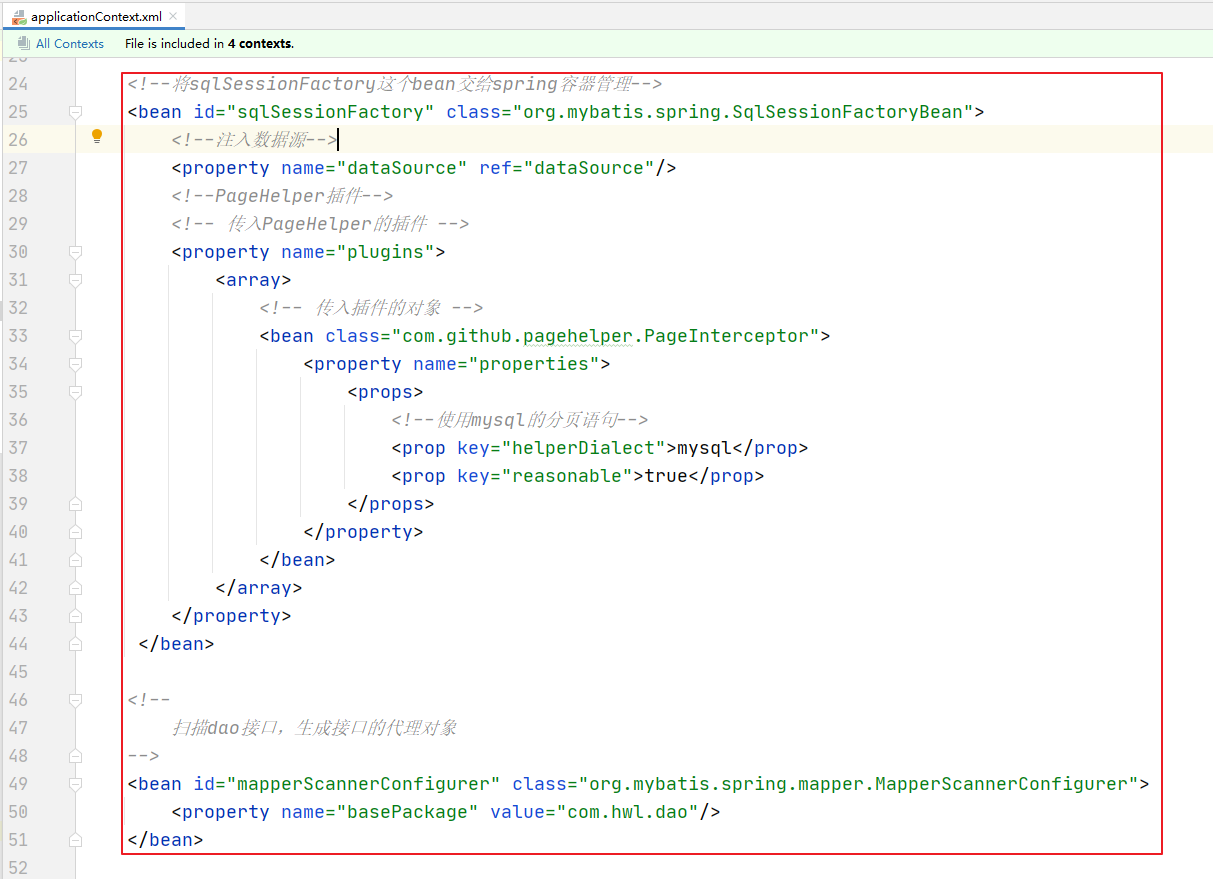
整合tomcat
这里演示整合本地的tomcat,点击
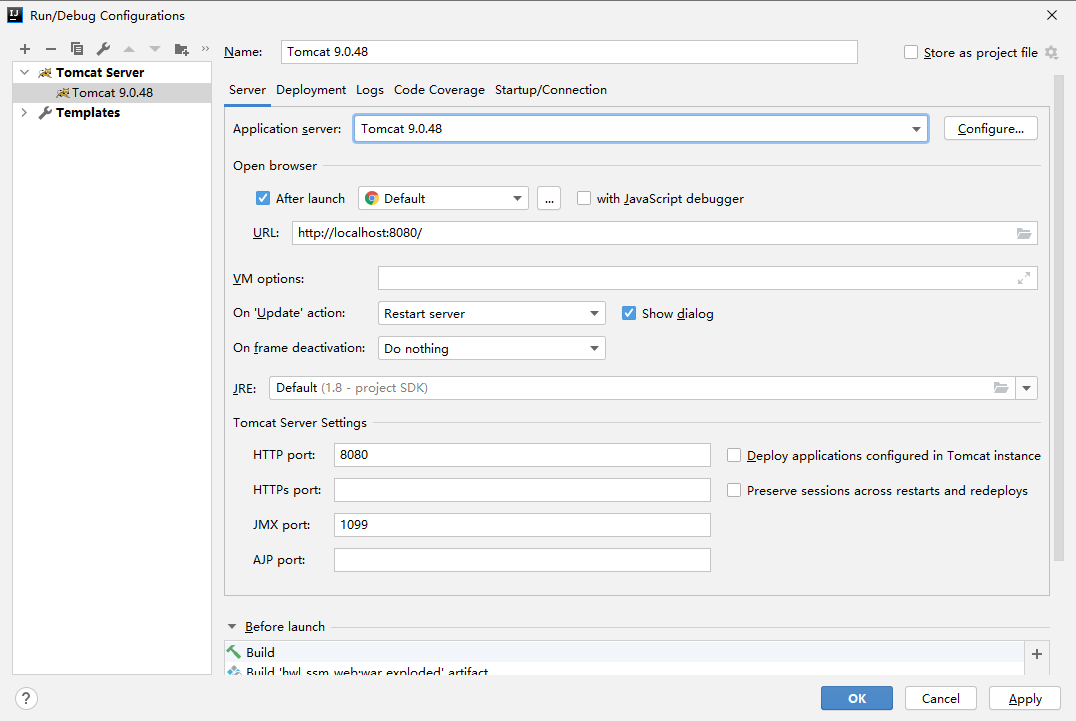
5.5-启动测试
把前端相关的文件复制进项目中,注意在本地的文件夹里面复制粘贴,不要在idea里面粘贴,因为速度不高。
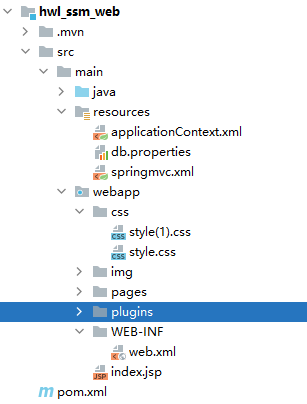
index.jsp:
通过 jsp:forward这个标签,跳转到main.jsp(主页)
启动运行:

5.6-展示所有商品信息
首先根据数据库表创建实体类Product
java
package com.hwl.pojo;
import com.hwl.utils.DateUtils;
import org.springframework.format.annotation.DateTimeFormat;
import java.util.Date;
public class Product {
private String id; //主键
private String productNum; //编号 唯一
private String productName; //名称
private String cityName; //出发城市
@DateTimeFormat(pattern = "yyyy-MM-dd HH:mm")
private Date departureTime; //出发时间
private String departureTimeStr; //(这个属性在数据表中没有,自己单独加,用于渲染)
private Double productPrice; //产品价格
private String productDesc; //产品描述
private Integer productStatus; //状态 0关闭 1开启
private String productStatusStr; //(这个属性在数据表中没有,自己单独加,用于渲染)
//getter、setter、toString,其中特殊的看下面
public String getDepartureTimeStr() {
if (departureTime != null) {
departureTimeStr = DateUtils.date2String(departureTime, "yyyy-MM-dd HH:mm:ss"); //这里用到的工具类
}
return departureTimeStr;
}
public String getProductStatusStr() {
if (productStatus != null){
if (productStatus == 0){
productStatusStr = "关闭";
}
if (productStatus == 1){
productStatusStr = "开启";
}
}
return productStatusStr;
}
}上面的代码里面,需要用到工具类(在
模块里),所以需要在
的pom.xml里面引入依赖
接着,去web模块写ProductController
java
@Controller
@RequestMapping("product")
public class ProductController {
@Autowired
ProductService productService;
@RequestMapping("findAll.do")
public String findAll(Model model){
List<Product> productList = productService.findAll(); //先不分页展示,直接显示,后面弄分页
model.addAttribute("productList", productList);
return "product-list";
}
}
前端写好的(注意不要忽略el表达式 isELIgnored="false"):
controller模块里面注入service依赖:
xml
<dependencies>
<dependency>
<groupId>com.hwl.service</groupId>
<artifactId>hwl_ssm_service</artifactId>
<version>1.0-SNAPSHOT</version>
</dependency>
</dependencies>service模块:
java
public interface ProductService {
//查询商品信息
List<Product> findAll();
}
java
@Service
@Transactional
public class ProductServiceImpl implements ProductService {
@Autowired
ProductDao productDao;
public List<Product> findAll() {
return productDao.findAll();
}
}注入dao依赖:
xml
<dependencies>
<dependency>
<groupId>com.hwl.dao</groupId>
<artifactId>hwl_ssm_dao</artifactId>
<version>1.0-SNAPSHOT</version>
</dependency>
</dependencies>dao模块:
java
public interface ProductDao {
@Select("select * from product")
List<Product> findAll();
}注入pojo依赖:
xml
<dependencies>
<dependency>
<groupId>com.hwl.pojo</groupId>
<artifactId>hwl_ssm_pojo</artifactId>
<version>1.0-SNAPSHOT</version>
</dependency>
</dependencies>启动运行:
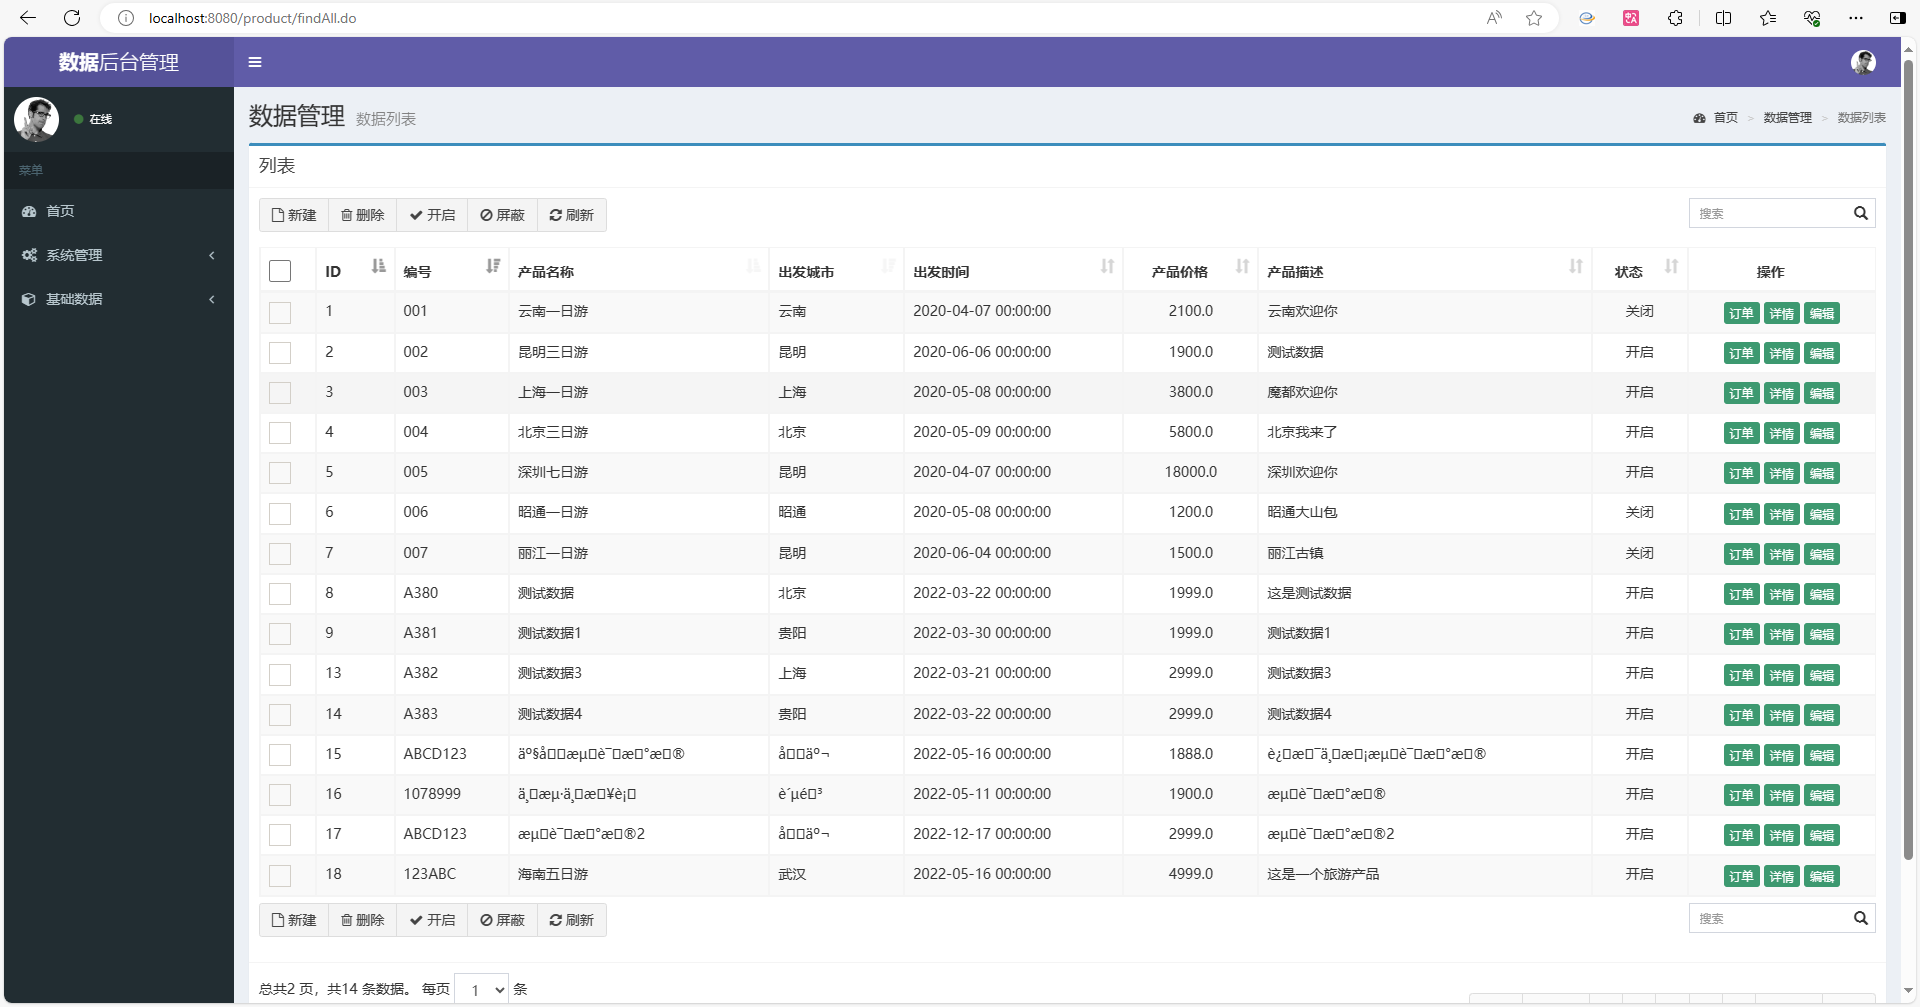
5.7-总结下刚才的步骤
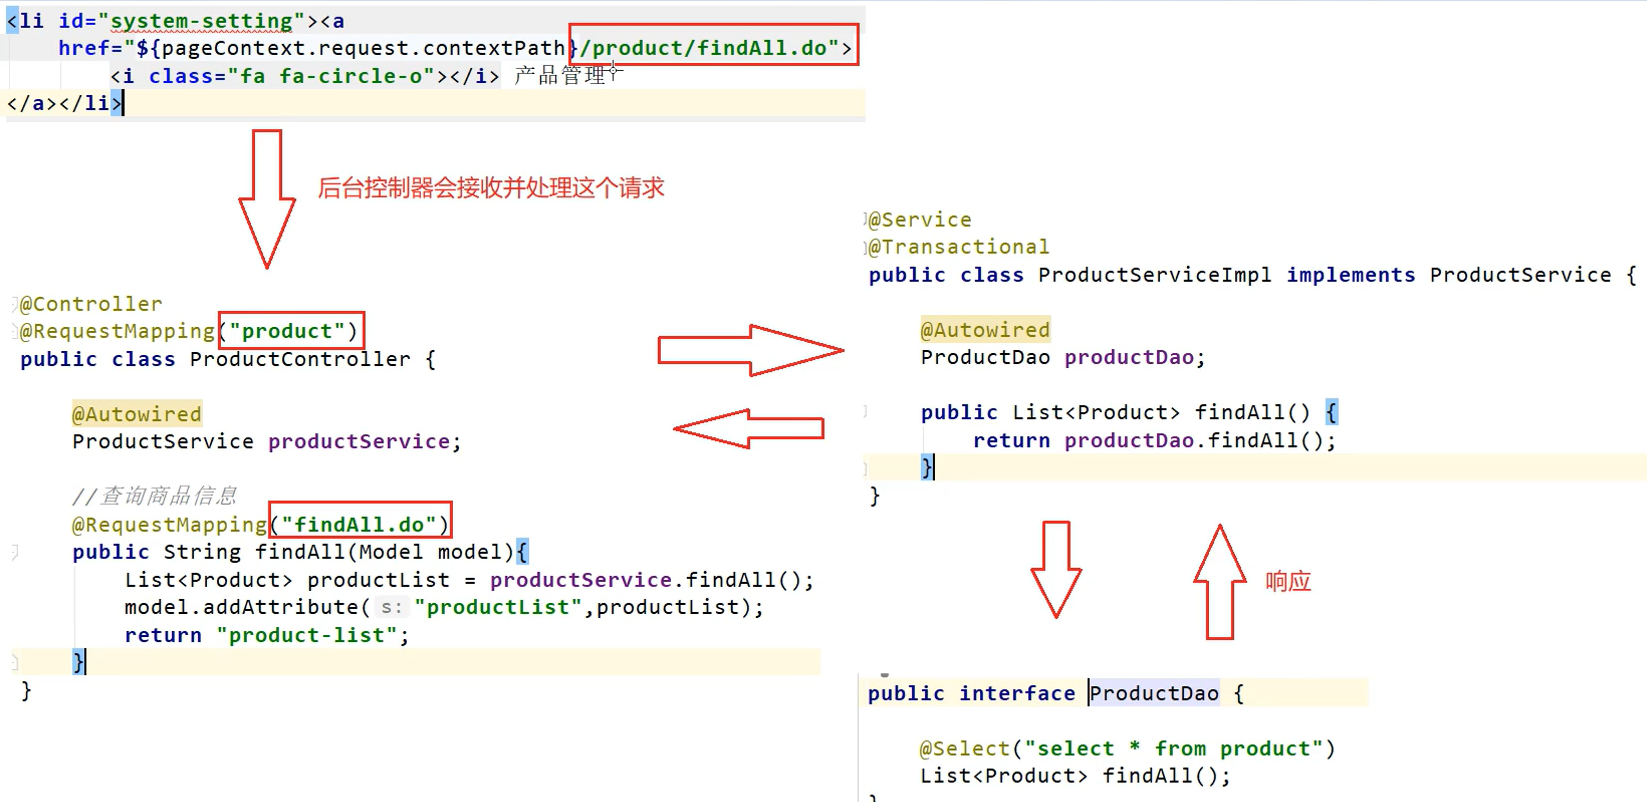
5.8-新增商品信息
首先,是看前端页面里该功能的入口在哪里 :
Java
@RequestMapping("save.do")
public String save(Product product){
productService.add(product);
return "redirect:findAll.do"; //这里必须使用重定向, 重新加载展示product的数据列表 (使用转发会导致表单的重复提交)
}
java
public interface ProductService {
//查询商品信息
List<Product> findAll();
//新增商品
void add(Product product);
}ProductDao:
java
@Insert("INSERT INTO product(productNum,productName,cityName,DepartureTime,productPrice,productDesc,productStatus) " +
"VALUES(#{productNum},#{productName},#{cityName},#{DepartureTime},#{productPrice},#{productDesc},#{productStatus})")
void add(Product product);启动测试:
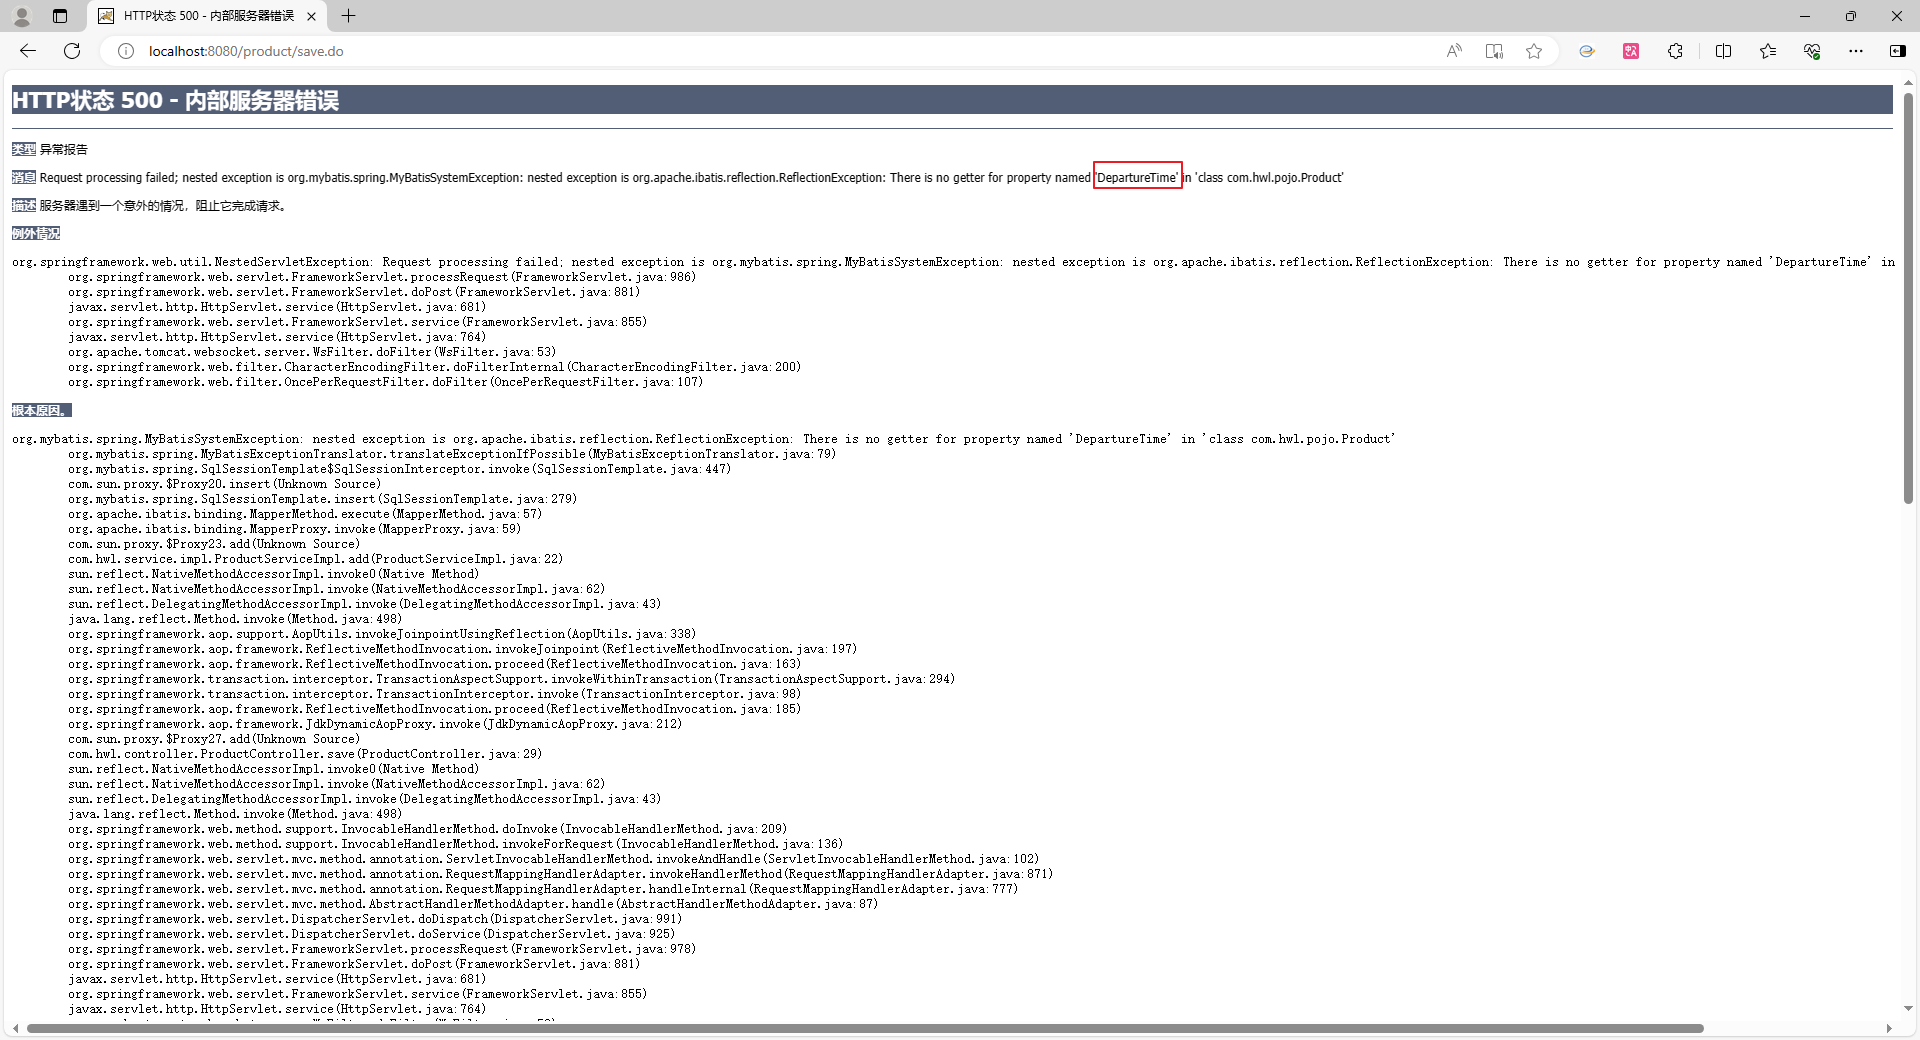
原因在于pojo里面的 departureTime 的 d 是小写,
,sql语句里的 #{} 里面的写的是实体的字段,所以应该改成小写

再次运行:
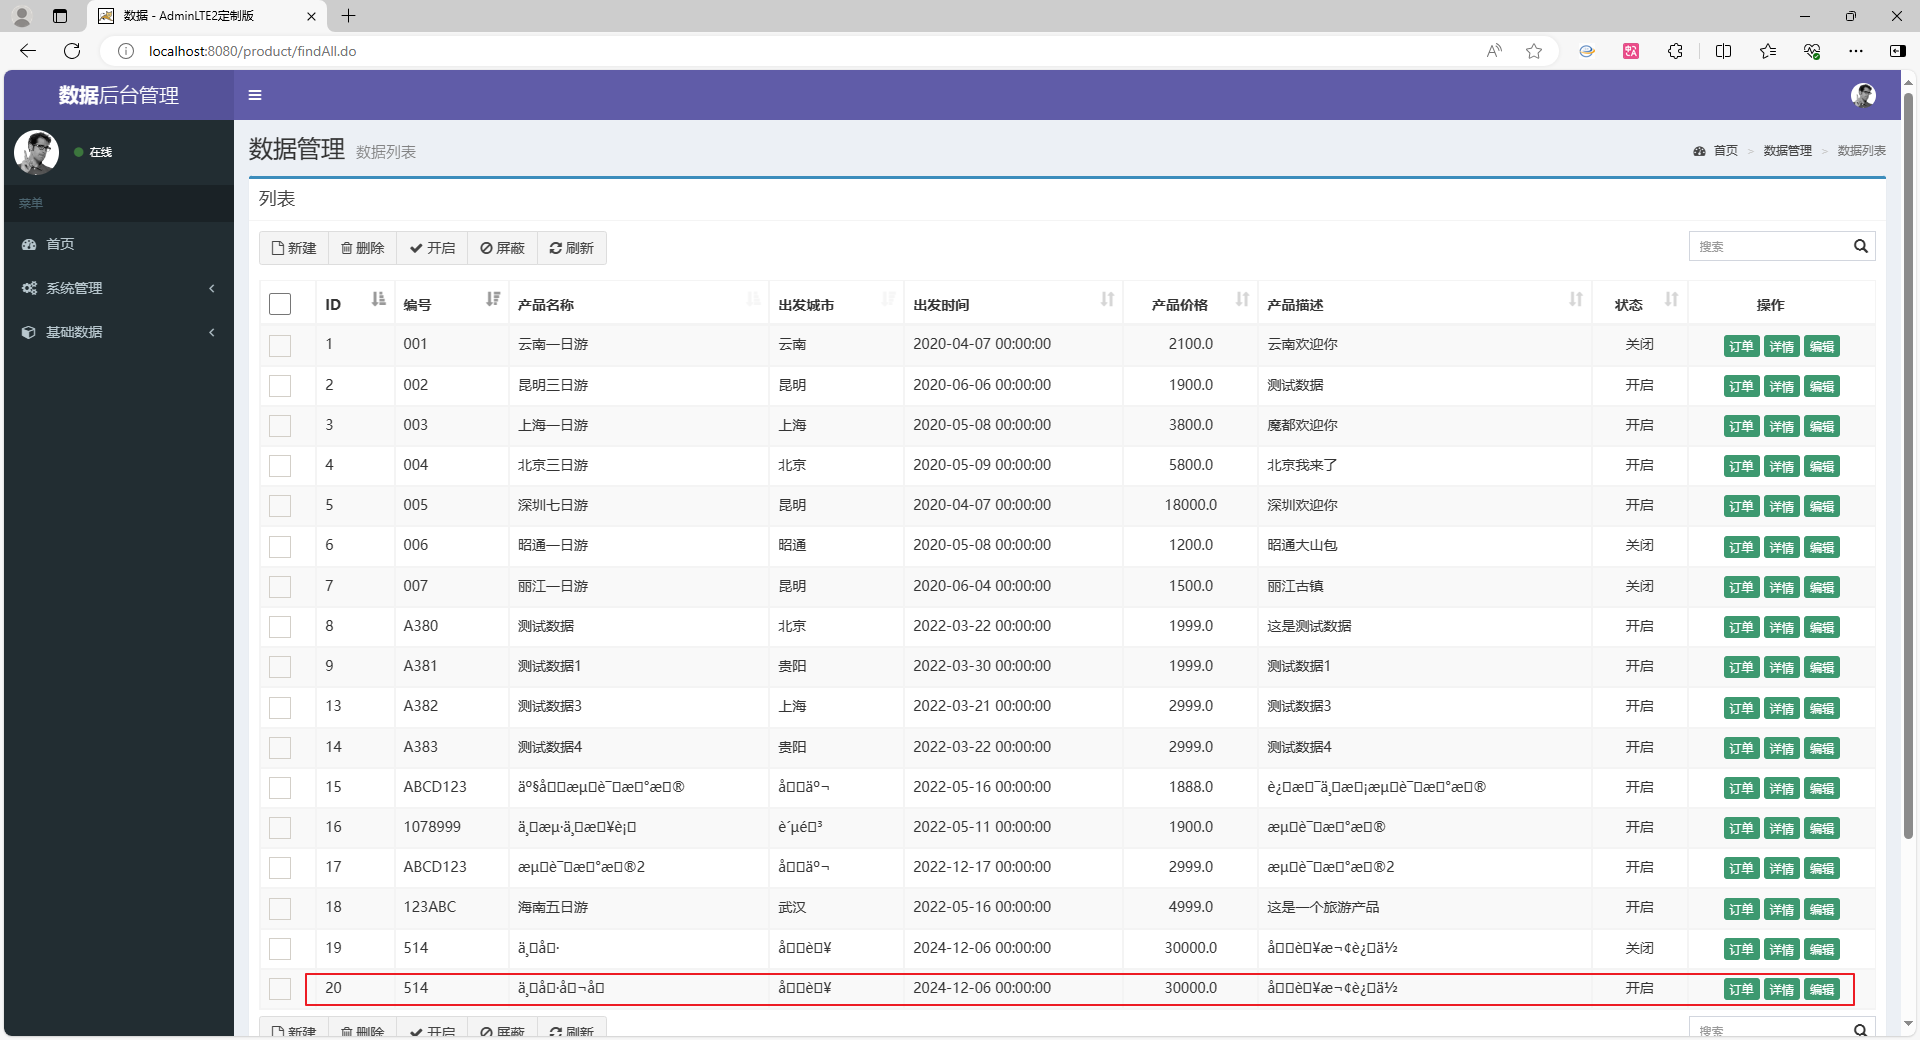
可以看到,插入成功,中文出现了乱码,下一节解决
5.9-解决新增商品中文乱码问题
首先检查前端页面的编码是否设置了:

再检查后端:
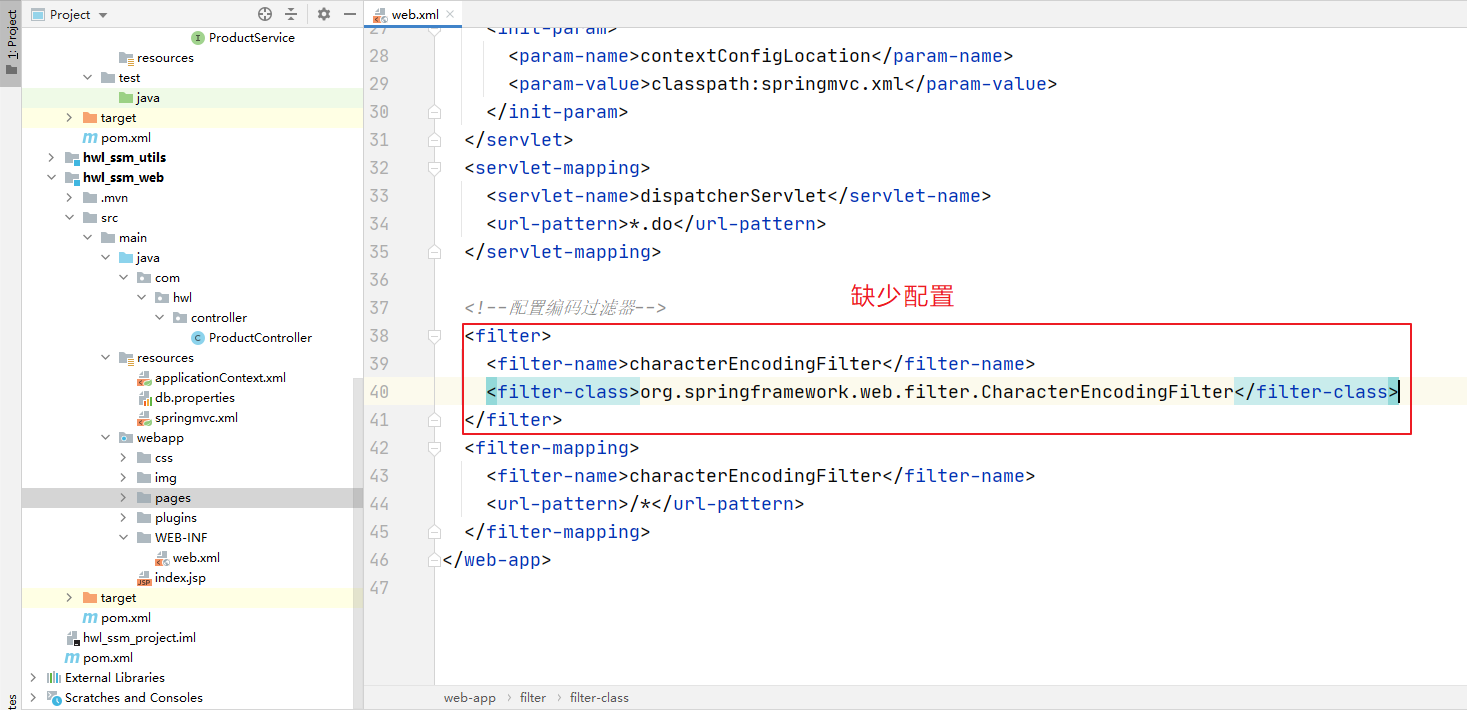
xml
<!--配置编码过滤器-->
<filter>
<filter-name>characterEncodingFilter</filter-name>
<filter-class>org.springframework.web.filter.CharacterEncodingFilter</filter-class>
<!--设置编码过滤器的格式,这里不写的话会导致中文乱码,具体在5.9节体现-->
<init-param>
<param-name>encoding</param-name>
<param-value>UTF-8</param-value>
</init-param>
</filter>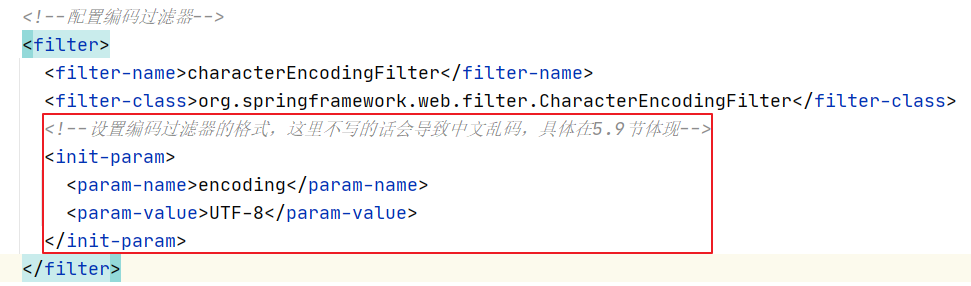
没有乱码了
5.10-分页展示订单信息
java
public class Orders {
private String id;
private String orderNum;
private Date orderTime;
private String orderTimeStr;
private int orderStatus;
private String orderStatusStr;
private int peopleCount;
private Product product; //有个Product属性,便于一对一查询
private List<Traveller> travellers;
private Member member;
private Integer payType;
private String payTypeStr;
private String orderDesc;
public String getOrderStatusStr() {
//订单状态(0未支付 1已支付)
if(orderStatus == 0){
orderStatusStr = "未支付";
}else if(orderStatus == 1){
orderStatusStr = "已支付";
}
return orderStatusStr;
}
public String getOrderTimeStr() {
if(orderTime != null){
orderTimeStr = DateUtils.date2String(orderTime, "yyyy-MM-dd HH:mm");
}
return orderTimeStr;
}
public String getPayTypeStr() {
//支付方式(0 支付宝 1微信 2其他)
if(payType == 0){
payTypeStr = "支付宝";
}else if(payType == 1){
payTypeStr = "微信";
}else if(payType == 2){
payTypeStr = "其他";
}
return payTypeStr;
}
//getter、setter
}首先还是找到订单展示数据的入口:
接着就去写订单的controller
java
@Controller
@RequestMapping("orders")
public class OrderController {
@Autowired
OrdersService ordersService;
@RequestMapping("findAll.do")
public String findAll(@RequestParam(value = "page", required = false, defaultValue = "1") Integer page,
@RequestParam(value = "size", required = false, defaultValue = "4") Integer size,
Model model) {
PageHelper.startPage(page, size);
List<Orders> ordersList = ordersService.findAll();
PageInfo<Orders> pageInfo = new PageInfo<Orders>(ordersList); //分页插件给我们提供好的分页模型
model.addAttribute("pageInfo", pageInfo);
return "orders-list"; //也是他给出来的前端页面
}
}
java
public interface OrdersService {
List<Orders> findAll();
}
java
@Service
@Transactional
public class OrdersServiceImpl implements OrdersService {
@Autowired
OrdersDao ordersDao;
public List<Orders> findAll() {
return ordersDao.findAll();
}
}
java
public interface OrdersDao {
@Results(id="orderMap",
value = {
@Result(id = true, property = "id", column = "id"),
@Result(property = "orderNum", column = "orderNum"),
@Result(property = "orderTime", column = "orderTime"),
@Result(property = "orderStatus", column = "orderStatus"),
@Result(property = "product", column = "productId", //这里假设一个订单对应一个产品,一对一
one = @One(select = "com.hwl.dao.ProductDao.findProductById")) //findProductById还得去ProductDao加
}
)
@Select("select * from orders")
List<Orders> findAll();
}写sql语句的时候,还得去看看前端页面是怎么渲染的
java
public interface ProductDao {
//其他的代码
@Select("select * from product where id = #{id}")
Product findProductById(Integer id);
}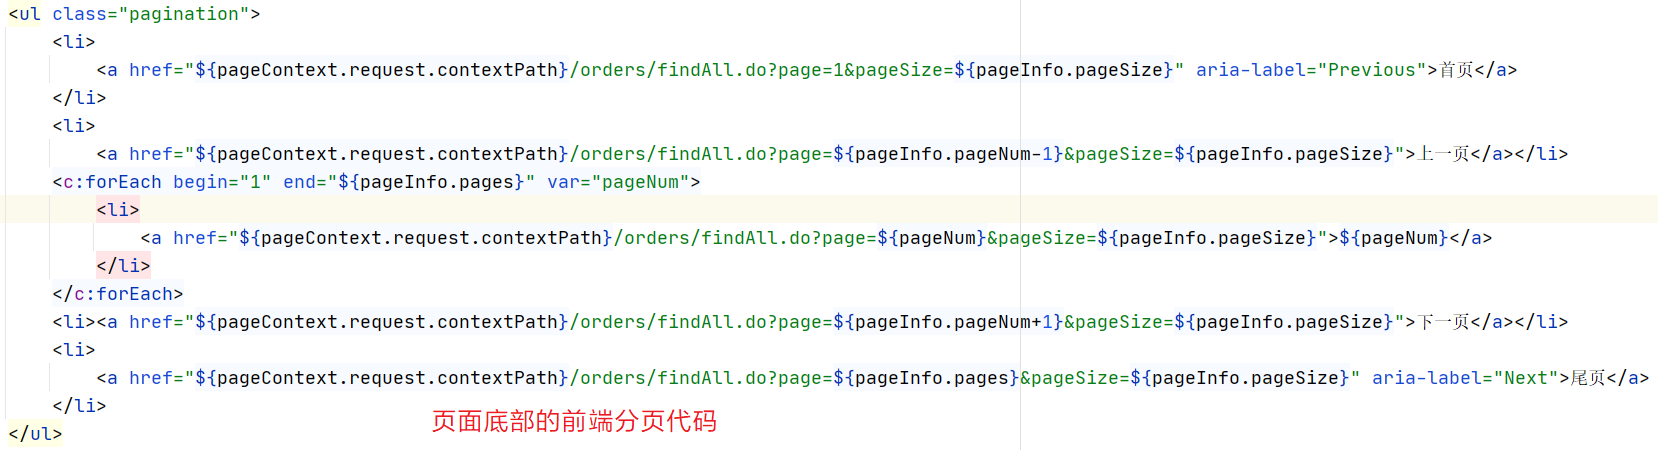
启动运行:
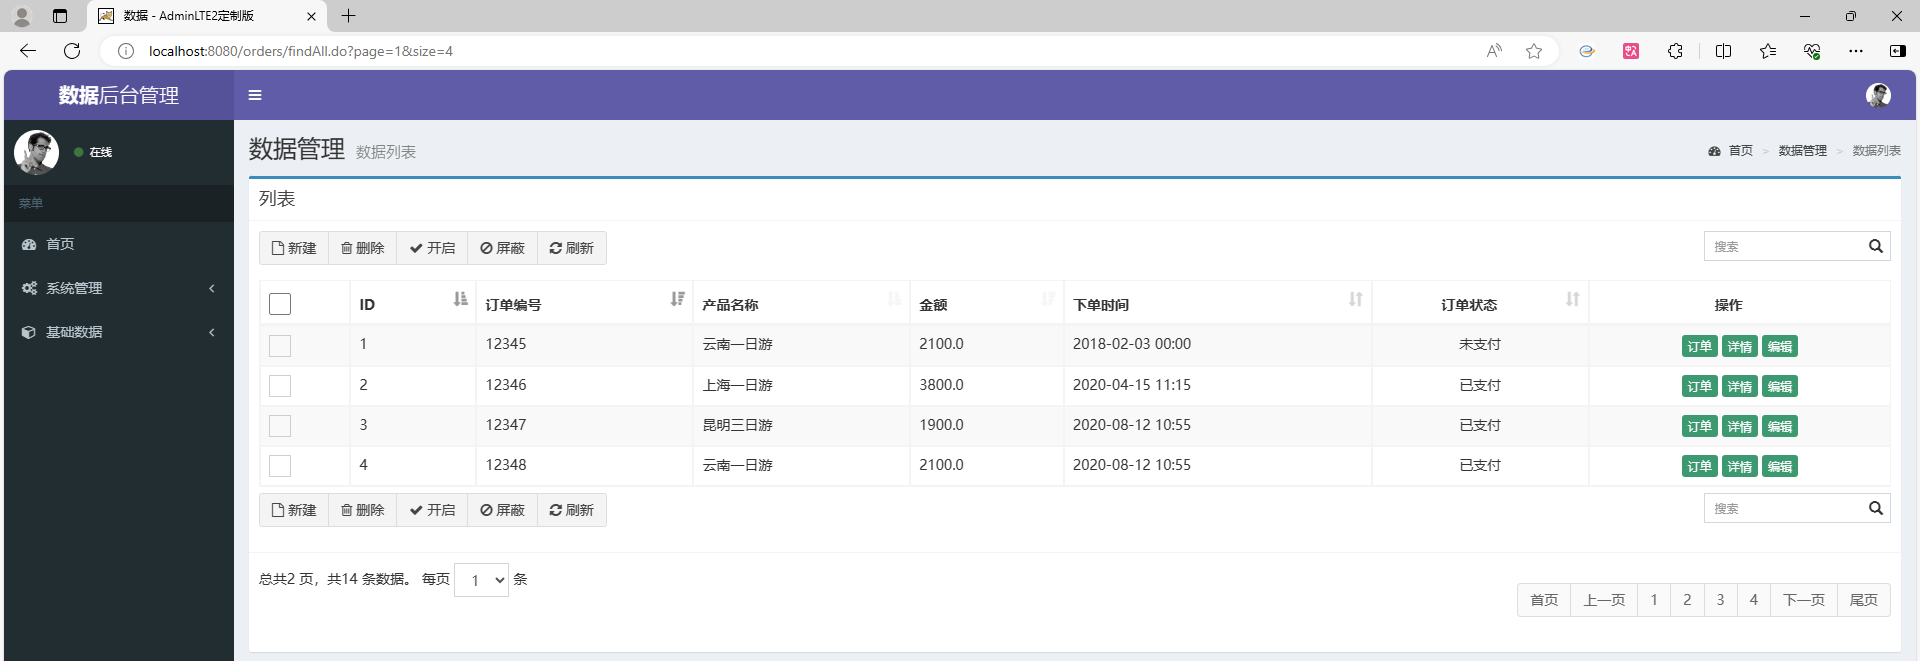
同样的,也可以改造之前的显示所有商品信息为分页展示
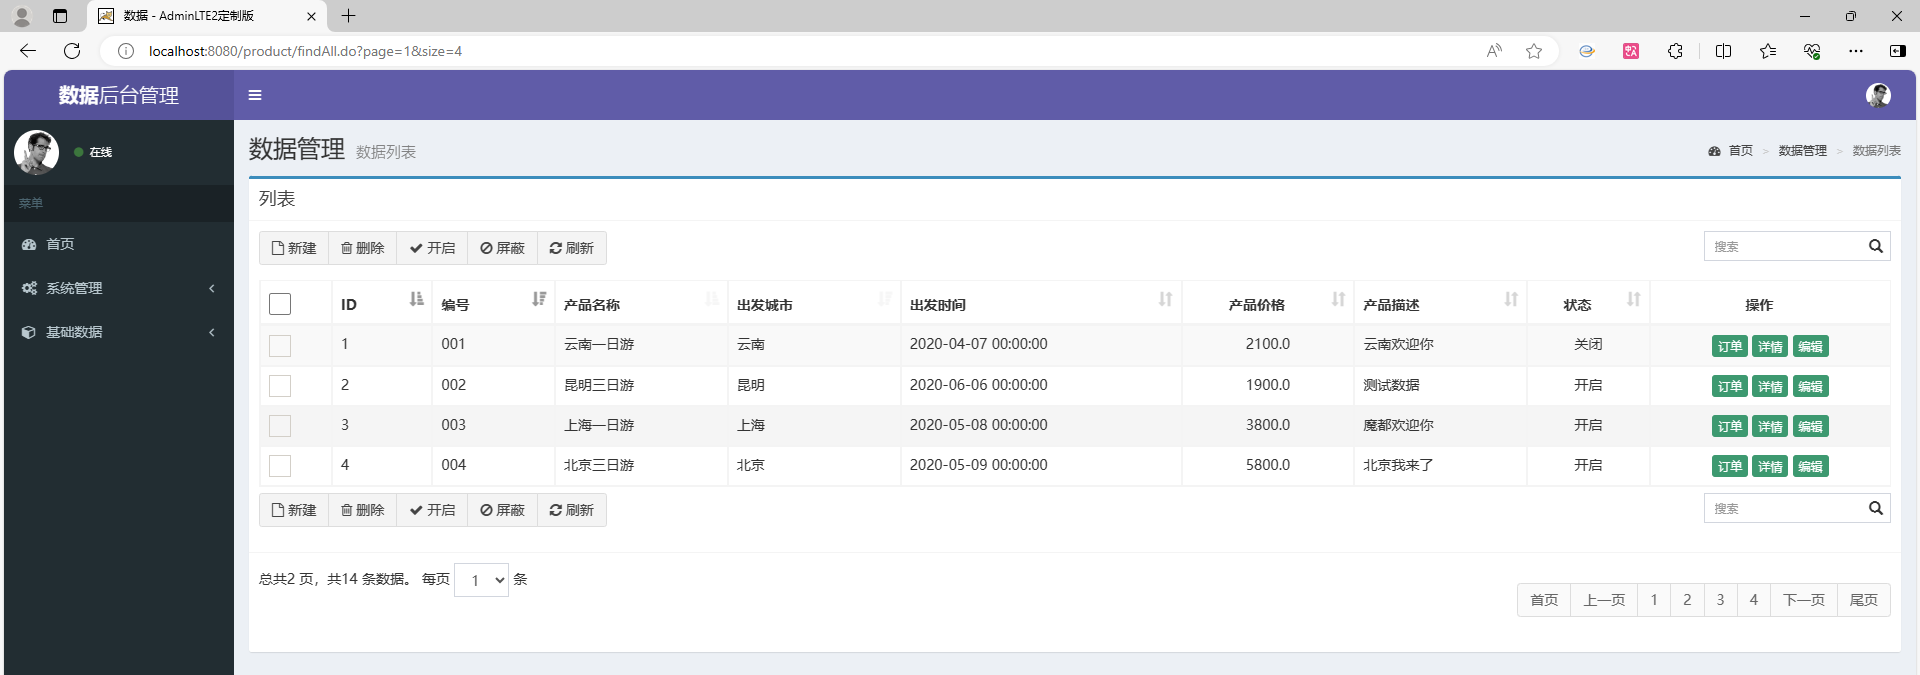
5.11-展示订单详情
OrderController.java:
java
//展示订单详情
@RequestMapping("findById.do")
public String findById(@RequestParam("id") Integer id, Model model) {
Orders orders = ordersService.findById(id);
model.addAttribute("orders", orders);
return "orders-show";
}
java
//根据订单id查询具体信息
Orders findById(Integer id);
java
public Orders findById(Integer id) {
return ordersDao.findById(id);
}
java
@Results(value = {
@Result(id = true, property = "id", column = "id"),
@Result(property = "orderNum", column = "orderNum"),
@Result(property = "orderTime", column = "orderTime"),
@Result(property = "orderStatus", column = "orderStatus"),
@Result(property = "peopleCount", column = "peopleCount"),
@Result(property = "payType", column = "payType"),
@Result(property = "product", column = "productId",one = @One(select = "com.hwl.dao.ProductDao.findProductById")),
@Result(property = "member", column = "memberId",one = @One(select = "com.hwl.dao.MemberDao.findMemberById")),
@Result(property = "travellers", column = "id",many = @Many(select = "com.hwl.dao.TravellerDao.findTravellerByOrderId"))
})
@Select("select * from orders where id = #{id}")
Orders findById(Integer id);
java
public interface ProductDao {
//其它省略
@Select("select * from product where id = #{id}")
Product findProductById(Integer id);
}
java
public interface MemberDao {
@Select("select * from member where id = #{id}")
Member findMemberById(Integer id);
}
java
public interface TravellerDao {
@Select("select * from traveller where id in(select travellerid from order_traveller where orderid = #{orderId})")
List<Traveller> findTravellerByOrderId(Integer id);
}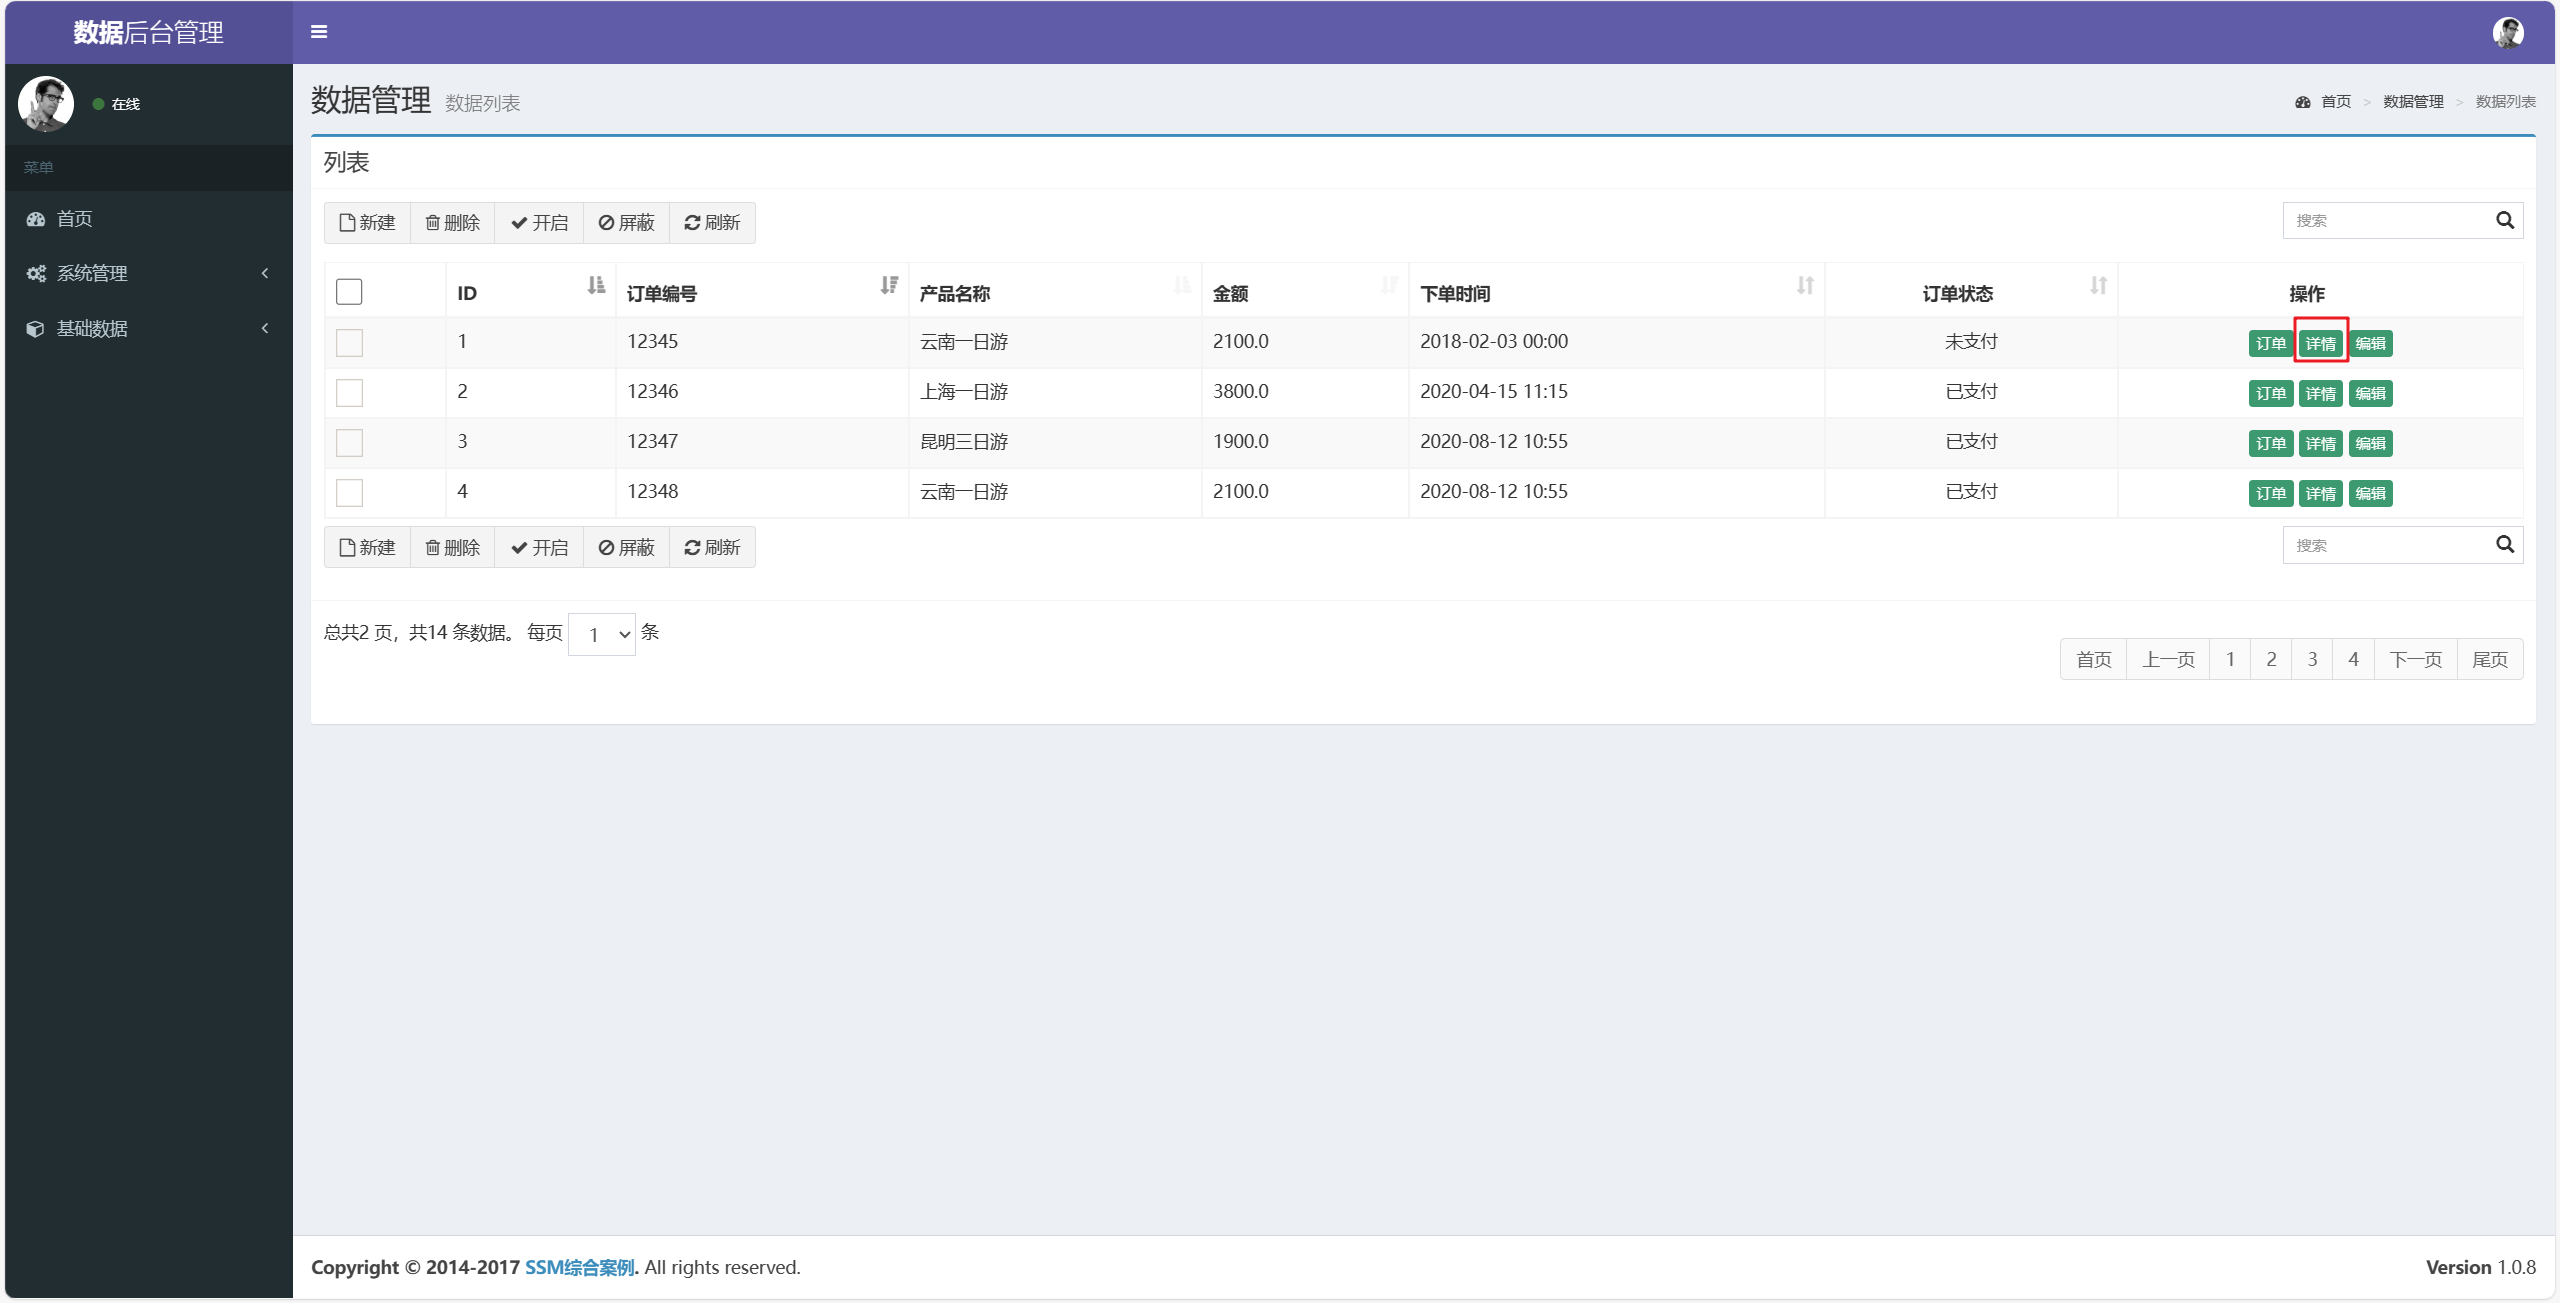
5.12-展示所有用户信息
步骤同前面一样,这里还是实现分页显示
java
@Controller
@RequestMapping("user")
public class UserController {
@Autowired
UserService userService;
@RequestMapping("findAll.do")
public String findAll(@RequestParam(value = "page", required = false, defaultValue = "1") Integer page,
@RequestParam(value = "size", required = false, defaultValue = "4") Integer size,
Model model) {
PageHelper.startPage(page, size);
List<UserInfo> userInfoList = userService.findAll();
PageInfo<UserInfo> pageInfo = new PageInfo<UserInfo>(userInfoList); //分页插件给我们提供好的分页模型
model.addAttribute("pageInfo", pageInfo);
return "user-list";
}
}
java
public interface UserService {
//显示所有用户
List<UserInfo> findAll();
}
java
@Service
@Transactional
public class UserServiceImpl implements UserService {
@Autowired
UserDao userDao;
public List<UserInfo> findAll(){
List<UserInfo> userInfoList = userDao.findAll();
return userInfoList;
}
}
java
public interface UserDao {
@Select("select * from users")
List<UserInfo> findAll();
}
java
//与数据库中users对应
public class UserInfo {
private String id;
private String username;
private String email;
private String password;
private String phoneNum;
private int status;
private String statusStr;
private List<Role> roles;
public String getStatusStr() {
if(status == 0){
statusStr = "未开启";
}else{
statusStr = "开启";
}
return statusStr;
}
}
5.13-新增用户信息
程序入口:
开始编写controller:
java
@RequestMapping("save.do")
public String userAdd(UserInfo userInfo){
userService.add(userInfo);
return "redirect:findAll.do"; //记住一定要用重定向,不能用转发(会导致表单的重复提交)
}
java
public interface UserService {
//新增用户信息
void add(UserInfo userInfo);
//其它代码
}
java
@Service
@Transactional
public class UserServiceImpl implements UserService {
@Autowired
UserDao userDao;
public void add(UserInfo userInfo) {
userDao.add(userInfo);
}
//其它代码
}
java
public interface UserDao {
@Insert("insert into users(email, username, password, phoneNum, status) " +
"values (#{email},#{username},#{password},#{phoneNum},#{status})")
void add(UserInfo userInfo);
//其它代码
}
5.14-展示用户详情
程序入口:
可以看到 users 和 role 表是多对多的关系,同时,role 表和 permission 表也是多对多的关系
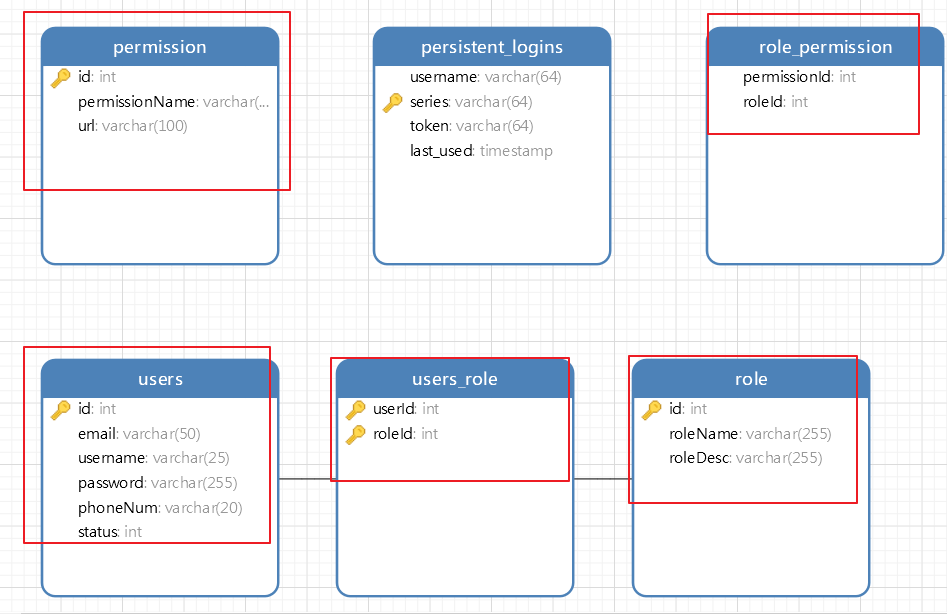
UserController.java:
java
//展示用户详情
@RequestMapping("findById.do")
public String userAdd(@RequestParam("id")Integer id, Model model){
UserInfo userInfo = userService.findById(id);
model.addAttribute("user", userInfo);
return "user-show";
}
java
public interface UserService {
//其它代码
//根据id查找用户
UserInfo findById(Integer id);
}
java
@Service
@Transactional
public class UserServiceImpl implements UserService {
@Autowired
UserDao userDao;
//其他代码
public UserInfo findById(Integer id) {
return userDao.findById(id);
}
}
java
public interface UserDao {
//其它代码
@Results(value = {
@Result(id = true, property = "id", column = "id"),
@Result(property = "username", column = "username"),
@Result(property = "password", column = "password"),
@Result(property = "phoneNum", column = "phoneNum"),
@Result(property = "email", column = "email"),
@Result(property = "status", column = "status"),
@Result(property = "roles", column = "id", many = @Many(select = "com.hwl.dao.RolesDao.findRolesByUserId"))
})
@Select("select * from users where id = #{id}")
UserInfo findById(Integer id);
}
java
public interface RolesDao {
@Results(value = {
@Result(id = true, property = "id", column = "id"),
@Result(property = "roleName", column = "roleName"),
@Result(property = "roleDesc", column = "roleDesc"),
@Result(property = "permissions", column = "id",many = @Many(select = "com.hwl.dao.PermissionDao.findPermissionByRoleId"))
})
@Select("SELECT * from role WHERE id IN (SELECT roleId from users_role WHERE userId = #{id})")
List<Role> findRolesByUserId(Integer id);
}
java
public interface PermissionDao {
@Select("SELECT * FROM permission WHERE id in(SELECT permissionId FROM role_permission WHERE roleId = #{id})")
List<Permission> findPermissionByRoleId(Integer id);
}
5.15-展示所有角色信息
同样的,还是实现分页展示:
java
@Controller
@RequestMapping("role")
public class RolesController {
@Autowired
RolesService rolesService;
@RequestMapping("findAll.do")
public String findAll(@RequestParam(value = "page", required = false, defaultValue = "1") Integer page,
@RequestParam(value = "size", required = false, defaultValue = "4") Integer size,
Model model) {
PageHelper.startPage(page, size);
List<Role> roleList = rolesService.findAll();
PageInfo<Role> pageInfo = new PageInfo<Role>(roleList);
model.addAttribute("pageInfo", pageInfo);
return "role-list";
}
}
java
public interface RolesService {
List<Role> findAll();
}
java
@Service
@Transactional
public class RolesServiceImpl implements RolesService {
@Autowired
RolesDao rolesDao;
public List<Role> findAll() {
return rolesDao.findAll();
}
}
java
public interface RolesDao {
//其它代码
@Select("select * from role")
List<Role> findAll();
}
5.16-新增角色信息
java
@Controller
@RequestMapping("role")
public class RolesController {
@Autowired
RolesService rolesService;
//其它代码
@RequestMapping("save.do")
public String addRole(Role role){
rolesService.add(role);
return "redirect:findAll.do";
}
}
java
public interface RolesService {
List<Role> findAll();
void add(Role role);
}
java
@Service
@Transactional
public class RolesServiceImpl implements RolesService {
@Autowired
RolesDao rolesDao;
public void add(Role role) {
rolesDao.add(role);
}
}
java
public interface RolesDao {
//其它代码
@Insert("INSERT INTO role(roleName, roleDesc) VALUES (#{roleName}, #{roleDesc})")
void add(Role role);
}
5.17-资源权限管理操作
- 显示所有权限
还是先找到前端页面的入口:
java
@Controller
@RequestMapping("permission")
public class PermissionController {
@Autowired
PermissionService permissionService;
@RequestMapping("findAll.do")
public String findAll(@RequestParam(value = "page", required = false, defaultValue = "1") Integer page,
@RequestParam(value = "size", required = false, defaultValue = "4") Integer size,
Model model){
PageHelper.startPage(page, size);
List<Permission> permissionList = permissionService.findAll();
PageInfo<Permission> pageInfo = new PageInfo<Permission>(permissionList);
model.addAttribute("pageInfo", pageInfo);
return "permission-list";
}
}
java
public interface PermissionService {
List<Permission> findAll();
}
java
@Service
@Transactional
public class PermissionServiceImpl implements PermissionService {
@Autowired
PermissionDao permissionDao;
public List<Permission> findAll() {
return permissionDao.findAll();
}
}
java
public interface PermissionDao {
//其他代码
@Select("select * from permission")
List<Permission> findAll();
}
- 实现新增权限
java
@RequestMapping("save.do")
public String add(Permission permission){
permissionService.add(permission);
return "redirect:findAll.do";
}
java
public interface PermissionService {
List<Permission> findAll();
void add(Permission permission);
}
java
@Service
@Transactional
public class PermissionServiceImpl implements PermissionService {
@Autowired
PermissionDao permissionDao;
public List<Permission> findAll() {
return permissionDao.findAll();
}
public void add(Permission permission) {
permissionDao.add(permission);
}
}
java
public interface PermissionDao {
@Select("SELECT * FROM permission WHERE id in(SELECT permissionId FROM role_permission WHERE roleId = #{id})")
List<Permission> findPermissionByRoleId(Integer id);
@Select("select * from permission")
List<Permission> findAll();
@Insert("insert into permission(permissionName, url) values (#{permissionName}, #{url})")
void add(Permission permission);
}
5.18-用户与角色关联与控制
给用户添加角色
- 首先要展示每个用户可以关联的角色
前端入口:
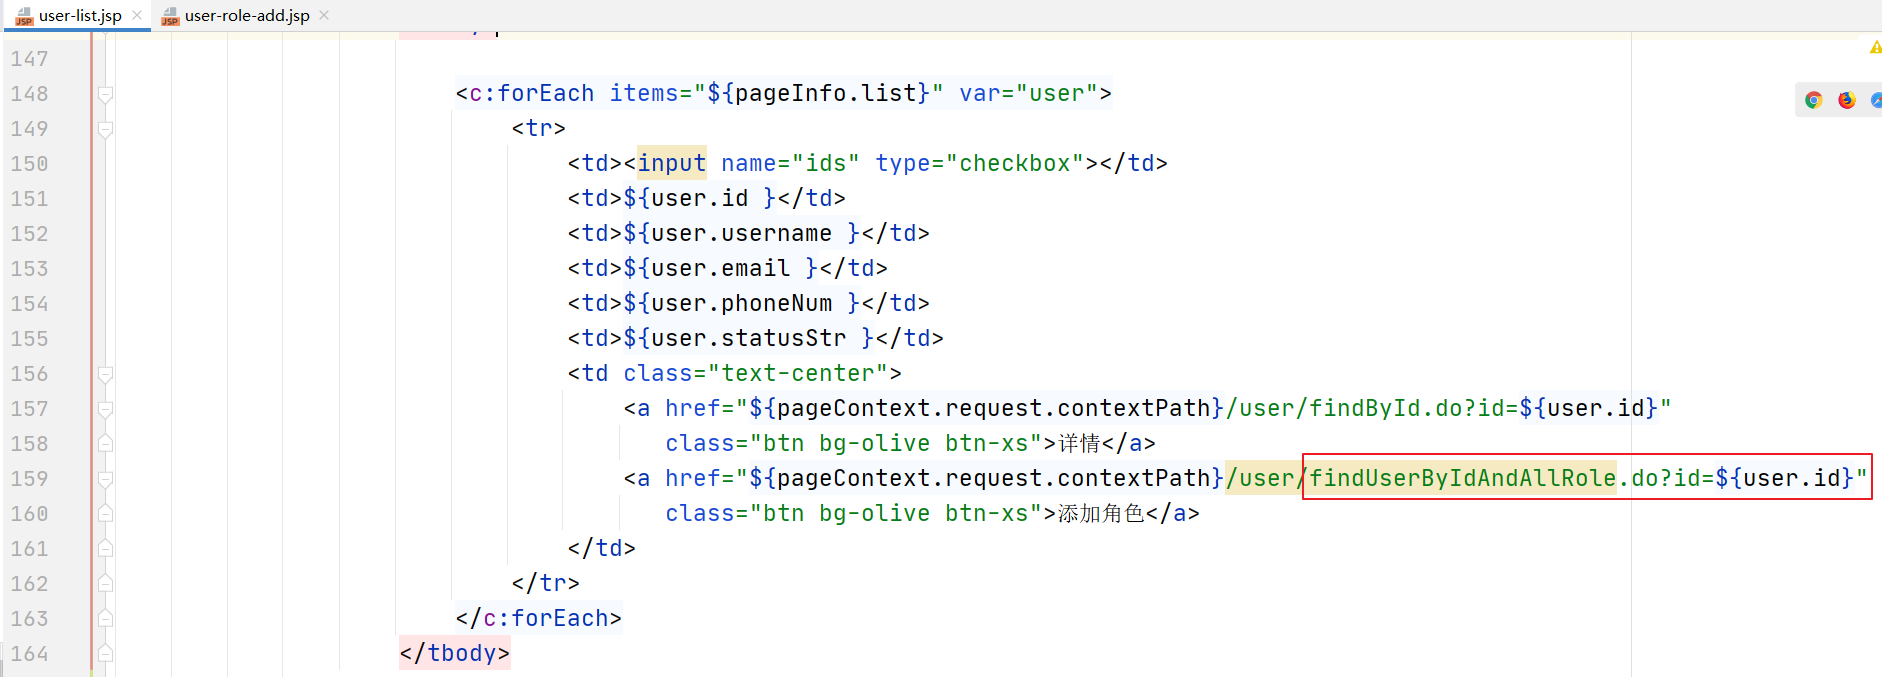
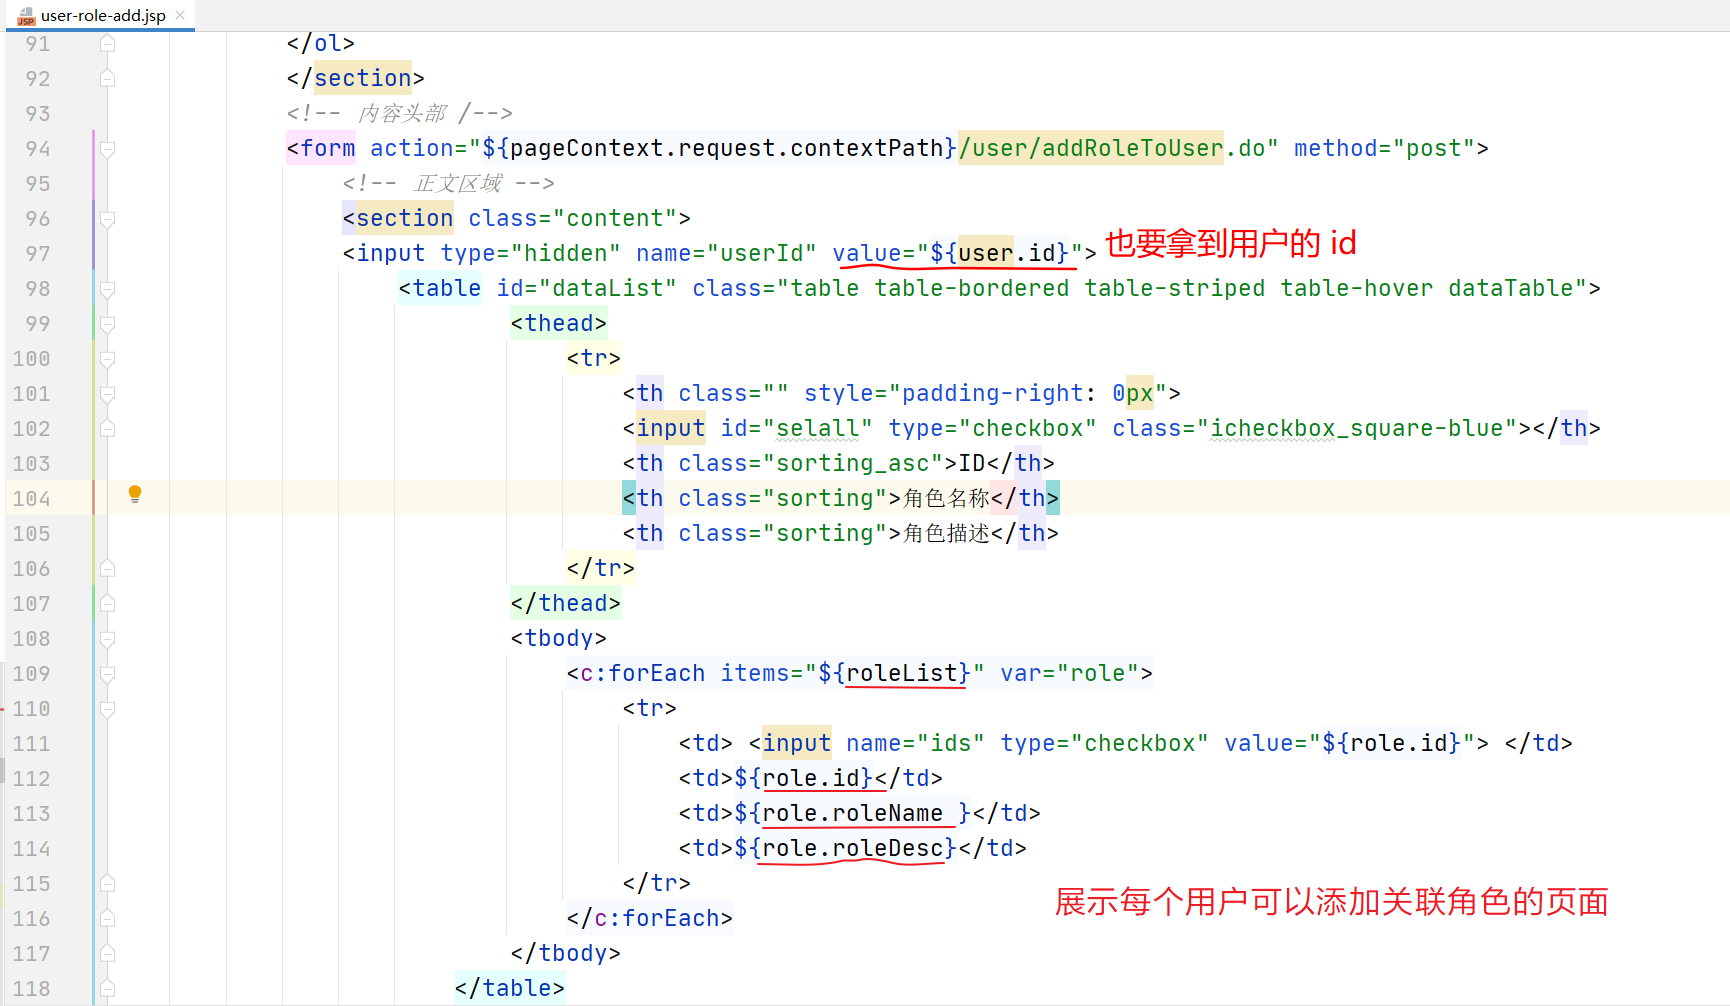
java
//将当前用户没有关联的角色信息查询出来
@RequestMapping("findUserByIdAndAllRole.do")
public String findUserByIdAndAllRole(@RequestParam("id" )Integer id, Model model) {
UserInfo user = userService.findById(id);
model.addAttribute("user", user);
List<Role> roleList = userService.findUserByIdAndAllRole(id);
model.addAttribute("roleList", roleList);
return "user-role-add";
}
java
public interface UserService {
//其他代码
//根据用户id查找还有哪些没有关联的角色
List<Role> findUserByIdAndAllRole(Integer id);
}
java
@Service
@Transactional
public class UserServiceImpl implements UserService {
@Autowired
UserDao userDao;
//其它代码
public List<Role> findUserByIdAndAllRole(Integer id) {
return userDao.findUserByIdAndAllRole(id);
}
}
java
public interface UserDao {
//其它代码
@Select("SELECT * FROM role WHERE id NOT IN(SELECT roleId FROM users_role WHERE userId = #{id})")
List<Role> findUserByIdAndAllRole(Integer id);
}
- 接着实现保存提交到数据库的功能
首先还是找到前端的页面代码:
java
//将用户信息和角色信息进行关联
@RequestMapping("addRoleToUser.do")
public String addRoleToUser(Integer userId, Integer[] ids){
userService.addRoleToUser(userId, ids);
return "redirect:findAll.do";
}
java
public interface UserService {
//其它代码
void addRoleToUser(Integer userId, Integer[] ids);
}
java
@Service
@Transactional
public class UserServiceImpl implements UserService {
@Autowired
UserDao userDao;
//其它代码
public void addRoleToUser(Integer userId, Integer[] ids) {
for (Integer id : ids) {
userDao.addRoleToUser(userId, id);
}
}
}
java
public interface UserDao {
//其它代码
@Insert("insert into users_role(userId, roleId) values(#{userId}, #{roleId})")
void addRoleToUser(@Param("userId") Integer userId, @Param("roleId") Integer id);
}开始运行测试,先看下数据库里用户 id 为 1 的用户关联的角色:
5.19-角色与资源权限关联控制
与上一节差不多
- 查找角色还剩下的可以关联的权限
java
@Controller
@RequestMapping("role")
public class RolesController {
@Autowired
RolesService rolesService;
//其它代码
//查询指定角色没有关联的权限信息
@RequestMapping("findRoleByIdAndPermission.do")
public String findRoleByIdAndPermission(@RequestParam("id") Integer id, Model model){
Role role = rolesService.findById(id);
List<Permission> permissionList = rolesService.findRoleByIdAndPermission(id);
model.addAttribute("role", role);
model.addAttribute("permissionList", permissionList);
return "role-permission-add";
}
}
java
public interface RolesService {
//其他代码
Role findById(Integer id);
List<Permission> findRoleByIdAndPermission(Integer id);
}
java
@Service
@Transactional
public class RolesServiceImpl implements RolesService {
@Autowired
RolesDao rolesDao;
//其他代码
public Role findById(Integer id) {
return rolesDao.findById(id);
}
public List<Permission> findRoleByIdAndPermission(Integer id) {
return rolesDao.findRoleByIdAndPermission(id);
}
}
java
public interface RolesDao {
//其它代码
@Select("select * from role where id = #{id}")
Role findById(Integer id);
@Select("select * from permission where id not in (select permissionId from role_permission where roleId = #{id})")
List<Permission> findRoleByIdAndPermission(Integer id);
}运行测试,先看角色 id 为1的已经关联的权限有哪些:
- 接着,将角色和权限进行关联
java
@Controller
@RequestMapping("role")
public class RolesController {
@Autowired
RolesService rolesService;
//其他代码
@RequestMapping("addPermissionToRole.do")
public String addPermissionToRole(Integer roleId, Integer[] ids){ /*注意:这里的形参必须要和前端页面的 name 字段保持一致*/
rolesService.addPermissionToRole(roleId, ids);
return "redirect:findAll.do";
}
}
java
public interface RolesService {
//其它代码
void addPermissionToRole(Integer roleId, Integer[] permissionId);
}
java
@Service
@Transactional
public class RolesServiceImpl implements RolesService {
@Autowired
RolesDao rolesDao;
//其他代码
public void addPermissionToRole(Integer roleId, Integer[] permissionId) {
for (Integer p : permissionId) {
rolesDao.addPermissionToRole(roleId, p);
}
}
}
java
public interface RolesDao {
//其他代码
@Insert("insert into role_permission(permissionId, roleId) values (#{permissionId}, #{roleId})")
void addPermissionToRole(@Param("roleId") Integer roleId, @Param("permissionId") Integer permissionId);
}
5.20-使用拦截器实现登录验证
目前这个项目还存在2个问题:
- 没有登录的选项
- 没有经过登录验证就可以直接访问系统
接下来实现这 2 个功能
实现登录
在web模块加入一个login.jsp
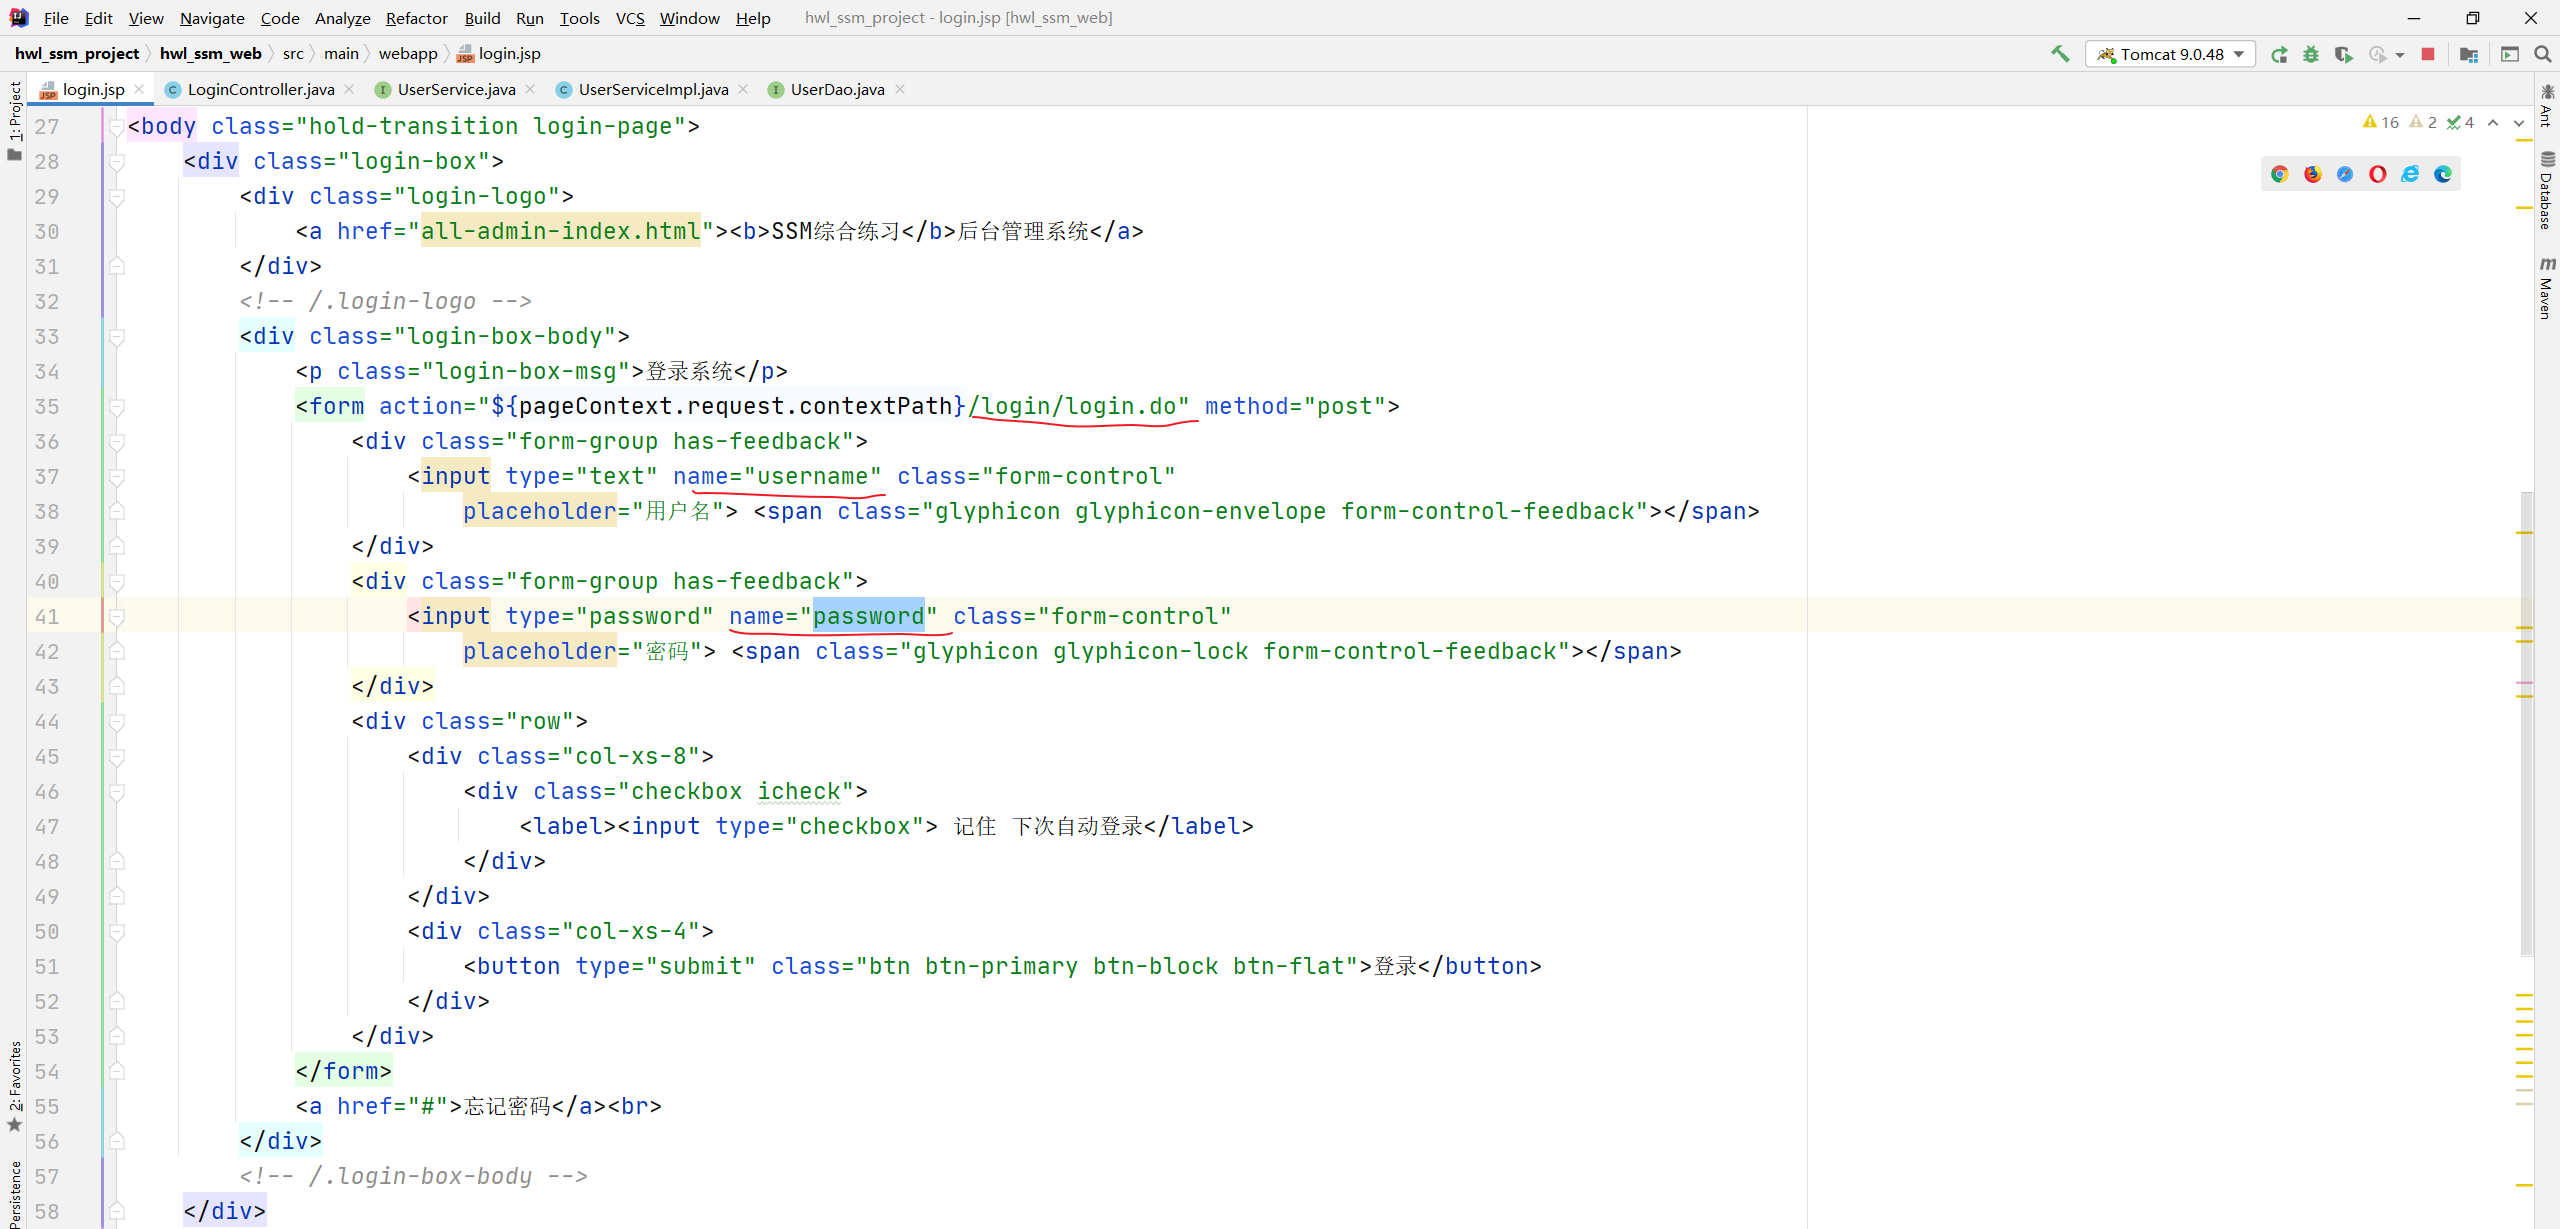
java
@Controller
@RequestMapping("login")
public class LoginController {
@Autowired
UserService userService;
@RequestMapping("login.do")
public String login(String username, String password, HttpServletRequest request) {
UserInfo user = userService.findUser(username, password);
if (!StringUtils.isEmpty(user)) {
//成功登录,把用户信息存到session里面去
HttpSession session = request.getSession();
session.setAttribute("user", user);
return "redirect:/index.jsp";
} else {
return "redirect:/login.jsp";
}
}
}
java
public interface UserService {
//其他代码
UserInfo findUser(String username, String password);
}
java
@Service
@Transactional
public class UserServiceImpl implements UserService {
@Autowired
UserDao userDao;
//其他代码
public UserInfo findUser(String username, String password) {
return userDao.findUser(username, password);
}
}
java
public interface UserDao {
//其它代码
@Select(("select * from users where username= #{username} and password = #{password}"))
UserInfo findUser(@Param("username") String username, @Param("password") String password);
}还可以在header.jsp 里面去取一下 user 的 username:
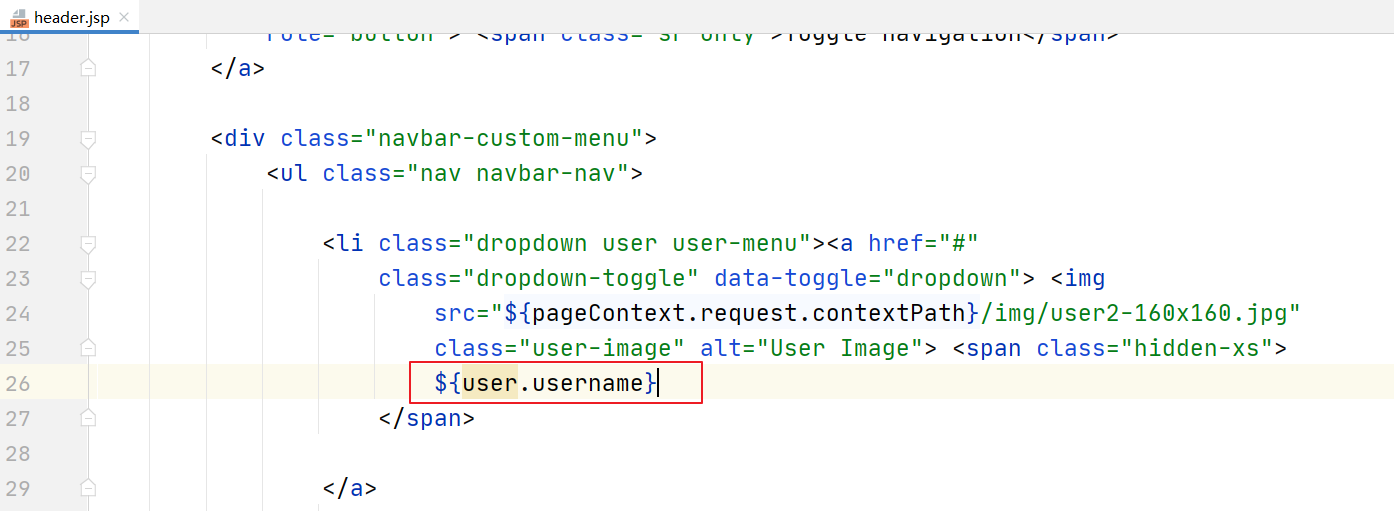

实现拦截登录
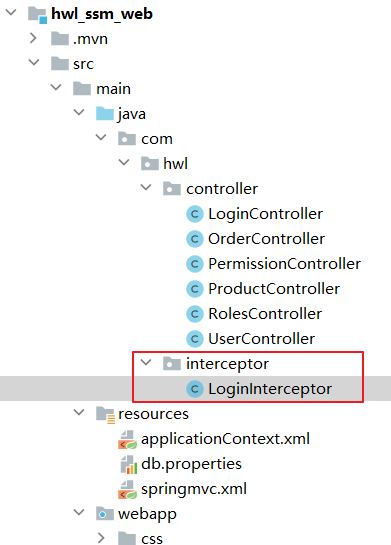
java
package com.hwl.interceptor;
import com.hwl.pojo.UserInfo;
import org.springframework.util.StringUtils;
import org.springframework.web.servlet.HandlerInterceptor;
import javax.servlet.http.HttpServletRequest;
import javax.servlet.http.HttpServletResponse;
import javax.servlet.http.HttpSession;
public class LoginInterceptor implements HandlerInterceptor {
//在每次访问资源之前,都要判断用户有没有登录过
public boolean preHandle(HttpServletRequest request, HttpServletResponse response, Object handler) throws Exception {
HttpSession session = request.getSession();
//获取session里面的用户信息
UserInfo user = (UserInfo) session.getAttribute("user");
if (StringUtils.isEmpty(user)) {
//没有登录
response.sendRedirect("/login.jsp");
return false;
}
return true;
}
}springmvc.xml 里面添加拦截器的配置:
xml
<!--配置拦截器-->
<mvc:interceptors>
<mvc:interceptor>
<!--拦截所有资源信息-->
<mvc:mapping path="/**"/>
<!--哪个不能拦截:就是处理登录逻辑的 login.do-->
<mvc:exclude-mapping path="/login/login.do"/>
<!--将拦截器交给spring容器管理-->
<bean class="com.hwl.interceptor.LoginInterceptor"/>
</mvc:interceptor>
</mvc:interceptors>启动服务器,测试:

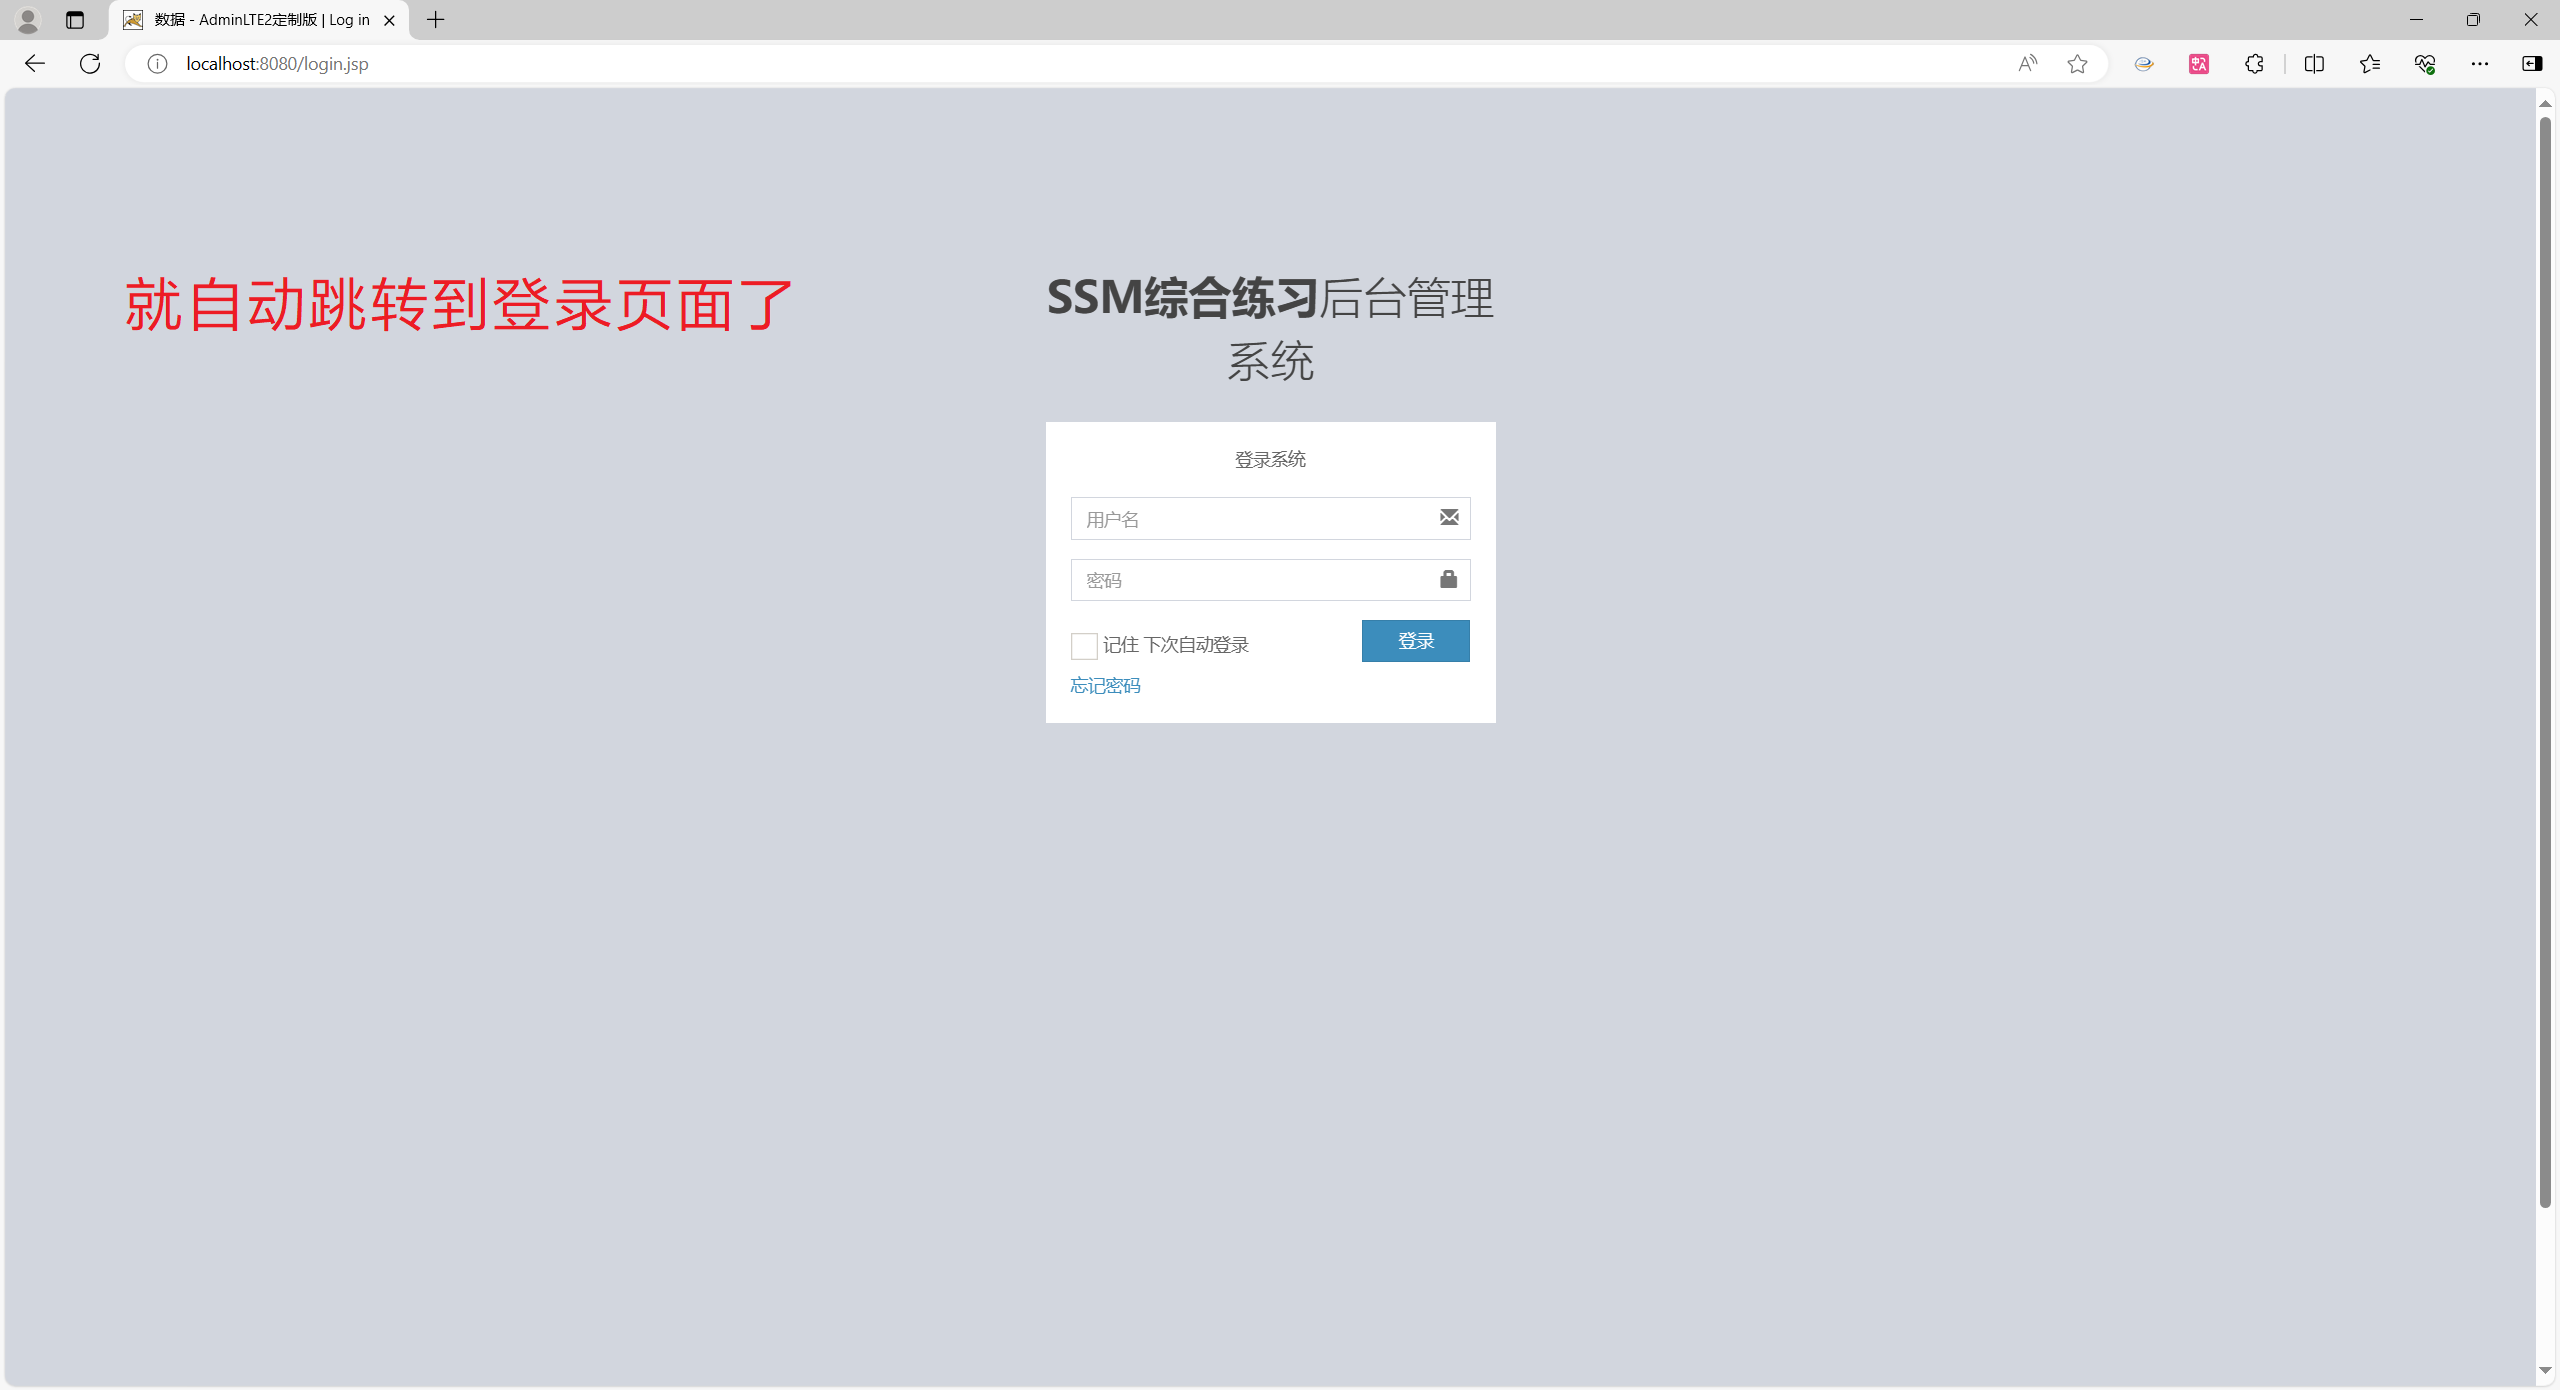
登录后,即可使用系统: