项目地址:github.com/wangyang-tp...
一个会"算账"的编辑器插件:统计代码行数、回溯每次提交的代码量变化、在光标行尾显示 Git blame、把选中文件夹的代码一键导出成 Word。本文记录它的完整实现过程与核心代码。可以直接在vscode的插件市场中根据关键词检索 wang yang.coder counter即可使用此插件。
一、为什么做这个插件
开发过程中我常遇到几个琐碎又重复的需求:
- 代码量统计:想知道一个文件夹到底有多少行代码,注释和空行各占多少。现有工具要么要装依赖,要么统计口径不合我意。
- 代码量变化:领导/团队想知道某个文件"最近有没有瘦身"。这需要回溯 Git 历史里每次提交时这个文件的行数。
- 谁改的这一行:编辑器里想快速看到当前行是哪次提交、谁写的(GitLens 风格),但 GitLens 太重了。
- 代码存档:评审/归档时想把整个项目的代码合并导出一个 Word 文档。
于是我用 VS Code 扩展 API + 直接调用 git 命令行 的方式,写了 coder-counter 这个插件。不依赖任何 Git 库,所有 Git 操作都是 child_process.exec('git ...'),轻量、可控、可调试。
二、整体架构
插件 main 入口是 out/extension.js,工程用 TypeScript + tsc 编译(module: Node16)。为了好维护,源码按功能拆成了 8 个模块:
bash
src/
├── types.ts        # 5 个共享接口(CountResult / HistoryItem / GitCommitStat 等)
├── analyzer.ts     # 行数统计、历史快照对比、CSV 导出
├── git.ts          # Git 层:所有 git 命令封装 + 历史内容提供器
├── wordExport.ts   # 代码合并导出 Word
├── webviews.ts     # 两个 Webview 页面 HTML 构建器
├── blame.ts        # 行尾 Git blame 装饰
├── commands.ts     # 7 个命令注册
└── extension.ts    # 入口,只有 activate / deactivate
依赖关系是单向的,没有循环:
dart
types.ts ← analyzer / git / webviews / blame / commands
git.ts   ← blame / commands / extension
commands.ts ← git + analyzer + wordExport + webviews
extension.ts ← git + blame + commands
extension.ts 入口:
ts
export function activate(context: vscode.ExtensionContext) {
  registerBlameFeature(context);   // 行尾 blame 装饰
  registerCommands(context);       // 7 个命令
  context.subscriptions.push(
    vscode.workspace.registerTextDocumentContentProvider(DIFF_SCHEME, new GitRevisionContentProvider())
  );
}
export function deactivate() {}
三、核心功能实现
1. 代码行数统计:一个"逐行判读"的解析器
统计口径:// 行注释、/* */ 块注释(支持跨行)、空行、其余算有效代码。
ts
export function parseContent(content: string): { code: number; comment: number; blank: number } {
  const lines = content.split(/\r?\n/);
  let code = 0, comment = 0, blank = 0;
  let inBlockComment = false; // 是否处于跨行块注释中

  for (const raw of lines) {
    const line = raw.trimStart();
    if (line.length === 0) { blank++; continue; }
    if (inBlockComment) {            // 上一行开了 /* 还没闭合
      comment++;
      if (line.indexOf('*/') !== -1) inBlockComment = false;
      continue;
    }
    const blockStart = line.indexOf('/*');
    const lineComment = line.indexOf('//');
    if (blockStart !== -1) {          // 本行有块注释开头
      comment++;
      if (line.indexOf('*/', blockStart + 2) === -1) inBlockComment = true;
      continue;
    }
    if (lineComment === 0) { comment++; continue; } // // 行注释
    code++;
  }
  return { code, comment, blank };
}
walkDir 递归遍历目录,跳过 node_modules / .git / dist / out,只统计白名单后缀(ts/js/java/c/cpp/py/go/rust/vue/html/css...),每个文件一行输出到 Output 面板的 Markdown 表格里:
lua
| 文件名 | 总行数 | 有效代码行 | 注释行 | 空行 |
|--------|--------|------------|--------|------|入口挂在资源管理器右键菜单(explorer/context),和"统计代码行数"同一组:
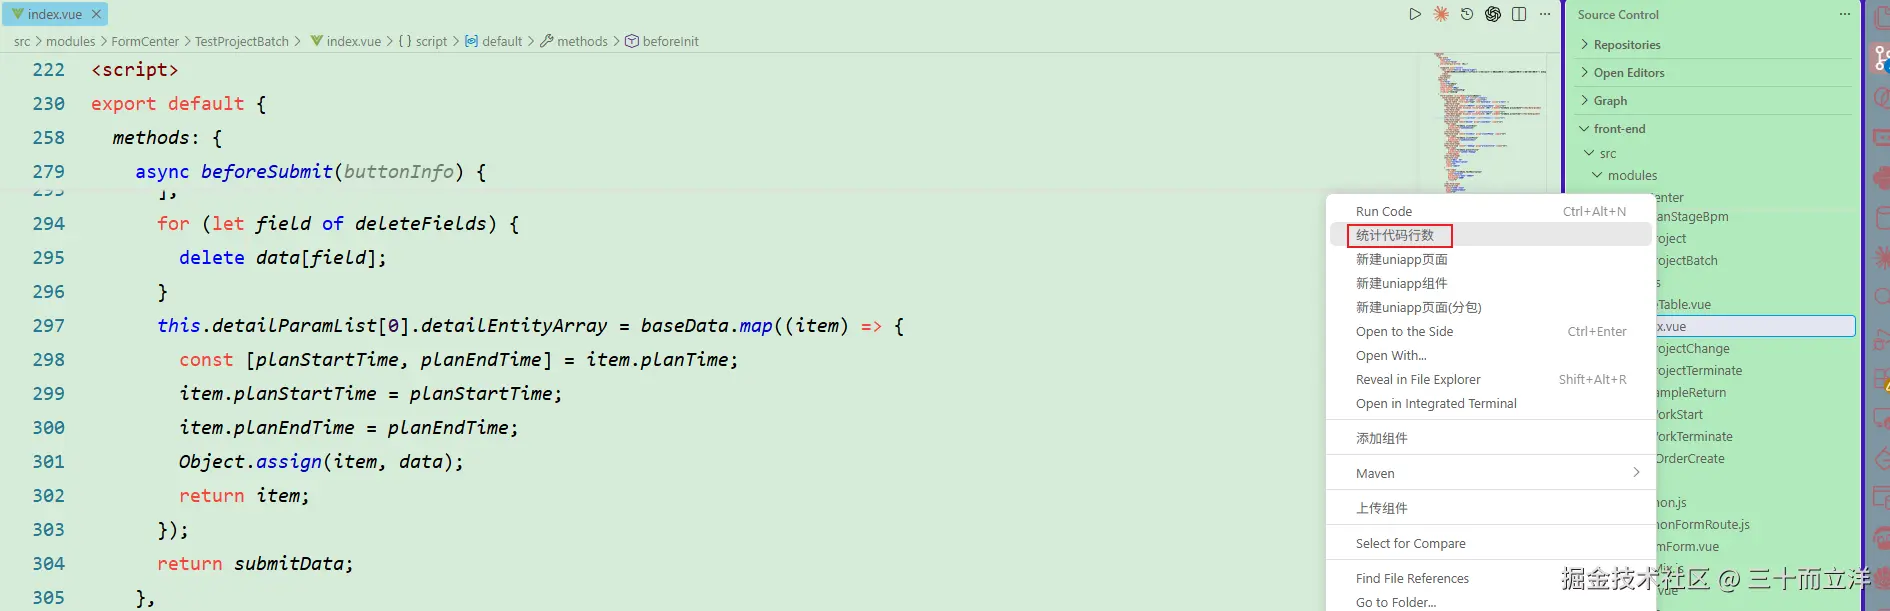
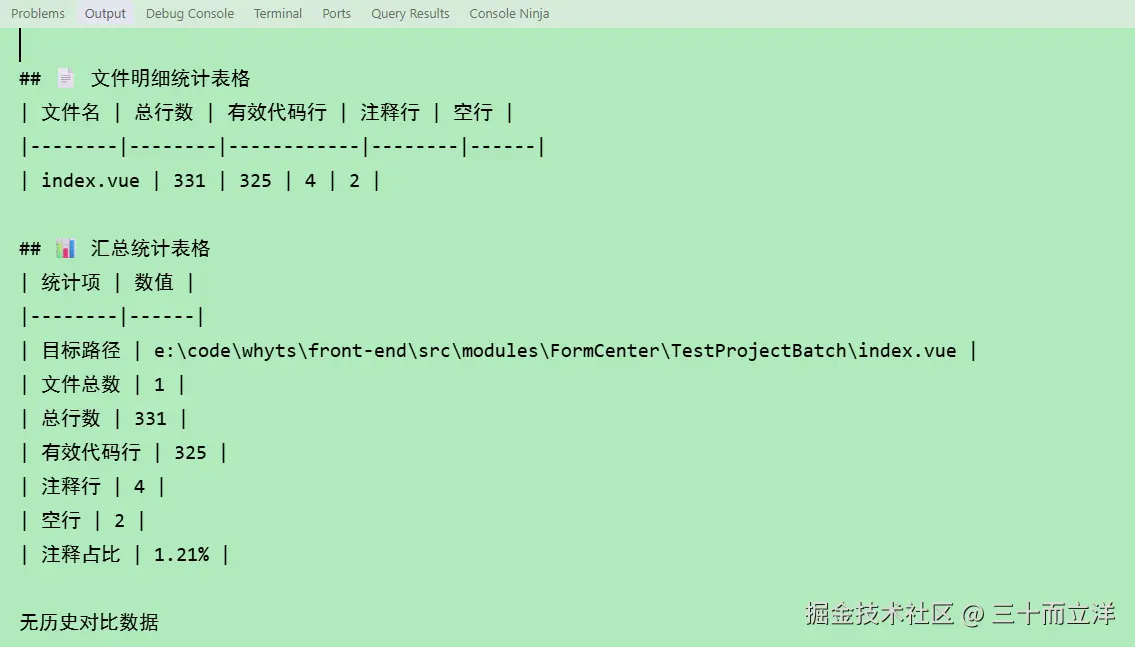
json
"contributes": {
  "menus": {
    "explorer/context": [
      { "command": "code-counter.countCode", "group": "navigation", "when": "resourceScheme == file" },
      { "command": "code-counter.exportWord", "group": "navigation", "when": "resourceScheme == file" }
    ]
  }
}
2. 历史快照:存到 globalState,与上次对比
每次统计完,把结果连同时间戳存进 context.globalState(插件自己的持久化 KV 存储),最多保留 50 条:
ts
const GLOBAL_KEY = "codeCounterStore";

function loadStore(): ExtensionGlobalState {
  const raw = context.globalState.get<ExtensionGlobalState>(GLOBAL_KEY);
  if (raw && Array.isArray(raw.historyList)) return raw;
  return { historyList: [] };
}

function saveStore(state: ExtensionGlobalState) {
  context.globalState.update(GLOBAL_KEY, state);
}
统计输出里会带上"与上一次快照对比",用 diffResult 算出差值,+/- 一目了然:
makefile
=====与上一次快照对比=====
文件数: +3
总行数: +120
有效代码行: +98
注释行: +10
空行: +12
历史还能一键导出 CSV,buildCsv 里用双引号包裹路径、转义内部引号,避免路径含逗号破坏列结构:
ts
const p = `"${item.targetPath.replace(/"/g, '""')}"`;3. Word 导出:零依赖,HTML 塞进 .doc
需求很简单------"把所有文件的代码合并导出,没有排版要求"。最省事又兼容 Word/WPS 的办法:生成一个带 Office 头标记的 HTML,扩展名存成 .doc。不需要引入任何 docx 库。
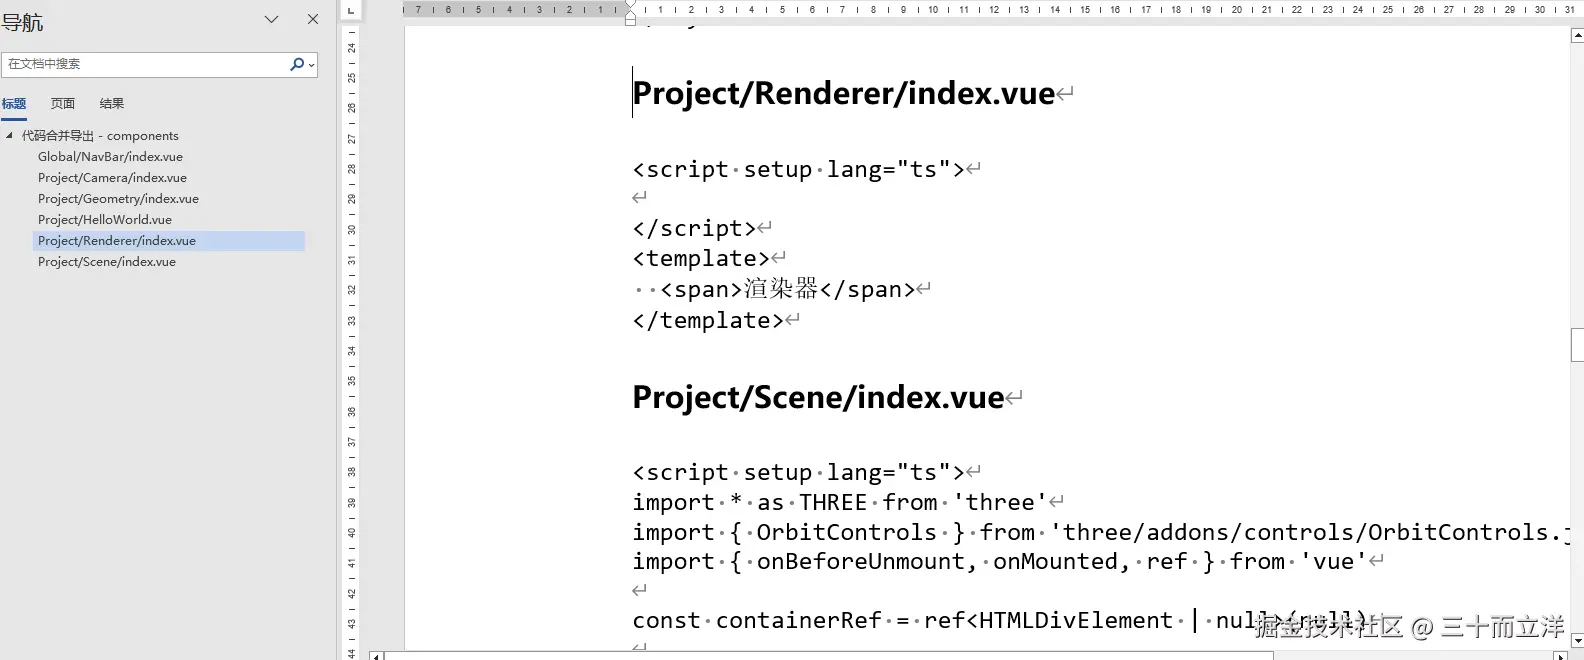
ts
export function buildWordHtml(fsPath: string, files) {
  const title = '代码合并导出 - ' + path.basename(fsPath);
  const sections = files.map(f => `<h2>${escapeHtml(f.rel)}</h2>\n<pre>${escapeHtml(f.content)}</pre>`).join('\n');
  return `<html xmlns:o="...office:office" xmlns:w="...office:word" xmlns="...REC-html40">
<head>
<meta charset="utf-8">
<!--[if gte mso 9]><xml><w:WordDocument><w:View>Print</w:View></w:WordDocument></xml><![endif]-->
...
<body><h1>${escapeHtml(title)}</h1>${sections}</body></html>`;
}
关键点是 <!--[if gte mso 9]>... 这段 Word 专用标记,加上 <pre> 的 white-space: pre-wrap,代码里的缩进和换行就完整保留了。导出前用 collectCodeFiles 递归收集白名单文件,同样跳过 node_modules。
4. 提交历史窗口:一个可筛选的 Webview
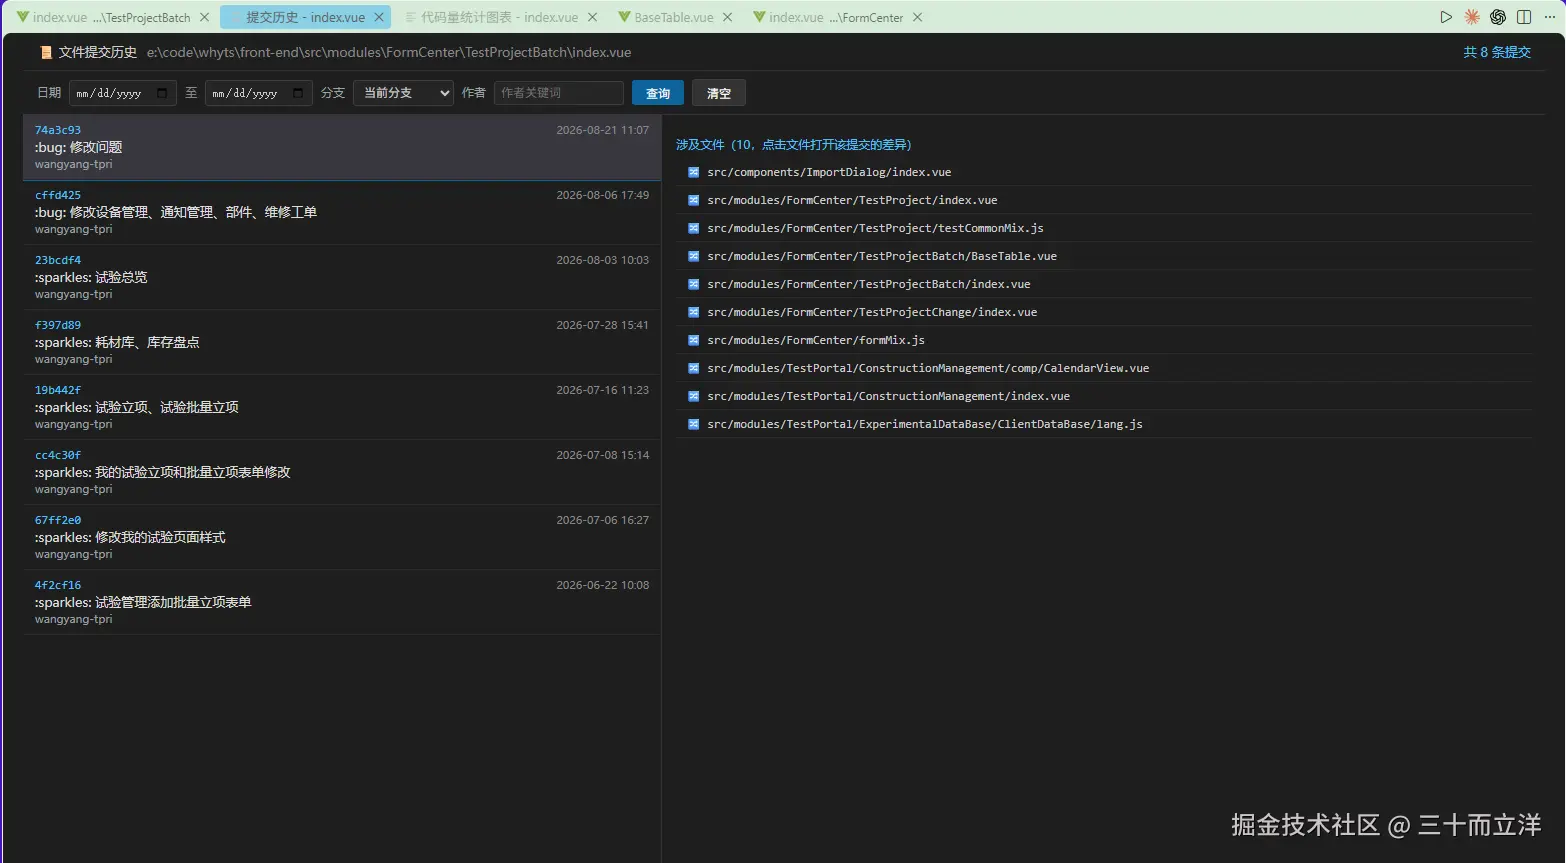
这是插件里最"重"的一个 UI。右侧点击文件 → 左侧列出该文件的提交历史,顶部还能按 日期 / 分支 / 作者 筛选。
Git 侧 :用一条 git log 拿到元数据,字段分隔符用 %x1e(控制符),而不是逗号------因为提交摘要里什么都可能有:
ts
const logOut = await runGitCmd(repoRoot,
  `git log --format=%H%x1e%an%x1e%ad%x1e%s --date=iso-strict${ref}${author}${since}${until} -- "${relativePath}"`);
筛选参数直接拼进命令:
ts
if (opts?.all) ref = ' --all';
else if (opts?.ref) ref = ` ${opts.ref}`;
const author = opts?.author ? ` --author="${opts.author}"` : '';
const since = opts?.since ? ` --since="${opts.since}"` : '';
const until = opts?.until ? ` --until="${opts.until}"` : '';
Webview 侧 :主进程和页面通过 postMessage / onDidReceiveMessage 通信。页面点提交 → 发 getFiles → 主进程 git show --name-only → 回 files → 右侧渲染涉及文件列表;点文件 → 发 openDiff → 主进程拼绝对路径后复用 openFileGitDiff 命令打开 diff 窗口。
这里有个很典型的坑 :分支下拉框的"当前分支"和"所有分支"。之前测试发现 git log <branch> -- file 会把该分支的所有祖先提交也算进来(这是 git 的正确语义),所以默认(不筛分支)和 ref=master 的结果是一样的------写测试时别把预期搞反了。
5. 代码量统计图表:ECharts + 自定义 scheme
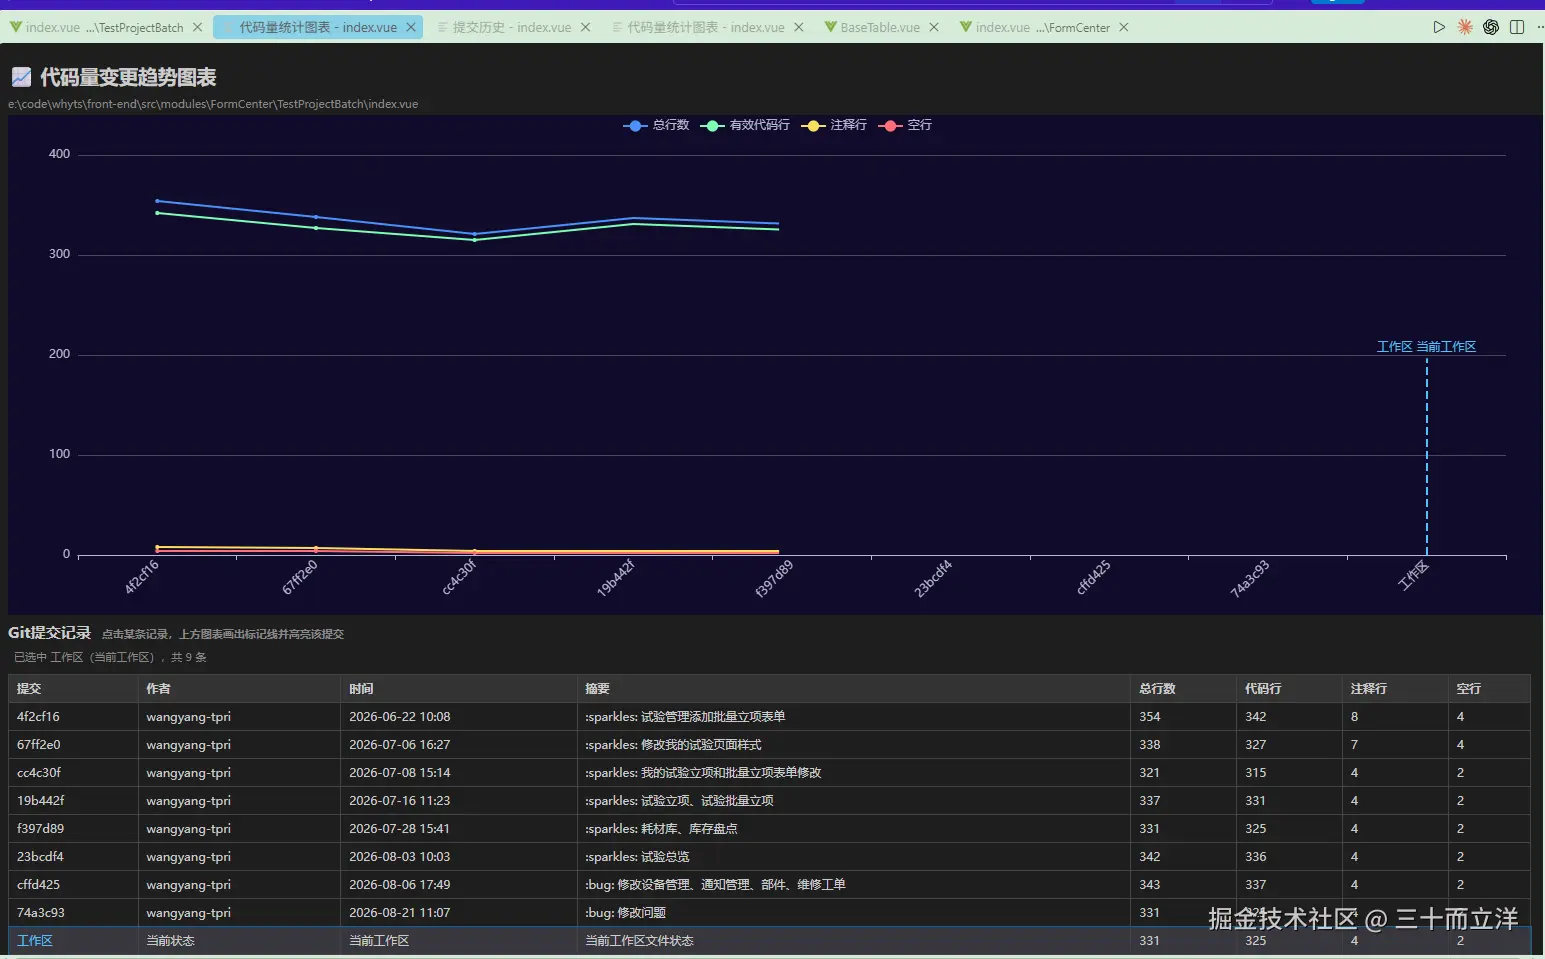 需求:展示一个文件在每次提交时的代码量变化趋势。实现:
git log --format=...拿到该文件的所有提交(新→旧)- 对每条提交执行
git show "<hash>:<path>"取出当时文件内容 - 用
parseContent算出当时的代码/注释/空行 - 翻转成旧→新,作为折线图的 X 轴
- 末尾追加一条"当前工作区"的合成记录,保证打开图表就有数据
ts
const current = await fs.promises.readFile(fileUri.fsPath, 'utf8');
result.push({ hash: '', shortHash: '工作区', author: '当前状态',
  dateLabel: '当前工作区', stats: computeStats(current), isWorkingTree: true });
图表用 ECharts,从多个 CDN 依次尝试加载(jsdelivr → unpkg → bootcdn),全失败也不影响下方的提交列表。点列表里某条提交,图表会画一条 markLine 标出当时的位置:
ts
const markLine = {
  symbol: 'none', silent: true,
  label: { color: '#4fc1ff', formatter: commits[idx].shortHash + ' ' + commits[idx].dateLabel },
  lineStyle: { color: '#4fc1ff', width: 2 },
  data: [{ xAxis: idx }]
};
最难的一步 是"点击提交历史里涉及的文件 → 打开该文件的提交差异"。VS Code 内置的 git:// scheme 是 git 扩展私有的,格式特殊、依赖其仓库加载状态,我们直接 vscode.diff(oldUri, newUri) 读不到历史版本。解决办法是注册一个自己的 scheme:
ts
export const DIFF_SCHEME = 'code-counter-git';

export class GitRevisionContentProvider implements vscode.TextDocumentContentProvider {
  async provideTextDocumentContent(uri: vscode.Uri): Promise<string> {
    const fileUri = vscode.Uri.from({ scheme: 'file', path: uri.path });
    const hash = uri.query;               // hash 放在 query 里传
    const repoRoot = await getGitRepoRoot(fileUri);
    const relativePath = getRepoRelativePath(repoRoot, fileUri);
    return getFileContentAtCommit(repoRoot, relativePath, hash); // git show hash:path
  }
}
调用 diff 时,左侧旧版本用这个 scheme 拼 URI:
ts
const oldUri = fileUri.with({ scheme: DIFF_SCHEME, query: hash });
await vscode.commands.executeCommand('vscode.diff', oldUri, fileUri,
  `提交 ${hash.substring(0, 7)}【${author}】:${summary}`, { viewColumn: vscode.ViewColumn.Two });
这就是为什么 extension.ts 里要显式 registerTextDocumentContentProvider(DIFF_SCHEME, ...)。
6. 行尾 blame 装饰:GitLens 的最简实现

光标所在行的行尾显示 短hash 作者 · 摘要,光标移走即消失,悬停还能弹出三个命令按钮(看差异 / 看历史 / 看图表)。
Git 侧 用 git blame --porcelain 拿结构化输出:
ts
const out = await execGit(dir, `git blame --porcelain "${relFile}"`);porcelain 格式里,提交元数据(hash、author、summary)只在每个提交块的第一行出现一次,后续代码行要沿用上一次的值------解析时必须记住,不能清空:
ts
for (const l of lines) {
  if (/^[0-9a-f]{40} /.test(l)) { hash = parts[0]; lineNum = parseInt(parts[2], 10); continue; }
  if (l.startsWith('author ')) { author = l.replace(/^author /, ''); continue; }
  if (l.startsWith('summary ')) { subject = l.replace(/^summary /, ''); continue; }
  if (l.startsWith('\t')) {
    result.push({ lineNumber: lineNum, shortHash: hash.substring(0, 7), fullHash: hash, author, subject });
  }
}
装饰侧 :TextEditorDecorationType + after.contentText 在行尾画字,hoverMessage 放 MarkdownString,命令用 URI 编码的参数传参:
ts
const args = encodeURIComponent(JSON.stringify([{ file: fsPath, hash: item.fullHash }]));
const hover = new vscode.MarkdownString();
hover.appendMarkdown(`**提交** \`${item.fullHash}\`  \n\n**作者** ${item.author}  \n**摘要** ${item.subject}  \n\n
  [🔀](command:code-counter.openFileGitDiff?${args} "查看提交差异")  [📜](command:code-counter.openFileCommitHistory?${historyArgs} "查看文件提交历史")  [📈](command:code-counter.openChart?${chartArgs} "代码量统计图表")`);
hover.isTrusted = true;性能上做了两层保护:按文件+mtime 缓存 blame 结果,以及同文件并发去重 (blameInFlight),光标快速上下移动时不会重复执行 git 命令。三个事件触发刷新:切换编辑器、光标移动、保存文档。
四、工程里踩过的一些坑
%x1e字段分隔符 :git log --format用逗号/管道都会撞上摘要里的内容,用控制符\x1e最稳,解析时split('\x1e')。- Windows 路径 :git 输出的是正斜杠
/,fsPath是反斜杠\,盘符还分大小写。统一转/后做不区分大小写的前缀匹配再截取相对路径。 - 大文件
git show:Node 的exec默认 stdout 缓冲只有 1MB,大文件会爆,必须maxBuffer: 100 * 1024 * 1024。 - Webview 注入 :页面里
const data = ${JSON.stringify(data)}时,如果路径/摘要含</script>会直接破掉页面,构建前先把<转义成<。 - 模块化后的测试 :webview 的脚本没法在 Node 里直接跑,做法是把构建出的 HTML 里的
<script>抽出来用new Function(script)只做语法校验(不执行)。 - git 分支的祖先语义 :
git log <branch> -- file会把该分支所有祖先提交算进来,写筛选逻辑和测试断言前务必想清楚,否则"默认 2 条 vs 指定分支 3 条"这种断言会挂。
五、测试:没有真实 VS Code 也能测
插件代码依赖 vscode 模块,单测里用一个 Proxy 桩 替换掉它:require('vscode') 时返回一个"要啥给啥"的对象,注册命令返回带 dispose 的假对象,window.activeTextEditor 返回 undefined 让 blame 逻辑安全短路。
js
const Module = require('module');
const origRequire = Module.prototype.require;
Module.prototype.require = function (request) {
  if (request === 'vscode') return vscodeStub;   // Proxy 桩
  return origRequire.apply(this, arguments);
};
然后直接 require('./out/extension.js'),用 { subscriptions: [], globalState: {...} } 这种假 context 调 activate(),断言不抛错、subscriptions 有内容。Git 相关函数则针对一个临时构造的双分支仓库(控制好提交时间、作者)验证筛选和 blame 结果。这样整个插件在没有 VS Code 的情况下也能自动回归。
六、小结
这个插件让我体会到:
- VS Code 扩展开发比想象中简单 :API 覆盖了编辑器、Webview、命令、菜单、持久化,
TextDocumentContentProvider这类机制把"读取历史文件内容"这种看似不可能的事也变得可行。 - 直接调 git 命令不丢人:对 Git 这种成熟工具,用 CLI 反而清晰可控,还能少引一堆依赖。
- Webview 是"浏览器 + 双向通信":把复杂 UI 交给 HTML/JS,主进程只负责数据,职责非常干净。
- 拆模块 + 桩测试,让插件代码真的可维护:1262 行单体拆成 8 个文件后,每个功能都能单独读、单独测。
如果你也常被"统计代码量 / 看提交历史 / 查 blame"这种事烦到,不妨也动手写一个------源码已经在这里,功能全覆盖。