SpringBoot4 云端咖啡站 阶段五:交付与进阶
第 15 章:测试 ------ 让每次改代码都有底气
本章目标
- 分清单元测试与整合测试的边界与分工
- 掌握 JUnit 5 基础:@Test/@DisplayName/断言
- @SpringBootTest 整合测试 + @MockitoBean 隔离依赖(Boot 4 新 API)
- @WebMvcTest 切片测试:只装 Web 层、不起端口测 Controller
- 测试类上的 @Transactional 自动回滚:数据库测试不留痕迹
前面十四章我们用 curl 逐个接口手工验证------每改一行代码都要把所有场景重新点一遍。
本章把这套验证固化成自动化测试:mvn test 一条命令,几秒钟跑完全部检查。
知识点讲解
测试金字塔:三层分工
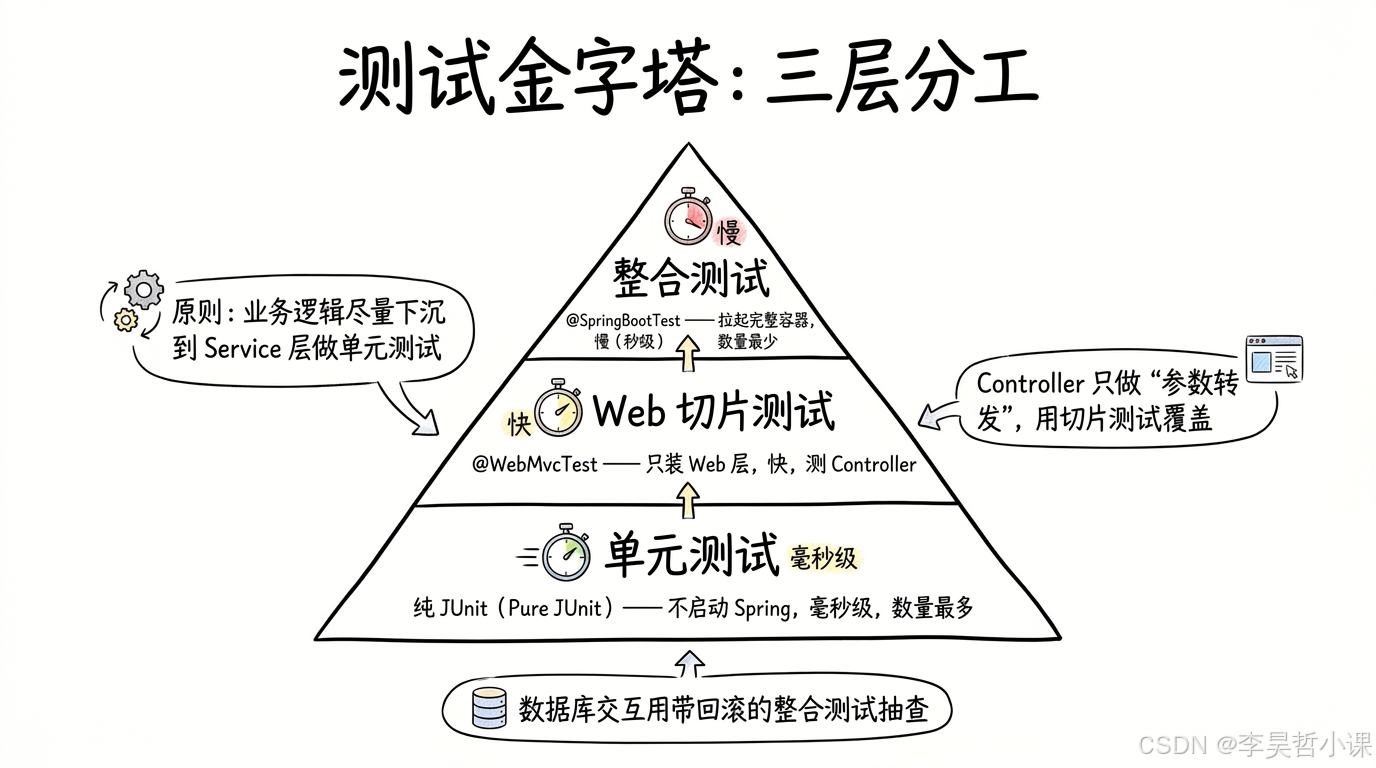
原则:业务逻辑尽量下沉到 Service 层做单元测试;Controller 只做"参数转发",用切片测试覆盖;数据库交互用带回滚的整合测试抽查。
JUnit 5 最小集
java
@Test
@DisplayName("会员价 = 原价 × 0.88")          // 给人看的名字,报告里显示
void memberPriceShouldDiscount() {
    assertEquals(new BigDecimal("24.64"),     // 期望值
            service.memberPrice(...));         // 实际值
}
常用断言:assertEquals 相等 / assertTrue 条件 / assertThrows 异常断言(返回异常对象可继续验证消息)。
@MockitoBean:Boot 4 的改名注解
Mock 对象的本质是"接口的空壳实现"------用 Mockito 生成并可以打桩:
java
// 打桩:调用 findById(1L) 时返回假数据
Mockito.when(coffeeMapper.findById(1L)).thenReturn(fake);
// 验证:updatePrice 被以指定参数调用过恰好一次
Mockito.verify(coffeeMapper).updatePrice(1L, new BigDecimal("30.50"));
【Boot 4 重大变化】老教程里的 @MockBean(org.springframework.boot.test.mock.mockito 包)在 Boot 4 已删除 ,替代品是 Spring Framework 的 @MockitoBean(org.springframework.test.context.bean.override.mockito 包)。语义相同:把容器里对应类型的 Bean 替换成 Mockito 假体。
@WebMvcTest 也是 Boot 4 搬过家的
| Boot 3 及以前 | Boot 4 |
|---|---|
| org.springframework.boot.test.autoconfigure.web.servlet.WebMvcTest | org.springframework.boot.webmvc.test.autoconfigure.WebMvcTest |
| 包含在 starter-test 里 | 需要 spring-boot-starter-webmvc-test 单独依赖 |
Boot 4 把 test-autoconfigure 大模块按技术栈拆分(webmvc/webflux/jdbc/security...各一个 *-test 模块)。
MockMvc:不起端口测 HTTP 层
java
mockMvc.perform(get("/api/menu/1"))                    // 构造请求
       .andExpect(status().isOk())                     // 断言状态码
       .andExpect(jsonPath("$.name").value("拿铁"));   // 断言 JSON 字段
不监听端口、不发真实网络包------DispatcherServlet 在 JVM 内直接处理请求,比 curl 快一个量级。jsonPath 用 JSONPath 表达式取字段。
测试类上的 @Transactional = 自动回滚
java
@SpringBootTest
@Transactional          // 测试框架特殊语义:每个测试方法结束后回滚!
class CoffeeMapperDbTest {
    @Test
    void updatePriceShouldWorkAndRollback() {
        coffeeMapper.updatePrice(1L, new BigDecimal("99.99"));
        // 同一事务内能看到修改;方法结束 → 回滚 → 库里还是 28.00
    }
}
生产代码里 @Transactional 是提交;测试类上标注时,Spring TestContext 框架在每个测试方法后强制回滚。这让数据库测试天然幂等------反复运行不残留脏数据。
全局设置导致的坑:Tests are skipped
本项目环境里 ~/.m2/settings.xml 配了 <maven.test.skip>true</maven.test.skip>(很多公司镜像这么干)。跑测试必须显式覆盖:
bash
mvn test -Dmaven.test.skip=false -Dtest='com.lihaozhe.chapter15.*Test'如果 mvn test 秒结束且日志出现 Tests are skipped.,先想到这个全局开关。
完整代码(最终版)
pom.xml(新增部分)
xml
<!-- 【第 15 章】测试支持:JUnit 5 + Mockito + MockMvc + 断言库 -->
<dependency>
    <groupId>org.springframework.boot</groupId>
    <artifactId>spring-boot-starter-test</artifactId>
    <scope>test</scope>
</dependency>

<!-- 【第 15 章】WebMvc 切片测试支持。
     Boot 4 的拆分改造:@WebMvcTest 从老的
     spring-boot-test-autoconfigure 挪到了独立的
     spring-boot-webmvc-test 模块(包名也改为
     org.springframework.boot.webmvc.test.autoconfigure),
     老包路径在 4.x 已删除------网上老教程编译不过就是这里。 -->
<dependency>
    <groupId>org.springframework.boot</groupId>
    <artifactId>spring-boot-starter-webmvc-test</artifactId>
    <scope>test</scope>
</dependency>
src/main/resources/application.yaml(新增部分)
yaml
# ============================================================
# 【第 15 章】测试章:数据库配置同前(@SpringBootTest 整合测试真连库)。
# 测试代码在 src/test/java/com/lihaozhe/chapter15/,
# mvn test 运行;测试类通过 @ActiveProfiles("ch15") 激活本段。
# ============================================================
---
spring:
  config:
    activate:
      on-profile: ch15

  autoconfigure:
    exclude: []

  datasource:
    url: jdbc:mysql://118.31.221.165:3306/sb_coffee?useSSL=false&allowPublicKeyRetrieval=true&serverTimezone=Asia/Shanghai
    username: root
    password: lihaozhe
    driver-class-name: com.mysql.cj.jdbc.Driver
    hikari:
      maximum-pool-size: 10
      minimum-idle: 2
      idle-timeout: 600000
      max-lifetime: 1800000

  sql:
    init:
      mode: never

mybatis:
  configuration:
    map-underscore-to-camel-case: true
src/main/java/com/lihaozhe/chapter15/Coffee.java
java
package com.lihaozhe.chapter15;

import java.math.BigDecimal;

/**
 * 第 15 章:咖啡实体(被测数据模型)。
 */
public class Coffee {

    private Long id;
    private String name;
    private BigDecimal price;
    private String description;
    private Integer stock;

    public Long getId() {
        return id;
    }

    public void setId(Long id) {
        this.id = id;
    }

    public String getName() {
        return name;
    }

    public void setName(String name) {
        this.name = name;
    }

    public BigDecimal getPrice() {
        return price;
    }

    public void setPrice(BigDecimal price) {
        this.price = price;
    }

    public String getDescription() {
        return description;
    }

    public void setDescription(String description) {
        this.description = description;
    }

    public Integer getStock() {
        return stock;
    }

    public void setStock(Integer stock) {
        this.stock = stock;
    }
}
src/main/java/com/lihaozhe/chapter15/CoffeeMapper.java
java
package com.lihaozhe.chapter15;

import java.util.List;

import org.apache.ibatis.annotations.Mapper;
import org.apache.ibatis.annotations.Param;
import org.apache.ibatis.annotations.Select;
import org.apache.ibatis.annotations.Update;

/**
 * 第 15 章:菜单 Mapper(被测 DAO)。
 */
@Mapper
public interface CoffeeMapper {

    @Select("SELECT id, name, price, description, stock FROM coffee_menu WHERE id = #{id}")
    Coffee findById(@Param("id") Long id);

    @Select("SELECT id, name, price, description, stock FROM coffee_menu ORDER BY id")
    List<Coffee> findAll();

    @Update("""
            UPDATE coffee_menu
            SET price = #{price}
            WHERE id = #{id} AND price >= 0
            """)
    int updatePrice(@Param("id") Long id, @Param("price") java.math.BigDecimal price);
}
src/main/java/com/lihaozhe/chapter15/PricingService.java
java
package com.lihaozhe.chapter15;

import java.math.BigDecimal;

import org.springframework.stereotype.Service;

/**
 * 第 15 章:菜单 Service ------ 纯业务逻辑,单元测试的主战场。
 *
 * <p>【为什么它好测】不依赖容器、只依赖构造器传入的协作者------
 * 单元测试里 new 出来、塞个假 Mapper 就能跑。</p>
 */
@Service
public class PricingService {

    private final CoffeeMapper coffeeMapper;

    public PricingService(CoffeeMapper coffeeMapper) {
        this.coffeeMapper = coffeeMapper;
    }

    /** 会员价规则:8.8 折,四舍五入到分 */
    public BigDecimal memberPrice(BigDecimal original) {
        if (original == null || original.signum() < 0) {
            throw new IllegalArgumentException("价格不能为空或负数");
        }
        return original.multiply(new BigDecimal("0.88"))
                .setScale(2, java.math.RoundingMode.HALF_UP);
    }

    /**
     * 改价并回查(演示 Mockito 打桩的依赖点)。
     * 业务规则:新价格必须大于 0。
     */
    public Coffee changePrice(Long id, BigDecimal newPrice) {
        if (newPrice == null || newPrice.signum() <= 0) {
            throw new IllegalArgumentException("价格必须大于 0");
        }
        coffeeMapper.updatePrice(id, newPrice);
        return coffeeMapper.findById(id);
    }
}
src/main/java/com/lihaozhe/chapter15/MenuController.java
java
package com.lihaozhe.chapter15;

import java.math.BigDecimal;
import java.util.LinkedHashMap;
import java.util.Map;

import org.springframework.web.bind.annotation.GetMapping;
import org.springframework.web.bind.annotation.PathVariable;
import org.springframework.web.bind.annotation.RequestParam;
import org.springframework.web.bind.annotation.RestController;

/**
 * 第 15 章:菜单 Controller(被测 Web 层)。
 */
@RestController
public class MenuController {

    private final CoffeeMapper coffeeMapper;
    private final PricingService pricingService;

    public MenuController(CoffeeMapper coffeeMapper, PricingService pricingService) {
        this.coffeeMapper = coffeeMapper;
        this.pricingService = pricingService;
    }

    @GetMapping("/api/menu/{id}")
    public Coffee detail(@PathVariable Long id) {
        Coffee coffee = coffeeMapper.findById(id);
        if (coffee == null) {
            throw new IllegalArgumentException("咖啡不存在: id=" + id);
        }
        return coffee;
    }

    /** 会员价试算(纯计算接口,MockMvc 测试的理想对象) */
    @GetMapping("/api/menu/member-price")
    public Map<String, Object> memberPrice(@RequestParam BigDecimal price) {
        Map<String, Object> result = new LinkedHashMap<>();
        result.put("original", price);
        result.put("memberPrice", pricingService.memberPrice(price));
        return result;
    }
}
src/main/java/com/lihaozhe/chapter15/SimpleExceptionHandler.java
java
package com.lihaozhe.chapter15;

import org.springframework.http.HttpStatus;
import org.springframework.web.bind.annotation.ExceptionHandler;
import org.springframework.web.bind.annotation.ResponseStatus;
import org.springframework.web.bind.annotation.RestControllerAdvice;

/**
 * 第 15 章:简单异常处理(同 ch11~ch14 模式)。
 */
@RestControllerAdvice
public class SimpleExceptionHandler {

    @ExceptionHandler(IllegalArgumentException.class)
    @ResponseStatus(HttpStatus.BAD_REQUEST)
    public Object handleIllegalArgument(IllegalArgumentException e) {
        return new java.util.LinkedHashMap<String, Object>() {{
            put("code", 400);
            put("message", e.getMessage());
            put("data", null);
        }};
    }
}
src/main/java/com/lihaozhe/chapter15/CoffeeApplication15.java
java
package com.lihaozhe.chapter15;

import org.springframework.boot.SpringApplication;
import org.springframework.boot.autoconfigure.SpringBootApplication;
import org.springframework.boot.builder.SpringApplicationBuilder;

/**
 * 第 15 章:测试章启动类(应用本体;测试代码在 src/test/java)。
 */
@SpringBootApplication
public class CoffeeApplication15 {

    public static void main(String[] args) {
        new SpringApplicationBuilder(CoffeeApplication15.class)
                .profiles("ch15")
                .run(args);
    }
}
src/test/java/com/lihaozhe/chapter15/PricingServiceTest.java(单元测试)
java
package com.lihaozhe.chapter15;

import java.math.BigDecimal;

import org.junit.jupiter.api.DisplayName;
import org.junit.jupiter.api.Test;

import static org.junit.jupiter.api.Assertions.assertEquals;
import static org.junit.jupiter.api.Assertions.assertThrows;
import static org.junit.jupiter.api.Assertions.assertTrue;

/**
 * 第 15 章:纯单元测试 ------ 不启动 Spring,纯 Java 对象直测。
 *
 * <p>【单元测试 vs 整合测试】
 * 单元测试:new 出被测对象、手工构造依赖,毫秒级跑完,数量最多;
 * 整合测试:@SpringBootTest 拉起完整容器(下一个类演示),慢但真实。
 * 分层原则:业务逻辑尽量下沉到可单测的 Service 层。</p>
 *
 * <p>【JUnit 5 结构】
 * @Test 标注测试方法;@DisplayName 给人看的名字;
 * 断言从 org.junit.jupiter.api.Assertions 静态导入。</p>
 */
@DisplayName("PricingService 单元测试(不启动容器)")
class PricingServiceTest {

    /**
     * 手工造一个"假 Mapper"------只覆盖被测方法用到的接口。
     * 正式项目用 Mockito 的 @Mock 自动生成;这里手写是为了看清本质:
     * Mock 就是"接口的空壳实现"。
     */
    private final CoffeeMapper fakeMapper = new CoffeeMapper() {
        @Override
        public Coffee findById(Long id) {
            return null;   // 打桩返回 null,本组测试不关心回查
        }

        @Override
        public java.util.List<Coffee> findAll() {
            return java.util.List.of();
        }

        @Override
        public int updatePrice(Long id, BigDecimal price) {
            return 1;      // 假装更新成功
        }
    };

    private final PricingService service = new PricingService(fakeMapper);

    @Test
    @DisplayName("会员价 = 原价 × 0.88,保留两位小数")
    void memberPriceShouldDiscount() {
        assertEquals(new BigDecimal("24.64"), service.memberPrice(new BigDecimal("28.00")));
        assertEquals(new BigDecimal("19.36"), service.memberPrice(new BigDecimal("22.00")));
    }

    @Test
    @DisplayName("负数价格抛 IllegalArgumentException")
    void negativePriceShouldThrow() {
        IllegalArgumentException ex = assertThrows(IllegalArgumentException.class,
                () -> service.memberPrice(new BigDecimal("-1")));
        assertTrue(ex.getMessage().contains("不能为空或负数"));
    }

    @Test
    @DisplayName("改价时新价必须大于 0")
    void changePriceShouldRejectZeroOrNegative() {
        assertThrows(IllegalArgumentException.class,
                () -> service.changePrice(1L, BigDecimal.ZERO));
        assertThrows(IllegalArgumentException.class,
                () -> service.changePrice(1L, new BigDecimal("-5")));
    }
}
src/test/java/com/lihaozhe/chapter15/PricingServiceIntegrationTest.java(整合测试 + @MockitoBean)
java
package com.lihaozhe.chapter15;

import java.math.BigDecimal;

import org.junit.jupiter.api.DisplayName;
import org.junit.jupiter.api.Test;
import org.mockito.Mockito;
import org.springframework.beans.factory.annotation.Autowired;
import org.springframework.boot.test.context.SpringBootTest;
import org.springframework.test.context.ActiveProfiles;
import org.springframework.test.context.bean.override.mockito.MockitoBean;

import static org.junit.jupiter.api.Assertions.assertEquals;
import static org.junit.jupiter.api.Assertions.assertNotNull;

/**
 * 第 15 章:@SpringBootTest 整合测试 ------ 拉起完整 Spring 容器。
 *
 * <p>【它做了什么】启动时和 CoffeeApplication15.main 一样加载全部配置,
 * 只是【不启动内嵌 Tomcat】(默认 webEnvironment=MOCK,用 Mock Servlet 环境)。
 * @ActiveProfiles("ch15") 激活 yaml 里的 ch15 段(数据库配置)。</p>
 *
 * <p>【@MockitoBean 替换 Bean】容器里的 CoffeeMapper 被 Mockito 生成的
 * 代理替换------整合测试也能隔离数据库依赖。注意:Boot 4 中
 * spring-boot-test 里的经典 @MockBean 已被移到 spring-test 并更名
 * @MockitoBean(org.springframework.test.context.bean.override.mockito),
 * 旧注解在 Boot 4 已删除,网上老教程会编译失败就是这个原因。</p>
 */
@SpringBootTest
@ActiveProfiles("ch15")
@DisplayName("SpringBootTest 整合测试:容器 + MockBean")
class PricingServiceIntegrationTest {

    @Autowired
    private PricingService pricingService;          // 真实 Bean

    /** 用 Mockito 假体替换容器里的 CoffeeMapper(Boot 4 新 API) */
    @MockitoBean
    private CoffeeMapper coffeeMapper;

    @Test
    @DisplayName("改价后回查返回打桩数据 ------ 依赖被成功隔离")
    void changePriceShouldUseMockedMapper() {
        Coffee fake = new Coffee();
        fake.setId(1L);
        fake.setName("拿铁");
        fake.setPrice(new BigDecimal("30.50"));

        // 打桩:updatePrice 放行;findById(1L) 返回上面的假对象
        Mockito.when(coffeeMapper.findById(1L)).thenReturn(fake);

        Coffee result = pricingService.changePrice(1L, new BigDecimal("30.50"));

        assertNotNull(result);
        assertEquals("拿铁", result.getName());
        assertEquals(new BigDecimal("30.50"), result.getPrice());

        // 验证交互:updatePrice 被以 (1L, 30.50) 调用过恰好一次
        Mockito.verify(coffeeMapper).updatePrice(1L, new BigDecimal("30.50"));
    }
}
src/test/java/com/lihaozhe/chapter15/MenuControllerSliceTest.java(WebMvc 切片)
java
package com.lihaozhe.chapter15;

import java.math.BigDecimal;

import org.junit.jupiter.api.DisplayName;
import org.junit.jupiter.api.Test;
import org.springframework.beans.factory.annotation.Autowired;
import org.springframework.boot.webmvc.test.autoconfigure.WebMvcTest;
import org.springframework.test.context.ActiveProfiles;
import org.springframework.test.context.bean.override.mockito.MockitoBean;
import org.springframework.test.web.servlet.MockMvc;

import static org.mockito.Mockito.when;
import static org.springframework.test.web.servlet.request.MockMvcRequestBuilders.get;
import static org.springframework.test.web.servlet.result.MockMvcResultMatchers.jsonPath;
import static org.springframework.test.web.servlet.result.MockMvcResultMatchers.status;

/**
 * 第 15 章:@WebMvcTest 切片测试 ------ 只装配 Web 层。
 *
 * <p>【与 @SpringBootTest 的区别】
 * @SpringBootTest 拉起全部 Bean(慢);@WebMvcTest 只装 Controller/
 * ControllerAdvice/Filter 等 web 组件(快),Service/Mapper 一概不装------
 * 依赖必须用 @MockitoBean 提供假体,否则启动报缺 Bean。</p>
 *
 * <p>【MockMvc】不发真实 HTTP 请求、不起端口,直接在方法链里模拟:
 * perform(请求) → andExpect(状态码/JSON 路径断言)。比 curl 快一个数量级。</p>
 */
@WebMvcTest(MenuController.class)
@ActiveProfiles("ch15")
@DisplayName("WebMvcTest 切片:只测 Web 层")
class MenuControllerSliceTest {

    @Autowired
    private MockMvc mockMvc;

    /** Web 层依赖的 Mapper 必须打桩(切片不装真实 Mapper) */
    @MockitoBean
    private CoffeeMapper coffeeMapper;

    /** PricingService 也被排除在切片外,同样要假体 */
    @MockitoBean
    private PricingService pricingService;

    @Test
    @DisplayName("GET /api/menu/1 返回 200 与 JSON 字段")
    void detailShouldReturnCoffee() throws Exception {
        Coffee latte = new Coffee();
        latte.setId(1L);
        latte.setName("拿铁");
        latte.setPrice(new BigDecimal("28.00"));
        latte.setStock(100);
        when(coffeeMapper.findById(1L)).thenReturn(latte);

        mockMvc.perform(get("/api/menu/1"))
                .andExpect(status().isOk())
                .andExpect(jsonPath("$.name").value("拿铁"))
                .andExpect(jsonPath("$.price").value(28.00));
    }

    @Test
    @DisplayName("GET 不存在的 id → 400 + 全局异常处理的 JSON")
    void detailShouldReturn400WhenMissing() throws Exception {
        when(coffeeMapper.findById(999L)).thenReturn(null);

        mockMvc.perform(get("/api/menu/999"))
                .andExpect(status().isBadRequest())
                .andExpect(jsonPath("$.code").value(400))
                .andExpect(jsonPath("$.message").value("咖啡不存在: id=999"));
    }
}
src/test/java/com/lihaozhe/chapter15/CoffeeMapperDbTest.java(真库 + 回滚)
java
package com.lihaozhe.chapter15;

import java.util.List;

import org.junit.jupiter.api.DisplayName;
import org.junit.jupiter.api.Test;
import org.springframework.beans.factory.annotation.Autowired;
import org.springframework.boot.test.context.SpringBootTest;
import org.springframework.test.context.ActiveProfiles;
import org.springframework.transaction.annotation.Transactional;

import static org.junit.jupiter.api.Assertions.assertEquals;
import static org.junit.jupiter.api.Assertions.assertNotNull;

/**
 * 第 15 章:真连数据库的整合测试 ------ 事务自动回滚。
 *
 * <p>【@Transactional 在测试里的特殊语义】
 * 生产代码里 @Transactional 是"提交";测试类/方法上标注时,
 * Spring 测试框架默认在每个测试方法结束后【回滚】------
 * 测试改的数据不会残留到数据库,天然幂等,可反复运行。</p>
 *
 * <p>【前提】ch15 段配置了真实 MySQL 连接;coffee_menu 表由
 * 第 04 章的初始化脚本建好(拿铁 id=1 等)。</p>
 */
@SpringBootTest
@ActiveProfiles("ch15")
@Transactional
@DisplayName("数据库整合测试:真实查询 + 自动回滚")
class CoffeeMapperDbTest {

    @Autowired
    private CoffeeMapper coffeeMapper;

    @Test
    @DisplayName("findById 查出第 4 章初始化的拿铁")
    void findByIdShouldReturnLatte() {
        Coffee latte = coffeeMapper.findById(1L);

        assertNotNull(latte);
        assertEquals("拿铁", latte.getName());
        assertEquals(0, latte.getPrice().compareTo(new java.math.BigDecimal("28.00")));
    }

    @Test
    @DisplayName("findAll 至少包含初始的三款饮品")
    void findAllShouldContainSeedData() {
        List<Coffee> all = coffeeMapper.findAll();

        List<String> names = all.stream().map(Coffee::getName).toList();
        org.junit.jupiter.api.Assertions.assertTrue(names.contains("拿铁"));
        org.junit.jupiter.api.Assertions.assertTrue(names.contains("美式"));
        org.junit.jupiter.api.Assertions.assertTrue(names.contains("燕麦白"));
    }

    @Test
    @DisplayName("updatePrice 生效,但测试结束后被回滚(库不受污染)")
    void updatePriceShouldWorkAndRollback() {
        int updated = coffeeMapper.updatePrice(1L, new java.math.BigDecimal("99.99"));
        assertEquals(1, updated);

        Coffee after = coffeeMapper.findById(1L);
        // 同一事务内能看到自己的修改
        assertEquals(0, after.getPrice().compareTo(new java.math.BigDecimal("99.99")));
        // 方法结束 → 事务回滚 → 数据库里价格仍是 28.00,可用 curl 验证
    }
}
运行验证
运行命令
bash
mvn test -Dmaven.test.skip=false -Dtest='com.lihaozhe.chapter15.*Test'(-Dmaven.test.skip=false 是因为本机 settings.xml 全局禁了测试------若你的环境没这个设置可省略。)
实际输出(4 个测试类、9 个测试全绿):
text
[INFO] Tests run: 3, Failures: 0, Errors: 0, Skipped: 0 -- in 数据库整合测试:真实查询 + 自动回滚
[INFO] Tests run: 2, Failures: 0, Errors: 0, Skipped: 0 -- in WebMvcTest 切片:只测 Web 层
[INFO] Tests run: 1, Failures: 0, Errors: 0, Skipped: 0 -- in SpringBootTest 整合测试:容器 + MockBean
[INFO] Tests run: 3, Failures: 0, Errors: 0, Skipped: 0 -- in PricingService 单元测试(不启动容器)
[INFO] Tests run: 9, Failures: 0, Errors: 0, Skipped: 0
[INFO] BUILD SUCCESS
耗时对比很说明问题:单元测试类 3 个用例 12ms;两个拉容器的整合类分别 5.8s 和 0.9s------这就是"单元测试数量最多"的理由。
验证回滚真的发生了
数据库整合测试把价格改成了 99.99,测试结束后查库:
text
price=28.00 stock=98价格纹丝不动------@Transactional 回滚生效,测试没有污染数据。
应用本体冒烟
bash
mvn compile exec:java -Dexec.mainClass=com.lihaozhe.chapter15.CoffeeApplication15
curl http://localhost:8080/api/menu/1
curl "http://localhost:8080/api/menu/member-price?price=28.00"
json
{"description":"浓缩咖啡与蒸汽牛奶的经典组合","id":1,"name":"拿铁","price":28.00,"stock":98}
{"original":28.00,"memberPrice":24.64}
常见坑
| 现象 | 原因与解决 |
|---|---|
mvn test 显示 Tests are skipped |
settings.xml/pom 里 maven.test.skip=true;加 -Dmaven.test.skip=false |
| @MockBean 编译不过(程序包不存在) | Boot 4 已删除;改用 @MockitoBean(org.springframework.test.context.bean.override.mockito) |
| @WebMvcTest 编译不过(程序包不存在) | Boot 4 挪了包名且拆了模块;pom 加 spring-boot-starter-webmvc-test,import org.springframework.boot.webmvc.test.autoconfigure.WebMvcTest |
| @WebMvcTest 启动报缺 Bean | 切片不装 Service/Mapper;所有依赖都要 @MockitoBean 提供假体 |
| 测试跑了但库里多了脏数据 | 测试类忘标 @Transactional;或方法内自己开了新事务(REQUIRES_NEW 不会被回滚) |
| 断言 BigDecimal 用 == 失败 | BigDecimal 要用 compareTo 或 equals(scale 也参与 equals);assertEquals 期望值与实际值 scale 一致 |
自测题
- 单元测试和整合测试的取舍标准是什么?为什么单元测试数量应该最多?
- @MockitoBean 和第 13 章 @Cacheable 有什么共同底层机制?为什么它能替换容器里的 Bean?
- @WebMvcTest 切片装配了哪些组件、排除了哪些?缺的依赖怎么补?
- 测试类上标 @Transactional 为什么能防止数据库污染?它的回滚时机是什么?
- jsonPath("$.name").value("拿铁") 断言的是响应的哪一部分?
- 你的环境跑 mvn test 显示 Tests are skipped,排查思路是什么?
下一章预告
功能开发完,最后一步是交付:打成 fat jar、双环境部署、健康检查与监控。
下一章学习 mvn package 生成可执行 jar、dev/prod 两套 profile 切换、Actuator 端点观测应用状态、logback 日志文件输出与优雅停机------把应用真正"上线"。
第 16 章:打包部署与监控 ------ 把应用真正"上线"
本章目标
- 用 mvn package 打出可执行 fat jar,理解它的内部结构
- 掌握"一次构建、多处运行":同一个 jar 通过 profile + 环境变量切换环境
- 配置 Actuator 健康检查端点,让运维能看到应用状态
- logback-spring.xml 日志落盘与滚动策略
- 优雅停机的原理与配置
前面十五章都在 IDE 里跑代码。真实的交付物是什么?一个 jar 文件 + 一条启动命令。本章把咖啡站"上线"。
知识点讲解
fat jar:一个文件装下整个应用
bash
mvn package -Dmaven.test.skip=true
# 产物:target/sb-claude-1.0.0.jar(约 37MB)
java -jar target/sb-claude-1.0.0.jar --spring.profiles.active=ch16,dev
fat jar = 你的 class + 全部依赖 jar + 内嵌 Tomcat。不需要目标机器预装 Tomcat,只要有 JRE 就能跑------这是 Spring Boot 革命性的部署简化。
【多启动类项目的坑】本项目有 17 个 @SpringBootApplication(每章一个),repackage 报 "Unable to find a single main class"。解法是在 spring-boot-maven-plugin 里显式指定:
xml
<configuration>
    <mainClass>com.lihaozhe.chapter16.CoffeeApplication16</mainClass>
</configuration>
单模块单应用的常规项目不需要这行。
一次构建,多处运行
部署铁律:构建产物只有一份,环境差异全部外部化。
同一份 sb-claude-1.0.0.jar
   ├── --spring.profiles.active=ch16,dev    → 连开发库
   └── STORE_NAME=xx DB_URL=jdbc:... --spring.profiles.active=ch16,prod → 生产库+自定义门店名
配置优先级(高→低):命令行参数 > 环境变量 > application.yaml。yaml 里用占位符接环境变量并给默认值:
yaml
store:
  name: ${STORE_NAME:云端咖啡站(生产)}     # 有 STORE_NAME 用它,没有用冒号后的默认值
Actuator:应用的体检中心
引入 spring-boot-starter-actuator 后自动暴露 /actuator/health:
json
{"components":{"db":{"details":{"database":"MySQL"},"status":"UP"},
               "diskSpace":{...},"livenessState":{"status":"UP"},...},
"status":"UP"}- DataSource 在类路径上会自动注册 db 指标(连不上库 health 变 DOWN)------K8s/负载均衡就靠它判断实例是否可用
- livenessState/readinessState 对应 K8s 的存活/就绪探针
- 安全红线:
management.endpoints.web.exposure.include只开 health,info;env/heapdump 这类敏感端点绝不暴露公网
logback-spring.xml 日志管理
文件名必须带 -spring 后缀------只有 logback-spring.xml 支持 <springProfile> 按环境区分日志行为。
核心结构:appender(输出目的地)+ logger/root(谁用什么级别输出到哪):
CONSOLE(控制台)── dev 环境主力
ROLLING_FILE(滚动文件)── prod 环境主力
    ├── 按天滚动 %d{yyyy-MM-dd}
    ├── 单文件超 50MB 切分 %i
    ├── 旧日志 gzip 压缩
    └── maxHistory 30 天 / totalSizeCap 2GB 防磁盘撑爆
日志目录通过属性 ${APP_LOG_DIR:-logs} 支持环境变量注入。
优雅停机
yaml
server:
  shutdown: graceful          # 默认 immediate:收到信号直接断所有连接
spring:
  lifecycle:
    timeout-per-shutdown-phase: 30s
收到 SIGTERM 后:停止接收新请求 → 等在处理中的请求完成(最多 30 秒)→ 关闭容器。滚动发布时不杀正在进行的请求,生产必备。
【Windows 教学环境的诚实说明】Git Bash 里 taskkill 不加 /F 发不出 SIGTERM(报"只有强制的才能终止"),PowerShell Stop-Process 是强杀,GenerateConsoleCtrlEvent 跨控制台也失败------所以本机只能强杀验证不了 graceful 流程。Linux 生产环境 kill <pid> 即触发,行为已由 Spring 官方保证。
完整代码(最终版)
pom.xml(spring-boot-maven-plugin 最终形态)
xml
<!-- repackage 插件:把普通 jar 打成可执行的 "fat jar"
     (内含全部依赖 + 内嵌 Tomcat,java -jar 直接运行,第 16 章实战) -->
<plugin>
    <groupId>org.springframework.boot</groupId>
    <artifactId>spring-boot-maven-plugin</artifactId>
    <configuration>
        <!-- 【多章共存项目的特殊配置】本项目有 17 个 @SpringBootApplication,
             repackage 无法猜出哪个是主类,必须显式指定。
             单模块单应用的项目不需要这行(自动探测即可)。 -->
        <mainClass>com.lihaozhe.chapter16.CoffeeApplication16</mainClass>
        <!-- 排除 Lombok:provided 依赖无需进入 fat jar -->
        <excludes>
            <exclude>
                <groupId>org.projectlombok</groupId>
                <artifactId>lombok</artifactId>
            </exclude>
        </excludes>
    </configuration>
</plugin>
src/main/resources/application.yaml(新增部分)
yaml
# ============================================================
# 【第 16 章】打包部署章:dev/prod 双环境演示段。
#
# 【设计要点】章节段(ch16)与环境段(dev/prod)分开写:
#   ch16 段放"本章通用的数据库配置";
#   dev/prod 段只放"环境差异项",且二者【互斥激活】。
# 如果把 store.name 同时写进 "ch16,dev" 和 "ch16,prod",
# 两段同时激活时后声明的会覆盖先声明的(第 03 章的规则)------
# 这正是初学者最容易踩的坑,特此用结构设计规避。
#
# 启动命令决定环境(注意启动类不再写死 setAdditionalProfiles):
#   java -jar sb-claude-1.0.0.jar --spring.profiles.active=ch16,dev
#   java -jar sb-claude-1.0.0.jar --spring.profiles.active=ch16,prod
# prod 段的门店名/数据库用环境变量覆盖(外部化配置示范)。
# ============================================================
---
spring:
  config:
    activate:
      on-profile: ch16

  autoconfigure:
    exclude: []

  datasource:
    url: jdbc:mysql://118.31.221.165:3306/sb_coffee?useSSL=false&allowPublicKeyRetrieval=true&serverTimezone=Asia/Shanghai
    username: root
    password: lihaozhe
    driver-class-name: com.mysql.cj.jdbc.Driver
    hikari:
      maximum-pool-size: 10
      minimum-idle: 2
      idle-timeout: 600000
      max-lifetime: 1800000

  sql:
    init:
      mode: never

mybatis:
  configuration:
    map-underscore-to-camel-case: true

---
spring:
  config:
    activate:
      on-profile: dev

store:
  name: 云端咖啡站(开发)

---
spring:
  config:
    activate:
      on-profile: prod

  # 【优雅停机】收到 SIGTERM(kill) 后不再接收新请求,
  # 等待在处理中的请求完成(最多 30 秒)再关闭容器------
  # 滚动发布时不杀正在进行的请求,生产必备
  lifecycle:
    timeout-per-shutdown-phase: 30s

server:
  # 开启优雅停机的开关(默认 immediate 直接断)
  shutdown: graceful

store:
  # 环境变量覆盖示例:启动前 export STORE_NAME=云端咖啡站(华东一区)
  name: ${STORE_NAME:云端咖啡站(生产)}

# Actuator 监控端点管理:
management:
  endpoints:
    web:
      exposure:
        # health/info 只读端点对外开放;env/heapdump 这类敏感端点绝不暴露!
        include: health,info
  endpoint:
    health:
      # show-details=always 让 /actuator/health 显示各组件明细(数据库状态等)
      # 生产建议 never 或 when-authorized,避免泄露内部拓扑
      show-details: always
src/main/resources/logback-spring.xml
xml
<?xml version="1.0" encoding="UTF-8"?>
<!-- ============================================================
     第 16 章:logback 日志配置(Spring Boot 4 的 logback 命名约定)。
     文件名必须是 logback-spring.xml(带 -spring 后缀):
     Spring Boot 先加载它,从而支持 <springProfile> 按环境区分日志行为;
     如果叫 logback.xml 会绕过 Boot 的日志初始化时序,springProfile 失效。

     结构:两个 appender(控制台 + 滚动文件),按 profile 决定用哪个。
     ============================================================ -->
<configuration>

    <!-- 日志输出格式:时间 级别 [线程] logger : 消息 换行 -->
    <property name="LOG_PATTERN"
              value="%d{yyyy-MM-dd HH:mm:ss.SSS} %-5level [%thread] %logger{36} : %msg%n"/>
    <!-- 日志目录:可通过 -Dapp.log.dir 或环境变量覆盖,默认 logs/ -->
    <property name="LOG_HOME" value="${APP_LOG_DIR:-logs}"/>

    <!-- 控制台输出:开发环境主力 -->
    <appender name="CONSOLE" class="ch.qos.logback.core.ConsoleAppender">
        <encoder>
            <pattern>${LOG_PATTERN}</pattern>
            <charset>UTF-8</charset>
        </encoder>
    </appender>

    <!-- 滚动文件输出:生产环境主力。
         按天 + 按大小滚动:每天一个文件;单文件超 50MB 也切分;
         总量保留 30 天/2GB,防止磁盘被日志撑爆。 -->
    <appender name="ROLLING_FILE" class="ch.qos.logback.core.rolling.RollingFileAppender">
        <!-- 当天日志文件路径 -->
        <file>${LOG_HOME}/sb-claude.log</file>
        <rollingPolicy class="ch.qos.logback.core.rolling.SizeAndTimeBasedRollingPolicy">
            <!-- %d=日期 %i=同一天内的序号 -->
            <fileNamePattern>${LOG_HOME}/sb-claude.%d{yyyy-MM-dd}.%i.log.gz</fileNamePattern>
            <maxFileSize>50MB</maxFileSize>
            <maxHistory>30</maxHistory>
            <totalSizeCap>2GB</totalSizeCap>
        </rollingPolicy>
        <encoder>
            <pattern>${LOG_PATTERN}</pattern>
            <charset>UTF-8</charset>
        </encoder>
    </appender>

    <!-- 按 Profile 区分行为:<springProfile> 是 logback-spring.xml 独有能力 -->
    <springProfile name="dev">
        <!-- 开发:只走控制台,DEBUG 级别看细节 -->
        <root level="INFO">
            <appender-ref ref="CONSOLE"/>
        </root>
        <logger name="com.lihaozhe" level="DEBUG"/>
    </springProfile>

    <springProfile name="prod">
        <!-- 生产:文件为主(控制台通常被 nohup 丢弃),INFO 起步减少噪音 -->
        <root level="INFO">
            <appender-ref ref="ROLLING_FILE"/>
            <appender-ref ref="CONSOLE"/>
        </root>
        <logger name="com.lihaozhe" level="INFO"/>
    </springProfile>

    <!-- 兜底:如果激活的 profile 不是 dev/prod(如教学章节 ch16 单独跑),也给个默认输出 -->
    <springProfile name="!(dev | prod)">
        <root level="INFO">
            <appender-ref ref="CONSOLE"/>
        </root>
    </springProfile>

</configuration>
src/main/java/com/lihaozhe/chapter16/Coffee.java
java
package com.lihaozhe.chapter16;

import java.math.BigDecimal;

/**
 * 第 16 章:咖啡实体。
 */
public class Coffee {

    private Long id;
    private String name;
    private BigDecimal price;
    private String description;
    private Integer stock;

    public Long getId() {
        return id;
    }

    public void setId(Long id) {
        this.id = id;
    }

    public String getName() {
        return name;
    }

    public void setName(String name) {
        this.name = name;
    }

    public BigDecimal getPrice() {
        return price;
    }

    public void setPrice(BigDecimal price) {
        this.price = price;
    }

    public String getDescription() {
        return description;
    }

    public void setDescription(String description) {
        this.description = description;
    }

    public Integer getStock() {
        return stock;
    }

    public void setStock(Integer stock) {
        this.stock = stock;
    }
}
src/main/java/com/lihaozhe/chapter16/CoffeeMapper.java
java
package com.lihaozhe.chapter16;

import java.util.List;

import org.apache.ibatis.annotations.Mapper;
import org.apache.ibatis.annotations.Select;

/**
 * 第 16 章:菜单 Mapper(只读)。
 */
@Mapper
public interface CoffeeMapper {

    @Select("SELECT id, name, price, description, stock FROM coffee_menu ORDER BY id")
    List<Coffee> findAll();
}
src/main/java/com/lihaozhe/chapter16/DeployInfoController.java
java
package com.lihaozhe.chapter16;

import java.util.LinkedHashMap;
import java.util.Map;

import org.springframework.beans.factory.annotation.Value;
import org.springframework.web.bind.annotation.GetMapping;
import org.springframework.web.bind.annotation.RestController;

/**
 * 第 16 章:部署信息接口 ------ 证明"同一个 jar,不同环境配置"。
 *
 * <p>【核心思想】打包产物只有一份(fat jar),环境差异全部通过
 * Profile + 环境变量注入------这就是"一次构建,多处运行"
 * (Build Once, Run Anywhere)的配置管理实践。</p>
 */
@RestController
public class DeployInfoController {

    private final CoffeeMapper coffeeMapper;

    /** 注入当前激活的 profile(dev/prod),用于展示 */
    private final String activeProfile;

    /** 门店名称:从 yaml 的 store.name 读(prod 环境用环境变量覆盖) */
    private final String storeName;

    public DeployInfoController(CoffeeMapper coffeeMapper,
                                @Value("${spring.profiles.active:unknown}") String activeProfile,
                                @Value("${store.name:默认门店}") String storeName) {
        this.coffeeMapper = coffeeMapper;
        this.activeProfile = activeProfile;
        this.storeName = storeName;
    }

    /** 部署信息页:能看到当前 jar 跑在哪个 profile、门店名是什么 */
    @GetMapping("/api/deploy-info")
    public Map<String, Object> info() {
        Map<String, Object> m = new LinkedHashMap<>();
        m.put("activeProfile", activeProfile);
        m.put("storeName", storeName);
        m.put("javaVersion", System.getProperty("java.version"));
        return m;
    }

    /** 菜单接口保持可用,证明业务功能在 jar 模式下一切正常 */
    @GetMapping("/api/menu")
    public Object menu() {
        return coffeeMapper.findAll();
    }
}
src/main/java/com/lihaozhe/chapter16/CoffeeApplication16.java
java
package com.lihaozhe.chapter16;

import org.springframework.boot.SpringApplication;
import org.springframework.boot.autoconfigure.SpringBootApplication;
import org.springframework.boot.builder.SpringApplicationBuilder;

/**
 * 第 16 章:打包部署章启动类。
 *
 * <p>【与前面章节的区别】不再写死 setAdditionalProfiles!
 * 部署章的 profile 由【启动命令】决定:
 *   java -jar sb-claude.jar --spring.profiles.active=ch16,prod
 * 这正是双环境部署的关键:代码/构建产物不动,环境由外部注入。</p>
 */
@SpringBootApplication
public class CoffeeApplication16 {

    public static void main(String[] args) {
        new SpringApplicationBuilder(CoffeeApplication16.class)
                .run(args);
    }
}
运行验证
第 1 步:打包
bash
mvn package -Dmaven.test.skip=true
ls -la target/sb-claude-1.0.0.jar
# -rw-r--r-- 1 ... 38477615 ... target/sb-claude-1.0.0.jar   (约 36.7MB)
第 2 步:dev 环境(纯命令行参数)
bash
java -jar target/sb-claude-1.0.0.jar --spring.profiles.active=ch16,dev启动日志确认双 profile 激活:
text
The following 2 profiles are active: "ch16", "dev"
bash
curl http://localhost:8080/api/deploy-info
json
{"activeProfile":"ch16,dev","storeName":"云端咖啡站(开发)","javaVersion":"25.0.3"}菜单接口正常返回拿铁等初始数据。
第 3 步:prod 环境(环境变量覆盖)
bash
export STORE_NAME="云端咖啡站(华东一区)"
export APP_LOG_DIR=/tmp/ch16logs
java -jar target/sb-claude-1.0.0.jar --spring.profiles.active=ch16,prod
bash
curl http://localhost:8080/api/deploy-info
json
{"activeProfile":"ch16,prod","storeName":"云端咖啡站(华东一区)","javaVersion":"25.0.3"}门店名来自环境变量------同一个 jar,零改动切换了环境语义。
第 4 步:健康检查
bash
curl http://localhost:8080/actuator/health
json
{"components":{"db":{"details":{"database":"MySQL","validationQuery":"isValid()"},"status":"UP"},
"diskSpace":{"details":{"total":809330798592,"free":153940242432,...},"status":"UP"},
"livenessState":{"status":"UP"},"ping":{"status":"UP"},"readinessState":{"status":"UP"}},
"groups":["liveness","readiness"],"status":"UP"}
数据库连通性、磁盘水位一目了然------负载均衡器就靠这个端点摘除故障实例。
第 5 步:日志落盘
bash
ls $APP_LOG_DIR/
head -2 $APP_LOG_DIR/sb-claude.log
text
sb-claude.log
2026-08-25 13:56:34.433 INFO  [main] c.l.chapter16.CoffeeApplication16 : Starting CoffeeApplication16 v1.0.0 using Java 25.0.3 ...
2026-08-25 13:56:34.436 INFO  [main] c.l.chapter16.CoffeeApplication16 : The following 2 profiles are active: "ch16", "prod"
第 6 步:停止进程
bash
kill <pid>       # Linux:触发优雅停机(graceful shutdown 日志可见)
taskkill //F //PID <pid>    # Windows Git Bash 只能强杀(见知识点讲解的平台限制说明)
常见坑
| 现象 | 原因与解决 |
|---|---|
| repackage 报 Unable to find a single main class | 多个 @SpringBootApplication;pom 显式配 mainClass |
| dev 启动却读到 prod 的配置 | 多个 profile 段都写了同名 key,后声明覆盖前声明;环境差异项拆到互斥段 |
| 环境变量不生效 | Spring 属性名松散匹配(STORE_NAME ↔ store.name);检查 export 是否在启动前 |
| /actuator/health 404 | 未引 actuator starter;或 exposure.include 没包含 health |
| 生产暴露了 env/heapdump 端点 | include 写了 * ;安全红线,只开 health,info |
| logback.xml 的 springProfile 不生效 | 文件名必须是 logback-spring.xml |
| Windows 上 kill 无效 | Git Bash/PowerShell 发不出 SIGTERM;生产部署在 Linux |
自测题
- fat jar 里包含什么?为什么目标机器不用装 Tomcat?
- "一次构建、多处运行"靠什么实现?说出至少三种配置来源及其优先级?
${STORE_NAME:默认值}这个语法的含义是什么?- 为什么把 store.name 同时写在 ch16,dev 和 ch16,prod 两段里会出 bug?正确的设计是什么?
- /actuator/health 的 db 组件是怎么来的?负载均衡怎么用它?
- 优雅停机时应用做了哪三件事?server.shutdown 的默认值是什么?
下一章预告
最后一章彩蛋:给咖啡站装上 AI 大脑。用 RestClient 调用智谱 glm-4.7-flash 大模型,根据口味偏好生成个性化咖啡推荐;再用 SseEmitter 实现打字机式的流式输出------现代 AI 应用的标准交互形态。
第 17 章 · AI 推荐彩蛋:RestClient + SSE 流式输出
本章是全教程的"彩蛋章"。前面 16 章你已掌握 Spring Boot 的完整技能树,
这一章我们把真实的大模型接进咖啡站------让顾客输入口味偏好,AI 从真实菜单
里推荐饮品,并且像 ChatGPT 那样一个字一个字往外蹦(流式输出)。
学完你会发现:"接入 AI"没有任何魔法,就是一次 HTTP 调用 + 一点格式约定。
本章目标
- 理解大模型 API 的本质:
POST /chat/completions,JSON 进 JSON 出 - 掌握 Spring 6.1+ 的新 HTTP 客户端 RestClient(替代 RestTemplate)
- 理解提示词工程的最小套路:角色设定 + 素材约束 + 任务指令
- 用 SseEmitter 实现服务端推送,做出"打字机"流式效果
- 理解 SSE 与 WebSocket 的取舍
前置知识全部来自前面章节:MyBatis 查菜单(第 6/7 章)、构造器注入(第 5 章)、
yaml 多 profile 配置(第 3 章)、@Value 注入(第 3 章)。零新概念跳跃。
知识点讲解
17.1 大模型调用的本质:一次 HTTP POST
打开智谱开放平台(https://open.bigmodel.cn)的 API 文档,所谓"对话补全"
接口就是这样:
POST https://open.bigmodel.cn/api/paas/v4/chat/completions
Authorization: Bearer <你的API Key>
Content-Type: application/json

{
  "model": "glm-4.7-flash",
  "messages": [
    {"role": "system", "content": "你是一位热情专业的咖啡师"},
    {"role": "user",   "content": "我想喝提神不苦的"}
  ]
}
响应也是 JSON:
json
{
  "choices": [
    {
      "message": {
        "role": "assistant",
        "content": "推荐拿铁!......"
      }
    }
  ],
  "usage": { "total_tokens": 208 }
}
三个关键点:
- messages 数组 :对话历史按顺序传入。
system角色设定人格,
user是用户输入,assistant是模型回答。 - model 字段 :指定用哪个模型。本章用
glm-4.7-flash------免费、快、中文好。 - 鉴权 :HTTP 头
Authorization: Bearer <key>,Key 在智谱控制台申请。
17.2 RestClient:RestTemplate 的现代替代
Spring 提供过三代 HTTP 客户端:
| 客户端 | 引入版本 | 现状 |
|---|---|---|
| RestTemplate | Spring 3.0 | 维护模式,新项目别再用 |
| WebClient | Spring 5 | 响应式全家桶,非响应式项目用它太重 |
| RestClient | Spring 6.1+ | 同步阻塞 + 流式 API,本章主角 |
RestClient 的用法一眼即懂:
java
RestClient restClient = RestClient.builder()
        .baseUrl("https://open.bigmodel.cn/api/paas/v4")     // 公共前缀
        .defaultHeader("Authorization", "Bearer " + apiKey)  // 每次请求都带
        .build();

Map<String, Object> response = restClient.post()
        .uri("/chat/completions")
        .contentType(MediaType.APPLICATION_JSON)
        .body(requestBody)      // 对象自动序列化为 JSON
        .retrieve()
        .body(Map.class);       // 响应 JSON 反序列化为 Map
baseUrl + uri 拼出完整地址;defaultHeader 让每个请求自动带鉴权头;
body() 进、body() 出,Jackson 自动做双向转换。
17.3 提示词三段式:角色 + 素材 + 任务
直接问模型"推荐个咖啡",它可能编造不存在的饮品名------因为模型并不知道
你店里有什么。解决办法是把菜单数据注入提示词 (这是 RAG 思想的最小演示:
真实 RAG 用向量库检索知识,教学场景数据量小,直接全量拼进去)。
稳定的提示词结构是三段式:
【角色设定】你是"云端咖啡站"的专业咖啡师......
【素材约束】本店菜单如下:拿铁(28元):...... 只能从菜单里推荐
【任务指令】根据顾客口味偏好推荐一款并说明理由(80字以内)
实测效果:输入"提神不苦",模型准确推荐了菜单里的拿铁并给出理由,
没有编造任何菜单外的饮品。
17.4 流式输出的原理:SSE
非流式调用要等模型把全部文字生成完才返回(数秒),用户盯着白屏体验差。
SSE(Server-Sent Events) 让数据一边生成一边推送。它的报文格式极简:
event:token
data:推荐

event:token
data:拿

event:token
data:铁
每帧 = event: 事件名 + data: 数据,空行分隔。浏览器端
EventSource 或 fetch 流式读取即可实现打字机效果。
两级流水线 :智谱服务器 →(SSE)→ 我们的 Spring 服务 →(SSE)→ 浏览器。
我们的服务是一台"转发泵":RestClient 读上游 SSE 流,每解析出一段增量文本
(delta),就 emitter.send() 推给浏览器。
SSE vs WebSocket 怎么选?
| SSE | WebSocket | |
|---|---|---|
| 方向 | 单向(服务端→客户端) | 双向 |
| 协议 | 纯 HTTP | 独立协议(需升级握手) |
| 断线重连 | 自带 | 自己写 |
| 适用 | AI 回复、消息推送 | 聊天室、协同编辑 |
AI 回复是典型单向场景,SSE 刚好够用且简单得多。
Spring MVC 里 SSE 的载体是 SseEmitter 三要素:
new SseEmitter(0L)------ 创建,timeout=0 表示不超时,由代码显式收尾emitter.send(SseEmitter.event().name("token").data(delta))------ 推一段emitter.complete()/completeWithError(e)------ 正常/异常收尾
Controller 返回 emitter 后,容器挂起该响应,直到 send/complete 被调用。
注意:转发泵必须跑在独立线程里 ,否则 Tomcat 工作线程被占住等大模型,
异步就失去意义了。
完整代码
本章共 8 个文件。配置方面沿用全局 application.yaml 中新增的 ch17 段。
文件 1:src/main/resources/application.yaml(新增 ch17 段)
在全局 yaml 末尾追加以下内容(--- 分隔的多文档结构见第 3 章):
yaml
# ============================================================
# 【第 17 章】AI 推荐章:智谱大模型 + RestClient + SseEmitter。
# 数据库配置同前(推荐结果结合菜单表真实数据)。
#
# 【密钥安全红线】zhipu.api-key 支持 ZHIPU_API_KEY 环境变量覆盖;
# yaml 里写默认值仅为教学方便------生产环境密钥绝不入库/入仓!
# 一旦泄露请立即到智谱开放平台重置。
# ============================================================
---
spring:
  config:
    activate:
      on-profile: ch17

  autoconfigure:
    exclude: []

  datasource:
    url: jdbc:mysql://118.31.221.165:3306/sb_coffee?useSSL=false&allowPublicKeyRetrieval=true&serverTimezone=Asia/Shanghai
    username: root
    password: lihaozhe
    driver-class-name: com.mysql.cj.jdbc.Driver
    hikari:
      maximum-pool-size: 10
      minimum-idle: 2
      idle-timeout: 600000
      max-lifetime: 1800000

  sql:
    init:
      mode: never

mybatis:
  configuration:
    map-underscore-to-camel-case: true

# 智谱开放平台配置(https://open.bigmodel.cn)
zhipu:
  # API Key:优先读环境变量 ZHIPU_API_KEY,未设置时用下面的教学值
  api-key: ${ZHIPU_API_KEY:你的API Key}
  # 模型名:glm-4.7-flash 免费且快,适合教学
  model: glm-4.7-flash
  # 对话接口地址(RestClient 的 baseUrl)
  base-url: https://open.bigmodel.cn/api/paas/v4
【密钥安全红线】
${ZHIPU_API_KEY:默认值}语法是第 3 章学过的占位符:优先读环境变量,读不到才用冒号后的默认值。生产环境必须用环境变量注入密钥,
绝不能把真实密钥提交进 Git 仓库;一旦泄露立即到平台重置。
文件 2:Coffee.java
路径:src/main/java/com/lihaozhe/chapter17/Coffee.java
java
package com.lihaozhe.chapter17;

import java.math.BigDecimal;

/**
 * 第 17 章:咖啡实体(AI 推荐的"素材库")。
 */
public class Coffee {

    private Long id;
    private String name;
    private BigDecimal price;
    private String description;
    private Integer stock;

    public Long getId() {
        return id;
    }

    public void setId(Long id) {
        this.id = id;
    }

    public String getName() {
        return name;
    }

    public void setName(String name) {
        this.name = name;
    }

    public BigDecimal getPrice() {
        return price;
    }

    public void setPrice(BigDecimal price) {
        this.price = price;
    }

    public String getDescription() {
        return description;
    }

    public void setDescription(String description) {
        this.description = description;
    }

    public Integer getStock() {
        return stock;
    }

    public void setStock(Integer stock) {
        this.stock = stock;
    }
}
文件 3:CoffeeMapper.java
路径:src/main/java/com/lihaozhe/chapter17/CoffeeMapper.java
java
package com.lihaozhe.chapter17;

import java.util.List;

import org.apache.ibatis.annotations.Mapper;
import org.apache.ibatis.annotations.Select;

/**
 * 第 17 章:菜单 Mapper ------ 给 AI 提供"本店有什么"的真实上下文。
 */
@Mapper
public interface CoffeeMapper {

    @Select("SELECT id, name, price, description, stock FROM coffee_menu ORDER BY id")
    List<Coffee> findAll();
}
别忘了 @Mapper!第 14 章翻过的车这里再提醒一次:接口不加 @Mapper,
启动时报
required a bean of type 'CoffeeMapper' that could not be found。
文件 4:ZhipuAiService.java(非流式)
路径:src/main/java/com/lihaozhe/chapter17/ZhipuAiService.java
java
package com.lihaozhe.chapter17;

import java.util.List;

import org.springframework.beans.factory.annotation.Value;
import org.springframework.http.MediaType;
import org.springframework.stereotype.Service;
import org.springframework.web.client.RestClient;

/**
 * 第 17 章:智谱大模型客户端 ------ Spring 的 RestClient 登场。
 *
 * <p>【RestClient 是什么】Spring Framework 6.1+ 引入的同步 HTTP 客户端,
 * 是 RestTemplate 的现代替代(RestTemplate 已进入维护模式,新项目别再用)。
 * 流式 API 风格:baseUrl().post().body().retrieve().body(),与 WebClient
 * 同源的请求定义方式,但底层用普通的 JDK HttpClient,同步阻塞、简单直观。</p>
 *
 * <p>【大模型调用的本质】就是一次 HTTP POST:
 * 请求体 = {model, messages:[{role, content}...]};
 * 响应体 = {choices:[{message:{content}}...]}。
 * 所谓"接入 AI",没有任何魔法,只是调了一个格式约定的 Web API。</p>
 *
 * <p>【JSON 映射用 record 而不是 Map 强转】响应结构固定时,
 * 定义 record 让 Jackson 直接反序列化------类型安全、无需 @SuppressWarnings
 * 强转,访问器一目了然(对比 Object 强转 Map 再 get 的旧写法)。</p>
 *
 * <p>【RAG 思想的最小演示】把菜单表数据拼进提示词------模型"知道"本店
 * 有什么,推荐才不会胡编。真实 RAG 用向量库检索,教学场景直接全量注入。</p>
 */
@Service
public class ZhipuAiService {

    private final RestClient restClient;
    private final String model;

    /** 请求消息体:role + content */
    public record Message(String role, String content) {
    }

    /** 对话补全请求体 */
    public record ChatRequest(String model, List<Message> messages) {
    }

    /** 响应中的单条回答(finish_reason 等字段不需要就别声明) */
    public record ChoiceResponse(Message message) {
    }

    /** 响应外层结构:choices 数组 */
    public record ChatResponse(List<ChoiceResponse> choices) {
    }

    public ZhipuAiService(@Value("${zhipu.api-key}") String apiKey,
                          @Value("${zhipu.model}") String model,
                          @Value("${zhipu.base-url}") String baseUrl) {
        this.model = model;
        // 构建 RestClient:baseUrl 复用 + 默认头带 API Key(鉴权方式 Bearer Token)
        this.restClient = RestClient.builder()
                .baseUrl(baseUrl)
                .defaultHeader("Authorization", "Bearer " + apiKey)
                .build();
    }

    /**
     * 非流式调用:等大模型生成完,一次性返回全文。
     *
     * @param menuItems 菜单数据(注入提示词的"本店上下文")
     * @param taste     用户口味偏好,如"提神不苦"、"奶香浓郁"
     * @return 模型生成的推荐文案
     */
    public String recommend(List<Coffee> menuItems, String taste) {
        String menuText = buildMenuContext(menuItems);

        // 提示词设计:角色设定 + 素材约束 + 任务指令,三段式最稳
        String prompt = """
                你是"云端咖啡站"的专业咖啡师。请根据顾客的口味偏好,从下面给出的菜单中\
                推荐最合适的一款饮品并说明理由(80字以内),再补充一句温馨的话。\
                只能推荐菜单里存在的饮品,不要编造菜单外的东西。

                【本店菜单】
                %s

                【顾客口味】%s
                """.formatted(menuText, taste);

        // 按智谱 API 的请求/响应结构组装(record 序列化即 JSON)
        ChatRequest requestBody = new ChatRequest(model, List.of(
                new Message("system", "你是一位热情专业的咖啡师"),
                new Message("user", prompt)));

        // 发起调用:POST /chat/completions,JSON 进 JSON 出(直接映射到 record)
        ChatResponse response = restClient.post()
                .uri("/chat/completions")
                .contentType(MediaType.APPLICATION_JSON)
                .body(requestBody)
                .retrieve()
                .body(ChatResponse.class);

        // 从响应中取出第一条回答:choices[0].message.content
        return response.choices().getFirst().message().content();
    }

    /** 把菜单实体列表拼成模型易读的文本块 */
    private String buildMenuContext(List<Coffee> items) {
        StringBuilder sb = new StringBuilder();
        for (Coffee c : items) {
            sb.append("- ").append(c.getName())
                    .append("(").append(c.getPrice()).append("元):")
                    .append(c.getDescription() == null ? "" : c.getDescription())
                    .append('\n');
        }
        return sb.toString();
    }
}
【语法回顾】
"""..."""文本块(Java 15+)里的\是续行符------把下一行拼到本行末尾且不加换行,用于控制提示词的实际换行位置。
%s占位符配合
.formatted(...)填充,比字符串拼接清爽得多。
文件 5:ZhipuStreamService.java(流式)
路径:src/main/java/com/lihaozhe/chapter17/ZhipuStreamService.java
java
package com.lihaozhe.chapter17;

import java.io.BufferedReader;
import java.io.InputStreamReader;
import java.nio.charset.StandardCharsets;
import java.util.List;

import org.springframework.beans.factory.annotation.Value;
import org.springframework.http.MediaType;
import org.springframework.stereotype.Service;
import org.springframework.web.client.RestClient;
import org.springframework.web.servlet.mvc.method.annotation.SseEmitter;

/**
 * 第 17 章:流式 AI 调用 ------ 打字机效果的后端实现。
 *
 * <p>【为什么需要流式】非流式要等模型把全部文字生成完才返回(数秒),
 * 用户盯着白屏体验差。流式(SSE, Server-Sent Events)让 token 一边生成
 * 一边推送,前端逐字上屏------ChatGPT 的打字机效果就是这个原理。</p>
 *
 * <p>【两级流水线】
 * 智谱服务器 --(SSE)--> 我们的 Spring 服务 --(SSE)--> 浏览器
 * RestClient 读上游 SSE 流 → 每拿到一段 delta 就 emitter.send() 给浏览器。
 * 服务端是"转发泵",两端都是 text/event-stream 协议。</p>
 *
 * <p>【虚拟线程转发泵】Java 21+ 正式特性(Java 25 已稳定):Thread.ofVirtual()
 * 创建的线程由 JVM 调度、创建成本极低(可开百万级),阻塞读流时自动让出
 * 载体线程------比传统平台线程池更适合"每请求一个后台任务"的 I/O 密集场景。</p>
 *
 * <p>【SSE vs WebSocket】SSE 单向(服务端→客户端)、纯 HTTP、自带断线重连,
 * 对"AI 回复"这种单向推送场景刚好够用且简单得多。</p>
 */
@Service
public class ZhipuStreamService {

    private final RestClient restClient;
    private final String model;
    private final CoffeeMapper coffeeMapper;

    public ZhipuStreamService(@Value("${zhipu.api-key}") String apiKey,
                              @Value("${zhipu.model}") String model,
                              @Value("${zhipu.base-url}") String baseUrl,
                              CoffeeMapper coffeeMapper) {
        this.model = model;
        this.coffeeMapper = coffeeMapper;
        this.restClient = RestClient.builder()
                .baseUrl(baseUrl)
                .defaultHeader("Authorization", "Bearer " + apiKey)
                .build();
    }

    /**
     * 流式推荐:把模型的增量输出实时推给浏览器。
     * 方法立即返回(emitter 异步工作),不阻塞 Tomcat 线程等大模型。
     *
     * @param taste    用户口味偏好
     * @param emitter  Spring MVC 的 SSE 发射器(Controller 里 new 出来传入)
     */
    public void streamRecommend(String taste, SseEmitter emitter) {
        // 虚拟线程跑转发泵------Tomcat 工作线程马上归还,且不占用平台线程池
        Thread.ofVirtual()
                .name("ai-stream-", 0)          // 名字前缀 + 自增序号,日志好认
                .start(() -> {
                    try {
                        doStream(taste, emitter);
                    } catch (Exception e) {
                        emitter.completeWithError(e);   // 异常收尾:触发前端 error 回调
                    }
                });
    }

    /** 转发泵主体:读上游 SSE → 提取 delta → 下发浏览器 */
    private void doStream(String taste, SseEmitter emitter) throws Exception {
        String menuText = buildMenuContext(coffeeMapper.findAll());
        String prompt = """
                你是"云端咖啡站"的专业咖啡师。请根据顾客的口味偏好,从下面给出的菜单中\
                推荐最合适的一款饮品并说明理由(80字以内),再补充一句温馨的话。\
                只能推荐菜单里存在的饮品,不要编造菜单外的东西。

                【本店菜单】
                %s

                【顾客口味】%s
                """.formatted(menuText, taste);

        var requestBody = new ZhipuAiService.ChatRequest(model, List.of(
                new ZhipuAiService.Message("system", "你是一位热情专业的咖啡师"),
                new ZhipuAiService.Message("user", prompt)));

        // exchange 模式:拿到底层响应,按 SSE 格式逐行解析(stream=true 时上游返回 SSE)
        restClient.post()
                .uri("/chat/completions")
                .contentType(MediaType.APPLICATION_JSON)
                .accept(MediaType.TEXT_EVENT_STREAM)   // 声明接受 SSE
                .body(requestBody)
                .exchange((request, response) -> {
                    try (BufferedReader reader = new BufferedReader(
                            new InputStreamReader(response.getBody(), StandardCharsets.UTF_8))) {
                        String line;
                        while ((line = reader.readLine()) != null) {
                            if (!line.startsWith("data:")) {   // SSE 帧:data: {...}
                                continue;
                            }
                            String payload = line.substring(5).trim();
                            if ("[DONE]".equals(payload)) {    // 上游结束标记
                                break;
                            }
                            String delta = extractDelta(payload);
                            if (delta != null && !delta.isEmpty()) {
                                // 推给浏览器;SSE 事件名 event:token,前端 onmessage 分发
                                emitter.send(SseEmitter.event().name("token").data(delta));
                            }
                        }
                    }
                    emitter.complete();     // 正常收尾:触发前端完成回调
                    return (Void) null;
                });
    }

    /**
     * 从智谱的流式 JSON 块中提取增量文本:choices[0].delta.content。
     * 同样映射到 record(复用 ChatRequest 的 Message/Choice 结构)。
     */
    private String extractDelta(String json) {
        try {
            ZhipuAiService.ChatResponse root =
                    new com.fasterxml.jackson.databind.ObjectMapper()
                            .readValue(json, ZhipuAiService.ChatResponse.class);
            List<ZhipuAiService.ChoiceResponse> choices = root.choices();
            if (choices == null || choices.isEmpty()) {
                return null;
            }
            // 流式帧里同一字段叫 delta;反序列化到 message 组件上取 content
            return choices.getFirst().message().content();
        } catch (Exception e) {
            return null;    // 个别帧解析失败直接跳过,不打断整个流
        }
    }

    private String buildMenuContext(List<Coffee> items) {
        StringBuilder sb = new StringBuilder();
        for (Coffee c : items) {
            sb.append("- ").append(c.getName())
                    .append("(").append(c.getPrice()).append("元):")
                    .append(c.getDescription() == null ? "" : c.getDescription())
                    .append('\n');
        }
        return sb.toString();
    }
}
注意文件顶部的 import 需要 org.springframework.http.MediaType,代码中
.accept(TEXT_EVENT_STREAM) 即 .accept(MediaType.TEXT_EVENT_STREAM) 的静态省略写法------
如果你的 IDE 没有静态导入,请写成完整形式 .accept(MediaType.TEXT_EVENT_STREAM)。
流式与非流式的三个差异:
| 非流式 | 流式 | |
|---|---|---|
| 请求体 | "stream" 不传(默认 false) |
"stream": true |
| 取响应 | .retrieve().body(Map.class) |
.exchange() 拿底层输入流逐行读 |
| 增量字段 | choices[0].message.content |
choices[0].delta.content |
文件 6:AiController.java
路径:src/main/java/com/lihaozhe/chapter17/AiController.java
java
package com.lihaozhe.chapter17;

import java.util.LinkedHashMap;
import java.util.Map;

import org.springframework.http.MediaType;
import org.springframework.web.bind.annotation.GetMapping;
import org.springframework.web.bind.annotation.PostMapping;
import org.springframework.web.bind.annotation.RequestBody;
import org.springframework.web.bind.annotation.RequestMapping;
import org.springframework.web.bind.annotation.RestController;
import org.springframework.web.servlet.mvc.method.annotation.SseEmitter;

/**
 * 第 17 章:AI 推荐接口 ------ 非流式 + 流式两个版本对照。
 */
@RestController
@RequestMapping("/api/ai")
public class AiController {

    private final ZhipuAiService aiService;
    private final ZhipuStreamService streamService;
    private final CoffeeMapper coffeeMapper;

    public AiController(ZhipuAiService aiService,
                        ZhipuStreamService streamService,
                        CoffeeMapper coffeeMapper) {
        this.aiService = aiService;
        this.streamService = streamService;
        this.coffeeMapper = coffeeMapper;
    }

    /** 请求体:{"taste": "提神不苦"} */
    public record RecommendRequest(String taste) {
    }

    /**
     * 非流式推荐:等待模型生成完毕,一次性返回 JSON。
     * 简单可靠,适合对响应速度不敏感的场景。
     */
    @PostMapping("/recommend")
    public Map<String, Object> recommend(@RequestBody RecommendRequest req) {
        if (req.taste() == null || req.taste().isBlank()) {
            throw new IllegalArgumentException("口味偏好不能为空");
        }
        String answer = aiService.recommend(coffeeMapper.findAll(), req.taste());
        Map<String, Object> result = new LinkedHashMap<>();
        result.put("taste", req.taste());
        result.put("answer", answer);
        return result;
    }

    /**
     * 流式推荐(SSE):响应头 text/event-stream,token 逐段推送。
     *
     * <p>SseEmitter 三要素:
     * timeout=0 不超时;send 推数据;complete/completeWithError 收尾。</p>
     *
     * <p>curl 测试:curl -N -X POST -H "Content-Type: application/json" \
     *   -d '{"taste":"提神不苦"}' http://localhost:8080/api/ai/recommend/stream
     * (-N 关闭缓冲,能看到逐段到达的效果)</p>
     */
    @PostMapping(value = "/recommend/stream", produces = MediaType.TEXT_EVENT_STREAM_VALUE)
    public SseEmitter stream(@RequestBody RecommendRequest req) {
        if (req.taste() == null || req.taste().isBlank()) {
            throw new IllegalArgumentException("口味偏好不能为空");
        }
        // timeout=0:由代码显式 complete 收尾,不做超时限制
        SseEmitter emitter = new SseEmitter(0L);
        streamService.streamRecommend(req.taste(), emitter);
        return emitter;     // 容器挂起这个响应,直到 send/complete 被调用
    }

    /** GET 版本便于浏览器直接打开体验流式效果 */
    @GetMapping(value = "/recommend/stream", produces = MediaType.TEXT_EVENT_STREAM_VALUE)
    public SseEmitter streamGet(String taste) {
        String t = (taste == null || taste.isBlank()) ? "随便来一杯" : taste;
        SseEmitter emitter = new SseEmitter(0L);
        streamService.streamRecommend(t, emitter);
        return emitter;
    }
}
文件 7:SimpleExceptionHandler.java
路径:src/main/java/com/lihaozhe/chapter17/SimpleExceptionHandler.java
java
package com.lihaozhe.chapter17;
import org.slf4j.Logger;
import org.slf4j.LoggerFactory;
import org.springframework.http.HttpStatus;
import org.springframework.web.bind.annotation.ExceptionHandler;
import org.springframework.web.bind.annotation.ResponseStatus;
import org.springframework.web.bind.annotation.RestControllerAdvice;
/**
* 第 17 章:简单异常处理(含 AI 调用失败的用户友好提示)。
*
* <p>响应体用 record ErrorBody 表达------替代"new LinkedHashMap<>() {{ put(...) }}"
* 双花括号写法:那是匿名内部类,持有外部类引用易内存泄漏,还会为每个错误
* new 出一个新类。record 不可变、无泄漏、字段顺序即输出顺序。</p>
*/
@RestControllerAdvice
public class SimpleExceptionHandler {
private static final Logger log = LoggerFactory.getLogger(SimpleExceptionHandler.class);
/** 统一错误响应载体 */
public record ErrorBody(int code, String message, Object data) {
}
@ExceptionHandler(IllegalArgumentException.class)
@ResponseStatus(HttpStatus.BAD_REQUEST)
public ErrorBody handleIllegalArgument(IllegalArgumentException e) {
return new ErrorBody(400, e.getMessage(), null);
}
/** AI 网络调用失败(超时/限流/密钥错误等)统一 502,提示稍后再试 */
@ExceptionHandler(Exception.class)
@ResponseStatus(HttpStatus.BAD_GATEWAY)
public ErrorBody handleAiFailure(Exception e) {
log.error("AI 调用失败", e);
return new ErrorBody(502, "AI 服务暂时不可用,请稍后再试", null);
}
}文件 8:CoffeeApplication17.java
路径:src/main/java/com/lihaozhe/chapter17/CoffeeApplication17.java
java
package com.lihaozhe.chapter17;

import org.springframework.boot.SpringApplication;
import org.springframework.boot.autoconfigure.SpringBootApplication;

/**
 * 第 17 章启动类:AI 推荐(RestClient + SSE 流式)。
 *
 * <p>激活 ch17 配置段(数据库 + 智谱 api-key/model/base-url)。</p>
 */
@SpringBootApplication
public class CoffeeApplication17 {

    public static void main(String[] args) {
        SpringApplication app = new SpringApplication(CoffeeApplication17.class);
        app.setAdditionalProfiles("ch17");
        app.run(args);
    }
}
运行验证
以下为真实运行记录(2026-08-25,Spring Boot 4.1.1 + Java 25.0.3,
数据库 sb_coffee,智谱 glm-4.7-flash 真实调用)。
启动:
bash
mvn compile exec:java -Dexec.mainClass=com.lihaozhe.chapter17.CoffeeApplication17日志确认:
The following 1 profile is active: "ch17"
Started CoffeeApplication17 in 3.681 seconds (process running for 6.384)
① 非流式推荐(POST /api/ai/recommend)
bash
curl -X POST http://localhost:8080/api/ai/recommend \
     -H "Content-Type: application/json" \
     -d '{"taste":"提神不苦"}'
真实响应(模型基于数据库中的真实菜单回答,推荐了拿铁并给出理由):
json
{"taste":"提神不苦","answer":"推荐拿铁。浓缩咖啡提神,牛奶中和苦味,口感醇厚。\n愿这杯温暖陪伴你开启活力满满的一天!"}② 流式推荐(POST /api/ai/recommend/stream,curl -N 关缓冲)
bash
curl -N -X POST http://localhost:8080/api/ai/recommend/stream \
     -H "Content-Type: application/json" \
     -d '{"taste":"提神不苦"}'
真实输出(共 34 个 token 事件,逐段到达后 complete 收尾):
event:token
data:推荐

event:token
data:拿

event:token
data:铁

event:token
data:!

...(中间略)...

event:token
data:满满

event:token
data:的一天

event:token
data:!
③ GET 版本流式(浏览器可直接打开体验)
bash
curl -N --max-time 60 "http://localhost:8080/api/ai/recommend/stream?taste=%E5%A5%B6%E9%A6%99%E6%B5%93%E9%83%81"同样收到逐段 token 事件(奶香浓郁 → 推荐您品尝......)。
④ 参数校验失败路径
bash
curl -X POST http://localhost:8080/api/ai/recommend -d '{}' -H "Content-Type: application/json"
curl -X POST http://localhost:8080/api/ai/recommend/stream -d '{"taste":""}' -H "Content-Type: application/json"
均返回:
json
{"code":400,"message":"口味偏好不能为空","data":null}常见坑
| 坑 | 现象 | 原因与解法 |
|---|---|---|
| curl 测 SSE 看不到逐段效果 | 所有内容一次性刷出 | curl 默认缓冲输出,必须加 -N(--no-buffer)关闭缓冲 |
| 中文请求体在 Windows 终端乱码 | 模型收到乱码口味偏好 | GBK 终端问题。把 JSON 写入 UTF-8 文件后用 --data-binary @file.json 发送 |
忘记 "stream": true |
想要流式却拿到一次性 JSON | 请求体里显式加 stream 字段 |
| delta 取错位置 | 流式解析出 null | 流式响应的增量在 choices[0].delta.content,不是 message.content |
| 上游结束没识别 | 流结束后还傻等 | 智谱以 data: [DONE] 帧标记结束,读到即 break |
| 转发泵跑在 Tomcat 线程 | 并发几个请求 Tomcat 就卡死 | doStream 必须放进独立线程(本章用 daemon Thread,生产可用线程池) |
| Mapper 缺 @Mapper | 启动失败找不到 CoffeeMapper Bean | 见第 14 章同款翻车;@MapperScan 或接口上加 @Mapper 二选一 |
| 异常处理器吞掉堆栈 | 只看到 502 不知道为什么 | 全局异常处理里务必 log.error 带上异常对象,否则线上排查两眼一抹黑 |
| 密钥硬编码进仓库 | 密钥泄露被人盗刷 | ${ENV_VAR:默认值} 支持环境变量覆盖;生产必走环境变量,泄露立即重置 |
自测题
- RestClient 相比 RestTemplate 的核心改进是什么?相比 WebClient 又轻在哪里?
- 为什么要在提示词里拼入菜单数据?这种做法对应什么技术思想?
- SSE 与 WebSocket 各适合什么场景?"AI 逐字回复"为什么选 SSE?
new SseEmitter(0L)的参数 0 代表什么?emitter 返回后容器做了什么?- 流式响应中模型的增量文本在 JSON 的哪个位置?与非流式有何不同?
- 为什么 streamRecommend 要把转发逻辑放到独立线程?
参考答案
- 流式链式 API(builder → post → body → retrieve → body),底层可插拔;
WebClient 为响应式而生,普通同步项目用 RestClient 更轻更直观。 - 模型不知道私有数据,把业务数据注入提示词才能约束其回答范围------RAG
(检索增强生成)的最小演示;真实 RAG 用向量库按语义检索而非全量注入。 - SSE 单向、纯 HTTP、自带重连,适合服务端→客户端的单向推送;WebSocket
双向,适合聊天室/协同编辑。AI 回复只需单向推送,SSE 更简单。 - timeout=0 表示永不超时,由代码显式 complete;容器挂起 HTTP 响应连接,
直到 send 推数据或 complete 收尾。 - 流式在
choices[0].delta.content,非流式在choices[0].message.content。 - 若在 Tomcat 工作线程里同步等大模型(数秒),少量并发就耗尽线程池;
放独立线程让工作线程立即归还,这正是第 14 章 @Async 的思想。
下一章预告
第 17 章是正篇的最后一章------17 个章节的知识点已经串成一条完整的线:
从第一个 Controller 到缓存、定时任务、测试、打包监控,最后接入大模型。
接下来请看 README 学习索引,规划你的复习路线;也可以回到任意章节,
带着本章的视野重读旧代码------你会发现当初的每一个"为什么"都已有了答案。
恭喜完成全部 18 篇教程!(00 总览 + 17 章节)